Ir directamente al contenido
icon-search Cerrar (esc)
icon-search Cerrar (esc)
This 7 Chakras Pillar features stacked layers of natural gemstones representing each of the body’s seven energy centers. Polished into a smooth pillar, it harmonizes beauty and energy, making it perfect for meditation, décor, or crystal grids.
Each gemstone layer corresponds to a specific chakra, promoting full-spectrum energy alignment—from grounding and stability to spiritual awakening. Its vibrant colors and geometric precision create a serene centerpiece for any altar, meditation space, or home.
Collectors and spiritual practitioners value the 7 Chakras Pillar for its ability to inspire balance, harmony, and holistic well-being.
This product is pulled at random by size.
Crystal Towers, Wands, Generators, Points, Pillars & Obelisks — What's the Difference?
While these terms may vary, they all describe beautifully shaped crystals with a pointed tip designed to channel and direct energy. Each name highlights a unique aspect of their use:
Towers - Known for their steady, grounding presence, crystal towers help focus and amplify energy, making them perfect for meditation and manifestation.
Wands - Traditionally used in energy work and healing, crystal wands are excellent for directing energy flow and clearing blockages.
Pillars - Symbolizing strength and stability, crystal pillars create a balanced and harmonious environment, making them great for home decor and spiritual practices.
Obelisks - Inspired by ancient structures, crystal obelisks are believed to connect earthly and spiritual energies, making them powerful tools for transformation and enlightenment.
No matter what you call them, these crystals serve the same purpose—to enhance energy, intention, and harmony in your space. Choose the one that resonates most with you!
Información de envío
Envío gratuito en pedidos superiores a $50 dentro de los Estados Unidos contiguos.
Los tiempos de envío pueden variar dependiendo del producto.
Nos esforzamos por procesar y enviar los pedidos dentro de 2-3 días hábiles.
El tiempo de entrega estimado suele ser de Within 7 days , aunque puede variar según el destino. Agradecemos su paciencia y comprensión mientras trabajamos diligentemente para entregar su pedido de manera rápida y segura.
Para cualquier ayuda adicional o consultas sobre el envío, no dude en comunicarse con nuestro equipo de atención al cliente.
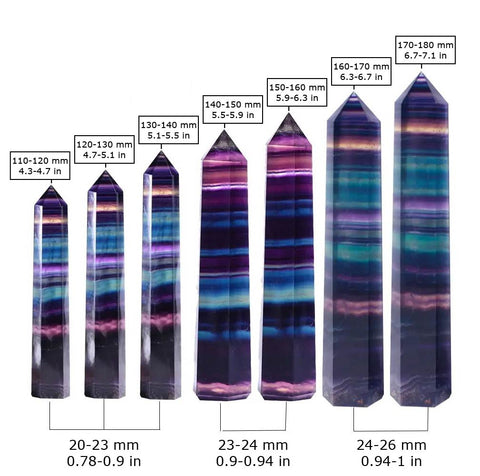
Diferenciación de tamaño y color
Cada cristal es natural y único, no existen dos cristales idénticos. Algunos cristales pueden contener grietas formadas naturalmente en su interior, no causadas por otros objetos.
Tenga en cuenta que el tamaño, el color y los patrones pueden variar debido a los diferentes lotes de cristales y sus inclusiones naturales o mediciones manuales.
Siempre puedes consultar la Tabla de tallas en cada página de producto para traducir gramos a libras y onzas, y milímetros y centímetros a pulgadas.
Gracias por comprender y disfrutar de todas las maravillas de los cristales.
{"item":{"id":8556690604203,"title":"7 Chakras Pillar","handle":"7-chakras-pillar-cd-10432","description":"\u003cp data-end=\"489\" data-start=\"218\"\u003eThis 7 Chakras Pillar features stacked layers of natural gemstones representing each of the body’s seven energy centers. Polished into a smooth pillar, it harmonizes beauty and energy, making it perfect for meditation, décor, or crystal grids.\u003c\/p\u003e\n\u003cp data-end=\"753\" data-start=\"491\"\u003eEach gemstone layer corresponds to a specific chakra, promoting full-spectrum energy alignment—from grounding and stability to spiritual awakening. Its vibrant colors and geometric precision create a serene centerpiece for any altar, meditation space, or home.\u003c\/p\u003e\n\u003cp data-end=\"892\" data-start=\"755\"\u003eCollectors and spiritual practitioners value the 7 Chakras Pillar for its ability to inspire balance, harmony, and holistic well-being.\u003c\/p\u003e\n\u003cp data-end=\"892\" data-start=\"755\"\u003eThis product is pulled at random by size.\u003c\/p\u003e\n\u003ch2\u003eCrystal Towers, Wands, Generators, Points, Pillars \u0026amp; Obelisks — What's the Difference?\u003c\/h2\u003e\n\u003cp id=\"isPasted\"\u003eWhile these terms may vary, they all describe beautifully shaped crystals with a pointed tip designed to channel and direct energy. Each name highlights a unique aspect of their use:\u003c\/p\u003e\n\u003cul\u003e\n\u003cli\u003e\n\u003cstrong\u003eTowers\u003c\/strong\u003e- Known for their steady, grounding presence, crystal towers help focus and amplify energy, making them perfect for meditation and manifestation.\u003c\/li\u003e\n\u003cli\u003e\n\u003cstrong\u003eWands\u003c\/strong\u003e- Traditionally used in energy work and healing, crystal wands are excellent for directing energy flow and clearing blockages.\u003c\/li\u003e\n\u003cli\u003e\n\u003cstrong\u003ePillars\u003c\/strong\u003e- Symbolizing strength and stability, crystal pillars create a balanced and harmonious environment, making them great for home decor and spiritual practices.\u003c\/li\u003e\n\u003cli\u003e\n\u003cstrong\u003eObelisks\u003c\/strong\u003e- Inspired by ancient structures, crystal obelisks are believed to connect earthly and spiritual energies, making them powerful tools for transformation and enlightenment.\u003c\/li\u003e\n\u003c\/ul\u003e\n\u003cp\u003eNo matter what you call them, these crystals serve the same purpose—to enhance energy, intention, and harmony in your space. Choose the one that resonates most with you!\u003c\/p\u003e","published_at":"2025-10-20T19:36:54-04:00","created_at":"2025-10-20T19:36:52-04:00","vendor":"Crystal Destiny","type":"Towers","tags":["crystal","polished","Towers"],"price":3499,"price_min":3499,"price_max":3499,"available":true,"price_varies":false,"compare_at_price":null,"compare_at_price_min":0,"compare_at_price_max":0,"compare_at_price_varies":false,"variants":[{"id":45748632125611,"title":"7 Chakras \/ 120g - 2.50\"H x 1.25\"W","option1":"7 Chakras","option2":"120g - 2.50\"H x 1.25\"W","option3":null,"sku":"CD-10432","requires_shipping":true,"taxable":true,"featured_image":null,"available":true,"name":"7 Chakras Pillar - 7 Chakras \/ 120g - 2.50\"H x 1.25\"W","public_title":"7 Chakras \/ 120g - 2.50\"H x 1.25\"W","options":["7 Chakras","120g - 2.50\"H x 1.25\"W"],"price":3499,"weight":130,"compare_at_price":null,"inventory_management":"shopify","barcode":"","requires_selling_plan":false,"selling_plan_allocations":[]}],"images":["\/\/crystaldestiny.com\/cdn\/shop\/files\/7-Chakras-Pillar-Towers.jpg?v=1761032106","\/\/crystaldestiny.com\/cdn\/shop\/files\/7-Chakras-Pillar-Towers-2.jpg?v=1761032109"],"featured_image":"\/\/crystaldestiny.com\/cdn\/shop\/files\/7-Chakras-Pillar-Towers.jpg?v=1761032106","options":["Material","Size"],"media":[{"alt":"7 Chakras Pillar-Towers-Crystal Destiny-7 Chakras-120g - 2.50\"H x 1.25\"W-Crystal Destiny","id":31997672226987,"position":1,"preview_image":{"aspect_ratio":1.0,"height":2048,"width":2048,"src":"\/\/crystaldestiny.com\/cdn\/shop\/files\/7-Chakras-Pillar-Towers.jpg?v=1761032106"},"aspect_ratio":1.0,"height":2048,"media_type":"image","src":"\/\/crystaldestiny.com\/cdn\/shop\/files\/7-Chakras-Pillar-Towers.jpg?v=1761032106","width":2048},{"alt":"7 Chakras Pillar-Towers-Crystal Destiny-7 Chakras-120g - 2.50\"H x 1.25\"W-Crystal Destiny","id":31997672259755,"position":2,"preview_image":{"aspect_ratio":1.0,"height":2048,"width":2048,"src":"\/\/crystaldestiny.com\/cdn\/shop\/files\/7-Chakras-Pillar-Towers-2.jpg?v=1761032109"},"aspect_ratio":1.0,"height":2048,"media_type":"image","src":"\/\/crystaldestiny.com\/cdn\/shop\/files\/7-Chakras-Pillar-Towers-2.jpg?v=1761032109","width":2048}],"requires_selling_plan":false,"selling_plan_groups":[],"content":"\u003cp data-end=\"489\" data-start=\"218\"\u003eThis 7 Chakras Pillar features stacked layers of natural gemstones representing each of the body’s seven energy centers. Polished into a smooth pillar, it harmonizes beauty and energy, making it perfect for meditation, décor, or crystal grids.\u003c\/p\u003e\n\u003cp data-end=\"753\" data-start=\"491\"\u003eEach gemstone layer corresponds to a specific chakra, promoting full-spectrum energy alignment—from grounding and stability to spiritual awakening. Its vibrant colors and geometric precision create a serene centerpiece for any altar, meditation space, or home.\u003c\/p\u003e\n\u003cp data-end=\"892\" data-start=\"755\"\u003eCollectors and spiritual practitioners value the 7 Chakras Pillar for its ability to inspire balance, harmony, and holistic well-being.\u003c\/p\u003e\n\u003cp data-end=\"892\" data-start=\"755\"\u003eThis product is pulled at random by size.\u003c\/p\u003e\n\u003ch2\u003eCrystal Towers, Wands, Generators, Points, Pillars \u0026amp; Obelisks — What's the Difference?\u003c\/h2\u003e\n\u003cp id=\"isPasted\"\u003eWhile these terms may vary, they all describe beautifully shaped crystals with a pointed tip designed to channel and direct energy. Each name highlights a unique aspect of their use:\u003c\/p\u003e\n\u003cul\u003e\n\u003cli\u003e\n\u003cstrong\u003eTowers\u003c\/strong\u003e- Known for their steady, grounding presence, crystal towers help focus and amplify energy, making them perfect for meditation and manifestation.\u003c\/li\u003e\n\u003cli\u003e\n\u003cstrong\u003eWands\u003c\/strong\u003e- Traditionally used in energy work and healing, crystal wands are excellent for directing energy flow and clearing blockages.\u003c\/li\u003e\n\u003cli\u003e\n\u003cstrong\u003ePillars\u003c\/strong\u003e- Symbolizing strength and stability, crystal pillars create a balanced and harmonious environment, making them great for home decor and spiritual practices.\u003c\/li\u003e\n\u003cli\u003e\n\u003cstrong\u003eObelisks\u003c\/strong\u003e- Inspired by ancient structures, crystal obelisks are believed to connect earthly and spiritual energies, making them powerful tools for transformation and enlightenment.\u003c\/li\u003e\n\u003c\/ul\u003e\n\u003cp\u003eNo matter what you call them, these crystals serve the same purpose—to enhance energy, intention, and harmony in your space. Choose the one that resonates most with you!\u003c\/p\u003e"},"options":[{"name":"Material","position":1,"values":["7 Chakras"]},{"name":"Size","position":2,"values":["120g - 2.50\"H x 1.25\"W"]}],"custom_metafields":{"shipping_time":"Within 7 days"},"metafields":{"badge":"\u003cdiv style='display:none' class='jdgm-prev-badge' data-average-rating='0.00' data-number-of-reviews='0' data-number-of-questions='0'\u003e \u003cspan class='jdgm-prev-badge__stars' data-score='0.00' tabindex='0' aria-label='0.00 stars' role='button'\u003e \u003cspan class='jdgm-star jdgm--off'\u003e\u003c\/span\u003e\u003cspan class='jdgm-star jdgm--off'\u003e\u003c\/span\u003e\u003cspan class='jdgm-star jdgm--off'\u003e\u003c\/span\u003e\u003cspan class='jdgm-star jdgm--off'\u003e\u003c\/span\u003e\u003cspan class='jdgm-star jdgm--off'\u003e\u003c\/span\u003e \u003c\/span\u003e \u003cspan class='jdgm-prev-badge__text'\u003e No reviews \u003c\/span\u003e \u003c\/div\u003e","widget":"\u003cdiv class='jdgm-rev-widg' data-updated-at='2025-10-20T23:38:50Z' data-average-rating='0.00' data-number-of-reviews='0' data-number-of-questions='0' data-image-url='https:\/\/cdn.shopify.com\/s\/files\/1\/0613\/0345\/5915\/files\/6I0A4389.jpg?v=1761003244'\u003e \u003cstyle class='jdgm-temp-hiding-style'\u003e.jdgm-rev-widg{ display: none }\u003c\/style\u003e \u003cdiv class='jdgm-rev-widg__header'\u003e \u003ch2 class='jdgm-rev-widg__title'\u003eCustomer Reviews\u003c\/h2\u003e \u003cdiv class='jdgm-rev-widg__summary'\u003e \u003cdiv class='jdgm-rev-widg__summary-stars' aria-label='Average rating is 0.00 stars' role='img'\u003e \u003cspan class='jdgm-star jdgm--off'\u003e\u003c\/span\u003e\u003cspan class='jdgm-star jdgm--off'\u003e\u003c\/span\u003e\u003cspan class='jdgm-star jdgm--off'\u003e\u003c\/span\u003e\u003cspan class='jdgm-star jdgm--off'\u003e\u003c\/span\u003e\u003cspan class='jdgm-star jdgm--off'\u003e\u003c\/span\u003e \u003c\/div\u003e \u003cdiv class='jdgm-rev-widg__summary-text'\u003eBe the first to write a review\u003c\/div\u003e \u003c\/div\u003e \u003ca style='display: none' href='#' class='jdgm-write-rev-link' role='button'\u003eWrite a review\u003c\/a\u003e \u003cdiv class='jdgm-histogram jdgm-temp-hidden'\u003e \u003cdiv class='jdgm-histogram__row' data-rating='5' data-frequency='0' data-percentage='0'\u003e \u003cdiv class='jdgm-histogram__star' role='button' aria-label=\"0% (0) reviews with 5 star rating\" tabindex='0' \u003e\u003cspan class='jdgm-star jdgm--on'\u003e\u003c\/span\u003e\u003cspan class='jdgm-star jdgm--on'\u003e\u003c\/span\u003e\u003cspan class='jdgm-star jdgm--on'\u003e\u003c\/span\u003e\u003cspan class='jdgm-star jdgm--on'\u003e\u003c\/span\u003e\u003cspan class='jdgm-star jdgm--on'\u003e\u003c\/span\u003e\u003c\/div\u003e \u003cdiv class='jdgm-histogram__bar'\u003e \u003cdiv class='jdgm-histogram__bar-content' style='width: 0%;'\u003e \u003c\/div\u003e \u003c\/div\u003e \u003cdiv class='jdgm-histogram__percentage'\u003e0%\u003c\/div\u003e \u003cdiv class='jdgm-histogram__frequency'\u003e(0)\u003c\/div\u003e \u003c\/div\u003e \u003cdiv class='jdgm-histogram__row' data-rating='4' data-frequency='0' data-percentage='0'\u003e \u003cdiv class='jdgm-histogram__star' role='button' aria-label=\"0% (0) reviews with 4 star rating\" tabindex='0' \u003e\u003cspan class='jdgm-star jdgm--on'\u003e\u003c\/span\u003e\u003cspan class='jdgm-star jdgm--on'\u003e\u003c\/span\u003e\u003cspan class='jdgm-star jdgm--on'\u003e\u003c\/span\u003e\u003cspan class='jdgm-star jdgm--on'\u003e\u003c\/span\u003e\u003cspan class='jdgm-star jdgm--off'\u003e\u003c\/span\u003e\u003c\/div\u003e \u003cdiv class='jdgm-histogram__bar'\u003e \u003cdiv class='jdgm-histogram__bar-content' style='width: 0%;'\u003e \u003c\/div\u003e \u003c\/div\u003e \u003cdiv class='jdgm-histogram__percentage'\u003e0%\u003c\/div\u003e \u003cdiv class='jdgm-histogram__frequency'\u003e(0)\u003c\/div\u003e \u003c\/div\u003e \u003cdiv class='jdgm-histogram__row' data-rating='3' data-frequency='0' data-percentage='0'\u003e \u003cdiv class='jdgm-histogram__star' role='button' aria-label=\"0% (0) reviews with 3 star rating\" tabindex='0' \u003e\u003cspan class='jdgm-star jdgm--on'\u003e\u003c\/span\u003e\u003cspan class='jdgm-star jdgm--on'\u003e\u003c\/span\u003e\u003cspan class='jdgm-star jdgm--on'\u003e\u003c\/span\u003e\u003cspan class='jdgm-star jdgm--off'\u003e\u003c\/span\u003e\u003cspan class='jdgm-star jdgm--off'\u003e\u003c\/span\u003e\u003c\/div\u003e \u003cdiv class='jdgm-histogram__bar'\u003e \u003cdiv class='jdgm-histogram__bar-content' style='width: 0%;'\u003e \u003c\/div\u003e \u003c\/div\u003e \u003cdiv class='jdgm-histogram__percentage'\u003e0%\u003c\/div\u003e \u003cdiv class='jdgm-histogram__frequency'\u003e(0)\u003c\/div\u003e \u003c\/div\u003e \u003cdiv class='jdgm-histogram__row' data-rating='2' data-frequency='0' data-percentage='0'\u003e \u003cdiv class='jdgm-histogram__star' role='button' aria-label=\"0% (0) reviews with 2 star rating\" tabindex='0' \u003e\u003cspan class='jdgm-star jdgm--on'\u003e\u003c\/span\u003e\u003cspan class='jdgm-star jdgm--on'\u003e\u003c\/span\u003e\u003cspan class='jdgm-star jdgm--off'\u003e\u003c\/span\u003e\u003cspan class='jdgm-star jdgm--off'\u003e\u003c\/span\u003e\u003cspan class='jdgm-star jdgm--off'\u003e\u003c\/span\u003e\u003c\/div\u003e \u003cdiv class='jdgm-histogram__bar'\u003e \u003cdiv class='jdgm-histogram__bar-content' style='width: 0%;'\u003e \u003c\/div\u003e \u003c\/div\u003e \u003cdiv class='jdgm-histogram__percentage'\u003e0%\u003c\/div\u003e \u003cdiv class='jdgm-histogram__frequency'\u003e(0)\u003c\/div\u003e \u003c\/div\u003e \u003cdiv class='jdgm-histogram__row' data-rating='1' data-frequency='0' data-percentage='0'\u003e \u003cdiv class='jdgm-histogram__star' role='button' aria-label=\"0% (0) reviews with 1 star rating\" tabindex='0' \u003e\u003cspan class='jdgm-star jdgm--on'\u003e\u003c\/span\u003e\u003cspan class='jdgm-star jdgm--off'\u003e\u003c\/span\u003e\u003cspan class='jdgm-star jdgm--off'\u003e\u003c\/span\u003e\u003cspan class='jdgm-star jdgm--off'\u003e\u003c\/span\u003e\u003cspan class='jdgm-star jdgm--off'\u003e\u003c\/span\u003e\u003c\/div\u003e \u003cdiv class='jdgm-histogram__bar'\u003e \u003cdiv class='jdgm-histogram__bar-content' style='width: 0%;'\u003e \u003c\/div\u003e \u003c\/div\u003e \u003cdiv class='jdgm-histogram__percentage'\u003e0%\u003c\/div\u003e \u003cdiv class='jdgm-histogram__frequency'\u003e(0)\u003c\/div\u003e \u003c\/div\u003e \u003cdiv class='jdgm-histogram__row jdgm-histogram__clear-filter' data-rating=null tabindex='0'\u003e\u003c\/div\u003e \u003c\/div\u003e \u003cdiv class='jdgm-rev-widg__sort-wrapper'\u003e\u003c\/div\u003e \u003c\/div\u003e \u003cdiv class='jdgm-rev-widg__body'\u003e \u003cdiv class='jdgm-rev-widg__reviews'\u003e\u003c\/div\u003e \u003cdiv class='jdgm-paginate' data-per-page='4' data-url='https:\/\/api.judge.me\/reviews\/reviews_for_widget' style=\"display: none;\"\u003e\u003c\/div\u003e \u003c\/div\u003e \u003cdiv class='jdgm-rev-widg__paginate-spinner-wrapper'\u003e \u003cdiv class='jdgm-spinner'\u003e\u003c\/div\u003e \u003c\/div\u003e \u003c\/div\u003e"},"collections":[{"id":294880051371,"handle":"crystals","title":"Crystals","updated_at":"2026-01-07T23:43:11-05:00","body_html":"\u003cp data-start=\"159\" data-end=\"687\"\u003e✨ \u003cstrong data-start=\"161\" data-end=\"216\"\u003eDiscover the Magic of Crystals with Crystal Destiny\u003c\/strong\u003e ✨\u003cbr data-start=\"218\" data-end=\"221\"\u003eCrystals have been treasured for centuries—not only for their natural beauty but also for their powerful healing energies. Beyond their visual allure, they bring balance, harmony, and positive energy into any space. Whether used for home décor, meditation, or simply to elevate the energy of your surroundings, crystals create a sanctuary of peace, relaxation, and well-being. Each piece is a unique gift from the Earth—visually stunning and spiritually uplifting.\u003c\/p\u003e\n\u003cp data-start=\"689\" data-end=\"1011\"\u003eAt \u003cstrong data-start=\"692\" data-end=\"711\"\u003eCrystal Destiny\u003c\/strong\u003e, our signature collection showcases a curated selection of exquisite crystals, from radiant Quartz to soothing Amethyst. Every stone is carefully sourced for its elegance and metaphysical resonance, making them perfect for enhancing your home, uplifting your spirit, or gifting to someone special.\u003c\/p\u003e\n\u003cp data-start=\"1013\" data-end=\"1206\"\u003eExperience the timeless sophistication of crystalline wonders. Explore the \u003cstrong data-start=\"1088\" data-end=\"1118\"\u003eCrystal Destiny Collection\u003c\/strong\u003e today and bring the transformative beauty of these treasures into your everyday life.\u003c\/p\u003e","published_at":"2023-06-05T11:24:02-04:00","sort_order":"created-desc","template_suffix":"","disjunctive":false,"rules":[{"column":"tag","relation":"equals","condition":"crystal"},{"column":"type","relation":"not_contains","condition":"925 Sterling Silver"},{"column":"type","relation":"not_contains","condition":"Wire Wraps"}],"published_scope":"global"},{"id":319456084139,"handle":"universal-chakra-crystals","title":"Universal Chakra Crystals","updated_at":"2026-01-06T23:24:24-05:00","body_html":"\u003cp data-start=\"116\" data-end=\"404\"\u003e✨ \u003cstrong data-start=\"118\" data-end=\"158\"\u003eUniversal Chakra Crystals Collection\u003c\/strong\u003e ✨\u003cbr data-start=\"160\" data-end=\"163\"\u003eBalance, align, and energize all your chakras with our \u003cstrong data-start=\"218\" data-end=\"247\"\u003eUniversal Chakra Crystals\u003c\/strong\u003e. Carefully selected to resonate with every energy center in the body, these crystals support holistic well-being, spiritual growth, and energetic harmony.\u003c\/p\u003e\n\u003cp data-start=\"406\" data-end=\"744\"\u003eOur curated selection includes vibrant stones such as Amethyst, Citrine, Clear Quartz, and more—each chosen for their ability to promote clarity, balance, and vitality across the entire chakra system. Perfect for meditation, energy work, or creating a harmonious space, Universal Chakra Crystals help you connect mind, body, and spirit.\u003c\/p\u003e\n\u003cp data-start=\"746\" data-end=\"875\"\u003eEmbrace full-spectrum energy and elevate your spiritual journey with the transformative power of \u003cstrong data-start=\"843\" data-end=\"872\"\u003eUniversal Chakra Crystals\u003c\/strong\u003e.\u003c\/p\u003e","published_at":"2025-07-17T18:19:50-04:00","sort_order":"best-selling","template_suffix":"","disjunctive":false,"rules":[{"column":"variant_metafield_definition","relation":"equals","condition":"All Chakras"}],"published_scope":"global","image":{"created_at":"2025-07-17T19:07:58-04:00","alt":null,"width":1080,"height":1080,"src":"\/\/crystaldestiny.com\/cdn\/shop\/collections\/Universal_7_Chakras_Collection.jpg?v=1762474934"}},{"id":294880116907,"handle":"polished","title":"Polished Crystals","updated_at":"2026-01-07T23:43:11-05:00","body_html":"\u003cp data-start=\"199\" data-end=\"598\"\u003e✨ \u003cstrong data-start=\"201\" data-end=\"248\"\u003eCrystal Destiny Polished Crystal Collection\u003c\/strong\u003e ✨\u003cbr data-start=\"250\" data-end=\"253\"\u003eIndulge in the brilliance of crystals refined to perfection. Our \u003cstrong data-start=\"318\" data-end=\"341\"\u003ePolished Collection\u003c\/strong\u003e showcases gemstones meticulously shaped and smoothed to reveal their natural radiance and timeless beauty. From the shimmering glow of Quartz to the deep allure of Obsidian, each polished piece is a testament to nature’s artistry and human craftsmanship.\u003c\/p\u003e\n\u003cp data-start=\"600\" data-end=\"862\"\u003ePerfect as statement décor, meaningful gifts, or companions on your spiritual journey, polished crystals bring sophistication and elevated energy into any space. Their radiant surfaces reflect not only light but also the transformative power of crystal energy.\u003c\/p\u003e\n\u003cp data-start=\"864\" data-end=\"1022\"\u003eDiscover the elegance of refinement with Crystal Destiny’s Polished Crystal Collection—where every facet shines with intention, beauty, and timeless allure.\u003c\/p\u003e","published_at":"2023-06-05T11:30:44-04:00","sort_order":"created-desc","template_suffix":"","disjunctive":false,"rules":[{"column":"tag","relation":"equals","condition":"polished"}],"published_scope":"global"},{"id":322471624875,"handle":"crystal-favorites","title":"Crystal Enthusiast's Favorites","updated_at":"2026-01-07T23:42:38-05:00","body_html":"\u003cp\u003eDiscover the crystals our community loves most. This collection features our best-selling stones and accessories, carefully curated to highlight pieces that are always in demand and ready to ship. Whether you’re adding to your collection or searching for a gift, these fan-favorite crystals are timeless staples for energy, beauty, and balance.\u003c\/p\u003e","published_at":"2025-10-01T21:07:06-04:00","sort_order":"price-asc","template_suffix":"","disjunctive":false,"rules":[{"column":"variant_inventory","relation":"greater_than","condition":"1"}],"published_scope":"global"},{"id":293659312299,"handle":"best-sellers","title":"Best Sellers","updated_at":"2026-01-07T23:43:11-05:00","body_html":"\u003cp data-start=\"155\" data-end=\"510\"\u003eDiscover the pieces our community loves most. Our Best Sellers Collection brings together handpicked crystals and jewelry that embody timeless elegance, spiritual resonance, and everyday sophistication. Each item has earned its place as a customer favorite—celebrated for both its beauty and its meaningful energy.\u003c\/p\u003e\n\u003cp data-start=\"512\" data-end=\"802\"\u003eFrom stunning statement pieces to versatile daily companions, these treasures are curated to elevate your space, uplift your spirit, and reflect refined taste. Indulge in what’s most cherished and let our best sellers guide you toward the perfect blend of style and transformative energy.\u003c\/p\u003e\n\u003cp data-start=\"804\" data-end=\"932\"\u003eExplore the Best Sellers Collection today—where elegance meets intention, and every piece tells a story of beauty and balance.\u003c\/p\u003e","published_at":"2023-03-15T16:04:51-04:00","sort_order":"best-selling","template_suffix":"","disjunctive":false,"rules":[{"column":"variant_price","relation":"greater_than","condition":"0"},{"column":"variant_inventory","relation":"greater_than","condition":"0"},{"column":"type","relation":"not_equals","condition":"Shipping Protection"}],"published_scope":"global"},{"id":321370390699,"handle":"monthly-crystal-sale","title":"Monthly Crystal Sale | Spheres \u0026 Towers","updated_at":"2026-01-06T23:24:37-05:00","body_html":"\u003cp\u003eShop our \u003cstrong\u003eMonthly Crystal Sale\u003c\/strong\u003e, where you can shop a wide selection of healing crystals at discounted prices. Explore \u003cstrong\u003ecrystal spheres and towers,\u003c\/strong\u003e— all carefully curated to support meditation, energy balancing, and spiritual wellness. Whether you're looking to enhance your home decor, boost your daily energy, or find the perfect gift, our \u003cstrong\u003ecrystals for healing and manifestation\u003c\/strong\u003e offer both beauty and metaphysical benefits.\u003c\/p\u003e\n\u003cp\u003eEach month, our sale features \u003cstrong\u003enew discounted collections\u003c\/strong\u003e, from \u003cstrong\u003enatural quartz and amethyst towers\u003c\/strong\u003e to \u003cstrong\u003ewire-wrapped pendants and polished stones\u003c\/strong\u003e, so there's always something fresh to discover. Shop with confidence knowing you're getting high-quality crystals with \u003cstrong\u003efree shipping options\u003c\/strong\u003e and a trusted experience.\u003c\/p\u003e\n\u003cp\u003e\u003cstrong\u003eTake advantage of the Monthly Crystal Sale today\u003c\/strong\u003e and add powerful, natural energy to your life with \u003cstrong\u003eauthentic healing crystals\u003c\/strong\u003e — while our limited-time discounts last.\u003c\/p\u003e\n\u003cp\u003e\u003cstrong\u003e*Discount automatically applied at checkout.\u003c\/strong\u003e\u003c\/p\u003e","published_at":"2025-12-02T01:26:17-05:00","sort_order":"alpha-asc","template_suffix":"","disjunctive":true,"rules":[{"column":"tag","relation":"equals","condition":"spheres"},{"column":"tag","relation":"equals","condition":"Towers"}],"published_scope":"global","image":{"created_at":"2026-01-01T01:32:34-05:00","alt":"","width":960,"height":960,"src":"\/\/crystaldestiny.com\/cdn\/shop\/collections\/3E8C2969-1B86-4ACE-B349-98E9D8768424.jpg?v=1767249154"}},{"id":297596059819,"handle":"all","title":"All Crystals \u0026 Jewelry","updated_at":"2026-01-07T23:43:11-05:00","body_html":"\u003cp data-start=\"149\" data-end=\"494\"\u003e✨ \u003cstrong data-start=\"151\" data-end=\"181\"\u003eWelcome to Crystal Destiny\u003c\/strong\u003e ✨\u003cbr data-start=\"183\" data-end=\"186\"\u003eStep into a world where beauty, energy, and artistry unite. Our collection is a treasure trove of exquisite crystals, from the raw, untamed elegance of natural formations to the polished brilliance of expertly crafted pieces. Each crystal is a masterpiece, carrying its own unique story and timeless charm.\u003c\/p\u003e\n\u003cp data-start=\"496\" data-end=\"831\"\u003eWhether you’re drawn to the calming presence of Amethyst, the vibrant energy of Citrine, or the grounding strength of Jasper, our crystals invite you to connect with nature’s finest wonders. Perfect for enhancing your space, supporting your spiritual journey, or gifting with intention, every piece resonates with beauty and meaning.\u003c\/p\u003e\n\u003cp data-start=\"833\" data-end=\"1000\"\u003eElevate your surroundings, embrace the mystique, and explore the enchanting world of crystals at \u003cstrong data-start=\"930\" data-end=\"949\"\u003eCrystal Destiny\u003c\/strong\u003e—where every crystal is waiting to be discovered.\u003c\/p\u003e","published_at":"2023-11-10T13:55:31-05:00","sort_order":"created-desc","template_suffix":"","disjunctive":false,"rules":[{"column":"type","relation":"not_equals","condition":"asdf"}],"published_scope":"global"},{"id":296256405675,"handle":"crystal-towers","title":"Crystal Towers","updated_at":"2026-01-06T23:24:37-05:00","body_html":"\u003cp data-end=\"568\" data-start=\"152\"\u003e✨ \u003cstrong data-end=\"190\" data-start=\"154\"\u003eCrystal Destiny Tower Collection\u003c\/strong\u003e ✨\u003cbr data-end=\"195\" data-start=\"192\"\u003eEnchant your space with the timeless beauty and powerful energy of crystal towers. Each piece in our \u003cstrong data-end=\"316\" data-start=\"296\"\u003eTower Collection\u003c\/strong\u003e is carefully crafted to showcase nature’s artistry while radiating higher vibrations and spiritual resonance. From the clarity of Quartz to the calming presence of Amethyst, these towers are both decorative masterpieces and tools for transformation.\u003c\/p\u003e\n\u003cp data-end=\"765\" data-start=\"570\"\u003ePerfect for meditation spaces, energy work, or simply elevating your home décor, crystal towers channel focused energy upward—creating balance, harmony, and refined elegance in any environment.\u003c\/p\u003e\n\u003cp data-end=\"917\" data-start=\"767\"\u003eDiscover the Crystal Destiny Tower Collection today and transform your surroundings into a sanctuary of beauty, purpose, and spiritual significance.\u003c\/p\u003e\n\u003ch2\u003eCrystal Towers, Wands, Generators, Points, Pillars \u0026amp; Obelisks — What's the Difference?\u003c\/h2\u003e\n\u003cp id=\"isPasted\"\u003eWhile these terms may vary, they all describe beautifully shaped crystals with a pointed tip designed to channel and direct energy. Each name highlights a unique aspect of their use:\u003c\/p\u003e\n\u003cul\u003e\n\u003cli\u003e\n\u003cstrong\u003eTowers\u003c\/strong\u003e- Known for their steady, grounding presence, crystal towers help focus and amplify energy, making them perfect for meditation and manifestation.\u003c\/li\u003e\n\u003cli\u003e\n\u003cstrong\u003eWands\u003c\/strong\u003e- Traditionally used in energy work and healing, crystal wands are excellent for directing energy flow and clearing blockages.\u003c\/li\u003e\n\u003cli\u003e\n\u003cstrong\u003ePillars\u003c\/strong\u003e- Symbolizing strength and stability, crystal pillars create a balanced and harmonious environment, making them great for home decor and spiritual practices.\u003c\/li\u003e\n\u003cli\u003e\n\u003cstrong\u003eObelisks\u003c\/strong\u003e- Inspired by ancient structures, crystal obelisks are believed to connect earthly and spiritual energies, making them powerful tools for transformation and enlightenment.\u003c\/li\u003e\n\u003c\/ul\u003e\n\u003cp\u003eNo matter what you call them, these crystals serve the same purpose—to enhance energy, intention, and harmony in your space. Choose the one that resonates most with you!\u003c\/p\u003e","published_at":"2023-09-14T12:52:35-04:00","sort_order":"created-desc","template_suffix":"","disjunctive":false,"rules":[{"column":"tag","relation":"equals","condition":"towers"}],"published_scope":"global"},{"id":298983391403,"handle":"january-crystal-sale","title":"January Sale | 25% Off Crystal Towers \u0026 Spheres","updated_at":"2026-01-06T23:24:37-05:00","body_html":"\u003cp\u003eShop our \u003cstrong\u003eJanuary Crystal Sale\u003c\/strong\u003e, where you can shop a wide selection of healing crystals at discounted prices. Explore \u003cstrong\u003eCrystal Towers, \u0026amp; Crystal Spheres\u003c\/strong\u003e — all carefully curated and crafted to support meditation, energy balancing, and spiritual wellness. Whether you're looking to enhance your home decor, boost your daily energy, or find the perfect gift, our \u003cstrong\u003ecrystals for healing and manifestation\u003c\/strong\u003e offer both beauty and metaphysical benefits.\u003c\/p\u003e\n\u003cp\u003eThis January, our sale features \u003cstrong\u003ediscounted crystal towers and spheres\u003c\/strong\u003e, from \u003cstrong\u003enatural quartz \u003c\/strong\u003eand \u003cstrong\u003eamethyst \u003c\/strong\u003eto \u003cstrong\u003ebumblebee jasper \u003c\/strong\u003eand \u003cstrong\u003ecarnelian\u003c\/strong\u003e, so there's always something fresh to discover. Shop with confidence knowing you're getting high-quality crystals with \u003cstrong\u003efree shipping options\u003c\/strong\u003e and a trusted experience.\u003c\/p\u003e\n\u003cp\u003e\u003cstrong\u003eTake advantage of the January Crystal Sale today\u003c\/strong\u003e and add powerful, natural energy to your life with \u003cstrong\u003eauthentic healing crystals\u003c\/strong\u003e — while our limited-time discounts last.\u003c\/p\u003e\n\u003cp\u003e\u003cstrong\u003e*Discount automatically applied at checkout.\u003c\/strong\u003e\u003c\/p\u003e","published_at":"2026-01-01T00:07:17-05:00","sort_order":"alpha-asc","template_suffix":"monthly-collection","disjunctive":true,"rules":[{"column":"tag","relation":"equals","condition":"Spheres"},{"column":"tag","relation":"equals","condition":"Towers"}],"published_scope":"global","image":{"created_at":"2026-01-01T01:29:59-05:00","alt":"","width":960,"height":960,"src":"\/\/crystaldestiny.com\/cdn\/shop\/collections\/1464163B-22B1-4D62-BEC5-CEC9AECB670B.jpg?v=1767248999"}}]}
[{"alt":"7 Chakras Pillar-Towers-Crystal Destiny-7 Chakras-120g - 2.50\"H x 1.25\"W-Crystal Destiny","id":31997672226987,"position":1,"preview_image":{"aspect_ratio":1.0,"height":2048,"width":2048,"src":"\/\/crystaldestiny.com\/cdn\/shop\/files\/7-Chakras-Pillar-Towers.jpg?v=1761032106"},"aspect_ratio":1.0,"height":2048,"media_type":"image","src":"\/\/crystaldestiny.com\/cdn\/shop\/files\/7-Chakras-Pillar-Towers.jpg?v=1761032106","width":2048},{"alt":"7 Chakras Pillar-Towers-Crystal Destiny-7 Chakras-120g - 2.50\"H x 1.25\"W-Crystal Destiny","id":31997672259755,"position":2,"preview_image":{"aspect_ratio":1.0,"height":2048,"width":2048,"src":"\/\/crystaldestiny.com\/cdn\/shop\/files\/7-Chakras-Pillar-Towers-2.jpg?v=1761032109"},"aspect_ratio":1.0,"height":2048,"media_type":"image","src":"\/\/crystaldestiny.com\/cdn\/shop\/files\/7-Chakras-Pillar-Towers-2.jpg?v=1761032109","width":2048}]
{"item":{"id":8529075863723,"title":"Acrylic Crystal Sphere Display Stand","handle":"acrylic-crystal-sphere-display-stand-1005007876510287-s-china","description":"\u003cp data-start=\"210\" data-end=\"523\"\u003eThis \u003cstrong data-start=\"242\" data-end=\"282\"\u003eAcrylic Crystal Sphere Display Stand\u003c\/strong\u003e features a clear hexagon-shaped base designed to elegantly support and showcase crystal spheres, gemstones, or decorative balls. Its transparent design allows the beauty of your stones to shine while providing a stable and secure display.\u003c\/p\u003e\n\u003cp data-start=\"525\" data-end=\"761\"\u003ePerfect for home décor, meditation spaces, or crystal collections, this stand adds a modern and minimalistic touch while keeping your spheres safe. Its durable acrylic construction ensures long-lasting functionality and visual appeal.\u003c\/p\u003e\n\u003cp data-start=\"763\" data-end=\"881\"\u003eElevate your crystal or stone display with this stylish, clear acrylic stand that blends practicality with elegance.\u003c\/p\u003e","published_at":"2025-09-21T18:05:25-04:00","created_at":"2025-09-21T14:45:25-04:00","vendor":"Ali","type":"Stands","tags":["adjusted-shipping","crystal","spheres","Stands"],"price":799,"price_min":799,"price_max":999,"available":true,"price_varies":true,"compare_at_price":0,"compare_at_price_min":0,"compare_at_price_max":0,"compare_at_price_varies":false,"variants":[{"id":45647173746859,"title":"Acrylic \/ Small - 4.6*2cm.","option1":"Acrylic","option2":"Small - 4.6*2cm.","option3":null,"sku":"1005007876510287-S-CHINA","requires_shipping":true,"taxable":true,"featured_image":{"id":40448946634923,"product_id":8529075863723,"position":1,"created_at":"2025-09-21T14:45:26-04:00","updated_at":"2025-12-11T00:11:17-05:00","alt":"Acrylic Crystal Sphere Display Stand-Stands-Ali-Acrylic-Small - 4.6*2cm.-Crystal Destiny","width":1001,"height":1001,"src":"\/\/crystaldestiny.com\/cdn\/shop\/files\/Acrylic-Crystal-Sphere-Display-Stand-Stands-Acrylic-Small-4_62cm.webp?v=1765429877","variant_ids":[45647173746859,45647173779627,45647173812395]},"available":true,"name":"Acrylic Crystal Sphere Display Stand - Acrylic \/ Small - 4.6*2cm.","public_title":"Acrylic \/ Small - 4.6*2cm.","options":["Acrylic","Small - 4.6*2cm."],"price":799,"weight":20,"compare_at_price":0,"inventory_management":"shopify","barcode":null,"featured_media":{"alt":"Acrylic Crystal Sphere Display Stand-Stands-Ali-Acrylic-Small - 4.6*2cm.-Crystal Destiny","id":31835995799723,"position":1,"preview_image":{"aspect_ratio":1.0,"height":1001,"width":1001,"src":"\/\/crystaldestiny.com\/cdn\/shop\/files\/Acrylic-Crystal-Sphere-Display-Stand-Stands-Acrylic-Small-4_62cm.webp?v=1765429877"}},"requires_selling_plan":false,"selling_plan_allocations":[]},{"id":45647173779627,"title":"Acrylic \/ Medium - 6*3cm","option1":"Acrylic","option2":"Medium - 6*3cm","option3":null,"sku":"1005007876510287-M-CHINA","requires_shipping":true,"taxable":true,"featured_image":{"id":40448946634923,"product_id":8529075863723,"position":1,"created_at":"2025-09-21T14:45:26-04:00","updated_at":"2025-12-11T00:11:17-05:00","alt":"Acrylic Crystal Sphere Display Stand-Stands-Ali-Acrylic-Small - 4.6*2cm.-Crystal Destiny","width":1001,"height":1001,"src":"\/\/crystaldestiny.com\/cdn\/shop\/files\/Acrylic-Crystal-Sphere-Display-Stand-Stands-Acrylic-Small-4_62cm.webp?v=1765429877","variant_ids":[45647173746859,45647173779627,45647173812395]},"available":true,"name":"Acrylic Crystal Sphere Display Stand - Acrylic \/ Medium - 6*3cm","public_title":"Acrylic \/ Medium - 6*3cm","options":["Acrylic","Medium - 6*3cm"],"price":899,"weight":20,"compare_at_price":0,"inventory_management":"shopify","barcode":null,"featured_media":{"alt":"Acrylic Crystal Sphere Display Stand-Stands-Ali-Acrylic-Small - 4.6*2cm.-Crystal Destiny","id":31835995799723,"position":1,"preview_image":{"aspect_ratio":1.0,"height":1001,"width":1001,"src":"\/\/crystaldestiny.com\/cdn\/shop\/files\/Acrylic-Crystal-Sphere-Display-Stand-Stands-Acrylic-Small-4_62cm.webp?v=1765429877"}},"requires_selling_plan":false,"selling_plan_allocations":[]},{"id":45647173812395,"title":"Acrylic \/ Large - 7.5*4cm","option1":"Acrylic","option2":"Large - 7.5*4cm","option3":null,"sku":"1005007876510287-L-CHINA","requires_shipping":true,"taxable":true,"featured_image":{"id":40448946634923,"product_id":8529075863723,"position":1,"created_at":"2025-09-21T14:45:26-04:00","updated_at":"2025-12-11T00:11:17-05:00","alt":"Acrylic Crystal Sphere Display Stand-Stands-Ali-Acrylic-Small - 4.6*2cm.-Crystal Destiny","width":1001,"height":1001,"src":"\/\/crystaldestiny.com\/cdn\/shop\/files\/Acrylic-Crystal-Sphere-Display-Stand-Stands-Acrylic-Small-4_62cm.webp?v=1765429877","variant_ids":[45647173746859,45647173779627,45647173812395]},"available":true,"name":"Acrylic Crystal Sphere Display Stand - Acrylic \/ Large - 7.5*4cm","public_title":"Acrylic \/ Large - 7.5*4cm","options":["Acrylic","Large - 7.5*4cm"],"price":999,"weight":20,"compare_at_price":0,"inventory_management":"shopify","barcode":null,"featured_media":{"alt":"Acrylic Crystal Sphere Display Stand-Stands-Ali-Acrylic-Small - 4.6*2cm.-Crystal Destiny","id":31835995799723,"position":1,"preview_image":{"aspect_ratio":1.0,"height":1001,"width":1001,"src":"\/\/crystaldestiny.com\/cdn\/shop\/files\/Acrylic-Crystal-Sphere-Display-Stand-Stands-Acrylic-Small-4_62cm.webp?v=1765429877"}},"requires_selling_plan":false,"selling_plan_allocations":[]}],"images":["\/\/crystaldestiny.com\/cdn\/shop\/files\/Acrylic-Crystal-Sphere-Display-Stand-Stands-Acrylic-Small-4_62cm.webp?v=1765429877","\/\/crystaldestiny.com\/cdn\/shop\/files\/Acrylic-Crystal-Sphere-Display-Stand-Stands-2.webp?v=1758558143","\/\/crystaldestiny.com\/cdn\/shop\/files\/Acrylic-Crystal-Sphere-Display-Stand-Stands-3.webp?v=1758558145","\/\/crystaldestiny.com\/cdn\/shop\/files\/Acrylic-Crystal-Sphere-Display-Stand-Stands-4.webp?v=1758558146","\/\/crystaldestiny.com\/cdn\/shop\/files\/Acrylic-Crystal-Sphere-Display-Stand-Stands-5.webp?v=1758558148","\/\/crystaldestiny.com\/cdn\/shop\/files\/Acrylic-Crystal-Sphere-Display-Stand-Stands-6.webp?v=1758558150"],"featured_image":"\/\/crystaldestiny.com\/cdn\/shop\/files\/Acrylic-Crystal-Sphere-Display-Stand-Stands-Acrylic-Small-4_62cm.webp?v=1765429877","options":["Material","Size"],"media":[{"alt":"Acrylic Crystal Sphere Display Stand-Stands-Ali-Acrylic-Small - 4.6*2cm.-Crystal Destiny","id":31835995799723,"position":1,"preview_image":{"aspect_ratio":1.0,"height":1001,"width":1001,"src":"\/\/crystaldestiny.com\/cdn\/shop\/files\/Acrylic-Crystal-Sphere-Display-Stand-Stands-Acrylic-Small-4_62cm.webp?v=1765429877"},"aspect_ratio":1.0,"height":1001,"media_type":"image","src":"\/\/crystaldestiny.com\/cdn\/shop\/files\/Acrylic-Crystal-Sphere-Display-Stand-Stands-Acrylic-Small-4_62cm.webp?v=1765429877","width":1001},{"alt":"Acrylic Crystal Sphere Display Stand-Stands-Ali-Acrylic-Small - 4.6*2cm.-Crystal Destiny","id":31835995898027,"position":2,"preview_image":{"aspect_ratio":1.0,"height":1600,"width":1600,"src":"\/\/crystaldestiny.com\/cdn\/shop\/files\/Acrylic-Crystal-Sphere-Display-Stand-Stands-2.webp?v=1758558143"},"aspect_ratio":1.0,"height":1600,"media_type":"image","src":"\/\/crystaldestiny.com\/cdn\/shop\/files\/Acrylic-Crystal-Sphere-Display-Stand-Stands-2.webp?v=1758558143","width":1600},{"alt":"Acrylic Crystal Sphere Display Stand-Stands-Ali-Acrylic-Small - 4.6*2cm.-Crystal Destiny","id":31835996029099,"position":3,"preview_image":{"aspect_ratio":1.0,"height":1001,"width":1001,"src":"\/\/crystaldestiny.com\/cdn\/shop\/files\/Acrylic-Crystal-Sphere-Display-Stand-Stands-3.webp?v=1758558145"},"aspect_ratio":1.0,"height":1001,"media_type":"image","src":"\/\/crystaldestiny.com\/cdn\/shop\/files\/Acrylic-Crystal-Sphere-Display-Stand-Stands-3.webp?v=1758558145","width":1001},{"alt":"Acrylic Crystal Sphere Display Stand-Stands-Ali-Acrylic-Small - 4.6*2cm.-Crystal Destiny","id":31835996127403,"position":4,"preview_image":{"aspect_ratio":1.0,"height":1001,"width":1001,"src":"\/\/crystaldestiny.com\/cdn\/shop\/files\/Acrylic-Crystal-Sphere-Display-Stand-Stands-4.webp?v=1758558146"},"aspect_ratio":1.0,"height":1001,"media_type":"image","src":"\/\/crystaldestiny.com\/cdn\/shop\/files\/Acrylic-Crystal-Sphere-Display-Stand-Stands-4.webp?v=1758558146","width":1001},{"alt":"Acrylic Crystal Sphere Display Stand-Stands-Ali-Acrylic-Small - 4.6*2cm.-Crystal Destiny","id":31835996258475,"position":5,"preview_image":{"aspect_ratio":1.0,"height":1001,"width":1001,"src":"\/\/crystaldestiny.com\/cdn\/shop\/files\/Acrylic-Crystal-Sphere-Display-Stand-Stands-5.webp?v=1758558148"},"aspect_ratio":1.0,"height":1001,"media_type":"image","src":"\/\/crystaldestiny.com\/cdn\/shop\/files\/Acrylic-Crystal-Sphere-Display-Stand-Stands-5.webp?v=1758558148","width":1001},{"alt":"Acrylic Crystal Sphere Display Stand-Stands-Ali-Acrylic-Small - 4.6*2cm.-Crystal Destiny","id":31835996389547,"position":6,"preview_image":{"aspect_ratio":1.0,"height":1600,"width":1600,"src":"\/\/crystaldestiny.com\/cdn\/shop\/files\/Acrylic-Crystal-Sphere-Display-Stand-Stands-6.webp?v=1758558150"},"aspect_ratio":1.0,"height":1600,"media_type":"image","src":"\/\/crystaldestiny.com\/cdn\/shop\/files\/Acrylic-Crystal-Sphere-Display-Stand-Stands-6.webp?v=1758558150","width":1600}],"requires_selling_plan":false,"selling_plan_groups":[],"content":"\u003cp data-start=\"210\" data-end=\"523\"\u003eThis \u003cstrong data-start=\"242\" data-end=\"282\"\u003eAcrylic Crystal Sphere Display Stand\u003c\/strong\u003e features a clear hexagon-shaped base designed to elegantly support and showcase crystal spheres, gemstones, or decorative balls. Its transparent design allows the beauty of your stones to shine while providing a stable and secure display.\u003c\/p\u003e\n\u003cp data-start=\"525\" data-end=\"761\"\u003ePerfect for home décor, meditation spaces, or crystal collections, this stand adds a modern and minimalistic touch while keeping your spheres safe. Its durable acrylic construction ensures long-lasting functionality and visual appeal.\u003c\/p\u003e\n\u003cp data-start=\"763\" data-end=\"881\"\u003eElevate your crystal or stone display with this stylish, clear acrylic stand that blends practicality with elegance.\u003c\/p\u003e"},"options":[{"name":"Material","position":1,"values":["Acrylic"]},{"name":"Size","position":2,"values":["Small - 4.6*2cm.","Medium - 6*3cm","Large - 7.5*4cm"]}],"custom_metafields":{"shipping_time":"12-16 days"},"metafields":{"badge":"\u003cdiv style='display:none' class='jdgm-prev-badge' data-average-rating='0.00' data-number-of-reviews='0' data-number-of-questions='0'\u003e \u003cspan class='jdgm-prev-badge__stars' data-score='0.00' tabindex='0' aria-label='0.00 stars' role='button'\u003e \u003cspan class='jdgm-star jdgm--off'\u003e\u003c\/span\u003e\u003cspan class='jdgm-star jdgm--off'\u003e\u003c\/span\u003e\u003cspan class='jdgm-star jdgm--off'\u003e\u003c\/span\u003e\u003cspan class='jdgm-star jdgm--off'\u003e\u003c\/span\u003e\u003cspan class='jdgm-star jdgm--off'\u003e\u003c\/span\u003e \u003c\/span\u003e \u003cspan class='jdgm-prev-badge__text'\u003e No reviews \u003c\/span\u003e \u003c\/div\u003e","widget":"\u003cdiv class='jdgm-rev-widg' data-updated-at='2025-09-21T22:05:27Z' data-average-rating='0.00' data-number-of-reviews='0' data-number-of-questions='0' data-image-url='https:\/\/cdn.shopify.com\/s\/files\/1\/0613\/0345\/5915\/files\/S731c3332b6414cfb9a1c53180c4de495r.webp?v=1758480329'\u003e \u003cstyle class='jdgm-temp-hiding-style'\u003e.jdgm-rev-widg{ display: none }\u003c\/style\u003e \u003cdiv class='jdgm-rev-widg__header'\u003e \u003ch2 class='jdgm-rev-widg__title'\u003eCustomer Reviews\u003c\/h2\u003e \u003cdiv class='jdgm-rev-widg__summary'\u003e \u003cdiv class='jdgm-rev-widg__summary-stars' aria-label='Average rating is 0.00 stars' role='img'\u003e \u003cspan class='jdgm-star jdgm--off'\u003e\u003c\/span\u003e\u003cspan class='jdgm-star jdgm--off'\u003e\u003c\/span\u003e\u003cspan class='jdgm-star jdgm--off'\u003e\u003c\/span\u003e\u003cspan class='jdgm-star jdgm--off'\u003e\u003c\/span\u003e\u003cspan class='jdgm-star jdgm--off'\u003e\u003c\/span\u003e \u003c\/div\u003e \u003cdiv class='jdgm-rev-widg__summary-text'\u003eBe the first to write a review\u003c\/div\u003e \u003c\/div\u003e \u003ca style='display: none' href='#' class='jdgm-write-rev-link' role='button'\u003eWrite a review\u003c\/a\u003e \u003cdiv class='jdgm-histogram jdgm-temp-hidden'\u003e \u003cdiv class='jdgm-histogram__row' data-rating='5' data-frequency='0' data-percentage='0'\u003e \u003cdiv class='jdgm-histogram__star' role='button' aria-label=\"0% (0) reviews with 5 star rating\" tabindex='0' \u003e\u003cspan class='jdgm-star jdgm--on'\u003e\u003c\/span\u003e\u003cspan class='jdgm-star jdgm--on'\u003e\u003c\/span\u003e\u003cspan class='jdgm-star jdgm--on'\u003e\u003c\/span\u003e\u003cspan class='jdgm-star jdgm--on'\u003e\u003c\/span\u003e\u003cspan class='jdgm-star jdgm--on'\u003e\u003c\/span\u003e\u003c\/div\u003e \u003cdiv class='jdgm-histogram__bar'\u003e \u003cdiv class='jdgm-histogram__bar-content' style='width: 0%;'\u003e \u003c\/div\u003e \u003c\/div\u003e \u003cdiv class='jdgm-histogram__percentage'\u003e0%\u003c\/div\u003e \u003cdiv class='jdgm-histogram__frequency'\u003e(0)\u003c\/div\u003e \u003c\/div\u003e \u003cdiv class='jdgm-histogram__row' data-rating='4' data-frequency='0' data-percentage='0'\u003e \u003cdiv class='jdgm-histogram__star' role='button' aria-label=\"0% (0) reviews with 4 star rating\" tabindex='0' \u003e\u003cspan class='jdgm-star jdgm--on'\u003e\u003c\/span\u003e\u003cspan class='jdgm-star jdgm--on'\u003e\u003c\/span\u003e\u003cspan class='jdgm-star jdgm--on'\u003e\u003c\/span\u003e\u003cspan class='jdgm-star jdgm--on'\u003e\u003c\/span\u003e\u003cspan class='jdgm-star jdgm--off'\u003e\u003c\/span\u003e\u003c\/div\u003e \u003cdiv class='jdgm-histogram__bar'\u003e \u003cdiv class='jdgm-histogram__bar-content' style='width: 0%;'\u003e \u003c\/div\u003e \u003c\/div\u003e \u003cdiv class='jdgm-histogram__percentage'\u003e0%\u003c\/div\u003e \u003cdiv class='jdgm-histogram__frequency'\u003e(0)\u003c\/div\u003e \u003c\/div\u003e \u003cdiv class='jdgm-histogram__row' data-rating='3' data-frequency='0' data-percentage='0'\u003e \u003cdiv class='jdgm-histogram__star' role='button' aria-label=\"0% (0) reviews with 3 star rating\" tabindex='0' \u003e\u003cspan class='jdgm-star jdgm--on'\u003e\u003c\/span\u003e\u003cspan class='jdgm-star jdgm--on'\u003e\u003c\/span\u003e\u003cspan class='jdgm-star jdgm--on'\u003e\u003c\/span\u003e\u003cspan class='jdgm-star jdgm--off'\u003e\u003c\/span\u003e\u003cspan class='jdgm-star jdgm--off'\u003e\u003c\/span\u003e\u003c\/div\u003e \u003cdiv class='jdgm-histogram__bar'\u003e \u003cdiv class='jdgm-histogram__bar-content' style='width: 0%;'\u003e \u003c\/div\u003e \u003c\/div\u003e \u003cdiv class='jdgm-histogram__percentage'\u003e0%\u003c\/div\u003e \u003cdiv class='jdgm-histogram__frequency'\u003e(0)\u003c\/div\u003e \u003c\/div\u003e \u003cdiv class='jdgm-histogram__row' data-rating='2' data-frequency='0' data-percentage='0'\u003e \u003cdiv class='jdgm-histogram__star' role='button' aria-label=\"0% (0) reviews with 2 star rating\" tabindex='0' \u003e\u003cspan class='jdgm-star jdgm--on'\u003e\u003c\/span\u003e\u003cspan class='jdgm-star jdgm--on'\u003e\u003c\/span\u003e\u003cspan class='jdgm-star jdgm--off'\u003e\u003c\/span\u003e\u003cspan class='jdgm-star jdgm--off'\u003e\u003c\/span\u003e\u003cspan class='jdgm-star jdgm--off'\u003e\u003c\/span\u003e\u003c\/div\u003e \u003cdiv class='jdgm-histogram__bar'\u003e \u003cdiv class='jdgm-histogram__bar-content' style='width: 0%;'\u003e \u003c\/div\u003e \u003c\/div\u003e \u003cdiv class='jdgm-histogram__percentage'\u003e0%\u003c\/div\u003e \u003cdiv class='jdgm-histogram__frequency'\u003e(0)\u003c\/div\u003e \u003c\/div\u003e \u003cdiv class='jdgm-histogram__row' data-rating='1' data-frequency='0' data-percentage='0'\u003e \u003cdiv class='jdgm-histogram__star' role='button' aria-label=\"0% (0) reviews with 1 star rating\" tabindex='0' \u003e\u003cspan class='jdgm-star jdgm--on'\u003e\u003c\/span\u003e\u003cspan class='jdgm-star jdgm--off'\u003e\u003c\/span\u003e\u003cspan class='jdgm-star jdgm--off'\u003e\u003c\/span\u003e\u003cspan class='jdgm-star jdgm--off'\u003e\u003c\/span\u003e\u003cspan class='jdgm-star jdgm--off'\u003e\u003c\/span\u003e\u003c\/div\u003e \u003cdiv class='jdgm-histogram__bar'\u003e \u003cdiv class='jdgm-histogram__bar-content' style='width: 0%;'\u003e \u003c\/div\u003e \u003c\/div\u003e \u003cdiv class='jdgm-histogram__percentage'\u003e0%\u003c\/div\u003e \u003cdiv class='jdgm-histogram__frequency'\u003e(0)\u003c\/div\u003e \u003c\/div\u003e \u003cdiv class='jdgm-histogram__row jdgm-histogram__clear-filter' data-rating=null tabindex='0'\u003e\u003c\/div\u003e \u003c\/div\u003e \u003cdiv class='jdgm-rev-widg__sort-wrapper'\u003e\u003c\/div\u003e \u003c\/div\u003e \u003cdiv class='jdgm-rev-widg__body'\u003e \u003cdiv class='jdgm-rev-widg__reviews'\u003e\u003c\/div\u003e \u003cdiv class='jdgm-paginate' data-per-page='4' data-url='https:\/\/api.judge.me\/reviews\/reviews_for_widget' style=\"display: none;\"\u003e\u003c\/div\u003e \u003c\/div\u003e \u003cdiv class='jdgm-rev-widg__paginate-spinner-wrapper'\u003e \u003cdiv class='jdgm-spinner'\u003e\u003c\/div\u003e \u003c\/div\u003e \u003c\/div\u003e"},"collections":[{"id":294880051371,"handle":"crystals","title":"Crystals","updated_at":"2026-01-07T23:43:11-05:00","body_html":"\u003cp data-start=\"159\" data-end=\"687\"\u003e✨ \u003cstrong data-start=\"161\" data-end=\"216\"\u003eDiscover the Magic of Crystals with Crystal Destiny\u003c\/strong\u003e ✨\u003cbr data-start=\"218\" data-end=\"221\"\u003eCrystals have been treasured for centuries—not only for their natural beauty but also for their powerful healing energies. Beyond their visual allure, they bring balance, harmony, and positive energy into any space. Whether used for home décor, meditation, or simply to elevate the energy of your surroundings, crystals create a sanctuary of peace, relaxation, and well-being. Each piece is a unique gift from the Earth—visually stunning and spiritually uplifting.\u003c\/p\u003e\n\u003cp data-start=\"689\" data-end=\"1011\"\u003eAt \u003cstrong data-start=\"692\" data-end=\"711\"\u003eCrystal Destiny\u003c\/strong\u003e, our signature collection showcases a curated selection of exquisite crystals, from radiant Quartz to soothing Amethyst. Every stone is carefully sourced for its elegance and metaphysical resonance, making them perfect for enhancing your home, uplifting your spirit, or gifting to someone special.\u003c\/p\u003e\n\u003cp data-start=\"1013\" data-end=\"1206\"\u003eExperience the timeless sophistication of crystalline wonders. Explore the \u003cstrong data-start=\"1088\" data-end=\"1118\"\u003eCrystal Destiny Collection\u003c\/strong\u003e today and bring the transformative beauty of these treasures into your everyday life.\u003c\/p\u003e","published_at":"2023-06-05T11:24:02-04:00","sort_order":"created-desc","template_suffix":"","disjunctive":false,"rules":[{"column":"tag","relation":"equals","condition":"crystal"},{"column":"type","relation":"not_contains","condition":"925 Sterling Silver"},{"column":"type","relation":"not_contains","condition":"Wire Wraps"}],"published_scope":"global"},{"id":322471624875,"handle":"crystal-favorites","title":"Crystal Enthusiast's Favorites","updated_at":"2026-01-07T23:42:38-05:00","body_html":"\u003cp\u003eDiscover the crystals our community loves most. This collection features our best-selling stones and accessories, carefully curated to highlight pieces that are always in demand and ready to ship. Whether you’re adding to your collection or searching for a gift, these fan-favorite crystals are timeless staples for energy, beauty, and balance.\u003c\/p\u003e","published_at":"2025-10-01T21:07:06-04:00","sort_order":"price-asc","template_suffix":"","disjunctive":false,"rules":[{"column":"variant_inventory","relation":"greater_than","condition":"1"}],"published_scope":"global"},{"id":321695744171,"handle":"direct-from-supplier","title":"Direct from Supplier","updated_at":"2026-01-07T23:43:11-05:00","body_html":"","published_at":"2025-09-12T16:38:23-04:00","sort_order":"best-selling","template_suffix":"","disjunctive":true,"rules":[{"column":"tag","relation":"equals","condition":"adjusted-shipping"}],"published_scope":"global"},{"id":295698202795,"handle":"spheres","title":"Crystal Spheres","updated_at":"2026-01-06T23:24:35-05:00","body_html":"\u003cp data-start=\"106\" data-end=\"370\"\u003e✨ \u003cstrong data-start=\"108\" data-end=\"138\"\u003eCrystal Spheres Collection\u003c\/strong\u003e ✨\u003cbr data-start=\"140\" data-end=\"143\"\u003eBring harmony, balance, and elegance into your space with our \u003cstrong data-start=\"205\" data-end=\"235\"\u003eCrystal Spheres Collection\u003c\/strong\u003e. Each sphere is meticulously crafted to showcase the natural beauty and energy of crystals, from radiant Quartz to calming Amethyst.\u003c\/p\u003e\n\u003cp data-start=\"372\" data-end=\"658\"\u003ePerfect for meditation, energy work, or as striking décor, crystal spheres radiate energy in all directions, promoting clarity, focus, and a sense of calm. Their smooth, polished surfaces highlight the stones’ natural patterns and colors, making each sphere a captivating centerpiece.\u003c\/p\u003e\n\u003cp data-start=\"660\" data-end=\"809\"\u003eElevate your space and embrace the transformative power of crystals with the \u003cstrong data-start=\"737\" data-end=\"767\"\u003eCrystal Spheres Collection\u003c\/strong\u003e—where beauty, energy, and harmony meet.\u003c\/p\u003e","published_at":"2023-07-28T14:20:46-04:00","sort_order":"created-desc","template_suffix":"","disjunctive":true,"rules":[{"column":"tag","relation":"equals","condition":"spheres"},{"column":"tag","relation":"equals","condition":"eggs"}],"published_scope":"global"},{"id":293659312299,"handle":"best-sellers","title":"Best Sellers","updated_at":"2026-01-07T23:43:11-05:00","body_html":"\u003cp data-start=\"155\" data-end=\"510\"\u003eDiscover the pieces our community loves most. Our Best Sellers Collection brings together handpicked crystals and jewelry that embody timeless elegance, spiritual resonance, and everyday sophistication. Each item has earned its place as a customer favorite—celebrated for both its beauty and its meaningful energy.\u003c\/p\u003e\n\u003cp data-start=\"512\" data-end=\"802\"\u003eFrom stunning statement pieces to versatile daily companions, these treasures are curated to elevate your space, uplift your spirit, and reflect refined taste. Indulge in what’s most cherished and let our best sellers guide you toward the perfect blend of style and transformative energy.\u003c\/p\u003e\n\u003cp data-start=\"804\" data-end=\"932\"\u003eExplore the Best Sellers Collection today—where elegance meets intention, and every piece tells a story of beauty and balance.\u003c\/p\u003e","published_at":"2023-03-15T16:04:51-04:00","sort_order":"best-selling","template_suffix":"","disjunctive":false,"rules":[{"column":"variant_price","relation":"greater_than","condition":"0"},{"column":"variant_inventory","relation":"greater_than","condition":"0"},{"column":"type","relation":"not_equals","condition":"Shipping Protection"}],"published_scope":"global"},{"id":321370390699,"handle":"monthly-crystal-sale","title":"Monthly Crystal Sale | Spheres \u0026 Towers","updated_at":"2026-01-06T23:24:37-05:00","body_html":"\u003cp\u003eShop our \u003cstrong\u003eMonthly Crystal Sale\u003c\/strong\u003e, where you can shop a wide selection of healing crystals at discounted prices. Explore \u003cstrong\u003ecrystal spheres and towers,\u003c\/strong\u003e— all carefully curated to support meditation, energy balancing, and spiritual wellness. Whether you're looking to enhance your home decor, boost your daily energy, or find the perfect gift, our \u003cstrong\u003ecrystals for healing and manifestation\u003c\/strong\u003e offer both beauty and metaphysical benefits.\u003c\/p\u003e\n\u003cp\u003eEach month, our sale features \u003cstrong\u003enew discounted collections\u003c\/strong\u003e, from \u003cstrong\u003enatural quartz and amethyst towers\u003c\/strong\u003e to \u003cstrong\u003ewire-wrapped pendants and polished stones\u003c\/strong\u003e, so there's always something fresh to discover. Shop with confidence knowing you're getting high-quality crystals with \u003cstrong\u003efree shipping options\u003c\/strong\u003e and a trusted experience.\u003c\/p\u003e\n\u003cp\u003e\u003cstrong\u003eTake advantage of the Monthly Crystal Sale today\u003c\/strong\u003e and add powerful, natural energy to your life with \u003cstrong\u003eauthentic healing crystals\u003c\/strong\u003e — while our limited-time discounts last.\u003c\/p\u003e\n\u003cp\u003e\u003cstrong\u003e*Discount automatically applied at checkout.\u003c\/strong\u003e\u003c\/p\u003e","published_at":"2025-12-02T01:26:17-05:00","sort_order":"alpha-asc","template_suffix":"","disjunctive":true,"rules":[{"column":"tag","relation":"equals","condition":"spheres"},{"column":"tag","relation":"equals","condition":"Towers"}],"published_scope":"global","image":{"created_at":"2026-01-01T01:32:34-05:00","alt":"","width":960,"height":960,"src":"\/\/crystaldestiny.com\/cdn\/shop\/collections\/3E8C2969-1B86-4ACE-B349-98E9D8768424.jpg?v=1767249154"}},{"id":310483058859,"handle":"crystal-stands-display-holders","title":"Crystal Stands \u0026 Display Holders for Minerals","updated_at":"2026-01-05T07:14:22-05:00","body_html":"\u003cp\u003eCrystals deserve more than just a shelf — they deserve a place where beauty and energy can truly shine. Our \u003cstrong\u003eCrystal Stands \u0026amp; Display Holders\u003c\/strong\u003e collection is designed to help you display your favorite stones, minerals, and specimens with both style and intention.\u003c\/p\u003e\n\u003cp\u003eWhether you're showcasing a single standout tower, arranging spheres on your altar, or displaying delicate mineral specimens, a crystal stand not only enhances the look of your collection but also helps amplify its presence in your space.\u003c\/p\u003e\n\u003ch2\u003eWhy Use a Crystal Stand?\u003c\/h2\u003e\n\u003cp\u003eA crystal stand allows you to elevate the energy of your crystals, making them the focal point of your space. Many stones and minerals are also prone to scratches, and some shapes are prone to rolling or falling over, but a stand allows you to protect these delicate minerals and preserve their lifelong beauty. Using a mineral display holder also allows you to add a polished and intentional aesthetic to your altar, desk, or display shelf. \u003c\/p\u003e\n\u003ch2\u003eTypes of Crystal Stands\/Displays\u003c\/h2\u003e\n\u003cul\u003e\n\u003cli\u003eMetal Stands: Minimalist designs for spheres, towers, or clusters.\u003c\/li\u003e\n\u003cli\u003eWooden Bases: Natural, grounding options to complement earthy energy.\u003c\/li\u003e\n\u003cli\u003eSpecimen Holders: Perfect for minerals, valuable collectibles, and unique finds.\u003c\/li\u003e\n\u003c\/ul\u003e\n\u003cp\u003eWhether you're a seasoned collector or just starting your crystal journey, the right stand can transform your space — helping you honor the beauty, purpose, and energy of each stone.\u003c\/p\u003e","published_at":"2024-11-27T13:51:40-05:00","sort_order":"created-desc","template_suffix":"","disjunctive":true,"rules":[{"column":"tag","relation":"equals","condition":"Stands"}],"published_scope":"global"},{"id":297596059819,"handle":"all","title":"All Crystals \u0026 Jewelry","updated_at":"2026-01-07T23:43:11-05:00","body_html":"\u003cp data-start=\"149\" data-end=\"494\"\u003e✨ \u003cstrong data-start=\"151\" data-end=\"181\"\u003eWelcome to Crystal Destiny\u003c\/strong\u003e ✨\u003cbr data-start=\"183\" data-end=\"186\"\u003eStep into a world where beauty, energy, and artistry unite. Our collection is a treasure trove of exquisite crystals, from the raw, untamed elegance of natural formations to the polished brilliance of expertly crafted pieces. Each crystal is a masterpiece, carrying its own unique story and timeless charm.\u003c\/p\u003e\n\u003cp data-start=\"496\" data-end=\"831\"\u003eWhether you’re drawn to the calming presence of Amethyst, the vibrant energy of Citrine, or the grounding strength of Jasper, our crystals invite you to connect with nature’s finest wonders. Perfect for enhancing your space, supporting your spiritual journey, or gifting with intention, every piece resonates with beauty and meaning.\u003c\/p\u003e\n\u003cp data-start=\"833\" data-end=\"1000\"\u003eElevate your surroundings, embrace the mystique, and explore the enchanting world of crystals at \u003cstrong data-start=\"930\" data-end=\"949\"\u003eCrystal Destiny\u003c\/strong\u003e—where every crystal is waiting to be discovered.\u003c\/p\u003e","published_at":"2023-11-10T13:55:31-05:00","sort_order":"created-desc","template_suffix":"","disjunctive":false,"rules":[{"column":"type","relation":"not_equals","condition":"asdf"}],"published_scope":"global"},{"id":298983391403,"handle":"january-crystal-sale","title":"January Sale | 25% Off Crystal Towers \u0026 Spheres","updated_at":"2026-01-06T23:24:37-05:00","body_html":"\u003cp\u003eShop our \u003cstrong\u003eJanuary Crystal Sale\u003c\/strong\u003e, where you can shop a wide selection of healing crystals at discounted prices. Explore \u003cstrong\u003eCrystal Towers, \u0026amp; Crystal Spheres\u003c\/strong\u003e — all carefully curated and crafted to support meditation, energy balancing, and spiritual wellness. Whether you're looking to enhance your home decor, boost your daily energy, or find the perfect gift, our \u003cstrong\u003ecrystals for healing and manifestation\u003c\/strong\u003e offer both beauty and metaphysical benefits.\u003c\/p\u003e\n\u003cp\u003eThis January, our sale features \u003cstrong\u003ediscounted crystal towers and spheres\u003c\/strong\u003e, from \u003cstrong\u003enatural quartz \u003c\/strong\u003eand \u003cstrong\u003eamethyst \u003c\/strong\u003eto \u003cstrong\u003ebumblebee jasper \u003c\/strong\u003eand \u003cstrong\u003ecarnelian\u003c\/strong\u003e, so there's always something fresh to discover. Shop with confidence knowing you're getting high-quality crystals with \u003cstrong\u003efree shipping options\u003c\/strong\u003e and a trusted experience.\u003c\/p\u003e\n\u003cp\u003e\u003cstrong\u003eTake advantage of the January Crystal Sale today\u003c\/strong\u003e and add powerful, natural energy to your life with \u003cstrong\u003eauthentic healing crystals\u003c\/strong\u003e — while our limited-time discounts last.\u003c\/p\u003e\n\u003cp\u003e\u003cstrong\u003e*Discount automatically applied at checkout.\u003c\/strong\u003e\u003c\/p\u003e","published_at":"2026-01-01T00:07:17-05:00","sort_order":"alpha-asc","template_suffix":"monthly-collection","disjunctive":true,"rules":[{"column":"tag","relation":"equals","condition":"Spheres"},{"column":"tag","relation":"equals","condition":"Towers"}],"published_scope":"global","image":{"created_at":"2026-01-01T01:29:59-05:00","alt":"","width":960,"height":960,"src":"\/\/crystaldestiny.com\/cdn\/shop\/collections\/1464163B-22B1-4D62-BEC5-CEC9AECB670B.jpg?v=1767248999"}}]}
[{"alt":"Acrylic Crystal Sphere Display Stand-Stands-Ali-Acrylic-Small - 4.6*2cm.-Crystal Destiny","id":31835995799723,"position":1,"preview_image":{"aspect_ratio":1.0,"height":1001,"width":1001,"src":"\/\/crystaldestiny.com\/cdn\/shop\/files\/Acrylic-Crystal-Sphere-Display-Stand-Stands-Acrylic-Small-4_62cm.webp?v=1765429877"},"aspect_ratio":1.0,"height":1001,"media_type":"image","src":"\/\/crystaldestiny.com\/cdn\/shop\/files\/Acrylic-Crystal-Sphere-Display-Stand-Stands-Acrylic-Small-4_62cm.webp?v=1765429877","width":1001},{"alt":"Acrylic Crystal Sphere Display Stand-Stands-Ali-Acrylic-Small - 4.6*2cm.-Crystal Destiny","id":31835995898027,"position":2,"preview_image":{"aspect_ratio":1.0,"height":1600,"width":1600,"src":"\/\/crystaldestiny.com\/cdn\/shop\/files\/Acrylic-Crystal-Sphere-Display-Stand-Stands-2.webp?v=1758558143"},"aspect_ratio":1.0,"height":1600,"media_type":"image","src":"\/\/crystaldestiny.com\/cdn\/shop\/files\/Acrylic-Crystal-Sphere-Display-Stand-Stands-2.webp?v=1758558143","width":1600},{"alt":"Acrylic Crystal Sphere Display Stand-Stands-Ali-Acrylic-Small - 4.6*2cm.-Crystal Destiny","id":31835996029099,"position":3,"preview_image":{"aspect_ratio":1.0,"height":1001,"width":1001,"src":"\/\/crystaldestiny.com\/cdn\/shop\/files\/Acrylic-Crystal-Sphere-Display-Stand-Stands-3.webp?v=1758558145"},"aspect_ratio":1.0,"height":1001,"media_type":"image","src":"\/\/crystaldestiny.com\/cdn\/shop\/files\/Acrylic-Crystal-Sphere-Display-Stand-Stands-3.webp?v=1758558145","width":1001},{"alt":"Acrylic Crystal Sphere Display Stand-Stands-Ali-Acrylic-Small - 4.6*2cm.-Crystal Destiny","id":31835996127403,"position":4,"preview_image":{"aspect_ratio":1.0,"height":1001,"width":1001,"src":"\/\/crystaldestiny.com\/cdn\/shop\/files\/Acrylic-Crystal-Sphere-Display-Stand-Stands-4.webp?v=1758558146"},"aspect_ratio":1.0,"height":1001,"media_type":"image","src":"\/\/crystaldestiny.com\/cdn\/shop\/files\/Acrylic-Crystal-Sphere-Display-Stand-Stands-4.webp?v=1758558146","width":1001},{"alt":"Acrylic Crystal Sphere Display Stand-Stands-Ali-Acrylic-Small - 4.6*2cm.-Crystal Destiny","id":31835996258475,"position":5,"preview_image":{"aspect_ratio":1.0,"height":1001,"width":1001,"src":"\/\/crystaldestiny.com\/cdn\/shop\/files\/Acrylic-Crystal-Sphere-Display-Stand-Stands-5.webp?v=1758558148"},"aspect_ratio":1.0,"height":1001,"media_type":"image","src":"\/\/crystaldestiny.com\/cdn\/shop\/files\/Acrylic-Crystal-Sphere-Display-Stand-Stands-5.webp?v=1758558148","width":1001},{"alt":"Acrylic Crystal Sphere Display Stand-Stands-Ali-Acrylic-Small - 4.6*2cm.-Crystal Destiny","id":31835996389547,"position":6,"preview_image":{"aspect_ratio":1.0,"height":1600,"width":1600,"src":"\/\/crystaldestiny.com\/cdn\/shop\/files\/Acrylic-Crystal-Sphere-Display-Stand-Stands-6.webp?v=1758558150"},"aspect_ratio":1.0,"height":1600,"media_type":"image","src":"\/\/crystaldestiny.com\/cdn\/shop\/files\/Acrylic-Crystal-Sphere-Display-Stand-Stands-6.webp?v=1758558150","width":1600}]
{"item":{"id":8570949796011,"title":"Amazonite Crystal XXL Obelisk Towers","handle":"amazonite-crystal-xxl-obelisk-towers-1005008959836511-amazonite-12-13cm","description":"\u003cp data-start=\"169\" data-end=\"492\"\u003eThese Natural Amazonite Crystal Obelisks are beautifully polished and carved into tall, elegant points, showcasing soft blue-green tones with natural veining unique to each piece. Perfect for display, meditation, or energy work, each obelisk brings a calming and uplifting presence to any space.\u003c\/p\u003e\n\u003cp data-start=\"494\" data-end=\"762\"\u003eAmazonite is known for soothing emotional energy, encouraging balance, communication, and inner peace. The obelisk shape amplifies intention, making it ideal for spiritual practices, altar arrangements, or as a standout décor piece for collectors and crystal lovers.\u003c\/p\u003e\n\u003cp data-start=\"764\" data-end=\"879\"\u003eCollectors value Amazonite Obelisks for their size, beauty, and ability to harmonize both energy and environment.\u003c\/p\u003e\n\u003cp data-start=\"764\" data-end=\"879\"\u003eThis product is pulled at random by size.\u003c\/p\u003e\u003ch2\u003eCrystal Towers, Wands, Generators, Points, Pillars \u0026amp; Obelisks — What's the Difference?\u003c\/h2\u003e\n\u003cp id=\"isPasted\"\u003eWhile these terms may vary, they all describe beautifully shaped crystals with a pointed tip designed to channel and direct energy. Each name highlights a unique aspect of their use:\u003c\/p\u003e\n\u003cul\u003e\n\u003cli\u003e\n\u003cstrong\u003eTowers\u003c\/strong\u003e- Known for their steady, grounding presence, crystal towers help focus and amplify energy, making them perfect for meditation and manifestation.\u003c\/li\u003e\n\u003cli\u003e\n\u003cstrong\u003eWands\u003c\/strong\u003e- Traditionally used in energy work and healing, crystal wands are excellent for directing energy flow and clearing blockages.\u003c\/li\u003e\n\u003cli\u003e\n\u003cstrong\u003ePillars\u003c\/strong\u003e- Symbolizing strength and stability, crystal pillars create a balanced and harmonious environment, making them great for home decor and spiritual practices.\u003c\/li\u003e\n\u003cli\u003e\n\u003cstrong\u003eObelisks\u003c\/strong\u003e- Inspired by ancient structures, crystal obelisks are believed to connect earthly and spiritual energies, making them powerful tools for transformation and enlightenment.\u003c\/li\u003e\n\u003c\/ul\u003e\n\u003cp\u003eNo matter what you call them, these crystals serve the same purpose—to enhance energy, intention, and harmony in your space. Choose the one that resonates most with you!\u003c\/p\u003e","published_at":"2025-11-03T20:31:00-05:00","created_at":"2025-11-03T20:24:23-05:00","vendor":"Ali","type":"Towers","tags":["adjusted-shipping","crystal","new-arrivals","polished","Towers"],"price":4699,"price_min":4699,"price_max":5999,"available":true,"price_varies":true,"compare_at_price":0,"compare_at_price_min":0,"compare_at_price_max":0,"compare_at_price_varies":false,"variants":[{"id":45796593762475,"title":"Amazonite \/ 120-130mm","option1":"Amazonite","option2":"120-130mm","option3":null,"sku":"1005008959836511-Amazonite-12-13cm","requires_shipping":true,"taxable":true,"featured_image":{"id":40709667848363,"product_id":8570949796011,"position":7,"created_at":"2025-11-03T20:24:25-05:00","updated_at":"2025-12-11T00:23:22-05:00","alt":"Amazonite Crystal XXL Obelisk Towers-Towers-Ali-Amazonite-120-130mm-Crystal Destiny","width":2049,"height":2049,"src":"\/\/crystaldestiny.com\/cdn\/shop\/files\/Amazonite-Crystal-XXL-Obelisk-Towers-Towers-Amazonite-120-130mm-7.webp?v=1765430602","variant_ids":[45796593762475,45796593795243,45796593828011]},"available":true,"name":"Amazonite Crystal XXL Obelisk Towers - Amazonite \/ 120-130mm","public_title":"Amazonite \/ 120-130mm","options":["Amazonite","120-130mm"],"price":4699,"weight":500,"compare_at_price":0,"inventory_management":"shopify","barcode":null,"featured_media":{"alt":"Amazonite Crystal XXL Obelisk Towers-Towers-Ali-Amazonite-120-130mm-Crystal Destiny","id":32085469593771,"position":7,"preview_image":{"aspect_ratio":1.0,"height":2049,"width":2049,"src":"\/\/crystaldestiny.com\/cdn\/shop\/files\/Amazonite-Crystal-XXL-Obelisk-Towers-Towers-Amazonite-120-130mm-7.webp?v=1765430602"}},"requires_selling_plan":false,"selling_plan_allocations":[]},{"id":45796593795243,"title":"Amazonite \/ 150-160mm","option1":"Amazonite","option2":"150-160mm","option3":null,"sku":"1005008959836511-Amazonite-15-16cm","requires_shipping":true,"taxable":true,"featured_image":{"id":40709667848363,"product_id":8570949796011,"position":7,"created_at":"2025-11-03T20:24:25-05:00","updated_at":"2025-12-11T00:23:22-05:00","alt":"Amazonite Crystal XXL Obelisk Towers-Towers-Ali-Amazonite-120-130mm-Crystal Destiny","width":2049,"height":2049,"src":"\/\/crystaldestiny.com\/cdn\/shop\/files\/Amazonite-Crystal-XXL-Obelisk-Towers-Towers-Amazonite-120-130mm-7.webp?v=1765430602","variant_ids":[45796593762475,45796593795243,45796593828011]},"available":true,"name":"Amazonite Crystal XXL Obelisk Towers - Amazonite \/ 150-160mm","public_title":"Amazonite \/ 150-160mm","options":["Amazonite","150-160mm"],"price":5499,"weight":500,"compare_at_price":0,"inventory_management":"shopify","barcode":null,"featured_media":{"alt":"Amazonite Crystal XXL Obelisk Towers-Towers-Ali-Amazonite-120-130mm-Crystal Destiny","id":32085469593771,"position":7,"preview_image":{"aspect_ratio":1.0,"height":2049,"width":2049,"src":"\/\/crystaldestiny.com\/cdn\/shop\/files\/Amazonite-Crystal-XXL-Obelisk-Towers-Towers-Amazonite-120-130mm-7.webp?v=1765430602"}},"requires_selling_plan":false,"selling_plan_allocations":[]},{"id":45796593828011,"title":"Amazonite \/ 170-180mm","option1":"Amazonite","option2":"170-180mm","option3":null,"sku":"1005008959836511-Amazonite-17-18cm","requires_shipping":true,"taxable":true,"featured_image":{"id":40709667848363,"product_id":8570949796011,"position":7,"created_at":"2025-11-03T20:24:25-05:00","updated_at":"2025-12-11T00:23:22-05:00","alt":"Amazonite Crystal XXL Obelisk Towers-Towers-Ali-Amazonite-120-130mm-Crystal Destiny","width":2049,"height":2049,"src":"\/\/crystaldestiny.com\/cdn\/shop\/files\/Amazonite-Crystal-XXL-Obelisk-Towers-Towers-Amazonite-120-130mm-7.webp?v=1765430602","variant_ids":[45796593762475,45796593795243,45796593828011]},"available":true,"name":"Amazonite Crystal XXL Obelisk Towers - Amazonite \/ 170-180mm","public_title":"Amazonite \/ 170-180mm","options":["Amazonite","170-180mm"],"price":5999,"weight":500,"compare_at_price":0,"inventory_management":"shopify","barcode":null,"featured_media":{"alt":"Amazonite Crystal XXL Obelisk Towers-Towers-Ali-Amazonite-120-130mm-Crystal Destiny","id":32085469593771,"position":7,"preview_image":{"aspect_ratio":1.0,"height":2049,"width":2049,"src":"\/\/crystaldestiny.com\/cdn\/shop\/files\/Amazonite-Crystal-XXL-Obelisk-Towers-Towers-Amazonite-120-130mm-7.webp?v=1765430602"}},"requires_selling_plan":false,"selling_plan_allocations":[]}],"images":["\/\/crystaldestiny.com\/cdn\/shop\/files\/Amazonite-Crystal-XXL-Obelisk-Towers-Towers.webp?v=1762273956","\/\/crystaldestiny.com\/cdn\/shop\/files\/Amazonite-Crystal-XXL-Obelisk-Towers-Towers-2.webp?v=1762273959","\/\/crystaldestiny.com\/cdn\/shop\/files\/Amazonite-Crystal-XXL-Obelisk-Towers-Towers-3.webp?v=1762273962","\/\/crystaldestiny.com\/cdn\/shop\/files\/Amazonite-Crystal-XXL-Obelisk-Towers-Towers-4.webp?v=1762273965","\/\/crystaldestiny.com\/cdn\/shop\/files\/Amazonite-Crystal-XXL-Obelisk-Towers-Towers-5.webp?v=1762273969","\/\/crystaldestiny.com\/cdn\/shop\/files\/Amazonite-Crystal-XXL-Obelisk-Towers-Towers-6.webp?v=1762273972","\/\/crystaldestiny.com\/cdn\/shop\/files\/Amazonite-Crystal-XXL-Obelisk-Towers-Towers-Amazonite-120-130mm-7.webp?v=1765430602"],"featured_image":"\/\/crystaldestiny.com\/cdn\/shop\/files\/Amazonite-Crystal-XXL-Obelisk-Towers-Towers.webp?v=1762273956","options":["Material","Size"],"media":[{"alt":"Amazonite Crystal XXL Obelisk Towers-Towers-Ali-Amazonite-120-130mm-Crystal Destiny","id":32085469397163,"position":1,"preview_image":{"aspect_ratio":1.0,"height":2160,"width":2160,"src":"\/\/crystaldestiny.com\/cdn\/shop\/files\/Amazonite-Crystal-XXL-Obelisk-Towers-Towers.webp?v=1762273956"},"aspect_ratio":1.0,"height":2160,"media_type":"image","src":"\/\/crystaldestiny.com\/cdn\/shop\/files\/Amazonite-Crystal-XXL-Obelisk-Towers-Towers.webp?v=1762273956","width":2160},{"alt":"Amazonite Crystal XXL Obelisk Towers-Towers-Ali-Amazonite-120-130mm-Crystal Destiny","id":32085469429931,"position":2,"preview_image":{"aspect_ratio":1.0,"height":2160,"width":2160,"src":"\/\/crystaldestiny.com\/cdn\/shop\/files\/Amazonite-Crystal-XXL-Obelisk-Towers-Towers-2.webp?v=1762273959"},"aspect_ratio":1.0,"height":2160,"media_type":"image","src":"\/\/crystaldestiny.com\/cdn\/shop\/files\/Amazonite-Crystal-XXL-Obelisk-Towers-Towers-2.webp?v=1762273959","width":2160},{"alt":"Amazonite Crystal XXL Obelisk Towers-Towers-Ali-Amazonite-120-130mm-Crystal Destiny","id":32085469462699,"position":3,"preview_image":{"aspect_ratio":1.0,"height":2160,"width":2160,"src":"\/\/crystaldestiny.com\/cdn\/shop\/files\/Amazonite-Crystal-XXL-Obelisk-Towers-Towers-3.webp?v=1762273962"},"aspect_ratio":1.0,"height":2160,"media_type":"image","src":"\/\/crystaldestiny.com\/cdn\/shop\/files\/Amazonite-Crystal-XXL-Obelisk-Towers-Towers-3.webp?v=1762273962","width":2160},{"alt":"Amazonite Crystal XXL Obelisk Towers-Towers-Ali-Amazonite-120-130mm-Crystal Destiny","id":32085469495467,"position":4,"preview_image":{"aspect_ratio":1.0,"height":2160,"width":2160,"src":"\/\/crystaldestiny.com\/cdn\/shop\/files\/Amazonite-Crystal-XXL-Obelisk-Towers-Towers-4.webp?v=1762273965"},"aspect_ratio":1.0,"height":2160,"media_type":"image","src":"\/\/crystaldestiny.com\/cdn\/shop\/files\/Amazonite-Crystal-XXL-Obelisk-Towers-Towers-4.webp?v=1762273965","width":2160},{"alt":"Amazonite Crystal XXL Obelisk Towers-Towers-Ali-Amazonite-120-130mm-Crystal Destiny","id":32085469528235,"position":5,"preview_image":{"aspect_ratio":1.0,"height":2160,"width":2160,"src":"\/\/crystaldestiny.com\/cdn\/shop\/files\/Amazonite-Crystal-XXL-Obelisk-Towers-Towers-5.webp?v=1762273969"},"aspect_ratio":1.0,"height":2160,"media_type":"image","src":"\/\/crystaldestiny.com\/cdn\/shop\/files\/Amazonite-Crystal-XXL-Obelisk-Towers-Towers-5.webp?v=1762273969","width":2160},{"alt":"Amazonite Crystal XXL Obelisk Towers-Towers-Ali-Amazonite-120-130mm-Crystal Destiny","id":32085469561003,"position":6,"preview_image":{"aspect_ratio":1.0,"height":2160,"width":2160,"src":"\/\/crystaldestiny.com\/cdn\/shop\/files\/Amazonite-Crystal-XXL-Obelisk-Towers-Towers-6.webp?v=1762273972"},"aspect_ratio":1.0,"height":2160,"media_type":"image","src":"\/\/crystaldestiny.com\/cdn\/shop\/files\/Amazonite-Crystal-XXL-Obelisk-Towers-Towers-6.webp?v=1762273972","width":2160},{"alt":"Amazonite Crystal XXL Obelisk Towers-Towers-Ali-Amazonite-120-130mm-Crystal Destiny","id":32085469593771,"position":7,"preview_image":{"aspect_ratio":1.0,"height":2049,"width":2049,"src":"\/\/crystaldestiny.com\/cdn\/shop\/files\/Amazonite-Crystal-XXL-Obelisk-Towers-Towers-Amazonite-120-130mm-7.webp?v=1765430602"},"aspect_ratio":1.0,"height":2049,"media_type":"image","src":"\/\/crystaldestiny.com\/cdn\/shop\/files\/Amazonite-Crystal-XXL-Obelisk-Towers-Towers-Amazonite-120-130mm-7.webp?v=1765430602","width":2049}],"requires_selling_plan":false,"selling_plan_groups":[],"content":"\u003cp data-start=\"169\" data-end=\"492\"\u003eThese Natural Amazonite Crystal Obelisks are beautifully polished and carved into tall, elegant points, showcasing soft blue-green tones with natural veining unique to each piece. Perfect for display, meditation, or energy work, each obelisk brings a calming and uplifting presence to any space.\u003c\/p\u003e\n\u003cp data-start=\"494\" data-end=\"762\"\u003eAmazonite is known for soothing emotional energy, encouraging balance, communication, and inner peace. The obelisk shape amplifies intention, making it ideal for spiritual practices, altar arrangements, or as a standout décor piece for collectors and crystal lovers.\u003c\/p\u003e\n\u003cp data-start=\"764\" data-end=\"879\"\u003eCollectors value Amazonite Obelisks for their size, beauty, and ability to harmonize both energy and environment.\u003c\/p\u003e\n\u003cp data-start=\"764\" data-end=\"879\"\u003eThis product is pulled at random by size.\u003c\/p\u003e\u003ch2\u003eCrystal Towers, Wands, Generators, Points, Pillars \u0026amp; Obelisks — What's the Difference?\u003c\/h2\u003e\n\u003cp id=\"isPasted\"\u003eWhile these terms may vary, they all describe beautifully shaped crystals with a pointed tip designed to channel and direct energy. Each name highlights a unique aspect of their use:\u003c\/p\u003e\n\u003cul\u003e\n\u003cli\u003e\n\u003cstrong\u003eTowers\u003c\/strong\u003e- Known for their steady, grounding presence, crystal towers help focus and amplify energy, making them perfect for meditation and manifestation.\u003c\/li\u003e\n\u003cli\u003e\n\u003cstrong\u003eWands\u003c\/strong\u003e- Traditionally used in energy work and healing, crystal wands are excellent for directing energy flow and clearing blockages.\u003c\/li\u003e\n\u003cli\u003e\n\u003cstrong\u003ePillars\u003c\/strong\u003e- Symbolizing strength and stability, crystal pillars create a balanced and harmonious environment, making them great for home decor and spiritual practices.\u003c\/li\u003e\n\u003cli\u003e\n\u003cstrong\u003eObelisks\u003c\/strong\u003e- Inspired by ancient structures, crystal obelisks are believed to connect earthly and spiritual energies, making them powerful tools for transformation and enlightenment.\u003c\/li\u003e\n\u003c\/ul\u003e\n\u003cp\u003eNo matter what you call them, these crystals serve the same purpose—to enhance energy, intention, and harmony in your space. Choose the one that resonates most with you!\u003c\/p\u003e"},"options":[{"name":"Material","position":1,"values":["Amazonite"]},{"name":"Size","position":2,"values":["120-130mm","150-160mm","170-180mm"]}],"custom_metafields":{"shipping_time":"12-16 days"},"metafields":{"badge":"\u003cdiv style='display:none' class='jdgm-prev-badge' data-average-rating='0.00' data-number-of-reviews='0' data-number-of-questions='0'\u003e \u003cspan class='jdgm-prev-badge__stars' data-score='0.00' tabindex='0' aria-label='0.00 stars' role='button'\u003e \u003cspan class='jdgm-star jdgm--off'\u003e\u003c\/span\u003e\u003cspan class='jdgm-star jdgm--off'\u003e\u003c\/span\u003e\u003cspan class='jdgm-star jdgm--off'\u003e\u003c\/span\u003e\u003cspan class='jdgm-star jdgm--off'\u003e\u003c\/span\u003e\u003cspan class='jdgm-star jdgm--off'\u003e\u003c\/span\u003e \u003c\/span\u003e \u003cspan class='jdgm-prev-badge__text'\u003e No reviews \u003c\/span\u003e \u003c\/div\u003e","widget":"\u003cdiv class='jdgm-rev-widg' data-updated-at='2025-11-04T01:31:03Z' data-average-rating='0.00' data-number-of-reviews='0' data-number-of-questions='0' data-image-url='https:\/\/cdn.shopify.com\/s\/files\/1\/0613\/0345\/5915\/files\/Sa97d30cf86b2427abcabeda6e0d2562ai.webp?v=1762219468'\u003e \u003cstyle class='jdgm-temp-hiding-style'\u003e.jdgm-rev-widg{ display: none }\u003c\/style\u003e \u003cdiv class='jdgm-rev-widg__header'\u003e \u003ch2 class='jdgm-rev-widg__title'\u003eCustomer Reviews\u003c\/h2\u003e \u003cdiv class='jdgm-rev-widg__summary'\u003e \u003cdiv class='jdgm-rev-widg__summary-stars' aria-label='Average rating is 0.00 stars' role='img'\u003e \u003cspan class='jdgm-star jdgm--off'\u003e\u003c\/span\u003e\u003cspan class='jdgm-star jdgm--off'\u003e\u003c\/span\u003e\u003cspan class='jdgm-star jdgm--off'\u003e\u003c\/span\u003e\u003cspan class='jdgm-star jdgm--off'\u003e\u003c\/span\u003e\u003cspan class='jdgm-star jdgm--off'\u003e\u003c\/span\u003e \u003c\/div\u003e \u003cdiv class='jdgm-rev-widg__summary-text'\u003eBe the first to write a review\u003c\/div\u003e \u003c\/div\u003e \u003ca style='display: none' href='#' class='jdgm-write-rev-link' role='button'\u003eWrite a review\u003c\/a\u003e \u003cdiv class='jdgm-histogram jdgm-temp-hidden'\u003e \u003cdiv class='jdgm-histogram__row' data-rating='5' data-frequency='0' data-percentage='0'\u003e \u003cdiv class='jdgm-histogram__star' role='button' aria-label=\"0% (0) reviews with 5 star rating\" tabindex='0' \u003e\u003cspan class='jdgm-star jdgm--on'\u003e\u003c\/span\u003e\u003cspan class='jdgm-star jdgm--on'\u003e\u003c\/span\u003e\u003cspan class='jdgm-star jdgm--on'\u003e\u003c\/span\u003e\u003cspan class='jdgm-star jdgm--on'\u003e\u003c\/span\u003e\u003cspan class='jdgm-star jdgm--on'\u003e\u003c\/span\u003e\u003c\/div\u003e \u003cdiv class='jdgm-histogram__bar'\u003e \u003cdiv class='jdgm-histogram__bar-content' style='width: 0%;'\u003e \u003c\/div\u003e \u003c\/div\u003e \u003cdiv class='jdgm-histogram__percentage'\u003e0%\u003c\/div\u003e \u003cdiv class='jdgm-histogram__frequency'\u003e(0)\u003c\/div\u003e \u003c\/div\u003e \u003cdiv class='jdgm-histogram__row' data-rating='4' data-frequency='0' data-percentage='0'\u003e \u003cdiv class='jdgm-histogram__star' role='button' aria-label=\"0% (0) reviews with 4 star rating\" tabindex='0' \u003e\u003cspan class='jdgm-star jdgm--on'\u003e\u003c\/span\u003e\u003cspan class='jdgm-star jdgm--on'\u003e\u003c\/span\u003e\u003cspan class='jdgm-star jdgm--on'\u003e\u003c\/span\u003e\u003cspan class='jdgm-star jdgm--on'\u003e\u003c\/span\u003e\u003cspan class='jdgm-star jdgm--off'\u003e\u003c\/span\u003e\u003c\/div\u003e \u003cdiv class='jdgm-histogram__bar'\u003e \u003cdiv class='jdgm-histogram__bar-content' style='width: 0%;'\u003e \u003c\/div\u003e \u003c\/div\u003e \u003cdiv class='jdgm-histogram__percentage'\u003e0%\u003c\/div\u003e \u003cdiv class='jdgm-histogram__frequency'\u003e(0)\u003c\/div\u003e \u003c\/div\u003e \u003cdiv class='jdgm-histogram__row' data-rating='3' data-frequency='0' data-percentage='0'\u003e \u003cdiv class='jdgm-histogram__star' role='button' aria-label=\"0% (0) reviews with 3 star rating\" tabindex='0' \u003e\u003cspan class='jdgm-star jdgm--on'\u003e\u003c\/span\u003e\u003cspan class='jdgm-star jdgm--on'\u003e\u003c\/span\u003e\u003cspan class='jdgm-star jdgm--on'\u003e\u003c\/span\u003e\u003cspan class='jdgm-star jdgm--off'\u003e\u003c\/span\u003e\u003cspan class='jdgm-star jdgm--off'\u003e\u003c\/span\u003e\u003c\/div\u003e \u003cdiv class='jdgm-histogram__bar'\u003e \u003cdiv class='jdgm-histogram__bar-content' style='width: 0%;'\u003e \u003c\/div\u003e \u003c\/div\u003e \u003cdiv class='jdgm-histogram__percentage'\u003e0%\u003c\/div\u003e \u003cdiv class='jdgm-histogram__frequency'\u003e(0)\u003c\/div\u003e \u003c\/div\u003e \u003cdiv class='jdgm-histogram__row' data-rating='2' data-frequency='0' data-percentage='0'\u003e \u003cdiv class='jdgm-histogram__star' role='button' aria-label=\"0% (0) reviews with 2 star rating\" tabindex='0' \u003e\u003cspan class='jdgm-star jdgm--on'\u003e\u003c\/span\u003e\u003cspan class='jdgm-star jdgm--on'\u003e\u003c\/span\u003e\u003cspan class='jdgm-star jdgm--off'\u003e\u003c\/span\u003e\u003cspan class='jdgm-star jdgm--off'\u003e\u003c\/span\u003e\u003cspan class='jdgm-star jdgm--off'\u003e\u003c\/span\u003e\u003c\/div\u003e \u003cdiv class='jdgm-histogram__bar'\u003e \u003cdiv class='jdgm-histogram__bar-content' style='width: 0%;'\u003e \u003c\/div\u003e \u003c\/div\u003e \u003cdiv class='jdgm-histogram__percentage'\u003e0%\u003c\/div\u003e \u003cdiv class='jdgm-histogram__frequency'\u003e(0)\u003c\/div\u003e \u003c\/div\u003e \u003cdiv class='jdgm-histogram__row' data-rating='1' data-frequency='0' data-percentage='0'\u003e \u003cdiv class='jdgm-histogram__star' role='button' aria-label=\"0% (0) reviews with 1 star rating\" tabindex='0' \u003e\u003cspan class='jdgm-star jdgm--on'\u003e\u003c\/span\u003e\u003cspan class='jdgm-star jdgm--off'\u003e\u003c\/span\u003e\u003cspan class='jdgm-star jdgm--off'\u003e\u003c\/span\u003e\u003cspan class='jdgm-star jdgm--off'\u003e\u003c\/span\u003e\u003cspan class='jdgm-star jdgm--off'\u003e\u003c\/span\u003e\u003c\/div\u003e \u003cdiv class='jdgm-histogram__bar'\u003e \u003cdiv class='jdgm-histogram__bar-content' style='width: 0%;'\u003e \u003c\/div\u003e \u003c\/div\u003e \u003cdiv class='jdgm-histogram__percentage'\u003e0%\u003c\/div\u003e \u003cdiv class='jdgm-histogram__frequency'\u003e(0)\u003c\/div\u003e \u003c\/div\u003e \u003cdiv class='jdgm-histogram__row jdgm-histogram__clear-filter' data-rating=null tabindex='0'\u003e\u003c\/div\u003e \u003c\/div\u003e \u003cdiv class='jdgm-rev-widg__sort-wrapper'\u003e\u003c\/div\u003e \u003c\/div\u003e \u003cdiv class='jdgm-rev-widg__body'\u003e \u003cdiv class='jdgm-rev-widg__reviews'\u003e\u003c\/div\u003e \u003cdiv class='jdgm-paginate' data-per-page='4' data-url='https:\/\/api.judge.me\/reviews\/reviews_for_widget' style=\"display: none;\"\u003e\u003c\/div\u003e \u003c\/div\u003e \u003cdiv class='jdgm-rev-widg__paginate-spinner-wrapper'\u003e \u003cdiv class='jdgm-spinner'\u003e\u003c\/div\u003e \u003c\/div\u003e \u003c\/div\u003e"},"collections":[{"id":294880051371,"handle":"crystals","title":"Crystals","updated_at":"2026-01-07T23:43:11-05:00","body_html":"\u003cp data-start=\"159\" data-end=\"687\"\u003e✨ \u003cstrong data-start=\"161\" data-end=\"216\"\u003eDiscover the Magic of Crystals with Crystal Destiny\u003c\/strong\u003e ✨\u003cbr data-start=\"218\" data-end=\"221\"\u003eCrystals have been treasured for centuries—not only for their natural beauty but also for their powerful healing energies. Beyond their visual allure, they bring balance, harmony, and positive energy into any space. Whether used for home décor, meditation, or simply to elevate the energy of your surroundings, crystals create a sanctuary of peace, relaxation, and well-being. Each piece is a unique gift from the Earth—visually stunning and spiritually uplifting.\u003c\/p\u003e\n\u003cp data-start=\"689\" data-end=\"1011\"\u003eAt \u003cstrong data-start=\"692\" data-end=\"711\"\u003eCrystal Destiny\u003c\/strong\u003e, our signature collection showcases a curated selection of exquisite crystals, from radiant Quartz to soothing Amethyst. Every stone is carefully sourced for its elegance and metaphysical resonance, making them perfect for enhancing your home, uplifting your spirit, or gifting to someone special.\u003c\/p\u003e\n\u003cp data-start=\"1013\" data-end=\"1206\"\u003eExperience the timeless sophistication of crystalline wonders. Explore the \u003cstrong data-start=\"1088\" data-end=\"1118\"\u003eCrystal Destiny Collection\u003c\/strong\u003e today and bring the transformative beauty of these treasures into your everyday life.\u003c\/p\u003e","published_at":"2023-06-05T11:24:02-04:00","sort_order":"created-desc","template_suffix":"","disjunctive":false,"rules":[{"column":"tag","relation":"equals","condition":"crystal"},{"column":"type","relation":"not_contains","condition":"925 Sterling Silver"},{"column":"type","relation":"not_contains","condition":"Wire Wraps"}],"published_scope":"global"},{"id":319455821995,"handle":"throat-chakra-crystals","title":"Throat Chakra Crystals","updated_at":"2026-01-07T07:13:13-05:00","body_html":"\u003cp data-start=\"108\" data-end=\"439\"\u003e✨ \u003cstrong data-start=\"110\" data-end=\"136\"\u003eThroat Chakra Crystals\u003c\/strong\u003e ✨\u003cbr data-start=\"138\" data-end=\"141\"\u003eEnhance communication, self-expression, and clarity with our \u003cstrong data-start=\"202\" data-end=\"228\"\u003eThroat Chakra Crystals\u003c\/strong\u003e. Located at the throat, this chakra governs speech, honesty, and personal expression. These crystals help unblock energy, promote confidence in speaking your truth, and support clear, authentic communication.\u003c\/p\u003e\n\u003cp data-start=\"441\" data-end=\"767\"\u003eOur curated selection includes stones such as Blue Lace Agate, Lapis Lazuli, and Sodalite—each chosen for their ability to stimulate creativity, intuition, and emotional balance. Perfect for meditation, energy work, or wearing as jewelry, Throat Chakra Crystals empower you to express yourself with confidence and integrity.\u003c\/p\u003e\n\u003cp data-start=\"769\" data-end=\"906\"\u003eStrengthen your voice, clarify your intentions, and embrace the transformative energy of the Throat Chakra with these vibrant crystals.\u003c\/p\u003e","published_at":"2025-07-17T18:17:14-04:00","sort_order":"best-selling","template_suffix":"","disjunctive":false,"rules":[{"column":"variant_metafield_definition","relation":"equals","condition":"Throat"}],"published_scope":"global","image":{"created_at":"2025-07-17T19:08:49-04:00","alt":null,"width":1080,"height":1080,"src":"\/\/crystaldestiny.com\/cdn\/shop\/collections\/Throat_Chakra_Collection.jpg?v=1762474926"}},{"id":319455887531,"handle":"heart-chakra-crystals","title":"Heart Chakra Crystals","updated_at":"2026-01-07T23:43:11-05:00","body_html":"\u003cp data-start=\"107\" data-end=\"457\"\u003e✨ \u003cstrong data-start=\"109\" data-end=\"134\"\u003eHeart Chakra Crystals\u003c\/strong\u003e ✨\u003cbr data-start=\"136\" data-end=\"139\"\u003eOpen your heart to love, compassion, and emotional balance with our \u003cstrong data-start=\"207\" data-end=\"232\"\u003eHeart Chakra Crystals\u003c\/strong\u003e. Located at the center of the chest, the Heart Chakra governs love, forgiveness, and connection to yourself and others. These crystals help release emotional blockages, foster empathy, and promote harmonious relationships.\u003c\/p\u003e\n\u003cp data-start=\"459\" data-end=\"773\"\u003eOur curated selection includes stones such as Rose Quartz, Green Aventurine, and Rhodonite—each chosen for their ability to inspire self-love, emotional healing, and compassion. Perfect for meditation, energy work, or wearing as jewelry, Heart Chakra Crystals support the flow of loving energy and inner harmony.\u003c\/p\u003e\n\u003cp data-start=\"775\" data-end=\"906\"\u003eEmbrace emotional balance, cultivate love, and harness the transformative energy of the Heart Chakra with these radiant crystals.\u003c\/p\u003e","published_at":"2025-07-17T18:17:52-04:00","sort_order":"best-selling","template_suffix":"","disjunctive":false,"rules":[{"column":"variant_metafield_definition","relation":"equals","condition":"Heart"}],"published_scope":"global","image":{"created_at":"2025-07-17T19:08:29-04:00","alt":null,"width":1080,"height":1080,"src":"\/\/crystaldestiny.com\/cdn\/shop\/collections\/Heart_Chakra_Collection.jpg?v=1762474927"}},{"id":294880116907,"handle":"polished","title":"Polished Crystals","updated_at":"2026-01-07T23:43:11-05:00","body_html":"\u003cp data-start=\"199\" data-end=\"598\"\u003e✨ \u003cstrong data-start=\"201\" data-end=\"248\"\u003eCrystal Destiny Polished Crystal Collection\u003c\/strong\u003e ✨\u003cbr data-start=\"250\" data-end=\"253\"\u003eIndulge in the brilliance of crystals refined to perfection. Our \u003cstrong data-start=\"318\" data-end=\"341\"\u003ePolished Collection\u003c\/strong\u003e showcases gemstones meticulously shaped and smoothed to reveal their natural radiance and timeless beauty. From the shimmering glow of Quartz to the deep allure of Obsidian, each polished piece is a testament to nature’s artistry and human craftsmanship.\u003c\/p\u003e\n\u003cp data-start=\"600\" data-end=\"862\"\u003ePerfect as statement décor, meaningful gifts, or companions on your spiritual journey, polished crystals bring sophistication and elevated energy into any space. Their radiant surfaces reflect not only light but also the transformative power of crystal energy.\u003c\/p\u003e\n\u003cp data-start=\"864\" data-end=\"1022\"\u003eDiscover the elegance of refinement with Crystal Destiny’s Polished Crystal Collection—where every facet shines with intention, beauty, and timeless allure.\u003c\/p\u003e","published_at":"2023-06-05T11:30:44-04:00","sort_order":"created-desc","template_suffix":"","disjunctive":false,"rules":[{"column":"tag","relation":"equals","condition":"polished"}],"published_scope":"global"},{"id":322471624875,"handle":"crystal-favorites","title":"Crystal Enthusiast's Favorites","updated_at":"2026-01-07T23:42:38-05:00","body_html":"\u003cp\u003eDiscover the crystals our community loves most. This collection features our best-selling stones and accessories, carefully curated to highlight pieces that are always in demand and ready to ship. Whether you’re adding to your collection or searching for a gift, these fan-favorite crystals are timeless staples for energy, beauty, and balance.\u003c\/p\u003e","published_at":"2025-10-01T21:07:06-04:00","sort_order":"price-asc","template_suffix":"","disjunctive":false,"rules":[{"column":"variant_inventory","relation":"greater_than","condition":"1"}],"published_scope":"global"},{"id":321695744171,"handle":"direct-from-supplier","title":"Direct from Supplier","updated_at":"2026-01-07T23:43:11-05:00","body_html":"","published_at":"2025-09-12T16:38:23-04:00","sort_order":"best-selling","template_suffix":"","disjunctive":true,"rules":[{"column":"tag","relation":"equals","condition":"adjusted-shipping"}],"published_scope":"global"},{"id":293659312299,"handle":"best-sellers","title":"Best Sellers","updated_at":"2026-01-07T23:43:11-05:00","body_html":"\u003cp data-start=\"155\" data-end=\"510\"\u003eDiscover the pieces our community loves most. Our Best Sellers Collection brings together handpicked crystals and jewelry that embody timeless elegance, spiritual resonance, and everyday sophistication. Each item has earned its place as a customer favorite—celebrated for both its beauty and its meaningful energy.\u003c\/p\u003e\n\u003cp data-start=\"512\" data-end=\"802\"\u003eFrom stunning statement pieces to versatile daily companions, these treasures are curated to elevate your space, uplift your spirit, and reflect refined taste. Indulge in what’s most cherished and let our best sellers guide you toward the perfect blend of style and transformative energy.\u003c\/p\u003e\n\u003cp data-start=\"804\" data-end=\"932\"\u003eExplore the Best Sellers Collection today—where elegance meets intention, and every piece tells a story of beauty and balance.\u003c\/p\u003e","published_at":"2023-03-15T16:04:51-04:00","sort_order":"best-selling","template_suffix":"","disjunctive":false,"rules":[{"column":"variant_price","relation":"greater_than","condition":"0"},{"column":"variant_inventory","relation":"greater_than","condition":"0"},{"column":"type","relation":"not_equals","condition":"Shipping Protection"}],"published_scope":"global"},{"id":321370390699,"handle":"monthly-crystal-sale","title":"Monthly Crystal Sale | Spheres \u0026 Towers","updated_at":"2026-01-06T23:24:37-05:00","body_html":"\u003cp\u003eShop our \u003cstrong\u003eMonthly Crystal Sale\u003c\/strong\u003e, where you can shop a wide selection of healing crystals at discounted prices. Explore \u003cstrong\u003ecrystal spheres and towers,\u003c\/strong\u003e— all carefully curated to support meditation, energy balancing, and spiritual wellness. Whether you're looking to enhance your home decor, boost your daily energy, or find the perfect gift, our \u003cstrong\u003ecrystals for healing and manifestation\u003c\/strong\u003e offer both beauty and metaphysical benefits.\u003c\/p\u003e\n\u003cp\u003eEach month, our sale features \u003cstrong\u003enew discounted collections\u003c\/strong\u003e, from \u003cstrong\u003enatural quartz and amethyst towers\u003c\/strong\u003e to \u003cstrong\u003ewire-wrapped pendants and polished stones\u003c\/strong\u003e, so there's always something fresh to discover. Shop with confidence knowing you're getting high-quality crystals with \u003cstrong\u003efree shipping options\u003c\/strong\u003e and a trusted experience.\u003c\/p\u003e\n\u003cp\u003e\u003cstrong\u003eTake advantage of the Monthly Crystal Sale today\u003c\/strong\u003e and add powerful, natural energy to your life with \u003cstrong\u003eauthentic healing crystals\u003c\/strong\u003e — while our limited-time discounts last.\u003c\/p\u003e\n\u003cp\u003e\u003cstrong\u003e*Discount automatically applied at checkout.\u003c\/strong\u003e\u003c\/p\u003e","published_at":"2025-12-02T01:26:17-05:00","sort_order":"alpha-asc","template_suffix":"","disjunctive":true,"rules":[{"column":"tag","relation":"equals","condition":"spheres"},{"column":"tag","relation":"equals","condition":"Towers"}],"published_scope":"global","image":{"created_at":"2026-01-01T01:32:34-05:00","alt":"","width":960,"height":960,"src":"\/\/crystaldestiny.com\/cdn\/shop\/collections\/3E8C2969-1B86-4ACE-B349-98E9D8768424.jpg?v=1767249154"}},{"id":297906241707,"handle":"new-arrivals","title":"New Arrivals","updated_at":"2026-01-07T23:43:11-05:00","body_html":"\u003cp data-start=\"172\" data-end=\"573\"\u003e✨ \u003cstrong data-start=\"174\" data-end=\"217\"\u003eDiscover Crystal Destiny’s New Arrivals\u003c\/strong\u003e ✨\u003cbr data-start=\"219\" data-end=\"222\"\u003eStep into a world of fresh sophistication with our latest crystal treasures. Each new piece—whether Quartz, Amethyst, or beyond—embodies nature’s artistry, radiating both timeless beauty and powerful energy. Thoughtfully curated and constantly refreshed, our New Arrivals Collection offers the perfect harmony of elegance and metaphysical resonance.\u003c\/p\u003e\n\u003cp data-start=\"575\" data-end=\"793\"\u003eElevate your space, uplift your spirit, and embrace the transformative power of nature’s wonders. Explore the newest expressions of crystal artistry today, and let your journey with crystals evolve with every update.\u003c\/p\u003e","published_at":"2023-11-20T15:35:42-05:00","sort_order":"created-desc","template_suffix":"","disjunctive":true,"rules":[{"column":"tag","relation":"equals","condition":"new-arrivals"}],"published_scope":"global"},{"id":297596059819,"handle":"all","title":"All Crystals \u0026 Jewelry","updated_at":"2026-01-07T23:43:11-05:00","body_html":"\u003cp data-start=\"149\" data-end=\"494\"\u003e✨ \u003cstrong data-start=\"151\" data-end=\"181\"\u003eWelcome to Crystal Destiny\u003c\/strong\u003e ✨\u003cbr data-start=\"183\" data-end=\"186\"\u003eStep into a world where beauty, energy, and artistry unite. Our collection is a treasure trove of exquisite crystals, from the raw, untamed elegance of natural formations to the polished brilliance of expertly crafted pieces. Each crystal is a masterpiece, carrying its own unique story and timeless charm.\u003c\/p\u003e\n\u003cp data-start=\"496\" data-end=\"831\"\u003eWhether you’re drawn to the calming presence of Amethyst, the vibrant energy of Citrine, or the grounding strength of Jasper, our crystals invite you to connect with nature’s finest wonders. Perfect for enhancing your space, supporting your spiritual journey, or gifting with intention, every piece resonates with beauty and meaning.\u003c\/p\u003e\n\u003cp data-start=\"833\" data-end=\"1000\"\u003eElevate your surroundings, embrace the mystique, and explore the enchanting world of crystals at \u003cstrong data-start=\"930\" data-end=\"949\"\u003eCrystal Destiny\u003c\/strong\u003e—where every crystal is waiting to be discovered.\u003c\/p\u003e","published_at":"2023-11-10T13:55:31-05:00","sort_order":"created-desc","template_suffix":"","disjunctive":false,"rules":[{"column":"type","relation":"not_equals","condition":"asdf"}],"published_scope":"global"},{"id":296256405675,"handle":"crystal-towers","title":"Crystal Towers","updated_at":"2026-01-06T23:24:37-05:00","body_html":"\u003cp data-end=\"568\" data-start=\"152\"\u003e✨ \u003cstrong data-end=\"190\" data-start=\"154\"\u003eCrystal Destiny Tower Collection\u003c\/strong\u003e ✨\u003cbr data-end=\"195\" data-start=\"192\"\u003eEnchant your space with the timeless beauty and powerful energy of crystal towers. Each piece in our \u003cstrong data-end=\"316\" data-start=\"296\"\u003eTower Collection\u003c\/strong\u003e is carefully crafted to showcase nature’s artistry while radiating higher vibrations and spiritual resonance. From the clarity of Quartz to the calming presence of Amethyst, these towers are both decorative masterpieces and tools for transformation.\u003c\/p\u003e\n\u003cp data-end=\"765\" data-start=\"570\"\u003ePerfect for meditation spaces, energy work, or simply elevating your home décor, crystal towers channel focused energy upward—creating balance, harmony, and refined elegance in any environment.\u003c\/p\u003e\n\u003cp data-end=\"917\" data-start=\"767\"\u003eDiscover the Crystal Destiny Tower Collection today and transform your surroundings into a sanctuary of beauty, purpose, and spiritual significance.\u003c\/p\u003e\n\u003ch2\u003eCrystal Towers, Wands, Generators, Points, Pillars \u0026amp; Obelisks — What's the Difference?\u003c\/h2\u003e\n\u003cp id=\"isPasted\"\u003eWhile these terms may vary, they all describe beautifully shaped crystals with a pointed tip designed to channel and direct energy. Each name highlights a unique aspect of their use:\u003c\/p\u003e\n\u003cul\u003e\n\u003cli\u003e\n\u003cstrong\u003eTowers\u003c\/strong\u003e- Known for their steady, grounding presence, crystal towers help focus and amplify energy, making them perfect for meditation and manifestation.\u003c\/li\u003e\n\u003cli\u003e\n\u003cstrong\u003eWands\u003c\/strong\u003e- Traditionally used in energy work and healing, crystal wands are excellent for directing energy flow and clearing blockages.\u003c\/li\u003e\n\u003cli\u003e\n\u003cstrong\u003ePillars\u003c\/strong\u003e- Symbolizing strength and stability, crystal pillars create a balanced and harmonious environment, making them great for home decor and spiritual practices.\u003c\/li\u003e\n\u003cli\u003e\n\u003cstrong\u003eObelisks\u003c\/strong\u003e- Inspired by ancient structures, crystal obelisks are believed to connect earthly and spiritual energies, making them powerful tools for transformation and enlightenment.\u003c\/li\u003e\n\u003c\/ul\u003e\n\u003cp\u003eNo matter what you call them, these crystals serve the same purpose—to enhance energy, intention, and harmony in your space. Choose the one that resonates most with you!\u003c\/p\u003e","published_at":"2023-09-14T12:52:35-04:00","sort_order":"created-desc","template_suffix":"","disjunctive":false,"rules":[{"column":"tag","relation":"equals","condition":"towers"}],"published_scope":"global"},{"id":298983391403,"handle":"january-crystal-sale","title":"January Sale | 25% Off Crystal Towers \u0026 Spheres","updated_at":"2026-01-06T23:24:37-05:00","body_html":"\u003cp\u003eShop our \u003cstrong\u003eJanuary Crystal Sale\u003c\/strong\u003e, where you can shop a wide selection of healing crystals at discounted prices. Explore \u003cstrong\u003eCrystal Towers, \u0026amp; Crystal Spheres\u003c\/strong\u003e — all carefully curated and crafted to support meditation, energy balancing, and spiritual wellness. Whether you're looking to enhance your home decor, boost your daily energy, or find the perfect gift, our \u003cstrong\u003ecrystals for healing and manifestation\u003c\/strong\u003e offer both beauty and metaphysical benefits.\u003c\/p\u003e\n\u003cp\u003eThis January, our sale features \u003cstrong\u003ediscounted crystal towers and spheres\u003c\/strong\u003e, from \u003cstrong\u003enatural quartz \u003c\/strong\u003eand \u003cstrong\u003eamethyst \u003c\/strong\u003eto \u003cstrong\u003ebumblebee jasper \u003c\/strong\u003eand \u003cstrong\u003ecarnelian\u003c\/strong\u003e, so there's always something fresh to discover. Shop with confidence knowing you're getting high-quality crystals with \u003cstrong\u003efree shipping options\u003c\/strong\u003e and a trusted experience.\u003c\/p\u003e\n\u003cp\u003e\u003cstrong\u003eTake advantage of the January Crystal Sale today\u003c\/strong\u003e and add powerful, natural energy to your life with \u003cstrong\u003eauthentic healing crystals\u003c\/strong\u003e — while our limited-time discounts last.\u003c\/p\u003e\n\u003cp\u003e\u003cstrong\u003e*Discount automatically applied at checkout.\u003c\/strong\u003e\u003c\/p\u003e","published_at":"2026-01-01T00:07:17-05:00","sort_order":"alpha-asc","template_suffix":"monthly-collection","disjunctive":true,"rules":[{"column":"tag","relation":"equals","condition":"Spheres"},{"column":"tag","relation":"equals","condition":"Towers"}],"published_scope":"global","image":{"created_at":"2026-01-01T01:29:59-05:00","alt":"","width":960,"height":960,"src":"\/\/crystaldestiny.com\/cdn\/shop\/collections\/1464163B-22B1-4D62-BEC5-CEC9AECB670B.jpg?v=1767248999"}}]}
[{"alt":"Amazonite Crystal XXL Obelisk Towers-Towers-Ali-Amazonite-120-130mm-Crystal Destiny","id":32085469397163,"position":1,"preview_image":{"aspect_ratio":1.0,"height":2160,"width":2160,"src":"\/\/crystaldestiny.com\/cdn\/shop\/files\/Amazonite-Crystal-XXL-Obelisk-Towers-Towers.webp?v=1762273956"},"aspect_ratio":1.0,"height":2160,"media_type":"image","src":"\/\/crystaldestiny.com\/cdn\/shop\/files\/Amazonite-Crystal-XXL-Obelisk-Towers-Towers.webp?v=1762273956","width":2160},{"alt":"Amazonite Crystal XXL Obelisk Towers-Towers-Ali-Amazonite-120-130mm-Crystal Destiny","id":32085469429931,"position":2,"preview_image":{"aspect_ratio":1.0,"height":2160,"width":2160,"src":"\/\/crystaldestiny.com\/cdn\/shop\/files\/Amazonite-Crystal-XXL-Obelisk-Towers-Towers-2.webp?v=1762273959"},"aspect_ratio":1.0,"height":2160,"media_type":"image","src":"\/\/crystaldestiny.com\/cdn\/shop\/files\/Amazonite-Crystal-XXL-Obelisk-Towers-Towers-2.webp?v=1762273959","width":2160},{"alt":"Amazonite Crystal XXL Obelisk Towers-Towers-Ali-Amazonite-120-130mm-Crystal Destiny","id":32085469462699,"position":3,"preview_image":{"aspect_ratio":1.0,"height":2160,"width":2160,"src":"\/\/crystaldestiny.com\/cdn\/shop\/files\/Amazonite-Crystal-XXL-Obelisk-Towers-Towers-3.webp?v=1762273962"},"aspect_ratio":1.0,"height":2160,"media_type":"image","src":"\/\/crystaldestiny.com\/cdn\/shop\/files\/Amazonite-Crystal-XXL-Obelisk-Towers-Towers-3.webp?v=1762273962","width":2160},{"alt":"Amazonite Crystal XXL Obelisk Towers-Towers-Ali-Amazonite-120-130mm-Crystal Destiny","id":32085469495467,"position":4,"preview_image":{"aspect_ratio":1.0,"height":2160,"width":2160,"src":"\/\/crystaldestiny.com\/cdn\/shop\/files\/Amazonite-Crystal-XXL-Obelisk-Towers-Towers-4.webp?v=1762273965"},"aspect_ratio":1.0,"height":2160,"media_type":"image","src":"\/\/crystaldestiny.com\/cdn\/shop\/files\/Amazonite-Crystal-XXL-Obelisk-Towers-Towers-4.webp?v=1762273965","width":2160},{"alt":"Amazonite Crystal XXL Obelisk Towers-Towers-Ali-Amazonite-120-130mm-Crystal Destiny","id":32085469528235,"position":5,"preview_image":{"aspect_ratio":1.0,"height":2160,"width":2160,"src":"\/\/crystaldestiny.com\/cdn\/shop\/files\/Amazonite-Crystal-XXL-Obelisk-Towers-Towers-5.webp?v=1762273969"},"aspect_ratio":1.0,"height":2160,"media_type":"image","src":"\/\/crystaldestiny.com\/cdn\/shop\/files\/Amazonite-Crystal-XXL-Obelisk-Towers-Towers-5.webp?v=1762273969","width":2160},{"alt":"Amazonite Crystal XXL Obelisk Towers-Towers-Ali-Amazonite-120-130mm-Crystal Destiny","id":32085469561003,"position":6,"preview_image":{"aspect_ratio":1.0,"height":2160,"width":2160,"src":"\/\/crystaldestiny.com\/cdn\/shop\/files\/Amazonite-Crystal-XXL-Obelisk-Towers-Towers-6.webp?v=1762273972"},"aspect_ratio":1.0,"height":2160,"media_type":"image","src":"\/\/crystaldestiny.com\/cdn\/shop\/files\/Amazonite-Crystal-XXL-Obelisk-Towers-Towers-6.webp?v=1762273972","width":2160},{"alt":"Amazonite Crystal XXL Obelisk Towers-Towers-Ali-Amazonite-120-130mm-Crystal Destiny","id":32085469593771,"position":7,"preview_image":{"aspect_ratio":1.0,"height":2049,"width":2049,"src":"\/\/crystaldestiny.com\/cdn\/shop\/files\/Amazonite-Crystal-XXL-Obelisk-Towers-Towers-Amazonite-120-130mm-7.webp?v=1765430602"},"aspect_ratio":1.0,"height":2049,"media_type":"image","src":"\/\/crystaldestiny.com\/cdn\/shop\/files\/Amazonite-Crystal-XXL-Obelisk-Towers-Towers-Amazonite-120-130mm-7.webp?v=1765430602","width":2049}]
{"item":{"id":8506692632747,"title":"Amethyst \"XXL\" Sphere 100mm","handle":"amethyst-xxl-sphere-100mm-cd-10270","description":"\u003cp\u003eThis 100mm XXL Amethyst Sphere showcases deep violet hues and natural crystalline patterns, embodying both elegance and metaphysical significance. Perfect for collectors or practitioners, its substantial size enhances energy flow and creates a captivating focal point for meditation or space cleansing. Crafted with precision, this sphere highlights the unique beauty of amethyst while offering durability and a smooth finish. Ideal for those seeking a powerful and visually striking addition to their crystal collection.\u003c\/p\u003e\n\u003cp\u003eThis product is an exact pick as pictured, one of a kind.\u003c\/p\u003e","published_at":"2025-08-28T19:02:46-04:00","created_at":"2025-08-28T19:02:42-04:00","vendor":"Crystal Destiny","type":"Spheres","tags":["crystal","polished","spheres"],"price":15999,"price_min":15999,"price_max":15999,"available":true,"price_varies":false,"compare_at_price":null,"compare_at_price_min":0,"compare_at_price_max":0,"compare_at_price_varies":false,"variants":[{"id":45564175220907,"title":"Amethyst \/ 1406g - 100mm Diameter","option1":"Amethyst","option2":"1406g - 100mm Diameter","option3":null,"sku":"CD-10270","requires_shipping":true,"taxable":true,"featured_image":null,"available":true,"name":"Amethyst \"XXL\" Sphere 100mm - Amethyst \/ 1406g - 100mm Diameter","public_title":"Amethyst \/ 1406g - 100mm Diameter","options":["Amethyst","1406g - 100mm Diameter"],"price":15999,"weight":1406,"compare_at_price":null,"inventory_management":"shopify","barcode":"","requires_selling_plan":false,"selling_plan_allocations":[]}],"images":["\/\/crystaldestiny.com\/cdn\/shop\/files\/Amethyst-XXL-Sphere-100mm-Spheres.jpg?v=1757135735","\/\/crystaldestiny.com\/cdn\/shop\/files\/Amethyst-XXL-Sphere-100mm-Spheres-2.jpg?v=1757135737","\/\/crystaldestiny.com\/cdn\/shop\/files\/Amethyst-XXL-Sphere-100mm-Spheres-3.jpg?v=1757135739","\/\/crystaldestiny.com\/cdn\/shop\/files\/Amethyst-XXL-Sphere-100mm-Spheres-4.jpg?v=1757135740"],"featured_image":"\/\/crystaldestiny.com\/cdn\/shop\/files\/Amethyst-XXL-Sphere-100mm-Spheres.jpg?v=1757135735","options":["Material","Size"],"media":[{"alt":"Amethyst \"XXL\" Sphere 100mm-Spheres-Crystal Destiny-Amethyst-1406g - 100mm Diameter-Crystal Destiny","id":31698569298091,"position":1,"preview_image":{"aspect_ratio":1.0,"height":1500,"width":1500,"src":"\/\/crystaldestiny.com\/cdn\/shop\/files\/Amethyst-XXL-Sphere-100mm-Spheres.jpg?v=1757135735"},"aspect_ratio":1.0,"height":1500,"media_type":"image","src":"\/\/crystaldestiny.com\/cdn\/shop\/files\/Amethyst-XXL-Sphere-100mm-Spheres.jpg?v=1757135735","width":1500},{"alt":"Amethyst \"XXL\" Sphere 100mm-Spheres-Crystal Destiny-Amethyst-1406g - 100mm Diameter-Crystal Destiny","id":31698569232555,"position":2,"preview_image":{"aspect_ratio":1.0,"height":1518,"width":1518,"src":"\/\/crystaldestiny.com\/cdn\/shop\/files\/Amethyst-XXL-Sphere-100mm-Spheres-2.jpg?v=1757135737"},"aspect_ratio":1.0,"height":1518,"media_type":"image","src":"\/\/crystaldestiny.com\/cdn\/shop\/files\/Amethyst-XXL-Sphere-100mm-Spheres-2.jpg?v=1757135737","width":1518},{"alt":"Amethyst \"XXL\" Sphere 100mm-Spheres-Crystal Destiny-Amethyst-1406g - 100mm Diameter-Crystal Destiny","id":31698569199787,"position":3,"preview_image":{"aspect_ratio":1.0,"height":1734,"width":1734,"src":"\/\/crystaldestiny.com\/cdn\/shop\/files\/Amethyst-XXL-Sphere-100mm-Spheres-3.jpg?v=1757135739"},"aspect_ratio":1.0,"height":1734,"media_type":"image","src":"\/\/crystaldestiny.com\/cdn\/shop\/files\/Amethyst-XXL-Sphere-100mm-Spheres-3.jpg?v=1757135739","width":1734},{"alt":"Amethyst \"XXL\" Sphere 100mm-Spheres-Crystal Destiny-Amethyst-1406g - 100mm Diameter-Crystal Destiny","id":31698569265323,"position":4,"preview_image":{"aspect_ratio":1.0,"height":1773,"width":1773,"src":"\/\/crystaldestiny.com\/cdn\/shop\/files\/Amethyst-XXL-Sphere-100mm-Spheres-4.jpg?v=1757135740"},"aspect_ratio":1.0,"height":1773,"media_type":"image","src":"\/\/crystaldestiny.com\/cdn\/shop\/files\/Amethyst-XXL-Sphere-100mm-Spheres-4.jpg?v=1757135740","width":1773}],"requires_selling_plan":false,"selling_plan_groups":[],"content":"\u003cp\u003eThis 100mm XXL Amethyst Sphere showcases deep violet hues and natural crystalline patterns, embodying both elegance and metaphysical significance. Perfect for collectors or practitioners, its substantial size enhances energy flow and creates a captivating focal point for meditation or space cleansing. Crafted with precision, this sphere highlights the unique beauty of amethyst while offering durability and a smooth finish. Ideal for those seeking a powerful and visually striking addition to their crystal collection.\u003c\/p\u003e\n\u003cp\u003eThis product is an exact pick as pictured, one of a kind.\u003c\/p\u003e"},"options":[{"name":"Material","position":1,"values":["Amethyst"]},{"name":"Size","position":2,"values":["1406g - 100mm Diameter"]}],"custom_metafields":{"shipping_time":"Within 7 days"},"metafields":{"badge":"\u003cdiv style='display:none' class='jdgm-prev-badge' data-average-rating='0.00' data-number-of-reviews='0' data-number-of-questions='0'\u003e \u003cspan class='jdgm-prev-badge__stars' data-score='0.00' tabindex='0' aria-label='0.00 stars' role='button'\u003e \u003cspan class='jdgm-star jdgm--off'\u003e\u003c\/span\u003e\u003cspan class='jdgm-star jdgm--off'\u003e\u003c\/span\u003e\u003cspan class='jdgm-star jdgm--off'\u003e\u003c\/span\u003e\u003cspan class='jdgm-star jdgm--off'\u003e\u003c\/span\u003e\u003cspan class='jdgm-star jdgm--off'\u003e\u003c\/span\u003e \u003c\/span\u003e \u003cspan class='jdgm-prev-badge__text'\u003e No reviews \u003c\/span\u003e \u003c\/div\u003e","widget":"\u003cdiv class='jdgm-rev-widg' data-updated-at='2025-08-28T23:04:04Z' data-average-rating='0.00' data-number-of-reviews='0' data-number-of-questions='0' data-image-url='https:\/\/cdn.shopify.com\/s\/files\/1\/0613\/0345\/5915\/files\/6I0A3790.jpg?v=1756422151'\u003e \u003cstyle class='jdgm-temp-hiding-style'\u003e.jdgm-rev-widg{ display: none }\u003c\/style\u003e \u003cdiv class='jdgm-rev-widg__header'\u003e \u003ch2 class='jdgm-rev-widg__title'\u003eCustomer Reviews\u003c\/h2\u003e \u003cdiv class='jdgm-rev-widg__summary'\u003e \u003cdiv class='jdgm-rev-widg__summary-stars' aria-label='Average rating is 0.00 stars' role='img'\u003e \u003cspan class='jdgm-star jdgm--off'\u003e\u003c\/span\u003e\u003cspan class='jdgm-star jdgm--off'\u003e\u003c\/span\u003e\u003cspan class='jdgm-star jdgm--off'\u003e\u003c\/span\u003e\u003cspan class='jdgm-star jdgm--off'\u003e\u003c\/span\u003e\u003cspan class='jdgm-star jdgm--off'\u003e\u003c\/span\u003e \u003c\/div\u003e \u003cdiv class='jdgm-rev-widg__summary-text'\u003eBe the first to write a review\u003c\/div\u003e \u003c\/div\u003e \u003ca style='display: none' href='#' class='jdgm-write-rev-link' role='button'\u003eWrite a review\u003c\/a\u003e \u003cdiv class='jdgm-histogram jdgm-temp-hidden'\u003e \u003cdiv class='jdgm-histogram__row' data-rating='5' data-frequency='0' data-percentage='0'\u003e \u003cdiv class='jdgm-histogram__star' role='button' aria-label=\"0% (0) reviews with 5 star rating\" tabindex='0' \u003e\u003cspan class='jdgm-star jdgm--on'\u003e\u003c\/span\u003e\u003cspan class='jdgm-star jdgm--on'\u003e\u003c\/span\u003e\u003cspan class='jdgm-star jdgm--on'\u003e\u003c\/span\u003e\u003cspan class='jdgm-star jdgm--on'\u003e\u003c\/span\u003e\u003cspan class='jdgm-star jdgm--on'\u003e\u003c\/span\u003e\u003c\/div\u003e \u003cdiv class='jdgm-histogram__bar'\u003e \u003cdiv class='jdgm-histogram__bar-content' style='width: 0%;'\u003e \u003c\/div\u003e \u003c\/div\u003e \u003cdiv class='jdgm-histogram__percentage'\u003e0%\u003c\/div\u003e \u003cdiv class='jdgm-histogram__frequency'\u003e(0)\u003c\/div\u003e \u003c\/div\u003e \u003cdiv class='jdgm-histogram__row' data-rating='4' data-frequency='0' data-percentage='0'\u003e \u003cdiv class='jdgm-histogram__star' role='button' aria-label=\"0% (0) reviews with 4 star rating\" tabindex='0' \u003e\u003cspan class='jdgm-star jdgm--on'\u003e\u003c\/span\u003e\u003cspan class='jdgm-star jdgm--on'\u003e\u003c\/span\u003e\u003cspan class='jdgm-star jdgm--on'\u003e\u003c\/span\u003e\u003cspan class='jdgm-star jdgm--on'\u003e\u003c\/span\u003e\u003cspan class='jdgm-star jdgm--off'\u003e\u003c\/span\u003e\u003c\/div\u003e \u003cdiv class='jdgm-histogram__bar'\u003e \u003cdiv class='jdgm-histogram__bar-content' style='width: 0%;'\u003e \u003c\/div\u003e \u003c\/div\u003e \u003cdiv class='jdgm-histogram__percentage'\u003e0%\u003c\/div\u003e \u003cdiv class='jdgm-histogram__frequency'\u003e(0)\u003c\/div\u003e \u003c\/div\u003e \u003cdiv class='jdgm-histogram__row' data-rating='3' data-frequency='0' data-percentage='0'\u003e \u003cdiv class='jdgm-histogram__star' role='button' aria-label=\"0% (0) reviews with 3 star rating\" tabindex='0' \u003e\u003cspan class='jdgm-star jdgm--on'\u003e\u003c\/span\u003e\u003cspan class='jdgm-star jdgm--on'\u003e\u003c\/span\u003e\u003cspan class='jdgm-star jdgm--on'\u003e\u003c\/span\u003e\u003cspan class='jdgm-star jdgm--off'\u003e\u003c\/span\u003e\u003cspan class='jdgm-star jdgm--off'\u003e\u003c\/span\u003e\u003c\/div\u003e \u003cdiv class='jdgm-histogram__bar'\u003e \u003cdiv class='jdgm-histogram__bar-content' style='width: 0%;'\u003e \u003c\/div\u003e \u003c\/div\u003e \u003cdiv class='jdgm-histogram__percentage'\u003e0%\u003c\/div\u003e \u003cdiv class='jdgm-histogram__frequency'\u003e(0)\u003c\/div\u003e \u003c\/div\u003e \u003cdiv class='jdgm-histogram__row' data-rating='2' data-frequency='0' data-percentage='0'\u003e \u003cdiv class='jdgm-histogram__star' role='button' aria-label=\"0% (0) reviews with 2 star rating\" tabindex='0' \u003e\u003cspan class='jdgm-star jdgm--on'\u003e\u003c\/span\u003e\u003cspan class='jdgm-star jdgm--on'\u003e\u003c\/span\u003e\u003cspan class='jdgm-star jdgm--off'\u003e\u003c\/span\u003e\u003cspan class='jdgm-star jdgm--off'\u003e\u003c\/span\u003e\u003cspan class='jdgm-star jdgm--off'\u003e\u003c\/span\u003e\u003c\/div\u003e \u003cdiv class='jdgm-histogram__bar'\u003e \u003cdiv class='jdgm-histogram__bar-content' style='width: 0%;'\u003e \u003c\/div\u003e \u003c\/div\u003e \u003cdiv class='jdgm-histogram__percentage'\u003e0%\u003c\/div\u003e \u003cdiv class='jdgm-histogram__frequency'\u003e(0)\u003c\/div\u003e \u003c\/div\u003e \u003cdiv class='jdgm-histogram__row' data-rating='1' data-frequency='0' data-percentage='0'\u003e \u003cdiv class='jdgm-histogram__star' role='button' aria-label=\"0% (0) reviews with 1 star rating\" tabindex='0' \u003e\u003cspan class='jdgm-star jdgm--on'\u003e\u003c\/span\u003e\u003cspan class='jdgm-star jdgm--off'\u003e\u003c\/span\u003e\u003cspan class='jdgm-star jdgm--off'\u003e\u003c\/span\u003e\u003cspan class='jdgm-star jdgm--off'\u003e\u003c\/span\u003e\u003cspan class='jdgm-star jdgm--off'\u003e\u003c\/span\u003e\u003c\/div\u003e \u003cdiv class='jdgm-histogram__bar'\u003e \u003cdiv class='jdgm-histogram__bar-content' style='width: 0%;'\u003e \u003c\/div\u003e \u003c\/div\u003e \u003cdiv class='jdgm-histogram__percentage'\u003e0%\u003c\/div\u003e \u003cdiv class='jdgm-histogram__frequency'\u003e(0)\u003c\/div\u003e \u003c\/div\u003e \u003cdiv class='jdgm-histogram__row jdgm-histogram__clear-filter' data-rating=null tabindex='0'\u003e\u003c\/div\u003e \u003c\/div\u003e \u003cdiv class='jdgm-rev-widg__sort-wrapper'\u003e\u003c\/div\u003e \u003c\/div\u003e \u003cdiv class='jdgm-rev-widg__body'\u003e \u003cdiv class='jdgm-rev-widg__reviews'\u003e\u003c\/div\u003e \u003cdiv class='jdgm-paginate' data-per-page='4' data-url='https:\/\/api.judge.me\/reviews\/reviews_for_widget' style=\"display: none;\"\u003e\u003c\/div\u003e \u003c\/div\u003e \u003cdiv class='jdgm-rev-widg__paginate-spinner-wrapper'\u003e \u003cdiv class='jdgm-spinner'\u003e\u003c\/div\u003e \u003c\/div\u003e \u003c\/div\u003e"},"collections":[{"id":294880051371,"handle":"crystals","title":"Crystals","updated_at":"2026-01-07T23:43:11-05:00","body_html":"\u003cp data-start=\"159\" data-end=\"687\"\u003e✨ \u003cstrong data-start=\"161\" data-end=\"216\"\u003eDiscover the Magic of Crystals with Crystal Destiny\u003c\/strong\u003e ✨\u003cbr data-start=\"218\" data-end=\"221\"\u003eCrystals have been treasured for centuries—not only for their natural beauty but also for their powerful healing energies. Beyond their visual allure, they bring balance, harmony, and positive energy into any space. Whether used for home décor, meditation, or simply to elevate the energy of your surroundings, crystals create a sanctuary of peace, relaxation, and well-being. Each piece is a unique gift from the Earth—visually stunning and spiritually uplifting.\u003c\/p\u003e\n\u003cp data-start=\"689\" data-end=\"1011\"\u003eAt \u003cstrong data-start=\"692\" data-end=\"711\"\u003eCrystal Destiny\u003c\/strong\u003e, our signature collection showcases a curated selection of exquisite crystals, from radiant Quartz to soothing Amethyst. Every stone is carefully sourced for its elegance and metaphysical resonance, making them perfect for enhancing your home, uplifting your spirit, or gifting to someone special.\u003c\/p\u003e\n\u003cp data-start=\"1013\" data-end=\"1206\"\u003eExperience the timeless sophistication of crystalline wonders. Explore the \u003cstrong data-start=\"1088\" data-end=\"1118\"\u003eCrystal Destiny Collection\u003c\/strong\u003e today and bring the transformative beauty of these treasures into your everyday life.\u003c\/p\u003e","published_at":"2023-06-05T11:24:02-04:00","sort_order":"created-desc","template_suffix":"","disjunctive":false,"rules":[{"column":"tag","relation":"equals","condition":"crystal"},{"column":"type","relation":"not_contains","condition":"925 Sterling Silver"},{"column":"type","relation":"not_contains","condition":"Wire Wraps"}],"published_scope":"global"},{"id":319455756459,"handle":"crown-chakra-crystals","title":"Crown Chakra Crystals","updated_at":"2026-01-07T23:42:38-05:00","body_html":"\u003cp data-start=\"144\" data-end=\"515\"\u003e✨ \u003cstrong data-start=\"146\" data-end=\"171\"\u003eCrown Chakra Crystals\u003c\/strong\u003e ✨\u003cbr data-start=\"173\" data-end=\"176\"\u003eConnect with higher consciousness and spiritual insight with our \u003cstrong data-start=\"241\" data-end=\"266\"\u003eCrown Chakra Crystals\u003c\/strong\u003e. Located at the top of the head, the Crown Chakra governs wisdom, enlightenment, and your connection to the divine. These crystals help open and balance this energy center, fostering clarity, spiritual growth, and a sense of universal connection.\u003c\/p\u003e\n\u003cp data-start=\"517\" data-end=\"851\"\u003eOur selection includes powerful stones such as Amethyst, Clear Quartz, Selenite, and Lepidolite—each chosen for their ability to enhance meditation, energy work, and mindful practices. Whether placed in your sacred space, carried with you, or worn as jewelry, Crown Chakra Crystals promote harmony, insight, and spiritual alignment.\u003c\/p\u003e\n\u003cp data-start=\"853\" data-end=\"1007\"\u003eElevate your consciousness, deepen your meditative practice, and embrace the transformative energy of the Crown Chakra with these illuminating crystals.\u003c\/p\u003e","published_at":"2025-07-17T18:16:11-04:00","sort_order":"best-selling","template_suffix":"","disjunctive":false,"rules":[{"column":"variant_metafield_definition","relation":"equals","condition":"Crown"}],"published_scope":"global","image":{"created_at":"2025-07-17T19:09:11-04:00","alt":null,"width":1080,"height":1080,"src":"\/\/crystaldestiny.com\/cdn\/shop\/collections\/Crown_Chakra_Collection.jpg?v=1762474922"}},{"id":294880116907,"handle":"polished","title":"Polished Crystals","updated_at":"2026-01-07T23:43:11-05:00","body_html":"\u003cp data-start=\"199\" data-end=\"598\"\u003e✨ \u003cstrong data-start=\"201\" data-end=\"248\"\u003eCrystal Destiny Polished Crystal Collection\u003c\/strong\u003e ✨\u003cbr data-start=\"250\" data-end=\"253\"\u003eIndulge in the brilliance of crystals refined to perfection. Our \u003cstrong data-start=\"318\" data-end=\"341\"\u003ePolished Collection\u003c\/strong\u003e showcases gemstones meticulously shaped and smoothed to reveal their natural radiance and timeless beauty. From the shimmering glow of Quartz to the deep allure of Obsidian, each polished piece is a testament to nature’s artistry and human craftsmanship.\u003c\/p\u003e\n\u003cp data-start=\"600\" data-end=\"862\"\u003ePerfect as statement décor, meaningful gifts, or companions on your spiritual journey, polished crystals bring sophistication and elevated energy into any space. Their radiant surfaces reflect not only light but also the transformative power of crystal energy.\u003c\/p\u003e\n\u003cp data-start=\"864\" data-end=\"1022\"\u003eDiscover the elegance of refinement with Crystal Destiny’s Polished Crystal Collection—where every facet shines with intention, beauty, and timeless allure.\u003c\/p\u003e","published_at":"2023-06-05T11:30:44-04:00","sort_order":"created-desc","template_suffix":"","disjunctive":false,"rules":[{"column":"tag","relation":"equals","condition":"polished"}],"published_scope":"global"},{"id":295698202795,"handle":"spheres","title":"Crystal Spheres","updated_at":"2026-01-06T23:24:35-05:00","body_html":"\u003cp data-start=\"106\" data-end=\"370\"\u003e✨ \u003cstrong data-start=\"108\" data-end=\"138\"\u003eCrystal Spheres Collection\u003c\/strong\u003e ✨\u003cbr data-start=\"140\" data-end=\"143\"\u003eBring harmony, balance, and elegance into your space with our \u003cstrong data-start=\"205\" data-end=\"235\"\u003eCrystal Spheres Collection\u003c\/strong\u003e. Each sphere is meticulously crafted to showcase the natural beauty and energy of crystals, from radiant Quartz to calming Amethyst.\u003c\/p\u003e\n\u003cp data-start=\"372\" data-end=\"658\"\u003ePerfect for meditation, energy work, or as striking décor, crystal spheres radiate energy in all directions, promoting clarity, focus, and a sense of calm. Their smooth, polished surfaces highlight the stones’ natural patterns and colors, making each sphere a captivating centerpiece.\u003c\/p\u003e\n\u003cp data-start=\"660\" data-end=\"809\"\u003eElevate your space and embrace the transformative power of crystals with the \u003cstrong data-start=\"737\" data-end=\"767\"\u003eCrystal Spheres Collection\u003c\/strong\u003e—where beauty, energy, and harmony meet.\u003c\/p\u003e","published_at":"2023-07-28T14:20:46-04:00","sort_order":"created-desc","template_suffix":"","disjunctive":true,"rules":[{"column":"tag","relation":"equals","condition":"spheres"},{"column":"tag","relation":"equals","condition":"eggs"}],"published_scope":"global"},{"id":293659312299,"handle":"best-sellers","title":"Best Sellers","updated_at":"2026-01-07T23:43:11-05:00","body_html":"\u003cp data-start=\"155\" data-end=\"510\"\u003eDiscover the pieces our community loves most. Our Best Sellers Collection brings together handpicked crystals and jewelry that embody timeless elegance, spiritual resonance, and everyday sophistication. Each item has earned its place as a customer favorite—celebrated for both its beauty and its meaningful energy.\u003c\/p\u003e\n\u003cp data-start=\"512\" data-end=\"802\"\u003eFrom stunning statement pieces to versatile daily companions, these treasures are curated to elevate your space, uplift your spirit, and reflect refined taste. Indulge in what’s most cherished and let our best sellers guide you toward the perfect blend of style and transformative energy.\u003c\/p\u003e\n\u003cp data-start=\"804\" data-end=\"932\"\u003eExplore the Best Sellers Collection today—where elegance meets intention, and every piece tells a story of beauty and balance.\u003c\/p\u003e","published_at":"2023-03-15T16:04:51-04:00","sort_order":"best-selling","template_suffix":"","disjunctive":false,"rules":[{"column":"variant_price","relation":"greater_than","condition":"0"},{"column":"variant_inventory","relation":"greater_than","condition":"0"},{"column":"type","relation":"not_equals","condition":"Shipping Protection"}],"published_scope":"global"},{"id":321370390699,"handle":"monthly-crystal-sale","title":"Monthly Crystal Sale | Spheres \u0026 Towers","updated_at":"2026-01-06T23:24:37-05:00","body_html":"\u003cp\u003eShop our \u003cstrong\u003eMonthly Crystal Sale\u003c\/strong\u003e, where you can shop a wide selection of healing crystals at discounted prices. Explore \u003cstrong\u003ecrystal spheres and towers,\u003c\/strong\u003e— all carefully curated to support meditation, energy balancing, and spiritual wellness. Whether you're looking to enhance your home decor, boost your daily energy, or find the perfect gift, our \u003cstrong\u003ecrystals for healing and manifestation\u003c\/strong\u003e offer both beauty and metaphysical benefits.\u003c\/p\u003e\n\u003cp\u003eEach month, our sale features \u003cstrong\u003enew discounted collections\u003c\/strong\u003e, from \u003cstrong\u003enatural quartz and amethyst towers\u003c\/strong\u003e to \u003cstrong\u003ewire-wrapped pendants and polished stones\u003c\/strong\u003e, so there's always something fresh to discover. Shop with confidence knowing you're getting high-quality crystals with \u003cstrong\u003efree shipping options\u003c\/strong\u003e and a trusted experience.\u003c\/p\u003e\n\u003cp\u003e\u003cstrong\u003eTake advantage of the Monthly Crystal Sale today\u003c\/strong\u003e and add powerful, natural energy to your life with \u003cstrong\u003eauthentic healing crystals\u003c\/strong\u003e — while our limited-time discounts last.\u003c\/p\u003e\n\u003cp\u003e\u003cstrong\u003e*Discount automatically applied at checkout.\u003c\/strong\u003e\u003c\/p\u003e","published_at":"2025-12-02T01:26:17-05:00","sort_order":"alpha-asc","template_suffix":"","disjunctive":true,"rules":[{"column":"tag","relation":"equals","condition":"spheres"},{"column":"tag","relation":"equals","condition":"Towers"}],"published_scope":"global","image":{"created_at":"2026-01-01T01:32:34-05:00","alt":"","width":960,"height":960,"src":"\/\/crystaldestiny.com\/cdn\/shop\/collections\/3E8C2969-1B86-4ACE-B349-98E9D8768424.jpg?v=1767249154"}},{"id":297596059819,"handle":"all","title":"All Crystals \u0026 Jewelry","updated_at":"2026-01-07T23:43:11-05:00","body_html":"\u003cp data-start=\"149\" data-end=\"494\"\u003e✨ \u003cstrong data-start=\"151\" data-end=\"181\"\u003eWelcome to Crystal Destiny\u003c\/strong\u003e ✨\u003cbr data-start=\"183\" data-end=\"186\"\u003eStep into a world where beauty, energy, and artistry unite. Our collection is a treasure trove of exquisite crystals, from the raw, untamed elegance of natural formations to the polished brilliance of expertly crafted pieces. Each crystal is a masterpiece, carrying its own unique story and timeless charm.\u003c\/p\u003e\n\u003cp data-start=\"496\" data-end=\"831\"\u003eWhether you’re drawn to the calming presence of Amethyst, the vibrant energy of Citrine, or the grounding strength of Jasper, our crystals invite you to connect with nature’s finest wonders. Perfect for enhancing your space, supporting your spiritual journey, or gifting with intention, every piece resonates with beauty and meaning.\u003c\/p\u003e\n\u003cp data-start=\"833\" data-end=\"1000\"\u003eElevate your surroundings, embrace the mystique, and explore the enchanting world of crystals at \u003cstrong data-start=\"930\" data-end=\"949\"\u003eCrystal Destiny\u003c\/strong\u003e—where every crystal is waiting to be discovered.\u003c\/p\u003e","published_at":"2023-11-10T13:55:31-05:00","sort_order":"created-desc","template_suffix":"","disjunctive":false,"rules":[{"column":"type","relation":"not_equals","condition":"asdf"}],"published_scope":"global"},{"id":298983391403,"handle":"january-crystal-sale","title":"January Sale | 25% Off Crystal Towers \u0026 Spheres","updated_at":"2026-01-06T23:24:37-05:00","body_html":"\u003cp\u003eShop our \u003cstrong\u003eJanuary Crystal Sale\u003c\/strong\u003e, where you can shop a wide selection of healing crystals at discounted prices. Explore \u003cstrong\u003eCrystal Towers, \u0026amp; Crystal Spheres\u003c\/strong\u003e — all carefully curated and crafted to support meditation, energy balancing, and spiritual wellness. Whether you're looking to enhance your home decor, boost your daily energy, or find the perfect gift, our \u003cstrong\u003ecrystals for healing and manifestation\u003c\/strong\u003e offer both beauty and metaphysical benefits.\u003c\/p\u003e\n\u003cp\u003eThis January, our sale features \u003cstrong\u003ediscounted crystal towers and spheres\u003c\/strong\u003e, from \u003cstrong\u003enatural quartz \u003c\/strong\u003eand \u003cstrong\u003eamethyst \u003c\/strong\u003eto \u003cstrong\u003ebumblebee jasper \u003c\/strong\u003eand \u003cstrong\u003ecarnelian\u003c\/strong\u003e, so there's always something fresh to discover. Shop with confidence knowing you're getting high-quality crystals with \u003cstrong\u003efree shipping options\u003c\/strong\u003e and a trusted experience.\u003c\/p\u003e\n\u003cp\u003e\u003cstrong\u003eTake advantage of the January Crystal Sale today\u003c\/strong\u003e and add powerful, natural energy to your life with \u003cstrong\u003eauthentic healing crystals\u003c\/strong\u003e — while our limited-time discounts last.\u003c\/p\u003e\n\u003cp\u003e\u003cstrong\u003e*Discount automatically applied at checkout.\u003c\/strong\u003e\u003c\/p\u003e","published_at":"2026-01-01T00:07:17-05:00","sort_order":"alpha-asc","template_suffix":"monthly-collection","disjunctive":true,"rules":[{"column":"tag","relation":"equals","condition":"Spheres"},{"column":"tag","relation":"equals","condition":"Towers"}],"published_scope":"global","image":{"created_at":"2026-01-01T01:29:59-05:00","alt":"","width":960,"height":960,"src":"\/\/crystaldestiny.com\/cdn\/shop\/collections\/1464163B-22B1-4D62-BEC5-CEC9AECB670B.jpg?v=1767248999"}}]}
[{"alt":"Amethyst \"XXL\" Sphere 100mm-Spheres-Crystal Destiny-Amethyst-1406g - 100mm Diameter-Crystal Destiny","id":31698569298091,"position":1,"preview_image":{"aspect_ratio":1.0,"height":1500,"width":1500,"src":"\/\/crystaldestiny.com\/cdn\/shop\/files\/Amethyst-XXL-Sphere-100mm-Spheres.jpg?v=1757135735"},"aspect_ratio":1.0,"height":1500,"media_type":"image","src":"\/\/crystaldestiny.com\/cdn\/shop\/files\/Amethyst-XXL-Sphere-100mm-Spheres.jpg?v=1757135735","width":1500},{"alt":"Amethyst \"XXL\" Sphere 100mm-Spheres-Crystal Destiny-Amethyst-1406g - 100mm Diameter-Crystal Destiny","id":31698569232555,"position":2,"preview_image":{"aspect_ratio":1.0,"height":1518,"width":1518,"src":"\/\/crystaldestiny.com\/cdn\/shop\/files\/Amethyst-XXL-Sphere-100mm-Spheres-2.jpg?v=1757135737"},"aspect_ratio":1.0,"height":1518,"media_type":"image","src":"\/\/crystaldestiny.com\/cdn\/shop\/files\/Amethyst-XXL-Sphere-100mm-Spheres-2.jpg?v=1757135737","width":1518},{"alt":"Amethyst \"XXL\" Sphere 100mm-Spheres-Crystal Destiny-Amethyst-1406g - 100mm Diameter-Crystal Destiny","id":31698569199787,"position":3,"preview_image":{"aspect_ratio":1.0,"height":1734,"width":1734,"src":"\/\/crystaldestiny.com\/cdn\/shop\/files\/Amethyst-XXL-Sphere-100mm-Spheres-3.jpg?v=1757135739"},"aspect_ratio":1.0,"height":1734,"media_type":"image","src":"\/\/crystaldestiny.com\/cdn\/shop\/files\/Amethyst-XXL-Sphere-100mm-Spheres-3.jpg?v=1757135739","width":1734},{"alt":"Amethyst \"XXL\" Sphere 100mm-Spheres-Crystal Destiny-Amethyst-1406g - 100mm Diameter-Crystal Destiny","id":31698569265323,"position":4,"preview_image":{"aspect_ratio":1.0,"height":1773,"width":1773,"src":"\/\/crystaldestiny.com\/cdn\/shop\/files\/Amethyst-XXL-Sphere-100mm-Spheres-4.jpg?v=1757135740"},"aspect_ratio":1.0,"height":1773,"media_type":"image","src":"\/\/crystaldestiny.com\/cdn\/shop\/files\/Amethyst-XXL-Sphere-100mm-Spheres-4.jpg?v=1757135740","width":1773}]
{"item":{"id":8468677591211,"title":"Torre de amatista","handle":"amethyst-tower-cd-10160","description":"\u003cp\u003eLa Torre de Amatista es una impactante formación cristalina natural conocida por sus profundos tonos violeta y su poderosa energía. Diseñada con maestría para realzar la estructura única de la piedra, sirve tanto como una cautivadora pieza decorativa como una herramienta para mejorar la meditación y las prácticas espirituales. Sus propiedades calmantes promueven la claridad, el equilibrio y la sanación emocional, lo que la convierte en una pieza esencial para quienes buscan profundizar su conexión con la paz interior y la intuición. Ideal para exhibir en cualquier espacio, la Torre de Amatista combina belleza estética con importantes beneficios energéticos.\u003c\/p\u003e\n\n\u003cp\u003e Este producto es exactamente como se muestra en la imagen, único en su tipo.\u003c\/p\u003e\n\u003cdiv\u003e \u003cspan style=\"font-size: 0.875rem;\"\u003eTorres de Cristal, Varas, Generadores, Puntas, Pilares y Obeliscos: ¿Cuál es la Diferencia?\u003c\/span\u003e\n\u003c\/div\u003e\n\u003cdiv\u003e Si bien estos términos pueden variar, todos describen cristales de formas hermosas con una punta puntiaguda diseñada para canalizar y dirigir la energía. Cada nombre destaca un aspecto único de su uso:\u003c\/div\u003e\n\u003cdiv\u003e \u0026lt;ul\u0026gt;\u003c\/div\u003e \u003cdiv\u003e\u0026lt;li\u0026gt;\u003c\/div\u003e\n\u003cdiv\u003e \u0026lt;strong\u0026gt;Torres\u0026lt;\/strong\u0026gt;: Conocidas por su presencia constante y estabilizadora, las torres de cristal ayudan a enfocar y amplificar la energía, lo que las hace perfectas para la meditación y la manifestación.\u0026lt;\/li\u0026gt;\u003c\/div\u003e\n\u003cdiv\u003e \u0026lt;li\u0026gt;\u003c\/div\u003e\n\u003cdiv\u003e \u0026lt;strong\u0026gt;Varitas\u0026lt;\/strong\u0026gt;: Tradicionalmente utilizadas en el trabajo energético y la curación, las varitas de cristal son excelentes para dirigir el flujo de energía y eliminar bloqueos.\u0026lt;\/li\u0026gt;\u003c\/div\u003e\n\u003cdiv\u003e \u0026lt;li\u0026gt;\u003c\/div\u003e\n\u003cdiv\u003e \u0026lt;strong\u0026gt;Pilares\u0026lt;\/strong\u0026gt;: Simbolizando fuerza y estabilidad, los pilares de cristal crean un ambiente equilibrado y armonioso, lo que los hace ideales para la decoración del hogar y las prácticas espirituales.\u0026lt;\/li\u0026gt;\u003c\/div\u003e\n\u003cdiv\u003e \u0026lt;li\u0026gt;\u003c\/div\u003e\n\u003cdiv\u003e \u0026lt;strong\u0026gt;Obeliscos\u0026lt;\/strong\u0026gt;: Inspirados en estructuras antiguas, se cree que los obeliscos de cristal conectan las energías terrenales y espirituales, lo que los convierte en poderosas herramientas para la transformación y la iluminación.\u0026lt;\/li\u0026gt;\u003c\/div\u003e\n\u003cdiv\u003e \u0026lt;\/ul\u0026gt;\u003c\/div\u003e \u003cdiv\u003eNo importa cómo los llames, estos cristales tienen el mismo propósito: potenciar la energía, la intención y la armonía en tu espacio. ¡Elige el que más te resuene!\u003c\/div\u003e","published_at":"2025-07-08T18:35:36-04:00","created_at":"2025-07-08T18:35:36-04:00","vendor":"Crystal Destiny","type":"Torres","tags":["crystal","polished","Towers"],"price":1799,"price_min":1799,"price_max":1999,"available":true,"price_varies":true,"compare_at_price":null,"compare_at_price_min":0,"compare_at_price_max":0,"compare_at_price_varies":false,"variants":[{"id":45391258878123,"title":"Amatista \/ 46 g - 1,5\" de alto x 1,0\" de ancho","option1":"Amatista","option2":"46 g - 1,5\" de alto x 1,0\" de ancho","option3":null,"sku":"CD-10160","requires_shipping":true,"taxable":true,"featured_image":{"id":39898897580203,"product_id":8468677591211,"position":2,"created_at":"2025-07-08T18:33:05-04:00","updated_at":"2025-12-11T00:04:55-05:00","alt":"Amethyst Tower-Towers-Crystal Destiny-Amethyst-46g - 1.5\"h x 1.0\"w-Crystal Destiny","width":1369,"height":1369,"src":"\/\/crystaldestiny.com\/cdn\/shop\/files\/Amethyst-Tower-Towers-Amethyst-46g-1_5h-x-1_0w-2.jpg?v=1765429495","variant_ids":[45391258878123]},"available":false,"name":"Torre de amatista - Amatista \/ 46 g - 1,5\" de alto x 1,0\" de ancho","public_title":"Amatista \/ 46 g - 1,5\" de alto x 1,0\" de ancho","options":["Amatista","46 g - 1,5\" de alto x 1,0\" de ancho"],"price":1999,"weight":0,"compare_at_price":null,"inventory_management":"shopify","barcode":"","featured_media":{"alt":"Amethyst Tower-Towers-Crystal Destiny-Amethyst-46g - 1.5\"h x 1.0\"w-Crystal Destiny","id":31410852036779,"position":2,"preview_image":{"aspect_ratio":1.0,"height":1369,"width":1369,"src":"\/\/crystaldestiny.com\/cdn\/shop\/files\/Amethyst-Tower-Towers-Amethyst-46g-1_5h-x-1_0w-2.jpg?v=1765429495"}},"requires_selling_plan":false,"selling_plan_allocations":[]},{"id":45391269101739,"title":"Amatista \/ 30 g - 2,60\" de alto x 0,75\" de ancho","option1":"Amatista","option2":"30 g - 2,60\" de alto x 0,75\" de ancho","option3":null,"sku":"CD-10161","requires_shipping":true,"taxable":true,"featured_image":{"id":39898934018219,"product_id":8468677591211,"position":3,"created_at":"2025-07-08T18:40:15-04:00","updated_at":"2025-12-11T00:04:57-05:00","alt":"Amethyst Tower-Towers-Crystal Destiny-Amethyst-30g - 2.60\"h x .75\"w-Crystal Destiny","width":1386,"height":1386,"src":"\/\/crystaldestiny.com\/cdn\/shop\/files\/Amethyst-Tower-Towers-Amethyst-30g-2_60h-x-_75w-3.jpg?v=1765429497","variant_ids":[45391269101739]},"available":true,"name":"Torre de amatista - Amatista \/ 30 g - 2,60\" de alto x 0,75\" de ancho","public_title":"Amatista \/ 30 g - 2,60\" de alto x 0,75\" de ancho","options":["Amatista","30 g - 2,60\" de alto x 0,75\" de ancho"],"price":1799,"weight":0,"compare_at_price":null,"inventory_management":"shopify","barcode":"","featured_media":{"alt":"Amethyst Tower-Towers-Crystal Destiny-Amethyst-30g - 2.60\"h x .75\"w-Crystal Destiny","id":31410880643243,"position":3,"preview_image":{"aspect_ratio":1.0,"height":1386,"width":1386,"src":"\/\/crystaldestiny.com\/cdn\/shop\/files\/Amethyst-Tower-Towers-Amethyst-30g-2_60h-x-_75w-3.jpg?v=1765429497"}},"requires_selling_plan":false,"selling_plan_allocations":[]}],"images":["\/\/crystaldestiny.com\/cdn\/shop\/files\/Amethyst-Tower-Towers.jpg?v=1757113949","\/\/crystaldestiny.com\/cdn\/shop\/files\/Amethyst-Tower-Towers-Amethyst-46g-1_5h-x-1_0w-2.jpg?v=1765429495","\/\/crystaldestiny.com\/cdn\/shop\/files\/Amethyst-Tower-Towers-Amethyst-30g-2_60h-x-_75w-3.jpg?v=1765429497"],"featured_image":"\/\/crystaldestiny.com\/cdn\/shop\/files\/Amethyst-Tower-Towers.jpg?v=1757113949","options":["Material","Tamaño"],"media":[{"alt":"Amethyst Tower-Towers-Crystal Destiny-Amethyst-46g - 1.5\"h x 1.0\"w-Crystal Destiny","id":31410852004011,"position":1,"preview_image":{"aspect_ratio":1.0,"height":1677,"width":1677,"src":"\/\/crystaldestiny.com\/cdn\/shop\/files\/Amethyst-Tower-Towers.jpg?v=1757113949"},"aspect_ratio":1.0,"height":1677,"media_type":"image","src":"\/\/crystaldestiny.com\/cdn\/shop\/files\/Amethyst-Tower-Towers.jpg?v=1757113949","width":1677},{"alt":"Amethyst Tower-Towers-Crystal Destiny-Amethyst-46g - 1.5\"h x 1.0\"w-Crystal Destiny","id":31410852036779,"position":2,"preview_image":{"aspect_ratio":1.0,"height":1369,"width":1369,"src":"\/\/crystaldestiny.com\/cdn\/shop\/files\/Amethyst-Tower-Towers-Amethyst-46g-1_5h-x-1_0w-2.jpg?v=1765429495"},"aspect_ratio":1.0,"height":1369,"media_type":"image","src":"\/\/crystaldestiny.com\/cdn\/shop\/files\/Amethyst-Tower-Towers-Amethyst-46g-1_5h-x-1_0w-2.jpg?v=1765429495","width":1369},{"alt":"Amethyst Tower-Towers-Crystal Destiny-Amethyst-30g - 2.60\"h x .75\"w-Crystal Destiny","id":31410880643243,"position":3,"preview_image":{"aspect_ratio":1.0,"height":1386,"width":1386,"src":"\/\/crystaldestiny.com\/cdn\/shop\/files\/Amethyst-Tower-Towers-Amethyst-30g-2_60h-x-_75w-3.jpg?v=1765429497"},"aspect_ratio":1.0,"height":1386,"media_type":"image","src":"\/\/crystaldestiny.com\/cdn\/shop\/files\/Amethyst-Tower-Towers-Amethyst-30g-2_60h-x-_75w-3.jpg?v=1765429497","width":1386}],"requires_selling_plan":false,"selling_plan_groups":[],"content":"\u003cp\u003eLa Torre de Amatista es una impactante formación cristalina natural conocida por sus profundos tonos violeta y su poderosa energía. Diseñada con maestría para realzar la estructura única de la piedra, sirve tanto como una cautivadora pieza decorativa como una herramienta para mejorar la meditación y las prácticas espirituales. Sus propiedades calmantes promueven la claridad, el equilibrio y la sanación emocional, lo que la convierte en una pieza esencial para quienes buscan profundizar su conexión con la paz interior y la intuición. Ideal para exhibir en cualquier espacio, la Torre de Amatista combina belleza estética con importantes beneficios energéticos.\u003c\/p\u003e\n\n\u003cp\u003e Este producto es exactamente como se muestra en la imagen, único en su tipo.\u003c\/p\u003e\n\u003cdiv\u003e \u003cspan style=\"font-size: 0.875rem;\"\u003eTorres de Cristal, Varas, Generadores, Puntas, Pilares y Obeliscos: ¿Cuál es la Diferencia?\u003c\/span\u003e\n\u003c\/div\u003e\n\u003cdiv\u003e Si bien estos términos pueden variar, todos describen cristales de formas hermosas con una punta puntiaguda diseñada para canalizar y dirigir la energía. Cada nombre destaca un aspecto único de su uso:\u003c\/div\u003e\n\u003cdiv\u003e \u0026lt;ul\u0026gt;\u003c\/div\u003e \u003cdiv\u003e\u0026lt;li\u0026gt;\u003c\/div\u003e\n\u003cdiv\u003e \u0026lt;strong\u0026gt;Torres\u0026lt;\/strong\u0026gt;: Conocidas por su presencia constante y estabilizadora, las torres de cristal ayudan a enfocar y amplificar la energía, lo que las hace perfectas para la meditación y la manifestación.\u0026lt;\/li\u0026gt;\u003c\/div\u003e\n\u003cdiv\u003e \u0026lt;li\u0026gt;\u003c\/div\u003e\n\u003cdiv\u003e \u0026lt;strong\u0026gt;Varitas\u0026lt;\/strong\u0026gt;: Tradicionalmente utilizadas en el trabajo energético y la curación, las varitas de cristal son excelentes para dirigir el flujo de energía y eliminar bloqueos.\u0026lt;\/li\u0026gt;\u003c\/div\u003e\n\u003cdiv\u003e \u0026lt;li\u0026gt;\u003c\/div\u003e\n\u003cdiv\u003e \u0026lt;strong\u0026gt;Pilares\u0026lt;\/strong\u0026gt;: Simbolizando fuerza y estabilidad, los pilares de cristal crean un ambiente equilibrado y armonioso, lo que los hace ideales para la decoración del hogar y las prácticas espirituales.\u0026lt;\/li\u0026gt;\u003c\/div\u003e\n\u003cdiv\u003e \u0026lt;li\u0026gt;\u003c\/div\u003e\n\u003cdiv\u003e \u0026lt;strong\u0026gt;Obeliscos\u0026lt;\/strong\u0026gt;: Inspirados en estructuras antiguas, se cree que los obeliscos de cristal conectan las energías terrenales y espirituales, lo que los convierte en poderosas herramientas para la transformación y la iluminación.\u0026lt;\/li\u0026gt;\u003c\/div\u003e\n\u003cdiv\u003e \u0026lt;\/ul\u0026gt;\u003c\/div\u003e \u003cdiv\u003eNo importa cómo los llames, estos cristales tienen el mismo propósito: potenciar la energía, la intención y la armonía en tu espacio. ¡Elige el que más te resuene!\u003c\/div\u003e"},"options":[{"name":"Material","position":1,"values":["Amatista"]},{"name":"Tamaño","position":2,"values":["46 g - 1,5\" de alto x 1,0\" de ancho","30 g - 2,60\" de alto x 0,75\" de ancho"]}],"custom_metafields":{"shipping_time":"En un plazo de 7 días"},"metafields":{"badge":"\u003cdiv style='display:none' class='jdgm-prev-badge' data-average-rating='0.00' data-number-of-reviews='0' data-number-of-questions='0'\u003e \u003cspan class='jdgm-prev-badge__stars' data-score='0.00' tabindex='0' aria-label='0.00 stars' role='button'\u003e \u003cspan class='jdgm-star jdgm--off'\u003e\u003c\/span\u003e\u003cspan class='jdgm-star jdgm--off'\u003e\u003c\/span\u003e\u003cspan class='jdgm-star jdgm--off'\u003e\u003c\/span\u003e\u003cspan class='jdgm-star jdgm--off'\u003e\u003c\/span\u003e\u003cspan class='jdgm-star jdgm--off'\u003e\u003c\/span\u003e \u003c\/span\u003e \u003cspan class='jdgm-prev-badge__text'\u003e No reviews \u003c\/span\u003e \u003c\/div\u003e","widget":"\u003cdiv class='jdgm-rev-widg' data-updated-at='2025-07-08T22:35:38Z' data-average-rating='0.00' data-number-of-reviews='0' data-number-of-questions='0' data-image-url='https:\/\/cdn.shopify.com\/s\/files\/1\/0613\/0345\/5915\/files\/6I0A3505.jpg?v=1752014012'\u003e \u003cstyle class='jdgm-temp-hiding-style'\u003e.jdgm-rev-widg{ display: none }\u003c\/style\u003e \u003cdiv class='jdgm-rev-widg__header'\u003e \u003ch2 class='jdgm-rev-widg__title'\u003eCustomer Reviews\u003c\/h2\u003e \u003cdiv class='jdgm-rev-widg__summary'\u003e \u003cdiv class='jdgm-rev-widg__summary-stars' aria-label='Average rating is 0.00 stars' role='img'\u003e \u003cspan class='jdgm-star jdgm--off'\u003e\u003c\/span\u003e\u003cspan class='jdgm-star jdgm--off'\u003e\u003c\/span\u003e\u003cspan class='jdgm-star jdgm--off'\u003e\u003c\/span\u003e\u003cspan class='jdgm-star jdgm--off'\u003e\u003c\/span\u003e\u003cspan class='jdgm-star jdgm--off'\u003e\u003c\/span\u003e \u003c\/div\u003e \u003cdiv class='jdgm-rev-widg__summary-text'\u003eBe the first to write a review\u003c\/div\u003e \u003c\/div\u003e \u003ca style='display: none' href='#' class='jdgm-write-rev-link' role='button'\u003eWrite a review\u003c\/a\u003e \u003cdiv class='jdgm-histogram jdgm-temp-hidden'\u003e \u003cdiv class='jdgm-histogram__row' data-rating='5' data-frequency='0' data-percentage='0'\u003e \u003cdiv class='jdgm-histogram__star' role='button' aria-label=\"0% (0) reviews with 5 star rating\" tabindex='0' \u003e\u003cspan class='jdgm-star jdgm--on'\u003e\u003c\/span\u003e\u003cspan class='jdgm-star jdgm--on'\u003e\u003c\/span\u003e\u003cspan class='jdgm-star jdgm--on'\u003e\u003c\/span\u003e\u003cspan class='jdgm-star jdgm--on'\u003e\u003c\/span\u003e\u003cspan class='jdgm-star jdgm--on'\u003e\u003c\/span\u003e\u003c\/div\u003e \u003cdiv class='jdgm-histogram__bar'\u003e \u003cdiv class='jdgm-histogram__bar-content' style='width: 0%;'\u003e \u003c\/div\u003e \u003c\/div\u003e \u003cdiv class='jdgm-histogram__percentage'\u003e0%\u003c\/div\u003e \u003cdiv class='jdgm-histogram__frequency'\u003e(0)\u003c\/div\u003e \u003c\/div\u003e \u003cdiv class='jdgm-histogram__row' data-rating='4' data-frequency='0' data-percentage='0'\u003e \u003cdiv class='jdgm-histogram__star' role='button' aria-label=\"0% (0) reviews with 4 star rating\" tabindex='0' \u003e\u003cspan class='jdgm-star jdgm--on'\u003e\u003c\/span\u003e\u003cspan class='jdgm-star jdgm--on'\u003e\u003c\/span\u003e\u003cspan class='jdgm-star jdgm--on'\u003e\u003c\/span\u003e\u003cspan class='jdgm-star jdgm--on'\u003e\u003c\/span\u003e\u003cspan class='jdgm-star jdgm--off'\u003e\u003c\/span\u003e\u003c\/div\u003e \u003cdiv class='jdgm-histogram__bar'\u003e \u003cdiv class='jdgm-histogram__bar-content' style='width: 0%;'\u003e \u003c\/div\u003e \u003c\/div\u003e \u003cdiv class='jdgm-histogram__percentage'\u003e0%\u003c\/div\u003e \u003cdiv class='jdgm-histogram__frequency'\u003e(0)\u003c\/div\u003e \u003c\/div\u003e \u003cdiv class='jdgm-histogram__row' data-rating='3' data-frequency='0' data-percentage='0'\u003e \u003cdiv class='jdgm-histogram__star' role='button' aria-label=\"0% (0) reviews with 3 star rating\" tabindex='0' \u003e\u003cspan class='jdgm-star jdgm--on'\u003e\u003c\/span\u003e\u003cspan class='jdgm-star jdgm--on'\u003e\u003c\/span\u003e\u003cspan class='jdgm-star jdgm--on'\u003e\u003c\/span\u003e\u003cspan class='jdgm-star jdgm--off'\u003e\u003c\/span\u003e\u003cspan class='jdgm-star jdgm--off'\u003e\u003c\/span\u003e\u003c\/div\u003e \u003cdiv class='jdgm-histogram__bar'\u003e \u003cdiv class='jdgm-histogram__bar-content' style='width: 0%;'\u003e \u003c\/div\u003e \u003c\/div\u003e \u003cdiv class='jdgm-histogram__percentage'\u003e0%\u003c\/div\u003e \u003cdiv class='jdgm-histogram__frequency'\u003e(0)\u003c\/div\u003e \u003c\/div\u003e \u003cdiv class='jdgm-histogram__row' data-rating='2' data-frequency='0' data-percentage='0'\u003e \u003cdiv class='jdgm-histogram__star' role='button' aria-label=\"0% (0) reviews with 2 star rating\" tabindex='0' \u003e\u003cspan class='jdgm-star jdgm--on'\u003e\u003c\/span\u003e\u003cspan class='jdgm-star jdgm--on'\u003e\u003c\/span\u003e\u003cspan class='jdgm-star jdgm--off'\u003e\u003c\/span\u003e\u003cspan class='jdgm-star jdgm--off'\u003e\u003c\/span\u003e\u003cspan class='jdgm-star jdgm--off'\u003e\u003c\/span\u003e\u003c\/div\u003e \u003cdiv class='jdgm-histogram__bar'\u003e \u003cdiv class='jdgm-histogram__bar-content' style='width: 0%;'\u003e \u003c\/div\u003e \u003c\/div\u003e \u003cdiv class='jdgm-histogram__percentage'\u003e0%\u003c\/div\u003e \u003cdiv class='jdgm-histogram__frequency'\u003e(0)\u003c\/div\u003e \u003c\/div\u003e \u003cdiv class='jdgm-histogram__row' data-rating='1' data-frequency='0' data-percentage='0'\u003e \u003cdiv class='jdgm-histogram__star' role='button' aria-label=\"0% (0) reviews with 1 star rating\" tabindex='0' \u003e\u003cspan class='jdgm-star jdgm--on'\u003e\u003c\/span\u003e\u003cspan class='jdgm-star jdgm--off'\u003e\u003c\/span\u003e\u003cspan class='jdgm-star jdgm--off'\u003e\u003c\/span\u003e\u003cspan class='jdgm-star jdgm--off'\u003e\u003c\/span\u003e\u003cspan class='jdgm-star jdgm--off'\u003e\u003c\/span\u003e\u003c\/div\u003e \u003cdiv class='jdgm-histogram__bar'\u003e \u003cdiv class='jdgm-histogram__bar-content' style='width: 0%;'\u003e \u003c\/div\u003e \u003c\/div\u003e \u003cdiv class='jdgm-histogram__percentage'\u003e0%\u003c\/div\u003e \u003cdiv class='jdgm-histogram__frequency'\u003e(0)\u003c\/div\u003e \u003c\/div\u003e \u003cdiv class='jdgm-histogram__row jdgm-histogram__clear-filter' data-rating=null tabindex='0'\u003e\u003c\/div\u003e \u003c\/div\u003e \u003cdiv class='jdgm-rev-widg__sort-wrapper'\u003e\u003c\/div\u003e \u003c\/div\u003e \u003cdiv class='jdgm-rev-widg__body'\u003e \u003cdiv class='jdgm-rev-widg__reviews'\u003e\u003c\/div\u003e \u003cdiv class='jdgm-paginate' data-per-page='5' data-url='https:\/\/api.judge.me\/reviews\/reviews_for_widget' style=\"display: none;\"\u003e\u003c\/div\u003e \u003c\/div\u003e \u003cdiv class='jdgm-rev-widg__paginate-spinner-wrapper'\u003e \u003cdiv class='jdgm-spinner'\u003e\u003c\/div\u003e \u003c\/div\u003e \u003c\/div\u003e"},"collections":[{"id":294880051371,"handle":"crystals","title":"Crystals","updated_at":"2026-01-07T23:43:11-05:00","body_html":"\u003cp data-start=\"159\" data-end=\"687\"\u003e✨ \u003cstrong data-start=\"161\" data-end=\"216\"\u003eDiscover the Magic of Crystals with Crystal Destiny\u003c\/strong\u003e ✨\u003cbr data-start=\"218\" data-end=\"221\"\u003eCrystals have been treasured for centuries—not only for their natural beauty but also for their powerful healing energies. Beyond their visual allure, they bring balance, harmony, and positive energy into any space. Whether used for home décor, meditation, or simply to elevate the energy of your surroundings, crystals create a sanctuary of peace, relaxation, and well-being. Each piece is a unique gift from the Earth—visually stunning and spiritually uplifting.\u003c\/p\u003e\n\u003cp data-start=\"689\" data-end=\"1011\"\u003eAt \u003cstrong data-start=\"692\" data-end=\"711\"\u003eCrystal Destiny\u003c\/strong\u003e, our signature collection showcases a curated selection of exquisite crystals, from radiant Quartz to soothing Amethyst. Every stone is carefully sourced for its elegance and metaphysical resonance, making them perfect for enhancing your home, uplifting your spirit, or gifting to someone special.\u003c\/p\u003e\n\u003cp data-start=\"1013\" data-end=\"1206\"\u003eExperience the timeless sophistication of crystalline wonders. Explore the \u003cstrong data-start=\"1088\" data-end=\"1118\"\u003eCrystal Destiny Collection\u003c\/strong\u003e today and bring the transformative beauty of these treasures into your everyday life.\u003c\/p\u003e","published_at":"2023-06-05T11:24:02-04:00","sort_order":"created-desc","template_suffix":"","disjunctive":false,"rules":[{"column":"tag","relation":"equals","condition":"crystal"},{"column":"type","relation":"not_contains","condition":"925 Sterling Silver"},{"column":"type","relation":"not_contains","condition":"Wire Wraps"}],"published_scope":"global"},{"id":319455756459,"handle":"crown-chakra-crystals","title":"Crown Chakra Crystals","updated_at":"2026-01-07T23:42:38-05:00","body_html":"\u003cp data-start=\"144\" data-end=\"515\"\u003e✨ \u003cstrong data-start=\"146\" data-end=\"171\"\u003eCrown Chakra Crystals\u003c\/strong\u003e ✨\u003cbr data-start=\"173\" data-end=\"176\"\u003eConnect with higher consciousness and spiritual insight with our \u003cstrong data-start=\"241\" data-end=\"266\"\u003eCrown Chakra Crystals\u003c\/strong\u003e. Located at the top of the head, the Crown Chakra governs wisdom, enlightenment, and your connection to the divine. These crystals help open and balance this energy center, fostering clarity, spiritual growth, and a sense of universal connection.\u003c\/p\u003e\n\u003cp data-start=\"517\" data-end=\"851\"\u003eOur selection includes powerful stones such as Amethyst, Clear Quartz, Selenite, and Lepidolite—each chosen for their ability to enhance meditation, energy work, and mindful practices. Whether placed in your sacred space, carried with you, or worn as jewelry, Crown Chakra Crystals promote harmony, insight, and spiritual alignment.\u003c\/p\u003e\n\u003cp data-start=\"853\" data-end=\"1007\"\u003eElevate your consciousness, deepen your meditative practice, and embrace the transformative energy of the Crown Chakra with these illuminating crystals.\u003c\/p\u003e","published_at":"2025-07-17T18:16:11-04:00","sort_order":"best-selling","template_suffix":"","disjunctive":false,"rules":[{"column":"variant_metafield_definition","relation":"equals","condition":"Crown"}],"published_scope":"global","image":{"created_at":"2025-07-17T19:09:11-04:00","alt":null,"width":1080,"height":1080,"src":"\/\/crystaldestiny.com\/cdn\/shop\/collections\/Crown_Chakra_Collection.jpg?v=1762474922"}},{"id":294880116907,"handle":"polished","title":"Polished Crystals","updated_at":"2026-01-07T23:43:11-05:00","body_html":"\u003cp data-start=\"199\" data-end=\"598\"\u003e✨ \u003cstrong data-start=\"201\" data-end=\"248\"\u003eCrystal Destiny Polished Crystal Collection\u003c\/strong\u003e ✨\u003cbr data-start=\"250\" data-end=\"253\"\u003eIndulge in the brilliance of crystals refined to perfection. Our \u003cstrong data-start=\"318\" data-end=\"341\"\u003ePolished Collection\u003c\/strong\u003e showcases gemstones meticulously shaped and smoothed to reveal their natural radiance and timeless beauty. From the shimmering glow of Quartz to the deep allure of Obsidian, each polished piece is a testament to nature’s artistry and human craftsmanship.\u003c\/p\u003e\n\u003cp data-start=\"600\" data-end=\"862\"\u003ePerfect as statement décor, meaningful gifts, or companions on your spiritual journey, polished crystals bring sophistication and elevated energy into any space. Their radiant surfaces reflect not only light but also the transformative power of crystal energy.\u003c\/p\u003e\n\u003cp data-start=\"864\" data-end=\"1022\"\u003eDiscover the elegance of refinement with Crystal Destiny’s Polished Crystal Collection—where every facet shines with intention, beauty, and timeless allure.\u003c\/p\u003e","published_at":"2023-06-05T11:30:44-04:00","sort_order":"created-desc","template_suffix":"","disjunctive":false,"rules":[{"column":"tag","relation":"equals","condition":"polished"}],"published_scope":"global"},{"id":293659312299,"handle":"best-sellers","title":"Best Sellers","updated_at":"2026-01-07T23:43:11-05:00","body_html":"\u003cp data-start=\"155\" data-end=\"510\"\u003eDiscover the pieces our community loves most. Our Best Sellers Collection brings together handpicked crystals and jewelry that embody timeless elegance, spiritual resonance, and everyday sophistication. Each item has earned its place as a customer favorite—celebrated for both its beauty and its meaningful energy.\u003c\/p\u003e\n\u003cp data-start=\"512\" data-end=\"802\"\u003eFrom stunning statement pieces to versatile daily companions, these treasures are curated to elevate your space, uplift your spirit, and reflect refined taste. Indulge in what’s most cherished and let our best sellers guide you toward the perfect blend of style and transformative energy.\u003c\/p\u003e\n\u003cp data-start=\"804\" data-end=\"932\"\u003eExplore the Best Sellers Collection today—where elegance meets intention, and every piece tells a story of beauty and balance.\u003c\/p\u003e","published_at":"2023-03-15T16:04:51-04:00","sort_order":"best-selling","template_suffix":"","disjunctive":false,"rules":[{"column":"variant_price","relation":"greater_than","condition":"0"},{"column":"variant_inventory","relation":"greater_than","condition":"0"},{"column":"type","relation":"not_equals","condition":"Shipping Protection"}],"published_scope":"global"},{"id":321370390699,"handle":"monthly-crystal-sale","title":"Monthly Crystal Sale | Spheres \u0026 Towers","updated_at":"2026-01-06T23:24:37-05:00","body_html":"\u003cp\u003eShop our \u003cstrong\u003eMonthly Crystal Sale\u003c\/strong\u003e, where you can shop a wide selection of healing crystals at discounted prices. Explore \u003cstrong\u003ecrystal spheres and towers,\u003c\/strong\u003e— all carefully curated to support meditation, energy balancing, and spiritual wellness. Whether you're looking to enhance your home decor, boost your daily energy, or find the perfect gift, our \u003cstrong\u003ecrystals for healing and manifestation\u003c\/strong\u003e offer both beauty and metaphysical benefits.\u003c\/p\u003e\n\u003cp\u003eEach month, our sale features \u003cstrong\u003enew discounted collections\u003c\/strong\u003e, from \u003cstrong\u003enatural quartz and amethyst towers\u003c\/strong\u003e to \u003cstrong\u003ewire-wrapped pendants and polished stones\u003c\/strong\u003e, so there's always something fresh to discover. Shop with confidence knowing you're getting high-quality crystals with \u003cstrong\u003efree shipping options\u003c\/strong\u003e and a trusted experience.\u003c\/p\u003e\n\u003cp\u003e\u003cstrong\u003eTake advantage of the Monthly Crystal Sale today\u003c\/strong\u003e and add powerful, natural energy to your life with \u003cstrong\u003eauthentic healing crystals\u003c\/strong\u003e — while our limited-time discounts last.\u003c\/p\u003e\n\u003cp\u003e\u003cstrong\u003e*Discount automatically applied at checkout.\u003c\/strong\u003e\u003c\/p\u003e","published_at":"2025-12-02T01:26:17-05:00","sort_order":"alpha-asc","template_suffix":"","disjunctive":true,"rules":[{"column":"tag","relation":"equals","condition":"spheres"},{"column":"tag","relation":"equals","condition":"Towers"}],"published_scope":"global","image":{"created_at":"2026-01-01T01:32:34-05:00","alt":"","width":960,"height":960,"src":"\/\/crystaldestiny.com\/cdn\/shop\/collections\/3E8C2969-1B86-4ACE-B349-98E9D8768424.jpg?v=1767249154"}},{"id":297596059819,"handle":"all","title":"All Crystals \u0026 Jewelry","updated_at":"2026-01-07T23:43:11-05:00","body_html":"\u003cp data-start=\"149\" data-end=\"494\"\u003e✨ \u003cstrong data-start=\"151\" data-end=\"181\"\u003eWelcome to Crystal Destiny\u003c\/strong\u003e ✨\u003cbr data-start=\"183\" data-end=\"186\"\u003eStep into a world where beauty, energy, and artistry unite. Our collection is a treasure trove of exquisite crystals, from the raw, untamed elegance of natural formations to the polished brilliance of expertly crafted pieces. Each crystal is a masterpiece, carrying its own unique story and timeless charm.\u003c\/p\u003e\n\u003cp data-start=\"496\" data-end=\"831\"\u003eWhether you’re drawn to the calming presence of Amethyst, the vibrant energy of Citrine, or the grounding strength of Jasper, our crystals invite you to connect with nature’s finest wonders. Perfect for enhancing your space, supporting your spiritual journey, or gifting with intention, every piece resonates with beauty and meaning.\u003c\/p\u003e\n\u003cp data-start=\"833\" data-end=\"1000\"\u003eElevate your surroundings, embrace the mystique, and explore the enchanting world of crystals at \u003cstrong data-start=\"930\" data-end=\"949\"\u003eCrystal Destiny\u003c\/strong\u003e—where every crystal is waiting to be discovered.\u003c\/p\u003e","published_at":"2023-11-10T13:55:31-05:00","sort_order":"created-desc","template_suffix":"","disjunctive":false,"rules":[{"column":"type","relation":"not_equals","condition":"asdf"}],"published_scope":"global"},{"id":296256405675,"handle":"crystal-towers","title":"Crystal Towers","updated_at":"2026-01-06T23:24:37-05:00","body_html":"\u003cp data-end=\"568\" data-start=\"152\"\u003e✨ \u003cstrong data-end=\"190\" data-start=\"154\"\u003eCrystal Destiny Tower Collection\u003c\/strong\u003e ✨\u003cbr data-end=\"195\" data-start=\"192\"\u003eEnchant your space with the timeless beauty and powerful energy of crystal towers. Each piece in our \u003cstrong data-end=\"316\" data-start=\"296\"\u003eTower Collection\u003c\/strong\u003e is carefully crafted to showcase nature’s artistry while radiating higher vibrations and spiritual resonance. From the clarity of Quartz to the calming presence of Amethyst, these towers are both decorative masterpieces and tools for transformation.\u003c\/p\u003e\n\u003cp data-end=\"765\" data-start=\"570\"\u003ePerfect for meditation spaces, energy work, or simply elevating your home décor, crystal towers channel focused energy upward—creating balance, harmony, and refined elegance in any environment.\u003c\/p\u003e\n\u003cp data-end=\"917\" data-start=\"767\"\u003eDiscover the Crystal Destiny Tower Collection today and transform your surroundings into a sanctuary of beauty, purpose, and spiritual significance.\u003c\/p\u003e\n\u003ch2\u003eCrystal Towers, Wands, Generators, Points, Pillars \u0026amp; Obelisks — What's the Difference?\u003c\/h2\u003e\n\u003cp id=\"isPasted\"\u003eWhile these terms may vary, they all describe beautifully shaped crystals with a pointed tip designed to channel and direct energy. Each name highlights a unique aspect of their use:\u003c\/p\u003e\n\u003cul\u003e\n\u003cli\u003e\n\u003cstrong\u003eTowers\u003c\/strong\u003e- Known for their steady, grounding presence, crystal towers help focus and amplify energy, making them perfect for meditation and manifestation.\u003c\/li\u003e\n\u003cli\u003e\n\u003cstrong\u003eWands\u003c\/strong\u003e- Traditionally used in energy work and healing, crystal wands are excellent for directing energy flow and clearing blockages.\u003c\/li\u003e\n\u003cli\u003e\n\u003cstrong\u003ePillars\u003c\/strong\u003e- Symbolizing strength and stability, crystal pillars create a balanced and harmonious environment, making them great for home decor and spiritual practices.\u003c\/li\u003e\n\u003cli\u003e\n\u003cstrong\u003eObelisks\u003c\/strong\u003e- Inspired by ancient structures, crystal obelisks are believed to connect earthly and spiritual energies, making them powerful tools for transformation and enlightenment.\u003c\/li\u003e\n\u003c\/ul\u003e\n\u003cp\u003eNo matter what you call them, these crystals serve the same purpose—to enhance energy, intention, and harmony in your space. Choose the one that resonates most with you!\u003c\/p\u003e","published_at":"2023-09-14T12:52:35-04:00","sort_order":"created-desc","template_suffix":"","disjunctive":false,"rules":[{"column":"tag","relation":"equals","condition":"towers"}],"published_scope":"global"},{"id":298983391403,"handle":"january-crystal-sale","title":"January Sale | 25% Off Crystal Towers \u0026 Spheres","updated_at":"2026-01-06T23:24:37-05:00","body_html":"\u003cp\u003eShop our \u003cstrong\u003eJanuary Crystal Sale\u003c\/strong\u003e, where you can shop a wide selection of healing crystals at discounted prices. Explore \u003cstrong\u003eCrystal Towers, \u0026amp; Crystal Spheres\u003c\/strong\u003e — all carefully curated and crafted to support meditation, energy balancing, and spiritual wellness. Whether you're looking to enhance your home decor, boost your daily energy, or find the perfect gift, our \u003cstrong\u003ecrystals for healing and manifestation\u003c\/strong\u003e offer both beauty and metaphysical benefits.\u003c\/p\u003e\n\u003cp\u003eThis January, our sale features \u003cstrong\u003ediscounted crystal towers and spheres\u003c\/strong\u003e, from \u003cstrong\u003enatural quartz \u003c\/strong\u003eand \u003cstrong\u003eamethyst \u003c\/strong\u003eto \u003cstrong\u003ebumblebee jasper \u003c\/strong\u003eand \u003cstrong\u003ecarnelian\u003c\/strong\u003e, so there's always something fresh to discover. Shop with confidence knowing you're getting high-quality crystals with \u003cstrong\u003efree shipping options\u003c\/strong\u003e and a trusted experience.\u003c\/p\u003e\n\u003cp\u003e\u003cstrong\u003eTake advantage of the January Crystal Sale today\u003c\/strong\u003e and add powerful, natural energy to your life with \u003cstrong\u003eauthentic healing crystals\u003c\/strong\u003e — while our limited-time discounts last.\u003c\/p\u003e\n\u003cp\u003e\u003cstrong\u003e*Discount automatically applied at checkout.\u003c\/strong\u003e\u003c\/p\u003e","published_at":"2026-01-01T00:07:17-05:00","sort_order":"alpha-asc","template_suffix":"monthly-collection","disjunctive":true,"rules":[{"column":"tag","relation":"equals","condition":"Spheres"},{"column":"tag","relation":"equals","condition":"Towers"}],"published_scope":"global","image":{"created_at":"2026-01-01T01:29:59-05:00","alt":"","width":960,"height":960,"src":"\/\/crystaldestiny.com\/cdn\/shop\/collections\/1464163B-22B1-4D62-BEC5-CEC9AECB670B.jpg?v=1767248999"}}]}
[{"alt":"Amethyst Tower-Towers-Crystal Destiny-Amethyst-46g - 1.5\"h x 1.0\"w-Crystal Destiny","id":31410852004011,"position":1,"preview_image":{"aspect_ratio":1.0,"height":1677,"width":1677,"src":"\/\/crystaldestiny.com\/cdn\/shop\/files\/Amethyst-Tower-Towers.jpg?v=1757113949"},"aspect_ratio":1.0,"height":1677,"media_type":"image","src":"\/\/crystaldestiny.com\/cdn\/shop\/files\/Amethyst-Tower-Towers.jpg?v=1757113949","width":1677},{"alt":"Amethyst Tower-Towers-Crystal Destiny-Amethyst-46g - 1.5\"h x 1.0\"w-Crystal Destiny","id":31410852036779,"position":2,"preview_image":{"aspect_ratio":1.0,"height":1369,"width":1369,"src":"\/\/crystaldestiny.com\/cdn\/shop\/files\/Amethyst-Tower-Towers-Amethyst-46g-1_5h-x-1_0w-2.jpg?v=1765429495"},"aspect_ratio":1.0,"height":1369,"media_type":"image","src":"\/\/crystaldestiny.com\/cdn\/shop\/files\/Amethyst-Tower-Towers-Amethyst-46g-1_5h-x-1_0w-2.jpg?v=1765429495","width":1369},{"alt":"Amethyst Tower-Towers-Crystal Destiny-Amethyst-30g - 2.60\"h x .75\"w-Crystal Destiny","id":31410880643243,"position":3,"preview_image":{"aspect_ratio":1.0,"height":1386,"width":1386,"src":"\/\/crystaldestiny.com\/cdn\/shop\/files\/Amethyst-Tower-Towers-Amethyst-30g-2_60h-x-_75w-3.jpg?v=1765429497"},"aspect_ratio":1.0,"height":1386,"media_type":"image","src":"\/\/crystaldestiny.com\/cdn\/shop\/files\/Amethyst-Tower-Towers-Amethyst-30g-2_60h-x-_75w-3.jpg?v=1765429497","width":1386}]
{"item":{"id":8567075209387,"title":"Angel Aura Quartz Crystal Tower","handle":"angel-aura-quartz-crystal-tower-1005010034291495-4-5cm","description":"\u003cp\u003eNo matter what you call them, these crystals serve the same purpose—to enhance energy, intention, and harmony in your space. Choose the one that resonates most with you!\u003c\/p\u003e\n\u003cp data-start=\"234\" data-end=\"532\"\u003eThis Angel Aura Quartz Crystal Tower features a polished quartz point enhanced with iridescent rainbow sheen, creating a luminous, ethereal display. Each tower is unique, perfect for meditation, crystal grids, energy work, or as a stunning decorative piece in any space.\u003c\/p\u003e\n\u003cp data-start=\"534\" data-end=\"817\"\u003eAngel Aura Quartz is known for uplifting vibrations, spiritual clarity, and intuitive enhancement. Its vibrant energy promotes calm, inspiration, and connection to higher consciousness, making it ideal for collectors, spiritual practitioners, or anyone seeking beauty with purpose.\u003c\/p\u003e\n\u003cp data-start=\"819\" data-end=\"942\"\u003eCollectors treasure Angel Aura Quartz Towers for their radiant colors, high vibrational energy, and captivating presence.\u003c\/p\u003e\n\u003cp data-start=\"819\" data-end=\"942\"\u003eThis product is pulled at random by size.\u003c\/p\u003e\n\u003ch2\u003eCrystal Towers, Wands, Generators, Points, Pillars \u0026amp; Obelisks — What's the Difference?\u003c\/h2\u003e\n\u003cp id=\"isPasted\"\u003eWhile these terms may vary, they all describe beautifully shaped crystals with a pointed tip designed to channel and direct energy. Each name highlights a unique aspect of their use:\u003c\/p\u003e\n\u003cul\u003e\n\u003cli\u003e\n\u003cstrong\u003eTowers\u003c\/strong\u003e- Known for their steady, grounding presence, crystal towers help focus and amplify energy, making them perfect for meditation and manifestation.\u003c\/li\u003e\n\u003cli\u003e\n\u003cstrong\u003eWands\u003c\/strong\u003e- Traditionally used in energy work and healing, crystal wands are excellent for directing energy flow and clearing blockages.\u003c\/li\u003e\n\u003cli\u003e\n\u003cstrong\u003ePillars\u003c\/strong\u003e- Symbolizing strength and stability, crystal pillars create a balanced and harmonious environment, making them great for home decor and spiritual practices.\u003c\/li\u003e\n\u003cli\u003e\n\u003cstrong\u003eObelisks\u003c\/strong\u003e- Inspired by ancient structures, crystal obelisks are believed to connect earthly and spiritual energies, making them powerful tools for transformation and enlightenment.\u003c\/li\u003e\n\u003c\/ul\u003e\n\u003cp data-start=\"819\" data-end=\"942\"\u003e \u003c\/p\u003e","published_at":"2025-10-30T17:20:56-04:00","created_at":"2025-10-30T17:08:08-04:00","vendor":"Ali","type":"Towers","tags":["adjusted-shipping","crystal","new-arrivals","polished","Towers"],"price":1899,"price_min":1899,"price_max":4499,"available":true,"price_varies":true,"compare_at_price":0,"compare_at_price_min":0,"compare_at_price_max":0,"compare_at_price_varies":false,"variants":[{"id":45782571221163,"title":"Angel Aura Quartz \/ 40-50mm","option1":"Angel Aura Quartz","option2":"40-50mm","option3":null,"sku":"1005010034291495-4-5cm","requires_shipping":true,"taxable":true,"featured_image":{"id":40684731662507,"product_id":8567075209387,"position":7,"created_at":"2025-10-30T17:08:09-04:00","updated_at":"2025-12-11T00:22:26-05:00","alt":"Angel Aura Quartz Crystal Tower-Towers-Ali-Angel Aura Quartz-40-50mm-Crystal Destiny","width":300,"height":300,"src":"\/\/crystaldestiny.com\/cdn\/shop\/files\/Angel-Aura-Quartz-Crystal-Tower-Towers-Angel-Aura-Quartz-40-50mm-7.webp?v=1765430546","variant_ids":[45782571221163]},"available":true,"name":"Angel Aura Quartz Crystal Tower - Angel Aura Quartz \/ 40-50mm","public_title":"Angel Aura Quartz \/ 40-50mm","options":["Angel Aura Quartz","40-50mm"],"price":1899,"weight":31,"compare_at_price":0,"inventory_management":"shopify","barcode":null,"featured_media":{"alt":"Angel Aura Quartz Crystal Tower-Towers-Ali-Angel Aura Quartz-40-50mm-Crystal Destiny","id":32062856724651,"position":7,"preview_image":{"aspect_ratio":1.0,"height":300,"width":300,"src":"\/\/crystaldestiny.com\/cdn\/shop\/files\/Angel-Aura-Quartz-Crystal-Tower-Towers-Angel-Aura-Quartz-40-50mm-7.webp?v=1765430546"}},"requires_selling_plan":false,"selling_plan_allocations":[]},{"id":45782571253931,"title":"Angel Aura Quartz \/ 50-60mm","option1":"Angel Aura Quartz","option2":"50-60mm","option3":null,"sku":"1005010034291495-5-6cm","requires_shipping":true,"taxable":true,"featured_image":{"id":40684731695275,"product_id":8567075209387,"position":8,"created_at":"2025-10-30T17:08:09-04:00","updated_at":"2025-12-11T00:22:28-05:00","alt":"Angel Aura Quartz Crystal Tower-Towers-Ali-Angel Aura Quartz-50-60mm-Crystal Destiny","width":794,"height":794,"src":"\/\/crystaldestiny.com\/cdn\/shop\/files\/Angel-Aura-Quartz-Crystal-Tower-Towers-Angel-Aura-Quartz-50-60mm-8.webp?v=1765430548","variant_ids":[45782571253931]},"available":true,"name":"Angel Aura Quartz Crystal Tower - Angel Aura Quartz \/ 50-60mm","public_title":"Angel Aura Quartz \/ 50-60mm","options":["Angel Aura Quartz","50-60mm"],"price":2199,"weight":31,"compare_at_price":0,"inventory_management":"shopify","barcode":null,"featured_media":{"alt":"Angel Aura Quartz Crystal Tower-Towers-Ali-Angel Aura Quartz-50-60mm-Crystal Destiny","id":32062856757419,"position":8,"preview_image":{"aspect_ratio":1.0,"height":794,"width":794,"src":"\/\/crystaldestiny.com\/cdn\/shop\/files\/Angel-Aura-Quartz-Crystal-Tower-Towers-Angel-Aura-Quartz-50-60mm-8.webp?v=1765430548"}},"requires_selling_plan":false,"selling_plan_allocations":[]},{"id":45782571286699,"title":"Angel Aura Quartz \/ 90-100mm","option1":"Angel Aura Quartz","option2":"90-100mm","option3":null,"sku":"1005010034291495-9-10cm","requires_shipping":true,"taxable":true,"featured_image":{"id":40684731728043,"product_id":8567075209387,"position":9,"created_at":"2025-10-30T17:08:09-04:00","updated_at":"2025-12-11T00:22:29-05:00","alt":"Angel Aura Quartz Crystal Tower-Towers-Ali-Angel Aura Quartz-90-100mm-Crystal Destiny","width":300,"height":300,"src":"\/\/crystaldestiny.com\/cdn\/shop\/files\/Angel-Aura-Quartz-Crystal-Tower-Towers-Angel-Aura-Quartz-90-100mm-9.webp?v=1765430549","variant_ids":[45782571286699]},"available":true,"name":"Angel Aura Quartz Crystal Tower - Angel Aura Quartz \/ 90-100mm","public_title":"Angel Aura Quartz \/ 90-100mm","options":["Angel Aura Quartz","90-100mm"],"price":4499,"weight":31,"compare_at_price":0,"inventory_management":"shopify","barcode":null,"featured_media":{"alt":"Angel Aura Quartz Crystal Tower-Towers-Ali-Angel Aura Quartz-90-100mm-Crystal Destiny","id":32062856790187,"position":9,"preview_image":{"aspect_ratio":1.0,"height":300,"width":300,"src":"\/\/crystaldestiny.com\/cdn\/shop\/files\/Angel-Aura-Quartz-Crystal-Tower-Towers-Angel-Aura-Quartz-90-100mm-9.webp?v=1765430549"}},"requires_selling_plan":false,"selling_plan_allocations":[]}],"images":["\/\/crystaldestiny.com\/cdn\/shop\/files\/Angel-Aura-Quartz-Crystal-Tower-Towers.webp?v=1762014643","\/\/crystaldestiny.com\/cdn\/shop\/files\/Angel-Aura-Quartz-Crystal-Tower-Towers-2.webp?v=1762014645","\/\/crystaldestiny.com\/cdn\/shop\/files\/Angel-Aura-Quartz-Crystal-Tower-Towers-3.webp?v=1762014646","\/\/crystaldestiny.com\/cdn\/shop\/files\/Angel-Aura-Quartz-Crystal-Tower-Towers-4.webp?v=1762014647","\/\/crystaldestiny.com\/cdn\/shop\/files\/Angel-Aura-Quartz-Crystal-Tower-Towers-5.webp?v=1762014648","\/\/crystaldestiny.com\/cdn\/shop\/files\/Angel-Aura-Quartz-Crystal-Tower-Towers-6.webp?v=1762014649","\/\/crystaldestiny.com\/cdn\/shop\/files\/Angel-Aura-Quartz-Crystal-Tower-Towers-Angel-Aura-Quartz-40-50mm-7.webp?v=1765430546","\/\/crystaldestiny.com\/cdn\/shop\/files\/Angel-Aura-Quartz-Crystal-Tower-Towers-Angel-Aura-Quartz-50-60mm-8.webp?v=1765430548","\/\/crystaldestiny.com\/cdn\/shop\/files\/Angel-Aura-Quartz-Crystal-Tower-Towers-Angel-Aura-Quartz-90-100mm-9.webp?v=1765430549"],"featured_image":"\/\/crystaldestiny.com\/cdn\/shop\/files\/Angel-Aura-Quartz-Crystal-Tower-Towers.webp?v=1762014643","options":["Material","Size"],"media":[{"alt":"Angel Aura Quartz Crystal Tower-Towers-Ali-Angel Aura Quartz-40-50mm-Crystal Destiny","id":32062856528043,"position":1,"preview_image":{"aspect_ratio":1.0,"height":794,"width":794,"src":"\/\/crystaldestiny.com\/cdn\/shop\/files\/Angel-Aura-Quartz-Crystal-Tower-Towers.webp?v=1762014643"},"aspect_ratio":1.0,"height":794,"media_type":"image","src":"\/\/crystaldestiny.com\/cdn\/shop\/files\/Angel-Aura-Quartz-Crystal-Tower-Towers.webp?v=1762014643","width":794},{"alt":"Angel Aura Quartz Crystal Tower-Towers-Ali-Angel Aura Quartz-40-50mm-Crystal Destiny","id":32062856560811,"position":2,"preview_image":{"aspect_ratio":1.0,"height":794,"width":794,"src":"\/\/crystaldestiny.com\/cdn\/shop\/files\/Angel-Aura-Quartz-Crystal-Tower-Towers-2.webp?v=1762014645"},"aspect_ratio":1.0,"height":794,"media_type":"image","src":"\/\/crystaldestiny.com\/cdn\/shop\/files\/Angel-Aura-Quartz-Crystal-Tower-Towers-2.webp?v=1762014645","width":794},{"alt":"Angel Aura Quartz Crystal Tower-Towers-Ali-Angel Aura Quartz-40-50mm-Crystal Destiny","id":32062856593579,"position":3,"preview_image":{"aspect_ratio":1.0,"height":794,"width":794,"src":"\/\/crystaldestiny.com\/cdn\/shop\/files\/Angel-Aura-Quartz-Crystal-Tower-Towers-3.webp?v=1762014646"},"aspect_ratio":1.0,"height":794,"media_type":"image","src":"\/\/crystaldestiny.com\/cdn\/shop\/files\/Angel-Aura-Quartz-Crystal-Tower-Towers-3.webp?v=1762014646","width":794},{"alt":"Angel Aura Quartz Crystal Tower-Towers-Ali-Angel Aura Quartz-40-50mm-Crystal Destiny","id":32062856626347,"position":4,"preview_image":{"aspect_ratio":1.0,"height":794,"width":794,"src":"\/\/crystaldestiny.com\/cdn\/shop\/files\/Angel-Aura-Quartz-Crystal-Tower-Towers-4.webp?v=1762014647"},"aspect_ratio":1.0,"height":794,"media_type":"image","src":"\/\/crystaldestiny.com\/cdn\/shop\/files\/Angel-Aura-Quartz-Crystal-Tower-Towers-4.webp?v=1762014647","width":794},{"alt":"Angel Aura Quartz Crystal Tower-Towers-Ali-Angel Aura Quartz-40-50mm-Crystal Destiny","id":32062856659115,"position":5,"preview_image":{"aspect_ratio":1.0,"height":794,"width":794,"src":"\/\/crystaldestiny.com\/cdn\/shop\/files\/Angel-Aura-Quartz-Crystal-Tower-Towers-5.webp?v=1762014648"},"aspect_ratio":1.0,"height":794,"media_type":"image","src":"\/\/crystaldestiny.com\/cdn\/shop\/files\/Angel-Aura-Quartz-Crystal-Tower-Towers-5.webp?v=1762014648","width":794},{"alt":"Angel Aura Quartz Crystal Tower-Towers-Ali-Angel Aura Quartz-40-50mm-Crystal Destiny","id":32062856691883,"position":6,"preview_image":{"aspect_ratio":1.0,"height":794,"width":794,"src":"\/\/crystaldestiny.com\/cdn\/shop\/files\/Angel-Aura-Quartz-Crystal-Tower-Towers-6.webp?v=1762014649"},"aspect_ratio":1.0,"height":794,"media_type":"image","src":"\/\/crystaldestiny.com\/cdn\/shop\/files\/Angel-Aura-Quartz-Crystal-Tower-Towers-6.webp?v=1762014649","width":794},{"alt":"Angel Aura Quartz Crystal Tower-Towers-Ali-Angel Aura Quartz-40-50mm-Crystal Destiny","id":32062856724651,"position":7,"preview_image":{"aspect_ratio":1.0,"height":300,"width":300,"src":"\/\/crystaldestiny.com\/cdn\/shop\/files\/Angel-Aura-Quartz-Crystal-Tower-Towers-Angel-Aura-Quartz-40-50mm-7.webp?v=1765430546"},"aspect_ratio":1.0,"height":300,"media_type":"image","src":"\/\/crystaldestiny.com\/cdn\/shop\/files\/Angel-Aura-Quartz-Crystal-Tower-Towers-Angel-Aura-Quartz-40-50mm-7.webp?v=1765430546","width":300},{"alt":"Angel Aura Quartz Crystal Tower-Towers-Ali-Angel Aura Quartz-50-60mm-Crystal Destiny","id":32062856757419,"position":8,"preview_image":{"aspect_ratio":1.0,"height":794,"width":794,"src":"\/\/crystaldestiny.com\/cdn\/shop\/files\/Angel-Aura-Quartz-Crystal-Tower-Towers-Angel-Aura-Quartz-50-60mm-8.webp?v=1765430548"},"aspect_ratio":1.0,"height":794,"media_type":"image","src":"\/\/crystaldestiny.com\/cdn\/shop\/files\/Angel-Aura-Quartz-Crystal-Tower-Towers-Angel-Aura-Quartz-50-60mm-8.webp?v=1765430548","width":794},{"alt":"Angel Aura Quartz Crystal Tower-Towers-Ali-Angel Aura Quartz-90-100mm-Crystal Destiny","id":32062856790187,"position":9,"preview_image":{"aspect_ratio":1.0,"height":300,"width":300,"src":"\/\/crystaldestiny.com\/cdn\/shop\/files\/Angel-Aura-Quartz-Crystal-Tower-Towers-Angel-Aura-Quartz-90-100mm-9.webp?v=1765430549"},"aspect_ratio":1.0,"height":300,"media_type":"image","src":"\/\/crystaldestiny.com\/cdn\/shop\/files\/Angel-Aura-Quartz-Crystal-Tower-Towers-Angel-Aura-Quartz-90-100mm-9.webp?v=1765430549","width":300}],"requires_selling_plan":false,"selling_plan_groups":[],"content":"\u003cp\u003eNo matter what you call them, these crystals serve the same purpose—to enhance energy, intention, and harmony in your space. Choose the one that resonates most with you!\u003c\/p\u003e\n\u003cp data-start=\"234\" data-end=\"532\"\u003eThis Angel Aura Quartz Crystal Tower features a polished quartz point enhanced with iridescent rainbow sheen, creating a luminous, ethereal display. Each tower is unique, perfect for meditation, crystal grids, energy work, or as a stunning decorative piece in any space.\u003c\/p\u003e\n\u003cp data-start=\"534\" data-end=\"817\"\u003eAngel Aura Quartz is known for uplifting vibrations, spiritual clarity, and intuitive enhancement. Its vibrant energy promotes calm, inspiration, and connection to higher consciousness, making it ideal for collectors, spiritual practitioners, or anyone seeking beauty with purpose.\u003c\/p\u003e\n\u003cp data-start=\"819\" data-end=\"942\"\u003eCollectors treasure Angel Aura Quartz Towers for their radiant colors, high vibrational energy, and captivating presence.\u003c\/p\u003e\n\u003cp data-start=\"819\" data-end=\"942\"\u003eThis product is pulled at random by size.\u003c\/p\u003e\n\u003ch2\u003eCrystal Towers, Wands, Generators, Points, Pillars \u0026amp; Obelisks — What's the Difference?\u003c\/h2\u003e\n\u003cp id=\"isPasted\"\u003eWhile these terms may vary, they all describe beautifully shaped crystals with a pointed tip designed to channel and direct energy. Each name highlights a unique aspect of their use:\u003c\/p\u003e\n\u003cul\u003e\n\u003cli\u003e\n\u003cstrong\u003eTowers\u003c\/strong\u003e- Known for their steady, grounding presence, crystal towers help focus and amplify energy, making them perfect for meditation and manifestation.\u003c\/li\u003e\n\u003cli\u003e\n\u003cstrong\u003eWands\u003c\/strong\u003e- Traditionally used in energy work and healing, crystal wands are excellent for directing energy flow and clearing blockages.\u003c\/li\u003e\n\u003cli\u003e\n\u003cstrong\u003ePillars\u003c\/strong\u003e- Symbolizing strength and stability, crystal pillars create a balanced and harmonious environment, making them great for home decor and spiritual practices.\u003c\/li\u003e\n\u003cli\u003e\n\u003cstrong\u003eObelisks\u003c\/strong\u003e- Inspired by ancient structures, crystal obelisks are believed to connect earthly and spiritual energies, making them powerful tools for transformation and enlightenment.\u003c\/li\u003e\n\u003c\/ul\u003e\n\u003cp data-start=\"819\" data-end=\"942\"\u003e \u003c\/p\u003e"},"options":[{"name":"Material","position":1,"values":["Angel Aura Quartz"]},{"name":"Size","position":2,"values":["40-50mm","50-60mm","90-100mm"]}],"custom_metafields":{"shipping_time":"12-16 days"},"metafields":{"badge":"\u003cdiv style='display:none' class='jdgm-prev-badge' data-average-rating='0.00' data-number-of-reviews='0' data-number-of-questions='0'\u003e \u003cspan class='jdgm-prev-badge__stars' data-score='0.00' tabindex='0' aria-label='0.00 stars' role='button'\u003e \u003cspan class='jdgm-star jdgm--off'\u003e\u003c\/span\u003e\u003cspan class='jdgm-star jdgm--off'\u003e\u003c\/span\u003e\u003cspan class='jdgm-star jdgm--off'\u003e\u003c\/span\u003e\u003cspan class='jdgm-star jdgm--off'\u003e\u003c\/span\u003e\u003cspan class='jdgm-star jdgm--off'\u003e\u003c\/span\u003e \u003c\/span\u003e \u003cspan class='jdgm-prev-badge__text'\u003e No reviews \u003c\/span\u003e \u003c\/div\u003e","widget":"\u003cdiv class='jdgm-rev-widg' data-updated-at='2025-10-30T21:22:06Z' data-average-rating='0.00' data-number-of-reviews='0' data-number-of-questions='0' data-image-url='https:\/\/cdn.shopify.com\/s\/files\/1\/0613\/0345\/5915\/files\/Se393390004804f5aae4a5248a1722549l.webp?v=1761858491'\u003e \u003cstyle class='jdgm-temp-hiding-style'\u003e.jdgm-rev-widg{ display: none }\u003c\/style\u003e \u003cdiv class='jdgm-rev-widg__header'\u003e \u003ch2 class='jdgm-rev-widg__title'\u003eCustomer Reviews\u003c\/h2\u003e \u003cdiv class='jdgm-rev-widg__summary'\u003e \u003cdiv class='jdgm-rev-widg__summary-stars' aria-label='Average rating is 0.00 stars' role='img'\u003e \u003cspan class='jdgm-star jdgm--off'\u003e\u003c\/span\u003e\u003cspan class='jdgm-star jdgm--off'\u003e\u003c\/span\u003e\u003cspan class='jdgm-star jdgm--off'\u003e\u003c\/span\u003e\u003cspan class='jdgm-star jdgm--off'\u003e\u003c\/span\u003e\u003cspan class='jdgm-star jdgm--off'\u003e\u003c\/span\u003e \u003c\/div\u003e \u003cdiv class='jdgm-rev-widg__summary-text'\u003eBe the first to write a review\u003c\/div\u003e \u003c\/div\u003e \u003ca style='display: none' href='#' class='jdgm-write-rev-link' role='button'\u003eWrite a review\u003c\/a\u003e \u003cdiv class='jdgm-histogram jdgm-temp-hidden'\u003e \u003cdiv class='jdgm-histogram__row' data-rating='5' data-frequency='0' data-percentage='0'\u003e \u003cdiv class='jdgm-histogram__star' role='button' aria-label=\"0% (0) reviews with 5 star rating\" tabindex='0' \u003e\u003cspan class='jdgm-star jdgm--on'\u003e\u003c\/span\u003e\u003cspan class='jdgm-star jdgm--on'\u003e\u003c\/span\u003e\u003cspan class='jdgm-star jdgm--on'\u003e\u003c\/span\u003e\u003cspan class='jdgm-star jdgm--on'\u003e\u003c\/span\u003e\u003cspan class='jdgm-star jdgm--on'\u003e\u003c\/span\u003e\u003c\/div\u003e \u003cdiv class='jdgm-histogram__bar'\u003e \u003cdiv class='jdgm-histogram__bar-content' style='width: 0%;'\u003e \u003c\/div\u003e \u003c\/div\u003e \u003cdiv class='jdgm-histogram__percentage'\u003e0%\u003c\/div\u003e \u003cdiv class='jdgm-histogram__frequency'\u003e(0)\u003c\/div\u003e \u003c\/div\u003e \u003cdiv class='jdgm-histogram__row' data-rating='4' data-frequency='0' data-percentage='0'\u003e \u003cdiv class='jdgm-histogram__star' role='button' aria-label=\"0% (0) reviews with 4 star rating\" tabindex='0' \u003e\u003cspan class='jdgm-star jdgm--on'\u003e\u003c\/span\u003e\u003cspan class='jdgm-star jdgm--on'\u003e\u003c\/span\u003e\u003cspan class='jdgm-star jdgm--on'\u003e\u003c\/span\u003e\u003cspan class='jdgm-star jdgm--on'\u003e\u003c\/span\u003e\u003cspan class='jdgm-star jdgm--off'\u003e\u003c\/span\u003e\u003c\/div\u003e \u003cdiv class='jdgm-histogram__bar'\u003e \u003cdiv class='jdgm-histogram__bar-content' style='width: 0%;'\u003e \u003c\/div\u003e \u003c\/div\u003e \u003cdiv class='jdgm-histogram__percentage'\u003e0%\u003c\/div\u003e \u003cdiv class='jdgm-histogram__frequency'\u003e(0)\u003c\/div\u003e \u003c\/div\u003e \u003cdiv class='jdgm-histogram__row' data-rating='3' data-frequency='0' data-percentage='0'\u003e \u003cdiv class='jdgm-histogram__star' role='button' aria-label=\"0% (0) reviews with 3 star rating\" tabindex='0' \u003e\u003cspan class='jdgm-star jdgm--on'\u003e\u003c\/span\u003e\u003cspan class='jdgm-star jdgm--on'\u003e\u003c\/span\u003e\u003cspan class='jdgm-star jdgm--on'\u003e\u003c\/span\u003e\u003cspan class='jdgm-star jdgm--off'\u003e\u003c\/span\u003e\u003cspan class='jdgm-star jdgm--off'\u003e\u003c\/span\u003e\u003c\/div\u003e \u003cdiv class='jdgm-histogram__bar'\u003e \u003cdiv class='jdgm-histogram__bar-content' style='width: 0%;'\u003e \u003c\/div\u003e \u003c\/div\u003e \u003cdiv class='jdgm-histogram__percentage'\u003e0%\u003c\/div\u003e \u003cdiv class='jdgm-histogram__frequency'\u003e(0)\u003c\/div\u003e \u003c\/div\u003e \u003cdiv class='jdgm-histogram__row' data-rating='2' data-frequency='0' data-percentage='0'\u003e \u003cdiv class='jdgm-histogram__star' role='button' aria-label=\"0% (0) reviews with 2 star rating\" tabindex='0' \u003e\u003cspan class='jdgm-star jdgm--on'\u003e\u003c\/span\u003e\u003cspan class='jdgm-star jdgm--on'\u003e\u003c\/span\u003e\u003cspan class='jdgm-star jdgm--off'\u003e\u003c\/span\u003e\u003cspan class='jdgm-star jdgm--off'\u003e\u003c\/span\u003e\u003cspan class='jdgm-star jdgm--off'\u003e\u003c\/span\u003e\u003c\/div\u003e \u003cdiv class='jdgm-histogram__bar'\u003e \u003cdiv class='jdgm-histogram__bar-content' style='width: 0%;'\u003e \u003c\/div\u003e \u003c\/div\u003e \u003cdiv class='jdgm-histogram__percentage'\u003e0%\u003c\/div\u003e \u003cdiv class='jdgm-histogram__frequency'\u003e(0)\u003c\/div\u003e \u003c\/div\u003e \u003cdiv class='jdgm-histogram__row' data-rating='1' data-frequency='0' data-percentage='0'\u003e \u003cdiv class='jdgm-histogram__star' role='button' aria-label=\"0% (0) reviews with 1 star rating\" tabindex='0' \u003e\u003cspan class='jdgm-star jdgm--on'\u003e\u003c\/span\u003e\u003cspan class='jdgm-star jdgm--off'\u003e\u003c\/span\u003e\u003cspan class='jdgm-star jdgm--off'\u003e\u003c\/span\u003e\u003cspan class='jdgm-star jdgm--off'\u003e\u003c\/span\u003e\u003cspan class='jdgm-star jdgm--off'\u003e\u003c\/span\u003e\u003c\/div\u003e \u003cdiv class='jdgm-histogram__bar'\u003e \u003cdiv class='jdgm-histogram__bar-content' style='width: 0%;'\u003e \u003c\/div\u003e \u003c\/div\u003e \u003cdiv class='jdgm-histogram__percentage'\u003e0%\u003c\/div\u003e \u003cdiv class='jdgm-histogram__frequency'\u003e(0)\u003c\/div\u003e \u003c\/div\u003e \u003cdiv class='jdgm-histogram__row jdgm-histogram__clear-filter' data-rating=null tabindex='0'\u003e\u003c\/div\u003e \u003c\/div\u003e \u003cdiv class='jdgm-rev-widg__sort-wrapper'\u003e\u003c\/div\u003e \u003c\/div\u003e \u003cdiv class='jdgm-rev-widg__body'\u003e \u003cdiv class='jdgm-rev-widg__reviews'\u003e\u003c\/div\u003e \u003cdiv class='jdgm-paginate' data-per-page='4' data-url='https:\/\/api.judge.me\/reviews\/reviews_for_widget' style=\"display: none;\"\u003e\u003c\/div\u003e \u003c\/div\u003e \u003cdiv class='jdgm-rev-widg__paginate-spinner-wrapper'\u003e \u003cdiv class='jdgm-spinner'\u003e\u003c\/div\u003e \u003c\/div\u003e \u003c\/div\u003e"},"collections":[{"id":294880051371,"handle":"crystals","title":"Crystals","updated_at":"2026-01-07T23:43:11-05:00","body_html":"\u003cp data-start=\"159\" data-end=\"687\"\u003e✨ \u003cstrong data-start=\"161\" data-end=\"216\"\u003eDiscover the Magic of Crystals with Crystal Destiny\u003c\/strong\u003e ✨\u003cbr data-start=\"218\" data-end=\"221\"\u003eCrystals have been treasured for centuries—not only for their natural beauty but also for their powerful healing energies. Beyond their visual allure, they bring balance, harmony, and positive energy into any space. Whether used for home décor, meditation, or simply to elevate the energy of your surroundings, crystals create a sanctuary of peace, relaxation, and well-being. Each piece is a unique gift from the Earth—visually stunning and spiritually uplifting.\u003c\/p\u003e\n\u003cp data-start=\"689\" data-end=\"1011\"\u003eAt \u003cstrong data-start=\"692\" data-end=\"711\"\u003eCrystal Destiny\u003c\/strong\u003e, our signature collection showcases a curated selection of exquisite crystals, from radiant Quartz to soothing Amethyst. Every stone is carefully sourced for its elegance and metaphysical resonance, making them perfect for enhancing your home, uplifting your spirit, or gifting to someone special.\u003c\/p\u003e\n\u003cp data-start=\"1013\" data-end=\"1206\"\u003eExperience the timeless sophistication of crystalline wonders. Explore the \u003cstrong data-start=\"1088\" data-end=\"1118\"\u003eCrystal Destiny Collection\u003c\/strong\u003e today and bring the transformative beauty of these treasures into your everyday life.\u003c\/p\u003e","published_at":"2023-06-05T11:24:02-04:00","sort_order":"created-desc","template_suffix":"","disjunctive":false,"rules":[{"column":"tag","relation":"equals","condition":"crystal"},{"column":"type","relation":"not_contains","condition":"925 Sterling Silver"},{"column":"type","relation":"not_contains","condition":"Wire Wraps"}],"published_scope":"global"},{"id":319455756459,"handle":"crown-chakra-crystals","title":"Crown Chakra Crystals","updated_at":"2026-01-07T23:42:38-05:00","body_html":"\u003cp data-start=\"144\" data-end=\"515\"\u003e✨ \u003cstrong data-start=\"146\" data-end=\"171\"\u003eCrown Chakra Crystals\u003c\/strong\u003e ✨\u003cbr data-start=\"173\" data-end=\"176\"\u003eConnect with higher consciousness and spiritual insight with our \u003cstrong data-start=\"241\" data-end=\"266\"\u003eCrown Chakra Crystals\u003c\/strong\u003e. Located at the top of the head, the Crown Chakra governs wisdom, enlightenment, and your connection to the divine. These crystals help open and balance this energy center, fostering clarity, spiritual growth, and a sense of universal connection.\u003c\/p\u003e\n\u003cp data-start=\"517\" data-end=\"851\"\u003eOur selection includes powerful stones such as Amethyst, Clear Quartz, Selenite, and Lepidolite—each chosen for their ability to enhance meditation, energy work, and mindful practices. Whether placed in your sacred space, carried with you, or worn as jewelry, Crown Chakra Crystals promote harmony, insight, and spiritual alignment.\u003c\/p\u003e\n\u003cp data-start=\"853\" data-end=\"1007\"\u003eElevate your consciousness, deepen your meditative practice, and embrace the transformative energy of the Crown Chakra with these illuminating crystals.\u003c\/p\u003e","published_at":"2025-07-17T18:16:11-04:00","sort_order":"best-selling","template_suffix":"","disjunctive":false,"rules":[{"column":"variant_metafield_definition","relation":"equals","condition":"Crown"}],"published_scope":"global","image":{"created_at":"2025-07-17T19:09:11-04:00","alt":null,"width":1080,"height":1080,"src":"\/\/crystaldestiny.com\/cdn\/shop\/collections\/Crown_Chakra_Collection.jpg?v=1762474922"}},{"id":319455887531,"handle":"heart-chakra-crystals","title":"Heart Chakra Crystals","updated_at":"2026-01-07T23:43:11-05:00","body_html":"\u003cp data-start=\"107\" data-end=\"457\"\u003e✨ \u003cstrong data-start=\"109\" data-end=\"134\"\u003eHeart Chakra Crystals\u003c\/strong\u003e ✨\u003cbr data-start=\"136\" data-end=\"139\"\u003eOpen your heart to love, compassion, and emotional balance with our \u003cstrong data-start=\"207\" data-end=\"232\"\u003eHeart Chakra Crystals\u003c\/strong\u003e. Located at the center of the chest, the Heart Chakra governs love, forgiveness, and connection to yourself and others. These crystals help release emotional blockages, foster empathy, and promote harmonious relationships.\u003c\/p\u003e\n\u003cp data-start=\"459\" data-end=\"773\"\u003eOur curated selection includes stones such as Rose Quartz, Green Aventurine, and Rhodonite—each chosen for their ability to inspire self-love, emotional healing, and compassion. Perfect for meditation, energy work, or wearing as jewelry, Heart Chakra Crystals support the flow of loving energy and inner harmony.\u003c\/p\u003e\n\u003cp data-start=\"775\" data-end=\"906\"\u003eEmbrace emotional balance, cultivate love, and harness the transformative energy of the Heart Chakra with these radiant crystals.\u003c\/p\u003e","published_at":"2025-07-17T18:17:52-04:00","sort_order":"best-selling","template_suffix":"","disjunctive":false,"rules":[{"column":"variant_metafield_definition","relation":"equals","condition":"Heart"}],"published_scope":"global","image":{"created_at":"2025-07-17T19:08:29-04:00","alt":null,"width":1080,"height":1080,"src":"\/\/crystaldestiny.com\/cdn\/shop\/collections\/Heart_Chakra_Collection.jpg?v=1762474927"}},{"id":319455789227,"handle":"third-eye-chakra-crystals","title":"Third Eye Chakra Crystals","updated_at":"2026-01-07T23:42:38-05:00","body_html":"\u003cp data-start=\"124\" data-end=\"474\"\u003e✨ \u003cstrong data-start=\"126\" data-end=\"155\"\u003eThird Eye Chakra Crystals\u003c\/strong\u003e ✨\u003cbr data-start=\"157\" data-end=\"160\"\u003eAwaken intuition, clarity, and insight with our \u003cstrong data-start=\"208\" data-end=\"237\"\u003eThird Eye Chakra Crystals\u003c\/strong\u003e. Located between the eyebrows, the Third Eye Chakra governs perception, intuition, and inner wisdom. These crystals help balance and activate this energy center, promoting mental clarity, spiritual awareness, and heightened intuition.\u003c\/p\u003e\n\u003cp data-start=\"476\" data-end=\"835\"\u003eOur curated selection features stones such as Amethyst, Lapis Lazuli, and Sodalite—chosen for their ability to enhance meditation, intuitive practices, and energy work. Whether placed in your sacred space, carried with you, or worn as jewelry, Third Eye Chakra Crystals support mental focus, spiritual growth, and a deeper connection to your inner guidance.\u003c\/p\u003e\n\u003cp data-start=\"837\" data-end=\"976\"\u003eElevate your intuition, expand your awareness, and embrace the transformative power of the Third Eye Chakra with these powerful crystals.\u003c\/p\u003e","published_at":"2025-07-17T18:16:49-04:00","sort_order":"best-selling","template_suffix":"","disjunctive":false,"rules":[{"column":"variant_metafield_definition","relation":"equals","condition":"Third Eye"}],"published_scope":"global","image":{"created_at":"2025-07-17T19:09:01-04:00","alt":null,"width":1080,"height":1080,"src":"\/\/crystaldestiny.com\/cdn\/shop\/collections\/Third_Eye_Chakra_Collection.jpg?v=1762474924"}},{"id":294880116907,"handle":"polished","title":"Polished Crystals","updated_at":"2026-01-07T23:43:11-05:00","body_html":"\u003cp data-start=\"199\" data-end=\"598\"\u003e✨ \u003cstrong data-start=\"201\" data-end=\"248\"\u003eCrystal Destiny Polished Crystal Collection\u003c\/strong\u003e ✨\u003cbr data-start=\"250\" data-end=\"253\"\u003eIndulge in the brilliance of crystals refined to perfection. Our \u003cstrong data-start=\"318\" data-end=\"341\"\u003ePolished Collection\u003c\/strong\u003e showcases gemstones meticulously shaped and smoothed to reveal their natural radiance and timeless beauty. From the shimmering glow of Quartz to the deep allure of Obsidian, each polished piece is a testament to nature’s artistry and human craftsmanship.\u003c\/p\u003e\n\u003cp data-start=\"600\" data-end=\"862\"\u003ePerfect as statement décor, meaningful gifts, or companions on your spiritual journey, polished crystals bring sophistication and elevated energy into any space. Their radiant surfaces reflect not only light but also the transformative power of crystal energy.\u003c\/p\u003e\n\u003cp data-start=\"864\" data-end=\"1022\"\u003eDiscover the elegance of refinement with Crystal Destiny’s Polished Crystal Collection—where every facet shines with intention, beauty, and timeless allure.\u003c\/p\u003e","published_at":"2023-06-05T11:30:44-04:00","sort_order":"created-desc","template_suffix":"","disjunctive":false,"rules":[{"column":"tag","relation":"equals","condition":"polished"}],"published_scope":"global"},{"id":322471624875,"handle":"crystal-favorites","title":"Crystal Enthusiast's Favorites","updated_at":"2026-01-07T23:42:38-05:00","body_html":"\u003cp\u003eDiscover the crystals our community loves most. This collection features our best-selling stones and accessories, carefully curated to highlight pieces that are always in demand and ready to ship. Whether you’re adding to your collection or searching for a gift, these fan-favorite crystals are timeless staples for energy, beauty, and balance.\u003c\/p\u003e","published_at":"2025-10-01T21:07:06-04:00","sort_order":"price-asc","template_suffix":"","disjunctive":false,"rules":[{"column":"variant_inventory","relation":"greater_than","condition":"1"}],"published_scope":"global"},{"id":321695744171,"handle":"direct-from-supplier","title":"Direct from Supplier","updated_at":"2026-01-07T23:43:11-05:00","body_html":"","published_at":"2025-09-12T16:38:23-04:00","sort_order":"best-selling","template_suffix":"","disjunctive":true,"rules":[{"column":"tag","relation":"equals","condition":"adjusted-shipping"}],"published_scope":"global"},{"id":293659312299,"handle":"best-sellers","title":"Best Sellers","updated_at":"2026-01-07T23:43:11-05:00","body_html":"\u003cp data-start=\"155\" data-end=\"510\"\u003eDiscover the pieces our community loves most. Our Best Sellers Collection brings together handpicked crystals and jewelry that embody timeless elegance, spiritual resonance, and everyday sophistication. Each item has earned its place as a customer favorite—celebrated for both its beauty and its meaningful energy.\u003c\/p\u003e\n\u003cp data-start=\"512\" data-end=\"802\"\u003eFrom stunning statement pieces to versatile daily companions, these treasures are curated to elevate your space, uplift your spirit, and reflect refined taste. Indulge in what’s most cherished and let our best sellers guide you toward the perfect blend of style and transformative energy.\u003c\/p\u003e\n\u003cp data-start=\"804\" data-end=\"932\"\u003eExplore the Best Sellers Collection today—where elegance meets intention, and every piece tells a story of beauty and balance.\u003c\/p\u003e","published_at":"2023-03-15T16:04:51-04:00","sort_order":"best-selling","template_suffix":"","disjunctive":false,"rules":[{"column":"variant_price","relation":"greater_than","condition":"0"},{"column":"variant_inventory","relation":"greater_than","condition":"0"},{"column":"type","relation":"not_equals","condition":"Shipping Protection"}],"published_scope":"global"},{"id":321370390699,"handle":"monthly-crystal-sale","title":"Monthly Crystal Sale | Spheres \u0026 Towers","updated_at":"2026-01-06T23:24:37-05:00","body_html":"\u003cp\u003eShop our \u003cstrong\u003eMonthly Crystal Sale\u003c\/strong\u003e, where you can shop a wide selection of healing crystals at discounted prices. Explore \u003cstrong\u003ecrystal spheres and towers,\u003c\/strong\u003e— all carefully curated to support meditation, energy balancing, and spiritual wellness. Whether you're looking to enhance your home decor, boost your daily energy, or find the perfect gift, our \u003cstrong\u003ecrystals for healing and manifestation\u003c\/strong\u003e offer both beauty and metaphysical benefits.\u003c\/p\u003e\n\u003cp\u003eEach month, our sale features \u003cstrong\u003enew discounted collections\u003c\/strong\u003e, from \u003cstrong\u003enatural quartz and amethyst towers\u003c\/strong\u003e to \u003cstrong\u003ewire-wrapped pendants and polished stones\u003c\/strong\u003e, so there's always something fresh to discover. Shop with confidence knowing you're getting high-quality crystals with \u003cstrong\u003efree shipping options\u003c\/strong\u003e and a trusted experience.\u003c\/p\u003e\n\u003cp\u003e\u003cstrong\u003eTake advantage of the Monthly Crystal Sale today\u003c\/strong\u003e and add powerful, natural energy to your life with \u003cstrong\u003eauthentic healing crystals\u003c\/strong\u003e — while our limited-time discounts last.\u003c\/p\u003e\n\u003cp\u003e\u003cstrong\u003e*Discount automatically applied at checkout.\u003c\/strong\u003e\u003c\/p\u003e","published_at":"2025-12-02T01:26:17-05:00","sort_order":"alpha-asc","template_suffix":"","disjunctive":true,"rules":[{"column":"tag","relation":"equals","condition":"spheres"},{"column":"tag","relation":"equals","condition":"Towers"}],"published_scope":"global","image":{"created_at":"2026-01-01T01:32:34-05:00","alt":"","width":960,"height":960,"src":"\/\/crystaldestiny.com\/cdn\/shop\/collections\/3E8C2969-1B86-4ACE-B349-98E9D8768424.jpg?v=1767249154"}},{"id":297906241707,"handle":"new-arrivals","title":"New Arrivals","updated_at":"2026-01-07T23:43:11-05:00","body_html":"\u003cp data-start=\"172\" data-end=\"573\"\u003e✨ \u003cstrong data-start=\"174\" data-end=\"217\"\u003eDiscover Crystal Destiny’s New Arrivals\u003c\/strong\u003e ✨\u003cbr data-start=\"219\" data-end=\"222\"\u003eStep into a world of fresh sophistication with our latest crystal treasures. Each new piece—whether Quartz, Amethyst, or beyond—embodies nature’s artistry, radiating both timeless beauty and powerful energy. Thoughtfully curated and constantly refreshed, our New Arrivals Collection offers the perfect harmony of elegance and metaphysical resonance.\u003c\/p\u003e\n\u003cp data-start=\"575\" data-end=\"793\"\u003eElevate your space, uplift your spirit, and embrace the transformative power of nature’s wonders. Explore the newest expressions of crystal artistry today, and let your journey with crystals evolve with every update.\u003c\/p\u003e","published_at":"2023-11-20T15:35:42-05:00","sort_order":"created-desc","template_suffix":"","disjunctive":true,"rules":[{"column":"tag","relation":"equals","condition":"new-arrivals"}],"published_scope":"global"},{"id":297596059819,"handle":"all","title":"All Crystals \u0026 Jewelry","updated_at":"2026-01-07T23:43:11-05:00","body_html":"\u003cp data-start=\"149\" data-end=\"494\"\u003e✨ \u003cstrong data-start=\"151\" data-end=\"181\"\u003eWelcome to Crystal Destiny\u003c\/strong\u003e ✨\u003cbr data-start=\"183\" data-end=\"186\"\u003eStep into a world where beauty, energy, and artistry unite. Our collection is a treasure trove of exquisite crystals, from the raw, untamed elegance of natural formations to the polished brilliance of expertly crafted pieces. Each crystal is a masterpiece, carrying its own unique story and timeless charm.\u003c\/p\u003e\n\u003cp data-start=\"496\" data-end=\"831\"\u003eWhether you’re drawn to the calming presence of Amethyst, the vibrant energy of Citrine, or the grounding strength of Jasper, our crystals invite you to connect with nature’s finest wonders. Perfect for enhancing your space, supporting your spiritual journey, or gifting with intention, every piece resonates with beauty and meaning.\u003c\/p\u003e\n\u003cp data-start=\"833\" data-end=\"1000\"\u003eElevate your surroundings, embrace the mystique, and explore the enchanting world of crystals at \u003cstrong data-start=\"930\" data-end=\"949\"\u003eCrystal Destiny\u003c\/strong\u003e—where every crystal is waiting to be discovered.\u003c\/p\u003e","published_at":"2023-11-10T13:55:31-05:00","sort_order":"created-desc","template_suffix":"","disjunctive":false,"rules":[{"column":"type","relation":"not_equals","condition":"asdf"}],"published_scope":"global"},{"id":296256405675,"handle":"crystal-towers","title":"Crystal Towers","updated_at":"2026-01-06T23:24:37-05:00","body_html":"\u003cp data-end=\"568\" data-start=\"152\"\u003e✨ \u003cstrong data-end=\"190\" data-start=\"154\"\u003eCrystal Destiny Tower Collection\u003c\/strong\u003e ✨\u003cbr data-end=\"195\" data-start=\"192\"\u003eEnchant your space with the timeless beauty and powerful energy of crystal towers. Each piece in our \u003cstrong data-end=\"316\" data-start=\"296\"\u003eTower Collection\u003c\/strong\u003e is carefully crafted to showcase nature’s artistry while radiating higher vibrations and spiritual resonance. From the clarity of Quartz to the calming presence of Amethyst, these towers are both decorative masterpieces and tools for transformation.\u003c\/p\u003e\n\u003cp data-end=\"765\" data-start=\"570\"\u003ePerfect for meditation spaces, energy work, or simply elevating your home décor, crystal towers channel focused energy upward—creating balance, harmony, and refined elegance in any environment.\u003c\/p\u003e\n\u003cp data-end=\"917\" data-start=\"767\"\u003eDiscover the Crystal Destiny Tower Collection today and transform your surroundings into a sanctuary of beauty, purpose, and spiritual significance.\u003c\/p\u003e\n\u003ch2\u003eCrystal Towers, Wands, Generators, Points, Pillars \u0026amp; Obelisks — What's the Difference?\u003c\/h2\u003e\n\u003cp id=\"isPasted\"\u003eWhile these terms may vary, they all describe beautifully shaped crystals with a pointed tip designed to channel and direct energy. Each name highlights a unique aspect of their use:\u003c\/p\u003e\n\u003cul\u003e\n\u003cli\u003e\n\u003cstrong\u003eTowers\u003c\/strong\u003e- Known for their steady, grounding presence, crystal towers help focus and amplify energy, making them perfect for meditation and manifestation.\u003c\/li\u003e\n\u003cli\u003e\n\u003cstrong\u003eWands\u003c\/strong\u003e- Traditionally used in energy work and healing, crystal wands are excellent for directing energy flow and clearing blockages.\u003c\/li\u003e\n\u003cli\u003e\n\u003cstrong\u003ePillars\u003c\/strong\u003e- Symbolizing strength and stability, crystal pillars create a balanced and harmonious environment, making them great for home decor and spiritual practices.\u003c\/li\u003e\n\u003cli\u003e\n\u003cstrong\u003eObelisks\u003c\/strong\u003e- Inspired by ancient structures, crystal obelisks are believed to connect earthly and spiritual energies, making them powerful tools for transformation and enlightenment.\u003c\/li\u003e\n\u003c\/ul\u003e\n\u003cp\u003eNo matter what you call them, these crystals serve the same purpose—to enhance energy, intention, and harmony in your space. Choose the one that resonates most with you!\u003c\/p\u003e","published_at":"2023-09-14T12:52:35-04:00","sort_order":"created-desc","template_suffix":"","disjunctive":false,"rules":[{"column":"tag","relation":"equals","condition":"towers"}],"published_scope":"global"},{"id":298983391403,"handle":"january-crystal-sale","title":"January Sale | 25% Off Crystal Towers \u0026 Spheres","updated_at":"2026-01-06T23:24:37-05:00","body_html":"\u003cp\u003eShop our \u003cstrong\u003eJanuary Crystal Sale\u003c\/strong\u003e, where you can shop a wide selection of healing crystals at discounted prices. Explore \u003cstrong\u003eCrystal Towers, \u0026amp; Crystal Spheres\u003c\/strong\u003e — all carefully curated and crafted to support meditation, energy balancing, and spiritual wellness. Whether you're looking to enhance your home decor, boost your daily energy, or find the perfect gift, our \u003cstrong\u003ecrystals for healing and manifestation\u003c\/strong\u003e offer both beauty and metaphysical benefits.\u003c\/p\u003e\n\u003cp\u003eThis January, our sale features \u003cstrong\u003ediscounted crystal towers and spheres\u003c\/strong\u003e, from \u003cstrong\u003enatural quartz \u003c\/strong\u003eand \u003cstrong\u003eamethyst \u003c\/strong\u003eto \u003cstrong\u003ebumblebee jasper \u003c\/strong\u003eand \u003cstrong\u003ecarnelian\u003c\/strong\u003e, so there's always something fresh to discover. Shop with confidence knowing you're getting high-quality crystals with \u003cstrong\u003efree shipping options\u003c\/strong\u003e and a trusted experience.\u003c\/p\u003e\n\u003cp\u003e\u003cstrong\u003eTake advantage of the January Crystal Sale today\u003c\/strong\u003e and add powerful, natural energy to your life with \u003cstrong\u003eauthentic healing crystals\u003c\/strong\u003e — while our limited-time discounts last.\u003c\/p\u003e\n\u003cp\u003e\u003cstrong\u003e*Discount automatically applied at checkout.\u003c\/strong\u003e\u003c\/p\u003e","published_at":"2026-01-01T00:07:17-05:00","sort_order":"alpha-asc","template_suffix":"monthly-collection","disjunctive":true,"rules":[{"column":"tag","relation":"equals","condition":"Spheres"},{"column":"tag","relation":"equals","condition":"Towers"}],"published_scope":"global","image":{"created_at":"2026-01-01T01:29:59-05:00","alt":"","width":960,"height":960,"src":"\/\/crystaldestiny.com\/cdn\/shop\/collections\/1464163B-22B1-4D62-BEC5-CEC9AECB670B.jpg?v=1767248999"}}]}
[{"alt":"Angel Aura Quartz Crystal Tower-Towers-Ali-Angel Aura Quartz-40-50mm-Crystal Destiny","id":32062856528043,"position":1,"preview_image":{"aspect_ratio":1.0,"height":794,"width":794,"src":"\/\/crystaldestiny.com\/cdn\/shop\/files\/Angel-Aura-Quartz-Crystal-Tower-Towers.webp?v=1762014643"},"aspect_ratio":1.0,"height":794,"media_type":"image","src":"\/\/crystaldestiny.com\/cdn\/shop\/files\/Angel-Aura-Quartz-Crystal-Tower-Towers.webp?v=1762014643","width":794},{"alt":"Angel Aura Quartz Crystal Tower-Towers-Ali-Angel Aura Quartz-40-50mm-Crystal Destiny","id":32062856560811,"position":2,"preview_image":{"aspect_ratio":1.0,"height":794,"width":794,"src":"\/\/crystaldestiny.com\/cdn\/shop\/files\/Angel-Aura-Quartz-Crystal-Tower-Towers-2.webp?v=1762014645"},"aspect_ratio":1.0,"height":794,"media_type":"image","src":"\/\/crystaldestiny.com\/cdn\/shop\/files\/Angel-Aura-Quartz-Crystal-Tower-Towers-2.webp?v=1762014645","width":794},{"alt":"Angel Aura Quartz Crystal Tower-Towers-Ali-Angel Aura Quartz-40-50mm-Crystal Destiny","id":32062856593579,"position":3,"preview_image":{"aspect_ratio":1.0,"height":794,"width":794,"src":"\/\/crystaldestiny.com\/cdn\/shop\/files\/Angel-Aura-Quartz-Crystal-Tower-Towers-3.webp?v=1762014646"},"aspect_ratio":1.0,"height":794,"media_type":"image","src":"\/\/crystaldestiny.com\/cdn\/shop\/files\/Angel-Aura-Quartz-Crystal-Tower-Towers-3.webp?v=1762014646","width":794},{"alt":"Angel Aura Quartz Crystal Tower-Towers-Ali-Angel Aura Quartz-40-50mm-Crystal Destiny","id":32062856626347,"position":4,"preview_image":{"aspect_ratio":1.0,"height":794,"width":794,"src":"\/\/crystaldestiny.com\/cdn\/shop\/files\/Angel-Aura-Quartz-Crystal-Tower-Towers-4.webp?v=1762014647"},"aspect_ratio":1.0,"height":794,"media_type":"image","src":"\/\/crystaldestiny.com\/cdn\/shop\/files\/Angel-Aura-Quartz-Crystal-Tower-Towers-4.webp?v=1762014647","width":794},{"alt":"Angel Aura Quartz Crystal Tower-Towers-Ali-Angel Aura Quartz-40-50mm-Crystal Destiny","id":32062856659115,"position":5,"preview_image":{"aspect_ratio":1.0,"height":794,"width":794,"src":"\/\/crystaldestiny.com\/cdn\/shop\/files\/Angel-Aura-Quartz-Crystal-Tower-Towers-5.webp?v=1762014648"},"aspect_ratio":1.0,"height":794,"media_type":"image","src":"\/\/crystaldestiny.com\/cdn\/shop\/files\/Angel-Aura-Quartz-Crystal-Tower-Towers-5.webp?v=1762014648","width":794},{"alt":"Angel Aura Quartz Crystal Tower-Towers-Ali-Angel Aura Quartz-40-50mm-Crystal Destiny","id":32062856691883,"position":6,"preview_image":{"aspect_ratio":1.0,"height":794,"width":794,"src":"\/\/crystaldestiny.com\/cdn\/shop\/files\/Angel-Aura-Quartz-Crystal-Tower-Towers-6.webp?v=1762014649"},"aspect_ratio":1.0,"height":794,"media_type":"image","src":"\/\/crystaldestiny.com\/cdn\/shop\/files\/Angel-Aura-Quartz-Crystal-Tower-Towers-6.webp?v=1762014649","width":794},{"alt":"Angel Aura Quartz Crystal Tower-Towers-Ali-Angel Aura Quartz-40-50mm-Crystal Destiny","id":32062856724651,"position":7,"preview_image":{"aspect_ratio":1.0,"height":300,"width":300,"src":"\/\/crystaldestiny.com\/cdn\/shop\/files\/Angel-Aura-Quartz-Crystal-Tower-Towers-Angel-Aura-Quartz-40-50mm-7.webp?v=1765430546"},"aspect_ratio":1.0,"height":300,"media_type":"image","src":"\/\/crystaldestiny.com\/cdn\/shop\/files\/Angel-Aura-Quartz-Crystal-Tower-Towers-Angel-Aura-Quartz-40-50mm-7.webp?v=1765430546","width":300},{"alt":"Angel Aura Quartz Crystal Tower-Towers-Ali-Angel Aura Quartz-50-60mm-Crystal Destiny","id":32062856757419,"position":8,"preview_image":{"aspect_ratio":1.0,"height":794,"width":794,"src":"\/\/crystaldestiny.com\/cdn\/shop\/files\/Angel-Aura-Quartz-Crystal-Tower-Towers-Angel-Aura-Quartz-50-60mm-8.webp?v=1765430548"},"aspect_ratio":1.0,"height":794,"media_type":"image","src":"\/\/crystaldestiny.com\/cdn\/shop\/files\/Angel-Aura-Quartz-Crystal-Tower-Towers-Angel-Aura-Quartz-50-60mm-8.webp?v=1765430548","width":794},{"alt":"Angel Aura Quartz Crystal Tower-Towers-Ali-Angel Aura Quartz-90-100mm-Crystal Destiny","id":32062856790187,"position":9,"preview_image":{"aspect_ratio":1.0,"height":300,"width":300,"src":"\/\/crystaldestiny.com\/cdn\/shop\/files\/Angel-Aura-Quartz-Crystal-Tower-Towers-Angel-Aura-Quartz-90-100mm-9.webp?v=1765430549"},"aspect_ratio":1.0,"height":300,"media_type":"image","src":"\/\/crystaldestiny.com\/cdn\/shop\/files\/Angel-Aura-Quartz-Crystal-Tower-Towers-Angel-Aura-Quartz-90-100mm-9.webp?v=1765430549","width":300}]
{"item":{"id":8535219077291,"title":"Aragonite XL Tower, Rare Thick Crystal","handle":"aragonite-xl-tower-rare-thick-crystal-cd-10381","description":"\u003cp data-start=\"206\" data-end=\"528\"\u003eThis \u003cstrong data-start=\"238\" data-end=\"260\"\u003eAragonite XL Tower\u003c\/strong\u003e is a rare and powerful crystal with a unique thick formation that showcases earthy tones and natural patterns. Known as a stone of grounding and stability, Aragonite helps bring balance to the mind, body, and spirit while encouraging patience and emotional healing.\u003c\/p\u003e\n\u003cp data-start=\"530\" data-end=\"804\"\u003ePerfect for meditation, energy work, or as a striking display piece, this rare Aragonite Tower radiates calming energy that anchors you to the present moment. Collectors and spiritual practitioners alike will appreciate its size, rarity, and powerful grounding vibrations.\u003c\/p\u003e\n\u003cp data-start=\"530\" data-end=\"804\"\u003eThis product is an exact pick as pictured, one of a kind.\u003c\/p\u003e\n\u003ch2\u003eCrystal Towers, Wands, Generators, Points, Pillars \u0026amp; Obelisks — What's the Difference?\u003c\/h2\u003e\n\u003cp id=\"isPasted\"\u003eWhile these terms may vary, they all describe beautifully shaped crystals with a pointed tip designed to channel and direct energy. Each name highlights a unique aspect of their use:\u003c\/p\u003e\n\u003cul\u003e\n\u003cli\u003e\n\u003cstrong\u003eTowers\u003c\/strong\u003e- Known for their steady, grounding presence, crystal towers help focus and amplify energy, making them perfect for meditation and manifestation.\u003c\/li\u003e\n\u003cli\u003e\n\u003cstrong\u003eWands\u003c\/strong\u003e- Traditionally used in energy work and healing, crystal wands are excellent for directing energy flow and clearing blockages.\u003c\/li\u003e\n\u003cli\u003e\n\u003cstrong\u003ePillars\u003c\/strong\u003e- Symbolizing strength and stability, crystal pillars create a balanced and harmonious environment, making them great for home decor and spiritual practices.\u003c\/li\u003e\n\u003cli\u003e\n\u003cstrong\u003eObelisks\u003c\/strong\u003e- Inspired by ancient structures, crystal obelisks are believed to connect earthly and spiritual energies, making them powerful tools for transformation and enlightenment.\u003c\/li\u003e\n\u003c\/ul\u003e\n\u003cp\u003eNo matter what you call them, these crystals serve the same purpose—to enhance energy, intention, and harmony in your space. Choose the one that resonates most with you!\u003c\/p\u003e","published_at":"2025-09-26T18:03:23-04:00","created_at":"2025-09-26T18:03:21-04:00","vendor":"Crystal Destiny","type":"Towers","tags":["crystal","polished","Towers"],"price":14999,"price_min":14999,"price_max":14999,"available":true,"price_varies":false,"compare_at_price":null,"compare_at_price_min":0,"compare_at_price_max":0,"compare_at_price_varies":false,"variants":[{"id":45670888800427,"title":"Aragonite \/ 584g - 6.00\"H x 2.50\"W","option1":"Aragonite","option2":"584g - 6.00\"H x 2.50\"W","option3":null,"sku":"CD-10381","requires_shipping":true,"taxable":true,"featured_image":null,"available":true,"name":"Aragonite XL Tower, Rare Thick Crystal - Aragonite \/ 584g - 6.00\"H x 2.50\"W","public_title":"Aragonite \/ 584g - 6.00\"H x 2.50\"W","options":["Aragonite","584g - 6.00\"H x 2.50\"W"],"price":14999,"weight":584,"compare_at_price":null,"inventory_management":"shopify","barcode":"","requires_selling_plan":false,"selling_plan_allocations":[]}],"images":["\/\/crystaldestiny.com\/cdn\/shop\/files\/Aragonite-XL-Tower-Rare-Thick-Crystal-Towers.jpg?v=1758989809","\/\/crystaldestiny.com\/cdn\/shop\/files\/Aragonite-XL-Tower-Rare-Thick-Crystal-Towers-2.jpg?v=1758949685","\/\/crystaldestiny.com\/cdn\/shop\/files\/Aragonite-XL-Tower-Rare-Thick-Crystal-Towers-3.jpg?v=1758989811","\/\/crystaldestiny.com\/cdn\/shop\/files\/Aragonite-XL-Tower-Rare-Thick-Crystal-Towers-4.jpg?v=1758949688"],"featured_image":"\/\/crystaldestiny.com\/cdn\/shop\/files\/Aragonite-XL-Tower-Rare-Thick-Crystal-Towers.jpg?v=1758989809","options":["Material","Size"],"media":[{"alt":"Aragonite XL Tower, Rare Thick Crystal-Towers-Crystal Destiny-Aragonite-584g - 6.00\"H x 2.50\"W-Crystal Destiny","id":31873038188715,"position":1,"preview_image":{"aspect_ratio":1.0,"height":2048,"width":2048,"src":"\/\/crystaldestiny.com\/cdn\/shop\/files\/Aragonite-XL-Tower-Rare-Thick-Crystal-Towers.jpg?v=1758989809"},"aspect_ratio":1.0,"height":2048,"media_type":"image","src":"\/\/crystaldestiny.com\/cdn\/shop\/files\/Aragonite-XL-Tower-Rare-Thick-Crystal-Towers.jpg?v=1758989809","width":2048},{"alt":"Aragonite XL Tower, Rare Thick Crystal-Towers-Crystal Destiny-Aragonite-584g - 6.00\"H x 2.50\"W-Crystal Destiny","id":31873038221483,"position":2,"preview_image":{"aspect_ratio":1.0,"height":2048,"width":2048,"src":"\/\/crystaldestiny.com\/cdn\/shop\/files\/Aragonite-XL-Tower-Rare-Thick-Crystal-Towers-2.jpg?v=1758949685"},"aspect_ratio":1.0,"height":2048,"media_type":"image","src":"\/\/crystaldestiny.com\/cdn\/shop\/files\/Aragonite-XL-Tower-Rare-Thick-Crystal-Towers-2.jpg?v=1758949685","width":2048},{"alt":"Aragonite XL Tower, Rare Thick Crystal-Towers-Crystal Destiny-Aragonite-584g - 6.00\"H x 2.50\"W-Crystal Destiny","id":31873038254251,"position":3,"preview_image":{"aspect_ratio":1.0,"height":2048,"width":2048,"src":"\/\/crystaldestiny.com\/cdn\/shop\/files\/Aragonite-XL-Tower-Rare-Thick-Crystal-Towers-3.jpg?v=1758989811"},"aspect_ratio":1.0,"height":2048,"media_type":"image","src":"\/\/crystaldestiny.com\/cdn\/shop\/files\/Aragonite-XL-Tower-Rare-Thick-Crystal-Towers-3.jpg?v=1758989811","width":2048},{"alt":"Aragonite XL Tower, Rare Thick Crystal-Towers-Crystal Destiny-Aragonite-584g - 6.00\"H x 2.50\"W-Crystal Destiny","id":31873038287019,"position":4,"preview_image":{"aspect_ratio":1.0,"height":2048,"width":2048,"src":"\/\/crystaldestiny.com\/cdn\/shop\/files\/Aragonite-XL-Tower-Rare-Thick-Crystal-Towers-4.jpg?v=1758949688"},"aspect_ratio":1.0,"height":2048,"media_type":"image","src":"\/\/crystaldestiny.com\/cdn\/shop\/files\/Aragonite-XL-Tower-Rare-Thick-Crystal-Towers-4.jpg?v=1758949688","width":2048}],"requires_selling_plan":false,"selling_plan_groups":[],"content":"\u003cp data-start=\"206\" data-end=\"528\"\u003eThis \u003cstrong data-start=\"238\" data-end=\"260\"\u003eAragonite XL Tower\u003c\/strong\u003e is a rare and powerful crystal with a unique thick formation that showcases earthy tones and natural patterns. Known as a stone of grounding and stability, Aragonite helps bring balance to the mind, body, and spirit while encouraging patience and emotional healing.\u003c\/p\u003e\n\u003cp data-start=\"530\" data-end=\"804\"\u003ePerfect for meditation, energy work, or as a striking display piece, this rare Aragonite Tower radiates calming energy that anchors you to the present moment. Collectors and spiritual practitioners alike will appreciate its size, rarity, and powerful grounding vibrations.\u003c\/p\u003e\n\u003cp data-start=\"530\" data-end=\"804\"\u003eThis product is an exact pick as pictured, one of a kind.\u003c\/p\u003e\n\u003ch2\u003eCrystal Towers, Wands, Generators, Points, Pillars \u0026amp; Obelisks — What's the Difference?\u003c\/h2\u003e\n\u003cp id=\"isPasted\"\u003eWhile these terms may vary, they all describe beautifully shaped crystals with a pointed tip designed to channel and direct energy. Each name highlights a unique aspect of their use:\u003c\/p\u003e\n\u003cul\u003e\n\u003cli\u003e\n\u003cstrong\u003eTowers\u003c\/strong\u003e- Known for their steady, grounding presence, crystal towers help focus and amplify energy, making them perfect for meditation and manifestation.\u003c\/li\u003e\n\u003cli\u003e\n\u003cstrong\u003eWands\u003c\/strong\u003e- Traditionally used in energy work and healing, crystal wands are excellent for directing energy flow and clearing blockages.\u003c\/li\u003e\n\u003cli\u003e\n\u003cstrong\u003ePillars\u003c\/strong\u003e- Symbolizing strength and stability, crystal pillars create a balanced and harmonious environment, making them great for home decor and spiritual practices.\u003c\/li\u003e\n\u003cli\u003e\n\u003cstrong\u003eObelisks\u003c\/strong\u003e- Inspired by ancient structures, crystal obelisks are believed to connect earthly and spiritual energies, making them powerful tools for transformation and enlightenment.\u003c\/li\u003e\n\u003c\/ul\u003e\n\u003cp\u003eNo matter what you call them, these crystals serve the same purpose—to enhance energy, intention, and harmony in your space. Choose the one that resonates most with you!\u003c\/p\u003e"},"options":[{"name":"Material","position":1,"values":["Aragonite"]},{"name":"Size","position":2,"values":["584g - 6.00\"H x 2.50\"W"]}],"custom_metafields":{"shipping_time":"Within 7 days"},"metafields":{"badge":"\u003cdiv style='display:none' class='jdgm-prev-badge' data-average-rating='0.00' data-number-of-reviews='0' data-number-of-questions='0'\u003e \u003cspan class='jdgm-prev-badge__stars' data-score='0.00' tabindex='0' aria-label='0.00 stars' role='button'\u003e \u003cspan class='jdgm-star jdgm--off'\u003e\u003c\/span\u003e\u003cspan class='jdgm-star jdgm--off'\u003e\u003c\/span\u003e\u003cspan class='jdgm-star jdgm--off'\u003e\u003c\/span\u003e\u003cspan class='jdgm-star jdgm--off'\u003e\u003c\/span\u003e\u003cspan class='jdgm-star jdgm--off'\u003e\u003c\/span\u003e \u003c\/span\u003e \u003cspan class='jdgm-prev-badge__text'\u003e No reviews \u003c\/span\u003e \u003c\/div\u003e","widget":"\u003cdiv class='jdgm-rev-widg' data-updated-at='2025-09-26T22:04:30Z' data-average-rating='0.00' data-number-of-reviews='0' data-number-of-questions='0' data-image-url='https:\/\/cdn.shopify.com\/s\/files\/1\/0613\/0345\/5915\/files\/6I0A4241.jpg?v=1758923998'\u003e \u003cstyle class='jdgm-temp-hiding-style'\u003e.jdgm-rev-widg{ display: none }\u003c\/style\u003e \u003cdiv class='jdgm-rev-widg__header'\u003e \u003ch2 class='jdgm-rev-widg__title'\u003eCustomer Reviews\u003c\/h2\u003e \u003cdiv class='jdgm-rev-widg__summary'\u003e \u003cdiv class='jdgm-rev-widg__summary-stars' aria-label='Average rating is 0.00 stars' role='img'\u003e \u003cspan class='jdgm-star jdgm--off'\u003e\u003c\/span\u003e\u003cspan class='jdgm-star jdgm--off'\u003e\u003c\/span\u003e\u003cspan class='jdgm-star jdgm--off'\u003e\u003c\/span\u003e\u003cspan class='jdgm-star jdgm--off'\u003e\u003c\/span\u003e\u003cspan class='jdgm-star jdgm--off'\u003e\u003c\/span\u003e \u003c\/div\u003e \u003cdiv class='jdgm-rev-widg__summary-text'\u003eBe the first to write a review\u003c\/div\u003e \u003c\/div\u003e \u003ca style='display: none' href='#' class='jdgm-write-rev-link' role='button'\u003eWrite a review\u003c\/a\u003e \u003cdiv class='jdgm-histogram jdgm-temp-hidden'\u003e \u003cdiv class='jdgm-histogram__row' data-rating='5' data-frequency='0' data-percentage='0'\u003e \u003cdiv class='jdgm-histogram__star' role='button' aria-label=\"0% (0) reviews with 5 star rating\" tabindex='0' \u003e\u003cspan class='jdgm-star jdgm--on'\u003e\u003c\/span\u003e\u003cspan class='jdgm-star jdgm--on'\u003e\u003c\/span\u003e\u003cspan class='jdgm-star jdgm--on'\u003e\u003c\/span\u003e\u003cspan class='jdgm-star jdgm--on'\u003e\u003c\/span\u003e\u003cspan class='jdgm-star jdgm--on'\u003e\u003c\/span\u003e\u003c\/div\u003e \u003cdiv class='jdgm-histogram__bar'\u003e \u003cdiv class='jdgm-histogram__bar-content' style='width: 0%;'\u003e \u003c\/div\u003e \u003c\/div\u003e \u003cdiv class='jdgm-histogram__percentage'\u003e0%\u003c\/div\u003e \u003cdiv class='jdgm-histogram__frequency'\u003e(0)\u003c\/div\u003e \u003c\/div\u003e \u003cdiv class='jdgm-histogram__row' data-rating='4' data-frequency='0' data-percentage='0'\u003e \u003cdiv class='jdgm-histogram__star' role='button' aria-label=\"0% (0) reviews with 4 star rating\" tabindex='0' \u003e\u003cspan class='jdgm-star jdgm--on'\u003e\u003c\/span\u003e\u003cspan class='jdgm-star jdgm--on'\u003e\u003c\/span\u003e\u003cspan class='jdgm-star jdgm--on'\u003e\u003c\/span\u003e\u003cspan class='jdgm-star jdgm--on'\u003e\u003c\/span\u003e\u003cspan class='jdgm-star jdgm--off'\u003e\u003c\/span\u003e\u003c\/div\u003e \u003cdiv class='jdgm-histogram__bar'\u003e \u003cdiv class='jdgm-histogram__bar-content' style='width: 0%;'\u003e \u003c\/div\u003e \u003c\/div\u003e \u003cdiv class='jdgm-histogram__percentage'\u003e0%\u003c\/div\u003e \u003cdiv class='jdgm-histogram__frequency'\u003e(0)\u003c\/div\u003e \u003c\/div\u003e \u003cdiv class='jdgm-histogram__row' data-rating='3' data-frequency='0' data-percentage='0'\u003e \u003cdiv class='jdgm-histogram__star' role='button' aria-label=\"0% (0) reviews with 3 star rating\" tabindex='0' \u003e\u003cspan class='jdgm-star jdgm--on'\u003e\u003c\/span\u003e\u003cspan class='jdgm-star jdgm--on'\u003e\u003c\/span\u003e\u003cspan class='jdgm-star jdgm--on'\u003e\u003c\/span\u003e\u003cspan class='jdgm-star jdgm--off'\u003e\u003c\/span\u003e\u003cspan class='jdgm-star jdgm--off'\u003e\u003c\/span\u003e\u003c\/div\u003e \u003cdiv class='jdgm-histogram__bar'\u003e \u003cdiv class='jdgm-histogram__bar-content' style='width: 0%;'\u003e \u003c\/div\u003e \u003c\/div\u003e \u003cdiv class='jdgm-histogram__percentage'\u003e0%\u003c\/div\u003e \u003cdiv class='jdgm-histogram__frequency'\u003e(0)\u003c\/div\u003e \u003c\/div\u003e \u003cdiv class='jdgm-histogram__row' data-rating='2' data-frequency='0' data-percentage='0'\u003e \u003cdiv class='jdgm-histogram__star' role='button' aria-label=\"0% (0) reviews with 2 star rating\" tabindex='0' \u003e\u003cspan class='jdgm-star jdgm--on'\u003e\u003c\/span\u003e\u003cspan class='jdgm-star jdgm--on'\u003e\u003c\/span\u003e\u003cspan class='jdgm-star jdgm--off'\u003e\u003c\/span\u003e\u003cspan class='jdgm-star jdgm--off'\u003e\u003c\/span\u003e\u003cspan class='jdgm-star jdgm--off'\u003e\u003c\/span\u003e\u003c\/div\u003e \u003cdiv class='jdgm-histogram__bar'\u003e \u003cdiv class='jdgm-histogram__bar-content' style='width: 0%;'\u003e \u003c\/div\u003e \u003c\/div\u003e \u003cdiv class='jdgm-histogram__percentage'\u003e0%\u003c\/div\u003e \u003cdiv class='jdgm-histogram__frequency'\u003e(0)\u003c\/div\u003e \u003c\/div\u003e \u003cdiv class='jdgm-histogram__row' data-rating='1' data-frequency='0' data-percentage='0'\u003e \u003cdiv class='jdgm-histogram__star' role='button' aria-label=\"0% (0) reviews with 1 star rating\" tabindex='0' \u003e\u003cspan class='jdgm-star jdgm--on'\u003e\u003c\/span\u003e\u003cspan class='jdgm-star jdgm--off'\u003e\u003c\/span\u003e\u003cspan class='jdgm-star jdgm--off'\u003e\u003c\/span\u003e\u003cspan class='jdgm-star jdgm--off'\u003e\u003c\/span\u003e\u003cspan class='jdgm-star jdgm--off'\u003e\u003c\/span\u003e\u003c\/div\u003e \u003cdiv class='jdgm-histogram__bar'\u003e \u003cdiv class='jdgm-histogram__bar-content' style='width: 0%;'\u003e \u003c\/div\u003e \u003c\/div\u003e \u003cdiv class='jdgm-histogram__percentage'\u003e0%\u003c\/div\u003e \u003cdiv class='jdgm-histogram__frequency'\u003e(0)\u003c\/div\u003e \u003c\/div\u003e \u003cdiv class='jdgm-histogram__row jdgm-histogram__clear-filter' data-rating=null tabindex='0'\u003e\u003c\/div\u003e \u003c\/div\u003e \u003cdiv class='jdgm-rev-widg__sort-wrapper'\u003e\u003c\/div\u003e \u003c\/div\u003e \u003cdiv class='jdgm-rev-widg__body'\u003e \u003cdiv class='jdgm-rev-widg__reviews'\u003e\u003c\/div\u003e \u003cdiv class='jdgm-paginate' data-per-page='4' data-url='https:\/\/api.judge.me\/reviews\/reviews_for_widget' style=\"display: none;\"\u003e\u003c\/div\u003e \u003c\/div\u003e \u003cdiv class='jdgm-rev-widg__paginate-spinner-wrapper'\u003e \u003cdiv class='jdgm-spinner'\u003e\u003c\/div\u003e \u003c\/div\u003e \u003c\/div\u003e"},"collections":[{"id":294880051371,"handle":"crystals","title":"Crystals","updated_at":"2026-01-07T23:43:11-05:00","body_html":"\u003cp data-start=\"159\" data-end=\"687\"\u003e✨ \u003cstrong data-start=\"161\" data-end=\"216\"\u003eDiscover the Magic of Crystals with Crystal Destiny\u003c\/strong\u003e ✨\u003cbr data-start=\"218\" data-end=\"221\"\u003eCrystals have been treasured for centuries—not only for their natural beauty but also for their powerful healing energies. Beyond their visual allure, they bring balance, harmony, and positive energy into any space. Whether used for home décor, meditation, or simply to elevate the energy of your surroundings, crystals create a sanctuary of peace, relaxation, and well-being. Each piece is a unique gift from the Earth—visually stunning and spiritually uplifting.\u003c\/p\u003e\n\u003cp data-start=\"689\" data-end=\"1011\"\u003eAt \u003cstrong data-start=\"692\" data-end=\"711\"\u003eCrystal Destiny\u003c\/strong\u003e, our signature collection showcases a curated selection of exquisite crystals, from radiant Quartz to soothing Amethyst. Every stone is carefully sourced for its elegance and metaphysical resonance, making them perfect for enhancing your home, uplifting your spirit, or gifting to someone special.\u003c\/p\u003e\n\u003cp data-start=\"1013\" data-end=\"1206\"\u003eExperience the timeless sophistication of crystalline wonders. Explore the \u003cstrong data-start=\"1088\" data-end=\"1118\"\u003eCrystal Destiny Collection\u003c\/strong\u003e today and bring the transformative beauty of these treasures into your everyday life.\u003c\/p\u003e","published_at":"2023-06-05T11:24:02-04:00","sort_order":"created-desc","template_suffix":"","disjunctive":false,"rules":[{"column":"tag","relation":"equals","condition":"crystal"},{"column":"type","relation":"not_contains","condition":"925 Sterling Silver"},{"column":"type","relation":"not_contains","condition":"Wire Wraps"}],"published_scope":"global"},{"id":319456051371,"handle":"root-chakra-crystals","title":"Root Chakra Crystals","updated_at":"2026-01-07T23:43:11-05:00","body_html":"\u003cp data-start=\"132\" data-end=\"502\"\u003e✨ \u003cstrong data-start=\"134\" data-end=\"158\"\u003eRoot Chakra Crystals\u003c\/strong\u003e ✨\u003cbr data-start=\"160\" data-end=\"163\"\u003eGround your energy and cultivate stability with our \u003cstrong data-start=\"215\" data-end=\"239\"\u003eRoot Chakra Crystals\u003c\/strong\u003e. Centered at the base of the spine, the Root Chakra governs your sense of security, balance, and connection to the Earth. These crystals help release fear, build resilience, and foster a strong foundation for your physical, emotional, and spiritual well-being.\u003c\/p\u003e\n\u003cp data-start=\"504\" data-end=\"881\"\u003eOur selection features powerful grounding stones such as Red Jasper, Black Tourmaline, Hematite, and Smoky Quartz—each chosen for their ability to stabilize energy and promote a sense of safety and strength. Perfect for meditation, energy work, or keeping in your living space, Root Chakra Crystals encourage you to feel anchored, supported, and empowered in your daily life.\u003c\/p\u003e\n\u003cp data-start=\"883\" data-end=\"1037\"\u003eReconnect with the Earth, strengthen your foundation, and embrace the transformative energy of the Root Chakra through these essential grounding stones.\u003c\/p\u003e","published_at":"2025-07-17T18:19:27-04:00","sort_order":"best-selling","template_suffix":"","disjunctive":false,"rules":[{"column":"variant_metafield_definition","relation":"equals","condition":"Root"}],"published_scope":"global","image":{"created_at":"2025-07-17T19:08:08-04:00","alt":null,"width":1080,"height":1080,"src":"\/\/crystaldestiny.com\/cdn\/shop\/collections\/Root_Chakra_Collection.jpg?v=1762474932"}},{"id":294880116907,"handle":"polished","title":"Polished Crystals","updated_at":"2026-01-07T23:43:11-05:00","body_html":"\u003cp data-start=\"199\" data-end=\"598\"\u003e✨ \u003cstrong data-start=\"201\" data-end=\"248\"\u003eCrystal Destiny Polished Crystal Collection\u003c\/strong\u003e ✨\u003cbr data-start=\"250\" data-end=\"253\"\u003eIndulge in the brilliance of crystals refined to perfection. Our \u003cstrong data-start=\"318\" data-end=\"341\"\u003ePolished Collection\u003c\/strong\u003e showcases gemstones meticulously shaped and smoothed to reveal their natural radiance and timeless beauty. From the shimmering glow of Quartz to the deep allure of Obsidian, each polished piece is a testament to nature’s artistry and human craftsmanship.\u003c\/p\u003e\n\u003cp data-start=\"600\" data-end=\"862\"\u003ePerfect as statement décor, meaningful gifts, or companions on your spiritual journey, polished crystals bring sophistication and elevated energy into any space. Their radiant surfaces reflect not only light but also the transformative power of crystal energy.\u003c\/p\u003e\n\u003cp data-start=\"864\" data-end=\"1022\"\u003eDiscover the elegance of refinement with Crystal Destiny’s Polished Crystal Collection—where every facet shines with intention, beauty, and timeless allure.\u003c\/p\u003e","published_at":"2023-06-05T11:30:44-04:00","sort_order":"created-desc","template_suffix":"","disjunctive":false,"rules":[{"column":"tag","relation":"equals","condition":"polished"}],"published_scope":"global"},{"id":293659312299,"handle":"best-sellers","title":"Best Sellers","updated_at":"2026-01-07T23:43:11-05:00","body_html":"\u003cp data-start=\"155\" data-end=\"510\"\u003eDiscover the pieces our community loves most. Our Best Sellers Collection brings together handpicked crystals and jewelry that embody timeless elegance, spiritual resonance, and everyday sophistication. Each item has earned its place as a customer favorite—celebrated for both its beauty and its meaningful energy.\u003c\/p\u003e\n\u003cp data-start=\"512\" data-end=\"802\"\u003eFrom stunning statement pieces to versatile daily companions, these treasures are curated to elevate your space, uplift your spirit, and reflect refined taste. Indulge in what’s most cherished and let our best sellers guide you toward the perfect blend of style and transformative energy.\u003c\/p\u003e\n\u003cp data-start=\"804\" data-end=\"932\"\u003eExplore the Best Sellers Collection today—where elegance meets intention, and every piece tells a story of beauty and balance.\u003c\/p\u003e","published_at":"2023-03-15T16:04:51-04:00","sort_order":"best-selling","template_suffix":"","disjunctive":false,"rules":[{"column":"variant_price","relation":"greater_than","condition":"0"},{"column":"variant_inventory","relation":"greater_than","condition":"0"},{"column":"type","relation":"not_equals","condition":"Shipping Protection"}],"published_scope":"global"},{"id":321370390699,"handle":"monthly-crystal-sale","title":"Monthly Crystal Sale | Spheres \u0026 Towers","updated_at":"2026-01-06T23:24:37-05:00","body_html":"\u003cp\u003eShop our \u003cstrong\u003eMonthly Crystal Sale\u003c\/strong\u003e, where you can shop a wide selection of healing crystals at discounted prices. Explore \u003cstrong\u003ecrystal spheres and towers,\u003c\/strong\u003e— all carefully curated to support meditation, energy balancing, and spiritual wellness. Whether you're looking to enhance your home decor, boost your daily energy, or find the perfect gift, our \u003cstrong\u003ecrystals for healing and manifestation\u003c\/strong\u003e offer both beauty and metaphysical benefits.\u003c\/p\u003e\n\u003cp\u003eEach month, our sale features \u003cstrong\u003enew discounted collections\u003c\/strong\u003e, from \u003cstrong\u003enatural quartz and amethyst towers\u003c\/strong\u003e to \u003cstrong\u003ewire-wrapped pendants and polished stones\u003c\/strong\u003e, so there's always something fresh to discover. Shop with confidence knowing you're getting high-quality crystals with \u003cstrong\u003efree shipping options\u003c\/strong\u003e and a trusted experience.\u003c\/p\u003e\n\u003cp\u003e\u003cstrong\u003eTake advantage of the Monthly Crystal Sale today\u003c\/strong\u003e and add powerful, natural energy to your life with \u003cstrong\u003eauthentic healing crystals\u003c\/strong\u003e — while our limited-time discounts last.\u003c\/p\u003e\n\u003cp\u003e\u003cstrong\u003e*Discount automatically applied at checkout.\u003c\/strong\u003e\u003c\/p\u003e","published_at":"2025-12-02T01:26:17-05:00","sort_order":"alpha-asc","template_suffix":"","disjunctive":true,"rules":[{"column":"tag","relation":"equals","condition":"spheres"},{"column":"tag","relation":"equals","condition":"Towers"}],"published_scope":"global","image":{"created_at":"2026-01-01T01:32:34-05:00","alt":"","width":960,"height":960,"src":"\/\/crystaldestiny.com\/cdn\/shop\/collections\/3E8C2969-1B86-4ACE-B349-98E9D8768424.jpg?v=1767249154"}},{"id":297596059819,"handle":"all","title":"All Crystals \u0026 Jewelry","updated_at":"2026-01-07T23:43:11-05:00","body_html":"\u003cp data-start=\"149\" data-end=\"494\"\u003e✨ \u003cstrong data-start=\"151\" data-end=\"181\"\u003eWelcome to Crystal Destiny\u003c\/strong\u003e ✨\u003cbr data-start=\"183\" data-end=\"186\"\u003eStep into a world where beauty, energy, and artistry unite. Our collection is a treasure trove of exquisite crystals, from the raw, untamed elegance of natural formations to the polished brilliance of expertly crafted pieces. Each crystal is a masterpiece, carrying its own unique story and timeless charm.\u003c\/p\u003e\n\u003cp data-start=\"496\" data-end=\"831\"\u003eWhether you’re drawn to the calming presence of Amethyst, the vibrant energy of Citrine, or the grounding strength of Jasper, our crystals invite you to connect with nature’s finest wonders. Perfect for enhancing your space, supporting your spiritual journey, or gifting with intention, every piece resonates with beauty and meaning.\u003c\/p\u003e\n\u003cp data-start=\"833\" data-end=\"1000\"\u003eElevate your surroundings, embrace the mystique, and explore the enchanting world of crystals at \u003cstrong data-start=\"930\" data-end=\"949\"\u003eCrystal Destiny\u003c\/strong\u003e—where every crystal is waiting to be discovered.\u003c\/p\u003e","published_at":"2023-11-10T13:55:31-05:00","sort_order":"created-desc","template_suffix":"","disjunctive":false,"rules":[{"column":"type","relation":"not_equals","condition":"asdf"}],"published_scope":"global"},{"id":296256405675,"handle":"crystal-towers","title":"Crystal Towers","updated_at":"2026-01-06T23:24:37-05:00","body_html":"\u003cp data-end=\"568\" data-start=\"152\"\u003e✨ \u003cstrong data-end=\"190\" data-start=\"154\"\u003eCrystal Destiny Tower Collection\u003c\/strong\u003e ✨\u003cbr data-end=\"195\" data-start=\"192\"\u003eEnchant your space with the timeless beauty and powerful energy of crystal towers. Each piece in our \u003cstrong data-end=\"316\" data-start=\"296\"\u003eTower Collection\u003c\/strong\u003e is carefully crafted to showcase nature’s artistry while radiating higher vibrations and spiritual resonance. From the clarity of Quartz to the calming presence of Amethyst, these towers are both decorative masterpieces and tools for transformation.\u003c\/p\u003e\n\u003cp data-end=\"765\" data-start=\"570\"\u003ePerfect for meditation spaces, energy work, or simply elevating your home décor, crystal towers channel focused energy upward—creating balance, harmony, and refined elegance in any environment.\u003c\/p\u003e\n\u003cp data-end=\"917\" data-start=\"767\"\u003eDiscover the Crystal Destiny Tower Collection today and transform your surroundings into a sanctuary of beauty, purpose, and spiritual significance.\u003c\/p\u003e\n\u003ch2\u003eCrystal Towers, Wands, Generators, Points, Pillars \u0026amp; Obelisks — What's the Difference?\u003c\/h2\u003e\n\u003cp id=\"isPasted\"\u003eWhile these terms may vary, they all describe beautifully shaped crystals with a pointed tip designed to channel and direct energy. Each name highlights a unique aspect of their use:\u003c\/p\u003e\n\u003cul\u003e\n\u003cli\u003e\n\u003cstrong\u003eTowers\u003c\/strong\u003e- Known for their steady, grounding presence, crystal towers help focus and amplify energy, making them perfect for meditation and manifestation.\u003c\/li\u003e\n\u003cli\u003e\n\u003cstrong\u003eWands\u003c\/strong\u003e- Traditionally used in energy work and healing, crystal wands are excellent for directing energy flow and clearing blockages.\u003c\/li\u003e\n\u003cli\u003e\n\u003cstrong\u003ePillars\u003c\/strong\u003e- Symbolizing strength and stability, crystal pillars create a balanced and harmonious environment, making them great for home decor and spiritual practices.\u003c\/li\u003e\n\u003cli\u003e\n\u003cstrong\u003eObelisks\u003c\/strong\u003e- Inspired by ancient structures, crystal obelisks are believed to connect earthly and spiritual energies, making them powerful tools for transformation and enlightenment.\u003c\/li\u003e\n\u003c\/ul\u003e\n\u003cp\u003eNo matter what you call them, these crystals serve the same purpose—to enhance energy, intention, and harmony in your space. Choose the one that resonates most with you!\u003c\/p\u003e","published_at":"2023-09-14T12:52:35-04:00","sort_order":"created-desc","template_suffix":"","disjunctive":false,"rules":[{"column":"tag","relation":"equals","condition":"towers"}],"published_scope":"global"},{"id":298983391403,"handle":"january-crystal-sale","title":"January Sale | 25% Off Crystal Towers \u0026 Spheres","updated_at":"2026-01-06T23:24:37-05:00","body_html":"\u003cp\u003eShop our \u003cstrong\u003eJanuary Crystal Sale\u003c\/strong\u003e, where you can shop a wide selection of healing crystals at discounted prices. Explore \u003cstrong\u003eCrystal Towers, \u0026amp; Crystal Spheres\u003c\/strong\u003e — all carefully curated and crafted to support meditation, energy balancing, and spiritual wellness. Whether you're looking to enhance your home decor, boost your daily energy, or find the perfect gift, our \u003cstrong\u003ecrystals for healing and manifestation\u003c\/strong\u003e offer both beauty and metaphysical benefits.\u003c\/p\u003e\n\u003cp\u003eThis January, our sale features \u003cstrong\u003ediscounted crystal towers and spheres\u003c\/strong\u003e, from \u003cstrong\u003enatural quartz \u003c\/strong\u003eand \u003cstrong\u003eamethyst \u003c\/strong\u003eto \u003cstrong\u003ebumblebee jasper \u003c\/strong\u003eand \u003cstrong\u003ecarnelian\u003c\/strong\u003e, so there's always something fresh to discover. Shop with confidence knowing you're getting high-quality crystals with \u003cstrong\u003efree shipping options\u003c\/strong\u003e and a trusted experience.\u003c\/p\u003e\n\u003cp\u003e\u003cstrong\u003eTake advantage of the January Crystal Sale today\u003c\/strong\u003e and add powerful, natural energy to your life with \u003cstrong\u003eauthentic healing crystals\u003c\/strong\u003e — while our limited-time discounts last.\u003c\/p\u003e\n\u003cp\u003e\u003cstrong\u003e*Discount automatically applied at checkout.\u003c\/strong\u003e\u003c\/p\u003e","published_at":"2026-01-01T00:07:17-05:00","sort_order":"alpha-asc","template_suffix":"monthly-collection","disjunctive":true,"rules":[{"column":"tag","relation":"equals","condition":"Spheres"},{"column":"tag","relation":"equals","condition":"Towers"}],"published_scope":"global","image":{"created_at":"2026-01-01T01:29:59-05:00","alt":"","width":960,"height":960,"src":"\/\/crystaldestiny.com\/cdn\/shop\/collections\/1464163B-22B1-4D62-BEC5-CEC9AECB670B.jpg?v=1767248999"}}]}
[{"alt":"Aragonite XL Tower, Rare Thick Crystal-Towers-Crystal Destiny-Aragonite-584g - 6.00\"H x 2.50\"W-Crystal Destiny","id":31873038188715,"position":1,"preview_image":{"aspect_ratio":1.0,"height":2048,"width":2048,"src":"\/\/crystaldestiny.com\/cdn\/shop\/files\/Aragonite-XL-Tower-Rare-Thick-Crystal-Towers.jpg?v=1758989809"},"aspect_ratio":1.0,"height":2048,"media_type":"image","src":"\/\/crystaldestiny.com\/cdn\/shop\/files\/Aragonite-XL-Tower-Rare-Thick-Crystal-Towers.jpg?v=1758989809","width":2048},{"alt":"Aragonite XL Tower, Rare Thick Crystal-Towers-Crystal Destiny-Aragonite-584g - 6.00\"H x 2.50\"W-Crystal Destiny","id":31873038221483,"position":2,"preview_image":{"aspect_ratio":1.0,"height":2048,"width":2048,"src":"\/\/crystaldestiny.com\/cdn\/shop\/files\/Aragonite-XL-Tower-Rare-Thick-Crystal-Towers-2.jpg?v=1758949685"},"aspect_ratio":1.0,"height":2048,"media_type":"image","src":"\/\/crystaldestiny.com\/cdn\/shop\/files\/Aragonite-XL-Tower-Rare-Thick-Crystal-Towers-2.jpg?v=1758949685","width":2048},{"alt":"Aragonite XL Tower, Rare Thick Crystal-Towers-Crystal Destiny-Aragonite-584g - 6.00\"H x 2.50\"W-Crystal Destiny","id":31873038254251,"position":3,"preview_image":{"aspect_ratio":1.0,"height":2048,"width":2048,"src":"\/\/crystaldestiny.com\/cdn\/shop\/files\/Aragonite-XL-Tower-Rare-Thick-Crystal-Towers-3.jpg?v=1758989811"},"aspect_ratio":1.0,"height":2048,"media_type":"image","src":"\/\/crystaldestiny.com\/cdn\/shop\/files\/Aragonite-XL-Tower-Rare-Thick-Crystal-Towers-3.jpg?v=1758989811","width":2048},{"alt":"Aragonite XL Tower, Rare Thick Crystal-Towers-Crystal Destiny-Aragonite-584g - 6.00\"H x 2.50\"W-Crystal Destiny","id":31873038287019,"position":4,"preview_image":{"aspect_ratio":1.0,"height":2048,"width":2048,"src":"\/\/crystaldestiny.com\/cdn\/shop\/files\/Aragonite-XL-Tower-Rare-Thick-Crystal-Towers-4.jpg?v=1758949688"},"aspect_ratio":1.0,"height":2048,"media_type":"image","src":"\/\/crystaldestiny.com\/cdn\/shop\/files\/Aragonite-XL-Tower-Rare-Thick-Crystal-Towers-4.jpg?v=1758949688","width":2048}]
{"item":{"id":8552831320235,"title":"Aura Angel Clear Quartz Crystal Twin-Point","handle":"aura-angel-clear-quartz-crystal-twin-point-1005001630586367-3pcs-approx50-80mm","description":"\u003cp data-start=\"254\" data-end=\"555\"\u003eThis Aura Angel Clear Quartz Twin-Point features shimmering iridescent coatings and double-pointed tips, expertly polished to enhance energy flow. Each piece is unique, ideal for meditation, Reiki, chakra balancing, or as a luminous display in your spiritual space.\u003c\/p\u003e\n\u003cp data-start=\"557\" data-end=\"868\"\u003eClear Quartz is known as the “Master Healer,” amplifying energy, intentions, and spiritual awareness. The twin-point design channels energy in both directions, making it perfect for crystal grids, energy healing, and alignment practices. Its angelic aura finish adds a radiant glow, uplifting any environment.\u003c\/p\u003e\n\u003cp data-start=\"870\" data-end=\"985\"\u003eCollectors and spiritual practitioners value this crystal for its versatility, beauty, and high-vibration energy.\u003c\/p\u003e\n\u003cp data-start=\"870\" data-end=\"985\"\u003eThis product is pulled at random by size.\u003c\/p\u003e\n\u003ch2\u003eCrystal Towers, Wands, Generators, Points, Pillars \u0026amp; Obelisks — What's the Difference?\u003c\/h2\u003e\n\u003cp id=\"isPasted\"\u003eWhile these terms may vary, they all describe beautifully shaped crystals with a pointed tip designed to channel and direct energy. Each name highlights a unique aspect of their use:\u003c\/p\u003e\n\u003cul\u003e\n\u003cli\u003e\n\u003cstrong\u003eTowers\u003c\/strong\u003e- Known for their steady, grounding presence, crystal towers help focus and amplify energy, making them perfect for meditation and manifestation.\u003c\/li\u003e\n\u003cli\u003e\n\u003cstrong\u003eWands\u003c\/strong\u003e- Traditionally used in energy work and healing, crystal wands are excellent for directing energy flow and clearing blockages.\u003c\/li\u003e\n\u003cli\u003e\n\u003cstrong\u003ePillars\u003c\/strong\u003e- Symbolizing strength and stability, crystal pillars create a balanced and harmonious environment, making them great for home decor and spiritual practices.\u003c\/li\u003e\n\u003cli\u003e\n\u003cstrong\u003eObelisks\u003c\/strong\u003e- Inspired by ancient structures, crystal obelisks are believed to connect earthly and spiritual energies, making them powerful tools for transformation and enlightenment.\u003c\/li\u003e\n\u003c\/ul\u003e\n\u003cp\u003eNo matter what you call them, these crystals serve the same purpose—to enhance energy, intention, and harmony in your space. Choose the one that resonates most with you!\u003c\/p\u003e","published_at":"2025-10-23T16:37:12-04:00","created_at":"2025-10-16T19:06:14-04:00","vendor":"Ali","type":"Points","tags":["adjusted-shipping","crystal","polished","Towers"],"price":3799,"price_min":3799,"price_max":3799,"available":true,"price_varies":false,"compare_at_price":0,"compare_at_price_min":0,"compare_at_price_max":0,"compare_at_price_varies":false,"variants":[{"id":45738523394219,"title":"Aura Quartz \/ 50-80mm","option1":"Aura Quartz","option2":"50-80mm","option3":null,"sku":"1005001630586367-3pcs-approx50-80mm","requires_shipping":true,"taxable":true,"featured_image":{"id":40587338023083,"product_id":8552831320235,"position":2,"created_at":"2025-10-16T19:06:15-04:00","updated_at":"2025-12-11T00:19:56-05:00","alt":"Aura Angel Clear Quartz Crystal Twin-Point-Points-Ali-Aura Quartz-50-80mm-Crystal Destiny","width":800,"height":800,"src":"\/\/crystaldestiny.com\/cdn\/shop\/files\/Aura-Angel-Clear-Quartz-Crystal-Twin-Point-Points-Aura-Quartz-50-80mm-2.webp?v=1765430396","variant_ids":[45738523394219]},"available":true,"name":"Aura Angel Clear Quartz Crystal Twin-Point - Aura Quartz \/ 50-80mm","public_title":"Aura Quartz \/ 50-80mm","options":["Aura Quartz","50-80mm"],"price":3799,"weight":140,"compare_at_price":0,"inventory_management":"shopify","barcode":"","featured_media":{"alt":"Aura Angel Clear Quartz Crystal Twin-Point-Points-Ali-Aura Quartz-50-80mm-Crystal Destiny","id":31972085825707,"position":2,"preview_image":{"aspect_ratio":1.0,"height":800,"width":800,"src":"\/\/crystaldestiny.com\/cdn\/shop\/files\/Aura-Angel-Clear-Quartz-Crystal-Twin-Point-Points-Aura-Quartz-50-80mm-2.webp?v=1765430396"}},"requires_selling_plan":false,"selling_plan_allocations":[]}],"images":["\/\/crystaldestiny.com\/cdn\/shop\/files\/Aura-Angel-Clear-Quartz-Crystal-Twin-Point-Points.webp?v=1761282370","\/\/crystaldestiny.com\/cdn\/shop\/files\/Aura-Angel-Clear-Quartz-Crystal-Twin-Point-Points-Aura-Quartz-50-80mm-2.webp?v=1765430396","\/\/crystaldestiny.com\/cdn\/shop\/files\/Aura-Angel-Clear-Quartz-Crystal-Twin-Point-Points-3.webp?v=1761282372","\/\/crystaldestiny.com\/cdn\/shop\/files\/Aura-Angel-Clear-Quartz-Crystal-Twin-Point-Points-4.webp?v=1761282374","\/\/crystaldestiny.com\/cdn\/shop\/files\/Aura-Angel-Clear-Quartz-Crystal-Twin-Point-Points-5.webp?v=1761282375","\/\/crystaldestiny.com\/cdn\/shop\/files\/Aura-Angel-Clear-Quartz-Crystal-Twin-Point-Points-6.webp?v=1761282377"],"featured_image":"\/\/crystaldestiny.com\/cdn\/shop\/files\/Aura-Angel-Clear-Quartz-Crystal-Twin-Point-Points.webp?v=1761282370","options":["Material","Size"],"media":[{"alt":"Aura Angel Clear Quartz Crystal Twin-Point-Points-Ali-Aura Quartz-50-80mm-Crystal Destiny","id":31972085858475,"position":1,"preview_image":{"aspect_ratio":1.0,"height":800,"width":800,"src":"\/\/crystaldestiny.com\/cdn\/shop\/files\/Aura-Angel-Clear-Quartz-Crystal-Twin-Point-Points.webp?v=1761282370"},"aspect_ratio":1.0,"height":800,"media_type":"image","src":"\/\/crystaldestiny.com\/cdn\/shop\/files\/Aura-Angel-Clear-Quartz-Crystal-Twin-Point-Points.webp?v=1761282370","width":800},{"alt":"Aura Angel Clear Quartz Crystal Twin-Point-Points-Ali-Aura Quartz-50-80mm-Crystal Destiny","id":31972085825707,"position":2,"preview_image":{"aspect_ratio":1.0,"height":800,"width":800,"src":"\/\/crystaldestiny.com\/cdn\/shop\/files\/Aura-Angel-Clear-Quartz-Crystal-Twin-Point-Points-Aura-Quartz-50-80mm-2.webp?v=1765430396"},"aspect_ratio":1.0,"height":800,"media_type":"image","src":"\/\/crystaldestiny.com\/cdn\/shop\/files\/Aura-Angel-Clear-Quartz-Crystal-Twin-Point-Points-Aura-Quartz-50-80mm-2.webp?v=1765430396","width":800},{"alt":"Aura Angel Clear Quartz Crystal Twin-Point-Points-Ali-Aura Quartz-50-80mm-Crystal Destiny","id":31972085891243,"position":3,"preview_image":{"aspect_ratio":1.0,"height":800,"width":800,"src":"\/\/crystaldestiny.com\/cdn\/shop\/files\/Aura-Angel-Clear-Quartz-Crystal-Twin-Point-Points-3.webp?v=1761282372"},"aspect_ratio":1.0,"height":800,"media_type":"image","src":"\/\/crystaldestiny.com\/cdn\/shop\/files\/Aura-Angel-Clear-Quartz-Crystal-Twin-Point-Points-3.webp?v=1761282372","width":800},{"alt":"Aura Angel Clear Quartz Crystal Twin-Point-Points-Ali-Aura Quartz-50-80mm-Crystal Destiny","id":31972085924011,"position":4,"preview_image":{"aspect_ratio":1.0,"height":800,"width":800,"src":"\/\/crystaldestiny.com\/cdn\/shop\/files\/Aura-Angel-Clear-Quartz-Crystal-Twin-Point-Points-4.webp?v=1761282374"},"aspect_ratio":1.0,"height":800,"media_type":"image","src":"\/\/crystaldestiny.com\/cdn\/shop\/files\/Aura-Angel-Clear-Quartz-Crystal-Twin-Point-Points-4.webp?v=1761282374","width":800},{"alt":"Aura Angel Clear Quartz Crystal Twin-Point-Points-Ali-Aura Quartz-50-80mm-Crystal Destiny","id":31972085956779,"position":5,"preview_image":{"aspect_ratio":1.0,"height":800,"width":800,"src":"\/\/crystaldestiny.com\/cdn\/shop\/files\/Aura-Angel-Clear-Quartz-Crystal-Twin-Point-Points-5.webp?v=1761282375"},"aspect_ratio":1.0,"height":800,"media_type":"image","src":"\/\/crystaldestiny.com\/cdn\/shop\/files\/Aura-Angel-Clear-Quartz-Crystal-Twin-Point-Points-5.webp?v=1761282375","width":800},{"alt":"Aura Angel Clear Quartz Crystal Twin-Point-Points-Ali-Aura Quartz-50-80mm-Crystal Destiny","id":31972085989547,"position":6,"preview_image":{"aspect_ratio":1.0,"height":800,"width":800,"src":"\/\/crystaldestiny.com\/cdn\/shop\/files\/Aura-Angel-Clear-Quartz-Crystal-Twin-Point-Points-6.webp?v=1761282377"},"aspect_ratio":1.0,"height":800,"media_type":"image","src":"\/\/crystaldestiny.com\/cdn\/shop\/files\/Aura-Angel-Clear-Quartz-Crystal-Twin-Point-Points-6.webp?v=1761282377","width":800}],"requires_selling_plan":false,"selling_plan_groups":[],"content":"\u003cp data-start=\"254\" data-end=\"555\"\u003eThis Aura Angel Clear Quartz Twin-Point features shimmering iridescent coatings and double-pointed tips, expertly polished to enhance energy flow. Each piece is unique, ideal for meditation, Reiki, chakra balancing, or as a luminous display in your spiritual space.\u003c\/p\u003e\n\u003cp data-start=\"557\" data-end=\"868\"\u003eClear Quartz is known as the “Master Healer,” amplifying energy, intentions, and spiritual awareness. The twin-point design channels energy in both directions, making it perfect for crystal grids, energy healing, and alignment practices. Its angelic aura finish adds a radiant glow, uplifting any environment.\u003c\/p\u003e\n\u003cp data-start=\"870\" data-end=\"985\"\u003eCollectors and spiritual practitioners value this crystal for its versatility, beauty, and high-vibration energy.\u003c\/p\u003e\n\u003cp data-start=\"870\" data-end=\"985\"\u003eThis product is pulled at random by size.\u003c\/p\u003e\n\u003ch2\u003eCrystal Towers, Wands, Generators, Points, Pillars \u0026amp; Obelisks — What's the Difference?\u003c\/h2\u003e\n\u003cp id=\"isPasted\"\u003eWhile these terms may vary, they all describe beautifully shaped crystals with a pointed tip designed to channel and direct energy. Each name highlights a unique aspect of their use:\u003c\/p\u003e\n\u003cul\u003e\n\u003cli\u003e\n\u003cstrong\u003eTowers\u003c\/strong\u003e- Known for their steady, grounding presence, crystal towers help focus and amplify energy, making them perfect for meditation and manifestation.\u003c\/li\u003e\n\u003cli\u003e\n\u003cstrong\u003eWands\u003c\/strong\u003e- Traditionally used in energy work and healing, crystal wands are excellent for directing energy flow and clearing blockages.\u003c\/li\u003e\n\u003cli\u003e\n\u003cstrong\u003ePillars\u003c\/strong\u003e- Symbolizing strength and stability, crystal pillars create a balanced and harmonious environment, making them great for home decor and spiritual practices.\u003c\/li\u003e\n\u003cli\u003e\n\u003cstrong\u003eObelisks\u003c\/strong\u003e- Inspired by ancient structures, crystal obelisks are believed to connect earthly and spiritual energies, making them powerful tools for transformation and enlightenment.\u003c\/li\u003e\n\u003c\/ul\u003e\n\u003cp\u003eNo matter what you call them, these crystals serve the same purpose—to enhance energy, intention, and harmony in your space. Choose the one that resonates most with you!\u003c\/p\u003e"},"options":[{"name":"Material","position":1,"values":["Aura Quartz"]},{"name":"Size","position":2,"values":["50-80mm"]}],"custom_metafields":{"shipping_time":"12-16 days"},"metafields":{"badge":"\u003cdiv style='display:none' class='jdgm-prev-badge' data-average-rating='0.00' data-number-of-reviews='0' data-number-of-questions='0'\u003e \u003cspan class='jdgm-prev-badge__stars' data-score='0.00' tabindex='0' aria-label='0.00 stars' role='button'\u003e \u003cspan class='jdgm-star jdgm--off'\u003e\u003c\/span\u003e\u003cspan class='jdgm-star jdgm--off'\u003e\u003c\/span\u003e\u003cspan class='jdgm-star jdgm--off'\u003e\u003c\/span\u003e\u003cspan class='jdgm-star jdgm--off'\u003e\u003c\/span\u003e\u003cspan class='jdgm-star jdgm--off'\u003e\u003c\/span\u003e \u003c\/span\u003e \u003cspan class='jdgm-prev-badge__text'\u003e No reviews \u003c\/span\u003e \u003c\/div\u003e","widget":"\u003cdiv class='jdgm-rev-widg' data-updated-at='2025-10-23T20:37:24Z' data-average-rating='0.00' data-number-of-reviews='0' data-number-of-questions='0' data-image-url='https:\/\/cdn.shopify.com\/s\/files\/1\/0613\/0345\/5915\/files\/Natural-Aura-Angel-clear-crystal-stone-Double-tip-wand-point-healing-quartz-stones-3pcs-approx50-80mm.webp?v=1760718840'\u003e \u003cstyle class='jdgm-temp-hiding-style'\u003e.jdgm-rev-widg{ display: none }\u003c\/style\u003e \u003cdiv class='jdgm-rev-widg__header'\u003e \u003ch2 class='jdgm-rev-widg__title'\u003eCustomer Reviews\u003c\/h2\u003e \u003cdiv class='jdgm-rev-widg__summary'\u003e \u003cdiv class='jdgm-rev-widg__summary-stars' aria-label='Average rating is 0.00 stars' role='img'\u003e \u003cspan class='jdgm-star jdgm--off'\u003e\u003c\/span\u003e\u003cspan class='jdgm-star jdgm--off'\u003e\u003c\/span\u003e\u003cspan class='jdgm-star jdgm--off'\u003e\u003c\/span\u003e\u003cspan class='jdgm-star jdgm--off'\u003e\u003c\/span\u003e\u003cspan class='jdgm-star jdgm--off'\u003e\u003c\/span\u003e \u003c\/div\u003e \u003cdiv class='jdgm-rev-widg__summary-text'\u003eBe the first to write a review\u003c\/div\u003e \u003c\/div\u003e \u003ca style='display: none' href='#' class='jdgm-write-rev-link' role='button'\u003eWrite a review\u003c\/a\u003e \u003cdiv class='jdgm-histogram jdgm-temp-hidden'\u003e \u003cdiv class='jdgm-histogram__row' data-rating='5' data-frequency='0' data-percentage='0'\u003e \u003cdiv class='jdgm-histogram__star' role='button' aria-label=\"0% (0) reviews with 5 star rating\" tabindex='0' \u003e\u003cspan class='jdgm-star jdgm--on'\u003e\u003c\/span\u003e\u003cspan class='jdgm-star jdgm--on'\u003e\u003c\/span\u003e\u003cspan class='jdgm-star jdgm--on'\u003e\u003c\/span\u003e\u003cspan class='jdgm-star jdgm--on'\u003e\u003c\/span\u003e\u003cspan class='jdgm-star jdgm--on'\u003e\u003c\/span\u003e\u003c\/div\u003e \u003cdiv class='jdgm-histogram__bar'\u003e \u003cdiv class='jdgm-histogram__bar-content' style='width: 0%;'\u003e \u003c\/div\u003e \u003c\/div\u003e \u003cdiv class='jdgm-histogram__percentage'\u003e0%\u003c\/div\u003e \u003cdiv class='jdgm-histogram__frequency'\u003e(0)\u003c\/div\u003e \u003c\/div\u003e \u003cdiv class='jdgm-histogram__row' data-rating='4' data-frequency='0' data-percentage='0'\u003e \u003cdiv class='jdgm-histogram__star' role='button' aria-label=\"0% (0) reviews with 4 star rating\" tabindex='0' \u003e\u003cspan class='jdgm-star jdgm--on'\u003e\u003c\/span\u003e\u003cspan class='jdgm-star jdgm--on'\u003e\u003c\/span\u003e\u003cspan class='jdgm-star jdgm--on'\u003e\u003c\/span\u003e\u003cspan class='jdgm-star jdgm--on'\u003e\u003c\/span\u003e\u003cspan class='jdgm-star jdgm--off'\u003e\u003c\/span\u003e\u003c\/div\u003e \u003cdiv class='jdgm-histogram__bar'\u003e \u003cdiv class='jdgm-histogram__bar-content' style='width: 0%;'\u003e \u003c\/div\u003e \u003c\/div\u003e \u003cdiv class='jdgm-histogram__percentage'\u003e0%\u003c\/div\u003e \u003cdiv class='jdgm-histogram__frequency'\u003e(0)\u003c\/div\u003e \u003c\/div\u003e \u003cdiv class='jdgm-histogram__row' data-rating='3' data-frequency='0' data-percentage='0'\u003e \u003cdiv class='jdgm-histogram__star' role='button' aria-label=\"0% (0) reviews with 3 star rating\" tabindex='0' \u003e\u003cspan class='jdgm-star jdgm--on'\u003e\u003c\/span\u003e\u003cspan class='jdgm-star jdgm--on'\u003e\u003c\/span\u003e\u003cspan class='jdgm-star jdgm--on'\u003e\u003c\/span\u003e\u003cspan class='jdgm-star jdgm--off'\u003e\u003c\/span\u003e\u003cspan class='jdgm-star jdgm--off'\u003e\u003c\/span\u003e\u003c\/div\u003e \u003cdiv class='jdgm-histogram__bar'\u003e \u003cdiv class='jdgm-histogram__bar-content' style='width: 0%;'\u003e \u003c\/div\u003e \u003c\/div\u003e \u003cdiv class='jdgm-histogram__percentage'\u003e0%\u003c\/div\u003e \u003cdiv class='jdgm-histogram__frequency'\u003e(0)\u003c\/div\u003e \u003c\/div\u003e \u003cdiv class='jdgm-histogram__row' data-rating='2' data-frequency='0' data-percentage='0'\u003e \u003cdiv class='jdgm-histogram__star' role='button' aria-label=\"0% (0) reviews with 2 star rating\" tabindex='0' \u003e\u003cspan class='jdgm-star jdgm--on'\u003e\u003c\/span\u003e\u003cspan class='jdgm-star jdgm--on'\u003e\u003c\/span\u003e\u003cspan class='jdgm-star jdgm--off'\u003e\u003c\/span\u003e\u003cspan class='jdgm-star jdgm--off'\u003e\u003c\/span\u003e\u003cspan class='jdgm-star jdgm--off'\u003e\u003c\/span\u003e\u003c\/div\u003e \u003cdiv class='jdgm-histogram__bar'\u003e \u003cdiv class='jdgm-histogram__bar-content' style='width: 0%;'\u003e \u003c\/div\u003e \u003c\/div\u003e \u003cdiv class='jdgm-histogram__percentage'\u003e0%\u003c\/div\u003e \u003cdiv class='jdgm-histogram__frequency'\u003e(0)\u003c\/div\u003e \u003c\/div\u003e \u003cdiv class='jdgm-histogram__row' data-rating='1' data-frequency='0' data-percentage='0'\u003e \u003cdiv class='jdgm-histogram__star' role='button' aria-label=\"0% (0) reviews with 1 star rating\" tabindex='0' \u003e\u003cspan class='jdgm-star jdgm--on'\u003e\u003c\/span\u003e\u003cspan class='jdgm-star jdgm--off'\u003e\u003c\/span\u003e\u003cspan class='jdgm-star jdgm--off'\u003e\u003c\/span\u003e\u003cspan class='jdgm-star jdgm--off'\u003e\u003c\/span\u003e\u003cspan class='jdgm-star jdgm--off'\u003e\u003c\/span\u003e\u003c\/div\u003e \u003cdiv class='jdgm-histogram__bar'\u003e \u003cdiv class='jdgm-histogram__bar-content' style='width: 0%;'\u003e \u003c\/div\u003e \u003c\/div\u003e \u003cdiv class='jdgm-histogram__percentage'\u003e0%\u003c\/div\u003e \u003cdiv class='jdgm-histogram__frequency'\u003e(0)\u003c\/div\u003e \u003c\/div\u003e \u003cdiv class='jdgm-histogram__row jdgm-histogram__clear-filter' data-rating=null tabindex='0'\u003e\u003c\/div\u003e \u003c\/div\u003e \u003cdiv class='jdgm-rev-widg__sort-wrapper'\u003e\u003c\/div\u003e \u003c\/div\u003e \u003cdiv class='jdgm-rev-widg__body'\u003e \u003cdiv class='jdgm-rev-widg__reviews'\u003e\u003c\/div\u003e \u003cdiv class='jdgm-paginate' data-per-page='4' data-url='https:\/\/api.judge.me\/reviews\/reviews_for_widget' style=\"display: none;\"\u003e\u003c\/div\u003e \u003c\/div\u003e \u003cdiv class='jdgm-rev-widg__paginate-spinner-wrapper'\u003e \u003cdiv class='jdgm-spinner'\u003e\u003c\/div\u003e \u003c\/div\u003e \u003c\/div\u003e"},"collections":[{"id":294880051371,"handle":"crystals","title":"Crystals","updated_at":"2026-01-07T23:43:11-05:00","body_html":"\u003cp data-start=\"159\" data-end=\"687\"\u003e✨ \u003cstrong data-start=\"161\" data-end=\"216\"\u003eDiscover the Magic of Crystals with Crystal Destiny\u003c\/strong\u003e ✨\u003cbr data-start=\"218\" data-end=\"221\"\u003eCrystals have been treasured for centuries—not only for their natural beauty but also for their powerful healing energies. Beyond their visual allure, they bring balance, harmony, and positive energy into any space. Whether used for home décor, meditation, or simply to elevate the energy of your surroundings, crystals create a sanctuary of peace, relaxation, and well-being. Each piece is a unique gift from the Earth—visually stunning and spiritually uplifting.\u003c\/p\u003e\n\u003cp data-start=\"689\" data-end=\"1011\"\u003eAt \u003cstrong data-start=\"692\" data-end=\"711\"\u003eCrystal Destiny\u003c\/strong\u003e, our signature collection showcases a curated selection of exquisite crystals, from radiant Quartz to soothing Amethyst. Every stone is carefully sourced for its elegance and metaphysical resonance, making them perfect for enhancing your home, uplifting your spirit, or gifting to someone special.\u003c\/p\u003e\n\u003cp data-start=\"1013\" data-end=\"1206\"\u003eExperience the timeless sophistication of crystalline wonders. Explore the \u003cstrong data-start=\"1088\" data-end=\"1118\"\u003eCrystal Destiny Collection\u003c\/strong\u003e today and bring the transformative beauty of these treasures into your everyday life.\u003c\/p\u003e","published_at":"2023-06-05T11:24:02-04:00","sort_order":"created-desc","template_suffix":"","disjunctive":false,"rules":[{"column":"tag","relation":"equals","condition":"crystal"},{"column":"type","relation":"not_contains","condition":"925 Sterling Silver"},{"column":"type","relation":"not_contains","condition":"Wire Wraps"}],"published_scope":"global"},{"id":319456084139,"handle":"universal-chakra-crystals","title":"Universal Chakra Crystals","updated_at":"2026-01-06T23:24:24-05:00","body_html":"\u003cp data-start=\"116\" data-end=\"404\"\u003e✨ \u003cstrong data-start=\"118\" data-end=\"158\"\u003eUniversal Chakra Crystals Collection\u003c\/strong\u003e ✨\u003cbr data-start=\"160\" data-end=\"163\"\u003eBalance, align, and energize all your chakras with our \u003cstrong data-start=\"218\" data-end=\"247\"\u003eUniversal Chakra Crystals\u003c\/strong\u003e. Carefully selected to resonate with every energy center in the body, these crystals support holistic well-being, spiritual growth, and energetic harmony.\u003c\/p\u003e\n\u003cp data-start=\"406\" data-end=\"744\"\u003eOur curated selection includes vibrant stones such as Amethyst, Citrine, Clear Quartz, and more—each chosen for their ability to promote clarity, balance, and vitality across the entire chakra system. Perfect for meditation, energy work, or creating a harmonious space, Universal Chakra Crystals help you connect mind, body, and spirit.\u003c\/p\u003e\n\u003cp data-start=\"746\" data-end=\"875\"\u003eEmbrace full-spectrum energy and elevate your spiritual journey with the transformative power of \u003cstrong data-start=\"843\" data-end=\"872\"\u003eUniversal Chakra Crystals\u003c\/strong\u003e.\u003c\/p\u003e","published_at":"2025-07-17T18:19:50-04:00","sort_order":"best-selling","template_suffix":"","disjunctive":false,"rules":[{"column":"variant_metafield_definition","relation":"equals","condition":"All Chakras"}],"published_scope":"global","image":{"created_at":"2025-07-17T19:07:58-04:00","alt":null,"width":1080,"height":1080,"src":"\/\/crystaldestiny.com\/cdn\/shop\/collections\/Universal_7_Chakras_Collection.jpg?v=1762474934"}},{"id":319455756459,"handle":"crown-chakra-crystals","title":"Crown Chakra Crystals","updated_at":"2026-01-07T23:42:38-05:00","body_html":"\u003cp data-start=\"144\" data-end=\"515\"\u003e✨ \u003cstrong data-start=\"146\" data-end=\"171\"\u003eCrown Chakra Crystals\u003c\/strong\u003e ✨\u003cbr data-start=\"173\" data-end=\"176\"\u003eConnect with higher consciousness and spiritual insight with our \u003cstrong data-start=\"241\" data-end=\"266\"\u003eCrown Chakra Crystals\u003c\/strong\u003e. Located at the top of the head, the Crown Chakra governs wisdom, enlightenment, and your connection to the divine. These crystals help open and balance this energy center, fostering clarity, spiritual growth, and a sense of universal connection.\u003c\/p\u003e\n\u003cp data-start=\"517\" data-end=\"851\"\u003eOur selection includes powerful stones such as Amethyst, Clear Quartz, Selenite, and Lepidolite—each chosen for their ability to enhance meditation, energy work, and mindful practices. Whether placed in your sacred space, carried with you, or worn as jewelry, Crown Chakra Crystals promote harmony, insight, and spiritual alignment.\u003c\/p\u003e\n\u003cp data-start=\"853\" data-end=\"1007\"\u003eElevate your consciousness, deepen your meditative practice, and embrace the transformative energy of the Crown Chakra with these illuminating crystals.\u003c\/p\u003e","published_at":"2025-07-17T18:16:11-04:00","sort_order":"best-selling","template_suffix":"","disjunctive":false,"rules":[{"column":"variant_metafield_definition","relation":"equals","condition":"Crown"}],"published_scope":"global","image":{"created_at":"2025-07-17T19:09:11-04:00","alt":null,"width":1080,"height":1080,"src":"\/\/crystaldestiny.com\/cdn\/shop\/collections\/Crown_Chakra_Collection.jpg?v=1762474922"}},{"id":294880116907,"handle":"polished","title":"Polished Crystals","updated_at":"2026-01-07T23:43:11-05:00","body_html":"\u003cp data-start=\"199\" data-end=\"598\"\u003e✨ \u003cstrong data-start=\"201\" data-end=\"248\"\u003eCrystal Destiny Polished Crystal Collection\u003c\/strong\u003e ✨\u003cbr data-start=\"250\" data-end=\"253\"\u003eIndulge in the brilliance of crystals refined to perfection. Our \u003cstrong data-start=\"318\" data-end=\"341\"\u003ePolished Collection\u003c\/strong\u003e showcases gemstones meticulously shaped and smoothed to reveal their natural radiance and timeless beauty. From the shimmering glow of Quartz to the deep allure of Obsidian, each polished piece is a testament to nature’s artistry and human craftsmanship.\u003c\/p\u003e\n\u003cp data-start=\"600\" data-end=\"862\"\u003ePerfect as statement décor, meaningful gifts, or companions on your spiritual journey, polished crystals bring sophistication and elevated energy into any space. Their radiant surfaces reflect not only light but also the transformative power of crystal energy.\u003c\/p\u003e\n\u003cp data-start=\"864\" data-end=\"1022\"\u003eDiscover the elegance of refinement with Crystal Destiny’s Polished Crystal Collection—where every facet shines with intention, beauty, and timeless allure.\u003c\/p\u003e","published_at":"2023-06-05T11:30:44-04:00","sort_order":"created-desc","template_suffix":"","disjunctive":false,"rules":[{"column":"tag","relation":"equals","condition":"polished"}],"published_scope":"global"},{"id":322471624875,"handle":"crystal-favorites","title":"Crystal Enthusiast's Favorites","updated_at":"2026-01-07T23:42:38-05:00","body_html":"\u003cp\u003eDiscover the crystals our community loves most. This collection features our best-selling stones and accessories, carefully curated to highlight pieces that are always in demand and ready to ship. Whether you’re adding to your collection or searching for a gift, these fan-favorite crystals are timeless staples for energy, beauty, and balance.\u003c\/p\u003e","published_at":"2025-10-01T21:07:06-04:00","sort_order":"price-asc","template_suffix":"","disjunctive":false,"rules":[{"column":"variant_inventory","relation":"greater_than","condition":"1"}],"published_scope":"global"},{"id":321695744171,"handle":"direct-from-supplier","title":"Direct from Supplier","updated_at":"2026-01-07T23:43:11-05:00","body_html":"","published_at":"2025-09-12T16:38:23-04:00","sort_order":"best-selling","template_suffix":"","disjunctive":true,"rules":[{"column":"tag","relation":"equals","condition":"adjusted-shipping"}],"published_scope":"global"},{"id":293659312299,"handle":"best-sellers","title":"Best Sellers","updated_at":"2026-01-07T23:43:11-05:00","body_html":"\u003cp data-start=\"155\" data-end=\"510\"\u003eDiscover the pieces our community loves most. Our Best Sellers Collection brings together handpicked crystals and jewelry that embody timeless elegance, spiritual resonance, and everyday sophistication. Each item has earned its place as a customer favorite—celebrated for both its beauty and its meaningful energy.\u003c\/p\u003e\n\u003cp data-start=\"512\" data-end=\"802\"\u003eFrom stunning statement pieces to versatile daily companions, these treasures are curated to elevate your space, uplift your spirit, and reflect refined taste. Indulge in what’s most cherished and let our best sellers guide you toward the perfect blend of style and transformative energy.\u003c\/p\u003e\n\u003cp data-start=\"804\" data-end=\"932\"\u003eExplore the Best Sellers Collection today—where elegance meets intention, and every piece tells a story of beauty and balance.\u003c\/p\u003e","published_at":"2023-03-15T16:04:51-04:00","sort_order":"best-selling","template_suffix":"","disjunctive":false,"rules":[{"column":"variant_price","relation":"greater_than","condition":"0"},{"column":"variant_inventory","relation":"greater_than","condition":"0"},{"column":"type","relation":"not_equals","condition":"Shipping Protection"}],"published_scope":"global"},{"id":321370390699,"handle":"monthly-crystal-sale","title":"Monthly Crystal Sale | Spheres \u0026 Towers","updated_at":"2026-01-06T23:24:37-05:00","body_html":"\u003cp\u003eShop our \u003cstrong\u003eMonthly Crystal Sale\u003c\/strong\u003e, where you can shop a wide selection of healing crystals at discounted prices. Explore \u003cstrong\u003ecrystal spheres and towers,\u003c\/strong\u003e— all carefully curated to support meditation, energy balancing, and spiritual wellness. Whether you're looking to enhance your home decor, boost your daily energy, or find the perfect gift, our \u003cstrong\u003ecrystals for healing and manifestation\u003c\/strong\u003e offer both beauty and metaphysical benefits.\u003c\/p\u003e\n\u003cp\u003eEach month, our sale features \u003cstrong\u003enew discounted collections\u003c\/strong\u003e, from \u003cstrong\u003enatural quartz and amethyst towers\u003c\/strong\u003e to \u003cstrong\u003ewire-wrapped pendants and polished stones\u003c\/strong\u003e, so there's always something fresh to discover. Shop with confidence knowing you're getting high-quality crystals with \u003cstrong\u003efree shipping options\u003c\/strong\u003e and a trusted experience.\u003c\/p\u003e\n\u003cp\u003e\u003cstrong\u003eTake advantage of the Monthly Crystal Sale today\u003c\/strong\u003e and add powerful, natural energy to your life with \u003cstrong\u003eauthentic healing crystals\u003c\/strong\u003e — while our limited-time discounts last.\u003c\/p\u003e\n\u003cp\u003e\u003cstrong\u003e*Discount automatically applied at checkout.\u003c\/strong\u003e\u003c\/p\u003e","published_at":"2025-12-02T01:26:17-05:00","sort_order":"alpha-asc","template_suffix":"","disjunctive":true,"rules":[{"column":"tag","relation":"equals","condition":"spheres"},{"column":"tag","relation":"equals","condition":"Towers"}],"published_scope":"global","image":{"created_at":"2026-01-01T01:32:34-05:00","alt":"","width":960,"height":960,"src":"\/\/crystaldestiny.com\/cdn\/shop\/collections\/3E8C2969-1B86-4ACE-B349-98E9D8768424.jpg?v=1767249154"}},{"id":297596059819,"handle":"all","title":"All Crystals \u0026 Jewelry","updated_at":"2026-01-07T23:43:11-05:00","body_html":"\u003cp data-start=\"149\" data-end=\"494\"\u003e✨ \u003cstrong data-start=\"151\" data-end=\"181\"\u003eWelcome to Crystal Destiny\u003c\/strong\u003e ✨\u003cbr data-start=\"183\" data-end=\"186\"\u003eStep into a world where beauty, energy, and artistry unite. Our collection is a treasure trove of exquisite crystals, from the raw, untamed elegance of natural formations to the polished brilliance of expertly crafted pieces. Each crystal is a masterpiece, carrying its own unique story and timeless charm.\u003c\/p\u003e\n\u003cp data-start=\"496\" data-end=\"831\"\u003eWhether you’re drawn to the calming presence of Amethyst, the vibrant energy of Citrine, or the grounding strength of Jasper, our crystals invite you to connect with nature’s finest wonders. Perfect for enhancing your space, supporting your spiritual journey, or gifting with intention, every piece resonates with beauty and meaning.\u003c\/p\u003e\n\u003cp data-start=\"833\" data-end=\"1000\"\u003eElevate your surroundings, embrace the mystique, and explore the enchanting world of crystals at \u003cstrong data-start=\"930\" data-end=\"949\"\u003eCrystal Destiny\u003c\/strong\u003e—where every crystal is waiting to be discovered.\u003c\/p\u003e","published_at":"2023-11-10T13:55:31-05:00","sort_order":"created-desc","template_suffix":"","disjunctive":false,"rules":[{"column":"type","relation":"not_equals","condition":"asdf"}],"published_scope":"global"},{"id":296256405675,"handle":"crystal-towers","title":"Crystal Towers","updated_at":"2026-01-06T23:24:37-05:00","body_html":"\u003cp data-end=\"568\" data-start=\"152\"\u003e✨ \u003cstrong data-end=\"190\" data-start=\"154\"\u003eCrystal Destiny Tower Collection\u003c\/strong\u003e ✨\u003cbr data-end=\"195\" data-start=\"192\"\u003eEnchant your space with the timeless beauty and powerful energy of crystal towers. Each piece in our \u003cstrong data-end=\"316\" data-start=\"296\"\u003eTower Collection\u003c\/strong\u003e is carefully crafted to showcase nature’s artistry while radiating higher vibrations and spiritual resonance. From the clarity of Quartz to the calming presence of Amethyst, these towers are both decorative masterpieces and tools for transformation.\u003c\/p\u003e\n\u003cp data-end=\"765\" data-start=\"570\"\u003ePerfect for meditation spaces, energy work, or simply elevating your home décor, crystal towers channel focused energy upward—creating balance, harmony, and refined elegance in any environment.\u003c\/p\u003e\n\u003cp data-end=\"917\" data-start=\"767\"\u003eDiscover the Crystal Destiny Tower Collection today and transform your surroundings into a sanctuary of beauty, purpose, and spiritual significance.\u003c\/p\u003e\n\u003ch2\u003eCrystal Towers, Wands, Generators, Points, Pillars \u0026amp; Obelisks — What's the Difference?\u003c\/h2\u003e\n\u003cp id=\"isPasted\"\u003eWhile these terms may vary, they all describe beautifully shaped crystals with a pointed tip designed to channel and direct energy. Each name highlights a unique aspect of their use:\u003c\/p\u003e\n\u003cul\u003e\n\u003cli\u003e\n\u003cstrong\u003eTowers\u003c\/strong\u003e- Known for their steady, grounding presence, crystal towers help focus and amplify energy, making them perfect for meditation and manifestation.\u003c\/li\u003e\n\u003cli\u003e\n\u003cstrong\u003eWands\u003c\/strong\u003e- Traditionally used in energy work and healing, crystal wands are excellent for directing energy flow and clearing blockages.\u003c\/li\u003e\n\u003cli\u003e\n\u003cstrong\u003ePillars\u003c\/strong\u003e- Symbolizing strength and stability, crystal pillars create a balanced and harmonious environment, making them great for home decor and spiritual practices.\u003c\/li\u003e\n\u003cli\u003e\n\u003cstrong\u003eObelisks\u003c\/strong\u003e- Inspired by ancient structures, crystal obelisks are believed to connect earthly and spiritual energies, making them powerful tools for transformation and enlightenment.\u003c\/li\u003e\n\u003c\/ul\u003e\n\u003cp\u003eNo matter what you call them, these crystals serve the same purpose—to enhance energy, intention, and harmony in your space. Choose the one that resonates most with you!\u003c\/p\u003e","published_at":"2023-09-14T12:52:35-04:00","sort_order":"created-desc","template_suffix":"","disjunctive":false,"rules":[{"column":"tag","relation":"equals","condition":"towers"}],"published_scope":"global"},{"id":298983391403,"handle":"january-crystal-sale","title":"January Sale | 25% Off Crystal Towers \u0026 Spheres","updated_at":"2026-01-06T23:24:37-05:00","body_html":"\u003cp\u003eShop our \u003cstrong\u003eJanuary Crystal Sale\u003c\/strong\u003e, where you can shop a wide selection of healing crystals at discounted prices. Explore \u003cstrong\u003eCrystal Towers, \u0026amp; Crystal Spheres\u003c\/strong\u003e — all carefully curated and crafted to support meditation, energy balancing, and spiritual wellness. Whether you're looking to enhance your home decor, boost your daily energy, or find the perfect gift, our \u003cstrong\u003ecrystals for healing and manifestation\u003c\/strong\u003e offer both beauty and metaphysical benefits.\u003c\/p\u003e\n\u003cp\u003eThis January, our sale features \u003cstrong\u003ediscounted crystal towers and spheres\u003c\/strong\u003e, from \u003cstrong\u003enatural quartz \u003c\/strong\u003eand \u003cstrong\u003eamethyst \u003c\/strong\u003eto \u003cstrong\u003ebumblebee jasper \u003c\/strong\u003eand \u003cstrong\u003ecarnelian\u003c\/strong\u003e, so there's always something fresh to discover. Shop with confidence knowing you're getting high-quality crystals with \u003cstrong\u003efree shipping options\u003c\/strong\u003e and a trusted experience.\u003c\/p\u003e\n\u003cp\u003e\u003cstrong\u003eTake advantage of the January Crystal Sale today\u003c\/strong\u003e and add powerful, natural energy to your life with \u003cstrong\u003eauthentic healing crystals\u003c\/strong\u003e — while our limited-time discounts last.\u003c\/p\u003e\n\u003cp\u003e\u003cstrong\u003e*Discount automatically applied at checkout.\u003c\/strong\u003e\u003c\/p\u003e","published_at":"2026-01-01T00:07:17-05:00","sort_order":"alpha-asc","template_suffix":"monthly-collection","disjunctive":true,"rules":[{"column":"tag","relation":"equals","condition":"Spheres"},{"column":"tag","relation":"equals","condition":"Towers"}],"published_scope":"global","image":{"created_at":"2026-01-01T01:29:59-05:00","alt":"","width":960,"height":960,"src":"\/\/crystaldestiny.com\/cdn\/shop\/collections\/1464163B-22B1-4D62-BEC5-CEC9AECB670B.jpg?v=1767248999"}}]}
[{"alt":"Aura Angel Clear Quartz Crystal Twin-Point-Points-Ali-Aura Quartz-50-80mm-Crystal Destiny","id":31972085858475,"position":1,"preview_image":{"aspect_ratio":1.0,"height":800,"width":800,"src":"\/\/crystaldestiny.com\/cdn\/shop\/files\/Aura-Angel-Clear-Quartz-Crystal-Twin-Point-Points.webp?v=1761282370"},"aspect_ratio":1.0,"height":800,"media_type":"image","src":"\/\/crystaldestiny.com\/cdn\/shop\/files\/Aura-Angel-Clear-Quartz-Crystal-Twin-Point-Points.webp?v=1761282370","width":800},{"alt":"Aura Angel Clear Quartz Crystal Twin-Point-Points-Ali-Aura Quartz-50-80mm-Crystal Destiny","id":31972085825707,"position":2,"preview_image":{"aspect_ratio":1.0,"height":800,"width":800,"src":"\/\/crystaldestiny.com\/cdn\/shop\/files\/Aura-Angel-Clear-Quartz-Crystal-Twin-Point-Points-Aura-Quartz-50-80mm-2.webp?v=1765430396"},"aspect_ratio":1.0,"height":800,"media_type":"image","src":"\/\/crystaldestiny.com\/cdn\/shop\/files\/Aura-Angel-Clear-Quartz-Crystal-Twin-Point-Points-Aura-Quartz-50-80mm-2.webp?v=1765430396","width":800},{"alt":"Aura Angel Clear Quartz Crystal Twin-Point-Points-Ali-Aura Quartz-50-80mm-Crystal Destiny","id":31972085891243,"position":3,"preview_image":{"aspect_ratio":1.0,"height":800,"width":800,"src":"\/\/crystaldestiny.com\/cdn\/shop\/files\/Aura-Angel-Clear-Quartz-Crystal-Twin-Point-Points-3.webp?v=1761282372"},"aspect_ratio":1.0,"height":800,"media_type":"image","src":"\/\/crystaldestiny.com\/cdn\/shop\/files\/Aura-Angel-Clear-Quartz-Crystal-Twin-Point-Points-3.webp?v=1761282372","width":800},{"alt":"Aura Angel Clear Quartz Crystal Twin-Point-Points-Ali-Aura Quartz-50-80mm-Crystal Destiny","id":31972085924011,"position":4,"preview_image":{"aspect_ratio":1.0,"height":800,"width":800,"src":"\/\/crystaldestiny.com\/cdn\/shop\/files\/Aura-Angel-Clear-Quartz-Crystal-Twin-Point-Points-4.webp?v=1761282374"},"aspect_ratio":1.0,"height":800,"media_type":"image","src":"\/\/crystaldestiny.com\/cdn\/shop\/files\/Aura-Angel-Clear-Quartz-Crystal-Twin-Point-Points-4.webp?v=1761282374","width":800},{"alt":"Aura Angel Clear Quartz Crystal Twin-Point-Points-Ali-Aura Quartz-50-80mm-Crystal Destiny","id":31972085956779,"position":5,"preview_image":{"aspect_ratio":1.0,"height":800,"width":800,"src":"\/\/crystaldestiny.com\/cdn\/shop\/files\/Aura-Angel-Clear-Quartz-Crystal-Twin-Point-Points-5.webp?v=1761282375"},"aspect_ratio":1.0,"height":800,"media_type":"image","src":"\/\/crystaldestiny.com\/cdn\/shop\/files\/Aura-Angel-Clear-Quartz-Crystal-Twin-Point-Points-5.webp?v=1761282375","width":800},{"alt":"Aura Angel Clear Quartz Crystal Twin-Point-Points-Ali-Aura Quartz-50-80mm-Crystal Destiny","id":31972085989547,"position":6,"preview_image":{"aspect_ratio":1.0,"height":800,"width":800,"src":"\/\/crystaldestiny.com\/cdn\/shop\/files\/Aura-Angel-Clear-Quartz-Crystal-Twin-Point-Points-6.webp?v=1761282377"},"aspect_ratio":1.0,"height":800,"media_type":"image","src":"\/\/crystaldestiny.com\/cdn\/shop\/files\/Aura-Angel-Clear-Quartz-Crystal-Twin-Point-Points-6.webp?v=1761282377","width":800}]
{"item":{"id":8507692056747,"title":"Aventurine Tall Quartz Obelisk Tower","handle":"aventurine-tall-quartz-obelisk-tower-cd-10282","description":"\u003cp\u003eThe Aventurine Tall Quartz Obelisk Tower is a striking crystal formation that combines the calming energy of aventurine with the clarity and amplifying properties of quartz. Its tall, slender obelisk shape enhances focus and energy flow, making it an ideal centerpiece for meditation or healing spaces. Crafted for both aesthetic appeal and metaphysical benefits, this tower supports emotional balance and mental clarity, fostering a grounded and harmonious environment. Ideal for collectors and practitioners alike, it brings refined energy to any space it occupies.\u003c\/p\u003e\n\u003cp\u003eThis product is an exact pick as pictured, one of a kind.\u003c\/p\u003e\u003ch2\u003eCrystal Towers, Wands, Generators, Points, Pillars \u0026amp; Obelisks — What's the Difference?\u003c\/h2\u003e\n\u003cp id=\"isPasted\"\u003eWhile these terms may vary, they all describe beautifully shaped crystals with a pointed tip designed to channel and direct energy. Each name highlights a unique aspect of their use:\u003c\/p\u003e\n\u003cul\u003e\n\u003cli\u003e\n\u003cstrong\u003eTowers\u003c\/strong\u003e- Known for their steady, grounding presence, crystal towers help focus and amplify energy, making them perfect for meditation and manifestation.\u003c\/li\u003e\n\u003cli\u003e\n\u003cstrong\u003eWands\u003c\/strong\u003e- Traditionally used in energy work and healing, crystal wands are excellent for directing energy flow and clearing blockages.\u003c\/li\u003e\n\u003cli\u003e\n\u003cstrong\u003ePillars\u003c\/strong\u003e- Symbolizing strength and stability, crystal pillars create a balanced and harmonious environment, making them great for home decor and spiritual practices.\u003c\/li\u003e\n\u003cli\u003e\n\u003cstrong\u003eObelisks\u003c\/strong\u003e- Inspired by ancient structures, crystal obelisks are believed to connect earthly and spiritual energies, making them powerful tools for transformation and enlightenment.\u003c\/li\u003e\n\u003c\/ul\u003e\n\u003cp\u003eNo matter what you call them, these crystals serve the same purpose—to enhance energy, intention, and harmony in your space. Choose the one that resonates most with you!\u003c\/p\u003e","published_at":"2025-08-30T19:06:54-04:00","created_at":"2025-08-30T19:06:51-04:00","vendor":"Crystal Destiny","type":"Towers","tags":["crystal","polished","Towers"],"price":3999,"price_min":3999,"price_max":4499,"available":true,"price_varies":true,"compare_at_price":null,"compare_at_price_min":0,"compare_at_price_max":0,"compare_at_price_varies":false,"variants":[{"id":45569587019947,"title":"Aventurine \/ 292g - 5.50\"H x 1.40\"W","option1":"Aventurine","option2":"292g - 5.50\"H x 1.40\"W","option3":null,"sku":"CD-10282","requires_shipping":true,"taxable":true,"featured_image":{"id":40307625885867,"product_id":8507692056747,"position":2,"created_at":"2025-08-30T19:03:31-04:00","updated_at":"2025-12-11T00:06:37-05:00","alt":"Aventurine Tall Quartz Obelisk Tower-Towers-Crystal Destiny-Aventurine-292g - 5.50\"H x 1.40\"W-Crystal Destiny","width":1846,"height":1846,"src":"\/\/crystaldestiny.com\/cdn\/shop\/files\/Aventurine-Tall-Quartz-Obelisk-Tower-Towers-Aventurine-292g-5_50H-x-1_40W-2.jpg?v=1765429597","variant_ids":[45569587019947]},"available":false,"name":"Aventurine Tall Quartz Obelisk Tower - Aventurine \/ 292g - 5.50\"H x 1.40\"W","public_title":"Aventurine \/ 292g - 5.50\"H x 1.40\"W","options":["Aventurine","292g - 5.50\"H x 1.40\"W"],"price":4499,"weight":292,"compare_at_price":null,"inventory_management":"shopify","barcode":"","featured_media":{"alt":"Aventurine Tall Quartz Obelisk Tower-Towers-Crystal Destiny-Aventurine-292g - 5.50\"H x 1.40\"W-Crystal Destiny","id":31707539833003,"position":2,"preview_image":{"aspect_ratio":1.0,"height":1846,"width":1846,"src":"\/\/crystaldestiny.com\/cdn\/shop\/files\/Aventurine-Tall-Quartz-Obelisk-Tower-Towers-Aventurine-292g-5_50H-x-1_40W-2.jpg?v=1765429597"}},"requires_selling_plan":false,"selling_plan_allocations":[]},{"id":45569587052715,"title":"Aventurine \/ 218g - 5.50\"H x 1.25\"W","option1":"Aventurine","option2":"218g - 5.50\"H x 1.25\"W","option3":null,"sku":"CD-10283","requires_shipping":true,"taxable":true,"featured_image":{"id":40307626082475,"product_id":8507692056747,"position":8,"created_at":"2025-08-30T19:03:31-04:00","updated_at":"2025-12-11T00:06:39-05:00","alt":"Aventurine Tall Quartz Obelisk Tower-Towers-Crystal Destiny-Aventurine-218g - 5.50\"H x 1.25\"W-Crystal Destiny","width":2048,"height":2048,"src":"\/\/crystaldestiny.com\/cdn\/shop\/files\/Aventurine-Tall-Quartz-Obelisk-Tower-Towers-Aventurine-218g-5_50H-x-1_25W-8.jpg?v=1765429599","variant_ids":[45569587052715]},"available":true,"name":"Aventurine Tall Quartz Obelisk Tower - Aventurine \/ 218g - 5.50\"H x 1.25\"W","public_title":"Aventurine \/ 218g - 5.50\"H x 1.25\"W","options":["Aventurine","218g - 5.50\"H x 1.25\"W"],"price":3999,"weight":292,"compare_at_price":null,"inventory_management":"shopify","barcode":"","featured_media":{"alt":"Aventurine Tall Quartz Obelisk Tower-Towers-Crystal Destiny-Aventurine-218g - 5.50\"H x 1.25\"W-Crystal Destiny","id":31707540029611,"position":8,"preview_image":{"aspect_ratio":1.0,"height":2048,"width":2048,"src":"\/\/crystaldestiny.com\/cdn\/shop\/files\/Aventurine-Tall-Quartz-Obelisk-Tower-Towers-Aventurine-218g-5_50H-x-1_25W-8.jpg?v=1765429599"}},"requires_selling_plan":false,"selling_plan_allocations":[]}],"images":["\/\/crystaldestiny.com\/cdn\/shop\/files\/Aventurine-Tall-Quartz-Obelisk-Tower-Towers.jpg?v=1756616605","\/\/crystaldestiny.com\/cdn\/shop\/files\/Aventurine-Tall-Quartz-Obelisk-Tower-Towers-Aventurine-292g-5_50H-x-1_40W-2.jpg?v=1765429597","\/\/crystaldestiny.com\/cdn\/shop\/files\/Aventurine-Tall-Quartz-Obelisk-Tower-Towers-3.jpg?v=1756616609","\/\/crystaldestiny.com\/cdn\/shop\/files\/Aventurine-Tall-Quartz-Obelisk-Tower-Towers-4.jpg?v=1756616610","\/\/crystaldestiny.com\/cdn\/shop\/files\/Aventurine-Tall-Quartz-Obelisk-Tower-Towers-5.jpg?v=1756616612","\/\/crystaldestiny.com\/cdn\/shop\/files\/Aventurine-Tall-Quartz-Obelisk-Tower-Towers-6.jpg?v=1756616613","\/\/crystaldestiny.com\/cdn\/shop\/files\/Aventurine-Tall-Quartz-Obelisk-Tower-Towers-7.jpg?v=1756616616","\/\/crystaldestiny.com\/cdn\/shop\/files\/Aventurine-Tall-Quartz-Obelisk-Tower-Towers-Aventurine-218g-5_50H-x-1_25W-8.jpg?v=1765429599"],"featured_image":"\/\/crystaldestiny.com\/cdn\/shop\/files\/Aventurine-Tall-Quartz-Obelisk-Tower-Towers.jpg?v=1756616605","options":["Material","Size"],"media":[{"alt":"Aventurine Tall Quartz Obelisk Tower-Towers-Crystal Destiny-Aventurine-292g - 5.50\"H x 1.40\"W-Crystal Destiny","id":31707539800235,"position":1,"preview_image":{"aspect_ratio":1.0,"height":1849,"width":1849,"src":"\/\/crystaldestiny.com\/cdn\/shop\/files\/Aventurine-Tall-Quartz-Obelisk-Tower-Towers.jpg?v=1756616605"},"aspect_ratio":1.0,"height":1849,"media_type":"image","src":"\/\/crystaldestiny.com\/cdn\/shop\/files\/Aventurine-Tall-Quartz-Obelisk-Tower-Towers.jpg?v=1756616605","width":1849},{"alt":"Aventurine Tall Quartz Obelisk Tower-Towers-Crystal Destiny-Aventurine-292g - 5.50\"H x 1.40\"W-Crystal Destiny","id":31707539833003,"position":2,"preview_image":{"aspect_ratio":1.0,"height":1846,"width":1846,"src":"\/\/crystaldestiny.com\/cdn\/shop\/files\/Aventurine-Tall-Quartz-Obelisk-Tower-Towers-Aventurine-292g-5_50H-x-1_40W-2.jpg?v=1765429597"},"aspect_ratio":1.0,"height":1846,"media_type":"image","src":"\/\/crystaldestiny.com\/cdn\/shop\/files\/Aventurine-Tall-Quartz-Obelisk-Tower-Towers-Aventurine-292g-5_50H-x-1_40W-2.jpg?v=1765429597","width":1846},{"alt":"Aventurine Tall Quartz Obelisk Tower-Towers-Crystal Destiny-Aventurine-292g - 5.50\"H x 1.40\"W-Crystal Destiny","id":31707539865771,"position":3,"preview_image":{"aspect_ratio":1.0,"height":2048,"width":2048,"src":"\/\/crystaldestiny.com\/cdn\/shop\/files\/Aventurine-Tall-Quartz-Obelisk-Tower-Towers-3.jpg?v=1756616609"},"aspect_ratio":1.0,"height":2048,"media_type":"image","src":"\/\/crystaldestiny.com\/cdn\/shop\/files\/Aventurine-Tall-Quartz-Obelisk-Tower-Towers-3.jpg?v=1756616609","width":2048},{"alt":"Aventurine Tall Quartz Obelisk Tower-Towers-Crystal Destiny-Aventurine-292g - 5.50\"H x 1.40\"W-Crystal Destiny","id":31707539898539,"position":4,"preview_image":{"aspect_ratio":1.0,"height":2048,"width":2048,"src":"\/\/crystaldestiny.com\/cdn\/shop\/files\/Aventurine-Tall-Quartz-Obelisk-Tower-Towers-4.jpg?v=1756616610"},"aspect_ratio":1.0,"height":2048,"media_type":"image","src":"\/\/crystaldestiny.com\/cdn\/shop\/files\/Aventurine-Tall-Quartz-Obelisk-Tower-Towers-4.jpg?v=1756616610","width":2048},{"alt":"Aventurine Tall Quartz Obelisk Tower-Towers-Crystal Destiny-Aventurine-292g - 5.50\"H x 1.40\"W-Crystal Destiny","id":31707539931307,"position":5,"preview_image":{"aspect_ratio":1.0,"height":2048,"width":2048,"src":"\/\/crystaldestiny.com\/cdn\/shop\/files\/Aventurine-Tall-Quartz-Obelisk-Tower-Towers-5.jpg?v=1756616612"},"aspect_ratio":1.0,"height":2048,"media_type":"image","src":"\/\/crystaldestiny.com\/cdn\/shop\/files\/Aventurine-Tall-Quartz-Obelisk-Tower-Towers-5.jpg?v=1756616612","width":2048},{"alt":"Aventurine Tall Quartz Obelisk Tower-Towers-Crystal Destiny-Aventurine-292g - 5.50\"H x 1.40\"W-Crystal Destiny","id":31707539964075,"position":6,"preview_image":{"aspect_ratio":1.0,"height":2048,"width":2048,"src":"\/\/crystaldestiny.com\/cdn\/shop\/files\/Aventurine-Tall-Quartz-Obelisk-Tower-Towers-6.jpg?v=1756616613"},"aspect_ratio":1.0,"height":2048,"media_type":"image","src":"\/\/crystaldestiny.com\/cdn\/shop\/files\/Aventurine-Tall-Quartz-Obelisk-Tower-Towers-6.jpg?v=1756616613","width":2048},{"alt":"Aventurine Tall Quartz Obelisk Tower-Towers-Crystal Destiny-Aventurine-292g - 5.50\"H x 1.40\"W-Crystal Destiny","id":31707539996843,"position":7,"preview_image":{"aspect_ratio":1.0,"height":2048,"width":2048,"src":"\/\/crystaldestiny.com\/cdn\/shop\/files\/Aventurine-Tall-Quartz-Obelisk-Tower-Towers-7.jpg?v=1756616616"},"aspect_ratio":1.0,"height":2048,"media_type":"image","src":"\/\/crystaldestiny.com\/cdn\/shop\/files\/Aventurine-Tall-Quartz-Obelisk-Tower-Towers-7.jpg?v=1756616616","width":2048},{"alt":"Aventurine Tall Quartz Obelisk Tower-Towers-Crystal Destiny-Aventurine-218g - 5.50\"H x 1.25\"W-Crystal Destiny","id":31707540029611,"position":8,"preview_image":{"aspect_ratio":1.0,"height":2048,"width":2048,"src":"\/\/crystaldestiny.com\/cdn\/shop\/files\/Aventurine-Tall-Quartz-Obelisk-Tower-Towers-Aventurine-218g-5_50H-x-1_25W-8.jpg?v=1765429599"},"aspect_ratio":1.0,"height":2048,"media_type":"image","src":"\/\/crystaldestiny.com\/cdn\/shop\/files\/Aventurine-Tall-Quartz-Obelisk-Tower-Towers-Aventurine-218g-5_50H-x-1_25W-8.jpg?v=1765429599","width":2048}],"requires_selling_plan":false,"selling_plan_groups":[],"content":"\u003cp\u003eThe Aventurine Tall Quartz Obelisk Tower is a striking crystal formation that combines the calming energy of aventurine with the clarity and amplifying properties of quartz. Its tall, slender obelisk shape enhances focus and energy flow, making it an ideal centerpiece for meditation or healing spaces. Crafted for both aesthetic appeal and metaphysical benefits, this tower supports emotional balance and mental clarity, fostering a grounded and harmonious environment. Ideal for collectors and practitioners alike, it brings refined energy to any space it occupies.\u003c\/p\u003e\n\u003cp\u003eThis product is an exact pick as pictured, one of a kind.\u003c\/p\u003e\u003ch2\u003eCrystal Towers, Wands, Generators, Points, Pillars \u0026amp; Obelisks — What's the Difference?\u003c\/h2\u003e\n\u003cp id=\"isPasted\"\u003eWhile these terms may vary, they all describe beautifully shaped crystals with a pointed tip designed to channel and direct energy. Each name highlights a unique aspect of their use:\u003c\/p\u003e\n\u003cul\u003e\n\u003cli\u003e\n\u003cstrong\u003eTowers\u003c\/strong\u003e- Known for their steady, grounding presence, crystal towers help focus and amplify energy, making them perfect for meditation and manifestation.\u003c\/li\u003e\n\u003cli\u003e\n\u003cstrong\u003eWands\u003c\/strong\u003e- Traditionally used in energy work and healing, crystal wands are excellent for directing energy flow and clearing blockages.\u003c\/li\u003e\n\u003cli\u003e\n\u003cstrong\u003ePillars\u003c\/strong\u003e- Symbolizing strength and stability, crystal pillars create a balanced and harmonious environment, making them great for home decor and spiritual practices.\u003c\/li\u003e\n\u003cli\u003e\n\u003cstrong\u003eObelisks\u003c\/strong\u003e- Inspired by ancient structures, crystal obelisks are believed to connect earthly and spiritual energies, making them powerful tools for transformation and enlightenment.\u003c\/li\u003e\n\u003c\/ul\u003e\n\u003cp\u003eNo matter what you call them, these crystals serve the same purpose—to enhance energy, intention, and harmony in your space. Choose the one that resonates most with you!\u003c\/p\u003e"},"options":[{"name":"Material","position":1,"values":["Aventurine"]},{"name":"Size","position":2,"values":["292g - 5.50\"H x 1.40\"W","218g - 5.50\"H x 1.25\"W"]}],"custom_metafields":{"shipping_time":"Within 7 days"},"metafields":{"badge":"\u003cdiv style='display:none' class='jdgm-prev-badge' data-average-rating='0.00' data-number-of-reviews='0' data-number-of-questions='0'\u003e \u003cspan class='jdgm-prev-badge__stars' data-score='0.00' tabindex='0' aria-label='0.00 stars' role='button'\u003e \u003cspan class='jdgm-star jdgm--off'\u003e\u003c\/span\u003e\u003cspan class='jdgm-star jdgm--off'\u003e\u003c\/span\u003e\u003cspan class='jdgm-star jdgm--off'\u003e\u003c\/span\u003e\u003cspan class='jdgm-star jdgm--off'\u003e\u003c\/span\u003e\u003cspan class='jdgm-star jdgm--off'\u003e\u003c\/span\u003e \u003c\/span\u003e \u003cspan class='jdgm-prev-badge__text'\u003e No reviews \u003c\/span\u003e \u003c\/div\u003e","widget":"\u003cdiv class='jdgm-rev-widg' data-updated-at='2025-08-30T23:07:57Z' data-average-rating='0.00' data-number-of-reviews='0' data-number-of-questions='0' data-image-url='https:\/\/cdn.shopify.com\/s\/files\/1\/0613\/0345\/5915\/files\/6I0A3836.jpg?v=1756595072'\u003e \u003cstyle class='jdgm-temp-hiding-style'\u003e.jdgm-rev-widg{ display: none }\u003c\/style\u003e \u003cdiv class='jdgm-rev-widg__header'\u003e \u003ch2 class='jdgm-rev-widg__title'\u003eCustomer Reviews\u003c\/h2\u003e \u003cdiv class='jdgm-rev-widg__summary'\u003e \u003cdiv class='jdgm-rev-widg__summary-stars' aria-label='Average rating is 0.00 stars' role='img'\u003e \u003cspan class='jdgm-star jdgm--off'\u003e\u003c\/span\u003e\u003cspan class='jdgm-star jdgm--off'\u003e\u003c\/span\u003e\u003cspan class='jdgm-star jdgm--off'\u003e\u003c\/span\u003e\u003cspan class='jdgm-star jdgm--off'\u003e\u003c\/span\u003e\u003cspan class='jdgm-star jdgm--off'\u003e\u003c\/span\u003e \u003c\/div\u003e \u003cdiv class='jdgm-rev-widg__summary-text'\u003eBe the first to write a review\u003c\/div\u003e \u003c\/div\u003e \u003ca style='display: none' href='#' class='jdgm-write-rev-link' role='button'\u003eWrite a review\u003c\/a\u003e \u003cdiv class='jdgm-histogram jdgm-temp-hidden'\u003e \u003cdiv class='jdgm-histogram__row' data-rating='5' data-frequency='0' data-percentage='0'\u003e \u003cdiv class='jdgm-histogram__star' role='button' aria-label=\"0% (0) reviews with 5 star rating\" tabindex='0' \u003e\u003cspan class='jdgm-star jdgm--on'\u003e\u003c\/span\u003e\u003cspan class='jdgm-star jdgm--on'\u003e\u003c\/span\u003e\u003cspan class='jdgm-star jdgm--on'\u003e\u003c\/span\u003e\u003cspan class='jdgm-star jdgm--on'\u003e\u003c\/span\u003e\u003cspan class='jdgm-star jdgm--on'\u003e\u003c\/span\u003e\u003c\/div\u003e \u003cdiv class='jdgm-histogram__bar'\u003e \u003cdiv class='jdgm-histogram__bar-content' style='width: 0%;'\u003e \u003c\/div\u003e \u003c\/div\u003e \u003cdiv class='jdgm-histogram__percentage'\u003e0%\u003c\/div\u003e \u003cdiv class='jdgm-histogram__frequency'\u003e(0)\u003c\/div\u003e \u003c\/div\u003e \u003cdiv class='jdgm-histogram__row' data-rating='4' data-frequency='0' data-percentage='0'\u003e \u003cdiv class='jdgm-histogram__star' role='button' aria-label=\"0% (0) reviews with 4 star rating\" tabindex='0' \u003e\u003cspan class='jdgm-star jdgm--on'\u003e\u003c\/span\u003e\u003cspan class='jdgm-star jdgm--on'\u003e\u003c\/span\u003e\u003cspan class='jdgm-star jdgm--on'\u003e\u003c\/span\u003e\u003cspan class='jdgm-star jdgm--on'\u003e\u003c\/span\u003e\u003cspan class='jdgm-star jdgm--off'\u003e\u003c\/span\u003e\u003c\/div\u003e \u003cdiv class='jdgm-histogram__bar'\u003e \u003cdiv class='jdgm-histogram__bar-content' style='width: 0%;'\u003e \u003c\/div\u003e \u003c\/div\u003e \u003cdiv class='jdgm-histogram__percentage'\u003e0%\u003c\/div\u003e \u003cdiv class='jdgm-histogram__frequency'\u003e(0)\u003c\/div\u003e \u003c\/div\u003e \u003cdiv class='jdgm-histogram__row' data-rating='3' data-frequency='0' data-percentage='0'\u003e \u003cdiv class='jdgm-histogram__star' role='button' aria-label=\"0% (0) reviews with 3 star rating\" tabindex='0' \u003e\u003cspan class='jdgm-star jdgm--on'\u003e\u003c\/span\u003e\u003cspan class='jdgm-star jdgm--on'\u003e\u003c\/span\u003e\u003cspan class='jdgm-star jdgm--on'\u003e\u003c\/span\u003e\u003cspan class='jdgm-star jdgm--off'\u003e\u003c\/span\u003e\u003cspan class='jdgm-star jdgm--off'\u003e\u003c\/span\u003e\u003c\/div\u003e \u003cdiv class='jdgm-histogram__bar'\u003e \u003cdiv class='jdgm-histogram__bar-content' style='width: 0%;'\u003e \u003c\/div\u003e \u003c\/div\u003e \u003cdiv class='jdgm-histogram__percentage'\u003e0%\u003c\/div\u003e \u003cdiv class='jdgm-histogram__frequency'\u003e(0)\u003c\/div\u003e \u003c\/div\u003e \u003cdiv class='jdgm-histogram__row' data-rating='2' data-frequency='0' data-percentage='0'\u003e \u003cdiv class='jdgm-histogram__star' role='button' aria-label=\"0% (0) reviews with 2 star rating\" tabindex='0' \u003e\u003cspan class='jdgm-star jdgm--on'\u003e\u003c\/span\u003e\u003cspan class='jdgm-star jdgm--on'\u003e\u003c\/span\u003e\u003cspan class='jdgm-star jdgm--off'\u003e\u003c\/span\u003e\u003cspan class='jdgm-star jdgm--off'\u003e\u003c\/span\u003e\u003cspan class='jdgm-star jdgm--off'\u003e\u003c\/span\u003e\u003c\/div\u003e \u003cdiv class='jdgm-histogram__bar'\u003e \u003cdiv class='jdgm-histogram__bar-content' style='width: 0%;'\u003e \u003c\/div\u003e \u003c\/div\u003e \u003cdiv class='jdgm-histogram__percentage'\u003e0%\u003c\/div\u003e \u003cdiv class='jdgm-histogram__frequency'\u003e(0)\u003c\/div\u003e \u003c\/div\u003e \u003cdiv class='jdgm-histogram__row' data-rating='1' data-frequency='0' data-percentage='0'\u003e \u003cdiv class='jdgm-histogram__star' role='button' aria-label=\"0% (0) reviews with 1 star rating\" tabindex='0' \u003e\u003cspan class='jdgm-star jdgm--on'\u003e\u003c\/span\u003e\u003cspan class='jdgm-star jdgm--off'\u003e\u003c\/span\u003e\u003cspan class='jdgm-star jdgm--off'\u003e\u003c\/span\u003e\u003cspan class='jdgm-star jdgm--off'\u003e\u003c\/span\u003e\u003cspan class='jdgm-star jdgm--off'\u003e\u003c\/span\u003e\u003c\/div\u003e \u003cdiv class='jdgm-histogram__bar'\u003e \u003cdiv class='jdgm-histogram__bar-content' style='width: 0%;'\u003e \u003c\/div\u003e \u003c\/div\u003e \u003cdiv class='jdgm-histogram__percentage'\u003e0%\u003c\/div\u003e \u003cdiv class='jdgm-histogram__frequency'\u003e(0)\u003c\/div\u003e \u003c\/div\u003e \u003cdiv class='jdgm-histogram__row jdgm-histogram__clear-filter' data-rating=null tabindex='0'\u003e\u003c\/div\u003e \u003c\/div\u003e \u003cdiv class='jdgm-rev-widg__sort-wrapper'\u003e\u003c\/div\u003e \u003c\/div\u003e \u003cdiv class='jdgm-rev-widg__body'\u003e \u003cdiv class='jdgm-rev-widg__reviews'\u003e\u003c\/div\u003e \u003cdiv class='jdgm-paginate' data-per-page='4' data-url='https:\/\/api.judge.me\/reviews\/reviews_for_widget' style=\"display: none;\"\u003e\u003c\/div\u003e \u003c\/div\u003e \u003cdiv class='jdgm-rev-widg__paginate-spinner-wrapper'\u003e \u003cdiv class='jdgm-spinner'\u003e\u003c\/div\u003e \u003c\/div\u003e \u003c\/div\u003e"},"collections":[{"id":294880051371,"handle":"crystals","title":"Crystals","updated_at":"2026-01-07T23:43:11-05:00","body_html":"\u003cp data-start=\"159\" data-end=\"687\"\u003e✨ \u003cstrong data-start=\"161\" data-end=\"216\"\u003eDiscover the Magic of Crystals with Crystal Destiny\u003c\/strong\u003e ✨\u003cbr data-start=\"218\" data-end=\"221\"\u003eCrystals have been treasured for centuries—not only for their natural beauty but also for their powerful healing energies. Beyond their visual allure, they bring balance, harmony, and positive energy into any space. Whether used for home décor, meditation, or simply to elevate the energy of your surroundings, crystals create a sanctuary of peace, relaxation, and well-being. Each piece is a unique gift from the Earth—visually stunning and spiritually uplifting.\u003c\/p\u003e\n\u003cp data-start=\"689\" data-end=\"1011\"\u003eAt \u003cstrong data-start=\"692\" data-end=\"711\"\u003eCrystal Destiny\u003c\/strong\u003e, our signature collection showcases a curated selection of exquisite crystals, from radiant Quartz to soothing Amethyst. Every stone is carefully sourced for its elegance and metaphysical resonance, making them perfect for enhancing your home, uplifting your spirit, or gifting to someone special.\u003c\/p\u003e\n\u003cp data-start=\"1013\" data-end=\"1206\"\u003eExperience the timeless sophistication of crystalline wonders. Explore the \u003cstrong data-start=\"1088\" data-end=\"1118\"\u003eCrystal Destiny Collection\u003c\/strong\u003e today and bring the transformative beauty of these treasures into your everyday life.\u003c\/p\u003e","published_at":"2023-06-05T11:24:02-04:00","sort_order":"created-desc","template_suffix":"","disjunctive":false,"rules":[{"column":"tag","relation":"equals","condition":"crystal"},{"column":"type","relation":"not_contains","condition":"925 Sterling Silver"},{"column":"type","relation":"not_contains","condition":"Wire Wraps"}],"published_scope":"global"},{"id":319455887531,"handle":"heart-chakra-crystals","title":"Heart Chakra Crystals","updated_at":"2026-01-07T23:43:11-05:00","body_html":"\u003cp data-start=\"107\" data-end=\"457\"\u003e✨ \u003cstrong data-start=\"109\" data-end=\"134\"\u003eHeart Chakra Crystals\u003c\/strong\u003e ✨\u003cbr data-start=\"136\" data-end=\"139\"\u003eOpen your heart to love, compassion, and emotional balance with our \u003cstrong data-start=\"207\" data-end=\"232\"\u003eHeart Chakra Crystals\u003c\/strong\u003e. Located at the center of the chest, the Heart Chakra governs love, forgiveness, and connection to yourself and others. These crystals help release emotional blockages, foster empathy, and promote harmonious relationships.\u003c\/p\u003e\n\u003cp data-start=\"459\" data-end=\"773\"\u003eOur curated selection includes stones such as Rose Quartz, Green Aventurine, and Rhodonite—each chosen for their ability to inspire self-love, emotional healing, and compassion. Perfect for meditation, energy work, or wearing as jewelry, Heart Chakra Crystals support the flow of loving energy and inner harmony.\u003c\/p\u003e\n\u003cp data-start=\"775\" data-end=\"906\"\u003eEmbrace emotional balance, cultivate love, and harness the transformative energy of the Heart Chakra with these radiant crystals.\u003c\/p\u003e","published_at":"2025-07-17T18:17:52-04:00","sort_order":"best-selling","template_suffix":"","disjunctive":false,"rules":[{"column":"variant_metafield_definition","relation":"equals","condition":"Heart"}],"published_scope":"global","image":{"created_at":"2025-07-17T19:08:29-04:00","alt":null,"width":1080,"height":1080,"src":"\/\/crystaldestiny.com\/cdn\/shop\/collections\/Heart_Chakra_Collection.jpg?v=1762474927"}},{"id":294880116907,"handle":"polished","title":"Polished Crystals","updated_at":"2026-01-07T23:43:11-05:00","body_html":"\u003cp data-start=\"199\" data-end=\"598\"\u003e✨ \u003cstrong data-start=\"201\" data-end=\"248\"\u003eCrystal Destiny Polished Crystal Collection\u003c\/strong\u003e ✨\u003cbr data-start=\"250\" data-end=\"253\"\u003eIndulge in the brilliance of crystals refined to perfection. Our \u003cstrong data-start=\"318\" data-end=\"341\"\u003ePolished Collection\u003c\/strong\u003e showcases gemstones meticulously shaped and smoothed to reveal their natural radiance and timeless beauty. From the shimmering glow of Quartz to the deep allure of Obsidian, each polished piece is a testament to nature’s artistry and human craftsmanship.\u003c\/p\u003e\n\u003cp data-start=\"600\" data-end=\"862\"\u003ePerfect as statement décor, meaningful gifts, or companions on your spiritual journey, polished crystals bring sophistication and elevated energy into any space. Their radiant surfaces reflect not only light but also the transformative power of crystal energy.\u003c\/p\u003e\n\u003cp data-start=\"864\" data-end=\"1022\"\u003eDiscover the elegance of refinement with Crystal Destiny’s Polished Crystal Collection—where every facet shines with intention, beauty, and timeless allure.\u003c\/p\u003e","published_at":"2023-06-05T11:30:44-04:00","sort_order":"created-desc","template_suffix":"","disjunctive":false,"rules":[{"column":"tag","relation":"equals","condition":"polished"}],"published_scope":"global"},{"id":293659312299,"handle":"best-sellers","title":"Best Sellers","updated_at":"2026-01-07T23:43:11-05:00","body_html":"\u003cp data-start=\"155\" data-end=\"510\"\u003eDiscover the pieces our community loves most. Our Best Sellers Collection brings together handpicked crystals and jewelry that embody timeless elegance, spiritual resonance, and everyday sophistication. Each item has earned its place as a customer favorite—celebrated for both its beauty and its meaningful energy.\u003c\/p\u003e\n\u003cp data-start=\"512\" data-end=\"802\"\u003eFrom stunning statement pieces to versatile daily companions, these treasures are curated to elevate your space, uplift your spirit, and reflect refined taste. Indulge in what’s most cherished and let our best sellers guide you toward the perfect blend of style and transformative energy.\u003c\/p\u003e\n\u003cp data-start=\"804\" data-end=\"932\"\u003eExplore the Best Sellers Collection today—where elegance meets intention, and every piece tells a story of beauty and balance.\u003c\/p\u003e","published_at":"2023-03-15T16:04:51-04:00","sort_order":"best-selling","template_suffix":"","disjunctive":false,"rules":[{"column":"variant_price","relation":"greater_than","condition":"0"},{"column":"variant_inventory","relation":"greater_than","condition":"0"},{"column":"type","relation":"not_equals","condition":"Shipping Protection"}],"published_scope":"global"},{"id":321370390699,"handle":"monthly-crystal-sale","title":"Monthly Crystal Sale | Spheres \u0026 Towers","updated_at":"2026-01-06T23:24:37-05:00","body_html":"\u003cp\u003eShop our \u003cstrong\u003eMonthly Crystal Sale\u003c\/strong\u003e, where you can shop a wide selection of healing crystals at discounted prices. Explore \u003cstrong\u003ecrystal spheres and towers,\u003c\/strong\u003e— all carefully curated to support meditation, energy balancing, and spiritual wellness. Whether you're looking to enhance your home decor, boost your daily energy, or find the perfect gift, our \u003cstrong\u003ecrystals for healing and manifestation\u003c\/strong\u003e offer both beauty and metaphysical benefits.\u003c\/p\u003e\n\u003cp\u003eEach month, our sale features \u003cstrong\u003enew discounted collections\u003c\/strong\u003e, from \u003cstrong\u003enatural quartz and amethyst towers\u003c\/strong\u003e to \u003cstrong\u003ewire-wrapped pendants and polished stones\u003c\/strong\u003e, so there's always something fresh to discover. Shop with confidence knowing you're getting high-quality crystals with \u003cstrong\u003efree shipping options\u003c\/strong\u003e and a trusted experience.\u003c\/p\u003e\n\u003cp\u003e\u003cstrong\u003eTake advantage of the Monthly Crystal Sale today\u003c\/strong\u003e and add powerful, natural energy to your life with \u003cstrong\u003eauthentic healing crystals\u003c\/strong\u003e — while our limited-time discounts last.\u003c\/p\u003e\n\u003cp\u003e\u003cstrong\u003e*Discount automatically applied at checkout.\u003c\/strong\u003e\u003c\/p\u003e","published_at":"2025-12-02T01:26:17-05:00","sort_order":"alpha-asc","template_suffix":"","disjunctive":true,"rules":[{"column":"tag","relation":"equals","condition":"spheres"},{"column":"tag","relation":"equals","condition":"Towers"}],"published_scope":"global","image":{"created_at":"2026-01-01T01:32:34-05:00","alt":"","width":960,"height":960,"src":"\/\/crystaldestiny.com\/cdn\/shop\/collections\/3E8C2969-1B86-4ACE-B349-98E9D8768424.jpg?v=1767249154"}},{"id":297596059819,"handle":"all","title":"All Crystals \u0026 Jewelry","updated_at":"2026-01-07T23:43:11-05:00","body_html":"\u003cp data-start=\"149\" data-end=\"494\"\u003e✨ \u003cstrong data-start=\"151\" data-end=\"181\"\u003eWelcome to Crystal Destiny\u003c\/strong\u003e ✨\u003cbr data-start=\"183\" data-end=\"186\"\u003eStep into a world where beauty, energy, and artistry unite. Our collection is a treasure trove of exquisite crystals, from the raw, untamed elegance of natural formations to the polished brilliance of expertly crafted pieces. Each crystal is a masterpiece, carrying its own unique story and timeless charm.\u003c\/p\u003e\n\u003cp data-start=\"496\" data-end=\"831\"\u003eWhether you’re drawn to the calming presence of Amethyst, the vibrant energy of Citrine, or the grounding strength of Jasper, our crystals invite you to connect with nature’s finest wonders. Perfect for enhancing your space, supporting your spiritual journey, or gifting with intention, every piece resonates with beauty and meaning.\u003c\/p\u003e\n\u003cp data-start=\"833\" data-end=\"1000\"\u003eElevate your surroundings, embrace the mystique, and explore the enchanting world of crystals at \u003cstrong data-start=\"930\" data-end=\"949\"\u003eCrystal Destiny\u003c\/strong\u003e—where every crystal is waiting to be discovered.\u003c\/p\u003e","published_at":"2023-11-10T13:55:31-05:00","sort_order":"created-desc","template_suffix":"","disjunctive":false,"rules":[{"column":"type","relation":"not_equals","condition":"asdf"}],"published_scope":"global"},{"id":296256405675,"handle":"crystal-towers","title":"Crystal Towers","updated_at":"2026-01-06T23:24:37-05:00","body_html":"\u003cp data-end=\"568\" data-start=\"152\"\u003e✨ \u003cstrong data-end=\"190\" data-start=\"154\"\u003eCrystal Destiny Tower Collection\u003c\/strong\u003e ✨\u003cbr data-end=\"195\" data-start=\"192\"\u003eEnchant your space with the timeless beauty and powerful energy of crystal towers. Each piece in our \u003cstrong data-end=\"316\" data-start=\"296\"\u003eTower Collection\u003c\/strong\u003e is carefully crafted to showcase nature’s artistry while radiating higher vibrations and spiritual resonance. From the clarity of Quartz to the calming presence of Amethyst, these towers are both decorative masterpieces and tools for transformation.\u003c\/p\u003e\n\u003cp data-end=\"765\" data-start=\"570\"\u003ePerfect for meditation spaces, energy work, or simply elevating your home décor, crystal towers channel focused energy upward—creating balance, harmony, and refined elegance in any environment.\u003c\/p\u003e\n\u003cp data-end=\"917\" data-start=\"767\"\u003eDiscover the Crystal Destiny Tower Collection today and transform your surroundings into a sanctuary of beauty, purpose, and spiritual significance.\u003c\/p\u003e\n\u003ch2\u003eCrystal Towers, Wands, Generators, Points, Pillars \u0026amp; Obelisks — What's the Difference?\u003c\/h2\u003e\n\u003cp id=\"isPasted\"\u003eWhile these terms may vary, they all describe beautifully shaped crystals with a pointed tip designed to channel and direct energy. Each name highlights a unique aspect of their use:\u003c\/p\u003e\n\u003cul\u003e\n\u003cli\u003e\n\u003cstrong\u003eTowers\u003c\/strong\u003e- Known for their steady, grounding presence, crystal towers help focus and amplify energy, making them perfect for meditation and manifestation.\u003c\/li\u003e\n\u003cli\u003e\n\u003cstrong\u003eWands\u003c\/strong\u003e- Traditionally used in energy work and healing, crystal wands are excellent for directing energy flow and clearing blockages.\u003c\/li\u003e\n\u003cli\u003e\n\u003cstrong\u003ePillars\u003c\/strong\u003e- Symbolizing strength and stability, crystal pillars create a balanced and harmonious environment, making them great for home decor and spiritual practices.\u003c\/li\u003e\n\u003cli\u003e\n\u003cstrong\u003eObelisks\u003c\/strong\u003e- Inspired by ancient structures, crystal obelisks are believed to connect earthly and spiritual energies, making them powerful tools for transformation and enlightenment.\u003c\/li\u003e\n\u003c\/ul\u003e\n\u003cp\u003eNo matter what you call them, these crystals serve the same purpose—to enhance energy, intention, and harmony in your space. Choose the one that resonates most with you!\u003c\/p\u003e","published_at":"2023-09-14T12:52:35-04:00","sort_order":"created-desc","template_suffix":"","disjunctive":false,"rules":[{"column":"tag","relation":"equals","condition":"towers"}],"published_scope":"global"},{"id":298983391403,"handle":"january-crystal-sale","title":"January Sale | 25% Off Crystal Towers \u0026 Spheres","updated_at":"2026-01-06T23:24:37-05:00","body_html":"\u003cp\u003eShop our \u003cstrong\u003eJanuary Crystal Sale\u003c\/strong\u003e, where you can shop a wide selection of healing crystals at discounted prices. Explore \u003cstrong\u003eCrystal Towers, \u0026amp; Crystal Spheres\u003c\/strong\u003e — all carefully curated and crafted to support meditation, energy balancing, and spiritual wellness. Whether you're looking to enhance your home decor, boost your daily energy, or find the perfect gift, our \u003cstrong\u003ecrystals for healing and manifestation\u003c\/strong\u003e offer both beauty and metaphysical benefits.\u003c\/p\u003e\n\u003cp\u003eThis January, our sale features \u003cstrong\u003ediscounted crystal towers and spheres\u003c\/strong\u003e, from \u003cstrong\u003enatural quartz \u003c\/strong\u003eand \u003cstrong\u003eamethyst \u003c\/strong\u003eto \u003cstrong\u003ebumblebee jasper \u003c\/strong\u003eand \u003cstrong\u003ecarnelian\u003c\/strong\u003e, so there's always something fresh to discover. Shop with confidence knowing you're getting high-quality crystals with \u003cstrong\u003efree shipping options\u003c\/strong\u003e and a trusted experience.\u003c\/p\u003e\n\u003cp\u003e\u003cstrong\u003eTake advantage of the January Crystal Sale today\u003c\/strong\u003e and add powerful, natural energy to your life with \u003cstrong\u003eauthentic healing crystals\u003c\/strong\u003e — while our limited-time discounts last.\u003c\/p\u003e\n\u003cp\u003e\u003cstrong\u003e*Discount automatically applied at checkout.\u003c\/strong\u003e\u003c\/p\u003e","published_at":"2026-01-01T00:07:17-05:00","sort_order":"alpha-asc","template_suffix":"monthly-collection","disjunctive":true,"rules":[{"column":"tag","relation":"equals","condition":"Spheres"},{"column":"tag","relation":"equals","condition":"Towers"}],"published_scope":"global","image":{"created_at":"2026-01-01T01:29:59-05:00","alt":"","width":960,"height":960,"src":"\/\/crystaldestiny.com\/cdn\/shop\/collections\/1464163B-22B1-4D62-BEC5-CEC9AECB670B.jpg?v=1767248999"}}]}
[{"alt":"Aventurine Tall Quartz Obelisk Tower-Towers-Crystal Destiny-Aventurine-292g - 5.50\"H x 1.40\"W-Crystal Destiny","id":31707539800235,"position":1,"preview_image":{"aspect_ratio":1.0,"height":1849,"width":1849,"src":"\/\/crystaldestiny.com\/cdn\/shop\/files\/Aventurine-Tall-Quartz-Obelisk-Tower-Towers.jpg?v=1756616605"},"aspect_ratio":1.0,"height":1849,"media_type":"image","src":"\/\/crystaldestiny.com\/cdn\/shop\/files\/Aventurine-Tall-Quartz-Obelisk-Tower-Towers.jpg?v=1756616605","width":1849},{"alt":"Aventurine Tall Quartz Obelisk Tower-Towers-Crystal Destiny-Aventurine-292g - 5.50\"H x 1.40\"W-Crystal Destiny","id":31707539833003,"position":2,"preview_image":{"aspect_ratio":1.0,"height":1846,"width":1846,"src":"\/\/crystaldestiny.com\/cdn\/shop\/files\/Aventurine-Tall-Quartz-Obelisk-Tower-Towers-Aventurine-292g-5_50H-x-1_40W-2.jpg?v=1765429597"},"aspect_ratio":1.0,"height":1846,"media_type":"image","src":"\/\/crystaldestiny.com\/cdn\/shop\/files\/Aventurine-Tall-Quartz-Obelisk-Tower-Towers-Aventurine-292g-5_50H-x-1_40W-2.jpg?v=1765429597","width":1846},{"alt":"Aventurine Tall Quartz Obelisk Tower-Towers-Crystal Destiny-Aventurine-292g - 5.50\"H x 1.40\"W-Crystal Destiny","id":31707539865771,"position":3,"preview_image":{"aspect_ratio":1.0,"height":2048,"width":2048,"src":"\/\/crystaldestiny.com\/cdn\/shop\/files\/Aventurine-Tall-Quartz-Obelisk-Tower-Towers-3.jpg?v=1756616609"},"aspect_ratio":1.0,"height":2048,"media_type":"image","src":"\/\/crystaldestiny.com\/cdn\/shop\/files\/Aventurine-Tall-Quartz-Obelisk-Tower-Towers-3.jpg?v=1756616609","width":2048},{"alt":"Aventurine Tall Quartz Obelisk Tower-Towers-Crystal Destiny-Aventurine-292g - 5.50\"H x 1.40\"W-Crystal Destiny","id":31707539898539,"position":4,"preview_image":{"aspect_ratio":1.0,"height":2048,"width":2048,"src":"\/\/crystaldestiny.com\/cdn\/shop\/files\/Aventurine-Tall-Quartz-Obelisk-Tower-Towers-4.jpg?v=1756616610"},"aspect_ratio":1.0,"height":2048,"media_type":"image","src":"\/\/crystaldestiny.com\/cdn\/shop\/files\/Aventurine-Tall-Quartz-Obelisk-Tower-Towers-4.jpg?v=1756616610","width":2048},{"alt":"Aventurine Tall Quartz Obelisk Tower-Towers-Crystal Destiny-Aventurine-292g - 5.50\"H x 1.40\"W-Crystal Destiny","id":31707539931307,"position":5,"preview_image":{"aspect_ratio":1.0,"height":2048,"width":2048,"src":"\/\/crystaldestiny.com\/cdn\/shop\/files\/Aventurine-Tall-Quartz-Obelisk-Tower-Towers-5.jpg?v=1756616612"},"aspect_ratio":1.0,"height":2048,"media_type":"image","src":"\/\/crystaldestiny.com\/cdn\/shop\/files\/Aventurine-Tall-Quartz-Obelisk-Tower-Towers-5.jpg?v=1756616612","width":2048},{"alt":"Aventurine Tall Quartz Obelisk Tower-Towers-Crystal Destiny-Aventurine-292g - 5.50\"H x 1.40\"W-Crystal Destiny","id":31707539964075,"position":6,"preview_image":{"aspect_ratio":1.0,"height":2048,"width":2048,"src":"\/\/crystaldestiny.com\/cdn\/shop\/files\/Aventurine-Tall-Quartz-Obelisk-Tower-Towers-6.jpg?v=1756616613"},"aspect_ratio":1.0,"height":2048,"media_type":"image","src":"\/\/crystaldestiny.com\/cdn\/shop\/files\/Aventurine-Tall-Quartz-Obelisk-Tower-Towers-6.jpg?v=1756616613","width":2048},{"alt":"Aventurine Tall Quartz Obelisk Tower-Towers-Crystal Destiny-Aventurine-292g - 5.50\"H x 1.40\"W-Crystal Destiny","id":31707539996843,"position":7,"preview_image":{"aspect_ratio":1.0,"height":2048,"width":2048,"src":"\/\/crystaldestiny.com\/cdn\/shop\/files\/Aventurine-Tall-Quartz-Obelisk-Tower-Towers-7.jpg?v=1756616616"},"aspect_ratio":1.0,"height":2048,"media_type":"image","src":"\/\/crystaldestiny.com\/cdn\/shop\/files\/Aventurine-Tall-Quartz-Obelisk-Tower-Towers-7.jpg?v=1756616616","width":2048},{"alt":"Aventurine Tall Quartz Obelisk Tower-Towers-Crystal Destiny-Aventurine-218g - 5.50\"H x 1.25\"W-Crystal Destiny","id":31707540029611,"position":8,"preview_image":{"aspect_ratio":1.0,"height":2048,"width":2048,"src":"\/\/crystaldestiny.com\/cdn\/shop\/files\/Aventurine-Tall-Quartz-Obelisk-Tower-Towers-Aventurine-218g-5_50H-x-1_25W-8.jpg?v=1765429599"},"aspect_ratio":1.0,"height":2048,"media_type":"image","src":"\/\/crystaldestiny.com\/cdn\/shop\/files\/Aventurine-Tall-Quartz-Obelisk-Tower-Towers-Aventurine-218g-5_50H-x-1_25W-8.jpg?v=1765429599","width":2048}]
{"item":{"id":8552831058091,"title":"Azurite w\/t Malachite Towers","handle":"azurite-w-t-malachite-towers-1005008348572301-1-77g-69mm","description":"\u003cp data-start=\"245\" data-end=\"523\"\u003eThese Azurite with Malachite Towers feature striking deep blue azurite layered with vibrant green malachite, polished into tall, pointed formations. Each tower is unique, ideal for meditation, crystal grids, décor, or as a standout collector’s piece.\u003c\/p\u003e\n\u003cp data-start=\"525\" data-end=\"813\"\u003eAzurite enhances intuition, mental clarity, and spiritual insight, while Malachite supports emotional balance, transformation, and protection. Together, they create a powerful combination for Third Eye and Heart Chakra activation, promoting focus, awareness, and harmonious energy flow.\u003c\/p\u003e\n\u003cp data-start=\"815\" data-end=\"935\"\u003eCollectors and crystal enthusiasts treasure these towers for their vivid color, natural beauty, and energetic synergy.\u003c\/p\u003e\n\u003cp data-start=\"815\" data-end=\"935\"\u003eThis product is an exact pick as pictured, one of a kind.\u003c\/p\u003e\u003ch2\u003eCrystal Towers, Wands, Generators, Points, Pillars \u0026amp; Obelisks — What's the Difference?\u003c\/h2\u003e\n\u003cp id=\"isPasted\"\u003eWhile these terms may vary, they all describe beautifully shaped crystals with a pointed tip designed to channel and direct energy. Each name highlights a unique aspect of their use:\u003c\/p\u003e\n\u003cul\u003e\n\u003cli\u003e\n\u003cstrong\u003eTowers\u003c\/strong\u003e- Known for their steady, grounding presence, crystal towers help focus and amplify energy, making them perfect for meditation and manifestation.\u003c\/li\u003e\n\u003cli\u003e\n\u003cstrong\u003eWands\u003c\/strong\u003e- Traditionally used in energy work and healing, crystal wands are excellent for directing energy flow and clearing blockages.\u003c\/li\u003e\n\u003cli\u003e\n\u003cstrong\u003ePillars\u003c\/strong\u003e- Symbolizing strength and stability, crystal pillars create a balanced and harmonious environment, making them great for home decor and spiritual practices.\u003c\/li\u003e\n\u003cli\u003e\n\u003cstrong\u003eObelisks\u003c\/strong\u003e- Inspired by ancient structures, crystal obelisks are believed to connect earthly and spiritual energies, making them powerful tools for transformation and enlightenment.\u003c\/li\u003e\n\u003c\/ul\u003e\n\u003cp\u003eNo matter what you call them, these crystals serve the same purpose—to enhance energy, intention, and harmony in your space. Choose the one that resonates most with you!\u003c\/p\u003e","published_at":"2025-10-23T17:19:41-04:00","created_at":"2025-10-16T19:06:11-04:00","vendor":"Ali","type":"Towers","tags":["adjusted-shipping","crystal","polished","Towers"],"price":3199,"price_min":3199,"price_max":5699,"available":true,"price_varies":true,"compare_at_price":0,"compare_at_price_min":0,"compare_at_price_max":0,"compare_at_price_varies":false,"variants":[{"id":45738522411179,"title":"1 77g 69mm \/ Azurite \/ Malachite","option1":"1 77g 69mm","option2":"Azurite \/ Malachite","option3":null,"sku":"1005008348572301-1 77g 69mm","requires_shipping":true,"taxable":true,"featured_image":{"id":40587336712363,"product_id":8552831058091,"position":32,"created_at":"2025-10-16T19:06:13-04:00","updated_at":"2025-12-10T00:17:26-05:00","alt":"Azurite w\/t Malachite Towers-Towers-Ali-1 77g 69mm-Azurite \/ Malachite-Crystal Destiny","width":1000,"height":1000,"src":"\/\/crystaldestiny.com\/cdn\/shop\/files\/Azurite-wt-Malachite-Towers-Towers-1-77g-69mm-Azurite-Malachite-32.webp?v=1765343846","variant_ids":[45738522411179]},"available":true,"name":"Azurite w\/t Malachite Towers - 1 77g 69mm \/ Azurite \/ Malachite","public_title":"1 77g 69mm \/ Azurite \/ Malachite","options":["1 77g 69mm","Azurite \/ Malachite"],"price":5399,"weight":150,"compare_at_price":0,"inventory_management":"shopify","barcode":null,"featured_media":{"alt":"Azurite w\/t Malachite Towers-Towers-Ali-1 77g 69mm-Azurite \/ Malachite-Crystal Destiny","id":31972084482219,"position":32,"preview_image":{"aspect_ratio":1.0,"height":1000,"width":1000,"src":"\/\/crystaldestiny.com\/cdn\/shop\/files\/Azurite-wt-Malachite-Towers-Towers-1-77g-69mm-Azurite-Malachite-32.webp?v=1765343846"}},"requires_selling_plan":false,"selling_plan_allocations":[]},{"id":45738522378411,"title":"2 82g 68mm \/ Azurite \/ Malachite","option1":"2 82g 68mm","option2":"Azurite \/ Malachite","option3":null,"sku":"1005008348572301-2 82g 68mm","requires_shipping":true,"taxable":true,"featured_image":{"id":40587336679595,"product_id":8552831058091,"position":31,"created_at":"2025-10-16T19:06:13-04:00","updated_at":"2025-12-10T00:17:24-05:00","alt":"Azurite w\/t Malachite Towers-Towers-Ali-2 82g 68mm-Azurite \/ Malachite-Crystal Destiny","width":1000,"height":1000,"src":"\/\/crystaldestiny.com\/cdn\/shop\/files\/Azurite-wt-Malachite-Towers-Towers-2-82g-68mm-Azurite-Malachite-31.webp?v=1765343844","variant_ids":[45738522378411]},"available":true,"name":"Azurite w\/t Malachite Towers - 2 82g 68mm \/ Azurite \/ Malachite","public_title":"2 82g 68mm \/ Azurite \/ Malachite","options":["2 82g 68mm","Azurite \/ Malachite"],"price":5699,"weight":150,"compare_at_price":0,"inventory_management":"shopify","barcode":null,"featured_media":{"alt":"Azurite w\/t Malachite Towers-Towers-Ali-2 82g 68mm-Azurite \/ Malachite-Crystal Destiny","id":31972084449451,"position":31,"preview_image":{"aspect_ratio":1.0,"height":1000,"width":1000,"src":"\/\/crystaldestiny.com\/cdn\/shop\/files\/Azurite-wt-Malachite-Towers-Towers-2-82g-68mm-Azurite-Malachite-31.webp?v=1765343844"}},"requires_selling_plan":false,"selling_plan_allocations":[]},{"id":45738522345643,"title":"3 62g 63mm \/ Azurite \/ Malachite","option1":"3 62g 63mm","option2":"Azurite \/ Malachite","option3":null,"sku":"1005008348572301-3 62g 63mm","requires_shipping":true,"taxable":true,"featured_image":{"id":40587336450219,"product_id":8552831058091,"position":24,"created_at":"2025-10-16T19:06:13-04:00","updated_at":"2025-12-10T00:17:14-05:00","alt":"Azurite w\/t Malachite Towers-Towers-Ali-3 62g 63mm-Azurite \/ Malachite-Crystal Destiny","width":1000,"height":1000,"src":"\/\/crystaldestiny.com\/cdn\/shop\/files\/Azurite-wt-Malachite-Towers-Towers-3-62g-63mm-Azurite-Malachite-24.webp?v=1765343834","variant_ids":[45738522345643]},"available":true,"name":"Azurite w\/t Malachite Towers - 3 62g 63mm \/ Azurite \/ Malachite","public_title":"3 62g 63mm \/ Azurite \/ Malachite","options":["3 62g 63mm","Azurite \/ Malachite"],"price":4499,"weight":150,"compare_at_price":0,"inventory_management":"shopify","barcode":null,"featured_media":{"alt":"Azurite w\/t Malachite Towers-Towers-Ali-3 62g 63mm-Azurite \/ Malachite-Crystal Destiny","id":31972084220075,"position":24,"preview_image":{"aspect_ratio":1.0,"height":1000,"width":1000,"src":"\/\/crystaldestiny.com\/cdn\/shop\/files\/Azurite-wt-Malachite-Towers-Towers-3-62g-63mm-Azurite-Malachite-24.webp?v=1765343834"}},"requires_selling_plan":false,"selling_plan_allocations":[]},{"id":45738522312875,"title":"4 57g 67mm \/ Azurite \/ Malachite","option1":"4 57g 67mm","option2":"Azurite \/ Malachite","option3":null,"sku":"1005008348572301-4 57g 67mm","requires_shipping":true,"taxable":true,"featured_image":{"id":40587336253611,"product_id":8552831058091,"position":18,"created_at":"2025-10-16T19:06:13-04:00","updated_at":"2025-12-10T00:17:05-05:00","alt":"Azurite w\/t Malachite Towers-Towers-Ali-4 57g 67mm-Azurite \/ Malachite-Crystal Destiny","width":1000,"height":1000,"src":"\/\/crystaldestiny.com\/cdn\/shop\/files\/Azurite-wt-Malachite-Towers-Towers-4-57g-67mm-Azurite-Malachite-18.webp?v=1765343825","variant_ids":[45738522312875]},"available":true,"name":"Azurite w\/t Malachite Towers - 4 57g 67mm \/ Azurite \/ Malachite","public_title":"4 57g 67mm \/ Azurite \/ Malachite","options":["4 57g 67mm","Azurite \/ Malachite"],"price":4699,"weight":150,"compare_at_price":0,"inventory_management":"shopify","barcode":null,"featured_media":{"alt":"Azurite w\/t Malachite Towers-Towers-Ali-4 57g 67mm-Azurite \/ Malachite-Crystal Destiny","id":31972084023467,"position":18,"preview_image":{"aspect_ratio":1.0,"height":1000,"width":1000,"src":"\/\/crystaldestiny.com\/cdn\/shop\/files\/Azurite-wt-Malachite-Towers-Towers-4-57g-67mm-Azurite-Malachite-18.webp?v=1765343825"}},"requires_selling_plan":false,"selling_plan_allocations":[]},{"id":45738522542251,"title":"5 78g 83mm \/ Azurite \/ Malachite","option1":"5 78g 83mm","option2":"Azurite \/ Malachite","option3":null,"sku":"1005008348572301-5 78g 83mm","requires_shipping":true,"taxable":true,"featured_image":{"id":40587336581291,"product_id":8552831058091,"position":28,"created_at":"2025-10-16T19:06:13-04:00","updated_at":"2025-12-10T00:17:20-05:00","alt":"Azurite w\/t Malachite Towers-Towers-Ali-5 78g 83mm-Azurite \/ Malachite-Crystal Destiny","width":1000,"height":1000,"src":"\/\/crystaldestiny.com\/cdn\/shop\/files\/Azurite-wt-Malachite-Towers-Towers-5-78g-83mm-Azurite-Malachite-28.webp?v=1765343840","variant_ids":[45738522542251]},"available":false,"name":"Azurite w\/t Malachite Towers - 5 78g 83mm \/ Azurite \/ Malachite","public_title":"5 78g 83mm \/ Azurite \/ Malachite","options":["5 78g 83mm","Azurite \/ Malachite"],"price":5399,"weight":150,"compare_at_price":0,"inventory_management":"shopify","barcode":null,"featured_media":{"alt":"Azurite w\/t Malachite Towers-Towers-Ali-5 78g 83mm-Azurite \/ Malachite-Crystal Destiny","id":31972084351147,"position":28,"preview_image":{"aspect_ratio":1.0,"height":1000,"width":1000,"src":"\/\/crystaldestiny.com\/cdn\/shop\/files\/Azurite-wt-Malachite-Towers-Towers-5-78g-83mm-Azurite-Malachite-28.webp?v=1765343840"}},"requires_selling_plan":false,"selling_plan_allocations":[]},{"id":45738522509483,"title":"6 74g 75mm \/ Azurite \/ Malachite","option1":"6 74g 75mm","option2":"Azurite \/ Malachite","option3":null,"sku":"1005008348572301-6 74g 75mm","requires_shipping":true,"taxable":true,"featured_image":{"id":40587336614059,"product_id":8552831058091,"position":29,"created_at":"2025-10-16T19:06:13-04:00","updated_at":"2025-12-10T00:17:22-05:00","alt":"Azurite w\/t Malachite Towers-Towers-Ali-6 74g 75mm-Azurite \/ Malachite-Crystal Destiny","width":1000,"height":1000,"src":"\/\/crystaldestiny.com\/cdn\/shop\/files\/Azurite-wt-Malachite-Towers-Towers-6-74g-75mm-Azurite-Malachite-29.webp?v=1765343842","variant_ids":[45738522509483]},"available":true,"name":"Azurite w\/t Malachite Towers - 6 74g 75mm \/ Azurite \/ Malachite","public_title":"6 74g 75mm \/ Azurite \/ Malachite","options":["6 74g 75mm","Azurite \/ Malachite"],"price":5199,"weight":150,"compare_at_price":0,"inventory_management":"shopify","barcode":null,"featured_media":{"alt":"Azurite w\/t Malachite Towers-Towers-Ali-6 74g 75mm-Azurite \/ Malachite-Crystal Destiny","id":31972084383915,"position":29,"preview_image":{"aspect_ratio":1.0,"height":1000,"width":1000,"src":"\/\/crystaldestiny.com\/cdn\/shop\/files\/Azurite-wt-Malachite-Towers-Towers-6-74g-75mm-Azurite-Malachite-29.webp?v=1765343842"}},"requires_selling_plan":false,"selling_plan_allocations":[]},{"id":45738522476715,"title":"7 69g 66mm \/ Azurite \/ Malachite","option1":"7 69g 66mm","option2":"Azurite \/ Malachite","option3":null,"sku":"1005008348572301-7 69g 66mm","requires_shipping":true,"taxable":true,"featured_image":{"id":40587336745131,"product_id":8552831058091,"position":33,"created_at":"2025-10-16T19:06:13-04:00","updated_at":"2025-12-10T00:17:27-05:00","alt":"Azurite w\/t Malachite Towers-Towers-Ali-7 69g 66mm-Azurite \/ Malachite-Crystal Destiny","width":1000,"height":1000,"src":"\/\/crystaldestiny.com\/cdn\/shop\/files\/Azurite-wt-Malachite-Towers-Towers-7-69g-66mm-Azurite-Malachite-33.webp?v=1765343847","variant_ids":[45738522476715]},"available":true,"name":"Azurite w\/t Malachite Towers - 7 69g 66mm \/ Azurite \/ Malachite","public_title":"7 69g 66mm \/ Azurite \/ Malachite","options":["7 69g 66mm","Azurite \/ Malachite"],"price":4799,"weight":150,"compare_at_price":0,"inventory_management":"shopify","barcode":null,"featured_media":{"alt":"Azurite w\/t Malachite Towers-Towers-Ali-7 69g 66mm-Azurite \/ Malachite-Crystal Destiny","id":31972084514987,"position":33,"preview_image":{"aspect_ratio":1.0,"height":1000,"width":1000,"src":"\/\/crystaldestiny.com\/cdn\/shop\/files\/Azurite-wt-Malachite-Towers-Towers-7-69g-66mm-Azurite-Malachite-33.webp?v=1765343847"}},"requires_selling_plan":false,"selling_plan_allocations":[]},{"id":45738522443947,"title":"8 78g 75mm \/ Azurite \/ Malachite","option1":"8 78g 75mm","option2":"Azurite \/ Malachite","option3":null,"sku":"1005008348572301-8 78g 75mm","requires_shipping":true,"taxable":true,"featured_image":{"id":40587336286379,"product_id":8552831058091,"position":19,"created_at":"2025-10-16T19:06:13-04:00","updated_at":"2025-12-10T00:17:07-05:00","alt":"Azurite w\/t Malachite Towers-Towers-Ali-8 78g 75mm-Azurite \/ Malachite-Crystal Destiny","width":1000,"height":1000,"src":"\/\/crystaldestiny.com\/cdn\/shop\/files\/Azurite-wt-Malachite-Towers-Towers-8-78g-75mm-Azurite-Malachite-19.webp?v=1765343827","variant_ids":[45738522443947]},"available":true,"name":"Azurite w\/t Malachite Towers - 8 78g 75mm \/ Azurite \/ Malachite","public_title":"8 78g 75mm \/ Azurite \/ Malachite","options":["8 78g 75mm","Azurite \/ Malachite"],"price":5399,"weight":150,"compare_at_price":0,"inventory_management":"shopify","barcode":null,"featured_media":{"alt":"Azurite w\/t Malachite Towers-Towers-Ali-8 78g 75mm-Azurite \/ Malachite-Crystal Destiny","id":31972084056235,"position":19,"preview_image":{"aspect_ratio":1.0,"height":1000,"width":1000,"src":"\/\/crystaldestiny.com\/cdn\/shop\/files\/Azurite-wt-Malachite-Towers-Towers-8-78g-75mm-Azurite-Malachite-19.webp?v=1765343827"}},"requires_selling_plan":false,"selling_plan_allocations":[]},{"id":45738522673323,"title":"9 61g 72mm \/ Azurite \/ Malachite","option1":"9 61g 72mm","option2":"Azurite \/ Malachite","option3":null,"sku":"1005008348572301-9 61g 72mm","requires_shipping":true,"taxable":true,"featured_image":{"id":40587336482987,"product_id":8552831058091,"position":25,"created_at":"2025-10-16T19:06:13-04:00","updated_at":"2025-12-10T00:17:16-05:00","alt":"Azurite w\/t Malachite Towers-Towers-Ali-9 61g 72mm-Azurite \/ Malachite-Crystal Destiny","width":1000,"height":1000,"src":"\/\/crystaldestiny.com\/cdn\/shop\/files\/Azurite-wt-Malachite-Towers-Towers-9-61g-72mm-Azurite-Malachite-25.webp?v=1765343836","variant_ids":[45738522673323]},"available":true,"name":"Azurite w\/t Malachite Towers - 9 61g 72mm \/ Azurite \/ Malachite","public_title":"9 61g 72mm \/ Azurite \/ Malachite","options":["9 61g 72mm","Azurite \/ Malachite"],"price":4499,"weight":150,"compare_at_price":0,"inventory_management":"shopify","barcode":null,"featured_media":{"alt":"Azurite w\/t Malachite Towers-Towers-Ali-9 61g 72mm-Azurite \/ Malachite-Crystal Destiny","id":31972084252843,"position":25,"preview_image":{"aspect_ratio":1.0,"height":1000,"width":1000,"src":"\/\/crystaldestiny.com\/cdn\/shop\/files\/Azurite-wt-Malachite-Towers-Towers-9-61g-72mm-Azurite-Malachite-25.webp?v=1765343836"}},"requires_selling_plan":false,"selling_plan_allocations":[]},{"id":45738522640555,"title":"10 75g 72mm \/ Azurite \/ Malachite","option1":"10 75g 72mm","option2":"Azurite \/ Malachite","option3":null,"sku":"1005008348572301-10 75g 72mm","requires_shipping":true,"taxable":true,"featured_image":{"id":40587336777899,"product_id":8552831058091,"position":34,"created_at":"2025-10-16T19:06:13-04:00","updated_at":"2025-12-10T00:17:29-05:00","alt":"Azurite w\/t Malachite Towers-Towers-Ali-10 75g 72mm-Azurite \/ Malachite-Crystal Destiny","width":1000,"height":1000,"src":"\/\/crystaldestiny.com\/cdn\/shop\/files\/Azurite-wt-Malachite-Towers-Towers-10-75g-72mm-Azurite-Malachite-34.webp?v=1765343849","variant_ids":[45738522640555]},"available":true,"name":"Azurite w\/t Malachite Towers - 10 75g 72mm \/ Azurite \/ Malachite","public_title":"10 75g 72mm \/ Azurite \/ Malachite","options":["10 75g 72mm","Azurite \/ Malachite"],"price":5299,"weight":150,"compare_at_price":0,"inventory_management":"shopify","barcode":null,"featured_media":{"alt":"Azurite w\/t Malachite Towers-Towers-Ali-10 75g 72mm-Azurite \/ Malachite-Crystal Destiny","id":31972084547755,"position":34,"preview_image":{"aspect_ratio":1.0,"height":1000,"width":1000,"src":"\/\/crystaldestiny.com\/cdn\/shop\/files\/Azurite-wt-Malachite-Towers-Towers-10-75g-72mm-Azurite-Malachite-34.webp?v=1765343849"}},"requires_selling_plan":false,"selling_plan_allocations":[]},{"id":45738522607787,"title":"11 66g 63mm \/ Azurite \/ Malachite","option1":"11 66g 63mm","option2":"Azurite \/ Malachite","option3":null,"sku":"1005008348572301-11 66g 63mm","requires_shipping":true,"taxable":true,"featured_image":{"id":40587336908971,"product_id":8552831058091,"position":38,"created_at":"2025-10-16T19:06:13-04:00","updated_at":"2025-12-10T00:17:35-05:00","alt":"Azurite w\/t Malachite Towers-Towers-Ali-11 66g 63mm-Azurite \/ Malachite-Crystal Destiny","width":1000,"height":1000,"src":"\/\/crystaldestiny.com\/cdn\/shop\/files\/Azurite-wt-Malachite-Towers-Towers-11-66g-63mm-Azurite-Malachite-38.webp?v=1765343855","variant_ids":[45738522607787]},"available":false,"name":"Azurite w\/t Malachite Towers - 11 66g 63mm \/ Azurite \/ Malachite","public_title":"11 66g 63mm \/ Azurite \/ Malachite","options":["11 66g 63mm","Azurite \/ Malachite"],"price":4699,"weight":150,"compare_at_price":0,"inventory_management":"shopify","barcode":null,"featured_media":{"alt":"Azurite w\/t Malachite Towers-Towers-Ali-11 66g 63mm-Azurite \/ Malachite-Crystal Destiny","id":31972084678827,"position":38,"preview_image":{"aspect_ratio":1.0,"height":1000,"width":1000,"src":"\/\/crystaldestiny.com\/cdn\/shop\/files\/Azurite-wt-Malachite-Towers-Towers-11-66g-63mm-Azurite-Malachite-38.webp?v=1765343855"}},"requires_selling_plan":false,"selling_plan_allocations":[]},{"id":45738522575019,"title":"12 68g 76mm \/ Azurite \/ Malachite","option1":"12 68g 76mm","option2":"Azurite \/ Malachite","option3":null,"sku":"1005008348572301-12 68g 76mm","requires_shipping":true,"taxable":true,"featured_image":{"id":40587337007275,"product_id":8552831058091,"position":41,"created_at":"2025-10-16T19:06:13-04:00","updated_at":"2025-12-10T00:17:39-05:00","alt":"Azurite w\/t Malachite Towers-Towers-Ali-12 68g 76mm-Azurite \/ Malachite-Crystal Destiny","width":1000,"height":1000,"src":"\/\/crystaldestiny.com\/cdn\/shop\/files\/Azurite-wt-Malachite-Towers-Towers-12-68g-76mm-Azurite-Malachite-41.webp?v=1765343859","variant_ids":[45738522575019]},"available":false,"name":"Azurite w\/t Malachite Towers - 12 68g 76mm \/ Azurite \/ Malachite","public_title":"12 68g 76mm \/ Azurite \/ Malachite","options":["12 68g 76mm","Azurite \/ Malachite"],"price":5499,"weight":150,"compare_at_price":0,"inventory_management":"shopify","barcode":null,"featured_media":{"alt":"Azurite w\/t Malachite Towers-Towers-Ali-12 68g 76mm-Azurite \/ Malachite-Crystal Destiny","id":31972084777131,"position":41,"preview_image":{"aspect_ratio":1.0,"height":1000,"width":1000,"src":"\/\/crystaldestiny.com\/cdn\/shop\/files\/Azurite-wt-Malachite-Towers-Towers-12-68g-76mm-Azurite-Malachite-41.webp?v=1765343859"}},"requires_selling_plan":false,"selling_plan_allocations":[]},{"id":45738522804395,"title":"13 40g 62mm \/ Azurite \/ Malachite","option1":"13 40g 62mm","option2":"Azurite \/ Malachite","option3":null,"sku":"1005008348572301-13 40g 62mm","requires_shipping":true,"taxable":true,"featured_image":{"id":40587336810667,"product_id":8552831058091,"position":35,"created_at":"2025-10-16T19:06:13-04:00","updated_at":"2025-12-10T00:17:30-05:00","alt":"Azurite w\/t Malachite Towers-Towers-Ali-13 40g 62mm-Azurite \/ Malachite-Crystal Destiny","width":1000,"height":1000,"src":"\/\/crystaldestiny.com\/cdn\/shop\/files\/Azurite-wt-Malachite-Towers-Towers-13-40g-62mm-Azurite-Malachite-35.webp?v=1765343850","variant_ids":[45738522804395]},"available":false,"name":"Azurite w\/t Malachite Towers - 13 40g 62mm \/ Azurite \/ Malachite","public_title":"13 40g 62mm \/ Azurite \/ Malachite","options":["13 40g 62mm","Azurite \/ Malachite"],"price":4399,"weight":150,"compare_at_price":0,"inventory_management":"shopify","barcode":null,"featured_media":{"alt":"Azurite w\/t Malachite Towers-Towers-Ali-13 40g 62mm-Azurite \/ Malachite-Crystal Destiny","id":31972084580523,"position":35,"preview_image":{"aspect_ratio":1.0,"height":1000,"width":1000,"src":"\/\/crystaldestiny.com\/cdn\/shop\/files\/Azurite-wt-Malachite-Towers-Towers-13-40g-62mm-Azurite-Malachite-35.webp?v=1765343850"}},"requires_selling_plan":false,"selling_plan_allocations":[]},{"id":45738522771627,"title":"14 53g 63mm \/ Azurite \/ Malachite","option1":"14 53g 63mm","option2":"Azurite \/ Malachite","option3":null,"sku":"1005008348572301-14 53g 63mm","requires_shipping":true,"taxable":true,"featured_image":{"id":40587335860395,"product_id":8552831058091,"position":6,"created_at":"2025-10-16T19:06:13-04:00","updated_at":"2025-12-10T00:16:49-05:00","alt":"Azurite w\/t Malachite Towers-Towers-Ali-14 53g 63mm-Azurite \/ Malachite-Crystal Destiny","width":1000,"height":1000,"src":"\/\/crystaldestiny.com\/cdn\/shop\/files\/Azurite-wt-Malachite-Towers-Towers-14-53g-63mm-Azurite-Malachite-6.webp?v=1765343809","variant_ids":[45738522771627]},"available":true,"name":"Azurite w\/t Malachite Towers - 14 53g 63mm \/ Azurite \/ Malachite","public_title":"14 53g 63mm \/ Azurite \/ Malachite","options":["14 53g 63mm","Azurite \/ Malachite"],"price":4299,"weight":150,"compare_at_price":0,"inventory_management":"shopify","barcode":null,"featured_media":{"alt":"Azurite w\/t Malachite Towers-Towers-Ali-14 53g 63mm-Azurite \/ Malachite-Crystal Destiny","id":31972083630251,"position":6,"preview_image":{"aspect_ratio":1.0,"height":1000,"width":1000,"src":"\/\/crystaldestiny.com\/cdn\/shop\/files\/Azurite-wt-Malachite-Towers-Towers-14-53g-63mm-Azurite-Malachite-6.webp?v=1765343809"}},"requires_selling_plan":false,"selling_plan_allocations":[]},{"id":45738522738859,"title":"15 55g 66mm \/ Azurite \/ Malachite","option1":"15 55g 66mm","option2":"Azurite \/ Malachite","option3":null,"sku":"1005008348572301-15 55g 66mm","requires_shipping":true,"taxable":true,"featured_image":{"id":40587336515755,"product_id":8552831058091,"position":26,"created_at":"2025-10-16T19:06:13-04:00","updated_at":"2025-12-10T00:17:17-05:00","alt":"Azurite w\/t Malachite Towers-Towers-Ali-15 55g 66mm-Azurite \/ Malachite-Crystal Destiny","width":1000,"height":1000,"src":"\/\/crystaldestiny.com\/cdn\/shop\/files\/Azurite-wt-Malachite-Towers-Towers-15-55g-66mm-Azurite-Malachite-26.webp?v=1765343837","variant_ids":[45738522738859]},"available":true,"name":"Azurite w\/t Malachite Towers - 15 55g 66mm \/ Azurite \/ Malachite","public_title":"15 55g 66mm \/ Azurite \/ Malachite","options":["15 55g 66mm","Azurite \/ Malachite"],"price":4299,"weight":150,"compare_at_price":0,"inventory_management":"shopify","barcode":null,"featured_media":{"alt":"Azurite w\/t Malachite Towers-Towers-Ali-15 55g 66mm-Azurite \/ Malachite-Crystal Destiny","id":31972084285611,"position":26,"preview_image":{"aspect_ratio":1.0,"height":1000,"width":1000,"src":"\/\/crystaldestiny.com\/cdn\/shop\/files\/Azurite-wt-Malachite-Towers-Towers-15-55g-66mm-Azurite-Malachite-26.webp?v=1765343837"}},"requires_selling_plan":false,"selling_plan_allocations":[]},{"id":45738522706091,"title":"16 59g 67mm \/ Azurite \/ Malachite","option1":"16 59g 67mm","option2":"Azurite \/ Malachite","option3":null,"sku":"1005008348572301-16 59g 67mm","requires_shipping":true,"taxable":true,"featured_image":{"id":40587335958699,"product_id":8552831058091,"position":9,"created_at":"2025-10-16T19:06:13-04:00","updated_at":"2025-12-10T00:16:53-05:00","alt":"Azurite w\/t Malachite Towers-Towers-Ali-16 59g 67mm-Azurite \/ Malachite-Crystal Destiny","width":1000,"height":1000,"src":"\/\/crystaldestiny.com\/cdn\/shop\/files\/Azurite-wt-Malachite-Towers-Towers-16-59g-67mm-Azurite-Malachite-9.webp?v=1765343813","variant_ids":[45738522706091]},"available":true,"name":"Azurite w\/t Malachite Towers - 16 59g 67mm \/ Azurite \/ Malachite","public_title":"16 59g 67mm \/ Azurite \/ Malachite","options":["16 59g 67mm","Azurite \/ Malachite"],"price":4499,"weight":150,"compare_at_price":0,"inventory_management":"shopify","barcode":null,"featured_media":{"alt":"Azurite w\/t Malachite Towers-Towers-Ali-16 59g 67mm-Azurite \/ Malachite-Crystal Destiny","id":31972083728555,"position":9,"preview_image":{"aspect_ratio":1.0,"height":1000,"width":1000,"src":"\/\/crystaldestiny.com\/cdn\/shop\/files\/Azurite-wt-Malachite-Towers-Towers-16-59g-67mm-Azurite-Malachite-9.webp?v=1765343813"}},"requires_selling_plan":false,"selling_plan_allocations":[]},{"id":45738521886891,"title":"17 33g 55mm \/ Azurite \/ Malachite","option1":"17 33g 55mm","option2":"Azurite \/ Malachite","option3":null,"sku":"1005008348572301-17 33g 55mm","requires_shipping":true,"taxable":true,"featured_image":{"id":40587336941739,"product_id":8552831058091,"position":39,"created_at":"2025-10-16T19:06:13-04:00","updated_at":"2025-12-10T00:17:36-05:00","alt":"Azurite w\/t Malachite Towers-Towers-Ali-17 33g 55mm-Azurite \/ Malachite-Crystal Destiny","width":1000,"height":1000,"src":"\/\/crystaldestiny.com\/cdn\/shop\/files\/Azurite-wt-Malachite-Towers-Towers-17-33g-55mm-Azurite-Malachite-39.webp?v=1765343856","variant_ids":[45738521886891]},"available":false,"name":"Azurite w\/t Malachite Towers - 17 33g 55mm \/ Azurite \/ Malachite","public_title":"17 33g 55mm \/ Azurite \/ Malachite","options":["17 33g 55mm","Azurite \/ Malachite"],"price":4099,"weight":150,"compare_at_price":0,"inventory_management":"shopify","barcode":null,"featured_media":{"alt":"Azurite w\/t Malachite Towers-Towers-Ali-17 33g 55mm-Azurite \/ Malachite-Crystal Destiny","id":31972084711595,"position":39,"preview_image":{"aspect_ratio":1.0,"height":1000,"width":1000,"src":"\/\/crystaldestiny.com\/cdn\/shop\/files\/Azurite-wt-Malachite-Towers-Towers-17-33g-55mm-Azurite-Malachite-39.webp?v=1765343856"}},"requires_selling_plan":false,"selling_plan_allocations":[]},{"id":45738521854123,"title":"18 49g 69mm \/ Azurite \/ Malachite","option1":"18 49g 69mm","option2":"Azurite \/ Malachite","option3":null,"sku":"1005008348572301-18 49g 69mm","requires_shipping":true,"taxable":true,"featured_image":{"id":40587336057003,"product_id":8552831058091,"position":12,"created_at":"2025-10-16T19:06:13-04:00","updated_at":"2025-12-10T00:16:57-05:00","alt":"Azurite w\/t Malachite Towers-Towers-Ali-18 49g 69mm-Azurite \/ Malachite-Crystal Destiny","width":1000,"height":1000,"src":"\/\/crystaldestiny.com\/cdn\/shop\/files\/Azurite-wt-Malachite-Towers-Towers-18-49g-69mm-Azurite-Malachite-12.webp?v=1765343817","variant_ids":[45738521854123]},"available":false,"name":"Azurite w\/t Malachite Towers - 18 49g 69mm \/ Azurite \/ Malachite","public_title":"18 49g 69mm \/ Azurite \/ Malachite","options":["18 49g 69mm","Azurite \/ Malachite"],"price":4699,"weight":150,"compare_at_price":0,"inventory_management":"shopify","barcode":null,"featured_media":{"alt":"Azurite w\/t Malachite Towers-Towers-Ali-18 49g 69mm-Azurite \/ Malachite-Crystal Destiny","id":31972083826859,"position":12,"preview_image":{"aspect_ratio":1.0,"height":1000,"width":1000,"src":"\/\/crystaldestiny.com\/cdn\/shop\/files\/Azurite-wt-Malachite-Towers-Towers-18-49g-69mm-Azurite-Malachite-12.webp?v=1765343817"}},"requires_selling_plan":false,"selling_plan_allocations":[]},{"id":45738521821355,"title":"19 39g 59mm \/ Azurite \/ Malachite","option1":"19 39g 59mm","option2":"Azurite \/ Malachite","option3":null,"sku":"1005008348572301-19 39g 59mm","requires_shipping":true,"taxable":true,"featured_image":{"id":40587336548523,"product_id":8552831058091,"position":27,"created_at":"2025-10-16T19:06:13-04:00","updated_at":"2025-12-10T00:17:18-05:00","alt":"Azurite w\/t Malachite Towers-Towers-Ali-19 39g 59mm-Azurite \/ Malachite-Crystal Destiny","width":1000,"height":1000,"src":"\/\/crystaldestiny.com\/cdn\/shop\/files\/Azurite-wt-Malachite-Towers-Towers-19-39g-59mm-Azurite-Malachite-27.webp?v=1765343838","variant_ids":[45738521821355]},"available":false,"name":"Azurite w\/t Malachite Towers - 19 39g 59mm \/ Azurite \/ Malachite","public_title":"19 39g 59mm \/ Azurite \/ Malachite","options":["19 39g 59mm","Azurite \/ Malachite"],"price":3799,"weight":150,"compare_at_price":0,"inventory_management":"shopify","barcode":null,"featured_media":{"alt":"Azurite w\/t Malachite Towers-Towers-Ali-19 39g 59mm-Azurite \/ Malachite-Crystal Destiny","id":31972084318379,"position":27,"preview_image":{"aspect_ratio":1.0,"height":1000,"width":1000,"src":"\/\/crystaldestiny.com\/cdn\/shop\/files\/Azurite-wt-Malachite-Towers-Towers-19-39g-59mm-Azurite-Malachite-27.webp?v=1765343838"}},"requires_selling_plan":false,"selling_plan_allocations":[]},{"id":45738521788587,"title":"20 45g 51mm \/ Azurite \/ Malachite","option1":"20 45g 51mm","option2":"Azurite \/ Malachite","option3":null,"sku":"1005008348572301-20 45g 51mm","requires_shipping":true,"taxable":true,"featured_image":{"id":40587336843435,"product_id":8552831058091,"position":36,"created_at":"2025-10-16T19:06:13-04:00","updated_at":"2025-12-10T00:17:32-05:00","alt":"Azurite w\/t Malachite Towers-Towers-Ali-20 45g 51mm-Azurite \/ Malachite-Crystal Destiny","width":1000,"height":1000,"src":"\/\/crystaldestiny.com\/cdn\/shop\/files\/Azurite-wt-Malachite-Towers-Towers-20-45g-51mm-Azurite-Malachite-36.webp?v=1765343852","variant_ids":[45738521788587]},"available":true,"name":"Azurite w\/t Malachite Towers - 20 45g 51mm \/ Azurite \/ Malachite","public_title":"20 45g 51mm \/ Azurite \/ Malachite","options":["20 45g 51mm","Azurite \/ Malachite"],"price":4099,"weight":150,"compare_at_price":0,"inventory_management":"shopify","barcode":null,"featured_media":{"alt":"Azurite w\/t Malachite Towers-Towers-Ali-20 45g 51mm-Azurite \/ Malachite-Crystal Destiny","id":31972084613291,"position":36,"preview_image":{"aspect_ratio":1.0,"height":1000,"width":1000,"src":"\/\/crystaldestiny.com\/cdn\/shop\/files\/Azurite-wt-Malachite-Towers-Towers-20-45g-51mm-Azurite-Malachite-36.webp?v=1765343852"}},"requires_selling_plan":false,"selling_plan_allocations":[]},{"id":45738522017963,"title":"21 26g 58mm \/ Azurite \/ Malachite","option1":"21 26g 58mm","option2":"Azurite \/ Malachite","option3":null,"sku":"1005008348572301-21 26g 58mm","requires_shipping":true,"taxable":true,"featured_image":{"id":40587336188075,"product_id":8552831058091,"position":16,"created_at":"2025-10-16T19:06:13-04:00","updated_at":"2025-12-10T00:17:03-05:00","alt":"Azurite w\/t Malachite Towers-Towers-Ali-21 26g 58mm-Azurite \/ Malachite-Crystal Destiny","width":1000,"height":1000,"src":"\/\/crystaldestiny.com\/cdn\/shop\/files\/Azurite-wt-Malachite-Towers-Towers-21-26g-58mm-Azurite-Malachite-16.webp?v=1765343823","variant_ids":[45738522017963]},"available":false,"name":"Azurite w\/t Malachite Towers - 21 26g 58mm \/ Azurite \/ Malachite","public_title":"21 26g 58mm \/ Azurite \/ Malachite","options":["21 26g 58mm","Azurite \/ Malachite"],"price":3699,"weight":150,"compare_at_price":0,"inventory_management":"shopify","barcode":null,"featured_media":{"alt":"Azurite w\/t Malachite Towers-Towers-Ali-21 26g 58mm-Azurite \/ Malachite-Crystal Destiny","id":31972083957931,"position":16,"preview_image":{"aspect_ratio":1.0,"height":1000,"width":1000,"src":"\/\/crystaldestiny.com\/cdn\/shop\/files\/Azurite-wt-Malachite-Towers-Towers-21-26g-58mm-Azurite-Malachite-16.webp?v=1765343823"}},"requires_selling_plan":false,"selling_plan_allocations":[]},{"id":45738521985195,"title":"22 77g 74mm \/ Azurite \/ Malachite","option1":"22 77g 74mm","option2":"Azurite \/ Malachite","option3":null,"sku":"1005008348572301-22 77g 74mm","requires_shipping":true,"taxable":true,"featured_image":{"id":40587336646827,"product_id":8552831058091,"position":30,"created_at":"2025-10-16T19:06:13-04:00","updated_at":"2025-12-10T00:17:23-05:00","alt":"Azurite w\/t Malachite Towers-Towers-Ali-22 77g 74mm-Azurite \/ Malachite-Crystal Destiny","width":1000,"height":1000,"src":"\/\/crystaldestiny.com\/cdn\/shop\/files\/Azurite-wt-Malachite-Towers-Towers-22-77g-74mm-Azurite-Malachite-30.webp?v=1765343843","variant_ids":[45738521985195]},"available":true,"name":"Azurite w\/t Malachite Towers - 22 77g 74mm \/ Azurite \/ Malachite","public_title":"22 77g 74mm \/ Azurite \/ Malachite","options":["22 77g 74mm","Azurite \/ Malachite"],"price":5399,"weight":150,"compare_at_price":0,"inventory_management":"shopify","barcode":null,"featured_media":{"alt":"Azurite w\/t Malachite Towers-Towers-Ali-22 77g 74mm-Azurite \/ Malachite-Crystal Destiny","id":31972084416683,"position":30,"preview_image":{"aspect_ratio":1.0,"height":1000,"width":1000,"src":"\/\/crystaldestiny.com\/cdn\/shop\/files\/Azurite-wt-Malachite-Towers-Towers-22-77g-74mm-Azurite-Malachite-30.webp?v=1765343843"}},"requires_selling_plan":false,"selling_plan_allocations":[]},{"id":45738521952427,"title":"23 56g 61mm \/ Azurite \/ Malachite","option1":"23 56g 61mm","option2":"Azurite \/ Malachite","option3":null,"sku":"1005008348572301-23 56g 61mm","requires_shipping":true,"taxable":true,"featured_image":{"id":40587336876203,"product_id":8552831058091,"position":37,"created_at":"2025-10-16T19:06:13-04:00","updated_at":"2025-12-10T00:17:33-05:00","alt":"Azurite w\/t Malachite Towers-Towers-Ali-23 56g 61mm-Azurite \/ Malachite-Crystal Destiny","width":1000,"height":1000,"src":"\/\/crystaldestiny.com\/cdn\/shop\/files\/Azurite-wt-Malachite-Towers-Towers-23-56g-61mm-Azurite-Malachite-37.webp?v=1765343853","variant_ids":[45738521952427]},"available":true,"name":"Azurite w\/t Malachite Towers - 23 56g 61mm \/ Azurite \/ Malachite","public_title":"23 56g 61mm \/ Azurite \/ Malachite","options":["23 56g 61mm","Azurite \/ Malachite"],"price":4399,"weight":150,"compare_at_price":0,"inventory_management":"shopify","barcode":null,"featured_media":{"alt":"Azurite w\/t Malachite Towers-Towers-Ali-23 56g 61mm-Azurite \/ Malachite-Crystal Destiny","id":31972084646059,"position":37,"preview_image":{"aspect_ratio":1.0,"height":1000,"width":1000,"src":"\/\/crystaldestiny.com\/cdn\/shop\/files\/Azurite-wt-Malachite-Towers-Towers-23-56g-61mm-Azurite-Malachite-37.webp?v=1765343853"}},"requires_selling_plan":false,"selling_plan_allocations":[]},{"id":45738521919659,"title":"24 63g 58mm \/ Azurite \/ Malachite","option1":"24 63g 58mm","option2":"Azurite \/ Malachite","option3":null,"sku":"1005008348572301-24 63g 58mm","requires_shipping":true,"taxable":true,"featured_image":{"id":40587336155307,"product_id":8552831058091,"position":15,"created_at":"2025-10-16T19:06:13-04:00","updated_at":"2025-12-10T00:17:01-05:00","alt":"Azurite w\/t Malachite Towers-Towers-Ali-24 63g 58mm-Azurite \/ Malachite-Crystal Destiny","width":1000,"height":1000,"src":"\/\/crystaldestiny.com\/cdn\/shop\/files\/Azurite-wt-Malachite-Towers-Towers-24-63g-58mm-Azurite-Malachite-15.webp?v=1765343821","variant_ids":[45738521919659]},"available":false,"name":"Azurite w\/t Malachite Towers - 24 63g 58mm \/ Azurite \/ Malachite","public_title":"24 63g 58mm \/ Azurite \/ Malachite","options":["24 63g 58mm","Azurite \/ Malachite"],"price":4599,"weight":150,"compare_at_price":0,"inventory_management":"shopify","barcode":null,"featured_media":{"alt":"Azurite w\/t Malachite Towers-Towers-Ali-24 63g 58mm-Azurite \/ Malachite-Crystal Destiny","id":31972083925163,"position":15,"preview_image":{"aspect_ratio":1.0,"height":1000,"width":1000,"src":"\/\/crystaldestiny.com\/cdn\/shop\/files\/Azurite-wt-Malachite-Towers-Towers-24-63g-58mm-Azurite-Malachite-15.webp?v=1765343821"}},"requires_selling_plan":false,"selling_plan_allocations":[]},{"id":45738522149035,"title":"25 40g 49mm \/ Azurite \/ Malachite","option1":"25 40g 49mm","option2":"Azurite \/ Malachite","option3":null,"sku":"1005008348572301-25 40g 49mm","requires_shipping":true,"taxable":true,"featured_image":{"id":40587336974507,"product_id":8552831058091,"position":40,"created_at":"2025-10-16T19:06:13-04:00","updated_at":"2025-12-10T00:17:38-05:00","alt":"Azurite w\/t Malachite Towers-Towers-Ali-25 40g 49mm-Azurite \/ Malachite-Crystal Destiny","width":1000,"height":1000,"src":"\/\/crystaldestiny.com\/cdn\/shop\/files\/Azurite-wt-Malachite-Towers-Towers-25-40g-49mm-Azurite-Malachite-40.webp?v=1765343858","variant_ids":[45738522149035]},"available":true,"name":"Azurite w\/t Malachite Towers - 25 40g 49mm \/ Azurite \/ Malachite","public_title":"25 40g 49mm \/ Azurite \/ Malachite","options":["25 40g 49mm","Azurite \/ Malachite"],"price":3899,"weight":150,"compare_at_price":0,"inventory_management":"shopify","barcode":null,"featured_media":{"alt":"Azurite w\/t Malachite Towers-Towers-Ali-25 40g 49mm-Azurite \/ Malachite-Crystal Destiny","id":31972084744363,"position":40,"preview_image":{"aspect_ratio":1.0,"height":1000,"width":1000,"src":"\/\/crystaldestiny.com\/cdn\/shop\/files\/Azurite-wt-Malachite-Towers-Towers-25-40g-49mm-Azurite-Malachite-40.webp?v=1765343858"}},"requires_selling_plan":false,"selling_plan_allocations":[]},{"id":45738522116267,"title":"26 33g 46mm \/ Azurite \/ Malachite","option1":"26 33g 46mm","option2":"Azurite \/ Malachite","option3":null,"sku":"1005008348572301-26 33g 46mm","requires_shipping":true,"taxable":true,"featured_image":{"id":40587336089771,"product_id":8552831058091,"position":13,"created_at":"2025-10-16T19:06:13-04:00","updated_at":"2025-12-10T00:16:58-05:00","alt":"Azurite w\/t Malachite Towers-Towers-Ali-26 33g 46mm-Azurite \/ Malachite-Crystal Destiny","width":1000,"height":1000,"src":"\/\/crystaldestiny.com\/cdn\/shop\/files\/Azurite-wt-Malachite-Towers-Towers-26-33g-46mm-Azurite-Malachite-13.webp?v=1765343818","variant_ids":[45738522116267]},"available":true,"name":"Azurite w\/t Malachite Towers - 26 33g 46mm \/ Azurite \/ Malachite","public_title":"26 33g 46mm \/ Azurite \/ Malachite","options":["26 33g 46mm","Azurite \/ Malachite"],"price":3599,"weight":150,"compare_at_price":0,"inventory_management":"shopify","barcode":null,"featured_media":{"alt":"Azurite w\/t Malachite Towers-Towers-Ali-26 33g 46mm-Azurite \/ Malachite-Crystal Destiny","id":31972083859627,"position":13,"preview_image":{"aspect_ratio":1.0,"height":1000,"width":1000,"src":"\/\/crystaldestiny.com\/cdn\/shop\/files\/Azurite-wt-Malachite-Towers-Towers-26-33g-46mm-Azurite-Malachite-13.webp?v=1765343818"}},"requires_selling_plan":false,"selling_plan_allocations":[]},{"id":45738522083499,"title":"27 35g 52mm \/ Azurite \/ Malachite","option1":"27 35g 52mm","option2":"Azurite \/ Malachite","option3":null,"sku":"1005008348572301-27 35g 52mm","requires_shipping":true,"taxable":true,"featured_image":{"id":40587336384683,"product_id":8552831058091,"position":22,"created_at":"2025-10-16T19:06:13-04:00","updated_at":"2025-12-10T00:17:11-05:00","alt":"Azurite w\/t Malachite Towers-Towers-Ali-27 35g 52mm-Azurite \/ Malachite-Crystal Destiny","width":1000,"height":1000,"src":"\/\/crystaldestiny.com\/cdn\/shop\/files\/Azurite-wt-Malachite-Towers-Towers-27-35g-52mm-Azurite-Malachite-22.webp?v=1765343831","variant_ids":[45738522083499]},"available":false,"name":"Azurite w\/t Malachite Towers - 27 35g 52mm \/ Azurite \/ Malachite","public_title":"27 35g 52mm \/ Azurite \/ Malachite","options":["27 35g 52mm","Azurite \/ Malachite"],"price":4199,"weight":150,"compare_at_price":0,"inventory_management":"shopify","barcode":null,"featured_media":{"alt":"Azurite w\/t Malachite Towers-Towers-Ali-27 35g 52mm-Azurite \/ Malachite-Crystal Destiny","id":31972084154539,"position":22,"preview_image":{"aspect_ratio":1.0,"height":1000,"width":1000,"src":"\/\/crystaldestiny.com\/cdn\/shop\/files\/Azurite-wt-Malachite-Towers-Towers-27-35g-52mm-Azurite-Malachite-22.webp?v=1765343831"}},"requires_selling_plan":false,"selling_plan_allocations":[]},{"id":45738522050731,"title":"28 27g 41mm \/ Azurite \/ Malachite","option1":"28 27g 41mm","option2":"Azurite \/ Malachite","option3":null,"sku":"1005008348572301-28 27g 41mm","requires_shipping":true,"taxable":true,"featured_image":{"id":40587335893163,"product_id":8552831058091,"position":7,"created_at":"2025-10-16T19:06:13-04:00","updated_at":"2025-12-10T00:16:50-05:00","alt":"Azurite w\/t Malachite Towers-Towers-Ali-28 27g 41mm-Azurite \/ Malachite-Crystal Destiny","width":1000,"height":1000,"src":"\/\/crystaldestiny.com\/cdn\/shop\/files\/Azurite-wt-Malachite-Towers-Towers-28-27g-41mm-Azurite-Malachite-7.webp?v=1765343810","variant_ids":[45738522050731]},"available":true,"name":"Azurite w\/t Malachite Towers - 28 27g 41mm \/ Azurite \/ Malachite","public_title":"28 27g 41mm \/ Azurite \/ Malachite","options":["28 27g 41mm","Azurite \/ Malachite"],"price":3299,"weight":150,"compare_at_price":0,"inventory_management":"shopify","barcode":null,"featured_media":{"alt":"Azurite w\/t Malachite Towers-Towers-Ali-28 27g 41mm-Azurite \/ Malachite-Crystal Destiny","id":31972083663019,"position":7,"preview_image":{"aspect_ratio":1.0,"height":1000,"width":1000,"src":"\/\/crystaldestiny.com\/cdn\/shop\/files\/Azurite-wt-Malachite-Towers-Towers-28-27g-41mm-Azurite-Malachite-7.webp?v=1765343810"}},"requires_selling_plan":false,"selling_plan_allocations":[]},{"id":45738522280107,"title":"29 32g 47mm \/ Azurite \/ Malachite","option1":"29 32g 47mm","option2":"Azurite \/ Malachite","option3":null,"sku":"1005008348572301-29 32g 47mm","requires_shipping":true,"taxable":true,"featured_image":{"id":40587336220843,"product_id":8552831058091,"position":17,"created_at":"2025-10-16T19:06:13-04:00","updated_at":"2025-12-10T00:17:04-05:00","alt":"Azurite w\/t Malachite Towers-Towers-Ali-29 32g 47mm-Azurite \/ Malachite-Crystal Destiny","width":1000,"height":1000,"src":"\/\/crystaldestiny.com\/cdn\/shop\/files\/Azurite-wt-Malachite-Towers-Towers-29-32g-47mm-Azurite-Malachite-17.webp?v=1765343824","variant_ids":[45738522280107]},"available":true,"name":"Azurite w\/t Malachite Towers - 29 32g 47mm \/ Azurite \/ Malachite","public_title":"29 32g 47mm \/ Azurite \/ Malachite","options":["29 32g 47mm","Azurite \/ Malachite"],"price":3499,"weight":150,"compare_at_price":0,"inventory_management":"shopify","barcode":null,"featured_media":{"alt":"Azurite w\/t Malachite Towers-Towers-Ali-29 32g 47mm-Azurite \/ Malachite-Crystal Destiny","id":31972083990699,"position":17,"preview_image":{"aspect_ratio":1.0,"height":1000,"width":1000,"src":"\/\/crystaldestiny.com\/cdn\/shop\/files\/Azurite-wt-Malachite-Towers-Towers-29-32g-47mm-Azurite-Malachite-17.webp?v=1765343824"}},"requires_selling_plan":false,"selling_plan_allocations":[]},{"id":45738522247339,"title":"30 26g 51mm \/ Azurite \/ Malachite","option1":"30 26g 51mm","option2":"Azurite \/ Malachite","option3":null,"sku":"1005008348572301-30 26g 51mm","requires_shipping":true,"taxable":true,"featured_image":{"id":40587335925931,"product_id":8552831058091,"position":8,"created_at":"2025-10-16T19:06:13-04:00","updated_at":"2025-12-10T00:16:51-05:00","alt":"Azurite w\/t Malachite Towers-Towers-Ali-30 26g 51mm-Azurite \/ Malachite-Crystal Destiny","width":1000,"height":1000,"src":"\/\/crystaldestiny.com\/cdn\/shop\/files\/Azurite-wt-Malachite-Towers-Towers-30-26g-51mm-Azurite-Malachite-8.webp?v=1765343811","variant_ids":[45738522247339]},"available":true,"name":"Azurite w\/t Malachite Towers - 30 26g 51mm \/ Azurite \/ Malachite","public_title":"30 26g 51mm \/ Azurite \/ Malachite","options":["30 26g 51mm","Azurite \/ Malachite"],"price":3299,"weight":150,"compare_at_price":0,"inventory_management":"shopify","barcode":null,"featured_media":{"alt":"Azurite w\/t Malachite Towers-Towers-Ali-30 26g 51mm-Azurite \/ Malachite-Crystal Destiny","id":31972083695787,"position":8,"preview_image":{"aspect_ratio":1.0,"height":1000,"width":1000,"src":"\/\/crystaldestiny.com\/cdn\/shop\/files\/Azurite-wt-Malachite-Towers-Towers-30-26g-51mm-Azurite-Malachite-8.webp?v=1765343811"}},"requires_selling_plan":false,"selling_plan_allocations":[]},{"id":45738522214571,"title":"31 27g 41mm \/ Azurite \/ Malachite","option1":"31 27g 41mm","option2":"Azurite \/ Malachite","option3":null,"sku":"1005008348572301-31 27g 41mm","requires_shipping":true,"taxable":true,"featured_image":{"id":40587336122539,"product_id":8552831058091,"position":14,"created_at":"2025-10-16T19:06:13-04:00","updated_at":"2025-12-10T00:17:00-05:00","alt":"Azurite w\/t Malachite Towers-Towers-Ali-31 27g 41mm-Azurite \/ Malachite-Crystal Destiny","width":1000,"height":1000,"src":"\/\/crystaldestiny.com\/cdn\/shop\/files\/Azurite-wt-Malachite-Towers-Towers-31-27g-41mm-Azurite-Malachite-14.webp?v=1765343820","variant_ids":[45738522214571]},"available":true,"name":"Azurite w\/t Malachite Towers - 31 27g 41mm \/ Azurite \/ Malachite","public_title":"31 27g 41mm \/ Azurite \/ Malachite","options":["31 27g 41mm","Azurite \/ Malachite"],"price":3299,"weight":150,"compare_at_price":0,"inventory_management":"shopify","barcode":null,"featured_media":{"alt":"Azurite w\/t Malachite Towers-Towers-Ali-31 27g 41mm-Azurite \/ Malachite-Crystal Destiny","id":31972083892395,"position":14,"preview_image":{"aspect_ratio":1.0,"height":1000,"width":1000,"src":"\/\/crystaldestiny.com\/cdn\/shop\/files\/Azurite-wt-Malachite-Towers-Towers-31-27g-41mm-Azurite-Malachite-14.webp?v=1765343820"}},"requires_selling_plan":false,"selling_plan_allocations":[]},{"id":45738522181803,"title":"32 26g 44mm \/ Azurite \/ Malachite","option1":"32 26g 44mm","option2":"Azurite \/ Malachite","option3":null,"sku":"1005008348572301-32 26g 44mm","requires_shipping":true,"taxable":true,"featured_image":{"id":40587336417451,"product_id":8552831058091,"position":23,"created_at":"2025-10-16T19:06:13-04:00","updated_at":"2025-12-10T00:17:12-05:00","alt":"Azurite w\/t Malachite Towers-Towers-Ali-32 26g 44mm-Azurite \/ Malachite-Crystal Destiny","width":1000,"height":1000,"src":"\/\/crystaldestiny.com\/cdn\/shop\/files\/Azurite-wt-Malachite-Towers-Towers-32-26g-44mm-Azurite-Malachite-23.webp?v=1765343832","variant_ids":[45738522181803]},"available":true,"name":"Azurite w\/t Malachite Towers - 32 26g 44mm \/ Azurite \/ Malachite","public_title":"32 26g 44mm \/ Azurite \/ Malachite","options":["32 26g 44mm","Azurite \/ Malachite"],"price":3199,"weight":150,"compare_at_price":0,"inventory_management":"shopify","barcode":null,"featured_media":{"alt":"Azurite w\/t Malachite Towers-Towers-Ali-32 26g 44mm-Azurite \/ Malachite-Crystal Destiny","id":31972084187307,"position":23,"preview_image":{"aspect_ratio":1.0,"height":1000,"width":1000,"src":"\/\/crystaldestiny.com\/cdn\/shop\/files\/Azurite-wt-Malachite-Towers-Towers-32-26g-44mm-Azurite-Malachite-23.webp?v=1765343832"}},"requires_selling_plan":false,"selling_plan_allocations":[]},{"id":45738521755819,"title":"33 36g 52mm \/ Azurite \/ Malachite","option1":"33 36g 52mm","option2":"Azurite \/ Malachite","option3":null,"sku":"1005008348572301-33 36g 52mm","requires_shipping":true,"taxable":true,"featured_image":{"id":40587336351915,"product_id":8552831058091,"position":21,"created_at":"2025-10-16T19:06:13-04:00","updated_at":"2025-12-10T00:17:10-05:00","alt":"Azurite w\/t Malachite Towers-Towers-Ali-33 36g 52mm-Azurite \/ Malachite-Crystal Destiny","width":1000,"height":1000,"src":"\/\/crystaldestiny.com\/cdn\/shop\/files\/Azurite-wt-Malachite-Towers-Towers-33-36g-52mm-Azurite-Malachite-21.webp?v=1765343830","variant_ids":[45738521755819]},"available":false,"name":"Azurite w\/t Malachite Towers - 33 36g 52mm \/ Azurite \/ Malachite","public_title":"33 36g 52mm \/ Azurite \/ Malachite","options":["33 36g 52mm","Azurite \/ Malachite"],"price":4099,"weight":150,"compare_at_price":0,"inventory_management":"shopify","barcode":null,"featured_media":{"alt":"Azurite w\/t Malachite Towers-Towers-Ali-33 36g 52mm-Azurite \/ Malachite-Crystal Destiny","id":31972084121771,"position":21,"preview_image":{"aspect_ratio":1.0,"height":1000,"width":1000,"src":"\/\/crystaldestiny.com\/cdn\/shop\/files\/Azurite-wt-Malachite-Towers-Towers-33-36g-52mm-Azurite-Malachite-21.webp?v=1765343830"}},"requires_selling_plan":false,"selling_plan_allocations":[]},{"id":45738521723051,"title":"34 28g 46mm \/ Azurite \/ Malachite","option1":"34 28g 46mm","option2":"Azurite \/ Malachite","option3":null,"sku":"1005008348572301-34 28g 46mm","requires_shipping":true,"taxable":true,"featured_image":{"id":40587336024235,"product_id":8552831058091,"position":11,"created_at":"2025-10-16T19:06:13-04:00","updated_at":"2025-12-10T00:16:55-05:00","alt":"Azurite w\/t Malachite Towers-Towers-Ali-34 28g 46mm-Azurite \/ Malachite-Crystal Destiny","width":1000,"height":1000,"src":"\/\/crystaldestiny.com\/cdn\/shop\/files\/Azurite-wt-Malachite-Towers-Towers-34-28g-46mm-Azurite-Malachite-11.webp?v=1765343815","variant_ids":[45738521723051]},"available":true,"name":"Azurite w\/t Malachite Towers - 34 28g 46mm \/ Azurite \/ Malachite","public_title":"34 28g 46mm \/ Azurite \/ Malachite","options":["34 28g 46mm","Azurite \/ Malachite"],"price":3299,"weight":150,"compare_at_price":0,"inventory_management":"shopify","barcode":null,"featured_media":{"alt":"Azurite w\/t Malachite Towers-Towers-Ali-34 28g 46mm-Azurite \/ Malachite-Crystal Destiny","id":31972083794091,"position":11,"preview_image":{"aspect_ratio":1.0,"height":1000,"width":1000,"src":"\/\/crystaldestiny.com\/cdn\/shop\/files\/Azurite-wt-Malachite-Towers-Towers-34-28g-46mm-Azurite-Malachite-11.webp?v=1765343815"}},"requires_selling_plan":false,"selling_plan_allocations":[]},{"id":45738521690283,"title":"35 29g 46mm \/ Azurite \/ Malachite","option1":"35 29g 46mm","option2":"Azurite \/ Malachite","option3":null,"sku":"1005008348572301-35 29g 46mm","requires_shipping":true,"taxable":true,"featured_image":{"id":40587336319147,"product_id":8552831058091,"position":20,"created_at":"2025-10-16T19:06:13-04:00","updated_at":"2025-12-10T00:17:08-05:00","alt":"Azurite w\/t Malachite Towers-Towers-Ali-35 29g 46mm-Azurite \/ Malachite-Crystal Destiny","width":1000,"height":1000,"src":"\/\/crystaldestiny.com\/cdn\/shop\/files\/Azurite-wt-Malachite-Towers-Towers-35-29g-46mm-Azurite-Malachite-20.webp?v=1765343828","variant_ids":[45738521690283]},"available":false,"name":"Azurite w\/t Malachite Towers - 35 29g 46mm \/ Azurite \/ Malachite","public_title":"35 29g 46mm \/ Azurite \/ Malachite","options":["35 29g 46mm","Azurite \/ Malachite"],"price":3399,"weight":150,"compare_at_price":0,"inventory_management":"shopify","barcode":null,"featured_media":{"alt":"Azurite w\/t Malachite Towers-Towers-Ali-35 29g 46mm-Azurite \/ Malachite-Crystal Destiny","id":31972084089003,"position":20,"preview_image":{"aspect_ratio":1.0,"height":1000,"width":1000,"src":"\/\/crystaldestiny.com\/cdn\/shop\/files\/Azurite-wt-Malachite-Towers-Towers-35-29g-46mm-Azurite-Malachite-20.webp?v=1765343828"}},"requires_selling_plan":false,"selling_plan_allocations":[]},{"id":45738521657515,"title":"36 35g 55mm \/ Azurite \/ Malachite","option1":"36 35g 55mm","option2":"Azurite \/ Malachite","option3":null,"sku":"1005008348572301-36 35g 55mm","requires_shipping":true,"taxable":true,"featured_image":{"id":40587335991467,"product_id":8552831058091,"position":10,"created_at":"2025-10-16T19:06:13-04:00","updated_at":"2025-12-10T00:16:54-05:00","alt":"Azurite w\/t Malachite Towers-Towers-Ali-36 35g 55mm-Azurite \/ Malachite-Crystal Destiny","width":1000,"height":1000,"src":"\/\/crystaldestiny.com\/cdn\/shop\/files\/Azurite-wt-Malachite-Towers-Towers-36-35g-55mm-Azurite-Malachite-10.webp?v=1765343814","variant_ids":[45738521657515]},"available":true,"name":"Azurite w\/t Malachite Towers - 36 35g 55mm \/ Azurite \/ Malachite","public_title":"36 35g 55mm \/ Azurite \/ Malachite","options":["36 35g 55mm","Azurite \/ Malachite"],"price":3599,"weight":150,"compare_at_price":0,"inventory_management":"shopify","barcode":null,"featured_media":{"alt":"Azurite w\/t Malachite Towers-Towers-Ali-36 35g 55mm-Azurite \/ Malachite-Crystal Destiny","id":31972083761323,"position":10,"preview_image":{"aspect_ratio":1.0,"height":1000,"width":1000,"src":"\/\/crystaldestiny.com\/cdn\/shop\/files\/Azurite-wt-Malachite-Towers-Towers-36-35g-55mm-Azurite-Malachite-10.webp?v=1765343814"}},"requires_selling_plan":false,"selling_plan_allocations":[]}],"images":["\/\/crystaldestiny.com\/cdn\/shop\/files\/Azurite-wt-Malachite-Towers-Towers.webp?v=1761282270","\/\/crystaldestiny.com\/cdn\/shop\/files\/Azurite-wt-Malachite-Towers-Towers-2.webp?v=1761282271","\/\/crystaldestiny.com\/cdn\/shop\/files\/Azurite-wt-Malachite-Towers-Towers-3.webp?v=1761282273","\/\/crystaldestiny.com\/cdn\/shop\/files\/Azurite-wt-Malachite-Towers-Towers-4.webp?v=1761282274","\/\/crystaldestiny.com\/cdn\/shop\/files\/Azurite-wt-Malachite-Towers-Towers-5.webp?v=1761282276","\/\/crystaldestiny.com\/cdn\/shop\/files\/Azurite-wt-Malachite-Towers-Towers-14-53g-63mm-Azurite-Malachite-6.webp?v=1765343809","\/\/crystaldestiny.com\/cdn\/shop\/files\/Azurite-wt-Malachite-Towers-Towers-28-27g-41mm-Azurite-Malachite-7.webp?v=1765343810","\/\/crystaldestiny.com\/cdn\/shop\/files\/Azurite-wt-Malachite-Towers-Towers-30-26g-51mm-Azurite-Malachite-8.webp?v=1765343811","\/\/crystaldestiny.com\/cdn\/shop\/files\/Azurite-wt-Malachite-Towers-Towers-16-59g-67mm-Azurite-Malachite-9.webp?v=1765343813","\/\/crystaldestiny.com\/cdn\/shop\/files\/Azurite-wt-Malachite-Towers-Towers-36-35g-55mm-Azurite-Malachite-10.webp?v=1765343814","\/\/crystaldestiny.com\/cdn\/shop\/files\/Azurite-wt-Malachite-Towers-Towers-34-28g-46mm-Azurite-Malachite-11.webp?v=1765343815","\/\/crystaldestiny.com\/cdn\/shop\/files\/Azurite-wt-Malachite-Towers-Towers-18-49g-69mm-Azurite-Malachite-12.webp?v=1765343817","\/\/crystaldestiny.com\/cdn\/shop\/files\/Azurite-wt-Malachite-Towers-Towers-26-33g-46mm-Azurite-Malachite-13.webp?v=1765343818","\/\/crystaldestiny.com\/cdn\/shop\/files\/Azurite-wt-Malachite-Towers-Towers-31-27g-41mm-Azurite-Malachite-14.webp?v=1765343820","\/\/crystaldestiny.com\/cdn\/shop\/files\/Azurite-wt-Malachite-Towers-Towers-24-63g-58mm-Azurite-Malachite-15.webp?v=1765343821","\/\/crystaldestiny.com\/cdn\/shop\/files\/Azurite-wt-Malachite-Towers-Towers-21-26g-58mm-Azurite-Malachite-16.webp?v=1765343823","\/\/crystaldestiny.com\/cdn\/shop\/files\/Azurite-wt-Malachite-Towers-Towers-29-32g-47mm-Azurite-Malachite-17.webp?v=1765343824","\/\/crystaldestiny.com\/cdn\/shop\/files\/Azurite-wt-Malachite-Towers-Towers-4-57g-67mm-Azurite-Malachite-18.webp?v=1765343825","\/\/crystaldestiny.com\/cdn\/shop\/files\/Azurite-wt-Malachite-Towers-Towers-8-78g-75mm-Azurite-Malachite-19.webp?v=1765343827","\/\/crystaldestiny.com\/cdn\/shop\/files\/Azurite-wt-Malachite-Towers-Towers-35-29g-46mm-Azurite-Malachite-20.webp?v=1765343828","\/\/crystaldestiny.com\/cdn\/shop\/files\/Azurite-wt-Malachite-Towers-Towers-33-36g-52mm-Azurite-Malachite-21.webp?v=1765343830","\/\/crystaldestiny.com\/cdn\/shop\/files\/Azurite-wt-Malachite-Towers-Towers-27-35g-52mm-Azurite-Malachite-22.webp?v=1765343831","\/\/crystaldestiny.com\/cdn\/shop\/files\/Azurite-wt-Malachite-Towers-Towers-32-26g-44mm-Azurite-Malachite-23.webp?v=1765343832","\/\/crystaldestiny.com\/cdn\/shop\/files\/Azurite-wt-Malachite-Towers-Towers-3-62g-63mm-Azurite-Malachite-24.webp?v=1765343834","\/\/crystaldestiny.com\/cdn\/shop\/files\/Azurite-wt-Malachite-Towers-Towers-9-61g-72mm-Azurite-Malachite-25.webp?v=1765343836","\/\/crystaldestiny.com\/cdn\/shop\/files\/Azurite-wt-Malachite-Towers-Towers-15-55g-66mm-Azurite-Malachite-26.webp?v=1765343837","\/\/crystaldestiny.com\/cdn\/shop\/files\/Azurite-wt-Malachite-Towers-Towers-19-39g-59mm-Azurite-Malachite-27.webp?v=1765343838","\/\/crystaldestiny.com\/cdn\/shop\/files\/Azurite-wt-Malachite-Towers-Towers-5-78g-83mm-Azurite-Malachite-28.webp?v=1765343840","\/\/crystaldestiny.com\/cdn\/shop\/files\/Azurite-wt-Malachite-Towers-Towers-6-74g-75mm-Azurite-Malachite-29.webp?v=1765343842","\/\/crystaldestiny.com\/cdn\/shop\/files\/Azurite-wt-Malachite-Towers-Towers-22-77g-74mm-Azurite-Malachite-30.webp?v=1765343843","\/\/crystaldestiny.com\/cdn\/shop\/files\/Azurite-wt-Malachite-Towers-Towers-2-82g-68mm-Azurite-Malachite-31.webp?v=1765343844","\/\/crystaldestiny.com\/cdn\/shop\/files\/Azurite-wt-Malachite-Towers-Towers-1-77g-69mm-Azurite-Malachite-32.webp?v=1765343846","\/\/crystaldestiny.com\/cdn\/shop\/files\/Azurite-wt-Malachite-Towers-Towers-7-69g-66mm-Azurite-Malachite-33.webp?v=1765343847","\/\/crystaldestiny.com\/cdn\/shop\/files\/Azurite-wt-Malachite-Towers-Towers-10-75g-72mm-Azurite-Malachite-34.webp?v=1765343849","\/\/crystaldestiny.com\/cdn\/shop\/files\/Azurite-wt-Malachite-Towers-Towers-13-40g-62mm-Azurite-Malachite-35.webp?v=1765343850","\/\/crystaldestiny.com\/cdn\/shop\/files\/Azurite-wt-Malachite-Towers-Towers-20-45g-51mm-Azurite-Malachite-36.webp?v=1765343852","\/\/crystaldestiny.com\/cdn\/shop\/files\/Azurite-wt-Malachite-Towers-Towers-23-56g-61mm-Azurite-Malachite-37.webp?v=1765343853","\/\/crystaldestiny.com\/cdn\/shop\/files\/Azurite-wt-Malachite-Towers-Towers-11-66g-63mm-Azurite-Malachite-38.webp?v=1765343855","\/\/crystaldestiny.com\/cdn\/shop\/files\/Azurite-wt-Malachite-Towers-Towers-17-33g-55mm-Azurite-Malachite-39.webp?v=1765343856","\/\/crystaldestiny.com\/cdn\/shop\/files\/Azurite-wt-Malachite-Towers-Towers-25-40g-49mm-Azurite-Malachite-40.webp?v=1765343858","\/\/crystaldestiny.com\/cdn\/shop\/files\/Azurite-wt-Malachite-Towers-Towers-12-68g-76mm-Azurite-Malachite-41.webp?v=1765343859"],"featured_image":"\/\/crystaldestiny.com\/cdn\/shop\/files\/Azurite-wt-Malachite-Towers-Towers.webp?v=1761282270","options":["Size","Material"],"media":[{"alt":"Azurite w\/t Malachite Towers-Towers-Ali-1 77g 69mm-Azurite \/ Malachite-Crystal Destiny","id":31972083466411,"position":1,"preview_image":{"aspect_ratio":1.0,"height":1000,"width":1000,"src":"\/\/crystaldestiny.com\/cdn\/shop\/files\/Azurite-wt-Malachite-Towers-Towers.webp?v=1761282270"},"aspect_ratio":1.0,"height":1000,"media_type":"image","src":"\/\/crystaldestiny.com\/cdn\/shop\/files\/Azurite-wt-Malachite-Towers-Towers.webp?v=1761282270","width":1000},{"alt":"Azurite w\/t Malachite Towers-Towers-Ali-1 77g 69mm-Azurite \/ Malachite-Crystal Destiny","id":31972083499179,"position":2,"preview_image":{"aspect_ratio":1.0,"height":1000,"width":1000,"src":"\/\/crystaldestiny.com\/cdn\/shop\/files\/Azurite-wt-Malachite-Towers-Towers-2.webp?v=1761282271"},"aspect_ratio":1.0,"height":1000,"media_type":"image","src":"\/\/crystaldestiny.com\/cdn\/shop\/files\/Azurite-wt-Malachite-Towers-Towers-2.webp?v=1761282271","width":1000},{"alt":"Azurite w\/t Malachite Towers-Towers-Ali-1 77g 69mm-Azurite \/ Malachite-Crystal Destiny","id":31972083531947,"position":3,"preview_image":{"aspect_ratio":1.0,"height":1000,"width":1000,"src":"\/\/crystaldestiny.com\/cdn\/shop\/files\/Azurite-wt-Malachite-Towers-Towers-3.webp?v=1761282273"},"aspect_ratio":1.0,"height":1000,"media_type":"image","src":"\/\/crystaldestiny.com\/cdn\/shop\/files\/Azurite-wt-Malachite-Towers-Towers-3.webp?v=1761282273","width":1000},{"alt":"Azurite w\/t Malachite Towers-Towers-Ali-1 77g 69mm-Azurite \/ Malachite-Crystal Destiny","id":31972083564715,"position":4,"preview_image":{"aspect_ratio":1.0,"height":1000,"width":1000,"src":"\/\/crystaldestiny.com\/cdn\/shop\/files\/Azurite-wt-Malachite-Towers-Towers-4.webp?v=1761282274"},"aspect_ratio":1.0,"height":1000,"media_type":"image","src":"\/\/crystaldestiny.com\/cdn\/shop\/files\/Azurite-wt-Malachite-Towers-Towers-4.webp?v=1761282274","width":1000},{"alt":"Azurite w\/t Malachite Towers-Towers-Ali-1 77g 69mm-Azurite \/ Malachite-Crystal Destiny","id":31972083597483,"position":5,"preview_image":{"aspect_ratio":1.0,"height":1000,"width":1000,"src":"\/\/crystaldestiny.com\/cdn\/shop\/files\/Azurite-wt-Malachite-Towers-Towers-5.webp?v=1761282276"},"aspect_ratio":1.0,"height":1000,"media_type":"image","src":"\/\/crystaldestiny.com\/cdn\/shop\/files\/Azurite-wt-Malachite-Towers-Towers-5.webp?v=1761282276","width":1000},{"alt":"Azurite w\/t Malachite Towers-Towers-Ali-14 53g 63mm-Azurite \/ Malachite-Crystal Destiny","id":31972083630251,"position":6,"preview_image":{"aspect_ratio":1.0,"height":1000,"width":1000,"src":"\/\/crystaldestiny.com\/cdn\/shop\/files\/Azurite-wt-Malachite-Towers-Towers-14-53g-63mm-Azurite-Malachite-6.webp?v=1765343809"},"aspect_ratio":1.0,"height":1000,"media_type":"image","src":"\/\/crystaldestiny.com\/cdn\/shop\/files\/Azurite-wt-Malachite-Towers-Towers-14-53g-63mm-Azurite-Malachite-6.webp?v=1765343809","width":1000},{"alt":"Azurite w\/t Malachite Towers-Towers-Ali-28 27g 41mm-Azurite \/ Malachite-Crystal Destiny","id":31972083663019,"position":7,"preview_image":{"aspect_ratio":1.0,"height":1000,"width":1000,"src":"\/\/crystaldestiny.com\/cdn\/shop\/files\/Azurite-wt-Malachite-Towers-Towers-28-27g-41mm-Azurite-Malachite-7.webp?v=1765343810"},"aspect_ratio":1.0,"height":1000,"media_type":"image","src":"\/\/crystaldestiny.com\/cdn\/shop\/files\/Azurite-wt-Malachite-Towers-Towers-28-27g-41mm-Azurite-Malachite-7.webp?v=1765343810","width":1000},{"alt":"Azurite w\/t Malachite Towers-Towers-Ali-30 26g 51mm-Azurite \/ Malachite-Crystal Destiny","id":31972083695787,"position":8,"preview_image":{"aspect_ratio":1.0,"height":1000,"width":1000,"src":"\/\/crystaldestiny.com\/cdn\/shop\/files\/Azurite-wt-Malachite-Towers-Towers-30-26g-51mm-Azurite-Malachite-8.webp?v=1765343811"},"aspect_ratio":1.0,"height":1000,"media_type":"image","src":"\/\/crystaldestiny.com\/cdn\/shop\/files\/Azurite-wt-Malachite-Towers-Towers-30-26g-51mm-Azurite-Malachite-8.webp?v=1765343811","width":1000},{"alt":"Azurite w\/t Malachite Towers-Towers-Ali-16 59g 67mm-Azurite \/ Malachite-Crystal Destiny","id":31972083728555,"position":9,"preview_image":{"aspect_ratio":1.0,"height":1000,"width":1000,"src":"\/\/crystaldestiny.com\/cdn\/shop\/files\/Azurite-wt-Malachite-Towers-Towers-16-59g-67mm-Azurite-Malachite-9.webp?v=1765343813"},"aspect_ratio":1.0,"height":1000,"media_type":"image","src":"\/\/crystaldestiny.com\/cdn\/shop\/files\/Azurite-wt-Malachite-Towers-Towers-16-59g-67mm-Azurite-Malachite-9.webp?v=1765343813","width":1000},{"alt":"Azurite w\/t Malachite Towers-Towers-Ali-36 35g 55mm-Azurite \/ Malachite-Crystal Destiny","id":31972083761323,"position":10,"preview_image":{"aspect_ratio":1.0,"height":1000,"width":1000,"src":"\/\/crystaldestiny.com\/cdn\/shop\/files\/Azurite-wt-Malachite-Towers-Towers-36-35g-55mm-Azurite-Malachite-10.webp?v=1765343814"},"aspect_ratio":1.0,"height":1000,"media_type":"image","src":"\/\/crystaldestiny.com\/cdn\/shop\/files\/Azurite-wt-Malachite-Towers-Towers-36-35g-55mm-Azurite-Malachite-10.webp?v=1765343814","width":1000},{"alt":"Azurite w\/t Malachite Towers-Towers-Ali-34 28g 46mm-Azurite \/ Malachite-Crystal Destiny","id":31972083794091,"position":11,"preview_image":{"aspect_ratio":1.0,"height":1000,"width":1000,"src":"\/\/crystaldestiny.com\/cdn\/shop\/files\/Azurite-wt-Malachite-Towers-Towers-34-28g-46mm-Azurite-Malachite-11.webp?v=1765343815"},"aspect_ratio":1.0,"height":1000,"media_type":"image","src":"\/\/crystaldestiny.com\/cdn\/shop\/files\/Azurite-wt-Malachite-Towers-Towers-34-28g-46mm-Azurite-Malachite-11.webp?v=1765343815","width":1000},{"alt":"Azurite w\/t Malachite Towers-Towers-Ali-18 49g 69mm-Azurite \/ Malachite-Crystal Destiny","id":31972083826859,"position":12,"preview_image":{"aspect_ratio":1.0,"height":1000,"width":1000,"src":"\/\/crystaldestiny.com\/cdn\/shop\/files\/Azurite-wt-Malachite-Towers-Towers-18-49g-69mm-Azurite-Malachite-12.webp?v=1765343817"},"aspect_ratio":1.0,"height":1000,"media_type":"image","src":"\/\/crystaldestiny.com\/cdn\/shop\/files\/Azurite-wt-Malachite-Towers-Towers-18-49g-69mm-Azurite-Malachite-12.webp?v=1765343817","width":1000},{"alt":"Azurite w\/t Malachite Towers-Towers-Ali-26 33g 46mm-Azurite \/ Malachite-Crystal Destiny","id":31972083859627,"position":13,"preview_image":{"aspect_ratio":1.0,"height":1000,"width":1000,"src":"\/\/crystaldestiny.com\/cdn\/shop\/files\/Azurite-wt-Malachite-Towers-Towers-26-33g-46mm-Azurite-Malachite-13.webp?v=1765343818"},"aspect_ratio":1.0,"height":1000,"media_type":"image","src":"\/\/crystaldestiny.com\/cdn\/shop\/files\/Azurite-wt-Malachite-Towers-Towers-26-33g-46mm-Azurite-Malachite-13.webp?v=1765343818","width":1000},{"alt":"Azurite w\/t Malachite Towers-Towers-Ali-31 27g 41mm-Azurite \/ Malachite-Crystal Destiny","id":31972083892395,"position":14,"preview_image":{"aspect_ratio":1.0,"height":1000,"width":1000,"src":"\/\/crystaldestiny.com\/cdn\/shop\/files\/Azurite-wt-Malachite-Towers-Towers-31-27g-41mm-Azurite-Malachite-14.webp?v=1765343820"},"aspect_ratio":1.0,"height":1000,"media_type":"image","src":"\/\/crystaldestiny.com\/cdn\/shop\/files\/Azurite-wt-Malachite-Towers-Towers-31-27g-41mm-Azurite-Malachite-14.webp?v=1765343820","width":1000},{"alt":"Azurite w\/t Malachite Towers-Towers-Ali-24 63g 58mm-Azurite \/ Malachite-Crystal Destiny","id":31972083925163,"position":15,"preview_image":{"aspect_ratio":1.0,"height":1000,"width":1000,"src":"\/\/crystaldestiny.com\/cdn\/shop\/files\/Azurite-wt-Malachite-Towers-Towers-24-63g-58mm-Azurite-Malachite-15.webp?v=1765343821"},"aspect_ratio":1.0,"height":1000,"media_type":"image","src":"\/\/crystaldestiny.com\/cdn\/shop\/files\/Azurite-wt-Malachite-Towers-Towers-24-63g-58mm-Azurite-Malachite-15.webp?v=1765343821","width":1000},{"alt":"Azurite w\/t Malachite Towers-Towers-Ali-21 26g 58mm-Azurite \/ Malachite-Crystal Destiny","id":31972083957931,"position":16,"preview_image":{"aspect_ratio":1.0,"height":1000,"width":1000,"src":"\/\/crystaldestiny.com\/cdn\/shop\/files\/Azurite-wt-Malachite-Towers-Towers-21-26g-58mm-Azurite-Malachite-16.webp?v=1765343823"},"aspect_ratio":1.0,"height":1000,"media_type":"image","src":"\/\/crystaldestiny.com\/cdn\/shop\/files\/Azurite-wt-Malachite-Towers-Towers-21-26g-58mm-Azurite-Malachite-16.webp?v=1765343823","width":1000},{"alt":"Azurite w\/t Malachite Towers-Towers-Ali-29 32g 47mm-Azurite \/ Malachite-Crystal Destiny","id":31972083990699,"position":17,"preview_image":{"aspect_ratio":1.0,"height":1000,"width":1000,"src":"\/\/crystaldestiny.com\/cdn\/shop\/files\/Azurite-wt-Malachite-Towers-Towers-29-32g-47mm-Azurite-Malachite-17.webp?v=1765343824"},"aspect_ratio":1.0,"height":1000,"media_type":"image","src":"\/\/crystaldestiny.com\/cdn\/shop\/files\/Azurite-wt-Malachite-Towers-Towers-29-32g-47mm-Azurite-Malachite-17.webp?v=1765343824","width":1000},{"alt":"Azurite w\/t Malachite Towers-Towers-Ali-4 57g 67mm-Azurite \/ Malachite-Crystal Destiny","id":31972084023467,"position":18,"preview_image":{"aspect_ratio":1.0,"height":1000,"width":1000,"src":"\/\/crystaldestiny.com\/cdn\/shop\/files\/Azurite-wt-Malachite-Towers-Towers-4-57g-67mm-Azurite-Malachite-18.webp?v=1765343825"},"aspect_ratio":1.0,"height":1000,"media_type":"image","src":"\/\/crystaldestiny.com\/cdn\/shop\/files\/Azurite-wt-Malachite-Towers-Towers-4-57g-67mm-Azurite-Malachite-18.webp?v=1765343825","width":1000},{"alt":"Azurite w\/t Malachite Towers-Towers-Ali-8 78g 75mm-Azurite \/ Malachite-Crystal Destiny","id":31972084056235,"position":19,"preview_image":{"aspect_ratio":1.0,"height":1000,"width":1000,"src":"\/\/crystaldestiny.com\/cdn\/shop\/files\/Azurite-wt-Malachite-Towers-Towers-8-78g-75mm-Azurite-Malachite-19.webp?v=1765343827"},"aspect_ratio":1.0,"height":1000,"media_type":"image","src":"\/\/crystaldestiny.com\/cdn\/shop\/files\/Azurite-wt-Malachite-Towers-Towers-8-78g-75mm-Azurite-Malachite-19.webp?v=1765343827","width":1000},{"alt":"Azurite w\/t Malachite Towers-Towers-Ali-35 29g 46mm-Azurite \/ Malachite-Crystal Destiny","id":31972084089003,"position":20,"preview_image":{"aspect_ratio":1.0,"height":1000,"width":1000,"src":"\/\/crystaldestiny.com\/cdn\/shop\/files\/Azurite-wt-Malachite-Towers-Towers-35-29g-46mm-Azurite-Malachite-20.webp?v=1765343828"},"aspect_ratio":1.0,"height":1000,"media_type":"image","src":"\/\/crystaldestiny.com\/cdn\/shop\/files\/Azurite-wt-Malachite-Towers-Towers-35-29g-46mm-Azurite-Malachite-20.webp?v=1765343828","width":1000},{"alt":"Azurite w\/t Malachite Towers-Towers-Ali-33 36g 52mm-Azurite \/ Malachite-Crystal Destiny","id":31972084121771,"position":21,"preview_image":{"aspect_ratio":1.0,"height":1000,"width":1000,"src":"\/\/crystaldestiny.com\/cdn\/shop\/files\/Azurite-wt-Malachite-Towers-Towers-33-36g-52mm-Azurite-Malachite-21.webp?v=1765343830"},"aspect_ratio":1.0,"height":1000,"media_type":"image","src":"\/\/crystaldestiny.com\/cdn\/shop\/files\/Azurite-wt-Malachite-Towers-Towers-33-36g-52mm-Azurite-Malachite-21.webp?v=1765343830","width":1000},{"alt":"Azurite w\/t Malachite Towers-Towers-Ali-27 35g 52mm-Azurite \/ Malachite-Crystal Destiny","id":31972084154539,"position":22,"preview_image":{"aspect_ratio":1.0,"height":1000,"width":1000,"src":"\/\/crystaldestiny.com\/cdn\/shop\/files\/Azurite-wt-Malachite-Towers-Towers-27-35g-52mm-Azurite-Malachite-22.webp?v=1765343831"},"aspect_ratio":1.0,"height":1000,"media_type":"image","src":"\/\/crystaldestiny.com\/cdn\/shop\/files\/Azurite-wt-Malachite-Towers-Towers-27-35g-52mm-Azurite-Malachite-22.webp?v=1765343831","width":1000},{"alt":"Azurite w\/t Malachite Towers-Towers-Ali-32 26g 44mm-Azurite \/ Malachite-Crystal Destiny","id":31972084187307,"position":23,"preview_image":{"aspect_ratio":1.0,"height":1000,"width":1000,"src":"\/\/crystaldestiny.com\/cdn\/shop\/files\/Azurite-wt-Malachite-Towers-Towers-32-26g-44mm-Azurite-Malachite-23.webp?v=1765343832"},"aspect_ratio":1.0,"height":1000,"media_type":"image","src":"\/\/crystaldestiny.com\/cdn\/shop\/files\/Azurite-wt-Malachite-Towers-Towers-32-26g-44mm-Azurite-Malachite-23.webp?v=1765343832","width":1000},{"alt":"Azurite w\/t Malachite Towers-Towers-Ali-3 62g 63mm-Azurite \/ Malachite-Crystal Destiny","id":31972084220075,"position":24,"preview_image":{"aspect_ratio":1.0,"height":1000,"width":1000,"src":"\/\/crystaldestiny.com\/cdn\/shop\/files\/Azurite-wt-Malachite-Towers-Towers-3-62g-63mm-Azurite-Malachite-24.webp?v=1765343834"},"aspect_ratio":1.0,"height":1000,"media_type":"image","src":"\/\/crystaldestiny.com\/cdn\/shop\/files\/Azurite-wt-Malachite-Towers-Towers-3-62g-63mm-Azurite-Malachite-24.webp?v=1765343834","width":1000},{"alt":"Azurite w\/t Malachite Towers-Towers-Ali-9 61g 72mm-Azurite \/ Malachite-Crystal Destiny","id":31972084252843,"position":25,"preview_image":{"aspect_ratio":1.0,"height":1000,"width":1000,"src":"\/\/crystaldestiny.com\/cdn\/shop\/files\/Azurite-wt-Malachite-Towers-Towers-9-61g-72mm-Azurite-Malachite-25.webp?v=1765343836"},"aspect_ratio":1.0,"height":1000,"media_type":"image","src":"\/\/crystaldestiny.com\/cdn\/shop\/files\/Azurite-wt-Malachite-Towers-Towers-9-61g-72mm-Azurite-Malachite-25.webp?v=1765343836","width":1000},{"alt":"Azurite w\/t Malachite Towers-Towers-Ali-15 55g 66mm-Azurite \/ Malachite-Crystal Destiny","id":31972084285611,"position":26,"preview_image":{"aspect_ratio":1.0,"height":1000,"width":1000,"src":"\/\/crystaldestiny.com\/cdn\/shop\/files\/Azurite-wt-Malachite-Towers-Towers-15-55g-66mm-Azurite-Malachite-26.webp?v=1765343837"},"aspect_ratio":1.0,"height":1000,"media_type":"image","src":"\/\/crystaldestiny.com\/cdn\/shop\/files\/Azurite-wt-Malachite-Towers-Towers-15-55g-66mm-Azurite-Malachite-26.webp?v=1765343837","width":1000},{"alt":"Azurite w\/t Malachite Towers-Towers-Ali-19 39g 59mm-Azurite \/ Malachite-Crystal Destiny","id":31972084318379,"position":27,"preview_image":{"aspect_ratio":1.0,"height":1000,"width":1000,"src":"\/\/crystaldestiny.com\/cdn\/shop\/files\/Azurite-wt-Malachite-Towers-Towers-19-39g-59mm-Azurite-Malachite-27.webp?v=1765343838"},"aspect_ratio":1.0,"height":1000,"media_type":"image","src":"\/\/crystaldestiny.com\/cdn\/shop\/files\/Azurite-wt-Malachite-Towers-Towers-19-39g-59mm-Azurite-Malachite-27.webp?v=1765343838","width":1000},{"alt":"Azurite w\/t Malachite Towers-Towers-Ali-5 78g 83mm-Azurite \/ Malachite-Crystal Destiny","id":31972084351147,"position":28,"preview_image":{"aspect_ratio":1.0,"height":1000,"width":1000,"src":"\/\/crystaldestiny.com\/cdn\/shop\/files\/Azurite-wt-Malachite-Towers-Towers-5-78g-83mm-Azurite-Malachite-28.webp?v=1765343840"},"aspect_ratio":1.0,"height":1000,"media_type":"image","src":"\/\/crystaldestiny.com\/cdn\/shop\/files\/Azurite-wt-Malachite-Towers-Towers-5-78g-83mm-Azurite-Malachite-28.webp?v=1765343840","width":1000},{"alt":"Azurite w\/t Malachite Towers-Towers-Ali-6 74g 75mm-Azurite \/ Malachite-Crystal Destiny","id":31972084383915,"position":29,"preview_image":{"aspect_ratio":1.0,"height":1000,"width":1000,"src":"\/\/crystaldestiny.com\/cdn\/shop\/files\/Azurite-wt-Malachite-Towers-Towers-6-74g-75mm-Azurite-Malachite-29.webp?v=1765343842"},"aspect_ratio":1.0,"height":1000,"media_type":"image","src":"\/\/crystaldestiny.com\/cdn\/shop\/files\/Azurite-wt-Malachite-Towers-Towers-6-74g-75mm-Azurite-Malachite-29.webp?v=1765343842","width":1000},{"alt":"Azurite w\/t Malachite Towers-Towers-Ali-22 77g 74mm-Azurite \/ Malachite-Crystal Destiny","id":31972084416683,"position":30,"preview_image":{"aspect_ratio":1.0,"height":1000,"width":1000,"src":"\/\/crystaldestiny.com\/cdn\/shop\/files\/Azurite-wt-Malachite-Towers-Towers-22-77g-74mm-Azurite-Malachite-30.webp?v=1765343843"},"aspect_ratio":1.0,"height":1000,"media_type":"image","src":"\/\/crystaldestiny.com\/cdn\/shop\/files\/Azurite-wt-Malachite-Towers-Towers-22-77g-74mm-Azurite-Malachite-30.webp?v=1765343843","width":1000},{"alt":"Azurite w\/t Malachite Towers-Towers-Ali-2 82g 68mm-Azurite \/ Malachite-Crystal Destiny","id":31972084449451,"position":31,"preview_image":{"aspect_ratio":1.0,"height":1000,"width":1000,"src":"\/\/crystaldestiny.com\/cdn\/shop\/files\/Azurite-wt-Malachite-Towers-Towers-2-82g-68mm-Azurite-Malachite-31.webp?v=1765343844"},"aspect_ratio":1.0,"height":1000,"media_type":"image","src":"\/\/crystaldestiny.com\/cdn\/shop\/files\/Azurite-wt-Malachite-Towers-Towers-2-82g-68mm-Azurite-Malachite-31.webp?v=1765343844","width":1000},{"alt":"Azurite w\/t Malachite Towers-Towers-Ali-1 77g 69mm-Azurite \/ Malachite-Crystal Destiny","id":31972084482219,"position":32,"preview_image":{"aspect_ratio":1.0,"height":1000,"width":1000,"src":"\/\/crystaldestiny.com\/cdn\/shop\/files\/Azurite-wt-Malachite-Towers-Towers-1-77g-69mm-Azurite-Malachite-32.webp?v=1765343846"},"aspect_ratio":1.0,"height":1000,"media_type":"image","src":"\/\/crystaldestiny.com\/cdn\/shop\/files\/Azurite-wt-Malachite-Towers-Towers-1-77g-69mm-Azurite-Malachite-32.webp?v=1765343846","width":1000},{"alt":"Azurite w\/t Malachite Towers-Towers-Ali-7 69g 66mm-Azurite \/ Malachite-Crystal Destiny","id":31972084514987,"position":33,"preview_image":{"aspect_ratio":1.0,"height":1000,"width":1000,"src":"\/\/crystaldestiny.com\/cdn\/shop\/files\/Azurite-wt-Malachite-Towers-Towers-7-69g-66mm-Azurite-Malachite-33.webp?v=1765343847"},"aspect_ratio":1.0,"height":1000,"media_type":"image","src":"\/\/crystaldestiny.com\/cdn\/shop\/files\/Azurite-wt-Malachite-Towers-Towers-7-69g-66mm-Azurite-Malachite-33.webp?v=1765343847","width":1000},{"alt":"Azurite w\/t Malachite Towers-Towers-Ali-10 75g 72mm-Azurite \/ Malachite-Crystal Destiny","id":31972084547755,"position":34,"preview_image":{"aspect_ratio":1.0,"height":1000,"width":1000,"src":"\/\/crystaldestiny.com\/cdn\/shop\/files\/Azurite-wt-Malachite-Towers-Towers-10-75g-72mm-Azurite-Malachite-34.webp?v=1765343849"},"aspect_ratio":1.0,"height":1000,"media_type":"image","src":"\/\/crystaldestiny.com\/cdn\/shop\/files\/Azurite-wt-Malachite-Towers-Towers-10-75g-72mm-Azurite-Malachite-34.webp?v=1765343849","width":1000},{"alt":"Azurite w\/t Malachite Towers-Towers-Ali-13 40g 62mm-Azurite \/ Malachite-Crystal Destiny","id":31972084580523,"position":35,"preview_image":{"aspect_ratio":1.0,"height":1000,"width":1000,"src":"\/\/crystaldestiny.com\/cdn\/shop\/files\/Azurite-wt-Malachite-Towers-Towers-13-40g-62mm-Azurite-Malachite-35.webp?v=1765343850"},"aspect_ratio":1.0,"height":1000,"media_type":"image","src":"\/\/crystaldestiny.com\/cdn\/shop\/files\/Azurite-wt-Malachite-Towers-Towers-13-40g-62mm-Azurite-Malachite-35.webp?v=1765343850","width":1000},{"alt":"Azurite w\/t Malachite Towers-Towers-Ali-20 45g 51mm-Azurite \/ Malachite-Crystal Destiny","id":31972084613291,"position":36,"preview_image":{"aspect_ratio":1.0,"height":1000,"width":1000,"src":"\/\/crystaldestiny.com\/cdn\/shop\/files\/Azurite-wt-Malachite-Towers-Towers-20-45g-51mm-Azurite-Malachite-36.webp?v=1765343852"},"aspect_ratio":1.0,"height":1000,"media_type":"image","src":"\/\/crystaldestiny.com\/cdn\/shop\/files\/Azurite-wt-Malachite-Towers-Towers-20-45g-51mm-Azurite-Malachite-36.webp?v=1765343852","width":1000},{"alt":"Azurite w\/t Malachite Towers-Towers-Ali-23 56g 61mm-Azurite \/ Malachite-Crystal Destiny","id":31972084646059,"position":37,"preview_image":{"aspect_ratio":1.0,"height":1000,"width":1000,"src":"\/\/crystaldestiny.com\/cdn\/shop\/files\/Azurite-wt-Malachite-Towers-Towers-23-56g-61mm-Azurite-Malachite-37.webp?v=1765343853"},"aspect_ratio":1.0,"height":1000,"media_type":"image","src":"\/\/crystaldestiny.com\/cdn\/shop\/files\/Azurite-wt-Malachite-Towers-Towers-23-56g-61mm-Azurite-Malachite-37.webp?v=1765343853","width":1000},{"alt":"Azurite w\/t Malachite Towers-Towers-Ali-11 66g 63mm-Azurite \/ Malachite-Crystal Destiny","id":31972084678827,"position":38,"preview_image":{"aspect_ratio":1.0,"height":1000,"width":1000,"src":"\/\/crystaldestiny.com\/cdn\/shop\/files\/Azurite-wt-Malachite-Towers-Towers-11-66g-63mm-Azurite-Malachite-38.webp?v=1765343855"},"aspect_ratio":1.0,"height":1000,"media_type":"image","src":"\/\/crystaldestiny.com\/cdn\/shop\/files\/Azurite-wt-Malachite-Towers-Towers-11-66g-63mm-Azurite-Malachite-38.webp?v=1765343855","width":1000},{"alt":"Azurite w\/t Malachite Towers-Towers-Ali-17 33g 55mm-Azurite \/ Malachite-Crystal Destiny","id":31972084711595,"position":39,"preview_image":{"aspect_ratio":1.0,"height":1000,"width":1000,"src":"\/\/crystaldestiny.com\/cdn\/shop\/files\/Azurite-wt-Malachite-Towers-Towers-17-33g-55mm-Azurite-Malachite-39.webp?v=1765343856"},"aspect_ratio":1.0,"height":1000,"media_type":"image","src":"\/\/crystaldestiny.com\/cdn\/shop\/files\/Azurite-wt-Malachite-Towers-Towers-17-33g-55mm-Azurite-Malachite-39.webp?v=1765343856","width":1000},{"alt":"Azurite w\/t Malachite Towers-Towers-Ali-25 40g 49mm-Azurite \/ Malachite-Crystal Destiny","id":31972084744363,"position":40,"preview_image":{"aspect_ratio":1.0,"height":1000,"width":1000,"src":"\/\/crystaldestiny.com\/cdn\/shop\/files\/Azurite-wt-Malachite-Towers-Towers-25-40g-49mm-Azurite-Malachite-40.webp?v=1765343858"},"aspect_ratio":1.0,"height":1000,"media_type":"image","src":"\/\/crystaldestiny.com\/cdn\/shop\/files\/Azurite-wt-Malachite-Towers-Towers-25-40g-49mm-Azurite-Malachite-40.webp?v=1765343858","width":1000},{"alt":"Azurite w\/t Malachite Towers-Towers-Ali-12 68g 76mm-Azurite \/ Malachite-Crystal Destiny","id":31972084777131,"position":41,"preview_image":{"aspect_ratio":1.0,"height":1000,"width":1000,"src":"\/\/crystaldestiny.com\/cdn\/shop\/files\/Azurite-wt-Malachite-Towers-Towers-12-68g-76mm-Azurite-Malachite-41.webp?v=1765343859"},"aspect_ratio":1.0,"height":1000,"media_type":"image","src":"\/\/crystaldestiny.com\/cdn\/shop\/files\/Azurite-wt-Malachite-Towers-Towers-12-68g-76mm-Azurite-Malachite-41.webp?v=1765343859","width":1000}],"requires_selling_plan":false,"selling_plan_groups":[],"content":"\u003cp data-start=\"245\" data-end=\"523\"\u003eThese Azurite with Malachite Towers feature striking deep blue azurite layered with vibrant green malachite, polished into tall, pointed formations. Each tower is unique, ideal for meditation, crystal grids, décor, or as a standout collector’s piece.\u003c\/p\u003e\n\u003cp data-start=\"525\" data-end=\"813\"\u003eAzurite enhances intuition, mental clarity, and spiritual insight, while Malachite supports emotional balance, transformation, and protection. Together, they create a powerful combination for Third Eye and Heart Chakra activation, promoting focus, awareness, and harmonious energy flow.\u003c\/p\u003e\n\u003cp data-start=\"815\" data-end=\"935\"\u003eCollectors and crystal enthusiasts treasure these towers for their vivid color, natural beauty, and energetic synergy.\u003c\/p\u003e\n\u003cp data-start=\"815\" data-end=\"935\"\u003eThis product is an exact pick as pictured, one of a kind.\u003c\/p\u003e\u003ch2\u003eCrystal Towers, Wands, Generators, Points, Pillars \u0026amp; Obelisks — What's the Difference?\u003c\/h2\u003e\n\u003cp id=\"isPasted\"\u003eWhile these terms may vary, they all describe beautifully shaped crystals with a pointed tip designed to channel and direct energy. Each name highlights a unique aspect of their use:\u003c\/p\u003e\n\u003cul\u003e\n\u003cli\u003e\n\u003cstrong\u003eTowers\u003c\/strong\u003e- Known for their steady, grounding presence, crystal towers help focus and amplify energy, making them perfect for meditation and manifestation.\u003c\/li\u003e\n\u003cli\u003e\n\u003cstrong\u003eWands\u003c\/strong\u003e- Traditionally used in energy work and healing, crystal wands are excellent for directing energy flow and clearing blockages.\u003c\/li\u003e\n\u003cli\u003e\n\u003cstrong\u003ePillars\u003c\/strong\u003e- Symbolizing strength and stability, crystal pillars create a balanced and harmonious environment, making them great for home decor and spiritual practices.\u003c\/li\u003e\n\u003cli\u003e\n\u003cstrong\u003eObelisks\u003c\/strong\u003e- Inspired by ancient structures, crystal obelisks are believed to connect earthly and spiritual energies, making them powerful tools for transformation and enlightenment.\u003c\/li\u003e\n\u003c\/ul\u003e\n\u003cp\u003eNo matter what you call them, these crystals serve the same purpose—to enhance energy, intention, and harmony in your space. Choose the one that resonates most with you!\u003c\/p\u003e"},"options":[{"name":"Size","position":1,"values":["1 77g 69mm","2 82g 68mm","3 62g 63mm","4 57g 67mm","5 78g 83mm","6 74g 75mm","7 69g 66mm","8 78g 75mm","9 61g 72mm","10 75g 72mm","11 66g 63mm","12 68g 76mm","13 40g 62mm","14 53g 63mm","15 55g 66mm","16 59g 67mm","17 33g 55mm","18 49g 69mm","19 39g 59mm","20 45g 51mm","21 26g 58mm","22 77g 74mm","23 56g 61mm","24 63g 58mm","25 40g 49mm","26 33g 46mm","27 35g 52mm","28 27g 41mm","29 32g 47mm","30 26g 51mm","31 27g 41mm","32 26g 44mm","33 36g 52mm","34 28g 46mm","35 29g 46mm","36 35g 55mm"]},{"name":"Material","position":2,"values":["Azurite \/ Malachite"]}],"custom_metafields":{"shipping_time":"12-16 days"},"metafields":{"badge":"\u003cdiv style='display:none' class='jdgm-prev-badge' data-average-rating='0.00' data-number-of-reviews='0' data-number-of-questions='0'\u003e \u003cspan class='jdgm-prev-badge__stars' data-score='0.00' tabindex='0' aria-label='0.00 stars' role='button'\u003e \u003cspan class='jdgm-star jdgm--off'\u003e\u003c\/span\u003e\u003cspan class='jdgm-star jdgm--off'\u003e\u003c\/span\u003e\u003cspan class='jdgm-star jdgm--off'\u003e\u003c\/span\u003e\u003cspan class='jdgm-star jdgm--off'\u003e\u003c\/span\u003e\u003cspan class='jdgm-star jdgm--off'\u003e\u003c\/span\u003e \u003c\/span\u003e \u003cspan class='jdgm-prev-badge__text'\u003e No reviews \u003c\/span\u003e \u003c\/div\u003e","widget":"\u003cdiv class='jdgm-rev-widg' data-updated-at='2025-10-23T21:21:08Z' data-average-rating='0.00' data-number-of-reviews='0' data-number-of-questions='0' data-image-url='https:\/\/cdn.shopify.com\/s\/files\/1\/0613\/0345\/5915\/files\/Phoenix-Pine-Quartz-Tower-Natural-Mineral-Raw-Stone-Reiki-Treatment-Spiritual-Meditation-Wealth-Stone-Home-Energy-Decoration.webp?v=1760718611'\u003e \u003cstyle class='jdgm-temp-hiding-style'\u003e.jdgm-rev-widg{ display: none }\u003c\/style\u003e \u003cdiv class='jdgm-rev-widg__header'\u003e \u003ch2 class='jdgm-rev-widg__title'\u003eCustomer Reviews\u003c\/h2\u003e \u003cdiv class='jdgm-rev-widg__summary'\u003e \u003cdiv class='jdgm-rev-widg__summary-stars' aria-label='Average rating is 0.00 stars' role='img'\u003e \u003cspan class='jdgm-star jdgm--off'\u003e\u003c\/span\u003e\u003cspan class='jdgm-star jdgm--off'\u003e\u003c\/span\u003e\u003cspan class='jdgm-star jdgm--off'\u003e\u003c\/span\u003e\u003cspan class='jdgm-star jdgm--off'\u003e\u003c\/span\u003e\u003cspan class='jdgm-star jdgm--off'\u003e\u003c\/span\u003e \u003c\/div\u003e \u003cdiv class='jdgm-rev-widg__summary-text'\u003eBe the first to write a review\u003c\/div\u003e \u003c\/div\u003e \u003ca style='display: none' href='#' class='jdgm-write-rev-link' role='button'\u003eWrite a review\u003c\/a\u003e \u003cdiv class='jdgm-histogram jdgm-temp-hidden'\u003e \u003cdiv class='jdgm-histogram__row' data-rating='5' data-frequency='0' data-percentage='0'\u003e \u003cdiv class='jdgm-histogram__star' role='button' aria-label=\"0% (0) reviews with 5 star rating\" tabindex='0' \u003e\u003cspan class='jdgm-star jdgm--on'\u003e\u003c\/span\u003e\u003cspan class='jdgm-star jdgm--on'\u003e\u003c\/span\u003e\u003cspan class='jdgm-star jdgm--on'\u003e\u003c\/span\u003e\u003cspan class='jdgm-star jdgm--on'\u003e\u003c\/span\u003e\u003cspan class='jdgm-star jdgm--on'\u003e\u003c\/span\u003e\u003c\/div\u003e \u003cdiv class='jdgm-histogram__bar'\u003e \u003cdiv class='jdgm-histogram__bar-content' style='width: 0%;'\u003e \u003c\/div\u003e \u003c\/div\u003e \u003cdiv class='jdgm-histogram__percentage'\u003e0%\u003c\/div\u003e \u003cdiv class='jdgm-histogram__frequency'\u003e(0)\u003c\/div\u003e \u003c\/div\u003e \u003cdiv class='jdgm-histogram__row' data-rating='4' data-frequency='0' data-percentage='0'\u003e \u003cdiv class='jdgm-histogram__star' role='button' aria-label=\"0% (0) reviews with 4 star rating\" tabindex='0' \u003e\u003cspan class='jdgm-star jdgm--on'\u003e\u003c\/span\u003e\u003cspan class='jdgm-star jdgm--on'\u003e\u003c\/span\u003e\u003cspan class='jdgm-star jdgm--on'\u003e\u003c\/span\u003e\u003cspan class='jdgm-star jdgm--on'\u003e\u003c\/span\u003e\u003cspan class='jdgm-star jdgm--off'\u003e\u003c\/span\u003e\u003c\/div\u003e \u003cdiv class='jdgm-histogram__bar'\u003e \u003cdiv class='jdgm-histogram__bar-content' style='width: 0%;'\u003e \u003c\/div\u003e \u003c\/div\u003e \u003cdiv class='jdgm-histogram__percentage'\u003e0%\u003c\/div\u003e \u003cdiv class='jdgm-histogram__frequency'\u003e(0)\u003c\/div\u003e \u003c\/div\u003e \u003cdiv class='jdgm-histogram__row' data-rating='3' data-frequency='0' data-percentage='0'\u003e \u003cdiv class='jdgm-histogram__star' role='button' aria-label=\"0% (0) reviews with 3 star rating\" tabindex='0' \u003e\u003cspan class='jdgm-star jdgm--on'\u003e\u003c\/span\u003e\u003cspan class='jdgm-star jdgm--on'\u003e\u003c\/span\u003e\u003cspan class='jdgm-star jdgm--on'\u003e\u003c\/span\u003e\u003cspan class='jdgm-star jdgm--off'\u003e\u003c\/span\u003e\u003cspan class='jdgm-star jdgm--off'\u003e\u003c\/span\u003e\u003c\/div\u003e \u003cdiv class='jdgm-histogram__bar'\u003e \u003cdiv class='jdgm-histogram__bar-content' style='width: 0%;'\u003e \u003c\/div\u003e \u003c\/div\u003e \u003cdiv class='jdgm-histogram__percentage'\u003e0%\u003c\/div\u003e \u003cdiv class='jdgm-histogram__frequency'\u003e(0)\u003c\/div\u003e \u003c\/div\u003e \u003cdiv class='jdgm-histogram__row' data-rating='2' data-frequency='0' data-percentage='0'\u003e \u003cdiv class='jdgm-histogram__star' role='button' aria-label=\"0% (0) reviews with 2 star rating\" tabindex='0' \u003e\u003cspan class='jdgm-star jdgm--on'\u003e\u003c\/span\u003e\u003cspan class='jdgm-star jdgm--on'\u003e\u003c\/span\u003e\u003cspan class='jdgm-star jdgm--off'\u003e\u003c\/span\u003e\u003cspan class='jdgm-star jdgm--off'\u003e\u003c\/span\u003e\u003cspan class='jdgm-star jdgm--off'\u003e\u003c\/span\u003e\u003c\/div\u003e \u003cdiv class='jdgm-histogram__bar'\u003e \u003cdiv class='jdgm-histogram__bar-content' style='width: 0%;'\u003e \u003c\/div\u003e \u003c\/div\u003e \u003cdiv class='jdgm-histogram__percentage'\u003e0%\u003c\/div\u003e \u003cdiv class='jdgm-histogram__frequency'\u003e(0)\u003c\/div\u003e \u003c\/div\u003e \u003cdiv class='jdgm-histogram__row' data-rating='1' data-frequency='0' data-percentage='0'\u003e \u003cdiv class='jdgm-histogram__star' role='button' aria-label=\"0% (0) reviews with 1 star rating\" tabindex='0' \u003e\u003cspan class='jdgm-star jdgm--on'\u003e\u003c\/span\u003e\u003cspan class='jdgm-star jdgm--off'\u003e\u003c\/span\u003e\u003cspan class='jdgm-star jdgm--off'\u003e\u003c\/span\u003e\u003cspan class='jdgm-star jdgm--off'\u003e\u003c\/span\u003e\u003cspan class='jdgm-star jdgm--off'\u003e\u003c\/span\u003e\u003c\/div\u003e \u003cdiv class='jdgm-histogram__bar'\u003e \u003cdiv class='jdgm-histogram__bar-content' style='width: 0%;'\u003e \u003c\/div\u003e \u003c\/div\u003e \u003cdiv class='jdgm-histogram__percentage'\u003e0%\u003c\/div\u003e \u003cdiv class='jdgm-histogram__frequency'\u003e(0)\u003c\/div\u003e \u003c\/div\u003e \u003cdiv class='jdgm-histogram__row jdgm-histogram__clear-filter' data-rating=null tabindex='0'\u003e\u003c\/div\u003e \u003c\/div\u003e \u003cdiv class='jdgm-rev-widg__sort-wrapper'\u003e\u003c\/div\u003e \u003c\/div\u003e \u003cdiv class='jdgm-rev-widg__body'\u003e \u003cdiv class='jdgm-rev-widg__reviews'\u003e\u003c\/div\u003e \u003cdiv class='jdgm-paginate' data-per-page='4' data-url='https:\/\/api.judge.me\/reviews\/reviews_for_widget' style=\"display: none;\"\u003e\u003c\/div\u003e \u003c\/div\u003e \u003cdiv class='jdgm-rev-widg__paginate-spinner-wrapper'\u003e \u003cdiv class='jdgm-spinner'\u003e\u003c\/div\u003e \u003c\/div\u003e \u003c\/div\u003e"},"collections":[{"id":294880051371,"handle":"crystals","title":"Crystals","updated_at":"2026-01-07T23:43:11-05:00","body_html":"\u003cp data-start=\"159\" data-end=\"687\"\u003e✨ \u003cstrong data-start=\"161\" data-end=\"216\"\u003eDiscover the Magic of Crystals with Crystal Destiny\u003c\/strong\u003e ✨\u003cbr data-start=\"218\" data-end=\"221\"\u003eCrystals have been treasured for centuries—not only for their natural beauty but also for their powerful healing energies. Beyond their visual allure, they bring balance, harmony, and positive energy into any space. Whether used for home décor, meditation, or simply to elevate the energy of your surroundings, crystals create a sanctuary of peace, relaxation, and well-being. Each piece is a unique gift from the Earth—visually stunning and spiritually uplifting.\u003c\/p\u003e\n\u003cp data-start=\"689\" data-end=\"1011\"\u003eAt \u003cstrong data-start=\"692\" data-end=\"711\"\u003eCrystal Destiny\u003c\/strong\u003e, our signature collection showcases a curated selection of exquisite crystals, from radiant Quartz to soothing Amethyst. Every stone is carefully sourced for its elegance and metaphysical resonance, making them perfect for enhancing your home, uplifting your spirit, or gifting to someone special.\u003c\/p\u003e\n\u003cp data-start=\"1013\" data-end=\"1206\"\u003eExperience the timeless sophistication of crystalline wonders. Explore the \u003cstrong data-start=\"1088\" data-end=\"1118\"\u003eCrystal Destiny Collection\u003c\/strong\u003e today and bring the transformative beauty of these treasures into your everyday life.\u003c\/p\u003e","published_at":"2023-06-05T11:24:02-04:00","sort_order":"created-desc","template_suffix":"","disjunctive":false,"rules":[{"column":"tag","relation":"equals","condition":"crystal"},{"column":"type","relation":"not_contains","condition":"925 Sterling Silver"},{"column":"type","relation":"not_contains","condition":"Wire Wraps"}],"published_scope":"global"},{"id":319455756459,"handle":"crown-chakra-crystals","title":"Crown Chakra Crystals","updated_at":"2026-01-07T23:42:38-05:00","body_html":"\u003cp data-start=\"144\" data-end=\"515\"\u003e✨ \u003cstrong data-start=\"146\" data-end=\"171\"\u003eCrown Chakra Crystals\u003c\/strong\u003e ✨\u003cbr data-start=\"173\" data-end=\"176\"\u003eConnect with higher consciousness and spiritual insight with our \u003cstrong data-start=\"241\" data-end=\"266\"\u003eCrown Chakra Crystals\u003c\/strong\u003e. Located at the top of the head, the Crown Chakra governs wisdom, enlightenment, and your connection to the divine. These crystals help open and balance this energy center, fostering clarity, spiritual growth, and a sense of universal connection.\u003c\/p\u003e\n\u003cp data-start=\"517\" data-end=\"851\"\u003eOur selection includes powerful stones such as Amethyst, Clear Quartz, Selenite, and Lepidolite—each chosen for their ability to enhance meditation, energy work, and mindful practices. Whether placed in your sacred space, carried with you, or worn as jewelry, Crown Chakra Crystals promote harmony, insight, and spiritual alignment.\u003c\/p\u003e\n\u003cp data-start=\"853\" data-end=\"1007\"\u003eElevate your consciousness, deepen your meditative practice, and embrace the transformative energy of the Crown Chakra with these illuminating crystals.\u003c\/p\u003e","published_at":"2025-07-17T18:16:11-04:00","sort_order":"best-selling","template_suffix":"","disjunctive":false,"rules":[{"column":"variant_metafield_definition","relation":"equals","condition":"Crown"}],"published_scope":"global","image":{"created_at":"2025-07-17T19:09:11-04:00","alt":null,"width":1080,"height":1080,"src":"\/\/crystaldestiny.com\/cdn\/shop\/collections\/Crown_Chakra_Collection.jpg?v=1762474922"}},{"id":319455887531,"handle":"heart-chakra-crystals","title":"Heart Chakra Crystals","updated_at":"2026-01-07T23:43:11-05:00","body_html":"\u003cp data-start=\"107\" data-end=\"457\"\u003e✨ \u003cstrong data-start=\"109\" data-end=\"134\"\u003eHeart Chakra Crystals\u003c\/strong\u003e ✨\u003cbr data-start=\"136\" data-end=\"139\"\u003eOpen your heart to love, compassion, and emotional balance with our \u003cstrong data-start=\"207\" data-end=\"232\"\u003eHeart Chakra Crystals\u003c\/strong\u003e. Located at the center of the chest, the Heart Chakra governs love, forgiveness, and connection to yourself and others. These crystals help release emotional blockages, foster empathy, and promote harmonious relationships.\u003c\/p\u003e\n\u003cp data-start=\"459\" data-end=\"773\"\u003eOur curated selection includes stones such as Rose Quartz, Green Aventurine, and Rhodonite—each chosen for their ability to inspire self-love, emotional healing, and compassion. Perfect for meditation, energy work, or wearing as jewelry, Heart Chakra Crystals support the flow of loving energy and inner harmony.\u003c\/p\u003e\n\u003cp data-start=\"775\" data-end=\"906\"\u003eEmbrace emotional balance, cultivate love, and harness the transformative energy of the Heart Chakra with these radiant crystals.\u003c\/p\u003e","published_at":"2025-07-17T18:17:52-04:00","sort_order":"best-selling","template_suffix":"","disjunctive":false,"rules":[{"column":"variant_metafield_definition","relation":"equals","condition":"Heart"}],"published_scope":"global","image":{"created_at":"2025-07-17T19:08:29-04:00","alt":null,"width":1080,"height":1080,"src":"\/\/crystaldestiny.com\/cdn\/shop\/collections\/Heart_Chakra_Collection.jpg?v=1762474927"}},{"id":319455789227,"handle":"third-eye-chakra-crystals","title":"Third Eye Chakra Crystals","updated_at":"2026-01-07T23:42:38-05:00","body_html":"\u003cp data-start=\"124\" data-end=\"474\"\u003e✨ \u003cstrong data-start=\"126\" data-end=\"155\"\u003eThird Eye Chakra Crystals\u003c\/strong\u003e ✨\u003cbr data-start=\"157\" data-end=\"160\"\u003eAwaken intuition, clarity, and insight with our \u003cstrong data-start=\"208\" data-end=\"237\"\u003eThird Eye Chakra Crystals\u003c\/strong\u003e. Located between the eyebrows, the Third Eye Chakra governs perception, intuition, and inner wisdom. These crystals help balance and activate this energy center, promoting mental clarity, spiritual awareness, and heightened intuition.\u003c\/p\u003e\n\u003cp data-start=\"476\" data-end=\"835\"\u003eOur curated selection features stones such as Amethyst, Lapis Lazuli, and Sodalite—chosen for their ability to enhance meditation, intuitive practices, and energy work. Whether placed in your sacred space, carried with you, or worn as jewelry, Third Eye Chakra Crystals support mental focus, spiritual growth, and a deeper connection to your inner guidance.\u003c\/p\u003e\n\u003cp data-start=\"837\" data-end=\"976\"\u003eElevate your intuition, expand your awareness, and embrace the transformative power of the Third Eye Chakra with these powerful crystals.\u003c\/p\u003e","published_at":"2025-07-17T18:16:49-04:00","sort_order":"best-selling","template_suffix":"","disjunctive":false,"rules":[{"column":"variant_metafield_definition","relation":"equals","condition":"Third Eye"}],"published_scope":"global","image":{"created_at":"2025-07-17T19:09:01-04:00","alt":null,"width":1080,"height":1080,"src":"\/\/crystaldestiny.com\/cdn\/shop\/collections\/Third_Eye_Chakra_Collection.jpg?v=1762474924"}},{"id":294880116907,"handle":"polished","title":"Polished Crystals","updated_at":"2026-01-07T23:43:11-05:00","body_html":"\u003cp data-start=\"199\" data-end=\"598\"\u003e✨ \u003cstrong data-start=\"201\" data-end=\"248\"\u003eCrystal Destiny Polished Crystal Collection\u003c\/strong\u003e ✨\u003cbr data-start=\"250\" data-end=\"253\"\u003eIndulge in the brilliance of crystals refined to perfection. Our \u003cstrong data-start=\"318\" data-end=\"341\"\u003ePolished Collection\u003c\/strong\u003e showcases gemstones meticulously shaped and smoothed to reveal their natural radiance and timeless beauty. From the shimmering glow of Quartz to the deep allure of Obsidian, each polished piece is a testament to nature’s artistry and human craftsmanship.\u003c\/p\u003e\n\u003cp data-start=\"600\" data-end=\"862\"\u003ePerfect as statement décor, meaningful gifts, or companions on your spiritual journey, polished crystals bring sophistication and elevated energy into any space. Their radiant surfaces reflect not only light but also the transformative power of crystal energy.\u003c\/p\u003e\n\u003cp data-start=\"864\" data-end=\"1022\"\u003eDiscover the elegance of refinement with Crystal Destiny’s Polished Crystal Collection—where every facet shines with intention, beauty, and timeless allure.\u003c\/p\u003e","published_at":"2023-06-05T11:30:44-04:00","sort_order":"created-desc","template_suffix":"","disjunctive":false,"rules":[{"column":"tag","relation":"equals","condition":"polished"}],"published_scope":"global"},{"id":321695744171,"handle":"direct-from-supplier","title":"Direct from Supplier","updated_at":"2026-01-07T23:43:11-05:00","body_html":"","published_at":"2025-09-12T16:38:23-04:00","sort_order":"best-selling","template_suffix":"","disjunctive":true,"rules":[{"column":"tag","relation":"equals","condition":"adjusted-shipping"}],"published_scope":"global"},{"id":293659312299,"handle":"best-sellers","title":"Best Sellers","updated_at":"2026-01-07T23:43:11-05:00","body_html":"\u003cp data-start=\"155\" data-end=\"510\"\u003eDiscover the pieces our community loves most. Our Best Sellers Collection brings together handpicked crystals and jewelry that embody timeless elegance, spiritual resonance, and everyday sophistication. Each item has earned its place as a customer favorite—celebrated for both its beauty and its meaningful energy.\u003c\/p\u003e\n\u003cp data-start=\"512\" data-end=\"802\"\u003eFrom stunning statement pieces to versatile daily companions, these treasures are curated to elevate your space, uplift your spirit, and reflect refined taste. Indulge in what’s most cherished and let our best sellers guide you toward the perfect blend of style and transformative energy.\u003c\/p\u003e\n\u003cp data-start=\"804\" data-end=\"932\"\u003eExplore the Best Sellers Collection today—where elegance meets intention, and every piece tells a story of beauty and balance.\u003c\/p\u003e","published_at":"2023-03-15T16:04:51-04:00","sort_order":"best-selling","template_suffix":"","disjunctive":false,"rules":[{"column":"variant_price","relation":"greater_than","condition":"0"},{"column":"variant_inventory","relation":"greater_than","condition":"0"},{"column":"type","relation":"not_equals","condition":"Shipping Protection"}],"published_scope":"global"},{"id":321370390699,"handle":"monthly-crystal-sale","title":"Monthly Crystal Sale | Spheres \u0026 Towers","updated_at":"2026-01-06T23:24:37-05:00","body_html":"\u003cp\u003eShop our \u003cstrong\u003eMonthly Crystal Sale\u003c\/strong\u003e, where you can shop a wide selection of healing crystals at discounted prices. Explore \u003cstrong\u003ecrystal spheres and towers,\u003c\/strong\u003e— all carefully curated to support meditation, energy balancing, and spiritual wellness. Whether you're looking to enhance your home decor, boost your daily energy, or find the perfect gift, our \u003cstrong\u003ecrystals for healing and manifestation\u003c\/strong\u003e offer both beauty and metaphysical benefits.\u003c\/p\u003e\n\u003cp\u003eEach month, our sale features \u003cstrong\u003enew discounted collections\u003c\/strong\u003e, from \u003cstrong\u003enatural quartz and amethyst towers\u003c\/strong\u003e to \u003cstrong\u003ewire-wrapped pendants and polished stones\u003c\/strong\u003e, so there's always something fresh to discover. Shop with confidence knowing you're getting high-quality crystals with \u003cstrong\u003efree shipping options\u003c\/strong\u003e and a trusted experience.\u003c\/p\u003e\n\u003cp\u003e\u003cstrong\u003eTake advantage of the Monthly Crystal Sale today\u003c\/strong\u003e and add powerful, natural energy to your life with \u003cstrong\u003eauthentic healing crystals\u003c\/strong\u003e — while our limited-time discounts last.\u003c\/p\u003e\n\u003cp\u003e\u003cstrong\u003e*Discount automatically applied at checkout.\u003c\/strong\u003e\u003c\/p\u003e","published_at":"2025-12-02T01:26:17-05:00","sort_order":"alpha-asc","template_suffix":"","disjunctive":true,"rules":[{"column":"tag","relation":"equals","condition":"spheres"},{"column":"tag","relation":"equals","condition":"Towers"}],"published_scope":"global","image":{"created_at":"2026-01-01T01:32:34-05:00","alt":"","width":960,"height":960,"src":"\/\/crystaldestiny.com\/cdn\/shop\/collections\/3E8C2969-1B86-4ACE-B349-98E9D8768424.jpg?v=1767249154"}},{"id":297596059819,"handle":"all","title":"All Crystals \u0026 Jewelry","updated_at":"2026-01-07T23:43:11-05:00","body_html":"\u003cp data-start=\"149\" data-end=\"494\"\u003e✨ \u003cstrong data-start=\"151\" data-end=\"181\"\u003eWelcome to Crystal Destiny\u003c\/strong\u003e ✨\u003cbr data-start=\"183\" data-end=\"186\"\u003eStep into a world where beauty, energy, and artistry unite. Our collection is a treasure trove of exquisite crystals, from the raw, untamed elegance of natural formations to the polished brilliance of expertly crafted pieces. Each crystal is a masterpiece, carrying its own unique story and timeless charm.\u003c\/p\u003e\n\u003cp data-start=\"496\" data-end=\"831\"\u003eWhether you’re drawn to the calming presence of Amethyst, the vibrant energy of Citrine, or the grounding strength of Jasper, our crystals invite you to connect with nature’s finest wonders. Perfect for enhancing your space, supporting your spiritual journey, or gifting with intention, every piece resonates with beauty and meaning.\u003c\/p\u003e\n\u003cp data-start=\"833\" data-end=\"1000\"\u003eElevate your surroundings, embrace the mystique, and explore the enchanting world of crystals at \u003cstrong data-start=\"930\" data-end=\"949\"\u003eCrystal Destiny\u003c\/strong\u003e—where every crystal is waiting to be discovered.\u003c\/p\u003e","published_at":"2023-11-10T13:55:31-05:00","sort_order":"created-desc","template_suffix":"","disjunctive":false,"rules":[{"column":"type","relation":"not_equals","condition":"asdf"}],"published_scope":"global"},{"id":296256405675,"handle":"crystal-towers","title":"Crystal Towers","updated_at":"2026-01-06T23:24:37-05:00","body_html":"\u003cp data-end=\"568\" data-start=\"152\"\u003e✨ \u003cstrong data-end=\"190\" data-start=\"154\"\u003eCrystal Destiny Tower Collection\u003c\/strong\u003e ✨\u003cbr data-end=\"195\" data-start=\"192\"\u003eEnchant your space with the timeless beauty and powerful energy of crystal towers. Each piece in our \u003cstrong data-end=\"316\" data-start=\"296\"\u003eTower Collection\u003c\/strong\u003e is carefully crafted to showcase nature’s artistry while radiating higher vibrations and spiritual resonance. From the clarity of Quartz to the calming presence of Amethyst, these towers are both decorative masterpieces and tools for transformation.\u003c\/p\u003e\n\u003cp data-end=\"765\" data-start=\"570\"\u003ePerfect for meditation spaces, energy work, or simply elevating your home décor, crystal towers channel focused energy upward—creating balance, harmony, and refined elegance in any environment.\u003c\/p\u003e\n\u003cp data-end=\"917\" data-start=\"767\"\u003eDiscover the Crystal Destiny Tower Collection today and transform your surroundings into a sanctuary of beauty, purpose, and spiritual significance.\u003c\/p\u003e\n\u003ch2\u003eCrystal Towers, Wands, Generators, Points, Pillars \u0026amp; Obelisks — What's the Difference?\u003c\/h2\u003e\n\u003cp id=\"isPasted\"\u003eWhile these terms may vary, they all describe beautifully shaped crystals with a pointed tip designed to channel and direct energy. Each name highlights a unique aspect of their use:\u003c\/p\u003e\n\u003cul\u003e\n\u003cli\u003e\n\u003cstrong\u003eTowers\u003c\/strong\u003e- Known for their steady, grounding presence, crystal towers help focus and amplify energy, making them perfect for meditation and manifestation.\u003c\/li\u003e\n\u003cli\u003e\n\u003cstrong\u003eWands\u003c\/strong\u003e- Traditionally used in energy work and healing, crystal wands are excellent for directing energy flow and clearing blockages.\u003c\/li\u003e\n\u003cli\u003e\n\u003cstrong\u003ePillars\u003c\/strong\u003e- Symbolizing strength and stability, crystal pillars create a balanced and harmonious environment, making them great for home decor and spiritual practices.\u003c\/li\u003e\n\u003cli\u003e\n\u003cstrong\u003eObelisks\u003c\/strong\u003e- Inspired by ancient structures, crystal obelisks are believed to connect earthly and spiritual energies, making them powerful tools for transformation and enlightenment.\u003c\/li\u003e\n\u003c\/ul\u003e\n\u003cp\u003eNo matter what you call them, these crystals serve the same purpose—to enhance energy, intention, and harmony in your space. Choose the one that resonates most with you!\u003c\/p\u003e","published_at":"2023-09-14T12:52:35-04:00","sort_order":"created-desc","template_suffix":"","disjunctive":false,"rules":[{"column":"tag","relation":"equals","condition":"towers"}],"published_scope":"global"},{"id":298983391403,"handle":"january-crystal-sale","title":"January Sale | 25% Off Crystal Towers \u0026 Spheres","updated_at":"2026-01-06T23:24:37-05:00","body_html":"\u003cp\u003eShop our \u003cstrong\u003eJanuary Crystal Sale\u003c\/strong\u003e, where you can shop a wide selection of healing crystals at discounted prices. Explore \u003cstrong\u003eCrystal Towers, \u0026amp; Crystal Spheres\u003c\/strong\u003e — all carefully curated and crafted to support meditation, energy balancing, and spiritual wellness. Whether you're looking to enhance your home decor, boost your daily energy, or find the perfect gift, our \u003cstrong\u003ecrystals for healing and manifestation\u003c\/strong\u003e offer both beauty and metaphysical benefits.\u003c\/p\u003e\n\u003cp\u003eThis January, our sale features \u003cstrong\u003ediscounted crystal towers and spheres\u003c\/strong\u003e, from \u003cstrong\u003enatural quartz \u003c\/strong\u003eand \u003cstrong\u003eamethyst \u003c\/strong\u003eto \u003cstrong\u003ebumblebee jasper \u003c\/strong\u003eand \u003cstrong\u003ecarnelian\u003c\/strong\u003e, so there's always something fresh to discover. Shop with confidence knowing you're getting high-quality crystals with \u003cstrong\u003efree shipping options\u003c\/strong\u003e and a trusted experience.\u003c\/p\u003e\n\u003cp\u003e\u003cstrong\u003eTake advantage of the January Crystal Sale today\u003c\/strong\u003e and add powerful, natural energy to your life with \u003cstrong\u003eauthentic healing crystals\u003c\/strong\u003e — while our limited-time discounts last.\u003c\/p\u003e\n\u003cp\u003e\u003cstrong\u003e*Discount automatically applied at checkout.\u003c\/strong\u003e\u003c\/p\u003e","published_at":"2026-01-01T00:07:17-05:00","sort_order":"alpha-asc","template_suffix":"monthly-collection","disjunctive":true,"rules":[{"column":"tag","relation":"equals","condition":"Spheres"},{"column":"tag","relation":"equals","condition":"Towers"}],"published_scope":"global","image":{"created_at":"2026-01-01T01:29:59-05:00","alt":"","width":960,"height":960,"src":"\/\/crystaldestiny.com\/cdn\/shop\/collections\/1464163B-22B1-4D62-BEC5-CEC9AECB670B.jpg?v=1767248999"}}]}
[{"alt":"Azurite w\/t Malachite Towers-Towers-Ali-1 77g 69mm-Azurite \/ Malachite-Crystal Destiny","id":31972083466411,"position":1,"preview_image":{"aspect_ratio":1.0,"height":1000,"width":1000,"src":"\/\/crystaldestiny.com\/cdn\/shop\/files\/Azurite-wt-Malachite-Towers-Towers.webp?v=1761282270"},"aspect_ratio":1.0,"height":1000,"media_type":"image","src":"\/\/crystaldestiny.com\/cdn\/shop\/files\/Azurite-wt-Malachite-Towers-Towers.webp?v=1761282270","width":1000},{"alt":"Azurite w\/t Malachite Towers-Towers-Ali-1 77g 69mm-Azurite \/ Malachite-Crystal Destiny","id":31972083499179,"position":2,"preview_image":{"aspect_ratio":1.0,"height":1000,"width":1000,"src":"\/\/crystaldestiny.com\/cdn\/shop\/files\/Azurite-wt-Malachite-Towers-Towers-2.webp?v=1761282271"},"aspect_ratio":1.0,"height":1000,"media_type":"image","src":"\/\/crystaldestiny.com\/cdn\/shop\/files\/Azurite-wt-Malachite-Towers-Towers-2.webp?v=1761282271","width":1000},{"alt":"Azurite w\/t Malachite Towers-Towers-Ali-1 77g 69mm-Azurite \/ Malachite-Crystal Destiny","id":31972083531947,"position":3,"preview_image":{"aspect_ratio":1.0,"height":1000,"width":1000,"src":"\/\/crystaldestiny.com\/cdn\/shop\/files\/Azurite-wt-Malachite-Towers-Towers-3.webp?v=1761282273"},"aspect_ratio":1.0,"height":1000,"media_type":"image","src":"\/\/crystaldestiny.com\/cdn\/shop\/files\/Azurite-wt-Malachite-Towers-Towers-3.webp?v=1761282273","width":1000},{"alt":"Azurite w\/t Malachite Towers-Towers-Ali-1 77g 69mm-Azurite \/ Malachite-Crystal Destiny","id":31972083564715,"position":4,"preview_image":{"aspect_ratio":1.0,"height":1000,"width":1000,"src":"\/\/crystaldestiny.com\/cdn\/shop\/files\/Azurite-wt-Malachite-Towers-Towers-4.webp?v=1761282274"},"aspect_ratio":1.0,"height":1000,"media_type":"image","src":"\/\/crystaldestiny.com\/cdn\/shop\/files\/Azurite-wt-Malachite-Towers-Towers-4.webp?v=1761282274","width":1000},{"alt":"Azurite w\/t Malachite Towers-Towers-Ali-1 77g 69mm-Azurite \/ Malachite-Crystal Destiny","id":31972083597483,"position":5,"preview_image":{"aspect_ratio":1.0,"height":1000,"width":1000,"src":"\/\/crystaldestiny.com\/cdn\/shop\/files\/Azurite-wt-Malachite-Towers-Towers-5.webp?v=1761282276"},"aspect_ratio":1.0,"height":1000,"media_type":"image","src":"\/\/crystaldestiny.com\/cdn\/shop\/files\/Azurite-wt-Malachite-Towers-Towers-5.webp?v=1761282276","width":1000},{"alt":"Azurite w\/t Malachite Towers-Towers-Ali-14 53g 63mm-Azurite \/ Malachite-Crystal Destiny","id":31972083630251,"position":6,"preview_image":{"aspect_ratio":1.0,"height":1000,"width":1000,"src":"\/\/crystaldestiny.com\/cdn\/shop\/files\/Azurite-wt-Malachite-Towers-Towers-14-53g-63mm-Azurite-Malachite-6.webp?v=1765343809"},"aspect_ratio":1.0,"height":1000,"media_type":"image","src":"\/\/crystaldestiny.com\/cdn\/shop\/files\/Azurite-wt-Malachite-Towers-Towers-14-53g-63mm-Azurite-Malachite-6.webp?v=1765343809","width":1000},{"alt":"Azurite w\/t Malachite Towers-Towers-Ali-28 27g 41mm-Azurite \/ Malachite-Crystal Destiny","id":31972083663019,"position":7,"preview_image":{"aspect_ratio":1.0,"height":1000,"width":1000,"src":"\/\/crystaldestiny.com\/cdn\/shop\/files\/Azurite-wt-Malachite-Towers-Towers-28-27g-41mm-Azurite-Malachite-7.webp?v=1765343810"},"aspect_ratio":1.0,"height":1000,"media_type":"image","src":"\/\/crystaldestiny.com\/cdn\/shop\/files\/Azurite-wt-Malachite-Towers-Towers-28-27g-41mm-Azurite-Malachite-7.webp?v=1765343810","width":1000},{"alt":"Azurite w\/t Malachite Towers-Towers-Ali-30 26g 51mm-Azurite \/ Malachite-Crystal Destiny","id":31972083695787,"position":8,"preview_image":{"aspect_ratio":1.0,"height":1000,"width":1000,"src":"\/\/crystaldestiny.com\/cdn\/shop\/files\/Azurite-wt-Malachite-Towers-Towers-30-26g-51mm-Azurite-Malachite-8.webp?v=1765343811"},"aspect_ratio":1.0,"height":1000,"media_type":"image","src":"\/\/crystaldestiny.com\/cdn\/shop\/files\/Azurite-wt-Malachite-Towers-Towers-30-26g-51mm-Azurite-Malachite-8.webp?v=1765343811","width":1000},{"alt":"Azurite w\/t Malachite Towers-Towers-Ali-16 59g 67mm-Azurite \/ Malachite-Crystal Destiny","id":31972083728555,"position":9,"preview_image":{"aspect_ratio":1.0,"height":1000,"width":1000,"src":"\/\/crystaldestiny.com\/cdn\/shop\/files\/Azurite-wt-Malachite-Towers-Towers-16-59g-67mm-Azurite-Malachite-9.webp?v=1765343813"},"aspect_ratio":1.0,"height":1000,"media_type":"image","src":"\/\/crystaldestiny.com\/cdn\/shop\/files\/Azurite-wt-Malachite-Towers-Towers-16-59g-67mm-Azurite-Malachite-9.webp?v=1765343813","width":1000},{"alt":"Azurite w\/t Malachite Towers-Towers-Ali-36 35g 55mm-Azurite \/ Malachite-Crystal Destiny","id":31972083761323,"position":10,"preview_image":{"aspect_ratio":1.0,"height":1000,"width":1000,"src":"\/\/crystaldestiny.com\/cdn\/shop\/files\/Azurite-wt-Malachite-Towers-Towers-36-35g-55mm-Azurite-Malachite-10.webp?v=1765343814"},"aspect_ratio":1.0,"height":1000,"media_type":"image","src":"\/\/crystaldestiny.com\/cdn\/shop\/files\/Azurite-wt-Malachite-Towers-Towers-36-35g-55mm-Azurite-Malachite-10.webp?v=1765343814","width":1000},{"alt":"Azurite w\/t Malachite Towers-Towers-Ali-34 28g 46mm-Azurite \/ Malachite-Crystal Destiny","id":31972083794091,"position":11,"preview_image":{"aspect_ratio":1.0,"height":1000,"width":1000,"src":"\/\/crystaldestiny.com\/cdn\/shop\/files\/Azurite-wt-Malachite-Towers-Towers-34-28g-46mm-Azurite-Malachite-11.webp?v=1765343815"},"aspect_ratio":1.0,"height":1000,"media_type":"image","src":"\/\/crystaldestiny.com\/cdn\/shop\/files\/Azurite-wt-Malachite-Towers-Towers-34-28g-46mm-Azurite-Malachite-11.webp?v=1765343815","width":1000},{"alt":"Azurite w\/t Malachite Towers-Towers-Ali-18 49g 69mm-Azurite \/ Malachite-Crystal Destiny","id":31972083826859,"position":12,"preview_image":{"aspect_ratio":1.0,"height":1000,"width":1000,"src":"\/\/crystaldestiny.com\/cdn\/shop\/files\/Azurite-wt-Malachite-Towers-Towers-18-49g-69mm-Azurite-Malachite-12.webp?v=1765343817"},"aspect_ratio":1.0,"height":1000,"media_type":"image","src":"\/\/crystaldestiny.com\/cdn\/shop\/files\/Azurite-wt-Malachite-Towers-Towers-18-49g-69mm-Azurite-Malachite-12.webp?v=1765343817","width":1000},{"alt":"Azurite w\/t Malachite Towers-Towers-Ali-26 33g 46mm-Azurite \/ Malachite-Crystal Destiny","id":31972083859627,"position":13,"preview_image":{"aspect_ratio":1.0,"height":1000,"width":1000,"src":"\/\/crystaldestiny.com\/cdn\/shop\/files\/Azurite-wt-Malachite-Towers-Towers-26-33g-46mm-Azurite-Malachite-13.webp?v=1765343818"},"aspect_ratio":1.0,"height":1000,"media_type":"image","src":"\/\/crystaldestiny.com\/cdn\/shop\/files\/Azurite-wt-Malachite-Towers-Towers-26-33g-46mm-Azurite-Malachite-13.webp?v=1765343818","width":1000},{"alt":"Azurite w\/t Malachite Towers-Towers-Ali-31 27g 41mm-Azurite \/ Malachite-Crystal Destiny","id":31972083892395,"position":14,"preview_image":{"aspect_ratio":1.0,"height":1000,"width":1000,"src":"\/\/crystaldestiny.com\/cdn\/shop\/files\/Azurite-wt-Malachite-Towers-Towers-31-27g-41mm-Azurite-Malachite-14.webp?v=1765343820"},"aspect_ratio":1.0,"height":1000,"media_type":"image","src":"\/\/crystaldestiny.com\/cdn\/shop\/files\/Azurite-wt-Malachite-Towers-Towers-31-27g-41mm-Azurite-Malachite-14.webp?v=1765343820","width":1000},{"alt":"Azurite w\/t Malachite Towers-Towers-Ali-24 63g 58mm-Azurite \/ Malachite-Crystal Destiny","id":31972083925163,"position":15,"preview_image":{"aspect_ratio":1.0,"height":1000,"width":1000,"src":"\/\/crystaldestiny.com\/cdn\/shop\/files\/Azurite-wt-Malachite-Towers-Towers-24-63g-58mm-Azurite-Malachite-15.webp?v=1765343821"},"aspect_ratio":1.0,"height":1000,"media_type":"image","src":"\/\/crystaldestiny.com\/cdn\/shop\/files\/Azurite-wt-Malachite-Towers-Towers-24-63g-58mm-Azurite-Malachite-15.webp?v=1765343821","width":1000},{"alt":"Azurite w\/t Malachite Towers-Towers-Ali-21 26g 58mm-Azurite \/ Malachite-Crystal Destiny","id":31972083957931,"position":16,"preview_image":{"aspect_ratio":1.0,"height":1000,"width":1000,"src":"\/\/crystaldestiny.com\/cdn\/shop\/files\/Azurite-wt-Malachite-Towers-Towers-21-26g-58mm-Azurite-Malachite-16.webp?v=1765343823"},"aspect_ratio":1.0,"height":1000,"media_type":"image","src":"\/\/crystaldestiny.com\/cdn\/shop\/files\/Azurite-wt-Malachite-Towers-Towers-21-26g-58mm-Azurite-Malachite-16.webp?v=1765343823","width":1000},{"alt":"Azurite w\/t Malachite Towers-Towers-Ali-29 32g 47mm-Azurite \/ Malachite-Crystal Destiny","id":31972083990699,"position":17,"preview_image":{"aspect_ratio":1.0,"height":1000,"width":1000,"src":"\/\/crystaldestiny.com\/cdn\/shop\/files\/Azurite-wt-Malachite-Towers-Towers-29-32g-47mm-Azurite-Malachite-17.webp?v=1765343824"},"aspect_ratio":1.0,"height":1000,"media_type":"image","src":"\/\/crystaldestiny.com\/cdn\/shop\/files\/Azurite-wt-Malachite-Towers-Towers-29-32g-47mm-Azurite-Malachite-17.webp?v=1765343824","width":1000},{"alt":"Azurite w\/t Malachite Towers-Towers-Ali-4 57g 67mm-Azurite \/ Malachite-Crystal Destiny","id":31972084023467,"position":18,"preview_image":{"aspect_ratio":1.0,"height":1000,"width":1000,"src":"\/\/crystaldestiny.com\/cdn\/shop\/files\/Azurite-wt-Malachite-Towers-Towers-4-57g-67mm-Azurite-Malachite-18.webp?v=1765343825"},"aspect_ratio":1.0,"height":1000,"media_type":"image","src":"\/\/crystaldestiny.com\/cdn\/shop\/files\/Azurite-wt-Malachite-Towers-Towers-4-57g-67mm-Azurite-Malachite-18.webp?v=1765343825","width":1000},{"alt":"Azurite w\/t Malachite Towers-Towers-Ali-8 78g 75mm-Azurite \/ Malachite-Crystal Destiny","id":31972084056235,"position":19,"preview_image":{"aspect_ratio":1.0,"height":1000,"width":1000,"src":"\/\/crystaldestiny.com\/cdn\/shop\/files\/Azurite-wt-Malachite-Towers-Towers-8-78g-75mm-Azurite-Malachite-19.webp?v=1765343827"},"aspect_ratio":1.0,"height":1000,"media_type":"image","src":"\/\/crystaldestiny.com\/cdn\/shop\/files\/Azurite-wt-Malachite-Towers-Towers-8-78g-75mm-Azurite-Malachite-19.webp?v=1765343827","width":1000},{"alt":"Azurite w\/t Malachite Towers-Towers-Ali-35 29g 46mm-Azurite \/ Malachite-Crystal Destiny","id":31972084089003,"position":20,"preview_image":{"aspect_ratio":1.0,"height":1000,"width":1000,"src":"\/\/crystaldestiny.com\/cdn\/shop\/files\/Azurite-wt-Malachite-Towers-Towers-35-29g-46mm-Azurite-Malachite-20.webp?v=1765343828"},"aspect_ratio":1.0,"height":1000,"media_type":"image","src":"\/\/crystaldestiny.com\/cdn\/shop\/files\/Azurite-wt-Malachite-Towers-Towers-35-29g-46mm-Azurite-Malachite-20.webp?v=1765343828","width":1000},{"alt":"Azurite w\/t Malachite Towers-Towers-Ali-33 36g 52mm-Azurite \/ Malachite-Crystal Destiny","id":31972084121771,"position":21,"preview_image":{"aspect_ratio":1.0,"height":1000,"width":1000,"src":"\/\/crystaldestiny.com\/cdn\/shop\/files\/Azurite-wt-Malachite-Towers-Towers-33-36g-52mm-Azurite-Malachite-21.webp?v=1765343830"},"aspect_ratio":1.0,"height":1000,"media_type":"image","src":"\/\/crystaldestiny.com\/cdn\/shop\/files\/Azurite-wt-Malachite-Towers-Towers-33-36g-52mm-Azurite-Malachite-21.webp?v=1765343830","width":1000},{"alt":"Azurite w\/t Malachite Towers-Towers-Ali-27 35g 52mm-Azurite \/ Malachite-Crystal Destiny","id":31972084154539,"position":22,"preview_image":{"aspect_ratio":1.0,"height":1000,"width":1000,"src":"\/\/crystaldestiny.com\/cdn\/shop\/files\/Azurite-wt-Malachite-Towers-Towers-27-35g-52mm-Azurite-Malachite-22.webp?v=1765343831"},"aspect_ratio":1.0,"height":1000,"media_type":"image","src":"\/\/crystaldestiny.com\/cdn\/shop\/files\/Azurite-wt-Malachite-Towers-Towers-27-35g-52mm-Azurite-Malachite-22.webp?v=1765343831","width":1000},{"alt":"Azurite w\/t Malachite Towers-Towers-Ali-32 26g 44mm-Azurite \/ Malachite-Crystal Destiny","id":31972084187307,"position":23,"preview_image":{"aspect_ratio":1.0,"height":1000,"width":1000,"src":"\/\/crystaldestiny.com\/cdn\/shop\/files\/Azurite-wt-Malachite-Towers-Towers-32-26g-44mm-Azurite-Malachite-23.webp?v=1765343832"},"aspect_ratio":1.0,"height":1000,"media_type":"image","src":"\/\/crystaldestiny.com\/cdn\/shop\/files\/Azurite-wt-Malachite-Towers-Towers-32-26g-44mm-Azurite-Malachite-23.webp?v=1765343832","width":1000},{"alt":"Azurite w\/t Malachite Towers-Towers-Ali-3 62g 63mm-Azurite \/ Malachite-Crystal Destiny","id":31972084220075,"position":24,"preview_image":{"aspect_ratio":1.0,"height":1000,"width":1000,"src":"\/\/crystaldestiny.com\/cdn\/shop\/files\/Azurite-wt-Malachite-Towers-Towers-3-62g-63mm-Azurite-Malachite-24.webp?v=1765343834"},"aspect_ratio":1.0,"height":1000,"media_type":"image","src":"\/\/crystaldestiny.com\/cdn\/shop\/files\/Azurite-wt-Malachite-Towers-Towers-3-62g-63mm-Azurite-Malachite-24.webp?v=1765343834","width":1000},{"alt":"Azurite w\/t Malachite Towers-Towers-Ali-9 61g 72mm-Azurite \/ Malachite-Crystal Destiny","id":31972084252843,"position":25,"preview_image":{"aspect_ratio":1.0,"height":1000,"width":1000,"src":"\/\/crystaldestiny.com\/cdn\/shop\/files\/Azurite-wt-Malachite-Towers-Towers-9-61g-72mm-Azurite-Malachite-25.webp?v=1765343836"},"aspect_ratio":1.0,"height":1000,"media_type":"image","src":"\/\/crystaldestiny.com\/cdn\/shop\/files\/Azurite-wt-Malachite-Towers-Towers-9-61g-72mm-Azurite-Malachite-25.webp?v=1765343836","width":1000},{"alt":"Azurite w\/t Malachite Towers-Towers-Ali-15 55g 66mm-Azurite \/ Malachite-Crystal Destiny","id":31972084285611,"position":26,"preview_image":{"aspect_ratio":1.0,"height":1000,"width":1000,"src":"\/\/crystaldestiny.com\/cdn\/shop\/files\/Azurite-wt-Malachite-Towers-Towers-15-55g-66mm-Azurite-Malachite-26.webp?v=1765343837"},"aspect_ratio":1.0,"height":1000,"media_type":"image","src":"\/\/crystaldestiny.com\/cdn\/shop\/files\/Azurite-wt-Malachite-Towers-Towers-15-55g-66mm-Azurite-Malachite-26.webp?v=1765343837","width":1000},{"alt":"Azurite w\/t Malachite Towers-Towers-Ali-19 39g 59mm-Azurite \/ Malachite-Crystal Destiny","id":31972084318379,"position":27,"preview_image":{"aspect_ratio":1.0,"height":1000,"width":1000,"src":"\/\/crystaldestiny.com\/cdn\/shop\/files\/Azurite-wt-Malachite-Towers-Towers-19-39g-59mm-Azurite-Malachite-27.webp?v=1765343838"},"aspect_ratio":1.0,"height":1000,"media_type":"image","src":"\/\/crystaldestiny.com\/cdn\/shop\/files\/Azurite-wt-Malachite-Towers-Towers-19-39g-59mm-Azurite-Malachite-27.webp?v=1765343838","width":1000},{"alt":"Azurite w\/t Malachite Towers-Towers-Ali-5 78g 83mm-Azurite \/ Malachite-Crystal Destiny","id":31972084351147,"position":28,"preview_image":{"aspect_ratio":1.0,"height":1000,"width":1000,"src":"\/\/crystaldestiny.com\/cdn\/shop\/files\/Azurite-wt-Malachite-Towers-Towers-5-78g-83mm-Azurite-Malachite-28.webp?v=1765343840"},"aspect_ratio":1.0,"height":1000,"media_type":"image","src":"\/\/crystaldestiny.com\/cdn\/shop\/files\/Azurite-wt-Malachite-Towers-Towers-5-78g-83mm-Azurite-Malachite-28.webp?v=1765343840","width":1000},{"alt":"Azurite w\/t Malachite Towers-Towers-Ali-6 74g 75mm-Azurite \/ Malachite-Crystal Destiny","id":31972084383915,"position":29,"preview_image":{"aspect_ratio":1.0,"height":1000,"width":1000,"src":"\/\/crystaldestiny.com\/cdn\/shop\/files\/Azurite-wt-Malachite-Towers-Towers-6-74g-75mm-Azurite-Malachite-29.webp?v=1765343842"},"aspect_ratio":1.0,"height":1000,"media_type":"image","src":"\/\/crystaldestiny.com\/cdn\/shop\/files\/Azurite-wt-Malachite-Towers-Towers-6-74g-75mm-Azurite-Malachite-29.webp?v=1765343842","width":1000},{"alt":"Azurite w\/t Malachite Towers-Towers-Ali-22 77g 74mm-Azurite \/ Malachite-Crystal Destiny","id":31972084416683,"position":30,"preview_image":{"aspect_ratio":1.0,"height":1000,"width":1000,"src":"\/\/crystaldestiny.com\/cdn\/shop\/files\/Azurite-wt-Malachite-Towers-Towers-22-77g-74mm-Azurite-Malachite-30.webp?v=1765343843"},"aspect_ratio":1.0,"height":1000,"media_type":"image","src":"\/\/crystaldestiny.com\/cdn\/shop\/files\/Azurite-wt-Malachite-Towers-Towers-22-77g-74mm-Azurite-Malachite-30.webp?v=1765343843","width":1000},{"alt":"Azurite w\/t Malachite Towers-Towers-Ali-2 82g 68mm-Azurite \/ Malachite-Crystal Destiny","id":31972084449451,"position":31,"preview_image":{"aspect_ratio":1.0,"height":1000,"width":1000,"src":"\/\/crystaldestiny.com\/cdn\/shop\/files\/Azurite-wt-Malachite-Towers-Towers-2-82g-68mm-Azurite-Malachite-31.webp?v=1765343844"},"aspect_ratio":1.0,"height":1000,"media_type":"image","src":"\/\/crystaldestiny.com\/cdn\/shop\/files\/Azurite-wt-Malachite-Towers-Towers-2-82g-68mm-Azurite-Malachite-31.webp?v=1765343844","width":1000},{"alt":"Azurite w\/t Malachite Towers-Towers-Ali-1 77g 69mm-Azurite \/ Malachite-Crystal Destiny","id":31972084482219,"position":32,"preview_image":{"aspect_ratio":1.0,"height":1000,"width":1000,"src":"\/\/crystaldestiny.com\/cdn\/shop\/files\/Azurite-wt-Malachite-Towers-Towers-1-77g-69mm-Azurite-Malachite-32.webp?v=1765343846"},"aspect_ratio":1.0,"height":1000,"media_type":"image","src":"\/\/crystaldestiny.com\/cdn\/shop\/files\/Azurite-wt-Malachite-Towers-Towers-1-77g-69mm-Azurite-Malachite-32.webp?v=1765343846","width":1000},{"alt":"Azurite w\/t Malachite Towers-Towers-Ali-7 69g 66mm-Azurite \/ Malachite-Crystal Destiny","id":31972084514987,"position":33,"preview_image":{"aspect_ratio":1.0,"height":1000,"width":1000,"src":"\/\/crystaldestiny.com\/cdn\/shop\/files\/Azurite-wt-Malachite-Towers-Towers-7-69g-66mm-Azurite-Malachite-33.webp?v=1765343847"},"aspect_ratio":1.0,"height":1000,"media_type":"image","src":"\/\/crystaldestiny.com\/cdn\/shop\/files\/Azurite-wt-Malachite-Towers-Towers-7-69g-66mm-Azurite-Malachite-33.webp?v=1765343847","width":1000},{"alt":"Azurite w\/t Malachite Towers-Towers-Ali-10 75g 72mm-Azurite \/ Malachite-Crystal Destiny","id":31972084547755,"position":34,"preview_image":{"aspect_ratio":1.0,"height":1000,"width":1000,"src":"\/\/crystaldestiny.com\/cdn\/shop\/files\/Azurite-wt-Malachite-Towers-Towers-10-75g-72mm-Azurite-Malachite-34.webp?v=1765343849"},"aspect_ratio":1.0,"height":1000,"media_type":"image","src":"\/\/crystaldestiny.com\/cdn\/shop\/files\/Azurite-wt-Malachite-Towers-Towers-10-75g-72mm-Azurite-Malachite-34.webp?v=1765343849","width":1000},{"alt":"Azurite w\/t Malachite Towers-Towers-Ali-13 40g 62mm-Azurite \/ Malachite-Crystal Destiny","id":31972084580523,"position":35,"preview_image":{"aspect_ratio":1.0,"height":1000,"width":1000,"src":"\/\/crystaldestiny.com\/cdn\/shop\/files\/Azurite-wt-Malachite-Towers-Towers-13-40g-62mm-Azurite-Malachite-35.webp?v=1765343850"},"aspect_ratio":1.0,"height":1000,"media_type":"image","src":"\/\/crystaldestiny.com\/cdn\/shop\/files\/Azurite-wt-Malachite-Towers-Towers-13-40g-62mm-Azurite-Malachite-35.webp?v=1765343850","width":1000},{"alt":"Azurite w\/t Malachite Towers-Towers-Ali-20 45g 51mm-Azurite \/ Malachite-Crystal Destiny","id":31972084613291,"position":36,"preview_image":{"aspect_ratio":1.0,"height":1000,"width":1000,"src":"\/\/crystaldestiny.com\/cdn\/shop\/files\/Azurite-wt-Malachite-Towers-Towers-20-45g-51mm-Azurite-Malachite-36.webp?v=1765343852"},"aspect_ratio":1.0,"height":1000,"media_type":"image","src":"\/\/crystaldestiny.com\/cdn\/shop\/files\/Azurite-wt-Malachite-Towers-Towers-20-45g-51mm-Azurite-Malachite-36.webp?v=1765343852","width":1000},{"alt":"Azurite w\/t Malachite Towers-Towers-Ali-23 56g 61mm-Azurite \/ Malachite-Crystal Destiny","id":31972084646059,"position":37,"preview_image":{"aspect_ratio":1.0,"height":1000,"width":1000,"src":"\/\/crystaldestiny.com\/cdn\/shop\/files\/Azurite-wt-Malachite-Towers-Towers-23-56g-61mm-Azurite-Malachite-37.webp?v=1765343853"},"aspect_ratio":1.0,"height":1000,"media_type":"image","src":"\/\/crystaldestiny.com\/cdn\/shop\/files\/Azurite-wt-Malachite-Towers-Towers-23-56g-61mm-Azurite-Malachite-37.webp?v=1765343853","width":1000},{"alt":"Azurite w\/t Malachite Towers-Towers-Ali-11 66g 63mm-Azurite \/ Malachite-Crystal Destiny","id":31972084678827,"position":38,"preview_image":{"aspect_ratio":1.0,"height":1000,"width":1000,"src":"\/\/crystaldestiny.com\/cdn\/shop\/files\/Azurite-wt-Malachite-Towers-Towers-11-66g-63mm-Azurite-Malachite-38.webp?v=1765343855"},"aspect_ratio":1.0,"height":1000,"media_type":"image","src":"\/\/crystaldestiny.com\/cdn\/shop\/files\/Azurite-wt-Malachite-Towers-Towers-11-66g-63mm-Azurite-Malachite-38.webp?v=1765343855","width":1000},{"alt":"Azurite w\/t Malachite Towers-Towers-Ali-17 33g 55mm-Azurite \/ Malachite-Crystal Destiny","id":31972084711595,"position":39,"preview_image":{"aspect_ratio":1.0,"height":1000,"width":1000,"src":"\/\/crystaldestiny.com\/cdn\/shop\/files\/Azurite-wt-Malachite-Towers-Towers-17-33g-55mm-Azurite-Malachite-39.webp?v=1765343856"},"aspect_ratio":1.0,"height":1000,"media_type":"image","src":"\/\/crystaldestiny.com\/cdn\/shop\/files\/Azurite-wt-Malachite-Towers-Towers-17-33g-55mm-Azurite-Malachite-39.webp?v=1765343856","width":1000},{"alt":"Azurite w\/t Malachite Towers-Towers-Ali-25 40g 49mm-Azurite \/ Malachite-Crystal Destiny","id":31972084744363,"position":40,"preview_image":{"aspect_ratio":1.0,"height":1000,"width":1000,"src":"\/\/crystaldestiny.com\/cdn\/shop\/files\/Azurite-wt-Malachite-Towers-Towers-25-40g-49mm-Azurite-Malachite-40.webp?v=1765343858"},"aspect_ratio":1.0,"height":1000,"media_type":"image","src":"\/\/crystaldestiny.com\/cdn\/shop\/files\/Azurite-wt-Malachite-Towers-Towers-25-40g-49mm-Azurite-Malachite-40.webp?v=1765343858","width":1000},{"alt":"Azurite w\/t Malachite Towers-Towers-Ali-12 68g 76mm-Azurite \/ Malachite-Crystal Destiny","id":31972084777131,"position":41,"preview_image":{"aspect_ratio":1.0,"height":1000,"width":1000,"src":"\/\/crystaldestiny.com\/cdn\/shop\/files\/Azurite-wt-Malachite-Towers-Towers-12-68g-76mm-Azurite-Malachite-41.webp?v=1765343859"},"aspect_ratio":1.0,"height":1000,"media_type":"image","src":"\/\/crystaldestiny.com\/cdn\/shop\/files\/Azurite-wt-Malachite-Towers-Towers-12-68g-76mm-Azurite-Malachite-41.webp?v=1765343859","width":1000}]
{"item":{"id":8603309244587,"title":"Black Agate Crystal Spheres","handle":"black-agate-crystal-spheres-1005009552901251-1-238g-55mm","description":"\u003cp data-start=\"159\" data-end=\"473\"\u003eThese Black Agate Crystal Spheres feature a deep, glossy finish with subtle natural banding that adds depth and elegance. Each sphere is polished to a smooth, reflective surface and comes with a display base, making it a striking addition to any altar, living space, or meditation area.\u003c\/p\u003e\n\u003cp data-start=\"475\" data-end=\"769\"\u003eBlack Agate is valued for its grounding, protective, and stabilizing properties. It supports focus, emotional balance, and clarity during divination or spiritual work. Whether used for energy practices, feng shui, or simply as a bold décor piece, these spheres offer both beauty and presence.\u003c\/p\u003e\n\u003cp data-start=\"475\" data-end=\"769\"\u003eThis product is an exact pick as pictured, one of a kind.\u003c\/p\u003e","published_at":"2025-12-11T18:44:19-05:00","created_at":"2025-12-09T14:38:19-05:00","vendor":"Crystal Destiny","type":"Spheres","tags":["adjusted-shipping","crystal","new-arrivals","polished","spheres"],"price":6899,"price_min":6899,"price_max":15099,"available":true,"price_varies":true,"compare_at_price":0,"compare_at_price_min":0,"compare_at_price_max":0,"compare_at_price_varies":false,"variants":[{"id":45941098119339,"title":"Black Agate \/ 1 238g 55mm","option1":"Black Agate","option2":"1 238g 55mm","option3":null,"sku":"1005009552901251-1 238g 55mm","requires_shipping":true,"taxable":true,"featured_image":{"id":40921464373419,"product_id":8603309244587,"position":18,"created_at":"2025-12-09T14:38:21-05:00","updated_at":"2025-12-12T00:06:48-05:00","alt":"Black Agate Crystal Spheres-Spheres-Crystal Destiny-Black Agate-1 238g 55mm-Crystal Destiny","width":1000,"height":1000,"src":"\/\/crystaldestiny.com\/cdn\/shop\/files\/Black-Agate-Crystal-Spheres-Spheres-Black-Agate-1-238g-55mm-18.webp?v=1765516008","variant_ids":[45941098119339]},"available":true,"name":"Black Agate Crystal Spheres - Black Agate \/ 1 238g 55mm","public_title":"Black Agate \/ 1 238g 55mm","options":["Black Agate","1 238g 55mm"],"price":9599,"weight":400,"compare_at_price":0,"inventory_management":"shopify","barcode":null,"featured_media":{"alt":"Black Agate Crystal Spheres-Spheres-Crystal Destiny-Black Agate-1 238g 55mm-Crystal Destiny","id":32289033879723,"position":18,"preview_image":{"aspect_ratio":1.0,"height":1000,"width":1000,"src":"\/\/crystaldestiny.com\/cdn\/shop\/files\/Black-Agate-Crystal-Spheres-Spheres-Black-Agate-1-238g-55mm-18.webp?v=1765516008"}},"requires_selling_plan":false,"selling_plan_allocations":[]},{"id":45941098086571,"title":"Black Agate \/ 2 211g 53mm","option1":"Black Agate","option2":"2 211g 53mm","option3":null,"sku":"1005009552901251-2 211g 53mm","requires_shipping":true,"taxable":true,"featured_image":{"id":40921464144043,"product_id":8603309244587,"position":11,"created_at":"2025-12-09T14:38:21-05:00","updated_at":"2025-12-12T00:06:38-05:00","alt":"Black Agate Crystal Spheres-Spheres-Crystal Destiny-Black Agate-2 211g 53mm-Crystal Destiny","width":1000,"height":1000,"src":"\/\/crystaldestiny.com\/cdn\/shop\/files\/Black-Agate-Crystal-Spheres-Spheres-Black-Agate-2-211g-53mm-11.webp?v=1765515998","variant_ids":[45941098086571]},"available":true,"name":"Black Agate Crystal Spheres - Black Agate \/ 2 211g 53mm","public_title":"Black Agate \/ 2 211g 53mm","options":["Black Agate","2 211g 53mm"],"price":8799,"weight":400,"compare_at_price":0,"inventory_management":"shopify","barcode":null,"featured_media":{"alt":"Black Agate Crystal Spheres-Spheres-Crystal Destiny-Black Agate-2 211g 53mm-Crystal Destiny","id":32289033650347,"position":11,"preview_image":{"aspect_ratio":1.0,"height":1000,"width":1000,"src":"\/\/crystaldestiny.com\/cdn\/shop\/files\/Black-Agate-Crystal-Spheres-Spheres-Black-Agate-2-211g-53mm-11.webp?v=1765515998"}},"requires_selling_plan":false,"selling_plan_allocations":[]},{"id":45941098053803,"title":"Black Agate \/ 3 207g 53mm","option1":"Black Agate","option2":"3 207g 53mm","option3":null,"sku":"1005009552901251-3 207g 53mm","requires_shipping":true,"taxable":true,"featured_image":{"id":40921464307883,"product_id":8603309244587,"position":16,"created_at":"2025-12-09T14:38:21-05:00","updated_at":"2025-12-12T00:06:46-05:00","alt":"Black Agate Crystal Spheres-Spheres-Crystal Destiny-Black Agate-3 207g 53mm-Crystal Destiny","width":1000,"height":1000,"src":"\/\/crystaldestiny.com\/cdn\/shop\/files\/Black-Agate-Crystal-Spheres-Spheres-Black-Agate-3-207g-53mm-16.webp?v=1765516006","variant_ids":[45941098053803]},"available":false,"name":"Black Agate Crystal Spheres - Black Agate \/ 3 207g 53mm","public_title":"Black Agate \/ 3 207g 53mm","options":["Black Agate","3 207g 53mm"],"price":8599,"weight":400,"compare_at_price":0,"inventory_management":"shopify","barcode":null,"featured_media":{"alt":"Black Agate Crystal Spheres-Spheres-Crystal Destiny-Black Agate-3 207g 53mm-Crystal Destiny","id":32289033814187,"position":16,"preview_image":{"aspect_ratio":1.0,"height":1000,"width":1000,"src":"\/\/crystaldestiny.com\/cdn\/shop\/files\/Black-Agate-Crystal-Spheres-Spheres-Black-Agate-3-207g-53mm-16.webp?v=1765516006"}},"requires_selling_plan":false,"selling_plan_allocations":[]},{"id":45941098021035,"title":"Black Agate \/ 4 234g 55mm","option1":"Black Agate","option2":"4 234g 55mm","option3":null,"sku":"1005009552901251-4 234g 55mm","requires_shipping":true,"taxable":true,"featured_image":{"id":40921464111275,"product_id":8603309244587,"position":10,"created_at":"2025-12-09T14:38:21-05:00","updated_at":"2025-12-12T00:06:37-05:00","alt":"Black Agate Crystal Spheres-Spheres-Crystal Destiny-Black Agate-4 234g 55mm-Crystal Destiny","width":1000,"height":1000,"src":"\/\/crystaldestiny.com\/cdn\/shop\/files\/Black-Agate-Crystal-Spheres-Spheres-Black-Agate-4-234g-55mm-10.webp?v=1765515997","variant_ids":[45941098021035]},"available":false,"name":"Black Agate Crystal Spheres - Black Agate \/ 4 234g 55mm","public_title":"Black Agate \/ 4 234g 55mm","options":["Black Agate","4 234g 55mm"],"price":9399,"weight":400,"compare_at_price":0,"inventory_management":"shopify","barcode":null,"featured_media":{"alt":"Black Agate Crystal Spheres-Spheres-Crystal Destiny-Black Agate-4 234g 55mm-Crystal Destiny","id":32289033617579,"position":10,"preview_image":{"aspect_ratio":1.0,"height":1000,"width":1000,"src":"\/\/crystaldestiny.com\/cdn\/shop\/files\/Black-Agate-Crystal-Spheres-Spheres-Black-Agate-4-234g-55mm-10.webp?v=1765515997"}},"requires_selling_plan":false,"selling_plan_allocations":[]},{"id":45941097988267,"title":"Black Agate \/ 5 218g 53mm","option1":"Black Agate","option2":"5 218g 53mm","option3":null,"sku":"1005009552901251-5 218g 53mm","requires_shipping":true,"taxable":true,"featured_image":{"id":40921464078507,"product_id":8603309244587,"position":9,"created_at":"2025-12-09T14:38:21-05:00","updated_at":"2025-12-12T00:06:35-05:00","alt":"Black Agate Crystal Spheres-Spheres-Crystal Destiny-Black Agate-5 218g 53mm-Crystal Destiny","width":1000,"height":1000,"src":"\/\/crystaldestiny.com\/cdn\/shop\/files\/Black-Agate-Crystal-Spheres-Spheres-Black-Agate-5-218g-53mm-9.webp?v=1765515995","variant_ids":[45941097988267]},"available":true,"name":"Black Agate Crystal Spheres - Black Agate \/ 5 218g 53mm","public_title":"Black Agate \/ 5 218g 53mm","options":["Black Agate","5 218g 53mm"],"price":8899,"weight":400,"compare_at_price":0,"inventory_management":"shopify","barcode":null,"featured_media":{"alt":"Black Agate Crystal Spheres-Spheres-Crystal Destiny-Black Agate-5 218g 53mm-Crystal Destiny","id":32289033584811,"position":9,"preview_image":{"aspect_ratio":1.0,"height":1000,"width":1000,"src":"\/\/crystaldestiny.com\/cdn\/shop\/files\/Black-Agate-Crystal-Spheres-Spheres-Black-Agate-5-218g-53mm-9.webp?v=1765515995"}},"requires_selling_plan":false,"selling_plan_allocations":[]},{"id":45941097955499,"title":"Black Agate \/ 6 247g 56mm","option1":"Black Agate","option2":"6 247g 56mm","option3":null,"sku":"1005009552901251-6 247g 56mm","requires_shipping":true,"taxable":true,"featured_image":{"id":40921464471723,"product_id":8603309244587,"position":21,"created_at":"2025-12-09T14:38:21-05:00","updated_at":"2025-12-12T00:06:52-05:00","alt":"Black Agate Crystal Spheres-Spheres-Crystal Destiny-Black Agate-6 247g 56mm-Crystal Destiny","width":1000,"height":1000,"src":"\/\/crystaldestiny.com\/cdn\/shop\/files\/Black-Agate-Crystal-Spheres-Spheres-Black-Agate-6-247g-56mm-21.webp?v=1765516012","variant_ids":[45941097955499]},"available":true,"name":"Black Agate Crystal Spheres - Black Agate \/ 6 247g 56mm","public_title":"Black Agate \/ 6 247g 56mm","options":["Black Agate","6 247g 56mm"],"price":9699,"weight":400,"compare_at_price":0,"inventory_management":"shopify","barcode":null,"featured_media":{"alt":"Black Agate Crystal Spheres-Spheres-Crystal Destiny-Black Agate-6 247g 56mm-Crystal Destiny","id":32289033978027,"position":21,"preview_image":{"aspect_ratio":1.0,"height":1000,"width":1000,"src":"\/\/crystaldestiny.com\/cdn\/shop\/files\/Black-Agate-Crystal-Spheres-Spheres-Black-Agate-6-247g-56mm-21.webp?v=1765516012"}},"requires_selling_plan":false,"selling_plan_allocations":[]},{"id":45941097922731,"title":"Black Agate \/ 7 202g 52mm","option1":"Black Agate","option2":"7 202g 52mm","option3":null,"sku":"1005009552901251-7 202g 52mm","requires_shipping":true,"taxable":true,"featured_image":{"id":40921464766635,"product_id":8603309244587,"position":30,"created_at":"2025-12-09T14:38:21-05:00","updated_at":"2025-12-12T00:07:06-05:00","alt":"Black Agate Crystal Spheres-Spheres-Crystal Destiny-Black Agate-7 202g 52mm-Crystal Destiny","width":1000,"height":1000,"src":"\/\/crystaldestiny.com\/cdn\/shop\/files\/Black-Agate-Crystal-Spheres-Spheres-Black-Agate-7-202g-52mm-30.webp?v=1765516026","variant_ids":[45941097922731]},"available":false,"name":"Black Agate Crystal Spheres - Black Agate \/ 7 202g 52mm","public_title":"Black Agate \/ 7 202g 52mm","options":["Black Agate","7 202g 52mm"],"price":8499,"weight":400,"compare_at_price":0,"inventory_management":"shopify","barcode":null,"featured_media":{"alt":"Black Agate Crystal Spheres-Spheres-Crystal Destiny-Black Agate-7 202g 52mm-Crystal Destiny","id":32289034272939,"position":30,"preview_image":{"aspect_ratio":1.0,"height":1000,"width":1000,"src":"\/\/crystaldestiny.com\/cdn\/shop\/files\/Black-Agate-Crystal-Spheres-Spheres-Black-Agate-7-202g-52mm-30.webp?v=1765516026"}},"requires_selling_plan":false,"selling_plan_allocations":[]},{"id":45941098381483,"title":"Black Agate \/ 8 201g 52mm","option1":"Black Agate","option2":"8 201g 52mm","option3":null,"sku":"1005009552901251-8 201g 52mm","requires_shipping":true,"taxable":true,"featured_image":{"id":40921464701099,"product_id":8603309244587,"position":28,"created_at":"2025-12-09T14:38:21-05:00","updated_at":"2025-12-12T00:07:03-05:00","alt":"Black Agate Crystal Spheres-Spheres-Crystal Destiny-Black Agate-8 201g 52mm-Crystal Destiny","width":1000,"height":1000,"src":"\/\/crystaldestiny.com\/cdn\/shop\/files\/Black-Agate-Crystal-Spheres-Spheres-Black-Agate-8-201g-52mm-28.webp?v=1765516023","variant_ids":[45941098381483]},"available":true,"name":"Black Agate Crystal Spheres - Black Agate \/ 8 201g 52mm","public_title":"Black Agate \/ 8 201g 52mm","options":["Black Agate","8 201g 52mm"],"price":8399,"weight":400,"compare_at_price":0,"inventory_management":"shopify","barcode":null,"featured_media":{"alt":"Black Agate Crystal Spheres-Spheres-Crystal Destiny-Black Agate-8 201g 52mm-Crystal Destiny","id":32289034207403,"position":28,"preview_image":{"aspect_ratio":1.0,"height":1000,"width":1000,"src":"\/\/crystaldestiny.com\/cdn\/shop\/files\/Black-Agate-Crystal-Spheres-Spheres-Black-Agate-8-201g-52mm-28.webp?v=1765516023"}},"requires_selling_plan":false,"selling_plan_allocations":[]},{"id":45941098348715,"title":"Black Agate \/ 9 188g 51mm","option1":"Black Agate","option2":"9 188g 51mm","option3":null,"sku":"1005009552901251-9 188g 51mm","requires_shipping":true,"taxable":true,"featured_image":{"id":40921464176811,"product_id":8603309244587,"position":12,"created_at":"2025-12-09T14:38:21-05:00","updated_at":"2025-12-12T00:06:40-05:00","alt":"Black Agate Crystal Spheres-Spheres-Crystal Destiny-Black Agate-9 188g 51mm-Crystal Destiny","width":1000,"height":1000,"src":"\/\/crystaldestiny.com\/cdn\/shop\/files\/Black-Agate-Crystal-Spheres-Spheres-Black-Agate-9-188g-51mm-12.webp?v=1765516000","variant_ids":[45941098348715]},"available":true,"name":"Black Agate Crystal Spheres - Black Agate \/ 9 188g 51mm","public_title":"Black Agate \/ 9 188g 51mm","options":["Black Agate","9 188g 51mm"],"price":8099,"weight":400,"compare_at_price":0,"inventory_management":"shopify","barcode":null,"featured_media":{"alt":"Black Agate Crystal Spheres-Spheres-Crystal Destiny-Black Agate-9 188g 51mm-Crystal Destiny","id":32289033683115,"position":12,"preview_image":{"aspect_ratio":1.0,"height":1000,"width":1000,"src":"\/\/crystaldestiny.com\/cdn\/shop\/files\/Black-Agate-Crystal-Spheres-Spheres-Black-Agate-9-188g-51mm-12.webp?v=1765516000"}},"requires_selling_plan":false,"selling_plan_allocations":[]},{"id":45941098315947,"title":"Black Agate \/ 10 236g 54mm","option1":"Black Agate","option2":"10 236g 54mm","option3":null,"sku":"1005009552901251-10 236g 54mm","requires_shipping":true,"taxable":true,"featured_image":{"id":40921464832171,"product_id":8603309244587,"position":32,"created_at":"2025-12-09T14:38:21-05:00","updated_at":"2025-12-12T00:07:08-05:00","alt":"Black Agate Crystal Spheres-Spheres-Crystal Destiny-Black Agate-10 236g 54mm-Crystal Destiny","width":1000,"height":1000,"src":"\/\/crystaldestiny.com\/cdn\/shop\/files\/Black-Agate-Crystal-Spheres-Spheres-Black-Agate-10-236g-54mm-32.webp?v=1765516028","variant_ids":[45941098315947]},"available":true,"name":"Black Agate Crystal Spheres - Black Agate \/ 10 236g 54mm","public_title":"Black Agate \/ 10 236g 54mm","options":["Black Agate","10 236g 54mm"],"price":9399,"weight":400,"compare_at_price":0,"inventory_management":"shopify","barcode":null,"featured_media":{"alt":"Black Agate Crystal Spheres-Spheres-Crystal Destiny-Black Agate-10 236g 54mm-Crystal Destiny","id":32289034338475,"position":32,"preview_image":{"aspect_ratio":1.0,"height":1000,"width":1000,"src":"\/\/crystaldestiny.com\/cdn\/shop\/files\/Black-Agate-Crystal-Spheres-Spheres-Black-Agate-10-236g-54mm-32.webp?v=1765516028"}},"requires_selling_plan":false,"selling_plan_allocations":[]},{"id":45941098283179,"title":"Black Agate \/ 11 156g 48mm","option1":"Black Agate","option2":"11 156g 48mm","option3":null,"sku":"1005009552901251-11 156g 48mm","requires_shipping":true,"taxable":true,"featured_image":{"id":40921464537259,"product_id":8603309244587,"position":23,"created_at":"2025-12-09T14:38:21-05:00","updated_at":"2025-12-12T00:06:55-05:00","alt":"Black Agate Crystal Spheres-Spheres-Crystal Destiny-Black Agate-11 156g 48mm-Crystal Destiny","width":1000,"height":1000,"src":"\/\/crystaldestiny.com\/cdn\/shop\/files\/Black-Agate-Crystal-Spheres-Spheres-Black-Agate-11-156g-48mm-23.webp?v=1765516015","variant_ids":[45941098283179]},"available":false,"name":"Black Agate Crystal Spheres - Black Agate \/ 11 156g 48mm","public_title":"Black Agate \/ 11 156g 48mm","options":["Black Agate","11 156g 48mm"],"price":6899,"weight":400,"compare_at_price":0,"inventory_management":"shopify","barcode":null,"featured_media":{"alt":"Black Agate Crystal Spheres-Spheres-Crystal Destiny-Black Agate-11 156g 48mm-Crystal Destiny","id":32289034043563,"position":23,"preview_image":{"aspect_ratio":1.0,"height":1000,"width":1000,"src":"\/\/crystaldestiny.com\/cdn\/shop\/files\/Black-Agate-Crystal-Spheres-Spheres-Black-Agate-11-156g-48mm-23.webp?v=1765516015"}},"requires_selling_plan":false,"selling_plan_allocations":[]},{"id":45941098250411,"title":"Black Agate \/ 12 222g 54mm","option1":"Black Agate","option2":"12 222g 54mm","option3":null,"sku":"1005009552901251-12 222g 54mm","requires_shipping":true,"taxable":true,"featured_image":{"id":40921465028779,"product_id":8603309244587,"position":38,"created_at":"2025-12-09T14:38:21-05:00","updated_at":"2025-12-12T00:07:17-05:00","alt":"Black Agate Crystal Spheres-Spheres-Crystal Destiny-Black Agate-12 222g 54mm-Crystal Destiny","width":1000,"height":1000,"src":"\/\/crystaldestiny.com\/cdn\/shop\/files\/Black-Agate-Crystal-Spheres-Spheres-Black-Agate-12-222g-54mm-38.webp?v=1765516037","variant_ids":[45941098250411]},"available":true,"name":"Black Agate Crystal Spheres - Black Agate \/ 12 222g 54mm","public_title":"Black Agate \/ 12 222g 54mm","options":["Black Agate","12 222g 54mm"],"price":8999,"weight":400,"compare_at_price":0,"inventory_management":"shopify","barcode":null,"featured_media":{"alt":"Black Agate Crystal Spheres-Spheres-Crystal Destiny-Black Agate-12 222g 54mm-Crystal Destiny","id":32289034535083,"position":38,"preview_image":{"aspect_ratio":1.0,"height":1000,"width":1000,"src":"\/\/crystaldestiny.com\/cdn\/shop\/files\/Black-Agate-Crystal-Spheres-Spheres-Black-Agate-12-222g-54mm-38.webp?v=1765516037"}},"requires_selling_plan":false,"selling_plan_allocations":[]},{"id":45941098217643,"title":"Black Agate \/ 13 203g 52mm","option1":"Black Agate","option2":"13 203g 52mm","option3":null,"sku":"1005009552901251-13 203g 52mm","requires_shipping":true,"taxable":true,"featured_image":{"id":40921464668331,"product_id":8603309244587,"position":27,"created_at":"2025-12-09T14:38:21-05:00","updated_at":"2025-12-12T00:07:01-05:00","alt":"Black Agate Crystal Spheres-Spheres-Crystal Destiny-Black Agate-13 203g 52mm-Crystal Destiny","width":1000,"height":1000,"src":"\/\/crystaldestiny.com\/cdn\/shop\/files\/Black-Agate-Crystal-Spheres-Spheres-Black-Agate-13-203g-52mm-27.webp?v=1765516021","variant_ids":[45941098217643]},"available":true,"name":"Black Agate Crystal Spheres - Black Agate \/ 13 203g 52mm","public_title":"Black Agate \/ 13 203g 52mm","options":["Black Agate","13 203g 52mm"],"price":8499,"weight":400,"compare_at_price":0,"inventory_management":"shopify","barcode":null,"featured_media":{"alt":"Black Agate Crystal Spheres-Spheres-Crystal Destiny-Black Agate-13 203g 52mm-Crystal Destiny","id":32289034174635,"position":27,"preview_image":{"aspect_ratio":1.0,"height":1000,"width":1000,"src":"\/\/crystaldestiny.com\/cdn\/shop\/files\/Black-Agate-Crystal-Spheres-Spheres-Black-Agate-13-203g-52mm-27.webp?v=1765516021"}},"requires_selling_plan":false,"selling_plan_allocations":[]},{"id":45941098184875,"title":"Black Agate \/ 14 195g 51mm","option1":"Black Agate","option2":"14 195g 51mm","option3":null,"sku":"1005009552901251-14 195g 51mm","requires_shipping":true,"taxable":true,"featured_image":{"id":40921464504491,"product_id":8603309244587,"position":22,"created_at":"2025-12-09T14:38:21-05:00","updated_at":"2025-12-12T00:06:54-05:00","alt":"Black Agate Crystal Spheres-Spheres-Crystal Destiny-Black Agate-14 195g 51mm-Crystal Destiny","width":1000,"height":1000,"src":"\/\/crystaldestiny.com\/cdn\/shop\/files\/Black-Agate-Crystal-Spheres-Spheres-Black-Agate-14-195g-51mm-22.webp?v=1765516014","variant_ids":[45941098184875]},"available":true,"name":"Black Agate Crystal Spheres - Black Agate \/ 14 195g 51mm","public_title":"Black Agate \/ 14 195g 51mm","options":["Black Agate","14 195g 51mm"],"price":8699,"weight":400,"compare_at_price":0,"inventory_management":"shopify","barcode":null,"featured_media":{"alt":"Black Agate Crystal Spheres-Spheres-Crystal Destiny-Black Agate-14 195g 51mm-Crystal Destiny","id":32289034010795,"position":22,"preview_image":{"aspect_ratio":1.0,"height":1000,"width":1000,"src":"\/\/crystaldestiny.com\/cdn\/shop\/files\/Black-Agate-Crystal-Spheres-Spheres-Black-Agate-14-195g-51mm-22.webp?v=1765516014"}},"requires_selling_plan":false,"selling_plan_allocations":[]},{"id":45941098152107,"title":"Black Agate \/ 15 230g 54mm","option1":"Black Agate","option2":"15 230g 54mm","option3":null,"sku":"1005009552901251-15 230g 54mm","requires_shipping":true,"taxable":true,"featured_image":{"id":40921464799403,"product_id":8603309244587,"position":31,"created_at":"2025-12-09T14:38:21-05:00","updated_at":"2025-12-12T00:07:07-05:00","alt":"Black Agate Crystal Spheres-Spheres-Crystal Destiny-Black Agate-15 230g 54mm-Crystal Destiny","width":1000,"height":1000,"src":"\/\/crystaldestiny.com\/cdn\/shop\/files\/Black-Agate-Crystal-Spheres-Spheres-Black-Agate-15-230g-54mm-31.webp?v=1765516027","variant_ids":[45941098152107]},"available":true,"name":"Black Agate Crystal Spheres - Black Agate \/ 15 230g 54mm","public_title":"Black Agate \/ 15 230g 54mm","options":["Black Agate","15 230g 54mm"],"price":9199,"weight":400,"compare_at_price":0,"inventory_management":"shopify","barcode":null,"featured_media":{"alt":"Black Agate Crystal Spheres-Spheres-Crystal Destiny-Black Agate-15 230g 54mm-Crystal Destiny","id":32289034305707,"position":31,"preview_image":{"aspect_ratio":1.0,"height":1000,"width":1000,"src":"\/\/crystaldestiny.com\/cdn\/shop\/files\/Black-Agate-Crystal-Spheres-Spheres-Black-Agate-15-230g-54mm-31.webp?v=1765516027"}},"requires_selling_plan":false,"selling_plan_allocations":[]},{"id":45941098643627,"title":"Black Agate \/ 16 243g 55mm","option1":"Black Agate","option2":"16 243g 55mm","option3":null,"sku":"1005009552901251-16 243g 55mm","requires_shipping":true,"taxable":true,"featured_image":{"id":40921464733867,"product_id":8603309244587,"position":29,"created_at":"2025-12-09T14:38:21-05:00","updated_at":"2025-12-12T00:07:04-05:00","alt":"Black Agate Crystal Spheres-Spheres-Crystal Destiny-Black Agate-16 243g 55mm-Crystal Destiny","width":1000,"height":1000,"src":"\/\/crystaldestiny.com\/cdn\/shop\/files\/Black-Agate-Crystal-Spheres-Spheres-Black-Agate-16-243g-55mm-29.webp?v=1765516024","variant_ids":[45941098643627]},"available":true,"name":"Black Agate Crystal Spheres - Black Agate \/ 16 243g 55mm","public_title":"Black Agate \/ 16 243g 55mm","options":["Black Agate","16 243g 55mm"],"price":9599,"weight":400,"compare_at_price":0,"inventory_management":"shopify","barcode":null,"featured_media":{"alt":"Black Agate Crystal Spheres-Spheres-Crystal Destiny-Black Agate-16 243g 55mm-Crystal Destiny","id":32289034240171,"position":29,"preview_image":{"aspect_ratio":1.0,"height":1000,"width":1000,"src":"\/\/crystaldestiny.com\/cdn\/shop\/files\/Black-Agate-Crystal-Spheres-Spheres-Black-Agate-16-243g-55mm-29.webp?v=1765516024"}},"requires_selling_plan":false,"selling_plan_allocations":[]},{"id":45941098610859,"title":"Black Agate \/ 17 225g 54mm","option1":"Black Agate","option2":"17 225g 54mm","option3":null,"sku":"1005009552901251-17 225g 54mm","requires_shipping":true,"taxable":true,"featured_image":{"id":40921464602795,"product_id":8603309244587,"position":25,"created_at":"2025-12-09T14:38:21-05:00","updated_at":"2025-12-12T00:06:58-05:00","alt":"Black Agate Crystal Spheres-Spheres-Crystal Destiny-Black Agate-17 225g 54mm-Crystal Destiny","width":1000,"height":1000,"src":"\/\/crystaldestiny.com\/cdn\/shop\/files\/Black-Agate-Crystal-Spheres-Spheres-Black-Agate-17-225g-54mm-25.webp?v=1765516018","variant_ids":[45941098610859]},"available":false,"name":"Black Agate Crystal Spheres - Black Agate \/ 17 225g 54mm","public_title":"Black Agate \/ 17 225g 54mm","options":["Black Agate","17 225g 54mm"],"price":9099,"weight":400,"compare_at_price":0,"inventory_management":"shopify","barcode":null,"featured_media":{"alt":"Black Agate Crystal Spheres-Spheres-Crystal Destiny-Black Agate-17 225g 54mm-Crystal Destiny","id":32289034109099,"position":25,"preview_image":{"aspect_ratio":1.0,"height":1000,"width":1000,"src":"\/\/crystaldestiny.com\/cdn\/shop\/files\/Black-Agate-Crystal-Spheres-Spheres-Black-Agate-17-225g-54mm-25.webp?v=1765516018"}},"requires_selling_plan":false,"selling_plan_allocations":[]},{"id":45941098578091,"title":"Black Agate \/ 18 246g 56mm","option1":"Black Agate","option2":"18 246g 56mm","option3":null,"sku":"1005009552901251-18 246g 56mm","requires_shipping":true,"taxable":true,"featured_image":{"id":40921463881899,"product_id":8603309244587,"position":3,"created_at":"2025-12-09T14:38:21-05:00","updated_at":"2025-12-12T00:06:27-05:00","alt":"Black Agate Crystal Spheres-Spheres-Crystal Destiny-Black Agate-18 246g 56mm-Crystal Destiny","width":1000,"height":1000,"src":"\/\/crystaldestiny.com\/cdn\/shop\/files\/Black-Agate-Crystal-Spheres-Spheres-Black-Agate-18-246g-56mm-3.webp?v=1765515987","variant_ids":[45941098578091]},"available":false,"name":"Black Agate Crystal Spheres - Black Agate \/ 18 246g 56mm","public_title":"Black Agate \/ 18 246g 56mm","options":["Black Agate","18 246g 56mm"],"price":9599,"weight":400,"compare_at_price":0,"inventory_management":"shopify","barcode":null,"featured_media":{"alt":"Black Agate Crystal Spheres-Spheres-Crystal Destiny-Black Agate-18 246g 56mm-Crystal Destiny","id":32289033388203,"position":3,"preview_image":{"aspect_ratio":1.0,"height":1000,"width":1000,"src":"\/\/crystaldestiny.com\/cdn\/shop\/files\/Black-Agate-Crystal-Spheres-Spheres-Black-Agate-18-246g-56mm-3.webp?v=1765515987"}},"requires_selling_plan":false,"selling_plan_allocations":[]},{"id":45941098545323,"title":"Black Agate \/ 19 188g 51mm","option1":"Black Agate","option2":"19 188g 51mm","option3":null,"sku":"1005009552901251-19 188g 51mm","requires_shipping":true,"taxable":true,"featured_image":{"id":40921464930475,"product_id":8603309244587,"position":35,"created_at":"2025-12-09T14:38:21-05:00","updated_at":"2025-12-12T00:07:13-05:00","alt":"Black Agate Crystal Spheres-Spheres-Crystal Destiny-Black Agate-19 188g 51mm-Crystal Destiny","width":1000,"height":1000,"src":"\/\/crystaldestiny.com\/cdn\/shop\/files\/Black-Agate-Crystal-Spheres-Spheres-Black-Agate-19-188g-51mm-35.webp?v=1765516033","variant_ids":[45941098545323]},"available":true,"name":"Black Agate Crystal Spheres - Black Agate \/ 19 188g 51mm","public_title":"Black Agate \/ 19 188g 51mm","options":["Black Agate","19 188g 51mm"],"price":8099,"weight":400,"compare_at_price":0,"inventory_management":"shopify","barcode":null,"featured_media":{"alt":"Black Agate Crystal Spheres-Spheres-Crystal Destiny-Black Agate-19 188g 51mm-Crystal Destiny","id":32289034436779,"position":35,"preview_image":{"aspect_ratio":1.0,"height":1000,"width":1000,"src":"\/\/crystaldestiny.com\/cdn\/shop\/files\/Black-Agate-Crystal-Spheres-Spheres-Black-Agate-19-188g-51mm-35.webp?v=1765516033"}},"requires_selling_plan":false,"selling_plan_allocations":[]},{"id":45941098512555,"title":"Black Agate \/ 20 237g 55mm","option1":"Black Agate","option2":"20 237g 55mm","option3":null,"sku":"1005009552901251-20 237g 55mm","requires_shipping":true,"taxable":true,"featured_image":{"id":40921464897707,"product_id":8603309244587,"position":34,"created_at":"2025-12-09T14:38:21-05:00","updated_at":"2025-12-12T00:07:11-05:00","alt":"Black Agate Crystal Spheres-Spheres-Crystal Destiny-Black Agate-20 237g 55mm-Crystal Destiny","width":1000,"height":1000,"src":"\/\/crystaldestiny.com\/cdn\/shop\/files\/Black-Agate-Crystal-Spheres-Spheres-Black-Agate-20-237g-55mm-34.webp?v=1765516031","variant_ids":[45941098512555]},"available":true,"name":"Black Agate Crystal Spheres - Black Agate \/ 20 237g 55mm","public_title":"Black Agate \/ 20 237g 55mm","options":["Black Agate","20 237g 55mm"],"price":9399,"weight":400,"compare_at_price":0,"inventory_management":"shopify","barcode":null,"featured_media":{"alt":"Black Agate Crystal Spheres-Spheres-Crystal Destiny-Black Agate-20 237g 55mm-Crystal Destiny","id":32289034404011,"position":34,"preview_image":{"aspect_ratio":1.0,"height":1000,"width":1000,"src":"\/\/crystaldestiny.com\/cdn\/shop\/files\/Black-Agate-Crystal-Spheres-Spheres-Black-Agate-20-237g-55mm-34.webp?v=1765516031"}},"requires_selling_plan":false,"selling_plan_allocations":[]},{"id":45941098479787,"title":"Black Agate \/ 21 229g 54mm","option1":"Black Agate","option2":"21 229g 54mm","option3":null,"sku":"1005009552901251-21 229g 54mm","requires_shipping":true,"taxable":true,"featured_image":{"id":40921464406187,"product_id":8603309244587,"position":19,"created_at":"2025-12-09T14:38:21-05:00","updated_at":"2025-12-12T00:06:50-05:00","alt":"Black Agate Crystal Spheres-Spheres-Crystal Destiny-Black Agate-21 229g 54mm-Crystal Destiny","width":1000,"height":1000,"src":"\/\/crystaldestiny.com\/cdn\/shop\/files\/Black-Agate-Crystal-Spheres-Spheres-Black-Agate-21-229g-54mm-19.webp?v=1765516010","variant_ids":[45941098479787]},"available":true,"name":"Black Agate Crystal Spheres - Black Agate \/ 21 229g 54mm","public_title":"Black Agate \/ 21 229g 54mm","options":["Black Agate","21 229g 54mm"],"price":9199,"weight":400,"compare_at_price":0,"inventory_management":"shopify","barcode":null,"featured_media":{"alt":"Black Agate Crystal Spheres-Spheres-Crystal Destiny-Black Agate-21 229g 54mm-Crystal Destiny","id":32289033912491,"position":19,"preview_image":{"aspect_ratio":1.0,"height":1000,"width":1000,"src":"\/\/crystaldestiny.com\/cdn\/shop\/files\/Black-Agate-Crystal-Spheres-Spheres-Black-Agate-21-229g-54mm-19.webp?v=1765516010"}},"requires_selling_plan":false,"selling_plan_allocations":[]},{"id":45941098447019,"title":"Black Agate \/ 22 244g 55mm","option1":"Black Agate","option2":"22 244g 55mm","option3":null,"sku":"1005009552901251-22 244g 55mm","requires_shipping":true,"taxable":true,"featured_image":{"id":40921464570027,"product_id":8603309244587,"position":24,"created_at":"2025-12-09T14:38:21-05:00","updated_at":"2025-12-12T00:06:56-05:00","alt":"Black Agate Crystal Spheres-Spheres-Crystal Destiny-Black Agate-22 244g 55mm-Crystal Destiny","width":1000,"height":1000,"src":"\/\/crystaldestiny.com\/cdn\/shop\/files\/Black-Agate-Crystal-Spheres-Spheres-Black-Agate-22-244g-55mm-24.webp?v=1765516016","variant_ids":[45941098447019]},"available":true,"name":"Black Agate Crystal Spheres - Black Agate \/ 22 244g 55mm","public_title":"Black Agate \/ 22 244g 55mm","options":["Black Agate","22 244g 55mm"],"price":9599,"weight":400,"compare_at_price":0,"inventory_management":"shopify","barcode":null,"featured_media":{"alt":"Black Agate Crystal Spheres-Spheres-Crystal Destiny-Black Agate-22 244g 55mm-Crystal Destiny","id":32289034076331,"position":24,"preview_image":{"aspect_ratio":1.0,"height":1000,"width":1000,"src":"\/\/crystaldestiny.com\/cdn\/shop\/files\/Black-Agate-Crystal-Spheres-Spheres-Black-Agate-22-244g-55mm-24.webp?v=1765516016"}},"requires_selling_plan":false,"selling_plan_allocations":[]},{"id":45941098414251,"title":"Black Agate \/ 23 315g 60mm","option1":"Black Agate","option2":"23 315g 60mm","option3":null,"sku":"1005009552901251-23 315g 60mm","requires_shipping":true,"taxable":true,"featured_image":{"id":40921464864939,"product_id":8603309244587,"position":33,"created_at":"2025-12-09T14:38:21-05:00","updated_at":"2025-12-12T00:07:10-05:00","alt":"Black Agate Crystal Spheres-Spheres-Crystal Destiny-Black Agate-23 315g 60mm-Crystal Destiny","width":1000,"height":1000,"src":"\/\/crystaldestiny.com\/cdn\/shop\/files\/Black-Agate-Crystal-Spheres-Spheres-Black-Agate-23-315g-60mm-33.webp?v=1765516030","variant_ids":[45941098414251]},"available":true,"name":"Black Agate Crystal Spheres - Black Agate \/ 23 315g 60mm","public_title":"Black Agate \/ 23 315g 60mm","options":["Black Agate","23 315g 60mm"],"price":12099,"weight":400,"compare_at_price":0,"inventory_management":"shopify","barcode":null,"featured_media":{"alt":"Black Agate Crystal Spheres-Spheres-Crystal Destiny-Black Agate-23 315g 60mm-Crystal Destiny","id":32289034371243,"position":33,"preview_image":{"aspect_ratio":1.0,"height":1000,"width":1000,"src":"\/\/crystaldestiny.com\/cdn\/shop\/files\/Black-Agate-Crystal-Spheres-Spheres-Black-Agate-23-315g-60mm-33.webp?v=1765516030"}},"requires_selling_plan":false,"selling_plan_allocations":[]},{"id":45941098905771,"title":"Black Agate \/ 24 264g 57mm","option1":"Black Agate","option2":"24 264g 57mm","option3":null,"sku":"1005009552901251-24 264g 57mm","requires_shipping":true,"taxable":true,"featured_image":{"id":40921464635563,"product_id":8603309244587,"position":26,"created_at":"2025-12-09T14:38:21-05:00","updated_at":"2025-12-12T00:07:00-05:00","alt":"Black Agate Crystal Spheres-Spheres-Crystal Destiny-Black Agate-24 264g 57mm-Crystal Destiny","width":1000,"height":1000,"src":"\/\/crystaldestiny.com\/cdn\/shop\/files\/Black-Agate-Crystal-Spheres-Spheres-Black-Agate-24-264g-57mm-26.webp?v=1765516020","variant_ids":[45941098905771]},"available":true,"name":"Black Agate Crystal Spheres - Black Agate \/ 24 264g 57mm","public_title":"Black Agate \/ 24 264g 57mm","options":["Black Agate","24 264g 57mm"],"price":10399,"weight":400,"compare_at_price":0,"inventory_management":"shopify","barcode":null,"featured_media":{"alt":"Black Agate Crystal Spheres-Spheres-Crystal Destiny-Black Agate-24 264g 57mm-Crystal Destiny","id":32289034141867,"position":26,"preview_image":{"aspect_ratio":1.0,"height":1000,"width":1000,"src":"\/\/crystaldestiny.com\/cdn\/shop\/files\/Black-Agate-Crystal-Spheres-Spheres-Black-Agate-24-264g-57mm-26.webp?v=1765516020"}},"requires_selling_plan":false,"selling_plan_allocations":[]},{"id":45941098873003,"title":"Black Agate \/ 25 272g 59mm","option1":"Black Agate","option2":"25 272g 59mm","option3":null,"sku":"1005009552901251-25 272g 59mm","requires_shipping":true,"taxable":true,"featured_image":{"id":40921464963243,"product_id":8603309244587,"position":36,"created_at":"2025-12-09T14:38:21-05:00","updated_at":"2025-12-12T00:07:14-05:00","alt":"Black Agate Crystal Spheres-Spheres-Crystal Destiny-Black Agate-25 272g 59mm-Crystal Destiny","width":1000,"height":1000,"src":"\/\/crystaldestiny.com\/cdn\/shop\/files\/Black-Agate-Crystal-Spheres-Spheres-Black-Agate-25-272g-59mm-36.webp?v=1765516034","variant_ids":[45941098873003]},"available":true,"name":"Black Agate Crystal Spheres - Black Agate \/ 25 272g 59mm","public_title":"Black Agate \/ 25 272g 59mm","options":["Black Agate","25 272g 59mm"],"price":10699,"weight":400,"compare_at_price":0,"inventory_management":"shopify","barcode":null,"featured_media":{"alt":"Black Agate Crystal Spheres-Spheres-Crystal Destiny-Black Agate-25 272g 59mm-Crystal Destiny","id":32289034469547,"position":36,"preview_image":{"aspect_ratio":1.0,"height":1000,"width":1000,"src":"\/\/crystaldestiny.com\/cdn\/shop\/files\/Black-Agate-Crystal-Spheres-Spheres-Black-Agate-25-272g-59mm-36.webp?v=1765516034"}},"requires_selling_plan":false,"selling_plan_allocations":[]},{"id":45941098840235,"title":"Black Agate \/ 26 264g 57mm","option1":"Black Agate","option2":"26 264g 57mm","option3":null,"sku":"1005009552901251-26 264g 57mm","requires_shipping":true,"taxable":true,"featured_image":{"id":40921464012971,"product_id":8603309244587,"position":7,"created_at":"2025-12-09T14:38:21-05:00","updated_at":"2025-12-12T00:06:33-05:00","alt":"Black Agate Crystal Spheres-Spheres-Crystal Destiny-Black Agate-26 264g 57mm-Crystal Destiny","width":1000,"height":1000,"src":"\/\/crystaldestiny.com\/cdn\/shop\/files\/Black-Agate-Crystal-Spheres-Spheres-Black-Agate-26-264g-57mm-7.webp?v=1765515993","variant_ids":[45941098840235]},"available":false,"name":"Black Agate Crystal Spheres - Black Agate \/ 26 264g 57mm","public_title":"Black Agate \/ 26 264g 57mm","options":["Black Agate","26 264g 57mm"],"price":10399,"weight":400,"compare_at_price":0,"inventory_management":"shopify","barcode":null,"featured_media":{"alt":"Black Agate Crystal Spheres-Spheres-Crystal Destiny-Black Agate-26 264g 57mm-Crystal Destiny","id":32289033519275,"position":7,"preview_image":{"aspect_ratio":1.0,"height":1000,"width":1000,"src":"\/\/crystaldestiny.com\/cdn\/shop\/files\/Black-Agate-Crystal-Spheres-Spheres-Black-Agate-26-264g-57mm-7.webp?v=1765515993"}},"requires_selling_plan":false,"selling_plan_allocations":[]},{"id":45941098807467,"title":"Black Agate \/ 27 310g 60mm","option1":"Black Agate","option2":"27 310g 60mm","option3":null,"sku":"1005009552901251-27 310g 60mm","requires_shipping":true,"taxable":true,"featured_image":{"id":40921464242347,"product_id":8603309244587,"position":14,"created_at":"2025-12-09T14:38:21-05:00","updated_at":"2025-12-12T00:06:43-05:00","alt":"Black Agate Crystal Spheres-Spheres-Crystal Destiny-Black Agate-27 310g 60mm-Crystal Destiny","width":1000,"height":1000,"src":"\/\/crystaldestiny.com\/cdn\/shop\/files\/Black-Agate-Crystal-Spheres-Spheres-Black-Agate-27-310g-60mm-14.webp?v=1765516003","variant_ids":[45941098807467]},"available":true,"name":"Black Agate Crystal Spheres - Black Agate \/ 27 310g 60mm","public_title":"Black Agate \/ 27 310g 60mm","options":["Black Agate","27 310g 60mm"],"price":12099,"weight":400,"compare_at_price":0,"inventory_management":"shopify","barcode":null,"featured_media":{"alt":"Black Agate Crystal Spheres-Spheres-Crystal Destiny-Black Agate-27 310g 60mm-Crystal Destiny","id":32289033748651,"position":14,"preview_image":{"aspect_ratio":1.0,"height":1000,"width":1000,"src":"\/\/crystaldestiny.com\/cdn\/shop\/files\/Black-Agate-Crystal-Spheres-Spheres-Black-Agate-27-310g-60mm-14.webp?v=1765516003"}},"requires_selling_plan":false,"selling_plan_allocations":[]},{"id":45941098774699,"title":"Black Agate \/ 28 250g 56mm","option1":"Black Agate","option2":"28 250g 56mm","option3":null,"sku":"1005009552901251-28 250g 56mm","requires_shipping":true,"taxable":true,"featured_image":{"id":40921463980203,"product_id":8603309244587,"position":6,"created_at":"2025-12-09T14:38:21-05:00","updated_at":"2025-12-12T00:06:31-05:00","alt":"Black Agate Crystal Spheres-Spheres-Crystal Destiny-Black Agate-28 250g 56mm-Crystal Destiny","width":1000,"height":1000,"src":"\/\/crystaldestiny.com\/cdn\/shop\/files\/Black-Agate-Crystal-Spheres-Spheres-Black-Agate-28-250g-56mm-6.webp?v=1765515991","variant_ids":[45941098774699]},"available":true,"name":"Black Agate Crystal Spheres - Black Agate \/ 28 250g 56mm","public_title":"Black Agate \/ 28 250g 56mm","options":["Black Agate","28 250g 56mm"],"price":9799,"weight":400,"compare_at_price":0,"inventory_management":"shopify","barcode":null,"featured_media":{"alt":"Black Agate Crystal Spheres-Spheres-Crystal Destiny-Black Agate-28 250g 56mm-Crystal Destiny","id":32289033486507,"position":6,"preview_image":{"aspect_ratio":1.0,"height":1000,"width":1000,"src":"\/\/crystaldestiny.com\/cdn\/shop\/files\/Black-Agate-Crystal-Spheres-Spheres-Black-Agate-28-250g-56mm-6.webp?v=1765515991"}},"requires_selling_plan":false,"selling_plan_allocations":[]},{"id":45941098741931,"title":"Black Agate \/ 29 362g 63mm","option1":"Black Agate","option2":"29 362g 63mm","option3":null,"sku":"1005009552901251-29 362g 63mm","requires_shipping":true,"taxable":true,"featured_image":{"id":40921463947435,"product_id":8603309244587,"position":5,"created_at":"2025-12-09T14:38:21-05:00","updated_at":"2025-12-12T00:06:30-05:00","alt":"Black Agate Crystal Spheres-Spheres-Crystal Destiny-Black Agate-29 362g 63mm-Crystal Destiny","width":1000,"height":1000,"src":"\/\/crystaldestiny.com\/cdn\/shop\/files\/Black-Agate-Crystal-Spheres-Spheres-Black-Agate-29-362g-63mm-5.webp?v=1765515990","variant_ids":[45941098741931]},"available":false,"name":"Black Agate Crystal Spheres - Black Agate \/ 29 362g 63mm","public_title":"Black Agate \/ 29 362g 63mm","options":["Black Agate","29 362g 63mm"],"price":13599,"weight":400,"compare_at_price":0,"inventory_management":"shopify","barcode":null,"featured_media":{"alt":"Black Agate Crystal Spheres-Spheres-Crystal Destiny-Black Agate-29 362g 63mm-Crystal Destiny","id":32289033453739,"position":5,"preview_image":{"aspect_ratio":1.0,"height":1000,"width":1000,"src":"\/\/crystaldestiny.com\/cdn\/shop\/files\/Black-Agate-Crystal-Spheres-Spheres-Black-Agate-29-362g-63mm-5.webp?v=1765515990"}},"requires_selling_plan":false,"selling_plan_allocations":[]},{"id":45941098709163,"title":"Black Agate \/ 30 290g 59mm","option1":"Black Agate","option2":"30 290g 59mm","option3":null,"sku":"1005009552901251-30 290g 59mm","requires_shipping":true,"taxable":true,"featured_image":{"id":40921464209579,"product_id":8603309244587,"position":13,"created_at":"2025-12-09T14:38:21-05:00","updated_at":"2025-12-12T00:06:41-05:00","alt":"Black Agate Crystal Spheres-Spheres-Crystal Destiny-Black Agate-30 290g 59mm-Crystal Destiny","width":1000,"height":1000,"src":"\/\/crystaldestiny.com\/cdn\/shop\/files\/Black-Agate-Crystal-Spheres-Spheres-Black-Agate-30-290g-59mm-13.webp?v=1765516001","variant_ids":[45941098709163]},"available":false,"name":"Black Agate Crystal Spheres - Black Agate \/ 30 290g 59mm","public_title":"Black Agate \/ 30 290g 59mm","options":["Black Agate","30 290g 59mm"],"price":11699,"weight":400,"compare_at_price":0,"inventory_management":"shopify","barcode":null,"featured_media":{"alt":"Black Agate Crystal Spheres-Spheres-Crystal Destiny-Black Agate-30 290g 59mm-Crystal Destiny","id":32289033715883,"position":13,"preview_image":{"aspect_ratio":1.0,"height":1000,"width":1000,"src":"\/\/crystaldestiny.com\/cdn\/shop\/files\/Black-Agate-Crystal-Spheres-Spheres-Black-Agate-30-290g-59mm-13.webp?v=1765516001"}},"requires_selling_plan":false,"selling_plan_allocations":[]},{"id":45941098676395,"title":"Black Agate \/ 31 393g 65mm","option1":"Black Agate","option2":"31 393g 65mm","option3":null,"sku":"1005009552901251-31 393g 65mm","requires_shipping":true,"taxable":true,"featured_image":{"id":40921463914667,"product_id":8603309244587,"position":4,"created_at":"2025-12-09T14:38:21-05:00","updated_at":"2025-12-12T00:06:28-05:00","alt":"Black Agate Crystal Spheres-Spheres-Crystal Destiny-Black Agate-31 393g 65mm-Crystal Destiny","width":1000,"height":1000,"src":"\/\/crystaldestiny.com\/cdn\/shop\/files\/Black-Agate-Crystal-Spheres-Spheres-Black-Agate-31-393g-65mm-4.webp?v=1765515988","variant_ids":[45941098676395]},"available":false,"name":"Black Agate Crystal Spheres - Black Agate \/ 31 393g 65mm","public_title":"Black Agate \/ 31 393g 65mm","options":["Black Agate","31 393g 65mm"],"price":15099,"weight":400,"compare_at_price":0,"inventory_management":"shopify","barcode":null,"featured_media":{"alt":"Black Agate Crystal Spheres-Spheres-Crystal Destiny-Black Agate-31 393g 65mm-Crystal Destiny","id":32289033420971,"position":4,"preview_image":{"aspect_ratio":1.0,"height":1000,"width":1000,"src":"\/\/crystaldestiny.com\/cdn\/shop\/files\/Black-Agate-Crystal-Spheres-Spheres-Black-Agate-31-393g-65mm-4.webp?v=1765515988"}},"requires_selling_plan":false,"selling_plan_allocations":[]},{"id":45941099069611,"title":"Black Agate \/ 32 295g 59mm","option1":"Black Agate","option2":"32 295g 59mm","option3":null,"sku":"1005009552901251-32 295g 59mm","requires_shipping":true,"taxable":true,"featured_image":{"id":40921464340651,"product_id":8603309244587,"position":17,"created_at":"2025-12-09T14:38:21-05:00","updated_at":"2025-12-12T00:06:47-05:00","alt":"Black Agate Crystal Spheres-Spheres-Crystal Destiny-Black Agate-32 295g 59mm-Crystal Destiny","width":1000,"height":1000,"src":"\/\/crystaldestiny.com\/cdn\/shop\/files\/Black-Agate-Crystal-Spheres-Spheres-Black-Agate-32-295g-59mm-17.webp?v=1765516007","variant_ids":[45941099069611]},"available":true,"name":"Black Agate Crystal Spheres - Black Agate \/ 32 295g 59mm","public_title":"Black Agate \/ 32 295g 59mm","options":["Black Agate","32 295g 59mm"],"price":11999,"weight":400,"compare_at_price":0,"inventory_management":"shopify","barcode":null,"featured_media":{"alt":"Black Agate Crystal Spheres-Spheres-Crystal Destiny-Black Agate-32 295g 59mm-Crystal Destiny","id":32289033846955,"position":17,"preview_image":{"aspect_ratio":1.0,"height":1000,"width":1000,"src":"\/\/crystaldestiny.com\/cdn\/shop\/files\/Black-Agate-Crystal-Spheres-Spheres-Black-Agate-32-295g-59mm-17.webp?v=1765516007"}},"requires_selling_plan":false,"selling_plan_allocations":[]},{"id":45941099036843,"title":"Black Agate \/ 33 247g 56mm","option1":"Black Agate","option2":"33 247g 56mm","option3":null,"sku":"1005009552901251-33 247g 56mm","requires_shipping":true,"taxable":true,"featured_image":{"id":40921464045739,"product_id":8603309244587,"position":8,"created_at":"2025-12-09T14:38:21-05:00","updated_at":"2025-12-12T00:06:34-05:00","alt":"Black Agate Crystal Spheres-Spheres-Crystal Destiny-Black Agate-33 247g 56mm-Crystal Destiny","width":1000,"height":1000,"src":"\/\/crystaldestiny.com\/cdn\/shop\/files\/Black-Agate-Crystal-Spheres-Spheres-Black-Agate-33-247g-56mm-8.webp?v=1765515994","variant_ids":[45941099036843]},"available":true,"name":"Black Agate Crystal Spheres - Black Agate \/ 33 247g 56mm","public_title":"Black Agate \/ 33 247g 56mm","options":["Black Agate","33 247g 56mm"],"price":9699,"weight":400,"compare_at_price":0,"inventory_management":"shopify","barcode":null,"featured_media":{"alt":"Black Agate Crystal Spheres-Spheres-Crystal Destiny-Black Agate-33 247g 56mm-Crystal Destiny","id":32289033552043,"position":8,"preview_image":{"aspect_ratio":1.0,"height":1000,"width":1000,"src":"\/\/crystaldestiny.com\/cdn\/shop\/files\/Black-Agate-Crystal-Spheres-Spheres-Black-Agate-33-247g-56mm-8.webp?v=1765515994"}},"requires_selling_plan":false,"selling_plan_allocations":[]},{"id":45941099004075,"title":"Black Agate \/ 34 295g 59mm","option1":"Black Agate","option2":"34 295g 59mm","option3":null,"sku":"1005009552901251-34 295g 59mm","requires_shipping":true,"taxable":true,"featured_image":{"id":40921464275115,"product_id":8603309244587,"position":15,"created_at":"2025-12-09T14:38:21-05:00","updated_at":"2025-12-12T00:06:44-05:00","alt":"Black Agate Crystal Spheres-Spheres-Crystal Destiny-Black Agate-34 295g 59mm-Crystal Destiny","width":1000,"height":1000,"src":"\/\/crystaldestiny.com\/cdn\/shop\/files\/Black-Agate-Crystal-Spheres-Spheres-Black-Agate-34-295g-59mm-15.webp?v=1765516004","variant_ids":[45941099004075]},"available":true,"name":"Black Agate Crystal Spheres - Black Agate \/ 34 295g 59mm","public_title":"Black Agate \/ 34 295g 59mm","options":["Black Agate","34 295g 59mm"],"price":11599,"weight":400,"compare_at_price":0,"inventory_management":"shopify","barcode":null,"featured_media":{"alt":"Black Agate Crystal Spheres-Spheres-Crystal Destiny-Black Agate-34 295g 59mm-Crystal Destiny","id":32289033781419,"position":15,"preview_image":{"aspect_ratio":1.0,"height":1000,"width":1000,"src":"\/\/crystaldestiny.com\/cdn\/shop\/files\/Black-Agate-Crystal-Spheres-Spheres-Black-Agate-34-295g-59mm-15.webp?v=1765516004"}},"requires_selling_plan":false,"selling_plan_allocations":[]},{"id":45941098971307,"title":"Black Agate \/ 35 279g 58mm","option1":"Black Agate","option2":"35 279g 58mm","option3":null,"sku":"1005009552901251-35 279g 58mm","requires_shipping":true,"taxable":true,"featured_image":{"id":40921464996011,"product_id":8603309244587,"position":37,"created_at":"2025-12-09T14:38:21-05:00","updated_at":"2025-12-12T00:07:16-05:00","alt":"Black Agate Crystal Spheres-Spheres-Crystal Destiny-Black Agate-35 279g 58mm-Crystal Destiny","width":1000,"height":1000,"src":"\/\/crystaldestiny.com\/cdn\/shop\/files\/Black-Agate-Crystal-Spheres-Spheres-Black-Agate-35-279g-58mm-37.webp?v=1765516036","variant_ids":[45941098971307]},"available":true,"name":"Black Agate Crystal Spheres - Black Agate \/ 35 279g 58mm","public_title":"Black Agate \/ 35 279g 58mm","options":["Black Agate","35 279g 58mm"],"price":10899,"weight":400,"compare_at_price":0,"inventory_management":"shopify","barcode":null,"featured_media":{"alt":"Black Agate Crystal Spheres-Spheres-Crystal Destiny-Black Agate-35 279g 58mm-Crystal Destiny","id":32289034502315,"position":37,"preview_image":{"aspect_ratio":1.0,"height":1000,"width":1000,"src":"\/\/crystaldestiny.com\/cdn\/shop\/files\/Black-Agate-Crystal-Spheres-Spheres-Black-Agate-35-279g-58mm-37.webp?v=1765516036"}},"requires_selling_plan":false,"selling_plan_allocations":[]},{"id":45941098938539,"title":"Black Agate \/ 36 379g 64mm","option1":"Black Agate","option2":"36 379g 64mm","option3":null,"sku":"1005009552901251-36 379g 64mm","requires_shipping":true,"taxable":true,"featured_image":{"id":40921464438955,"product_id":8603309244587,"position":20,"created_at":"2025-12-09T14:38:21-05:00","updated_at":"2025-12-12T00:06:51-05:00","alt":"Black Agate Crystal Spheres-Spheres-Crystal Destiny-Black Agate-36 379g 64mm-Crystal Destiny","width":1000,"height":1000,"src":"\/\/crystaldestiny.com\/cdn\/shop\/files\/Black-Agate-Crystal-Spheres-Spheres-Black-Agate-36-379g-64mm-20.webp?v=1765516011","variant_ids":[45941098938539]},"available":true,"name":"Black Agate Crystal Spheres - Black Agate \/ 36 379g 64mm","public_title":"Black Agate \/ 36 379g 64mm","options":["Black Agate","36 379g 64mm"],"price":14699,"weight":400,"compare_at_price":0,"inventory_management":"shopify","barcode":null,"featured_media":{"alt":"Black Agate Crystal Spheres-Spheres-Crystal Destiny-Black Agate-36 379g 64mm-Crystal Destiny","id":32289033945259,"position":20,"preview_image":{"aspect_ratio":1.0,"height":1000,"width":1000,"src":"\/\/crystaldestiny.com\/cdn\/shop\/files\/Black-Agate-Crystal-Spheres-Spheres-Black-Agate-36-379g-64mm-20.webp?v=1765516011"}},"requires_selling_plan":false,"selling_plan_allocations":[]}],"images":["\/\/crystaldestiny.com\/cdn\/shop\/files\/Black-Agate-Crystal-Spheres-Spheres.webp?v=1765515984","\/\/crystaldestiny.com\/cdn\/shop\/files\/Black-Agate-Crystal-Spheres-Spheres-2.webp?v=1765515985","\/\/crystaldestiny.com\/cdn\/shop\/files\/Black-Agate-Crystal-Spheres-Spheres-Black-Agate-18-246g-56mm-3.webp?v=1765515987","\/\/crystaldestiny.com\/cdn\/shop\/files\/Black-Agate-Crystal-Spheres-Spheres-Black-Agate-31-393g-65mm-4.webp?v=1765515988","\/\/crystaldestiny.com\/cdn\/shop\/files\/Black-Agate-Crystal-Spheres-Spheres-Black-Agate-29-362g-63mm-5.webp?v=1765515990","\/\/crystaldestiny.com\/cdn\/shop\/files\/Black-Agate-Crystal-Spheres-Spheres-Black-Agate-28-250g-56mm-6.webp?v=1765515991","\/\/crystaldestiny.com\/cdn\/shop\/files\/Black-Agate-Crystal-Spheres-Spheres-Black-Agate-26-264g-57mm-7.webp?v=1765515993","\/\/crystaldestiny.com\/cdn\/shop\/files\/Black-Agate-Crystal-Spheres-Spheres-Black-Agate-33-247g-56mm-8.webp?v=1765515994","\/\/crystaldestiny.com\/cdn\/shop\/files\/Black-Agate-Crystal-Spheres-Spheres-Black-Agate-5-218g-53mm-9.webp?v=1765515995","\/\/crystaldestiny.com\/cdn\/shop\/files\/Black-Agate-Crystal-Spheres-Spheres-Black-Agate-4-234g-55mm-10.webp?v=1765515997","\/\/crystaldestiny.com\/cdn\/shop\/files\/Black-Agate-Crystal-Spheres-Spheres-Black-Agate-2-211g-53mm-11.webp?v=1765515998","\/\/crystaldestiny.com\/cdn\/shop\/files\/Black-Agate-Crystal-Spheres-Spheres-Black-Agate-9-188g-51mm-12.webp?v=1765516000","\/\/crystaldestiny.com\/cdn\/shop\/files\/Black-Agate-Crystal-Spheres-Spheres-Black-Agate-30-290g-59mm-13.webp?v=1765516001","\/\/crystaldestiny.com\/cdn\/shop\/files\/Black-Agate-Crystal-Spheres-Spheres-Black-Agate-27-310g-60mm-14.webp?v=1765516003","\/\/crystaldestiny.com\/cdn\/shop\/files\/Black-Agate-Crystal-Spheres-Spheres-Black-Agate-34-295g-59mm-15.webp?v=1765516004","\/\/crystaldestiny.com\/cdn\/shop\/files\/Black-Agate-Crystal-Spheres-Spheres-Black-Agate-3-207g-53mm-16.webp?v=1765516006","\/\/crystaldestiny.com\/cdn\/shop\/files\/Black-Agate-Crystal-Spheres-Spheres-Black-Agate-32-295g-59mm-17.webp?v=1765516007","\/\/crystaldestiny.com\/cdn\/shop\/files\/Black-Agate-Crystal-Spheres-Spheres-Black-Agate-1-238g-55mm-18.webp?v=1765516008","\/\/crystaldestiny.com\/cdn\/shop\/files\/Black-Agate-Crystal-Spheres-Spheres-Black-Agate-21-229g-54mm-19.webp?v=1765516010","\/\/crystaldestiny.com\/cdn\/shop\/files\/Black-Agate-Crystal-Spheres-Spheres-Black-Agate-36-379g-64mm-20.webp?v=1765516011","\/\/crystaldestiny.com\/cdn\/shop\/files\/Black-Agate-Crystal-Spheres-Spheres-Black-Agate-6-247g-56mm-21.webp?v=1765516012","\/\/crystaldestiny.com\/cdn\/shop\/files\/Black-Agate-Crystal-Spheres-Spheres-Black-Agate-14-195g-51mm-22.webp?v=1765516014","\/\/crystaldestiny.com\/cdn\/shop\/files\/Black-Agate-Crystal-Spheres-Spheres-Black-Agate-11-156g-48mm-23.webp?v=1765516015","\/\/crystaldestiny.com\/cdn\/shop\/files\/Black-Agate-Crystal-Spheres-Spheres-Black-Agate-22-244g-55mm-24.webp?v=1765516016","\/\/crystaldestiny.com\/cdn\/shop\/files\/Black-Agate-Crystal-Spheres-Spheres-Black-Agate-17-225g-54mm-25.webp?v=1765516018","\/\/crystaldestiny.com\/cdn\/shop\/files\/Black-Agate-Crystal-Spheres-Spheres-Black-Agate-24-264g-57mm-26.webp?v=1765516020","\/\/crystaldestiny.com\/cdn\/shop\/files\/Black-Agate-Crystal-Spheres-Spheres-Black-Agate-13-203g-52mm-27.webp?v=1765516021","\/\/crystaldestiny.com\/cdn\/shop\/files\/Black-Agate-Crystal-Spheres-Spheres-Black-Agate-8-201g-52mm-28.webp?v=1765516023","\/\/crystaldestiny.com\/cdn\/shop\/files\/Black-Agate-Crystal-Spheres-Spheres-Black-Agate-16-243g-55mm-29.webp?v=1765516024","\/\/crystaldestiny.com\/cdn\/shop\/files\/Black-Agate-Crystal-Spheres-Spheres-Black-Agate-7-202g-52mm-30.webp?v=1765516026","\/\/crystaldestiny.com\/cdn\/shop\/files\/Black-Agate-Crystal-Spheres-Spheres-Black-Agate-15-230g-54mm-31.webp?v=1765516027","\/\/crystaldestiny.com\/cdn\/shop\/files\/Black-Agate-Crystal-Spheres-Spheres-Black-Agate-10-236g-54mm-32.webp?v=1765516028","\/\/crystaldestiny.com\/cdn\/shop\/files\/Black-Agate-Crystal-Spheres-Spheres-Black-Agate-23-315g-60mm-33.webp?v=1765516030","\/\/crystaldestiny.com\/cdn\/shop\/files\/Black-Agate-Crystal-Spheres-Spheres-Black-Agate-20-237g-55mm-34.webp?v=1765516031","\/\/crystaldestiny.com\/cdn\/shop\/files\/Black-Agate-Crystal-Spheres-Spheres-Black-Agate-19-188g-51mm-35.webp?v=1765516033","\/\/crystaldestiny.com\/cdn\/shop\/files\/Black-Agate-Crystal-Spheres-Spheres-Black-Agate-25-272g-59mm-36.webp?v=1765516034","\/\/crystaldestiny.com\/cdn\/shop\/files\/Black-Agate-Crystal-Spheres-Spheres-Black-Agate-35-279g-58mm-37.webp?v=1765516036","\/\/crystaldestiny.com\/cdn\/shop\/files\/Black-Agate-Crystal-Spheres-Spheres-Black-Agate-12-222g-54mm-38.webp?v=1765516037"],"featured_image":"\/\/crystaldestiny.com\/cdn\/shop\/files\/Black-Agate-Crystal-Spheres-Spheres.webp?v=1765515984","options":["Material","Size"],"media":[{"alt":"Black Agate Crystal Spheres-Spheres-Crystal Destiny-Black Agate-1 238g 55mm-Crystal Destiny","id":32289033322667,"position":1,"preview_image":{"aspect_ratio":1.0,"height":1000,"width":1000,"src":"\/\/crystaldestiny.com\/cdn\/shop\/files\/Black-Agate-Crystal-Spheres-Spheres.webp?v=1765515984"},"aspect_ratio":1.0,"height":1000,"media_type":"image","src":"\/\/crystaldestiny.com\/cdn\/shop\/files\/Black-Agate-Crystal-Spheres-Spheres.webp?v=1765515984","width":1000},{"alt":"Black Agate Crystal Spheres-Spheres-Crystal Destiny-Black Agate-1 238g 55mm-Crystal Destiny","id":32289033355435,"position":2,"preview_image":{"aspect_ratio":1.0,"height":1000,"width":1000,"src":"\/\/crystaldestiny.com\/cdn\/shop\/files\/Black-Agate-Crystal-Spheres-Spheres-2.webp?v=1765515985"},"aspect_ratio":1.0,"height":1000,"media_type":"image","src":"\/\/crystaldestiny.com\/cdn\/shop\/files\/Black-Agate-Crystal-Spheres-Spheres-2.webp?v=1765515985","width":1000},{"alt":"Black Agate Crystal Spheres-Spheres-Crystal Destiny-Black Agate-18 246g 56mm-Crystal Destiny","id":32289033388203,"position":3,"preview_image":{"aspect_ratio":1.0,"height":1000,"width":1000,"src":"\/\/crystaldestiny.com\/cdn\/shop\/files\/Black-Agate-Crystal-Spheres-Spheres-Black-Agate-18-246g-56mm-3.webp?v=1765515987"},"aspect_ratio":1.0,"height":1000,"media_type":"image","src":"\/\/crystaldestiny.com\/cdn\/shop\/files\/Black-Agate-Crystal-Spheres-Spheres-Black-Agate-18-246g-56mm-3.webp?v=1765515987","width":1000},{"alt":"Black Agate Crystal Spheres-Spheres-Crystal Destiny-Black Agate-31 393g 65mm-Crystal Destiny","id":32289033420971,"position":4,"preview_image":{"aspect_ratio":1.0,"height":1000,"width":1000,"src":"\/\/crystaldestiny.com\/cdn\/shop\/files\/Black-Agate-Crystal-Spheres-Spheres-Black-Agate-31-393g-65mm-4.webp?v=1765515988"},"aspect_ratio":1.0,"height":1000,"media_type":"image","src":"\/\/crystaldestiny.com\/cdn\/shop\/files\/Black-Agate-Crystal-Spheres-Spheres-Black-Agate-31-393g-65mm-4.webp?v=1765515988","width":1000},{"alt":"Black Agate Crystal Spheres-Spheres-Crystal Destiny-Black Agate-29 362g 63mm-Crystal Destiny","id":32289033453739,"position":5,"preview_image":{"aspect_ratio":1.0,"height":1000,"width":1000,"src":"\/\/crystaldestiny.com\/cdn\/shop\/files\/Black-Agate-Crystal-Spheres-Spheres-Black-Agate-29-362g-63mm-5.webp?v=1765515990"},"aspect_ratio":1.0,"height":1000,"media_type":"image","src":"\/\/crystaldestiny.com\/cdn\/shop\/files\/Black-Agate-Crystal-Spheres-Spheres-Black-Agate-29-362g-63mm-5.webp?v=1765515990","width":1000},{"alt":"Black Agate Crystal Spheres-Spheres-Crystal Destiny-Black Agate-28 250g 56mm-Crystal Destiny","id":32289033486507,"position":6,"preview_image":{"aspect_ratio":1.0,"height":1000,"width":1000,"src":"\/\/crystaldestiny.com\/cdn\/shop\/files\/Black-Agate-Crystal-Spheres-Spheres-Black-Agate-28-250g-56mm-6.webp?v=1765515991"},"aspect_ratio":1.0,"height":1000,"media_type":"image","src":"\/\/crystaldestiny.com\/cdn\/shop\/files\/Black-Agate-Crystal-Spheres-Spheres-Black-Agate-28-250g-56mm-6.webp?v=1765515991","width":1000},{"alt":"Black Agate Crystal Spheres-Spheres-Crystal Destiny-Black Agate-26 264g 57mm-Crystal Destiny","id":32289033519275,"position":7,"preview_image":{"aspect_ratio":1.0,"height":1000,"width":1000,"src":"\/\/crystaldestiny.com\/cdn\/shop\/files\/Black-Agate-Crystal-Spheres-Spheres-Black-Agate-26-264g-57mm-7.webp?v=1765515993"},"aspect_ratio":1.0,"height":1000,"media_type":"image","src":"\/\/crystaldestiny.com\/cdn\/shop\/files\/Black-Agate-Crystal-Spheres-Spheres-Black-Agate-26-264g-57mm-7.webp?v=1765515993","width":1000},{"alt":"Black Agate Crystal Spheres-Spheres-Crystal Destiny-Black Agate-33 247g 56mm-Crystal Destiny","id":32289033552043,"position":8,"preview_image":{"aspect_ratio":1.0,"height":1000,"width":1000,"src":"\/\/crystaldestiny.com\/cdn\/shop\/files\/Black-Agate-Crystal-Spheres-Spheres-Black-Agate-33-247g-56mm-8.webp?v=1765515994"},"aspect_ratio":1.0,"height":1000,"media_type":"image","src":"\/\/crystaldestiny.com\/cdn\/shop\/files\/Black-Agate-Crystal-Spheres-Spheres-Black-Agate-33-247g-56mm-8.webp?v=1765515994","width":1000},{"alt":"Black Agate Crystal Spheres-Spheres-Crystal Destiny-Black Agate-5 218g 53mm-Crystal Destiny","id":32289033584811,"position":9,"preview_image":{"aspect_ratio":1.0,"height":1000,"width":1000,"src":"\/\/crystaldestiny.com\/cdn\/shop\/files\/Black-Agate-Crystal-Spheres-Spheres-Black-Agate-5-218g-53mm-9.webp?v=1765515995"},"aspect_ratio":1.0,"height":1000,"media_type":"image","src":"\/\/crystaldestiny.com\/cdn\/shop\/files\/Black-Agate-Crystal-Spheres-Spheres-Black-Agate-5-218g-53mm-9.webp?v=1765515995","width":1000},{"alt":"Black Agate Crystal Spheres-Spheres-Crystal Destiny-Black Agate-4 234g 55mm-Crystal Destiny","id":32289033617579,"position":10,"preview_image":{"aspect_ratio":1.0,"height":1000,"width":1000,"src":"\/\/crystaldestiny.com\/cdn\/shop\/files\/Black-Agate-Crystal-Spheres-Spheres-Black-Agate-4-234g-55mm-10.webp?v=1765515997"},"aspect_ratio":1.0,"height":1000,"media_type":"image","src":"\/\/crystaldestiny.com\/cdn\/shop\/files\/Black-Agate-Crystal-Spheres-Spheres-Black-Agate-4-234g-55mm-10.webp?v=1765515997","width":1000},{"alt":"Black Agate Crystal Spheres-Spheres-Crystal Destiny-Black Agate-2 211g 53mm-Crystal Destiny","id":32289033650347,"position":11,"preview_image":{"aspect_ratio":1.0,"height":1000,"width":1000,"src":"\/\/crystaldestiny.com\/cdn\/shop\/files\/Black-Agate-Crystal-Spheres-Spheres-Black-Agate-2-211g-53mm-11.webp?v=1765515998"},"aspect_ratio":1.0,"height":1000,"media_type":"image","src":"\/\/crystaldestiny.com\/cdn\/shop\/files\/Black-Agate-Crystal-Spheres-Spheres-Black-Agate-2-211g-53mm-11.webp?v=1765515998","width":1000},{"alt":"Black Agate Crystal Spheres-Spheres-Crystal Destiny-Black Agate-9 188g 51mm-Crystal Destiny","id":32289033683115,"position":12,"preview_image":{"aspect_ratio":1.0,"height":1000,"width":1000,"src":"\/\/crystaldestiny.com\/cdn\/shop\/files\/Black-Agate-Crystal-Spheres-Spheres-Black-Agate-9-188g-51mm-12.webp?v=1765516000"},"aspect_ratio":1.0,"height":1000,"media_type":"image","src":"\/\/crystaldestiny.com\/cdn\/shop\/files\/Black-Agate-Crystal-Spheres-Spheres-Black-Agate-9-188g-51mm-12.webp?v=1765516000","width":1000},{"alt":"Black Agate Crystal Spheres-Spheres-Crystal Destiny-Black Agate-30 290g 59mm-Crystal Destiny","id":32289033715883,"position":13,"preview_image":{"aspect_ratio":1.0,"height":1000,"width":1000,"src":"\/\/crystaldestiny.com\/cdn\/shop\/files\/Black-Agate-Crystal-Spheres-Spheres-Black-Agate-30-290g-59mm-13.webp?v=1765516001"},"aspect_ratio":1.0,"height":1000,"media_type":"image","src":"\/\/crystaldestiny.com\/cdn\/shop\/files\/Black-Agate-Crystal-Spheres-Spheres-Black-Agate-30-290g-59mm-13.webp?v=1765516001","width":1000},{"alt":"Black Agate Crystal Spheres-Spheres-Crystal Destiny-Black Agate-27 310g 60mm-Crystal Destiny","id":32289033748651,"position":14,"preview_image":{"aspect_ratio":1.0,"height":1000,"width":1000,"src":"\/\/crystaldestiny.com\/cdn\/shop\/files\/Black-Agate-Crystal-Spheres-Spheres-Black-Agate-27-310g-60mm-14.webp?v=1765516003"},"aspect_ratio":1.0,"height":1000,"media_type":"image","src":"\/\/crystaldestiny.com\/cdn\/shop\/files\/Black-Agate-Crystal-Spheres-Spheres-Black-Agate-27-310g-60mm-14.webp?v=1765516003","width":1000},{"alt":"Black Agate Crystal Spheres-Spheres-Crystal Destiny-Black Agate-34 295g 59mm-Crystal Destiny","id":32289033781419,"position":15,"preview_image":{"aspect_ratio":1.0,"height":1000,"width":1000,"src":"\/\/crystaldestiny.com\/cdn\/shop\/files\/Black-Agate-Crystal-Spheres-Spheres-Black-Agate-34-295g-59mm-15.webp?v=1765516004"},"aspect_ratio":1.0,"height":1000,"media_type":"image","src":"\/\/crystaldestiny.com\/cdn\/shop\/files\/Black-Agate-Crystal-Spheres-Spheres-Black-Agate-34-295g-59mm-15.webp?v=1765516004","width":1000},{"alt":"Black Agate Crystal Spheres-Spheres-Crystal Destiny-Black Agate-3 207g 53mm-Crystal Destiny","id":32289033814187,"position":16,"preview_image":{"aspect_ratio":1.0,"height":1000,"width":1000,"src":"\/\/crystaldestiny.com\/cdn\/shop\/files\/Black-Agate-Crystal-Spheres-Spheres-Black-Agate-3-207g-53mm-16.webp?v=1765516006"},"aspect_ratio":1.0,"height":1000,"media_type":"image","src":"\/\/crystaldestiny.com\/cdn\/shop\/files\/Black-Agate-Crystal-Spheres-Spheres-Black-Agate-3-207g-53mm-16.webp?v=1765516006","width":1000},{"alt":"Black Agate Crystal Spheres-Spheres-Crystal Destiny-Black Agate-32 295g 59mm-Crystal Destiny","id":32289033846955,"position":17,"preview_image":{"aspect_ratio":1.0,"height":1000,"width":1000,"src":"\/\/crystaldestiny.com\/cdn\/shop\/files\/Black-Agate-Crystal-Spheres-Spheres-Black-Agate-32-295g-59mm-17.webp?v=1765516007"},"aspect_ratio":1.0,"height":1000,"media_type":"image","src":"\/\/crystaldestiny.com\/cdn\/shop\/files\/Black-Agate-Crystal-Spheres-Spheres-Black-Agate-32-295g-59mm-17.webp?v=1765516007","width":1000},{"alt":"Black Agate Crystal Spheres-Spheres-Crystal Destiny-Black Agate-1 238g 55mm-Crystal Destiny","id":32289033879723,"position":18,"preview_image":{"aspect_ratio":1.0,"height":1000,"width":1000,"src":"\/\/crystaldestiny.com\/cdn\/shop\/files\/Black-Agate-Crystal-Spheres-Spheres-Black-Agate-1-238g-55mm-18.webp?v=1765516008"},"aspect_ratio":1.0,"height":1000,"media_type":"image","src":"\/\/crystaldestiny.com\/cdn\/shop\/files\/Black-Agate-Crystal-Spheres-Spheres-Black-Agate-1-238g-55mm-18.webp?v=1765516008","width":1000},{"alt":"Black Agate Crystal Spheres-Spheres-Crystal Destiny-Black Agate-21 229g 54mm-Crystal Destiny","id":32289033912491,"position":19,"preview_image":{"aspect_ratio":1.0,"height":1000,"width":1000,"src":"\/\/crystaldestiny.com\/cdn\/shop\/files\/Black-Agate-Crystal-Spheres-Spheres-Black-Agate-21-229g-54mm-19.webp?v=1765516010"},"aspect_ratio":1.0,"height":1000,"media_type":"image","src":"\/\/crystaldestiny.com\/cdn\/shop\/files\/Black-Agate-Crystal-Spheres-Spheres-Black-Agate-21-229g-54mm-19.webp?v=1765516010","width":1000},{"alt":"Black Agate Crystal Spheres-Spheres-Crystal Destiny-Black Agate-36 379g 64mm-Crystal Destiny","id":32289033945259,"position":20,"preview_image":{"aspect_ratio":1.0,"height":1000,"width":1000,"src":"\/\/crystaldestiny.com\/cdn\/shop\/files\/Black-Agate-Crystal-Spheres-Spheres-Black-Agate-36-379g-64mm-20.webp?v=1765516011"},"aspect_ratio":1.0,"height":1000,"media_type":"image","src":"\/\/crystaldestiny.com\/cdn\/shop\/files\/Black-Agate-Crystal-Spheres-Spheres-Black-Agate-36-379g-64mm-20.webp?v=1765516011","width":1000},{"alt":"Black Agate Crystal Spheres-Spheres-Crystal Destiny-Black Agate-6 247g 56mm-Crystal Destiny","id":32289033978027,"position":21,"preview_image":{"aspect_ratio":1.0,"height":1000,"width":1000,"src":"\/\/crystaldestiny.com\/cdn\/shop\/files\/Black-Agate-Crystal-Spheres-Spheres-Black-Agate-6-247g-56mm-21.webp?v=1765516012"},"aspect_ratio":1.0,"height":1000,"media_type":"image","src":"\/\/crystaldestiny.com\/cdn\/shop\/files\/Black-Agate-Crystal-Spheres-Spheres-Black-Agate-6-247g-56mm-21.webp?v=1765516012","width":1000},{"alt":"Black Agate Crystal Spheres-Spheres-Crystal Destiny-Black Agate-14 195g 51mm-Crystal Destiny","id":32289034010795,"position":22,"preview_image":{"aspect_ratio":1.0,"height":1000,"width":1000,"src":"\/\/crystaldestiny.com\/cdn\/shop\/files\/Black-Agate-Crystal-Spheres-Spheres-Black-Agate-14-195g-51mm-22.webp?v=1765516014"},"aspect_ratio":1.0,"height":1000,"media_type":"image","src":"\/\/crystaldestiny.com\/cdn\/shop\/files\/Black-Agate-Crystal-Spheres-Spheres-Black-Agate-14-195g-51mm-22.webp?v=1765516014","width":1000},{"alt":"Black Agate Crystal Spheres-Spheres-Crystal Destiny-Black Agate-11 156g 48mm-Crystal Destiny","id":32289034043563,"position":23,"preview_image":{"aspect_ratio":1.0,"height":1000,"width":1000,"src":"\/\/crystaldestiny.com\/cdn\/shop\/files\/Black-Agate-Crystal-Spheres-Spheres-Black-Agate-11-156g-48mm-23.webp?v=1765516015"},"aspect_ratio":1.0,"height":1000,"media_type":"image","src":"\/\/crystaldestiny.com\/cdn\/shop\/files\/Black-Agate-Crystal-Spheres-Spheres-Black-Agate-11-156g-48mm-23.webp?v=1765516015","width":1000},{"alt":"Black Agate Crystal Spheres-Spheres-Crystal Destiny-Black Agate-22 244g 55mm-Crystal Destiny","id":32289034076331,"position":24,"preview_image":{"aspect_ratio":1.0,"height":1000,"width":1000,"src":"\/\/crystaldestiny.com\/cdn\/shop\/files\/Black-Agate-Crystal-Spheres-Spheres-Black-Agate-22-244g-55mm-24.webp?v=1765516016"},"aspect_ratio":1.0,"height":1000,"media_type":"image","src":"\/\/crystaldestiny.com\/cdn\/shop\/files\/Black-Agate-Crystal-Spheres-Spheres-Black-Agate-22-244g-55mm-24.webp?v=1765516016","width":1000},{"alt":"Black Agate Crystal Spheres-Spheres-Crystal Destiny-Black Agate-17 225g 54mm-Crystal Destiny","id":32289034109099,"position":25,"preview_image":{"aspect_ratio":1.0,"height":1000,"width":1000,"src":"\/\/crystaldestiny.com\/cdn\/shop\/files\/Black-Agate-Crystal-Spheres-Spheres-Black-Agate-17-225g-54mm-25.webp?v=1765516018"},"aspect_ratio":1.0,"height":1000,"media_type":"image","src":"\/\/crystaldestiny.com\/cdn\/shop\/files\/Black-Agate-Crystal-Spheres-Spheres-Black-Agate-17-225g-54mm-25.webp?v=1765516018","width":1000},{"alt":"Black Agate Crystal Spheres-Spheres-Crystal Destiny-Black Agate-24 264g 57mm-Crystal Destiny","id":32289034141867,"position":26,"preview_image":{"aspect_ratio":1.0,"height":1000,"width":1000,"src":"\/\/crystaldestiny.com\/cdn\/shop\/files\/Black-Agate-Crystal-Spheres-Spheres-Black-Agate-24-264g-57mm-26.webp?v=1765516020"},"aspect_ratio":1.0,"height":1000,"media_type":"image","src":"\/\/crystaldestiny.com\/cdn\/shop\/files\/Black-Agate-Crystal-Spheres-Spheres-Black-Agate-24-264g-57mm-26.webp?v=1765516020","width":1000},{"alt":"Black Agate Crystal Spheres-Spheres-Crystal Destiny-Black Agate-13 203g 52mm-Crystal Destiny","id":32289034174635,"position":27,"preview_image":{"aspect_ratio":1.0,"height":1000,"width":1000,"src":"\/\/crystaldestiny.com\/cdn\/shop\/files\/Black-Agate-Crystal-Spheres-Spheres-Black-Agate-13-203g-52mm-27.webp?v=1765516021"},"aspect_ratio":1.0,"height":1000,"media_type":"image","src":"\/\/crystaldestiny.com\/cdn\/shop\/files\/Black-Agate-Crystal-Spheres-Spheres-Black-Agate-13-203g-52mm-27.webp?v=1765516021","width":1000},{"alt":"Black Agate Crystal Spheres-Spheres-Crystal Destiny-Black Agate-8 201g 52mm-Crystal Destiny","id":32289034207403,"position":28,"preview_image":{"aspect_ratio":1.0,"height":1000,"width":1000,"src":"\/\/crystaldestiny.com\/cdn\/shop\/files\/Black-Agate-Crystal-Spheres-Spheres-Black-Agate-8-201g-52mm-28.webp?v=1765516023"},"aspect_ratio":1.0,"height":1000,"media_type":"image","src":"\/\/crystaldestiny.com\/cdn\/shop\/files\/Black-Agate-Crystal-Spheres-Spheres-Black-Agate-8-201g-52mm-28.webp?v=1765516023","width":1000},{"alt":"Black Agate Crystal Spheres-Spheres-Crystal Destiny-Black Agate-16 243g 55mm-Crystal Destiny","id":32289034240171,"position":29,"preview_image":{"aspect_ratio":1.0,"height":1000,"width":1000,"src":"\/\/crystaldestiny.com\/cdn\/shop\/files\/Black-Agate-Crystal-Spheres-Spheres-Black-Agate-16-243g-55mm-29.webp?v=1765516024"},"aspect_ratio":1.0,"height":1000,"media_type":"image","src":"\/\/crystaldestiny.com\/cdn\/shop\/files\/Black-Agate-Crystal-Spheres-Spheres-Black-Agate-16-243g-55mm-29.webp?v=1765516024","width":1000},{"alt":"Black Agate Crystal Spheres-Spheres-Crystal Destiny-Black Agate-7 202g 52mm-Crystal Destiny","id":32289034272939,"position":30,"preview_image":{"aspect_ratio":1.0,"height":1000,"width":1000,"src":"\/\/crystaldestiny.com\/cdn\/shop\/files\/Black-Agate-Crystal-Spheres-Spheres-Black-Agate-7-202g-52mm-30.webp?v=1765516026"},"aspect_ratio":1.0,"height":1000,"media_type":"image","src":"\/\/crystaldestiny.com\/cdn\/shop\/files\/Black-Agate-Crystal-Spheres-Spheres-Black-Agate-7-202g-52mm-30.webp?v=1765516026","width":1000},{"alt":"Black Agate Crystal Spheres-Spheres-Crystal Destiny-Black Agate-15 230g 54mm-Crystal Destiny","id":32289034305707,"position":31,"preview_image":{"aspect_ratio":1.0,"height":1000,"width":1000,"src":"\/\/crystaldestiny.com\/cdn\/shop\/files\/Black-Agate-Crystal-Spheres-Spheres-Black-Agate-15-230g-54mm-31.webp?v=1765516027"},"aspect_ratio":1.0,"height":1000,"media_type":"image","src":"\/\/crystaldestiny.com\/cdn\/shop\/files\/Black-Agate-Crystal-Spheres-Spheres-Black-Agate-15-230g-54mm-31.webp?v=1765516027","width":1000},{"alt":"Black Agate Crystal Spheres-Spheres-Crystal Destiny-Black Agate-10 236g 54mm-Crystal Destiny","id":32289034338475,"position":32,"preview_image":{"aspect_ratio":1.0,"height":1000,"width":1000,"src":"\/\/crystaldestiny.com\/cdn\/shop\/files\/Black-Agate-Crystal-Spheres-Spheres-Black-Agate-10-236g-54mm-32.webp?v=1765516028"},"aspect_ratio":1.0,"height":1000,"media_type":"image","src":"\/\/crystaldestiny.com\/cdn\/shop\/files\/Black-Agate-Crystal-Spheres-Spheres-Black-Agate-10-236g-54mm-32.webp?v=1765516028","width":1000},{"alt":"Black Agate Crystal Spheres-Spheres-Crystal Destiny-Black Agate-23 315g 60mm-Crystal Destiny","id":32289034371243,"position":33,"preview_image":{"aspect_ratio":1.0,"height":1000,"width":1000,"src":"\/\/crystaldestiny.com\/cdn\/shop\/files\/Black-Agate-Crystal-Spheres-Spheres-Black-Agate-23-315g-60mm-33.webp?v=1765516030"},"aspect_ratio":1.0,"height":1000,"media_type":"image","src":"\/\/crystaldestiny.com\/cdn\/shop\/files\/Black-Agate-Crystal-Spheres-Spheres-Black-Agate-23-315g-60mm-33.webp?v=1765516030","width":1000},{"alt":"Black Agate Crystal Spheres-Spheres-Crystal Destiny-Black Agate-20 237g 55mm-Crystal Destiny","id":32289034404011,"position":34,"preview_image":{"aspect_ratio":1.0,"height":1000,"width":1000,"src":"\/\/crystaldestiny.com\/cdn\/shop\/files\/Black-Agate-Crystal-Spheres-Spheres-Black-Agate-20-237g-55mm-34.webp?v=1765516031"},"aspect_ratio":1.0,"height":1000,"media_type":"image","src":"\/\/crystaldestiny.com\/cdn\/shop\/files\/Black-Agate-Crystal-Spheres-Spheres-Black-Agate-20-237g-55mm-34.webp?v=1765516031","width":1000},{"alt":"Black Agate Crystal Spheres-Spheres-Crystal Destiny-Black Agate-19 188g 51mm-Crystal Destiny","id":32289034436779,"position":35,"preview_image":{"aspect_ratio":1.0,"height":1000,"width":1000,"src":"\/\/crystaldestiny.com\/cdn\/shop\/files\/Black-Agate-Crystal-Spheres-Spheres-Black-Agate-19-188g-51mm-35.webp?v=1765516033"},"aspect_ratio":1.0,"height":1000,"media_type":"image","src":"\/\/crystaldestiny.com\/cdn\/shop\/files\/Black-Agate-Crystal-Spheres-Spheres-Black-Agate-19-188g-51mm-35.webp?v=1765516033","width":1000},{"alt":"Black Agate Crystal Spheres-Spheres-Crystal Destiny-Black Agate-25 272g 59mm-Crystal Destiny","id":32289034469547,"position":36,"preview_image":{"aspect_ratio":1.0,"height":1000,"width":1000,"src":"\/\/crystaldestiny.com\/cdn\/shop\/files\/Black-Agate-Crystal-Spheres-Spheres-Black-Agate-25-272g-59mm-36.webp?v=1765516034"},"aspect_ratio":1.0,"height":1000,"media_type":"image","src":"\/\/crystaldestiny.com\/cdn\/shop\/files\/Black-Agate-Crystal-Spheres-Spheres-Black-Agate-25-272g-59mm-36.webp?v=1765516034","width":1000},{"alt":"Black Agate Crystal Spheres-Spheres-Crystal Destiny-Black Agate-35 279g 58mm-Crystal Destiny","id":32289034502315,"position":37,"preview_image":{"aspect_ratio":1.0,"height":1000,"width":1000,"src":"\/\/crystaldestiny.com\/cdn\/shop\/files\/Black-Agate-Crystal-Spheres-Spheres-Black-Agate-35-279g-58mm-37.webp?v=1765516036"},"aspect_ratio":1.0,"height":1000,"media_type":"image","src":"\/\/crystaldestiny.com\/cdn\/shop\/files\/Black-Agate-Crystal-Spheres-Spheres-Black-Agate-35-279g-58mm-37.webp?v=1765516036","width":1000},{"alt":"Black Agate Crystal Spheres-Spheres-Crystal Destiny-Black Agate-12 222g 54mm-Crystal Destiny","id":32289034535083,"position":38,"preview_image":{"aspect_ratio":1.0,"height":1000,"width":1000,"src":"\/\/crystaldestiny.com\/cdn\/shop\/files\/Black-Agate-Crystal-Spheres-Spheres-Black-Agate-12-222g-54mm-38.webp?v=1765516037"},"aspect_ratio":1.0,"height":1000,"media_type":"image","src":"\/\/crystaldestiny.com\/cdn\/shop\/files\/Black-Agate-Crystal-Spheres-Spheres-Black-Agate-12-222g-54mm-38.webp?v=1765516037","width":1000}],"requires_selling_plan":false,"selling_plan_groups":[],"content":"\u003cp data-start=\"159\" data-end=\"473\"\u003eThese Black Agate Crystal Spheres feature a deep, glossy finish with subtle natural banding that adds depth and elegance. Each sphere is polished to a smooth, reflective surface and comes with a display base, making it a striking addition to any altar, living space, or meditation area.\u003c\/p\u003e\n\u003cp data-start=\"475\" data-end=\"769\"\u003eBlack Agate is valued for its grounding, protective, and stabilizing properties. It supports focus, emotional balance, and clarity during divination or spiritual work. Whether used for energy practices, feng shui, or simply as a bold décor piece, these spheres offer both beauty and presence.\u003c\/p\u003e\n\u003cp data-start=\"475\" data-end=\"769\"\u003eThis product is an exact pick as pictured, one of a kind.\u003c\/p\u003e"},"options":[{"name":"Material","position":1,"values":["Black Agate"]},{"name":"Size","position":2,"values":["1 238g 55mm","2 211g 53mm","3 207g 53mm","4 234g 55mm","5 218g 53mm","6 247g 56mm","7 202g 52mm","8 201g 52mm","9 188g 51mm","10 236g 54mm","11 156g 48mm","12 222g 54mm","13 203g 52mm","14 195g 51mm","15 230g 54mm","16 243g 55mm","17 225g 54mm","18 246g 56mm","19 188g 51mm","20 237g 55mm","21 229g 54mm","22 244g 55mm","23 315g 60mm","24 264g 57mm","25 272g 59mm","26 264g 57mm","27 310g 60mm","28 250g 56mm","29 362g 63mm","30 290g 59mm","31 393g 65mm","32 295g 59mm","33 247g 56mm","34 295g 59mm","35 279g 58mm","36 379g 64mm"]}],"custom_metafields":{"shipping_time":"12-16 days"},"metafields":{"badge":"\u003cdiv style='display:none' class='jdgm-prev-badge' data-average-rating='0.00' data-number-of-reviews='0' data-number-of-questions='0'\u003e \u003cspan class='jdgm-prev-badge__stars' data-score='0.00' tabindex='0' aria-label='0.00 stars' role='button'\u003e \u003cspan class='jdgm-star jdgm--off'\u003e\u003c\/span\u003e\u003cspan class='jdgm-star jdgm--off'\u003e\u003c\/span\u003e\u003cspan class='jdgm-star jdgm--off'\u003e\u003c\/span\u003e\u003cspan class='jdgm-star jdgm--off'\u003e\u003c\/span\u003e\u003cspan class='jdgm-star jdgm--off'\u003e\u003c\/span\u003e \u003c\/span\u003e \u003cspan class='jdgm-prev-badge__text'\u003e No reviews \u003c\/span\u003e \u003c\/div\u003e","widget":"\u003cdiv class='jdgm-rev-widg' data-updated-at='2025-12-11T23:44:27Z' data-average-rating='0.00' data-number-of-reviews='0' data-number-of-questions='0' data-image-url='https:\/\/cdn.shopify.com\/s\/files\/1\/0613\/0345\/5915\/files\/Natural-Black-Agate-Mineral-Quartz-Ball-Aura-Treatment-Witchcraft-Chakra-Divination-Energy-Home-Feng-Shui-Decorative-GiftBase.webp?v=1765383223'\u003e \u003cstyle class='jdgm-temp-hiding-style'\u003e.jdgm-rev-widg{ display: none }\u003c\/style\u003e \u003cdiv class='jdgm-rev-widg__header'\u003e \u003ch2 class='jdgm-rev-widg__title'\u003eCustomer Reviews\u003c\/h2\u003e \u003cdiv class='jdgm-rev-widg__summary'\u003e \u003cdiv class='jdgm-rev-widg__summary-stars' aria-label='Average rating is 0.00 stars' role='img'\u003e \u003cspan class='jdgm-star jdgm--off'\u003e\u003c\/span\u003e\u003cspan class='jdgm-star jdgm--off'\u003e\u003c\/span\u003e\u003cspan class='jdgm-star jdgm--off'\u003e\u003c\/span\u003e\u003cspan class='jdgm-star jdgm--off'\u003e\u003c\/span\u003e\u003cspan class='jdgm-star jdgm--off'\u003e\u003c\/span\u003e \u003c\/div\u003e \u003cdiv class='jdgm-rev-widg__summary-text'\u003eBe the first to write a review\u003c\/div\u003e \u003c\/div\u003e \u003ca style='display: none' href='#' class='jdgm-write-rev-link' role='button'\u003eWrite a review\u003c\/a\u003e \u003cdiv class='jdgm-histogram jdgm-temp-hidden'\u003e \u003cdiv class='jdgm-histogram__row' data-rating='5' data-frequency='0' data-percentage='0'\u003e \u003cdiv class='jdgm-histogram__star' role='button' aria-label=\"0% (0) reviews with 5 star rating\" tabindex='0' \u003e\u003cspan class='jdgm-star jdgm--on'\u003e\u003c\/span\u003e\u003cspan class='jdgm-star jdgm--on'\u003e\u003c\/span\u003e\u003cspan class='jdgm-star jdgm--on'\u003e\u003c\/span\u003e\u003cspan class='jdgm-star jdgm--on'\u003e\u003c\/span\u003e\u003cspan class='jdgm-star jdgm--on'\u003e\u003c\/span\u003e\u003c\/div\u003e \u003cdiv class='jdgm-histogram__bar'\u003e \u003cdiv class='jdgm-histogram__bar-content' style='width: 0%;'\u003e \u003c\/div\u003e \u003c\/div\u003e \u003cdiv class='jdgm-histogram__percentage'\u003e0%\u003c\/div\u003e \u003cdiv class='jdgm-histogram__frequency'\u003e(0)\u003c\/div\u003e \u003c\/div\u003e \u003cdiv class='jdgm-histogram__row' data-rating='4' data-frequency='0' data-percentage='0'\u003e \u003cdiv class='jdgm-histogram__star' role='button' aria-label=\"0% (0) reviews with 4 star rating\" tabindex='0' \u003e\u003cspan class='jdgm-star jdgm--on'\u003e\u003c\/span\u003e\u003cspan class='jdgm-star jdgm--on'\u003e\u003c\/span\u003e\u003cspan class='jdgm-star jdgm--on'\u003e\u003c\/span\u003e\u003cspan class='jdgm-star jdgm--on'\u003e\u003c\/span\u003e\u003cspan class='jdgm-star jdgm--off'\u003e\u003c\/span\u003e\u003c\/div\u003e \u003cdiv class='jdgm-histogram__bar'\u003e \u003cdiv class='jdgm-histogram__bar-content' style='width: 0%;'\u003e \u003c\/div\u003e \u003c\/div\u003e \u003cdiv class='jdgm-histogram__percentage'\u003e0%\u003c\/div\u003e \u003cdiv class='jdgm-histogram__frequency'\u003e(0)\u003c\/div\u003e \u003c\/div\u003e \u003cdiv class='jdgm-histogram__row' data-rating='3' data-frequency='0' data-percentage='0'\u003e \u003cdiv class='jdgm-histogram__star' role='button' aria-label=\"0% (0) reviews with 3 star rating\" tabindex='0' \u003e\u003cspan class='jdgm-star jdgm--on'\u003e\u003c\/span\u003e\u003cspan class='jdgm-star jdgm--on'\u003e\u003c\/span\u003e\u003cspan class='jdgm-star jdgm--on'\u003e\u003c\/span\u003e\u003cspan class='jdgm-star jdgm--off'\u003e\u003c\/span\u003e\u003cspan class='jdgm-star jdgm--off'\u003e\u003c\/span\u003e\u003c\/div\u003e \u003cdiv class='jdgm-histogram__bar'\u003e \u003cdiv class='jdgm-histogram__bar-content' style='width: 0%;'\u003e \u003c\/div\u003e \u003c\/div\u003e \u003cdiv class='jdgm-histogram__percentage'\u003e0%\u003c\/div\u003e \u003cdiv class='jdgm-histogram__frequency'\u003e(0)\u003c\/div\u003e \u003c\/div\u003e \u003cdiv class='jdgm-histogram__row' data-rating='2' data-frequency='0' data-percentage='0'\u003e \u003cdiv class='jdgm-histogram__star' role='button' aria-label=\"0% (0) reviews with 2 star rating\" tabindex='0' \u003e\u003cspan class='jdgm-star jdgm--on'\u003e\u003c\/span\u003e\u003cspan class='jdgm-star jdgm--on'\u003e\u003c\/span\u003e\u003cspan class='jdgm-star jdgm--off'\u003e\u003c\/span\u003e\u003cspan class='jdgm-star jdgm--off'\u003e\u003c\/span\u003e\u003cspan class='jdgm-star jdgm--off'\u003e\u003c\/span\u003e\u003c\/div\u003e \u003cdiv class='jdgm-histogram__bar'\u003e \u003cdiv class='jdgm-histogram__bar-content' style='width: 0%;'\u003e \u003c\/div\u003e \u003c\/div\u003e \u003cdiv class='jdgm-histogram__percentage'\u003e0%\u003c\/div\u003e \u003cdiv class='jdgm-histogram__frequency'\u003e(0)\u003c\/div\u003e \u003c\/div\u003e \u003cdiv class='jdgm-histogram__row' data-rating='1' data-frequency='0' data-percentage='0'\u003e \u003cdiv class='jdgm-histogram__star' role='button' aria-label=\"0% (0) reviews with 1 star rating\" tabindex='0' \u003e\u003cspan class='jdgm-star jdgm--on'\u003e\u003c\/span\u003e\u003cspan class='jdgm-star jdgm--off'\u003e\u003c\/span\u003e\u003cspan class='jdgm-star jdgm--off'\u003e\u003c\/span\u003e\u003cspan class='jdgm-star jdgm--off'\u003e\u003c\/span\u003e\u003cspan class='jdgm-star jdgm--off'\u003e\u003c\/span\u003e\u003c\/div\u003e \u003cdiv class='jdgm-histogram__bar'\u003e \u003cdiv class='jdgm-histogram__bar-content' style='width: 0%;'\u003e \u003c\/div\u003e \u003c\/div\u003e \u003cdiv class='jdgm-histogram__percentage'\u003e0%\u003c\/div\u003e \u003cdiv class='jdgm-histogram__frequency'\u003e(0)\u003c\/div\u003e \u003c\/div\u003e \u003cdiv class='jdgm-histogram__row jdgm-histogram__clear-filter' data-rating=null tabindex='0'\u003e\u003c\/div\u003e \u003c\/div\u003e \u003cdiv class='jdgm-rev-widg__sort-wrapper'\u003e\u003c\/div\u003e \u003c\/div\u003e \u003cdiv class='jdgm-rev-widg__body'\u003e \u003cdiv class='jdgm-rev-widg__reviews'\u003e\u003c\/div\u003e \u003cdiv class='jdgm-paginate' data-per-page='4' data-url='https:\/\/api.judge.me\/reviews\/reviews_for_widget' style=\"display: none;\"\u003e\u003c\/div\u003e \u003c\/div\u003e \u003cdiv class='jdgm-rev-widg__paginate-spinner-wrapper'\u003e \u003cdiv class='jdgm-spinner'\u003e\u003c\/div\u003e \u003c\/div\u003e \u003c\/div\u003e"},"collections":[{"id":294880051371,"handle":"crystals","title":"Crystals","updated_at":"2026-01-07T23:43:11-05:00","body_html":"\u003cp data-start=\"159\" data-end=\"687\"\u003e✨ \u003cstrong data-start=\"161\" data-end=\"216\"\u003eDiscover the Magic of Crystals with Crystal Destiny\u003c\/strong\u003e ✨\u003cbr data-start=\"218\" data-end=\"221\"\u003eCrystals have been treasured for centuries—not only for their natural beauty but also for their powerful healing energies. Beyond their visual allure, they bring balance, harmony, and positive energy into any space. Whether used for home décor, meditation, or simply to elevate the energy of your surroundings, crystals create a sanctuary of peace, relaxation, and well-being. Each piece is a unique gift from the Earth—visually stunning and spiritually uplifting.\u003c\/p\u003e\n\u003cp data-start=\"689\" data-end=\"1011\"\u003eAt \u003cstrong data-start=\"692\" data-end=\"711\"\u003eCrystal Destiny\u003c\/strong\u003e, our signature collection showcases a curated selection of exquisite crystals, from radiant Quartz to soothing Amethyst. Every stone is carefully sourced for its elegance and metaphysical resonance, making them perfect for enhancing your home, uplifting your spirit, or gifting to someone special.\u003c\/p\u003e\n\u003cp data-start=\"1013\" data-end=\"1206\"\u003eExperience the timeless sophistication of crystalline wonders. Explore the \u003cstrong data-start=\"1088\" data-end=\"1118\"\u003eCrystal Destiny Collection\u003c\/strong\u003e today and bring the transformative beauty of these treasures into your everyday life.\u003c\/p\u003e","published_at":"2023-06-05T11:24:02-04:00","sort_order":"created-desc","template_suffix":"","disjunctive":false,"rules":[{"column":"tag","relation":"equals","condition":"crystal"},{"column":"type","relation":"not_contains","condition":"925 Sterling Silver"},{"column":"type","relation":"not_contains","condition":"Wire Wraps"}],"published_scope":"global"},{"id":319456051371,"handle":"root-chakra-crystals","title":"Root Chakra Crystals","updated_at":"2026-01-07T23:43:11-05:00","body_html":"\u003cp data-start=\"132\" data-end=\"502\"\u003e✨ \u003cstrong data-start=\"134\" data-end=\"158\"\u003eRoot Chakra Crystals\u003c\/strong\u003e ✨\u003cbr data-start=\"160\" data-end=\"163\"\u003eGround your energy and cultivate stability with our \u003cstrong data-start=\"215\" data-end=\"239\"\u003eRoot Chakra Crystals\u003c\/strong\u003e. Centered at the base of the spine, the Root Chakra governs your sense of security, balance, and connection to the Earth. These crystals help release fear, build resilience, and foster a strong foundation for your physical, emotional, and spiritual well-being.\u003c\/p\u003e\n\u003cp data-start=\"504\" data-end=\"881\"\u003eOur selection features powerful grounding stones such as Red Jasper, Black Tourmaline, Hematite, and Smoky Quartz—each chosen for their ability to stabilize energy and promote a sense of safety and strength. Perfect for meditation, energy work, or keeping in your living space, Root Chakra Crystals encourage you to feel anchored, supported, and empowered in your daily life.\u003c\/p\u003e\n\u003cp data-start=\"883\" data-end=\"1037\"\u003eReconnect with the Earth, strengthen your foundation, and embrace the transformative energy of the Root Chakra through these essential grounding stones.\u003c\/p\u003e","published_at":"2025-07-17T18:19:27-04:00","sort_order":"best-selling","template_suffix":"","disjunctive":false,"rules":[{"column":"variant_metafield_definition","relation":"equals","condition":"Root"}],"published_scope":"global","image":{"created_at":"2025-07-17T19:08:08-04:00","alt":null,"width":1080,"height":1080,"src":"\/\/crystaldestiny.com\/cdn\/shop\/collections\/Root_Chakra_Collection.jpg?v=1762474932"}},{"id":294880116907,"handle":"polished","title":"Polished Crystals","updated_at":"2026-01-07T23:43:11-05:00","body_html":"\u003cp data-start=\"199\" data-end=\"598\"\u003e✨ \u003cstrong data-start=\"201\" data-end=\"248\"\u003eCrystal Destiny Polished Crystal Collection\u003c\/strong\u003e ✨\u003cbr data-start=\"250\" data-end=\"253\"\u003eIndulge in the brilliance of crystals refined to perfection. Our \u003cstrong data-start=\"318\" data-end=\"341\"\u003ePolished Collection\u003c\/strong\u003e showcases gemstones meticulously shaped and smoothed to reveal their natural radiance and timeless beauty. From the shimmering glow of Quartz to the deep allure of Obsidian, each polished piece is a testament to nature’s artistry and human craftsmanship.\u003c\/p\u003e\n\u003cp data-start=\"600\" data-end=\"862\"\u003ePerfect as statement décor, meaningful gifts, or companions on your spiritual journey, polished crystals bring sophistication and elevated energy into any space. Their radiant surfaces reflect not only light but also the transformative power of crystal energy.\u003c\/p\u003e\n\u003cp data-start=\"864\" data-end=\"1022\"\u003eDiscover the elegance of refinement with Crystal Destiny’s Polished Crystal Collection—where every facet shines with intention, beauty, and timeless allure.\u003c\/p\u003e","published_at":"2023-06-05T11:30:44-04:00","sort_order":"created-desc","template_suffix":"","disjunctive":false,"rules":[{"column":"tag","relation":"equals","condition":"polished"}],"published_scope":"global"},{"id":321695744171,"handle":"direct-from-supplier","title":"Direct from Supplier","updated_at":"2026-01-07T23:43:11-05:00","body_html":"","published_at":"2025-09-12T16:38:23-04:00","sort_order":"best-selling","template_suffix":"","disjunctive":true,"rules":[{"column":"tag","relation":"equals","condition":"adjusted-shipping"}],"published_scope":"global"},{"id":295698202795,"handle":"spheres","title":"Crystal Spheres","updated_at":"2026-01-06T23:24:35-05:00","body_html":"\u003cp data-start=\"106\" data-end=\"370\"\u003e✨ \u003cstrong data-start=\"108\" data-end=\"138\"\u003eCrystal Spheres Collection\u003c\/strong\u003e ✨\u003cbr data-start=\"140\" data-end=\"143\"\u003eBring harmony, balance, and elegance into your space with our \u003cstrong data-start=\"205\" data-end=\"235\"\u003eCrystal Spheres Collection\u003c\/strong\u003e. Each sphere is meticulously crafted to showcase the natural beauty and energy of crystals, from radiant Quartz to calming Amethyst.\u003c\/p\u003e\n\u003cp data-start=\"372\" data-end=\"658\"\u003ePerfect for meditation, energy work, or as striking décor, crystal spheres radiate energy in all directions, promoting clarity, focus, and a sense of calm. Their smooth, polished surfaces highlight the stones’ natural patterns and colors, making each sphere a captivating centerpiece.\u003c\/p\u003e\n\u003cp data-start=\"660\" data-end=\"809\"\u003eElevate your space and embrace the transformative power of crystals with the \u003cstrong data-start=\"737\" data-end=\"767\"\u003eCrystal Spheres Collection\u003c\/strong\u003e—where beauty, energy, and harmony meet.\u003c\/p\u003e","published_at":"2023-07-28T14:20:46-04:00","sort_order":"created-desc","template_suffix":"","disjunctive":true,"rules":[{"column":"tag","relation":"equals","condition":"spheres"},{"column":"tag","relation":"equals","condition":"eggs"}],"published_scope":"global"},{"id":293659312299,"handle":"best-sellers","title":"Best Sellers","updated_at":"2026-01-07T23:43:11-05:00","body_html":"\u003cp data-start=\"155\" data-end=\"510\"\u003eDiscover the pieces our community loves most. Our Best Sellers Collection brings together handpicked crystals and jewelry that embody timeless elegance, spiritual resonance, and everyday sophistication. Each item has earned its place as a customer favorite—celebrated for both its beauty and its meaningful energy.\u003c\/p\u003e\n\u003cp data-start=\"512\" data-end=\"802\"\u003eFrom stunning statement pieces to versatile daily companions, these treasures are curated to elevate your space, uplift your spirit, and reflect refined taste. Indulge in what’s most cherished and let our best sellers guide you toward the perfect blend of style and transformative energy.\u003c\/p\u003e\n\u003cp data-start=\"804\" data-end=\"932\"\u003eExplore the Best Sellers Collection today—where elegance meets intention, and every piece tells a story of beauty and balance.\u003c\/p\u003e","published_at":"2023-03-15T16:04:51-04:00","sort_order":"best-selling","template_suffix":"","disjunctive":false,"rules":[{"column":"variant_price","relation":"greater_than","condition":"0"},{"column":"variant_inventory","relation":"greater_than","condition":"0"},{"column":"type","relation":"not_equals","condition":"Shipping Protection"}],"published_scope":"global"},{"id":321370390699,"handle":"monthly-crystal-sale","title":"Monthly Crystal Sale | Spheres \u0026 Towers","updated_at":"2026-01-06T23:24:37-05:00","body_html":"\u003cp\u003eShop our \u003cstrong\u003eMonthly Crystal Sale\u003c\/strong\u003e, where you can shop a wide selection of healing crystals at discounted prices. Explore \u003cstrong\u003ecrystal spheres and towers,\u003c\/strong\u003e— all carefully curated to support meditation, energy balancing, and spiritual wellness. Whether you're looking to enhance your home decor, boost your daily energy, or find the perfect gift, our \u003cstrong\u003ecrystals for healing and manifestation\u003c\/strong\u003e offer both beauty and metaphysical benefits.\u003c\/p\u003e\n\u003cp\u003eEach month, our sale features \u003cstrong\u003enew discounted collections\u003c\/strong\u003e, from \u003cstrong\u003enatural quartz and amethyst towers\u003c\/strong\u003e to \u003cstrong\u003ewire-wrapped pendants and polished stones\u003c\/strong\u003e, so there's always something fresh to discover. Shop with confidence knowing you're getting high-quality crystals with \u003cstrong\u003efree shipping options\u003c\/strong\u003e and a trusted experience.\u003c\/p\u003e\n\u003cp\u003e\u003cstrong\u003eTake advantage of the Monthly Crystal Sale today\u003c\/strong\u003e and add powerful, natural energy to your life with \u003cstrong\u003eauthentic healing crystals\u003c\/strong\u003e — while our limited-time discounts last.\u003c\/p\u003e\n\u003cp\u003e\u003cstrong\u003e*Discount automatically applied at checkout.\u003c\/strong\u003e\u003c\/p\u003e","published_at":"2025-12-02T01:26:17-05:00","sort_order":"alpha-asc","template_suffix":"","disjunctive":true,"rules":[{"column":"tag","relation":"equals","condition":"spheres"},{"column":"tag","relation":"equals","condition":"Towers"}],"published_scope":"global","image":{"created_at":"2026-01-01T01:32:34-05:00","alt":"","width":960,"height":960,"src":"\/\/crystaldestiny.com\/cdn\/shop\/collections\/3E8C2969-1B86-4ACE-B349-98E9D8768424.jpg?v=1767249154"}},{"id":297906241707,"handle":"new-arrivals","title":"New Arrivals","updated_at":"2026-01-07T23:43:11-05:00","body_html":"\u003cp data-start=\"172\" data-end=\"573\"\u003e✨ \u003cstrong data-start=\"174\" data-end=\"217\"\u003eDiscover Crystal Destiny’s New Arrivals\u003c\/strong\u003e ✨\u003cbr data-start=\"219\" data-end=\"222\"\u003eStep into a world of fresh sophistication with our latest crystal treasures. Each new piece—whether Quartz, Amethyst, or beyond—embodies nature’s artistry, radiating both timeless beauty and powerful energy. Thoughtfully curated and constantly refreshed, our New Arrivals Collection offers the perfect harmony of elegance and metaphysical resonance.\u003c\/p\u003e\n\u003cp data-start=\"575\" data-end=\"793\"\u003eElevate your space, uplift your spirit, and embrace the transformative power of nature’s wonders. Explore the newest expressions of crystal artistry today, and let your journey with crystals evolve with every update.\u003c\/p\u003e","published_at":"2023-11-20T15:35:42-05:00","sort_order":"created-desc","template_suffix":"","disjunctive":true,"rules":[{"column":"tag","relation":"equals","condition":"new-arrivals"}],"published_scope":"global"},{"id":297596059819,"handle":"all","title":"All Crystals \u0026 Jewelry","updated_at":"2026-01-07T23:43:11-05:00","body_html":"\u003cp data-start=\"149\" data-end=\"494\"\u003e✨ \u003cstrong data-start=\"151\" data-end=\"181\"\u003eWelcome to Crystal Destiny\u003c\/strong\u003e ✨\u003cbr data-start=\"183\" data-end=\"186\"\u003eStep into a world where beauty, energy, and artistry unite. Our collection is a treasure trove of exquisite crystals, from the raw, untamed elegance of natural formations to the polished brilliance of expertly crafted pieces. Each crystal is a masterpiece, carrying its own unique story and timeless charm.\u003c\/p\u003e\n\u003cp data-start=\"496\" data-end=\"831\"\u003eWhether you’re drawn to the calming presence of Amethyst, the vibrant energy of Citrine, or the grounding strength of Jasper, our crystals invite you to connect with nature’s finest wonders. Perfect for enhancing your space, supporting your spiritual journey, or gifting with intention, every piece resonates with beauty and meaning.\u003c\/p\u003e\n\u003cp data-start=\"833\" data-end=\"1000\"\u003eElevate your surroundings, embrace the mystique, and explore the enchanting world of crystals at \u003cstrong data-start=\"930\" data-end=\"949\"\u003eCrystal Destiny\u003c\/strong\u003e—where every crystal is waiting to be discovered.\u003c\/p\u003e","published_at":"2023-11-10T13:55:31-05:00","sort_order":"created-desc","template_suffix":"","disjunctive":false,"rules":[{"column":"type","relation":"not_equals","condition":"asdf"}],"published_scope":"global"},{"id":298983391403,"handle":"january-crystal-sale","title":"January Sale | 25% Off Crystal Towers \u0026 Spheres","updated_at":"2026-01-06T23:24:37-05:00","body_html":"\u003cp\u003eShop our \u003cstrong\u003eJanuary Crystal Sale\u003c\/strong\u003e, where you can shop a wide selection of healing crystals at discounted prices. Explore \u003cstrong\u003eCrystal Towers, \u0026amp; Crystal Spheres\u003c\/strong\u003e — all carefully curated and crafted to support meditation, energy balancing, and spiritual wellness. Whether you're looking to enhance your home decor, boost your daily energy, or find the perfect gift, our \u003cstrong\u003ecrystals for healing and manifestation\u003c\/strong\u003e offer both beauty and metaphysical benefits.\u003c\/p\u003e\n\u003cp\u003eThis January, our sale features \u003cstrong\u003ediscounted crystal towers and spheres\u003c\/strong\u003e, from \u003cstrong\u003enatural quartz \u003c\/strong\u003eand \u003cstrong\u003eamethyst \u003c\/strong\u003eto \u003cstrong\u003ebumblebee jasper \u003c\/strong\u003eand \u003cstrong\u003ecarnelian\u003c\/strong\u003e, so there's always something fresh to discover. Shop with confidence knowing you're getting high-quality crystals with \u003cstrong\u003efree shipping options\u003c\/strong\u003e and a trusted experience.\u003c\/p\u003e\n\u003cp\u003e\u003cstrong\u003eTake advantage of the January Crystal Sale today\u003c\/strong\u003e and add powerful, natural energy to your life with \u003cstrong\u003eauthentic healing crystals\u003c\/strong\u003e — while our limited-time discounts last.\u003c\/p\u003e\n\u003cp\u003e\u003cstrong\u003e*Discount automatically applied at checkout.\u003c\/strong\u003e\u003c\/p\u003e","published_at":"2026-01-01T00:07:17-05:00","sort_order":"alpha-asc","template_suffix":"monthly-collection","disjunctive":true,"rules":[{"column":"tag","relation":"equals","condition":"Spheres"},{"column":"tag","relation":"equals","condition":"Towers"}],"published_scope":"global","image":{"created_at":"2026-01-01T01:29:59-05:00","alt":"","width":960,"height":960,"src":"\/\/crystaldestiny.com\/cdn\/shop\/collections\/1464163B-22B1-4D62-BEC5-CEC9AECB670B.jpg?v=1767248999"}}]}
[{"alt":"Black Agate Crystal Spheres-Spheres-Crystal Destiny-Black Agate-1 238g 55mm-Crystal Destiny","id":32289033322667,"position":1,"preview_image":{"aspect_ratio":1.0,"height":1000,"width":1000,"src":"\/\/crystaldestiny.com\/cdn\/shop\/files\/Black-Agate-Crystal-Spheres-Spheres.webp?v=1765515984"},"aspect_ratio":1.0,"height":1000,"media_type":"image","src":"\/\/crystaldestiny.com\/cdn\/shop\/files\/Black-Agate-Crystal-Spheres-Spheres.webp?v=1765515984","width":1000},{"alt":"Black Agate Crystal Spheres-Spheres-Crystal Destiny-Black Agate-1 238g 55mm-Crystal Destiny","id":32289033355435,"position":2,"preview_image":{"aspect_ratio":1.0,"height":1000,"width":1000,"src":"\/\/crystaldestiny.com\/cdn\/shop\/files\/Black-Agate-Crystal-Spheres-Spheres-2.webp?v=1765515985"},"aspect_ratio":1.0,"height":1000,"media_type":"image","src":"\/\/crystaldestiny.com\/cdn\/shop\/files\/Black-Agate-Crystal-Spheres-Spheres-2.webp?v=1765515985","width":1000},{"alt":"Black Agate Crystal Spheres-Spheres-Crystal Destiny-Black Agate-18 246g 56mm-Crystal Destiny","id":32289033388203,"position":3,"preview_image":{"aspect_ratio":1.0,"height":1000,"width":1000,"src":"\/\/crystaldestiny.com\/cdn\/shop\/files\/Black-Agate-Crystal-Spheres-Spheres-Black-Agate-18-246g-56mm-3.webp?v=1765515987"},"aspect_ratio":1.0,"height":1000,"media_type":"image","src":"\/\/crystaldestiny.com\/cdn\/shop\/files\/Black-Agate-Crystal-Spheres-Spheres-Black-Agate-18-246g-56mm-3.webp?v=1765515987","width":1000},{"alt":"Black Agate Crystal Spheres-Spheres-Crystal Destiny-Black Agate-31 393g 65mm-Crystal Destiny","id":32289033420971,"position":4,"preview_image":{"aspect_ratio":1.0,"height":1000,"width":1000,"src":"\/\/crystaldestiny.com\/cdn\/shop\/files\/Black-Agate-Crystal-Spheres-Spheres-Black-Agate-31-393g-65mm-4.webp?v=1765515988"},"aspect_ratio":1.0,"height":1000,"media_type":"image","src":"\/\/crystaldestiny.com\/cdn\/shop\/files\/Black-Agate-Crystal-Spheres-Spheres-Black-Agate-31-393g-65mm-4.webp?v=1765515988","width":1000},{"alt":"Black Agate Crystal Spheres-Spheres-Crystal Destiny-Black Agate-29 362g 63mm-Crystal Destiny","id":32289033453739,"position":5,"preview_image":{"aspect_ratio":1.0,"height":1000,"width":1000,"src":"\/\/crystaldestiny.com\/cdn\/shop\/files\/Black-Agate-Crystal-Spheres-Spheres-Black-Agate-29-362g-63mm-5.webp?v=1765515990"},"aspect_ratio":1.0,"height":1000,"media_type":"image","src":"\/\/crystaldestiny.com\/cdn\/shop\/files\/Black-Agate-Crystal-Spheres-Spheres-Black-Agate-29-362g-63mm-5.webp?v=1765515990","width":1000},{"alt":"Black Agate Crystal Spheres-Spheres-Crystal Destiny-Black Agate-28 250g 56mm-Crystal Destiny","id":32289033486507,"position":6,"preview_image":{"aspect_ratio":1.0,"height":1000,"width":1000,"src":"\/\/crystaldestiny.com\/cdn\/shop\/files\/Black-Agate-Crystal-Spheres-Spheres-Black-Agate-28-250g-56mm-6.webp?v=1765515991"},"aspect_ratio":1.0,"height":1000,"media_type":"image","src":"\/\/crystaldestiny.com\/cdn\/shop\/files\/Black-Agate-Crystal-Spheres-Spheres-Black-Agate-28-250g-56mm-6.webp?v=1765515991","width":1000},{"alt":"Black Agate Crystal Spheres-Spheres-Crystal Destiny-Black Agate-26 264g 57mm-Crystal Destiny","id":32289033519275,"position":7,"preview_image":{"aspect_ratio":1.0,"height":1000,"width":1000,"src":"\/\/crystaldestiny.com\/cdn\/shop\/files\/Black-Agate-Crystal-Spheres-Spheres-Black-Agate-26-264g-57mm-7.webp?v=1765515993"},"aspect_ratio":1.0,"height":1000,"media_type":"image","src":"\/\/crystaldestiny.com\/cdn\/shop\/files\/Black-Agate-Crystal-Spheres-Spheres-Black-Agate-26-264g-57mm-7.webp?v=1765515993","width":1000},{"alt":"Black Agate Crystal Spheres-Spheres-Crystal Destiny-Black Agate-33 247g 56mm-Crystal Destiny","id":32289033552043,"position":8,"preview_image":{"aspect_ratio":1.0,"height":1000,"width":1000,"src":"\/\/crystaldestiny.com\/cdn\/shop\/files\/Black-Agate-Crystal-Spheres-Spheres-Black-Agate-33-247g-56mm-8.webp?v=1765515994"},"aspect_ratio":1.0,"height":1000,"media_type":"image","src":"\/\/crystaldestiny.com\/cdn\/shop\/files\/Black-Agate-Crystal-Spheres-Spheres-Black-Agate-33-247g-56mm-8.webp?v=1765515994","width":1000},{"alt":"Black Agate Crystal Spheres-Spheres-Crystal Destiny-Black Agate-5 218g 53mm-Crystal Destiny","id":32289033584811,"position":9,"preview_image":{"aspect_ratio":1.0,"height":1000,"width":1000,"src":"\/\/crystaldestiny.com\/cdn\/shop\/files\/Black-Agate-Crystal-Spheres-Spheres-Black-Agate-5-218g-53mm-9.webp?v=1765515995"},"aspect_ratio":1.0,"height":1000,"media_type":"image","src":"\/\/crystaldestiny.com\/cdn\/shop\/files\/Black-Agate-Crystal-Spheres-Spheres-Black-Agate-5-218g-53mm-9.webp?v=1765515995","width":1000},{"alt":"Black Agate Crystal Spheres-Spheres-Crystal Destiny-Black Agate-4 234g 55mm-Crystal Destiny","id":32289033617579,"position":10,"preview_image":{"aspect_ratio":1.0,"height":1000,"width":1000,"src":"\/\/crystaldestiny.com\/cdn\/shop\/files\/Black-Agate-Crystal-Spheres-Spheres-Black-Agate-4-234g-55mm-10.webp?v=1765515997"},"aspect_ratio":1.0,"height":1000,"media_type":"image","src":"\/\/crystaldestiny.com\/cdn\/shop\/files\/Black-Agate-Crystal-Spheres-Spheres-Black-Agate-4-234g-55mm-10.webp?v=1765515997","width":1000},{"alt":"Black Agate Crystal Spheres-Spheres-Crystal Destiny-Black Agate-2 211g 53mm-Crystal Destiny","id":32289033650347,"position":11,"preview_image":{"aspect_ratio":1.0,"height":1000,"width":1000,"src":"\/\/crystaldestiny.com\/cdn\/shop\/files\/Black-Agate-Crystal-Spheres-Spheres-Black-Agate-2-211g-53mm-11.webp?v=1765515998"},"aspect_ratio":1.0,"height":1000,"media_type":"image","src":"\/\/crystaldestiny.com\/cdn\/shop\/files\/Black-Agate-Crystal-Spheres-Spheres-Black-Agate-2-211g-53mm-11.webp?v=1765515998","width":1000},{"alt":"Black Agate Crystal Spheres-Spheres-Crystal Destiny-Black Agate-9 188g 51mm-Crystal Destiny","id":32289033683115,"position":12,"preview_image":{"aspect_ratio":1.0,"height":1000,"width":1000,"src":"\/\/crystaldestiny.com\/cdn\/shop\/files\/Black-Agate-Crystal-Spheres-Spheres-Black-Agate-9-188g-51mm-12.webp?v=1765516000"},"aspect_ratio":1.0,"height":1000,"media_type":"image","src":"\/\/crystaldestiny.com\/cdn\/shop\/files\/Black-Agate-Crystal-Spheres-Spheres-Black-Agate-9-188g-51mm-12.webp?v=1765516000","width":1000},{"alt":"Black Agate Crystal Spheres-Spheres-Crystal Destiny-Black Agate-30 290g 59mm-Crystal Destiny","id":32289033715883,"position":13,"preview_image":{"aspect_ratio":1.0,"height":1000,"width":1000,"src":"\/\/crystaldestiny.com\/cdn\/shop\/files\/Black-Agate-Crystal-Spheres-Spheres-Black-Agate-30-290g-59mm-13.webp?v=1765516001"},"aspect_ratio":1.0,"height":1000,"media_type":"image","src":"\/\/crystaldestiny.com\/cdn\/shop\/files\/Black-Agate-Crystal-Spheres-Spheres-Black-Agate-30-290g-59mm-13.webp?v=1765516001","width":1000},{"alt":"Black Agate Crystal Spheres-Spheres-Crystal Destiny-Black Agate-27 310g 60mm-Crystal Destiny","id":32289033748651,"position":14,"preview_image":{"aspect_ratio":1.0,"height":1000,"width":1000,"src":"\/\/crystaldestiny.com\/cdn\/shop\/files\/Black-Agate-Crystal-Spheres-Spheres-Black-Agate-27-310g-60mm-14.webp?v=1765516003"},"aspect_ratio":1.0,"height":1000,"media_type":"image","src":"\/\/crystaldestiny.com\/cdn\/shop\/files\/Black-Agate-Crystal-Spheres-Spheres-Black-Agate-27-310g-60mm-14.webp?v=1765516003","width":1000},{"alt":"Black Agate Crystal Spheres-Spheres-Crystal Destiny-Black Agate-34 295g 59mm-Crystal Destiny","id":32289033781419,"position":15,"preview_image":{"aspect_ratio":1.0,"height":1000,"width":1000,"src":"\/\/crystaldestiny.com\/cdn\/shop\/files\/Black-Agate-Crystal-Spheres-Spheres-Black-Agate-34-295g-59mm-15.webp?v=1765516004"},"aspect_ratio":1.0,"height":1000,"media_type":"image","src":"\/\/crystaldestiny.com\/cdn\/shop\/files\/Black-Agate-Crystal-Spheres-Spheres-Black-Agate-34-295g-59mm-15.webp?v=1765516004","width":1000},{"alt":"Black Agate Crystal Spheres-Spheres-Crystal Destiny-Black Agate-3 207g 53mm-Crystal Destiny","id":32289033814187,"position":16,"preview_image":{"aspect_ratio":1.0,"height":1000,"width":1000,"src":"\/\/crystaldestiny.com\/cdn\/shop\/files\/Black-Agate-Crystal-Spheres-Spheres-Black-Agate-3-207g-53mm-16.webp?v=1765516006"},"aspect_ratio":1.0,"height":1000,"media_type":"image","src":"\/\/crystaldestiny.com\/cdn\/shop\/files\/Black-Agate-Crystal-Spheres-Spheres-Black-Agate-3-207g-53mm-16.webp?v=1765516006","width":1000},{"alt":"Black Agate Crystal Spheres-Spheres-Crystal Destiny-Black Agate-32 295g 59mm-Crystal Destiny","id":32289033846955,"position":17,"preview_image":{"aspect_ratio":1.0,"height":1000,"width":1000,"src":"\/\/crystaldestiny.com\/cdn\/shop\/files\/Black-Agate-Crystal-Spheres-Spheres-Black-Agate-32-295g-59mm-17.webp?v=1765516007"},"aspect_ratio":1.0,"height":1000,"media_type":"image","src":"\/\/crystaldestiny.com\/cdn\/shop\/files\/Black-Agate-Crystal-Spheres-Spheres-Black-Agate-32-295g-59mm-17.webp?v=1765516007","width":1000},{"alt":"Black Agate Crystal Spheres-Spheres-Crystal Destiny-Black Agate-1 238g 55mm-Crystal Destiny","id":32289033879723,"position":18,"preview_image":{"aspect_ratio":1.0,"height":1000,"width":1000,"src":"\/\/crystaldestiny.com\/cdn\/shop\/files\/Black-Agate-Crystal-Spheres-Spheres-Black-Agate-1-238g-55mm-18.webp?v=1765516008"},"aspect_ratio":1.0,"height":1000,"media_type":"image","src":"\/\/crystaldestiny.com\/cdn\/shop\/files\/Black-Agate-Crystal-Spheres-Spheres-Black-Agate-1-238g-55mm-18.webp?v=1765516008","width":1000},{"alt":"Black Agate Crystal Spheres-Spheres-Crystal Destiny-Black Agate-21 229g 54mm-Crystal Destiny","id":32289033912491,"position":19,"preview_image":{"aspect_ratio":1.0,"height":1000,"width":1000,"src":"\/\/crystaldestiny.com\/cdn\/shop\/files\/Black-Agate-Crystal-Spheres-Spheres-Black-Agate-21-229g-54mm-19.webp?v=1765516010"},"aspect_ratio":1.0,"height":1000,"media_type":"image","src":"\/\/crystaldestiny.com\/cdn\/shop\/files\/Black-Agate-Crystal-Spheres-Spheres-Black-Agate-21-229g-54mm-19.webp?v=1765516010","width":1000},{"alt":"Black Agate Crystal Spheres-Spheres-Crystal Destiny-Black Agate-36 379g 64mm-Crystal Destiny","id":32289033945259,"position":20,"preview_image":{"aspect_ratio":1.0,"height":1000,"width":1000,"src":"\/\/crystaldestiny.com\/cdn\/shop\/files\/Black-Agate-Crystal-Spheres-Spheres-Black-Agate-36-379g-64mm-20.webp?v=1765516011"},"aspect_ratio":1.0,"height":1000,"media_type":"image","src":"\/\/crystaldestiny.com\/cdn\/shop\/files\/Black-Agate-Crystal-Spheres-Spheres-Black-Agate-36-379g-64mm-20.webp?v=1765516011","width":1000},{"alt":"Black Agate Crystal Spheres-Spheres-Crystal Destiny-Black Agate-6 247g 56mm-Crystal Destiny","id":32289033978027,"position":21,"preview_image":{"aspect_ratio":1.0,"height":1000,"width":1000,"src":"\/\/crystaldestiny.com\/cdn\/shop\/files\/Black-Agate-Crystal-Spheres-Spheres-Black-Agate-6-247g-56mm-21.webp?v=1765516012"},"aspect_ratio":1.0,"height":1000,"media_type":"image","src":"\/\/crystaldestiny.com\/cdn\/shop\/files\/Black-Agate-Crystal-Spheres-Spheres-Black-Agate-6-247g-56mm-21.webp?v=1765516012","width":1000},{"alt":"Black Agate Crystal Spheres-Spheres-Crystal Destiny-Black Agate-14 195g 51mm-Crystal Destiny","id":32289034010795,"position":22,"preview_image":{"aspect_ratio":1.0,"height":1000,"width":1000,"src":"\/\/crystaldestiny.com\/cdn\/shop\/files\/Black-Agate-Crystal-Spheres-Spheres-Black-Agate-14-195g-51mm-22.webp?v=1765516014"},"aspect_ratio":1.0,"height":1000,"media_type":"image","src":"\/\/crystaldestiny.com\/cdn\/shop\/files\/Black-Agate-Crystal-Spheres-Spheres-Black-Agate-14-195g-51mm-22.webp?v=1765516014","width":1000},{"alt":"Black Agate Crystal Spheres-Spheres-Crystal Destiny-Black Agate-11 156g 48mm-Crystal Destiny","id":32289034043563,"position":23,"preview_image":{"aspect_ratio":1.0,"height":1000,"width":1000,"src":"\/\/crystaldestiny.com\/cdn\/shop\/files\/Black-Agate-Crystal-Spheres-Spheres-Black-Agate-11-156g-48mm-23.webp?v=1765516015"},"aspect_ratio":1.0,"height":1000,"media_type":"image","src":"\/\/crystaldestiny.com\/cdn\/shop\/files\/Black-Agate-Crystal-Spheres-Spheres-Black-Agate-11-156g-48mm-23.webp?v=1765516015","width":1000},{"alt":"Black Agate Crystal Spheres-Spheres-Crystal Destiny-Black Agate-22 244g 55mm-Crystal Destiny","id":32289034076331,"position":24,"preview_image":{"aspect_ratio":1.0,"height":1000,"width":1000,"src":"\/\/crystaldestiny.com\/cdn\/shop\/files\/Black-Agate-Crystal-Spheres-Spheres-Black-Agate-22-244g-55mm-24.webp?v=1765516016"},"aspect_ratio":1.0,"height":1000,"media_type":"image","src":"\/\/crystaldestiny.com\/cdn\/shop\/files\/Black-Agate-Crystal-Spheres-Spheres-Black-Agate-22-244g-55mm-24.webp?v=1765516016","width":1000},{"alt":"Black Agate Crystal Spheres-Spheres-Crystal Destiny-Black Agate-17 225g 54mm-Crystal Destiny","id":32289034109099,"position":25,"preview_image":{"aspect_ratio":1.0,"height":1000,"width":1000,"src":"\/\/crystaldestiny.com\/cdn\/shop\/files\/Black-Agate-Crystal-Spheres-Spheres-Black-Agate-17-225g-54mm-25.webp?v=1765516018"},"aspect_ratio":1.0,"height":1000,"media_type":"image","src":"\/\/crystaldestiny.com\/cdn\/shop\/files\/Black-Agate-Crystal-Spheres-Spheres-Black-Agate-17-225g-54mm-25.webp?v=1765516018","width":1000},{"alt":"Black Agate Crystal Spheres-Spheres-Crystal Destiny-Black Agate-24 264g 57mm-Crystal Destiny","id":32289034141867,"position":26,"preview_image":{"aspect_ratio":1.0,"height":1000,"width":1000,"src":"\/\/crystaldestiny.com\/cdn\/shop\/files\/Black-Agate-Crystal-Spheres-Spheres-Black-Agate-24-264g-57mm-26.webp?v=1765516020"},"aspect_ratio":1.0,"height":1000,"media_type":"image","src":"\/\/crystaldestiny.com\/cdn\/shop\/files\/Black-Agate-Crystal-Spheres-Spheres-Black-Agate-24-264g-57mm-26.webp?v=1765516020","width":1000},{"alt":"Black Agate Crystal Spheres-Spheres-Crystal Destiny-Black Agate-13 203g 52mm-Crystal Destiny","id":32289034174635,"position":27,"preview_image":{"aspect_ratio":1.0,"height":1000,"width":1000,"src":"\/\/crystaldestiny.com\/cdn\/shop\/files\/Black-Agate-Crystal-Spheres-Spheres-Black-Agate-13-203g-52mm-27.webp?v=1765516021"},"aspect_ratio":1.0,"height":1000,"media_type":"image","src":"\/\/crystaldestiny.com\/cdn\/shop\/files\/Black-Agate-Crystal-Spheres-Spheres-Black-Agate-13-203g-52mm-27.webp?v=1765516021","width":1000},{"alt":"Black Agate Crystal Spheres-Spheres-Crystal Destiny-Black Agate-8 201g 52mm-Crystal Destiny","id":32289034207403,"position":28,"preview_image":{"aspect_ratio":1.0,"height":1000,"width":1000,"src":"\/\/crystaldestiny.com\/cdn\/shop\/files\/Black-Agate-Crystal-Spheres-Spheres-Black-Agate-8-201g-52mm-28.webp?v=1765516023"},"aspect_ratio":1.0,"height":1000,"media_type":"image","src":"\/\/crystaldestiny.com\/cdn\/shop\/files\/Black-Agate-Crystal-Spheres-Spheres-Black-Agate-8-201g-52mm-28.webp?v=1765516023","width":1000},{"alt":"Black Agate Crystal Spheres-Spheres-Crystal Destiny-Black Agate-16 243g 55mm-Crystal Destiny","id":32289034240171,"position":29,"preview_image":{"aspect_ratio":1.0,"height":1000,"width":1000,"src":"\/\/crystaldestiny.com\/cdn\/shop\/files\/Black-Agate-Crystal-Spheres-Spheres-Black-Agate-16-243g-55mm-29.webp?v=1765516024"},"aspect_ratio":1.0,"height":1000,"media_type":"image","src":"\/\/crystaldestiny.com\/cdn\/shop\/files\/Black-Agate-Crystal-Spheres-Spheres-Black-Agate-16-243g-55mm-29.webp?v=1765516024","width":1000},{"alt":"Black Agate Crystal Spheres-Spheres-Crystal Destiny-Black Agate-7 202g 52mm-Crystal Destiny","id":32289034272939,"position":30,"preview_image":{"aspect_ratio":1.0,"height":1000,"width":1000,"src":"\/\/crystaldestiny.com\/cdn\/shop\/files\/Black-Agate-Crystal-Spheres-Spheres-Black-Agate-7-202g-52mm-30.webp?v=1765516026"},"aspect_ratio":1.0,"height":1000,"media_type":"image","src":"\/\/crystaldestiny.com\/cdn\/shop\/files\/Black-Agate-Crystal-Spheres-Spheres-Black-Agate-7-202g-52mm-30.webp?v=1765516026","width":1000},{"alt":"Black Agate Crystal Spheres-Spheres-Crystal Destiny-Black Agate-15 230g 54mm-Crystal Destiny","id":32289034305707,"position":31,"preview_image":{"aspect_ratio":1.0,"height":1000,"width":1000,"src":"\/\/crystaldestiny.com\/cdn\/shop\/files\/Black-Agate-Crystal-Spheres-Spheres-Black-Agate-15-230g-54mm-31.webp?v=1765516027"},"aspect_ratio":1.0,"height":1000,"media_type":"image","src":"\/\/crystaldestiny.com\/cdn\/shop\/files\/Black-Agate-Crystal-Spheres-Spheres-Black-Agate-15-230g-54mm-31.webp?v=1765516027","width":1000},{"alt":"Black Agate Crystal Spheres-Spheres-Crystal Destiny-Black Agate-10 236g 54mm-Crystal Destiny","id":32289034338475,"position":32,"preview_image":{"aspect_ratio":1.0,"height":1000,"width":1000,"src":"\/\/crystaldestiny.com\/cdn\/shop\/files\/Black-Agate-Crystal-Spheres-Spheres-Black-Agate-10-236g-54mm-32.webp?v=1765516028"},"aspect_ratio":1.0,"height":1000,"media_type":"image","src":"\/\/crystaldestiny.com\/cdn\/shop\/files\/Black-Agate-Crystal-Spheres-Spheres-Black-Agate-10-236g-54mm-32.webp?v=1765516028","width":1000},{"alt":"Black Agate Crystal Spheres-Spheres-Crystal Destiny-Black Agate-23 315g 60mm-Crystal Destiny","id":32289034371243,"position":33,"preview_image":{"aspect_ratio":1.0,"height":1000,"width":1000,"src":"\/\/crystaldestiny.com\/cdn\/shop\/files\/Black-Agate-Crystal-Spheres-Spheres-Black-Agate-23-315g-60mm-33.webp?v=1765516030"},"aspect_ratio":1.0,"height":1000,"media_type":"image","src":"\/\/crystaldestiny.com\/cdn\/shop\/files\/Black-Agate-Crystal-Spheres-Spheres-Black-Agate-23-315g-60mm-33.webp?v=1765516030","width":1000},{"alt":"Black Agate Crystal Spheres-Spheres-Crystal Destiny-Black Agate-20 237g 55mm-Crystal Destiny","id":32289034404011,"position":34,"preview_image":{"aspect_ratio":1.0,"height":1000,"width":1000,"src":"\/\/crystaldestiny.com\/cdn\/shop\/files\/Black-Agate-Crystal-Spheres-Spheres-Black-Agate-20-237g-55mm-34.webp?v=1765516031"},"aspect_ratio":1.0,"height":1000,"media_type":"image","src":"\/\/crystaldestiny.com\/cdn\/shop\/files\/Black-Agate-Crystal-Spheres-Spheres-Black-Agate-20-237g-55mm-34.webp?v=1765516031","width":1000},{"alt":"Black Agate Crystal Spheres-Spheres-Crystal Destiny-Black Agate-19 188g 51mm-Crystal Destiny","id":32289034436779,"position":35,"preview_image":{"aspect_ratio":1.0,"height":1000,"width":1000,"src":"\/\/crystaldestiny.com\/cdn\/shop\/files\/Black-Agate-Crystal-Spheres-Spheres-Black-Agate-19-188g-51mm-35.webp?v=1765516033"},"aspect_ratio":1.0,"height":1000,"media_type":"image","src":"\/\/crystaldestiny.com\/cdn\/shop\/files\/Black-Agate-Crystal-Spheres-Spheres-Black-Agate-19-188g-51mm-35.webp?v=1765516033","width":1000},{"alt":"Black Agate Crystal Spheres-Spheres-Crystal Destiny-Black Agate-25 272g 59mm-Crystal Destiny","id":32289034469547,"position":36,"preview_image":{"aspect_ratio":1.0,"height":1000,"width":1000,"src":"\/\/crystaldestiny.com\/cdn\/shop\/files\/Black-Agate-Crystal-Spheres-Spheres-Black-Agate-25-272g-59mm-36.webp?v=1765516034"},"aspect_ratio":1.0,"height":1000,"media_type":"image","src":"\/\/crystaldestiny.com\/cdn\/shop\/files\/Black-Agate-Crystal-Spheres-Spheres-Black-Agate-25-272g-59mm-36.webp?v=1765516034","width":1000},{"alt":"Black Agate Crystal Spheres-Spheres-Crystal Destiny-Black Agate-35 279g 58mm-Crystal Destiny","id":32289034502315,"position":37,"preview_image":{"aspect_ratio":1.0,"height":1000,"width":1000,"src":"\/\/crystaldestiny.com\/cdn\/shop\/files\/Black-Agate-Crystal-Spheres-Spheres-Black-Agate-35-279g-58mm-37.webp?v=1765516036"},"aspect_ratio":1.0,"height":1000,"media_type":"image","src":"\/\/crystaldestiny.com\/cdn\/shop\/files\/Black-Agate-Crystal-Spheres-Spheres-Black-Agate-35-279g-58mm-37.webp?v=1765516036","width":1000},{"alt":"Black Agate Crystal Spheres-Spheres-Crystal Destiny-Black Agate-12 222g 54mm-Crystal Destiny","id":32289034535083,"position":38,"preview_image":{"aspect_ratio":1.0,"height":1000,"width":1000,"src":"\/\/crystaldestiny.com\/cdn\/shop\/files\/Black-Agate-Crystal-Spheres-Spheres-Black-Agate-12-222g-54mm-38.webp?v=1765516037"},"aspect_ratio":1.0,"height":1000,"media_type":"image","src":"\/\/crystaldestiny.com\/cdn\/shop\/files\/Black-Agate-Crystal-Spheres-Spheres-Black-Agate-12-222g-54mm-38.webp?v=1765516037","width":1000}]
{"item":{"id":8549781569707,"title":"Blue \u0026 Yellow Tiger Eye Crystal Towers","handle":"blue-yellow-tiger-eye-crystal-towers-1005009991623733-1","description":"\u003cp data-end=\"372\" data-start=\"61\"\u003eThese \u003cstrong data-end=\"134\" data-start=\"94\"\u003eBlue \u0026amp; Yellow Tiger Eye Crystal Towers\u003c\/strong\u003e showcase a mesmerizing blend of golden and deep blue chatoyancy, symbolizing strength, clarity, and balance. Each polished point amplifies focus and confidence, making it an excellent stone for personal empowerment and decision-making.\u003c\/p\u003e\n\u003cp data-end=\"634\" data-start=\"374\"\u003eBlue Tiger Eye enhances intuition and inner calm, while Yellow Tiger Eye brings courage and grounding energy. Together, they form a powerful union of insight and action — ideal for meditation, manifestation, or as a bold statement in your crystal collection.\u003c\/p\u003e\n\u003cp data-end=\"634\" data-start=\"374\"\u003eThis product is an exact pick as pictured, one of a kind.\u003c\/p\u003e\n\u003ch2\u003eCrystal Towers, Wands, Generators, Points, Pillars \u0026amp; Obelisks — What's the Difference?\u003c\/h2\u003e\n\u003cp id=\"isPasted\"\u003eWhile these terms may vary, they all describe beautifully shaped crystals with a pointed tip designed to channel and direct energy. Each name highlights a unique aspect of their use:\u003c\/p\u003e\n\u003cul\u003e\n\u003cli\u003e\n\u003cstrong\u003eTowers\u003c\/strong\u003e- Known for their steady, grounding presence, crystal towers help focus and amplify energy, making them perfect for meditation and manifestation.\u003c\/li\u003e\n\u003cli\u003e\n\u003cstrong\u003eWands\u003c\/strong\u003e- Traditionally used in energy work and healing, crystal wands are excellent for directing energy flow and clearing blockages.\u003c\/li\u003e\n\u003cli\u003e\n\u003cstrong\u003ePillars\u003c\/strong\u003e- Symbolizing strength and stability, crystal pillars create a balanced and harmonious environment, making them great for home decor and spiritual practices.\u003c\/li\u003e\n\u003cli\u003e\n\u003cstrong\u003eObelisks\u003c\/strong\u003e- Inspired by ancient structures, crystal obelisks are believed to connect earthly and spiritual energies, making them powerful tools for transformation and enlightenment.\u003c\/li\u003e\n\u003c\/ul\u003e\n\u003cp\u003eNo matter what you call them, these crystals serve the same purpose—to enhance energy, intention, and harmony in your space. Choose the one that resonates most with you!\u003c\/p\u003e","published_at":"2025-10-13T20:07:28-04:00","created_at":"2025-10-13T19:37:11-04:00","vendor":"Ali","type":"Towers","tags":["adjusted-shipping","crystal","polished","Towers"],"price":4199,"price_min":4199,"price_max":5899,"available":true,"price_varies":true,"compare_at_price":0,"compare_at_price_min":0,"compare_at_price_max":0,"compare_at_price_varies":false,"variants":[{"id":45727103353003,"title":"1 \/ Tiger's Eye","option1":"1","option2":"Tiger's Eye","option3":null,"sku":"1005009991623733-1","requires_shipping":true,"taxable":true,"featured_image":{"id":40571164885163,"product_id":8549781569707,"position":26,"created_at":"2025-10-13T19:37:12-04:00","updated_at":"2025-12-11T00:18:48-05:00","alt":"Blue \u0026 Yellow Tiger Eye Crystal Towers-Towers-Ali-1-Tiger's Eye-Crystal Destiny","width":1000,"height":1000,"src":"\/\/crystaldestiny.com\/cdn\/shop\/files\/Blue-Yellow-Tiger-Eye-Crystal-Towers-Towers-1-Tigers-Eye-26.webp?v=1765430328","variant_ids":[45727103353003]},"available":true,"name":"Blue \u0026 Yellow Tiger Eye Crystal Towers - 1 \/ Tiger's Eye","public_title":"1 \/ Tiger's Eye","options":["1","Tiger's Eye"],"price":5899,"weight":100,"compare_at_price":0,"inventory_management":"shopify","barcode":null,"featured_media":{"alt":"Blue \u0026 Yellow Tiger Eye Crystal Towers-Towers-Ali-1-Tiger's Eye-Crystal Destiny","id":31956318453931,"position":26,"preview_image":{"aspect_ratio":1.0,"height":1000,"width":1000,"src":"\/\/crystaldestiny.com\/cdn\/shop\/files\/Blue-Yellow-Tiger-Eye-Crystal-Towers-Towers-1-Tigers-Eye-26.webp?v=1765430328"}},"requires_selling_plan":false,"selling_plan_allocations":[]},{"id":45727103942827,"title":"2 \/ Tiger's Eye","option1":"2","option2":"Tiger's Eye","option3":null,"sku":"1005009991623733-2","requires_shipping":true,"taxable":true,"featured_image":{"id":40571164852395,"product_id":8549781569707,"position":25,"created_at":"2025-10-13T19:37:12-04:00","updated_at":"2025-12-11T00:18:47-05:00","alt":"Blue \u0026 Yellow Tiger Eye Crystal Towers-Towers-Ali-2-Tiger's Eye-Crystal Destiny","width":1000,"height":1000,"src":"\/\/crystaldestiny.com\/cdn\/shop\/files\/Blue-Yellow-Tiger-Eye-Crystal-Towers-Towers-2-Tigers-Eye-25.webp?v=1765430327","variant_ids":[45727103942827]},"available":false,"name":"Blue \u0026 Yellow Tiger Eye Crystal Towers - 2 \/ Tiger's Eye","public_title":"2 \/ Tiger's Eye","options":["2","Tiger's Eye"],"price":5499,"weight":100,"compare_at_price":0,"inventory_management":"shopify","barcode":null,"featured_media":{"alt":"Blue \u0026 Yellow Tiger Eye Crystal Towers-Towers-Ali-2-Tiger's Eye-Crystal Destiny","id":31956318421163,"position":25,"preview_image":{"aspect_ratio":1.0,"height":1000,"width":1000,"src":"\/\/crystaldestiny.com\/cdn\/shop\/files\/Blue-Yellow-Tiger-Eye-Crystal-Towers-Towers-2-Tigers-Eye-25.webp?v=1765430327"}},"requires_selling_plan":false,"selling_plan_allocations":[]},{"id":45727103910059,"title":"3 \/ Tiger's Eye","option1":"3","option2":"Tiger's Eye","option3":null,"sku":"1005009991623733-3","requires_shipping":true,"taxable":true,"featured_image":{"id":40571164557483,"product_id":8549781569707,"position":16,"created_at":"2025-10-13T19:37:12-04:00","updated_at":"2025-12-11T00:18:34-05:00","alt":"Blue \u0026 Yellow Tiger Eye Crystal Towers-Towers-Ali-3-Tiger's Eye-Crystal Destiny","width":1000,"height":1000,"src":"\/\/crystaldestiny.com\/cdn\/shop\/files\/Blue-Yellow-Tiger-Eye-Crystal-Towers-Towers-3-Tigers-Eye-16.webp?v=1765430314","variant_ids":[45727103910059]},"available":true,"name":"Blue \u0026 Yellow Tiger Eye Crystal Towers - 3 \/ Tiger's Eye","public_title":"3 \/ Tiger's Eye","options":["3","Tiger's Eye"],"price":5499,"weight":100,"compare_at_price":0,"inventory_management":"shopify","barcode":null,"featured_media":{"alt":"Blue \u0026 Yellow Tiger Eye Crystal Towers-Towers-Ali-3-Tiger's Eye-Crystal Destiny","id":31956318126251,"position":16,"preview_image":{"aspect_ratio":1.0,"height":1000,"width":1000,"src":"\/\/crystaldestiny.com\/cdn\/shop\/files\/Blue-Yellow-Tiger-Eye-Crystal-Towers-Towers-3-Tigers-Eye-16.webp?v=1765430314"}},"requires_selling_plan":false,"selling_plan_allocations":[]},{"id":45727104008363,"title":"4 \/ Tiger's Eye","option1":"4","option2":"Tiger's Eye","option3":null,"sku":"1005009991623733-4","requires_shipping":true,"taxable":true,"featured_image":{"id":40571164590251,"product_id":8549781569707,"position":17,"created_at":"2025-10-13T19:37:12-04:00","updated_at":"2025-12-11T00:18:35-05:00","alt":"Blue \u0026 Yellow Tiger Eye Crystal Towers-Towers-Ali-4-Tiger's Eye-Crystal Destiny","width":1000,"height":1000,"src":"\/\/crystaldestiny.com\/cdn\/shop\/files\/Blue-Yellow-Tiger-Eye-Crystal-Towers-Towers-4-Tigers-Eye-17.webp?v=1765430315","variant_ids":[45727104008363]},"available":true,"name":"Blue \u0026 Yellow Tiger Eye Crystal Towers - 4 \/ Tiger's Eye","public_title":"4 \/ Tiger's Eye","options":["4","Tiger's Eye"],"price":4999,"weight":100,"compare_at_price":0,"inventory_management":"shopify","barcode":null,"featured_media":{"alt":"Blue \u0026 Yellow Tiger Eye Crystal Towers-Towers-Ali-4-Tiger's Eye-Crystal Destiny","id":31956318159019,"position":17,"preview_image":{"aspect_ratio":1.0,"height":1000,"width":1000,"src":"\/\/crystaldestiny.com\/cdn\/shop\/files\/Blue-Yellow-Tiger-Eye-Crystal-Towers-Towers-4-Tigers-Eye-17.webp?v=1765430315"}},"requires_selling_plan":false,"selling_plan_allocations":[]},{"id":45727103975595,"title":"5 \/ Tiger's Eye","option1":"5","option2":"Tiger's Eye","option3":null,"sku":"1005009991623733-5","requires_shipping":true,"taxable":true,"featured_image":{"id":40571164360875,"product_id":8549781569707,"position":10,"created_at":"2025-10-13T19:37:12-04:00","updated_at":"2025-12-11T00:18:26-05:00","alt":"Blue \u0026 Yellow Tiger Eye Crystal Towers-Towers-Ali-5-Tiger's Eye-Crystal Destiny","width":1000,"height":1000,"src":"\/\/crystaldestiny.com\/cdn\/shop\/files\/Blue-Yellow-Tiger-Eye-Crystal-Towers-Towers-5-Tigers-Eye-10.webp?v=1765430306","variant_ids":[45727103975595]},"available":true,"name":"Blue \u0026 Yellow Tiger Eye Crystal Towers - 5 \/ Tiger's Eye","public_title":"5 \/ Tiger's Eye","options":["5","Tiger's Eye"],"price":5899,"weight":100,"compare_at_price":0,"inventory_management":"shopify","barcode":null,"featured_media":{"alt":"Blue \u0026 Yellow Tiger Eye Crystal Towers-Towers-Ali-5-Tiger's Eye-Crystal Destiny","id":31956317929643,"position":10,"preview_image":{"aspect_ratio":1.0,"height":1000,"width":1000,"src":"\/\/crystaldestiny.com\/cdn\/shop\/files\/Blue-Yellow-Tiger-Eye-Crystal-Towers-Towers-5-Tigers-Eye-10.webp?v=1765430306"}},"requires_selling_plan":false,"selling_plan_allocations":[]},{"id":45727103811755,"title":"6 \/ Tiger's Eye","option1":"6","option2":"Tiger's Eye","option3":null,"sku":"1005009991623733-6","requires_shipping":true,"taxable":true,"featured_image":{"id":40571164819627,"product_id":8549781569707,"position":24,"created_at":"2025-10-13T19:37:12-04:00","updated_at":"2025-12-11T00:18:46-05:00","alt":"Blue \u0026 Yellow Tiger Eye Crystal Towers-Towers-Ali-6-Tiger's Eye-Crystal Destiny","width":1000,"height":1000,"src":"\/\/crystaldestiny.com\/cdn\/shop\/files\/Blue-Yellow-Tiger-Eye-Crystal-Towers-Towers-6-Tigers-Eye-24.webp?v=1765430326","variant_ids":[45727103811755]},"available":false,"name":"Blue \u0026 Yellow Tiger Eye Crystal Towers - 6 \/ Tiger's Eye","public_title":"6 \/ Tiger's Eye","options":["6","Tiger's Eye"],"price":5399,"weight":100,"compare_at_price":0,"inventory_management":"shopify","barcode":null,"featured_media":{"alt":"Blue \u0026 Yellow Tiger Eye Crystal Towers-Towers-Ali-6-Tiger's Eye-Crystal Destiny","id":31956318388395,"position":24,"preview_image":{"aspect_ratio":1.0,"height":1000,"width":1000,"src":"\/\/crystaldestiny.com\/cdn\/shop\/files\/Blue-Yellow-Tiger-Eye-Crystal-Towers-Towers-6-Tigers-Eye-24.webp?v=1765430326"}},"requires_selling_plan":false,"selling_plan_allocations":[]},{"id":45727103778987,"title":"7 \/ Tiger's Eye","option1":"7","option2":"Tiger's Eye","option3":null,"sku":"1005009991623733-7","requires_shipping":true,"taxable":true,"featured_image":{"id":40571164786859,"product_id":8549781569707,"position":23,"created_at":"2025-10-13T19:37:12-04:00","updated_at":"2025-12-11T00:18:44-05:00","alt":"Blue \u0026 Yellow Tiger Eye Crystal Towers-Towers-Ali-7-Tiger's Eye-Crystal Destiny","width":1000,"height":1000,"src":"\/\/crystaldestiny.com\/cdn\/shop\/files\/Blue-Yellow-Tiger-Eye-Crystal-Towers-Towers-7-Tigers-Eye-23.webp?v=1765430324","variant_ids":[45727103778987]},"available":true,"name":"Blue \u0026 Yellow Tiger Eye Crystal Towers - 7 \/ Tiger's Eye","public_title":"7 \/ Tiger's Eye","options":["7","Tiger's Eye"],"price":4999,"weight":100,"compare_at_price":0,"inventory_management":"shopify","barcode":null,"featured_media":{"alt":"Blue \u0026 Yellow Tiger Eye Crystal Towers-Towers-Ali-7-Tiger's Eye-Crystal Destiny","id":31956318355627,"position":23,"preview_image":{"aspect_ratio":1.0,"height":1000,"width":1000,"src":"\/\/crystaldestiny.com\/cdn\/shop\/files\/Blue-Yellow-Tiger-Eye-Crystal-Towers-Towers-7-Tigers-Eye-23.webp?v=1765430324"}},"requires_selling_plan":false,"selling_plan_allocations":[]},{"id":45727103877291,"title":"8 \/ Tiger's Eye","option1":"8","option2":"Tiger's Eye","option3":null,"sku":"1005009991623733-8","requires_shipping":true,"taxable":true,"featured_image":{"id":40571164328107,"product_id":8549781569707,"position":9,"created_at":"2025-10-13T19:37:12-04:00","updated_at":"2025-12-11T00:18:24-05:00","alt":"Blue \u0026 Yellow Tiger Eye Crystal Towers-Towers-Ali-8-Tiger's Eye-Crystal Destiny","width":1000,"height":1000,"src":"\/\/crystaldestiny.com\/cdn\/shop\/files\/Blue-Yellow-Tiger-Eye-Crystal-Towers-Towers-8-Tigers-Eye-9.webp?v=1765430304","variant_ids":[45727103877291]},"available":true,"name":"Blue \u0026 Yellow Tiger Eye Crystal Towers - 8 \/ Tiger's Eye","public_title":"8 \/ Tiger's Eye","options":["8","Tiger's Eye"],"price":5499,"weight":100,"compare_at_price":0,"inventory_management":"shopify","barcode":null,"featured_media":{"alt":"Blue \u0026 Yellow Tiger Eye Crystal Towers-Towers-Ali-8-Tiger's Eye-Crystal Destiny","id":31956317896875,"position":9,"preview_image":{"aspect_ratio":1.0,"height":1000,"width":1000,"src":"\/\/crystaldestiny.com\/cdn\/shop\/files\/Blue-Yellow-Tiger-Eye-Crystal-Towers-Towers-8-Tigers-Eye-9.webp?v=1765430304"}},"requires_selling_plan":false,"selling_plan_allocations":[]},{"id":45727103844523,"title":"9 \/ Tiger's Eye","option1":"9","option2":"Tiger's Eye","option3":null,"sku":"1005009991623733-9","requires_shipping":true,"taxable":true,"featured_image":{"id":40571164524715,"product_id":8549781569707,"position":15,"created_at":"2025-10-13T19:37:12-04:00","updated_at":"2025-12-11T00:18:32-05:00","alt":"Blue \u0026 Yellow Tiger Eye Crystal Towers-Towers-Ali-9-Tiger's Eye-Crystal Destiny","width":1000,"height":1000,"src":"\/\/crystaldestiny.com\/cdn\/shop\/files\/Blue-Yellow-Tiger-Eye-Crystal-Towers-Towers-9-Tigers-Eye-15.webp?v=1765430312","variant_ids":[45727103844523]},"available":true,"name":"Blue \u0026 Yellow Tiger Eye Crystal Towers - 9 \/ Tiger's Eye","public_title":"9 \/ Tiger's Eye","options":["9","Tiger's Eye"],"price":5499,"weight":100,"compare_at_price":0,"inventory_management":"shopify","barcode":null,"featured_media":{"alt":"Blue \u0026 Yellow Tiger Eye Crystal Towers-Towers-Ali-9-Tiger's Eye-Crystal Destiny","id":31956318093483,"position":15,"preview_image":{"aspect_ratio":1.0,"height":1000,"width":1000,"src":"\/\/crystaldestiny.com\/cdn\/shop\/files\/Blue-Yellow-Tiger-Eye-Crystal-Towers-Towers-9-Tigers-Eye-15.webp?v=1765430312"}},"requires_selling_plan":false,"selling_plan_allocations":[]},{"id":45727103680683,"title":"10 \/ Tiger's Eye","option1":"10","option2":"Tiger's Eye","option3":null,"sku":"1005009991623733-10","requires_shipping":true,"taxable":true,"featured_image":{"id":40571164688555,"product_id":8549781569707,"position":20,"created_at":"2025-10-13T19:37:12-04:00","updated_at":"2025-12-11T00:18:40-05:00","alt":"Blue \u0026 Yellow Tiger Eye Crystal Towers-Towers-Ali-10-Tiger's Eye-Crystal Destiny","width":1000,"height":1000,"src":"\/\/crystaldestiny.com\/cdn\/shop\/files\/Blue-Yellow-Tiger-Eye-Crystal-Towers-Towers-10-Tigers-Eye-20.webp?v=1765430320","variant_ids":[45727103680683]},"available":true,"name":"Blue \u0026 Yellow Tiger Eye Crystal Towers - 10 \/ Tiger's Eye","public_title":"10 \/ Tiger's Eye","options":["10","Tiger's Eye"],"price":5399,"weight":100,"compare_at_price":0,"inventory_management":"shopify","barcode":null,"featured_media":{"alt":"Blue \u0026 Yellow Tiger Eye Crystal Towers-Towers-Ali-10-Tiger's Eye-Crystal Destiny","id":31956318257323,"position":20,"preview_image":{"aspect_ratio":1.0,"height":1000,"width":1000,"src":"\/\/crystaldestiny.com\/cdn\/shop\/files\/Blue-Yellow-Tiger-Eye-Crystal-Towers-Towers-10-Tigers-Eye-20.webp?v=1765430320"}},"requires_selling_plan":false,"selling_plan_allocations":[]},{"id":45727103647915,"title":"11 \/ Tiger's Eye","option1":"11","option2":"Tiger's Eye","option3":null,"sku":"1005009991623733-11","requires_shipping":true,"taxable":true,"featured_image":{"id":40571164655787,"product_id":8549781569707,"position":19,"created_at":"2025-10-13T19:37:12-04:00","updated_at":"2025-12-11T00:18:38-05:00","alt":"Blue \u0026 Yellow Tiger Eye Crystal Towers-Towers-Ali-11-Tiger's Eye-Crystal Destiny","width":1000,"height":1000,"src":"\/\/crystaldestiny.com\/cdn\/shop\/files\/Blue-Yellow-Tiger-Eye-Crystal-Towers-Towers-11-Tigers-Eye-19.webp?v=1765430318","variant_ids":[45727103647915]},"available":true,"name":"Blue \u0026 Yellow Tiger Eye Crystal Towers - 11 \/ Tiger's Eye","public_title":"11 \/ Tiger's Eye","options":["11","Tiger's Eye"],"price":5399,"weight":100,"compare_at_price":0,"inventory_management":"shopify","barcode":null,"featured_media":{"alt":"Blue \u0026 Yellow Tiger Eye Crystal Towers-Towers-Ali-11-Tiger's Eye-Crystal Destiny","id":31956318224555,"position":19,"preview_image":{"aspect_ratio":1.0,"height":1000,"width":1000,"src":"\/\/crystaldestiny.com\/cdn\/shop\/files\/Blue-Yellow-Tiger-Eye-Crystal-Towers-Towers-11-Tigers-Eye-19.webp?v=1765430318"}},"requires_selling_plan":false,"selling_plan_allocations":[]},{"id":45727103746219,"title":"12 \/ Tiger's Eye","option1":"12","option2":"Tiger's Eye","option3":null,"sku":"1005009991623733-12","requires_shipping":true,"taxable":true,"featured_image":{"id":40571164754091,"product_id":8549781569707,"position":22,"created_at":"2025-10-13T19:37:12-04:00","updated_at":"2025-12-11T00:18:42-05:00","alt":"Blue \u0026 Yellow Tiger Eye Crystal Towers-Towers-Ali-12-Tiger's Eye-Crystal Destiny","width":1000,"height":1000,"src":"\/\/crystaldestiny.com\/cdn\/shop\/files\/Blue-Yellow-Tiger-Eye-Crystal-Towers-Towers-12-Tigers-Eye-22.webp?v=1765430322","variant_ids":[45727103746219]},"available":true,"name":"Blue \u0026 Yellow Tiger Eye Crystal Towers - 12 \/ Tiger's Eye","public_title":"12 \/ Tiger's Eye","options":["12","Tiger's Eye"],"price":5799,"weight":100,"compare_at_price":0,"inventory_management":"shopify","barcode":null,"featured_media":{"alt":"Blue \u0026 Yellow Tiger Eye Crystal Towers-Towers-Ali-12-Tiger's Eye-Crystal Destiny","id":31956318322859,"position":22,"preview_image":{"aspect_ratio":1.0,"height":1000,"width":1000,"src":"\/\/crystaldestiny.com\/cdn\/shop\/files\/Blue-Yellow-Tiger-Eye-Crystal-Towers-Towers-12-Tigers-Eye-22.webp?v=1765430322"}},"requires_selling_plan":false,"selling_plan_allocations":[]},{"id":45727103713451,"title":"13 \/ Tiger's Eye","option1":"13","option2":"Tiger's Eye","option3":null,"sku":"1005009991623733-13","requires_shipping":true,"taxable":true,"featured_image":{"id":40571164721323,"product_id":8549781569707,"position":21,"created_at":"2025-10-13T19:37:12-04:00","updated_at":"2025-12-11T00:18:41-05:00","alt":"Blue \u0026 Yellow Tiger Eye Crystal Towers-Towers-Ali-13-Tiger's Eye-Crystal Destiny","width":1000,"height":1000,"src":"\/\/crystaldestiny.com\/cdn\/shop\/files\/Blue-Yellow-Tiger-Eye-Crystal-Towers-Towers-13-Tigers-Eye-21.webp?v=1765430321","variant_ids":[45727103713451]},"available":true,"name":"Blue \u0026 Yellow Tiger Eye Crystal Towers - 13 \/ Tiger's Eye","public_title":"13 \/ Tiger's Eye","options":["13","Tiger's Eye"],"price":5499,"weight":100,"compare_at_price":0,"inventory_management":"shopify","barcode":null,"featured_media":{"alt":"Blue \u0026 Yellow Tiger Eye Crystal Towers-Towers-Ali-13-Tiger's Eye-Crystal Destiny","id":31956318290091,"position":21,"preview_image":{"aspect_ratio":1.0,"height":1000,"width":1000,"src":"\/\/crystaldestiny.com\/cdn\/shop\/files\/Blue-Yellow-Tiger-Eye-Crystal-Towers-Towers-13-Tigers-Eye-21.webp?v=1765430321"}},"requires_selling_plan":false,"selling_plan_allocations":[]},{"id":45727103549611,"title":"14 \/ Tiger's Eye","option1":"14","option2":"Tiger's Eye","option3":null,"sku":"1005009991623733-14","requires_shipping":true,"taxable":true,"featured_image":{"id":40571164426411,"product_id":8549781569707,"position":12,"created_at":"2025-10-13T19:37:12-04:00","updated_at":"2025-12-11T00:18:28-05:00","alt":"Blue \u0026 Yellow Tiger Eye Crystal Towers-Towers-Ali-14-Tiger's Eye-Crystal Destiny","width":1000,"height":1000,"src":"\/\/crystaldestiny.com\/cdn\/shop\/files\/Blue-Yellow-Tiger-Eye-Crystal-Towers-Towers-14-Tigers-Eye-12.webp?v=1765430308","variant_ids":[45727103549611]},"available":false,"name":"Blue \u0026 Yellow Tiger Eye Crystal Towers - 14 \/ Tiger's Eye","public_title":"14 \/ Tiger's Eye","options":["14","Tiger's Eye"],"price":5499,"weight":100,"compare_at_price":0,"inventory_management":"shopify","barcode":null,"featured_media":{"alt":"Blue \u0026 Yellow Tiger Eye Crystal Towers-Towers-Ali-14-Tiger's Eye-Crystal Destiny","id":31956317995179,"position":12,"preview_image":{"aspect_ratio":1.0,"height":1000,"width":1000,"src":"\/\/crystaldestiny.com\/cdn\/shop\/files\/Blue-Yellow-Tiger-Eye-Crystal-Towers-Towers-14-Tigers-Eye-12.webp?v=1765430308"}},"requires_selling_plan":false,"selling_plan_allocations":[]},{"id":45727103516843,"title":"15 \/ Tiger's Eye","option1":"15","option2":"Tiger's Eye","option3":null,"sku":"1005009991623733-15","requires_shipping":true,"taxable":true,"featured_image":{"id":40571164459179,"product_id":8549781569707,"position":13,"created_at":"2025-10-13T19:37:12-04:00","updated_at":"2025-12-11T00:18:30-05:00","alt":"Blue \u0026 Yellow Tiger Eye Crystal Towers-Towers-Ali-15-Tiger's Eye-Crystal Destiny","width":1000,"height":1000,"src":"\/\/crystaldestiny.com\/cdn\/shop\/files\/Blue-Yellow-Tiger-Eye-Crystal-Towers-Towers-15-Tigers-Eye-13.webp?v=1765430310","variant_ids":[45727103516843]},"available":true,"name":"Blue \u0026 Yellow Tiger Eye Crystal Towers - 15 \/ Tiger's Eye","public_title":"15 \/ Tiger's Eye","options":["15","Tiger's Eye"],"price":4799,"weight":100,"compare_at_price":0,"inventory_management":"shopify","barcode":null,"featured_media":{"alt":"Blue \u0026 Yellow Tiger Eye Crystal Towers-Towers-Ali-15-Tiger's Eye-Crystal Destiny","id":31956318027947,"position":13,"preview_image":{"aspect_ratio":1.0,"height":1000,"width":1000,"src":"\/\/crystaldestiny.com\/cdn\/shop\/files\/Blue-Yellow-Tiger-Eye-Crystal-Towers-Towers-15-Tigers-Eye-13.webp?v=1765430310"}},"requires_selling_plan":false,"selling_plan_allocations":[]},{"id":45727103615147,"title":"16 \/ Tiger's Eye","option1":"16","option2":"Tiger's Eye","option3":null,"sku":"1005009991623733-16","requires_shipping":true,"taxable":true,"featured_image":{"id":40571164295339,"product_id":8549781569707,"position":8,"created_at":"2025-10-13T19:37:12-04:00","updated_at":"2025-12-11T00:18:23-05:00","alt":"Blue \u0026 Yellow Tiger Eye Crystal Towers-Towers-Ali-16-Tiger's Eye-Crystal Destiny","width":1000,"height":1000,"src":"\/\/crystaldestiny.com\/cdn\/shop\/files\/Blue-Yellow-Tiger-Eye-Crystal-Towers-Towers-16-Tigers-Eye-8.webp?v=1765430303","variant_ids":[45727103615147]},"available":false,"name":"Blue \u0026 Yellow Tiger Eye Crystal Towers - 16 \/ Tiger's Eye","public_title":"16 \/ Tiger's Eye","options":["16","Tiger's Eye"],"price":4899,"weight":100,"compare_at_price":0,"inventory_management":"shopify","barcode":null,"featured_media":{"alt":"Blue \u0026 Yellow Tiger Eye Crystal Towers-Towers-Ali-16-Tiger's Eye-Crystal Destiny","id":31956317864107,"position":8,"preview_image":{"aspect_ratio":1.0,"height":1000,"width":1000,"src":"\/\/crystaldestiny.com\/cdn\/shop\/files\/Blue-Yellow-Tiger-Eye-Crystal-Towers-Towers-16-Tigers-Eye-8.webp?v=1765430303"}},"requires_selling_plan":false,"selling_plan_allocations":[]},{"id":45727103582379,"title":"17 \/ Tiger's Eye","option1":"17","option2":"Tiger's Eye","option3":null,"sku":"1005009991623733-17","requires_shipping":true,"taxable":true,"featured_image":{"id":40571164491947,"product_id":8549781569707,"position":14,"created_at":"2025-10-13T19:37:12-04:00","updated_at":"2025-12-11T00:18:31-05:00","alt":"Blue \u0026 Yellow Tiger Eye Crystal Towers-Towers-Ali-17-Tiger's Eye-Crystal Destiny","width":1000,"height":1000,"src":"\/\/crystaldestiny.com\/cdn\/shop\/files\/Blue-Yellow-Tiger-Eye-Crystal-Towers-Towers-17-Tigers-Eye-14.webp?v=1765430311","variant_ids":[45727103582379]},"available":true,"name":"Blue \u0026 Yellow Tiger Eye Crystal Towers - 17 \/ Tiger's Eye","public_title":"17 \/ Tiger's Eye","options":["17","Tiger's Eye"],"price":4499,"weight":100,"compare_at_price":0,"inventory_management":"shopify","barcode":null,"featured_media":{"alt":"Blue \u0026 Yellow Tiger Eye Crystal Towers-Towers-Ali-17-Tiger's Eye-Crystal Destiny","id":31956318060715,"position":14,"preview_image":{"aspect_ratio":1.0,"height":1000,"width":1000,"src":"\/\/crystaldestiny.com\/cdn\/shop\/files\/Blue-Yellow-Tiger-Eye-Crystal-Towers-Towers-17-Tigers-Eye-14.webp?v=1765430311"}},"requires_selling_plan":false,"selling_plan_allocations":[]},{"id":45727103418539,"title":"18 \/ Tiger's Eye","option1":"18","option2":"Tiger's Eye","option3":null,"sku":"1005009991623733-18","requires_shipping":true,"taxable":true,"featured_image":{"id":40571164917931,"product_id":8549781569707,"position":27,"created_at":"2025-10-13T19:37:12-04:00","updated_at":"2025-12-11T00:18:50-05:00","alt":"Blue \u0026 Yellow Tiger Eye Crystal Towers-Towers-Ali-18-Tiger's Eye-Crystal Destiny","width":1000,"height":1000,"src":"\/\/crystaldestiny.com\/cdn\/shop\/files\/Blue-Yellow-Tiger-Eye-Crystal-Towers-Towers-18-Tigers-Eye-27.webp?v=1765430330","variant_ids":[45727103418539]},"available":true,"name":"Blue \u0026 Yellow Tiger Eye Crystal Towers - 18 \/ Tiger's Eye","public_title":"18 \/ Tiger's Eye","options":["18","Tiger's Eye"],"price":4499,"weight":100,"compare_at_price":0,"inventory_management":"shopify","barcode":null,"featured_media":{"alt":"Blue \u0026 Yellow Tiger Eye Crystal Towers-Towers-Ali-18-Tiger's Eye-Crystal Destiny","id":31956318486699,"position":27,"preview_image":{"aspect_ratio":1.0,"height":1000,"width":1000,"src":"\/\/crystaldestiny.com\/cdn\/shop\/files\/Blue-Yellow-Tiger-Eye-Crystal-Towers-Towers-18-Tigers-Eye-27.webp?v=1765430330"}},"requires_selling_plan":false,"selling_plan_allocations":[]},{"id":45727103385771,"title":"19 \/ Tiger's Eye","option1":"19","option2":"Tiger's Eye","option3":null,"sku":"1005009991623733-19","requires_shipping":true,"taxable":true,"featured_image":{"id":40571164393643,"product_id":8549781569707,"position":11,"created_at":"2025-10-13T19:37:12-04:00","updated_at":"2025-12-11T00:18:27-05:00","alt":"Blue \u0026 Yellow Tiger Eye Crystal Towers-Towers-Ali-19-Tiger's Eye-Crystal Destiny","width":1000,"height":1000,"src":"\/\/crystaldestiny.com\/cdn\/shop\/files\/Blue-Yellow-Tiger-Eye-Crystal-Towers-Towers-19-Tigers-Eye-11.webp?v=1765430307","variant_ids":[45727103385771]},"available":true,"name":"Blue \u0026 Yellow Tiger Eye Crystal Towers - 19 \/ Tiger's Eye","public_title":"19 \/ Tiger's Eye","options":["19","Tiger's Eye"],"price":4199,"weight":100,"compare_at_price":0,"inventory_management":"shopify","barcode":null,"featured_media":{"alt":"Blue \u0026 Yellow Tiger Eye Crystal Towers-Towers-Ali-19-Tiger's Eye-Crystal Destiny","id":31956317962411,"position":11,"preview_image":{"aspect_ratio":1.0,"height":1000,"width":1000,"src":"\/\/crystaldestiny.com\/cdn\/shop\/files\/Blue-Yellow-Tiger-Eye-Crystal-Towers-Towers-19-Tigers-Eye-11.webp?v=1765430307"}},"requires_selling_plan":false,"selling_plan_allocations":[]},{"id":45727103484075,"title":"20 \/ Tiger's Eye","option1":"20","option2":"Tiger's Eye","option3":null,"sku":"1005009991623733-20","requires_shipping":true,"taxable":true,"featured_image":{"id":40571164262571,"product_id":8549781569707,"position":7,"created_at":"2025-10-13T19:37:12-04:00","updated_at":"2025-12-11T00:18:21-05:00","alt":"Blue \u0026 Yellow Tiger Eye Crystal Towers-Towers-Ali-20-Tiger's Eye-Crystal Destiny","width":1000,"height":1000,"src":"\/\/crystaldestiny.com\/cdn\/shop\/files\/Blue-Yellow-Tiger-Eye-Crystal-Towers-Towers-20-Tigers-Eye-7.webp?v=1765430301","variant_ids":[45727103484075]},"available":true,"name":"Blue \u0026 Yellow Tiger Eye Crystal Towers - 20 \/ Tiger's Eye","public_title":"20 \/ Tiger's Eye","options":["20","Tiger's Eye"],"price":4199,"weight":100,"compare_at_price":0,"inventory_management":"shopify","barcode":null,"featured_media":{"alt":"Blue \u0026 Yellow Tiger Eye Crystal Towers-Towers-Ali-20-Tiger's Eye-Crystal Destiny","id":31956317831339,"position":7,"preview_image":{"aspect_ratio":1.0,"height":1000,"width":1000,"src":"\/\/crystaldestiny.com\/cdn\/shop\/files\/Blue-Yellow-Tiger-Eye-Crystal-Towers-Towers-20-Tigers-Eye-7.webp?v=1765430301"}},"requires_selling_plan":false,"selling_plan_allocations":[]},{"id":45727103451307,"title":"21 \/ Tiger's Eye","option1":"21","option2":"Tiger's Eye","option3":null,"sku":"1005009991623733-21","requires_shipping":true,"taxable":true,"featured_image":{"id":40571164623019,"product_id":8549781569707,"position":18,"created_at":"2025-10-13T19:37:12-04:00","updated_at":"2025-12-11T00:18:37-05:00","alt":"Blue \u0026 Yellow Tiger Eye Crystal Towers-Towers-Ali-21-Tiger's Eye-Crystal Destiny","width":1000,"height":1000,"src":"\/\/crystaldestiny.com\/cdn\/shop\/files\/Blue-Yellow-Tiger-Eye-Crystal-Towers-Towers-21-Tigers-Eye-18.webp?v=1765430317","variant_ids":[45727103451307]},"available":false,"name":"Blue \u0026 Yellow Tiger Eye Crystal Towers - 21 \/ Tiger's Eye","public_title":"21 \/ Tiger's Eye","options":["21","Tiger's Eye"],"price":4699,"weight":100,"compare_at_price":0,"inventory_management":"shopify","barcode":null,"featured_media":{"alt":"Blue \u0026 Yellow Tiger Eye Crystal Towers-Towers-Ali-21-Tiger's Eye-Crystal Destiny","id":31956318191787,"position":18,"preview_image":{"aspect_ratio":1.0,"height":1000,"width":1000,"src":"\/\/crystaldestiny.com\/cdn\/shop\/files\/Blue-Yellow-Tiger-Eye-Crystal-Towers-Towers-21-Tigers-Eye-18.webp?v=1765430317"}},"requires_selling_plan":false,"selling_plan_allocations":[]}],"images":["\/\/crystaldestiny.com\/cdn\/shop\/files\/Blue-Yellow-Tiger-Eye-Crystal-Towers-Towers.webp?v=1760458930","\/\/crystaldestiny.com\/cdn\/shop\/files\/Blue-Yellow-Tiger-Eye-Crystal-Towers-Towers-2.webp?v=1760458933","\/\/crystaldestiny.com\/cdn\/shop\/files\/Blue-Yellow-Tiger-Eye-Crystal-Towers-Towers-3.webp?v=1760458935","\/\/crystaldestiny.com\/cdn\/shop\/files\/Blue-Yellow-Tiger-Eye-Crystal-Towers-Towers-4.webp?v=1760458938","\/\/crystaldestiny.com\/cdn\/shop\/files\/Blue-Yellow-Tiger-Eye-Crystal-Towers-Towers-5.webp?v=1760458940","\/\/crystaldestiny.com\/cdn\/shop\/files\/Blue-Yellow-Tiger-Eye-Crystal-Towers-Towers-6.webp?v=1760458944","\/\/crystaldestiny.com\/cdn\/shop\/files\/Blue-Yellow-Tiger-Eye-Crystal-Towers-Towers-20-Tigers-Eye-7.webp?v=1765430301","\/\/crystaldestiny.com\/cdn\/shop\/files\/Blue-Yellow-Tiger-Eye-Crystal-Towers-Towers-16-Tigers-Eye-8.webp?v=1765430303","\/\/crystaldestiny.com\/cdn\/shop\/files\/Blue-Yellow-Tiger-Eye-Crystal-Towers-Towers-8-Tigers-Eye-9.webp?v=1765430304","\/\/crystaldestiny.com\/cdn\/shop\/files\/Blue-Yellow-Tiger-Eye-Crystal-Towers-Towers-5-Tigers-Eye-10.webp?v=1765430306","\/\/crystaldestiny.com\/cdn\/shop\/files\/Blue-Yellow-Tiger-Eye-Crystal-Towers-Towers-19-Tigers-Eye-11.webp?v=1765430307","\/\/crystaldestiny.com\/cdn\/shop\/files\/Blue-Yellow-Tiger-Eye-Crystal-Towers-Towers-14-Tigers-Eye-12.webp?v=1765430308","\/\/crystaldestiny.com\/cdn\/shop\/files\/Blue-Yellow-Tiger-Eye-Crystal-Towers-Towers-15-Tigers-Eye-13.webp?v=1765430310","\/\/crystaldestiny.com\/cdn\/shop\/files\/Blue-Yellow-Tiger-Eye-Crystal-Towers-Towers-17-Tigers-Eye-14.webp?v=1765430311","\/\/crystaldestiny.com\/cdn\/shop\/files\/Blue-Yellow-Tiger-Eye-Crystal-Towers-Towers-9-Tigers-Eye-15.webp?v=1765430312","\/\/crystaldestiny.com\/cdn\/shop\/files\/Blue-Yellow-Tiger-Eye-Crystal-Towers-Towers-3-Tigers-Eye-16.webp?v=1765430314","\/\/crystaldestiny.com\/cdn\/shop\/files\/Blue-Yellow-Tiger-Eye-Crystal-Towers-Towers-4-Tigers-Eye-17.webp?v=1765430315","\/\/crystaldestiny.com\/cdn\/shop\/files\/Blue-Yellow-Tiger-Eye-Crystal-Towers-Towers-21-Tigers-Eye-18.webp?v=1765430317","\/\/crystaldestiny.com\/cdn\/shop\/files\/Blue-Yellow-Tiger-Eye-Crystal-Towers-Towers-11-Tigers-Eye-19.webp?v=1765430318","\/\/crystaldestiny.com\/cdn\/shop\/files\/Blue-Yellow-Tiger-Eye-Crystal-Towers-Towers-10-Tigers-Eye-20.webp?v=1765430320","\/\/crystaldestiny.com\/cdn\/shop\/files\/Blue-Yellow-Tiger-Eye-Crystal-Towers-Towers-13-Tigers-Eye-21.webp?v=1765430321","\/\/crystaldestiny.com\/cdn\/shop\/files\/Blue-Yellow-Tiger-Eye-Crystal-Towers-Towers-12-Tigers-Eye-22.webp?v=1765430322","\/\/crystaldestiny.com\/cdn\/shop\/files\/Blue-Yellow-Tiger-Eye-Crystal-Towers-Towers-7-Tigers-Eye-23.webp?v=1765430324","\/\/crystaldestiny.com\/cdn\/shop\/files\/Blue-Yellow-Tiger-Eye-Crystal-Towers-Towers-6-Tigers-Eye-24.webp?v=1765430326","\/\/crystaldestiny.com\/cdn\/shop\/files\/Blue-Yellow-Tiger-Eye-Crystal-Towers-Towers-2-Tigers-Eye-25.webp?v=1765430327","\/\/crystaldestiny.com\/cdn\/shop\/files\/Blue-Yellow-Tiger-Eye-Crystal-Towers-Towers-1-Tigers-Eye-26.webp?v=1765430328","\/\/crystaldestiny.com\/cdn\/shop\/files\/Blue-Yellow-Tiger-Eye-Crystal-Towers-Towers-18-Tigers-Eye-27.webp?v=1765430330"],"featured_image":"\/\/crystaldestiny.com\/cdn\/shop\/files\/Blue-Yellow-Tiger-Eye-Crystal-Towers-Towers.webp?v=1760458930","options":["size","Material"],"media":[{"alt":"Blue \u0026 Yellow Tiger Eye Crystal Towers-Towers-Ali-1-Tiger's Eye-Crystal Destiny","id":31956317634731,"position":1,"preview_image":{"aspect_ratio":1.0,"height":1000,"width":1000,"src":"\/\/crystaldestiny.com\/cdn\/shop\/files\/Blue-Yellow-Tiger-Eye-Crystal-Towers-Towers.webp?v=1760458930"},"aspect_ratio":1.0,"height":1000,"media_type":"image","src":"\/\/crystaldestiny.com\/cdn\/shop\/files\/Blue-Yellow-Tiger-Eye-Crystal-Towers-Towers.webp?v=1760458930","width":1000},{"alt":"Blue \u0026 Yellow Tiger Eye Crystal Towers-Towers-Ali-1-Tiger's Eye-Crystal Destiny","id":31956317667499,"position":2,"preview_image":{"aspect_ratio":1.0,"height":1000,"width":1000,"src":"\/\/crystaldestiny.com\/cdn\/shop\/files\/Blue-Yellow-Tiger-Eye-Crystal-Towers-Towers-2.webp?v=1760458933"},"aspect_ratio":1.0,"height":1000,"media_type":"image","src":"\/\/crystaldestiny.com\/cdn\/shop\/files\/Blue-Yellow-Tiger-Eye-Crystal-Towers-Towers-2.webp?v=1760458933","width":1000},{"alt":"Blue \u0026 Yellow Tiger Eye Crystal Towers-Towers-Ali-1-Tiger's Eye-Crystal Destiny","id":31956317700267,"position":3,"preview_image":{"aspect_ratio":1.0,"height":1000,"width":1000,"src":"\/\/crystaldestiny.com\/cdn\/shop\/files\/Blue-Yellow-Tiger-Eye-Crystal-Towers-Towers-3.webp?v=1760458935"},"aspect_ratio":1.0,"height":1000,"media_type":"image","src":"\/\/crystaldestiny.com\/cdn\/shop\/files\/Blue-Yellow-Tiger-Eye-Crystal-Towers-Towers-3.webp?v=1760458935","width":1000},{"alt":"Blue \u0026 Yellow Tiger Eye Crystal Towers-Towers-Ali-1-Tiger's Eye-Crystal Destiny","id":31956317733035,"position":4,"preview_image":{"aspect_ratio":1.0,"height":1000,"width":1000,"src":"\/\/crystaldestiny.com\/cdn\/shop\/files\/Blue-Yellow-Tiger-Eye-Crystal-Towers-Towers-4.webp?v=1760458938"},"aspect_ratio":1.0,"height":1000,"media_type":"image","src":"\/\/crystaldestiny.com\/cdn\/shop\/files\/Blue-Yellow-Tiger-Eye-Crystal-Towers-Towers-4.webp?v=1760458938","width":1000},{"alt":"Blue \u0026 Yellow Tiger Eye Crystal Towers-Towers-Ali-1-Tiger's Eye-Crystal Destiny","id":31956317765803,"position":5,"preview_image":{"aspect_ratio":1.0,"height":1000,"width":1000,"src":"\/\/crystaldestiny.com\/cdn\/shop\/files\/Blue-Yellow-Tiger-Eye-Crystal-Towers-Towers-5.webp?v=1760458940"},"aspect_ratio":1.0,"height":1000,"media_type":"image","src":"\/\/crystaldestiny.com\/cdn\/shop\/files\/Blue-Yellow-Tiger-Eye-Crystal-Towers-Towers-5.webp?v=1760458940","width":1000},{"alt":"Blue \u0026 Yellow Tiger Eye Crystal Towers-Towers-Ali-1-Tiger's Eye-Crystal Destiny","id":31956317798571,"position":6,"preview_image":{"aspect_ratio":1.0,"height":1000,"width":1000,"src":"\/\/crystaldestiny.com\/cdn\/shop\/files\/Blue-Yellow-Tiger-Eye-Crystal-Towers-Towers-6.webp?v=1760458944"},"aspect_ratio":1.0,"height":1000,"media_type":"image","src":"\/\/crystaldestiny.com\/cdn\/shop\/files\/Blue-Yellow-Tiger-Eye-Crystal-Towers-Towers-6.webp?v=1760458944","width":1000},{"alt":"Blue \u0026 Yellow Tiger Eye Crystal Towers-Towers-Ali-20-Tiger's Eye-Crystal Destiny","id":31956317831339,"position":7,"preview_image":{"aspect_ratio":1.0,"height":1000,"width":1000,"src":"\/\/crystaldestiny.com\/cdn\/shop\/files\/Blue-Yellow-Tiger-Eye-Crystal-Towers-Towers-20-Tigers-Eye-7.webp?v=1765430301"},"aspect_ratio":1.0,"height":1000,"media_type":"image","src":"\/\/crystaldestiny.com\/cdn\/shop\/files\/Blue-Yellow-Tiger-Eye-Crystal-Towers-Towers-20-Tigers-Eye-7.webp?v=1765430301","width":1000},{"alt":"Blue \u0026 Yellow Tiger Eye Crystal Towers-Towers-Ali-16-Tiger's Eye-Crystal Destiny","id":31956317864107,"position":8,"preview_image":{"aspect_ratio":1.0,"height":1000,"width":1000,"src":"\/\/crystaldestiny.com\/cdn\/shop\/files\/Blue-Yellow-Tiger-Eye-Crystal-Towers-Towers-16-Tigers-Eye-8.webp?v=1765430303"},"aspect_ratio":1.0,"height":1000,"media_type":"image","src":"\/\/crystaldestiny.com\/cdn\/shop\/files\/Blue-Yellow-Tiger-Eye-Crystal-Towers-Towers-16-Tigers-Eye-8.webp?v=1765430303","width":1000},{"alt":"Blue \u0026 Yellow Tiger Eye Crystal Towers-Towers-Ali-8-Tiger's Eye-Crystal Destiny","id":31956317896875,"position":9,"preview_image":{"aspect_ratio":1.0,"height":1000,"width":1000,"src":"\/\/crystaldestiny.com\/cdn\/shop\/files\/Blue-Yellow-Tiger-Eye-Crystal-Towers-Towers-8-Tigers-Eye-9.webp?v=1765430304"},"aspect_ratio":1.0,"height":1000,"media_type":"image","src":"\/\/crystaldestiny.com\/cdn\/shop\/files\/Blue-Yellow-Tiger-Eye-Crystal-Towers-Towers-8-Tigers-Eye-9.webp?v=1765430304","width":1000},{"alt":"Blue \u0026 Yellow Tiger Eye Crystal Towers-Towers-Ali-5-Tiger's Eye-Crystal Destiny","id":31956317929643,"position":10,"preview_image":{"aspect_ratio":1.0,"height":1000,"width":1000,"src":"\/\/crystaldestiny.com\/cdn\/shop\/files\/Blue-Yellow-Tiger-Eye-Crystal-Towers-Towers-5-Tigers-Eye-10.webp?v=1765430306"},"aspect_ratio":1.0,"height":1000,"media_type":"image","src":"\/\/crystaldestiny.com\/cdn\/shop\/files\/Blue-Yellow-Tiger-Eye-Crystal-Towers-Towers-5-Tigers-Eye-10.webp?v=1765430306","width":1000},{"alt":"Blue \u0026 Yellow Tiger Eye Crystal Towers-Towers-Ali-19-Tiger's Eye-Crystal Destiny","id":31956317962411,"position":11,"preview_image":{"aspect_ratio":1.0,"height":1000,"width":1000,"src":"\/\/crystaldestiny.com\/cdn\/shop\/files\/Blue-Yellow-Tiger-Eye-Crystal-Towers-Towers-19-Tigers-Eye-11.webp?v=1765430307"},"aspect_ratio":1.0,"height":1000,"media_type":"image","src":"\/\/crystaldestiny.com\/cdn\/shop\/files\/Blue-Yellow-Tiger-Eye-Crystal-Towers-Towers-19-Tigers-Eye-11.webp?v=1765430307","width":1000},{"alt":"Blue \u0026 Yellow Tiger Eye Crystal Towers-Towers-Ali-14-Tiger's Eye-Crystal Destiny","id":31956317995179,"position":12,"preview_image":{"aspect_ratio":1.0,"height":1000,"width":1000,"src":"\/\/crystaldestiny.com\/cdn\/shop\/files\/Blue-Yellow-Tiger-Eye-Crystal-Towers-Towers-14-Tigers-Eye-12.webp?v=1765430308"},"aspect_ratio":1.0,"height":1000,"media_type":"image","src":"\/\/crystaldestiny.com\/cdn\/shop\/files\/Blue-Yellow-Tiger-Eye-Crystal-Towers-Towers-14-Tigers-Eye-12.webp?v=1765430308","width":1000},{"alt":"Blue \u0026 Yellow Tiger Eye Crystal Towers-Towers-Ali-15-Tiger's Eye-Crystal Destiny","id":31956318027947,"position":13,"preview_image":{"aspect_ratio":1.0,"height":1000,"width":1000,"src":"\/\/crystaldestiny.com\/cdn\/shop\/files\/Blue-Yellow-Tiger-Eye-Crystal-Towers-Towers-15-Tigers-Eye-13.webp?v=1765430310"},"aspect_ratio":1.0,"height":1000,"media_type":"image","src":"\/\/crystaldestiny.com\/cdn\/shop\/files\/Blue-Yellow-Tiger-Eye-Crystal-Towers-Towers-15-Tigers-Eye-13.webp?v=1765430310","width":1000},{"alt":"Blue \u0026 Yellow Tiger Eye Crystal Towers-Towers-Ali-17-Tiger's Eye-Crystal Destiny","id":31956318060715,"position":14,"preview_image":{"aspect_ratio":1.0,"height":1000,"width":1000,"src":"\/\/crystaldestiny.com\/cdn\/shop\/files\/Blue-Yellow-Tiger-Eye-Crystal-Towers-Towers-17-Tigers-Eye-14.webp?v=1765430311"},"aspect_ratio":1.0,"height":1000,"media_type":"image","src":"\/\/crystaldestiny.com\/cdn\/shop\/files\/Blue-Yellow-Tiger-Eye-Crystal-Towers-Towers-17-Tigers-Eye-14.webp?v=1765430311","width":1000},{"alt":"Blue \u0026 Yellow Tiger Eye Crystal Towers-Towers-Ali-9-Tiger's Eye-Crystal Destiny","id":31956318093483,"position":15,"preview_image":{"aspect_ratio":1.0,"height":1000,"width":1000,"src":"\/\/crystaldestiny.com\/cdn\/shop\/files\/Blue-Yellow-Tiger-Eye-Crystal-Towers-Towers-9-Tigers-Eye-15.webp?v=1765430312"},"aspect_ratio":1.0,"height":1000,"media_type":"image","src":"\/\/crystaldestiny.com\/cdn\/shop\/files\/Blue-Yellow-Tiger-Eye-Crystal-Towers-Towers-9-Tigers-Eye-15.webp?v=1765430312","width":1000},{"alt":"Blue \u0026 Yellow Tiger Eye Crystal Towers-Towers-Ali-3-Tiger's Eye-Crystal Destiny","id":31956318126251,"position":16,"preview_image":{"aspect_ratio":1.0,"height":1000,"width":1000,"src":"\/\/crystaldestiny.com\/cdn\/shop\/files\/Blue-Yellow-Tiger-Eye-Crystal-Towers-Towers-3-Tigers-Eye-16.webp?v=1765430314"},"aspect_ratio":1.0,"height":1000,"media_type":"image","src":"\/\/crystaldestiny.com\/cdn\/shop\/files\/Blue-Yellow-Tiger-Eye-Crystal-Towers-Towers-3-Tigers-Eye-16.webp?v=1765430314","width":1000},{"alt":"Blue \u0026 Yellow Tiger Eye Crystal Towers-Towers-Ali-4-Tiger's Eye-Crystal Destiny","id":31956318159019,"position":17,"preview_image":{"aspect_ratio":1.0,"height":1000,"width":1000,"src":"\/\/crystaldestiny.com\/cdn\/shop\/files\/Blue-Yellow-Tiger-Eye-Crystal-Towers-Towers-4-Tigers-Eye-17.webp?v=1765430315"},"aspect_ratio":1.0,"height":1000,"media_type":"image","src":"\/\/crystaldestiny.com\/cdn\/shop\/files\/Blue-Yellow-Tiger-Eye-Crystal-Towers-Towers-4-Tigers-Eye-17.webp?v=1765430315","width":1000},{"alt":"Blue \u0026 Yellow Tiger Eye Crystal Towers-Towers-Ali-21-Tiger's Eye-Crystal Destiny","id":31956318191787,"position":18,"preview_image":{"aspect_ratio":1.0,"height":1000,"width":1000,"src":"\/\/crystaldestiny.com\/cdn\/shop\/files\/Blue-Yellow-Tiger-Eye-Crystal-Towers-Towers-21-Tigers-Eye-18.webp?v=1765430317"},"aspect_ratio":1.0,"height":1000,"media_type":"image","src":"\/\/crystaldestiny.com\/cdn\/shop\/files\/Blue-Yellow-Tiger-Eye-Crystal-Towers-Towers-21-Tigers-Eye-18.webp?v=1765430317","width":1000},{"alt":"Blue \u0026 Yellow Tiger Eye Crystal Towers-Towers-Ali-11-Tiger's Eye-Crystal Destiny","id":31956318224555,"position":19,"preview_image":{"aspect_ratio":1.0,"height":1000,"width":1000,"src":"\/\/crystaldestiny.com\/cdn\/shop\/files\/Blue-Yellow-Tiger-Eye-Crystal-Towers-Towers-11-Tigers-Eye-19.webp?v=1765430318"},"aspect_ratio":1.0,"height":1000,"media_type":"image","src":"\/\/crystaldestiny.com\/cdn\/shop\/files\/Blue-Yellow-Tiger-Eye-Crystal-Towers-Towers-11-Tigers-Eye-19.webp?v=1765430318","width":1000},{"alt":"Blue \u0026 Yellow Tiger Eye Crystal Towers-Towers-Ali-10-Tiger's Eye-Crystal Destiny","id":31956318257323,"position":20,"preview_image":{"aspect_ratio":1.0,"height":1000,"width":1000,"src":"\/\/crystaldestiny.com\/cdn\/shop\/files\/Blue-Yellow-Tiger-Eye-Crystal-Towers-Towers-10-Tigers-Eye-20.webp?v=1765430320"},"aspect_ratio":1.0,"height":1000,"media_type":"image","src":"\/\/crystaldestiny.com\/cdn\/shop\/files\/Blue-Yellow-Tiger-Eye-Crystal-Towers-Towers-10-Tigers-Eye-20.webp?v=1765430320","width":1000},{"alt":"Blue \u0026 Yellow Tiger Eye Crystal Towers-Towers-Ali-13-Tiger's Eye-Crystal Destiny","id":31956318290091,"position":21,"preview_image":{"aspect_ratio":1.0,"height":1000,"width":1000,"src":"\/\/crystaldestiny.com\/cdn\/shop\/files\/Blue-Yellow-Tiger-Eye-Crystal-Towers-Towers-13-Tigers-Eye-21.webp?v=1765430321"},"aspect_ratio":1.0,"height":1000,"media_type":"image","src":"\/\/crystaldestiny.com\/cdn\/shop\/files\/Blue-Yellow-Tiger-Eye-Crystal-Towers-Towers-13-Tigers-Eye-21.webp?v=1765430321","width":1000},{"alt":"Blue \u0026 Yellow Tiger Eye Crystal Towers-Towers-Ali-12-Tiger's Eye-Crystal Destiny","id":31956318322859,"position":22,"preview_image":{"aspect_ratio":1.0,"height":1000,"width":1000,"src":"\/\/crystaldestiny.com\/cdn\/shop\/files\/Blue-Yellow-Tiger-Eye-Crystal-Towers-Towers-12-Tigers-Eye-22.webp?v=1765430322"},"aspect_ratio":1.0,"height":1000,"media_type":"image","src":"\/\/crystaldestiny.com\/cdn\/shop\/files\/Blue-Yellow-Tiger-Eye-Crystal-Towers-Towers-12-Tigers-Eye-22.webp?v=1765430322","width":1000},{"alt":"Blue \u0026 Yellow Tiger Eye Crystal Towers-Towers-Ali-7-Tiger's Eye-Crystal Destiny","id":31956318355627,"position":23,"preview_image":{"aspect_ratio":1.0,"height":1000,"width":1000,"src":"\/\/crystaldestiny.com\/cdn\/shop\/files\/Blue-Yellow-Tiger-Eye-Crystal-Towers-Towers-7-Tigers-Eye-23.webp?v=1765430324"},"aspect_ratio":1.0,"height":1000,"media_type":"image","src":"\/\/crystaldestiny.com\/cdn\/shop\/files\/Blue-Yellow-Tiger-Eye-Crystal-Towers-Towers-7-Tigers-Eye-23.webp?v=1765430324","width":1000},{"alt":"Blue \u0026 Yellow Tiger Eye Crystal Towers-Towers-Ali-6-Tiger's Eye-Crystal Destiny","id":31956318388395,"position":24,"preview_image":{"aspect_ratio":1.0,"height":1000,"width":1000,"src":"\/\/crystaldestiny.com\/cdn\/shop\/files\/Blue-Yellow-Tiger-Eye-Crystal-Towers-Towers-6-Tigers-Eye-24.webp?v=1765430326"},"aspect_ratio":1.0,"height":1000,"media_type":"image","src":"\/\/crystaldestiny.com\/cdn\/shop\/files\/Blue-Yellow-Tiger-Eye-Crystal-Towers-Towers-6-Tigers-Eye-24.webp?v=1765430326","width":1000},{"alt":"Blue \u0026 Yellow Tiger Eye Crystal Towers-Towers-Ali-2-Tiger's Eye-Crystal Destiny","id":31956318421163,"position":25,"preview_image":{"aspect_ratio":1.0,"height":1000,"width":1000,"src":"\/\/crystaldestiny.com\/cdn\/shop\/files\/Blue-Yellow-Tiger-Eye-Crystal-Towers-Towers-2-Tigers-Eye-25.webp?v=1765430327"},"aspect_ratio":1.0,"height":1000,"media_type":"image","src":"\/\/crystaldestiny.com\/cdn\/shop\/files\/Blue-Yellow-Tiger-Eye-Crystal-Towers-Towers-2-Tigers-Eye-25.webp?v=1765430327","width":1000},{"alt":"Blue \u0026 Yellow Tiger Eye Crystal Towers-Towers-Ali-1-Tiger's Eye-Crystal Destiny","id":31956318453931,"position":26,"preview_image":{"aspect_ratio":1.0,"height":1000,"width":1000,"src":"\/\/crystaldestiny.com\/cdn\/shop\/files\/Blue-Yellow-Tiger-Eye-Crystal-Towers-Towers-1-Tigers-Eye-26.webp?v=1765430328"},"aspect_ratio":1.0,"height":1000,"media_type":"image","src":"\/\/crystaldestiny.com\/cdn\/shop\/files\/Blue-Yellow-Tiger-Eye-Crystal-Towers-Towers-1-Tigers-Eye-26.webp?v=1765430328","width":1000},{"alt":"Blue \u0026 Yellow Tiger Eye Crystal Towers-Towers-Ali-18-Tiger's Eye-Crystal Destiny","id":31956318486699,"position":27,"preview_image":{"aspect_ratio":1.0,"height":1000,"width":1000,"src":"\/\/crystaldestiny.com\/cdn\/shop\/files\/Blue-Yellow-Tiger-Eye-Crystal-Towers-Towers-18-Tigers-Eye-27.webp?v=1765430330"},"aspect_ratio":1.0,"height":1000,"media_type":"image","src":"\/\/crystaldestiny.com\/cdn\/shop\/files\/Blue-Yellow-Tiger-Eye-Crystal-Towers-Towers-18-Tigers-Eye-27.webp?v=1765430330","width":1000}],"requires_selling_plan":false,"selling_plan_groups":[],"content":"\u003cp data-end=\"372\" data-start=\"61\"\u003eThese \u003cstrong data-end=\"134\" data-start=\"94\"\u003eBlue \u0026amp; Yellow Tiger Eye Crystal Towers\u003c\/strong\u003e showcase a mesmerizing blend of golden and deep blue chatoyancy, symbolizing strength, clarity, and balance. Each polished point amplifies focus and confidence, making it an excellent stone for personal empowerment and decision-making.\u003c\/p\u003e\n\u003cp data-end=\"634\" data-start=\"374\"\u003eBlue Tiger Eye enhances intuition and inner calm, while Yellow Tiger Eye brings courage and grounding energy. Together, they form a powerful union of insight and action — ideal for meditation, manifestation, or as a bold statement in your crystal collection.\u003c\/p\u003e\n\u003cp data-end=\"634\" data-start=\"374\"\u003eThis product is an exact pick as pictured, one of a kind.\u003c\/p\u003e\n\u003ch2\u003eCrystal Towers, Wands, Generators, Points, Pillars \u0026amp; Obelisks — What's the Difference?\u003c\/h2\u003e\n\u003cp id=\"isPasted\"\u003eWhile these terms may vary, they all describe beautifully shaped crystals with a pointed tip designed to channel and direct energy. Each name highlights a unique aspect of their use:\u003c\/p\u003e\n\u003cul\u003e\n\u003cli\u003e\n\u003cstrong\u003eTowers\u003c\/strong\u003e- Known for their steady, grounding presence, crystal towers help focus and amplify energy, making them perfect for meditation and manifestation.\u003c\/li\u003e\n\u003cli\u003e\n\u003cstrong\u003eWands\u003c\/strong\u003e- Traditionally used in energy work and healing, crystal wands are excellent for directing energy flow and clearing blockages.\u003c\/li\u003e\n\u003cli\u003e\n\u003cstrong\u003ePillars\u003c\/strong\u003e- Symbolizing strength and stability, crystal pillars create a balanced and harmonious environment, making them great for home decor and spiritual practices.\u003c\/li\u003e\n\u003cli\u003e\n\u003cstrong\u003eObelisks\u003c\/strong\u003e- Inspired by ancient structures, crystal obelisks are believed to connect earthly and spiritual energies, making them powerful tools for transformation and enlightenment.\u003c\/li\u003e\n\u003c\/ul\u003e\n\u003cp\u003eNo matter what you call them, these crystals serve the same purpose—to enhance energy, intention, and harmony in your space. Choose the one that resonates most with you!\u003c\/p\u003e"},"options":[{"name":"size","position":1,"values":["1","2","3","4","5","6","7","8","9","10","11","12","13","14","15","16","17","18","19","20","21"]},{"name":"Material","position":2,"values":["Tiger's Eye"]}],"custom_metafields":{"shipping_time":"12-16 days"},"metafields":{"badge":"\u003cdiv style='display:none' class='jdgm-prev-badge' data-average-rating='0.00' data-number-of-reviews='0' data-number-of-questions='0'\u003e \u003cspan class='jdgm-prev-badge__stars' data-score='0.00' tabindex='0' aria-label='0.00 stars' role='button'\u003e \u003cspan class='jdgm-star jdgm--off'\u003e\u003c\/span\u003e\u003cspan class='jdgm-star jdgm--off'\u003e\u003c\/span\u003e\u003cspan class='jdgm-star jdgm--off'\u003e\u003c\/span\u003e\u003cspan class='jdgm-star jdgm--off'\u003e\u003c\/span\u003e\u003cspan class='jdgm-star jdgm--off'\u003e\u003c\/span\u003e \u003c\/span\u003e \u003cspan class='jdgm-prev-badge__text'\u003e No reviews \u003c\/span\u003e \u003c\/div\u003e","widget":"\u003cdiv class='jdgm-rev-widg' data-updated-at='2025-10-14T00:08:09Z' data-average-rating='0.00' data-number-of-reviews='0' data-number-of-questions='0' data-image-url='https:\/\/cdn.shopify.com\/s\/files\/1\/0613\/0345\/5915\/files\/Sb30b7a6149524125a0414f4dbfd77a73o.webp?v=1760398635'\u003e \u003cstyle class='jdgm-temp-hiding-style'\u003e.jdgm-rev-widg{ display: none }\u003c\/style\u003e \u003cdiv class='jdgm-rev-widg__header'\u003e \u003ch2 class='jdgm-rev-widg__title'\u003eCustomer Reviews\u003c\/h2\u003e \u003cdiv class='jdgm-rev-widg__summary'\u003e \u003cdiv class='jdgm-rev-widg__summary-stars' aria-label='Average rating is 0.00 stars' role='img'\u003e \u003cspan class='jdgm-star jdgm--off'\u003e\u003c\/span\u003e\u003cspan class='jdgm-star jdgm--off'\u003e\u003c\/span\u003e\u003cspan class='jdgm-star jdgm--off'\u003e\u003c\/span\u003e\u003cspan class='jdgm-star jdgm--off'\u003e\u003c\/span\u003e\u003cspan class='jdgm-star jdgm--off'\u003e\u003c\/span\u003e \u003c\/div\u003e \u003cdiv class='jdgm-rev-widg__summary-text'\u003eBe the first to write a review\u003c\/div\u003e \u003c\/div\u003e \u003ca style='display: none' href='#' class='jdgm-write-rev-link' role='button'\u003eWrite a review\u003c\/a\u003e \u003cdiv class='jdgm-histogram jdgm-temp-hidden'\u003e \u003cdiv class='jdgm-histogram__row' data-rating='5' data-frequency='0' data-percentage='0'\u003e \u003cdiv class='jdgm-histogram__star' role='button' aria-label=\"0% (0) reviews with 5 star rating\" tabindex='0' \u003e\u003cspan class='jdgm-star jdgm--on'\u003e\u003c\/span\u003e\u003cspan class='jdgm-star jdgm--on'\u003e\u003c\/span\u003e\u003cspan class='jdgm-star jdgm--on'\u003e\u003c\/span\u003e\u003cspan class='jdgm-star jdgm--on'\u003e\u003c\/span\u003e\u003cspan class='jdgm-star jdgm--on'\u003e\u003c\/span\u003e\u003c\/div\u003e \u003cdiv class='jdgm-histogram__bar'\u003e \u003cdiv class='jdgm-histogram__bar-content' style='width: 0%;'\u003e \u003c\/div\u003e \u003c\/div\u003e \u003cdiv class='jdgm-histogram__percentage'\u003e0%\u003c\/div\u003e \u003cdiv class='jdgm-histogram__frequency'\u003e(0)\u003c\/div\u003e \u003c\/div\u003e \u003cdiv class='jdgm-histogram__row' data-rating='4' data-frequency='0' data-percentage='0'\u003e \u003cdiv class='jdgm-histogram__star' role='button' aria-label=\"0% (0) reviews with 4 star rating\" tabindex='0' \u003e\u003cspan class='jdgm-star jdgm--on'\u003e\u003c\/span\u003e\u003cspan class='jdgm-star jdgm--on'\u003e\u003c\/span\u003e\u003cspan class='jdgm-star jdgm--on'\u003e\u003c\/span\u003e\u003cspan class='jdgm-star jdgm--on'\u003e\u003c\/span\u003e\u003cspan class='jdgm-star jdgm--off'\u003e\u003c\/span\u003e\u003c\/div\u003e \u003cdiv class='jdgm-histogram__bar'\u003e \u003cdiv class='jdgm-histogram__bar-content' style='width: 0%;'\u003e \u003c\/div\u003e \u003c\/div\u003e \u003cdiv class='jdgm-histogram__percentage'\u003e0%\u003c\/div\u003e \u003cdiv class='jdgm-histogram__frequency'\u003e(0)\u003c\/div\u003e \u003c\/div\u003e \u003cdiv class='jdgm-histogram__row' data-rating='3' data-frequency='0' data-percentage='0'\u003e \u003cdiv class='jdgm-histogram__star' role='button' aria-label=\"0% (0) reviews with 3 star rating\" tabindex='0' \u003e\u003cspan class='jdgm-star jdgm--on'\u003e\u003c\/span\u003e\u003cspan class='jdgm-star jdgm--on'\u003e\u003c\/span\u003e\u003cspan class='jdgm-star jdgm--on'\u003e\u003c\/span\u003e\u003cspan class='jdgm-star jdgm--off'\u003e\u003c\/span\u003e\u003cspan class='jdgm-star jdgm--off'\u003e\u003c\/span\u003e\u003c\/div\u003e \u003cdiv class='jdgm-histogram__bar'\u003e \u003cdiv class='jdgm-histogram__bar-content' style='width: 0%;'\u003e \u003c\/div\u003e \u003c\/div\u003e \u003cdiv class='jdgm-histogram__percentage'\u003e0%\u003c\/div\u003e \u003cdiv class='jdgm-histogram__frequency'\u003e(0)\u003c\/div\u003e \u003c\/div\u003e \u003cdiv class='jdgm-histogram__row' data-rating='2' data-frequency='0' data-percentage='0'\u003e \u003cdiv class='jdgm-histogram__star' role='button' aria-label=\"0% (0) reviews with 2 star rating\" tabindex='0' \u003e\u003cspan class='jdgm-star jdgm--on'\u003e\u003c\/span\u003e\u003cspan class='jdgm-star jdgm--on'\u003e\u003c\/span\u003e\u003cspan class='jdgm-star jdgm--off'\u003e\u003c\/span\u003e\u003cspan class='jdgm-star jdgm--off'\u003e\u003c\/span\u003e\u003cspan class='jdgm-star jdgm--off'\u003e\u003c\/span\u003e\u003c\/div\u003e \u003cdiv class='jdgm-histogram__bar'\u003e \u003cdiv class='jdgm-histogram__bar-content' style='width: 0%;'\u003e \u003c\/div\u003e \u003c\/div\u003e \u003cdiv class='jdgm-histogram__percentage'\u003e0%\u003c\/div\u003e \u003cdiv class='jdgm-histogram__frequency'\u003e(0)\u003c\/div\u003e \u003c\/div\u003e \u003cdiv class='jdgm-histogram__row' data-rating='1' data-frequency='0' data-percentage='0'\u003e \u003cdiv class='jdgm-histogram__star' role='button' aria-label=\"0% (0) reviews with 1 star rating\" tabindex='0' \u003e\u003cspan class='jdgm-star jdgm--on'\u003e\u003c\/span\u003e\u003cspan class='jdgm-star jdgm--off'\u003e\u003c\/span\u003e\u003cspan class='jdgm-star jdgm--off'\u003e\u003c\/span\u003e\u003cspan class='jdgm-star jdgm--off'\u003e\u003c\/span\u003e\u003cspan class='jdgm-star jdgm--off'\u003e\u003c\/span\u003e\u003c\/div\u003e \u003cdiv class='jdgm-histogram__bar'\u003e \u003cdiv class='jdgm-histogram__bar-content' style='width: 0%;'\u003e \u003c\/div\u003e \u003c\/div\u003e \u003cdiv class='jdgm-histogram__percentage'\u003e0%\u003c\/div\u003e \u003cdiv class='jdgm-histogram__frequency'\u003e(0)\u003c\/div\u003e \u003c\/div\u003e \u003cdiv class='jdgm-histogram__row jdgm-histogram__clear-filter' data-rating=null tabindex='0'\u003e\u003c\/div\u003e \u003c\/div\u003e \u003cdiv class='jdgm-rev-widg__sort-wrapper'\u003e\u003c\/div\u003e \u003c\/div\u003e \u003cdiv class='jdgm-rev-widg__body'\u003e \u003cdiv class='jdgm-rev-widg__reviews'\u003e\u003c\/div\u003e \u003cdiv class='jdgm-paginate' data-per-page='4' data-url='https:\/\/api.judge.me\/reviews\/reviews_for_widget' style=\"display: none;\"\u003e\u003c\/div\u003e \u003c\/div\u003e \u003cdiv class='jdgm-rev-widg__paginate-spinner-wrapper'\u003e \u003cdiv class='jdgm-spinner'\u003e\u003c\/div\u003e \u003c\/div\u003e \u003c\/div\u003e"},"collections":[{"id":294880051371,"handle":"crystals","title":"Crystals","updated_at":"2026-01-07T23:43:11-05:00","body_html":"\u003cp data-start=\"159\" data-end=\"687\"\u003e✨ \u003cstrong data-start=\"161\" data-end=\"216\"\u003eDiscover the Magic of Crystals with Crystal Destiny\u003c\/strong\u003e ✨\u003cbr data-start=\"218\" data-end=\"221\"\u003eCrystals have been treasured for centuries—not only for their natural beauty but also for their powerful healing energies. Beyond their visual allure, they bring balance, harmony, and positive energy into any space. Whether used for home décor, meditation, or simply to elevate the energy of your surroundings, crystals create a sanctuary of peace, relaxation, and well-being. Each piece is a unique gift from the Earth—visually stunning and spiritually uplifting.\u003c\/p\u003e\n\u003cp data-start=\"689\" data-end=\"1011\"\u003eAt \u003cstrong data-start=\"692\" data-end=\"711\"\u003eCrystal Destiny\u003c\/strong\u003e, our signature collection showcases a curated selection of exquisite crystals, from radiant Quartz to soothing Amethyst. Every stone is carefully sourced for its elegance and metaphysical resonance, making them perfect for enhancing your home, uplifting your spirit, or gifting to someone special.\u003c\/p\u003e\n\u003cp data-start=\"1013\" data-end=\"1206\"\u003eExperience the timeless sophistication of crystalline wonders. Explore the \u003cstrong data-start=\"1088\" data-end=\"1118\"\u003eCrystal Destiny Collection\u003c\/strong\u003e today and bring the transformative beauty of these treasures into your everyday life.\u003c\/p\u003e","published_at":"2023-06-05T11:24:02-04:00","sort_order":"created-desc","template_suffix":"","disjunctive":false,"rules":[{"column":"tag","relation":"equals","condition":"crystal"},{"column":"type","relation":"not_contains","condition":"925 Sterling Silver"},{"column":"type","relation":"not_contains","condition":"Wire Wraps"}],"published_scope":"global"},{"id":319455953067,"handle":"solar-plexus-chakra-crystals","title":"Solar Plexus Chakra Crystals","updated_at":"2026-01-06T11:12:19-05:00","body_html":"\u003cp data-start=\"142\" data-end=\"577\"\u003e✨ \u003cstrong data-start=\"144\" data-end=\"176\"\u003eSolar Plexus Chakra Crystals\u003c\/strong\u003e ✨\u003cbr data-start=\"178\" data-end=\"181\"\u003eHarness the power of your personal will and confidence with our \u003cstrong data-start=\"245\" data-end=\"277\"\u003eSolar Plexus Chakra Crystals\u003c\/strong\u003e. Focused on the third chakra, located at the center of your torso, these stones help balance self-esteem, personal power, and motivation. Perfect for meditation, energy work, or as wearable reminders of inner strength, each crystal resonates with vibrant energy designed to ignite your inner fire.\u003c\/p\u003e\n\u003cp data-start=\"579\" data-end=\"960\"\u003eOur curated selection includes radiant yellow and golden stones such as Citrine, Yellow Jasper, and Tiger’s Eye—each chosen for their ability to stimulate vitality, courage, and focus. Whether you place them in your sacred space, carry them with you, or incorporate them into jewelry, Solar Plexus Chakra Crystals invite clarity, confidence, and empowerment into your daily life.\u003c\/p\u003e\n\u003cp data-start=\"962\" data-end=\"1109\"\u003eElevate your energy, amplify your inner strength, and embrace the transformative power of your Solar Plexus with these powerful, luminous stones.\u003c\/p\u003e","published_at":"2025-07-17T18:18:13-04:00","sort_order":"best-selling","template_suffix":"","disjunctive":false,"rules":[{"column":"variant_metafield_definition","relation":"equals","condition":"Solar Plexus"}],"published_scope":"global","image":{"created_at":"2025-07-17T19:08:38-04:00","alt":null,"width":1080,"height":1080,"src":"\/\/crystaldestiny.com\/cdn\/shop\/collections\/Solar_Plexus_Chakra_Collection.jpg?v=1762474929"}},{"id":319455789227,"handle":"third-eye-chakra-crystals","title":"Third Eye Chakra Crystals","updated_at":"2026-01-07T23:42:38-05:00","body_html":"\u003cp data-start=\"124\" data-end=\"474\"\u003e✨ \u003cstrong data-start=\"126\" data-end=\"155\"\u003eThird Eye Chakra Crystals\u003c\/strong\u003e ✨\u003cbr data-start=\"157\" data-end=\"160\"\u003eAwaken intuition, clarity, and insight with our \u003cstrong data-start=\"208\" data-end=\"237\"\u003eThird Eye Chakra Crystals\u003c\/strong\u003e. Located between the eyebrows, the Third Eye Chakra governs perception, intuition, and inner wisdom. These crystals help balance and activate this energy center, promoting mental clarity, spiritual awareness, and heightened intuition.\u003c\/p\u003e\n\u003cp data-start=\"476\" data-end=\"835\"\u003eOur curated selection features stones such as Amethyst, Lapis Lazuli, and Sodalite—chosen for their ability to enhance meditation, intuitive practices, and energy work. Whether placed in your sacred space, carried with you, or worn as jewelry, Third Eye Chakra Crystals support mental focus, spiritual growth, and a deeper connection to your inner guidance.\u003c\/p\u003e\n\u003cp data-start=\"837\" data-end=\"976\"\u003eElevate your intuition, expand your awareness, and embrace the transformative power of the Third Eye Chakra with these powerful crystals.\u003c\/p\u003e","published_at":"2025-07-17T18:16:49-04:00","sort_order":"best-selling","template_suffix":"","disjunctive":false,"rules":[{"column":"variant_metafield_definition","relation":"equals","condition":"Third Eye"}],"published_scope":"global","image":{"created_at":"2025-07-17T19:09:01-04:00","alt":null,"width":1080,"height":1080,"src":"\/\/crystaldestiny.com\/cdn\/shop\/collections\/Third_Eye_Chakra_Collection.jpg?v=1762474924"}},{"id":294880116907,"handle":"polished","title":"Polished Crystals","updated_at":"2026-01-07T23:43:11-05:00","body_html":"\u003cp data-start=\"199\" data-end=\"598\"\u003e✨ \u003cstrong data-start=\"201\" data-end=\"248\"\u003eCrystal Destiny Polished Crystal Collection\u003c\/strong\u003e ✨\u003cbr data-start=\"250\" data-end=\"253\"\u003eIndulge in the brilliance of crystals refined to perfection. Our \u003cstrong data-start=\"318\" data-end=\"341\"\u003ePolished Collection\u003c\/strong\u003e showcases gemstones meticulously shaped and smoothed to reveal their natural radiance and timeless beauty. From the shimmering glow of Quartz to the deep allure of Obsidian, each polished piece is a testament to nature’s artistry and human craftsmanship.\u003c\/p\u003e\n\u003cp data-start=\"600\" data-end=\"862\"\u003ePerfect as statement décor, meaningful gifts, or companions on your spiritual journey, polished crystals bring sophistication and elevated energy into any space. Their radiant surfaces reflect not only light but also the transformative power of crystal energy.\u003c\/p\u003e\n\u003cp data-start=\"864\" data-end=\"1022\"\u003eDiscover the elegance of refinement with Crystal Destiny’s Polished Crystal Collection—where every facet shines with intention, beauty, and timeless allure.\u003c\/p\u003e","published_at":"2023-06-05T11:30:44-04:00","sort_order":"created-desc","template_suffix":"","disjunctive":false,"rules":[{"column":"tag","relation":"equals","condition":"polished"}],"published_scope":"global"},{"id":321695744171,"handle":"direct-from-supplier","title":"Direct from Supplier","updated_at":"2026-01-07T23:43:11-05:00","body_html":"","published_at":"2025-09-12T16:38:23-04:00","sort_order":"best-selling","template_suffix":"","disjunctive":true,"rules":[{"column":"tag","relation":"equals","condition":"adjusted-shipping"}],"published_scope":"global"},{"id":293659312299,"handle":"best-sellers","title":"Best Sellers","updated_at":"2026-01-07T23:43:11-05:00","body_html":"\u003cp data-start=\"155\" data-end=\"510\"\u003eDiscover the pieces our community loves most. Our Best Sellers Collection brings together handpicked crystals and jewelry that embody timeless elegance, spiritual resonance, and everyday sophistication. Each item has earned its place as a customer favorite—celebrated for both its beauty and its meaningful energy.\u003c\/p\u003e\n\u003cp data-start=\"512\" data-end=\"802\"\u003eFrom stunning statement pieces to versatile daily companions, these treasures are curated to elevate your space, uplift your spirit, and reflect refined taste. Indulge in what’s most cherished and let our best sellers guide you toward the perfect blend of style and transformative energy.\u003c\/p\u003e\n\u003cp data-start=\"804\" data-end=\"932\"\u003eExplore the Best Sellers Collection today—where elegance meets intention, and every piece tells a story of beauty and balance.\u003c\/p\u003e","published_at":"2023-03-15T16:04:51-04:00","sort_order":"best-selling","template_suffix":"","disjunctive":false,"rules":[{"column":"variant_price","relation":"greater_than","condition":"0"},{"column":"variant_inventory","relation":"greater_than","condition":"0"},{"column":"type","relation":"not_equals","condition":"Shipping Protection"}],"published_scope":"global"},{"id":321370390699,"handle":"monthly-crystal-sale","title":"Monthly Crystal Sale | Spheres \u0026 Towers","updated_at":"2026-01-06T23:24:37-05:00","body_html":"\u003cp\u003eShop our \u003cstrong\u003eMonthly Crystal Sale\u003c\/strong\u003e, where you can shop a wide selection of healing crystals at discounted prices. Explore \u003cstrong\u003ecrystal spheres and towers,\u003c\/strong\u003e— all carefully curated to support meditation, energy balancing, and spiritual wellness. Whether you're looking to enhance your home decor, boost your daily energy, or find the perfect gift, our \u003cstrong\u003ecrystals for healing and manifestation\u003c\/strong\u003e offer both beauty and metaphysical benefits.\u003c\/p\u003e\n\u003cp\u003eEach month, our sale features \u003cstrong\u003enew discounted collections\u003c\/strong\u003e, from \u003cstrong\u003enatural quartz and amethyst towers\u003c\/strong\u003e to \u003cstrong\u003ewire-wrapped pendants and polished stones\u003c\/strong\u003e, so there's always something fresh to discover. Shop with confidence knowing you're getting high-quality crystals with \u003cstrong\u003efree shipping options\u003c\/strong\u003e and a trusted experience.\u003c\/p\u003e\n\u003cp\u003e\u003cstrong\u003eTake advantage of the Monthly Crystal Sale today\u003c\/strong\u003e and add powerful, natural energy to your life with \u003cstrong\u003eauthentic healing crystals\u003c\/strong\u003e — while our limited-time discounts last.\u003c\/p\u003e\n\u003cp\u003e\u003cstrong\u003e*Discount automatically applied at checkout.\u003c\/strong\u003e\u003c\/p\u003e","published_at":"2025-12-02T01:26:17-05:00","sort_order":"alpha-asc","template_suffix":"","disjunctive":true,"rules":[{"column":"tag","relation":"equals","condition":"spheres"},{"column":"tag","relation":"equals","condition":"Towers"}],"published_scope":"global","image":{"created_at":"2026-01-01T01:32:34-05:00","alt":"","width":960,"height":960,"src":"\/\/crystaldestiny.com\/cdn\/shop\/collections\/3E8C2969-1B86-4ACE-B349-98E9D8768424.jpg?v=1767249154"}},{"id":297596059819,"handle":"all","title":"All Crystals \u0026 Jewelry","updated_at":"2026-01-07T23:43:11-05:00","body_html":"\u003cp data-start=\"149\" data-end=\"494\"\u003e✨ \u003cstrong data-start=\"151\" data-end=\"181\"\u003eWelcome to Crystal Destiny\u003c\/strong\u003e ✨\u003cbr data-start=\"183\" data-end=\"186\"\u003eStep into a world where beauty, energy, and artistry unite. Our collection is a treasure trove of exquisite crystals, from the raw, untamed elegance of natural formations to the polished brilliance of expertly crafted pieces. Each crystal is a masterpiece, carrying its own unique story and timeless charm.\u003c\/p\u003e\n\u003cp data-start=\"496\" data-end=\"831\"\u003eWhether you’re drawn to the calming presence of Amethyst, the vibrant energy of Citrine, or the grounding strength of Jasper, our crystals invite you to connect with nature’s finest wonders. Perfect for enhancing your space, supporting your spiritual journey, or gifting with intention, every piece resonates with beauty and meaning.\u003c\/p\u003e\n\u003cp data-start=\"833\" data-end=\"1000\"\u003eElevate your surroundings, embrace the mystique, and explore the enchanting world of crystals at \u003cstrong data-start=\"930\" data-end=\"949\"\u003eCrystal Destiny\u003c\/strong\u003e—where every crystal is waiting to be discovered.\u003c\/p\u003e","published_at":"2023-11-10T13:55:31-05:00","sort_order":"created-desc","template_suffix":"","disjunctive":false,"rules":[{"column":"type","relation":"not_equals","condition":"asdf"}],"published_scope":"global"},{"id":296256405675,"handle":"crystal-towers","title":"Crystal Towers","updated_at":"2026-01-06T23:24:37-05:00","body_html":"\u003cp data-end=\"568\" data-start=\"152\"\u003e✨ \u003cstrong data-end=\"190\" data-start=\"154\"\u003eCrystal Destiny Tower Collection\u003c\/strong\u003e ✨\u003cbr data-end=\"195\" data-start=\"192\"\u003eEnchant your space with the timeless beauty and powerful energy of crystal towers. Each piece in our \u003cstrong data-end=\"316\" data-start=\"296\"\u003eTower Collection\u003c\/strong\u003e is carefully crafted to showcase nature’s artistry while radiating higher vibrations and spiritual resonance. From the clarity of Quartz to the calming presence of Amethyst, these towers are both decorative masterpieces and tools for transformation.\u003c\/p\u003e\n\u003cp data-end=\"765\" data-start=\"570\"\u003ePerfect for meditation spaces, energy work, or simply elevating your home décor, crystal towers channel focused energy upward—creating balance, harmony, and refined elegance in any environment.\u003c\/p\u003e\n\u003cp data-end=\"917\" data-start=\"767\"\u003eDiscover the Crystal Destiny Tower Collection today and transform your surroundings into a sanctuary of beauty, purpose, and spiritual significance.\u003c\/p\u003e\n\u003ch2\u003eCrystal Towers, Wands, Generators, Points, Pillars \u0026amp; Obelisks — What's the Difference?\u003c\/h2\u003e\n\u003cp id=\"isPasted\"\u003eWhile these terms may vary, they all describe beautifully shaped crystals with a pointed tip designed to channel and direct energy. Each name highlights a unique aspect of their use:\u003c\/p\u003e\n\u003cul\u003e\n\u003cli\u003e\n\u003cstrong\u003eTowers\u003c\/strong\u003e- Known for their steady, grounding presence, crystal towers help focus and amplify energy, making them perfect for meditation and manifestation.\u003c\/li\u003e\n\u003cli\u003e\n\u003cstrong\u003eWands\u003c\/strong\u003e- Traditionally used in energy work and healing, crystal wands are excellent for directing energy flow and clearing blockages.\u003c\/li\u003e\n\u003cli\u003e\n\u003cstrong\u003ePillars\u003c\/strong\u003e- Symbolizing strength and stability, crystal pillars create a balanced and harmonious environment, making them great for home decor and spiritual practices.\u003c\/li\u003e\n\u003cli\u003e\n\u003cstrong\u003eObelisks\u003c\/strong\u003e- Inspired by ancient structures, crystal obelisks are believed to connect earthly and spiritual energies, making them powerful tools for transformation and enlightenment.\u003c\/li\u003e\n\u003c\/ul\u003e\n\u003cp\u003eNo matter what you call them, these crystals serve the same purpose—to enhance energy, intention, and harmony in your space. Choose the one that resonates most with you!\u003c\/p\u003e","published_at":"2023-09-14T12:52:35-04:00","sort_order":"created-desc","template_suffix":"","disjunctive":false,"rules":[{"column":"tag","relation":"equals","condition":"towers"}],"published_scope":"global"},{"id":298983391403,"handle":"january-crystal-sale","title":"January Sale | 25% Off Crystal Towers \u0026 Spheres","updated_at":"2026-01-06T23:24:37-05:00","body_html":"\u003cp\u003eShop our \u003cstrong\u003eJanuary Crystal Sale\u003c\/strong\u003e, where you can shop a wide selection of healing crystals at discounted prices. Explore \u003cstrong\u003eCrystal Towers, \u0026amp; Crystal Spheres\u003c\/strong\u003e — all carefully curated and crafted to support meditation, energy balancing, and spiritual wellness. Whether you're looking to enhance your home decor, boost your daily energy, or find the perfect gift, our \u003cstrong\u003ecrystals for healing and manifestation\u003c\/strong\u003e offer both beauty and metaphysical benefits.\u003c\/p\u003e\n\u003cp\u003eThis January, our sale features \u003cstrong\u003ediscounted crystal towers and spheres\u003c\/strong\u003e, from \u003cstrong\u003enatural quartz \u003c\/strong\u003eand \u003cstrong\u003eamethyst \u003c\/strong\u003eto \u003cstrong\u003ebumblebee jasper \u003c\/strong\u003eand \u003cstrong\u003ecarnelian\u003c\/strong\u003e, so there's always something fresh to discover. Shop with confidence knowing you're getting high-quality crystals with \u003cstrong\u003efree shipping options\u003c\/strong\u003e and a trusted experience.\u003c\/p\u003e\n\u003cp\u003e\u003cstrong\u003eTake advantage of the January Crystal Sale today\u003c\/strong\u003e and add powerful, natural energy to your life with \u003cstrong\u003eauthentic healing crystals\u003c\/strong\u003e — while our limited-time discounts last.\u003c\/p\u003e\n\u003cp\u003e\u003cstrong\u003e*Discount automatically applied at checkout.\u003c\/strong\u003e\u003c\/p\u003e","published_at":"2026-01-01T00:07:17-05:00","sort_order":"alpha-asc","template_suffix":"monthly-collection","disjunctive":true,"rules":[{"column":"tag","relation":"equals","condition":"Spheres"},{"column":"tag","relation":"equals","condition":"Towers"}],"published_scope":"global","image":{"created_at":"2026-01-01T01:29:59-05:00","alt":"","width":960,"height":960,"src":"\/\/crystaldestiny.com\/cdn\/shop\/collections\/1464163B-22B1-4D62-BEC5-CEC9AECB670B.jpg?v=1767248999"}}]}
[{"alt":"Blue \u0026 Yellow Tiger Eye Crystal Towers-Towers-Ali-1-Tiger's Eye-Crystal Destiny","id":31956317634731,"position":1,"preview_image":{"aspect_ratio":1.0,"height":1000,"width":1000,"src":"\/\/crystaldestiny.com\/cdn\/shop\/files\/Blue-Yellow-Tiger-Eye-Crystal-Towers-Towers.webp?v=1760458930"},"aspect_ratio":1.0,"height":1000,"media_type":"image","src":"\/\/crystaldestiny.com\/cdn\/shop\/files\/Blue-Yellow-Tiger-Eye-Crystal-Towers-Towers.webp?v=1760458930","width":1000},{"alt":"Blue \u0026 Yellow Tiger Eye Crystal Towers-Towers-Ali-1-Tiger's Eye-Crystal Destiny","id":31956317667499,"position":2,"preview_image":{"aspect_ratio":1.0,"height":1000,"width":1000,"src":"\/\/crystaldestiny.com\/cdn\/shop\/files\/Blue-Yellow-Tiger-Eye-Crystal-Towers-Towers-2.webp?v=1760458933"},"aspect_ratio":1.0,"height":1000,"media_type":"image","src":"\/\/crystaldestiny.com\/cdn\/shop\/files\/Blue-Yellow-Tiger-Eye-Crystal-Towers-Towers-2.webp?v=1760458933","width":1000},{"alt":"Blue \u0026 Yellow Tiger Eye Crystal Towers-Towers-Ali-1-Tiger's Eye-Crystal Destiny","id":31956317700267,"position":3,"preview_image":{"aspect_ratio":1.0,"height":1000,"width":1000,"src":"\/\/crystaldestiny.com\/cdn\/shop\/files\/Blue-Yellow-Tiger-Eye-Crystal-Towers-Towers-3.webp?v=1760458935"},"aspect_ratio":1.0,"height":1000,"media_type":"image","src":"\/\/crystaldestiny.com\/cdn\/shop\/files\/Blue-Yellow-Tiger-Eye-Crystal-Towers-Towers-3.webp?v=1760458935","width":1000},{"alt":"Blue \u0026 Yellow Tiger Eye Crystal Towers-Towers-Ali-1-Tiger's Eye-Crystal Destiny","id":31956317733035,"position":4,"preview_image":{"aspect_ratio":1.0,"height":1000,"width":1000,"src":"\/\/crystaldestiny.com\/cdn\/shop\/files\/Blue-Yellow-Tiger-Eye-Crystal-Towers-Towers-4.webp?v=1760458938"},"aspect_ratio":1.0,"height":1000,"media_type":"image","src":"\/\/crystaldestiny.com\/cdn\/shop\/files\/Blue-Yellow-Tiger-Eye-Crystal-Towers-Towers-4.webp?v=1760458938","width":1000},{"alt":"Blue \u0026 Yellow Tiger Eye Crystal Towers-Towers-Ali-1-Tiger's Eye-Crystal Destiny","id":31956317765803,"position":5,"preview_image":{"aspect_ratio":1.0,"height":1000,"width":1000,"src":"\/\/crystaldestiny.com\/cdn\/shop\/files\/Blue-Yellow-Tiger-Eye-Crystal-Towers-Towers-5.webp?v=1760458940"},"aspect_ratio":1.0,"height":1000,"media_type":"image","src":"\/\/crystaldestiny.com\/cdn\/shop\/files\/Blue-Yellow-Tiger-Eye-Crystal-Towers-Towers-5.webp?v=1760458940","width":1000},{"alt":"Blue \u0026 Yellow Tiger Eye Crystal Towers-Towers-Ali-1-Tiger's Eye-Crystal Destiny","id":31956317798571,"position":6,"preview_image":{"aspect_ratio":1.0,"height":1000,"width":1000,"src":"\/\/crystaldestiny.com\/cdn\/shop\/files\/Blue-Yellow-Tiger-Eye-Crystal-Towers-Towers-6.webp?v=1760458944"},"aspect_ratio":1.0,"height":1000,"media_type":"image","src":"\/\/crystaldestiny.com\/cdn\/shop\/files\/Blue-Yellow-Tiger-Eye-Crystal-Towers-Towers-6.webp?v=1760458944","width":1000},{"alt":"Blue \u0026 Yellow Tiger Eye Crystal Towers-Towers-Ali-20-Tiger's Eye-Crystal Destiny","id":31956317831339,"position":7,"preview_image":{"aspect_ratio":1.0,"height":1000,"width":1000,"src":"\/\/crystaldestiny.com\/cdn\/shop\/files\/Blue-Yellow-Tiger-Eye-Crystal-Towers-Towers-20-Tigers-Eye-7.webp?v=1765430301"},"aspect_ratio":1.0,"height":1000,"media_type":"image","src":"\/\/crystaldestiny.com\/cdn\/shop\/files\/Blue-Yellow-Tiger-Eye-Crystal-Towers-Towers-20-Tigers-Eye-7.webp?v=1765430301","width":1000},{"alt":"Blue \u0026 Yellow Tiger Eye Crystal Towers-Towers-Ali-16-Tiger's Eye-Crystal Destiny","id":31956317864107,"position":8,"preview_image":{"aspect_ratio":1.0,"height":1000,"width":1000,"src":"\/\/crystaldestiny.com\/cdn\/shop\/files\/Blue-Yellow-Tiger-Eye-Crystal-Towers-Towers-16-Tigers-Eye-8.webp?v=1765430303"},"aspect_ratio":1.0,"height":1000,"media_type":"image","src":"\/\/crystaldestiny.com\/cdn\/shop\/files\/Blue-Yellow-Tiger-Eye-Crystal-Towers-Towers-16-Tigers-Eye-8.webp?v=1765430303","width":1000},{"alt":"Blue \u0026 Yellow Tiger Eye Crystal Towers-Towers-Ali-8-Tiger's Eye-Crystal Destiny","id":31956317896875,"position":9,"preview_image":{"aspect_ratio":1.0,"height":1000,"width":1000,"src":"\/\/crystaldestiny.com\/cdn\/shop\/files\/Blue-Yellow-Tiger-Eye-Crystal-Towers-Towers-8-Tigers-Eye-9.webp?v=1765430304"},"aspect_ratio":1.0,"height":1000,"media_type":"image","src":"\/\/crystaldestiny.com\/cdn\/shop\/files\/Blue-Yellow-Tiger-Eye-Crystal-Towers-Towers-8-Tigers-Eye-9.webp?v=1765430304","width":1000},{"alt":"Blue \u0026 Yellow Tiger Eye Crystal Towers-Towers-Ali-5-Tiger's Eye-Crystal Destiny","id":31956317929643,"position":10,"preview_image":{"aspect_ratio":1.0,"height":1000,"width":1000,"src":"\/\/crystaldestiny.com\/cdn\/shop\/files\/Blue-Yellow-Tiger-Eye-Crystal-Towers-Towers-5-Tigers-Eye-10.webp?v=1765430306"},"aspect_ratio":1.0,"height":1000,"media_type":"image","src":"\/\/crystaldestiny.com\/cdn\/shop\/files\/Blue-Yellow-Tiger-Eye-Crystal-Towers-Towers-5-Tigers-Eye-10.webp?v=1765430306","width":1000},{"alt":"Blue \u0026 Yellow Tiger Eye Crystal Towers-Towers-Ali-19-Tiger's Eye-Crystal Destiny","id":31956317962411,"position":11,"preview_image":{"aspect_ratio":1.0,"height":1000,"width":1000,"src":"\/\/crystaldestiny.com\/cdn\/shop\/files\/Blue-Yellow-Tiger-Eye-Crystal-Towers-Towers-19-Tigers-Eye-11.webp?v=1765430307"},"aspect_ratio":1.0,"height":1000,"media_type":"image","src":"\/\/crystaldestiny.com\/cdn\/shop\/files\/Blue-Yellow-Tiger-Eye-Crystal-Towers-Towers-19-Tigers-Eye-11.webp?v=1765430307","width":1000},{"alt":"Blue \u0026 Yellow Tiger Eye Crystal Towers-Towers-Ali-14-Tiger's Eye-Crystal Destiny","id":31956317995179,"position":12,"preview_image":{"aspect_ratio":1.0,"height":1000,"width":1000,"src":"\/\/crystaldestiny.com\/cdn\/shop\/files\/Blue-Yellow-Tiger-Eye-Crystal-Towers-Towers-14-Tigers-Eye-12.webp?v=1765430308"},"aspect_ratio":1.0,"height":1000,"media_type":"image","src":"\/\/crystaldestiny.com\/cdn\/shop\/files\/Blue-Yellow-Tiger-Eye-Crystal-Towers-Towers-14-Tigers-Eye-12.webp?v=1765430308","width":1000},{"alt":"Blue \u0026 Yellow Tiger Eye Crystal Towers-Towers-Ali-15-Tiger's Eye-Crystal Destiny","id":31956318027947,"position":13,"preview_image":{"aspect_ratio":1.0,"height":1000,"width":1000,"src":"\/\/crystaldestiny.com\/cdn\/shop\/files\/Blue-Yellow-Tiger-Eye-Crystal-Towers-Towers-15-Tigers-Eye-13.webp?v=1765430310"},"aspect_ratio":1.0,"height":1000,"media_type":"image","src":"\/\/crystaldestiny.com\/cdn\/shop\/files\/Blue-Yellow-Tiger-Eye-Crystal-Towers-Towers-15-Tigers-Eye-13.webp?v=1765430310","width":1000},{"alt":"Blue \u0026 Yellow Tiger Eye Crystal Towers-Towers-Ali-17-Tiger's Eye-Crystal Destiny","id":31956318060715,"position":14,"preview_image":{"aspect_ratio":1.0,"height":1000,"width":1000,"src":"\/\/crystaldestiny.com\/cdn\/shop\/files\/Blue-Yellow-Tiger-Eye-Crystal-Towers-Towers-17-Tigers-Eye-14.webp?v=1765430311"},"aspect_ratio":1.0,"height":1000,"media_type":"image","src":"\/\/crystaldestiny.com\/cdn\/shop\/files\/Blue-Yellow-Tiger-Eye-Crystal-Towers-Towers-17-Tigers-Eye-14.webp?v=1765430311","width":1000},{"alt":"Blue \u0026 Yellow Tiger Eye Crystal Towers-Towers-Ali-9-Tiger's Eye-Crystal Destiny","id":31956318093483,"position":15,"preview_image":{"aspect_ratio":1.0,"height":1000,"width":1000,"src":"\/\/crystaldestiny.com\/cdn\/shop\/files\/Blue-Yellow-Tiger-Eye-Crystal-Towers-Towers-9-Tigers-Eye-15.webp?v=1765430312"},"aspect_ratio":1.0,"height":1000,"media_type":"image","src":"\/\/crystaldestiny.com\/cdn\/shop\/files\/Blue-Yellow-Tiger-Eye-Crystal-Towers-Towers-9-Tigers-Eye-15.webp?v=1765430312","width":1000},{"alt":"Blue \u0026 Yellow Tiger Eye Crystal Towers-Towers-Ali-3-Tiger's Eye-Crystal Destiny","id":31956318126251,"position":16,"preview_image":{"aspect_ratio":1.0,"height":1000,"width":1000,"src":"\/\/crystaldestiny.com\/cdn\/shop\/files\/Blue-Yellow-Tiger-Eye-Crystal-Towers-Towers-3-Tigers-Eye-16.webp?v=1765430314"},"aspect_ratio":1.0,"height":1000,"media_type":"image","src":"\/\/crystaldestiny.com\/cdn\/shop\/files\/Blue-Yellow-Tiger-Eye-Crystal-Towers-Towers-3-Tigers-Eye-16.webp?v=1765430314","width":1000},{"alt":"Blue \u0026 Yellow Tiger Eye Crystal Towers-Towers-Ali-4-Tiger's Eye-Crystal Destiny","id":31956318159019,"position":17,"preview_image":{"aspect_ratio":1.0,"height":1000,"width":1000,"src":"\/\/crystaldestiny.com\/cdn\/shop\/files\/Blue-Yellow-Tiger-Eye-Crystal-Towers-Towers-4-Tigers-Eye-17.webp?v=1765430315"},"aspect_ratio":1.0,"height":1000,"media_type":"image","src":"\/\/crystaldestiny.com\/cdn\/shop\/files\/Blue-Yellow-Tiger-Eye-Crystal-Towers-Towers-4-Tigers-Eye-17.webp?v=1765430315","width":1000},{"alt":"Blue \u0026 Yellow Tiger Eye Crystal Towers-Towers-Ali-21-Tiger's Eye-Crystal Destiny","id":31956318191787,"position":18,"preview_image":{"aspect_ratio":1.0,"height":1000,"width":1000,"src":"\/\/crystaldestiny.com\/cdn\/shop\/files\/Blue-Yellow-Tiger-Eye-Crystal-Towers-Towers-21-Tigers-Eye-18.webp?v=1765430317"},"aspect_ratio":1.0,"height":1000,"media_type":"image","src":"\/\/crystaldestiny.com\/cdn\/shop\/files\/Blue-Yellow-Tiger-Eye-Crystal-Towers-Towers-21-Tigers-Eye-18.webp?v=1765430317","width":1000},{"alt":"Blue \u0026 Yellow Tiger Eye Crystal Towers-Towers-Ali-11-Tiger's Eye-Crystal Destiny","id":31956318224555,"position":19,"preview_image":{"aspect_ratio":1.0,"height":1000,"width":1000,"src":"\/\/crystaldestiny.com\/cdn\/shop\/files\/Blue-Yellow-Tiger-Eye-Crystal-Towers-Towers-11-Tigers-Eye-19.webp?v=1765430318"},"aspect_ratio":1.0,"height":1000,"media_type":"image","src":"\/\/crystaldestiny.com\/cdn\/shop\/files\/Blue-Yellow-Tiger-Eye-Crystal-Towers-Towers-11-Tigers-Eye-19.webp?v=1765430318","width":1000},{"alt":"Blue \u0026 Yellow Tiger Eye Crystal Towers-Towers-Ali-10-Tiger's Eye-Crystal Destiny","id":31956318257323,"position":20,"preview_image":{"aspect_ratio":1.0,"height":1000,"width":1000,"src":"\/\/crystaldestiny.com\/cdn\/shop\/files\/Blue-Yellow-Tiger-Eye-Crystal-Towers-Towers-10-Tigers-Eye-20.webp?v=1765430320"},"aspect_ratio":1.0,"height":1000,"media_type":"image","src":"\/\/crystaldestiny.com\/cdn\/shop\/files\/Blue-Yellow-Tiger-Eye-Crystal-Towers-Towers-10-Tigers-Eye-20.webp?v=1765430320","width":1000},{"alt":"Blue \u0026 Yellow Tiger Eye Crystal Towers-Towers-Ali-13-Tiger's Eye-Crystal Destiny","id":31956318290091,"position":21,"preview_image":{"aspect_ratio":1.0,"height":1000,"width":1000,"src":"\/\/crystaldestiny.com\/cdn\/shop\/files\/Blue-Yellow-Tiger-Eye-Crystal-Towers-Towers-13-Tigers-Eye-21.webp?v=1765430321"},"aspect_ratio":1.0,"height":1000,"media_type":"image","src":"\/\/crystaldestiny.com\/cdn\/shop\/files\/Blue-Yellow-Tiger-Eye-Crystal-Towers-Towers-13-Tigers-Eye-21.webp?v=1765430321","width":1000},{"alt":"Blue \u0026 Yellow Tiger Eye Crystal Towers-Towers-Ali-12-Tiger's Eye-Crystal Destiny","id":31956318322859,"position":22,"preview_image":{"aspect_ratio":1.0,"height":1000,"width":1000,"src":"\/\/crystaldestiny.com\/cdn\/shop\/files\/Blue-Yellow-Tiger-Eye-Crystal-Towers-Towers-12-Tigers-Eye-22.webp?v=1765430322"},"aspect_ratio":1.0,"height":1000,"media_type":"image","src":"\/\/crystaldestiny.com\/cdn\/shop\/files\/Blue-Yellow-Tiger-Eye-Crystal-Towers-Towers-12-Tigers-Eye-22.webp?v=1765430322","width":1000},{"alt":"Blue \u0026 Yellow Tiger Eye Crystal Towers-Towers-Ali-7-Tiger's Eye-Crystal Destiny","id":31956318355627,"position":23,"preview_image":{"aspect_ratio":1.0,"height":1000,"width":1000,"src":"\/\/crystaldestiny.com\/cdn\/shop\/files\/Blue-Yellow-Tiger-Eye-Crystal-Towers-Towers-7-Tigers-Eye-23.webp?v=1765430324"},"aspect_ratio":1.0,"height":1000,"media_type":"image","src":"\/\/crystaldestiny.com\/cdn\/shop\/files\/Blue-Yellow-Tiger-Eye-Crystal-Towers-Towers-7-Tigers-Eye-23.webp?v=1765430324","width":1000},{"alt":"Blue \u0026 Yellow Tiger Eye Crystal Towers-Towers-Ali-6-Tiger's Eye-Crystal Destiny","id":31956318388395,"position":24,"preview_image":{"aspect_ratio":1.0,"height":1000,"width":1000,"src":"\/\/crystaldestiny.com\/cdn\/shop\/files\/Blue-Yellow-Tiger-Eye-Crystal-Towers-Towers-6-Tigers-Eye-24.webp?v=1765430326"},"aspect_ratio":1.0,"height":1000,"media_type":"image","src":"\/\/crystaldestiny.com\/cdn\/shop\/files\/Blue-Yellow-Tiger-Eye-Crystal-Towers-Towers-6-Tigers-Eye-24.webp?v=1765430326","width":1000},{"alt":"Blue \u0026 Yellow Tiger Eye Crystal Towers-Towers-Ali-2-Tiger's Eye-Crystal Destiny","id":31956318421163,"position":25,"preview_image":{"aspect_ratio":1.0,"height":1000,"width":1000,"src":"\/\/crystaldestiny.com\/cdn\/shop\/files\/Blue-Yellow-Tiger-Eye-Crystal-Towers-Towers-2-Tigers-Eye-25.webp?v=1765430327"},"aspect_ratio":1.0,"height":1000,"media_type":"image","src":"\/\/crystaldestiny.com\/cdn\/shop\/files\/Blue-Yellow-Tiger-Eye-Crystal-Towers-Towers-2-Tigers-Eye-25.webp?v=1765430327","width":1000},{"alt":"Blue \u0026 Yellow Tiger Eye Crystal Towers-Towers-Ali-1-Tiger's Eye-Crystal Destiny","id":31956318453931,"position":26,"preview_image":{"aspect_ratio":1.0,"height":1000,"width":1000,"src":"\/\/crystaldestiny.com\/cdn\/shop\/files\/Blue-Yellow-Tiger-Eye-Crystal-Towers-Towers-1-Tigers-Eye-26.webp?v=1765430328"},"aspect_ratio":1.0,"height":1000,"media_type":"image","src":"\/\/crystaldestiny.com\/cdn\/shop\/files\/Blue-Yellow-Tiger-Eye-Crystal-Towers-Towers-1-Tigers-Eye-26.webp?v=1765430328","width":1000},{"alt":"Blue \u0026 Yellow Tiger Eye Crystal Towers-Towers-Ali-18-Tiger's Eye-Crystal Destiny","id":31956318486699,"position":27,"preview_image":{"aspect_ratio":1.0,"height":1000,"width":1000,"src":"\/\/crystaldestiny.com\/cdn\/shop\/files\/Blue-Yellow-Tiger-Eye-Crystal-Towers-Towers-18-Tigers-Eye-27.webp?v=1765430330"},"aspect_ratio":1.0,"height":1000,"media_type":"image","src":"\/\/crystaldestiny.com\/cdn\/shop\/files\/Blue-Yellow-Tiger-Eye-Crystal-Towers-Towers-18-Tigers-Eye-27.webp?v=1765430330","width":1000}]
{"item":{"id":8436001538219,"title":"Torre de cianita azul y dorada","handle":"blue-and-gold-kyanite-tower-cd-10030","description":"\u003cp\u003e Esta torre de cianita azul y dorada exhibe una formación mineral excepcional con un llamativo contraste de color. El ejemplar presenta láminas azules naturales intercaladas con inclusiones doradas, creando una pieza visualmente dinámica. Cada torre presenta una estructura única gracias al distintivo patrón de crecimiento cristalino de la cianita, lo que la convierte en una pieza de colección y una herramienta energética para quienes aprecian los minerales de alta calidad.\u003c\/p\u003e\n\n\u003cp\u003e Este producto es exactamente como se muestra en la imagen, único en su tipo.\u003c\/p\u003e \u003cdiv\u003e\u003cspan style=\"font-size: 0.875rem;\"\u003eTorres de Cristal, Varas, Generadores, Puntas, Pilares y Obeliscos: ¿Cuál es la Diferencia?\u003c\/span\u003e\u003c\/div\u003e\n\u003cdiv\u003e Si bien estos términos pueden variar, todos describen cristales de formas hermosas con una punta puntiaguda diseñada para canalizar y dirigir la energía. Cada nombre destaca un aspecto único de su uso:\u003c\/div\u003e\n\u003cdiv\u003e \u0026lt;ul\u0026gt;\u003c\/div\u003e\n\u003cdiv\u003e \u0026lt;li\u0026gt;\u003c\/div\u003e\n\u003cdiv\u003e \u0026lt;strong\u0026gt;Torres\u0026lt;\/strong\u0026gt;: Conocidas por su presencia constante y estabilizadora, las torres de cristal ayudan a enfocar y amplificar la energía, lo que las hace perfectas para la meditación y la manifestación.\u0026lt;\/li\u0026gt;\u003c\/div\u003e\n\u003cdiv\u003e \u0026lt;li\u0026gt;\u003c\/div\u003e\n\u003cdiv\u003e \u0026lt;strong\u0026gt;Varitas\u0026lt;\/strong\u0026gt;: Tradicionalmente utilizadas en el trabajo energético y la curación, las varitas de cristal son excelentes para dirigir el flujo de energía y eliminar bloqueos.\u0026lt;\/li\u0026gt;\u003c\/div\u003e\n\u003cdiv\u003e \u0026lt;li\u0026gt;\u003c\/div\u003e\n\u003cdiv\u003e \u0026lt;strong\u0026gt;Pilares\u0026lt;\/strong\u0026gt;: Simbolizando fuerza y estabilidad, los pilares de cristal crean un ambiente equilibrado y armonioso, lo que los hace ideales para la decoración del hogar y las prácticas espirituales.\u0026lt;\/li\u0026gt;\u003c\/div\u003e\n\u003cdiv\u003e \u0026lt;li\u0026gt;\u003c\/div\u003e \u003cdiv\u003e\u0026lt;strong\u0026gt;Obeliscos\u0026lt;\/strong\u0026gt;: Inspirados en estructuras antiguas, se cree que los obeliscos de cristal conectan las energías terrenales y espirituales, lo que los convierte en poderosas herramientas para la transformación y la iluminación.\u0026lt;\/li\u0026gt;\u003c\/div\u003e\n\u003cdiv\u003e \u0026lt;\/ul\u0026gt;\u003c\/div\u003e\n\u003cdiv\u003e No importa cómo los llames, estos cristales tienen el mismo propósito: potenciar la energía, la intención y la armonía en tu espacio. ¡Elige el que más te resuene!\u003c\/div\u003e","published_at":"2025-05-22T21:21:27-04:00","created_at":"2025-05-22T21:21:27-04:00","vendor":"Crystal Destiny","type":"Torres","tags":["crystal","polished","Towers"],"price":17999,"price_min":17999,"price_max":17999,"available":true,"price_varies":false,"compare_at_price":null,"compare_at_price_min":0,"compare_at_price_max":0,"compare_at_price_varies":false,"variants":[{"id":45240634835115,"title":"Cianita \/ 11\" de alto x 1,75\" de ancho","option1":"Cianita","option2":"11\" de alto x 1,75\" de ancho","option3":null,"sku":"CD-10030","requires_shipping":true,"taxable":true,"featured_image":null,"available":true,"name":"Torre de cianita azul y dorada - Cianita \/ 11\" de alto x 1,75\" de ancho","public_title":"Cianita \/ 11\" de alto x 1,75\" de ancho","options":["Cianita","11\" de alto x 1,75\" de ancho"],"price":17999,"weight":0,"compare_at_price":null,"inventory_management":"shopify","barcode":"","requires_selling_plan":false,"selling_plan_allocations":[]}],"images":["\/\/crystaldestiny.com\/cdn\/shop\/files\/Blue-and-Gold-Kyanite-Tower-Towers.jpg?v=1757199618"],"featured_image":"\/\/crystaldestiny.com\/cdn\/shop\/files\/Blue-and-Gold-Kyanite-Tower-Towers.jpg?v=1757199618","options":["Material","Tamaño"],"media":[{"alt":"Blue and Gold Kyanite Tower-Towers-Crystal Destiny-Kyanite-11\" H x 1.75\"W-Crystal Destiny","id":31137685962923,"position":1,"preview_image":{"aspect_ratio":0.85,"height":3206,"width":2726,"src":"\/\/crystaldestiny.com\/cdn\/shop\/files\/Blue-and-Gold-Kyanite-Tower-Towers.jpg?v=1757199618"},"aspect_ratio":0.85,"height":3206,"media_type":"image","src":"\/\/crystaldestiny.com\/cdn\/shop\/files\/Blue-and-Gold-Kyanite-Tower-Towers.jpg?v=1757199618","width":2726}],"requires_selling_plan":false,"selling_plan_groups":[],"content":"\u003cp\u003e Esta torre de cianita azul y dorada exhibe una formación mineral excepcional con un llamativo contraste de color. El ejemplar presenta láminas azules naturales intercaladas con inclusiones doradas, creando una pieza visualmente dinámica. Cada torre presenta una estructura única gracias al distintivo patrón de crecimiento cristalino de la cianita, lo que la convierte en una pieza de colección y una herramienta energética para quienes aprecian los minerales de alta calidad.\u003c\/p\u003e\n\n\u003cp\u003e Este producto es exactamente como se muestra en la imagen, único en su tipo.\u003c\/p\u003e \u003cdiv\u003e\u003cspan style=\"font-size: 0.875rem;\"\u003eTorres de Cristal, Varas, Generadores, Puntas, Pilares y Obeliscos: ¿Cuál es la Diferencia?\u003c\/span\u003e\u003c\/div\u003e\n\u003cdiv\u003e Si bien estos términos pueden variar, todos describen cristales de formas hermosas con una punta puntiaguda diseñada para canalizar y dirigir la energía. Cada nombre destaca un aspecto único de su uso:\u003c\/div\u003e\n\u003cdiv\u003e \u0026lt;ul\u0026gt;\u003c\/div\u003e\n\u003cdiv\u003e \u0026lt;li\u0026gt;\u003c\/div\u003e\n\u003cdiv\u003e \u0026lt;strong\u0026gt;Torres\u0026lt;\/strong\u0026gt;: Conocidas por su presencia constante y estabilizadora, las torres de cristal ayudan a enfocar y amplificar la energía, lo que las hace perfectas para la meditación y la manifestación.\u0026lt;\/li\u0026gt;\u003c\/div\u003e\n\u003cdiv\u003e \u0026lt;li\u0026gt;\u003c\/div\u003e\n\u003cdiv\u003e \u0026lt;strong\u0026gt;Varitas\u0026lt;\/strong\u0026gt;: Tradicionalmente utilizadas en el trabajo energético y la curación, las varitas de cristal son excelentes para dirigir el flujo de energía y eliminar bloqueos.\u0026lt;\/li\u0026gt;\u003c\/div\u003e\n\u003cdiv\u003e \u0026lt;li\u0026gt;\u003c\/div\u003e\n\u003cdiv\u003e \u0026lt;strong\u0026gt;Pilares\u0026lt;\/strong\u0026gt;: Simbolizando fuerza y estabilidad, los pilares de cristal crean un ambiente equilibrado y armonioso, lo que los hace ideales para la decoración del hogar y las prácticas espirituales.\u0026lt;\/li\u0026gt;\u003c\/div\u003e\n\u003cdiv\u003e \u0026lt;li\u0026gt;\u003c\/div\u003e \u003cdiv\u003e\u0026lt;strong\u0026gt;Obeliscos\u0026lt;\/strong\u0026gt;: Inspirados en estructuras antiguas, se cree que los obeliscos de cristal conectan las energías terrenales y espirituales, lo que los convierte en poderosas herramientas para la transformación y la iluminación.\u0026lt;\/li\u0026gt;\u003c\/div\u003e\n\u003cdiv\u003e \u0026lt;\/ul\u0026gt;\u003c\/div\u003e\n\u003cdiv\u003e No importa cómo los llames, estos cristales tienen el mismo propósito: potenciar la energía, la intención y la armonía en tu espacio. ¡Elige el que más te resuene!\u003c\/div\u003e"},"options":[{"name":"Material","position":1,"values":["Cianita"]},{"name":"Tamaño","position":2,"values":["11\" de alto x 1,75\" de ancho"]}],"custom_metafields":{"shipping_time":"En un plazo de 7 días"},"metafields":{"badge":"\u003cdiv style='display:none' class='jdgm-prev-badge' data-average-rating='0.00' data-number-of-reviews='0' data-number-of-questions='0'\u003e \u003cspan class='jdgm-prev-badge__stars' data-score='0.00' tabindex='0' aria-label='0.00 stars' role='button'\u003e \u003cspan class='jdgm-star jdgm--off'\u003e\u003c\/span\u003e\u003cspan class='jdgm-star jdgm--off'\u003e\u003c\/span\u003e\u003cspan class='jdgm-star jdgm--off'\u003e\u003c\/span\u003e\u003cspan class='jdgm-star jdgm--off'\u003e\u003c\/span\u003e\u003cspan class='jdgm-star jdgm--off'\u003e\u003c\/span\u003e \u003c\/span\u003e \u003cspan class='jdgm-prev-badge__text'\u003e No reviews \u003c\/span\u003e \u003c\/div\u003e","widget":"\u003cdiv class='jdgm-rev-widg' data-updated-at='2025-05-23T01:21:31Z' data-average-rating='0.00' data-number-of-reviews='0' data-number-of-questions='0'\u003e \u003cstyle class='jdgm-temp-hiding-style'\u003e.jdgm-rev-widg{ display: none }\u003c\/style\u003e \u003cdiv class='jdgm-rev-widg__header'\u003e \u003ch2 class='jdgm-rev-widg__title'\u003eCustomer Reviews\u003c\/h2\u003e \u003cdiv class='jdgm-rev-widg__summary'\u003e \u003cdiv class='jdgm-rev-widg__summary-stars' aria-label='Average rating is 0.00 stars' role='img'\u003e \u003cspan class='jdgm-star jdgm--off'\u003e\u003c\/span\u003e\u003cspan class='jdgm-star jdgm--off'\u003e\u003c\/span\u003e\u003cspan class='jdgm-star jdgm--off'\u003e\u003c\/span\u003e\u003cspan class='jdgm-star jdgm--off'\u003e\u003c\/span\u003e\u003cspan class='jdgm-star jdgm--off'\u003e\u003c\/span\u003e \u003c\/div\u003e \u003cdiv class='jdgm-rev-widg__summary-text'\u003eBe the first to write a review\u003c\/div\u003e \u003c\/div\u003e \u003ca style='display: none' href='#' class='jdgm-write-rev-link' role='button'\u003eWrite a review\u003c\/a\u003e \u003cdiv class='jdgm-histogram jdgm-temp-hidden'\u003e \u003cdiv class='jdgm-histogram__row' data-rating='5' data-frequency='0' data-percentage='0'\u003e \u003cdiv class='jdgm-histogram__star' role='button' aria-label=\"0% (0) reviews with 5 star rating\" tabindex='0' \u003e\u003cspan class='jdgm-star jdgm--on'\u003e\u003c\/span\u003e\u003cspan class='jdgm-star jdgm--on'\u003e\u003c\/span\u003e\u003cspan class='jdgm-star jdgm--on'\u003e\u003c\/span\u003e\u003cspan class='jdgm-star jdgm--on'\u003e\u003c\/span\u003e\u003cspan class='jdgm-star jdgm--on'\u003e\u003c\/span\u003e\u003c\/div\u003e \u003cdiv class='jdgm-histogram__bar'\u003e \u003cdiv class='jdgm-histogram__bar-content' style='width: 0%;'\u003e \u003c\/div\u003e \u003c\/div\u003e \u003cdiv class='jdgm-histogram__percentage'\u003e0%\u003c\/div\u003e \u003cdiv class='jdgm-histogram__frequency'\u003e(0)\u003c\/div\u003e \u003c\/div\u003e \u003cdiv class='jdgm-histogram__row' data-rating='4' data-frequency='0' data-percentage='0'\u003e \u003cdiv class='jdgm-histogram__star' role='button' aria-label=\"0% (0) reviews with 4 star rating\" tabindex='0' \u003e\u003cspan class='jdgm-star jdgm--on'\u003e\u003c\/span\u003e\u003cspan class='jdgm-star jdgm--on'\u003e\u003c\/span\u003e\u003cspan class='jdgm-star jdgm--on'\u003e\u003c\/span\u003e\u003cspan class='jdgm-star jdgm--on'\u003e\u003c\/span\u003e\u003cspan class='jdgm-star jdgm--off'\u003e\u003c\/span\u003e\u003c\/div\u003e \u003cdiv class='jdgm-histogram__bar'\u003e \u003cdiv class='jdgm-histogram__bar-content' style='width: 0%;'\u003e \u003c\/div\u003e \u003c\/div\u003e \u003cdiv class='jdgm-histogram__percentage'\u003e0%\u003c\/div\u003e \u003cdiv class='jdgm-histogram__frequency'\u003e(0)\u003c\/div\u003e \u003c\/div\u003e \u003cdiv class='jdgm-histogram__row' data-rating='3' data-frequency='0' data-percentage='0'\u003e \u003cdiv class='jdgm-histogram__star' role='button' aria-label=\"0% (0) reviews with 3 star rating\" tabindex='0' \u003e\u003cspan class='jdgm-star jdgm--on'\u003e\u003c\/span\u003e\u003cspan class='jdgm-star jdgm--on'\u003e\u003c\/span\u003e\u003cspan class='jdgm-star jdgm--on'\u003e\u003c\/span\u003e\u003cspan class='jdgm-star jdgm--off'\u003e\u003c\/span\u003e\u003cspan class='jdgm-star jdgm--off'\u003e\u003c\/span\u003e\u003c\/div\u003e \u003cdiv class='jdgm-histogram__bar'\u003e \u003cdiv class='jdgm-histogram__bar-content' style='width: 0%;'\u003e \u003c\/div\u003e \u003c\/div\u003e \u003cdiv class='jdgm-histogram__percentage'\u003e0%\u003c\/div\u003e \u003cdiv class='jdgm-histogram__frequency'\u003e(0)\u003c\/div\u003e \u003c\/div\u003e \u003cdiv class='jdgm-histogram__row' data-rating='2' data-frequency='0' data-percentage='0'\u003e \u003cdiv class='jdgm-histogram__star' role='button' aria-label=\"0% (0) reviews with 2 star rating\" tabindex='0' \u003e\u003cspan class='jdgm-star jdgm--on'\u003e\u003c\/span\u003e\u003cspan class='jdgm-star jdgm--on'\u003e\u003c\/span\u003e\u003cspan class='jdgm-star jdgm--off'\u003e\u003c\/span\u003e\u003cspan class='jdgm-star jdgm--off'\u003e\u003c\/span\u003e\u003cspan class='jdgm-star jdgm--off'\u003e\u003c\/span\u003e\u003c\/div\u003e \u003cdiv class='jdgm-histogram__bar'\u003e \u003cdiv class='jdgm-histogram__bar-content' style='width: 0%;'\u003e \u003c\/div\u003e \u003c\/div\u003e \u003cdiv class='jdgm-histogram__percentage'\u003e0%\u003c\/div\u003e \u003cdiv class='jdgm-histogram__frequency'\u003e(0)\u003c\/div\u003e \u003c\/div\u003e \u003cdiv class='jdgm-histogram__row' data-rating='1' data-frequency='0' data-percentage='0'\u003e \u003cdiv class='jdgm-histogram__star' role='button' aria-label=\"0% (0) reviews with 1 star rating\" tabindex='0' \u003e\u003cspan class='jdgm-star jdgm--on'\u003e\u003c\/span\u003e\u003cspan class='jdgm-star jdgm--off'\u003e\u003c\/span\u003e\u003cspan class='jdgm-star jdgm--off'\u003e\u003c\/span\u003e\u003cspan class='jdgm-star jdgm--off'\u003e\u003c\/span\u003e\u003cspan class='jdgm-star jdgm--off'\u003e\u003c\/span\u003e\u003c\/div\u003e \u003cdiv class='jdgm-histogram__bar'\u003e \u003cdiv class='jdgm-histogram__bar-content' style='width: 0%;'\u003e \u003c\/div\u003e \u003c\/div\u003e \u003cdiv class='jdgm-histogram__percentage'\u003e0%\u003c\/div\u003e \u003cdiv class='jdgm-histogram__frequency'\u003e(0)\u003c\/div\u003e \u003c\/div\u003e \u003cdiv class='jdgm-histogram__row jdgm-histogram__clear-filter' data-rating=null tabindex='0'\u003e\u003c\/div\u003e \u003c\/div\u003e \u003cdiv class='jdgm-rev-widg__sort-wrapper'\u003e\u003c\/div\u003e \u003c\/div\u003e \u003cdiv class='jdgm-rev-widg__body'\u003e \u003cdiv class='jdgm-rev-widg__reviews'\u003e\u003c\/div\u003e \u003cdiv class='jdgm-paginate' data-per-page='5' data-url='https:\/\/api.judge.me\/reviews\/reviews_for_widget' style=\"display: none;\"\u003e\u003c\/div\u003e \u003c\/div\u003e \u003cdiv class='jdgm-rev-widg__paginate-spinner-wrapper'\u003e \u003cdiv class='jdgm-spinner'\u003e\u003c\/div\u003e \u003c\/div\u003e \u003c\/div\u003e"},"collections":[{"id":294880051371,"handle":"crystals","title":"Crystals","updated_at":"2026-01-07T23:43:11-05:00","body_html":"\u003cp data-start=\"159\" data-end=\"687\"\u003e✨ \u003cstrong data-start=\"161\" data-end=\"216\"\u003eDiscover the Magic of Crystals with Crystal Destiny\u003c\/strong\u003e ✨\u003cbr data-start=\"218\" data-end=\"221\"\u003eCrystals have been treasured for centuries—not only for their natural beauty but also for their powerful healing energies. Beyond their visual allure, they bring balance, harmony, and positive energy into any space. Whether used for home décor, meditation, or simply to elevate the energy of your surroundings, crystals create a sanctuary of peace, relaxation, and well-being. Each piece is a unique gift from the Earth—visually stunning and spiritually uplifting.\u003c\/p\u003e\n\u003cp data-start=\"689\" data-end=\"1011\"\u003eAt \u003cstrong data-start=\"692\" data-end=\"711\"\u003eCrystal Destiny\u003c\/strong\u003e, our signature collection showcases a curated selection of exquisite crystals, from radiant Quartz to soothing Amethyst. Every stone is carefully sourced for its elegance and metaphysical resonance, making them perfect for enhancing your home, uplifting your spirit, or gifting to someone special.\u003c\/p\u003e\n\u003cp data-start=\"1013\" data-end=\"1206\"\u003eExperience the timeless sophistication of crystalline wonders. Explore the \u003cstrong data-start=\"1088\" data-end=\"1118\"\u003eCrystal Destiny Collection\u003c\/strong\u003e today and bring the transformative beauty of these treasures into your everyday life.\u003c\/p\u003e","published_at":"2023-06-05T11:24:02-04:00","sort_order":"created-desc","template_suffix":"","disjunctive":false,"rules":[{"column":"tag","relation":"equals","condition":"crystal"},{"column":"type","relation":"not_contains","condition":"925 Sterling Silver"},{"column":"type","relation":"not_contains","condition":"Wire Wraps"}],"published_scope":"global"},{"id":319455821995,"handle":"throat-chakra-crystals","title":"Throat Chakra Crystals","updated_at":"2026-01-07T07:13:13-05:00","body_html":"\u003cp data-start=\"108\" data-end=\"439\"\u003e✨ \u003cstrong data-start=\"110\" data-end=\"136\"\u003eThroat Chakra Crystals\u003c\/strong\u003e ✨\u003cbr data-start=\"138\" data-end=\"141\"\u003eEnhance communication, self-expression, and clarity with our \u003cstrong data-start=\"202\" data-end=\"228\"\u003eThroat Chakra Crystals\u003c\/strong\u003e. Located at the throat, this chakra governs speech, honesty, and personal expression. These crystals help unblock energy, promote confidence in speaking your truth, and support clear, authentic communication.\u003c\/p\u003e\n\u003cp data-start=\"441\" data-end=\"767\"\u003eOur curated selection includes stones such as Blue Lace Agate, Lapis Lazuli, and Sodalite—each chosen for their ability to stimulate creativity, intuition, and emotional balance. Perfect for meditation, energy work, or wearing as jewelry, Throat Chakra Crystals empower you to express yourself with confidence and integrity.\u003c\/p\u003e\n\u003cp data-start=\"769\" data-end=\"906\"\u003eStrengthen your voice, clarify your intentions, and embrace the transformative energy of the Throat Chakra with these vibrant crystals.\u003c\/p\u003e","published_at":"2025-07-17T18:17:14-04:00","sort_order":"best-selling","template_suffix":"","disjunctive":false,"rules":[{"column":"variant_metafield_definition","relation":"equals","condition":"Throat"}],"published_scope":"global","image":{"created_at":"2025-07-17T19:08:49-04:00","alt":null,"width":1080,"height":1080,"src":"\/\/crystaldestiny.com\/cdn\/shop\/collections\/Throat_Chakra_Collection.jpg?v=1762474926"}},{"id":294880116907,"handle":"polished","title":"Polished Crystals","updated_at":"2026-01-07T23:43:11-05:00","body_html":"\u003cp data-start=\"199\" data-end=\"598\"\u003e✨ \u003cstrong data-start=\"201\" data-end=\"248\"\u003eCrystal Destiny Polished Crystal Collection\u003c\/strong\u003e ✨\u003cbr data-start=\"250\" data-end=\"253\"\u003eIndulge in the brilliance of crystals refined to perfection. Our \u003cstrong data-start=\"318\" data-end=\"341\"\u003ePolished Collection\u003c\/strong\u003e showcases gemstones meticulously shaped and smoothed to reveal their natural radiance and timeless beauty. From the shimmering glow of Quartz to the deep allure of Obsidian, each polished piece is a testament to nature’s artistry and human craftsmanship.\u003c\/p\u003e\n\u003cp data-start=\"600\" data-end=\"862\"\u003ePerfect as statement décor, meaningful gifts, or companions on your spiritual journey, polished crystals bring sophistication and elevated energy into any space. Their radiant surfaces reflect not only light but also the transformative power of crystal energy.\u003c\/p\u003e\n\u003cp data-start=\"864\" data-end=\"1022\"\u003eDiscover the elegance of refinement with Crystal Destiny’s Polished Crystal Collection—where every facet shines with intention, beauty, and timeless allure.\u003c\/p\u003e","published_at":"2023-06-05T11:30:44-04:00","sort_order":"created-desc","template_suffix":"","disjunctive":false,"rules":[{"column":"tag","relation":"equals","condition":"polished"}],"published_scope":"global"},{"id":293659312299,"handle":"best-sellers","title":"Best Sellers","updated_at":"2026-01-07T23:43:11-05:00","body_html":"\u003cp data-start=\"155\" data-end=\"510\"\u003eDiscover the pieces our community loves most. Our Best Sellers Collection brings together handpicked crystals and jewelry that embody timeless elegance, spiritual resonance, and everyday sophistication. Each item has earned its place as a customer favorite—celebrated for both its beauty and its meaningful energy.\u003c\/p\u003e\n\u003cp data-start=\"512\" data-end=\"802\"\u003eFrom stunning statement pieces to versatile daily companions, these treasures are curated to elevate your space, uplift your spirit, and reflect refined taste. Indulge in what’s most cherished and let our best sellers guide you toward the perfect blend of style and transformative energy.\u003c\/p\u003e\n\u003cp data-start=\"804\" data-end=\"932\"\u003eExplore the Best Sellers Collection today—where elegance meets intention, and every piece tells a story of beauty and balance.\u003c\/p\u003e","published_at":"2023-03-15T16:04:51-04:00","sort_order":"best-selling","template_suffix":"","disjunctive":false,"rules":[{"column":"variant_price","relation":"greater_than","condition":"0"},{"column":"variant_inventory","relation":"greater_than","condition":"0"},{"column":"type","relation":"not_equals","condition":"Shipping Protection"}],"published_scope":"global"},{"id":321370390699,"handle":"monthly-crystal-sale","title":"Monthly Crystal Sale | Spheres \u0026 Towers","updated_at":"2026-01-06T23:24:37-05:00","body_html":"\u003cp\u003eShop our \u003cstrong\u003eMonthly Crystal Sale\u003c\/strong\u003e, where you can shop a wide selection of healing crystals at discounted prices. Explore \u003cstrong\u003ecrystal spheres and towers,\u003c\/strong\u003e— all carefully curated to support meditation, energy balancing, and spiritual wellness. Whether you're looking to enhance your home decor, boost your daily energy, or find the perfect gift, our \u003cstrong\u003ecrystals for healing and manifestation\u003c\/strong\u003e offer both beauty and metaphysical benefits.\u003c\/p\u003e\n\u003cp\u003eEach month, our sale features \u003cstrong\u003enew discounted collections\u003c\/strong\u003e, from \u003cstrong\u003enatural quartz and amethyst towers\u003c\/strong\u003e to \u003cstrong\u003ewire-wrapped pendants and polished stones\u003c\/strong\u003e, so there's always something fresh to discover. Shop with confidence knowing you're getting high-quality crystals with \u003cstrong\u003efree shipping options\u003c\/strong\u003e and a trusted experience.\u003c\/p\u003e\n\u003cp\u003e\u003cstrong\u003eTake advantage of the Monthly Crystal Sale today\u003c\/strong\u003e and add powerful, natural energy to your life with \u003cstrong\u003eauthentic healing crystals\u003c\/strong\u003e — while our limited-time discounts last.\u003c\/p\u003e\n\u003cp\u003e\u003cstrong\u003e*Discount automatically applied at checkout.\u003c\/strong\u003e\u003c\/p\u003e","published_at":"2025-12-02T01:26:17-05:00","sort_order":"alpha-asc","template_suffix":"","disjunctive":true,"rules":[{"column":"tag","relation":"equals","condition":"spheres"},{"column":"tag","relation":"equals","condition":"Towers"}],"published_scope":"global","image":{"created_at":"2026-01-01T01:32:34-05:00","alt":"","width":960,"height":960,"src":"\/\/crystaldestiny.com\/cdn\/shop\/collections\/3E8C2969-1B86-4ACE-B349-98E9D8768424.jpg?v=1767249154"}},{"id":297596059819,"handle":"all","title":"All Crystals \u0026 Jewelry","updated_at":"2026-01-07T23:43:11-05:00","body_html":"\u003cp data-start=\"149\" data-end=\"494\"\u003e✨ \u003cstrong data-start=\"151\" data-end=\"181\"\u003eWelcome to Crystal Destiny\u003c\/strong\u003e ✨\u003cbr data-start=\"183\" data-end=\"186\"\u003eStep into a world where beauty, energy, and artistry unite. Our collection is a treasure trove of exquisite crystals, from the raw, untamed elegance of natural formations to the polished brilliance of expertly crafted pieces. Each crystal is a masterpiece, carrying its own unique story and timeless charm.\u003c\/p\u003e\n\u003cp data-start=\"496\" data-end=\"831\"\u003eWhether you’re drawn to the calming presence of Amethyst, the vibrant energy of Citrine, or the grounding strength of Jasper, our crystals invite you to connect with nature’s finest wonders. Perfect for enhancing your space, supporting your spiritual journey, or gifting with intention, every piece resonates with beauty and meaning.\u003c\/p\u003e\n\u003cp data-start=\"833\" data-end=\"1000\"\u003eElevate your surroundings, embrace the mystique, and explore the enchanting world of crystals at \u003cstrong data-start=\"930\" data-end=\"949\"\u003eCrystal Destiny\u003c\/strong\u003e—where every crystal is waiting to be discovered.\u003c\/p\u003e","published_at":"2023-11-10T13:55:31-05:00","sort_order":"created-desc","template_suffix":"","disjunctive":false,"rules":[{"column":"type","relation":"not_equals","condition":"asdf"}],"published_scope":"global"},{"id":296256405675,"handle":"crystal-towers","title":"Crystal Towers","updated_at":"2026-01-06T23:24:37-05:00","body_html":"\u003cp data-end=\"568\" data-start=\"152\"\u003e✨ \u003cstrong data-end=\"190\" data-start=\"154\"\u003eCrystal Destiny Tower Collection\u003c\/strong\u003e ✨\u003cbr data-end=\"195\" data-start=\"192\"\u003eEnchant your space with the timeless beauty and powerful energy of crystal towers. Each piece in our \u003cstrong data-end=\"316\" data-start=\"296\"\u003eTower Collection\u003c\/strong\u003e is carefully crafted to showcase nature’s artistry while radiating higher vibrations and spiritual resonance. From the clarity of Quartz to the calming presence of Amethyst, these towers are both decorative masterpieces and tools for transformation.\u003c\/p\u003e\n\u003cp data-end=\"765\" data-start=\"570\"\u003ePerfect for meditation spaces, energy work, or simply elevating your home décor, crystal towers channel focused energy upward—creating balance, harmony, and refined elegance in any environment.\u003c\/p\u003e\n\u003cp data-end=\"917\" data-start=\"767\"\u003eDiscover the Crystal Destiny Tower Collection today and transform your surroundings into a sanctuary of beauty, purpose, and spiritual significance.\u003c\/p\u003e\n\u003ch2\u003eCrystal Towers, Wands, Generators, Points, Pillars \u0026amp; Obelisks — What's the Difference?\u003c\/h2\u003e\n\u003cp id=\"isPasted\"\u003eWhile these terms may vary, they all describe beautifully shaped crystals with a pointed tip designed to channel and direct energy. Each name highlights a unique aspect of their use:\u003c\/p\u003e\n\u003cul\u003e\n\u003cli\u003e\n\u003cstrong\u003eTowers\u003c\/strong\u003e- Known for their steady, grounding presence, crystal towers help focus and amplify energy, making them perfect for meditation and manifestation.\u003c\/li\u003e\n\u003cli\u003e\n\u003cstrong\u003eWands\u003c\/strong\u003e- Traditionally used in energy work and healing, crystal wands are excellent for directing energy flow and clearing blockages.\u003c\/li\u003e\n\u003cli\u003e\n\u003cstrong\u003ePillars\u003c\/strong\u003e- Symbolizing strength and stability, crystal pillars create a balanced and harmonious environment, making them great for home decor and spiritual practices.\u003c\/li\u003e\n\u003cli\u003e\n\u003cstrong\u003eObelisks\u003c\/strong\u003e- Inspired by ancient structures, crystal obelisks are believed to connect earthly and spiritual energies, making them powerful tools for transformation and enlightenment.\u003c\/li\u003e\n\u003c\/ul\u003e\n\u003cp\u003eNo matter what you call them, these crystals serve the same purpose—to enhance energy, intention, and harmony in your space. Choose the one that resonates most with you!\u003c\/p\u003e","published_at":"2023-09-14T12:52:35-04:00","sort_order":"created-desc","template_suffix":"","disjunctive":false,"rules":[{"column":"tag","relation":"equals","condition":"towers"}],"published_scope":"global"},{"id":298983391403,"handle":"january-crystal-sale","title":"January Sale | 25% Off Crystal Towers \u0026 Spheres","updated_at":"2026-01-06T23:24:37-05:00","body_html":"\u003cp\u003eShop our \u003cstrong\u003eJanuary Crystal Sale\u003c\/strong\u003e, where you can shop a wide selection of healing crystals at discounted prices. Explore \u003cstrong\u003eCrystal Towers, \u0026amp; Crystal Spheres\u003c\/strong\u003e — all carefully curated and crafted to support meditation, energy balancing, and spiritual wellness. Whether you're looking to enhance your home decor, boost your daily energy, or find the perfect gift, our \u003cstrong\u003ecrystals for healing and manifestation\u003c\/strong\u003e offer both beauty and metaphysical benefits.\u003c\/p\u003e\n\u003cp\u003eThis January, our sale features \u003cstrong\u003ediscounted crystal towers and spheres\u003c\/strong\u003e, from \u003cstrong\u003enatural quartz \u003c\/strong\u003eand \u003cstrong\u003eamethyst \u003c\/strong\u003eto \u003cstrong\u003ebumblebee jasper \u003c\/strong\u003eand \u003cstrong\u003ecarnelian\u003c\/strong\u003e, so there's always something fresh to discover. Shop with confidence knowing you're getting high-quality crystals with \u003cstrong\u003efree shipping options\u003c\/strong\u003e and a trusted experience.\u003c\/p\u003e\n\u003cp\u003e\u003cstrong\u003eTake advantage of the January Crystal Sale today\u003c\/strong\u003e and add powerful, natural energy to your life with \u003cstrong\u003eauthentic healing crystals\u003c\/strong\u003e — while our limited-time discounts last.\u003c\/p\u003e\n\u003cp\u003e\u003cstrong\u003e*Discount automatically applied at checkout.\u003c\/strong\u003e\u003c\/p\u003e","published_at":"2026-01-01T00:07:17-05:00","sort_order":"alpha-asc","template_suffix":"monthly-collection","disjunctive":true,"rules":[{"column":"tag","relation":"equals","condition":"Spheres"},{"column":"tag","relation":"equals","condition":"Towers"}],"published_scope":"global","image":{"created_at":"2026-01-01T01:29:59-05:00","alt":"","width":960,"height":960,"src":"\/\/crystaldestiny.com\/cdn\/shop\/collections\/1464163B-22B1-4D62-BEC5-CEC9AECB670B.jpg?v=1767248999"}}]}
[{"alt":"Blue and Gold Kyanite Tower-Towers-Crystal Destiny-Kyanite-11\" H x 1.75\"W-Crystal Destiny","id":31137685962923,"position":1,"preview_image":{"aspect_ratio":0.85,"height":3206,"width":2726,"src":"\/\/crystaldestiny.com\/cdn\/shop\/files\/Blue-and-Gold-Kyanite-Tower-Towers.jpg?v=1757199618"},"aspect_ratio":0.85,"height":3206,"media_type":"image","src":"\/\/crystaldestiny.com\/cdn\/shop\/files\/Blue-and-Gold-Kyanite-Tower-Towers.jpg?v=1757199618","width":2726}]
{"item":{"id":8436972847275,"title":"Esferas de calcita azul","handle":"blue-calcite-spheres-72-93mm-cd-10070","description":"\u003cp\u003e Esta esfera de calcita azul aprovecha las propiedades calmantes naturales de la piedra, promoviendo la claridad mental y la reducción del estrés. Su forma perfectamente redondeada mejora la distribución de la energía en los espacios, mientras que su distintivo tono azul actúa para calmar el chakra de la garganta y facilitar una comunicación fluida. Cada esfera se pule cuidadosamente para preservar las propiedades ópticas naturales de la calcita y su singular estructura cristalina.\u003c\/p\u003e","published_at":"2025-05-24T19:20:17-04:00","created_at":"2025-05-24T19:20:17-04:00","vendor":"Crystal Destiny","type":"Esferas","tags":["crystal","polished","spheres"],"price":4299,"price_min":4299,"price_max":6999,"available":true,"price_varies":true,"compare_at_price":null,"compare_at_price_min":0,"compare_at_price_max":0,"compare_at_price_varies":false,"variants":[{"id":45246378115243,"title":"Calcita azul \/ 514 gramos","option1":"Calcita azul","option2":"514 gramos","option3":null,"sku":"CD-10070","requires_shipping":true,"taxable":true,"featured_image":{"id":39534299381931,"product_id":8436972847275,"position":2,"created_at":"2025-05-24T19:18:57-04:00","updated_at":"2025-12-11T00:03:28-05:00","alt":"Blue Calcite Spheres 72-93mm-Spheres-Crystal Destiny-Blue Calcite-514g - 72mm Diameter-Crystal Destiny","width":1742,"height":1742,"src":"\/\/crystaldestiny.com\/cdn\/shop\/files\/Blue-Calcite-Spheres-72-93mm-Spheres-Blue-Calcite-514g-72mm-Diameter-2.jpg?v=1765429408","variant_ids":[45246378115243]},"available":true,"name":"Esferas de calcita azul - Calcita azul \/ 514 gramos","public_title":"Calcita azul \/ 514 gramos","options":["Calcita azul","514 gramos"],"price":4299,"weight":0,"compare_at_price":null,"inventory_management":"shopify","barcode":"","featured_media":{"alt":"Blue Calcite Spheres 72-93mm-Spheres-Crystal Destiny-Blue Calcite-514g - 72mm Diameter-Crystal Destiny","id":31151294316715,"position":2,"preview_image":{"aspect_ratio":1.0,"height":1742,"width":1742,"src":"\/\/crystaldestiny.com\/cdn\/shop\/files\/Blue-Calcite-Spheres-72-93mm-Spheres-Blue-Calcite-514g-72mm-Diameter-2.jpg?v=1765429408"}},"requires_selling_plan":false,"selling_plan_allocations":[]},{"id":45258432872619,"title":"Calcita azul \/ 554 gramos","option1":"Calcita azul","option2":"554 gramos","option3":null,"sku":"CD-10081","requires_shipping":true,"taxable":true,"featured_image":{"id":39562316775595,"product_id":8436972847275,"position":8,"created_at":"2025-05-28T15:40:15-04:00","updated_at":"2025-12-11T00:03:36-05:00","alt":"Blue Calcite Spheres 72-93mm-Spheres-Crystal Destiny-Blue Calcite-554g- 73mm Diameter-Crystal Destiny","width":1663,"height":1663,"src":"\/\/crystaldestiny.com\/cdn\/shop\/files\/Blue-Calcite-Spheres-72-93mm-Spheres-Blue-Calcite-554g-73mm-Diameter-8.jpg?v=1765429416","variant_ids":[45258432872619]},"available":true,"name":"Esferas de calcita azul - Calcita azul \/ 554 gramos","public_title":"Calcita azul \/ 554 gramos","options":["Calcita azul","554 gramos"],"price":4599,"weight":0,"compare_at_price":null,"inventory_management":"shopify","barcode":"","featured_media":{"alt":"Blue Calcite Spheres 72-93mm-Spheres-Crystal Destiny-Blue Calcite-554g- 73mm Diameter-Crystal Destiny","id":31172232052907,"position":8,"preview_image":{"aspect_ratio":1.0,"height":1663,"width":1663,"src":"\/\/crystaldestiny.com\/cdn\/shop\/files\/Blue-Calcite-Spheres-72-93mm-Spheres-Blue-Calcite-554g-73mm-Diameter-8.jpg?v=1765429416"}},"requires_selling_plan":false,"selling_plan_allocations":[]},{"id":45246378082475,"title":"Calcita azul \/ 562 gramos","option1":"Calcita azul","option2":"562 gramos","option3":null,"sku":"CD-10071","requires_shipping":true,"taxable":true,"featured_image":{"id":39534291517611,"product_id":8436972847275,"position":1,"created_at":"2025-05-24T19:16:41-04:00","updated_at":"2025-12-11T00:03:26-05:00","alt":"Blue Calcite Spheres 72-93mm-Spheres-Crystal Destiny-Blue Calcite-562g - 74mm Diameter-Crystal Destiny","width":1770,"height":1770,"src":"\/\/crystaldestiny.com\/cdn\/shop\/files\/Blue-Calcite-Spheres-72-93mm-Spheres-Blue-Calcite-562g-74mm-Diameter.jpg?v=1765429406","variant_ids":[45246378082475]},"available":false,"name":"Esferas de calcita azul - Calcita azul \/ 562 gramos","public_title":"Calcita azul \/ 562 gramos","options":["Calcita azul","562 gramos"],"price":4799,"weight":0,"compare_at_price":null,"inventory_management":"shopify","barcode":"","featured_media":{"alt":"Blue Calcite Spheres 72-93mm-Spheres-Crystal Destiny-Blue Calcite-562g - 74mm Diameter-Crystal Destiny","id":31151286616235,"position":1,"preview_image":{"aspect_ratio":1.0,"height":1770,"width":1770,"src":"\/\/crystaldestiny.com\/cdn\/shop\/files\/Blue-Calcite-Spheres-72-93mm-Spheres-Blue-Calcite-562g-74mm-Diameter.jpg?v=1765429406"}},"requires_selling_plan":false,"selling_plan_allocations":[]},{"id":45246378148011,"title":"Calcita azul \/ 632 gramos","option1":"Calcita azul","option2":"632 gramos","option3":null,"sku":"CD-10069","requires_shipping":true,"taxable":true,"featured_image":{"id":39534300397739,"product_id":8436972847275,"position":3,"created_at":"2025-05-24T19:19:13-04:00","updated_at":"2025-12-11T00:03:29-05:00","alt":"Blue Calcite Spheres 72-93mm-Spheres-Crystal Destiny-Blue Calcite-632g - 77mm Diameter-Crystal Destiny","width":1635,"height":1635,"src":"\/\/crystaldestiny.com\/cdn\/shop\/files\/Blue-Calcite-Spheres-72-93mm-Spheres-Blue-Calcite-632g-77mm-Diameter-3.jpg?v=1765429409","variant_ids":[45246378148011]},"available":false,"name":"Esferas de calcita azul - Calcita azul \/ 632 gramos","public_title":"Calcita azul \/ 632 gramos","options":["Calcita azul","632 gramos"],"price":4999,"weight":0,"compare_at_price":null,"inventory_management":"shopify","barcode":"","featured_media":{"alt":"Blue Calcite Spheres 72-93mm-Spheres-Crystal Destiny-Blue Calcite-632g - 77mm Diameter-Crystal Destiny","id":31151295103147,"position":3,"preview_image":{"aspect_ratio":1.0,"height":1635,"width":1635,"src":"\/\/crystaldestiny.com\/cdn\/shop\/files\/Blue-Calcite-Spheres-72-93mm-Spheres-Blue-Calcite-632g-77mm-Diameter-3.jpg?v=1765429409"}},"requires_selling_plan":false,"selling_plan_allocations":[]},{"id":45258432839851,"title":"Calcita azul \/ 810 gramos","option1":"Calcita azul","option2":"810 gramos","option3":null,"sku":"CD-10082","requires_shipping":true,"taxable":true,"featured_image":{"id":39562311696555,"product_id":8436972847275,"position":7,"created_at":"2025-05-28T15:37:29-04:00","updated_at":"2025-12-11T00:03:35-05:00","alt":"Blue Calcite Spheres 72-93mm-Spheres-Crystal Destiny-Blue Calcite-810g - 82mm Diameter-Crystal Destiny","width":1747,"height":1747,"src":"\/\/crystaldestiny.com\/cdn\/shop\/files\/Blue-Calcite-Spheres-72-93mm-Spheres-Blue-Calcite-810g-82mm-Diameter-7.jpg?v=1765429415","variant_ids":[45258432839851]},"available":true,"name":"Esferas de calcita azul - Calcita azul \/ 810 gramos","public_title":"Calcita azul \/ 810 gramos","options":["Calcita azul","810 gramos"],"price":5499,"weight":0,"compare_at_price":null,"inventory_management":"shopify","barcode":"","featured_media":{"alt":"Blue Calcite Spheres 72-93mm-Spheres-Crystal Destiny-Blue Calcite-810g - 82mm Diameter-Crystal Destiny","id":31172229005483,"position":7,"preview_image":{"aspect_ratio":1.0,"height":1747,"width":1747,"src":"\/\/crystaldestiny.com\/cdn\/shop\/files\/Blue-Calcite-Spheres-72-93mm-Spheres-Blue-Calcite-810g-82mm-Diameter-7.jpg?v=1765429415"}},"requires_selling_plan":false,"selling_plan_allocations":[]},{"id":45258432774315,"title":"Calcita azul \/ 1064 gramos","option1":"Calcita azul","option2":"1064 gramos","option3":null,"sku":"CD-10084","requires_shipping":true,"taxable":true,"featured_image":{"id":39562303406251,"product_id":8436972847275,"position":4,"created_at":"2025-05-28T15:31:39-04:00","updated_at":"2025-12-11T00:03:31-05:00","alt":"Blue Calcite Spheres 72-93mm-Spheres-Crystal Destiny-Blue Calcite-1064g - 91mm Diameter-Crystal Destiny","width":1972,"height":1972,"src":"\/\/crystaldestiny.com\/cdn\/shop\/files\/Blue-Calcite-Spheres-72-93mm-Spheres-Blue-Calcite-1064g-91mm-Diameter-4.jpg?v=1765429411","variant_ids":[45258432774315]},"available":true,"name":"Esferas de calcita azul - Calcita azul \/ 1064 gramos","public_title":"Calcita azul \/ 1064 gramos","options":["Calcita azul","1064 gramos"],"price":6499,"weight":0,"compare_at_price":null,"inventory_management":"shopify","barcode":"","featured_media":{"alt":"Blue Calcite Spheres 72-93mm-Spheres-Crystal Destiny-Blue Calcite-1064g - 91mm Diameter-Crystal Destiny","id":31172222648491,"position":4,"preview_image":{"aspect_ratio":1.0,"height":1972,"width":1972,"src":"\/\/crystaldestiny.com\/cdn\/shop\/files\/Blue-Calcite-Spheres-72-93mm-Spheres-Blue-Calcite-1064g-91mm-Diameter-4.jpg?v=1765429411"}},"requires_selling_plan":false,"selling_plan_allocations":[]},{"id":45258432807083,"title":"Calcita azul \/ 1104 gramos","option1":"Calcita azul","option2":"1104 gramos","option3":null,"sku":"CD-10083","requires_shipping":true,"taxable":true,"featured_image":{"id":39562309107883,"product_id":8436972847275,"position":6,"created_at":"2025-05-28T15:35:44-04:00","updated_at":"2025-12-11T00:03:33-05:00","alt":"Blue Calcite Spheres 72-93mm-Spheres-Crystal Destiny-Blue Calcite-1104g - 93mm Diameter-Crystal Destiny","width":1928,"height":1928,"src":"\/\/crystaldestiny.com\/cdn\/shop\/files\/Blue-Calcite-Spheres-72-93mm-Spheres-Blue-Calcite-1104g-93mm-Diameter-6.jpg?v=1765429413","variant_ids":[45258432807083]},"available":true,"name":"Esferas de calcita azul - Calcita azul \/ 1104 gramos","public_title":"Calcita azul \/ 1104 gramos","options":["Calcita azul","1104 gramos"],"price":6999,"weight":0,"compare_at_price":null,"inventory_management":"shopify","barcode":"","featured_media":{"alt":"Blue Calcite Spheres 72-93mm-Spheres-Crystal Destiny-Blue Calcite-1104g - 93mm Diameter-Crystal Destiny","id":31172227334315,"position":6,"preview_image":{"aspect_ratio":1.0,"height":1928,"width":1928,"src":"\/\/crystaldestiny.com\/cdn\/shop\/files\/Blue-Calcite-Spheres-72-93mm-Spheres-Blue-Calcite-1104g-93mm-Diameter-6.jpg?v=1765429413"}},"requires_selling_plan":false,"selling_plan_allocations":[]}],"images":["\/\/crystaldestiny.com\/cdn\/shop\/files\/Blue-Calcite-Spheres-72-93mm-Spheres-Blue-Calcite-562g-74mm-Diameter.jpg?v=1765429406","\/\/crystaldestiny.com\/cdn\/shop\/files\/Blue-Calcite-Spheres-72-93mm-Spheres-Blue-Calcite-514g-72mm-Diameter-2.jpg?v=1765429408","\/\/crystaldestiny.com\/cdn\/shop\/files\/Blue-Calcite-Spheres-72-93mm-Spheres-Blue-Calcite-632g-77mm-Diameter-3.jpg?v=1765429409","\/\/crystaldestiny.com\/cdn\/shop\/files\/Blue-Calcite-Spheres-72-93mm-Spheres-Blue-Calcite-1064g-91mm-Diameter-4.jpg?v=1765429411","\/\/crystaldestiny.com\/cdn\/shop\/files\/Blue-Calcite-Spheres-72-93mm-Spheres-5.jpg?v=1757135339","\/\/crystaldestiny.com\/cdn\/shop\/files\/Blue-Calcite-Spheres-72-93mm-Spheres-Blue-Calcite-1104g-93mm-Diameter-6.jpg?v=1765429413","\/\/crystaldestiny.com\/cdn\/shop\/files\/Blue-Calcite-Spheres-72-93mm-Spheres-Blue-Calcite-810g-82mm-Diameter-7.jpg?v=1765429415","\/\/crystaldestiny.com\/cdn\/shop\/files\/Blue-Calcite-Spheres-72-93mm-Spheres-Blue-Calcite-554g-73mm-Diameter-8.jpg?v=1765429416"],"featured_image":"\/\/crystaldestiny.com\/cdn\/shop\/files\/Blue-Calcite-Spheres-72-93mm-Spheres-Blue-Calcite-562g-74mm-Diameter.jpg?v=1765429406","options":["Material","Tamaño"],"media":[{"alt":"Blue Calcite Spheres 72-93mm-Spheres-Crystal Destiny-Blue Calcite-562g - 74mm Diameter-Crystal Destiny","id":31151286616235,"position":1,"preview_image":{"aspect_ratio":1.0,"height":1770,"width":1770,"src":"\/\/crystaldestiny.com\/cdn\/shop\/files\/Blue-Calcite-Spheres-72-93mm-Spheres-Blue-Calcite-562g-74mm-Diameter.jpg?v=1765429406"},"aspect_ratio":1.0,"height":1770,"media_type":"image","src":"\/\/crystaldestiny.com\/cdn\/shop\/files\/Blue-Calcite-Spheres-72-93mm-Spheres-Blue-Calcite-562g-74mm-Diameter.jpg?v=1765429406","width":1770},{"alt":"Blue Calcite Spheres 72-93mm-Spheres-Crystal Destiny-Blue Calcite-514g - 72mm Diameter-Crystal Destiny","id":31151294316715,"position":2,"preview_image":{"aspect_ratio":1.0,"height":1742,"width":1742,"src":"\/\/crystaldestiny.com\/cdn\/shop\/files\/Blue-Calcite-Spheres-72-93mm-Spheres-Blue-Calcite-514g-72mm-Diameter-2.jpg?v=1765429408"},"aspect_ratio":1.0,"height":1742,"media_type":"image","src":"\/\/crystaldestiny.com\/cdn\/shop\/files\/Blue-Calcite-Spheres-72-93mm-Spheres-Blue-Calcite-514g-72mm-Diameter-2.jpg?v=1765429408","width":1742},{"alt":"Blue Calcite Spheres 72-93mm-Spheres-Crystal Destiny-Blue Calcite-632g - 77mm Diameter-Crystal Destiny","id":31151295103147,"position":3,"preview_image":{"aspect_ratio":1.0,"height":1635,"width":1635,"src":"\/\/crystaldestiny.com\/cdn\/shop\/files\/Blue-Calcite-Spheres-72-93mm-Spheres-Blue-Calcite-632g-77mm-Diameter-3.jpg?v=1765429409"},"aspect_ratio":1.0,"height":1635,"media_type":"image","src":"\/\/crystaldestiny.com\/cdn\/shop\/files\/Blue-Calcite-Spheres-72-93mm-Spheres-Blue-Calcite-632g-77mm-Diameter-3.jpg?v=1765429409","width":1635},{"alt":"Blue Calcite Spheres 72-93mm-Spheres-Crystal Destiny-Blue Calcite-1064g - 91mm Diameter-Crystal Destiny","id":31172222648491,"position":4,"preview_image":{"aspect_ratio":1.0,"height":1972,"width":1972,"src":"\/\/crystaldestiny.com\/cdn\/shop\/files\/Blue-Calcite-Spheres-72-93mm-Spheres-Blue-Calcite-1064g-91mm-Diameter-4.jpg?v=1765429411"},"aspect_ratio":1.0,"height":1972,"media_type":"image","src":"\/\/crystaldestiny.com\/cdn\/shop\/files\/Blue-Calcite-Spheres-72-93mm-Spheres-Blue-Calcite-1064g-91mm-Diameter-4.jpg?v=1765429411","width":1972},{"alt":"Blue Calcite Spheres 72-93mm-Spheres-Crystal Destiny-Blue Calcite-514g - 72mm Diameter-Crystal Destiny","id":31172223598763,"position":5,"preview_image":{"aspect_ratio":1.0,"height":1965,"width":1965,"src":"\/\/crystaldestiny.com\/cdn\/shop\/files\/Blue-Calcite-Spheres-72-93mm-Spheres-5.jpg?v=1757135339"},"aspect_ratio":1.0,"height":1965,"media_type":"image","src":"\/\/crystaldestiny.com\/cdn\/shop\/files\/Blue-Calcite-Spheres-72-93mm-Spheres-5.jpg?v=1757135339","width":1965},{"alt":"Blue Calcite Spheres 72-93mm-Spheres-Crystal Destiny-Blue Calcite-1104g - 93mm Diameter-Crystal Destiny","id":31172227334315,"position":6,"preview_image":{"aspect_ratio":1.0,"height":1928,"width":1928,"src":"\/\/crystaldestiny.com\/cdn\/shop\/files\/Blue-Calcite-Spheres-72-93mm-Spheres-Blue-Calcite-1104g-93mm-Diameter-6.jpg?v=1765429413"},"aspect_ratio":1.0,"height":1928,"media_type":"image","src":"\/\/crystaldestiny.com\/cdn\/shop\/files\/Blue-Calcite-Spheres-72-93mm-Spheres-Blue-Calcite-1104g-93mm-Diameter-6.jpg?v=1765429413","width":1928},{"alt":"Blue Calcite Spheres 72-93mm-Spheres-Crystal Destiny-Blue Calcite-810g - 82mm Diameter-Crystal Destiny","id":31172229005483,"position":7,"preview_image":{"aspect_ratio":1.0,"height":1747,"width":1747,"src":"\/\/crystaldestiny.com\/cdn\/shop\/files\/Blue-Calcite-Spheres-72-93mm-Spheres-Blue-Calcite-810g-82mm-Diameter-7.jpg?v=1765429415"},"aspect_ratio":1.0,"height":1747,"media_type":"image","src":"\/\/crystaldestiny.com\/cdn\/shop\/files\/Blue-Calcite-Spheres-72-93mm-Spheres-Blue-Calcite-810g-82mm-Diameter-7.jpg?v=1765429415","width":1747},{"alt":"Blue Calcite Spheres 72-93mm-Spheres-Crystal Destiny-Blue Calcite-554g- 73mm Diameter-Crystal Destiny","id":31172232052907,"position":8,"preview_image":{"aspect_ratio":1.0,"height":1663,"width":1663,"src":"\/\/crystaldestiny.com\/cdn\/shop\/files\/Blue-Calcite-Spheres-72-93mm-Spheres-Blue-Calcite-554g-73mm-Diameter-8.jpg?v=1765429416"},"aspect_ratio":1.0,"height":1663,"media_type":"image","src":"\/\/crystaldestiny.com\/cdn\/shop\/files\/Blue-Calcite-Spheres-72-93mm-Spheres-Blue-Calcite-554g-73mm-Diameter-8.jpg?v=1765429416","width":1663}],"requires_selling_plan":false,"selling_plan_groups":[],"content":"\u003cp\u003e Esta esfera de calcita azul aprovecha las propiedades calmantes naturales de la piedra, promoviendo la claridad mental y la reducción del estrés. Su forma perfectamente redondeada mejora la distribución de la energía en los espacios, mientras que su distintivo tono azul actúa para calmar el chakra de la garganta y facilitar una comunicación fluida. Cada esfera se pule cuidadosamente para preservar las propiedades ópticas naturales de la calcita y su singular estructura cristalina.\u003c\/p\u003e"},"options":[{"name":"Material","position":1,"values":["Calcita azul"]},{"name":"Tamaño","position":2,"values":["514 gramos","554 gramos","562 gramos","632 gramos","810 gramos","1064 gramos","1104 gramos"]}],"custom_metafields":{"shipping_time":"En un plazo de 7 días"},"metafields":{"badge":"\u003cdiv style='display:none' class='jdgm-prev-badge' data-average-rating='0.00' data-number-of-reviews='0' data-number-of-questions='0'\u003e \u003cspan class='jdgm-prev-badge__stars' data-score='0.00' tabindex='0' aria-label='0.00 stars' role='button'\u003e \u003cspan class='jdgm-star jdgm--off'\u003e\u003c\/span\u003e\u003cspan class='jdgm-star jdgm--off'\u003e\u003c\/span\u003e\u003cspan class='jdgm-star jdgm--off'\u003e\u003c\/span\u003e\u003cspan class='jdgm-star jdgm--off'\u003e\u003c\/span\u003e\u003cspan class='jdgm-star jdgm--off'\u003e\u003c\/span\u003e \u003c\/span\u003e \u003cspan class='jdgm-prev-badge__text'\u003e No reviews \u003c\/span\u003e \u003c\/div\u003e","widget":"\u003cdiv class='jdgm-rev-widg' data-updated-at='2025-05-24T23:21:37Z' data-average-rating='0.00' data-number-of-reviews='0' data-number-of-questions='0'\u003e \u003cstyle class='jdgm-temp-hiding-style'\u003e.jdgm-rev-widg{ display: none }\u003c\/style\u003e \u003cdiv class='jdgm-rev-widg__header'\u003e \u003ch2 class='jdgm-rev-widg__title'\u003eCustomer Reviews\u003c\/h2\u003e \u003cdiv class='jdgm-rev-widg__summary'\u003e \u003cdiv class='jdgm-rev-widg__summary-stars' aria-label='Average rating is 0.00 stars' role='img'\u003e \u003cspan class='jdgm-star jdgm--off'\u003e\u003c\/span\u003e\u003cspan class='jdgm-star jdgm--off'\u003e\u003c\/span\u003e\u003cspan class='jdgm-star jdgm--off'\u003e\u003c\/span\u003e\u003cspan class='jdgm-star jdgm--off'\u003e\u003c\/span\u003e\u003cspan class='jdgm-star jdgm--off'\u003e\u003c\/span\u003e \u003c\/div\u003e \u003cdiv class='jdgm-rev-widg__summary-text'\u003eBe the first to write a review\u003c\/div\u003e \u003c\/div\u003e \u003ca style='display: none' href='#' class='jdgm-write-rev-link' role='button'\u003eWrite a review\u003c\/a\u003e \u003cdiv class='jdgm-histogram jdgm-temp-hidden'\u003e \u003cdiv class='jdgm-histogram__row' data-rating='5' data-frequency='0' data-percentage='0'\u003e \u003cdiv class='jdgm-histogram__star' role='button' aria-label=\"0% (0) reviews with 5 star rating\" tabindex='0' \u003e\u003cspan class='jdgm-star jdgm--on'\u003e\u003c\/span\u003e\u003cspan class='jdgm-star jdgm--on'\u003e\u003c\/span\u003e\u003cspan class='jdgm-star jdgm--on'\u003e\u003c\/span\u003e\u003cspan class='jdgm-star jdgm--on'\u003e\u003c\/span\u003e\u003cspan class='jdgm-star jdgm--on'\u003e\u003c\/span\u003e\u003c\/div\u003e \u003cdiv class='jdgm-histogram__bar'\u003e \u003cdiv class='jdgm-histogram__bar-content' style='width: 0%;'\u003e \u003c\/div\u003e \u003c\/div\u003e \u003cdiv class='jdgm-histogram__percentage'\u003e0%\u003c\/div\u003e \u003cdiv class='jdgm-histogram__frequency'\u003e(0)\u003c\/div\u003e \u003c\/div\u003e \u003cdiv class='jdgm-histogram__row' data-rating='4' data-frequency='0' data-percentage='0'\u003e \u003cdiv class='jdgm-histogram__star' role='button' aria-label=\"0% (0) reviews with 4 star rating\" tabindex='0' \u003e\u003cspan class='jdgm-star jdgm--on'\u003e\u003c\/span\u003e\u003cspan class='jdgm-star jdgm--on'\u003e\u003c\/span\u003e\u003cspan class='jdgm-star jdgm--on'\u003e\u003c\/span\u003e\u003cspan class='jdgm-star jdgm--on'\u003e\u003c\/span\u003e\u003cspan class='jdgm-star jdgm--off'\u003e\u003c\/span\u003e\u003c\/div\u003e \u003cdiv class='jdgm-histogram__bar'\u003e \u003cdiv class='jdgm-histogram__bar-content' style='width: 0%;'\u003e \u003c\/div\u003e \u003c\/div\u003e \u003cdiv class='jdgm-histogram__percentage'\u003e0%\u003c\/div\u003e \u003cdiv class='jdgm-histogram__frequency'\u003e(0)\u003c\/div\u003e \u003c\/div\u003e \u003cdiv class='jdgm-histogram__row' data-rating='3' data-frequency='0' data-percentage='0'\u003e \u003cdiv class='jdgm-histogram__star' role='button' aria-label=\"0% (0) reviews with 3 star rating\" tabindex='0' \u003e\u003cspan class='jdgm-star jdgm--on'\u003e\u003c\/span\u003e\u003cspan class='jdgm-star jdgm--on'\u003e\u003c\/span\u003e\u003cspan class='jdgm-star jdgm--on'\u003e\u003c\/span\u003e\u003cspan class='jdgm-star jdgm--off'\u003e\u003c\/span\u003e\u003cspan class='jdgm-star jdgm--off'\u003e\u003c\/span\u003e\u003c\/div\u003e \u003cdiv class='jdgm-histogram__bar'\u003e \u003cdiv class='jdgm-histogram__bar-content' style='width: 0%;'\u003e \u003c\/div\u003e \u003c\/div\u003e \u003cdiv class='jdgm-histogram__percentage'\u003e0%\u003c\/div\u003e \u003cdiv class='jdgm-histogram__frequency'\u003e(0)\u003c\/div\u003e \u003c\/div\u003e \u003cdiv class='jdgm-histogram__row' data-rating='2' data-frequency='0' data-percentage='0'\u003e \u003cdiv class='jdgm-histogram__star' role='button' aria-label=\"0% (0) reviews with 2 star rating\" tabindex='0' \u003e\u003cspan class='jdgm-star jdgm--on'\u003e\u003c\/span\u003e\u003cspan class='jdgm-star jdgm--on'\u003e\u003c\/span\u003e\u003cspan class='jdgm-star jdgm--off'\u003e\u003c\/span\u003e\u003cspan class='jdgm-star jdgm--off'\u003e\u003c\/span\u003e\u003cspan class='jdgm-star jdgm--off'\u003e\u003c\/span\u003e\u003c\/div\u003e \u003cdiv class='jdgm-histogram__bar'\u003e \u003cdiv class='jdgm-histogram__bar-content' style='width: 0%;'\u003e \u003c\/div\u003e \u003c\/div\u003e \u003cdiv class='jdgm-histogram__percentage'\u003e0%\u003c\/div\u003e \u003cdiv class='jdgm-histogram__frequency'\u003e(0)\u003c\/div\u003e \u003c\/div\u003e \u003cdiv class='jdgm-histogram__row' data-rating='1' data-frequency='0' data-percentage='0'\u003e \u003cdiv class='jdgm-histogram__star' role='button' aria-label=\"0% (0) reviews with 1 star rating\" tabindex='0' \u003e\u003cspan class='jdgm-star jdgm--on'\u003e\u003c\/span\u003e\u003cspan class='jdgm-star jdgm--off'\u003e\u003c\/span\u003e\u003cspan class='jdgm-star jdgm--off'\u003e\u003c\/span\u003e\u003cspan class='jdgm-star jdgm--off'\u003e\u003c\/span\u003e\u003cspan class='jdgm-star jdgm--off'\u003e\u003c\/span\u003e\u003c\/div\u003e \u003cdiv class='jdgm-histogram__bar'\u003e \u003cdiv class='jdgm-histogram__bar-content' style='width: 0%;'\u003e \u003c\/div\u003e \u003c\/div\u003e \u003cdiv class='jdgm-histogram__percentage'\u003e0%\u003c\/div\u003e \u003cdiv class='jdgm-histogram__frequency'\u003e(0)\u003c\/div\u003e \u003c\/div\u003e \u003cdiv class='jdgm-histogram__row jdgm-histogram__clear-filter' data-rating=null tabindex='0'\u003e\u003c\/div\u003e \u003c\/div\u003e \u003cdiv class='jdgm-rev-widg__sort-wrapper'\u003e\u003c\/div\u003e \u003c\/div\u003e \u003cdiv class='jdgm-rev-widg__body'\u003e \u003cdiv class='jdgm-rev-widg__reviews'\u003e\u003c\/div\u003e \u003cdiv class='jdgm-paginate' data-per-page='5' data-url='https:\/\/api.judge.me\/reviews\/reviews_for_widget' style=\"display: none;\"\u003e\u003c\/div\u003e \u003c\/div\u003e \u003cdiv class='jdgm-rev-widg__paginate-spinner-wrapper'\u003e \u003cdiv class='jdgm-spinner'\u003e\u003c\/div\u003e \u003c\/div\u003e \u003c\/div\u003e"},"collections":[{"id":294880051371,"handle":"crystals","title":"Crystals","updated_at":"2026-01-07T23:43:11-05:00","body_html":"\u003cp data-start=\"159\" data-end=\"687\"\u003e✨ \u003cstrong data-start=\"161\" data-end=\"216\"\u003eDiscover the Magic of Crystals with Crystal Destiny\u003c\/strong\u003e ✨\u003cbr data-start=\"218\" data-end=\"221\"\u003eCrystals have been treasured for centuries—not only for their natural beauty but also for their powerful healing energies. Beyond their visual allure, they bring balance, harmony, and positive energy into any space. Whether used for home décor, meditation, or simply to elevate the energy of your surroundings, crystals create a sanctuary of peace, relaxation, and well-being. Each piece is a unique gift from the Earth—visually stunning and spiritually uplifting.\u003c\/p\u003e\n\u003cp data-start=\"689\" data-end=\"1011\"\u003eAt \u003cstrong data-start=\"692\" data-end=\"711\"\u003eCrystal Destiny\u003c\/strong\u003e, our signature collection showcases a curated selection of exquisite crystals, from radiant Quartz to soothing Amethyst. Every stone is carefully sourced for its elegance and metaphysical resonance, making them perfect for enhancing your home, uplifting your spirit, or gifting to someone special.\u003c\/p\u003e\n\u003cp data-start=\"1013\" data-end=\"1206\"\u003eExperience the timeless sophistication of crystalline wonders. Explore the \u003cstrong data-start=\"1088\" data-end=\"1118\"\u003eCrystal Destiny Collection\u003c\/strong\u003e today and bring the transformative beauty of these treasures into your everyday life.\u003c\/p\u003e","published_at":"2023-06-05T11:24:02-04:00","sort_order":"created-desc","template_suffix":"","disjunctive":false,"rules":[{"column":"tag","relation":"equals","condition":"crystal"},{"column":"type","relation":"not_contains","condition":"925 Sterling Silver"},{"column":"type","relation":"not_contains","condition":"Wire Wraps"}],"published_scope":"global"},{"id":319455821995,"handle":"throat-chakra-crystals","title":"Throat Chakra Crystals","updated_at":"2026-01-07T07:13:13-05:00","body_html":"\u003cp data-start=\"108\" data-end=\"439\"\u003e✨ \u003cstrong data-start=\"110\" data-end=\"136\"\u003eThroat Chakra Crystals\u003c\/strong\u003e ✨\u003cbr data-start=\"138\" data-end=\"141\"\u003eEnhance communication, self-expression, and clarity with our \u003cstrong data-start=\"202\" data-end=\"228\"\u003eThroat Chakra Crystals\u003c\/strong\u003e. Located at the throat, this chakra governs speech, honesty, and personal expression. These crystals help unblock energy, promote confidence in speaking your truth, and support clear, authentic communication.\u003c\/p\u003e\n\u003cp data-start=\"441\" data-end=\"767\"\u003eOur curated selection includes stones such as Blue Lace Agate, Lapis Lazuli, and Sodalite—each chosen for their ability to stimulate creativity, intuition, and emotional balance. Perfect for meditation, energy work, or wearing as jewelry, Throat Chakra Crystals empower you to express yourself with confidence and integrity.\u003c\/p\u003e\n\u003cp data-start=\"769\" data-end=\"906\"\u003eStrengthen your voice, clarify your intentions, and embrace the transformative energy of the Throat Chakra with these vibrant crystals.\u003c\/p\u003e","published_at":"2025-07-17T18:17:14-04:00","sort_order":"best-selling","template_suffix":"","disjunctive":false,"rules":[{"column":"variant_metafield_definition","relation":"equals","condition":"Throat"}],"published_scope":"global","image":{"created_at":"2025-07-17T19:08:49-04:00","alt":null,"width":1080,"height":1080,"src":"\/\/crystaldestiny.com\/cdn\/shop\/collections\/Throat_Chakra_Collection.jpg?v=1762474926"}},{"id":294880116907,"handle":"polished","title":"Polished Crystals","updated_at":"2026-01-07T23:43:11-05:00","body_html":"\u003cp data-start=\"199\" data-end=\"598\"\u003e✨ \u003cstrong data-start=\"201\" data-end=\"248\"\u003eCrystal Destiny Polished Crystal Collection\u003c\/strong\u003e ✨\u003cbr data-start=\"250\" data-end=\"253\"\u003eIndulge in the brilliance of crystals refined to perfection. Our \u003cstrong data-start=\"318\" data-end=\"341\"\u003ePolished Collection\u003c\/strong\u003e showcases gemstones meticulously shaped and smoothed to reveal their natural radiance and timeless beauty. From the shimmering glow of Quartz to the deep allure of Obsidian, each polished piece is a testament to nature’s artistry and human craftsmanship.\u003c\/p\u003e\n\u003cp data-start=\"600\" data-end=\"862\"\u003ePerfect as statement décor, meaningful gifts, or companions on your spiritual journey, polished crystals bring sophistication and elevated energy into any space. Their radiant surfaces reflect not only light but also the transformative power of crystal energy.\u003c\/p\u003e\n\u003cp data-start=\"864\" data-end=\"1022\"\u003eDiscover the elegance of refinement with Crystal Destiny’s Polished Crystal Collection—where every facet shines with intention, beauty, and timeless allure.\u003c\/p\u003e","published_at":"2023-06-05T11:30:44-04:00","sort_order":"created-desc","template_suffix":"","disjunctive":false,"rules":[{"column":"tag","relation":"equals","condition":"polished"}],"published_scope":"global"},{"id":295698202795,"handle":"spheres","title":"Crystal Spheres","updated_at":"2026-01-06T23:24:35-05:00","body_html":"\u003cp data-start=\"106\" data-end=\"370\"\u003e✨ \u003cstrong data-start=\"108\" data-end=\"138\"\u003eCrystal Spheres Collection\u003c\/strong\u003e ✨\u003cbr data-start=\"140\" data-end=\"143\"\u003eBring harmony, balance, and elegance into your space with our \u003cstrong data-start=\"205\" data-end=\"235\"\u003eCrystal Spheres Collection\u003c\/strong\u003e. Each sphere is meticulously crafted to showcase the natural beauty and energy of crystals, from radiant Quartz to calming Amethyst.\u003c\/p\u003e\n\u003cp data-start=\"372\" data-end=\"658\"\u003ePerfect for meditation, energy work, or as striking décor, crystal spheres radiate energy in all directions, promoting clarity, focus, and a sense of calm. Their smooth, polished surfaces highlight the stones’ natural patterns and colors, making each sphere a captivating centerpiece.\u003c\/p\u003e\n\u003cp data-start=\"660\" data-end=\"809\"\u003eElevate your space and embrace the transformative power of crystals with the \u003cstrong data-start=\"737\" data-end=\"767\"\u003eCrystal Spheres Collection\u003c\/strong\u003e—where beauty, energy, and harmony meet.\u003c\/p\u003e","published_at":"2023-07-28T14:20:46-04:00","sort_order":"created-desc","template_suffix":"","disjunctive":true,"rules":[{"column":"tag","relation":"equals","condition":"spheres"},{"column":"tag","relation":"equals","condition":"eggs"}],"published_scope":"global"},{"id":293659312299,"handle":"best-sellers","title":"Best Sellers","updated_at":"2026-01-07T23:43:11-05:00","body_html":"\u003cp data-start=\"155\" data-end=\"510\"\u003eDiscover the pieces our community loves most. Our Best Sellers Collection brings together handpicked crystals and jewelry that embody timeless elegance, spiritual resonance, and everyday sophistication. Each item has earned its place as a customer favorite—celebrated for both its beauty and its meaningful energy.\u003c\/p\u003e\n\u003cp data-start=\"512\" data-end=\"802\"\u003eFrom stunning statement pieces to versatile daily companions, these treasures are curated to elevate your space, uplift your spirit, and reflect refined taste. Indulge in what’s most cherished and let our best sellers guide you toward the perfect blend of style and transformative energy.\u003c\/p\u003e\n\u003cp data-start=\"804\" data-end=\"932\"\u003eExplore the Best Sellers Collection today—where elegance meets intention, and every piece tells a story of beauty and balance.\u003c\/p\u003e","published_at":"2023-03-15T16:04:51-04:00","sort_order":"best-selling","template_suffix":"","disjunctive":false,"rules":[{"column":"variant_price","relation":"greater_than","condition":"0"},{"column":"variant_inventory","relation":"greater_than","condition":"0"},{"column":"type","relation":"not_equals","condition":"Shipping Protection"}],"published_scope":"global"},{"id":321370390699,"handle":"monthly-crystal-sale","title":"Monthly Crystal Sale | Spheres \u0026 Towers","updated_at":"2026-01-06T23:24:37-05:00","body_html":"\u003cp\u003eShop our \u003cstrong\u003eMonthly Crystal Sale\u003c\/strong\u003e, where you can shop a wide selection of healing crystals at discounted prices. Explore \u003cstrong\u003ecrystal spheres and towers,\u003c\/strong\u003e— all carefully curated to support meditation, energy balancing, and spiritual wellness. Whether you're looking to enhance your home decor, boost your daily energy, or find the perfect gift, our \u003cstrong\u003ecrystals for healing and manifestation\u003c\/strong\u003e offer both beauty and metaphysical benefits.\u003c\/p\u003e\n\u003cp\u003eEach month, our sale features \u003cstrong\u003enew discounted collections\u003c\/strong\u003e, from \u003cstrong\u003enatural quartz and amethyst towers\u003c\/strong\u003e to \u003cstrong\u003ewire-wrapped pendants and polished stones\u003c\/strong\u003e, so there's always something fresh to discover. Shop with confidence knowing you're getting high-quality crystals with \u003cstrong\u003efree shipping options\u003c\/strong\u003e and a trusted experience.\u003c\/p\u003e\n\u003cp\u003e\u003cstrong\u003eTake advantage of the Monthly Crystal Sale today\u003c\/strong\u003e and add powerful, natural energy to your life with \u003cstrong\u003eauthentic healing crystals\u003c\/strong\u003e — while our limited-time discounts last.\u003c\/p\u003e\n\u003cp\u003e\u003cstrong\u003e*Discount automatically applied at checkout.\u003c\/strong\u003e\u003c\/p\u003e","published_at":"2025-12-02T01:26:17-05:00","sort_order":"alpha-asc","template_suffix":"","disjunctive":true,"rules":[{"column":"tag","relation":"equals","condition":"spheres"},{"column":"tag","relation":"equals","condition":"Towers"}],"published_scope":"global","image":{"created_at":"2026-01-01T01:32:34-05:00","alt":"","width":960,"height":960,"src":"\/\/crystaldestiny.com\/cdn\/shop\/collections\/3E8C2969-1B86-4ACE-B349-98E9D8768424.jpg?v=1767249154"}},{"id":297596059819,"handle":"all","title":"All Crystals \u0026 Jewelry","updated_at":"2026-01-07T23:43:11-05:00","body_html":"\u003cp data-start=\"149\" data-end=\"494\"\u003e✨ \u003cstrong data-start=\"151\" data-end=\"181\"\u003eWelcome to Crystal Destiny\u003c\/strong\u003e ✨\u003cbr data-start=\"183\" data-end=\"186\"\u003eStep into a world where beauty, energy, and artistry unite. Our collection is a treasure trove of exquisite crystals, from the raw, untamed elegance of natural formations to the polished brilliance of expertly crafted pieces. Each crystal is a masterpiece, carrying its own unique story and timeless charm.\u003c\/p\u003e\n\u003cp data-start=\"496\" data-end=\"831\"\u003eWhether you’re drawn to the calming presence of Amethyst, the vibrant energy of Citrine, or the grounding strength of Jasper, our crystals invite you to connect with nature’s finest wonders. Perfect for enhancing your space, supporting your spiritual journey, or gifting with intention, every piece resonates with beauty and meaning.\u003c\/p\u003e\n\u003cp data-start=\"833\" data-end=\"1000\"\u003eElevate your surroundings, embrace the mystique, and explore the enchanting world of crystals at \u003cstrong data-start=\"930\" data-end=\"949\"\u003eCrystal Destiny\u003c\/strong\u003e—where every crystal is waiting to be discovered.\u003c\/p\u003e","published_at":"2023-11-10T13:55:31-05:00","sort_order":"created-desc","template_suffix":"","disjunctive":false,"rules":[{"column":"type","relation":"not_equals","condition":"asdf"}],"published_scope":"global"},{"id":298983391403,"handle":"january-crystal-sale","title":"January Sale | 25% Off Crystal Towers \u0026 Spheres","updated_at":"2026-01-06T23:24:37-05:00","body_html":"\u003cp\u003eShop our \u003cstrong\u003eJanuary Crystal Sale\u003c\/strong\u003e, where you can shop a wide selection of healing crystals at discounted prices. Explore \u003cstrong\u003eCrystal Towers, \u0026amp; Crystal Spheres\u003c\/strong\u003e — all carefully curated and crafted to support meditation, energy balancing, and spiritual wellness. Whether you're looking to enhance your home decor, boost your daily energy, or find the perfect gift, our \u003cstrong\u003ecrystals for healing and manifestation\u003c\/strong\u003e offer both beauty and metaphysical benefits.\u003c\/p\u003e\n\u003cp\u003eThis January, our sale features \u003cstrong\u003ediscounted crystal towers and spheres\u003c\/strong\u003e, from \u003cstrong\u003enatural quartz \u003c\/strong\u003eand \u003cstrong\u003eamethyst \u003c\/strong\u003eto \u003cstrong\u003ebumblebee jasper \u003c\/strong\u003eand \u003cstrong\u003ecarnelian\u003c\/strong\u003e, so there's always something fresh to discover. Shop with confidence knowing you're getting high-quality crystals with \u003cstrong\u003efree shipping options\u003c\/strong\u003e and a trusted experience.\u003c\/p\u003e\n\u003cp\u003e\u003cstrong\u003eTake advantage of the January Crystal Sale today\u003c\/strong\u003e and add powerful, natural energy to your life with \u003cstrong\u003eauthentic healing crystals\u003c\/strong\u003e — while our limited-time discounts last.\u003c\/p\u003e\n\u003cp\u003e\u003cstrong\u003e*Discount automatically applied at checkout.\u003c\/strong\u003e\u003c\/p\u003e","published_at":"2026-01-01T00:07:17-05:00","sort_order":"alpha-asc","template_suffix":"monthly-collection","disjunctive":true,"rules":[{"column":"tag","relation":"equals","condition":"Spheres"},{"column":"tag","relation":"equals","condition":"Towers"}],"published_scope":"global","image":{"created_at":"2026-01-01T01:29:59-05:00","alt":"","width":960,"height":960,"src":"\/\/crystaldestiny.com\/cdn\/shop\/collections\/1464163B-22B1-4D62-BEC5-CEC9AECB670B.jpg?v=1767248999"}}]}
[{"alt":"Blue Calcite Spheres 72-93mm-Spheres-Crystal Destiny-Blue Calcite-562g - 74mm Diameter-Crystal Destiny","id":31151286616235,"position":1,"preview_image":{"aspect_ratio":1.0,"height":1770,"width":1770,"src":"\/\/crystaldestiny.com\/cdn\/shop\/files\/Blue-Calcite-Spheres-72-93mm-Spheres-Blue-Calcite-562g-74mm-Diameter.jpg?v=1765429406"},"aspect_ratio":1.0,"height":1770,"media_type":"image","src":"\/\/crystaldestiny.com\/cdn\/shop\/files\/Blue-Calcite-Spheres-72-93mm-Spheres-Blue-Calcite-562g-74mm-Diameter.jpg?v=1765429406","width":1770},{"alt":"Blue Calcite Spheres 72-93mm-Spheres-Crystal Destiny-Blue Calcite-514g - 72mm Diameter-Crystal Destiny","id":31151294316715,"position":2,"preview_image":{"aspect_ratio":1.0,"height":1742,"width":1742,"src":"\/\/crystaldestiny.com\/cdn\/shop\/files\/Blue-Calcite-Spheres-72-93mm-Spheres-Blue-Calcite-514g-72mm-Diameter-2.jpg?v=1765429408"},"aspect_ratio":1.0,"height":1742,"media_type":"image","src":"\/\/crystaldestiny.com\/cdn\/shop\/files\/Blue-Calcite-Spheres-72-93mm-Spheres-Blue-Calcite-514g-72mm-Diameter-2.jpg?v=1765429408","width":1742},{"alt":"Blue Calcite Spheres 72-93mm-Spheres-Crystal Destiny-Blue Calcite-632g - 77mm Diameter-Crystal Destiny","id":31151295103147,"position":3,"preview_image":{"aspect_ratio":1.0,"height":1635,"width":1635,"src":"\/\/crystaldestiny.com\/cdn\/shop\/files\/Blue-Calcite-Spheres-72-93mm-Spheres-Blue-Calcite-632g-77mm-Diameter-3.jpg?v=1765429409"},"aspect_ratio":1.0,"height":1635,"media_type":"image","src":"\/\/crystaldestiny.com\/cdn\/shop\/files\/Blue-Calcite-Spheres-72-93mm-Spheres-Blue-Calcite-632g-77mm-Diameter-3.jpg?v=1765429409","width":1635},{"alt":"Blue Calcite Spheres 72-93mm-Spheres-Crystal Destiny-Blue Calcite-1064g - 91mm Diameter-Crystal Destiny","id":31172222648491,"position":4,"preview_image":{"aspect_ratio":1.0,"height":1972,"width":1972,"src":"\/\/crystaldestiny.com\/cdn\/shop\/files\/Blue-Calcite-Spheres-72-93mm-Spheres-Blue-Calcite-1064g-91mm-Diameter-4.jpg?v=1765429411"},"aspect_ratio":1.0,"height":1972,"media_type":"image","src":"\/\/crystaldestiny.com\/cdn\/shop\/files\/Blue-Calcite-Spheres-72-93mm-Spheres-Blue-Calcite-1064g-91mm-Diameter-4.jpg?v=1765429411","width":1972},{"alt":"Blue Calcite Spheres 72-93mm-Spheres-Crystal Destiny-Blue Calcite-514g - 72mm Diameter-Crystal Destiny","id":31172223598763,"position":5,"preview_image":{"aspect_ratio":1.0,"height":1965,"width":1965,"src":"\/\/crystaldestiny.com\/cdn\/shop\/files\/Blue-Calcite-Spheres-72-93mm-Spheres-5.jpg?v=1757135339"},"aspect_ratio":1.0,"height":1965,"media_type":"image","src":"\/\/crystaldestiny.com\/cdn\/shop\/files\/Blue-Calcite-Spheres-72-93mm-Spheres-5.jpg?v=1757135339","width":1965},{"alt":"Blue Calcite Spheres 72-93mm-Spheres-Crystal Destiny-Blue Calcite-1104g - 93mm Diameter-Crystal Destiny","id":31172227334315,"position":6,"preview_image":{"aspect_ratio":1.0,"height":1928,"width":1928,"src":"\/\/crystaldestiny.com\/cdn\/shop\/files\/Blue-Calcite-Spheres-72-93mm-Spheres-Blue-Calcite-1104g-93mm-Diameter-6.jpg?v=1765429413"},"aspect_ratio":1.0,"height":1928,"media_type":"image","src":"\/\/crystaldestiny.com\/cdn\/shop\/files\/Blue-Calcite-Spheres-72-93mm-Spheres-Blue-Calcite-1104g-93mm-Diameter-6.jpg?v=1765429413","width":1928},{"alt":"Blue Calcite Spheres 72-93mm-Spheres-Crystal Destiny-Blue Calcite-810g - 82mm Diameter-Crystal Destiny","id":31172229005483,"position":7,"preview_image":{"aspect_ratio":1.0,"height":1747,"width":1747,"src":"\/\/crystaldestiny.com\/cdn\/shop\/files\/Blue-Calcite-Spheres-72-93mm-Spheres-Blue-Calcite-810g-82mm-Diameter-7.jpg?v=1765429415"},"aspect_ratio":1.0,"height":1747,"media_type":"image","src":"\/\/crystaldestiny.com\/cdn\/shop\/files\/Blue-Calcite-Spheres-72-93mm-Spheres-Blue-Calcite-810g-82mm-Diameter-7.jpg?v=1765429415","width":1747},{"alt":"Blue Calcite Spheres 72-93mm-Spheres-Crystal Destiny-Blue Calcite-554g- 73mm Diameter-Crystal Destiny","id":31172232052907,"position":8,"preview_image":{"aspect_ratio":1.0,"height":1663,"width":1663,"src":"\/\/crystaldestiny.com\/cdn\/shop\/files\/Blue-Calcite-Spheres-72-93mm-Spheres-Blue-Calcite-554g-73mm-Diameter-8.jpg?v=1765429416"},"aspect_ratio":1.0,"height":1663,"media_type":"image","src":"\/\/crystaldestiny.com\/cdn\/shop\/files\/Blue-Calcite-Spheres-72-93mm-Spheres-Blue-Calcite-554g-73mm-Diameter-8.jpg?v=1765429416","width":1663}]
{"item":{"id":8513740636331,"title":"Caribbean Calcite Towers \"XXL\"","handle":"caribbean-calcite-towers-xxl-cd-10335","description":"\u003cp\u003eCaribbean Calcite Towers \"XXL\" are exceptional specimens that embody both powerful beauty and profound metaphysical energy. Sourced from the vibrant Caribbean region, these towers showcase stunning crystalline formations with a gentle, soothing palette of soft oranges, creamy whites, and warm golden hues. Their towering structure not only makes them a commanding decorative piece but also serves as an energetic amplifier in any space.\u003c\/p\u003e\n\u003cp\u003eMetaphysically, Caribbean Calcite is known for its remarkable ability to clear negative energy and foster emotional healing. It facilitates balance and harmony by gently enhancing spiritual growth and inner peace. This particular variety is often linked to the sacral and solar plexus chakras, promoting creativity, confidence, and motivation. Beyond their aesthetic appeal, these XXL towers act as powerful tools for meditation, energy clearing, and manifesting goals by amplifying intentions and enhancing mental clarity. Ideal for crystal enthusiasts and healers alike, these towers bring a radiant presence that supports emotional resilience and spiritual awakening.\u003c\/p\u003e\n\u003cp\u003eThis product is an exact pick as pictured, one of a kind.\u003c\/p\u003e","published_at":"2025-09-08T17:47:48-04:00","created_at":"2025-09-08T17:47:46-04:00","vendor":"Crystal Destiny","type":"Towers","tags":["crystal","polished","Towers"],"price":17999,"price_min":17999,"price_max":17999,"available":true,"price_varies":false,"compare_at_price":null,"compare_at_price_min":0,"compare_at_price_max":0,"compare_at_price_varies":false,"variants":[{"id":45594817953963,"title":"Caribbean Calcite \/ 590g - 6.00\"H x 2.25\"W","option1":"Caribbean Calcite","option2":"590g - 6.00\"H x 2.25\"W","option3":null,"sku":"CD-10335","requires_shipping":true,"taxable":true,"featured_image":{"id":40346834174123,"product_id":8513740636331,"position":2,"created_at":"2025-09-08T17:44:36-04:00","updated_at":"2025-12-11T00:07:14-05:00","alt":"Caribbean Calcite Towers \"XXL\"-Towers-Crystal Destiny-Caribbean Calcite-590g - 6.00\"H x 2.25\"W-Crystal Destiny","width":2048,"height":2048,"src":"\/\/crystaldestiny.com\/cdn\/shop\/files\/Caribbean-Calcite-Towers-XXL-Towers-Caribbean-Calcite-590g-6_00H-x-2_25W-2.jpg?v=1765429634","variant_ids":[45594817953963]},"available":true,"name":"Caribbean Calcite Towers \"XXL\" - Caribbean Calcite \/ 590g - 6.00\"H x 2.25\"W","public_title":"Caribbean Calcite \/ 590g - 6.00\"H x 2.25\"W","options":["Caribbean Calcite","590g - 6.00\"H x 2.25\"W"],"price":17999,"weight":500,"compare_at_price":null,"inventory_management":"shopify","barcode":"","featured_media":{"alt":"Caribbean Calcite Towers \"XXL\"-Towers-Crystal Destiny-Caribbean Calcite-590g - 6.00\"H x 2.25\"W-Crystal Destiny","id":31745987281067,"position":2,"preview_image":{"aspect_ratio":1.0,"height":2048,"width":2048,"src":"\/\/crystaldestiny.com\/cdn\/shop\/files\/Caribbean-Calcite-Towers-XXL-Towers-Caribbean-Calcite-590g-6_00H-x-2_25W-2.jpg?v=1765429634"}},"requires_selling_plan":false,"selling_plan_allocations":[]},{"id":45594819297451,"title":"Caribbean Calcite \/ 580g - 6.75\"H x 2.00\"W","option1":"Caribbean Calcite","option2":"580g - 6.75\"H x 2.00\"W","option3":null,"sku":"CD-10334","requires_shipping":true,"taxable":true,"featured_image":{"id":40346834436267,"product_id":8513740636331,"position":10,"created_at":"2025-09-08T17:44:36-04:00","updated_at":"2025-12-11T00:07:19-05:00","alt":"Caribbean Calcite Towers \"XXL\"-Towers-Crystal Destiny-Caribbean Calcite-580g - 6.75\"H x 2.00\"W-Crystal Destiny","width":2048,"height":2048,"src":"\/\/crystaldestiny.com\/cdn\/shop\/files\/Caribbean-Calcite-Towers-XXL-Towers-Caribbean-Calcite-580g-6_75H-x-2_00W-10.jpg?v=1765429639","variant_ids":[45594819297451]},"available":true,"name":"Caribbean Calcite Towers \"XXL\" - Caribbean Calcite \/ 580g - 6.75\"H x 2.00\"W","public_title":"Caribbean Calcite \/ 580g - 6.75\"H x 2.00\"W","options":["Caribbean Calcite","580g - 6.75\"H x 2.00\"W"],"price":17999,"weight":580,"compare_at_price":null,"inventory_management":"shopify","barcode":"","featured_media":{"alt":"Caribbean Calcite Towers \"XXL\"-Towers-Crystal Destiny-Caribbean Calcite-580g - 6.75\"H x 2.00\"W-Crystal Destiny","id":31745987543211,"position":10,"preview_image":{"aspect_ratio":1.0,"height":2048,"width":2048,"src":"\/\/crystaldestiny.com\/cdn\/shop\/files\/Caribbean-Calcite-Towers-XXL-Towers-Caribbean-Calcite-580g-6_75H-x-2_00W-10.jpg?v=1765429639"}},"requires_selling_plan":false,"selling_plan_allocations":[]},{"id":45594813464747,"title":"Caribbean Calcite \/ 500g - 7.00\"H x 1.75\"W","option1":"Caribbean Calcite","option2":"500g - 7.00\"H x 1.75\"W","option3":null,"sku":"CD-10329","requires_shipping":true,"taxable":true,"featured_image":{"id":40346834305195,"product_id":8513740636331,"position":6,"created_at":"2025-09-08T17:44:36-04:00","updated_at":"2025-12-11T00:07:16-05:00","alt":"Caribbean Calcite Towers \"XXL\"-Towers-Crystal Destiny-Caribbean Calcite-500g - 7.00\"H x 1.75\"W-Crystal Destiny","width":2048,"height":2048,"src":"\/\/crystaldestiny.com\/cdn\/shop\/files\/Caribbean-Calcite-Towers-XXL-Towers-Caribbean-Calcite-500g-7_00H-x-1_75W-6.jpg?v=1765429636","variant_ids":[45594813464747]},"available":true,"name":"Caribbean Calcite Towers \"XXL\" - Caribbean Calcite \/ 500g - 7.00\"H x 1.75\"W","public_title":"Caribbean Calcite \/ 500g - 7.00\"H x 1.75\"W","options":["Caribbean Calcite","500g - 7.00\"H x 1.75\"W"],"price":17999,"weight":500,"compare_at_price":null,"inventory_management":"shopify","barcode":"","featured_media":{"alt":"Caribbean Calcite Towers \"XXL\"-Towers-Crystal Destiny-Caribbean Calcite-500g - 7.00\"H x 1.75\"W-Crystal Destiny","id":31745987412139,"position":6,"preview_image":{"aspect_ratio":1.0,"height":2048,"width":2048,"src":"\/\/crystaldestiny.com\/cdn\/shop\/files\/Caribbean-Calcite-Towers-XXL-Towers-Caribbean-Calcite-500g-7_00H-x-1_75W-6.jpg?v=1765429636"}},"requires_selling_plan":false,"selling_plan_allocations":[]}],"images":["\/\/crystaldestiny.com\/cdn\/shop\/files\/Caribbean-Calcite-Towers-XXL-Towers.jpg?v=1757394410","\/\/crystaldestiny.com\/cdn\/shop\/files\/Caribbean-Calcite-Towers-XXL-Towers-Caribbean-Calcite-590g-6_00H-x-2_25W-2.jpg?v=1765429634","\/\/crystaldestiny.com\/cdn\/shop\/files\/Caribbean-Calcite-Towers-XXL-Towers-3.jpg?v=1757394413","\/\/crystaldestiny.com\/cdn\/shop\/files\/Caribbean-Calcite-Towers-XXL-Towers-4.jpg?v=1757394415","\/\/crystaldestiny.com\/cdn\/shop\/files\/Caribbean-Calcite-Towers-XXL-Towers-5.jpg?v=1757394416","\/\/crystaldestiny.com\/cdn\/shop\/files\/Caribbean-Calcite-Towers-XXL-Towers-Caribbean-Calcite-500g-7_00H-x-1_75W-6.jpg?v=1765429636","\/\/crystaldestiny.com\/cdn\/shop\/files\/Caribbean-Calcite-Towers-XXL-Towers-7.jpg?v=1757394420","\/\/crystaldestiny.com\/cdn\/shop\/files\/Caribbean-Calcite-Towers-XXL-Towers-8.jpg?v=1757394422","\/\/crystaldestiny.com\/cdn\/shop\/files\/Caribbean-Calcite-Towers-XXL-Towers-9.jpg?v=1757394424","\/\/crystaldestiny.com\/cdn\/shop\/files\/Caribbean-Calcite-Towers-XXL-Towers-Caribbean-Calcite-580g-6_75H-x-2_00W-10.jpg?v=1765429639","\/\/crystaldestiny.com\/cdn\/shop\/files\/Caribbean-Calcite-Towers-XXL-Towers-11.jpg?v=1757394427","\/\/crystaldestiny.com\/cdn\/shop\/files\/Caribbean-Calcite-Towers-XXL-Towers-12.jpg?v=1757394430","\/\/crystaldestiny.com\/cdn\/shop\/files\/Caribbean-Calcite-Towers-XXL-Towers-13.jpg?v=1757394431"],"featured_image":"\/\/crystaldestiny.com\/cdn\/shop\/files\/Caribbean-Calcite-Towers-XXL-Towers.jpg?v=1757394410","options":["Material","Size"],"media":[{"alt":"Caribbean Calcite Towers \"XXL\"-Towers-Crystal Destiny-Caribbean Calcite-590g - 6.00\"H x 2.25\"W-Crystal Destiny","id":31745987248299,"position":1,"preview_image":{"aspect_ratio":1.0,"height":1876,"width":1876,"src":"\/\/crystaldestiny.com\/cdn\/shop\/files\/Caribbean-Calcite-Towers-XXL-Towers.jpg?v=1757394410"},"aspect_ratio":1.0,"height":1876,"media_type":"image","src":"\/\/crystaldestiny.com\/cdn\/shop\/files\/Caribbean-Calcite-Towers-XXL-Towers.jpg?v=1757394410","width":1876},{"alt":"Caribbean Calcite Towers \"XXL\"-Towers-Crystal Destiny-Caribbean Calcite-590g - 6.00\"H x 2.25\"W-Crystal Destiny","id":31745987281067,"position":2,"preview_image":{"aspect_ratio":1.0,"height":2048,"width":2048,"src":"\/\/crystaldestiny.com\/cdn\/shop\/files\/Caribbean-Calcite-Towers-XXL-Towers-Caribbean-Calcite-590g-6_00H-x-2_25W-2.jpg?v=1765429634"},"aspect_ratio":1.0,"height":2048,"media_type":"image","src":"\/\/crystaldestiny.com\/cdn\/shop\/files\/Caribbean-Calcite-Towers-XXL-Towers-Caribbean-Calcite-590g-6_00H-x-2_25W-2.jpg?v=1765429634","width":2048},{"alt":"Caribbean Calcite Towers \"XXL\"-Towers-Crystal Destiny-Caribbean Calcite-590g - 6.00\"H x 2.25\"W-Crystal Destiny","id":31745987313835,"position":3,"preview_image":{"aspect_ratio":1.0,"height":2048,"width":2048,"src":"\/\/crystaldestiny.com\/cdn\/shop\/files\/Caribbean-Calcite-Towers-XXL-Towers-3.jpg?v=1757394413"},"aspect_ratio":1.0,"height":2048,"media_type":"image","src":"\/\/crystaldestiny.com\/cdn\/shop\/files\/Caribbean-Calcite-Towers-XXL-Towers-3.jpg?v=1757394413","width":2048},{"alt":"Caribbean Calcite Towers \"XXL\"-Towers-Crystal Destiny-Caribbean Calcite-590g - 6.00\"H x 2.25\"W-Crystal Destiny","id":31745987346603,"position":4,"preview_image":{"aspect_ratio":1.0,"height":2048,"width":2048,"src":"\/\/crystaldestiny.com\/cdn\/shop\/files\/Caribbean-Calcite-Towers-XXL-Towers-4.jpg?v=1757394415"},"aspect_ratio":1.0,"height":2048,"media_type":"image","src":"\/\/crystaldestiny.com\/cdn\/shop\/files\/Caribbean-Calcite-Towers-XXL-Towers-4.jpg?v=1757394415","width":2048},{"alt":"Caribbean Calcite Towers \"XXL\"-Towers-Crystal Destiny-Caribbean Calcite-590g - 6.00\"H x 2.25\"W-Crystal Destiny","id":31745987379371,"position":5,"preview_image":{"aspect_ratio":1.0,"height":2048,"width":2048,"src":"\/\/crystaldestiny.com\/cdn\/shop\/files\/Caribbean-Calcite-Towers-XXL-Towers-5.jpg?v=1757394416"},"aspect_ratio":1.0,"height":2048,"media_type":"image","src":"\/\/crystaldestiny.com\/cdn\/shop\/files\/Caribbean-Calcite-Towers-XXL-Towers-5.jpg?v=1757394416","width":2048},{"alt":"Caribbean Calcite Towers \"XXL\"-Towers-Crystal Destiny-Caribbean Calcite-500g - 7.00\"H x 1.75\"W-Crystal Destiny","id":31745987412139,"position":6,"preview_image":{"aspect_ratio":1.0,"height":2048,"width":2048,"src":"\/\/crystaldestiny.com\/cdn\/shop\/files\/Caribbean-Calcite-Towers-XXL-Towers-Caribbean-Calcite-500g-7_00H-x-1_75W-6.jpg?v=1765429636"},"aspect_ratio":1.0,"height":2048,"media_type":"image","src":"\/\/crystaldestiny.com\/cdn\/shop\/files\/Caribbean-Calcite-Towers-XXL-Towers-Caribbean-Calcite-500g-7_00H-x-1_75W-6.jpg?v=1765429636","width":2048},{"alt":"Caribbean Calcite Towers \"XXL\"-Towers-Crystal Destiny-Caribbean Calcite-590g - 6.00\"H x 2.25\"W-Crystal Destiny","id":31745987444907,"position":7,"preview_image":{"aspect_ratio":1.0,"height":2048,"width":2048,"src":"\/\/crystaldestiny.com\/cdn\/shop\/files\/Caribbean-Calcite-Towers-XXL-Towers-7.jpg?v=1757394420"},"aspect_ratio":1.0,"height":2048,"media_type":"image","src":"\/\/crystaldestiny.com\/cdn\/shop\/files\/Caribbean-Calcite-Towers-XXL-Towers-7.jpg?v=1757394420","width":2048},{"alt":"Caribbean Calcite Towers \"XXL\"-Towers-Crystal Destiny-Caribbean Calcite-590g - 6.00\"H x 2.25\"W-Crystal Destiny","id":31745987477675,"position":8,"preview_image":{"aspect_ratio":1.0,"height":2048,"width":2048,"src":"\/\/crystaldestiny.com\/cdn\/shop\/files\/Caribbean-Calcite-Towers-XXL-Towers-8.jpg?v=1757394422"},"aspect_ratio":1.0,"height":2048,"media_type":"image","src":"\/\/crystaldestiny.com\/cdn\/shop\/files\/Caribbean-Calcite-Towers-XXL-Towers-8.jpg?v=1757394422","width":2048},{"alt":"Caribbean Calcite Towers \"XXL\"-Towers-Crystal Destiny-Caribbean Calcite-590g - 6.00\"H x 2.25\"W-Crystal Destiny","id":31745987510443,"position":9,"preview_image":{"aspect_ratio":1.0,"height":2048,"width":2048,"src":"\/\/crystaldestiny.com\/cdn\/shop\/files\/Caribbean-Calcite-Towers-XXL-Towers-9.jpg?v=1757394424"},"aspect_ratio":1.0,"height":2048,"media_type":"image","src":"\/\/crystaldestiny.com\/cdn\/shop\/files\/Caribbean-Calcite-Towers-XXL-Towers-9.jpg?v=1757394424","width":2048},{"alt":"Caribbean Calcite Towers \"XXL\"-Towers-Crystal Destiny-Caribbean Calcite-580g - 6.75\"H x 2.00\"W-Crystal Destiny","id":31745987543211,"position":10,"preview_image":{"aspect_ratio":1.0,"height":2048,"width":2048,"src":"\/\/crystaldestiny.com\/cdn\/shop\/files\/Caribbean-Calcite-Towers-XXL-Towers-Caribbean-Calcite-580g-6_75H-x-2_00W-10.jpg?v=1765429639"},"aspect_ratio":1.0,"height":2048,"media_type":"image","src":"\/\/crystaldestiny.com\/cdn\/shop\/files\/Caribbean-Calcite-Towers-XXL-Towers-Caribbean-Calcite-580g-6_75H-x-2_00W-10.jpg?v=1765429639","width":2048},{"alt":"Caribbean Calcite Towers \"XXL\"-Towers-Crystal Destiny-Caribbean Calcite-590g - 6.00\"H x 2.25\"W-Crystal Destiny","id":31745987575979,"position":11,"preview_image":{"aspect_ratio":1.0,"height":2048,"width":2048,"src":"\/\/crystaldestiny.com\/cdn\/shop\/files\/Caribbean-Calcite-Towers-XXL-Towers-11.jpg?v=1757394427"},"aspect_ratio":1.0,"height":2048,"media_type":"image","src":"\/\/crystaldestiny.com\/cdn\/shop\/files\/Caribbean-Calcite-Towers-XXL-Towers-11.jpg?v=1757394427","width":2048},{"alt":"Caribbean Calcite Towers \"XXL\"-Towers-Crystal Destiny-Caribbean Calcite-590g - 6.00\"H x 2.25\"W-Crystal Destiny","id":31745987608747,"position":12,"preview_image":{"aspect_ratio":1.0,"height":2048,"width":2048,"src":"\/\/crystaldestiny.com\/cdn\/shop\/files\/Caribbean-Calcite-Towers-XXL-Towers-12.jpg?v=1757394430"},"aspect_ratio":1.0,"height":2048,"media_type":"image","src":"\/\/crystaldestiny.com\/cdn\/shop\/files\/Caribbean-Calcite-Towers-XXL-Towers-12.jpg?v=1757394430","width":2048},{"alt":"Caribbean Calcite Towers \"XXL\"-Towers-Crystal Destiny-Caribbean Calcite-590g - 6.00\"H x 2.25\"W-Crystal Destiny","id":31745987641515,"position":13,"preview_image":{"aspect_ratio":1.0,"height":2048,"width":2048,"src":"\/\/crystaldestiny.com\/cdn\/shop\/files\/Caribbean-Calcite-Towers-XXL-Towers-13.jpg?v=1757394431"},"aspect_ratio":1.0,"height":2048,"media_type":"image","src":"\/\/crystaldestiny.com\/cdn\/shop\/files\/Caribbean-Calcite-Towers-XXL-Towers-13.jpg?v=1757394431","width":2048}],"requires_selling_plan":false,"selling_plan_groups":[],"content":"\u003cp\u003eCaribbean Calcite Towers \"XXL\" are exceptional specimens that embody both powerful beauty and profound metaphysical energy. Sourced from the vibrant Caribbean region, these towers showcase stunning crystalline formations with a gentle, soothing palette of soft oranges, creamy whites, and warm golden hues. Their towering structure not only makes them a commanding decorative piece but also serves as an energetic amplifier in any space.\u003c\/p\u003e\n\u003cp\u003eMetaphysically, Caribbean Calcite is known for its remarkable ability to clear negative energy and foster emotional healing. It facilitates balance and harmony by gently enhancing spiritual growth and inner peace. This particular variety is often linked to the sacral and solar plexus chakras, promoting creativity, confidence, and motivation. Beyond their aesthetic appeal, these XXL towers act as powerful tools for meditation, energy clearing, and manifesting goals by amplifying intentions and enhancing mental clarity. Ideal for crystal enthusiasts and healers alike, these towers bring a radiant presence that supports emotional resilience and spiritual awakening.\u003c\/p\u003e\n\u003cp\u003eThis product is an exact pick as pictured, one of a kind.\u003c\/p\u003e"},"options":[{"name":"Material","position":1,"values":["Caribbean Calcite"]},{"name":"Size","position":2,"values":["590g - 6.00\"H x 2.25\"W","580g - 6.75\"H x 2.00\"W","500g - 7.00\"H x 1.75\"W"]}],"custom_metafields":{"shipping_time":"Within 7 days"},"metafields":{"badge":"\u003cdiv style='display:none' class='jdgm-prev-badge' data-average-rating='0.00' data-number-of-reviews='0' data-number-of-questions='0'\u003e \u003cspan class='jdgm-prev-badge__stars' data-score='0.00' tabindex='0' aria-label='0.00 stars' role='button'\u003e \u003cspan class='jdgm-star jdgm--off'\u003e\u003c\/span\u003e\u003cspan class='jdgm-star jdgm--off'\u003e\u003c\/span\u003e\u003cspan class='jdgm-star jdgm--off'\u003e\u003c\/span\u003e\u003cspan class='jdgm-star jdgm--off'\u003e\u003c\/span\u003e\u003cspan class='jdgm-star jdgm--off'\u003e\u003c\/span\u003e \u003c\/span\u003e \u003cspan class='jdgm-prev-badge__text'\u003e No reviews \u003c\/span\u003e \u003c\/div\u003e","widget":"\u003cdiv class='jdgm-rev-widg' data-updated-at='2025-09-08T21:49:10Z' data-average-rating='0.00' data-number-of-reviews='0' data-number-of-questions='0' data-image-url='https:\/\/cdn.shopify.com\/s\/files\/1\/0613\/0345\/5915\/files\/6I0A4091.jpg?v=1757367878'\u003e \u003cstyle class='jdgm-temp-hiding-style'\u003e.jdgm-rev-widg{ display: none }\u003c\/style\u003e \u003cdiv class='jdgm-rev-widg__header'\u003e \u003ch2 class='jdgm-rev-widg__title'\u003eCustomer Reviews\u003c\/h2\u003e \u003cdiv class='jdgm-rev-widg__summary'\u003e \u003cdiv class='jdgm-rev-widg__summary-stars' aria-label='Average rating is 0.00 stars' role='img'\u003e \u003cspan class='jdgm-star jdgm--off'\u003e\u003c\/span\u003e\u003cspan class='jdgm-star jdgm--off'\u003e\u003c\/span\u003e\u003cspan class='jdgm-star jdgm--off'\u003e\u003c\/span\u003e\u003cspan class='jdgm-star jdgm--off'\u003e\u003c\/span\u003e\u003cspan class='jdgm-star jdgm--off'\u003e\u003c\/span\u003e \u003c\/div\u003e \u003cdiv class='jdgm-rev-widg__summary-text'\u003eBe the first to write a review\u003c\/div\u003e \u003c\/div\u003e \u003ca style='display: none' href='#' class='jdgm-write-rev-link' role='button'\u003eWrite a review\u003c\/a\u003e \u003cdiv class='jdgm-histogram jdgm-temp-hidden'\u003e \u003cdiv class='jdgm-histogram__row' data-rating='5' data-frequency='0' data-percentage='0'\u003e \u003cdiv class='jdgm-histogram__star' role='button' aria-label=\"0% (0) reviews with 5 star rating\" tabindex='0' \u003e\u003cspan class='jdgm-star jdgm--on'\u003e\u003c\/span\u003e\u003cspan class='jdgm-star jdgm--on'\u003e\u003c\/span\u003e\u003cspan class='jdgm-star jdgm--on'\u003e\u003c\/span\u003e\u003cspan class='jdgm-star jdgm--on'\u003e\u003c\/span\u003e\u003cspan class='jdgm-star jdgm--on'\u003e\u003c\/span\u003e\u003c\/div\u003e \u003cdiv class='jdgm-histogram__bar'\u003e \u003cdiv class='jdgm-histogram__bar-content' style='width: 0%;'\u003e \u003c\/div\u003e \u003c\/div\u003e \u003cdiv class='jdgm-histogram__percentage'\u003e0%\u003c\/div\u003e \u003cdiv class='jdgm-histogram__frequency'\u003e(0)\u003c\/div\u003e \u003c\/div\u003e \u003cdiv class='jdgm-histogram__row' data-rating='4' data-frequency='0' data-percentage='0'\u003e \u003cdiv class='jdgm-histogram__star' role='button' aria-label=\"0% (0) reviews with 4 star rating\" tabindex='0' \u003e\u003cspan class='jdgm-star jdgm--on'\u003e\u003c\/span\u003e\u003cspan class='jdgm-star jdgm--on'\u003e\u003c\/span\u003e\u003cspan class='jdgm-star jdgm--on'\u003e\u003c\/span\u003e\u003cspan class='jdgm-star jdgm--on'\u003e\u003c\/span\u003e\u003cspan class='jdgm-star jdgm--off'\u003e\u003c\/span\u003e\u003c\/div\u003e \u003cdiv class='jdgm-histogram__bar'\u003e \u003cdiv class='jdgm-histogram__bar-content' style='width: 0%;'\u003e \u003c\/div\u003e \u003c\/div\u003e \u003cdiv class='jdgm-histogram__percentage'\u003e0%\u003c\/div\u003e \u003cdiv class='jdgm-histogram__frequency'\u003e(0)\u003c\/div\u003e \u003c\/div\u003e \u003cdiv class='jdgm-histogram__row' data-rating='3' data-frequency='0' data-percentage='0'\u003e \u003cdiv class='jdgm-histogram__star' role='button' aria-label=\"0% (0) reviews with 3 star rating\" tabindex='0' \u003e\u003cspan class='jdgm-star jdgm--on'\u003e\u003c\/span\u003e\u003cspan class='jdgm-star jdgm--on'\u003e\u003c\/span\u003e\u003cspan class='jdgm-star jdgm--on'\u003e\u003c\/span\u003e\u003cspan class='jdgm-star jdgm--off'\u003e\u003c\/span\u003e\u003cspan class='jdgm-star jdgm--off'\u003e\u003c\/span\u003e\u003c\/div\u003e \u003cdiv class='jdgm-histogram__bar'\u003e \u003cdiv class='jdgm-histogram__bar-content' style='width: 0%;'\u003e \u003c\/div\u003e \u003c\/div\u003e \u003cdiv class='jdgm-histogram__percentage'\u003e0%\u003c\/div\u003e \u003cdiv class='jdgm-histogram__frequency'\u003e(0)\u003c\/div\u003e \u003c\/div\u003e \u003cdiv class='jdgm-histogram__row' data-rating='2' data-frequency='0' data-percentage='0'\u003e \u003cdiv class='jdgm-histogram__star' role='button' aria-label=\"0% (0) reviews with 2 star rating\" tabindex='0' \u003e\u003cspan class='jdgm-star jdgm--on'\u003e\u003c\/span\u003e\u003cspan class='jdgm-star jdgm--on'\u003e\u003c\/span\u003e\u003cspan class='jdgm-star jdgm--off'\u003e\u003c\/span\u003e\u003cspan class='jdgm-star jdgm--off'\u003e\u003c\/span\u003e\u003cspan class='jdgm-star jdgm--off'\u003e\u003c\/span\u003e\u003c\/div\u003e \u003cdiv class='jdgm-histogram__bar'\u003e \u003cdiv class='jdgm-histogram__bar-content' style='width: 0%;'\u003e \u003c\/div\u003e \u003c\/div\u003e \u003cdiv class='jdgm-histogram__percentage'\u003e0%\u003c\/div\u003e \u003cdiv class='jdgm-histogram__frequency'\u003e(0)\u003c\/div\u003e \u003c\/div\u003e \u003cdiv class='jdgm-histogram__row' data-rating='1' data-frequency='0' data-percentage='0'\u003e \u003cdiv class='jdgm-histogram__star' role='button' aria-label=\"0% (0) reviews with 1 star rating\" tabindex='0' \u003e\u003cspan class='jdgm-star jdgm--on'\u003e\u003c\/span\u003e\u003cspan class='jdgm-star jdgm--off'\u003e\u003c\/span\u003e\u003cspan class='jdgm-star jdgm--off'\u003e\u003c\/span\u003e\u003cspan class='jdgm-star jdgm--off'\u003e\u003c\/span\u003e\u003cspan class='jdgm-star jdgm--off'\u003e\u003c\/span\u003e\u003c\/div\u003e \u003cdiv class='jdgm-histogram__bar'\u003e \u003cdiv class='jdgm-histogram__bar-content' style='width: 0%;'\u003e \u003c\/div\u003e \u003c\/div\u003e \u003cdiv class='jdgm-histogram__percentage'\u003e0%\u003c\/div\u003e \u003cdiv class='jdgm-histogram__frequency'\u003e(0)\u003c\/div\u003e \u003c\/div\u003e \u003cdiv class='jdgm-histogram__row jdgm-histogram__clear-filter' data-rating=null tabindex='0'\u003e\u003c\/div\u003e \u003c\/div\u003e \u003cdiv class='jdgm-rev-widg__sort-wrapper'\u003e\u003c\/div\u003e \u003c\/div\u003e \u003cdiv class='jdgm-rev-widg__body'\u003e \u003cdiv class='jdgm-rev-widg__reviews'\u003e\u003c\/div\u003e \u003cdiv class='jdgm-paginate' data-per-page='4' data-url='https:\/\/api.judge.me\/reviews\/reviews_for_widget' style=\"display: none;\"\u003e\u003c\/div\u003e \u003c\/div\u003e \u003cdiv class='jdgm-rev-widg__paginate-spinner-wrapper'\u003e \u003cdiv class='jdgm-spinner'\u003e\u003c\/div\u003e \u003c\/div\u003e \u003c\/div\u003e"},"collections":[{"id":294880051371,"handle":"crystals","title":"Crystals","updated_at":"2026-01-07T23:43:11-05:00","body_html":"\u003cp data-start=\"159\" data-end=\"687\"\u003e✨ \u003cstrong data-start=\"161\" data-end=\"216\"\u003eDiscover the Magic of Crystals with Crystal Destiny\u003c\/strong\u003e ✨\u003cbr data-start=\"218\" data-end=\"221\"\u003eCrystals have been treasured for centuries—not only for their natural beauty but also for their powerful healing energies. Beyond their visual allure, they bring balance, harmony, and positive energy into any space. Whether used for home décor, meditation, or simply to elevate the energy of your surroundings, crystals create a sanctuary of peace, relaxation, and well-being. Each piece is a unique gift from the Earth—visually stunning and spiritually uplifting.\u003c\/p\u003e\n\u003cp data-start=\"689\" data-end=\"1011\"\u003eAt \u003cstrong data-start=\"692\" data-end=\"711\"\u003eCrystal Destiny\u003c\/strong\u003e, our signature collection showcases a curated selection of exquisite crystals, from radiant Quartz to soothing Amethyst. Every stone is carefully sourced for its elegance and metaphysical resonance, making them perfect for enhancing your home, uplifting your spirit, or gifting to someone special.\u003c\/p\u003e\n\u003cp data-start=\"1013\" data-end=\"1206\"\u003eExperience the timeless sophistication of crystalline wonders. Explore the \u003cstrong data-start=\"1088\" data-end=\"1118\"\u003eCrystal Destiny Collection\u003c\/strong\u003e today and bring the transformative beauty of these treasures into your everyday life.\u003c\/p\u003e","published_at":"2023-06-05T11:24:02-04:00","sort_order":"created-desc","template_suffix":"","disjunctive":false,"rules":[{"column":"tag","relation":"equals","condition":"crystal"},{"column":"type","relation":"not_contains","condition":"925 Sterling Silver"},{"column":"type","relation":"not_contains","condition":"Wire Wraps"}],"published_scope":"global"},{"id":319455756459,"handle":"crown-chakra-crystals","title":"Crown Chakra Crystals","updated_at":"2026-01-07T23:42:38-05:00","body_html":"\u003cp data-start=\"144\" data-end=\"515\"\u003e✨ \u003cstrong data-start=\"146\" data-end=\"171\"\u003eCrown Chakra Crystals\u003c\/strong\u003e ✨\u003cbr data-start=\"173\" data-end=\"176\"\u003eConnect with higher consciousness and spiritual insight with our \u003cstrong data-start=\"241\" data-end=\"266\"\u003eCrown Chakra Crystals\u003c\/strong\u003e. Located at the top of the head, the Crown Chakra governs wisdom, enlightenment, and your connection to the divine. These crystals help open and balance this energy center, fostering clarity, spiritual growth, and a sense of universal connection.\u003c\/p\u003e\n\u003cp data-start=\"517\" data-end=\"851\"\u003eOur selection includes powerful stones such as Amethyst, Clear Quartz, Selenite, and Lepidolite—each chosen for their ability to enhance meditation, energy work, and mindful practices. Whether placed in your sacred space, carried with you, or worn as jewelry, Crown Chakra Crystals promote harmony, insight, and spiritual alignment.\u003c\/p\u003e\n\u003cp data-start=\"853\" data-end=\"1007\"\u003eElevate your consciousness, deepen your meditative practice, and embrace the transformative energy of the Crown Chakra with these illuminating crystals.\u003c\/p\u003e","published_at":"2025-07-17T18:16:11-04:00","sort_order":"best-selling","template_suffix":"","disjunctive":false,"rules":[{"column":"variant_metafield_definition","relation":"equals","condition":"Crown"}],"published_scope":"global","image":{"created_at":"2025-07-17T19:09:11-04:00","alt":null,"width":1080,"height":1080,"src":"\/\/crystaldestiny.com\/cdn\/shop\/collections\/Crown_Chakra_Collection.jpg?v=1762474922"}},{"id":319455789227,"handle":"third-eye-chakra-crystals","title":"Third Eye Chakra Crystals","updated_at":"2026-01-07T23:42:38-05:00","body_html":"\u003cp data-start=\"124\" data-end=\"474\"\u003e✨ \u003cstrong data-start=\"126\" data-end=\"155\"\u003eThird Eye Chakra Crystals\u003c\/strong\u003e ✨\u003cbr data-start=\"157\" data-end=\"160\"\u003eAwaken intuition, clarity, and insight with our \u003cstrong data-start=\"208\" data-end=\"237\"\u003eThird Eye Chakra Crystals\u003c\/strong\u003e. Located between the eyebrows, the Third Eye Chakra governs perception, intuition, and inner wisdom. These crystals help balance and activate this energy center, promoting mental clarity, spiritual awareness, and heightened intuition.\u003c\/p\u003e\n\u003cp data-start=\"476\" data-end=\"835\"\u003eOur curated selection features stones such as Amethyst, Lapis Lazuli, and Sodalite—chosen for their ability to enhance meditation, intuitive practices, and energy work. Whether placed in your sacred space, carried with you, or worn as jewelry, Third Eye Chakra Crystals support mental focus, spiritual growth, and a deeper connection to your inner guidance.\u003c\/p\u003e\n\u003cp data-start=\"837\" data-end=\"976\"\u003eElevate your intuition, expand your awareness, and embrace the transformative power of the Third Eye Chakra with these powerful crystals.\u003c\/p\u003e","published_at":"2025-07-17T18:16:49-04:00","sort_order":"best-selling","template_suffix":"","disjunctive":false,"rules":[{"column":"variant_metafield_definition","relation":"equals","condition":"Third Eye"}],"published_scope":"global","image":{"created_at":"2025-07-17T19:09:01-04:00","alt":null,"width":1080,"height":1080,"src":"\/\/crystaldestiny.com\/cdn\/shop\/collections\/Third_Eye_Chakra_Collection.jpg?v=1762474924"}},{"id":294880116907,"handle":"polished","title":"Polished Crystals","updated_at":"2026-01-07T23:43:11-05:00","body_html":"\u003cp data-start=\"199\" data-end=\"598\"\u003e✨ \u003cstrong data-start=\"201\" data-end=\"248\"\u003eCrystal Destiny Polished Crystal Collection\u003c\/strong\u003e ✨\u003cbr data-start=\"250\" data-end=\"253\"\u003eIndulge in the brilliance of crystals refined to perfection. Our \u003cstrong data-start=\"318\" data-end=\"341\"\u003ePolished Collection\u003c\/strong\u003e showcases gemstones meticulously shaped and smoothed to reveal their natural radiance and timeless beauty. From the shimmering glow of Quartz to the deep allure of Obsidian, each polished piece is a testament to nature’s artistry and human craftsmanship.\u003c\/p\u003e\n\u003cp data-start=\"600\" data-end=\"862\"\u003ePerfect as statement décor, meaningful gifts, or companions on your spiritual journey, polished crystals bring sophistication and elevated energy into any space. Their radiant surfaces reflect not only light but also the transformative power of crystal energy.\u003c\/p\u003e\n\u003cp data-start=\"864\" data-end=\"1022\"\u003eDiscover the elegance of refinement with Crystal Destiny’s Polished Crystal Collection—where every facet shines with intention, beauty, and timeless allure.\u003c\/p\u003e","published_at":"2023-06-05T11:30:44-04:00","sort_order":"created-desc","template_suffix":"","disjunctive":false,"rules":[{"column":"tag","relation":"equals","condition":"polished"}],"published_scope":"global"},{"id":293659312299,"handle":"best-sellers","title":"Best Sellers","updated_at":"2026-01-07T23:43:11-05:00","body_html":"\u003cp data-start=\"155\" data-end=\"510\"\u003eDiscover the pieces our community loves most. Our Best Sellers Collection brings together handpicked crystals and jewelry that embody timeless elegance, spiritual resonance, and everyday sophistication. Each item has earned its place as a customer favorite—celebrated for both its beauty and its meaningful energy.\u003c\/p\u003e\n\u003cp data-start=\"512\" data-end=\"802\"\u003eFrom stunning statement pieces to versatile daily companions, these treasures are curated to elevate your space, uplift your spirit, and reflect refined taste. Indulge in what’s most cherished and let our best sellers guide you toward the perfect blend of style and transformative energy.\u003c\/p\u003e\n\u003cp data-start=\"804\" data-end=\"932\"\u003eExplore the Best Sellers Collection today—where elegance meets intention, and every piece tells a story of beauty and balance.\u003c\/p\u003e","published_at":"2023-03-15T16:04:51-04:00","sort_order":"best-selling","template_suffix":"","disjunctive":false,"rules":[{"column":"variant_price","relation":"greater_than","condition":"0"},{"column":"variant_inventory","relation":"greater_than","condition":"0"},{"column":"type","relation":"not_equals","condition":"Shipping Protection"}],"published_scope":"global"},{"id":321370390699,"handle":"monthly-crystal-sale","title":"Monthly Crystal Sale | Spheres \u0026 Towers","updated_at":"2026-01-06T23:24:37-05:00","body_html":"\u003cp\u003eShop our \u003cstrong\u003eMonthly Crystal Sale\u003c\/strong\u003e, where you can shop a wide selection of healing crystals at discounted prices. Explore \u003cstrong\u003ecrystal spheres and towers,\u003c\/strong\u003e— all carefully curated to support meditation, energy balancing, and spiritual wellness. Whether you're looking to enhance your home decor, boost your daily energy, or find the perfect gift, our \u003cstrong\u003ecrystals for healing and manifestation\u003c\/strong\u003e offer both beauty and metaphysical benefits.\u003c\/p\u003e\n\u003cp\u003eEach month, our sale features \u003cstrong\u003enew discounted collections\u003c\/strong\u003e, from \u003cstrong\u003enatural quartz and amethyst towers\u003c\/strong\u003e to \u003cstrong\u003ewire-wrapped pendants and polished stones\u003c\/strong\u003e, so there's always something fresh to discover. Shop with confidence knowing you're getting high-quality crystals with \u003cstrong\u003efree shipping options\u003c\/strong\u003e and a trusted experience.\u003c\/p\u003e\n\u003cp\u003e\u003cstrong\u003eTake advantage of the Monthly Crystal Sale today\u003c\/strong\u003e and add powerful, natural energy to your life with \u003cstrong\u003eauthentic healing crystals\u003c\/strong\u003e — while our limited-time discounts last.\u003c\/p\u003e\n\u003cp\u003e\u003cstrong\u003e*Discount automatically applied at checkout.\u003c\/strong\u003e\u003c\/p\u003e","published_at":"2025-12-02T01:26:17-05:00","sort_order":"alpha-asc","template_suffix":"","disjunctive":true,"rules":[{"column":"tag","relation":"equals","condition":"spheres"},{"column":"tag","relation":"equals","condition":"Towers"}],"published_scope":"global","image":{"created_at":"2026-01-01T01:32:34-05:00","alt":"","width":960,"height":960,"src":"\/\/crystaldestiny.com\/cdn\/shop\/collections\/3E8C2969-1B86-4ACE-B349-98E9D8768424.jpg?v=1767249154"}},{"id":297596059819,"handle":"all","title":"All Crystals \u0026 Jewelry","updated_at":"2026-01-07T23:43:11-05:00","body_html":"\u003cp data-start=\"149\" data-end=\"494\"\u003e✨ \u003cstrong data-start=\"151\" data-end=\"181\"\u003eWelcome to Crystal Destiny\u003c\/strong\u003e ✨\u003cbr data-start=\"183\" data-end=\"186\"\u003eStep into a world where beauty, energy, and artistry unite. Our collection is a treasure trove of exquisite crystals, from the raw, untamed elegance of natural formations to the polished brilliance of expertly crafted pieces. Each crystal is a masterpiece, carrying its own unique story and timeless charm.\u003c\/p\u003e\n\u003cp data-start=\"496\" data-end=\"831\"\u003eWhether you’re drawn to the calming presence of Amethyst, the vibrant energy of Citrine, or the grounding strength of Jasper, our crystals invite you to connect with nature’s finest wonders. Perfect for enhancing your space, supporting your spiritual journey, or gifting with intention, every piece resonates with beauty and meaning.\u003c\/p\u003e\n\u003cp data-start=\"833\" data-end=\"1000\"\u003eElevate your surroundings, embrace the mystique, and explore the enchanting world of crystals at \u003cstrong data-start=\"930\" data-end=\"949\"\u003eCrystal Destiny\u003c\/strong\u003e—where every crystal is waiting to be discovered.\u003c\/p\u003e","published_at":"2023-11-10T13:55:31-05:00","sort_order":"created-desc","template_suffix":"","disjunctive":false,"rules":[{"column":"type","relation":"not_equals","condition":"asdf"}],"published_scope":"global"},{"id":296256405675,"handle":"crystal-towers","title":"Crystal Towers","updated_at":"2026-01-06T23:24:37-05:00","body_html":"\u003cp data-end=\"568\" data-start=\"152\"\u003e✨ \u003cstrong data-end=\"190\" data-start=\"154\"\u003eCrystal Destiny Tower Collection\u003c\/strong\u003e ✨\u003cbr data-end=\"195\" data-start=\"192\"\u003eEnchant your space with the timeless beauty and powerful energy of crystal towers. Each piece in our \u003cstrong data-end=\"316\" data-start=\"296\"\u003eTower Collection\u003c\/strong\u003e is carefully crafted to showcase nature’s artistry while radiating higher vibrations and spiritual resonance. From the clarity of Quartz to the calming presence of Amethyst, these towers are both decorative masterpieces and tools for transformation.\u003c\/p\u003e\n\u003cp data-end=\"765\" data-start=\"570\"\u003ePerfect for meditation spaces, energy work, or simply elevating your home décor, crystal towers channel focused energy upward—creating balance, harmony, and refined elegance in any environment.\u003c\/p\u003e\n\u003cp data-end=\"917\" data-start=\"767\"\u003eDiscover the Crystal Destiny Tower Collection today and transform your surroundings into a sanctuary of beauty, purpose, and spiritual significance.\u003c\/p\u003e\n\u003ch2\u003eCrystal Towers, Wands, Generators, Points, Pillars \u0026amp; Obelisks — What's the Difference?\u003c\/h2\u003e\n\u003cp id=\"isPasted\"\u003eWhile these terms may vary, they all describe beautifully shaped crystals with a pointed tip designed to channel and direct energy. Each name highlights a unique aspect of their use:\u003c\/p\u003e\n\u003cul\u003e\n\u003cli\u003e\n\u003cstrong\u003eTowers\u003c\/strong\u003e- Known for their steady, grounding presence, crystal towers help focus and amplify energy, making them perfect for meditation and manifestation.\u003c\/li\u003e\n\u003cli\u003e\n\u003cstrong\u003eWands\u003c\/strong\u003e- Traditionally used in energy work and healing, crystal wands are excellent for directing energy flow and clearing blockages.\u003c\/li\u003e\n\u003cli\u003e\n\u003cstrong\u003ePillars\u003c\/strong\u003e- Symbolizing strength and stability, crystal pillars create a balanced and harmonious environment, making them great for home decor and spiritual practices.\u003c\/li\u003e\n\u003cli\u003e\n\u003cstrong\u003eObelisks\u003c\/strong\u003e- Inspired by ancient structures, crystal obelisks are believed to connect earthly and spiritual energies, making them powerful tools for transformation and enlightenment.\u003c\/li\u003e\n\u003c\/ul\u003e\n\u003cp\u003eNo matter what you call them, these crystals serve the same purpose—to enhance energy, intention, and harmony in your space. Choose the one that resonates most with you!\u003c\/p\u003e","published_at":"2023-09-14T12:52:35-04:00","sort_order":"created-desc","template_suffix":"","disjunctive":false,"rules":[{"column":"tag","relation":"equals","condition":"towers"}],"published_scope":"global"},{"id":298983391403,"handle":"january-crystal-sale","title":"January Sale | 25% Off Crystal Towers \u0026 Spheres","updated_at":"2026-01-06T23:24:37-05:00","body_html":"\u003cp\u003eShop our \u003cstrong\u003eJanuary Crystal Sale\u003c\/strong\u003e, where you can shop a wide selection of healing crystals at discounted prices. Explore \u003cstrong\u003eCrystal Towers, \u0026amp; Crystal Spheres\u003c\/strong\u003e — all carefully curated and crafted to support meditation, energy balancing, and spiritual wellness. Whether you're looking to enhance your home decor, boost your daily energy, or find the perfect gift, our \u003cstrong\u003ecrystals for healing and manifestation\u003c\/strong\u003e offer both beauty and metaphysical benefits.\u003c\/p\u003e\n\u003cp\u003eThis January, our sale features \u003cstrong\u003ediscounted crystal towers and spheres\u003c\/strong\u003e, from \u003cstrong\u003enatural quartz \u003c\/strong\u003eand \u003cstrong\u003eamethyst \u003c\/strong\u003eto \u003cstrong\u003ebumblebee jasper \u003c\/strong\u003eand \u003cstrong\u003ecarnelian\u003c\/strong\u003e, so there's always something fresh to discover. Shop with confidence knowing you're getting high-quality crystals with \u003cstrong\u003efree shipping options\u003c\/strong\u003e and a trusted experience.\u003c\/p\u003e\n\u003cp\u003e\u003cstrong\u003eTake advantage of the January Crystal Sale today\u003c\/strong\u003e and add powerful, natural energy to your life with \u003cstrong\u003eauthentic healing crystals\u003c\/strong\u003e — while our limited-time discounts last.\u003c\/p\u003e\n\u003cp\u003e\u003cstrong\u003e*Discount automatically applied at checkout.\u003c\/strong\u003e\u003c\/p\u003e","published_at":"2026-01-01T00:07:17-05:00","sort_order":"alpha-asc","template_suffix":"monthly-collection","disjunctive":true,"rules":[{"column":"tag","relation":"equals","condition":"Spheres"},{"column":"tag","relation":"equals","condition":"Towers"}],"published_scope":"global","image":{"created_at":"2026-01-01T01:29:59-05:00","alt":"","width":960,"height":960,"src":"\/\/crystaldestiny.com\/cdn\/shop\/collections\/1464163B-22B1-4D62-BEC5-CEC9AECB670B.jpg?v=1767248999"}}]}
[{"alt":"Caribbean Calcite Towers \"XXL\"-Towers-Crystal Destiny-Caribbean Calcite-590g - 6.00\"H x 2.25\"W-Crystal Destiny","id":31745987248299,"position":1,"preview_image":{"aspect_ratio":1.0,"height":1876,"width":1876,"src":"\/\/crystaldestiny.com\/cdn\/shop\/files\/Caribbean-Calcite-Towers-XXL-Towers.jpg?v=1757394410"},"aspect_ratio":1.0,"height":1876,"media_type":"image","src":"\/\/crystaldestiny.com\/cdn\/shop\/files\/Caribbean-Calcite-Towers-XXL-Towers.jpg?v=1757394410","width":1876},{"alt":"Caribbean Calcite Towers \"XXL\"-Towers-Crystal Destiny-Caribbean Calcite-590g - 6.00\"H x 2.25\"W-Crystal Destiny","id":31745987281067,"position":2,"preview_image":{"aspect_ratio":1.0,"height":2048,"width":2048,"src":"\/\/crystaldestiny.com\/cdn\/shop\/files\/Caribbean-Calcite-Towers-XXL-Towers-Caribbean-Calcite-590g-6_00H-x-2_25W-2.jpg?v=1765429634"},"aspect_ratio":1.0,"height":2048,"media_type":"image","src":"\/\/crystaldestiny.com\/cdn\/shop\/files\/Caribbean-Calcite-Towers-XXL-Towers-Caribbean-Calcite-590g-6_00H-x-2_25W-2.jpg?v=1765429634","width":2048},{"alt":"Caribbean Calcite Towers \"XXL\"-Towers-Crystal Destiny-Caribbean Calcite-590g - 6.00\"H x 2.25\"W-Crystal Destiny","id":31745987313835,"position":3,"preview_image":{"aspect_ratio":1.0,"height":2048,"width":2048,"src":"\/\/crystaldestiny.com\/cdn\/shop\/files\/Caribbean-Calcite-Towers-XXL-Towers-3.jpg?v=1757394413"},"aspect_ratio":1.0,"height":2048,"media_type":"image","src":"\/\/crystaldestiny.com\/cdn\/shop\/files\/Caribbean-Calcite-Towers-XXL-Towers-3.jpg?v=1757394413","width":2048},{"alt":"Caribbean Calcite Towers \"XXL\"-Towers-Crystal Destiny-Caribbean Calcite-590g - 6.00\"H x 2.25\"W-Crystal Destiny","id":31745987346603,"position":4,"preview_image":{"aspect_ratio":1.0,"height":2048,"width":2048,"src":"\/\/crystaldestiny.com\/cdn\/shop\/files\/Caribbean-Calcite-Towers-XXL-Towers-4.jpg?v=1757394415"},"aspect_ratio":1.0,"height":2048,"media_type":"image","src":"\/\/crystaldestiny.com\/cdn\/shop\/files\/Caribbean-Calcite-Towers-XXL-Towers-4.jpg?v=1757394415","width":2048},{"alt":"Caribbean Calcite Towers \"XXL\"-Towers-Crystal Destiny-Caribbean Calcite-590g - 6.00\"H x 2.25\"W-Crystal Destiny","id":31745987379371,"position":5,"preview_image":{"aspect_ratio":1.0,"height":2048,"width":2048,"src":"\/\/crystaldestiny.com\/cdn\/shop\/files\/Caribbean-Calcite-Towers-XXL-Towers-5.jpg?v=1757394416"},"aspect_ratio":1.0,"height":2048,"media_type":"image","src":"\/\/crystaldestiny.com\/cdn\/shop\/files\/Caribbean-Calcite-Towers-XXL-Towers-5.jpg?v=1757394416","width":2048},{"alt":"Caribbean Calcite Towers \"XXL\"-Towers-Crystal Destiny-Caribbean Calcite-500g - 7.00\"H x 1.75\"W-Crystal Destiny","id":31745987412139,"position":6,"preview_image":{"aspect_ratio":1.0,"height":2048,"width":2048,"src":"\/\/crystaldestiny.com\/cdn\/shop\/files\/Caribbean-Calcite-Towers-XXL-Towers-Caribbean-Calcite-500g-7_00H-x-1_75W-6.jpg?v=1765429636"},"aspect_ratio":1.0,"height":2048,"media_type":"image","src":"\/\/crystaldestiny.com\/cdn\/shop\/files\/Caribbean-Calcite-Towers-XXL-Towers-Caribbean-Calcite-500g-7_00H-x-1_75W-6.jpg?v=1765429636","width":2048},{"alt":"Caribbean Calcite Towers \"XXL\"-Towers-Crystal Destiny-Caribbean Calcite-590g - 6.00\"H x 2.25\"W-Crystal Destiny","id":31745987444907,"position":7,"preview_image":{"aspect_ratio":1.0,"height":2048,"width":2048,"src":"\/\/crystaldestiny.com\/cdn\/shop\/files\/Caribbean-Calcite-Towers-XXL-Towers-7.jpg?v=1757394420"},"aspect_ratio":1.0,"height":2048,"media_type":"image","src":"\/\/crystaldestiny.com\/cdn\/shop\/files\/Caribbean-Calcite-Towers-XXL-Towers-7.jpg?v=1757394420","width":2048},{"alt":"Caribbean Calcite Towers \"XXL\"-Towers-Crystal Destiny-Caribbean Calcite-590g - 6.00\"H x 2.25\"W-Crystal Destiny","id":31745987477675,"position":8,"preview_image":{"aspect_ratio":1.0,"height":2048,"width":2048,"src":"\/\/crystaldestiny.com\/cdn\/shop\/files\/Caribbean-Calcite-Towers-XXL-Towers-8.jpg?v=1757394422"},"aspect_ratio":1.0,"height":2048,"media_type":"image","src":"\/\/crystaldestiny.com\/cdn\/shop\/files\/Caribbean-Calcite-Towers-XXL-Towers-8.jpg?v=1757394422","width":2048},{"alt":"Caribbean Calcite Towers \"XXL\"-Towers-Crystal Destiny-Caribbean Calcite-590g - 6.00\"H x 2.25\"W-Crystal Destiny","id":31745987510443,"position":9,"preview_image":{"aspect_ratio":1.0,"height":2048,"width":2048,"src":"\/\/crystaldestiny.com\/cdn\/shop\/files\/Caribbean-Calcite-Towers-XXL-Towers-9.jpg?v=1757394424"},"aspect_ratio":1.0,"height":2048,"media_type":"image","src":"\/\/crystaldestiny.com\/cdn\/shop\/files\/Caribbean-Calcite-Towers-XXL-Towers-9.jpg?v=1757394424","width":2048},{"alt":"Caribbean Calcite Towers \"XXL\"-Towers-Crystal Destiny-Caribbean Calcite-580g - 6.75\"H x 2.00\"W-Crystal Destiny","id":31745987543211,"position":10,"preview_image":{"aspect_ratio":1.0,"height":2048,"width":2048,"src":"\/\/crystaldestiny.com\/cdn\/shop\/files\/Caribbean-Calcite-Towers-XXL-Towers-Caribbean-Calcite-580g-6_75H-x-2_00W-10.jpg?v=1765429639"},"aspect_ratio":1.0,"height":2048,"media_type":"image","src":"\/\/crystaldestiny.com\/cdn\/shop\/files\/Caribbean-Calcite-Towers-XXL-Towers-Caribbean-Calcite-580g-6_75H-x-2_00W-10.jpg?v=1765429639","width":2048},{"alt":"Caribbean Calcite Towers \"XXL\"-Towers-Crystal Destiny-Caribbean Calcite-590g - 6.00\"H x 2.25\"W-Crystal Destiny","id":31745987575979,"position":11,"preview_image":{"aspect_ratio":1.0,"height":2048,"width":2048,"src":"\/\/crystaldestiny.com\/cdn\/shop\/files\/Caribbean-Calcite-Towers-XXL-Towers-11.jpg?v=1757394427"},"aspect_ratio":1.0,"height":2048,"media_type":"image","src":"\/\/crystaldestiny.com\/cdn\/shop\/files\/Caribbean-Calcite-Towers-XXL-Towers-11.jpg?v=1757394427","width":2048},{"alt":"Caribbean Calcite Towers \"XXL\"-Towers-Crystal Destiny-Caribbean Calcite-590g - 6.00\"H x 2.25\"W-Crystal Destiny","id":31745987608747,"position":12,"preview_image":{"aspect_ratio":1.0,"height":2048,"width":2048,"src":"\/\/crystaldestiny.com\/cdn\/shop\/files\/Caribbean-Calcite-Towers-XXL-Towers-12.jpg?v=1757394430"},"aspect_ratio":1.0,"height":2048,"media_type":"image","src":"\/\/crystaldestiny.com\/cdn\/shop\/files\/Caribbean-Calcite-Towers-XXL-Towers-12.jpg?v=1757394430","width":2048},{"alt":"Caribbean Calcite Towers \"XXL\"-Towers-Crystal Destiny-Caribbean Calcite-590g - 6.00\"H x 2.25\"W-Crystal Destiny","id":31745987641515,"position":13,"preview_image":{"aspect_ratio":1.0,"height":2048,"width":2048,"src":"\/\/crystaldestiny.com\/cdn\/shop\/files\/Caribbean-Calcite-Towers-XXL-Towers-13.jpg?v=1757394431"},"aspect_ratio":1.0,"height":2048,"media_type":"image","src":"\/\/crystaldestiny.com\/cdn\/shop\/files\/Caribbean-Calcite-Towers-XXL-Towers-13.jpg?v=1757394431","width":2048}]
{"item":{"id":8474022379691,"title":"Torre de cara cruda de calcedonia","handle":"chalcedony-raw-face-tower-cd-10181","description":"\u003cp\u003eLa Torre de Calcedonia con Cara Cruda exhibe la belleza natural de este mineral translúcido de color azul grisáceo en su forma cruda y sin pulir. Conocida por su energía calmante, se cree que la calcedonia promueve el equilibrio emocional y mejora la comunicación. Esta forma de torre resalta la textura y estructura únicas de la piedra, convirtiéndola en una excelente pieza para la meditación, el trabajo energético o como un elemento decorativo distintivo en cualquier espacio. Su acabado crudo conserva las cualidades auténticas del mineral, atractivo para coleccionistas y practicantes que buscan la auténtica energía cristalina.\u003c\/p\u003e\n\n\u003cp\u003e Este producto es exactamente como se muestra en la imagen, único en su tipo.\u003c\/p\u003e\n\u003cdiv\u003e \u003cspan style=\"font-size: 0.875rem;\"\u003eTorres de Cristal, Varas, Generadores, Puntas, Pilares y Obeliscos: ¿Cuál es la Diferencia?\u003c\/span\u003e\n\u003c\/div\u003e\n\u003cdiv\u003e Si bien estos términos pueden variar, todos describen cristales de formas hermosas con una punta puntiaguda diseñada para canalizar y dirigir la energía. Cada nombre destaca un aspecto único de su uso:\u003c\/div\u003e\n\u003cdiv\u003e \u0026lt;ul\u0026gt;\u003c\/div\u003e\n\u003cdiv\u003e \u0026lt;li\u0026gt;\u003c\/div\u003e \u003cdiv\u003e\u0026lt;strong\u0026gt;Torres\u0026lt;\/strong\u0026gt;: Conocidas por su presencia constante y estabilizadora, las torres de cristal ayudan a enfocar y amplificar la energía, lo que las hace perfectas para la meditación y la manifestación.\u0026lt;\/li\u0026gt;\u003c\/div\u003e\n\u003cdiv\u003e \u0026lt;li\u0026gt;\u003c\/div\u003e\n\u003cdiv\u003e \u0026lt;strong\u0026gt;Varitas\u0026lt;\/strong\u0026gt;: Tradicionalmente utilizadas en el trabajo energético y la curación, las varitas de cristal son excelentes para dirigir el flujo de energía y eliminar bloqueos.\u0026lt;\/li\u0026gt;\u003c\/div\u003e\n\u003cdiv\u003e \u0026lt;li\u0026gt;\u003c\/div\u003e\n\u003cdiv\u003e \u0026lt;strong\u0026gt;Pilares\u0026lt;\/strong\u0026gt;: Simbolizando fuerza y estabilidad, los pilares de cristal crean un ambiente equilibrado y armonioso, lo que los hace ideales para la decoración del hogar y las prácticas espirituales.\u0026lt;\/li\u0026gt;\u003c\/div\u003e\n\u003cdiv\u003e \u0026lt;li\u0026gt;\u003c\/div\u003e\n\u003cdiv\u003e \u0026lt;strong\u0026gt;Obeliscos\u0026lt;\/strong\u0026gt;: Inspirados en estructuras antiguas, se cree que los obeliscos de cristal conectan las energías terrenales y espirituales, lo que los convierte en poderosas herramientas para la transformación y la iluminación.\u0026lt;\/li\u0026gt;\u003c\/div\u003e\n\u003cdiv\u003e \u0026lt;\/ul\u0026gt;\u003c\/div\u003e\n\u003cdiv\u003e No importa cómo los llames, estos cristales tienen el mismo propósito: potenciar la energía, la intención y la armonía en tu espacio. ¡Elige el que más te resuene!\u003c\/div\u003e","published_at":"2025-07-15T19:24:54-04:00","created_at":"2025-07-15T19:24:53-04:00","vendor":"Crystal Destiny","type":"Torres","tags":["crystal","polished","Raw","Towers"],"price":2499,"price_min":2499,"price_max":2499,"available":true,"price_varies":false,"compare_at_price":null,"compare_at_price_min":0,"compare_at_price_max":0,"compare_at_price_varies":false,"variants":[{"id":45411093741739,"title":"Calcedonia \/ 194 g - 3,75\" de alto x 1,50\" de profundidad x 1,25\" de ancho","option1":"Calcedonia","option2":"194 g - 3,75\" de alto x 1,50\" de profundidad x 1,25\" de ancho","option3":null,"sku":"CD-10181","requires_shipping":true,"taxable":true,"featured_image":null,"available":true,"name":"Torre de cara cruda de calcedonia - Calcedonia \/ 194 g - 3,75\" de alto x 1,50\" de profundidad x 1,25\" de ancho","public_title":"Calcedonia \/ 194 g - 3,75\" de alto x 1,50\" de profundidad x 1,25\" de ancho","options":["Calcedonia","194 g - 3,75\" de alto x 1,50\" de profundidad x 1,25\" de ancho"],"price":2499,"weight":194,"compare_at_price":null,"inventory_management":"shopify","barcode":"","requires_selling_plan":false,"selling_plan_allocations":[]}],"images":["\/\/crystaldestiny.com\/cdn\/shop\/files\/Chalcedony-Raw-Face-Tower-Towers.jpg?v=1757206245","\/\/crystaldestiny.com\/cdn\/shop\/files\/Chalcedony-Raw-Face-Tower-Towers-2.jpg?v=1757206270"],"featured_image":"\/\/crystaldestiny.com\/cdn\/shop\/files\/Chalcedony-Raw-Face-Tower-Towers.jpg?v=1757206245","options":["Material","Tamaño"],"media":[{"alt":"Chalcedony Raw Face Tower-Towers-Crystal Destiny-Chalcedony-194g - 3.75\"H x 1.50\"D x 1.25\"W-Crystal Destiny","id":31450368213163,"position":1,"preview_image":{"aspect_ratio":1.0,"height":1876,"width":1876,"src":"\/\/crystaldestiny.com\/cdn\/shop\/files\/Chalcedony-Raw-Face-Tower-Towers.jpg?v=1757206245"},"aspect_ratio":1.0,"height":1876,"media_type":"image","src":"\/\/crystaldestiny.com\/cdn\/shop\/files\/Chalcedony-Raw-Face-Tower-Towers.jpg?v=1757206245","width":1876},{"alt":"Chalcedony Raw Face Tower-Towers-Crystal Destiny-Chalcedony-194g - 3.75\"H x 1.50\"D x 1.25\"W-Crystal Destiny","id":31450368245931,"position":2,"preview_image":{"aspect_ratio":1.0,"height":1952,"width":1952,"src":"\/\/crystaldestiny.com\/cdn\/shop\/files\/Chalcedony-Raw-Face-Tower-Towers-2.jpg?v=1757206270"},"aspect_ratio":1.0,"height":1952,"media_type":"image","src":"\/\/crystaldestiny.com\/cdn\/shop\/files\/Chalcedony-Raw-Face-Tower-Towers-2.jpg?v=1757206270","width":1952}],"requires_selling_plan":false,"selling_plan_groups":[],"content":"\u003cp\u003eLa Torre de Calcedonia con Cara Cruda exhibe la belleza natural de este mineral translúcido de color azul grisáceo en su forma cruda y sin pulir. Conocida por su energía calmante, se cree que la calcedonia promueve el equilibrio emocional y mejora la comunicación. Esta forma de torre resalta la textura y estructura únicas de la piedra, convirtiéndola en una excelente pieza para la meditación, el trabajo energético o como un elemento decorativo distintivo en cualquier espacio. Su acabado crudo conserva las cualidades auténticas del mineral, atractivo para coleccionistas y practicantes que buscan la auténtica energía cristalina.\u003c\/p\u003e\n\n\u003cp\u003e Este producto es exactamente como se muestra en la imagen, único en su tipo.\u003c\/p\u003e\n\u003cdiv\u003e \u003cspan style=\"font-size: 0.875rem;\"\u003eTorres de Cristal, Varas, Generadores, Puntas, Pilares y Obeliscos: ¿Cuál es la Diferencia?\u003c\/span\u003e\n\u003c\/div\u003e\n\u003cdiv\u003e Si bien estos términos pueden variar, todos describen cristales de formas hermosas con una punta puntiaguda diseñada para canalizar y dirigir la energía. Cada nombre destaca un aspecto único de su uso:\u003c\/div\u003e\n\u003cdiv\u003e \u0026lt;ul\u0026gt;\u003c\/div\u003e\n\u003cdiv\u003e \u0026lt;li\u0026gt;\u003c\/div\u003e \u003cdiv\u003e\u0026lt;strong\u0026gt;Torres\u0026lt;\/strong\u0026gt;: Conocidas por su presencia constante y estabilizadora, las torres de cristal ayudan a enfocar y amplificar la energía, lo que las hace perfectas para la meditación y la manifestación.\u0026lt;\/li\u0026gt;\u003c\/div\u003e\n\u003cdiv\u003e \u0026lt;li\u0026gt;\u003c\/div\u003e\n\u003cdiv\u003e \u0026lt;strong\u0026gt;Varitas\u0026lt;\/strong\u0026gt;: Tradicionalmente utilizadas en el trabajo energético y la curación, las varitas de cristal son excelentes para dirigir el flujo de energía y eliminar bloqueos.\u0026lt;\/li\u0026gt;\u003c\/div\u003e\n\u003cdiv\u003e \u0026lt;li\u0026gt;\u003c\/div\u003e\n\u003cdiv\u003e \u0026lt;strong\u0026gt;Pilares\u0026lt;\/strong\u0026gt;: Simbolizando fuerza y estabilidad, los pilares de cristal crean un ambiente equilibrado y armonioso, lo que los hace ideales para la decoración del hogar y las prácticas espirituales.\u0026lt;\/li\u0026gt;\u003c\/div\u003e\n\u003cdiv\u003e \u0026lt;li\u0026gt;\u003c\/div\u003e\n\u003cdiv\u003e \u0026lt;strong\u0026gt;Obeliscos\u0026lt;\/strong\u0026gt;: Inspirados en estructuras antiguas, se cree que los obeliscos de cristal conectan las energías terrenales y espirituales, lo que los convierte en poderosas herramientas para la transformación y la iluminación.\u0026lt;\/li\u0026gt;\u003c\/div\u003e\n\u003cdiv\u003e \u0026lt;\/ul\u0026gt;\u003c\/div\u003e\n\u003cdiv\u003e No importa cómo los llames, estos cristales tienen el mismo propósito: potenciar la energía, la intención y la armonía en tu espacio. ¡Elige el que más te resuene!\u003c\/div\u003e"},"options":[{"name":"Material","position":1,"values":["Calcedonia"]},{"name":"Tamaño","position":2,"values":["194 g - 3,75\" de alto x 1,50\" de profundidad x 1,25\" de ancho"]}],"custom_metafields":{"shipping_time":"En un plazo de 7 días"},"metafields":{"badge":"\u003cdiv style='display:none' class='jdgm-prev-badge' data-average-rating='0.00' data-number-of-reviews='0' data-number-of-questions='0'\u003e \u003cspan class='jdgm-prev-badge__stars' data-score='0.00' tabindex='0' aria-label='0.00 stars' role='button'\u003e \u003cspan class='jdgm-star jdgm--off'\u003e\u003c\/span\u003e\u003cspan class='jdgm-star jdgm--off'\u003e\u003c\/span\u003e\u003cspan class='jdgm-star jdgm--off'\u003e\u003c\/span\u003e\u003cspan class='jdgm-star jdgm--off'\u003e\u003c\/span\u003e\u003cspan class='jdgm-star jdgm--off'\u003e\u003c\/span\u003e \u003c\/span\u003e \u003cspan class='jdgm-prev-badge__text'\u003e No reviews \u003c\/span\u003e \u003c\/div\u003e","widget":"\u003cdiv class='jdgm-rev-widg' data-updated-at='2025-07-15T23:24:55Z' data-average-rating='0.00' data-number-of-reviews='0' data-number-of-questions='0' data-image-url='https:\/\/cdn.shopify.com\/s\/files\/1\/0613\/0345\/5915\/files\/6I0A3540.jpg?v=1752621886'\u003e \u003cstyle class='jdgm-temp-hiding-style'\u003e.jdgm-rev-widg{ display: none }\u003c\/style\u003e \u003cdiv class='jdgm-rev-widg__header'\u003e \u003ch2 class='jdgm-rev-widg__title'\u003eCustomer Reviews\u003c\/h2\u003e \u003cdiv class='jdgm-rev-widg__summary'\u003e \u003cdiv class='jdgm-rev-widg__summary-stars' aria-label='Average rating is 0.00 stars' role='img'\u003e \u003cspan class='jdgm-star jdgm--off'\u003e\u003c\/span\u003e\u003cspan class='jdgm-star jdgm--off'\u003e\u003c\/span\u003e\u003cspan class='jdgm-star jdgm--off'\u003e\u003c\/span\u003e\u003cspan class='jdgm-star jdgm--off'\u003e\u003c\/span\u003e\u003cspan class='jdgm-star jdgm--off'\u003e\u003c\/span\u003e \u003c\/div\u003e \u003cdiv class='jdgm-rev-widg__summary-text'\u003eBe the first to write a review\u003c\/div\u003e \u003c\/div\u003e \u003ca style='display: none' href='#' class='jdgm-write-rev-link' role='button'\u003eWrite a review\u003c\/a\u003e \u003cdiv class='jdgm-histogram jdgm-temp-hidden'\u003e \u003cdiv class='jdgm-histogram__row' data-rating='5' data-frequency='0' data-percentage='0'\u003e \u003cdiv class='jdgm-histogram__star' role='button' aria-label=\"0% (0) reviews with 5 star rating\" tabindex='0' \u003e\u003cspan class='jdgm-star jdgm--on'\u003e\u003c\/span\u003e\u003cspan class='jdgm-star jdgm--on'\u003e\u003c\/span\u003e\u003cspan class='jdgm-star jdgm--on'\u003e\u003c\/span\u003e\u003cspan class='jdgm-star jdgm--on'\u003e\u003c\/span\u003e\u003cspan class='jdgm-star jdgm--on'\u003e\u003c\/span\u003e\u003c\/div\u003e \u003cdiv class='jdgm-histogram__bar'\u003e \u003cdiv class='jdgm-histogram__bar-content' style='width: 0%;'\u003e \u003c\/div\u003e \u003c\/div\u003e \u003cdiv class='jdgm-histogram__percentage'\u003e0%\u003c\/div\u003e \u003cdiv class='jdgm-histogram__frequency'\u003e(0)\u003c\/div\u003e \u003c\/div\u003e \u003cdiv class='jdgm-histogram__row' data-rating='4' data-frequency='0' data-percentage='0'\u003e \u003cdiv class='jdgm-histogram__star' role='button' aria-label=\"0% (0) reviews with 4 star rating\" tabindex='0' \u003e\u003cspan class='jdgm-star jdgm--on'\u003e\u003c\/span\u003e\u003cspan class='jdgm-star jdgm--on'\u003e\u003c\/span\u003e\u003cspan class='jdgm-star jdgm--on'\u003e\u003c\/span\u003e\u003cspan class='jdgm-star jdgm--on'\u003e\u003c\/span\u003e\u003cspan class='jdgm-star jdgm--off'\u003e\u003c\/span\u003e\u003c\/div\u003e \u003cdiv class='jdgm-histogram__bar'\u003e \u003cdiv class='jdgm-histogram__bar-content' style='width: 0%;'\u003e \u003c\/div\u003e \u003c\/div\u003e \u003cdiv class='jdgm-histogram__percentage'\u003e0%\u003c\/div\u003e \u003cdiv class='jdgm-histogram__frequency'\u003e(0)\u003c\/div\u003e \u003c\/div\u003e \u003cdiv class='jdgm-histogram__row' data-rating='3' data-frequency='0' data-percentage='0'\u003e \u003cdiv class='jdgm-histogram__star' role='button' aria-label=\"0% (0) reviews with 3 star rating\" tabindex='0' \u003e\u003cspan class='jdgm-star jdgm--on'\u003e\u003c\/span\u003e\u003cspan class='jdgm-star jdgm--on'\u003e\u003c\/span\u003e\u003cspan class='jdgm-star jdgm--on'\u003e\u003c\/span\u003e\u003cspan class='jdgm-star jdgm--off'\u003e\u003c\/span\u003e\u003cspan class='jdgm-star jdgm--off'\u003e\u003c\/span\u003e\u003c\/div\u003e \u003cdiv class='jdgm-histogram__bar'\u003e \u003cdiv class='jdgm-histogram__bar-content' style='width: 0%;'\u003e \u003c\/div\u003e \u003c\/div\u003e \u003cdiv class='jdgm-histogram__percentage'\u003e0%\u003c\/div\u003e \u003cdiv class='jdgm-histogram__frequency'\u003e(0)\u003c\/div\u003e \u003c\/div\u003e \u003cdiv class='jdgm-histogram__row' data-rating='2' data-frequency='0' data-percentage='0'\u003e \u003cdiv class='jdgm-histogram__star' role='button' aria-label=\"0% (0) reviews with 2 star rating\" tabindex='0' \u003e\u003cspan class='jdgm-star jdgm--on'\u003e\u003c\/span\u003e\u003cspan class='jdgm-star jdgm--on'\u003e\u003c\/span\u003e\u003cspan class='jdgm-star jdgm--off'\u003e\u003c\/span\u003e\u003cspan class='jdgm-star jdgm--off'\u003e\u003c\/span\u003e\u003cspan class='jdgm-star jdgm--off'\u003e\u003c\/span\u003e\u003c\/div\u003e \u003cdiv class='jdgm-histogram__bar'\u003e \u003cdiv class='jdgm-histogram__bar-content' style='width: 0%;'\u003e \u003c\/div\u003e \u003c\/div\u003e \u003cdiv class='jdgm-histogram__percentage'\u003e0%\u003c\/div\u003e \u003cdiv class='jdgm-histogram__frequency'\u003e(0)\u003c\/div\u003e \u003c\/div\u003e \u003cdiv class='jdgm-histogram__row' data-rating='1' data-frequency='0' data-percentage='0'\u003e \u003cdiv class='jdgm-histogram__star' role='button' aria-label=\"0% (0) reviews with 1 star rating\" tabindex='0' \u003e\u003cspan class='jdgm-star jdgm--on'\u003e\u003c\/span\u003e\u003cspan class='jdgm-star jdgm--off'\u003e\u003c\/span\u003e\u003cspan class='jdgm-star jdgm--off'\u003e\u003c\/span\u003e\u003cspan class='jdgm-star jdgm--off'\u003e\u003c\/span\u003e\u003cspan class='jdgm-star jdgm--off'\u003e\u003c\/span\u003e\u003c\/div\u003e \u003cdiv class='jdgm-histogram__bar'\u003e \u003cdiv class='jdgm-histogram__bar-content' style='width: 0%;'\u003e \u003c\/div\u003e \u003c\/div\u003e \u003cdiv class='jdgm-histogram__percentage'\u003e0%\u003c\/div\u003e \u003cdiv class='jdgm-histogram__frequency'\u003e(0)\u003c\/div\u003e \u003c\/div\u003e \u003cdiv class='jdgm-histogram__row jdgm-histogram__clear-filter' data-rating=null tabindex='0'\u003e\u003c\/div\u003e \u003c\/div\u003e \u003cdiv class='jdgm-rev-widg__sort-wrapper'\u003e\u003c\/div\u003e \u003c\/div\u003e \u003cdiv class='jdgm-rev-widg__body'\u003e \u003cdiv class='jdgm-rev-widg__reviews'\u003e\u003c\/div\u003e \u003cdiv class='jdgm-paginate' data-per-page='5' data-url='https:\/\/api.judge.me\/reviews\/reviews_for_widget' style=\"display: none;\"\u003e\u003c\/div\u003e \u003c\/div\u003e \u003cdiv class='jdgm-rev-widg__paginate-spinner-wrapper'\u003e \u003cdiv class='jdgm-spinner'\u003e\u003c\/div\u003e \u003c\/div\u003e \u003c\/div\u003e"},"collections":[{"id":294880051371,"handle":"crystals","title":"Crystals","updated_at":"2026-01-07T23:43:11-05:00","body_html":"\u003cp data-start=\"159\" data-end=\"687\"\u003e✨ \u003cstrong data-start=\"161\" data-end=\"216\"\u003eDiscover the Magic of Crystals with Crystal Destiny\u003c\/strong\u003e ✨\u003cbr data-start=\"218\" data-end=\"221\"\u003eCrystals have been treasured for centuries—not only for their natural beauty but also for their powerful healing energies. Beyond their visual allure, they bring balance, harmony, and positive energy into any space. Whether used for home décor, meditation, or simply to elevate the energy of your surroundings, crystals create a sanctuary of peace, relaxation, and well-being. Each piece is a unique gift from the Earth—visually stunning and spiritually uplifting.\u003c\/p\u003e\n\u003cp data-start=\"689\" data-end=\"1011\"\u003eAt \u003cstrong data-start=\"692\" data-end=\"711\"\u003eCrystal Destiny\u003c\/strong\u003e, our signature collection showcases a curated selection of exquisite crystals, from radiant Quartz to soothing Amethyst. Every stone is carefully sourced for its elegance and metaphysical resonance, making them perfect for enhancing your home, uplifting your spirit, or gifting to someone special.\u003c\/p\u003e\n\u003cp data-start=\"1013\" data-end=\"1206\"\u003eExperience the timeless sophistication of crystalline wonders. Explore the \u003cstrong data-start=\"1088\" data-end=\"1118\"\u003eCrystal Destiny Collection\u003c\/strong\u003e today and bring the transformative beauty of these treasures into your everyday life.\u003c\/p\u003e","published_at":"2023-06-05T11:24:02-04:00","sort_order":"created-desc","template_suffix":"","disjunctive":false,"rules":[{"column":"tag","relation":"equals","condition":"crystal"},{"column":"type","relation":"not_contains","condition":"925 Sterling Silver"},{"column":"type","relation":"not_contains","condition":"Wire Wraps"}],"published_scope":"global"},{"id":294880182443,"handle":"raw","title":"Raw Crystals","updated_at":"2026-01-04T23:21:50-05:00","body_html":"\u003cp data-start=\"116\" data-end=\"373\"\u003e✨ \u003cstrong data-start=\"118\" data-end=\"145\"\u003eRaw Crystals Collection\u003c\/strong\u003e ✨\u003cbr data-start=\"147\" data-end=\"150\"\u003eExperience the natural beauty and raw energy of crystals in their purest form. Our \u003cstrong data-start=\"233\" data-end=\"249\"\u003eRaw Crystals\u003c\/strong\u003e are unpolished, uncut, and full of authentic Earth energy, allowing you to connect directly with their unique vibrations.\u003c\/p\u003e\n\u003cp data-start=\"375\" data-end=\"618\"\u003ePerfect for meditation, energy work, home décor, or crystal collections, each piece is a testament to nature’s artistry. From striking Quartz to vibrant Amethyst, our raw crystals bring grounding, clarity, and healing energy into your space.\u003c\/p\u003e\n\u003cp data-start=\"620\" data-end=\"752\"\u003eCelebrate the unrefined splendor of the Earth and let the transformative power of \u003cstrong data-start=\"702\" data-end=\"718\"\u003eRaw Crystals\u003c\/strong\u003e inspire your spiritual journey.\u003c\/p\u003e","published_at":"2023-06-05T11:39:02-04:00","sort_order":"created-desc","template_suffix":"","disjunctive":false,"rules":[{"column":"tag","relation":"equals","condition":"raw"}],"published_scope":"global"},{"id":319455821995,"handle":"throat-chakra-crystals","title":"Throat Chakra Crystals","updated_at":"2026-01-07T07:13:13-05:00","body_html":"\u003cp data-start=\"108\" data-end=\"439\"\u003e✨ \u003cstrong data-start=\"110\" data-end=\"136\"\u003eThroat Chakra Crystals\u003c\/strong\u003e ✨\u003cbr data-start=\"138\" data-end=\"141\"\u003eEnhance communication, self-expression, and clarity with our \u003cstrong data-start=\"202\" data-end=\"228\"\u003eThroat Chakra Crystals\u003c\/strong\u003e. Located at the throat, this chakra governs speech, honesty, and personal expression. These crystals help unblock energy, promote confidence in speaking your truth, and support clear, authentic communication.\u003c\/p\u003e\n\u003cp data-start=\"441\" data-end=\"767\"\u003eOur curated selection includes stones such as Blue Lace Agate, Lapis Lazuli, and Sodalite—each chosen for their ability to stimulate creativity, intuition, and emotional balance. Perfect for meditation, energy work, or wearing as jewelry, Throat Chakra Crystals empower you to express yourself with confidence and integrity.\u003c\/p\u003e\n\u003cp data-start=\"769\" data-end=\"906\"\u003eStrengthen your voice, clarify your intentions, and embrace the transformative energy of the Throat Chakra with these vibrant crystals.\u003c\/p\u003e","published_at":"2025-07-17T18:17:14-04:00","sort_order":"best-selling","template_suffix":"","disjunctive":false,"rules":[{"column":"variant_metafield_definition","relation":"equals","condition":"Throat"}],"published_scope":"global","image":{"created_at":"2025-07-17T19:08:49-04:00","alt":null,"width":1080,"height":1080,"src":"\/\/crystaldestiny.com\/cdn\/shop\/collections\/Throat_Chakra_Collection.jpg?v=1762474926"}},{"id":294880116907,"handle":"polished","title":"Polished Crystals","updated_at":"2026-01-07T23:43:11-05:00","body_html":"\u003cp data-start=\"199\" data-end=\"598\"\u003e✨ \u003cstrong data-start=\"201\" data-end=\"248\"\u003eCrystal Destiny Polished Crystal Collection\u003c\/strong\u003e ✨\u003cbr data-start=\"250\" data-end=\"253\"\u003eIndulge in the brilliance of crystals refined to perfection. Our \u003cstrong data-start=\"318\" data-end=\"341\"\u003ePolished Collection\u003c\/strong\u003e showcases gemstones meticulously shaped and smoothed to reveal their natural radiance and timeless beauty. From the shimmering glow of Quartz to the deep allure of Obsidian, each polished piece is a testament to nature’s artistry and human craftsmanship.\u003c\/p\u003e\n\u003cp data-start=\"600\" data-end=\"862\"\u003ePerfect as statement décor, meaningful gifts, or companions on your spiritual journey, polished crystals bring sophistication and elevated energy into any space. Their radiant surfaces reflect not only light but also the transformative power of crystal energy.\u003c\/p\u003e\n\u003cp data-start=\"864\" data-end=\"1022\"\u003eDiscover the elegance of refinement with Crystal Destiny’s Polished Crystal Collection—where every facet shines with intention, beauty, and timeless allure.\u003c\/p\u003e","published_at":"2023-06-05T11:30:44-04:00","sort_order":"created-desc","template_suffix":"","disjunctive":false,"rules":[{"column":"tag","relation":"equals","condition":"polished"}],"published_scope":"global"},{"id":293659312299,"handle":"best-sellers","title":"Best Sellers","updated_at":"2026-01-07T23:43:11-05:00","body_html":"\u003cp data-start=\"155\" data-end=\"510\"\u003eDiscover the pieces our community loves most. Our Best Sellers Collection brings together handpicked crystals and jewelry that embody timeless elegance, spiritual resonance, and everyday sophistication. Each item has earned its place as a customer favorite—celebrated for both its beauty and its meaningful energy.\u003c\/p\u003e\n\u003cp data-start=\"512\" data-end=\"802\"\u003eFrom stunning statement pieces to versatile daily companions, these treasures are curated to elevate your space, uplift your spirit, and reflect refined taste. Indulge in what’s most cherished and let our best sellers guide you toward the perfect blend of style and transformative energy.\u003c\/p\u003e\n\u003cp data-start=\"804\" data-end=\"932\"\u003eExplore the Best Sellers Collection today—where elegance meets intention, and every piece tells a story of beauty and balance.\u003c\/p\u003e","published_at":"2023-03-15T16:04:51-04:00","sort_order":"best-selling","template_suffix":"","disjunctive":false,"rules":[{"column":"variant_price","relation":"greater_than","condition":"0"},{"column":"variant_inventory","relation":"greater_than","condition":"0"},{"column":"type","relation":"not_equals","condition":"Shipping Protection"}],"published_scope":"global"},{"id":321370390699,"handle":"monthly-crystal-sale","title":"Monthly Crystal Sale | Spheres \u0026 Towers","updated_at":"2026-01-06T23:24:37-05:00","body_html":"\u003cp\u003eShop our \u003cstrong\u003eMonthly Crystal Sale\u003c\/strong\u003e, where you can shop a wide selection of healing crystals at discounted prices. Explore \u003cstrong\u003ecrystal spheres and towers,\u003c\/strong\u003e— all carefully curated to support meditation, energy balancing, and spiritual wellness. Whether you're looking to enhance your home decor, boost your daily energy, or find the perfect gift, our \u003cstrong\u003ecrystals for healing and manifestation\u003c\/strong\u003e offer both beauty and metaphysical benefits.\u003c\/p\u003e\n\u003cp\u003eEach month, our sale features \u003cstrong\u003enew discounted collections\u003c\/strong\u003e, from \u003cstrong\u003enatural quartz and amethyst towers\u003c\/strong\u003e to \u003cstrong\u003ewire-wrapped pendants and polished stones\u003c\/strong\u003e, so there's always something fresh to discover. Shop with confidence knowing you're getting high-quality crystals with \u003cstrong\u003efree shipping options\u003c\/strong\u003e and a trusted experience.\u003c\/p\u003e\n\u003cp\u003e\u003cstrong\u003eTake advantage of the Monthly Crystal Sale today\u003c\/strong\u003e and add powerful, natural energy to your life with \u003cstrong\u003eauthentic healing crystals\u003c\/strong\u003e — while our limited-time discounts last.\u003c\/p\u003e\n\u003cp\u003e\u003cstrong\u003e*Discount automatically applied at checkout.\u003c\/strong\u003e\u003c\/p\u003e","published_at":"2025-12-02T01:26:17-05:00","sort_order":"alpha-asc","template_suffix":"","disjunctive":true,"rules":[{"column":"tag","relation":"equals","condition":"spheres"},{"column":"tag","relation":"equals","condition":"Towers"}],"published_scope":"global","image":{"created_at":"2026-01-01T01:32:34-05:00","alt":"","width":960,"height":960,"src":"\/\/crystaldestiny.com\/cdn\/shop\/collections\/3E8C2969-1B86-4ACE-B349-98E9D8768424.jpg?v=1767249154"}},{"id":297596059819,"handle":"all","title":"All Crystals \u0026 Jewelry","updated_at":"2026-01-07T23:43:11-05:00","body_html":"\u003cp data-start=\"149\" data-end=\"494\"\u003e✨ \u003cstrong data-start=\"151\" data-end=\"181\"\u003eWelcome to Crystal Destiny\u003c\/strong\u003e ✨\u003cbr data-start=\"183\" data-end=\"186\"\u003eStep into a world where beauty, energy, and artistry unite. Our collection is a treasure trove of exquisite crystals, from the raw, untamed elegance of natural formations to the polished brilliance of expertly crafted pieces. Each crystal is a masterpiece, carrying its own unique story and timeless charm.\u003c\/p\u003e\n\u003cp data-start=\"496\" data-end=\"831\"\u003eWhether you’re drawn to the calming presence of Amethyst, the vibrant energy of Citrine, or the grounding strength of Jasper, our crystals invite you to connect with nature’s finest wonders. Perfect for enhancing your space, supporting your spiritual journey, or gifting with intention, every piece resonates with beauty and meaning.\u003c\/p\u003e\n\u003cp data-start=\"833\" data-end=\"1000\"\u003eElevate your surroundings, embrace the mystique, and explore the enchanting world of crystals at \u003cstrong data-start=\"930\" data-end=\"949\"\u003eCrystal Destiny\u003c\/strong\u003e—where every crystal is waiting to be discovered.\u003c\/p\u003e","published_at":"2023-11-10T13:55:31-05:00","sort_order":"created-desc","template_suffix":"","disjunctive":false,"rules":[{"column":"type","relation":"not_equals","condition":"asdf"}],"published_scope":"global"},{"id":296256405675,"handle":"crystal-towers","title":"Crystal Towers","updated_at":"2026-01-06T23:24:37-05:00","body_html":"\u003cp data-end=\"568\" data-start=\"152\"\u003e✨ \u003cstrong data-end=\"190\" data-start=\"154\"\u003eCrystal Destiny Tower Collection\u003c\/strong\u003e ✨\u003cbr data-end=\"195\" data-start=\"192\"\u003eEnchant your space with the timeless beauty and powerful energy of crystal towers. Each piece in our \u003cstrong data-end=\"316\" data-start=\"296\"\u003eTower Collection\u003c\/strong\u003e is carefully crafted to showcase nature’s artistry while radiating higher vibrations and spiritual resonance. From the clarity of Quartz to the calming presence of Amethyst, these towers are both decorative masterpieces and tools for transformation.\u003c\/p\u003e\n\u003cp data-end=\"765\" data-start=\"570\"\u003ePerfect for meditation spaces, energy work, or simply elevating your home décor, crystal towers channel focused energy upward—creating balance, harmony, and refined elegance in any environment.\u003c\/p\u003e\n\u003cp data-end=\"917\" data-start=\"767\"\u003eDiscover the Crystal Destiny Tower Collection today and transform your surroundings into a sanctuary of beauty, purpose, and spiritual significance.\u003c\/p\u003e\n\u003ch2\u003eCrystal Towers, Wands, Generators, Points, Pillars \u0026amp; Obelisks — What's the Difference?\u003c\/h2\u003e\n\u003cp id=\"isPasted\"\u003eWhile these terms may vary, they all describe beautifully shaped crystals with a pointed tip designed to channel and direct energy. Each name highlights a unique aspect of their use:\u003c\/p\u003e\n\u003cul\u003e\n\u003cli\u003e\n\u003cstrong\u003eTowers\u003c\/strong\u003e- Known for their steady, grounding presence, crystal towers help focus and amplify energy, making them perfect for meditation and manifestation.\u003c\/li\u003e\n\u003cli\u003e\n\u003cstrong\u003eWands\u003c\/strong\u003e- Traditionally used in energy work and healing, crystal wands are excellent for directing energy flow and clearing blockages.\u003c\/li\u003e\n\u003cli\u003e\n\u003cstrong\u003ePillars\u003c\/strong\u003e- Symbolizing strength and stability, crystal pillars create a balanced and harmonious environment, making them great for home decor and spiritual practices.\u003c\/li\u003e\n\u003cli\u003e\n\u003cstrong\u003eObelisks\u003c\/strong\u003e- Inspired by ancient structures, crystal obelisks are believed to connect earthly and spiritual energies, making them powerful tools for transformation and enlightenment.\u003c\/li\u003e\n\u003c\/ul\u003e\n\u003cp\u003eNo matter what you call them, these crystals serve the same purpose—to enhance energy, intention, and harmony in your space. Choose the one that resonates most with you!\u003c\/p\u003e","published_at":"2023-09-14T12:52:35-04:00","sort_order":"created-desc","template_suffix":"","disjunctive":false,"rules":[{"column":"tag","relation":"equals","condition":"towers"}],"published_scope":"global"},{"id":298983391403,"handle":"january-crystal-sale","title":"January Sale | 25% Off Crystal Towers \u0026 Spheres","updated_at":"2026-01-06T23:24:37-05:00","body_html":"\u003cp\u003eShop our \u003cstrong\u003eJanuary Crystal Sale\u003c\/strong\u003e, where you can shop a wide selection of healing crystals at discounted prices. Explore \u003cstrong\u003eCrystal Towers, \u0026amp; Crystal Spheres\u003c\/strong\u003e — all carefully curated and crafted to support meditation, energy balancing, and spiritual wellness. Whether you're looking to enhance your home decor, boost your daily energy, or find the perfect gift, our \u003cstrong\u003ecrystals for healing and manifestation\u003c\/strong\u003e offer both beauty and metaphysical benefits.\u003c\/p\u003e\n\u003cp\u003eThis January, our sale features \u003cstrong\u003ediscounted crystal towers and spheres\u003c\/strong\u003e, from \u003cstrong\u003enatural quartz \u003c\/strong\u003eand \u003cstrong\u003eamethyst \u003c\/strong\u003eto \u003cstrong\u003ebumblebee jasper \u003c\/strong\u003eand \u003cstrong\u003ecarnelian\u003c\/strong\u003e, so there's always something fresh to discover. Shop with confidence knowing you're getting high-quality crystals with \u003cstrong\u003efree shipping options\u003c\/strong\u003e and a trusted experience.\u003c\/p\u003e\n\u003cp\u003e\u003cstrong\u003eTake advantage of the January Crystal Sale today\u003c\/strong\u003e and add powerful, natural energy to your life with \u003cstrong\u003eauthentic healing crystals\u003c\/strong\u003e — while our limited-time discounts last.\u003c\/p\u003e\n\u003cp\u003e\u003cstrong\u003e*Discount automatically applied at checkout.\u003c\/strong\u003e\u003c\/p\u003e","published_at":"2026-01-01T00:07:17-05:00","sort_order":"alpha-asc","template_suffix":"monthly-collection","disjunctive":true,"rules":[{"column":"tag","relation":"equals","condition":"Spheres"},{"column":"tag","relation":"equals","condition":"Towers"}],"published_scope":"global","image":{"created_at":"2026-01-01T01:29:59-05:00","alt":"","width":960,"height":960,"src":"\/\/crystaldestiny.com\/cdn\/shop\/collections\/1464163B-22B1-4D62-BEC5-CEC9AECB670B.jpg?v=1767248999"}}]}
[{"alt":"Chalcedony Raw Face Tower-Towers-Crystal Destiny-Chalcedony-194g - 3.75\"H x 1.50\"D x 1.25\"W-Crystal Destiny","id":31450368213163,"position":1,"preview_image":{"aspect_ratio":1.0,"height":1876,"width":1876,"src":"\/\/crystaldestiny.com\/cdn\/shop\/files\/Chalcedony-Raw-Face-Tower-Towers.jpg?v=1757206245"},"aspect_ratio":1.0,"height":1876,"media_type":"image","src":"\/\/crystaldestiny.com\/cdn\/shop\/files\/Chalcedony-Raw-Face-Tower-Towers.jpg?v=1757206245","width":1876},{"alt":"Chalcedony Raw Face Tower-Towers-Crystal Destiny-Chalcedony-194g - 3.75\"H x 1.50\"D x 1.25\"W-Crystal Destiny","id":31450368245931,"position":2,"preview_image":{"aspect_ratio":1.0,"height":1952,"width":1952,"src":"\/\/crystaldestiny.com\/cdn\/shop\/files\/Chalcedony-Raw-Face-Tower-Towers-2.jpg?v=1757206270"},"aspect_ratio":1.0,"height":1952,"media_type":"image","src":"\/\/crystaldestiny.com\/cdn\/shop\/files\/Chalcedony-Raw-Face-Tower-Towers-2.jpg?v=1757206270","width":1952}]
{"item":{"id":8603309310123,"title":"Cherry Agate Crystal Sphere with Base","handle":"cherry-agate-crystal-sphere-with-base-1005008785619324-6-183g-50mnm","description":"\u003cp data-start=\"189\" data-end=\"551\"\u003eThis Cherry Agate Crystal Sphere features rich, natural red and pink hues, polished into a smooth orb to highlight its unique banding patterns. Each sphere comes with a base, making it perfect for display, meditation, or energy work. Its vibrant coloration adds warmth and beauty to any space while radiating gentle, grounding energy.\u003c\/p\u003e\n\u003cp data-start=\"553\" data-end=\"874\"\u003eCherry Agate is known for supporting emotional balance, courage, and personal empowerment. Ideal for meditation, witchcraft, or spiritual practices, this sphere also makes a meaningful gift or a striking decorative piece for home or office. Collectors value its rare coloration, polished finish, and energetic presence.\u003c\/p\u003e\n\u003cp data-start=\"553\" data-end=\"874\"\u003eThis product is an exact pick as pictured, one of a kind.\u003c\/p\u003e","published_at":"2025-12-09T19:36:37-05:00","created_at":"2025-12-09T14:38:20-05:00","vendor":"Crystal Destiny","type":"Spheres","tags":["adjusted-shipping","crystal","new-arrivals","polished","spheres"],"price":6099,"price_min":6099,"price_max":19299,"available":true,"price_varies":true,"compare_at_price":0,"compare_at_price_min":0,"compare_at_price_max":0,"compare_at_price_varies":false,"variants":[{"id":45941099167915,"title":"6 183g 50mnm \/ Cherry Agate","option1":"6 183g 50mnm","option2":"Cherry Agate","option3":null,"sku":"1005008785619324-6 183g 50mnm","requires_shipping":true,"taxable":true,"featured_image":{"id":40921465553067,"product_id":8603309310123,"position":11,"created_at":"2025-12-09T14:38:22-05:00","updated_at":"2025-12-10T11:15:23-05:00","alt":"Cherry Agate Crystal Sphere with Base-Spheres-Crystal Destiny-6 183g 50mnm-Cherry Agate-Crystal Destiny","width":1000,"height":1000,"src":"\/\/crystaldestiny.com\/cdn\/shop\/files\/Cherry-Agate-Crystal-Sphere-with-Base-Spheres-6-183g-50mnm-Cherry-Agate-11.webp?v=1765383323","variant_ids":[45941099167915]},"available":true,"name":"Cherry Agate Crystal Sphere with Base - 6 183g 50mnm \/ Cherry Agate","public_title":"6 183g 50mnm \/ Cherry Agate","options":["6 183g 50mnm","Cherry Agate"],"price":9299,"weight":400,"compare_at_price":0,"inventory_management":"shopify","barcode":null,"featured_media":{"alt":"Cherry Agate Crystal Sphere with Base-Spheres-Crystal Destiny-6 183g 50mnm-Cherry Agate-Crystal Destiny","id":32289034895531,"position":11,"preview_image":{"aspect_ratio":1.0,"height":1000,"width":1000,"src":"\/\/crystaldestiny.com\/cdn\/shop\/files\/Cherry-Agate-Crystal-Sphere-with-Base-Spheres-6-183g-50mnm-Cherry-Agate-11.webp?v=1765383323"}},"requires_selling_plan":false,"selling_plan_allocations":[]},{"id":45941099200683,"title":"5 206g 53mm \/ Cherry Agate","option1":"5 206g 53mm","option2":"Cherry Agate","option3":null,"sku":"1005008785619324-5 206g 53mm","requires_shipping":true,"taxable":true,"featured_image":{"id":40921465258155,"product_id":8603309310123,"position":2,"created_at":"2025-12-09T14:38:22-05:00","updated_at":"2025-12-10T11:15:08-05:00","alt":"Cherry Agate Crystal Sphere with Base-Spheres-Crystal Destiny-5 206g 53mm-Cherry Agate-Crystal Destiny","width":1000,"height":1000,"src":"\/\/crystaldestiny.com\/cdn\/shop\/files\/Cherry-Agate-Crystal-Sphere-with-Base-Spheres-5-206g-53mm-Cherry-Agate-2.webp?v=1765383308","variant_ids":[45941099200683]},"available":true,"name":"Cherry Agate Crystal Sphere with Base - 5 206g 53mm \/ Cherry Agate","public_title":"5 206g 53mm \/ Cherry Agate","options":["5 206g 53mm","Cherry Agate"],"price":10799,"weight":400,"compare_at_price":0,"inventory_management":"shopify","barcode":null,"featured_media":{"alt":"Cherry Agate Crystal Sphere with Base-Spheres-Crystal Destiny-5 206g 53mm-Cherry Agate-Crystal Destiny","id":32289034600619,"position":2,"preview_image":{"aspect_ratio":1.0,"height":1000,"width":1000,"src":"\/\/crystaldestiny.com\/cdn\/shop\/files\/Cherry-Agate-Crystal-Sphere-with-Base-Spheres-5-206g-53mm-Cherry-Agate-2.webp?v=1765383308"}},"requires_selling_plan":false,"selling_plan_allocations":[]},{"id":45941099233451,"title":"4 232g 55mm \/ Cherry Agate","option1":"4 232g 55mm","option2":"Cherry Agate","option3":null,"sku":"1005008785619324-4 232g 55mm","requires_shipping":true,"taxable":true,"featured_image":{"id":40921465880747,"product_id":8603309310123,"position":21,"created_at":"2025-12-09T14:38:22-05:00","updated_at":"2025-12-10T11:15:40-05:00","alt":"Cherry Agate Crystal Sphere with Base-Spheres-Crystal Destiny-4 232g 55mm-Cherry Agate-Crystal Destiny","width":1000,"height":1000,"src":"\/\/crystaldestiny.com\/cdn\/shop\/files\/Cherry-Agate-Crystal-Sphere-with-Base-Spheres-4-232g-55mm-Cherry-Agate-21.webp?v=1765383340","variant_ids":[45941099233451]},"available":false,"name":"Cherry Agate Crystal Sphere with Base - 4 232g 55mm \/ Cherry Agate","public_title":"4 232g 55mm \/ Cherry Agate","options":["4 232g 55mm","Cherry Agate"],"price":11799,"weight":400,"compare_at_price":0,"inventory_management":"shopify","barcode":null,"featured_media":{"alt":"Cherry Agate Crystal Sphere with Base-Spheres-Crystal Destiny-4 232g 55mm-Cherry Agate-Crystal Destiny","id":32289035223211,"position":21,"preview_image":{"aspect_ratio":1.0,"height":1000,"width":1000,"src":"\/\/crystaldestiny.com\/cdn\/shop\/files\/Cherry-Agate-Crystal-Sphere-with-Base-Spheres-4-232g-55mm-Cherry-Agate-21.webp?v=1765383340"}},"requires_selling_plan":false,"selling_plan_allocations":[]},{"id":45941099266219,"title":"3 138g 46mm \/ Cherry Agate","option1":"3 138g 46mm","option2":"Cherry Agate","option3":null,"sku":"1005008785619324-3 138g 46mm","requires_shipping":true,"taxable":true,"featured_image":{"id":40921465684139,"product_id":8603309310123,"position":15,"created_at":"2025-12-09T14:38:22-05:00","updated_at":"2025-12-10T11:15:29-05:00","alt":"Cherry Agate Crystal Sphere with Base-Spheres-Crystal Destiny-3 138g 46mm-Cherry Agate-Crystal Destiny","width":1000,"height":1000,"src":"\/\/crystaldestiny.com\/cdn\/shop\/files\/Cherry-Agate-Crystal-Sphere-with-Base-Spheres-3-138g-46mm-Cherry-Agate-15.webp?v=1765383329","variant_ids":[45941099266219]},"available":false,"name":"Cherry Agate Crystal Sphere with Base - 3 138g 46mm \/ Cherry Agate","public_title":"3 138g 46mm \/ Cherry Agate","options":["3 138g 46mm","Cherry Agate"],"price":7999,"weight":400,"compare_at_price":0,"inventory_management":"shopify","barcode":null,"featured_media":{"alt":"Cherry Agate Crystal Sphere with Base-Spheres-Crystal Destiny-3 138g 46mm-Cherry Agate-Crystal Destiny","id":32289035026603,"position":15,"preview_image":{"aspect_ratio":1.0,"height":1000,"width":1000,"src":"\/\/crystaldestiny.com\/cdn\/shop\/files\/Cherry-Agate-Crystal-Sphere-with-Base-Spheres-3-138g-46mm-Cherry-Agate-15.webp?v=1765383329"}},"requires_selling_plan":false,"selling_plan_allocations":[]},{"id":45941099298987,"title":"2 201g 52mm \/ Cherry Agate","option1":"2 201g 52mm","option2":"Cherry Agate","option3":null,"sku":"1005008785619324-2 201g 52mm","requires_shipping":true,"taxable":true,"featured_image":{"id":40921465389227,"product_id":8603309310123,"position":6,"created_at":"2025-12-09T14:38:22-05:00","updated_at":"2025-12-10T11:15:14-05:00","alt":"Cherry Agate Crystal Sphere with Base-Spheres-Crystal Destiny-2 201g 52mm-Cherry Agate-Crystal Destiny","width":1000,"height":1000,"src":"\/\/crystaldestiny.com\/cdn\/shop\/files\/Cherry-Agate-Crystal-Sphere-with-Base-Spheres-2-201g-52mm-Cherry-Agate-6.webp?v=1765383314","variant_ids":[45941099298987]},"available":true,"name":"Cherry Agate Crystal Sphere with Base - 2 201g 52mm \/ Cherry Agate","public_title":"2 201g 52mm \/ Cherry Agate","options":["2 201g 52mm","Cherry Agate"],"price":10699,"weight":400,"compare_at_price":0,"inventory_management":"shopify","barcode":null,"featured_media":{"alt":"Cherry Agate Crystal Sphere with Base-Spheres-Crystal Destiny-2 201g 52mm-Cherry Agate-Crystal Destiny","id":32289034731691,"position":6,"preview_image":{"aspect_ratio":1.0,"height":1000,"width":1000,"src":"\/\/crystaldestiny.com\/cdn\/shop\/files\/Cherry-Agate-Crystal-Sphere-with-Base-Spheres-2-201g-52mm-Cherry-Agate-6.webp?v=1765383314"}},"requires_selling_plan":false,"selling_plan_allocations":[]},{"id":45941099331755,"title":"1 364g 64mm \/ Cherry Agate","option1":"1 364g 64mm","option2":"Cherry Agate","option3":null,"sku":"1005008785619324-1 364g 64mm","requires_shipping":true,"taxable":true,"featured_image":{"id":40921465716907,"product_id":8603309310123,"position":16,"created_at":"2025-12-09T14:38:22-05:00","updated_at":"2025-12-10T11:15:31-05:00","alt":"Cherry Agate Crystal Sphere with Base-Spheres-Crystal Destiny-1 364g 64mm-Cherry Agate-Crystal Destiny","width":1000,"height":1000,"src":"\/\/crystaldestiny.com\/cdn\/shop\/files\/Cherry-Agate-Crystal-Sphere-with-Base-Spheres-1-364g-64mm-Cherry-Agate-16.webp?v=1765383331","variant_ids":[45941099331755]},"available":false,"name":"Cherry Agate Crystal Sphere with Base - 1 364g 64mm \/ Cherry Agate","public_title":"1 364g 64mm \/ Cherry Agate","options":["1 364g 64mm","Cherry Agate"],"price":17199,"weight":400,"compare_at_price":0,"inventory_management":"shopify","barcode":null,"featured_media":{"alt":"Cherry Agate Crystal Sphere with Base-Spheres-Crystal Destiny-1 364g 64mm-Cherry Agate-Crystal Destiny","id":32289035059371,"position":16,"preview_image":{"aspect_ratio":1.0,"height":1000,"width":1000,"src":"\/\/crystaldestiny.com\/cdn\/shop\/files\/Cherry-Agate-Crystal-Sphere-with-Base-Spheres-1-364g-64mm-Cherry-Agate-16.webp?v=1765383331"}},"requires_selling_plan":false,"selling_plan_allocations":[]},{"id":45941099364523,"title":"14 267g 57mm \/ Cherry Agate","option1":"14 267g 57mm","option2":"Cherry Agate","option3":null,"sku":"1005008785619324-14 267g 57mm","requires_shipping":true,"taxable":true,"featured_image":{"id":40921465421995,"product_id":8603309310123,"position":7,"created_at":"2025-12-09T14:38:22-05:00","updated_at":"2025-12-10T11:15:16-05:00","alt":"Cherry Agate Crystal Sphere with Base-Spheres-Crystal Destiny-14 267g 57mm-Cherry Agate-Crystal Destiny","width":1000,"height":1000,"src":"\/\/crystaldestiny.com\/cdn\/shop\/files\/Cherry-Agate-Crystal-Sphere-with-Base-Spheres-14-267g-57mm-Cherry-Agate-7.webp?v=1765383316","variant_ids":[45941099364523]},"available":true,"name":"Cherry Agate Crystal Sphere with Base - 14 267g 57mm \/ Cherry Agate","public_title":"14 267g 57mm \/ Cherry Agate","options":["14 267g 57mm","Cherry Agate"],"price":13199,"weight":400,"compare_at_price":0,"inventory_management":"shopify","barcode":null,"featured_media":{"alt":"Cherry Agate Crystal Sphere with Base-Spheres-Crystal Destiny-14 267g 57mm-Cherry Agate-Crystal Destiny","id":32289034764459,"position":7,"preview_image":{"aspect_ratio":1.0,"height":1000,"width":1000,"src":"\/\/crystaldestiny.com\/cdn\/shop\/files\/Cherry-Agate-Crystal-Sphere-with-Base-Spheres-14-267g-57mm-Cherry-Agate-7.webp?v=1765383316"}},"requires_selling_plan":false,"selling_plan_allocations":[]},{"id":45941099397291,"title":"13 247g 56mm \/ Cherry Agate","option1":"13 247g 56mm","option2":"Cherry Agate","option3":null,"sku":"1005008785619324-13 247g 56mm","requires_shipping":true,"taxable":true,"featured_image":{"id":40921465290923,"product_id":8603309310123,"position":3,"created_at":"2025-12-09T14:38:22-05:00","updated_at":"2025-12-10T11:15:09-05:00","alt":"Cherry Agate Crystal Sphere with Base-Spheres-Crystal Destiny-13 247g 56mm-Cherry Agate-Crystal Destiny","width":1000,"height":1000,"src":"\/\/crystaldestiny.com\/cdn\/shop\/files\/Cherry-Agate-Crystal-Sphere-with-Base-Spheres-13-247g-56mm-Cherry-Agate-3.webp?v=1765383309","variant_ids":[45941099397291]},"available":true,"name":"Cherry Agate Crystal Sphere with Base - 13 247g 56mm \/ Cherry Agate","public_title":"13 247g 56mm \/ Cherry Agate","options":["13 247g 56mm","Cherry Agate"],"price":12399,"weight":400,"compare_at_price":0,"inventory_management":"shopify","barcode":null,"featured_media":{"alt":"Cherry Agate Crystal Sphere with Base-Spheres-Crystal Destiny-13 247g 56mm-Cherry Agate-Crystal Destiny","id":32289034633387,"position":3,"preview_image":{"aspect_ratio":1.0,"height":1000,"width":1000,"src":"\/\/crystaldestiny.com\/cdn\/shop\/files\/Cherry-Agate-Crystal-Sphere-with-Base-Spheres-13-247g-56mm-Cherry-Agate-3.webp?v=1765383309"}},"requires_selling_plan":false,"selling_plan_allocations":[]},{"id":45941099430059,"title":"12 198g 52mm \/ Cherry Agate","option1":"12 198g 52mm","option2":"Cherry Agate","option3":null,"sku":"1005008785619324-12 198g 52mm","requires_shipping":true,"taxable":true,"featured_image":{"id":40921466175659,"product_id":8603309310123,"position":30,"created_at":"2025-12-09T14:38:22-05:00","updated_at":"2025-12-10T11:15:55-05:00","alt":"Cherry Agate Crystal Sphere with Base-Spheres-Crystal Destiny-12 198g 52mm-Cherry Agate-Crystal Destiny","width":1000,"height":1000,"src":"\/\/crystaldestiny.com\/cdn\/shop\/files\/Cherry-Agate-Crystal-Sphere-with-Base-Spheres-12-198g-52mm-Cherry-Agate-30.webp?v=1765383355","variant_ids":[45941099430059]},"available":true,"name":"Cherry Agate Crystal Sphere with Base - 12 198g 52mm \/ Cherry Agate","public_title":"12 198g 52mm \/ Cherry Agate","options":["12 198g 52mm","Cherry Agate"],"price":10499,"weight":400,"compare_at_price":0,"inventory_management":"shopify","barcode":null,"featured_media":{"alt":"Cherry Agate Crystal Sphere with Base-Spheres-Crystal Destiny-12 198g 52mm-Cherry Agate-Crystal Destiny","id":32289035518123,"position":30,"preview_image":{"aspect_ratio":1.0,"height":1000,"width":1000,"src":"\/\/crystaldestiny.com\/cdn\/shop\/files\/Cherry-Agate-Crystal-Sphere-with-Base-Spheres-12-198g-52mm-Cherry-Agate-30.webp?v=1765383355"}},"requires_selling_plan":false,"selling_plan_allocations":[]},{"id":45941099462827,"title":"11 246g 56mm \/ Cherry Agate","option1":"11 246g 56mm","option2":"Cherry Agate","option3":null,"sku":"1005008785619324-11 246g 56mm","requires_shipping":true,"taxable":true,"featured_image":{"id":40921466044587,"product_id":8603309310123,"position":26,"created_at":"2025-12-09T14:38:22-05:00","updated_at":"2025-12-10T11:15:48-05:00","alt":"Cherry Agate Crystal Sphere with Base-Spheres-Crystal Destiny-11 246g 56mm-Cherry Agate-Crystal Destiny","width":1000,"height":1000,"src":"\/\/crystaldestiny.com\/cdn\/shop\/files\/Cherry-Agate-Crystal-Sphere-with-Base-Spheres-11-246g-56mm-Cherry-Agate-26.webp?v=1765383348","variant_ids":[45941099462827]},"available":true,"name":"Cherry Agate Crystal Sphere with Base - 11 246g 56mm \/ Cherry Agate","public_title":"11 246g 56mm \/ Cherry Agate","options":["11 246g 56mm","Cherry Agate"],"price":12399,"weight":400,"compare_at_price":0,"inventory_management":"shopify","barcode":null,"featured_media":{"alt":"Cherry Agate Crystal Sphere with Base-Spheres-Crystal Destiny-11 246g 56mm-Cherry Agate-Crystal Destiny","id":32289035387051,"position":26,"preview_image":{"aspect_ratio":1.0,"height":1000,"width":1000,"src":"\/\/crystaldestiny.com\/cdn\/shop\/files\/Cherry-Agate-Crystal-Sphere-with-Base-Spheres-11-246g-56mm-Cherry-Agate-26.webp?v=1765383348"}},"requires_selling_plan":false,"selling_plan_allocations":[]},{"id":45941099495595,"title":"10 229g 54mm \/ Cherry Agate","option1":"10 229g 54mm","option2":"Cherry Agate","option3":null,"sku":"1005008785619324-10 229g 54mm","requires_shipping":true,"taxable":true,"featured_image":{"id":40921465454763,"product_id":8603309310123,"position":8,"created_at":"2025-12-09T14:38:22-05:00","updated_at":"2025-12-10T11:15:18-05:00","alt":"Cherry Agate Crystal Sphere with Base-Spheres-Crystal Destiny-10 229g 54mm-Cherry Agate-Crystal Destiny","width":1000,"height":1000,"src":"\/\/crystaldestiny.com\/cdn\/shop\/files\/Cherry-Agate-Crystal-Sphere-with-Base-Spheres-10-229g-54mm-Cherry-Agate-8.webp?v=1765383318","variant_ids":[45941099495595]},"available":true,"name":"Cherry Agate Crystal Sphere with Base - 10 229g 54mm \/ Cherry Agate","public_title":"10 229g 54mm \/ Cherry Agate","options":["10 229g 54mm","Cherry Agate"],"price":11699,"weight":400,"compare_at_price":0,"inventory_management":"shopify","barcode":null,"featured_media":{"alt":"Cherry Agate Crystal Sphere with Base-Spheres-Crystal Destiny-10 229g 54mm-Cherry Agate-Crystal Destiny","id":32289034797227,"position":8,"preview_image":{"aspect_ratio":1.0,"height":1000,"width":1000,"src":"\/\/crystaldestiny.com\/cdn\/shop\/files\/Cherry-Agate-Crystal-Sphere-with-Base-Spheres-10-229g-54mm-Cherry-Agate-8.webp?v=1765383318"}},"requires_selling_plan":false,"selling_plan_allocations":[]},{"id":45941099528363,"title":"9 181g 51mm \/ Cherry Agate","option1":"9 181g 51mm","option2":"Cherry Agate","option3":null,"sku":"1005008785619324-9 181g 51mm","requires_shipping":true,"taxable":true,"featured_image":{"id":40921466077355,"product_id":8603309310123,"position":27,"created_at":"2025-12-09T14:38:22-05:00","updated_at":"2025-12-10T11:15:50-05:00","alt":"Cherry Agate Crystal Sphere with Base-Spheres-Crystal Destiny-9 181g 51mm-Cherry Agate-Crystal Destiny","width":1000,"height":1000,"src":"\/\/crystaldestiny.com\/cdn\/shop\/files\/Cherry-Agate-Crystal-Sphere-with-Base-Spheres-9-181g-51mm-Cherry-Agate-27.webp?v=1765383350","variant_ids":[45941099528363]},"available":false,"name":"Cherry Agate Crystal Sphere with Base - 9 181g 51mm \/ Cherry Agate","public_title":"9 181g 51mm \/ Cherry Agate","options":["9 181g 51mm","Cherry Agate"],"price":9299,"weight":400,"compare_at_price":0,"inventory_management":"shopify","barcode":null,"featured_media":{"alt":"Cherry Agate Crystal Sphere with Base-Spheres-Crystal Destiny-9 181g 51mm-Cherry Agate-Crystal Destiny","id":32289035419819,"position":27,"preview_image":{"aspect_ratio":1.0,"height":1000,"width":1000,"src":"\/\/crystaldestiny.com\/cdn\/shop\/files\/Cherry-Agate-Crystal-Sphere-with-Base-Spheres-9-181g-51mm-Cherry-Agate-27.webp?v=1765383350"}},"requires_selling_plan":false,"selling_plan_allocations":[]},{"id":45941099561131,"title":"8 262g 57mm \/ Cherry Agate","option1":"8 262g 57mm","option2":"Cherry Agate","option3":null,"sku":"1005008785619324-8 262g 57mm","requires_shipping":true,"taxable":true,"featured_image":{"id":40921466339499,"product_id":8603309310123,"position":35,"created_at":"2025-12-09T14:38:22-05:00","updated_at":"2025-12-10T11:16:02-05:00","alt":"Cherry Agate Crystal Sphere with Base-Spheres-Crystal Destiny-8 262g 57mm-Cherry Agate-Crystal Destiny","width":1000,"height":1000,"src":"\/\/crystaldestiny.com\/cdn\/shop\/files\/Cherry-Agate-Crystal-Sphere-with-Base-Spheres-8-262g-57mm-Cherry-Agate-35.webp?v=1765383362","variant_ids":[45941099561131]},"available":true,"name":"Cherry Agate Crystal Sphere with Base - 8 262g 57mm \/ Cherry Agate","public_title":"8 262g 57mm \/ Cherry Agate","options":["8 262g 57mm","Cherry Agate"],"price":12999,"weight":400,"compare_at_price":0,"inventory_management":"shopify","barcode":null,"featured_media":{"alt":"Cherry Agate Crystal Sphere with Base-Spheres-Crystal Destiny-8 262g 57mm-Cherry Agate-Crystal Destiny","id":32289035681963,"position":35,"preview_image":{"aspect_ratio":1.0,"height":1000,"width":1000,"src":"\/\/crystaldestiny.com\/cdn\/shop\/files\/Cherry-Agate-Crystal-Sphere-with-Base-Spheres-8-262g-57mm-Cherry-Agate-35.webp?v=1765383362"}},"requires_selling_plan":false,"selling_plan_allocations":[]},{"id":45941099593899,"title":"7 268g 57mm \/ Cherry Agate","option1":"7 268g 57mm","option2":"Cherry Agate","option3":null,"sku":"1005008785619324-7 268g 57mm","requires_shipping":true,"taxable":true,"featured_image":{"id":40921465913515,"product_id":8603309310123,"position":22,"created_at":"2025-12-09T14:38:22-05:00","updated_at":"2025-12-10T11:15:41-05:00","alt":"Cherry Agate Crystal Sphere with Base-Spheres-Crystal Destiny-7 268g 57mm-Cherry Agate-Crystal Destiny","width":1000,"height":1000,"src":"\/\/crystaldestiny.com\/cdn\/shop\/files\/Cherry-Agate-Crystal-Sphere-with-Base-Spheres-7-268g-57mm-Cherry-Agate-22.webp?v=1765383341","variant_ids":[45941099593899]},"available":false,"name":"Cherry Agate Crystal Sphere with Base - 7 268g 57mm \/ Cherry Agate","public_title":"7 268g 57mm \/ Cherry Agate","options":["7 268g 57mm","Cherry Agate"],"price":13199,"weight":400,"compare_at_price":0,"inventory_management":"shopify","barcode":null,"featured_media":{"alt":"Cherry Agate Crystal Sphere with Base-Spheres-Crystal Destiny-7 268g 57mm-Cherry Agate-Crystal Destiny","id":32289035255979,"position":22,"preview_image":{"aspect_ratio":1.0,"height":1000,"width":1000,"src":"\/\/crystaldestiny.com\/cdn\/shop\/files\/Cherry-Agate-Crystal-Sphere-with-Base-Spheres-7-268g-57mm-Cherry-Agate-22.webp?v=1765383341"}},"requires_selling_plan":false,"selling_plan_allocations":[]},{"id":45941099626667,"title":"22 215g 53mm \/ Cherry Agate","option1":"22 215g 53mm","option2":"Cherry Agate","option3":null,"sku":"1005008785619324-22 215g 53mm","requires_shipping":true,"taxable":true,"featured_image":{"id":40921466208427,"product_id":8603309310123,"position":31,"created_at":"2025-12-09T14:38:22-05:00","updated_at":"2025-12-10T11:15:57-05:00","alt":"Cherry Agate Crystal Sphere with Base-Spheres-Crystal Destiny-22 215g 53mm-Cherry Agate-Crystal Destiny","width":1000,"height":1000,"src":"\/\/crystaldestiny.com\/cdn\/shop\/files\/Cherry-Agate-Crystal-Sphere-with-Base-Spheres-22-215g-53mm-Cherry-Agate-31.webp?v=1765383357","variant_ids":[45941099626667]},"available":true,"name":"Cherry Agate Crystal Sphere with Base - 22 215g 53mm \/ Cherry Agate","public_title":"22 215g 53mm \/ Cherry Agate","options":["22 215g 53mm","Cherry Agate"],"price":11199,"weight":400,"compare_at_price":0,"inventory_management":"shopify","barcode":null,"featured_media":{"alt":"Cherry Agate Crystal Sphere with Base-Spheres-Crystal Destiny-22 215g 53mm-Cherry Agate-Crystal Destiny","id":32289035550891,"position":31,"preview_image":{"aspect_ratio":1.0,"height":1000,"width":1000,"src":"\/\/crystaldestiny.com\/cdn\/shop\/files\/Cherry-Agate-Crystal-Sphere-with-Base-Spheres-22-215g-53mm-Cherry-Agate-31.webp?v=1765383357"}},"requires_selling_plan":false,"selling_plan_allocations":[]},{"id":45941099659435,"title":"21 209g 54mm \/ Cherry Agate","option1":"21 209g 54mm","option2":"Cherry Agate","option3":null,"sku":"1005008785619324-21 209g 54mm","requires_shipping":true,"taxable":true,"featured_image":{"id":40921465585835,"product_id":8603309310123,"position":12,"created_at":"2025-12-09T14:38:22-05:00","updated_at":"2025-12-10T11:15:24-05:00","alt":"Cherry Agate Crystal Sphere with Base-Spheres-Crystal Destiny-21 209g 54mm-Cherry Agate-Crystal Destiny","width":1000,"height":1000,"src":"\/\/crystaldestiny.com\/cdn\/shop\/files\/Cherry-Agate-Crystal-Sphere-with-Base-Spheres-21-209g-54mm-Cherry-Agate-12.webp?v=1765383324","variant_ids":[45941099659435]},"available":true,"name":"Cherry Agate Crystal Sphere with Base - 21 209g 54mm \/ Cherry Agate","public_title":"21 209g 54mm \/ Cherry Agate","options":["21 209g 54mm","Cherry Agate"],"price":10899,"weight":400,"compare_at_price":0,"inventory_management":"shopify","barcode":null,"featured_media":{"alt":"Cherry Agate Crystal Sphere with Base-Spheres-Crystal Destiny-21 209g 54mm-Cherry Agate-Crystal Destiny","id":32289034928299,"position":12,"preview_image":{"aspect_ratio":1.0,"height":1000,"width":1000,"src":"\/\/crystaldestiny.com\/cdn\/shop\/files\/Cherry-Agate-Crystal-Sphere-with-Base-Spheres-21-209g-54mm-Cherry-Agate-12.webp?v=1765383324"}},"requires_selling_plan":false,"selling_plan_allocations":[]},{"id":45941099692203,"title":"20 417g 67mm \/ Cherry Agate","option1":"20 417g 67mm","option2":"Cherry Agate","option3":null,"sku":"1005008785619324-20 417g 67mm","requires_shipping":true,"taxable":true,"featured_image":{"id":40921465749675,"product_id":8603309310123,"position":17,"created_at":"2025-12-09T14:38:22-05:00","updated_at":"2025-12-10T11:15:33-05:00","alt":"Cherry Agate Crystal Sphere with Base-Spheres-Crystal Destiny-20 417g 67mm-Cherry Agate-Crystal Destiny","width":1000,"height":1000,"src":"\/\/crystaldestiny.com\/cdn\/shop\/files\/Cherry-Agate-Crystal-Sphere-with-Base-Spheres-20-417g-67mm-Cherry-Agate-17.webp?v=1765383333","variant_ids":[45941099692203]},"available":false,"name":"Cherry Agate Crystal Sphere with Base - 20 417g 67mm \/ Cherry Agate","public_title":"20 417g 67mm \/ Cherry Agate","options":["20 417g 67mm","Cherry Agate"],"price":19299,"weight":400,"compare_at_price":0,"inventory_management":"shopify","barcode":null,"featured_media":{"alt":"Cherry Agate Crystal Sphere with Base-Spheres-Crystal Destiny-20 417g 67mm-Cherry Agate-Crystal Destiny","id":32289035092139,"position":17,"preview_image":{"aspect_ratio":1.0,"height":1000,"width":1000,"src":"\/\/crystaldestiny.com\/cdn\/shop\/files\/Cherry-Agate-Crystal-Sphere-with-Base-Spheres-20-417g-67mm-Cherry-Agate-17.webp?v=1765383333"}},"requires_selling_plan":false,"selling_plan_allocations":[]},{"id":45941099724971,"title":"19 296g 60mm \/ Cherry Agate","option1":"19 296g 60mm","option2":"Cherry Agate","option3":null,"sku":"1005008785619324-19 296g 60mm","requires_shipping":true,"taxable":true,"featured_image":{"id":40921465782443,"product_id":8603309310123,"position":18,"created_at":"2025-12-09T14:38:22-05:00","updated_at":"2025-12-10T11:15:35-05:00","alt":"Cherry Agate Crystal Sphere with Base-Spheres-Crystal Destiny-19 296g 60mm-Cherry Agate-Crystal Destiny","width":1000,"height":1000,"src":"\/\/crystaldestiny.com\/cdn\/shop\/files\/Cherry-Agate-Crystal-Sphere-with-Base-Spheres-19-296g-60mm-Cherry-Agate-18.webp?v=1765383335","variant_ids":[45941099724971]},"available":true,"name":"Cherry Agate Crystal Sphere with Base - 19 296g 60mm \/ Cherry Agate","public_title":"19 296g 60mm \/ Cherry Agate","options":["19 296g 60mm","Cherry Agate"],"price":14899,"weight":400,"compare_at_price":0,"inventory_management":"shopify","barcode":null,"featured_media":{"alt":"Cherry Agate Crystal Sphere with Base-Spheres-Crystal Destiny-19 296g 60mm-Cherry Agate-Crystal Destiny","id":32289035124907,"position":18,"preview_image":{"aspect_ratio":1.0,"height":1000,"width":1000,"src":"\/\/crystaldestiny.com\/cdn\/shop\/files\/Cherry-Agate-Crystal-Sphere-with-Base-Spheres-19-296g-60mm-Cherry-Agate-18.webp?v=1765383335"}},"requires_selling_plan":false,"selling_plan_allocations":[]},{"id":45941099757739,"title":"18 323g 61mm \/ Cherry Agate","option1":"18 323g 61mm","option2":"Cherry Agate","option3":null,"sku":"1005008785619324-18 323g 61mm","requires_shipping":true,"taxable":true,"featured_image":{"id":40921466110123,"product_id":8603309310123,"position":28,"created_at":"2025-12-09T14:38:22-05:00","updated_at":"2025-12-10T11:15:52-05:00","alt":"Cherry Agate Crystal Sphere with Base-Spheres-Crystal Destiny-18 323g 61mm-Cherry Agate-Crystal Destiny","width":1000,"height":1000,"src":"\/\/crystaldestiny.com\/cdn\/shop\/files\/Cherry-Agate-Crystal-Sphere-with-Base-Spheres-18-323g-61mm-Cherry-Agate-28.webp?v=1765383352","variant_ids":[45941099757739]},"available":true,"name":"Cherry Agate Crystal Sphere with Base - 18 323g 61mm \/ Cherry Agate","public_title":"18 323g 61mm \/ Cherry Agate","options":["18 323g 61mm","Cherry Agate"],"price":15999,"weight":400,"compare_at_price":0,"inventory_management":"shopify","barcode":null,"featured_media":{"alt":"Cherry Agate Crystal Sphere with Base-Spheres-Crystal Destiny-18 323g 61mm-Cherry Agate-Crystal Destiny","id":32289035452587,"position":28,"preview_image":{"aspect_ratio":1.0,"height":1000,"width":1000,"src":"\/\/crystaldestiny.com\/cdn\/shop\/files\/Cherry-Agate-Crystal-Sphere-with-Base-Spheres-18-323g-61mm-Cherry-Agate-28.webp?v=1765383352"}},"requires_selling_plan":false,"selling_plan_allocations":[]},{"id":45941099790507,"title":"17 200g 52mm \/ Cherry Agate","option1":"17 200g 52mm","option2":"Cherry Agate","option3":null,"sku":"1005008785619324-17 200g 52mm","requires_shipping":true,"taxable":true,"featured_image":{"id":40921465487531,"product_id":8603309310123,"position":9,"created_at":"2025-12-09T14:38:22-05:00","updated_at":"2025-12-10T11:15:19-05:00","alt":"Cherry Agate Crystal Sphere with Base-Spheres-Crystal Destiny-17 200g 52mm-Cherry Agate-Crystal Destiny","width":1000,"height":1000,"src":"\/\/crystaldestiny.com\/cdn\/shop\/files\/Cherry-Agate-Crystal-Sphere-with-Base-Spheres-17-200g-52mm-Cherry-Agate-9.webp?v=1765383319","variant_ids":[45941099790507]},"available":true,"name":"Cherry Agate Crystal Sphere with Base - 17 200g 52mm \/ Cherry Agate","public_title":"17 200g 52mm \/ Cherry Agate","options":["17 200g 52mm","Cherry Agate"],"price":10599,"weight":400,"compare_at_price":0,"inventory_management":"shopify","barcode":null,"featured_media":{"alt":"Cherry Agate Crystal Sphere with Base-Spheres-Crystal Destiny-17 200g 52mm-Cherry Agate-Crystal Destiny","id":32289034829995,"position":9,"preview_image":{"aspect_ratio":1.0,"height":1000,"width":1000,"src":"\/\/crystaldestiny.com\/cdn\/shop\/files\/Cherry-Agate-Crystal-Sphere-with-Base-Spheres-17-200g-52mm-Cherry-Agate-9.webp?v=1765383319"}},"requires_selling_plan":false,"selling_plan_allocations":[]},{"id":45941099823275,"title":"16 207g 53mm \/ Cherry Agate","option1":"16 207g 53mm","option2":"Cherry Agate","option3":null,"sku":"1005008785619324-16 207g 53mm","requires_shipping":true,"taxable":true,"featured_image":{"id":40921465815211,"product_id":8603309310123,"position":19,"created_at":"2025-12-09T14:38:22-05:00","updated_at":"2025-12-10T11:15:37-05:00","alt":"Cherry Agate Crystal Sphere with Base-Spheres-Crystal Destiny-16 207g 53mm-Cherry Agate-Crystal Destiny","width":1000,"height":1000,"src":"\/\/crystaldestiny.com\/cdn\/shop\/files\/Cherry-Agate-Crystal-Sphere-with-Base-Spheres-16-207g-53mm-Cherry-Agate-19.webp?v=1765383337","variant_ids":[45941099823275]},"available":true,"name":"Cherry Agate Crystal Sphere with Base - 16 207g 53mm \/ Cherry Agate","public_title":"16 207g 53mm \/ Cherry Agate","options":["16 207g 53mm","Cherry Agate"],"price":10799,"weight":400,"compare_at_price":0,"inventory_management":"shopify","barcode":null,"featured_media":{"alt":"Cherry Agate Crystal Sphere with Base-Spheres-Crystal Destiny-16 207g 53mm-Cherry Agate-Crystal Destiny","id":32289035157675,"position":19,"preview_image":{"aspect_ratio":1.0,"height":1000,"width":1000,"src":"\/\/crystaldestiny.com\/cdn\/shop\/files\/Cherry-Agate-Crystal-Sphere-with-Base-Spheres-16-207g-53mm-Cherry-Agate-19.webp?v=1765383337"}},"requires_selling_plan":false,"selling_plan_allocations":[]},{"id":45941099856043,"title":"15 331g 62mm \/ Cherry Agate","option1":"15 331g 62mm","option2":"Cherry Agate","option3":null,"sku":"1005008785619324-15 331g 62mm","requires_shipping":true,"taxable":true,"featured_image":{"id":40921465946283,"product_id":8603309310123,"position":23,"created_at":"2025-12-09T14:38:22-05:00","updated_at":"2025-12-10T11:15:44-05:00","alt":"Cherry Agate Crystal Sphere with Base-Spheres-Crystal Destiny-15 331g 62mm-Cherry Agate-Crystal Destiny","width":1000,"height":1000,"src":"\/\/crystaldestiny.com\/cdn\/shop\/files\/Cherry-Agate-Crystal-Sphere-with-Base-Spheres-15-331g-62mm-Cherry-Agate-23.webp?v=1765383344","variant_ids":[45941099856043]},"available":false,"name":"Cherry Agate Crystal Sphere with Base - 15 331g 62mm \/ Cherry Agate","public_title":"15 331g 62mm \/ Cherry Agate","options":["15 331g 62mm","Cherry Agate"],"price":16299,"weight":400,"compare_at_price":0,"inventory_management":"shopify","barcode":null,"featured_media":{"alt":"Cherry Agate Crystal Sphere with Base-Spheres-Crystal Destiny-15 331g 62mm-Cherry Agate-Crystal Destiny","id":32289035288747,"position":23,"preview_image":{"aspect_ratio":1.0,"height":1000,"width":1000,"src":"\/\/crystaldestiny.com\/cdn\/shop\/files\/Cherry-Agate-Crystal-Sphere-with-Base-Spheres-15-331g-62mm-Cherry-Agate-23.webp?v=1765383344"}},"requires_selling_plan":false,"selling_plan_allocations":[]},{"id":45941099888811,"title":"30 206g 53mm \/ Cherry Agate","option1":"30 206g 53mm","option2":"Cherry Agate","option3":null,"sku":"1005008785619324-30 206g 53mm","requires_shipping":true,"taxable":true,"featured_image":{"id":40921466241195,"product_id":8603309310123,"position":32,"created_at":"2025-12-09T14:38:22-05:00","updated_at":"2025-12-10T11:15:58-05:00","alt":"Cherry Agate Crystal Sphere with Base-Spheres-Crystal Destiny-30 206g 53mm-Cherry Agate-Crystal Destiny","width":1000,"height":1000,"src":"\/\/crystaldestiny.com\/cdn\/shop\/files\/Cherry-Agate-Crystal-Sphere-with-Base-Spheres-30-206g-53mm-Cherry-Agate-32.webp?v=1765383358","variant_ids":[45941099888811]},"available":true,"name":"Cherry Agate Crystal Sphere with Base - 30 206g 53mm \/ Cherry Agate","public_title":"30 206g 53mm \/ Cherry Agate","options":["30 206g 53mm","Cherry Agate"],"price":10799,"weight":400,"compare_at_price":0,"inventory_management":"shopify","barcode":null,"featured_media":{"alt":"Cherry Agate Crystal Sphere with Base-Spheres-Crystal Destiny-30 206g 53mm-Cherry Agate-Crystal Destiny","id":32289035583659,"position":32,"preview_image":{"aspect_ratio":1.0,"height":1000,"width":1000,"src":"\/\/crystaldestiny.com\/cdn\/shop\/files\/Cherry-Agate-Crystal-Sphere-with-Base-Spheres-30-206g-53mm-Cherry-Agate-32.webp?v=1765383358"}},"requires_selling_plan":false,"selling_plan_allocations":[]},{"id":45941099921579,"title":"29 331g 62mm \/ Cherry Agate","option1":"29 331g 62mm","option2":"Cherry Agate","option3":null,"sku":"1005008785619324-29 331g 62mm","requires_shipping":true,"taxable":true,"featured_image":{"id":40921465847979,"product_id":8603309310123,"position":20,"created_at":"2025-12-09T14:38:22-05:00","updated_at":"2025-12-10T11:15:38-05:00","alt":"Cherry Agate Crystal Sphere with Base-Spheres-Crystal Destiny-29 331g 62mm-Cherry Agate-Crystal Destiny","width":1000,"height":1000,"src":"\/\/crystaldestiny.com\/cdn\/shop\/files\/Cherry-Agate-Crystal-Sphere-with-Base-Spheres-29-331g-62mm-Cherry-Agate-20.webp?v=1765383338","variant_ids":[45941099921579]},"available":false,"name":"Cherry Agate Crystal Sphere with Base - 29 331g 62mm \/ Cherry Agate","public_title":"29 331g 62mm \/ Cherry Agate","options":["29 331g 62mm","Cherry Agate"],"price":16299,"weight":400,"compare_at_price":0,"inventory_management":"shopify","barcode":null,"featured_media":{"alt":"Cherry Agate Crystal Sphere with Base-Spheres-Crystal Destiny-29 331g 62mm-Cherry Agate-Crystal Destiny","id":32289035190443,"position":20,"preview_image":{"aspect_ratio":1.0,"height":1000,"width":1000,"src":"\/\/crystaldestiny.com\/cdn\/shop\/files\/Cherry-Agate-Crystal-Sphere-with-Base-Spheres-29-331g-62mm-Cherry-Agate-20.webp?v=1765383338"}},"requires_selling_plan":false,"selling_plan_allocations":[]},{"id":45941099954347,"title":"28 231g 55mm \/ Cherry Agate","option1":"28 231g 55mm","option2":"Cherry Agate","option3":null,"sku":"1005008785619324-28 231g 55mm","requires_shipping":true,"taxable":true,"featured_image":{"id":40921465520299,"product_id":8603309310123,"position":10,"created_at":"2025-12-09T14:38:22-05:00","updated_at":"2025-12-10T11:15:21-05:00","alt":"Cherry Agate Crystal Sphere with Base-Spheres-Crystal Destiny-28 231g 55mm-Cherry Agate-Crystal Destiny","width":1000,"height":1000,"src":"\/\/crystaldestiny.com\/cdn\/shop\/files\/Cherry-Agate-Crystal-Sphere-with-Base-Spheres-28-231g-55mm-Cherry-Agate-10.webp?v=1765383321","variant_ids":[45941099954347]},"available":true,"name":"Cherry Agate Crystal Sphere with Base - 28 231g 55mm \/ Cherry Agate","public_title":"28 231g 55mm \/ Cherry Agate","options":["28 231g 55mm","Cherry Agate"],"price":11699,"weight":400,"compare_at_price":0,"inventory_management":"shopify","barcode":null,"featured_media":{"alt":"Cherry Agate Crystal Sphere with Base-Spheres-Crystal Destiny-28 231g 55mm-Cherry Agate-Crystal Destiny","id":32289034862763,"position":10,"preview_image":{"aspect_ratio":1.0,"height":1000,"width":1000,"src":"\/\/crystaldestiny.com\/cdn\/shop\/files\/Cherry-Agate-Crystal-Sphere-with-Base-Spheres-28-231g-55mm-Cherry-Agate-10.webp?v=1765383321"}},"requires_selling_plan":false,"selling_plan_allocations":[]},{"id":45941099987115,"title":"27 169g 49mm \/ Cherry Agate","option1":"27 169g 49mm","option2":"Cherry Agate","option3":null,"sku":"1005008785619324-27 169g 49mm","requires_shipping":true,"taxable":true,"featured_image":{"id":40921465979051,"product_id":8603309310123,"position":24,"created_at":"2025-12-09T14:38:22-05:00","updated_at":"2025-12-10T11:15:45-05:00","alt":"Cherry Agate Crystal Sphere with Base-Spheres-Crystal Destiny-27 169g 49mm-Cherry Agate-Crystal Destiny","width":1000,"height":1000,"src":"\/\/crystaldestiny.com\/cdn\/shop\/files\/Cherry-Agate-Crystal-Sphere-with-Base-Spheres-27-169g-49mm-Cherry-Agate-24.webp?v=1765383345","variant_ids":[45941099987115]},"available":true,"name":"Cherry Agate Crystal Sphere with Base - 27 169g 49mm \/ Cherry Agate","public_title":"27 169g 49mm \/ Cherry Agate","options":["27 169g 49mm","Cherry Agate"],"price":8799,"weight":400,"compare_at_price":0,"inventory_management":"shopify","barcode":null,"featured_media":{"alt":"Cherry Agate Crystal Sphere with Base-Spheres-Crystal Destiny-27 169g 49mm-Cherry Agate-Crystal Destiny","id":32289035321515,"position":24,"preview_image":{"aspect_ratio":1.0,"height":1000,"width":1000,"src":"\/\/crystaldestiny.com\/cdn\/shop\/files\/Cherry-Agate-Crystal-Sphere-with-Base-Spheres-27-169g-49mm-Cherry-Agate-24.webp?v=1765383345"}},"requires_selling_plan":false,"selling_plan_allocations":[]},{"id":45941100019883,"title":"26 171g 50mm \/ Cherry Agate","option1":"26 171g 50mm","option2":"Cherry Agate","option3":null,"sku":"1005008785619324-26 171g 50mm","requires_shipping":true,"taxable":true,"featured_image":{"id":40921465356459,"product_id":8603309310123,"position":5,"created_at":"2025-12-09T14:38:22-05:00","updated_at":"2025-12-10T11:15:13-05:00","alt":"Cherry Agate Crystal Sphere with Base-Spheres-Crystal Destiny-26 171g 50mm-Cherry Agate-Crystal Destiny","width":1000,"height":1000,"src":"\/\/crystaldestiny.com\/cdn\/shop\/files\/Cherry-Agate-Crystal-Sphere-with-Base-Spheres-26-171g-50mm-Cherry-Agate-5.webp?v=1765383313","variant_ids":[45941100019883]},"available":false,"name":"Cherry Agate Crystal Sphere with Base - 26 171g 50mm \/ Cherry Agate","public_title":"26 171g 50mm \/ Cherry Agate","options":["26 171g 50mm","Cherry Agate"],"price":8799,"weight":400,"compare_at_price":0,"inventory_management":"shopify","barcode":null,"featured_media":{"alt":"Cherry Agate Crystal Sphere with Base-Spheres-Crystal Destiny-26 171g 50mm-Cherry Agate-Crystal Destiny","id":32289034698923,"position":5,"preview_image":{"aspect_ratio":1.0,"height":1000,"width":1000,"src":"\/\/crystaldestiny.com\/cdn\/shop\/files\/Cherry-Agate-Crystal-Sphere-with-Base-Spheres-26-171g-50mm-Cherry-Agate-5.webp?v=1765383313"}},"requires_selling_plan":false,"selling_plan_allocations":[]},{"id":45941100052651,"title":"25 279g 59mm \/ Cherry Agate","option1":"25 279g 59mm","option2":"Cherry Agate","option3":null,"sku":"1005008785619324-25 279g 59mm","requires_shipping":true,"taxable":true,"featured_image":{"id":40921466011819,"product_id":8603309310123,"position":25,"created_at":"2025-12-09T14:38:22-05:00","updated_at":"2025-12-10T11:15:47-05:00","alt":"Cherry Agate Crystal Sphere with Base-Spheres-Crystal Destiny-25 279g 59mm-Cherry Agate-Crystal Destiny","width":1000,"height":1000,"src":"\/\/crystaldestiny.com\/cdn\/shop\/files\/Cherry-Agate-Crystal-Sphere-with-Base-Spheres-25-279g-59mm-Cherry-Agate-25.webp?v=1765383347","variant_ids":[45941100052651]},"available":true,"name":"Cherry Agate Crystal Sphere with Base - 25 279g 59mm \/ Cherry Agate","public_title":"25 279g 59mm \/ Cherry Agate","options":["25 279g 59mm","Cherry Agate"],"price":13599,"weight":400,"compare_at_price":0,"inventory_management":"shopify","barcode":null,"featured_media":{"alt":"Cherry Agate Crystal Sphere with Base-Spheres-Crystal Destiny-25 279g 59mm-Cherry Agate-Crystal Destiny","id":32289035354283,"position":25,"preview_image":{"aspect_ratio":1.0,"height":1000,"width":1000,"src":"\/\/crystaldestiny.com\/cdn\/shop\/files\/Cherry-Agate-Crystal-Sphere-with-Base-Spheres-25-279g-59mm-Cherry-Agate-25.webp?v=1765383347"}},"requires_selling_plan":false,"selling_plan_allocations":[]},{"id":45941100085419,"title":"24 196g 52mm \/ Cherry Agate","option1":"24 196g 52mm","option2":"Cherry Agate","option3":null,"sku":"1005008785619324-24 196g 52mm","requires_shipping":true,"taxable":true,"featured_image":{"id":40921465618603,"product_id":8603309310123,"position":13,"created_at":"2025-12-09T14:38:22-05:00","updated_at":"2025-12-10T11:15:26-05:00","alt":"Cherry Agate Crystal Sphere with Base-Spheres-Crystal Destiny-24 196g 52mm-Cherry Agate-Crystal Destiny","width":1000,"height":1000,"src":"\/\/crystaldestiny.com\/cdn\/shop\/files\/Cherry-Agate-Crystal-Sphere-with-Base-Spheres-24-196g-52mm-Cherry-Agate-13.webp?v=1765383326","variant_ids":[45941100085419]},"available":true,"name":"Cherry Agate Crystal Sphere with Base - 24 196g 52mm \/ Cherry Agate","public_title":"24 196g 52mm \/ Cherry Agate","options":["24 196g 52mm","Cherry Agate"],"price":10399,"weight":400,"compare_at_price":0,"inventory_management":"shopify","barcode":null,"featured_media":{"alt":"Cherry Agate Crystal Sphere with Base-Spheres-Crystal Destiny-24 196g 52mm-Cherry Agate-Crystal Destiny","id":32289034961067,"position":13,"preview_image":{"aspect_ratio":1.0,"height":1000,"width":1000,"src":"\/\/crystaldestiny.com\/cdn\/shop\/files\/Cherry-Agate-Crystal-Sphere-with-Base-Spheres-24-196g-52mm-Cherry-Agate-13.webp?v=1765383326"}},"requires_selling_plan":false,"selling_plan_allocations":[]},{"id":45941100118187,"title":"23 211g 53mm \/ Cherry Agate","option1":"23 211g 53mm","option2":"Cherry Agate","option3":null,"sku":"1005008785619324-23 211g 53mm","requires_shipping":true,"taxable":true,"featured_image":{"id":40921466372267,"product_id":8603309310123,"position":36,"created_at":"2025-12-09T14:38:22-05:00","updated_at":"2025-12-10T11:16:04-05:00","alt":"Cherry Agate Crystal Sphere with Base-Spheres-Crystal Destiny-23 211g 53mm-Cherry Agate-Crystal Destiny","width":1000,"height":1000,"src":"\/\/crystaldestiny.com\/cdn\/shop\/files\/Cherry-Agate-Crystal-Sphere-with-Base-Spheres-23-211g-53mm-Cherry-Agate-36.webp?v=1765383364","variant_ids":[45941100118187]},"available":true,"name":"Cherry Agate Crystal Sphere with Base - 23 211g 53mm \/ Cherry Agate","public_title":"23 211g 53mm \/ Cherry Agate","options":["23 211g 53mm","Cherry Agate"],"price":10999,"weight":400,"compare_at_price":0,"inventory_management":"shopify","barcode":null,"featured_media":{"alt":"Cherry Agate Crystal Sphere with Base-Spheres-Crystal Destiny-23 211g 53mm-Cherry Agate-Crystal Destiny","id":32289035714731,"position":36,"preview_image":{"aspect_ratio":1.0,"height":1000,"width":1000,"src":"\/\/crystaldestiny.com\/cdn\/shop\/files\/Cherry-Agate-Crystal-Sphere-with-Base-Spheres-23-211g-53mm-Cherry-Agate-36.webp?v=1765383364"}},"requires_selling_plan":false,"selling_plan_allocations":[]},{"id":45941100150955,"title":"36 148g 47mm \/ Cherry Agate","option1":"36 148g 47mm","option2":"Cherry Agate","option3":null,"sku":"1005008785619324-36 148g 47mm","requires_shipping":true,"taxable":true,"featured_image":{"id":40921466405035,"product_id":8603309310123,"position":37,"created_at":"2025-12-09T14:38:22-05:00","updated_at":"2025-12-10T11:16:06-05:00","alt":"Cherry Agate Crystal Sphere with Base-Spheres-Crystal Destiny-36 148g 47mm-Cherry Agate-Crystal Destiny","width":1000,"height":1000,"src":"\/\/crystaldestiny.com\/cdn\/shop\/files\/Cherry-Agate-Crystal-Sphere-with-Base-Spheres-36-148g-47mm-Cherry-Agate-37.webp?v=1765383366","variant_ids":[45941100150955]},"available":true,"name":"Cherry Agate Crystal Sphere with Base - 36 148g 47mm \/ Cherry Agate","public_title":"36 148g 47mm \/ Cherry Agate","options":["36 148g 47mm","Cherry Agate"],"price":8399,"weight":400,"compare_at_price":0,"inventory_management":"shopify","barcode":null,"featured_media":{"alt":"Cherry Agate Crystal Sphere with Base-Spheres-Crystal Destiny-36 148g 47mm-Cherry Agate-Crystal Destiny","id":32289035747499,"position":37,"preview_image":{"aspect_ratio":1.0,"height":1000,"width":1000,"src":"\/\/crystaldestiny.com\/cdn\/shop\/files\/Cherry-Agate-Crystal-Sphere-with-Base-Spheres-36-148g-47mm-Cherry-Agate-37.webp?v=1765383366"}},"requires_selling_plan":false,"selling_plan_allocations":[]},{"id":45941100183723,"title":"35 89g 40mm \/ Cherry Agate","option1":"35 89g 40mm","option2":"Cherry Agate","option3":null,"sku":"1005008785619324-35 89g 40mm","requires_shipping":true,"taxable":true,"featured_image":{"id":40921465323691,"product_id":8603309310123,"position":4,"created_at":"2025-12-09T14:38:22-05:00","updated_at":"2025-12-10T11:15:11-05:00","alt":"Cherry Agate Crystal Sphere with Base-Spheres-Crystal Destiny-35 89g 40mm-Cherry Agate-Crystal Destiny","width":1000,"height":1000,"src":"\/\/crystaldestiny.com\/cdn\/shop\/files\/Cherry-Agate-Crystal-Sphere-with-Base-Spheres-35-89g-40mm-Cherry-Agate-4.webp?v=1765383311","variant_ids":[45941100183723]},"available":false,"name":"Cherry Agate Crystal Sphere with Base - 35 89g 40mm \/ Cherry Agate","public_title":"35 89g 40mm \/ Cherry Agate","options":["35 89g 40mm","Cherry Agate"],"price":6099,"weight":400,"compare_at_price":0,"inventory_management":"shopify","barcode":null,"featured_media":{"alt":"Cherry Agate Crystal Sphere with Base-Spheres-Crystal Destiny-35 89g 40mm-Cherry Agate-Crystal Destiny","id":32289034666155,"position":4,"preview_image":{"aspect_ratio":1.0,"height":1000,"width":1000,"src":"\/\/crystaldestiny.com\/cdn\/shop\/files\/Cherry-Agate-Crystal-Sphere-with-Base-Spheres-35-89g-40mm-Cherry-Agate-4.webp?v=1765383311"}},"requires_selling_plan":false,"selling_plan_allocations":[]},{"id":45941100216491,"title":"34 103g 42mm \/ Cherry Agate","option1":"34 103g 42mm","option2":"Cherry Agate","option3":null,"sku":"1005008785619324-34 103g 42mm","requires_shipping":true,"taxable":true,"featured_image":{"id":40921466273963,"product_id":8603309310123,"position":33,"created_at":"2025-12-09T14:38:22-05:00","updated_at":"2025-12-10T11:15:59-05:00","alt":"Cherry Agate Crystal Sphere with Base-Spheres-Crystal Destiny-34 103g 42mm-Cherry Agate-Crystal Destiny","width":1000,"height":1000,"src":"\/\/crystaldestiny.com\/cdn\/shop\/files\/Cherry-Agate-Crystal-Sphere-with-Base-Spheres-34-103g-42mm-Cherry-Agate-33.webp?v=1765383359","variant_ids":[45941100216491]},"available":true,"name":"Cherry Agate Crystal Sphere with Base - 34 103g 42mm \/ Cherry Agate","public_title":"34 103g 42mm \/ Cherry Agate","options":["34 103g 42mm","Cherry Agate"],"price":6699,"weight":400,"compare_at_price":0,"inventory_management":"shopify","barcode":null,"featured_media":{"alt":"Cherry Agate Crystal Sphere with Base-Spheres-Crystal Destiny-34 103g 42mm-Cherry Agate-Crystal Destiny","id":32289035616427,"position":33,"preview_image":{"aspect_ratio":1.0,"height":1000,"width":1000,"src":"\/\/crystaldestiny.com\/cdn\/shop\/files\/Cherry-Agate-Crystal-Sphere-with-Base-Spheres-34-103g-42mm-Cherry-Agate-33.webp?v=1765383359"}},"requires_selling_plan":false,"selling_plan_allocations":[]},{"id":45941100249259,"title":"33 215g 54mm \/ Cherry Agate","option1":"33 215g 54mm","option2":"Cherry Agate","option3":null,"sku":"1005008785619324-33 215g 54mm","requires_shipping":true,"taxable":true,"featured_image":{"id":40921466142891,"product_id":8603309310123,"position":29,"created_at":"2025-12-09T14:38:22-05:00","updated_at":"2025-12-10T11:15:53-05:00","alt":"Cherry Agate Crystal Sphere with Base-Spheres-Crystal Destiny-33 215g 54mm-Cherry Agate-Crystal Destiny","width":1000,"height":1000,"src":"\/\/crystaldestiny.com\/cdn\/shop\/files\/Cherry-Agate-Crystal-Sphere-with-Base-Spheres-33-215g-54mm-Cherry-Agate-29.webp?v=1765383353","variant_ids":[45941100249259]},"available":true,"name":"Cherry Agate Crystal Sphere with Base - 33 215g 54mm \/ Cherry Agate","public_title":"33 215g 54mm \/ Cherry Agate","options":["33 215g 54mm","Cherry Agate"],"price":11199,"weight":400,"compare_at_price":0,"inventory_management":"shopify","barcode":null,"featured_media":{"alt":"Cherry Agate Crystal Sphere with Base-Spheres-Crystal Destiny-33 215g 54mm-Cherry Agate-Crystal Destiny","id":32289035485355,"position":29,"preview_image":{"aspect_ratio":1.0,"height":1000,"width":1000,"src":"\/\/crystaldestiny.com\/cdn\/shop\/files\/Cherry-Agate-Crystal-Sphere-with-Base-Spheres-33-215g-54mm-Cherry-Agate-29.webp?v=1765383353"}},"requires_selling_plan":false,"selling_plan_allocations":[]},{"id":45941100282027,"title":"32 170g 50mm \/ Cherry Agate","option1":"32 170g 50mm","option2":"Cherry Agate","option3":null,"sku":"1005008785619324-32 170g 50mm","requires_shipping":true,"taxable":true,"featured_image":{"id":40921465651371,"product_id":8603309310123,"position":14,"created_at":"2025-12-09T14:38:22-05:00","updated_at":"2025-12-10T11:15:28-05:00","alt":"Cherry Agate Crystal Sphere with Base-Spheres-Crystal Destiny-32 170g 50mm-Cherry Agate-Crystal Destiny","width":1000,"height":1000,"src":"\/\/crystaldestiny.com\/cdn\/shop\/files\/Cherry-Agate-Crystal-Sphere-with-Base-Spheres-32-170g-50mm-Cherry-Agate-14.webp?v=1765383328","variant_ids":[45941100282027]},"available":true,"name":"Cherry Agate Crystal Sphere with Base - 32 170g 50mm \/ Cherry Agate","public_title":"32 170g 50mm \/ Cherry Agate","options":["32 170g 50mm","Cherry Agate"],"price":8799,"weight":400,"compare_at_price":0,"inventory_management":"shopify","barcode":null,"featured_media":{"alt":"Cherry Agate Crystal Sphere with Base-Spheres-Crystal Destiny-32 170g 50mm-Cherry Agate-Crystal Destiny","id":32289034993835,"position":14,"preview_image":{"aspect_ratio":1.0,"height":1000,"width":1000,"src":"\/\/crystaldestiny.com\/cdn\/shop\/files\/Cherry-Agate-Crystal-Sphere-with-Base-Spheres-32-170g-50mm-Cherry-Agate-14.webp?v=1765383328"}},"requires_selling_plan":false,"selling_plan_allocations":[]},{"id":45941100314795,"title":"31 176g 50mm \/ Cherry Agate","option1":"31 176g 50mm","option2":"Cherry Agate","option3":null,"sku":"1005008785619324-31 176g 50mm","requires_shipping":true,"taxable":true,"featured_image":{"id":40921466306731,"product_id":8603309310123,"position":34,"created_at":"2025-12-09T14:38:22-05:00","updated_at":"2025-12-10T11:16:00-05:00","alt":"Cherry Agate Crystal Sphere with Base-Spheres-Crystal Destiny-31 176g 50mm-Cherry Agate-Crystal Destiny","width":1000,"height":1000,"src":"\/\/crystaldestiny.com\/cdn\/shop\/files\/Cherry-Agate-Crystal-Sphere-with-Base-Spheres-31-176g-50mm-Cherry-Agate-34.webp?v=1765383360","variant_ids":[45941100314795]},"available":false,"name":"Cherry Agate Crystal Sphere with Base - 31 176g 50mm \/ Cherry Agate","public_title":"31 176g 50mm \/ Cherry Agate","options":["31 176g 50mm","Cherry Agate"],"price":9099,"weight":400,"compare_at_price":0,"inventory_management":"shopify","barcode":null,"featured_media":{"alt":"Cherry Agate Crystal Sphere with Base-Spheres-Crystal Destiny-31 176g 50mm-Cherry Agate-Crystal Destiny","id":32289035649195,"position":34,"preview_image":{"aspect_ratio":1.0,"height":1000,"width":1000,"src":"\/\/crystaldestiny.com\/cdn\/shop\/files\/Cherry-Agate-Crystal-Sphere-with-Base-Spheres-31-176g-50mm-Cherry-Agate-34.webp?v=1765383360"}},"requires_selling_plan":false,"selling_plan_allocations":[]}],"images":["\/\/crystaldestiny.com\/cdn\/shop\/files\/Cherry-Agate-Crystal-Sphere-with-Base-Spheres.webp?v=1765383306","\/\/crystaldestiny.com\/cdn\/shop\/files\/Cherry-Agate-Crystal-Sphere-with-Base-Spheres-5-206g-53mm-Cherry-Agate-2.webp?v=1765383308","\/\/crystaldestiny.com\/cdn\/shop\/files\/Cherry-Agate-Crystal-Sphere-with-Base-Spheres-13-247g-56mm-Cherry-Agate-3.webp?v=1765383309","\/\/crystaldestiny.com\/cdn\/shop\/files\/Cherry-Agate-Crystal-Sphere-with-Base-Spheres-35-89g-40mm-Cherry-Agate-4.webp?v=1765383311","\/\/crystaldestiny.com\/cdn\/shop\/files\/Cherry-Agate-Crystal-Sphere-with-Base-Spheres-26-171g-50mm-Cherry-Agate-5.webp?v=1765383313","\/\/crystaldestiny.com\/cdn\/shop\/files\/Cherry-Agate-Crystal-Sphere-with-Base-Spheres-2-201g-52mm-Cherry-Agate-6.webp?v=1765383314","\/\/crystaldestiny.com\/cdn\/shop\/files\/Cherry-Agate-Crystal-Sphere-with-Base-Spheres-14-267g-57mm-Cherry-Agate-7.webp?v=1765383316","\/\/crystaldestiny.com\/cdn\/shop\/files\/Cherry-Agate-Crystal-Sphere-with-Base-Spheres-10-229g-54mm-Cherry-Agate-8.webp?v=1765383318","\/\/crystaldestiny.com\/cdn\/shop\/files\/Cherry-Agate-Crystal-Sphere-with-Base-Spheres-17-200g-52mm-Cherry-Agate-9.webp?v=1765383319","\/\/crystaldestiny.com\/cdn\/shop\/files\/Cherry-Agate-Crystal-Sphere-with-Base-Spheres-28-231g-55mm-Cherry-Agate-10.webp?v=1765383321","\/\/crystaldestiny.com\/cdn\/shop\/files\/Cherry-Agate-Crystal-Sphere-with-Base-Spheres-6-183g-50mnm-Cherry-Agate-11.webp?v=1765383323","\/\/crystaldestiny.com\/cdn\/shop\/files\/Cherry-Agate-Crystal-Sphere-with-Base-Spheres-21-209g-54mm-Cherry-Agate-12.webp?v=1765383324","\/\/crystaldestiny.com\/cdn\/shop\/files\/Cherry-Agate-Crystal-Sphere-with-Base-Spheres-24-196g-52mm-Cherry-Agate-13.webp?v=1765383326","\/\/crystaldestiny.com\/cdn\/shop\/files\/Cherry-Agate-Crystal-Sphere-with-Base-Spheres-32-170g-50mm-Cherry-Agate-14.webp?v=1765383328","\/\/crystaldestiny.com\/cdn\/shop\/files\/Cherry-Agate-Crystal-Sphere-with-Base-Spheres-3-138g-46mm-Cherry-Agate-15.webp?v=1765383329","\/\/crystaldestiny.com\/cdn\/shop\/files\/Cherry-Agate-Crystal-Sphere-with-Base-Spheres-1-364g-64mm-Cherry-Agate-16.webp?v=1765383331","\/\/crystaldestiny.com\/cdn\/shop\/files\/Cherry-Agate-Crystal-Sphere-with-Base-Spheres-20-417g-67mm-Cherry-Agate-17.webp?v=1765383333","\/\/crystaldestiny.com\/cdn\/shop\/files\/Cherry-Agate-Crystal-Sphere-with-Base-Spheres-19-296g-60mm-Cherry-Agate-18.webp?v=1765383335","\/\/crystaldestiny.com\/cdn\/shop\/files\/Cherry-Agate-Crystal-Sphere-with-Base-Spheres-16-207g-53mm-Cherry-Agate-19.webp?v=1765383337","\/\/crystaldestiny.com\/cdn\/shop\/files\/Cherry-Agate-Crystal-Sphere-with-Base-Spheres-29-331g-62mm-Cherry-Agate-20.webp?v=1765383338","\/\/crystaldestiny.com\/cdn\/shop\/files\/Cherry-Agate-Crystal-Sphere-with-Base-Spheres-4-232g-55mm-Cherry-Agate-21.webp?v=1765383340","\/\/crystaldestiny.com\/cdn\/shop\/files\/Cherry-Agate-Crystal-Sphere-with-Base-Spheres-7-268g-57mm-Cherry-Agate-22.webp?v=1765383341","\/\/crystaldestiny.com\/cdn\/shop\/files\/Cherry-Agate-Crystal-Sphere-with-Base-Spheres-15-331g-62mm-Cherry-Agate-23.webp?v=1765383344","\/\/crystaldestiny.com\/cdn\/shop\/files\/Cherry-Agate-Crystal-Sphere-with-Base-Spheres-27-169g-49mm-Cherry-Agate-24.webp?v=1765383345","\/\/crystaldestiny.com\/cdn\/shop\/files\/Cherry-Agate-Crystal-Sphere-with-Base-Spheres-25-279g-59mm-Cherry-Agate-25.webp?v=1765383347","\/\/crystaldestiny.com\/cdn\/shop\/files\/Cherry-Agate-Crystal-Sphere-with-Base-Spheres-11-246g-56mm-Cherry-Agate-26.webp?v=1765383348","\/\/crystaldestiny.com\/cdn\/shop\/files\/Cherry-Agate-Crystal-Sphere-with-Base-Spheres-9-181g-51mm-Cherry-Agate-27.webp?v=1765383350","\/\/crystaldestiny.com\/cdn\/shop\/files\/Cherry-Agate-Crystal-Sphere-with-Base-Spheres-18-323g-61mm-Cherry-Agate-28.webp?v=1765383352","\/\/crystaldestiny.com\/cdn\/shop\/files\/Cherry-Agate-Crystal-Sphere-with-Base-Spheres-33-215g-54mm-Cherry-Agate-29.webp?v=1765383353","\/\/crystaldestiny.com\/cdn\/shop\/files\/Cherry-Agate-Crystal-Sphere-with-Base-Spheres-12-198g-52mm-Cherry-Agate-30.webp?v=1765383355","\/\/crystaldestiny.com\/cdn\/shop\/files\/Cherry-Agate-Crystal-Sphere-with-Base-Spheres-22-215g-53mm-Cherry-Agate-31.webp?v=1765383357","\/\/crystaldestiny.com\/cdn\/shop\/files\/Cherry-Agate-Crystal-Sphere-with-Base-Spheres-30-206g-53mm-Cherry-Agate-32.webp?v=1765383358","\/\/crystaldestiny.com\/cdn\/shop\/files\/Cherry-Agate-Crystal-Sphere-with-Base-Spheres-34-103g-42mm-Cherry-Agate-33.webp?v=1765383359","\/\/crystaldestiny.com\/cdn\/shop\/files\/Cherry-Agate-Crystal-Sphere-with-Base-Spheres-31-176g-50mm-Cherry-Agate-34.webp?v=1765383360","\/\/crystaldestiny.com\/cdn\/shop\/files\/Cherry-Agate-Crystal-Sphere-with-Base-Spheres-8-262g-57mm-Cherry-Agate-35.webp?v=1765383362","\/\/crystaldestiny.com\/cdn\/shop\/files\/Cherry-Agate-Crystal-Sphere-with-Base-Spheres-23-211g-53mm-Cherry-Agate-36.webp?v=1765383364","\/\/crystaldestiny.com\/cdn\/shop\/files\/Cherry-Agate-Crystal-Sphere-with-Base-Spheres-36-148g-47mm-Cherry-Agate-37.webp?v=1765383366"],"featured_image":"\/\/crystaldestiny.com\/cdn\/shop\/files\/Cherry-Agate-Crystal-Sphere-with-Base-Spheres.webp?v=1765383306","options":["Size","Material"],"media":[{"alt":"Cherry Agate Crystal Sphere with Base-Spheres-Crystal Destiny-6 183g 50mnm-Cherry Agate-Crystal Destiny","id":32289034567851,"position":1,"preview_image":{"aspect_ratio":1.0,"height":1000,"width":1000,"src":"\/\/crystaldestiny.com\/cdn\/shop\/files\/Cherry-Agate-Crystal-Sphere-with-Base-Spheres.webp?v=1765383306"},"aspect_ratio":1.0,"height":1000,"media_type":"image","src":"\/\/crystaldestiny.com\/cdn\/shop\/files\/Cherry-Agate-Crystal-Sphere-with-Base-Spheres.webp?v=1765383306","width":1000},{"alt":"Cherry Agate Crystal Sphere with Base-Spheres-Crystal Destiny-5 206g 53mm-Cherry Agate-Crystal Destiny","id":32289034600619,"position":2,"preview_image":{"aspect_ratio":1.0,"height":1000,"width":1000,"src":"\/\/crystaldestiny.com\/cdn\/shop\/files\/Cherry-Agate-Crystal-Sphere-with-Base-Spheres-5-206g-53mm-Cherry-Agate-2.webp?v=1765383308"},"aspect_ratio":1.0,"height":1000,"media_type":"image","src":"\/\/crystaldestiny.com\/cdn\/shop\/files\/Cherry-Agate-Crystal-Sphere-with-Base-Spheres-5-206g-53mm-Cherry-Agate-2.webp?v=1765383308","width":1000},{"alt":"Cherry Agate Crystal Sphere with Base-Spheres-Crystal Destiny-13 247g 56mm-Cherry Agate-Crystal Destiny","id":32289034633387,"position":3,"preview_image":{"aspect_ratio":1.0,"height":1000,"width":1000,"src":"\/\/crystaldestiny.com\/cdn\/shop\/files\/Cherry-Agate-Crystal-Sphere-with-Base-Spheres-13-247g-56mm-Cherry-Agate-3.webp?v=1765383309"},"aspect_ratio":1.0,"height":1000,"media_type":"image","src":"\/\/crystaldestiny.com\/cdn\/shop\/files\/Cherry-Agate-Crystal-Sphere-with-Base-Spheres-13-247g-56mm-Cherry-Agate-3.webp?v=1765383309","width":1000},{"alt":"Cherry Agate Crystal Sphere with Base-Spheres-Crystal Destiny-35 89g 40mm-Cherry Agate-Crystal Destiny","id":32289034666155,"position":4,"preview_image":{"aspect_ratio":1.0,"height":1000,"width":1000,"src":"\/\/crystaldestiny.com\/cdn\/shop\/files\/Cherry-Agate-Crystal-Sphere-with-Base-Spheres-35-89g-40mm-Cherry-Agate-4.webp?v=1765383311"},"aspect_ratio":1.0,"height":1000,"media_type":"image","src":"\/\/crystaldestiny.com\/cdn\/shop\/files\/Cherry-Agate-Crystal-Sphere-with-Base-Spheres-35-89g-40mm-Cherry-Agate-4.webp?v=1765383311","width":1000},{"alt":"Cherry Agate Crystal Sphere with Base-Spheres-Crystal Destiny-26 171g 50mm-Cherry Agate-Crystal Destiny","id":32289034698923,"position":5,"preview_image":{"aspect_ratio":1.0,"height":1000,"width":1000,"src":"\/\/crystaldestiny.com\/cdn\/shop\/files\/Cherry-Agate-Crystal-Sphere-with-Base-Spheres-26-171g-50mm-Cherry-Agate-5.webp?v=1765383313"},"aspect_ratio":1.0,"height":1000,"media_type":"image","src":"\/\/crystaldestiny.com\/cdn\/shop\/files\/Cherry-Agate-Crystal-Sphere-with-Base-Spheres-26-171g-50mm-Cherry-Agate-5.webp?v=1765383313","width":1000},{"alt":"Cherry Agate Crystal Sphere with Base-Spheres-Crystal Destiny-2 201g 52mm-Cherry Agate-Crystal Destiny","id":32289034731691,"position":6,"preview_image":{"aspect_ratio":1.0,"height":1000,"width":1000,"src":"\/\/crystaldestiny.com\/cdn\/shop\/files\/Cherry-Agate-Crystal-Sphere-with-Base-Spheres-2-201g-52mm-Cherry-Agate-6.webp?v=1765383314"},"aspect_ratio":1.0,"height":1000,"media_type":"image","src":"\/\/crystaldestiny.com\/cdn\/shop\/files\/Cherry-Agate-Crystal-Sphere-with-Base-Spheres-2-201g-52mm-Cherry-Agate-6.webp?v=1765383314","width":1000},{"alt":"Cherry Agate Crystal Sphere with Base-Spheres-Crystal Destiny-14 267g 57mm-Cherry Agate-Crystal Destiny","id":32289034764459,"position":7,"preview_image":{"aspect_ratio":1.0,"height":1000,"width":1000,"src":"\/\/crystaldestiny.com\/cdn\/shop\/files\/Cherry-Agate-Crystal-Sphere-with-Base-Spheres-14-267g-57mm-Cherry-Agate-7.webp?v=1765383316"},"aspect_ratio":1.0,"height":1000,"media_type":"image","src":"\/\/crystaldestiny.com\/cdn\/shop\/files\/Cherry-Agate-Crystal-Sphere-with-Base-Spheres-14-267g-57mm-Cherry-Agate-7.webp?v=1765383316","width":1000},{"alt":"Cherry Agate Crystal Sphere with Base-Spheres-Crystal Destiny-10 229g 54mm-Cherry Agate-Crystal Destiny","id":32289034797227,"position":8,"preview_image":{"aspect_ratio":1.0,"height":1000,"width":1000,"src":"\/\/crystaldestiny.com\/cdn\/shop\/files\/Cherry-Agate-Crystal-Sphere-with-Base-Spheres-10-229g-54mm-Cherry-Agate-8.webp?v=1765383318"},"aspect_ratio":1.0,"height":1000,"media_type":"image","src":"\/\/crystaldestiny.com\/cdn\/shop\/files\/Cherry-Agate-Crystal-Sphere-with-Base-Spheres-10-229g-54mm-Cherry-Agate-8.webp?v=1765383318","width":1000},{"alt":"Cherry Agate Crystal Sphere with Base-Spheres-Crystal Destiny-17 200g 52mm-Cherry Agate-Crystal Destiny","id":32289034829995,"position":9,"preview_image":{"aspect_ratio":1.0,"height":1000,"width":1000,"src":"\/\/crystaldestiny.com\/cdn\/shop\/files\/Cherry-Agate-Crystal-Sphere-with-Base-Spheres-17-200g-52mm-Cherry-Agate-9.webp?v=1765383319"},"aspect_ratio":1.0,"height":1000,"media_type":"image","src":"\/\/crystaldestiny.com\/cdn\/shop\/files\/Cherry-Agate-Crystal-Sphere-with-Base-Spheres-17-200g-52mm-Cherry-Agate-9.webp?v=1765383319","width":1000},{"alt":"Cherry Agate Crystal Sphere with Base-Spheres-Crystal Destiny-28 231g 55mm-Cherry Agate-Crystal Destiny","id":32289034862763,"position":10,"preview_image":{"aspect_ratio":1.0,"height":1000,"width":1000,"src":"\/\/crystaldestiny.com\/cdn\/shop\/files\/Cherry-Agate-Crystal-Sphere-with-Base-Spheres-28-231g-55mm-Cherry-Agate-10.webp?v=1765383321"},"aspect_ratio":1.0,"height":1000,"media_type":"image","src":"\/\/crystaldestiny.com\/cdn\/shop\/files\/Cherry-Agate-Crystal-Sphere-with-Base-Spheres-28-231g-55mm-Cherry-Agate-10.webp?v=1765383321","width":1000},{"alt":"Cherry Agate Crystal Sphere with Base-Spheres-Crystal Destiny-6 183g 50mnm-Cherry Agate-Crystal Destiny","id":32289034895531,"position":11,"preview_image":{"aspect_ratio":1.0,"height":1000,"width":1000,"src":"\/\/crystaldestiny.com\/cdn\/shop\/files\/Cherry-Agate-Crystal-Sphere-with-Base-Spheres-6-183g-50mnm-Cherry-Agate-11.webp?v=1765383323"},"aspect_ratio":1.0,"height":1000,"media_type":"image","src":"\/\/crystaldestiny.com\/cdn\/shop\/files\/Cherry-Agate-Crystal-Sphere-with-Base-Spheres-6-183g-50mnm-Cherry-Agate-11.webp?v=1765383323","width":1000},{"alt":"Cherry Agate Crystal Sphere with Base-Spheres-Crystal Destiny-21 209g 54mm-Cherry Agate-Crystal Destiny","id":32289034928299,"position":12,"preview_image":{"aspect_ratio":1.0,"height":1000,"width":1000,"src":"\/\/crystaldestiny.com\/cdn\/shop\/files\/Cherry-Agate-Crystal-Sphere-with-Base-Spheres-21-209g-54mm-Cherry-Agate-12.webp?v=1765383324"},"aspect_ratio":1.0,"height":1000,"media_type":"image","src":"\/\/crystaldestiny.com\/cdn\/shop\/files\/Cherry-Agate-Crystal-Sphere-with-Base-Spheres-21-209g-54mm-Cherry-Agate-12.webp?v=1765383324","width":1000},{"alt":"Cherry Agate Crystal Sphere with Base-Spheres-Crystal Destiny-24 196g 52mm-Cherry Agate-Crystal Destiny","id":32289034961067,"position":13,"preview_image":{"aspect_ratio":1.0,"height":1000,"width":1000,"src":"\/\/crystaldestiny.com\/cdn\/shop\/files\/Cherry-Agate-Crystal-Sphere-with-Base-Spheres-24-196g-52mm-Cherry-Agate-13.webp?v=1765383326"},"aspect_ratio":1.0,"height":1000,"media_type":"image","src":"\/\/crystaldestiny.com\/cdn\/shop\/files\/Cherry-Agate-Crystal-Sphere-with-Base-Spheres-24-196g-52mm-Cherry-Agate-13.webp?v=1765383326","width":1000},{"alt":"Cherry Agate Crystal Sphere with Base-Spheres-Crystal Destiny-32 170g 50mm-Cherry Agate-Crystal Destiny","id":32289034993835,"position":14,"preview_image":{"aspect_ratio":1.0,"height":1000,"width":1000,"src":"\/\/crystaldestiny.com\/cdn\/shop\/files\/Cherry-Agate-Crystal-Sphere-with-Base-Spheres-32-170g-50mm-Cherry-Agate-14.webp?v=1765383328"},"aspect_ratio":1.0,"height":1000,"media_type":"image","src":"\/\/crystaldestiny.com\/cdn\/shop\/files\/Cherry-Agate-Crystal-Sphere-with-Base-Spheres-32-170g-50mm-Cherry-Agate-14.webp?v=1765383328","width":1000},{"alt":"Cherry Agate Crystal Sphere with Base-Spheres-Crystal Destiny-3 138g 46mm-Cherry Agate-Crystal Destiny","id":32289035026603,"position":15,"preview_image":{"aspect_ratio":1.0,"height":1000,"width":1000,"src":"\/\/crystaldestiny.com\/cdn\/shop\/files\/Cherry-Agate-Crystal-Sphere-with-Base-Spheres-3-138g-46mm-Cherry-Agate-15.webp?v=1765383329"},"aspect_ratio":1.0,"height":1000,"media_type":"image","src":"\/\/crystaldestiny.com\/cdn\/shop\/files\/Cherry-Agate-Crystal-Sphere-with-Base-Spheres-3-138g-46mm-Cherry-Agate-15.webp?v=1765383329","width":1000},{"alt":"Cherry Agate Crystal Sphere with Base-Spheres-Crystal Destiny-1 364g 64mm-Cherry Agate-Crystal Destiny","id":32289035059371,"position":16,"preview_image":{"aspect_ratio":1.0,"height":1000,"width":1000,"src":"\/\/crystaldestiny.com\/cdn\/shop\/files\/Cherry-Agate-Crystal-Sphere-with-Base-Spheres-1-364g-64mm-Cherry-Agate-16.webp?v=1765383331"},"aspect_ratio":1.0,"height":1000,"media_type":"image","src":"\/\/crystaldestiny.com\/cdn\/shop\/files\/Cherry-Agate-Crystal-Sphere-with-Base-Spheres-1-364g-64mm-Cherry-Agate-16.webp?v=1765383331","width":1000},{"alt":"Cherry Agate Crystal Sphere with Base-Spheres-Crystal Destiny-20 417g 67mm-Cherry Agate-Crystal Destiny","id":32289035092139,"position":17,"preview_image":{"aspect_ratio":1.0,"height":1000,"width":1000,"src":"\/\/crystaldestiny.com\/cdn\/shop\/files\/Cherry-Agate-Crystal-Sphere-with-Base-Spheres-20-417g-67mm-Cherry-Agate-17.webp?v=1765383333"},"aspect_ratio":1.0,"height":1000,"media_type":"image","src":"\/\/crystaldestiny.com\/cdn\/shop\/files\/Cherry-Agate-Crystal-Sphere-with-Base-Spheres-20-417g-67mm-Cherry-Agate-17.webp?v=1765383333","width":1000},{"alt":"Cherry Agate Crystal Sphere with Base-Spheres-Crystal Destiny-19 296g 60mm-Cherry Agate-Crystal Destiny","id":32289035124907,"position":18,"preview_image":{"aspect_ratio":1.0,"height":1000,"width":1000,"src":"\/\/crystaldestiny.com\/cdn\/shop\/files\/Cherry-Agate-Crystal-Sphere-with-Base-Spheres-19-296g-60mm-Cherry-Agate-18.webp?v=1765383335"},"aspect_ratio":1.0,"height":1000,"media_type":"image","src":"\/\/crystaldestiny.com\/cdn\/shop\/files\/Cherry-Agate-Crystal-Sphere-with-Base-Spheres-19-296g-60mm-Cherry-Agate-18.webp?v=1765383335","width":1000},{"alt":"Cherry Agate Crystal Sphere with Base-Spheres-Crystal Destiny-16 207g 53mm-Cherry Agate-Crystal Destiny","id":32289035157675,"position":19,"preview_image":{"aspect_ratio":1.0,"height":1000,"width":1000,"src":"\/\/crystaldestiny.com\/cdn\/shop\/files\/Cherry-Agate-Crystal-Sphere-with-Base-Spheres-16-207g-53mm-Cherry-Agate-19.webp?v=1765383337"},"aspect_ratio":1.0,"height":1000,"media_type":"image","src":"\/\/crystaldestiny.com\/cdn\/shop\/files\/Cherry-Agate-Crystal-Sphere-with-Base-Spheres-16-207g-53mm-Cherry-Agate-19.webp?v=1765383337","width":1000},{"alt":"Cherry Agate Crystal Sphere with Base-Spheres-Crystal Destiny-29 331g 62mm-Cherry Agate-Crystal Destiny","id":32289035190443,"position":20,"preview_image":{"aspect_ratio":1.0,"height":1000,"width":1000,"src":"\/\/crystaldestiny.com\/cdn\/shop\/files\/Cherry-Agate-Crystal-Sphere-with-Base-Spheres-29-331g-62mm-Cherry-Agate-20.webp?v=1765383338"},"aspect_ratio":1.0,"height":1000,"media_type":"image","src":"\/\/crystaldestiny.com\/cdn\/shop\/files\/Cherry-Agate-Crystal-Sphere-with-Base-Spheres-29-331g-62mm-Cherry-Agate-20.webp?v=1765383338","width":1000},{"alt":"Cherry Agate Crystal Sphere with Base-Spheres-Crystal Destiny-4 232g 55mm-Cherry Agate-Crystal Destiny","id":32289035223211,"position":21,"preview_image":{"aspect_ratio":1.0,"height":1000,"width":1000,"src":"\/\/crystaldestiny.com\/cdn\/shop\/files\/Cherry-Agate-Crystal-Sphere-with-Base-Spheres-4-232g-55mm-Cherry-Agate-21.webp?v=1765383340"},"aspect_ratio":1.0,"height":1000,"media_type":"image","src":"\/\/crystaldestiny.com\/cdn\/shop\/files\/Cherry-Agate-Crystal-Sphere-with-Base-Spheres-4-232g-55mm-Cherry-Agate-21.webp?v=1765383340","width":1000},{"alt":"Cherry Agate Crystal Sphere with Base-Spheres-Crystal Destiny-7 268g 57mm-Cherry Agate-Crystal Destiny","id":32289035255979,"position":22,"preview_image":{"aspect_ratio":1.0,"height":1000,"width":1000,"src":"\/\/crystaldestiny.com\/cdn\/shop\/files\/Cherry-Agate-Crystal-Sphere-with-Base-Spheres-7-268g-57mm-Cherry-Agate-22.webp?v=1765383341"},"aspect_ratio":1.0,"height":1000,"media_type":"image","src":"\/\/crystaldestiny.com\/cdn\/shop\/files\/Cherry-Agate-Crystal-Sphere-with-Base-Spheres-7-268g-57mm-Cherry-Agate-22.webp?v=1765383341","width":1000},{"alt":"Cherry Agate Crystal Sphere with Base-Spheres-Crystal Destiny-15 331g 62mm-Cherry Agate-Crystal Destiny","id":32289035288747,"position":23,"preview_image":{"aspect_ratio":1.0,"height":1000,"width":1000,"src":"\/\/crystaldestiny.com\/cdn\/shop\/files\/Cherry-Agate-Crystal-Sphere-with-Base-Spheres-15-331g-62mm-Cherry-Agate-23.webp?v=1765383344"},"aspect_ratio":1.0,"height":1000,"media_type":"image","src":"\/\/crystaldestiny.com\/cdn\/shop\/files\/Cherry-Agate-Crystal-Sphere-with-Base-Spheres-15-331g-62mm-Cherry-Agate-23.webp?v=1765383344","width":1000},{"alt":"Cherry Agate Crystal Sphere with Base-Spheres-Crystal Destiny-27 169g 49mm-Cherry Agate-Crystal Destiny","id":32289035321515,"position":24,"preview_image":{"aspect_ratio":1.0,"height":1000,"width":1000,"src":"\/\/crystaldestiny.com\/cdn\/shop\/files\/Cherry-Agate-Crystal-Sphere-with-Base-Spheres-27-169g-49mm-Cherry-Agate-24.webp?v=1765383345"},"aspect_ratio":1.0,"height":1000,"media_type":"image","src":"\/\/crystaldestiny.com\/cdn\/shop\/files\/Cherry-Agate-Crystal-Sphere-with-Base-Spheres-27-169g-49mm-Cherry-Agate-24.webp?v=1765383345","width":1000},{"alt":"Cherry Agate Crystal Sphere with Base-Spheres-Crystal Destiny-25 279g 59mm-Cherry Agate-Crystal Destiny","id":32289035354283,"position":25,"preview_image":{"aspect_ratio":1.0,"height":1000,"width":1000,"src":"\/\/crystaldestiny.com\/cdn\/shop\/files\/Cherry-Agate-Crystal-Sphere-with-Base-Spheres-25-279g-59mm-Cherry-Agate-25.webp?v=1765383347"},"aspect_ratio":1.0,"height":1000,"media_type":"image","src":"\/\/crystaldestiny.com\/cdn\/shop\/files\/Cherry-Agate-Crystal-Sphere-with-Base-Spheres-25-279g-59mm-Cherry-Agate-25.webp?v=1765383347","width":1000},{"alt":"Cherry Agate Crystal Sphere with Base-Spheres-Crystal Destiny-11 246g 56mm-Cherry Agate-Crystal Destiny","id":32289035387051,"position":26,"preview_image":{"aspect_ratio":1.0,"height":1000,"width":1000,"src":"\/\/crystaldestiny.com\/cdn\/shop\/files\/Cherry-Agate-Crystal-Sphere-with-Base-Spheres-11-246g-56mm-Cherry-Agate-26.webp?v=1765383348"},"aspect_ratio":1.0,"height":1000,"media_type":"image","src":"\/\/crystaldestiny.com\/cdn\/shop\/files\/Cherry-Agate-Crystal-Sphere-with-Base-Spheres-11-246g-56mm-Cherry-Agate-26.webp?v=1765383348","width":1000},{"alt":"Cherry Agate Crystal Sphere with Base-Spheres-Crystal Destiny-9 181g 51mm-Cherry Agate-Crystal Destiny","id":32289035419819,"position":27,"preview_image":{"aspect_ratio":1.0,"height":1000,"width":1000,"src":"\/\/crystaldestiny.com\/cdn\/shop\/files\/Cherry-Agate-Crystal-Sphere-with-Base-Spheres-9-181g-51mm-Cherry-Agate-27.webp?v=1765383350"},"aspect_ratio":1.0,"height":1000,"media_type":"image","src":"\/\/crystaldestiny.com\/cdn\/shop\/files\/Cherry-Agate-Crystal-Sphere-with-Base-Spheres-9-181g-51mm-Cherry-Agate-27.webp?v=1765383350","width":1000},{"alt":"Cherry Agate Crystal Sphere with Base-Spheres-Crystal Destiny-18 323g 61mm-Cherry Agate-Crystal Destiny","id":32289035452587,"position":28,"preview_image":{"aspect_ratio":1.0,"height":1000,"width":1000,"src":"\/\/crystaldestiny.com\/cdn\/shop\/files\/Cherry-Agate-Crystal-Sphere-with-Base-Spheres-18-323g-61mm-Cherry-Agate-28.webp?v=1765383352"},"aspect_ratio":1.0,"height":1000,"media_type":"image","src":"\/\/crystaldestiny.com\/cdn\/shop\/files\/Cherry-Agate-Crystal-Sphere-with-Base-Spheres-18-323g-61mm-Cherry-Agate-28.webp?v=1765383352","width":1000},{"alt":"Cherry Agate Crystal Sphere with Base-Spheres-Crystal Destiny-33 215g 54mm-Cherry Agate-Crystal Destiny","id":32289035485355,"position":29,"preview_image":{"aspect_ratio":1.0,"height":1000,"width":1000,"src":"\/\/crystaldestiny.com\/cdn\/shop\/files\/Cherry-Agate-Crystal-Sphere-with-Base-Spheres-33-215g-54mm-Cherry-Agate-29.webp?v=1765383353"},"aspect_ratio":1.0,"height":1000,"media_type":"image","src":"\/\/crystaldestiny.com\/cdn\/shop\/files\/Cherry-Agate-Crystal-Sphere-with-Base-Spheres-33-215g-54mm-Cherry-Agate-29.webp?v=1765383353","width":1000},{"alt":"Cherry Agate Crystal Sphere with Base-Spheres-Crystal Destiny-12 198g 52mm-Cherry Agate-Crystal Destiny","id":32289035518123,"position":30,"preview_image":{"aspect_ratio":1.0,"height":1000,"width":1000,"src":"\/\/crystaldestiny.com\/cdn\/shop\/files\/Cherry-Agate-Crystal-Sphere-with-Base-Spheres-12-198g-52mm-Cherry-Agate-30.webp?v=1765383355"},"aspect_ratio":1.0,"height":1000,"media_type":"image","src":"\/\/crystaldestiny.com\/cdn\/shop\/files\/Cherry-Agate-Crystal-Sphere-with-Base-Spheres-12-198g-52mm-Cherry-Agate-30.webp?v=1765383355","width":1000},{"alt":"Cherry Agate Crystal Sphere with Base-Spheres-Crystal Destiny-22 215g 53mm-Cherry Agate-Crystal Destiny","id":32289035550891,"position":31,"preview_image":{"aspect_ratio":1.0,"height":1000,"width":1000,"src":"\/\/crystaldestiny.com\/cdn\/shop\/files\/Cherry-Agate-Crystal-Sphere-with-Base-Spheres-22-215g-53mm-Cherry-Agate-31.webp?v=1765383357"},"aspect_ratio":1.0,"height":1000,"media_type":"image","src":"\/\/crystaldestiny.com\/cdn\/shop\/files\/Cherry-Agate-Crystal-Sphere-with-Base-Spheres-22-215g-53mm-Cherry-Agate-31.webp?v=1765383357","width":1000},{"alt":"Cherry Agate Crystal Sphere with Base-Spheres-Crystal Destiny-30 206g 53mm-Cherry Agate-Crystal Destiny","id":32289035583659,"position":32,"preview_image":{"aspect_ratio":1.0,"height":1000,"width":1000,"src":"\/\/crystaldestiny.com\/cdn\/shop\/files\/Cherry-Agate-Crystal-Sphere-with-Base-Spheres-30-206g-53mm-Cherry-Agate-32.webp?v=1765383358"},"aspect_ratio":1.0,"height":1000,"media_type":"image","src":"\/\/crystaldestiny.com\/cdn\/shop\/files\/Cherry-Agate-Crystal-Sphere-with-Base-Spheres-30-206g-53mm-Cherry-Agate-32.webp?v=1765383358","width":1000},{"alt":"Cherry Agate Crystal Sphere with Base-Spheres-Crystal Destiny-34 103g 42mm-Cherry Agate-Crystal Destiny","id":32289035616427,"position":33,"preview_image":{"aspect_ratio":1.0,"height":1000,"width":1000,"src":"\/\/crystaldestiny.com\/cdn\/shop\/files\/Cherry-Agate-Crystal-Sphere-with-Base-Spheres-34-103g-42mm-Cherry-Agate-33.webp?v=1765383359"},"aspect_ratio":1.0,"height":1000,"media_type":"image","src":"\/\/crystaldestiny.com\/cdn\/shop\/files\/Cherry-Agate-Crystal-Sphere-with-Base-Spheres-34-103g-42mm-Cherry-Agate-33.webp?v=1765383359","width":1000},{"alt":"Cherry Agate Crystal Sphere with Base-Spheres-Crystal Destiny-31 176g 50mm-Cherry Agate-Crystal Destiny","id":32289035649195,"position":34,"preview_image":{"aspect_ratio":1.0,"height":1000,"width":1000,"src":"\/\/crystaldestiny.com\/cdn\/shop\/files\/Cherry-Agate-Crystal-Sphere-with-Base-Spheres-31-176g-50mm-Cherry-Agate-34.webp?v=1765383360"},"aspect_ratio":1.0,"height":1000,"media_type":"image","src":"\/\/crystaldestiny.com\/cdn\/shop\/files\/Cherry-Agate-Crystal-Sphere-with-Base-Spheres-31-176g-50mm-Cherry-Agate-34.webp?v=1765383360","width":1000},{"alt":"Cherry Agate Crystal Sphere with Base-Spheres-Crystal Destiny-8 262g 57mm-Cherry Agate-Crystal Destiny","id":32289035681963,"position":35,"preview_image":{"aspect_ratio":1.0,"height":1000,"width":1000,"src":"\/\/crystaldestiny.com\/cdn\/shop\/files\/Cherry-Agate-Crystal-Sphere-with-Base-Spheres-8-262g-57mm-Cherry-Agate-35.webp?v=1765383362"},"aspect_ratio":1.0,"height":1000,"media_type":"image","src":"\/\/crystaldestiny.com\/cdn\/shop\/files\/Cherry-Agate-Crystal-Sphere-with-Base-Spheres-8-262g-57mm-Cherry-Agate-35.webp?v=1765383362","width":1000},{"alt":"Cherry Agate Crystal Sphere with Base-Spheres-Crystal Destiny-23 211g 53mm-Cherry Agate-Crystal Destiny","id":32289035714731,"position":36,"preview_image":{"aspect_ratio":1.0,"height":1000,"width":1000,"src":"\/\/crystaldestiny.com\/cdn\/shop\/files\/Cherry-Agate-Crystal-Sphere-with-Base-Spheres-23-211g-53mm-Cherry-Agate-36.webp?v=1765383364"},"aspect_ratio":1.0,"height":1000,"media_type":"image","src":"\/\/crystaldestiny.com\/cdn\/shop\/files\/Cherry-Agate-Crystal-Sphere-with-Base-Spheres-23-211g-53mm-Cherry-Agate-36.webp?v=1765383364","width":1000},{"alt":"Cherry Agate Crystal Sphere with Base-Spheres-Crystal Destiny-36 148g 47mm-Cherry Agate-Crystal Destiny","id":32289035747499,"position":37,"preview_image":{"aspect_ratio":1.0,"height":1000,"width":1000,"src":"\/\/crystaldestiny.com\/cdn\/shop\/files\/Cherry-Agate-Crystal-Sphere-with-Base-Spheres-36-148g-47mm-Cherry-Agate-37.webp?v=1765383366"},"aspect_ratio":1.0,"height":1000,"media_type":"image","src":"\/\/crystaldestiny.com\/cdn\/shop\/files\/Cherry-Agate-Crystal-Sphere-with-Base-Spheres-36-148g-47mm-Cherry-Agate-37.webp?v=1765383366","width":1000}],"requires_selling_plan":false,"selling_plan_groups":[],"content":"\u003cp data-start=\"189\" data-end=\"551\"\u003eThis Cherry Agate Crystal Sphere features rich, natural red and pink hues, polished into a smooth orb to highlight its unique banding patterns. Each sphere comes with a base, making it perfect for display, meditation, or energy work. Its vibrant coloration adds warmth and beauty to any space while radiating gentle, grounding energy.\u003c\/p\u003e\n\u003cp data-start=\"553\" data-end=\"874\"\u003eCherry Agate is known for supporting emotional balance, courage, and personal empowerment. Ideal for meditation, witchcraft, or spiritual practices, this sphere also makes a meaningful gift or a striking decorative piece for home or office. Collectors value its rare coloration, polished finish, and energetic presence.\u003c\/p\u003e\n\u003cp data-start=\"553\" data-end=\"874\"\u003eThis product is an exact pick as pictured, one of a kind.\u003c\/p\u003e"},"options":[{"name":"Size","position":1,"values":["6 183g 50mnm","5 206g 53mm","4 232g 55mm","3 138g 46mm","2 201g 52mm","1 364g 64mm","14 267g 57mm","13 247g 56mm","12 198g 52mm","11 246g 56mm","10 229g 54mm","9 181g 51mm","8 262g 57mm","7 268g 57mm","22 215g 53mm","21 209g 54mm","20 417g 67mm","19 296g 60mm","18 323g 61mm","17 200g 52mm","16 207g 53mm","15 331g 62mm","30 206g 53mm","29 331g 62mm","28 231g 55mm","27 169g 49mm","26 171g 50mm","25 279g 59mm","24 196g 52mm","23 211g 53mm","36 148g 47mm","35 89g 40mm","34 103g 42mm","33 215g 54mm","32 170g 50mm","31 176g 50mm"]},{"name":"Material","position":2,"values":["Cherry Agate"]}],"custom_metafields":{"shipping_time":"12-16 days"},"metafields":{"badge":"\u003cdiv style='display:none' class='jdgm-prev-badge' data-average-rating='0.00' data-number-of-reviews='0' data-number-of-questions='0'\u003e \u003cspan class='jdgm-prev-badge__stars' data-score='0.00' tabindex='0' aria-label='0.00 stars' role='button'\u003e \u003cspan class='jdgm-star jdgm--off'\u003e\u003c\/span\u003e\u003cspan class='jdgm-star jdgm--off'\u003e\u003c\/span\u003e\u003cspan class='jdgm-star jdgm--off'\u003e\u003c\/span\u003e\u003cspan class='jdgm-star jdgm--off'\u003e\u003c\/span\u003e\u003cspan class='jdgm-star jdgm--off'\u003e\u003c\/span\u003e \u003c\/span\u003e \u003cspan class='jdgm-prev-badge__text'\u003e No reviews \u003c\/span\u003e \u003c\/div\u003e","widget":"\u003cdiv class='jdgm-rev-widg' data-updated-at='2025-12-10T00:36:39Z' data-average-rating='0.00' data-number-of-reviews='0' data-number-of-questions='0' data-image-url='https:\/\/cdn.shopify.com\/s\/files\/1\/0613\/0345\/5915\/files\/S1d9ff4c486a7445093cec1cd6414b0d3c.webp?v=1765309105'\u003e \u003cstyle class='jdgm-temp-hiding-style'\u003e.jdgm-rev-widg{ display: none }\u003c\/style\u003e \u003cdiv class='jdgm-rev-widg__header'\u003e \u003ch2 class='jdgm-rev-widg__title'\u003eCustomer Reviews\u003c\/h2\u003e \u003cdiv class='jdgm-rev-widg__summary'\u003e \u003cdiv class='jdgm-rev-widg__summary-stars' aria-label='Average rating is 0.00 stars' role='img'\u003e \u003cspan class='jdgm-star jdgm--off'\u003e\u003c\/span\u003e\u003cspan class='jdgm-star jdgm--off'\u003e\u003c\/span\u003e\u003cspan class='jdgm-star jdgm--off'\u003e\u003c\/span\u003e\u003cspan class='jdgm-star jdgm--off'\u003e\u003c\/span\u003e\u003cspan class='jdgm-star jdgm--off'\u003e\u003c\/span\u003e \u003c\/div\u003e \u003cdiv class='jdgm-rev-widg__summary-text'\u003eBe the first to write a review\u003c\/div\u003e \u003c\/div\u003e \u003ca style='display: none' href='#' class='jdgm-write-rev-link' role='button'\u003eWrite a review\u003c\/a\u003e \u003cdiv class='jdgm-histogram jdgm-temp-hidden'\u003e \u003cdiv class='jdgm-histogram__row' data-rating='5' data-frequency='0' data-percentage='0'\u003e \u003cdiv class='jdgm-histogram__star' role='button' aria-label=\"0% (0) reviews with 5 star rating\" tabindex='0' \u003e\u003cspan class='jdgm-star jdgm--on'\u003e\u003c\/span\u003e\u003cspan class='jdgm-star jdgm--on'\u003e\u003c\/span\u003e\u003cspan class='jdgm-star jdgm--on'\u003e\u003c\/span\u003e\u003cspan class='jdgm-star jdgm--on'\u003e\u003c\/span\u003e\u003cspan class='jdgm-star jdgm--on'\u003e\u003c\/span\u003e\u003c\/div\u003e \u003cdiv class='jdgm-histogram__bar'\u003e \u003cdiv class='jdgm-histogram__bar-content' style='width: 0%;'\u003e \u003c\/div\u003e \u003c\/div\u003e \u003cdiv class='jdgm-histogram__percentage'\u003e0%\u003c\/div\u003e \u003cdiv class='jdgm-histogram__frequency'\u003e(0)\u003c\/div\u003e \u003c\/div\u003e \u003cdiv class='jdgm-histogram__row' data-rating='4' data-frequency='0' data-percentage='0'\u003e \u003cdiv class='jdgm-histogram__star' role='button' aria-label=\"0% (0) reviews with 4 star rating\" tabindex='0' \u003e\u003cspan class='jdgm-star jdgm--on'\u003e\u003c\/span\u003e\u003cspan class='jdgm-star jdgm--on'\u003e\u003c\/span\u003e\u003cspan class='jdgm-star jdgm--on'\u003e\u003c\/span\u003e\u003cspan class='jdgm-star jdgm--on'\u003e\u003c\/span\u003e\u003cspan class='jdgm-star jdgm--off'\u003e\u003c\/span\u003e\u003c\/div\u003e \u003cdiv class='jdgm-histogram__bar'\u003e \u003cdiv class='jdgm-histogram__bar-content' style='width: 0%;'\u003e \u003c\/div\u003e \u003c\/div\u003e \u003cdiv class='jdgm-histogram__percentage'\u003e0%\u003c\/div\u003e \u003cdiv class='jdgm-histogram__frequency'\u003e(0)\u003c\/div\u003e \u003c\/div\u003e \u003cdiv class='jdgm-histogram__row' data-rating='3' data-frequency='0' data-percentage='0'\u003e \u003cdiv class='jdgm-histogram__star' role='button' aria-label=\"0% (0) reviews with 3 star rating\" tabindex='0' \u003e\u003cspan class='jdgm-star jdgm--on'\u003e\u003c\/span\u003e\u003cspan class='jdgm-star jdgm--on'\u003e\u003c\/span\u003e\u003cspan class='jdgm-star jdgm--on'\u003e\u003c\/span\u003e\u003cspan class='jdgm-star jdgm--off'\u003e\u003c\/span\u003e\u003cspan class='jdgm-star jdgm--off'\u003e\u003c\/span\u003e\u003c\/div\u003e \u003cdiv class='jdgm-histogram__bar'\u003e \u003cdiv class='jdgm-histogram__bar-content' style='width: 0%;'\u003e \u003c\/div\u003e \u003c\/div\u003e \u003cdiv class='jdgm-histogram__percentage'\u003e0%\u003c\/div\u003e \u003cdiv class='jdgm-histogram__frequency'\u003e(0)\u003c\/div\u003e \u003c\/div\u003e \u003cdiv class='jdgm-histogram__row' data-rating='2' data-frequency='0' data-percentage='0'\u003e \u003cdiv class='jdgm-histogram__star' role='button' aria-label=\"0% (0) reviews with 2 star rating\" tabindex='0' \u003e\u003cspan class='jdgm-star jdgm--on'\u003e\u003c\/span\u003e\u003cspan class='jdgm-star jdgm--on'\u003e\u003c\/span\u003e\u003cspan class='jdgm-star jdgm--off'\u003e\u003c\/span\u003e\u003cspan class='jdgm-star jdgm--off'\u003e\u003c\/span\u003e\u003cspan class='jdgm-star jdgm--off'\u003e\u003c\/span\u003e\u003c\/div\u003e \u003cdiv class='jdgm-histogram__bar'\u003e \u003cdiv class='jdgm-histogram__bar-content' style='width: 0%;'\u003e \u003c\/div\u003e \u003c\/div\u003e \u003cdiv class='jdgm-histogram__percentage'\u003e0%\u003c\/div\u003e \u003cdiv class='jdgm-histogram__frequency'\u003e(0)\u003c\/div\u003e \u003c\/div\u003e \u003cdiv class='jdgm-histogram__row' data-rating='1' data-frequency='0' data-percentage='0'\u003e \u003cdiv class='jdgm-histogram__star' role='button' aria-label=\"0% (0) reviews with 1 star rating\" tabindex='0' \u003e\u003cspan class='jdgm-star jdgm--on'\u003e\u003c\/span\u003e\u003cspan class='jdgm-star jdgm--off'\u003e\u003c\/span\u003e\u003cspan class='jdgm-star jdgm--off'\u003e\u003c\/span\u003e\u003cspan class='jdgm-star jdgm--off'\u003e\u003c\/span\u003e\u003cspan class='jdgm-star jdgm--off'\u003e\u003c\/span\u003e\u003c\/div\u003e \u003cdiv class='jdgm-histogram__bar'\u003e \u003cdiv class='jdgm-histogram__bar-content' style='width: 0%;'\u003e \u003c\/div\u003e \u003c\/div\u003e \u003cdiv class='jdgm-histogram__percentage'\u003e0%\u003c\/div\u003e \u003cdiv class='jdgm-histogram__frequency'\u003e(0)\u003c\/div\u003e \u003c\/div\u003e \u003cdiv class='jdgm-histogram__row jdgm-histogram__clear-filter' data-rating=null tabindex='0'\u003e\u003c\/div\u003e \u003c\/div\u003e \u003cdiv class='jdgm-rev-widg__sort-wrapper'\u003e\u003c\/div\u003e \u003c\/div\u003e \u003cdiv class='jdgm-rev-widg__body'\u003e \u003cdiv class='jdgm-rev-widg__reviews'\u003e\u003c\/div\u003e \u003cdiv class='jdgm-paginate' data-per-page='4' data-url='https:\/\/api.judge.me\/reviews\/reviews_for_widget' style=\"display: none;\"\u003e\u003c\/div\u003e \u003c\/div\u003e \u003cdiv class='jdgm-rev-widg__paginate-spinner-wrapper'\u003e \u003cdiv class='jdgm-spinner'\u003e\u003c\/div\u003e \u003c\/div\u003e \u003c\/div\u003e"},"collections":[{"id":294880051371,"handle":"crystals","title":"Crystals","updated_at":"2026-01-07T23:43:11-05:00","body_html":"\u003cp data-start=\"159\" data-end=\"687\"\u003e✨ \u003cstrong data-start=\"161\" data-end=\"216\"\u003eDiscover the Magic of Crystals with Crystal Destiny\u003c\/strong\u003e ✨\u003cbr data-start=\"218\" data-end=\"221\"\u003eCrystals have been treasured for centuries—not only for their natural beauty but also for their powerful healing energies. Beyond their visual allure, they bring balance, harmony, and positive energy into any space. Whether used for home décor, meditation, or simply to elevate the energy of your surroundings, crystals create a sanctuary of peace, relaxation, and well-being. Each piece is a unique gift from the Earth—visually stunning and spiritually uplifting.\u003c\/p\u003e\n\u003cp data-start=\"689\" data-end=\"1011\"\u003eAt \u003cstrong data-start=\"692\" data-end=\"711\"\u003eCrystal Destiny\u003c\/strong\u003e, our signature collection showcases a curated selection of exquisite crystals, from radiant Quartz to soothing Amethyst. Every stone is carefully sourced for its elegance and metaphysical resonance, making them perfect for enhancing your home, uplifting your spirit, or gifting to someone special.\u003c\/p\u003e\n\u003cp data-start=\"1013\" data-end=\"1206\"\u003eExperience the timeless sophistication of crystalline wonders. Explore the \u003cstrong data-start=\"1088\" data-end=\"1118\"\u003eCrystal Destiny Collection\u003c\/strong\u003e today and bring the transformative beauty of these treasures into your everyday life.\u003c\/p\u003e","published_at":"2023-06-05T11:24:02-04:00","sort_order":"created-desc","template_suffix":"","disjunctive":false,"rules":[{"column":"tag","relation":"equals","condition":"crystal"},{"column":"type","relation":"not_contains","condition":"925 Sterling Silver"},{"column":"type","relation":"not_contains","condition":"Wire Wraps"}],"published_scope":"global"},{"id":319456051371,"handle":"root-chakra-crystals","title":"Root Chakra Crystals","updated_at":"2026-01-07T23:43:11-05:00","body_html":"\u003cp data-start=\"132\" data-end=\"502\"\u003e✨ \u003cstrong data-start=\"134\" data-end=\"158\"\u003eRoot Chakra Crystals\u003c\/strong\u003e ✨\u003cbr data-start=\"160\" data-end=\"163\"\u003eGround your energy and cultivate stability with our \u003cstrong data-start=\"215\" data-end=\"239\"\u003eRoot Chakra Crystals\u003c\/strong\u003e. Centered at the base of the spine, the Root Chakra governs your sense of security, balance, and connection to the Earth. These crystals help release fear, build resilience, and foster a strong foundation for your physical, emotional, and spiritual well-being.\u003c\/p\u003e\n\u003cp data-start=\"504\" data-end=\"881\"\u003eOur selection features powerful grounding stones such as Red Jasper, Black Tourmaline, Hematite, and Smoky Quartz—each chosen for their ability to stabilize energy and promote a sense of safety and strength. Perfect for meditation, energy work, or keeping in your living space, Root Chakra Crystals encourage you to feel anchored, supported, and empowered in your daily life.\u003c\/p\u003e\n\u003cp data-start=\"883\" data-end=\"1037\"\u003eReconnect with the Earth, strengthen your foundation, and embrace the transformative energy of the Root Chakra through these essential grounding stones.\u003c\/p\u003e","published_at":"2025-07-17T18:19:27-04:00","sort_order":"best-selling","template_suffix":"","disjunctive":false,"rules":[{"column":"variant_metafield_definition","relation":"equals","condition":"Root"}],"published_scope":"global","image":{"created_at":"2025-07-17T19:08:08-04:00","alt":null,"width":1080,"height":1080,"src":"\/\/crystaldestiny.com\/cdn\/shop\/collections\/Root_Chakra_Collection.jpg?v=1762474932"}},{"id":319456018603,"handle":"sacral-chakra-crystals","title":"Sacral Chakra Crystals","updated_at":"2026-01-06T11:12:19-05:00","body_html":"\u003cp data-start=\"144\" data-end=\"489\"\u003e✨ \u003cstrong data-start=\"146\" data-end=\"172\"\u003eSacral Chakra Crystals\u003c\/strong\u003e ✨\u003cbr data-start=\"174\" data-end=\"177\"\u003eIgnite creativity, passion, and emotional balance with our \u003cstrong data-start=\"236\" data-end=\"262\"\u003eSacral Chakra Crystals\u003c\/strong\u003e. Located just below the navel, the Sacral Chakra governs pleasure, intimacy, and self-expression. These crystals help release emotional blockages, enhance creativity, and promote confidence in expressing your authentic self.\u003c\/p\u003e\n\u003cp data-start=\"491\" data-end=\"833\"\u003eOur curated selection includes stones such as Carnelian, Orange Calcite, and Sunstone—chosen for their vibrant energy and ability to awaken joy, vitality, and emotional harmony. Perfect for meditation, energy work, or as wearable reminders, Sacral Chakra Crystals encourage a healthy flow of energy and inspire passion in all areas of life.\u003c\/p\u003e\n\u003cp data-start=\"835\" data-end=\"970\"\u003eEmbrace creativity, cultivate emotional balance, and awaken your inner fire with the transformative energy of Sacral Chakra Crystals.\u003c\/p\u003e","published_at":"2025-07-17T18:19:00-04:00","sort_order":"best-selling","template_suffix":"","disjunctive":false,"rules":[{"column":"variant_metafield_definition","relation":"equals","condition":"Sacral"}],"published_scope":"global","image":{"created_at":"2025-07-17T19:08:18-04:00","alt":null,"width":1080,"height":1080,"src":"\/\/crystaldestiny.com\/cdn\/shop\/collections\/Sacral_Chakra_Collection.jpg?v=1762474931"}},{"id":294880116907,"handle":"polished","title":"Polished Crystals","updated_at":"2026-01-07T23:43:11-05:00","body_html":"\u003cp data-start=\"199\" data-end=\"598\"\u003e✨ \u003cstrong data-start=\"201\" data-end=\"248\"\u003eCrystal Destiny Polished Crystal Collection\u003c\/strong\u003e ✨\u003cbr data-start=\"250\" data-end=\"253\"\u003eIndulge in the brilliance of crystals refined to perfection. Our \u003cstrong data-start=\"318\" data-end=\"341\"\u003ePolished Collection\u003c\/strong\u003e showcases gemstones meticulously shaped and smoothed to reveal their natural radiance and timeless beauty. From the shimmering glow of Quartz to the deep allure of Obsidian, each polished piece is a testament to nature’s artistry and human craftsmanship.\u003c\/p\u003e\n\u003cp data-start=\"600\" data-end=\"862\"\u003ePerfect as statement décor, meaningful gifts, or companions on your spiritual journey, polished crystals bring sophistication and elevated energy into any space. Their radiant surfaces reflect not only light but also the transformative power of crystal energy.\u003c\/p\u003e\n\u003cp data-start=\"864\" data-end=\"1022\"\u003eDiscover the elegance of refinement with Crystal Destiny’s Polished Crystal Collection—where every facet shines with intention, beauty, and timeless allure.\u003c\/p\u003e","published_at":"2023-06-05T11:30:44-04:00","sort_order":"created-desc","template_suffix":"","disjunctive":false,"rules":[{"column":"tag","relation":"equals","condition":"polished"}],"published_scope":"global"},{"id":321695744171,"handle":"direct-from-supplier","title":"Direct from Supplier","updated_at":"2026-01-07T23:43:11-05:00","body_html":"","published_at":"2025-09-12T16:38:23-04:00","sort_order":"best-selling","template_suffix":"","disjunctive":true,"rules":[{"column":"tag","relation":"equals","condition":"adjusted-shipping"}],"published_scope":"global"},{"id":295698202795,"handle":"spheres","title":"Crystal Spheres","updated_at":"2026-01-06T23:24:35-05:00","body_html":"\u003cp data-start=\"106\" data-end=\"370\"\u003e✨ \u003cstrong data-start=\"108\" data-end=\"138\"\u003eCrystal Spheres Collection\u003c\/strong\u003e ✨\u003cbr data-start=\"140\" data-end=\"143\"\u003eBring harmony, balance, and elegance into your space with our \u003cstrong data-start=\"205\" data-end=\"235\"\u003eCrystal Spheres Collection\u003c\/strong\u003e. Each sphere is meticulously crafted to showcase the natural beauty and energy of crystals, from radiant Quartz to calming Amethyst.\u003c\/p\u003e\n\u003cp data-start=\"372\" data-end=\"658\"\u003ePerfect for meditation, energy work, or as striking décor, crystal spheres radiate energy in all directions, promoting clarity, focus, and a sense of calm. Their smooth, polished surfaces highlight the stones’ natural patterns and colors, making each sphere a captivating centerpiece.\u003c\/p\u003e\n\u003cp data-start=\"660\" data-end=\"809\"\u003eElevate your space and embrace the transformative power of crystals with the \u003cstrong data-start=\"737\" data-end=\"767\"\u003eCrystal Spheres Collection\u003c\/strong\u003e—where beauty, energy, and harmony meet.\u003c\/p\u003e","published_at":"2023-07-28T14:20:46-04:00","sort_order":"created-desc","template_suffix":"","disjunctive":true,"rules":[{"column":"tag","relation":"equals","condition":"spheres"},{"column":"tag","relation":"equals","condition":"eggs"}],"published_scope":"global"},{"id":293659312299,"handle":"best-sellers","title":"Best Sellers","updated_at":"2026-01-07T23:43:11-05:00","body_html":"\u003cp data-start=\"155\" data-end=\"510\"\u003eDiscover the pieces our community loves most. Our Best Sellers Collection brings together handpicked crystals and jewelry that embody timeless elegance, spiritual resonance, and everyday sophistication. Each item has earned its place as a customer favorite—celebrated for both its beauty and its meaningful energy.\u003c\/p\u003e\n\u003cp data-start=\"512\" data-end=\"802\"\u003eFrom stunning statement pieces to versatile daily companions, these treasures are curated to elevate your space, uplift your spirit, and reflect refined taste. Indulge in what’s most cherished and let our best sellers guide you toward the perfect blend of style and transformative energy.\u003c\/p\u003e\n\u003cp data-start=\"804\" data-end=\"932\"\u003eExplore the Best Sellers Collection today—where elegance meets intention, and every piece tells a story of beauty and balance.\u003c\/p\u003e","published_at":"2023-03-15T16:04:51-04:00","sort_order":"best-selling","template_suffix":"","disjunctive":false,"rules":[{"column":"variant_price","relation":"greater_than","condition":"0"},{"column":"variant_inventory","relation":"greater_than","condition":"0"},{"column":"type","relation":"not_equals","condition":"Shipping Protection"}],"published_scope":"global"},{"id":321370390699,"handle":"monthly-crystal-sale","title":"Monthly Crystal Sale | Spheres \u0026 Towers","updated_at":"2026-01-06T23:24:37-05:00","body_html":"\u003cp\u003eShop our \u003cstrong\u003eMonthly Crystal Sale\u003c\/strong\u003e, where you can shop a wide selection of healing crystals at discounted prices. Explore \u003cstrong\u003ecrystal spheres and towers,\u003c\/strong\u003e— all carefully curated to support meditation, energy balancing, and spiritual wellness. Whether you're looking to enhance your home decor, boost your daily energy, or find the perfect gift, our \u003cstrong\u003ecrystals for healing and manifestation\u003c\/strong\u003e offer both beauty and metaphysical benefits.\u003c\/p\u003e\n\u003cp\u003eEach month, our sale features \u003cstrong\u003enew discounted collections\u003c\/strong\u003e, from \u003cstrong\u003enatural quartz and amethyst towers\u003c\/strong\u003e to \u003cstrong\u003ewire-wrapped pendants and polished stones\u003c\/strong\u003e, so there's always something fresh to discover. Shop with confidence knowing you're getting high-quality crystals with \u003cstrong\u003efree shipping options\u003c\/strong\u003e and a trusted experience.\u003c\/p\u003e\n\u003cp\u003e\u003cstrong\u003eTake advantage of the Monthly Crystal Sale today\u003c\/strong\u003e and add powerful, natural energy to your life with \u003cstrong\u003eauthentic healing crystals\u003c\/strong\u003e — while our limited-time discounts last.\u003c\/p\u003e\n\u003cp\u003e\u003cstrong\u003e*Discount automatically applied at checkout.\u003c\/strong\u003e\u003c\/p\u003e","published_at":"2025-12-02T01:26:17-05:00","sort_order":"alpha-asc","template_suffix":"","disjunctive":true,"rules":[{"column":"tag","relation":"equals","condition":"spheres"},{"column":"tag","relation":"equals","condition":"Towers"}],"published_scope":"global","image":{"created_at":"2026-01-01T01:32:34-05:00","alt":"","width":960,"height":960,"src":"\/\/crystaldestiny.com\/cdn\/shop\/collections\/3E8C2969-1B86-4ACE-B349-98E9D8768424.jpg?v=1767249154"}},{"id":297906241707,"handle":"new-arrivals","title":"New Arrivals","updated_at":"2026-01-07T23:43:11-05:00","body_html":"\u003cp data-start=\"172\" data-end=\"573\"\u003e✨ \u003cstrong data-start=\"174\" data-end=\"217\"\u003eDiscover Crystal Destiny’s New Arrivals\u003c\/strong\u003e ✨\u003cbr data-start=\"219\" data-end=\"222\"\u003eStep into a world of fresh sophistication with our latest crystal treasures. Each new piece—whether Quartz, Amethyst, or beyond—embodies nature’s artistry, radiating both timeless beauty and powerful energy. Thoughtfully curated and constantly refreshed, our New Arrivals Collection offers the perfect harmony of elegance and metaphysical resonance.\u003c\/p\u003e\n\u003cp data-start=\"575\" data-end=\"793\"\u003eElevate your space, uplift your spirit, and embrace the transformative power of nature’s wonders. Explore the newest expressions of crystal artistry today, and let your journey with crystals evolve with every update.\u003c\/p\u003e","published_at":"2023-11-20T15:35:42-05:00","sort_order":"created-desc","template_suffix":"","disjunctive":true,"rules":[{"column":"tag","relation":"equals","condition":"new-arrivals"}],"published_scope":"global"},{"id":297596059819,"handle":"all","title":"All Crystals \u0026 Jewelry","updated_at":"2026-01-07T23:43:11-05:00","body_html":"\u003cp data-start=\"149\" data-end=\"494\"\u003e✨ \u003cstrong data-start=\"151\" data-end=\"181\"\u003eWelcome to Crystal Destiny\u003c\/strong\u003e ✨\u003cbr data-start=\"183\" data-end=\"186\"\u003eStep into a world where beauty, energy, and artistry unite. Our collection is a treasure trove of exquisite crystals, from the raw, untamed elegance of natural formations to the polished brilliance of expertly crafted pieces. Each crystal is a masterpiece, carrying its own unique story and timeless charm.\u003c\/p\u003e\n\u003cp data-start=\"496\" data-end=\"831\"\u003eWhether you’re drawn to the calming presence of Amethyst, the vibrant energy of Citrine, or the grounding strength of Jasper, our crystals invite you to connect with nature’s finest wonders. Perfect for enhancing your space, supporting your spiritual journey, or gifting with intention, every piece resonates with beauty and meaning.\u003c\/p\u003e\n\u003cp data-start=\"833\" data-end=\"1000\"\u003eElevate your surroundings, embrace the mystique, and explore the enchanting world of crystals at \u003cstrong data-start=\"930\" data-end=\"949\"\u003eCrystal Destiny\u003c\/strong\u003e—where every crystal is waiting to be discovered.\u003c\/p\u003e","published_at":"2023-11-10T13:55:31-05:00","sort_order":"created-desc","template_suffix":"","disjunctive":false,"rules":[{"column":"type","relation":"not_equals","condition":"asdf"}],"published_scope":"global"},{"id":298983391403,"handle":"january-crystal-sale","title":"January Sale | 25% Off Crystal Towers \u0026 Spheres","updated_at":"2026-01-06T23:24:37-05:00","body_html":"\u003cp\u003eShop our \u003cstrong\u003eJanuary Crystal Sale\u003c\/strong\u003e, where you can shop a wide selection of healing crystals at discounted prices. Explore \u003cstrong\u003eCrystal Towers, \u0026amp; Crystal Spheres\u003c\/strong\u003e — all carefully curated and crafted to support meditation, energy balancing, and spiritual wellness. Whether you're looking to enhance your home decor, boost your daily energy, or find the perfect gift, our \u003cstrong\u003ecrystals for healing and manifestation\u003c\/strong\u003e offer both beauty and metaphysical benefits.\u003c\/p\u003e\n\u003cp\u003eThis January, our sale features \u003cstrong\u003ediscounted crystal towers and spheres\u003c\/strong\u003e, from \u003cstrong\u003enatural quartz \u003c\/strong\u003eand \u003cstrong\u003eamethyst \u003c\/strong\u003eto \u003cstrong\u003ebumblebee jasper \u003c\/strong\u003eand \u003cstrong\u003ecarnelian\u003c\/strong\u003e, so there's always something fresh to discover. Shop with confidence knowing you're getting high-quality crystals with \u003cstrong\u003efree shipping options\u003c\/strong\u003e and a trusted experience.\u003c\/p\u003e\n\u003cp\u003e\u003cstrong\u003eTake advantage of the January Crystal Sale today\u003c\/strong\u003e and add powerful, natural energy to your life with \u003cstrong\u003eauthentic healing crystals\u003c\/strong\u003e — while our limited-time discounts last.\u003c\/p\u003e\n\u003cp\u003e\u003cstrong\u003e*Discount automatically applied at checkout.\u003c\/strong\u003e\u003c\/p\u003e","published_at":"2026-01-01T00:07:17-05:00","sort_order":"alpha-asc","template_suffix":"monthly-collection","disjunctive":true,"rules":[{"column":"tag","relation":"equals","condition":"Spheres"},{"column":"tag","relation":"equals","condition":"Towers"}],"published_scope":"global","image":{"created_at":"2026-01-01T01:29:59-05:00","alt":"","width":960,"height":960,"src":"\/\/crystaldestiny.com\/cdn\/shop\/collections\/1464163B-22B1-4D62-BEC5-CEC9AECB670B.jpg?v=1767248999"}}]}
[{"alt":"Cherry Agate Crystal Sphere with Base-Spheres-Crystal Destiny-6 183g 50mnm-Cherry Agate-Crystal Destiny","id":32289034567851,"position":1,"preview_image":{"aspect_ratio":1.0,"height":1000,"width":1000,"src":"\/\/crystaldestiny.com\/cdn\/shop\/files\/Cherry-Agate-Crystal-Sphere-with-Base-Spheres.webp?v=1765383306"},"aspect_ratio":1.0,"height":1000,"media_type":"image","src":"\/\/crystaldestiny.com\/cdn\/shop\/files\/Cherry-Agate-Crystal-Sphere-with-Base-Spheres.webp?v=1765383306","width":1000},{"alt":"Cherry Agate Crystal Sphere with Base-Spheres-Crystal Destiny-5 206g 53mm-Cherry Agate-Crystal Destiny","id":32289034600619,"position":2,"preview_image":{"aspect_ratio":1.0,"height":1000,"width":1000,"src":"\/\/crystaldestiny.com\/cdn\/shop\/files\/Cherry-Agate-Crystal-Sphere-with-Base-Spheres-5-206g-53mm-Cherry-Agate-2.webp?v=1765383308"},"aspect_ratio":1.0,"height":1000,"media_type":"image","src":"\/\/crystaldestiny.com\/cdn\/shop\/files\/Cherry-Agate-Crystal-Sphere-with-Base-Spheres-5-206g-53mm-Cherry-Agate-2.webp?v=1765383308","width":1000},{"alt":"Cherry Agate Crystal Sphere with Base-Spheres-Crystal Destiny-13 247g 56mm-Cherry Agate-Crystal Destiny","id":32289034633387,"position":3,"preview_image":{"aspect_ratio":1.0,"height":1000,"width":1000,"src":"\/\/crystaldestiny.com\/cdn\/shop\/files\/Cherry-Agate-Crystal-Sphere-with-Base-Spheres-13-247g-56mm-Cherry-Agate-3.webp?v=1765383309"},"aspect_ratio":1.0,"height":1000,"media_type":"image","src":"\/\/crystaldestiny.com\/cdn\/shop\/files\/Cherry-Agate-Crystal-Sphere-with-Base-Spheres-13-247g-56mm-Cherry-Agate-3.webp?v=1765383309","width":1000},{"alt":"Cherry Agate Crystal Sphere with Base-Spheres-Crystal Destiny-35 89g 40mm-Cherry Agate-Crystal Destiny","id":32289034666155,"position":4,"preview_image":{"aspect_ratio":1.0,"height":1000,"width":1000,"src":"\/\/crystaldestiny.com\/cdn\/shop\/files\/Cherry-Agate-Crystal-Sphere-with-Base-Spheres-35-89g-40mm-Cherry-Agate-4.webp?v=1765383311"},"aspect_ratio":1.0,"height":1000,"media_type":"image","src":"\/\/crystaldestiny.com\/cdn\/shop\/files\/Cherry-Agate-Crystal-Sphere-with-Base-Spheres-35-89g-40mm-Cherry-Agate-4.webp?v=1765383311","width":1000},{"alt":"Cherry Agate Crystal Sphere with Base-Spheres-Crystal Destiny-26 171g 50mm-Cherry Agate-Crystal Destiny","id":32289034698923,"position":5,"preview_image":{"aspect_ratio":1.0,"height":1000,"width":1000,"src":"\/\/crystaldestiny.com\/cdn\/shop\/files\/Cherry-Agate-Crystal-Sphere-with-Base-Spheres-26-171g-50mm-Cherry-Agate-5.webp?v=1765383313"},"aspect_ratio":1.0,"height":1000,"media_type":"image","src":"\/\/crystaldestiny.com\/cdn\/shop\/files\/Cherry-Agate-Crystal-Sphere-with-Base-Spheres-26-171g-50mm-Cherry-Agate-5.webp?v=1765383313","width":1000},{"alt":"Cherry Agate Crystal Sphere with Base-Spheres-Crystal Destiny-2 201g 52mm-Cherry Agate-Crystal Destiny","id":32289034731691,"position":6,"preview_image":{"aspect_ratio":1.0,"height":1000,"width":1000,"src":"\/\/crystaldestiny.com\/cdn\/shop\/files\/Cherry-Agate-Crystal-Sphere-with-Base-Spheres-2-201g-52mm-Cherry-Agate-6.webp?v=1765383314"},"aspect_ratio":1.0,"height":1000,"media_type":"image","src":"\/\/crystaldestiny.com\/cdn\/shop\/files\/Cherry-Agate-Crystal-Sphere-with-Base-Spheres-2-201g-52mm-Cherry-Agate-6.webp?v=1765383314","width":1000},{"alt":"Cherry Agate Crystal Sphere with Base-Spheres-Crystal Destiny-14 267g 57mm-Cherry Agate-Crystal Destiny","id":32289034764459,"position":7,"preview_image":{"aspect_ratio":1.0,"height":1000,"width":1000,"src":"\/\/crystaldestiny.com\/cdn\/shop\/files\/Cherry-Agate-Crystal-Sphere-with-Base-Spheres-14-267g-57mm-Cherry-Agate-7.webp?v=1765383316"},"aspect_ratio":1.0,"height":1000,"media_type":"image","src":"\/\/crystaldestiny.com\/cdn\/shop\/files\/Cherry-Agate-Crystal-Sphere-with-Base-Spheres-14-267g-57mm-Cherry-Agate-7.webp?v=1765383316","width":1000},{"alt":"Cherry Agate Crystal Sphere with Base-Spheres-Crystal Destiny-10 229g 54mm-Cherry Agate-Crystal Destiny","id":32289034797227,"position":8,"preview_image":{"aspect_ratio":1.0,"height":1000,"width":1000,"src":"\/\/crystaldestiny.com\/cdn\/shop\/files\/Cherry-Agate-Crystal-Sphere-with-Base-Spheres-10-229g-54mm-Cherry-Agate-8.webp?v=1765383318"},"aspect_ratio":1.0,"height":1000,"media_type":"image","src":"\/\/crystaldestiny.com\/cdn\/shop\/files\/Cherry-Agate-Crystal-Sphere-with-Base-Spheres-10-229g-54mm-Cherry-Agate-8.webp?v=1765383318","width":1000},{"alt":"Cherry Agate Crystal Sphere with Base-Spheres-Crystal Destiny-17 200g 52mm-Cherry Agate-Crystal Destiny","id":32289034829995,"position":9,"preview_image":{"aspect_ratio":1.0,"height":1000,"width":1000,"src":"\/\/crystaldestiny.com\/cdn\/shop\/files\/Cherry-Agate-Crystal-Sphere-with-Base-Spheres-17-200g-52mm-Cherry-Agate-9.webp?v=1765383319"},"aspect_ratio":1.0,"height":1000,"media_type":"image","src":"\/\/crystaldestiny.com\/cdn\/shop\/files\/Cherry-Agate-Crystal-Sphere-with-Base-Spheres-17-200g-52mm-Cherry-Agate-9.webp?v=1765383319","width":1000},{"alt":"Cherry Agate Crystal Sphere with Base-Spheres-Crystal Destiny-28 231g 55mm-Cherry Agate-Crystal Destiny","id":32289034862763,"position":10,"preview_image":{"aspect_ratio":1.0,"height":1000,"width":1000,"src":"\/\/crystaldestiny.com\/cdn\/shop\/files\/Cherry-Agate-Crystal-Sphere-with-Base-Spheres-28-231g-55mm-Cherry-Agate-10.webp?v=1765383321"},"aspect_ratio":1.0,"height":1000,"media_type":"image","src":"\/\/crystaldestiny.com\/cdn\/shop\/files\/Cherry-Agate-Crystal-Sphere-with-Base-Spheres-28-231g-55mm-Cherry-Agate-10.webp?v=1765383321","width":1000},{"alt":"Cherry Agate Crystal Sphere with Base-Spheres-Crystal Destiny-6 183g 50mnm-Cherry Agate-Crystal Destiny","id":32289034895531,"position":11,"preview_image":{"aspect_ratio":1.0,"height":1000,"width":1000,"src":"\/\/crystaldestiny.com\/cdn\/shop\/files\/Cherry-Agate-Crystal-Sphere-with-Base-Spheres-6-183g-50mnm-Cherry-Agate-11.webp?v=1765383323"},"aspect_ratio":1.0,"height":1000,"media_type":"image","src":"\/\/crystaldestiny.com\/cdn\/shop\/files\/Cherry-Agate-Crystal-Sphere-with-Base-Spheres-6-183g-50mnm-Cherry-Agate-11.webp?v=1765383323","width":1000},{"alt":"Cherry Agate Crystal Sphere with Base-Spheres-Crystal Destiny-21 209g 54mm-Cherry Agate-Crystal Destiny","id":32289034928299,"position":12,"preview_image":{"aspect_ratio":1.0,"height":1000,"width":1000,"src":"\/\/crystaldestiny.com\/cdn\/shop\/files\/Cherry-Agate-Crystal-Sphere-with-Base-Spheres-21-209g-54mm-Cherry-Agate-12.webp?v=1765383324"},"aspect_ratio":1.0,"height":1000,"media_type":"image","src":"\/\/crystaldestiny.com\/cdn\/shop\/files\/Cherry-Agate-Crystal-Sphere-with-Base-Spheres-21-209g-54mm-Cherry-Agate-12.webp?v=1765383324","width":1000},{"alt":"Cherry Agate Crystal Sphere with Base-Spheres-Crystal Destiny-24 196g 52mm-Cherry Agate-Crystal Destiny","id":32289034961067,"position":13,"preview_image":{"aspect_ratio":1.0,"height":1000,"width":1000,"src":"\/\/crystaldestiny.com\/cdn\/shop\/files\/Cherry-Agate-Crystal-Sphere-with-Base-Spheres-24-196g-52mm-Cherry-Agate-13.webp?v=1765383326"},"aspect_ratio":1.0,"height":1000,"media_type":"image","src":"\/\/crystaldestiny.com\/cdn\/shop\/files\/Cherry-Agate-Crystal-Sphere-with-Base-Spheres-24-196g-52mm-Cherry-Agate-13.webp?v=1765383326","width":1000},{"alt":"Cherry Agate Crystal Sphere with Base-Spheres-Crystal Destiny-32 170g 50mm-Cherry Agate-Crystal Destiny","id":32289034993835,"position":14,"preview_image":{"aspect_ratio":1.0,"height":1000,"width":1000,"src":"\/\/crystaldestiny.com\/cdn\/shop\/files\/Cherry-Agate-Crystal-Sphere-with-Base-Spheres-32-170g-50mm-Cherry-Agate-14.webp?v=1765383328"},"aspect_ratio":1.0,"height":1000,"media_type":"image","src":"\/\/crystaldestiny.com\/cdn\/shop\/files\/Cherry-Agate-Crystal-Sphere-with-Base-Spheres-32-170g-50mm-Cherry-Agate-14.webp?v=1765383328","width":1000},{"alt":"Cherry Agate Crystal Sphere with Base-Spheres-Crystal Destiny-3 138g 46mm-Cherry Agate-Crystal Destiny","id":32289035026603,"position":15,"preview_image":{"aspect_ratio":1.0,"height":1000,"width":1000,"src":"\/\/crystaldestiny.com\/cdn\/shop\/files\/Cherry-Agate-Crystal-Sphere-with-Base-Spheres-3-138g-46mm-Cherry-Agate-15.webp?v=1765383329"},"aspect_ratio":1.0,"height":1000,"media_type":"image","src":"\/\/crystaldestiny.com\/cdn\/shop\/files\/Cherry-Agate-Crystal-Sphere-with-Base-Spheres-3-138g-46mm-Cherry-Agate-15.webp?v=1765383329","width":1000},{"alt":"Cherry Agate Crystal Sphere with Base-Spheres-Crystal Destiny-1 364g 64mm-Cherry Agate-Crystal Destiny","id":32289035059371,"position":16,"preview_image":{"aspect_ratio":1.0,"height":1000,"width":1000,"src":"\/\/crystaldestiny.com\/cdn\/shop\/files\/Cherry-Agate-Crystal-Sphere-with-Base-Spheres-1-364g-64mm-Cherry-Agate-16.webp?v=1765383331"},"aspect_ratio":1.0,"height":1000,"media_type":"image","src":"\/\/crystaldestiny.com\/cdn\/shop\/files\/Cherry-Agate-Crystal-Sphere-with-Base-Spheres-1-364g-64mm-Cherry-Agate-16.webp?v=1765383331","width":1000},{"alt":"Cherry Agate Crystal Sphere with Base-Spheres-Crystal Destiny-20 417g 67mm-Cherry Agate-Crystal Destiny","id":32289035092139,"position":17,"preview_image":{"aspect_ratio":1.0,"height":1000,"width":1000,"src":"\/\/crystaldestiny.com\/cdn\/shop\/files\/Cherry-Agate-Crystal-Sphere-with-Base-Spheres-20-417g-67mm-Cherry-Agate-17.webp?v=1765383333"},"aspect_ratio":1.0,"height":1000,"media_type":"image","src":"\/\/crystaldestiny.com\/cdn\/shop\/files\/Cherry-Agate-Crystal-Sphere-with-Base-Spheres-20-417g-67mm-Cherry-Agate-17.webp?v=1765383333","width":1000},{"alt":"Cherry Agate Crystal Sphere with Base-Spheres-Crystal Destiny-19 296g 60mm-Cherry Agate-Crystal Destiny","id":32289035124907,"position":18,"preview_image":{"aspect_ratio":1.0,"height":1000,"width":1000,"src":"\/\/crystaldestiny.com\/cdn\/shop\/files\/Cherry-Agate-Crystal-Sphere-with-Base-Spheres-19-296g-60mm-Cherry-Agate-18.webp?v=1765383335"},"aspect_ratio":1.0,"height":1000,"media_type":"image","src":"\/\/crystaldestiny.com\/cdn\/shop\/files\/Cherry-Agate-Crystal-Sphere-with-Base-Spheres-19-296g-60mm-Cherry-Agate-18.webp?v=1765383335","width":1000},{"alt":"Cherry Agate Crystal Sphere with Base-Spheres-Crystal Destiny-16 207g 53mm-Cherry Agate-Crystal Destiny","id":32289035157675,"position":19,"preview_image":{"aspect_ratio":1.0,"height":1000,"width":1000,"src":"\/\/crystaldestiny.com\/cdn\/shop\/files\/Cherry-Agate-Crystal-Sphere-with-Base-Spheres-16-207g-53mm-Cherry-Agate-19.webp?v=1765383337"},"aspect_ratio":1.0,"height":1000,"media_type":"image","src":"\/\/crystaldestiny.com\/cdn\/shop\/files\/Cherry-Agate-Crystal-Sphere-with-Base-Spheres-16-207g-53mm-Cherry-Agate-19.webp?v=1765383337","width":1000},{"alt":"Cherry Agate Crystal Sphere with Base-Spheres-Crystal Destiny-29 331g 62mm-Cherry Agate-Crystal Destiny","id":32289035190443,"position":20,"preview_image":{"aspect_ratio":1.0,"height":1000,"width":1000,"src":"\/\/crystaldestiny.com\/cdn\/shop\/files\/Cherry-Agate-Crystal-Sphere-with-Base-Spheres-29-331g-62mm-Cherry-Agate-20.webp?v=1765383338"},"aspect_ratio":1.0,"height":1000,"media_type":"image","src":"\/\/crystaldestiny.com\/cdn\/shop\/files\/Cherry-Agate-Crystal-Sphere-with-Base-Spheres-29-331g-62mm-Cherry-Agate-20.webp?v=1765383338","width":1000},{"alt":"Cherry Agate Crystal Sphere with Base-Spheres-Crystal Destiny-4 232g 55mm-Cherry Agate-Crystal Destiny","id":32289035223211,"position":21,"preview_image":{"aspect_ratio":1.0,"height":1000,"width":1000,"src":"\/\/crystaldestiny.com\/cdn\/shop\/files\/Cherry-Agate-Crystal-Sphere-with-Base-Spheres-4-232g-55mm-Cherry-Agate-21.webp?v=1765383340"},"aspect_ratio":1.0,"height":1000,"media_type":"image","src":"\/\/crystaldestiny.com\/cdn\/shop\/files\/Cherry-Agate-Crystal-Sphere-with-Base-Spheres-4-232g-55mm-Cherry-Agate-21.webp?v=1765383340","width":1000},{"alt":"Cherry Agate Crystal Sphere with Base-Spheres-Crystal Destiny-7 268g 57mm-Cherry Agate-Crystal Destiny","id":32289035255979,"position":22,"preview_image":{"aspect_ratio":1.0,"height":1000,"width":1000,"src":"\/\/crystaldestiny.com\/cdn\/shop\/files\/Cherry-Agate-Crystal-Sphere-with-Base-Spheres-7-268g-57mm-Cherry-Agate-22.webp?v=1765383341"},"aspect_ratio":1.0,"height":1000,"media_type":"image","src":"\/\/crystaldestiny.com\/cdn\/shop\/files\/Cherry-Agate-Crystal-Sphere-with-Base-Spheres-7-268g-57mm-Cherry-Agate-22.webp?v=1765383341","width":1000},{"alt":"Cherry Agate Crystal Sphere with Base-Spheres-Crystal Destiny-15 331g 62mm-Cherry Agate-Crystal Destiny","id":32289035288747,"position":23,"preview_image":{"aspect_ratio":1.0,"height":1000,"width":1000,"src":"\/\/crystaldestiny.com\/cdn\/shop\/files\/Cherry-Agate-Crystal-Sphere-with-Base-Spheres-15-331g-62mm-Cherry-Agate-23.webp?v=1765383344"},"aspect_ratio":1.0,"height":1000,"media_type":"image","src":"\/\/crystaldestiny.com\/cdn\/shop\/files\/Cherry-Agate-Crystal-Sphere-with-Base-Spheres-15-331g-62mm-Cherry-Agate-23.webp?v=1765383344","width":1000},{"alt":"Cherry Agate Crystal Sphere with Base-Spheres-Crystal Destiny-27 169g 49mm-Cherry Agate-Crystal Destiny","id":32289035321515,"position":24,"preview_image":{"aspect_ratio":1.0,"height":1000,"width":1000,"src":"\/\/crystaldestiny.com\/cdn\/shop\/files\/Cherry-Agate-Crystal-Sphere-with-Base-Spheres-27-169g-49mm-Cherry-Agate-24.webp?v=1765383345"},"aspect_ratio":1.0,"height":1000,"media_type":"image","src":"\/\/crystaldestiny.com\/cdn\/shop\/files\/Cherry-Agate-Crystal-Sphere-with-Base-Spheres-27-169g-49mm-Cherry-Agate-24.webp?v=1765383345","width":1000},{"alt":"Cherry Agate Crystal Sphere with Base-Spheres-Crystal Destiny-25 279g 59mm-Cherry Agate-Crystal Destiny","id":32289035354283,"position":25,"preview_image":{"aspect_ratio":1.0,"height":1000,"width":1000,"src":"\/\/crystaldestiny.com\/cdn\/shop\/files\/Cherry-Agate-Crystal-Sphere-with-Base-Spheres-25-279g-59mm-Cherry-Agate-25.webp?v=1765383347"},"aspect_ratio":1.0,"height":1000,"media_type":"image","src":"\/\/crystaldestiny.com\/cdn\/shop\/files\/Cherry-Agate-Crystal-Sphere-with-Base-Spheres-25-279g-59mm-Cherry-Agate-25.webp?v=1765383347","width":1000},{"alt":"Cherry Agate Crystal Sphere with Base-Spheres-Crystal Destiny-11 246g 56mm-Cherry Agate-Crystal Destiny","id":32289035387051,"position":26,"preview_image":{"aspect_ratio":1.0,"height":1000,"width":1000,"src":"\/\/crystaldestiny.com\/cdn\/shop\/files\/Cherry-Agate-Crystal-Sphere-with-Base-Spheres-11-246g-56mm-Cherry-Agate-26.webp?v=1765383348"},"aspect_ratio":1.0,"height":1000,"media_type":"image","src":"\/\/crystaldestiny.com\/cdn\/shop\/files\/Cherry-Agate-Crystal-Sphere-with-Base-Spheres-11-246g-56mm-Cherry-Agate-26.webp?v=1765383348","width":1000},{"alt":"Cherry Agate Crystal Sphere with Base-Spheres-Crystal Destiny-9 181g 51mm-Cherry Agate-Crystal Destiny","id":32289035419819,"position":27,"preview_image":{"aspect_ratio":1.0,"height":1000,"width":1000,"src":"\/\/crystaldestiny.com\/cdn\/shop\/files\/Cherry-Agate-Crystal-Sphere-with-Base-Spheres-9-181g-51mm-Cherry-Agate-27.webp?v=1765383350"},"aspect_ratio":1.0,"height":1000,"media_type":"image","src":"\/\/crystaldestiny.com\/cdn\/shop\/files\/Cherry-Agate-Crystal-Sphere-with-Base-Spheres-9-181g-51mm-Cherry-Agate-27.webp?v=1765383350","width":1000},{"alt":"Cherry Agate Crystal Sphere with Base-Spheres-Crystal Destiny-18 323g 61mm-Cherry Agate-Crystal Destiny","id":32289035452587,"position":28,"preview_image":{"aspect_ratio":1.0,"height":1000,"width":1000,"src":"\/\/crystaldestiny.com\/cdn\/shop\/files\/Cherry-Agate-Crystal-Sphere-with-Base-Spheres-18-323g-61mm-Cherry-Agate-28.webp?v=1765383352"},"aspect_ratio":1.0,"height":1000,"media_type":"image","src":"\/\/crystaldestiny.com\/cdn\/shop\/files\/Cherry-Agate-Crystal-Sphere-with-Base-Spheres-18-323g-61mm-Cherry-Agate-28.webp?v=1765383352","width":1000},{"alt":"Cherry Agate Crystal Sphere with Base-Spheres-Crystal Destiny-33 215g 54mm-Cherry Agate-Crystal Destiny","id":32289035485355,"position":29,"preview_image":{"aspect_ratio":1.0,"height":1000,"width":1000,"src":"\/\/crystaldestiny.com\/cdn\/shop\/files\/Cherry-Agate-Crystal-Sphere-with-Base-Spheres-33-215g-54mm-Cherry-Agate-29.webp?v=1765383353"},"aspect_ratio":1.0,"height":1000,"media_type":"image","src":"\/\/crystaldestiny.com\/cdn\/shop\/files\/Cherry-Agate-Crystal-Sphere-with-Base-Spheres-33-215g-54mm-Cherry-Agate-29.webp?v=1765383353","width":1000},{"alt":"Cherry Agate Crystal Sphere with Base-Spheres-Crystal Destiny-12 198g 52mm-Cherry Agate-Crystal Destiny","id":32289035518123,"position":30,"preview_image":{"aspect_ratio":1.0,"height":1000,"width":1000,"src":"\/\/crystaldestiny.com\/cdn\/shop\/files\/Cherry-Agate-Crystal-Sphere-with-Base-Spheres-12-198g-52mm-Cherry-Agate-30.webp?v=1765383355"},"aspect_ratio":1.0,"height":1000,"media_type":"image","src":"\/\/crystaldestiny.com\/cdn\/shop\/files\/Cherry-Agate-Crystal-Sphere-with-Base-Spheres-12-198g-52mm-Cherry-Agate-30.webp?v=1765383355","width":1000},{"alt":"Cherry Agate Crystal Sphere with Base-Spheres-Crystal Destiny-22 215g 53mm-Cherry Agate-Crystal Destiny","id":32289035550891,"position":31,"preview_image":{"aspect_ratio":1.0,"height":1000,"width":1000,"src":"\/\/crystaldestiny.com\/cdn\/shop\/files\/Cherry-Agate-Crystal-Sphere-with-Base-Spheres-22-215g-53mm-Cherry-Agate-31.webp?v=1765383357"},"aspect_ratio":1.0,"height":1000,"media_type":"image","src":"\/\/crystaldestiny.com\/cdn\/shop\/files\/Cherry-Agate-Crystal-Sphere-with-Base-Spheres-22-215g-53mm-Cherry-Agate-31.webp?v=1765383357","width":1000},{"alt":"Cherry Agate Crystal Sphere with Base-Spheres-Crystal Destiny-30 206g 53mm-Cherry Agate-Crystal Destiny","id":32289035583659,"position":32,"preview_image":{"aspect_ratio":1.0,"height":1000,"width":1000,"src":"\/\/crystaldestiny.com\/cdn\/shop\/files\/Cherry-Agate-Crystal-Sphere-with-Base-Spheres-30-206g-53mm-Cherry-Agate-32.webp?v=1765383358"},"aspect_ratio":1.0,"height":1000,"media_type":"image","src":"\/\/crystaldestiny.com\/cdn\/shop\/files\/Cherry-Agate-Crystal-Sphere-with-Base-Spheres-30-206g-53mm-Cherry-Agate-32.webp?v=1765383358","width":1000},{"alt":"Cherry Agate Crystal Sphere with Base-Spheres-Crystal Destiny-34 103g 42mm-Cherry Agate-Crystal Destiny","id":32289035616427,"position":33,"preview_image":{"aspect_ratio":1.0,"height":1000,"width":1000,"src":"\/\/crystaldestiny.com\/cdn\/shop\/files\/Cherry-Agate-Crystal-Sphere-with-Base-Spheres-34-103g-42mm-Cherry-Agate-33.webp?v=1765383359"},"aspect_ratio":1.0,"height":1000,"media_type":"image","src":"\/\/crystaldestiny.com\/cdn\/shop\/files\/Cherry-Agate-Crystal-Sphere-with-Base-Spheres-34-103g-42mm-Cherry-Agate-33.webp?v=1765383359","width":1000},{"alt":"Cherry Agate Crystal Sphere with Base-Spheres-Crystal Destiny-31 176g 50mm-Cherry Agate-Crystal Destiny","id":32289035649195,"position":34,"preview_image":{"aspect_ratio":1.0,"height":1000,"width":1000,"src":"\/\/crystaldestiny.com\/cdn\/shop\/files\/Cherry-Agate-Crystal-Sphere-with-Base-Spheres-31-176g-50mm-Cherry-Agate-34.webp?v=1765383360"},"aspect_ratio":1.0,"height":1000,"media_type":"image","src":"\/\/crystaldestiny.com\/cdn\/shop\/files\/Cherry-Agate-Crystal-Sphere-with-Base-Spheres-31-176g-50mm-Cherry-Agate-34.webp?v=1765383360","width":1000},{"alt":"Cherry Agate Crystal Sphere with Base-Spheres-Crystal Destiny-8 262g 57mm-Cherry Agate-Crystal Destiny","id":32289035681963,"position":35,"preview_image":{"aspect_ratio":1.0,"height":1000,"width":1000,"src":"\/\/crystaldestiny.com\/cdn\/shop\/files\/Cherry-Agate-Crystal-Sphere-with-Base-Spheres-8-262g-57mm-Cherry-Agate-35.webp?v=1765383362"},"aspect_ratio":1.0,"height":1000,"media_type":"image","src":"\/\/crystaldestiny.com\/cdn\/shop\/files\/Cherry-Agate-Crystal-Sphere-with-Base-Spheres-8-262g-57mm-Cherry-Agate-35.webp?v=1765383362","width":1000},{"alt":"Cherry Agate Crystal Sphere with Base-Spheres-Crystal Destiny-23 211g 53mm-Cherry Agate-Crystal Destiny","id":32289035714731,"position":36,"preview_image":{"aspect_ratio":1.0,"height":1000,"width":1000,"src":"\/\/crystaldestiny.com\/cdn\/shop\/files\/Cherry-Agate-Crystal-Sphere-with-Base-Spheres-23-211g-53mm-Cherry-Agate-36.webp?v=1765383364"},"aspect_ratio":1.0,"height":1000,"media_type":"image","src":"\/\/crystaldestiny.com\/cdn\/shop\/files\/Cherry-Agate-Crystal-Sphere-with-Base-Spheres-23-211g-53mm-Cherry-Agate-36.webp?v=1765383364","width":1000},{"alt":"Cherry Agate Crystal Sphere with Base-Spheres-Crystal Destiny-36 148g 47mm-Cherry Agate-Crystal Destiny","id":32289035747499,"position":37,"preview_image":{"aspect_ratio":1.0,"height":1000,"width":1000,"src":"\/\/crystaldestiny.com\/cdn\/shop\/files\/Cherry-Agate-Crystal-Sphere-with-Base-Spheres-36-148g-47mm-Cherry-Agate-37.webp?v=1765383366"},"aspect_ratio":1.0,"height":1000,"media_type":"image","src":"\/\/crystaldestiny.com\/cdn\/shop\/files\/Cherry-Agate-Crystal-Sphere-with-Base-Spheres-36-148g-47mm-Cherry-Agate-37.webp?v=1765383366","width":1000}]
{"item":{"id":8535221698731,"title":"Chevron Amethyst Double Termination Point","handle":"chevron-amethyst-double-termination-point-cd-10382","description":"\u003cp data-start=\"208\" data-end=\"572\"\u003eThis \u003cstrong data-start=\"240\" data-end=\"285\"\u003eChevron Amethyst Double Termination Point\u003c\/strong\u003e combines the calming purple hues of Amethyst with striking white quartz banding, creating a crystal of both beauty and power. Double-terminated points allow energy to flow in both directions, making this piece especially effective for meditation, energy healing, and chakra balancing.\u003c\/p\u003e\n\u003cp data-start=\"574\" data-end=\"895\"\u003eChevron Amethyst is known for enhancing spiritual awareness, strengthening intuition, and promoting inner peace. Its unique formation makes it a powerful tool for clearing negative energy, amplifying intentions, and connecting with higher guidance. Collectors and healers alike will value this rare and radiant crystal.\u003c\/p\u003e\n\u003cp data-start=\"574\" data-end=\"895\"\u003eThis product is an exact pick as pictured, one of a kind.\u003c\/p\u003e\n\u003ch2\u003eCrystal Towers, Wands, Generators, Points, Pillars \u0026amp; Obelisks — What's the Difference?\u003c\/h2\u003e\n\u003cp id=\"isPasted\"\u003eWhile these terms may vary, they all describe beautifully shaped crystals with a pointed tip designed to channel and direct energy. Each name highlights a unique aspect of their use:\u003c\/p\u003e\n\u003cul\u003e\n\u003cli\u003e\n\u003cstrong\u003eTowers\u003c\/strong\u003e- Known for their steady, grounding presence, crystal towers help focus and amplify energy, making them perfect for meditation and manifestation.\u003c\/li\u003e\n\u003cli\u003e\n\u003cstrong\u003eWands\u003c\/strong\u003e- Traditionally used in energy work and healing, crystal wands are excellent for directing energy flow and clearing blockages.\u003c\/li\u003e\n\u003cli\u003e\n\u003cstrong\u003ePillars\u003c\/strong\u003e- Symbolizing strength and stability, crystal pillars create a balanced and harmonious environment, making them great for home decor and spiritual practices.\u003c\/li\u003e\n\u003cli\u003e\n\u003cstrong\u003eObelisks\u003c\/strong\u003e- Inspired by ancient structures, crystal obelisks are believed to connect earthly and spiritual energies, making them powerful tools for transformation and enlightenment.\u003c\/li\u003e\n\u003c\/ul\u003e\n\u003cp\u003eNo matter what you call them, these crystals serve the same purpose—to enhance energy, intention, and harmony in your space. Choose the one that resonates most with you!\u003c\/p\u003e\n\u003cp data-start=\"574\" data-end=\"895\"\u003e \u003c\/p\u003e","published_at":"2025-09-26T18:17:48-04:00","created_at":"2025-09-26T18:17:46-04:00","vendor":"Crystal Destiny","type":"Points","tags":["crystal","polished","Towers"],"price":3499,"price_min":3499,"price_max":3499,"available":true,"price_varies":false,"compare_at_price":null,"compare_at_price_min":0,"compare_at_price_max":0,"compare_at_price_varies":false,"variants":[{"id":45670891520171,"title":"Chevron Amethyst \/ 174g - 4.75\"L x 1.10\"W x 1.10\"D","option1":"Chevron Amethyst","option2":"174g - 4.75\"L x 1.10\"W x 1.10\"D","option3":null,"sku":"CD-10382","requires_shipping":true,"taxable":true,"featured_image":null,"available":true,"name":"Chevron Amethyst Double Termination Point - Chevron Amethyst \/ 174g - 4.75\"L x 1.10\"W x 1.10\"D","public_title":"Chevron Amethyst \/ 174g - 4.75\"L x 1.10\"W x 1.10\"D","options":["Chevron Amethyst","174g - 4.75\"L x 1.10\"W x 1.10\"D"],"price":3499,"weight":174,"compare_at_price":null,"inventory_management":"shopify","barcode":"","requires_selling_plan":false,"selling_plan_allocations":[]}],"images":["\/\/crystaldestiny.com\/cdn\/shop\/files\/Chevron-Amethyst-Double-Termination-Point-Points.jpg?v=1758949690","\/\/crystaldestiny.com\/cdn\/shop\/files\/Chevron-Amethyst-Double-Termination-Point-Points-2.jpg?v=1758949692"],"featured_image":"\/\/crystaldestiny.com\/cdn\/shop\/files\/Chevron-Amethyst-Double-Termination-Point-Points.jpg?v=1758949690","options":["Material","Size"],"media":[{"alt":"Chevron Amethyst Double Termination Point-Points-Crystal Destiny-Chevron Amethyst-174g - 4.75\"L x 1.10\"W x 1.10\"D-Crystal Destiny","id":31873063387307,"position":1,"preview_image":{"aspect_ratio":1.0,"height":2048,"width":2048,"src":"\/\/crystaldestiny.com\/cdn\/shop\/files\/Chevron-Amethyst-Double-Termination-Point-Points.jpg?v=1758949690"},"aspect_ratio":1.0,"height":2048,"media_type":"image","src":"\/\/crystaldestiny.com\/cdn\/shop\/files\/Chevron-Amethyst-Double-Termination-Point-Points.jpg?v=1758949690","width":2048},{"alt":"Chevron Amethyst Double Termination Point-Points-Crystal Destiny-Chevron Amethyst-174g - 4.75\"L x 1.10\"W x 1.10\"D-Crystal Destiny","id":31873063420075,"position":2,"preview_image":{"aspect_ratio":1.0,"height":2048,"width":2048,"src":"\/\/crystaldestiny.com\/cdn\/shop\/files\/Chevron-Amethyst-Double-Termination-Point-Points-2.jpg?v=1758949692"},"aspect_ratio":1.0,"height":2048,"media_type":"image","src":"\/\/crystaldestiny.com\/cdn\/shop\/files\/Chevron-Amethyst-Double-Termination-Point-Points-2.jpg?v=1758949692","width":2048}],"requires_selling_plan":false,"selling_plan_groups":[],"content":"\u003cp data-start=\"208\" data-end=\"572\"\u003eThis \u003cstrong data-start=\"240\" data-end=\"285\"\u003eChevron Amethyst Double Termination Point\u003c\/strong\u003e combines the calming purple hues of Amethyst with striking white quartz banding, creating a crystal of both beauty and power. Double-terminated points allow energy to flow in both directions, making this piece especially effective for meditation, energy healing, and chakra balancing.\u003c\/p\u003e\n\u003cp data-start=\"574\" data-end=\"895\"\u003eChevron Amethyst is known for enhancing spiritual awareness, strengthening intuition, and promoting inner peace. Its unique formation makes it a powerful tool for clearing negative energy, amplifying intentions, and connecting with higher guidance. Collectors and healers alike will value this rare and radiant crystal.\u003c\/p\u003e\n\u003cp data-start=\"574\" data-end=\"895\"\u003eThis product is an exact pick as pictured, one of a kind.\u003c\/p\u003e\n\u003ch2\u003eCrystal Towers, Wands, Generators, Points, Pillars \u0026amp; Obelisks — What's the Difference?\u003c\/h2\u003e\n\u003cp id=\"isPasted\"\u003eWhile these terms may vary, they all describe beautifully shaped crystals with a pointed tip designed to channel and direct energy. Each name highlights a unique aspect of their use:\u003c\/p\u003e\n\u003cul\u003e\n\u003cli\u003e\n\u003cstrong\u003eTowers\u003c\/strong\u003e- Known for their steady, grounding presence, crystal towers help focus and amplify energy, making them perfect for meditation and manifestation.\u003c\/li\u003e\n\u003cli\u003e\n\u003cstrong\u003eWands\u003c\/strong\u003e- Traditionally used in energy work and healing, crystal wands are excellent for directing energy flow and clearing blockages.\u003c\/li\u003e\n\u003cli\u003e\n\u003cstrong\u003ePillars\u003c\/strong\u003e- Symbolizing strength and stability, crystal pillars create a balanced and harmonious environment, making them great for home decor and spiritual practices.\u003c\/li\u003e\n\u003cli\u003e\n\u003cstrong\u003eObelisks\u003c\/strong\u003e- Inspired by ancient structures, crystal obelisks are believed to connect earthly and spiritual energies, making them powerful tools for transformation and enlightenment.\u003c\/li\u003e\n\u003c\/ul\u003e\n\u003cp\u003eNo matter what you call them, these crystals serve the same purpose—to enhance energy, intention, and harmony in your space. Choose the one that resonates most with you!\u003c\/p\u003e\n\u003cp data-start=\"574\" data-end=\"895\"\u003e \u003c\/p\u003e"},"options":[{"name":"Material","position":1,"values":["Chevron Amethyst"]},{"name":"Size","position":2,"values":["174g - 4.75\"L x 1.10\"W x 1.10\"D"]}],"custom_metafields":{"shipping_time":"Within 7 days"},"metafields":{"badge":"\u003cdiv style='display:none' class='jdgm-prev-badge' data-average-rating='0.00' data-number-of-reviews='0' data-number-of-questions='0'\u003e \u003cspan class='jdgm-prev-badge__stars' data-score='0.00' tabindex='0' aria-label='0.00 stars' role='button'\u003e \u003cspan class='jdgm-star jdgm--off'\u003e\u003c\/span\u003e\u003cspan class='jdgm-star jdgm--off'\u003e\u003c\/span\u003e\u003cspan class='jdgm-star jdgm--off'\u003e\u003c\/span\u003e\u003cspan class='jdgm-star jdgm--off'\u003e\u003c\/span\u003e\u003cspan class='jdgm-star jdgm--off'\u003e\u003c\/span\u003e \u003c\/span\u003e \u003cspan class='jdgm-prev-badge__text'\u003e No reviews \u003c\/span\u003e \u003c\/div\u003e","widget":"\u003cdiv class='jdgm-rev-widg' data-updated-at='2025-09-26T22:18:54Z' data-average-rating='0.00' data-number-of-reviews='0' data-number-of-questions='0' data-image-url='https:\/\/cdn.shopify.com\/s\/files\/1\/0613\/0345\/5915\/files\/6I0A4245.jpg?v=1758924936'\u003e \u003cstyle class='jdgm-temp-hiding-style'\u003e.jdgm-rev-widg{ display: none }\u003c\/style\u003e \u003cdiv class='jdgm-rev-widg__header'\u003e \u003ch2 class='jdgm-rev-widg__title'\u003eCustomer Reviews\u003c\/h2\u003e \u003cdiv class='jdgm-rev-widg__summary'\u003e \u003cdiv class='jdgm-rev-widg__summary-stars' aria-label='Average rating is 0.00 stars' role='img'\u003e \u003cspan class='jdgm-star jdgm--off'\u003e\u003c\/span\u003e\u003cspan class='jdgm-star jdgm--off'\u003e\u003c\/span\u003e\u003cspan class='jdgm-star jdgm--off'\u003e\u003c\/span\u003e\u003cspan class='jdgm-star jdgm--off'\u003e\u003c\/span\u003e\u003cspan class='jdgm-star jdgm--off'\u003e\u003c\/span\u003e \u003c\/div\u003e \u003cdiv class='jdgm-rev-widg__summary-text'\u003eBe the first to write a review\u003c\/div\u003e \u003c\/div\u003e \u003ca style='display: none' href='#' class='jdgm-write-rev-link' role='button'\u003eWrite a review\u003c\/a\u003e \u003cdiv class='jdgm-histogram jdgm-temp-hidden'\u003e \u003cdiv class='jdgm-histogram__row' data-rating='5' data-frequency='0' data-percentage='0'\u003e \u003cdiv class='jdgm-histogram__star' role='button' aria-label=\"0% (0) reviews with 5 star rating\" tabindex='0' \u003e\u003cspan class='jdgm-star jdgm--on'\u003e\u003c\/span\u003e\u003cspan class='jdgm-star jdgm--on'\u003e\u003c\/span\u003e\u003cspan class='jdgm-star jdgm--on'\u003e\u003c\/span\u003e\u003cspan class='jdgm-star jdgm--on'\u003e\u003c\/span\u003e\u003cspan class='jdgm-star jdgm--on'\u003e\u003c\/span\u003e\u003c\/div\u003e \u003cdiv class='jdgm-histogram__bar'\u003e \u003cdiv class='jdgm-histogram__bar-content' style='width: 0%;'\u003e \u003c\/div\u003e \u003c\/div\u003e \u003cdiv class='jdgm-histogram__percentage'\u003e0%\u003c\/div\u003e \u003cdiv class='jdgm-histogram__frequency'\u003e(0)\u003c\/div\u003e \u003c\/div\u003e \u003cdiv class='jdgm-histogram__row' data-rating='4' data-frequency='0' data-percentage='0'\u003e \u003cdiv class='jdgm-histogram__star' role='button' aria-label=\"0% (0) reviews with 4 star rating\" tabindex='0' \u003e\u003cspan class='jdgm-star jdgm--on'\u003e\u003c\/span\u003e\u003cspan class='jdgm-star jdgm--on'\u003e\u003c\/span\u003e\u003cspan class='jdgm-star jdgm--on'\u003e\u003c\/span\u003e\u003cspan class='jdgm-star jdgm--on'\u003e\u003c\/span\u003e\u003cspan class='jdgm-star jdgm--off'\u003e\u003c\/span\u003e\u003c\/div\u003e \u003cdiv class='jdgm-histogram__bar'\u003e \u003cdiv class='jdgm-histogram__bar-content' style='width: 0%;'\u003e \u003c\/div\u003e \u003c\/div\u003e \u003cdiv class='jdgm-histogram__percentage'\u003e0%\u003c\/div\u003e \u003cdiv class='jdgm-histogram__frequency'\u003e(0)\u003c\/div\u003e \u003c\/div\u003e \u003cdiv class='jdgm-histogram__row' data-rating='3' data-frequency='0' data-percentage='0'\u003e \u003cdiv class='jdgm-histogram__star' role='button' aria-label=\"0% (0) reviews with 3 star rating\" tabindex='0' \u003e\u003cspan class='jdgm-star jdgm--on'\u003e\u003c\/span\u003e\u003cspan class='jdgm-star jdgm--on'\u003e\u003c\/span\u003e\u003cspan class='jdgm-star jdgm--on'\u003e\u003c\/span\u003e\u003cspan class='jdgm-star jdgm--off'\u003e\u003c\/span\u003e\u003cspan class='jdgm-star jdgm--off'\u003e\u003c\/span\u003e\u003c\/div\u003e \u003cdiv class='jdgm-histogram__bar'\u003e \u003cdiv class='jdgm-histogram__bar-content' style='width: 0%;'\u003e \u003c\/div\u003e \u003c\/div\u003e \u003cdiv class='jdgm-histogram__percentage'\u003e0%\u003c\/div\u003e \u003cdiv class='jdgm-histogram__frequency'\u003e(0)\u003c\/div\u003e \u003c\/div\u003e \u003cdiv class='jdgm-histogram__row' data-rating='2' data-frequency='0' data-percentage='0'\u003e \u003cdiv class='jdgm-histogram__star' role='button' aria-label=\"0% (0) reviews with 2 star rating\" tabindex='0' \u003e\u003cspan class='jdgm-star jdgm--on'\u003e\u003c\/span\u003e\u003cspan class='jdgm-star jdgm--on'\u003e\u003c\/span\u003e\u003cspan class='jdgm-star jdgm--off'\u003e\u003c\/span\u003e\u003cspan class='jdgm-star jdgm--off'\u003e\u003c\/span\u003e\u003cspan class='jdgm-star jdgm--off'\u003e\u003c\/span\u003e\u003c\/div\u003e \u003cdiv class='jdgm-histogram__bar'\u003e \u003cdiv class='jdgm-histogram__bar-content' style='width: 0%;'\u003e \u003c\/div\u003e \u003c\/div\u003e \u003cdiv class='jdgm-histogram__percentage'\u003e0%\u003c\/div\u003e \u003cdiv class='jdgm-histogram__frequency'\u003e(0)\u003c\/div\u003e \u003c\/div\u003e \u003cdiv class='jdgm-histogram__row' data-rating='1' data-frequency='0' data-percentage='0'\u003e \u003cdiv class='jdgm-histogram__star' role='button' aria-label=\"0% (0) reviews with 1 star rating\" tabindex='0' \u003e\u003cspan class='jdgm-star jdgm--on'\u003e\u003c\/span\u003e\u003cspan class='jdgm-star jdgm--off'\u003e\u003c\/span\u003e\u003cspan class='jdgm-star jdgm--off'\u003e\u003c\/span\u003e\u003cspan class='jdgm-star jdgm--off'\u003e\u003c\/span\u003e\u003cspan class='jdgm-star jdgm--off'\u003e\u003c\/span\u003e\u003c\/div\u003e \u003cdiv class='jdgm-histogram__bar'\u003e \u003cdiv class='jdgm-histogram__bar-content' style='width: 0%;'\u003e \u003c\/div\u003e \u003c\/div\u003e \u003cdiv class='jdgm-histogram__percentage'\u003e0%\u003c\/div\u003e \u003cdiv class='jdgm-histogram__frequency'\u003e(0)\u003c\/div\u003e \u003c\/div\u003e \u003cdiv class='jdgm-histogram__row jdgm-histogram__clear-filter' data-rating=null tabindex='0'\u003e\u003c\/div\u003e \u003c\/div\u003e \u003cdiv class='jdgm-rev-widg__sort-wrapper'\u003e\u003c\/div\u003e \u003c\/div\u003e \u003cdiv class='jdgm-rev-widg__body'\u003e \u003cdiv class='jdgm-rev-widg__reviews'\u003e\u003c\/div\u003e \u003cdiv class='jdgm-paginate' data-per-page='4' data-url='https:\/\/api.judge.me\/reviews\/reviews_for_widget' style=\"display: none;\"\u003e\u003c\/div\u003e \u003c\/div\u003e \u003cdiv class='jdgm-rev-widg__paginate-spinner-wrapper'\u003e \u003cdiv class='jdgm-spinner'\u003e\u003c\/div\u003e \u003c\/div\u003e \u003c\/div\u003e"},"collections":[{"id":294880051371,"handle":"crystals","title":"Crystals","updated_at":"2026-01-07T23:43:11-05:00","body_html":"\u003cp data-start=\"159\" data-end=\"687\"\u003e✨ \u003cstrong data-start=\"161\" data-end=\"216\"\u003eDiscover the Magic of Crystals with Crystal Destiny\u003c\/strong\u003e ✨\u003cbr data-start=\"218\" data-end=\"221\"\u003eCrystals have been treasured for centuries—not only for their natural beauty but also for their powerful healing energies. Beyond their visual allure, they bring balance, harmony, and positive energy into any space. Whether used for home décor, meditation, or simply to elevate the energy of your surroundings, crystals create a sanctuary of peace, relaxation, and well-being. Each piece is a unique gift from the Earth—visually stunning and spiritually uplifting.\u003c\/p\u003e\n\u003cp data-start=\"689\" data-end=\"1011\"\u003eAt \u003cstrong data-start=\"692\" data-end=\"711\"\u003eCrystal Destiny\u003c\/strong\u003e, our signature collection showcases a curated selection of exquisite crystals, from radiant Quartz to soothing Amethyst. Every stone is carefully sourced for its elegance and metaphysical resonance, making them perfect for enhancing your home, uplifting your spirit, or gifting to someone special.\u003c\/p\u003e\n\u003cp data-start=\"1013\" data-end=\"1206\"\u003eExperience the timeless sophistication of crystalline wonders. Explore the \u003cstrong data-start=\"1088\" data-end=\"1118\"\u003eCrystal Destiny Collection\u003c\/strong\u003e today and bring the transformative beauty of these treasures into your everyday life.\u003c\/p\u003e","published_at":"2023-06-05T11:24:02-04:00","sort_order":"created-desc","template_suffix":"","disjunctive":false,"rules":[{"column":"tag","relation":"equals","condition":"crystal"},{"column":"type","relation":"not_contains","condition":"925 Sterling Silver"},{"column":"type","relation":"not_contains","condition":"Wire Wraps"}],"published_scope":"global"},{"id":319455789227,"handle":"third-eye-chakra-crystals","title":"Third Eye Chakra Crystals","updated_at":"2026-01-07T23:42:38-05:00","body_html":"\u003cp data-start=\"124\" data-end=\"474\"\u003e✨ \u003cstrong data-start=\"126\" data-end=\"155\"\u003eThird Eye Chakra Crystals\u003c\/strong\u003e ✨\u003cbr data-start=\"157\" data-end=\"160\"\u003eAwaken intuition, clarity, and insight with our \u003cstrong data-start=\"208\" data-end=\"237\"\u003eThird Eye Chakra Crystals\u003c\/strong\u003e. Located between the eyebrows, the Third Eye Chakra governs perception, intuition, and inner wisdom. These crystals help balance and activate this energy center, promoting mental clarity, spiritual awareness, and heightened intuition.\u003c\/p\u003e\n\u003cp data-start=\"476\" data-end=\"835\"\u003eOur curated selection features stones such as Amethyst, Lapis Lazuli, and Sodalite—chosen for their ability to enhance meditation, intuitive practices, and energy work. Whether placed in your sacred space, carried with you, or worn as jewelry, Third Eye Chakra Crystals support mental focus, spiritual growth, and a deeper connection to your inner guidance.\u003c\/p\u003e\n\u003cp data-start=\"837\" data-end=\"976\"\u003eElevate your intuition, expand your awareness, and embrace the transformative power of the Third Eye Chakra with these powerful crystals.\u003c\/p\u003e","published_at":"2025-07-17T18:16:49-04:00","sort_order":"best-selling","template_suffix":"","disjunctive":false,"rules":[{"column":"variant_metafield_definition","relation":"equals","condition":"Third Eye"}],"published_scope":"global","image":{"created_at":"2025-07-17T19:09:01-04:00","alt":null,"width":1080,"height":1080,"src":"\/\/crystaldestiny.com\/cdn\/shop\/collections\/Third_Eye_Chakra_Collection.jpg?v=1762474924"}},{"id":294880116907,"handle":"polished","title":"Polished Crystals","updated_at":"2026-01-07T23:43:11-05:00","body_html":"\u003cp data-start=\"199\" data-end=\"598\"\u003e✨ \u003cstrong data-start=\"201\" data-end=\"248\"\u003eCrystal Destiny Polished Crystal Collection\u003c\/strong\u003e ✨\u003cbr data-start=\"250\" data-end=\"253\"\u003eIndulge in the brilliance of crystals refined to perfection. Our \u003cstrong data-start=\"318\" data-end=\"341\"\u003ePolished Collection\u003c\/strong\u003e showcases gemstones meticulously shaped and smoothed to reveal their natural radiance and timeless beauty. From the shimmering glow of Quartz to the deep allure of Obsidian, each polished piece is a testament to nature’s artistry and human craftsmanship.\u003c\/p\u003e\n\u003cp data-start=\"600\" data-end=\"862\"\u003ePerfect as statement décor, meaningful gifts, or companions on your spiritual journey, polished crystals bring sophistication and elevated energy into any space. Their radiant surfaces reflect not only light but also the transformative power of crystal energy.\u003c\/p\u003e\n\u003cp data-start=\"864\" data-end=\"1022\"\u003eDiscover the elegance of refinement with Crystal Destiny’s Polished Crystal Collection—where every facet shines with intention, beauty, and timeless allure.\u003c\/p\u003e","published_at":"2023-06-05T11:30:44-04:00","sort_order":"created-desc","template_suffix":"","disjunctive":false,"rules":[{"column":"tag","relation":"equals","condition":"polished"}],"published_scope":"global"},{"id":293659312299,"handle":"best-sellers","title":"Best Sellers","updated_at":"2026-01-07T23:43:11-05:00","body_html":"\u003cp data-start=\"155\" data-end=\"510\"\u003eDiscover the pieces our community loves most. Our Best Sellers Collection brings together handpicked crystals and jewelry that embody timeless elegance, spiritual resonance, and everyday sophistication. Each item has earned its place as a customer favorite—celebrated for both its beauty and its meaningful energy.\u003c\/p\u003e\n\u003cp data-start=\"512\" data-end=\"802\"\u003eFrom stunning statement pieces to versatile daily companions, these treasures are curated to elevate your space, uplift your spirit, and reflect refined taste. Indulge in what’s most cherished and let our best sellers guide you toward the perfect blend of style and transformative energy.\u003c\/p\u003e\n\u003cp data-start=\"804\" data-end=\"932\"\u003eExplore the Best Sellers Collection today—where elegance meets intention, and every piece tells a story of beauty and balance.\u003c\/p\u003e","published_at":"2023-03-15T16:04:51-04:00","sort_order":"best-selling","template_suffix":"","disjunctive":false,"rules":[{"column":"variant_price","relation":"greater_than","condition":"0"},{"column":"variant_inventory","relation":"greater_than","condition":"0"},{"column":"type","relation":"not_equals","condition":"Shipping Protection"}],"published_scope":"global"},{"id":321370390699,"handle":"monthly-crystal-sale","title":"Monthly Crystal Sale | Spheres \u0026 Towers","updated_at":"2026-01-06T23:24:37-05:00","body_html":"\u003cp\u003eShop our \u003cstrong\u003eMonthly Crystal Sale\u003c\/strong\u003e, where you can shop a wide selection of healing crystals at discounted prices. Explore \u003cstrong\u003ecrystal spheres and towers,\u003c\/strong\u003e— all carefully curated to support meditation, energy balancing, and spiritual wellness. Whether you're looking to enhance your home decor, boost your daily energy, or find the perfect gift, our \u003cstrong\u003ecrystals for healing and manifestation\u003c\/strong\u003e offer both beauty and metaphysical benefits.\u003c\/p\u003e\n\u003cp\u003eEach month, our sale features \u003cstrong\u003enew discounted collections\u003c\/strong\u003e, from \u003cstrong\u003enatural quartz and amethyst towers\u003c\/strong\u003e to \u003cstrong\u003ewire-wrapped pendants and polished stones\u003c\/strong\u003e, so there's always something fresh to discover. Shop with confidence knowing you're getting high-quality crystals with \u003cstrong\u003efree shipping options\u003c\/strong\u003e and a trusted experience.\u003c\/p\u003e\n\u003cp\u003e\u003cstrong\u003eTake advantage of the Monthly Crystal Sale today\u003c\/strong\u003e and add powerful, natural energy to your life with \u003cstrong\u003eauthentic healing crystals\u003c\/strong\u003e — while our limited-time discounts last.\u003c\/p\u003e\n\u003cp\u003e\u003cstrong\u003e*Discount automatically applied at checkout.\u003c\/strong\u003e\u003c\/p\u003e","published_at":"2025-12-02T01:26:17-05:00","sort_order":"alpha-asc","template_suffix":"","disjunctive":true,"rules":[{"column":"tag","relation":"equals","condition":"spheres"},{"column":"tag","relation":"equals","condition":"Towers"}],"published_scope":"global","image":{"created_at":"2026-01-01T01:32:34-05:00","alt":"","width":960,"height":960,"src":"\/\/crystaldestiny.com\/cdn\/shop\/collections\/3E8C2969-1B86-4ACE-B349-98E9D8768424.jpg?v=1767249154"}},{"id":297596059819,"handle":"all","title":"All Crystals \u0026 Jewelry","updated_at":"2026-01-07T23:43:11-05:00","body_html":"\u003cp data-start=\"149\" data-end=\"494\"\u003e✨ \u003cstrong data-start=\"151\" data-end=\"181\"\u003eWelcome to Crystal Destiny\u003c\/strong\u003e ✨\u003cbr data-start=\"183\" data-end=\"186\"\u003eStep into a world where beauty, energy, and artistry unite. Our collection is a treasure trove of exquisite crystals, from the raw, untamed elegance of natural formations to the polished brilliance of expertly crafted pieces. Each crystal is a masterpiece, carrying its own unique story and timeless charm.\u003c\/p\u003e\n\u003cp data-start=\"496\" data-end=\"831\"\u003eWhether you’re drawn to the calming presence of Amethyst, the vibrant energy of Citrine, or the grounding strength of Jasper, our crystals invite you to connect with nature’s finest wonders. Perfect for enhancing your space, supporting your spiritual journey, or gifting with intention, every piece resonates with beauty and meaning.\u003c\/p\u003e\n\u003cp data-start=\"833\" data-end=\"1000\"\u003eElevate your surroundings, embrace the mystique, and explore the enchanting world of crystals at \u003cstrong data-start=\"930\" data-end=\"949\"\u003eCrystal Destiny\u003c\/strong\u003e—where every crystal is waiting to be discovered.\u003c\/p\u003e","published_at":"2023-11-10T13:55:31-05:00","sort_order":"created-desc","template_suffix":"","disjunctive":false,"rules":[{"column":"type","relation":"not_equals","condition":"asdf"}],"published_scope":"global"},{"id":296256405675,"handle":"crystal-towers","title":"Crystal Towers","updated_at":"2026-01-06T23:24:37-05:00","body_html":"\u003cp data-end=\"568\" data-start=\"152\"\u003e✨ \u003cstrong data-end=\"190\" data-start=\"154\"\u003eCrystal Destiny Tower Collection\u003c\/strong\u003e ✨\u003cbr data-end=\"195\" data-start=\"192\"\u003eEnchant your space with the timeless beauty and powerful energy of crystal towers. Each piece in our \u003cstrong data-end=\"316\" data-start=\"296\"\u003eTower Collection\u003c\/strong\u003e is carefully crafted to showcase nature’s artistry while radiating higher vibrations and spiritual resonance. From the clarity of Quartz to the calming presence of Amethyst, these towers are both decorative masterpieces and tools for transformation.\u003c\/p\u003e\n\u003cp data-end=\"765\" data-start=\"570\"\u003ePerfect for meditation spaces, energy work, or simply elevating your home décor, crystal towers channel focused energy upward—creating balance, harmony, and refined elegance in any environment.\u003c\/p\u003e\n\u003cp data-end=\"917\" data-start=\"767\"\u003eDiscover the Crystal Destiny Tower Collection today and transform your surroundings into a sanctuary of beauty, purpose, and spiritual significance.\u003c\/p\u003e\n\u003ch2\u003eCrystal Towers, Wands, Generators, Points, Pillars \u0026amp; Obelisks — What's the Difference?\u003c\/h2\u003e\n\u003cp id=\"isPasted\"\u003eWhile these terms may vary, they all describe beautifully shaped crystals with a pointed tip designed to channel and direct energy. Each name highlights a unique aspect of their use:\u003c\/p\u003e\n\u003cul\u003e\n\u003cli\u003e\n\u003cstrong\u003eTowers\u003c\/strong\u003e- Known for their steady, grounding presence, crystal towers help focus and amplify energy, making them perfect for meditation and manifestation.\u003c\/li\u003e\n\u003cli\u003e\n\u003cstrong\u003eWands\u003c\/strong\u003e- Traditionally used in energy work and healing, crystal wands are excellent for directing energy flow and clearing blockages.\u003c\/li\u003e\n\u003cli\u003e\n\u003cstrong\u003ePillars\u003c\/strong\u003e- Symbolizing strength and stability, crystal pillars create a balanced and harmonious environment, making them great for home decor and spiritual practices.\u003c\/li\u003e\n\u003cli\u003e\n\u003cstrong\u003eObelisks\u003c\/strong\u003e- Inspired by ancient structures, crystal obelisks are believed to connect earthly and spiritual energies, making them powerful tools for transformation and enlightenment.\u003c\/li\u003e\n\u003c\/ul\u003e\n\u003cp\u003eNo matter what you call them, these crystals serve the same purpose—to enhance energy, intention, and harmony in your space. Choose the one that resonates most with you!\u003c\/p\u003e","published_at":"2023-09-14T12:52:35-04:00","sort_order":"created-desc","template_suffix":"","disjunctive":false,"rules":[{"column":"tag","relation":"equals","condition":"towers"}],"published_scope":"global"},{"id":298983391403,"handle":"january-crystal-sale","title":"January Sale | 25% Off Crystal Towers \u0026 Spheres","updated_at":"2026-01-06T23:24:37-05:00","body_html":"\u003cp\u003eShop our \u003cstrong\u003eJanuary Crystal Sale\u003c\/strong\u003e, where you can shop a wide selection of healing crystals at discounted prices. Explore \u003cstrong\u003eCrystal Towers, \u0026amp; Crystal Spheres\u003c\/strong\u003e — all carefully curated and crafted to support meditation, energy balancing, and spiritual wellness. Whether you're looking to enhance your home decor, boost your daily energy, or find the perfect gift, our \u003cstrong\u003ecrystals for healing and manifestation\u003c\/strong\u003e offer both beauty and metaphysical benefits.\u003c\/p\u003e\n\u003cp\u003eThis January, our sale features \u003cstrong\u003ediscounted crystal towers and spheres\u003c\/strong\u003e, from \u003cstrong\u003enatural quartz \u003c\/strong\u003eand \u003cstrong\u003eamethyst \u003c\/strong\u003eto \u003cstrong\u003ebumblebee jasper \u003c\/strong\u003eand \u003cstrong\u003ecarnelian\u003c\/strong\u003e, so there's always something fresh to discover. Shop with confidence knowing you're getting high-quality crystals with \u003cstrong\u003efree shipping options\u003c\/strong\u003e and a trusted experience.\u003c\/p\u003e\n\u003cp\u003e\u003cstrong\u003eTake advantage of the January Crystal Sale today\u003c\/strong\u003e and add powerful, natural energy to your life with \u003cstrong\u003eauthentic healing crystals\u003c\/strong\u003e — while our limited-time discounts last.\u003c\/p\u003e\n\u003cp\u003e\u003cstrong\u003e*Discount automatically applied at checkout.\u003c\/strong\u003e\u003c\/p\u003e","published_at":"2026-01-01T00:07:17-05:00","sort_order":"alpha-asc","template_suffix":"monthly-collection","disjunctive":true,"rules":[{"column":"tag","relation":"equals","condition":"Spheres"},{"column":"tag","relation":"equals","condition":"Towers"}],"published_scope":"global","image":{"created_at":"2026-01-01T01:29:59-05:00","alt":"","width":960,"height":960,"src":"\/\/crystaldestiny.com\/cdn\/shop\/collections\/1464163B-22B1-4D62-BEC5-CEC9AECB670B.jpg?v=1767248999"}}]}
[{"alt":"Chevron Amethyst Double Termination Point-Points-Crystal Destiny-Chevron Amethyst-174g - 4.75\"L x 1.10\"W x 1.10\"D-Crystal Destiny","id":31873063387307,"position":1,"preview_image":{"aspect_ratio":1.0,"height":2048,"width":2048,"src":"\/\/crystaldestiny.com\/cdn\/shop\/files\/Chevron-Amethyst-Double-Termination-Point-Points.jpg?v=1758949690"},"aspect_ratio":1.0,"height":2048,"media_type":"image","src":"\/\/crystaldestiny.com\/cdn\/shop\/files\/Chevron-Amethyst-Double-Termination-Point-Points.jpg?v=1758949690","width":2048},{"alt":"Chevron Amethyst Double Termination Point-Points-Crystal Destiny-Chevron Amethyst-174g - 4.75\"L x 1.10\"W x 1.10\"D-Crystal Destiny","id":31873063420075,"position":2,"preview_image":{"aspect_ratio":1.0,"height":2048,"width":2048,"src":"\/\/crystaldestiny.com\/cdn\/shop\/files\/Chevron-Amethyst-Double-Termination-Point-Points-2.jpg?v=1758949692"},"aspect_ratio":1.0,"height":2048,"media_type":"image","src":"\/\/crystaldestiny.com\/cdn\/shop\/files\/Chevron-Amethyst-Double-Termination-Point-Points-2.jpg?v=1758949692","width":2048}]
{"item":{"id":8515024486571,"title":"Chevron Amethyst Spheres 58-71MM","handle":"chevron-amethyst-spheres-58-71mm-cd-10347","description":"\u003cp\u003eChevron Amethyst Spheres, measuring between 58-71MM, are exceptional specimens that blend the distinctive banded patterns of Chevron Amethyst with the smooth, spherical shape highly prized in crystal healing and metaphysical practices. These spheres showcase the unique, V-shaped or chevron-like patterns within the amethyst, which enhance the crystal’s natural energies. Expertly polished to reveal their stunning purple hues ranging from deep violet to lighter lavender, these spheres are not only beautiful but also potent tools for spiritual work.\u003c\/p\u003e\n\u003cp\u003eMetaphysically, Chevron Amethyst combines the intuitive and calming qualities of pure amethyst with a vortex-like pattern that amplifies its effects, making it an excellent stone for meditation, enhancing mental clarity, and protection. The sphere shape encourages energy flow in all directions, promoting balance and harmony. These spheres can be used to clear negative energy, relieve stress, and assist in deeper spiritual insight. Whether displayed as a decorative piece or used as a focus for meditation, Chevron Amethyst Spheres of this size serve as powerful allies for those seeking to elevate their spiritual practice and maintain emotional equilibrium.\u003c\/p\u003e\n\u003cp\u003eThis product is an exact pick as pictured, one of a kind.\u003c\/p\u003e","published_at":"2025-09-09T19:00:51-04:00","created_at":"2025-09-09T19:00:49-04:00","vendor":"Crystal Destiny","type":"Spheres","tags":["crystal","polished","spheres"],"price":4999,"price_min":4999,"price_max":8499,"available":true,"price_varies":true,"compare_at_price":null,"compare_at_price_min":0,"compare_at_price_max":0,"compare_at_price_varies":false,"variants":[{"id":45600998752427,"title":"Amethyst \/ 490g - 71mm Diameter","option1":"Amethyst","option2":"490g - 71mm Diameter","option3":null,"sku":"CD-10347","requires_shipping":true,"taxable":true,"featured_image":{"id":40354923380907,"product_id":8515024486571,"position":1,"created_at":"2025-09-09T18:56:01-04:00","updated_at":"2025-12-11T00:07:37-05:00","alt":"Chevron Amethyst Spheres 58-71MM-Spheres-Crystal Destiny-Amethyst-490g - 71mm Diameter-Crystal Destiny","width":1623,"height":1623,"src":"\/\/crystaldestiny.com\/cdn\/shop\/files\/Chevron-Amethyst-Spheres-58-71MM-Spheres-Amethyst-490g-71mm-Diameter.jpg?v=1765429657","variant_ids":[45600998752427]},"available":false,"name":"Chevron Amethyst Spheres 58-71MM - Amethyst \/ 490g - 71mm Diameter","public_title":"Amethyst \/ 490g - 71mm Diameter","options":["Amethyst","490g - 71mm Diameter"],"price":8499,"weight":490,"compare_at_price":null,"inventory_management":"shopify","barcode":"","featured_media":{"alt":"Chevron Amethyst Spheres 58-71MM-Spheres-Crystal Destiny-Amethyst-490g - 71mm Diameter-Crystal Destiny","id":31754093985963,"position":1,"preview_image":{"aspect_ratio":1.0,"height":1623,"width":1623,"src":"\/\/crystaldestiny.com\/cdn\/shop\/files\/Chevron-Amethyst-Spheres-58-71MM-Spheres-Amethyst-490g-71mm-Diameter.jpg?v=1765429657"}},"requires_selling_plan":false,"selling_plan_allocations":[]},{"id":45600998785195,"title":"Amethyst \/ 272g - 58mm Diameter","option1":"Amethyst","option2":"272g - 58mm Diameter","option3":null,"sku":"CD-10348","requires_shipping":true,"taxable":true,"featured_image":{"id":40354923479211,"product_id":8515024486571,"position":4,"created_at":"2025-09-09T18:56:01-04:00","updated_at":"2025-12-11T00:07:38-05:00","alt":"Chevron Amethyst Spheres 58-71MM-Spheres-Crystal Destiny-Amethyst-272g - 58mm Diameter-Crystal Destiny","width":1582,"height":1582,"src":"\/\/crystaldestiny.com\/cdn\/shop\/files\/Chevron-Amethyst-Spheres-58-71MM-Spheres-Amethyst-272g-58mm-Diameter-4.jpg?v=1765429658","variant_ids":[45600998785195]},"available":true,"name":"Chevron Amethyst Spheres 58-71MM - Amethyst \/ 272g - 58mm Diameter","public_title":"Amethyst \/ 272g - 58mm Diameter","options":["Amethyst","272g - 58mm Diameter"],"price":4999,"weight":274,"compare_at_price":null,"inventory_management":"shopify","barcode":"","featured_media":{"alt":"Chevron Amethyst Spheres 58-71MM-Spheres-Crystal Destiny-Amethyst-272g - 58mm Diameter-Crystal Destiny","id":31754094084267,"position":4,"preview_image":{"aspect_ratio":1.0,"height":1582,"width":1582,"src":"\/\/crystaldestiny.com\/cdn\/shop\/files\/Chevron-Amethyst-Spheres-58-71MM-Spheres-Amethyst-272g-58mm-Diameter-4.jpg?v=1765429658"}},"requires_selling_plan":false,"selling_plan_allocations":[]}],"images":["\/\/crystaldestiny.com\/cdn\/shop\/files\/Chevron-Amethyst-Spheres-58-71MM-Spheres-Amethyst-490g-71mm-Diameter.jpg?v=1765429657","\/\/crystaldestiny.com\/cdn\/shop\/files\/Chevron-Amethyst-Spheres-58-71MM-Spheres-2.jpg?v=1757481190","\/\/crystaldestiny.com\/cdn\/shop\/files\/Chevron-Amethyst-Spheres-58-71MM-Spheres-3.jpg?v=1757481191","\/\/crystaldestiny.com\/cdn\/shop\/files\/Chevron-Amethyst-Spheres-58-71MM-Spheres-Amethyst-272g-58mm-Diameter-4.jpg?v=1765429658","\/\/crystaldestiny.com\/cdn\/shop\/files\/Chevron-Amethyst-Spheres-58-71MM-Spheres-5.jpg?v=1757481194","\/\/crystaldestiny.com\/cdn\/shop\/files\/Chevron-Amethyst-Spheres-58-71MM-Spheres-6.jpg?v=1757481196"],"featured_image":"\/\/crystaldestiny.com\/cdn\/shop\/files\/Chevron-Amethyst-Spheres-58-71MM-Spheres-Amethyst-490g-71mm-Diameter.jpg?v=1765429657","options":["Material","Size"],"media":[{"alt":"Chevron Amethyst Spheres 58-71MM-Spheres-Crystal Destiny-Amethyst-490g - 71mm Diameter-Crystal Destiny","id":31754093985963,"position":1,"preview_image":{"aspect_ratio":1.0,"height":1623,"width":1623,"src":"\/\/crystaldestiny.com\/cdn\/shop\/files\/Chevron-Amethyst-Spheres-58-71MM-Spheres-Amethyst-490g-71mm-Diameter.jpg?v=1765429657"},"aspect_ratio":1.0,"height":1623,"media_type":"image","src":"\/\/crystaldestiny.com\/cdn\/shop\/files\/Chevron-Amethyst-Spheres-58-71MM-Spheres-Amethyst-490g-71mm-Diameter.jpg?v=1765429657","width":1623},{"alt":"Chevron Amethyst Spheres 58-71MM-Spheres-Crystal Destiny-Amethyst-490g - 71mm Diameter-Crystal Destiny","id":31754094018731,"position":2,"preview_image":{"aspect_ratio":1.0,"height":1682,"width":1682,"src":"\/\/crystaldestiny.com\/cdn\/shop\/files\/Chevron-Amethyst-Spheres-58-71MM-Spheres-2.jpg?v=1757481190"},"aspect_ratio":1.0,"height":1682,"media_type":"image","src":"\/\/crystaldestiny.com\/cdn\/shop\/files\/Chevron-Amethyst-Spheres-58-71MM-Spheres-2.jpg?v=1757481190","width":1682},{"alt":"Chevron Amethyst Spheres 58-71MM-Spheres-Crystal Destiny-Amethyst-490g - 71mm Diameter-Crystal Destiny","id":31754094051499,"position":3,"preview_image":{"aspect_ratio":1.0,"height":1679,"width":1679,"src":"\/\/crystaldestiny.com\/cdn\/shop\/files\/Chevron-Amethyst-Spheres-58-71MM-Spheres-3.jpg?v=1757481191"},"aspect_ratio":1.0,"height":1679,"media_type":"image","src":"\/\/crystaldestiny.com\/cdn\/shop\/files\/Chevron-Amethyst-Spheres-58-71MM-Spheres-3.jpg?v=1757481191","width":1679},{"alt":"Chevron Amethyst Spheres 58-71MM-Spheres-Crystal Destiny-Amethyst-272g - 58mm Diameter-Crystal Destiny","id":31754094084267,"position":4,"preview_image":{"aspect_ratio":1.0,"height":1582,"width":1582,"src":"\/\/crystaldestiny.com\/cdn\/shop\/files\/Chevron-Amethyst-Spheres-58-71MM-Spheres-Amethyst-272g-58mm-Diameter-4.jpg?v=1765429658"},"aspect_ratio":1.0,"height":1582,"media_type":"image","src":"\/\/crystaldestiny.com\/cdn\/shop\/files\/Chevron-Amethyst-Spheres-58-71MM-Spheres-Amethyst-272g-58mm-Diameter-4.jpg?v=1765429658","width":1582},{"alt":"Chevron Amethyst Spheres 58-71MM-Spheres-Crystal Destiny-Amethyst-490g - 71mm Diameter-Crystal Destiny","id":31754094117035,"position":5,"preview_image":{"aspect_ratio":1.0,"height":1591,"width":1591,"src":"\/\/crystaldestiny.com\/cdn\/shop\/files\/Chevron-Amethyst-Spheres-58-71MM-Spheres-5.jpg?v=1757481194"},"aspect_ratio":1.0,"height":1591,"media_type":"image","src":"\/\/crystaldestiny.com\/cdn\/shop\/files\/Chevron-Amethyst-Spheres-58-71MM-Spheres-5.jpg?v=1757481194","width":1591},{"alt":"Chevron Amethyst Spheres 58-71MM-Spheres-Crystal Destiny-Amethyst-490g - 71mm Diameter-Crystal Destiny","id":31754094149803,"position":6,"preview_image":{"aspect_ratio":1.0,"height":1554,"width":1554,"src":"\/\/crystaldestiny.com\/cdn\/shop\/files\/Chevron-Amethyst-Spheres-58-71MM-Spheres-6.jpg?v=1757481196"},"aspect_ratio":1.0,"height":1554,"media_type":"image","src":"\/\/crystaldestiny.com\/cdn\/shop\/files\/Chevron-Amethyst-Spheres-58-71MM-Spheres-6.jpg?v=1757481196","width":1554}],"requires_selling_plan":false,"selling_plan_groups":[],"content":"\u003cp\u003eChevron Amethyst Spheres, measuring between 58-71MM, are exceptional specimens that blend the distinctive banded patterns of Chevron Amethyst with the smooth, spherical shape highly prized in crystal healing and metaphysical practices. These spheres showcase the unique, V-shaped or chevron-like patterns within the amethyst, which enhance the crystal’s natural energies. Expertly polished to reveal their stunning purple hues ranging from deep violet to lighter lavender, these spheres are not only beautiful but also potent tools for spiritual work.\u003c\/p\u003e\n\u003cp\u003eMetaphysically, Chevron Amethyst combines the intuitive and calming qualities of pure amethyst with a vortex-like pattern that amplifies its effects, making it an excellent stone for meditation, enhancing mental clarity, and protection. The sphere shape encourages energy flow in all directions, promoting balance and harmony. These spheres can be used to clear negative energy, relieve stress, and assist in deeper spiritual insight. Whether displayed as a decorative piece or used as a focus for meditation, Chevron Amethyst Spheres of this size serve as powerful allies for those seeking to elevate their spiritual practice and maintain emotional equilibrium.\u003c\/p\u003e\n\u003cp\u003eThis product is an exact pick as pictured, one of a kind.\u003c\/p\u003e"},"options":[{"name":"Material","position":1,"values":["Amethyst"]},{"name":"Size","position":2,"values":["490g - 71mm Diameter","272g - 58mm Diameter"]}],"custom_metafields":{"shipping_time":"Within 7 days"},"metafields":{"badge":"\u003cdiv style='display:none' class='jdgm-prev-badge' data-average-rating='0.00' data-number-of-reviews='0' data-number-of-questions='0'\u003e \u003cspan class='jdgm-prev-badge__stars' data-score='0.00' tabindex='0' aria-label='0.00 stars' role='button'\u003e \u003cspan class='jdgm-star jdgm--off'\u003e\u003c\/span\u003e\u003cspan class='jdgm-star jdgm--off'\u003e\u003c\/span\u003e\u003cspan class='jdgm-star jdgm--off'\u003e\u003c\/span\u003e\u003cspan class='jdgm-star jdgm--off'\u003e\u003c\/span\u003e\u003cspan class='jdgm-star jdgm--off'\u003e\u003c\/span\u003e \u003c\/span\u003e \u003cspan class='jdgm-prev-badge__text'\u003e No reviews \u003c\/span\u003e \u003c\/div\u003e","widget":"\u003cdiv class='jdgm-rev-widg' data-updated-at='2025-09-09T23:02:00Z' data-average-rating='0.00' data-number-of-reviews='0' data-number-of-questions='0' data-image-url='https:\/\/cdn.shopify.com\/s\/files\/1\/0613\/0345\/5915\/files\/6I0A4139.jpg?v=1757458670'\u003e \u003cstyle class='jdgm-temp-hiding-style'\u003e.jdgm-rev-widg{ display: none }\u003c\/style\u003e \u003cdiv class='jdgm-rev-widg__header'\u003e \u003ch2 class='jdgm-rev-widg__title'\u003eCustomer Reviews\u003c\/h2\u003e \u003cdiv class='jdgm-rev-widg__summary'\u003e \u003cdiv class='jdgm-rev-widg__summary-stars' aria-label='Average rating is 0.00 stars' role='img'\u003e \u003cspan class='jdgm-star jdgm--off'\u003e\u003c\/span\u003e\u003cspan class='jdgm-star jdgm--off'\u003e\u003c\/span\u003e\u003cspan class='jdgm-star jdgm--off'\u003e\u003c\/span\u003e\u003cspan class='jdgm-star jdgm--off'\u003e\u003c\/span\u003e\u003cspan class='jdgm-star jdgm--off'\u003e\u003c\/span\u003e \u003c\/div\u003e \u003cdiv class='jdgm-rev-widg__summary-text'\u003eBe the first to write a review\u003c\/div\u003e \u003c\/div\u003e \u003ca style='display: none' href='#' class='jdgm-write-rev-link' role='button'\u003eWrite a review\u003c\/a\u003e \u003cdiv class='jdgm-histogram jdgm-temp-hidden'\u003e \u003cdiv class='jdgm-histogram__row' data-rating='5' data-frequency='0' data-percentage='0'\u003e \u003cdiv class='jdgm-histogram__star' role='button' aria-label=\"0% (0) reviews with 5 star rating\" tabindex='0' \u003e\u003cspan class='jdgm-star jdgm--on'\u003e\u003c\/span\u003e\u003cspan class='jdgm-star jdgm--on'\u003e\u003c\/span\u003e\u003cspan class='jdgm-star jdgm--on'\u003e\u003c\/span\u003e\u003cspan class='jdgm-star jdgm--on'\u003e\u003c\/span\u003e\u003cspan class='jdgm-star jdgm--on'\u003e\u003c\/span\u003e\u003c\/div\u003e \u003cdiv class='jdgm-histogram__bar'\u003e \u003cdiv class='jdgm-histogram__bar-content' style='width: 0%;'\u003e \u003c\/div\u003e \u003c\/div\u003e \u003cdiv class='jdgm-histogram__percentage'\u003e0%\u003c\/div\u003e \u003cdiv class='jdgm-histogram__frequency'\u003e(0)\u003c\/div\u003e \u003c\/div\u003e \u003cdiv class='jdgm-histogram__row' data-rating='4' data-frequency='0' data-percentage='0'\u003e \u003cdiv class='jdgm-histogram__star' role='button' aria-label=\"0% (0) reviews with 4 star rating\" tabindex='0' \u003e\u003cspan class='jdgm-star jdgm--on'\u003e\u003c\/span\u003e\u003cspan class='jdgm-star jdgm--on'\u003e\u003c\/span\u003e\u003cspan class='jdgm-star jdgm--on'\u003e\u003c\/span\u003e\u003cspan class='jdgm-star jdgm--on'\u003e\u003c\/span\u003e\u003cspan class='jdgm-star jdgm--off'\u003e\u003c\/span\u003e\u003c\/div\u003e \u003cdiv class='jdgm-histogram__bar'\u003e \u003cdiv class='jdgm-histogram__bar-content' style='width: 0%;'\u003e \u003c\/div\u003e \u003c\/div\u003e \u003cdiv class='jdgm-histogram__percentage'\u003e0%\u003c\/div\u003e \u003cdiv class='jdgm-histogram__frequency'\u003e(0)\u003c\/div\u003e \u003c\/div\u003e \u003cdiv class='jdgm-histogram__row' data-rating='3' data-frequency='0' data-percentage='0'\u003e \u003cdiv class='jdgm-histogram__star' role='button' aria-label=\"0% (0) reviews with 3 star rating\" tabindex='0' \u003e\u003cspan class='jdgm-star jdgm--on'\u003e\u003c\/span\u003e\u003cspan class='jdgm-star jdgm--on'\u003e\u003c\/span\u003e\u003cspan class='jdgm-star jdgm--on'\u003e\u003c\/span\u003e\u003cspan class='jdgm-star jdgm--off'\u003e\u003c\/span\u003e\u003cspan class='jdgm-star jdgm--off'\u003e\u003c\/span\u003e\u003c\/div\u003e \u003cdiv class='jdgm-histogram__bar'\u003e \u003cdiv class='jdgm-histogram__bar-content' style='width: 0%;'\u003e \u003c\/div\u003e \u003c\/div\u003e \u003cdiv class='jdgm-histogram__percentage'\u003e0%\u003c\/div\u003e \u003cdiv class='jdgm-histogram__frequency'\u003e(0)\u003c\/div\u003e \u003c\/div\u003e \u003cdiv class='jdgm-histogram__row' data-rating='2' data-frequency='0' data-percentage='0'\u003e \u003cdiv class='jdgm-histogram__star' role='button' aria-label=\"0% (0) reviews with 2 star rating\" tabindex='0' \u003e\u003cspan class='jdgm-star jdgm--on'\u003e\u003c\/span\u003e\u003cspan class='jdgm-star jdgm--on'\u003e\u003c\/span\u003e\u003cspan class='jdgm-star jdgm--off'\u003e\u003c\/span\u003e\u003cspan class='jdgm-star jdgm--off'\u003e\u003c\/span\u003e\u003cspan class='jdgm-star jdgm--off'\u003e\u003c\/span\u003e\u003c\/div\u003e \u003cdiv class='jdgm-histogram__bar'\u003e \u003cdiv class='jdgm-histogram__bar-content' style='width: 0%;'\u003e \u003c\/div\u003e \u003c\/div\u003e \u003cdiv class='jdgm-histogram__percentage'\u003e0%\u003c\/div\u003e \u003cdiv class='jdgm-histogram__frequency'\u003e(0)\u003c\/div\u003e \u003c\/div\u003e \u003cdiv class='jdgm-histogram__row' data-rating='1' data-frequency='0' data-percentage='0'\u003e \u003cdiv class='jdgm-histogram__star' role='button' aria-label=\"0% (0) reviews with 1 star rating\" tabindex='0' \u003e\u003cspan class='jdgm-star jdgm--on'\u003e\u003c\/span\u003e\u003cspan class='jdgm-star jdgm--off'\u003e\u003c\/span\u003e\u003cspan class='jdgm-star jdgm--off'\u003e\u003c\/span\u003e\u003cspan class='jdgm-star jdgm--off'\u003e\u003c\/span\u003e\u003cspan class='jdgm-star jdgm--off'\u003e\u003c\/span\u003e\u003c\/div\u003e \u003cdiv class='jdgm-histogram__bar'\u003e \u003cdiv class='jdgm-histogram__bar-content' style='width: 0%;'\u003e \u003c\/div\u003e \u003c\/div\u003e \u003cdiv class='jdgm-histogram__percentage'\u003e0%\u003c\/div\u003e \u003cdiv class='jdgm-histogram__frequency'\u003e(0)\u003c\/div\u003e \u003c\/div\u003e \u003cdiv class='jdgm-histogram__row jdgm-histogram__clear-filter' data-rating=null tabindex='0'\u003e\u003c\/div\u003e \u003c\/div\u003e \u003cdiv class='jdgm-rev-widg__sort-wrapper'\u003e\u003c\/div\u003e \u003c\/div\u003e \u003cdiv class='jdgm-rev-widg__body'\u003e \u003cdiv class='jdgm-rev-widg__reviews'\u003e\u003c\/div\u003e \u003cdiv class='jdgm-paginate' data-per-page='4' data-url='https:\/\/api.judge.me\/reviews\/reviews_for_widget' style=\"display: none;\"\u003e\u003c\/div\u003e \u003c\/div\u003e \u003cdiv class='jdgm-rev-widg__paginate-spinner-wrapper'\u003e \u003cdiv class='jdgm-spinner'\u003e\u003c\/div\u003e \u003c\/div\u003e \u003c\/div\u003e"},"collections":[{"id":294880051371,"handle":"crystals","title":"Crystals","updated_at":"2026-01-07T23:43:11-05:00","body_html":"\u003cp data-start=\"159\" data-end=\"687\"\u003e✨ \u003cstrong data-start=\"161\" data-end=\"216\"\u003eDiscover the Magic of Crystals with Crystal Destiny\u003c\/strong\u003e ✨\u003cbr data-start=\"218\" data-end=\"221\"\u003eCrystals have been treasured for centuries—not only for their natural beauty but also for their powerful healing energies. Beyond their visual allure, they bring balance, harmony, and positive energy into any space. Whether used for home décor, meditation, or simply to elevate the energy of your surroundings, crystals create a sanctuary of peace, relaxation, and well-being. Each piece is a unique gift from the Earth—visually stunning and spiritually uplifting.\u003c\/p\u003e\n\u003cp data-start=\"689\" data-end=\"1011\"\u003eAt \u003cstrong data-start=\"692\" data-end=\"711\"\u003eCrystal Destiny\u003c\/strong\u003e, our signature collection showcases a curated selection of exquisite crystals, from radiant Quartz to soothing Amethyst. Every stone is carefully sourced for its elegance and metaphysical resonance, making them perfect for enhancing your home, uplifting your spirit, or gifting to someone special.\u003c\/p\u003e\n\u003cp data-start=\"1013\" data-end=\"1206\"\u003eExperience the timeless sophistication of crystalline wonders. Explore the \u003cstrong data-start=\"1088\" data-end=\"1118\"\u003eCrystal Destiny Collection\u003c\/strong\u003e today and bring the transformative beauty of these treasures into your everyday life.\u003c\/p\u003e","published_at":"2023-06-05T11:24:02-04:00","sort_order":"created-desc","template_suffix":"","disjunctive":false,"rules":[{"column":"tag","relation":"equals","condition":"crystal"},{"column":"type","relation":"not_contains","condition":"925 Sterling Silver"},{"column":"type","relation":"not_contains","condition":"Wire Wraps"}],"published_scope":"global"},{"id":319455756459,"handle":"crown-chakra-crystals","title":"Crown Chakra Crystals","updated_at":"2026-01-07T23:42:38-05:00","body_html":"\u003cp data-start=\"144\" data-end=\"515\"\u003e✨ \u003cstrong data-start=\"146\" data-end=\"171\"\u003eCrown Chakra Crystals\u003c\/strong\u003e ✨\u003cbr data-start=\"173\" data-end=\"176\"\u003eConnect with higher consciousness and spiritual insight with our \u003cstrong data-start=\"241\" data-end=\"266\"\u003eCrown Chakra Crystals\u003c\/strong\u003e. Located at the top of the head, the Crown Chakra governs wisdom, enlightenment, and your connection to the divine. These crystals help open and balance this energy center, fostering clarity, spiritual growth, and a sense of universal connection.\u003c\/p\u003e\n\u003cp data-start=\"517\" data-end=\"851\"\u003eOur selection includes powerful stones such as Amethyst, Clear Quartz, Selenite, and Lepidolite—each chosen for their ability to enhance meditation, energy work, and mindful practices. Whether placed in your sacred space, carried with you, or worn as jewelry, Crown Chakra Crystals promote harmony, insight, and spiritual alignment.\u003c\/p\u003e\n\u003cp data-start=\"853\" data-end=\"1007\"\u003eElevate your consciousness, deepen your meditative practice, and embrace the transformative energy of the Crown Chakra with these illuminating crystals.\u003c\/p\u003e","published_at":"2025-07-17T18:16:11-04:00","sort_order":"best-selling","template_suffix":"","disjunctive":false,"rules":[{"column":"variant_metafield_definition","relation":"equals","condition":"Crown"}],"published_scope":"global","image":{"created_at":"2025-07-17T19:09:11-04:00","alt":null,"width":1080,"height":1080,"src":"\/\/crystaldestiny.com\/cdn\/shop\/collections\/Crown_Chakra_Collection.jpg?v=1762474922"}},{"id":294880116907,"handle":"polished","title":"Polished Crystals","updated_at":"2026-01-07T23:43:11-05:00","body_html":"\u003cp data-start=\"199\" data-end=\"598\"\u003e✨ \u003cstrong data-start=\"201\" data-end=\"248\"\u003eCrystal Destiny Polished Crystal Collection\u003c\/strong\u003e ✨\u003cbr data-start=\"250\" data-end=\"253\"\u003eIndulge in the brilliance of crystals refined to perfection. Our \u003cstrong data-start=\"318\" data-end=\"341\"\u003ePolished Collection\u003c\/strong\u003e showcases gemstones meticulously shaped and smoothed to reveal their natural radiance and timeless beauty. From the shimmering glow of Quartz to the deep allure of Obsidian, each polished piece is a testament to nature’s artistry and human craftsmanship.\u003c\/p\u003e\n\u003cp data-start=\"600\" data-end=\"862\"\u003ePerfect as statement décor, meaningful gifts, or companions on your spiritual journey, polished crystals bring sophistication and elevated energy into any space. Their radiant surfaces reflect not only light but also the transformative power of crystal energy.\u003c\/p\u003e\n\u003cp data-start=\"864\" data-end=\"1022\"\u003eDiscover the elegance of refinement with Crystal Destiny’s Polished Crystal Collection—where every facet shines with intention, beauty, and timeless allure.\u003c\/p\u003e","published_at":"2023-06-05T11:30:44-04:00","sort_order":"created-desc","template_suffix":"","disjunctive":false,"rules":[{"column":"tag","relation":"equals","condition":"polished"}],"published_scope":"global"},{"id":295698202795,"handle":"spheres","title":"Crystal Spheres","updated_at":"2026-01-06T23:24:35-05:00","body_html":"\u003cp data-start=\"106\" data-end=\"370\"\u003e✨ \u003cstrong data-start=\"108\" data-end=\"138\"\u003eCrystal Spheres Collection\u003c\/strong\u003e ✨\u003cbr data-start=\"140\" data-end=\"143\"\u003eBring harmony, balance, and elegance into your space with our \u003cstrong data-start=\"205\" data-end=\"235\"\u003eCrystal Spheres Collection\u003c\/strong\u003e. Each sphere is meticulously crafted to showcase the natural beauty and energy of crystals, from radiant Quartz to calming Amethyst.\u003c\/p\u003e\n\u003cp data-start=\"372\" data-end=\"658\"\u003ePerfect for meditation, energy work, or as striking décor, crystal spheres radiate energy in all directions, promoting clarity, focus, and a sense of calm. Their smooth, polished surfaces highlight the stones’ natural patterns and colors, making each sphere a captivating centerpiece.\u003c\/p\u003e\n\u003cp data-start=\"660\" data-end=\"809\"\u003eElevate your space and embrace the transformative power of crystals with the \u003cstrong data-start=\"737\" data-end=\"767\"\u003eCrystal Spheres Collection\u003c\/strong\u003e—where beauty, energy, and harmony meet.\u003c\/p\u003e","published_at":"2023-07-28T14:20:46-04:00","sort_order":"created-desc","template_suffix":"","disjunctive":true,"rules":[{"column":"tag","relation":"equals","condition":"spheres"},{"column":"tag","relation":"equals","condition":"eggs"}],"published_scope":"global"},{"id":293659312299,"handle":"best-sellers","title":"Best Sellers","updated_at":"2026-01-07T23:43:11-05:00","body_html":"\u003cp data-start=\"155\" data-end=\"510\"\u003eDiscover the pieces our community loves most. Our Best Sellers Collection brings together handpicked crystals and jewelry that embody timeless elegance, spiritual resonance, and everyday sophistication. Each item has earned its place as a customer favorite—celebrated for both its beauty and its meaningful energy.\u003c\/p\u003e\n\u003cp data-start=\"512\" data-end=\"802\"\u003eFrom stunning statement pieces to versatile daily companions, these treasures are curated to elevate your space, uplift your spirit, and reflect refined taste. Indulge in what’s most cherished and let our best sellers guide you toward the perfect blend of style and transformative energy.\u003c\/p\u003e\n\u003cp data-start=\"804\" data-end=\"932\"\u003eExplore the Best Sellers Collection today—where elegance meets intention, and every piece tells a story of beauty and balance.\u003c\/p\u003e","published_at":"2023-03-15T16:04:51-04:00","sort_order":"best-selling","template_suffix":"","disjunctive":false,"rules":[{"column":"variant_price","relation":"greater_than","condition":"0"},{"column":"variant_inventory","relation":"greater_than","condition":"0"},{"column":"type","relation":"not_equals","condition":"Shipping Protection"}],"published_scope":"global"},{"id":321370390699,"handle":"monthly-crystal-sale","title":"Monthly Crystal Sale | Spheres \u0026 Towers","updated_at":"2026-01-06T23:24:37-05:00","body_html":"\u003cp\u003eShop our \u003cstrong\u003eMonthly Crystal Sale\u003c\/strong\u003e, where you can shop a wide selection of healing crystals at discounted prices. Explore \u003cstrong\u003ecrystal spheres and towers,\u003c\/strong\u003e— all carefully curated to support meditation, energy balancing, and spiritual wellness. Whether you're looking to enhance your home decor, boost your daily energy, or find the perfect gift, our \u003cstrong\u003ecrystals for healing and manifestation\u003c\/strong\u003e offer both beauty and metaphysical benefits.\u003c\/p\u003e\n\u003cp\u003eEach month, our sale features \u003cstrong\u003enew discounted collections\u003c\/strong\u003e, from \u003cstrong\u003enatural quartz and amethyst towers\u003c\/strong\u003e to \u003cstrong\u003ewire-wrapped pendants and polished stones\u003c\/strong\u003e, so there's always something fresh to discover. Shop with confidence knowing you're getting high-quality crystals with \u003cstrong\u003efree shipping options\u003c\/strong\u003e and a trusted experience.\u003c\/p\u003e\n\u003cp\u003e\u003cstrong\u003eTake advantage of the Monthly Crystal Sale today\u003c\/strong\u003e and add powerful, natural energy to your life with \u003cstrong\u003eauthentic healing crystals\u003c\/strong\u003e — while our limited-time discounts last.\u003c\/p\u003e\n\u003cp\u003e\u003cstrong\u003e*Discount automatically applied at checkout.\u003c\/strong\u003e\u003c\/p\u003e","published_at":"2025-12-02T01:26:17-05:00","sort_order":"alpha-asc","template_suffix":"","disjunctive":true,"rules":[{"column":"tag","relation":"equals","condition":"spheres"},{"column":"tag","relation":"equals","condition":"Towers"}],"published_scope":"global","image":{"created_at":"2026-01-01T01:32:34-05:00","alt":"","width":960,"height":960,"src":"\/\/crystaldestiny.com\/cdn\/shop\/collections\/3E8C2969-1B86-4ACE-B349-98E9D8768424.jpg?v=1767249154"}},{"id":297596059819,"handle":"all","title":"All Crystals \u0026 Jewelry","updated_at":"2026-01-07T23:43:11-05:00","body_html":"\u003cp data-start=\"149\" data-end=\"494\"\u003e✨ \u003cstrong data-start=\"151\" data-end=\"181\"\u003eWelcome to Crystal Destiny\u003c\/strong\u003e ✨\u003cbr data-start=\"183\" data-end=\"186\"\u003eStep into a world where beauty, energy, and artistry unite. Our collection is a treasure trove of exquisite crystals, from the raw, untamed elegance of natural formations to the polished brilliance of expertly crafted pieces. Each crystal is a masterpiece, carrying its own unique story and timeless charm.\u003c\/p\u003e\n\u003cp data-start=\"496\" data-end=\"831\"\u003eWhether you’re drawn to the calming presence of Amethyst, the vibrant energy of Citrine, or the grounding strength of Jasper, our crystals invite you to connect with nature’s finest wonders. Perfect for enhancing your space, supporting your spiritual journey, or gifting with intention, every piece resonates with beauty and meaning.\u003c\/p\u003e\n\u003cp data-start=\"833\" data-end=\"1000\"\u003eElevate your surroundings, embrace the mystique, and explore the enchanting world of crystals at \u003cstrong data-start=\"930\" data-end=\"949\"\u003eCrystal Destiny\u003c\/strong\u003e—where every crystal is waiting to be discovered.\u003c\/p\u003e","published_at":"2023-11-10T13:55:31-05:00","sort_order":"created-desc","template_suffix":"","disjunctive":false,"rules":[{"column":"type","relation":"not_equals","condition":"asdf"}],"published_scope":"global"},{"id":298983391403,"handle":"january-crystal-sale","title":"January Sale | 25% Off Crystal Towers \u0026 Spheres","updated_at":"2026-01-06T23:24:37-05:00","body_html":"\u003cp\u003eShop our \u003cstrong\u003eJanuary Crystal Sale\u003c\/strong\u003e, where you can shop a wide selection of healing crystals at discounted prices. Explore \u003cstrong\u003eCrystal Towers, \u0026amp; Crystal Spheres\u003c\/strong\u003e — all carefully curated and crafted to support meditation, energy balancing, and spiritual wellness. Whether you're looking to enhance your home decor, boost your daily energy, or find the perfect gift, our \u003cstrong\u003ecrystals for healing and manifestation\u003c\/strong\u003e offer both beauty and metaphysical benefits.\u003c\/p\u003e\n\u003cp\u003eThis January, our sale features \u003cstrong\u003ediscounted crystal towers and spheres\u003c\/strong\u003e, from \u003cstrong\u003enatural quartz \u003c\/strong\u003eand \u003cstrong\u003eamethyst \u003c\/strong\u003eto \u003cstrong\u003ebumblebee jasper \u003c\/strong\u003eand \u003cstrong\u003ecarnelian\u003c\/strong\u003e, so there's always something fresh to discover. Shop with confidence knowing you're getting high-quality crystals with \u003cstrong\u003efree shipping options\u003c\/strong\u003e and a trusted experience.\u003c\/p\u003e\n\u003cp\u003e\u003cstrong\u003eTake advantage of the January Crystal Sale today\u003c\/strong\u003e and add powerful, natural energy to your life with \u003cstrong\u003eauthentic healing crystals\u003c\/strong\u003e — while our limited-time discounts last.\u003c\/p\u003e\n\u003cp\u003e\u003cstrong\u003e*Discount automatically applied at checkout.\u003c\/strong\u003e\u003c\/p\u003e","published_at":"2026-01-01T00:07:17-05:00","sort_order":"alpha-asc","template_suffix":"monthly-collection","disjunctive":true,"rules":[{"column":"tag","relation":"equals","condition":"Spheres"},{"column":"tag","relation":"equals","condition":"Towers"}],"published_scope":"global","image":{"created_at":"2026-01-01T01:29:59-05:00","alt":"","width":960,"height":960,"src":"\/\/crystaldestiny.com\/cdn\/shop\/collections\/1464163B-22B1-4D62-BEC5-CEC9AECB670B.jpg?v=1767248999"}}]}
[{"alt":"Chevron Amethyst Spheres 58-71MM-Spheres-Crystal Destiny-Amethyst-490g - 71mm Diameter-Crystal Destiny","id":31754093985963,"position":1,"preview_image":{"aspect_ratio":1.0,"height":1623,"width":1623,"src":"\/\/crystaldestiny.com\/cdn\/shop\/files\/Chevron-Amethyst-Spheres-58-71MM-Spheres-Amethyst-490g-71mm-Diameter.jpg?v=1765429657"},"aspect_ratio":1.0,"height":1623,"media_type":"image","src":"\/\/crystaldestiny.com\/cdn\/shop\/files\/Chevron-Amethyst-Spheres-58-71MM-Spheres-Amethyst-490g-71mm-Diameter.jpg?v=1765429657","width":1623},{"alt":"Chevron Amethyst Spheres 58-71MM-Spheres-Crystal Destiny-Amethyst-490g - 71mm Diameter-Crystal Destiny","id":31754094018731,"position":2,"preview_image":{"aspect_ratio":1.0,"height":1682,"width":1682,"src":"\/\/crystaldestiny.com\/cdn\/shop\/files\/Chevron-Amethyst-Spheres-58-71MM-Spheres-2.jpg?v=1757481190"},"aspect_ratio":1.0,"height":1682,"media_type":"image","src":"\/\/crystaldestiny.com\/cdn\/shop\/files\/Chevron-Amethyst-Spheres-58-71MM-Spheres-2.jpg?v=1757481190","width":1682},{"alt":"Chevron Amethyst Spheres 58-71MM-Spheres-Crystal Destiny-Amethyst-490g - 71mm Diameter-Crystal Destiny","id":31754094051499,"position":3,"preview_image":{"aspect_ratio":1.0,"height":1679,"width":1679,"src":"\/\/crystaldestiny.com\/cdn\/shop\/files\/Chevron-Amethyst-Spheres-58-71MM-Spheres-3.jpg?v=1757481191"},"aspect_ratio":1.0,"height":1679,"media_type":"image","src":"\/\/crystaldestiny.com\/cdn\/shop\/files\/Chevron-Amethyst-Spheres-58-71MM-Spheres-3.jpg?v=1757481191","width":1679},{"alt":"Chevron Amethyst Spheres 58-71MM-Spheres-Crystal Destiny-Amethyst-272g - 58mm Diameter-Crystal Destiny","id":31754094084267,"position":4,"preview_image":{"aspect_ratio":1.0,"height":1582,"width":1582,"src":"\/\/crystaldestiny.com\/cdn\/shop\/files\/Chevron-Amethyst-Spheres-58-71MM-Spheres-Amethyst-272g-58mm-Diameter-4.jpg?v=1765429658"},"aspect_ratio":1.0,"height":1582,"media_type":"image","src":"\/\/crystaldestiny.com\/cdn\/shop\/files\/Chevron-Amethyst-Spheres-58-71MM-Spheres-Amethyst-272g-58mm-Diameter-4.jpg?v=1765429658","width":1582},{"alt":"Chevron Amethyst Spheres 58-71MM-Spheres-Crystal Destiny-Amethyst-490g - 71mm Diameter-Crystal Destiny","id":31754094117035,"position":5,"preview_image":{"aspect_ratio":1.0,"height":1591,"width":1591,"src":"\/\/crystaldestiny.com\/cdn\/shop\/files\/Chevron-Amethyst-Spheres-58-71MM-Spheres-5.jpg?v=1757481194"},"aspect_ratio":1.0,"height":1591,"media_type":"image","src":"\/\/crystaldestiny.com\/cdn\/shop\/files\/Chevron-Amethyst-Spheres-58-71MM-Spheres-5.jpg?v=1757481194","width":1591},{"alt":"Chevron Amethyst Spheres 58-71MM-Spheres-Crystal Destiny-Amethyst-490g - 71mm Diameter-Crystal Destiny","id":31754094149803,"position":6,"preview_image":{"aspect_ratio":1.0,"height":1554,"width":1554,"src":"\/\/crystaldestiny.com\/cdn\/shop\/files\/Chevron-Amethyst-Spheres-58-71MM-Spheres-6.jpg?v=1757481196"},"aspect_ratio":1.0,"height":1554,"media_type":"image","src":"\/\/crystaldestiny.com\/cdn\/shop\/files\/Chevron-Amethyst-Spheres-58-71MM-Spheres-6.jpg?v=1757481196","width":1554}]
{"item":{"id":8463787065515,"title":"Torre Citrino \"Gordo\"","handle":"citrine-fatty-tower-cd-10150","description":"\u003cp\u003eLa Torre de Citrino \"Grueso\" es una formación cristalina sustancial y naturalmente vibrante, apreciada por sus ricos tonos dorados y su robusta estructura. Ideal para mejorar el flujo de energía y promover la positividad, esta torre es una pieza central impactante en cualquier espacio. Su forma densa y bien formada la hace perfecta tanto para exhibiciones como para prácticas metafísicas, ofreciendo una presencia sólida y a la vez inspiradora. Creada por la naturaleza, la Torre de Citrino \"Grueso\" combina atractivo estético con beneficios energéticos, lo que la convierte en una valiosa adición tanto para coleccionistas como para entusiastas de los cristales.\u003c\/p\u003e\n\u003cdiv\u003e \u003cspan style=\"font-size: 0.875rem;\"\u003eTorres de Cristal, Varas, Generadores, Puntas, Pilares y Obeliscos: ¿Cuál es la Diferencia?\u003c\/span\u003e\n\u003c\/div\u003e\n\u003cdiv\u003e Si bien estos términos pueden variar, todos describen cristales de formas hermosas con una punta puntiaguda diseñada para canalizar y dirigir la energía. Cada nombre destaca un aspecto único de su uso:\u003c\/div\u003e\n\u003cdiv\u003e \u0026lt;ul\u0026gt;\u003c\/div\u003e\n\u003cdiv\u003e \u0026lt;li\u0026gt;\u003c\/div\u003e \u003cdiv\u003e\u0026lt;strong\u0026gt;Torres\u0026lt;\/strong\u0026gt;: Conocidas por su presencia constante y estabilizadora, las torres de cristal ayudan a enfocar y amplificar la energía, lo que las hace perfectas para la meditación y la manifestación.\u0026lt;\/li\u0026gt;\u003c\/div\u003e\n\u003cdiv\u003e \u0026lt;li\u0026gt;\u003c\/div\u003e\n\u003cdiv\u003e \u0026lt;strong\u0026gt;Varitas\u0026lt;\/strong\u0026gt;: Tradicionalmente utilizadas en el trabajo energético y la curación, las varitas de cristal son excelentes para dirigir el flujo de energía y eliminar bloqueos.\u0026lt;\/li\u0026gt;\u003c\/div\u003e\n\u003cdiv\u003e \u0026lt;li\u0026gt;\u003c\/div\u003e\n\u003cdiv\u003e \u0026lt;strong\u0026gt;Pilares\u0026lt;\/strong\u0026gt;: Simbolizando fuerza y estabilidad, los pilares de cristal crean un ambiente equilibrado y armonioso, lo que los hace ideales para la decoración del hogar y las prácticas espirituales.\u0026lt;\/li\u0026gt;\u003c\/div\u003e\n\u003cdiv\u003e \u0026lt;li\u0026gt;\u003c\/div\u003e\n\u003cdiv\u003e \u0026lt;strong\u0026gt;Obeliscos\u0026lt;\/strong\u0026gt;: Inspirados en estructuras antiguas, se cree que los obeliscos de cristal conectan las energías terrenales y espirituales, lo que los convierte en poderosas herramientas para la transformación y la iluminación.\u0026lt;\/li\u0026gt;\u003c\/div\u003e\n\u003cdiv\u003e \u0026lt;\/ul\u0026gt;\u003c\/div\u003e\n\u003cdiv\u003e No importa cómo los llames, estos cristales tienen el mismo propósito: potenciar la energía, la intención y la armonía en tu espacio. ¡Elige el que más te resuene!\u003c\/div\u003e","published_at":"2025-07-01T11:47:56-04:00","created_at":"2025-07-01T11:47:55-04:00","vendor":"Crystal Destiny","type":"Torres","tags":["crystal","polished","Towers"],"price":8999,"price_min":8999,"price_max":8999,"available":true,"price_varies":false,"compare_at_price":null,"compare_at_price_min":0,"compare_at_price_max":0,"compare_at_price_varies":false,"variants":[{"id":45365445853355,"title":"Citrino \/ 701 g - 4,75\" de alto x 2,75\" de ancho","option1":"Citrino","option2":"701 g - 4,75\" de alto x 2,75\" de ancho","option3":null,"sku":"CD-10150","requires_shipping":true,"taxable":true,"featured_image":null,"available":true,"name":"Torre Citrino \"Gordo\" - Citrino \/ 701 g - 4,75\" de alto x 2,75\" de ancho","public_title":"Citrino \/ 701 g - 4,75\" de alto x 2,75\" de ancho","options":["Citrino","701 g - 4,75\" de alto x 2,75\" de ancho"],"price":8999,"weight":0,"compare_at_price":null,"inventory_management":"shopify","barcode":"","requires_selling_plan":false,"selling_plan_allocations":[]}],"images":["\/\/crystaldestiny.com\/cdn\/shop\/files\/Citrine-Fatty-Tower-Towers.jpg?v=1757204760","\/\/crystaldestiny.com\/cdn\/shop\/files\/Citrine-Fatty-Tower-Towers-2.jpg?v=1757204890"],"featured_image":"\/\/crystaldestiny.com\/cdn\/shop\/files\/Citrine-Fatty-Tower-Towers.jpg?v=1757204760","options":["Material","Tamaño"],"media":[{"alt":"Citrine \"Fatty\" Tower-Towers-Crystal Destiny-Citrine-701g - 4.75\"H x 2.75\"W-Crystal Destiny","id":31363018293419,"position":1,"preview_image":{"aspect_ratio":1.0,"height":2903,"width":2903,"src":"\/\/crystaldestiny.com\/cdn\/shop\/files\/Citrine-Fatty-Tower-Towers.jpg?v=1757204760"},"aspect_ratio":1.0,"height":2903,"media_type":"image","src":"\/\/crystaldestiny.com\/cdn\/shop\/files\/Citrine-Fatty-Tower-Towers.jpg?v=1757204760","width":2903},{"alt":"Citrine \"Fatty\" Tower-Towers-Crystal Destiny-Citrine-701g - 4.75\"H x 2.75\"W-Crystal Destiny","id":31363018326187,"position":2,"preview_image":{"aspect_ratio":1.0,"height":2726,"width":2726,"src":"\/\/crystaldestiny.com\/cdn\/shop\/files\/Citrine-Fatty-Tower-Towers-2.jpg?v=1757204890"},"aspect_ratio":1.0,"height":2726,"media_type":"image","src":"\/\/crystaldestiny.com\/cdn\/shop\/files\/Citrine-Fatty-Tower-Towers-2.jpg?v=1757204890","width":2726}],"requires_selling_plan":false,"selling_plan_groups":[],"content":"\u003cp\u003eLa Torre de Citrino \"Grueso\" es una formación cristalina sustancial y naturalmente vibrante, apreciada por sus ricos tonos dorados y su robusta estructura. Ideal para mejorar el flujo de energía y promover la positividad, esta torre es una pieza central impactante en cualquier espacio. Su forma densa y bien formada la hace perfecta tanto para exhibiciones como para prácticas metafísicas, ofreciendo una presencia sólida y a la vez inspiradora. Creada por la naturaleza, la Torre de Citrino \"Grueso\" combina atractivo estético con beneficios energéticos, lo que la convierte en una valiosa adición tanto para coleccionistas como para entusiastas de los cristales.\u003c\/p\u003e\n\u003cdiv\u003e \u003cspan style=\"font-size: 0.875rem;\"\u003eTorres de Cristal, Varas, Generadores, Puntas, Pilares y Obeliscos: ¿Cuál es la Diferencia?\u003c\/span\u003e\n\u003c\/div\u003e\n\u003cdiv\u003e Si bien estos términos pueden variar, todos describen cristales de formas hermosas con una punta puntiaguda diseñada para canalizar y dirigir la energía. Cada nombre destaca un aspecto único de su uso:\u003c\/div\u003e\n\u003cdiv\u003e \u0026lt;ul\u0026gt;\u003c\/div\u003e\n\u003cdiv\u003e \u0026lt;li\u0026gt;\u003c\/div\u003e \u003cdiv\u003e\u0026lt;strong\u0026gt;Torres\u0026lt;\/strong\u0026gt;: Conocidas por su presencia constante y estabilizadora, las torres de cristal ayudan a enfocar y amplificar la energía, lo que las hace perfectas para la meditación y la manifestación.\u0026lt;\/li\u0026gt;\u003c\/div\u003e\n\u003cdiv\u003e \u0026lt;li\u0026gt;\u003c\/div\u003e\n\u003cdiv\u003e \u0026lt;strong\u0026gt;Varitas\u0026lt;\/strong\u0026gt;: Tradicionalmente utilizadas en el trabajo energético y la curación, las varitas de cristal son excelentes para dirigir el flujo de energía y eliminar bloqueos.\u0026lt;\/li\u0026gt;\u003c\/div\u003e\n\u003cdiv\u003e \u0026lt;li\u0026gt;\u003c\/div\u003e\n\u003cdiv\u003e \u0026lt;strong\u0026gt;Pilares\u0026lt;\/strong\u0026gt;: Simbolizando fuerza y estabilidad, los pilares de cristal crean un ambiente equilibrado y armonioso, lo que los hace ideales para la decoración del hogar y las prácticas espirituales.\u0026lt;\/li\u0026gt;\u003c\/div\u003e\n\u003cdiv\u003e \u0026lt;li\u0026gt;\u003c\/div\u003e\n\u003cdiv\u003e \u0026lt;strong\u0026gt;Obeliscos\u0026lt;\/strong\u0026gt;: Inspirados en estructuras antiguas, se cree que los obeliscos de cristal conectan las energías terrenales y espirituales, lo que los convierte en poderosas herramientas para la transformación y la iluminación.\u0026lt;\/li\u0026gt;\u003c\/div\u003e\n\u003cdiv\u003e \u0026lt;\/ul\u0026gt;\u003c\/div\u003e\n\u003cdiv\u003e No importa cómo los llames, estos cristales tienen el mismo propósito: potenciar la energía, la intención y la armonía en tu espacio. ¡Elige el que más te resuene!\u003c\/div\u003e"},"options":[{"name":"Material","position":1,"values":["Citrino"]},{"name":"Tamaño","position":2,"values":["701 g - 4,75\" de alto x 2,75\" de ancho"]}],"custom_metafields":{"shipping_time":"En un plazo de 7 días"},"metafields":{"badge":"\u003cdiv style='display:none' class='jdgm-prev-badge' data-average-rating='0.00' data-number-of-reviews='0' data-number-of-questions='0'\u003e \u003cspan class='jdgm-prev-badge__stars' data-score='0.00' tabindex='0' aria-label='0.00 stars' role='button'\u003e \u003cspan class='jdgm-star jdgm--off'\u003e\u003c\/span\u003e\u003cspan class='jdgm-star jdgm--off'\u003e\u003c\/span\u003e\u003cspan class='jdgm-star jdgm--off'\u003e\u003c\/span\u003e\u003cspan class='jdgm-star jdgm--off'\u003e\u003c\/span\u003e\u003cspan class='jdgm-star jdgm--off'\u003e\u003c\/span\u003e \u003c\/span\u003e \u003cspan class='jdgm-prev-badge__text'\u003e No reviews \u003c\/span\u003e \u003c\/div\u003e","widget":"\u003cdiv class='jdgm-rev-widg' data-updated-at='2025-07-01T15:48:01Z' data-average-rating='0.00' data-number-of-reviews='0' data-number-of-questions='0' data-image-url='https:\/\/cdn.shopify.com\/s\/files\/1\/0613\/0345\/5915\/files\/6I0A3484.jpg?v=1751384545'\u003e \u003cstyle class='jdgm-temp-hiding-style'\u003e.jdgm-rev-widg{ display: none }\u003c\/style\u003e \u003cdiv class='jdgm-rev-widg__header'\u003e \u003ch2 class='jdgm-rev-widg__title'\u003eCustomer Reviews\u003c\/h2\u003e \u003cdiv class='jdgm-rev-widg__summary'\u003e \u003cdiv class='jdgm-rev-widg__summary-stars' aria-label='Average rating is 0.00 stars' role='img'\u003e \u003cspan class='jdgm-star jdgm--off'\u003e\u003c\/span\u003e\u003cspan class='jdgm-star jdgm--off'\u003e\u003c\/span\u003e\u003cspan class='jdgm-star jdgm--off'\u003e\u003c\/span\u003e\u003cspan class='jdgm-star jdgm--off'\u003e\u003c\/span\u003e\u003cspan class='jdgm-star jdgm--off'\u003e\u003c\/span\u003e \u003c\/div\u003e \u003cdiv class='jdgm-rev-widg__summary-text'\u003eBe the first to write a review\u003c\/div\u003e \u003c\/div\u003e \u003ca style='display: none' href='#' class='jdgm-write-rev-link' role='button'\u003eWrite a review\u003c\/a\u003e \u003cdiv class='jdgm-histogram jdgm-temp-hidden'\u003e \u003cdiv class='jdgm-histogram__row' data-rating='5' data-frequency='0' data-percentage='0'\u003e \u003cdiv class='jdgm-histogram__star' role='button' aria-label=\"0% (0) reviews with 5 star rating\" tabindex='0' \u003e\u003cspan class='jdgm-star jdgm--on'\u003e\u003c\/span\u003e\u003cspan class='jdgm-star jdgm--on'\u003e\u003c\/span\u003e\u003cspan class='jdgm-star jdgm--on'\u003e\u003c\/span\u003e\u003cspan class='jdgm-star jdgm--on'\u003e\u003c\/span\u003e\u003cspan class='jdgm-star jdgm--on'\u003e\u003c\/span\u003e\u003c\/div\u003e \u003cdiv class='jdgm-histogram__bar'\u003e \u003cdiv class='jdgm-histogram__bar-content' style='width: 0%;'\u003e \u003c\/div\u003e \u003c\/div\u003e \u003cdiv class='jdgm-histogram__percentage'\u003e0%\u003c\/div\u003e \u003cdiv class='jdgm-histogram__frequency'\u003e(0)\u003c\/div\u003e \u003c\/div\u003e \u003cdiv class='jdgm-histogram__row' data-rating='4' data-frequency='0' data-percentage='0'\u003e \u003cdiv class='jdgm-histogram__star' role='button' aria-label=\"0% (0) reviews with 4 star rating\" tabindex='0' \u003e\u003cspan class='jdgm-star jdgm--on'\u003e\u003c\/span\u003e\u003cspan class='jdgm-star jdgm--on'\u003e\u003c\/span\u003e\u003cspan class='jdgm-star jdgm--on'\u003e\u003c\/span\u003e\u003cspan class='jdgm-star jdgm--on'\u003e\u003c\/span\u003e\u003cspan class='jdgm-star jdgm--off'\u003e\u003c\/span\u003e\u003c\/div\u003e \u003cdiv class='jdgm-histogram__bar'\u003e \u003cdiv class='jdgm-histogram__bar-content' style='width: 0%;'\u003e \u003c\/div\u003e \u003c\/div\u003e \u003cdiv class='jdgm-histogram__percentage'\u003e0%\u003c\/div\u003e \u003cdiv class='jdgm-histogram__frequency'\u003e(0)\u003c\/div\u003e \u003c\/div\u003e \u003cdiv class='jdgm-histogram__row' data-rating='3' data-frequency='0' data-percentage='0'\u003e \u003cdiv class='jdgm-histogram__star' role='button' aria-label=\"0% (0) reviews with 3 star rating\" tabindex='0' \u003e\u003cspan class='jdgm-star jdgm--on'\u003e\u003c\/span\u003e\u003cspan class='jdgm-star jdgm--on'\u003e\u003c\/span\u003e\u003cspan class='jdgm-star jdgm--on'\u003e\u003c\/span\u003e\u003cspan class='jdgm-star jdgm--off'\u003e\u003c\/span\u003e\u003cspan class='jdgm-star jdgm--off'\u003e\u003c\/span\u003e\u003c\/div\u003e \u003cdiv class='jdgm-histogram__bar'\u003e \u003cdiv class='jdgm-histogram__bar-content' style='width: 0%;'\u003e \u003c\/div\u003e \u003c\/div\u003e \u003cdiv class='jdgm-histogram__percentage'\u003e0%\u003c\/div\u003e \u003cdiv class='jdgm-histogram__frequency'\u003e(0)\u003c\/div\u003e \u003c\/div\u003e \u003cdiv class='jdgm-histogram__row' data-rating='2' data-frequency='0' data-percentage='0'\u003e \u003cdiv class='jdgm-histogram__star' role='button' aria-label=\"0% (0) reviews with 2 star rating\" tabindex='0' \u003e\u003cspan class='jdgm-star jdgm--on'\u003e\u003c\/span\u003e\u003cspan class='jdgm-star jdgm--on'\u003e\u003c\/span\u003e\u003cspan class='jdgm-star jdgm--off'\u003e\u003c\/span\u003e\u003cspan class='jdgm-star jdgm--off'\u003e\u003c\/span\u003e\u003cspan class='jdgm-star jdgm--off'\u003e\u003c\/span\u003e\u003c\/div\u003e \u003cdiv class='jdgm-histogram__bar'\u003e \u003cdiv class='jdgm-histogram__bar-content' style='width: 0%;'\u003e \u003c\/div\u003e \u003c\/div\u003e \u003cdiv class='jdgm-histogram__percentage'\u003e0%\u003c\/div\u003e \u003cdiv class='jdgm-histogram__frequency'\u003e(0)\u003c\/div\u003e \u003c\/div\u003e \u003cdiv class='jdgm-histogram__row' data-rating='1' data-frequency='0' data-percentage='0'\u003e \u003cdiv class='jdgm-histogram__star' role='button' aria-label=\"0% (0) reviews with 1 star rating\" tabindex='0' \u003e\u003cspan class='jdgm-star jdgm--on'\u003e\u003c\/span\u003e\u003cspan class='jdgm-star jdgm--off'\u003e\u003c\/span\u003e\u003cspan class='jdgm-star jdgm--off'\u003e\u003c\/span\u003e\u003cspan class='jdgm-star jdgm--off'\u003e\u003c\/span\u003e\u003cspan class='jdgm-star jdgm--off'\u003e\u003c\/span\u003e\u003c\/div\u003e \u003cdiv class='jdgm-histogram__bar'\u003e \u003cdiv class='jdgm-histogram__bar-content' style='width: 0%;'\u003e \u003c\/div\u003e \u003c\/div\u003e \u003cdiv class='jdgm-histogram__percentage'\u003e0%\u003c\/div\u003e \u003cdiv class='jdgm-histogram__frequency'\u003e(0)\u003c\/div\u003e \u003c\/div\u003e \u003cdiv class='jdgm-histogram__row jdgm-histogram__clear-filter' data-rating=null tabindex='0'\u003e\u003c\/div\u003e \u003c\/div\u003e \u003cdiv class='jdgm-rev-widg__sort-wrapper'\u003e\u003c\/div\u003e \u003c\/div\u003e \u003cdiv class='jdgm-rev-widg__body'\u003e \u003cdiv class='jdgm-rev-widg__reviews'\u003e\u003c\/div\u003e \u003cdiv class='jdgm-paginate' data-per-page='5' data-url='https:\/\/api.judge.me\/reviews\/reviews_for_widget' style=\"display: none;\"\u003e\u003c\/div\u003e \u003c\/div\u003e \u003cdiv class='jdgm-rev-widg__paginate-spinner-wrapper'\u003e \u003cdiv class='jdgm-spinner'\u003e\u003c\/div\u003e \u003c\/div\u003e \u003c\/div\u003e"},"collections":[{"id":294880051371,"handle":"crystals","title":"Crystals","updated_at":"2026-01-07T23:43:11-05:00","body_html":"\u003cp data-start=\"159\" data-end=\"687\"\u003e✨ \u003cstrong data-start=\"161\" data-end=\"216\"\u003eDiscover the Magic of Crystals with Crystal Destiny\u003c\/strong\u003e ✨\u003cbr data-start=\"218\" data-end=\"221\"\u003eCrystals have been treasured for centuries—not only for their natural beauty but also for their powerful healing energies. Beyond their visual allure, they bring balance, harmony, and positive energy into any space. Whether used for home décor, meditation, or simply to elevate the energy of your surroundings, crystals create a sanctuary of peace, relaxation, and well-being. Each piece is a unique gift from the Earth—visually stunning and spiritually uplifting.\u003c\/p\u003e\n\u003cp data-start=\"689\" data-end=\"1011\"\u003eAt \u003cstrong data-start=\"692\" data-end=\"711\"\u003eCrystal Destiny\u003c\/strong\u003e, our signature collection showcases a curated selection of exquisite crystals, from radiant Quartz to soothing Amethyst. Every stone is carefully sourced for its elegance and metaphysical resonance, making them perfect for enhancing your home, uplifting your spirit, or gifting to someone special.\u003c\/p\u003e\n\u003cp data-start=\"1013\" data-end=\"1206\"\u003eExperience the timeless sophistication of crystalline wonders. Explore the \u003cstrong data-start=\"1088\" data-end=\"1118\"\u003eCrystal Destiny Collection\u003c\/strong\u003e today and bring the transformative beauty of these treasures into your everyday life.\u003c\/p\u003e","published_at":"2023-06-05T11:24:02-04:00","sort_order":"created-desc","template_suffix":"","disjunctive":false,"rules":[{"column":"tag","relation":"equals","condition":"crystal"},{"column":"type","relation":"not_contains","condition":"925 Sterling Silver"},{"column":"type","relation":"not_contains","condition":"Wire Wraps"}],"published_scope":"global"},{"id":319455953067,"handle":"solar-plexus-chakra-crystals","title":"Solar Plexus Chakra Crystals","updated_at":"2026-01-06T11:12:19-05:00","body_html":"\u003cp data-start=\"142\" data-end=\"577\"\u003e✨ \u003cstrong data-start=\"144\" data-end=\"176\"\u003eSolar Plexus Chakra Crystals\u003c\/strong\u003e ✨\u003cbr data-start=\"178\" data-end=\"181\"\u003eHarness the power of your personal will and confidence with our \u003cstrong data-start=\"245\" data-end=\"277\"\u003eSolar Plexus Chakra Crystals\u003c\/strong\u003e. Focused on the third chakra, located at the center of your torso, these stones help balance self-esteem, personal power, and motivation. Perfect for meditation, energy work, or as wearable reminders of inner strength, each crystal resonates with vibrant energy designed to ignite your inner fire.\u003c\/p\u003e\n\u003cp data-start=\"579\" data-end=\"960\"\u003eOur curated selection includes radiant yellow and golden stones such as Citrine, Yellow Jasper, and Tiger’s Eye—each chosen for their ability to stimulate vitality, courage, and focus. Whether you place them in your sacred space, carry them with you, or incorporate them into jewelry, Solar Plexus Chakra Crystals invite clarity, confidence, and empowerment into your daily life.\u003c\/p\u003e\n\u003cp data-start=\"962\" data-end=\"1109\"\u003eElevate your energy, amplify your inner strength, and embrace the transformative power of your Solar Plexus with these powerful, luminous stones.\u003c\/p\u003e","published_at":"2025-07-17T18:18:13-04:00","sort_order":"best-selling","template_suffix":"","disjunctive":false,"rules":[{"column":"variant_metafield_definition","relation":"equals","condition":"Solar Plexus"}],"published_scope":"global","image":{"created_at":"2025-07-17T19:08:38-04:00","alt":null,"width":1080,"height":1080,"src":"\/\/crystaldestiny.com\/cdn\/shop\/collections\/Solar_Plexus_Chakra_Collection.jpg?v=1762474929"}},{"id":294880116907,"handle":"polished","title":"Polished Crystals","updated_at":"2026-01-07T23:43:11-05:00","body_html":"\u003cp data-start=\"199\" data-end=\"598\"\u003e✨ \u003cstrong data-start=\"201\" data-end=\"248\"\u003eCrystal Destiny Polished Crystal Collection\u003c\/strong\u003e ✨\u003cbr data-start=\"250\" data-end=\"253\"\u003eIndulge in the brilliance of crystals refined to perfection. Our \u003cstrong data-start=\"318\" data-end=\"341\"\u003ePolished Collection\u003c\/strong\u003e showcases gemstones meticulously shaped and smoothed to reveal their natural radiance and timeless beauty. From the shimmering glow of Quartz to the deep allure of Obsidian, each polished piece is a testament to nature’s artistry and human craftsmanship.\u003c\/p\u003e\n\u003cp data-start=\"600\" data-end=\"862\"\u003ePerfect as statement décor, meaningful gifts, or companions on your spiritual journey, polished crystals bring sophistication and elevated energy into any space. Their radiant surfaces reflect not only light but also the transformative power of crystal energy.\u003c\/p\u003e\n\u003cp data-start=\"864\" data-end=\"1022\"\u003eDiscover the elegance of refinement with Crystal Destiny’s Polished Crystal Collection—where every facet shines with intention, beauty, and timeless allure.\u003c\/p\u003e","published_at":"2023-06-05T11:30:44-04:00","sort_order":"created-desc","template_suffix":"","disjunctive":false,"rules":[{"column":"tag","relation":"equals","condition":"polished"}],"published_scope":"global"},{"id":293659312299,"handle":"best-sellers","title":"Best Sellers","updated_at":"2026-01-07T23:43:11-05:00","body_html":"\u003cp data-start=\"155\" data-end=\"510\"\u003eDiscover the pieces our community loves most. Our Best Sellers Collection brings together handpicked crystals and jewelry that embody timeless elegance, spiritual resonance, and everyday sophistication. Each item has earned its place as a customer favorite—celebrated for both its beauty and its meaningful energy.\u003c\/p\u003e\n\u003cp data-start=\"512\" data-end=\"802\"\u003eFrom stunning statement pieces to versatile daily companions, these treasures are curated to elevate your space, uplift your spirit, and reflect refined taste. Indulge in what’s most cherished and let our best sellers guide you toward the perfect blend of style and transformative energy.\u003c\/p\u003e\n\u003cp data-start=\"804\" data-end=\"932\"\u003eExplore the Best Sellers Collection today—where elegance meets intention, and every piece tells a story of beauty and balance.\u003c\/p\u003e","published_at":"2023-03-15T16:04:51-04:00","sort_order":"best-selling","template_suffix":"","disjunctive":false,"rules":[{"column":"variant_price","relation":"greater_than","condition":"0"},{"column":"variant_inventory","relation":"greater_than","condition":"0"},{"column":"type","relation":"not_equals","condition":"Shipping Protection"}],"published_scope":"global"},{"id":321370390699,"handle":"monthly-crystal-sale","title":"Monthly Crystal Sale | Spheres \u0026 Towers","updated_at":"2026-01-06T23:24:37-05:00","body_html":"\u003cp\u003eShop our \u003cstrong\u003eMonthly Crystal Sale\u003c\/strong\u003e, where you can shop a wide selection of healing crystals at discounted prices. Explore \u003cstrong\u003ecrystal spheres and towers,\u003c\/strong\u003e— all carefully curated to support meditation, energy balancing, and spiritual wellness. Whether you're looking to enhance your home decor, boost your daily energy, or find the perfect gift, our \u003cstrong\u003ecrystals for healing and manifestation\u003c\/strong\u003e offer both beauty and metaphysical benefits.\u003c\/p\u003e\n\u003cp\u003eEach month, our sale features \u003cstrong\u003enew discounted collections\u003c\/strong\u003e, from \u003cstrong\u003enatural quartz and amethyst towers\u003c\/strong\u003e to \u003cstrong\u003ewire-wrapped pendants and polished stones\u003c\/strong\u003e, so there's always something fresh to discover. Shop with confidence knowing you're getting high-quality crystals with \u003cstrong\u003efree shipping options\u003c\/strong\u003e and a trusted experience.\u003c\/p\u003e\n\u003cp\u003e\u003cstrong\u003eTake advantage of the Monthly Crystal Sale today\u003c\/strong\u003e and add powerful, natural energy to your life with \u003cstrong\u003eauthentic healing crystals\u003c\/strong\u003e — while our limited-time discounts last.\u003c\/p\u003e\n\u003cp\u003e\u003cstrong\u003e*Discount automatically applied at checkout.\u003c\/strong\u003e\u003c\/p\u003e","published_at":"2025-12-02T01:26:17-05:00","sort_order":"alpha-asc","template_suffix":"","disjunctive":true,"rules":[{"column":"tag","relation":"equals","condition":"spheres"},{"column":"tag","relation":"equals","condition":"Towers"}],"published_scope":"global","image":{"created_at":"2026-01-01T01:32:34-05:00","alt":"","width":960,"height":960,"src":"\/\/crystaldestiny.com\/cdn\/shop\/collections\/3E8C2969-1B86-4ACE-B349-98E9D8768424.jpg?v=1767249154"}},{"id":297596059819,"handle":"all","title":"All Crystals \u0026 Jewelry","updated_at":"2026-01-07T23:43:11-05:00","body_html":"\u003cp data-start=\"149\" data-end=\"494\"\u003e✨ \u003cstrong data-start=\"151\" data-end=\"181\"\u003eWelcome to Crystal Destiny\u003c\/strong\u003e ✨\u003cbr data-start=\"183\" data-end=\"186\"\u003eStep into a world where beauty, energy, and artistry unite. Our collection is a treasure trove of exquisite crystals, from the raw, untamed elegance of natural formations to the polished brilliance of expertly crafted pieces. Each crystal is a masterpiece, carrying its own unique story and timeless charm.\u003c\/p\u003e\n\u003cp data-start=\"496\" data-end=\"831\"\u003eWhether you’re drawn to the calming presence of Amethyst, the vibrant energy of Citrine, or the grounding strength of Jasper, our crystals invite you to connect with nature’s finest wonders. Perfect for enhancing your space, supporting your spiritual journey, or gifting with intention, every piece resonates with beauty and meaning.\u003c\/p\u003e\n\u003cp data-start=\"833\" data-end=\"1000\"\u003eElevate your surroundings, embrace the mystique, and explore the enchanting world of crystals at \u003cstrong data-start=\"930\" data-end=\"949\"\u003eCrystal Destiny\u003c\/strong\u003e—where every crystal is waiting to be discovered.\u003c\/p\u003e","published_at":"2023-11-10T13:55:31-05:00","sort_order":"created-desc","template_suffix":"","disjunctive":false,"rules":[{"column":"type","relation":"not_equals","condition":"asdf"}],"published_scope":"global"},{"id":296256405675,"handle":"crystal-towers","title":"Crystal Towers","updated_at":"2026-01-06T23:24:37-05:00","body_html":"\u003cp data-end=\"568\" data-start=\"152\"\u003e✨ \u003cstrong data-end=\"190\" data-start=\"154\"\u003eCrystal Destiny Tower Collection\u003c\/strong\u003e ✨\u003cbr data-end=\"195\" data-start=\"192\"\u003eEnchant your space with the timeless beauty and powerful energy of crystal towers. Each piece in our \u003cstrong data-end=\"316\" data-start=\"296\"\u003eTower Collection\u003c\/strong\u003e is carefully crafted to showcase nature’s artistry while radiating higher vibrations and spiritual resonance. From the clarity of Quartz to the calming presence of Amethyst, these towers are both decorative masterpieces and tools for transformation.\u003c\/p\u003e\n\u003cp data-end=\"765\" data-start=\"570\"\u003ePerfect for meditation spaces, energy work, or simply elevating your home décor, crystal towers channel focused energy upward—creating balance, harmony, and refined elegance in any environment.\u003c\/p\u003e\n\u003cp data-end=\"917\" data-start=\"767\"\u003eDiscover the Crystal Destiny Tower Collection today and transform your surroundings into a sanctuary of beauty, purpose, and spiritual significance.\u003c\/p\u003e\n\u003ch2\u003eCrystal Towers, Wands, Generators, Points, Pillars \u0026amp; Obelisks — What's the Difference?\u003c\/h2\u003e\n\u003cp id=\"isPasted\"\u003eWhile these terms may vary, they all describe beautifully shaped crystals with a pointed tip designed to channel and direct energy. Each name highlights a unique aspect of their use:\u003c\/p\u003e\n\u003cul\u003e\n\u003cli\u003e\n\u003cstrong\u003eTowers\u003c\/strong\u003e- Known for their steady, grounding presence, crystal towers help focus and amplify energy, making them perfect for meditation and manifestation.\u003c\/li\u003e\n\u003cli\u003e\n\u003cstrong\u003eWands\u003c\/strong\u003e- Traditionally used in energy work and healing, crystal wands are excellent for directing energy flow and clearing blockages.\u003c\/li\u003e\n\u003cli\u003e\n\u003cstrong\u003ePillars\u003c\/strong\u003e- Symbolizing strength and stability, crystal pillars create a balanced and harmonious environment, making them great for home decor and spiritual practices.\u003c\/li\u003e\n\u003cli\u003e\n\u003cstrong\u003eObelisks\u003c\/strong\u003e- Inspired by ancient structures, crystal obelisks are believed to connect earthly and spiritual energies, making them powerful tools for transformation and enlightenment.\u003c\/li\u003e\n\u003c\/ul\u003e\n\u003cp\u003eNo matter what you call them, these crystals serve the same purpose—to enhance energy, intention, and harmony in your space. Choose the one that resonates most with you!\u003c\/p\u003e","published_at":"2023-09-14T12:52:35-04:00","sort_order":"created-desc","template_suffix":"","disjunctive":false,"rules":[{"column":"tag","relation":"equals","condition":"towers"}],"published_scope":"global"},{"id":298983391403,"handle":"january-crystal-sale","title":"January Sale | 25% Off Crystal Towers \u0026 Spheres","updated_at":"2026-01-06T23:24:37-05:00","body_html":"\u003cp\u003eShop our \u003cstrong\u003eJanuary Crystal Sale\u003c\/strong\u003e, where you can shop a wide selection of healing crystals at discounted prices. Explore \u003cstrong\u003eCrystal Towers, \u0026amp; Crystal Spheres\u003c\/strong\u003e — all carefully curated and crafted to support meditation, energy balancing, and spiritual wellness. Whether you're looking to enhance your home decor, boost your daily energy, or find the perfect gift, our \u003cstrong\u003ecrystals for healing and manifestation\u003c\/strong\u003e offer both beauty and metaphysical benefits.\u003c\/p\u003e\n\u003cp\u003eThis January, our sale features \u003cstrong\u003ediscounted crystal towers and spheres\u003c\/strong\u003e, from \u003cstrong\u003enatural quartz \u003c\/strong\u003eand \u003cstrong\u003eamethyst \u003c\/strong\u003eto \u003cstrong\u003ebumblebee jasper \u003c\/strong\u003eand \u003cstrong\u003ecarnelian\u003c\/strong\u003e, so there's always something fresh to discover. Shop with confidence knowing you're getting high-quality crystals with \u003cstrong\u003efree shipping options\u003c\/strong\u003e and a trusted experience.\u003c\/p\u003e\n\u003cp\u003e\u003cstrong\u003eTake advantage of the January Crystal Sale today\u003c\/strong\u003e and add powerful, natural energy to your life with \u003cstrong\u003eauthentic healing crystals\u003c\/strong\u003e — while our limited-time discounts last.\u003c\/p\u003e\n\u003cp\u003e\u003cstrong\u003e*Discount automatically applied at checkout.\u003c\/strong\u003e\u003c\/p\u003e","published_at":"2026-01-01T00:07:17-05:00","sort_order":"alpha-asc","template_suffix":"monthly-collection","disjunctive":true,"rules":[{"column":"tag","relation":"equals","condition":"Spheres"},{"column":"tag","relation":"equals","condition":"Towers"}],"published_scope":"global","image":{"created_at":"2026-01-01T01:29:59-05:00","alt":"","width":960,"height":960,"src":"\/\/crystaldestiny.com\/cdn\/shop\/collections\/1464163B-22B1-4D62-BEC5-CEC9AECB670B.jpg?v=1767248999"}}]}
[{"alt":"Citrine \"Fatty\" Tower-Towers-Crystal Destiny-Citrine-701g - 4.75\"H x 2.75\"W-Crystal Destiny","id":31363018293419,"position":1,"preview_image":{"aspect_ratio":1.0,"height":2903,"width":2903,"src":"\/\/crystaldestiny.com\/cdn\/shop\/files\/Citrine-Fatty-Tower-Towers.jpg?v=1757204760"},"aspect_ratio":1.0,"height":2903,"media_type":"image","src":"\/\/crystaldestiny.com\/cdn\/shop\/files\/Citrine-Fatty-Tower-Towers.jpg?v=1757204760","width":2903},{"alt":"Citrine \"Fatty\" Tower-Towers-Crystal Destiny-Citrine-701g - 4.75\"H x 2.75\"W-Crystal Destiny","id":31363018326187,"position":2,"preview_image":{"aspect_ratio":1.0,"height":2726,"width":2726,"src":"\/\/crystaldestiny.com\/cdn\/shop\/files\/Citrine-Fatty-Tower-Towers-2.jpg?v=1757204890"},"aspect_ratio":1.0,"height":2726,"media_type":"image","src":"\/\/crystaldestiny.com\/cdn\/shop\/files\/Citrine-Fatty-Tower-Towers-2.jpg?v=1757204890","width":2726}]
{"item":{"id":8515007512747,"title":"Clear Quartz 24-Faceted Vogel","handle":"clear-quartz-24-faceted-vogel-cd-10343","description":"\u003cp\u003eThe Clear Quartz 24-Faceted Vogel is a meticulously crafted crystal known for its precision and energetic potency. Featuring 24 expertly cut facets, this Vogel point is designed to amplify, focus, and balance energy with exceptional clarity and power. Clear Quartz itself is revered as the “master healer,” capable of enhancing spiritual growth, mental clarity, and emotional stability.\u003c\/p\u003e\n\u003cp\u003eThe 24 facets enhance the crystal’s ability to direct and magnify energy flow, making it a highly effective tool for meditation, energy healing, and intention setting. Its balanced geometric design aligns with sacred geometry principles, promoting harmony and energetic balance. This piece is ideal for practitioners seeking refined energy work, deeper spiritual connection, and amplified healing frequencies in their practice.\u003c\/p\u003e\n\u003cp\u003e(note; slight white streak so it's marked down.)\u003c\/p\u003e\n\u003cp\u003eThis product is an exact pick as pictured, one of a kind.\u003c\/p\u003e\n\u003ch2\u003eCrystal Towers, Wands, Generators, Points, Pillars \u0026amp; Obelisks — What's the Difference?\u003c\/h2\u003e\n\u003cp id=\"isPasted\"\u003eWhile these terms may vary, they all describe beautifully shaped crystals with a pointed tip designed to channel and direct energy. Each name highlights a unique aspect of their use:\u003c\/p\u003e\n\u003cul\u003e\n\u003cli\u003e\n\u003cstrong\u003eTowers\u003c\/strong\u003e- Known for their steady, grounding presence, crystal towers help focus and amplify energy, making them perfect for meditation and manifestation.\u003c\/li\u003e\n\u003cli\u003e\n\u003cstrong\u003eWands\u003c\/strong\u003e- Traditionally used in energy work and healing, crystal wands are excellent for directing energy flow and clearing blockages.\u003c\/li\u003e\n\u003cli\u003e\n\u003cstrong\u003ePillars\u003c\/strong\u003e- Symbolizing strength and stability, crystal pillars create a balanced and harmonious environment, making them great for home decor and spiritual practices.\u003c\/li\u003e\n\u003cli\u003e\n\u003cstrong\u003eObelisks\u003c\/strong\u003e- Inspired by ancient structures, crystal obelisks are believed to connect earthly and spiritual energies, making them powerful tools for transformation and enlightenment.\u003c\/li\u003e\n\u003c\/ul\u003e\n\u003cp\u003eNo matter what you call them, these crystals serve the same purpose—to enhance energy, intention, and harmony in your space. Choose the one that resonates most with you!\u003c\/p\u003e","published_at":"2025-09-09T17:56:51-04:00","created_at":"2025-09-09T17:56:49-04:00","vendor":"Crystal Destiny","type":"Vogels","tags":["crystal","polished","Towers"],"price":9997,"price_min":9997,"price_max":9997,"available":true,"price_varies":false,"compare_at_price":13999,"compare_at_price_min":13999,"compare_at_price_max":13999,"compare_at_price_varies":false,"variants":[{"id":45600937181355,"title":"Clear Quartz \/ 36g - 2.50\"L","option1":"Clear Quartz","option2":"36g - 2.50\"L","option3":null,"sku":"CD-10343","requires_shipping":true,"taxable":true,"featured_image":null,"available":true,"name":"Clear Quartz 24-Faceted Vogel - Clear Quartz \/ 36g - 2.50\"L","public_title":"Clear Quartz \/ 36g - 2.50\"L","options":["Clear Quartz","36g - 2.50\"L"],"price":9997,"weight":36,"compare_at_price":13999,"inventory_management":"shopify","barcode":"","requires_selling_plan":false,"selling_plan_allocations":[]}],"images":["\/\/crystaldestiny.com\/cdn\/shop\/files\/Clear-Quartz-24-Faceted-Vogel-Vogels.jpg?v=1757481172","\/\/crystaldestiny.com\/cdn\/shop\/files\/Clear-Quartz-24-Faceted-Vogel-Vogels-2.jpg?v=1757481174","\/\/crystaldestiny.com\/cdn\/shop\/files\/Clear-Quartz-24-Faceted-Vogel-Vogels-3.jpg?v=1757481176"],"featured_image":"\/\/crystaldestiny.com\/cdn\/shop\/files\/Clear-Quartz-24-Faceted-Vogel-Vogels.jpg?v=1757481172","options":["Material","Size"],"media":[{"alt":"Clear Quartz 24-Faceted Vogel-Vogels-Crystal Destiny-Clear Quartz-36g - 2.50\"L-Crystal Destiny","id":31753916645547,"position":1,"preview_image":{"aspect_ratio":1.0,"height":1530,"width":1530,"src":"\/\/crystaldestiny.com\/cdn\/shop\/files\/Clear-Quartz-24-Faceted-Vogel-Vogels.jpg?v=1757481172"},"aspect_ratio":1.0,"height":1530,"media_type":"image","src":"\/\/crystaldestiny.com\/cdn\/shop\/files\/Clear-Quartz-24-Faceted-Vogel-Vogels.jpg?v=1757481172","width":1530},{"alt":"Clear Quartz 24-Faceted Vogel-Vogels-Crystal Destiny-Clear Quartz-36g - 2.50\"L-Crystal Destiny","id":31753916678315,"position":2,"preview_image":{"aspect_ratio":1.0,"height":1513,"width":1513,"src":"\/\/crystaldestiny.com\/cdn\/shop\/files\/Clear-Quartz-24-Faceted-Vogel-Vogels-2.jpg?v=1757481174"},"aspect_ratio":1.0,"height":1513,"media_type":"image","src":"\/\/crystaldestiny.com\/cdn\/shop\/files\/Clear-Quartz-24-Faceted-Vogel-Vogels-2.jpg?v=1757481174","width":1513},{"alt":"Clear Quartz 24-Faceted Vogel-Vogels-Crystal Destiny-Clear Quartz-36g - 2.50\"L-Crystal Destiny","id":31753916711083,"position":3,"preview_image":{"aspect_ratio":1.0,"height":1608,"width":1608,"src":"\/\/crystaldestiny.com\/cdn\/shop\/files\/Clear-Quartz-24-Faceted-Vogel-Vogels-3.jpg?v=1757481176"},"aspect_ratio":1.0,"height":1608,"media_type":"image","src":"\/\/crystaldestiny.com\/cdn\/shop\/files\/Clear-Quartz-24-Faceted-Vogel-Vogels-3.jpg?v=1757481176","width":1608}],"requires_selling_plan":false,"selling_plan_groups":[],"content":"\u003cp\u003eThe Clear Quartz 24-Faceted Vogel is a meticulously crafted crystal known for its precision and energetic potency. Featuring 24 expertly cut facets, this Vogel point is designed to amplify, focus, and balance energy with exceptional clarity and power. Clear Quartz itself is revered as the “master healer,” capable of enhancing spiritual growth, mental clarity, and emotional stability.\u003c\/p\u003e\n\u003cp\u003eThe 24 facets enhance the crystal’s ability to direct and magnify energy flow, making it a highly effective tool for meditation, energy healing, and intention setting. Its balanced geometric design aligns with sacred geometry principles, promoting harmony and energetic balance. This piece is ideal for practitioners seeking refined energy work, deeper spiritual connection, and amplified healing frequencies in their practice.\u003c\/p\u003e\n\u003cp\u003e(note; slight white streak so it's marked down.)\u003c\/p\u003e\n\u003cp\u003eThis product is an exact pick as pictured, one of a kind.\u003c\/p\u003e\n\u003ch2\u003eCrystal Towers, Wands, Generators, Points, Pillars \u0026amp; Obelisks — What's the Difference?\u003c\/h2\u003e\n\u003cp id=\"isPasted\"\u003eWhile these terms may vary, they all describe beautifully shaped crystals with a pointed tip designed to channel and direct energy. Each name highlights a unique aspect of their use:\u003c\/p\u003e\n\u003cul\u003e\n\u003cli\u003e\n\u003cstrong\u003eTowers\u003c\/strong\u003e- Known for their steady, grounding presence, crystal towers help focus and amplify energy, making them perfect for meditation and manifestation.\u003c\/li\u003e\n\u003cli\u003e\n\u003cstrong\u003eWands\u003c\/strong\u003e- Traditionally used in energy work and healing, crystal wands are excellent for directing energy flow and clearing blockages.\u003c\/li\u003e\n\u003cli\u003e\n\u003cstrong\u003ePillars\u003c\/strong\u003e- Symbolizing strength and stability, crystal pillars create a balanced and harmonious environment, making them great for home decor and spiritual practices.\u003c\/li\u003e\n\u003cli\u003e\n\u003cstrong\u003eObelisks\u003c\/strong\u003e- Inspired by ancient structures, crystal obelisks are believed to connect earthly and spiritual energies, making them powerful tools for transformation and enlightenment.\u003c\/li\u003e\n\u003c\/ul\u003e\n\u003cp\u003eNo matter what you call them, these crystals serve the same purpose—to enhance energy, intention, and harmony in your space. Choose the one that resonates most with you!\u003c\/p\u003e"},"options":[{"name":"Material","position":1,"values":["Clear Quartz"]},{"name":"Size","position":2,"values":["36g - 2.50\"L"]}],"custom_metafields":{"shipping_time":"Within 7 days"},"metafields":{"badge":"\u003cdiv style='display:none' class='jdgm-prev-badge' data-average-rating='0.00' data-number-of-reviews='0' data-number-of-questions='0'\u003e \u003cspan class='jdgm-prev-badge__stars' data-score='0.00' tabindex='0' aria-label='0.00 stars' role='button'\u003e \u003cspan class='jdgm-star jdgm--off'\u003e\u003c\/span\u003e\u003cspan class='jdgm-star jdgm--off'\u003e\u003c\/span\u003e\u003cspan class='jdgm-star jdgm--off'\u003e\u003c\/span\u003e\u003cspan class='jdgm-star jdgm--off'\u003e\u003c\/span\u003e\u003cspan class='jdgm-star jdgm--off'\u003e\u003c\/span\u003e \u003c\/span\u003e \u003cspan class='jdgm-prev-badge__text'\u003e No reviews \u003c\/span\u003e \u003c\/div\u003e","widget":"\u003cdiv class='jdgm-rev-widg' data-updated-at='2025-09-09T21:57:59Z' data-average-rating='0.00' data-number-of-reviews='0' data-number-of-questions='0' data-image-url='https:\/\/cdn.shopify.com\/s\/files\/1\/0613\/0345\/5915\/files\/6I0A4130.jpg?v=1757454916'\u003e \u003cstyle class='jdgm-temp-hiding-style'\u003e.jdgm-rev-widg{ display: none }\u003c\/style\u003e \u003cdiv class='jdgm-rev-widg__header'\u003e \u003ch2 class='jdgm-rev-widg__title'\u003eCustomer Reviews\u003c\/h2\u003e \u003cdiv class='jdgm-rev-widg__summary'\u003e \u003cdiv class='jdgm-rev-widg__summary-stars' aria-label='Average rating is 0.00 stars' role='img'\u003e \u003cspan class='jdgm-star jdgm--off'\u003e\u003c\/span\u003e\u003cspan class='jdgm-star jdgm--off'\u003e\u003c\/span\u003e\u003cspan class='jdgm-star jdgm--off'\u003e\u003c\/span\u003e\u003cspan class='jdgm-star jdgm--off'\u003e\u003c\/span\u003e\u003cspan class='jdgm-star jdgm--off'\u003e\u003c\/span\u003e \u003c\/div\u003e \u003cdiv class='jdgm-rev-widg__summary-text'\u003eBe the first to write a review\u003c\/div\u003e \u003c\/div\u003e \u003ca style='display: none' href='#' class='jdgm-write-rev-link' role='button'\u003eWrite a review\u003c\/a\u003e \u003cdiv class='jdgm-histogram jdgm-temp-hidden'\u003e \u003cdiv class='jdgm-histogram__row' data-rating='5' data-frequency='0' data-percentage='0'\u003e \u003cdiv class='jdgm-histogram__star' role='button' aria-label=\"0% (0) reviews with 5 star rating\" tabindex='0' \u003e\u003cspan class='jdgm-star jdgm--on'\u003e\u003c\/span\u003e\u003cspan class='jdgm-star jdgm--on'\u003e\u003c\/span\u003e\u003cspan class='jdgm-star jdgm--on'\u003e\u003c\/span\u003e\u003cspan class='jdgm-star jdgm--on'\u003e\u003c\/span\u003e\u003cspan class='jdgm-star jdgm--on'\u003e\u003c\/span\u003e\u003c\/div\u003e \u003cdiv class='jdgm-histogram__bar'\u003e \u003cdiv class='jdgm-histogram__bar-content' style='width: 0%;'\u003e \u003c\/div\u003e \u003c\/div\u003e \u003cdiv class='jdgm-histogram__percentage'\u003e0%\u003c\/div\u003e \u003cdiv class='jdgm-histogram__frequency'\u003e(0)\u003c\/div\u003e \u003c\/div\u003e \u003cdiv class='jdgm-histogram__row' data-rating='4' data-frequency='0' data-percentage='0'\u003e \u003cdiv class='jdgm-histogram__star' role='button' aria-label=\"0% (0) reviews with 4 star rating\" tabindex='0' \u003e\u003cspan class='jdgm-star jdgm--on'\u003e\u003c\/span\u003e\u003cspan class='jdgm-star jdgm--on'\u003e\u003c\/span\u003e\u003cspan class='jdgm-star jdgm--on'\u003e\u003c\/span\u003e\u003cspan class='jdgm-star jdgm--on'\u003e\u003c\/span\u003e\u003cspan class='jdgm-star jdgm--off'\u003e\u003c\/span\u003e\u003c\/div\u003e \u003cdiv class='jdgm-histogram__bar'\u003e \u003cdiv class='jdgm-histogram__bar-content' style='width: 0%;'\u003e \u003c\/div\u003e \u003c\/div\u003e \u003cdiv class='jdgm-histogram__percentage'\u003e0%\u003c\/div\u003e \u003cdiv class='jdgm-histogram__frequency'\u003e(0)\u003c\/div\u003e \u003c\/div\u003e \u003cdiv class='jdgm-histogram__row' data-rating='3' data-frequency='0' data-percentage='0'\u003e \u003cdiv class='jdgm-histogram__star' role='button' aria-label=\"0% (0) reviews with 3 star rating\" tabindex='0' \u003e\u003cspan class='jdgm-star jdgm--on'\u003e\u003c\/span\u003e\u003cspan class='jdgm-star jdgm--on'\u003e\u003c\/span\u003e\u003cspan class='jdgm-star jdgm--on'\u003e\u003c\/span\u003e\u003cspan class='jdgm-star jdgm--off'\u003e\u003c\/span\u003e\u003cspan class='jdgm-star jdgm--off'\u003e\u003c\/span\u003e\u003c\/div\u003e \u003cdiv class='jdgm-histogram__bar'\u003e \u003cdiv class='jdgm-histogram__bar-content' style='width: 0%;'\u003e \u003c\/div\u003e \u003c\/div\u003e \u003cdiv class='jdgm-histogram__percentage'\u003e0%\u003c\/div\u003e \u003cdiv class='jdgm-histogram__frequency'\u003e(0)\u003c\/div\u003e \u003c\/div\u003e \u003cdiv class='jdgm-histogram__row' data-rating='2' data-frequency='0' data-percentage='0'\u003e \u003cdiv class='jdgm-histogram__star' role='button' aria-label=\"0% (0) reviews with 2 star rating\" tabindex='0' \u003e\u003cspan class='jdgm-star jdgm--on'\u003e\u003c\/span\u003e\u003cspan class='jdgm-star jdgm--on'\u003e\u003c\/span\u003e\u003cspan class='jdgm-star jdgm--off'\u003e\u003c\/span\u003e\u003cspan class='jdgm-star jdgm--off'\u003e\u003c\/span\u003e\u003cspan class='jdgm-star jdgm--off'\u003e\u003c\/span\u003e\u003c\/div\u003e \u003cdiv class='jdgm-histogram__bar'\u003e \u003cdiv class='jdgm-histogram__bar-content' style='width: 0%;'\u003e \u003c\/div\u003e \u003c\/div\u003e \u003cdiv class='jdgm-histogram__percentage'\u003e0%\u003c\/div\u003e \u003cdiv class='jdgm-histogram__frequency'\u003e(0)\u003c\/div\u003e \u003c\/div\u003e \u003cdiv class='jdgm-histogram__row' data-rating='1' data-frequency='0' data-percentage='0'\u003e \u003cdiv class='jdgm-histogram__star' role='button' aria-label=\"0% (0) reviews with 1 star rating\" tabindex='0' \u003e\u003cspan class='jdgm-star jdgm--on'\u003e\u003c\/span\u003e\u003cspan class='jdgm-star jdgm--off'\u003e\u003c\/span\u003e\u003cspan class='jdgm-star jdgm--off'\u003e\u003c\/span\u003e\u003cspan class='jdgm-star jdgm--off'\u003e\u003c\/span\u003e\u003cspan class='jdgm-star jdgm--off'\u003e\u003c\/span\u003e\u003c\/div\u003e \u003cdiv class='jdgm-histogram__bar'\u003e \u003cdiv class='jdgm-histogram__bar-content' style='width: 0%;'\u003e \u003c\/div\u003e \u003c\/div\u003e \u003cdiv class='jdgm-histogram__percentage'\u003e0%\u003c\/div\u003e \u003cdiv class='jdgm-histogram__frequency'\u003e(0)\u003c\/div\u003e \u003c\/div\u003e \u003cdiv class='jdgm-histogram__row jdgm-histogram__clear-filter' data-rating=null tabindex='0'\u003e\u003c\/div\u003e \u003c\/div\u003e \u003cdiv class='jdgm-rev-widg__sort-wrapper'\u003e\u003c\/div\u003e \u003c\/div\u003e \u003cdiv class='jdgm-rev-widg__body'\u003e \u003cdiv class='jdgm-rev-widg__reviews'\u003e\u003c\/div\u003e \u003cdiv class='jdgm-paginate' data-per-page='4' data-url='https:\/\/api.judge.me\/reviews\/reviews_for_widget' style=\"display: none;\"\u003e\u003c\/div\u003e \u003c\/div\u003e \u003cdiv class='jdgm-rev-widg__paginate-spinner-wrapper'\u003e \u003cdiv class='jdgm-spinner'\u003e\u003c\/div\u003e \u003c\/div\u003e \u003c\/div\u003e"},"collections":[{"id":294880051371,"handle":"crystals","title":"Crystals","updated_at":"2026-01-07T23:43:11-05:00","body_html":"\u003cp data-start=\"159\" data-end=\"687\"\u003e✨ \u003cstrong data-start=\"161\" data-end=\"216\"\u003eDiscover the Magic of Crystals with Crystal Destiny\u003c\/strong\u003e ✨\u003cbr data-start=\"218\" data-end=\"221\"\u003eCrystals have been treasured for centuries—not only for their natural beauty but also for their powerful healing energies. Beyond their visual allure, they bring balance, harmony, and positive energy into any space. Whether used for home décor, meditation, or simply to elevate the energy of your surroundings, crystals create a sanctuary of peace, relaxation, and well-being. Each piece is a unique gift from the Earth—visually stunning and spiritually uplifting.\u003c\/p\u003e\n\u003cp data-start=\"689\" data-end=\"1011\"\u003eAt \u003cstrong data-start=\"692\" data-end=\"711\"\u003eCrystal Destiny\u003c\/strong\u003e, our signature collection showcases a curated selection of exquisite crystals, from radiant Quartz to soothing Amethyst. Every stone is carefully sourced for its elegance and metaphysical resonance, making them perfect for enhancing your home, uplifting your spirit, or gifting to someone special.\u003c\/p\u003e\n\u003cp data-start=\"1013\" data-end=\"1206\"\u003eExperience the timeless sophistication of crystalline wonders. Explore the \u003cstrong data-start=\"1088\" data-end=\"1118\"\u003eCrystal Destiny Collection\u003c\/strong\u003e today and bring the transformative beauty of these treasures into your everyday life.\u003c\/p\u003e","published_at":"2023-06-05T11:24:02-04:00","sort_order":"created-desc","template_suffix":"","disjunctive":false,"rules":[{"column":"tag","relation":"equals","condition":"crystal"},{"column":"type","relation":"not_contains","condition":"925 Sterling Silver"},{"column":"type","relation":"not_contains","condition":"Wire Wraps"}],"published_scope":"global"},{"id":319456084139,"handle":"universal-chakra-crystals","title":"Universal Chakra Crystals","updated_at":"2026-01-06T23:24:24-05:00","body_html":"\u003cp data-start=\"116\" data-end=\"404\"\u003e✨ \u003cstrong data-start=\"118\" data-end=\"158\"\u003eUniversal Chakra Crystals Collection\u003c\/strong\u003e ✨\u003cbr data-start=\"160\" data-end=\"163\"\u003eBalance, align, and energize all your chakras with our \u003cstrong data-start=\"218\" data-end=\"247\"\u003eUniversal Chakra Crystals\u003c\/strong\u003e. Carefully selected to resonate with every energy center in the body, these crystals support holistic well-being, spiritual growth, and energetic harmony.\u003c\/p\u003e\n\u003cp data-start=\"406\" data-end=\"744\"\u003eOur curated selection includes vibrant stones such as Amethyst, Citrine, Clear Quartz, and more—each chosen for their ability to promote clarity, balance, and vitality across the entire chakra system. Perfect for meditation, energy work, or creating a harmonious space, Universal Chakra Crystals help you connect mind, body, and spirit.\u003c\/p\u003e\n\u003cp data-start=\"746\" data-end=\"875\"\u003eEmbrace full-spectrum energy and elevate your spiritual journey with the transformative power of \u003cstrong data-start=\"843\" data-end=\"872\"\u003eUniversal Chakra Crystals\u003c\/strong\u003e.\u003c\/p\u003e","published_at":"2025-07-17T18:19:50-04:00","sort_order":"best-selling","template_suffix":"","disjunctive":false,"rules":[{"column":"variant_metafield_definition","relation":"equals","condition":"All Chakras"}],"published_scope":"global","image":{"created_at":"2025-07-17T19:07:58-04:00","alt":null,"width":1080,"height":1080,"src":"\/\/crystaldestiny.com\/cdn\/shop\/collections\/Universal_7_Chakras_Collection.jpg?v=1762474934"}},{"id":294880116907,"handle":"polished","title":"Polished Crystals","updated_at":"2026-01-07T23:43:11-05:00","body_html":"\u003cp data-start=\"199\" data-end=\"598\"\u003e✨ \u003cstrong data-start=\"201\" data-end=\"248\"\u003eCrystal Destiny Polished Crystal Collection\u003c\/strong\u003e ✨\u003cbr data-start=\"250\" data-end=\"253\"\u003eIndulge in the brilliance of crystals refined to perfection. Our \u003cstrong data-start=\"318\" data-end=\"341\"\u003ePolished Collection\u003c\/strong\u003e showcases gemstones meticulously shaped and smoothed to reveal their natural radiance and timeless beauty. From the shimmering glow of Quartz to the deep allure of Obsidian, each polished piece is a testament to nature’s artistry and human craftsmanship.\u003c\/p\u003e\n\u003cp data-start=\"600\" data-end=\"862\"\u003ePerfect as statement décor, meaningful gifts, or companions on your spiritual journey, polished crystals bring sophistication and elevated energy into any space. Their radiant surfaces reflect not only light but also the transformative power of crystal energy.\u003c\/p\u003e\n\u003cp data-start=\"864\" data-end=\"1022\"\u003eDiscover the elegance of refinement with Crystal Destiny’s Polished Crystal Collection—where every facet shines with intention, beauty, and timeless allure.\u003c\/p\u003e","published_at":"2023-06-05T11:30:44-04:00","sort_order":"created-desc","template_suffix":"","disjunctive":false,"rules":[{"column":"tag","relation":"equals","condition":"polished"}],"published_scope":"global"},{"id":293659312299,"handle":"best-sellers","title":"Best Sellers","updated_at":"2026-01-07T23:43:11-05:00","body_html":"\u003cp data-start=\"155\" data-end=\"510\"\u003eDiscover the pieces our community loves most. Our Best Sellers Collection brings together handpicked crystals and jewelry that embody timeless elegance, spiritual resonance, and everyday sophistication. Each item has earned its place as a customer favorite—celebrated for both its beauty and its meaningful energy.\u003c\/p\u003e\n\u003cp data-start=\"512\" data-end=\"802\"\u003eFrom stunning statement pieces to versatile daily companions, these treasures are curated to elevate your space, uplift your spirit, and reflect refined taste. Indulge in what’s most cherished and let our best sellers guide you toward the perfect blend of style and transformative energy.\u003c\/p\u003e\n\u003cp data-start=\"804\" data-end=\"932\"\u003eExplore the Best Sellers Collection today—where elegance meets intention, and every piece tells a story of beauty and balance.\u003c\/p\u003e","published_at":"2023-03-15T16:04:51-04:00","sort_order":"best-selling","template_suffix":"","disjunctive":false,"rules":[{"column":"variant_price","relation":"greater_than","condition":"0"},{"column":"variant_inventory","relation":"greater_than","condition":"0"},{"column":"type","relation":"not_equals","condition":"Shipping Protection"}],"published_scope":"global"},{"id":321370390699,"handle":"monthly-crystal-sale","title":"Monthly Crystal Sale | Spheres \u0026 Towers","updated_at":"2026-01-06T23:24:37-05:00","body_html":"\u003cp\u003eShop our \u003cstrong\u003eMonthly Crystal Sale\u003c\/strong\u003e, where you can shop a wide selection of healing crystals at discounted prices. Explore \u003cstrong\u003ecrystal spheres and towers,\u003c\/strong\u003e— all carefully curated to support meditation, energy balancing, and spiritual wellness. Whether you're looking to enhance your home decor, boost your daily energy, or find the perfect gift, our \u003cstrong\u003ecrystals for healing and manifestation\u003c\/strong\u003e offer both beauty and metaphysical benefits.\u003c\/p\u003e\n\u003cp\u003eEach month, our sale features \u003cstrong\u003enew discounted collections\u003c\/strong\u003e, from \u003cstrong\u003enatural quartz and amethyst towers\u003c\/strong\u003e to \u003cstrong\u003ewire-wrapped pendants and polished stones\u003c\/strong\u003e, so there's always something fresh to discover. Shop with confidence knowing you're getting high-quality crystals with \u003cstrong\u003efree shipping options\u003c\/strong\u003e and a trusted experience.\u003c\/p\u003e\n\u003cp\u003e\u003cstrong\u003eTake advantage of the Monthly Crystal Sale today\u003c\/strong\u003e and add powerful, natural energy to your life with \u003cstrong\u003eauthentic healing crystals\u003c\/strong\u003e — while our limited-time discounts last.\u003c\/p\u003e\n\u003cp\u003e\u003cstrong\u003e*Discount automatically applied at checkout.\u003c\/strong\u003e\u003c\/p\u003e","published_at":"2025-12-02T01:26:17-05:00","sort_order":"alpha-asc","template_suffix":"","disjunctive":true,"rules":[{"column":"tag","relation":"equals","condition":"spheres"},{"column":"tag","relation":"equals","condition":"Towers"}],"published_scope":"global","image":{"created_at":"2026-01-01T01:32:34-05:00","alt":"","width":960,"height":960,"src":"\/\/crystaldestiny.com\/cdn\/shop\/collections\/3E8C2969-1B86-4ACE-B349-98E9D8768424.jpg?v=1767249154"}},{"id":297596059819,"handle":"all","title":"All Crystals \u0026 Jewelry","updated_at":"2026-01-07T23:43:11-05:00","body_html":"\u003cp data-start=\"149\" data-end=\"494\"\u003e✨ \u003cstrong data-start=\"151\" data-end=\"181\"\u003eWelcome to Crystal Destiny\u003c\/strong\u003e ✨\u003cbr data-start=\"183\" data-end=\"186\"\u003eStep into a world where beauty, energy, and artistry unite. Our collection is a treasure trove of exquisite crystals, from the raw, untamed elegance of natural formations to the polished brilliance of expertly crafted pieces. Each crystal is a masterpiece, carrying its own unique story and timeless charm.\u003c\/p\u003e\n\u003cp data-start=\"496\" data-end=\"831\"\u003eWhether you’re drawn to the calming presence of Amethyst, the vibrant energy of Citrine, or the grounding strength of Jasper, our crystals invite you to connect with nature’s finest wonders. Perfect for enhancing your space, supporting your spiritual journey, or gifting with intention, every piece resonates with beauty and meaning.\u003c\/p\u003e\n\u003cp data-start=\"833\" data-end=\"1000\"\u003eElevate your surroundings, embrace the mystique, and explore the enchanting world of crystals at \u003cstrong data-start=\"930\" data-end=\"949\"\u003eCrystal Destiny\u003c\/strong\u003e—where every crystal is waiting to be discovered.\u003c\/p\u003e","published_at":"2023-11-10T13:55:31-05:00","sort_order":"created-desc","template_suffix":"","disjunctive":false,"rules":[{"column":"type","relation":"not_equals","condition":"asdf"}],"published_scope":"global"},{"id":296256405675,"handle":"crystal-towers","title":"Crystal Towers","updated_at":"2026-01-06T23:24:37-05:00","body_html":"\u003cp data-end=\"568\" data-start=\"152\"\u003e✨ \u003cstrong data-end=\"190\" data-start=\"154\"\u003eCrystal Destiny Tower Collection\u003c\/strong\u003e ✨\u003cbr data-end=\"195\" data-start=\"192\"\u003eEnchant your space with the timeless beauty and powerful energy of crystal towers. Each piece in our \u003cstrong data-end=\"316\" data-start=\"296\"\u003eTower Collection\u003c\/strong\u003e is carefully crafted to showcase nature’s artistry while radiating higher vibrations and spiritual resonance. From the clarity of Quartz to the calming presence of Amethyst, these towers are both decorative masterpieces and tools for transformation.\u003c\/p\u003e\n\u003cp data-end=\"765\" data-start=\"570\"\u003ePerfect for meditation spaces, energy work, or simply elevating your home décor, crystal towers channel focused energy upward—creating balance, harmony, and refined elegance in any environment.\u003c\/p\u003e\n\u003cp data-end=\"917\" data-start=\"767\"\u003eDiscover the Crystal Destiny Tower Collection today and transform your surroundings into a sanctuary of beauty, purpose, and spiritual significance.\u003c\/p\u003e\n\u003ch2\u003eCrystal Towers, Wands, Generators, Points, Pillars \u0026amp; Obelisks — What's the Difference?\u003c\/h2\u003e\n\u003cp id=\"isPasted\"\u003eWhile these terms may vary, they all describe beautifully shaped crystals with a pointed tip designed to channel and direct energy. Each name highlights a unique aspect of their use:\u003c\/p\u003e\n\u003cul\u003e\n\u003cli\u003e\n\u003cstrong\u003eTowers\u003c\/strong\u003e- Known for their steady, grounding presence, crystal towers help focus and amplify energy, making them perfect for meditation and manifestation.\u003c\/li\u003e\n\u003cli\u003e\n\u003cstrong\u003eWands\u003c\/strong\u003e- Traditionally used in energy work and healing, crystal wands are excellent for directing energy flow and clearing blockages.\u003c\/li\u003e\n\u003cli\u003e\n\u003cstrong\u003ePillars\u003c\/strong\u003e- Symbolizing strength and stability, crystal pillars create a balanced and harmonious environment, making them great for home decor and spiritual practices.\u003c\/li\u003e\n\u003cli\u003e\n\u003cstrong\u003eObelisks\u003c\/strong\u003e- Inspired by ancient structures, crystal obelisks are believed to connect earthly and spiritual energies, making them powerful tools for transformation and enlightenment.\u003c\/li\u003e\n\u003c\/ul\u003e\n\u003cp\u003eNo matter what you call them, these crystals serve the same purpose—to enhance energy, intention, and harmony in your space. Choose the one that resonates most with you!\u003c\/p\u003e","published_at":"2023-09-14T12:52:35-04:00","sort_order":"created-desc","template_suffix":"","disjunctive":false,"rules":[{"column":"tag","relation":"equals","condition":"towers"}],"published_scope":"global"},{"id":298983391403,"handle":"january-crystal-sale","title":"January Sale | 25% Off Crystal Towers \u0026 Spheres","updated_at":"2026-01-06T23:24:37-05:00","body_html":"\u003cp\u003eShop our \u003cstrong\u003eJanuary Crystal Sale\u003c\/strong\u003e, where you can shop a wide selection of healing crystals at discounted prices. Explore \u003cstrong\u003eCrystal Towers, \u0026amp; Crystal Spheres\u003c\/strong\u003e — all carefully curated and crafted to support meditation, energy balancing, and spiritual wellness. Whether you're looking to enhance your home decor, boost your daily energy, or find the perfect gift, our \u003cstrong\u003ecrystals for healing and manifestation\u003c\/strong\u003e offer both beauty and metaphysical benefits.\u003c\/p\u003e\n\u003cp\u003eThis January, our sale features \u003cstrong\u003ediscounted crystal towers and spheres\u003c\/strong\u003e, from \u003cstrong\u003enatural quartz \u003c\/strong\u003eand \u003cstrong\u003eamethyst \u003c\/strong\u003eto \u003cstrong\u003ebumblebee jasper \u003c\/strong\u003eand \u003cstrong\u003ecarnelian\u003c\/strong\u003e, so there's always something fresh to discover. Shop with confidence knowing you're getting high-quality crystals with \u003cstrong\u003efree shipping options\u003c\/strong\u003e and a trusted experience.\u003c\/p\u003e\n\u003cp\u003e\u003cstrong\u003eTake advantage of the January Crystal Sale today\u003c\/strong\u003e and add powerful, natural energy to your life with \u003cstrong\u003eauthentic healing crystals\u003c\/strong\u003e — while our limited-time discounts last.\u003c\/p\u003e\n\u003cp\u003e\u003cstrong\u003e*Discount automatically applied at checkout.\u003c\/strong\u003e\u003c\/p\u003e","published_at":"2026-01-01T00:07:17-05:00","sort_order":"alpha-asc","template_suffix":"monthly-collection","disjunctive":true,"rules":[{"column":"tag","relation":"equals","condition":"Spheres"},{"column":"tag","relation":"equals","condition":"Towers"}],"published_scope":"global","image":{"created_at":"2026-01-01T01:29:59-05:00","alt":"","width":960,"height":960,"src":"\/\/crystaldestiny.com\/cdn\/shop\/collections\/1464163B-22B1-4D62-BEC5-CEC9AECB670B.jpg?v=1767248999"}}]}
[{"alt":"Clear Quartz 24-Faceted Vogel-Vogels-Crystal Destiny-Clear Quartz-36g - 2.50\"L-Crystal Destiny","id":31753916645547,"position":1,"preview_image":{"aspect_ratio":1.0,"height":1530,"width":1530,"src":"\/\/crystaldestiny.com\/cdn\/shop\/files\/Clear-Quartz-24-Faceted-Vogel-Vogels.jpg?v=1757481172"},"aspect_ratio":1.0,"height":1530,"media_type":"image","src":"\/\/crystaldestiny.com\/cdn\/shop\/files\/Clear-Quartz-24-Faceted-Vogel-Vogels.jpg?v=1757481172","width":1530},{"alt":"Clear Quartz 24-Faceted Vogel-Vogels-Crystal Destiny-Clear Quartz-36g - 2.50\"L-Crystal Destiny","id":31753916678315,"position":2,"preview_image":{"aspect_ratio":1.0,"height":1513,"width":1513,"src":"\/\/crystaldestiny.com\/cdn\/shop\/files\/Clear-Quartz-24-Faceted-Vogel-Vogels-2.jpg?v=1757481174"},"aspect_ratio":1.0,"height":1513,"media_type":"image","src":"\/\/crystaldestiny.com\/cdn\/shop\/files\/Clear-Quartz-24-Faceted-Vogel-Vogels-2.jpg?v=1757481174","width":1513},{"alt":"Clear Quartz 24-Faceted Vogel-Vogels-Crystal Destiny-Clear Quartz-36g - 2.50\"L-Crystal Destiny","id":31753916711083,"position":3,"preview_image":{"aspect_ratio":1.0,"height":1608,"width":1608,"src":"\/\/crystaldestiny.com\/cdn\/shop\/files\/Clear-Quartz-24-Faceted-Vogel-Vogels-3.jpg?v=1757481176"},"aspect_ratio":1.0,"height":1608,"media_type":"image","src":"\/\/crystaldestiny.com\/cdn\/shop\/files\/Clear-Quartz-24-Faceted-Vogel-Vogels-3.jpg?v=1757481176","width":1608}]
{"item":{"id":8597779742891,"title":"Clear Quartz Crystal XXL Obelisk","handle":"clear-quartz-crystal-xxl-obelisk-1005006072845076-700-750g","description":"\u003cp data-end=\"459\" data-start=\"171\"\u003eThis Natural Clear Quartz Crystal Obelisk features a polished single-point design, highlighting the stone’s clarity and natural energy. Perfect for display, meditation, or spiritual practice, this crystal tower adds elegance and energetic balance to any space. This tower is substantial and has a nice girth to amplify its energy.\u003c\/p\u003e\n\u003cp data-end=\"772\" data-start=\"461\"\u003eClear Quartz is renowned for amplifying energy, enhancing clarity, and supporting focus. Use it on your altar, in meditation, or as a decorative crystal pillar to elevate your environment. Collectors and crystal enthusiasts treasure Clear Quartz obelisks for their versatility, beauty, and spiritual benefits.\u003c\/p\u003e\n\u003cp data-end=\"772\" data-start=\"461\"\u003eThis product is pulled at random by size.\u003c\/p\u003e\u003ch2\u003eCrystal Towers, Wands, Generators, Points, Pillars \u0026amp; Obelisks — What's the Difference?\u003c\/h2\u003e\n\u003cp id=\"isPasted\"\u003eWhile these terms may vary, they all describe beautifully shaped crystals with a pointed tip designed to channel and direct energy. Each name highlights a unique aspect of their use:\u003c\/p\u003e\n\u003cul\u003e\n\u003cli\u003e\n\u003cstrong\u003eTowers\u003c\/strong\u003e- Known for their steady, grounding presence, crystal towers help focus and amplify energy, making them perfect for meditation and manifestation.\u003c\/li\u003e\n\u003cli\u003e\n\u003cstrong\u003eWands\u003c\/strong\u003e- Traditionally used in energy work and healing, crystal wands are excellent for directing energy flow and clearing blockages.\u003c\/li\u003e\n\u003cli\u003e\n\u003cstrong\u003ePillars\u003c\/strong\u003e- Symbolizing strength and stability, crystal pillars create a balanced and harmonious environment, making them great for home decor and spiritual practices.\u003c\/li\u003e\n\u003cli\u003e\n\u003cstrong\u003eObelisks\u003c\/strong\u003e- Inspired by ancient structures, crystal obelisks are believed to connect earthly and spiritual energies, making them powerful tools for transformation and enlightenment.\u003c\/li\u003e\n\u003c\/ul\u003e\n\u003cp\u003eNo matter what you call them, these crystals serve the same purpose—to enhance energy, intention, and harmony in your space. Choose the one that resonates most with you!\u003c\/p\u003e","published_at":"2025-12-03T22:48:14-05:00","created_at":"2025-12-02T21:10:56-05:00","vendor":"Ali","type":"Towers","tags":["adjusted-shipping","crystal","new-arrivals","polished","Towers"],"price":22699,"price_min":22699,"price_max":150299,"available":true,"price_varies":true,"compare_at_price":0,"compare_at_price_min":0,"compare_at_price_max":0,"compare_at_price_varies":false,"variants":[{"id":45917740531883,"title":"Clear Quartz \/ 700-750g","option1":"Clear Quartz","option2":"700-750g","option3":null,"sku":"1005006072845076-700-750g","requires_shipping":true,"taxable":true,"featured_image":{"id":40885016101035,"product_id":8597779742891,"position":1,"created_at":"2025-12-02T21:10:58-05:00","updated_at":"2025-12-10T00:22:55-05:00","alt":"Clear Quartz Crystal XXL Obelisk-Towers-Ali-Clear Quartz-700-750g-Crystal Destiny","width":1600,"height":1600,"src":"\/\/crystaldestiny.com\/cdn\/shop\/files\/Clear-Quartz-Crystal-XXL-Obelisk-Towers-Clear-Quartz-700-750g.webp?v=1765344175","variant_ids":[45917740433579,45917740466347,45917740499115,45917740531883,45917740761259,45917740794027,45917740826795,45917740859563,45917740892331,45917740925099,45917740957867,45917740990635]},"available":true,"name":"Clear Quartz Crystal XXL Obelisk - Clear Quartz \/ 700-750g","public_title":"Clear Quartz \/ 700-750g","options":["Clear Quartz","700-750g"],"price":22699,"weight":500,"compare_at_price":0,"inventory_management":"shopify","barcode":null,"featured_media":{"alt":"Clear Quartz Crystal XXL Obelisk-Towers-Ali-Clear Quartz-700-750g-Crystal Destiny","id":32255576539307,"position":1,"preview_image":{"aspect_ratio":1.0,"height":1600,"width":1600,"src":"\/\/crystaldestiny.com\/cdn\/shop\/files\/Clear-Quartz-Crystal-XXL-Obelisk-Towers-Clear-Quartz-700-750g.webp?v=1765344175"}},"requires_selling_plan":false,"selling_plan_allocations":[]},{"id":45917740499115,"title":"Clear Quartz \/ 800-850g","option1":"Clear Quartz","option2":"800-850g","option3":null,"sku":"1005006072845076-800-850g","requires_shipping":true,"taxable":true,"featured_image":{"id":40885016101035,"product_id":8597779742891,"position":1,"created_at":"2025-12-02T21:10:58-05:00","updated_at":"2025-12-10T00:22:55-05:00","alt":"Clear Quartz Crystal XXL Obelisk-Towers-Ali-Clear Quartz-700-750g-Crystal Destiny","width":1600,"height":1600,"src":"\/\/crystaldestiny.com\/cdn\/shop\/files\/Clear-Quartz-Crystal-XXL-Obelisk-Towers-Clear-Quartz-700-750g.webp?v=1765344175","variant_ids":[45917740433579,45917740466347,45917740499115,45917740531883,45917740761259,45917740794027,45917740826795,45917740859563,45917740892331,45917740925099,45917740957867,45917740990635]},"available":true,"name":"Clear Quartz Crystal XXL Obelisk - Clear Quartz \/ 800-850g","public_title":"Clear Quartz \/ 800-850g","options":["Clear Quartz","800-850g"],"price":25699,"weight":500,"compare_at_price":0,"inventory_management":"shopify","barcode":null,"featured_media":{"alt":"Clear Quartz Crystal XXL Obelisk-Towers-Ali-Clear Quartz-700-750g-Crystal Destiny","id":32255576539307,"position":1,"preview_image":{"aspect_ratio":1.0,"height":1600,"width":1600,"src":"\/\/crystaldestiny.com\/cdn\/shop\/files\/Clear-Quartz-Crystal-XXL-Obelisk-Towers-Clear-Quartz-700-750g.webp?v=1765344175"}},"requires_selling_plan":false,"selling_plan_allocations":[]},{"id":45917740466347,"title":"Clear Quartz \/ 900-1000g","option1":"Clear Quartz","option2":"900-1000g","option3":null,"sku":"1005006072845076-900-1000g","requires_shipping":true,"taxable":true,"featured_image":{"id":40885016101035,"product_id":8597779742891,"position":1,"created_at":"2025-12-02T21:10:58-05:00","updated_at":"2025-12-10T00:22:55-05:00","alt":"Clear Quartz Crystal XXL Obelisk-Towers-Ali-Clear Quartz-700-750g-Crystal Destiny","width":1600,"height":1600,"src":"\/\/crystaldestiny.com\/cdn\/shop\/files\/Clear-Quartz-Crystal-XXL-Obelisk-Towers-Clear-Quartz-700-750g.webp?v=1765344175","variant_ids":[45917740433579,45917740466347,45917740499115,45917740531883,45917740761259,45917740794027,45917740826795,45917740859563,45917740892331,45917740925099,45917740957867,45917740990635]},"available":true,"name":"Clear Quartz Crystal XXL Obelisk - Clear Quartz \/ 900-1000g","public_title":"Clear Quartz \/ 900-1000g","options":["Clear Quartz","900-1000g"],"price":30499,"weight":500,"compare_at_price":0,"inventory_management":"shopify","barcode":null,"featured_media":{"alt":"Clear Quartz Crystal XXL Obelisk-Towers-Ali-Clear Quartz-700-750g-Crystal Destiny","id":32255576539307,"position":1,"preview_image":{"aspect_ratio":1.0,"height":1600,"width":1600,"src":"\/\/crystaldestiny.com\/cdn\/shop\/files\/Clear-Quartz-Crystal-XXL-Obelisk-Towers-Clear-Quartz-700-750g.webp?v=1765344175"}},"requires_selling_plan":false,"selling_plan_allocations":[]},{"id":45917740433579,"title":"Clear Quartz \/ 1100-1200g","option1":"Clear Quartz","option2":"1100-1200g","option3":null,"sku":"1005006072845076-1100-1200g","requires_shipping":true,"taxable":true,"featured_image":{"id":40885016101035,"product_id":8597779742891,"position":1,"created_at":"2025-12-02T21:10:58-05:00","updated_at":"2025-12-10T00:22:55-05:00","alt":"Clear Quartz Crystal XXL Obelisk-Towers-Ali-Clear Quartz-700-750g-Crystal Destiny","width":1600,"height":1600,"src":"\/\/crystaldestiny.com\/cdn\/shop\/files\/Clear-Quartz-Crystal-XXL-Obelisk-Towers-Clear-Quartz-700-750g.webp?v=1765344175","variant_ids":[45917740433579,45917740466347,45917740499115,45917740531883,45917740761259,45917740794027,45917740826795,45917740859563,45917740892331,45917740925099,45917740957867,45917740990635]},"available":true,"name":"Clear Quartz Crystal XXL Obelisk - Clear Quartz \/ 1100-1200g","public_title":"Clear Quartz \/ 1100-1200g","options":["Clear Quartz","1100-1200g"],"price":36199,"weight":500,"compare_at_price":0,"inventory_management":"shopify","barcode":null,"featured_media":{"alt":"Clear Quartz Crystal XXL Obelisk-Towers-Ali-Clear Quartz-700-750g-Crystal Destiny","id":32255576539307,"position":1,"preview_image":{"aspect_ratio":1.0,"height":1600,"width":1600,"src":"\/\/crystaldestiny.com\/cdn\/shop\/files\/Clear-Quartz-Crystal-XXL-Obelisk-Towers-Clear-Quartz-700-750g.webp?v=1765344175"}},"requires_selling_plan":false,"selling_plan_allocations":[]},{"id":45917740990635,"title":"Clear Quartz \/ 1300-1400g","option1":"Clear Quartz","option2":"1300-1400g","option3":null,"sku":"1005006072845076-1300-1400g","requires_shipping":true,"taxable":true,"featured_image":{"id":40885016101035,"product_id":8597779742891,"position":1,"created_at":"2025-12-02T21:10:58-05:00","updated_at":"2025-12-10T00:22:55-05:00","alt":"Clear Quartz Crystal XXL Obelisk-Towers-Ali-Clear Quartz-700-750g-Crystal Destiny","width":1600,"height":1600,"src":"\/\/crystaldestiny.com\/cdn\/shop\/files\/Clear-Quartz-Crystal-XXL-Obelisk-Towers-Clear-Quartz-700-750g.webp?v=1765344175","variant_ids":[45917740433579,45917740466347,45917740499115,45917740531883,45917740761259,45917740794027,45917740826795,45917740859563,45917740892331,45917740925099,45917740957867,45917740990635]},"available":true,"name":"Clear Quartz Crystal XXL Obelisk - Clear Quartz \/ 1300-1400g","public_title":"Clear Quartz \/ 1300-1400g","options":["Clear Quartz","1300-1400g"],"price":41999,"weight":500,"compare_at_price":0,"inventory_management":"shopify","barcode":null,"featured_media":{"alt":"Clear Quartz Crystal XXL Obelisk-Towers-Ali-Clear Quartz-700-750g-Crystal Destiny","id":32255576539307,"position":1,"preview_image":{"aspect_ratio":1.0,"height":1600,"width":1600,"src":"\/\/crystaldestiny.com\/cdn\/shop\/files\/Clear-Quartz-Crystal-XXL-Obelisk-Towers-Clear-Quartz-700-750g.webp?v=1765344175"}},"requires_selling_plan":false,"selling_plan_allocations":[]},{"id":45917740957867,"title":"Clear Quartz \/ 1500-1600g","option1":"Clear Quartz","option2":"1500-1600g","option3":null,"sku":"1005006072845076-1500-1600g","requires_shipping":true,"taxable":true,"featured_image":{"id":40885016101035,"product_id":8597779742891,"position":1,"created_at":"2025-12-02T21:10:58-05:00","updated_at":"2025-12-10T00:22:55-05:00","alt":"Clear Quartz Crystal XXL Obelisk-Towers-Ali-Clear Quartz-700-750g-Crystal Destiny","width":1600,"height":1600,"src":"\/\/crystaldestiny.com\/cdn\/shop\/files\/Clear-Quartz-Crystal-XXL-Obelisk-Towers-Clear-Quartz-700-750g.webp?v=1765344175","variant_ids":[45917740433579,45917740466347,45917740499115,45917740531883,45917740761259,45917740794027,45917740826795,45917740859563,45917740892331,45917740925099,45917740957867,45917740990635]},"available":true,"name":"Clear Quartz Crystal XXL Obelisk - Clear Quartz \/ 1500-1600g","public_title":"Clear Quartz \/ 1500-1600g","options":["Clear Quartz","1500-1600g"],"price":47699,"weight":500,"compare_at_price":0,"inventory_management":"shopify","barcode":null,"featured_media":{"alt":"Clear Quartz Crystal XXL Obelisk-Towers-Ali-Clear Quartz-700-750g-Crystal Destiny","id":32255576539307,"position":1,"preview_image":{"aspect_ratio":1.0,"height":1600,"width":1600,"src":"\/\/crystaldestiny.com\/cdn\/shop\/files\/Clear-Quartz-Crystal-XXL-Obelisk-Towers-Clear-Quartz-700-750g.webp?v=1765344175"}},"requires_selling_plan":false,"selling_plan_allocations":[]},{"id":45917740925099,"title":"Clear Quartz \/ 2-2.5kg","option1":"Clear Quartz","option2":"2-2.5kg","option3":null,"sku":"1005006072845076-2-2.5kg","requires_shipping":true,"taxable":true,"featured_image":{"id":40885016101035,"product_id":8597779742891,"position":1,"created_at":"2025-12-02T21:10:58-05:00","updated_at":"2025-12-10T00:22:55-05:00","alt":"Clear Quartz Crystal XXL Obelisk-Towers-Ali-Clear Quartz-700-750g-Crystal Destiny","width":1600,"height":1600,"src":"\/\/crystaldestiny.com\/cdn\/shop\/files\/Clear-Quartz-Crystal-XXL-Obelisk-Towers-Clear-Quartz-700-750g.webp?v=1765344175","variant_ids":[45917740433579,45917740466347,45917740499115,45917740531883,45917740761259,45917740794027,45917740826795,45917740859563,45917740892331,45917740925099,45917740957867,45917740990635]},"available":true,"name":"Clear Quartz Crystal XXL Obelisk - Clear Quartz \/ 2-2.5kg","public_title":"Clear Quartz \/ 2-2.5kg","options":["Clear Quartz","2-2.5kg"],"price":67899,"weight":500,"compare_at_price":0,"inventory_management":"shopify","barcode":null,"featured_media":{"alt":"Clear Quartz Crystal XXL Obelisk-Towers-Ali-Clear Quartz-700-750g-Crystal Destiny","id":32255576539307,"position":1,"preview_image":{"aspect_ratio":1.0,"height":1600,"width":1600,"src":"\/\/crystaldestiny.com\/cdn\/shop\/files\/Clear-Quartz-Crystal-XXL-Obelisk-Towers-Clear-Quartz-700-750g.webp?v=1765344175"}},"requires_selling_plan":false,"selling_plan_allocations":[]},{"id":45917740892331,"title":"Clear Quartz \/ 3-3.5kg","option1":"Clear Quartz","option2":"3-3.5kg","option3":null,"sku":"1005006072845076-3-3.5kg","requires_shipping":true,"taxable":true,"featured_image":{"id":40885016101035,"product_id":8597779742891,"position":1,"created_at":"2025-12-02T21:10:58-05:00","updated_at":"2025-12-10T00:22:55-05:00","alt":"Clear Quartz Crystal XXL Obelisk-Towers-Ali-Clear Quartz-700-750g-Crystal Destiny","width":1600,"height":1600,"src":"\/\/crystaldestiny.com\/cdn\/shop\/files\/Clear-Quartz-Crystal-XXL-Obelisk-Towers-Clear-Quartz-700-750g.webp?v=1765344175","variant_ids":[45917740433579,45917740466347,45917740499115,45917740531883,45917740761259,45917740794027,45917740826795,45917740859563,45917740892331,45917740925099,45917740957867,45917740990635]},"available":true,"name":"Clear Quartz Crystal XXL Obelisk - Clear Quartz \/ 3-3.5kg","public_title":"Clear Quartz \/ 3-3.5kg","options":["Clear Quartz","3-3.5kg"],"price":86499,"weight":500,"compare_at_price":0,"inventory_management":"shopify","barcode":null,"featured_media":{"alt":"Clear Quartz Crystal XXL Obelisk-Towers-Ali-Clear Quartz-700-750g-Crystal Destiny","id":32255576539307,"position":1,"preview_image":{"aspect_ratio":1.0,"height":1600,"width":1600,"src":"\/\/crystaldestiny.com\/cdn\/shop\/files\/Clear-Quartz-Crystal-XXL-Obelisk-Towers-Clear-Quartz-700-750g.webp?v=1765344175"}},"requires_selling_plan":false,"selling_plan_allocations":[]},{"id":45917740859563,"title":"Clear Quartz \/ 4-4.5kg","option1":"Clear Quartz","option2":"4-4.5kg","option3":null,"sku":"1005006072845076-4-4.5kg","requires_shipping":true,"taxable":true,"featured_image":{"id":40885016101035,"product_id":8597779742891,"position":1,"created_at":"2025-12-02T21:10:58-05:00","updated_at":"2025-12-10T00:22:55-05:00","alt":"Clear Quartz Crystal XXL Obelisk-Towers-Ali-Clear Quartz-700-750g-Crystal Destiny","width":1600,"height":1600,"src":"\/\/crystaldestiny.com\/cdn\/shop\/files\/Clear-Quartz-Crystal-XXL-Obelisk-Towers-Clear-Quartz-700-750g.webp?v=1765344175","variant_ids":[45917740433579,45917740466347,45917740499115,45917740531883,45917740761259,45917740794027,45917740826795,45917740859563,45917740892331,45917740925099,45917740957867,45917740990635]},"available":true,"name":"Clear Quartz Crystal XXL Obelisk - Clear Quartz \/ 4-4.5kg","public_title":"Clear Quartz \/ 4-4.5kg","options":["Clear Quartz","4-4.5kg"],"price":98199,"weight":500,"compare_at_price":0,"inventory_management":"shopify","barcode":null,"featured_media":{"alt":"Clear Quartz Crystal XXL Obelisk-Towers-Ali-Clear Quartz-700-750g-Crystal Destiny","id":32255576539307,"position":1,"preview_image":{"aspect_ratio":1.0,"height":1600,"width":1600,"src":"\/\/crystaldestiny.com\/cdn\/shop\/files\/Clear-Quartz-Crystal-XXL-Obelisk-Towers-Clear-Quartz-700-750g.webp?v=1765344175"}},"requires_selling_plan":false,"selling_plan_allocations":[]},{"id":45917740826795,"title":"Clear Quartz \/ 5-5.5kg","option1":"Clear Quartz","option2":"5-5.5kg","option3":null,"sku":"1005006072845076-5-5.5kg","requires_shipping":true,"taxable":true,"featured_image":{"id":40885016101035,"product_id":8597779742891,"position":1,"created_at":"2025-12-02T21:10:58-05:00","updated_at":"2025-12-10T00:22:55-05:00","alt":"Clear Quartz Crystal XXL Obelisk-Towers-Ali-Clear Quartz-700-750g-Crystal Destiny","width":1600,"height":1600,"src":"\/\/crystaldestiny.com\/cdn\/shop\/files\/Clear-Quartz-Crystal-XXL-Obelisk-Towers-Clear-Quartz-700-750g.webp?v=1765344175","variant_ids":[45917740433579,45917740466347,45917740499115,45917740531883,45917740761259,45917740794027,45917740826795,45917740859563,45917740892331,45917740925099,45917740957867,45917740990635]},"available":true,"name":"Clear Quartz Crystal XXL Obelisk - Clear Quartz \/ 5-5.5kg","public_title":"Clear Quartz \/ 5-5.5kg","options":["Clear Quartz","5-5.5kg"],"price":116699,"weight":500,"compare_at_price":0,"inventory_management":"shopify","barcode":null,"featured_media":{"alt":"Clear Quartz Crystal XXL Obelisk-Towers-Ali-Clear Quartz-700-750g-Crystal Destiny","id":32255576539307,"position":1,"preview_image":{"aspect_ratio":1.0,"height":1600,"width":1600,"src":"\/\/crystaldestiny.com\/cdn\/shop\/files\/Clear-Quartz-Crystal-XXL-Obelisk-Towers-Clear-Quartz-700-750g.webp?v=1765344175"}},"requires_selling_plan":false,"selling_plan_allocations":[]},{"id":45917740794027,"title":"Clear Quartz \/ 6-6.5kg","option1":"Clear Quartz","option2":"6-6.5kg","option3":null,"sku":"1005006072845076-6-6.5kg","requires_shipping":true,"taxable":true,"featured_image":{"id":40885016101035,"product_id":8597779742891,"position":1,"created_at":"2025-12-02T21:10:58-05:00","updated_at":"2025-12-10T00:22:55-05:00","alt":"Clear Quartz Crystal XXL Obelisk-Towers-Ali-Clear Quartz-700-750g-Crystal Destiny","width":1600,"height":1600,"src":"\/\/crystaldestiny.com\/cdn\/shop\/files\/Clear-Quartz-Crystal-XXL-Obelisk-Towers-Clear-Quartz-700-750g.webp?v=1765344175","variant_ids":[45917740433579,45917740466347,45917740499115,45917740531883,45917740761259,45917740794027,45917740826795,45917740859563,45917740892331,45917740925099,45917740957867,45917740990635]},"available":true,"name":"Clear Quartz Crystal XXL Obelisk - Clear Quartz \/ 6-6.5kg","public_title":"Clear Quartz \/ 6-6.5kg","options":["Clear Quartz","6-6.5kg"],"price":133999,"weight":500,"compare_at_price":0,"inventory_management":"shopify","barcode":null,"featured_media":{"alt":"Clear Quartz Crystal XXL Obelisk-Towers-Ali-Clear Quartz-700-750g-Crystal Destiny","id":32255576539307,"position":1,"preview_image":{"aspect_ratio":1.0,"height":1600,"width":1600,"src":"\/\/crystaldestiny.com\/cdn\/shop\/files\/Clear-Quartz-Crystal-XXL-Obelisk-Towers-Clear-Quartz-700-750g.webp?v=1765344175"}},"requires_selling_plan":false,"selling_plan_allocations":[]},{"id":45917740761259,"title":"Clear Quartz \/ 7-7.5kg","option1":"Clear Quartz","option2":"7-7.5kg","option3":null,"sku":"1005006072845076-7-7.5kg","requires_shipping":true,"taxable":true,"featured_image":{"id":40885016101035,"product_id":8597779742891,"position":1,"created_at":"2025-12-02T21:10:58-05:00","updated_at":"2025-12-10T00:22:55-05:00","alt":"Clear Quartz Crystal XXL Obelisk-Towers-Ali-Clear Quartz-700-750g-Crystal Destiny","width":1600,"height":1600,"src":"\/\/crystaldestiny.com\/cdn\/shop\/files\/Clear-Quartz-Crystal-XXL-Obelisk-Towers-Clear-Quartz-700-750g.webp?v=1765344175","variant_ids":[45917740433579,45917740466347,45917740499115,45917740531883,45917740761259,45917740794027,45917740826795,45917740859563,45917740892331,45917740925099,45917740957867,45917740990635]},"available":true,"name":"Clear Quartz Crystal XXL Obelisk - Clear Quartz \/ 7-7.5kg","public_title":"Clear Quartz \/ 7-7.5kg","options":["Clear Quartz","7-7.5kg"],"price":150299,"weight":500,"compare_at_price":0,"inventory_management":"shopify","barcode":null,"featured_media":{"alt":"Clear Quartz Crystal XXL Obelisk-Towers-Ali-Clear Quartz-700-750g-Crystal Destiny","id":32255576539307,"position":1,"preview_image":{"aspect_ratio":1.0,"height":1600,"width":1600,"src":"\/\/crystaldestiny.com\/cdn\/shop\/files\/Clear-Quartz-Crystal-XXL-Obelisk-Towers-Clear-Quartz-700-750g.webp?v=1765344175"}},"requires_selling_plan":false,"selling_plan_allocations":[]}],"images":["\/\/crystaldestiny.com\/cdn\/shop\/files\/Clear-Quartz-Crystal-XXL-Obelisk-Towers-Clear-Quartz-700-750g.webp?v=1765344175","\/\/crystaldestiny.com\/cdn\/shop\/files\/Clear-Quartz-Crystal-XXL-Obelisk-Towers-2.webp?v=1764824541","\/\/crystaldestiny.com\/cdn\/shop\/files\/Clear-Quartz-Crystal-XXL-Obelisk-Towers-3.webp?v=1764824542","\/\/crystaldestiny.com\/cdn\/shop\/files\/Clear-Quartz-Crystal-XXL-Obelisk-Towers-4.webp?v=1764824544","\/\/crystaldestiny.com\/cdn\/shop\/files\/Clear-Quartz-Crystal-XXL-Obelisk-Towers-5.webp?v=1764824545","\/\/crystaldestiny.com\/cdn\/shop\/files\/Clear-Quartz-Crystal-XXL-Obelisk-Towers-6.webp?v=1764824547"],"featured_image":"\/\/crystaldestiny.com\/cdn\/shop\/files\/Clear-Quartz-Crystal-XXL-Obelisk-Towers-Clear-Quartz-700-750g.webp?v=1765344175","options":["Material","Size"],"media":[{"alt":"Clear Quartz Crystal XXL Obelisk-Towers-Ali-Clear Quartz-700-750g-Crystal Destiny","id":32255576539307,"position":1,"preview_image":{"aspect_ratio":1.0,"height":1600,"width":1600,"src":"\/\/crystaldestiny.com\/cdn\/shop\/files\/Clear-Quartz-Crystal-XXL-Obelisk-Towers-Clear-Quartz-700-750g.webp?v=1765344175"},"aspect_ratio":1.0,"height":1600,"media_type":"image","src":"\/\/crystaldestiny.com\/cdn\/shop\/files\/Clear-Quartz-Crystal-XXL-Obelisk-Towers-Clear-Quartz-700-750g.webp?v=1765344175","width":1600},{"alt":"Clear Quartz Crystal XXL Obelisk-Towers-Ali-Clear Quartz-700-750g-Crystal Destiny","id":32255576572075,"position":2,"preview_image":{"aspect_ratio":1.0,"height":1600,"width":1600,"src":"\/\/crystaldestiny.com\/cdn\/shop\/files\/Clear-Quartz-Crystal-XXL-Obelisk-Towers-2.webp?v=1764824541"},"aspect_ratio":1.0,"height":1600,"media_type":"image","src":"\/\/crystaldestiny.com\/cdn\/shop\/files\/Clear-Quartz-Crystal-XXL-Obelisk-Towers-2.webp?v=1764824541","width":1600},{"alt":"Clear Quartz Crystal XXL Obelisk-Towers-Ali-Clear Quartz-700-750g-Crystal Destiny","id":32255576604843,"position":3,"preview_image":{"aspect_ratio":1.0,"height":1600,"width":1600,"src":"\/\/crystaldestiny.com\/cdn\/shop\/files\/Clear-Quartz-Crystal-XXL-Obelisk-Towers-3.webp?v=1764824542"},"aspect_ratio":1.0,"height":1600,"media_type":"image","src":"\/\/crystaldestiny.com\/cdn\/shop\/files\/Clear-Quartz-Crystal-XXL-Obelisk-Towers-3.webp?v=1764824542","width":1600},{"alt":"Clear Quartz Crystal XXL Obelisk-Towers-Ali-Clear Quartz-700-750g-Crystal Destiny","id":32255576637611,"position":4,"preview_image":{"aspect_ratio":1.0,"height":1600,"width":1600,"src":"\/\/crystaldestiny.com\/cdn\/shop\/files\/Clear-Quartz-Crystal-XXL-Obelisk-Towers-4.webp?v=1764824544"},"aspect_ratio":1.0,"height":1600,"media_type":"image","src":"\/\/crystaldestiny.com\/cdn\/shop\/files\/Clear-Quartz-Crystal-XXL-Obelisk-Towers-4.webp?v=1764824544","width":1600},{"alt":"Clear Quartz Crystal XXL Obelisk-Towers-Ali-Clear Quartz-700-750g-Crystal Destiny","id":32255576670379,"position":5,"preview_image":{"aspect_ratio":1.0,"height":1600,"width":1600,"src":"\/\/crystaldestiny.com\/cdn\/shop\/files\/Clear-Quartz-Crystal-XXL-Obelisk-Towers-5.webp?v=1764824545"},"aspect_ratio":1.0,"height":1600,"media_type":"image","src":"\/\/crystaldestiny.com\/cdn\/shop\/files\/Clear-Quartz-Crystal-XXL-Obelisk-Towers-5.webp?v=1764824545","width":1600},{"alt":"Clear Quartz Crystal XXL Obelisk-Towers-Ali-Clear Quartz-700-750g-Crystal Destiny","id":32255576703147,"position":6,"preview_image":{"aspect_ratio":1.0,"height":1600,"width":1600,"src":"\/\/crystaldestiny.com\/cdn\/shop\/files\/Clear-Quartz-Crystal-XXL-Obelisk-Towers-6.webp?v=1764824547"},"aspect_ratio":1.0,"height":1600,"media_type":"image","src":"\/\/crystaldestiny.com\/cdn\/shop\/files\/Clear-Quartz-Crystal-XXL-Obelisk-Towers-6.webp?v=1764824547","width":1600}],"requires_selling_plan":false,"selling_plan_groups":[],"content":"\u003cp data-end=\"459\" data-start=\"171\"\u003eThis Natural Clear Quartz Crystal Obelisk features a polished single-point design, highlighting the stone’s clarity and natural energy. Perfect for display, meditation, or spiritual practice, this crystal tower adds elegance and energetic balance to any space. This tower is substantial and has a nice girth to amplify its energy.\u003c\/p\u003e\n\u003cp data-end=\"772\" data-start=\"461\"\u003eClear Quartz is renowned for amplifying energy, enhancing clarity, and supporting focus. Use it on your altar, in meditation, or as a decorative crystal pillar to elevate your environment. Collectors and crystal enthusiasts treasure Clear Quartz obelisks for their versatility, beauty, and spiritual benefits.\u003c\/p\u003e\n\u003cp data-end=\"772\" data-start=\"461\"\u003eThis product is pulled at random by size.\u003c\/p\u003e\u003ch2\u003eCrystal Towers, Wands, Generators, Points, Pillars \u0026amp; Obelisks — What's the Difference?\u003c\/h2\u003e\n\u003cp id=\"isPasted\"\u003eWhile these terms may vary, they all describe beautifully shaped crystals with a pointed tip designed to channel and direct energy. Each name highlights a unique aspect of their use:\u003c\/p\u003e\n\u003cul\u003e\n\u003cli\u003e\n\u003cstrong\u003eTowers\u003c\/strong\u003e- Known for their steady, grounding presence, crystal towers help focus and amplify energy, making them perfect for meditation and manifestation.\u003c\/li\u003e\n\u003cli\u003e\n\u003cstrong\u003eWands\u003c\/strong\u003e- Traditionally used in energy work and healing, crystal wands are excellent for directing energy flow and clearing blockages.\u003c\/li\u003e\n\u003cli\u003e\n\u003cstrong\u003ePillars\u003c\/strong\u003e- Symbolizing strength and stability, crystal pillars create a balanced and harmonious environment, making them great for home decor and spiritual practices.\u003c\/li\u003e\n\u003cli\u003e\n\u003cstrong\u003eObelisks\u003c\/strong\u003e- Inspired by ancient structures, crystal obelisks are believed to connect earthly and spiritual energies, making them powerful tools for transformation and enlightenment.\u003c\/li\u003e\n\u003c\/ul\u003e\n\u003cp\u003eNo matter what you call them, these crystals serve the same purpose—to enhance energy, intention, and harmony in your space. Choose the one that resonates most with you!\u003c\/p\u003e"},"options":[{"name":"Material","position":1,"values":["Clear Quartz"]},{"name":"Size","position":2,"values":["700-750g","800-850g","900-1000g","1100-1200g","1300-1400g","1500-1600g","2-2.5kg","3-3.5kg","4-4.5kg","5-5.5kg","6-6.5kg","7-7.5kg"]}],"custom_metafields":{"shipping_time":"12-16 days"},"metafields":{"badge":"\u003cdiv style='display:none' class='jdgm-prev-badge' data-average-rating='0.00' data-number-of-reviews='0' data-number-of-questions='0'\u003e \u003cspan class='jdgm-prev-badge__stars' data-score='0.00' tabindex='0' aria-label='0.00 stars' role='button'\u003e \u003cspan class='jdgm-star jdgm--off'\u003e\u003c\/span\u003e\u003cspan class='jdgm-star jdgm--off'\u003e\u003c\/span\u003e\u003cspan class='jdgm-star jdgm--off'\u003e\u003c\/span\u003e\u003cspan class='jdgm-star jdgm--off'\u003e\u003c\/span\u003e\u003cspan class='jdgm-star jdgm--off'\u003e\u003c\/span\u003e \u003c\/span\u003e \u003cspan class='jdgm-prev-badge__text'\u003e No reviews \u003c\/span\u003e \u003c\/div\u003e","widget":"\u003cdiv class='jdgm-rev-widg' data-updated-at='2025-12-04T03:48:16Z' data-average-rating='0.00' data-number-of-reviews='0' data-number-of-questions='0' data-image-url='https:\/\/cdn.shopify.com\/s\/files\/1\/0613\/0345\/5915\/files\/Natural-Clear-Quartz-Crystal-Obelisk-Crystal-Tower-Wand-Point-Reiki-Healing.webp?v=1764778678'\u003e \u003cstyle class='jdgm-temp-hiding-style'\u003e.jdgm-rev-widg{ display: none }\u003c\/style\u003e \u003cdiv class='jdgm-rev-widg__header'\u003e \u003ch2 class='jdgm-rev-widg__title'\u003eCustomer Reviews\u003c\/h2\u003e \u003cdiv class='jdgm-rev-widg__summary'\u003e \u003cdiv class='jdgm-rev-widg__summary-stars' aria-label='Average rating is 0.00 stars' role='img'\u003e \u003cspan class='jdgm-star jdgm--off'\u003e\u003c\/span\u003e\u003cspan class='jdgm-star jdgm--off'\u003e\u003c\/span\u003e\u003cspan class='jdgm-star jdgm--off'\u003e\u003c\/span\u003e\u003cspan class='jdgm-star jdgm--off'\u003e\u003c\/span\u003e\u003cspan class='jdgm-star jdgm--off'\u003e\u003c\/span\u003e \u003c\/div\u003e \u003cdiv class='jdgm-rev-widg__summary-text'\u003eBe the first to write a review\u003c\/div\u003e \u003c\/div\u003e \u003ca style='display: none' href='#' class='jdgm-write-rev-link' role='button'\u003eWrite a review\u003c\/a\u003e \u003cdiv class='jdgm-histogram jdgm-temp-hidden'\u003e \u003cdiv class='jdgm-histogram__row' data-rating='5' data-frequency='0' data-percentage='0'\u003e \u003cdiv class='jdgm-histogram__star' role='button' aria-label=\"0% (0) reviews with 5 star rating\" tabindex='0' \u003e\u003cspan class='jdgm-star jdgm--on'\u003e\u003c\/span\u003e\u003cspan class='jdgm-star jdgm--on'\u003e\u003c\/span\u003e\u003cspan class='jdgm-star jdgm--on'\u003e\u003c\/span\u003e\u003cspan class='jdgm-star jdgm--on'\u003e\u003c\/span\u003e\u003cspan class='jdgm-star jdgm--on'\u003e\u003c\/span\u003e\u003c\/div\u003e \u003cdiv class='jdgm-histogram__bar'\u003e \u003cdiv class='jdgm-histogram__bar-content' style='width: 0%;'\u003e \u003c\/div\u003e \u003c\/div\u003e \u003cdiv class='jdgm-histogram__percentage'\u003e0%\u003c\/div\u003e \u003cdiv class='jdgm-histogram__frequency'\u003e(0)\u003c\/div\u003e \u003c\/div\u003e \u003cdiv class='jdgm-histogram__row' data-rating='4' data-frequency='0' data-percentage='0'\u003e \u003cdiv class='jdgm-histogram__star' role='button' aria-label=\"0% (0) reviews with 4 star rating\" tabindex='0' \u003e\u003cspan class='jdgm-star jdgm--on'\u003e\u003c\/span\u003e\u003cspan class='jdgm-star jdgm--on'\u003e\u003c\/span\u003e\u003cspan class='jdgm-star jdgm--on'\u003e\u003c\/span\u003e\u003cspan class='jdgm-star jdgm--on'\u003e\u003c\/span\u003e\u003cspan class='jdgm-star jdgm--off'\u003e\u003c\/span\u003e\u003c\/div\u003e \u003cdiv class='jdgm-histogram__bar'\u003e \u003cdiv class='jdgm-histogram__bar-content' style='width: 0%;'\u003e \u003c\/div\u003e \u003c\/div\u003e \u003cdiv class='jdgm-histogram__percentage'\u003e0%\u003c\/div\u003e \u003cdiv class='jdgm-histogram__frequency'\u003e(0)\u003c\/div\u003e \u003c\/div\u003e \u003cdiv class='jdgm-histogram__row' data-rating='3' data-frequency='0' data-percentage='0'\u003e \u003cdiv class='jdgm-histogram__star' role='button' aria-label=\"0% (0) reviews with 3 star rating\" tabindex='0' \u003e\u003cspan class='jdgm-star jdgm--on'\u003e\u003c\/span\u003e\u003cspan class='jdgm-star jdgm--on'\u003e\u003c\/span\u003e\u003cspan class='jdgm-star jdgm--on'\u003e\u003c\/span\u003e\u003cspan class='jdgm-star jdgm--off'\u003e\u003c\/span\u003e\u003cspan class='jdgm-star jdgm--off'\u003e\u003c\/span\u003e\u003c\/div\u003e \u003cdiv class='jdgm-histogram__bar'\u003e \u003cdiv class='jdgm-histogram__bar-content' style='width: 0%;'\u003e \u003c\/div\u003e \u003c\/div\u003e \u003cdiv class='jdgm-histogram__percentage'\u003e0%\u003c\/div\u003e \u003cdiv class='jdgm-histogram__frequency'\u003e(0)\u003c\/div\u003e \u003c\/div\u003e \u003cdiv class='jdgm-histogram__row' data-rating='2' data-frequency='0' data-percentage='0'\u003e \u003cdiv class='jdgm-histogram__star' role='button' aria-label=\"0% (0) reviews with 2 star rating\" tabindex='0' \u003e\u003cspan class='jdgm-star jdgm--on'\u003e\u003c\/span\u003e\u003cspan class='jdgm-star jdgm--on'\u003e\u003c\/span\u003e\u003cspan class='jdgm-star jdgm--off'\u003e\u003c\/span\u003e\u003cspan class='jdgm-star jdgm--off'\u003e\u003c\/span\u003e\u003cspan class='jdgm-star jdgm--off'\u003e\u003c\/span\u003e\u003c\/div\u003e \u003cdiv class='jdgm-histogram__bar'\u003e \u003cdiv class='jdgm-histogram__bar-content' style='width: 0%;'\u003e \u003c\/div\u003e \u003c\/div\u003e \u003cdiv class='jdgm-histogram__percentage'\u003e0%\u003c\/div\u003e \u003cdiv class='jdgm-histogram__frequency'\u003e(0)\u003c\/div\u003e \u003c\/div\u003e \u003cdiv class='jdgm-histogram__row' data-rating='1' data-frequency='0' data-percentage='0'\u003e \u003cdiv class='jdgm-histogram__star' role='button' aria-label=\"0% (0) reviews with 1 star rating\" tabindex='0' \u003e\u003cspan class='jdgm-star jdgm--on'\u003e\u003c\/span\u003e\u003cspan class='jdgm-star jdgm--off'\u003e\u003c\/span\u003e\u003cspan class='jdgm-star jdgm--off'\u003e\u003c\/span\u003e\u003cspan class='jdgm-star jdgm--off'\u003e\u003c\/span\u003e\u003cspan class='jdgm-star jdgm--off'\u003e\u003c\/span\u003e\u003c\/div\u003e \u003cdiv class='jdgm-histogram__bar'\u003e \u003cdiv class='jdgm-histogram__bar-content' style='width: 0%;'\u003e \u003c\/div\u003e \u003c\/div\u003e \u003cdiv class='jdgm-histogram__percentage'\u003e0%\u003c\/div\u003e \u003cdiv class='jdgm-histogram__frequency'\u003e(0)\u003c\/div\u003e \u003c\/div\u003e \u003cdiv class='jdgm-histogram__row jdgm-histogram__clear-filter' data-rating=null tabindex='0'\u003e\u003c\/div\u003e \u003c\/div\u003e \u003cdiv class='jdgm-rev-widg__sort-wrapper'\u003e\u003c\/div\u003e \u003c\/div\u003e \u003cdiv class='jdgm-rev-widg__body'\u003e \u003cdiv class='jdgm-rev-widg__reviews'\u003e\u003c\/div\u003e \u003cdiv class='jdgm-paginate' data-per-page='4' data-url='https:\/\/api.judge.me\/reviews\/reviews_for_widget' style=\"display: none;\"\u003e\u003c\/div\u003e \u003c\/div\u003e \u003cdiv class='jdgm-rev-widg__paginate-spinner-wrapper'\u003e \u003cdiv class='jdgm-spinner'\u003e\u003c\/div\u003e \u003c\/div\u003e \u003c\/div\u003e"},"collections":[{"id":305307320491,"handle":"collectors-corner","title":"VIP Collector's Vault","updated_at":"2026-01-06T23:24:37-05:00","body_html":"\u003cp data-start=\"131\" data-end=\"457\"\u003e✨ \u003cstrong data-start=\"133\" data-end=\"173\"\u003eWelcome to the VIP Collector’s Vault\u003c\/strong\u003e ✨\u003cbr data-start=\"175\" data-end=\"178\"\u003eStep into a world of unparalleled elegance with our \u003cstrong data-start=\"230\" data-end=\"255\"\u003eVIP Collector’s Vault\u003c\/strong\u003e, where only the most exquisite high-end crystals reside. Each piece in this exclusive collection is valued at over $500 and carefully selected for its exceptional quality, rarity, and natural beauty.\u003c\/p\u003e\n\u003cp data-start=\"459\" data-end=\"652\"\u003ePerfect for seasoned collectors, those seeking a luxurious addition to their collection, or anyone looking for a truly unique gift, these crystals represent the pinnacle of nature’s artistry.\u003c\/p\u003e\n\u003cp data-start=\"654\" data-end=\"818\"\u003eExplore the VIP Collector’s Vault today and discover treasures that embody sophistication, craftsmanship, and the timeless allure of the Earth’s finest offerings.\u003c\/p\u003e","published_at":"2024-06-21T11:19:44-04:00","sort_order":"created-desc","template_suffix":"collectors-corner","disjunctive":false,"rules":[{"column":"variant_price","relation":"greater_than","condition":"499.99"},{"column":"variant_inventory","relation":"greater_than","condition":"0"}],"published_scope":"global"},{"id":294880051371,"handle":"crystals","title":"Crystals","updated_at":"2026-01-07T23:43:11-05:00","body_html":"\u003cp data-start=\"159\" data-end=\"687\"\u003e✨ \u003cstrong data-start=\"161\" data-end=\"216\"\u003eDiscover the Magic of Crystals with Crystal Destiny\u003c\/strong\u003e ✨\u003cbr data-start=\"218\" data-end=\"221\"\u003eCrystals have been treasured for centuries—not only for their natural beauty but also for their powerful healing energies. Beyond their visual allure, they bring balance, harmony, and positive energy into any space. Whether used for home décor, meditation, or simply to elevate the energy of your surroundings, crystals create a sanctuary of peace, relaxation, and well-being. Each piece is a unique gift from the Earth—visually stunning and spiritually uplifting.\u003c\/p\u003e\n\u003cp data-start=\"689\" data-end=\"1011\"\u003eAt \u003cstrong data-start=\"692\" data-end=\"711\"\u003eCrystal Destiny\u003c\/strong\u003e, our signature collection showcases a curated selection of exquisite crystals, from radiant Quartz to soothing Amethyst. Every stone is carefully sourced for its elegance and metaphysical resonance, making them perfect for enhancing your home, uplifting your spirit, or gifting to someone special.\u003c\/p\u003e\n\u003cp data-start=\"1013\" data-end=\"1206\"\u003eExperience the timeless sophistication of crystalline wonders. Explore the \u003cstrong data-start=\"1088\" data-end=\"1118\"\u003eCrystal Destiny Collection\u003c\/strong\u003e today and bring the transformative beauty of these treasures into your everyday life.\u003c\/p\u003e","published_at":"2023-06-05T11:24:02-04:00","sort_order":"created-desc","template_suffix":"","disjunctive":false,"rules":[{"column":"tag","relation":"equals","condition":"crystal"},{"column":"type","relation":"not_contains","condition":"925 Sterling Silver"},{"column":"type","relation":"not_contains","condition":"Wire Wraps"}],"published_scope":"global"},{"id":319455756459,"handle":"crown-chakra-crystals","title":"Crown Chakra Crystals","updated_at":"2026-01-07T23:42:38-05:00","body_html":"\u003cp data-start=\"144\" data-end=\"515\"\u003e✨ \u003cstrong data-start=\"146\" data-end=\"171\"\u003eCrown Chakra Crystals\u003c\/strong\u003e ✨\u003cbr data-start=\"173\" data-end=\"176\"\u003eConnect with higher consciousness and spiritual insight with our \u003cstrong data-start=\"241\" data-end=\"266\"\u003eCrown Chakra Crystals\u003c\/strong\u003e. Located at the top of the head, the Crown Chakra governs wisdom, enlightenment, and your connection to the divine. These crystals help open and balance this energy center, fostering clarity, spiritual growth, and a sense of universal connection.\u003c\/p\u003e\n\u003cp data-start=\"517\" data-end=\"851\"\u003eOur selection includes powerful stones such as Amethyst, Clear Quartz, Selenite, and Lepidolite—each chosen for their ability to enhance meditation, energy work, and mindful practices. Whether placed in your sacred space, carried with you, or worn as jewelry, Crown Chakra Crystals promote harmony, insight, and spiritual alignment.\u003c\/p\u003e\n\u003cp data-start=\"853\" data-end=\"1007\"\u003eElevate your consciousness, deepen your meditative practice, and embrace the transformative energy of the Crown Chakra with these illuminating crystals.\u003c\/p\u003e","published_at":"2025-07-17T18:16:11-04:00","sort_order":"best-selling","template_suffix":"","disjunctive":false,"rules":[{"column":"variant_metafield_definition","relation":"equals","condition":"Crown"}],"published_scope":"global","image":{"created_at":"2025-07-17T19:09:11-04:00","alt":null,"width":1080,"height":1080,"src":"\/\/crystaldestiny.com\/cdn\/shop\/collections\/Crown_Chakra_Collection.jpg?v=1762474922"}},{"id":319455789227,"handle":"third-eye-chakra-crystals","title":"Third Eye Chakra Crystals","updated_at":"2026-01-07T23:42:38-05:00","body_html":"\u003cp data-start=\"124\" data-end=\"474\"\u003e✨ \u003cstrong data-start=\"126\" data-end=\"155\"\u003eThird Eye Chakra Crystals\u003c\/strong\u003e ✨\u003cbr data-start=\"157\" data-end=\"160\"\u003eAwaken intuition, clarity, and insight with our \u003cstrong data-start=\"208\" data-end=\"237\"\u003eThird Eye Chakra Crystals\u003c\/strong\u003e. Located between the eyebrows, the Third Eye Chakra governs perception, intuition, and inner wisdom. These crystals help balance and activate this energy center, promoting mental clarity, spiritual awareness, and heightened intuition.\u003c\/p\u003e\n\u003cp data-start=\"476\" data-end=\"835\"\u003eOur curated selection features stones such as Amethyst, Lapis Lazuli, and Sodalite—chosen for their ability to enhance meditation, intuitive practices, and energy work. Whether placed in your sacred space, carried with you, or worn as jewelry, Third Eye Chakra Crystals support mental focus, spiritual growth, and a deeper connection to your inner guidance.\u003c\/p\u003e\n\u003cp data-start=\"837\" data-end=\"976\"\u003eElevate your intuition, expand your awareness, and embrace the transformative power of the Third Eye Chakra with these powerful crystals.\u003c\/p\u003e","published_at":"2025-07-17T18:16:49-04:00","sort_order":"best-selling","template_suffix":"","disjunctive":false,"rules":[{"column":"variant_metafield_definition","relation":"equals","condition":"Third Eye"}],"published_scope":"global","image":{"created_at":"2025-07-17T19:09:01-04:00","alt":null,"width":1080,"height":1080,"src":"\/\/crystaldestiny.com\/cdn\/shop\/collections\/Third_Eye_Chakra_Collection.jpg?v=1762474924"}},{"id":294880116907,"handle":"polished","title":"Polished Crystals","updated_at":"2026-01-07T23:43:11-05:00","body_html":"\u003cp data-start=\"199\" data-end=\"598\"\u003e✨ \u003cstrong data-start=\"201\" data-end=\"248\"\u003eCrystal Destiny Polished Crystal Collection\u003c\/strong\u003e ✨\u003cbr data-start=\"250\" data-end=\"253\"\u003eIndulge in the brilliance of crystals refined to perfection. Our \u003cstrong data-start=\"318\" data-end=\"341\"\u003ePolished Collection\u003c\/strong\u003e showcases gemstones meticulously shaped and smoothed to reveal their natural radiance and timeless beauty. From the shimmering glow of Quartz to the deep allure of Obsidian, each polished piece is a testament to nature’s artistry and human craftsmanship.\u003c\/p\u003e\n\u003cp data-start=\"600\" data-end=\"862\"\u003ePerfect as statement décor, meaningful gifts, or companions on your spiritual journey, polished crystals bring sophistication and elevated energy into any space. Their radiant surfaces reflect not only light but also the transformative power of crystal energy.\u003c\/p\u003e\n\u003cp data-start=\"864\" data-end=\"1022\"\u003eDiscover the elegance of refinement with Crystal Destiny’s Polished Crystal Collection—where every facet shines with intention, beauty, and timeless allure.\u003c\/p\u003e","published_at":"2023-06-05T11:30:44-04:00","sort_order":"created-desc","template_suffix":"","disjunctive":false,"rules":[{"column":"tag","relation":"equals","condition":"polished"}],"published_scope":"global"},{"id":322471624875,"handle":"crystal-favorites","title":"Crystal Enthusiast's Favorites","updated_at":"2026-01-07T23:42:38-05:00","body_html":"\u003cp\u003eDiscover the crystals our community loves most. This collection features our best-selling stones and accessories, carefully curated to highlight pieces that are always in demand and ready to ship. Whether you’re adding to your collection or searching for a gift, these fan-favorite crystals are timeless staples for energy, beauty, and balance.\u003c\/p\u003e","published_at":"2025-10-01T21:07:06-04:00","sort_order":"price-asc","template_suffix":"","disjunctive":false,"rules":[{"column":"variant_inventory","relation":"greater_than","condition":"1"}],"published_scope":"global"},{"id":321695744171,"handle":"direct-from-supplier","title":"Direct from Supplier","updated_at":"2026-01-07T23:43:11-05:00","body_html":"","published_at":"2025-09-12T16:38:23-04:00","sort_order":"best-selling","template_suffix":"","disjunctive":true,"rules":[{"column":"tag","relation":"equals","condition":"adjusted-shipping"}],"published_scope":"global"},{"id":293659312299,"handle":"best-sellers","title":"Best Sellers","updated_at":"2026-01-07T23:43:11-05:00","body_html":"\u003cp data-start=\"155\" data-end=\"510\"\u003eDiscover the pieces our community loves most. Our Best Sellers Collection brings together handpicked crystals and jewelry that embody timeless elegance, spiritual resonance, and everyday sophistication. Each item has earned its place as a customer favorite—celebrated for both its beauty and its meaningful energy.\u003c\/p\u003e\n\u003cp data-start=\"512\" data-end=\"802\"\u003eFrom stunning statement pieces to versatile daily companions, these treasures are curated to elevate your space, uplift your spirit, and reflect refined taste. Indulge in what’s most cherished and let our best sellers guide you toward the perfect blend of style and transformative energy.\u003c\/p\u003e\n\u003cp data-start=\"804\" data-end=\"932\"\u003eExplore the Best Sellers Collection today—where elegance meets intention, and every piece tells a story of beauty and balance.\u003c\/p\u003e","published_at":"2023-03-15T16:04:51-04:00","sort_order":"best-selling","template_suffix":"","disjunctive":false,"rules":[{"column":"variant_price","relation":"greater_than","condition":"0"},{"column":"variant_inventory","relation":"greater_than","condition":"0"},{"column":"type","relation":"not_equals","condition":"Shipping Protection"}],"published_scope":"global"},{"id":321370390699,"handle":"monthly-crystal-sale","title":"Monthly Crystal Sale | Spheres \u0026 Towers","updated_at":"2026-01-06T23:24:37-05:00","body_html":"\u003cp\u003eShop our \u003cstrong\u003eMonthly Crystal Sale\u003c\/strong\u003e, where you can shop a wide selection of healing crystals at discounted prices. Explore \u003cstrong\u003ecrystal spheres and towers,\u003c\/strong\u003e— all carefully curated to support meditation, energy balancing, and spiritual wellness. Whether you're looking to enhance your home decor, boost your daily energy, or find the perfect gift, our \u003cstrong\u003ecrystals for healing and manifestation\u003c\/strong\u003e offer both beauty and metaphysical benefits.\u003c\/p\u003e\n\u003cp\u003eEach month, our sale features \u003cstrong\u003enew discounted collections\u003c\/strong\u003e, from \u003cstrong\u003enatural quartz and amethyst towers\u003c\/strong\u003e to \u003cstrong\u003ewire-wrapped pendants and polished stones\u003c\/strong\u003e, so there's always something fresh to discover. Shop with confidence knowing you're getting high-quality crystals with \u003cstrong\u003efree shipping options\u003c\/strong\u003e and a trusted experience.\u003c\/p\u003e\n\u003cp\u003e\u003cstrong\u003eTake advantage of the Monthly Crystal Sale today\u003c\/strong\u003e and add powerful, natural energy to your life with \u003cstrong\u003eauthentic healing crystals\u003c\/strong\u003e — while our limited-time discounts last.\u003c\/p\u003e\n\u003cp\u003e\u003cstrong\u003e*Discount automatically applied at checkout.\u003c\/strong\u003e\u003c\/p\u003e","published_at":"2025-12-02T01:26:17-05:00","sort_order":"alpha-asc","template_suffix":"","disjunctive":true,"rules":[{"column":"tag","relation":"equals","condition":"spheres"},{"column":"tag","relation":"equals","condition":"Towers"}],"published_scope":"global","image":{"created_at":"2026-01-01T01:32:34-05:00","alt":"","width":960,"height":960,"src":"\/\/crystaldestiny.com\/cdn\/shop\/collections\/3E8C2969-1B86-4ACE-B349-98E9D8768424.jpg?v=1767249154"}},{"id":297906241707,"handle":"new-arrivals","title":"New Arrivals","updated_at":"2026-01-07T23:43:11-05:00","body_html":"\u003cp data-start=\"172\" data-end=\"573\"\u003e✨ \u003cstrong data-start=\"174\" data-end=\"217\"\u003eDiscover Crystal Destiny’s New Arrivals\u003c\/strong\u003e ✨\u003cbr data-start=\"219\" data-end=\"222\"\u003eStep into a world of fresh sophistication with our latest crystal treasures. Each new piece—whether Quartz, Amethyst, or beyond—embodies nature’s artistry, radiating both timeless beauty and powerful energy. Thoughtfully curated and constantly refreshed, our New Arrivals Collection offers the perfect harmony of elegance and metaphysical resonance.\u003c\/p\u003e\n\u003cp data-start=\"575\" data-end=\"793\"\u003eElevate your space, uplift your spirit, and embrace the transformative power of nature’s wonders. Explore the newest expressions of crystal artistry today, and let your journey with crystals evolve with every update.\u003c\/p\u003e","published_at":"2023-11-20T15:35:42-05:00","sort_order":"created-desc","template_suffix":"","disjunctive":true,"rules":[{"column":"tag","relation":"equals","condition":"new-arrivals"}],"published_scope":"global"},{"id":297596059819,"handle":"all","title":"All Crystals \u0026 Jewelry","updated_at":"2026-01-07T23:43:11-05:00","body_html":"\u003cp data-start=\"149\" data-end=\"494\"\u003e✨ \u003cstrong data-start=\"151\" data-end=\"181\"\u003eWelcome to Crystal Destiny\u003c\/strong\u003e ✨\u003cbr data-start=\"183\" data-end=\"186\"\u003eStep into a world where beauty, energy, and artistry unite. Our collection is a treasure trove of exquisite crystals, from the raw, untamed elegance of natural formations to the polished brilliance of expertly crafted pieces. Each crystal is a masterpiece, carrying its own unique story and timeless charm.\u003c\/p\u003e\n\u003cp data-start=\"496\" data-end=\"831\"\u003eWhether you’re drawn to the calming presence of Amethyst, the vibrant energy of Citrine, or the grounding strength of Jasper, our crystals invite you to connect with nature’s finest wonders. Perfect for enhancing your space, supporting your spiritual journey, or gifting with intention, every piece resonates with beauty and meaning.\u003c\/p\u003e\n\u003cp data-start=\"833\" data-end=\"1000\"\u003eElevate your surroundings, embrace the mystique, and explore the enchanting world of crystals at \u003cstrong data-start=\"930\" data-end=\"949\"\u003eCrystal Destiny\u003c\/strong\u003e—where every crystal is waiting to be discovered.\u003c\/p\u003e","published_at":"2023-11-10T13:55:31-05:00","sort_order":"created-desc","template_suffix":"","disjunctive":false,"rules":[{"column":"type","relation":"not_equals","condition":"asdf"}],"published_scope":"global"},{"id":296256405675,"handle":"crystal-towers","title":"Crystal Towers","updated_at":"2026-01-06T23:24:37-05:00","body_html":"\u003cp data-end=\"568\" data-start=\"152\"\u003e✨ \u003cstrong data-end=\"190\" data-start=\"154\"\u003eCrystal Destiny Tower Collection\u003c\/strong\u003e ✨\u003cbr data-end=\"195\" data-start=\"192\"\u003eEnchant your space with the timeless beauty and powerful energy of crystal towers. Each piece in our \u003cstrong data-end=\"316\" data-start=\"296\"\u003eTower Collection\u003c\/strong\u003e is carefully crafted to showcase nature’s artistry while radiating higher vibrations and spiritual resonance. From the clarity of Quartz to the calming presence of Amethyst, these towers are both decorative masterpieces and tools for transformation.\u003c\/p\u003e\n\u003cp data-end=\"765\" data-start=\"570\"\u003ePerfect for meditation spaces, energy work, or simply elevating your home décor, crystal towers channel focused energy upward—creating balance, harmony, and refined elegance in any environment.\u003c\/p\u003e\n\u003cp data-end=\"917\" data-start=\"767\"\u003eDiscover the Crystal Destiny Tower Collection today and transform your surroundings into a sanctuary of beauty, purpose, and spiritual significance.\u003c\/p\u003e\n\u003ch2\u003eCrystal Towers, Wands, Generators, Points, Pillars \u0026amp; Obelisks — What's the Difference?\u003c\/h2\u003e\n\u003cp id=\"isPasted\"\u003eWhile these terms may vary, they all describe beautifully shaped crystals with a pointed tip designed to channel and direct energy. Each name highlights a unique aspect of their use:\u003c\/p\u003e\n\u003cul\u003e\n\u003cli\u003e\n\u003cstrong\u003eTowers\u003c\/strong\u003e- Known for their steady, grounding presence, crystal towers help focus and amplify energy, making them perfect for meditation and manifestation.\u003c\/li\u003e\n\u003cli\u003e\n\u003cstrong\u003eWands\u003c\/strong\u003e- Traditionally used in energy work and healing, crystal wands are excellent for directing energy flow and clearing blockages.\u003c\/li\u003e\n\u003cli\u003e\n\u003cstrong\u003ePillars\u003c\/strong\u003e- Symbolizing strength and stability, crystal pillars create a balanced and harmonious environment, making them great for home decor and spiritual practices.\u003c\/li\u003e\n\u003cli\u003e\n\u003cstrong\u003eObelisks\u003c\/strong\u003e- Inspired by ancient structures, crystal obelisks are believed to connect earthly and spiritual energies, making them powerful tools for transformation and enlightenment.\u003c\/li\u003e\n\u003c\/ul\u003e\n\u003cp\u003eNo matter what you call them, these crystals serve the same purpose—to enhance energy, intention, and harmony in your space. Choose the one that resonates most with you!\u003c\/p\u003e","published_at":"2023-09-14T12:52:35-04:00","sort_order":"created-desc","template_suffix":"","disjunctive":false,"rules":[{"column":"tag","relation":"equals","condition":"towers"}],"published_scope":"global"},{"id":298983391403,"handle":"january-crystal-sale","title":"January Sale | 25% Off Crystal Towers \u0026 Spheres","updated_at":"2026-01-06T23:24:37-05:00","body_html":"\u003cp\u003eShop our \u003cstrong\u003eJanuary Crystal Sale\u003c\/strong\u003e, where you can shop a wide selection of healing crystals at discounted prices. Explore \u003cstrong\u003eCrystal Towers, \u0026amp; Crystal Spheres\u003c\/strong\u003e — all carefully curated and crafted to support meditation, energy balancing, and spiritual wellness. Whether you're looking to enhance your home decor, boost your daily energy, or find the perfect gift, our \u003cstrong\u003ecrystals for healing and manifestation\u003c\/strong\u003e offer both beauty and metaphysical benefits.\u003c\/p\u003e\n\u003cp\u003eThis January, our sale features \u003cstrong\u003ediscounted crystal towers and spheres\u003c\/strong\u003e, from \u003cstrong\u003enatural quartz \u003c\/strong\u003eand \u003cstrong\u003eamethyst \u003c\/strong\u003eto \u003cstrong\u003ebumblebee jasper \u003c\/strong\u003eand \u003cstrong\u003ecarnelian\u003c\/strong\u003e, so there's always something fresh to discover. Shop with confidence knowing you're getting high-quality crystals with \u003cstrong\u003efree shipping options\u003c\/strong\u003e and a trusted experience.\u003c\/p\u003e\n\u003cp\u003e\u003cstrong\u003eTake advantage of the January Crystal Sale today\u003c\/strong\u003e and add powerful, natural energy to your life with \u003cstrong\u003eauthentic healing crystals\u003c\/strong\u003e — while our limited-time discounts last.\u003c\/p\u003e\n\u003cp\u003e\u003cstrong\u003e*Discount automatically applied at checkout.\u003c\/strong\u003e\u003c\/p\u003e","published_at":"2026-01-01T00:07:17-05:00","sort_order":"alpha-asc","template_suffix":"monthly-collection","disjunctive":true,"rules":[{"column":"tag","relation":"equals","condition":"Spheres"},{"column":"tag","relation":"equals","condition":"Towers"}],"published_scope":"global","image":{"created_at":"2026-01-01T01:29:59-05:00","alt":"","width":960,"height":960,"src":"\/\/crystaldestiny.com\/cdn\/shop\/collections\/1464163B-22B1-4D62-BEC5-CEC9AECB670B.jpg?v=1767248999"}}]}
[{"alt":"Clear Quartz Crystal XXL Obelisk-Towers-Ali-Clear Quartz-700-750g-Crystal Destiny","id":32255576539307,"position":1,"preview_image":{"aspect_ratio":1.0,"height":1600,"width":1600,"src":"\/\/crystaldestiny.com\/cdn\/shop\/files\/Clear-Quartz-Crystal-XXL-Obelisk-Towers-Clear-Quartz-700-750g.webp?v=1765344175"},"aspect_ratio":1.0,"height":1600,"media_type":"image","src":"\/\/crystaldestiny.com\/cdn\/shop\/files\/Clear-Quartz-Crystal-XXL-Obelisk-Towers-Clear-Quartz-700-750g.webp?v=1765344175","width":1600},{"alt":"Clear Quartz Crystal XXL Obelisk-Towers-Ali-Clear Quartz-700-750g-Crystal Destiny","id":32255576572075,"position":2,"preview_image":{"aspect_ratio":1.0,"height":1600,"width":1600,"src":"\/\/crystaldestiny.com\/cdn\/shop\/files\/Clear-Quartz-Crystal-XXL-Obelisk-Towers-2.webp?v=1764824541"},"aspect_ratio":1.0,"height":1600,"media_type":"image","src":"\/\/crystaldestiny.com\/cdn\/shop\/files\/Clear-Quartz-Crystal-XXL-Obelisk-Towers-2.webp?v=1764824541","width":1600},{"alt":"Clear Quartz Crystal XXL Obelisk-Towers-Ali-Clear Quartz-700-750g-Crystal Destiny","id":32255576604843,"position":3,"preview_image":{"aspect_ratio":1.0,"height":1600,"width":1600,"src":"\/\/crystaldestiny.com\/cdn\/shop\/files\/Clear-Quartz-Crystal-XXL-Obelisk-Towers-3.webp?v=1764824542"},"aspect_ratio":1.0,"height":1600,"media_type":"image","src":"\/\/crystaldestiny.com\/cdn\/shop\/files\/Clear-Quartz-Crystal-XXL-Obelisk-Towers-3.webp?v=1764824542","width":1600},{"alt":"Clear Quartz Crystal XXL Obelisk-Towers-Ali-Clear Quartz-700-750g-Crystal Destiny","id":32255576637611,"position":4,"preview_image":{"aspect_ratio":1.0,"height":1600,"width":1600,"src":"\/\/crystaldestiny.com\/cdn\/shop\/files\/Clear-Quartz-Crystal-XXL-Obelisk-Towers-4.webp?v=1764824544"},"aspect_ratio":1.0,"height":1600,"media_type":"image","src":"\/\/crystaldestiny.com\/cdn\/shop\/files\/Clear-Quartz-Crystal-XXL-Obelisk-Towers-4.webp?v=1764824544","width":1600},{"alt":"Clear Quartz Crystal XXL Obelisk-Towers-Ali-Clear Quartz-700-750g-Crystal Destiny","id":32255576670379,"position":5,"preview_image":{"aspect_ratio":1.0,"height":1600,"width":1600,"src":"\/\/crystaldestiny.com\/cdn\/shop\/files\/Clear-Quartz-Crystal-XXL-Obelisk-Towers-5.webp?v=1764824545"},"aspect_ratio":1.0,"height":1600,"media_type":"image","src":"\/\/crystaldestiny.com\/cdn\/shop\/files\/Clear-Quartz-Crystal-XXL-Obelisk-Towers-5.webp?v=1764824545","width":1600},{"alt":"Clear Quartz Crystal XXL Obelisk-Towers-Ali-Clear Quartz-700-750g-Crystal Destiny","id":32255576703147,"position":6,"preview_image":{"aspect_ratio":1.0,"height":1600,"width":1600,"src":"\/\/crystaldestiny.com\/cdn\/shop\/files\/Clear-Quartz-Crystal-XXL-Obelisk-Towers-6.webp?v=1764824547"},"aspect_ratio":1.0,"height":1600,"media_type":"image","src":"\/\/crystaldestiny.com\/cdn\/shop\/files\/Clear-Quartz-Crystal-XXL-Obelisk-Towers-6.webp?v=1764824547","width":1600}]
{"item":{"id":8570949664939,"title":"Clear Quartz Hexagonal Crystal Tower","handle":"clear-quartz-hexagonal-crystal-tower-1005008811069927-clear-quartz-point-5-6cm","description":"\u003cp data-end=\"541\" data-start=\"230\"\u003eThis Clear Quartz Hexagonal Crystal towers are a polished natural crystal tower ranging from 50–150mm, showcasing transparency and luminous white clarity. Its hexagonal obelisk shape amplifies energy and intention, making it ideal for meditation, crystal grids, or as a striking décor accent.\u003c\/p\u003e\n\u003cp data-end=\"790\" data-start=\"543\"\u003eClear Quartz is renowned as a master energy amplifier, promoting clarity, focus, and harmony. Place it in your home, office, or sacred space to cleanse and balance surrounding energy, or use it as a meditation wand to enhance spiritual practice.\u003c\/p\u003e\n\u003cp data-end=\"920\" data-start=\"792\"\u003eCollectors and crystal enthusiasts treasure Clear Quartz points for their versatile energy, elegant shape, and natural beauty.\u003c\/p\u003e\n\u003cp data-end=\"920\" data-start=\"792\"\u003eThis product is pulled at random by size.\u003c\/p\u003e\u003ch2\u003eCrystal Towers, Wands, Generators, Points, Pillars \u0026amp; Obelisks — What's the Difference?\u003c\/h2\u003e\n\u003cp id=\"isPasted\"\u003eWhile these terms may vary, they all describe beautifully shaped crystals with a pointed tip designed to channel and direct energy. Each name highlights a unique aspect of their use:\u003c\/p\u003e\n\u003cul\u003e\n\u003cli\u003e\n\u003cstrong\u003eTowers\u003c\/strong\u003e- Known for their steady, grounding presence, crystal towers help focus and amplify energy, making them perfect for meditation and manifestation.\u003c\/li\u003e\n\u003cli\u003e\n\u003cstrong\u003eWands\u003c\/strong\u003e- Traditionally used in energy work and healing, crystal wands are excellent for directing energy flow and clearing blockages.\u003c\/li\u003e\n\u003cli\u003e\n\u003cstrong\u003ePillars\u003c\/strong\u003e- Symbolizing strength and stability, crystal pillars create a balanced and harmonious environment, making them great for home decor and spiritual practices.\u003c\/li\u003e\n\u003cli\u003e\n\u003cstrong\u003eObelisks\u003c\/strong\u003e- Inspired by ancient structures, crystal obelisks are believed to connect earthly and spiritual energies, making them powerful tools for transformation and enlightenment.\u003c\/li\u003e\n\u003c\/ul\u003e\n\u003cp\u003eNo matter what you call them, these crystals serve the same purpose—to enhance energy, intention, and harmony in your space. Choose the one that resonates most with you!\u003c\/p\u003e","published_at":"2025-11-03T21:34:08-05:00","created_at":"2025-11-03T20:24:22-05:00","vendor":"Ali","type":"Towers","tags":["adjusted-shipping","crystal","new-arrivals","polished","Towers"],"price":1599,"price_min":1599,"price_max":7399,"available":true,"price_varies":true,"compare_at_price":0,"compare_at_price_min":0,"compare_at_price_max":0,"compare_at_price_varies":false,"variants":[{"id":45796593533099,"title":"Clear Quartz \/ 50-60mm","option1":"Clear Quartz","option2":"50-60mm","option3":null,"sku":"1005008811069927-Clear Quartz point-5-6cm","requires_shipping":true,"taxable":true,"featured_image":{"id":40709667291307,"product_id":8570949664939,"position":6,"created_at":"2025-11-03T20:24:24-05:00","updated_at":"2025-12-10T00:18:47-05:00","alt":"Clear Quartz Hexagonal Crystal Tower-Towers-Ali-Clear Quartz-50-60mm-Crystal Destiny","width":1000,"height":1000,"src":"\/\/crystaldestiny.com\/cdn\/shop\/files\/Clear-Quartz-Hexagonal-Crystal-Tower-Towers-Clear-Quartz-50-60mm-6.webp?v=1765343927","variant_ids":[45796593533099,45796593565867,45796593598635,45796593631403,45796593664171,45796593696939]},"available":true,"name":"Clear Quartz Hexagonal Crystal Tower - Clear Quartz \/ 50-60mm","public_title":"Clear Quartz \/ 50-60mm","options":["Clear Quartz","50-60mm"],"price":1599,"weight":100,"compare_at_price":0,"inventory_management":"shopify","barcode":null,"featured_media":{"alt":"Clear Quartz Hexagonal Crystal Tower-Towers-Ali-Clear Quartz-50-60mm-Crystal Destiny","id":32085469364395,"position":6,"preview_image":{"aspect_ratio":1.0,"height":1000,"width":1000,"src":"\/\/crystaldestiny.com\/cdn\/shop\/files\/Clear-Quartz-Hexagonal-Crystal-Tower-Towers-Clear-Quartz-50-60mm-6.webp?v=1765343927"}},"requires_selling_plan":false,"selling_plan_allocations":[]},{"id":45796593565867,"title":"Clear Quartz \/ 70-80mm","option1":"Clear Quartz","option2":"70-80mm","option3":null,"sku":"1005008811069927-Clear Quartz point-7-8cm","requires_shipping":true,"taxable":true,"featured_image":{"id":40709667291307,"product_id":8570949664939,"position":6,"created_at":"2025-11-03T20:24:24-05:00","updated_at":"2025-12-10T00:18:47-05:00","alt":"Clear Quartz Hexagonal Crystal Tower-Towers-Ali-Clear Quartz-50-60mm-Crystal Destiny","width":1000,"height":1000,"src":"\/\/crystaldestiny.com\/cdn\/shop\/files\/Clear-Quartz-Hexagonal-Crystal-Tower-Towers-Clear-Quartz-50-60mm-6.webp?v=1765343927","variant_ids":[45796593533099,45796593565867,45796593598635,45796593631403,45796593664171,45796593696939]},"available":true,"name":"Clear Quartz Hexagonal Crystal Tower - Clear Quartz \/ 70-80mm","public_title":"Clear Quartz \/ 70-80mm","options":["Clear Quartz","70-80mm"],"price":2199,"weight":100,"compare_at_price":0,"inventory_management":"shopify","barcode":null,"featured_media":{"alt":"Clear Quartz Hexagonal Crystal Tower-Towers-Ali-Clear Quartz-50-60mm-Crystal Destiny","id":32085469364395,"position":6,"preview_image":{"aspect_ratio":1.0,"height":1000,"width":1000,"src":"\/\/crystaldestiny.com\/cdn\/shop\/files\/Clear-Quartz-Hexagonal-Crystal-Tower-Towers-Clear-Quartz-50-60mm-6.webp?v=1765343927"}},"requires_selling_plan":false,"selling_plan_allocations":[]},{"id":45796593598635,"title":"Clear Quartz \/ 60-70mm","option1":"Clear Quartz","option2":"60-70mm","option3":null,"sku":"1005008811069927-Clear Quartz point-6-7cm","requires_shipping":true,"taxable":true,"featured_image":{"id":40709667291307,"product_id":8570949664939,"position":6,"created_at":"2025-11-03T20:24:24-05:00","updated_at":"2025-12-10T00:18:47-05:00","alt":"Clear Quartz Hexagonal Crystal Tower-Towers-Ali-Clear Quartz-50-60mm-Crystal Destiny","width":1000,"height":1000,"src":"\/\/crystaldestiny.com\/cdn\/shop\/files\/Clear-Quartz-Hexagonal-Crystal-Tower-Towers-Clear-Quartz-50-60mm-6.webp?v=1765343927","variant_ids":[45796593533099,45796593565867,45796593598635,45796593631403,45796593664171,45796593696939]},"available":true,"name":"Clear Quartz Hexagonal Crystal Tower - Clear Quartz \/ 60-70mm","public_title":"Clear Quartz \/ 60-70mm","options":["Clear Quartz","60-70mm"],"price":1899,"weight":100,"compare_at_price":0,"inventory_management":"shopify","barcode":null,"featured_media":{"alt":"Clear Quartz Hexagonal Crystal Tower-Towers-Ali-Clear Quartz-50-60mm-Crystal Destiny","id":32085469364395,"position":6,"preview_image":{"aspect_ratio":1.0,"height":1000,"width":1000,"src":"\/\/crystaldestiny.com\/cdn\/shop\/files\/Clear-Quartz-Hexagonal-Crystal-Tower-Towers-Clear-Quartz-50-60mm-6.webp?v=1765343927"}},"requires_selling_plan":false,"selling_plan_allocations":[]},{"id":45796593631403,"title":"Clear Quartz \/ 90-110mm","option1":"Clear Quartz","option2":"90-110mm","option3":null,"sku":"1005008811069927-Clear Quartz point-9-11cm","requires_shipping":true,"taxable":true,"featured_image":{"id":40709667291307,"product_id":8570949664939,"position":6,"created_at":"2025-11-03T20:24:24-05:00","updated_at":"2025-12-10T00:18:47-05:00","alt":"Clear Quartz Hexagonal Crystal Tower-Towers-Ali-Clear Quartz-50-60mm-Crystal Destiny","width":1000,"height":1000,"src":"\/\/crystaldestiny.com\/cdn\/shop\/files\/Clear-Quartz-Hexagonal-Crystal-Tower-Towers-Clear-Quartz-50-60mm-6.webp?v=1765343927","variant_ids":[45796593533099,45796593565867,45796593598635,45796593631403,45796593664171,45796593696939]},"available":true,"name":"Clear Quartz Hexagonal Crystal Tower - Clear Quartz \/ 90-110mm","public_title":"Clear Quartz \/ 90-110mm","options":["Clear Quartz","90-110mm"],"price":3499,"weight":100,"compare_at_price":0,"inventory_management":"shopify","barcode":null,"featured_media":{"alt":"Clear Quartz Hexagonal Crystal Tower-Towers-Ali-Clear Quartz-50-60mm-Crystal Destiny","id":32085469364395,"position":6,"preview_image":{"aspect_ratio":1.0,"height":1000,"width":1000,"src":"\/\/crystaldestiny.com\/cdn\/shop\/files\/Clear-Quartz-Hexagonal-Crystal-Tower-Towers-Clear-Quartz-50-60mm-6.webp?v=1765343927"}},"requires_selling_plan":false,"selling_plan_allocations":[]},{"id":45796593664171,"title":"Clear Quartz \/ 80-90mm","option1":"Clear Quartz","option2":"80-90mm","option3":null,"sku":"1005008811069927-Clear Quartz point-8-9cm","requires_shipping":true,"taxable":true,"featured_image":{"id":40709667291307,"product_id":8570949664939,"position":6,"created_at":"2025-11-03T20:24:24-05:00","updated_at":"2025-12-10T00:18:47-05:00","alt":"Clear Quartz Hexagonal Crystal Tower-Towers-Ali-Clear Quartz-50-60mm-Crystal Destiny","width":1000,"height":1000,"src":"\/\/crystaldestiny.com\/cdn\/shop\/files\/Clear-Quartz-Hexagonal-Crystal-Tower-Towers-Clear-Quartz-50-60mm-6.webp?v=1765343927","variant_ids":[45796593533099,45796593565867,45796593598635,45796593631403,45796593664171,45796593696939]},"available":true,"name":"Clear Quartz Hexagonal Crystal Tower - Clear Quartz \/ 80-90mm","public_title":"Clear Quartz \/ 80-90mm","options":["Clear Quartz","80-90mm"],"price":3099,"weight":100,"compare_at_price":0,"inventory_management":"shopify","barcode":null,"featured_media":{"alt":"Clear Quartz Hexagonal Crystal Tower-Towers-Ali-Clear Quartz-50-60mm-Crystal Destiny","id":32085469364395,"position":6,"preview_image":{"aspect_ratio":1.0,"height":1000,"width":1000,"src":"\/\/crystaldestiny.com\/cdn\/shop\/files\/Clear-Quartz-Hexagonal-Crystal-Tower-Towers-Clear-Quartz-50-60mm-6.webp?v=1765343927"}},"requires_selling_plan":false,"selling_plan_allocations":[]},{"id":45796593696939,"title":"Clear Quartz \/ 110-150mm","option1":"Clear Quartz","option2":"110-150mm","option3":null,"sku":"1005008811069927-Clear Quartz point-11-15cm","requires_shipping":true,"taxable":true,"featured_image":{"id":40709667291307,"product_id":8570949664939,"position":6,"created_at":"2025-11-03T20:24:24-05:00","updated_at":"2025-12-10T00:18:47-05:00","alt":"Clear Quartz Hexagonal Crystal Tower-Towers-Ali-Clear Quartz-50-60mm-Crystal Destiny","width":1000,"height":1000,"src":"\/\/crystaldestiny.com\/cdn\/shop\/files\/Clear-Quartz-Hexagonal-Crystal-Tower-Towers-Clear-Quartz-50-60mm-6.webp?v=1765343927","variant_ids":[45796593533099,45796593565867,45796593598635,45796593631403,45796593664171,45796593696939]},"available":true,"name":"Clear Quartz Hexagonal Crystal Tower - Clear Quartz \/ 110-150mm","public_title":"Clear Quartz \/ 110-150mm","options":["Clear Quartz","110-150mm"],"price":7399,"weight":100,"compare_at_price":0,"inventory_management":"shopify","barcode":null,"featured_media":{"alt":"Clear Quartz Hexagonal Crystal Tower-Towers-Ali-Clear Quartz-50-60mm-Crystal Destiny","id":32085469364395,"position":6,"preview_image":{"aspect_ratio":1.0,"height":1000,"width":1000,"src":"\/\/crystaldestiny.com\/cdn\/shop\/files\/Clear-Quartz-Hexagonal-Crystal-Tower-Towers-Clear-Quartz-50-60mm-6.webp?v=1765343927"}},"requires_selling_plan":false,"selling_plan_allocations":[]}],"images":["\/\/crystaldestiny.com\/cdn\/shop\/files\/Clear-Quartz-Hexagonal-Crystal-Tower-Towers.webp?v=1762273820","\/\/crystaldestiny.com\/cdn\/shop\/files\/Clear-Quartz-Hexagonal-Crystal-Tower-Towers-2.webp?v=1762273821","\/\/crystaldestiny.com\/cdn\/shop\/files\/Clear-Quartz-Hexagonal-Crystal-Tower-Towers-3.webp?v=1762273822","\/\/crystaldestiny.com\/cdn\/shop\/files\/Clear-Quartz-Hexagonal-Crystal-Tower-Towers-4.webp?v=1762273823","\/\/crystaldestiny.com\/cdn\/shop\/files\/Clear-Quartz-Hexagonal-Crystal-Tower-Towers-5.webp?v=1762273824","\/\/crystaldestiny.com\/cdn\/shop\/files\/Clear-Quartz-Hexagonal-Crystal-Tower-Towers-Clear-Quartz-50-60mm-6.webp?v=1765343927"],"featured_image":"\/\/crystaldestiny.com\/cdn\/shop\/files\/Clear-Quartz-Hexagonal-Crystal-Tower-Towers.webp?v=1762273820","options":["Material","Size"],"media":[{"alt":"Clear Quartz Hexagonal Crystal Tower-Towers-Ali-Clear Quartz-50-60mm-Crystal Destiny","id":32085469200555,"position":1,"preview_image":{"aspect_ratio":1.0,"height":1000,"width":1000,"src":"\/\/crystaldestiny.com\/cdn\/shop\/files\/Clear-Quartz-Hexagonal-Crystal-Tower-Towers.webp?v=1762273820"},"aspect_ratio":1.0,"height":1000,"media_type":"image","src":"\/\/crystaldestiny.com\/cdn\/shop\/files\/Clear-Quartz-Hexagonal-Crystal-Tower-Towers.webp?v=1762273820","width":1000},{"alt":"Clear Quartz Hexagonal Crystal Tower-Towers-Ali-Clear Quartz-50-60mm-Crystal Destiny","id":32085469233323,"position":2,"preview_image":{"aspect_ratio":1.0,"height":1000,"width":1000,"src":"\/\/crystaldestiny.com\/cdn\/shop\/files\/Clear-Quartz-Hexagonal-Crystal-Tower-Towers-2.webp?v=1762273821"},"aspect_ratio":1.0,"height":1000,"media_type":"image","src":"\/\/crystaldestiny.com\/cdn\/shop\/files\/Clear-Quartz-Hexagonal-Crystal-Tower-Towers-2.webp?v=1762273821","width":1000},{"alt":"Clear Quartz Hexagonal Crystal Tower-Towers-Ali-Clear Quartz-50-60mm-Crystal Destiny","id":32085469266091,"position":3,"preview_image":{"aspect_ratio":1.0,"height":1000,"width":1000,"src":"\/\/crystaldestiny.com\/cdn\/shop\/files\/Clear-Quartz-Hexagonal-Crystal-Tower-Towers-3.webp?v=1762273822"},"aspect_ratio":1.0,"height":1000,"media_type":"image","src":"\/\/crystaldestiny.com\/cdn\/shop\/files\/Clear-Quartz-Hexagonal-Crystal-Tower-Towers-3.webp?v=1762273822","width":1000},{"alt":"Clear Quartz Hexagonal Crystal Tower-Towers-Ali-Clear Quartz-50-60mm-Crystal Destiny","id":32085469298859,"position":4,"preview_image":{"aspect_ratio":1.0,"height":818,"width":818,"src":"\/\/crystaldestiny.com\/cdn\/shop\/files\/Clear-Quartz-Hexagonal-Crystal-Tower-Towers-4.webp?v=1762273823"},"aspect_ratio":1.0,"height":818,"media_type":"image","src":"\/\/crystaldestiny.com\/cdn\/shop\/files\/Clear-Quartz-Hexagonal-Crystal-Tower-Towers-4.webp?v=1762273823","width":818},{"alt":"Clear Quartz Hexagonal Crystal Tower-Towers-Ali-Clear Quartz-50-60mm-Crystal Destiny","id":32085469331627,"position":5,"preview_image":{"aspect_ratio":1.0,"height":1000,"width":1000,"src":"\/\/crystaldestiny.com\/cdn\/shop\/files\/Clear-Quartz-Hexagonal-Crystal-Tower-Towers-5.webp?v=1762273824"},"aspect_ratio":1.0,"height":1000,"media_type":"image","src":"\/\/crystaldestiny.com\/cdn\/shop\/files\/Clear-Quartz-Hexagonal-Crystal-Tower-Towers-5.webp?v=1762273824","width":1000},{"alt":"Clear Quartz Hexagonal Crystal Tower-Towers-Ali-Clear Quartz-50-60mm-Crystal Destiny","id":32085469364395,"position":6,"preview_image":{"aspect_ratio":1.0,"height":1000,"width":1000,"src":"\/\/crystaldestiny.com\/cdn\/shop\/files\/Clear-Quartz-Hexagonal-Crystal-Tower-Towers-Clear-Quartz-50-60mm-6.webp?v=1765343927"},"aspect_ratio":1.0,"height":1000,"media_type":"image","src":"\/\/crystaldestiny.com\/cdn\/shop\/files\/Clear-Quartz-Hexagonal-Crystal-Tower-Towers-Clear-Quartz-50-60mm-6.webp?v=1765343927","width":1000}],"requires_selling_plan":false,"selling_plan_groups":[],"content":"\u003cp data-end=\"541\" data-start=\"230\"\u003eThis Clear Quartz Hexagonal Crystal towers are a polished natural crystal tower ranging from 50–150mm, showcasing transparency and luminous white clarity. Its hexagonal obelisk shape amplifies energy and intention, making it ideal for meditation, crystal grids, or as a striking décor accent.\u003c\/p\u003e\n\u003cp data-end=\"790\" data-start=\"543\"\u003eClear Quartz is renowned as a master energy amplifier, promoting clarity, focus, and harmony. Place it in your home, office, or sacred space to cleanse and balance surrounding energy, or use it as a meditation wand to enhance spiritual practice.\u003c\/p\u003e\n\u003cp data-end=\"920\" data-start=\"792\"\u003eCollectors and crystal enthusiasts treasure Clear Quartz points for their versatile energy, elegant shape, and natural beauty.\u003c\/p\u003e\n\u003cp data-end=\"920\" data-start=\"792\"\u003eThis product is pulled at random by size.\u003c\/p\u003e\u003ch2\u003eCrystal Towers, Wands, Generators, Points, Pillars \u0026amp; Obelisks — What's the Difference?\u003c\/h2\u003e\n\u003cp id=\"isPasted\"\u003eWhile these terms may vary, they all describe beautifully shaped crystals with a pointed tip designed to channel and direct energy. Each name highlights a unique aspect of their use:\u003c\/p\u003e\n\u003cul\u003e\n\u003cli\u003e\n\u003cstrong\u003eTowers\u003c\/strong\u003e- Known for their steady, grounding presence, crystal towers help focus and amplify energy, making them perfect for meditation and manifestation.\u003c\/li\u003e\n\u003cli\u003e\n\u003cstrong\u003eWands\u003c\/strong\u003e- Traditionally used in energy work and healing, crystal wands are excellent for directing energy flow and clearing blockages.\u003c\/li\u003e\n\u003cli\u003e\n\u003cstrong\u003ePillars\u003c\/strong\u003e- Symbolizing strength and stability, crystal pillars create a balanced and harmonious environment, making them great for home decor and spiritual practices.\u003c\/li\u003e\n\u003cli\u003e\n\u003cstrong\u003eObelisks\u003c\/strong\u003e- Inspired by ancient structures, crystal obelisks are believed to connect earthly and spiritual energies, making them powerful tools for transformation and enlightenment.\u003c\/li\u003e\n\u003c\/ul\u003e\n\u003cp\u003eNo matter what you call them, these crystals serve the same purpose—to enhance energy, intention, and harmony in your space. Choose the one that resonates most with you!\u003c\/p\u003e"},"options":[{"name":"Material","position":1,"values":["Clear Quartz"]},{"name":"Size","position":2,"values":["50-60mm","70-80mm","60-70mm","90-110mm","80-90mm","110-150mm"]}],"custom_metafields":{"shipping_time":"12-16 days"},"metafields":{"badge":"\u003cdiv style='display:none' class='jdgm-prev-badge' data-average-rating='0.00' data-number-of-reviews='0' data-number-of-questions='0'\u003e \u003cspan class='jdgm-prev-badge__stars' data-score='0.00' tabindex='0' aria-label='0.00 stars' role='button'\u003e \u003cspan class='jdgm-star jdgm--off'\u003e\u003c\/span\u003e\u003cspan class='jdgm-star jdgm--off'\u003e\u003c\/span\u003e\u003cspan class='jdgm-star jdgm--off'\u003e\u003c\/span\u003e\u003cspan class='jdgm-star jdgm--off'\u003e\u003c\/span\u003e\u003cspan class='jdgm-star jdgm--off'\u003e\u003c\/span\u003e \u003c\/span\u003e \u003cspan class='jdgm-prev-badge__text'\u003e No reviews \u003c\/span\u003e \u003c\/div\u003e","widget":"\u003cdiv class='jdgm-rev-widg' data-updated-at='2025-11-04T02:36:46Z' data-average-rating='0.00' data-number-of-reviews='0' data-number-of-questions='0' data-image-url='https:\/\/cdn.shopify.com\/s\/files\/1\/0613\/0345\/5915\/files\/Sc4b70b7b52c544cfb658aedd3e9b5745S.webp?v=1762219466'\u003e \u003cstyle class='jdgm-temp-hiding-style'\u003e.jdgm-rev-widg{ display: none }\u003c\/style\u003e \u003cdiv class='jdgm-rev-widg__header'\u003e \u003ch2 class='jdgm-rev-widg__title'\u003eCustomer Reviews\u003c\/h2\u003e \u003cdiv class='jdgm-rev-widg__summary'\u003e \u003cdiv class='jdgm-rev-widg__summary-stars' aria-label='Average rating is 0.00 stars' role='img'\u003e \u003cspan class='jdgm-star jdgm--off'\u003e\u003c\/span\u003e\u003cspan class='jdgm-star jdgm--off'\u003e\u003c\/span\u003e\u003cspan class='jdgm-star jdgm--off'\u003e\u003c\/span\u003e\u003cspan class='jdgm-star jdgm--off'\u003e\u003c\/span\u003e\u003cspan class='jdgm-star jdgm--off'\u003e\u003c\/span\u003e \u003c\/div\u003e \u003cdiv class='jdgm-rev-widg__summary-text'\u003eBe the first to write a review\u003c\/div\u003e \u003c\/div\u003e \u003ca style='display: none' href='#' class='jdgm-write-rev-link' role='button'\u003eWrite a review\u003c\/a\u003e \u003cdiv class='jdgm-histogram jdgm-temp-hidden'\u003e \u003cdiv class='jdgm-histogram__row' data-rating='5' data-frequency='0' data-percentage='0'\u003e \u003cdiv class='jdgm-histogram__star' role='button' aria-label=\"0% (0) reviews with 5 star rating\" tabindex='0' \u003e\u003cspan class='jdgm-star jdgm--on'\u003e\u003c\/span\u003e\u003cspan class='jdgm-star jdgm--on'\u003e\u003c\/span\u003e\u003cspan class='jdgm-star jdgm--on'\u003e\u003c\/span\u003e\u003cspan class='jdgm-star jdgm--on'\u003e\u003c\/span\u003e\u003cspan class='jdgm-star jdgm--on'\u003e\u003c\/span\u003e\u003c\/div\u003e \u003cdiv class='jdgm-histogram__bar'\u003e \u003cdiv class='jdgm-histogram__bar-content' style='width: 0%;'\u003e \u003c\/div\u003e \u003c\/div\u003e \u003cdiv class='jdgm-histogram__percentage'\u003e0%\u003c\/div\u003e \u003cdiv class='jdgm-histogram__frequency'\u003e(0)\u003c\/div\u003e \u003c\/div\u003e \u003cdiv class='jdgm-histogram__row' data-rating='4' data-frequency='0' data-percentage='0'\u003e \u003cdiv class='jdgm-histogram__star' role='button' aria-label=\"0% (0) reviews with 4 star rating\" tabindex='0' \u003e\u003cspan class='jdgm-star jdgm--on'\u003e\u003c\/span\u003e\u003cspan class='jdgm-star jdgm--on'\u003e\u003c\/span\u003e\u003cspan class='jdgm-star jdgm--on'\u003e\u003c\/span\u003e\u003cspan class='jdgm-star jdgm--on'\u003e\u003c\/span\u003e\u003cspan class='jdgm-star jdgm--off'\u003e\u003c\/span\u003e\u003c\/div\u003e \u003cdiv class='jdgm-histogram__bar'\u003e \u003cdiv class='jdgm-histogram__bar-content' style='width: 0%;'\u003e \u003c\/div\u003e \u003c\/div\u003e \u003cdiv class='jdgm-histogram__percentage'\u003e0%\u003c\/div\u003e \u003cdiv class='jdgm-histogram__frequency'\u003e(0)\u003c\/div\u003e \u003c\/div\u003e \u003cdiv class='jdgm-histogram__row' data-rating='3' data-frequency='0' data-percentage='0'\u003e \u003cdiv class='jdgm-histogram__star' role='button' aria-label=\"0% (0) reviews with 3 star rating\" tabindex='0' \u003e\u003cspan class='jdgm-star jdgm--on'\u003e\u003c\/span\u003e\u003cspan class='jdgm-star jdgm--on'\u003e\u003c\/span\u003e\u003cspan class='jdgm-star jdgm--on'\u003e\u003c\/span\u003e\u003cspan class='jdgm-star jdgm--off'\u003e\u003c\/span\u003e\u003cspan class='jdgm-star jdgm--off'\u003e\u003c\/span\u003e\u003c\/div\u003e \u003cdiv class='jdgm-histogram__bar'\u003e \u003cdiv class='jdgm-histogram__bar-content' style='width: 0%;'\u003e \u003c\/div\u003e \u003c\/div\u003e \u003cdiv class='jdgm-histogram__percentage'\u003e0%\u003c\/div\u003e \u003cdiv class='jdgm-histogram__frequency'\u003e(0)\u003c\/div\u003e \u003c\/div\u003e \u003cdiv class='jdgm-histogram__row' data-rating='2' data-frequency='0' data-percentage='0'\u003e \u003cdiv class='jdgm-histogram__star' role='button' aria-label=\"0% (0) reviews with 2 star rating\" tabindex='0' \u003e\u003cspan class='jdgm-star jdgm--on'\u003e\u003c\/span\u003e\u003cspan class='jdgm-star jdgm--on'\u003e\u003c\/span\u003e\u003cspan class='jdgm-star jdgm--off'\u003e\u003c\/span\u003e\u003cspan class='jdgm-star jdgm--off'\u003e\u003c\/span\u003e\u003cspan class='jdgm-star jdgm--off'\u003e\u003c\/span\u003e\u003c\/div\u003e \u003cdiv class='jdgm-histogram__bar'\u003e \u003cdiv class='jdgm-histogram__bar-content' style='width: 0%;'\u003e \u003c\/div\u003e \u003c\/div\u003e \u003cdiv class='jdgm-histogram__percentage'\u003e0%\u003c\/div\u003e \u003cdiv class='jdgm-histogram__frequency'\u003e(0)\u003c\/div\u003e \u003c\/div\u003e \u003cdiv class='jdgm-histogram__row' data-rating='1' data-frequency='0' data-percentage='0'\u003e \u003cdiv class='jdgm-histogram__star' role='button' aria-label=\"0% (0) reviews with 1 star rating\" tabindex='0' \u003e\u003cspan class='jdgm-star jdgm--on'\u003e\u003c\/span\u003e\u003cspan class='jdgm-star jdgm--off'\u003e\u003c\/span\u003e\u003cspan class='jdgm-star jdgm--off'\u003e\u003c\/span\u003e\u003cspan class='jdgm-star jdgm--off'\u003e\u003c\/span\u003e\u003cspan class='jdgm-star jdgm--off'\u003e\u003c\/span\u003e\u003c\/div\u003e \u003cdiv class='jdgm-histogram__bar'\u003e \u003cdiv class='jdgm-histogram__bar-content' style='width: 0%;'\u003e \u003c\/div\u003e \u003c\/div\u003e \u003cdiv class='jdgm-histogram__percentage'\u003e0%\u003c\/div\u003e \u003cdiv class='jdgm-histogram__frequency'\u003e(0)\u003c\/div\u003e \u003c\/div\u003e \u003cdiv class='jdgm-histogram__row jdgm-histogram__clear-filter' data-rating=null tabindex='0'\u003e\u003c\/div\u003e \u003c\/div\u003e \u003cdiv class='jdgm-rev-widg__sort-wrapper'\u003e\u003c\/div\u003e \u003c\/div\u003e \u003cdiv class='jdgm-rev-widg__body'\u003e \u003cdiv class='jdgm-rev-widg__reviews'\u003e\u003c\/div\u003e \u003cdiv class='jdgm-paginate' data-per-page='4' data-url='https:\/\/api.judge.me\/reviews\/reviews_for_widget' style=\"display: none;\"\u003e\u003c\/div\u003e \u003c\/div\u003e \u003cdiv class='jdgm-rev-widg__paginate-spinner-wrapper'\u003e \u003cdiv class='jdgm-spinner'\u003e\u003c\/div\u003e \u003c\/div\u003e \u003c\/div\u003e"},"collections":[{"id":294880051371,"handle":"crystals","title":"Crystals","updated_at":"2026-01-07T23:43:11-05:00","body_html":"\u003cp data-start=\"159\" data-end=\"687\"\u003e✨ \u003cstrong data-start=\"161\" data-end=\"216\"\u003eDiscover the Magic of Crystals with Crystal Destiny\u003c\/strong\u003e ✨\u003cbr data-start=\"218\" data-end=\"221\"\u003eCrystals have been treasured for centuries—not only for their natural beauty but also for their powerful healing energies. Beyond their visual allure, they bring balance, harmony, and positive energy into any space. Whether used for home décor, meditation, or simply to elevate the energy of your surroundings, crystals create a sanctuary of peace, relaxation, and well-being. Each piece is a unique gift from the Earth—visually stunning and spiritually uplifting.\u003c\/p\u003e\n\u003cp data-start=\"689\" data-end=\"1011\"\u003eAt \u003cstrong data-start=\"692\" data-end=\"711\"\u003eCrystal Destiny\u003c\/strong\u003e, our signature collection showcases a curated selection of exquisite crystals, from radiant Quartz to soothing Amethyst. Every stone is carefully sourced for its elegance and metaphysical resonance, making them perfect for enhancing your home, uplifting your spirit, or gifting to someone special.\u003c\/p\u003e\n\u003cp data-start=\"1013\" data-end=\"1206\"\u003eExperience the timeless sophistication of crystalline wonders. Explore the \u003cstrong data-start=\"1088\" data-end=\"1118\"\u003eCrystal Destiny Collection\u003c\/strong\u003e today and bring the transformative beauty of these treasures into your everyday life.\u003c\/p\u003e","published_at":"2023-06-05T11:24:02-04:00","sort_order":"created-desc","template_suffix":"","disjunctive":false,"rules":[{"column":"tag","relation":"equals","condition":"crystal"},{"column":"type","relation":"not_contains","condition":"925 Sterling Silver"},{"column":"type","relation":"not_contains","condition":"Wire Wraps"}],"published_scope":"global"},{"id":319455756459,"handle":"crown-chakra-crystals","title":"Crown Chakra Crystals","updated_at":"2026-01-07T23:42:38-05:00","body_html":"\u003cp data-start=\"144\" data-end=\"515\"\u003e✨ \u003cstrong data-start=\"146\" data-end=\"171\"\u003eCrown Chakra Crystals\u003c\/strong\u003e ✨\u003cbr data-start=\"173\" data-end=\"176\"\u003eConnect with higher consciousness and spiritual insight with our \u003cstrong data-start=\"241\" data-end=\"266\"\u003eCrown Chakra Crystals\u003c\/strong\u003e. Located at the top of the head, the Crown Chakra governs wisdom, enlightenment, and your connection to the divine. These crystals help open and balance this energy center, fostering clarity, spiritual growth, and a sense of universal connection.\u003c\/p\u003e\n\u003cp data-start=\"517\" data-end=\"851\"\u003eOur selection includes powerful stones such as Amethyst, Clear Quartz, Selenite, and Lepidolite—each chosen for their ability to enhance meditation, energy work, and mindful practices. Whether placed in your sacred space, carried with you, or worn as jewelry, Crown Chakra Crystals promote harmony, insight, and spiritual alignment.\u003c\/p\u003e\n\u003cp data-start=\"853\" data-end=\"1007\"\u003eElevate your consciousness, deepen your meditative practice, and embrace the transformative energy of the Crown Chakra with these illuminating crystals.\u003c\/p\u003e","published_at":"2025-07-17T18:16:11-04:00","sort_order":"best-selling","template_suffix":"","disjunctive":false,"rules":[{"column":"variant_metafield_definition","relation":"equals","condition":"Crown"}],"published_scope":"global","image":{"created_at":"2025-07-17T19:09:11-04:00","alt":null,"width":1080,"height":1080,"src":"\/\/crystaldestiny.com\/cdn\/shop\/collections\/Crown_Chakra_Collection.jpg?v=1762474922"}},{"id":319455789227,"handle":"third-eye-chakra-crystals","title":"Third Eye Chakra Crystals","updated_at":"2026-01-07T23:42:38-05:00","body_html":"\u003cp data-start=\"124\" data-end=\"474\"\u003e✨ \u003cstrong data-start=\"126\" data-end=\"155\"\u003eThird Eye Chakra Crystals\u003c\/strong\u003e ✨\u003cbr data-start=\"157\" data-end=\"160\"\u003eAwaken intuition, clarity, and insight with our \u003cstrong data-start=\"208\" data-end=\"237\"\u003eThird Eye Chakra Crystals\u003c\/strong\u003e. Located between the eyebrows, the Third Eye Chakra governs perception, intuition, and inner wisdom. These crystals help balance and activate this energy center, promoting mental clarity, spiritual awareness, and heightened intuition.\u003c\/p\u003e\n\u003cp data-start=\"476\" data-end=\"835\"\u003eOur curated selection features stones such as Amethyst, Lapis Lazuli, and Sodalite—chosen for their ability to enhance meditation, intuitive practices, and energy work. Whether placed in your sacred space, carried with you, or worn as jewelry, Third Eye Chakra Crystals support mental focus, spiritual growth, and a deeper connection to your inner guidance.\u003c\/p\u003e\n\u003cp data-start=\"837\" data-end=\"976\"\u003eElevate your intuition, expand your awareness, and embrace the transformative power of the Third Eye Chakra with these powerful crystals.\u003c\/p\u003e","published_at":"2025-07-17T18:16:49-04:00","sort_order":"best-selling","template_suffix":"","disjunctive":false,"rules":[{"column":"variant_metafield_definition","relation":"equals","condition":"Third Eye"}],"published_scope":"global","image":{"created_at":"2025-07-17T19:09:01-04:00","alt":null,"width":1080,"height":1080,"src":"\/\/crystaldestiny.com\/cdn\/shop\/collections\/Third_Eye_Chakra_Collection.jpg?v=1762474924"}},{"id":294880116907,"handle":"polished","title":"Polished Crystals","updated_at":"2026-01-07T23:43:11-05:00","body_html":"\u003cp data-start=\"199\" data-end=\"598\"\u003e✨ \u003cstrong data-start=\"201\" data-end=\"248\"\u003eCrystal Destiny Polished Crystal Collection\u003c\/strong\u003e ✨\u003cbr data-start=\"250\" data-end=\"253\"\u003eIndulge in the brilliance of crystals refined to perfection. Our \u003cstrong data-start=\"318\" data-end=\"341\"\u003ePolished Collection\u003c\/strong\u003e showcases gemstones meticulously shaped and smoothed to reveal their natural radiance and timeless beauty. From the shimmering glow of Quartz to the deep allure of Obsidian, each polished piece is a testament to nature’s artistry and human craftsmanship.\u003c\/p\u003e\n\u003cp data-start=\"600\" data-end=\"862\"\u003ePerfect as statement décor, meaningful gifts, or companions on your spiritual journey, polished crystals bring sophistication and elevated energy into any space. Their radiant surfaces reflect not only light but also the transformative power of crystal energy.\u003c\/p\u003e\n\u003cp data-start=\"864\" data-end=\"1022\"\u003eDiscover the elegance of refinement with Crystal Destiny’s Polished Crystal Collection—where every facet shines with intention, beauty, and timeless allure.\u003c\/p\u003e","published_at":"2023-06-05T11:30:44-04:00","sort_order":"created-desc","template_suffix":"","disjunctive":false,"rules":[{"column":"tag","relation":"equals","condition":"polished"}],"published_scope":"global"},{"id":322471624875,"handle":"crystal-favorites","title":"Crystal Enthusiast's Favorites","updated_at":"2026-01-07T23:42:38-05:00","body_html":"\u003cp\u003eDiscover the crystals our community loves most. This collection features our best-selling stones and accessories, carefully curated to highlight pieces that are always in demand and ready to ship. Whether you’re adding to your collection or searching for a gift, these fan-favorite crystals are timeless staples for energy, beauty, and balance.\u003c\/p\u003e","published_at":"2025-10-01T21:07:06-04:00","sort_order":"price-asc","template_suffix":"","disjunctive":false,"rules":[{"column":"variant_inventory","relation":"greater_than","condition":"1"}],"published_scope":"global"},{"id":321695744171,"handle":"direct-from-supplier","title":"Direct from Supplier","updated_at":"2026-01-07T23:43:11-05:00","body_html":"","published_at":"2025-09-12T16:38:23-04:00","sort_order":"best-selling","template_suffix":"","disjunctive":true,"rules":[{"column":"tag","relation":"equals","condition":"adjusted-shipping"}],"published_scope":"global"},{"id":293659312299,"handle":"best-sellers","title":"Best Sellers","updated_at":"2026-01-07T23:43:11-05:00","body_html":"\u003cp data-start=\"155\" data-end=\"510\"\u003eDiscover the pieces our community loves most. Our Best Sellers Collection brings together handpicked crystals and jewelry that embody timeless elegance, spiritual resonance, and everyday sophistication. Each item has earned its place as a customer favorite—celebrated for both its beauty and its meaningful energy.\u003c\/p\u003e\n\u003cp data-start=\"512\" data-end=\"802\"\u003eFrom stunning statement pieces to versatile daily companions, these treasures are curated to elevate your space, uplift your spirit, and reflect refined taste. Indulge in what’s most cherished and let our best sellers guide you toward the perfect blend of style and transformative energy.\u003c\/p\u003e\n\u003cp data-start=\"804\" data-end=\"932\"\u003eExplore the Best Sellers Collection today—where elegance meets intention, and every piece tells a story of beauty and balance.\u003c\/p\u003e","published_at":"2023-03-15T16:04:51-04:00","sort_order":"best-selling","template_suffix":"","disjunctive":false,"rules":[{"column":"variant_price","relation":"greater_than","condition":"0"},{"column":"variant_inventory","relation":"greater_than","condition":"0"},{"column":"type","relation":"not_equals","condition":"Shipping Protection"}],"published_scope":"global"},{"id":321370390699,"handle":"monthly-crystal-sale","title":"Monthly Crystal Sale | Spheres \u0026 Towers","updated_at":"2026-01-06T23:24:37-05:00","body_html":"\u003cp\u003eShop our \u003cstrong\u003eMonthly Crystal Sale\u003c\/strong\u003e, where you can shop a wide selection of healing crystals at discounted prices. Explore \u003cstrong\u003ecrystal spheres and towers,\u003c\/strong\u003e— all carefully curated to support meditation, energy balancing, and spiritual wellness. Whether you're looking to enhance your home decor, boost your daily energy, or find the perfect gift, our \u003cstrong\u003ecrystals for healing and manifestation\u003c\/strong\u003e offer both beauty and metaphysical benefits.\u003c\/p\u003e\n\u003cp\u003eEach month, our sale features \u003cstrong\u003enew discounted collections\u003c\/strong\u003e, from \u003cstrong\u003enatural quartz and amethyst towers\u003c\/strong\u003e to \u003cstrong\u003ewire-wrapped pendants and polished stones\u003c\/strong\u003e, so there's always something fresh to discover. Shop with confidence knowing you're getting high-quality crystals with \u003cstrong\u003efree shipping options\u003c\/strong\u003e and a trusted experience.\u003c\/p\u003e\n\u003cp\u003e\u003cstrong\u003eTake advantage of the Monthly Crystal Sale today\u003c\/strong\u003e and add powerful, natural energy to your life with \u003cstrong\u003eauthentic healing crystals\u003c\/strong\u003e — while our limited-time discounts last.\u003c\/p\u003e\n\u003cp\u003e\u003cstrong\u003e*Discount automatically applied at checkout.\u003c\/strong\u003e\u003c\/p\u003e","published_at":"2025-12-02T01:26:17-05:00","sort_order":"alpha-asc","template_suffix":"","disjunctive":true,"rules":[{"column":"tag","relation":"equals","condition":"spheres"},{"column":"tag","relation":"equals","condition":"Towers"}],"published_scope":"global","image":{"created_at":"2026-01-01T01:32:34-05:00","alt":"","width":960,"height":960,"src":"\/\/crystaldestiny.com\/cdn\/shop\/collections\/3E8C2969-1B86-4ACE-B349-98E9D8768424.jpg?v=1767249154"}},{"id":297906241707,"handle":"new-arrivals","title":"New Arrivals","updated_at":"2026-01-07T23:43:11-05:00","body_html":"\u003cp data-start=\"172\" data-end=\"573\"\u003e✨ \u003cstrong data-start=\"174\" data-end=\"217\"\u003eDiscover Crystal Destiny’s New Arrivals\u003c\/strong\u003e ✨\u003cbr data-start=\"219\" data-end=\"222\"\u003eStep into a world of fresh sophistication with our latest crystal treasures. Each new piece—whether Quartz, Amethyst, or beyond—embodies nature’s artistry, radiating both timeless beauty and powerful energy. Thoughtfully curated and constantly refreshed, our New Arrivals Collection offers the perfect harmony of elegance and metaphysical resonance.\u003c\/p\u003e\n\u003cp data-start=\"575\" data-end=\"793\"\u003eElevate your space, uplift your spirit, and embrace the transformative power of nature’s wonders. Explore the newest expressions of crystal artistry today, and let your journey with crystals evolve with every update.\u003c\/p\u003e","published_at":"2023-11-20T15:35:42-05:00","sort_order":"created-desc","template_suffix":"","disjunctive":true,"rules":[{"column":"tag","relation":"equals","condition":"new-arrivals"}],"published_scope":"global"},{"id":297596059819,"handle":"all","title":"All Crystals \u0026 Jewelry","updated_at":"2026-01-07T23:43:11-05:00","body_html":"\u003cp data-start=\"149\" data-end=\"494\"\u003e✨ \u003cstrong data-start=\"151\" data-end=\"181\"\u003eWelcome to Crystal Destiny\u003c\/strong\u003e ✨\u003cbr data-start=\"183\" data-end=\"186\"\u003eStep into a world where beauty, energy, and artistry unite. Our collection is a treasure trove of exquisite crystals, from the raw, untamed elegance of natural formations to the polished brilliance of expertly crafted pieces. Each crystal is a masterpiece, carrying its own unique story and timeless charm.\u003c\/p\u003e\n\u003cp data-start=\"496\" data-end=\"831\"\u003eWhether you’re drawn to the calming presence of Amethyst, the vibrant energy of Citrine, or the grounding strength of Jasper, our crystals invite you to connect with nature’s finest wonders. Perfect for enhancing your space, supporting your spiritual journey, or gifting with intention, every piece resonates with beauty and meaning.\u003c\/p\u003e\n\u003cp data-start=\"833\" data-end=\"1000\"\u003eElevate your surroundings, embrace the mystique, and explore the enchanting world of crystals at \u003cstrong data-start=\"930\" data-end=\"949\"\u003eCrystal Destiny\u003c\/strong\u003e—where every crystal is waiting to be discovered.\u003c\/p\u003e","published_at":"2023-11-10T13:55:31-05:00","sort_order":"created-desc","template_suffix":"","disjunctive":false,"rules":[{"column":"type","relation":"not_equals","condition":"asdf"}],"published_scope":"global"},{"id":296256405675,"handle":"crystal-towers","title":"Crystal Towers","updated_at":"2026-01-06T23:24:37-05:00","body_html":"\u003cp data-end=\"568\" data-start=\"152\"\u003e✨ \u003cstrong data-end=\"190\" data-start=\"154\"\u003eCrystal Destiny Tower Collection\u003c\/strong\u003e ✨\u003cbr data-end=\"195\" data-start=\"192\"\u003eEnchant your space with the timeless beauty and powerful energy of crystal towers. Each piece in our \u003cstrong data-end=\"316\" data-start=\"296\"\u003eTower Collection\u003c\/strong\u003e is carefully crafted to showcase nature’s artistry while radiating higher vibrations and spiritual resonance. From the clarity of Quartz to the calming presence of Amethyst, these towers are both decorative masterpieces and tools for transformation.\u003c\/p\u003e\n\u003cp data-end=\"765\" data-start=\"570\"\u003ePerfect for meditation spaces, energy work, or simply elevating your home décor, crystal towers channel focused energy upward—creating balance, harmony, and refined elegance in any environment.\u003c\/p\u003e\n\u003cp data-end=\"917\" data-start=\"767\"\u003eDiscover the Crystal Destiny Tower Collection today and transform your surroundings into a sanctuary of beauty, purpose, and spiritual significance.\u003c\/p\u003e\n\u003ch2\u003eCrystal Towers, Wands, Generators, Points, Pillars \u0026amp; Obelisks — What's the Difference?\u003c\/h2\u003e\n\u003cp id=\"isPasted\"\u003eWhile these terms may vary, they all describe beautifully shaped crystals with a pointed tip designed to channel and direct energy. Each name highlights a unique aspect of their use:\u003c\/p\u003e\n\u003cul\u003e\n\u003cli\u003e\n\u003cstrong\u003eTowers\u003c\/strong\u003e- Known for their steady, grounding presence, crystal towers help focus and amplify energy, making them perfect for meditation and manifestation.\u003c\/li\u003e\n\u003cli\u003e\n\u003cstrong\u003eWands\u003c\/strong\u003e- Traditionally used in energy work and healing, crystal wands are excellent for directing energy flow and clearing blockages.\u003c\/li\u003e\n\u003cli\u003e\n\u003cstrong\u003ePillars\u003c\/strong\u003e- Symbolizing strength and stability, crystal pillars create a balanced and harmonious environment, making them great for home decor and spiritual practices.\u003c\/li\u003e\n\u003cli\u003e\n\u003cstrong\u003eObelisks\u003c\/strong\u003e- Inspired by ancient structures, crystal obelisks are believed to connect earthly and spiritual energies, making them powerful tools for transformation and enlightenment.\u003c\/li\u003e\n\u003c\/ul\u003e\n\u003cp\u003eNo matter what you call them, these crystals serve the same purpose—to enhance energy, intention, and harmony in your space. Choose the one that resonates most with you!\u003c\/p\u003e","published_at":"2023-09-14T12:52:35-04:00","sort_order":"created-desc","template_suffix":"","disjunctive":false,"rules":[{"column":"tag","relation":"equals","condition":"towers"}],"published_scope":"global"},{"id":298983391403,"handle":"january-crystal-sale","title":"January Sale | 25% Off Crystal Towers \u0026 Spheres","updated_at":"2026-01-06T23:24:37-05:00","body_html":"\u003cp\u003eShop our \u003cstrong\u003eJanuary Crystal Sale\u003c\/strong\u003e, where you can shop a wide selection of healing crystals at discounted prices. Explore \u003cstrong\u003eCrystal Towers, \u0026amp; Crystal Spheres\u003c\/strong\u003e — all carefully curated and crafted to support meditation, energy balancing, and spiritual wellness. Whether you're looking to enhance your home decor, boost your daily energy, or find the perfect gift, our \u003cstrong\u003ecrystals for healing and manifestation\u003c\/strong\u003e offer both beauty and metaphysical benefits.\u003c\/p\u003e\n\u003cp\u003eThis January, our sale features \u003cstrong\u003ediscounted crystal towers and spheres\u003c\/strong\u003e, from \u003cstrong\u003enatural quartz \u003c\/strong\u003eand \u003cstrong\u003eamethyst \u003c\/strong\u003eto \u003cstrong\u003ebumblebee jasper \u003c\/strong\u003eand \u003cstrong\u003ecarnelian\u003c\/strong\u003e, so there's always something fresh to discover. Shop with confidence knowing you're getting high-quality crystals with \u003cstrong\u003efree shipping options\u003c\/strong\u003e and a trusted experience.\u003c\/p\u003e\n\u003cp\u003e\u003cstrong\u003eTake advantage of the January Crystal Sale today\u003c\/strong\u003e and add powerful, natural energy to your life with \u003cstrong\u003eauthentic healing crystals\u003c\/strong\u003e — while our limited-time discounts last.\u003c\/p\u003e\n\u003cp\u003e\u003cstrong\u003e*Discount automatically applied at checkout.\u003c\/strong\u003e\u003c\/p\u003e","published_at":"2026-01-01T00:07:17-05:00","sort_order":"alpha-asc","template_suffix":"monthly-collection","disjunctive":true,"rules":[{"column":"tag","relation":"equals","condition":"Spheres"},{"column":"tag","relation":"equals","condition":"Towers"}],"published_scope":"global","image":{"created_at":"2026-01-01T01:29:59-05:00","alt":"","width":960,"height":960,"src":"\/\/crystaldestiny.com\/cdn\/shop\/collections\/1464163B-22B1-4D62-BEC5-CEC9AECB670B.jpg?v=1767248999"}}]}
[{"alt":"Clear Quartz Hexagonal Crystal Tower-Towers-Ali-Clear Quartz-50-60mm-Crystal Destiny","id":32085469200555,"position":1,"preview_image":{"aspect_ratio":1.0,"height":1000,"width":1000,"src":"\/\/crystaldestiny.com\/cdn\/shop\/files\/Clear-Quartz-Hexagonal-Crystal-Tower-Towers.webp?v=1762273820"},"aspect_ratio":1.0,"height":1000,"media_type":"image","src":"\/\/crystaldestiny.com\/cdn\/shop\/files\/Clear-Quartz-Hexagonal-Crystal-Tower-Towers.webp?v=1762273820","width":1000},{"alt":"Clear Quartz Hexagonal Crystal Tower-Towers-Ali-Clear Quartz-50-60mm-Crystal Destiny","id":32085469233323,"position":2,"preview_image":{"aspect_ratio":1.0,"height":1000,"width":1000,"src":"\/\/crystaldestiny.com\/cdn\/shop\/files\/Clear-Quartz-Hexagonal-Crystal-Tower-Towers-2.webp?v=1762273821"},"aspect_ratio":1.0,"height":1000,"media_type":"image","src":"\/\/crystaldestiny.com\/cdn\/shop\/files\/Clear-Quartz-Hexagonal-Crystal-Tower-Towers-2.webp?v=1762273821","width":1000},{"alt":"Clear Quartz Hexagonal Crystal Tower-Towers-Ali-Clear Quartz-50-60mm-Crystal Destiny","id":32085469266091,"position":3,"preview_image":{"aspect_ratio":1.0,"height":1000,"width":1000,"src":"\/\/crystaldestiny.com\/cdn\/shop\/files\/Clear-Quartz-Hexagonal-Crystal-Tower-Towers-3.webp?v=1762273822"},"aspect_ratio":1.0,"height":1000,"media_type":"image","src":"\/\/crystaldestiny.com\/cdn\/shop\/files\/Clear-Quartz-Hexagonal-Crystal-Tower-Towers-3.webp?v=1762273822","width":1000},{"alt":"Clear Quartz Hexagonal Crystal Tower-Towers-Ali-Clear Quartz-50-60mm-Crystal Destiny","id":32085469298859,"position":4,"preview_image":{"aspect_ratio":1.0,"height":818,"width":818,"src":"\/\/crystaldestiny.com\/cdn\/shop\/files\/Clear-Quartz-Hexagonal-Crystal-Tower-Towers-4.webp?v=1762273823"},"aspect_ratio":1.0,"height":818,"media_type":"image","src":"\/\/crystaldestiny.com\/cdn\/shop\/files\/Clear-Quartz-Hexagonal-Crystal-Tower-Towers-4.webp?v=1762273823","width":818},{"alt":"Clear Quartz Hexagonal Crystal Tower-Towers-Ali-Clear Quartz-50-60mm-Crystal Destiny","id":32085469331627,"position":5,"preview_image":{"aspect_ratio":1.0,"height":1000,"width":1000,"src":"\/\/crystaldestiny.com\/cdn\/shop\/files\/Clear-Quartz-Hexagonal-Crystal-Tower-Towers-5.webp?v=1762273824"},"aspect_ratio":1.0,"height":1000,"media_type":"image","src":"\/\/crystaldestiny.com\/cdn\/shop\/files\/Clear-Quartz-Hexagonal-Crystal-Tower-Towers-5.webp?v=1762273824","width":1000},{"alt":"Clear Quartz Hexagonal Crystal Tower-Towers-Ali-Clear Quartz-50-60mm-Crystal Destiny","id":32085469364395,"position":6,"preview_image":{"aspect_ratio":1.0,"height":1000,"width":1000,"src":"\/\/crystaldestiny.com\/cdn\/shop\/files\/Clear-Quartz-Hexagonal-Crystal-Tower-Towers-Clear-Quartz-50-60mm-6.webp?v=1765343927"},"aspect_ratio":1.0,"height":1000,"media_type":"image","src":"\/\/crystaldestiny.com\/cdn\/shop\/files\/Clear-Quartz-Hexagonal-Crystal-Tower-Towers-Clear-Quartz-50-60mm-6.webp?v=1765343927","width":1000}]
{"item":{"id":8440117166251,"title":"Torre de obelisco de cuarzo transparente","handle":"clear-quartz-obelisk-tower-cd-10095","description":"\u003cp\u003e Aprovecha la energía amplificadora de nuestra Torre Obelisco de Cuarzo Transparente, meticulosamente diseñada para dirigir y enfocar las propiedades metafísicas. Esta estructura cristalina funciona como un poderoso generador de energía y una elegante pieza de decoración. La claridad natural del cuarzo lo convierte en una herramienta excepcional para la meditación, el trabajo energético y la limpieza del espacio, mientras que su forma puntiaguda canaliza eficazmente las intenciones hacia arriba, hacia su manifestación. Contiene arcoíris e inclusiones autocurativas.\u003c\/p\u003e\n\n\u003cp\u003e Este producto es exactamente como se muestra en la imagen, único en su tipo.\u003c\/p\u003e \u003cdiv\u003e\u003cspan style=\"font-size: 0.875rem;\"\u003eTorres de Cristal, Varas, Generadores, Puntas, Pilares y Obeliscos: ¿Cuál es la Diferencia?\u003c\/span\u003e\u003c\/div\u003e\n\u003cdiv\u003e Si bien estos términos pueden variar, todos describen cristales de formas hermosas con una punta puntiaguda diseñada para canalizar y dirigir la energía. Cada nombre destaca un aspecto único de su uso:\u003c\/div\u003e\n\u003cdiv\u003e \u0026lt;ul\u0026gt;\u003c\/div\u003e\n\u003cdiv\u003e \u0026lt;li\u0026gt;\u003c\/div\u003e\n\u003cdiv\u003e \u0026lt;strong\u0026gt;Torres\u0026lt;\/strong\u0026gt;: Conocidas por su presencia constante y estabilizadora, las torres de cristal ayudan a enfocar y amplificar la energía, lo que las hace perfectas para la meditación y la manifestación.\u0026lt;\/li\u0026gt;\u003c\/div\u003e\n\u003cdiv\u003e \u0026lt;li\u0026gt;\u003c\/div\u003e\n\u003cdiv\u003e \u0026lt;strong\u0026gt;Varitas\u0026lt;\/strong\u0026gt;: Tradicionalmente utilizadas en el trabajo energético y la curación, las varitas de cristal son excelentes para dirigir el flujo de energía y eliminar bloqueos.\u0026lt;\/li\u0026gt;\u003c\/div\u003e\n\u003cdiv\u003e \u0026lt;li\u0026gt;\u003c\/div\u003e\n\u003cdiv\u003e \u0026lt;strong\u0026gt;Pilares\u0026lt;\/strong\u0026gt;: Simbolizando fuerza y estabilidad, los pilares de cristal crean un ambiente equilibrado y armonioso, lo que los hace ideales para la decoración del hogar y las prácticas espirituales.\u0026lt;\/li\u0026gt;\u003c\/div\u003e\n\u003cdiv\u003e \u0026lt;li\u0026gt;\u003c\/div\u003e \u003cdiv\u003e\u0026lt;strong\u0026gt;Obeliscos\u0026lt;\/strong\u0026gt;: Inspirados en estructuras antiguas, se cree que los obeliscos de cristal conectan las energías terrenales y espirituales, lo que los convierte en poderosas herramientas para la transformación y la iluminación.\u0026lt;\/li\u0026gt;\u003c\/div\u003e\n\u003cdiv\u003e \u0026lt;\/ul\u0026gt;\u003c\/div\u003e\n\u003cdiv\u003e No importa cómo los llames, estos cristales tienen el mismo propósito: potenciar la energía, la intención y la armonía en tu espacio. ¡Elige el que más te resuene!\u003c\/div\u003e","published_at":"2025-05-29T18:04:51-04:00","created_at":"2025-05-29T18:04:51-04:00","vendor":"Crystal Destiny","type":"Torres","tags":["crystal","polished","Towers"],"price":7999,"price_min":7999,"price_max":7999,"available":true,"price_varies":false,"compare_at_price":null,"compare_at_price_min":0,"compare_at_price_max":0,"compare_at_price_varies":false,"variants":[{"id":45261389103275,"title":"Cuarzo transparente \/ 614 g - 5,50\" de alto x 2,50\" de ancho","option1":"Cuarzo transparente","option2":"614 g - 5,50\" de alto x 2,50\" de ancho","option3":null,"sku":"CD-10095","requires_shipping":true,"taxable":true,"featured_image":null,"available":true,"name":"Torre de obelisco de cuarzo transparente - Cuarzo transparente \/ 614 g - 5,50\" de alto x 2,50\" de ancho","public_title":"Cuarzo transparente \/ 614 g - 5,50\" de alto x 2,50\" de ancho","options":["Cuarzo transparente","614 g - 5,50\" de alto x 2,50\" de ancho"],"price":7999,"weight":0,"compare_at_price":null,"inventory_management":"shopify","barcode":"","requires_selling_plan":false,"selling_plan_allocations":[]}],"images":["\/\/crystaldestiny.com\/cdn\/shop\/files\/Clear-Quartz-Obelisk-Tower-Towers.jpg?v=1757201089"],"featured_image":"\/\/crystaldestiny.com\/cdn\/shop\/files\/Clear-Quartz-Obelisk-Tower-Towers.jpg?v=1757201089","options":["Material","Tamaño"],"media":[{"alt":"Clear Quartz Obelisk Tower-Towers-Crystal Destiny-Clear Quartz-614g - 5.50\"H x 2.50\"W-Crystal Destiny","id":31176344731819,"position":1,"preview_image":{"aspect_ratio":1.0,"height":3037,"width":3037,"src":"\/\/crystaldestiny.com\/cdn\/shop\/files\/Clear-Quartz-Obelisk-Tower-Towers.jpg?v=1757201089"},"aspect_ratio":1.0,"height":3037,"media_type":"image","src":"\/\/crystaldestiny.com\/cdn\/shop\/files\/Clear-Quartz-Obelisk-Tower-Towers.jpg?v=1757201089","width":3037}],"requires_selling_plan":false,"selling_plan_groups":[],"content":"\u003cp\u003e Aprovecha la energía amplificadora de nuestra Torre Obelisco de Cuarzo Transparente, meticulosamente diseñada para dirigir y enfocar las propiedades metafísicas. Esta estructura cristalina funciona como un poderoso generador de energía y una elegante pieza de decoración. La claridad natural del cuarzo lo convierte en una herramienta excepcional para la meditación, el trabajo energético y la limpieza del espacio, mientras que su forma puntiaguda canaliza eficazmente las intenciones hacia arriba, hacia su manifestación. Contiene arcoíris e inclusiones autocurativas.\u003c\/p\u003e\n\n\u003cp\u003e Este producto es exactamente como se muestra en la imagen, único en su tipo.\u003c\/p\u003e \u003cdiv\u003e\u003cspan style=\"font-size: 0.875rem;\"\u003eTorres de Cristal, Varas, Generadores, Puntas, Pilares y Obeliscos: ¿Cuál es la Diferencia?\u003c\/span\u003e\u003c\/div\u003e\n\u003cdiv\u003e Si bien estos términos pueden variar, todos describen cristales de formas hermosas con una punta puntiaguda diseñada para canalizar y dirigir la energía. Cada nombre destaca un aspecto único de su uso:\u003c\/div\u003e\n\u003cdiv\u003e \u0026lt;ul\u0026gt;\u003c\/div\u003e\n\u003cdiv\u003e \u0026lt;li\u0026gt;\u003c\/div\u003e\n\u003cdiv\u003e \u0026lt;strong\u0026gt;Torres\u0026lt;\/strong\u0026gt;: Conocidas por su presencia constante y estabilizadora, las torres de cristal ayudan a enfocar y amplificar la energía, lo que las hace perfectas para la meditación y la manifestación.\u0026lt;\/li\u0026gt;\u003c\/div\u003e\n\u003cdiv\u003e \u0026lt;li\u0026gt;\u003c\/div\u003e\n\u003cdiv\u003e \u0026lt;strong\u0026gt;Varitas\u0026lt;\/strong\u0026gt;: Tradicionalmente utilizadas en el trabajo energético y la curación, las varitas de cristal son excelentes para dirigir el flujo de energía y eliminar bloqueos.\u0026lt;\/li\u0026gt;\u003c\/div\u003e\n\u003cdiv\u003e \u0026lt;li\u0026gt;\u003c\/div\u003e\n\u003cdiv\u003e \u0026lt;strong\u0026gt;Pilares\u0026lt;\/strong\u0026gt;: Simbolizando fuerza y estabilidad, los pilares de cristal crean un ambiente equilibrado y armonioso, lo que los hace ideales para la decoración del hogar y las prácticas espirituales.\u0026lt;\/li\u0026gt;\u003c\/div\u003e\n\u003cdiv\u003e \u0026lt;li\u0026gt;\u003c\/div\u003e \u003cdiv\u003e\u0026lt;strong\u0026gt;Obeliscos\u0026lt;\/strong\u0026gt;: Inspirados en estructuras antiguas, se cree que los obeliscos de cristal conectan las energías terrenales y espirituales, lo que los convierte en poderosas herramientas para la transformación y la iluminación.\u0026lt;\/li\u0026gt;\u003c\/div\u003e\n\u003cdiv\u003e \u0026lt;\/ul\u0026gt;\u003c\/div\u003e\n\u003cdiv\u003e No importa cómo los llames, estos cristales tienen el mismo propósito: potenciar la energía, la intención y la armonía en tu espacio. ¡Elige el que más te resuene!\u003c\/div\u003e"},"options":[{"name":"Material","position":1,"values":["Cuarzo transparente"]},{"name":"Tamaño","position":2,"values":["614 g - 5,50\" de alto x 2,50\" de ancho"]}],"custom_metafields":{"shipping_time":"En un plazo de 7 días"},"metafields":{"badge":"\u003cdiv style='display:none' class='jdgm-prev-badge' data-average-rating='0.00' data-number-of-reviews='0' data-number-of-questions='0'\u003e \u003cspan class='jdgm-prev-badge__stars' data-score='0.00' tabindex='0' aria-label='0.00 stars' role='button'\u003e \u003cspan class='jdgm-star jdgm--off'\u003e\u003c\/span\u003e\u003cspan class='jdgm-star jdgm--off'\u003e\u003c\/span\u003e\u003cspan class='jdgm-star jdgm--off'\u003e\u003c\/span\u003e\u003cspan class='jdgm-star jdgm--off'\u003e\u003c\/span\u003e\u003cspan class='jdgm-star jdgm--off'\u003e\u003c\/span\u003e \u003c\/span\u003e \u003cspan class='jdgm-prev-badge__text'\u003e No reviews \u003c\/span\u003e \u003c\/div\u003e","widget":"\u003cdiv class='jdgm-rev-widg' data-updated-at='2025-05-29T22:04:53Z' data-average-rating='0.00' data-number-of-reviews='0' data-number-of-questions='0'\u003e \u003cstyle class='jdgm-temp-hiding-style'\u003e.jdgm-rev-widg{ display: none }\u003c\/style\u003e \u003cdiv class='jdgm-rev-widg__header'\u003e \u003ch2 class='jdgm-rev-widg__title'\u003eCustomer Reviews\u003c\/h2\u003e \u003cdiv class='jdgm-rev-widg__summary'\u003e \u003cdiv class='jdgm-rev-widg__summary-stars' aria-label='Average rating is 0.00 stars' role='img'\u003e \u003cspan class='jdgm-star jdgm--off'\u003e\u003c\/span\u003e\u003cspan class='jdgm-star jdgm--off'\u003e\u003c\/span\u003e\u003cspan class='jdgm-star jdgm--off'\u003e\u003c\/span\u003e\u003cspan class='jdgm-star jdgm--off'\u003e\u003c\/span\u003e\u003cspan class='jdgm-star jdgm--off'\u003e\u003c\/span\u003e \u003c\/div\u003e \u003cdiv class='jdgm-rev-widg__summary-text'\u003eBe the first to write a review\u003c\/div\u003e \u003c\/div\u003e \u003ca style='display: none' href='#' class='jdgm-write-rev-link' role='button'\u003eWrite a review\u003c\/a\u003e \u003cdiv class='jdgm-histogram jdgm-temp-hidden'\u003e \u003cdiv class='jdgm-histogram__row' data-rating='5' data-frequency='0' data-percentage='0'\u003e \u003cdiv class='jdgm-histogram__star' role='button' aria-label=\"0% (0) reviews with 5 star rating\" tabindex='0' \u003e\u003cspan class='jdgm-star jdgm--on'\u003e\u003c\/span\u003e\u003cspan class='jdgm-star jdgm--on'\u003e\u003c\/span\u003e\u003cspan class='jdgm-star jdgm--on'\u003e\u003c\/span\u003e\u003cspan class='jdgm-star jdgm--on'\u003e\u003c\/span\u003e\u003cspan class='jdgm-star jdgm--on'\u003e\u003c\/span\u003e\u003c\/div\u003e \u003cdiv class='jdgm-histogram__bar'\u003e \u003cdiv class='jdgm-histogram__bar-content' style='width: 0%;'\u003e \u003c\/div\u003e \u003c\/div\u003e \u003cdiv class='jdgm-histogram__percentage'\u003e0%\u003c\/div\u003e \u003cdiv class='jdgm-histogram__frequency'\u003e(0)\u003c\/div\u003e \u003c\/div\u003e \u003cdiv class='jdgm-histogram__row' data-rating='4' data-frequency='0' data-percentage='0'\u003e \u003cdiv class='jdgm-histogram__star' role='button' aria-label=\"0% (0) reviews with 4 star rating\" tabindex='0' \u003e\u003cspan class='jdgm-star jdgm--on'\u003e\u003c\/span\u003e\u003cspan class='jdgm-star jdgm--on'\u003e\u003c\/span\u003e\u003cspan class='jdgm-star jdgm--on'\u003e\u003c\/span\u003e\u003cspan class='jdgm-star jdgm--on'\u003e\u003c\/span\u003e\u003cspan class='jdgm-star jdgm--off'\u003e\u003c\/span\u003e\u003c\/div\u003e \u003cdiv class='jdgm-histogram__bar'\u003e \u003cdiv class='jdgm-histogram__bar-content' style='width: 0%;'\u003e \u003c\/div\u003e \u003c\/div\u003e \u003cdiv class='jdgm-histogram__percentage'\u003e0%\u003c\/div\u003e \u003cdiv class='jdgm-histogram__frequency'\u003e(0)\u003c\/div\u003e \u003c\/div\u003e \u003cdiv class='jdgm-histogram__row' data-rating='3' data-frequency='0' data-percentage='0'\u003e \u003cdiv class='jdgm-histogram__star' role='button' aria-label=\"0% (0) reviews with 3 star rating\" tabindex='0' \u003e\u003cspan class='jdgm-star jdgm--on'\u003e\u003c\/span\u003e\u003cspan class='jdgm-star jdgm--on'\u003e\u003c\/span\u003e\u003cspan class='jdgm-star jdgm--on'\u003e\u003c\/span\u003e\u003cspan class='jdgm-star jdgm--off'\u003e\u003c\/span\u003e\u003cspan class='jdgm-star jdgm--off'\u003e\u003c\/span\u003e\u003c\/div\u003e \u003cdiv class='jdgm-histogram__bar'\u003e \u003cdiv class='jdgm-histogram__bar-content' style='width: 0%;'\u003e \u003c\/div\u003e \u003c\/div\u003e \u003cdiv class='jdgm-histogram__percentage'\u003e0%\u003c\/div\u003e \u003cdiv class='jdgm-histogram__frequency'\u003e(0)\u003c\/div\u003e \u003c\/div\u003e \u003cdiv class='jdgm-histogram__row' data-rating='2' data-frequency='0' data-percentage='0'\u003e \u003cdiv class='jdgm-histogram__star' role='button' aria-label=\"0% (0) reviews with 2 star rating\" tabindex='0' \u003e\u003cspan class='jdgm-star jdgm--on'\u003e\u003c\/span\u003e\u003cspan class='jdgm-star jdgm--on'\u003e\u003c\/span\u003e\u003cspan class='jdgm-star jdgm--off'\u003e\u003c\/span\u003e\u003cspan class='jdgm-star jdgm--off'\u003e\u003c\/span\u003e\u003cspan class='jdgm-star jdgm--off'\u003e\u003c\/span\u003e\u003c\/div\u003e \u003cdiv class='jdgm-histogram__bar'\u003e \u003cdiv class='jdgm-histogram__bar-content' style='width: 0%;'\u003e \u003c\/div\u003e \u003c\/div\u003e \u003cdiv class='jdgm-histogram__percentage'\u003e0%\u003c\/div\u003e \u003cdiv class='jdgm-histogram__frequency'\u003e(0)\u003c\/div\u003e \u003c\/div\u003e \u003cdiv class='jdgm-histogram__row' data-rating='1' data-frequency='0' data-percentage='0'\u003e \u003cdiv class='jdgm-histogram__star' role='button' aria-label=\"0% (0) reviews with 1 star rating\" tabindex='0' \u003e\u003cspan class='jdgm-star jdgm--on'\u003e\u003c\/span\u003e\u003cspan class='jdgm-star jdgm--off'\u003e\u003c\/span\u003e\u003cspan class='jdgm-star jdgm--off'\u003e\u003c\/span\u003e\u003cspan class='jdgm-star jdgm--off'\u003e\u003c\/span\u003e\u003cspan class='jdgm-star jdgm--off'\u003e\u003c\/span\u003e\u003c\/div\u003e \u003cdiv class='jdgm-histogram__bar'\u003e \u003cdiv class='jdgm-histogram__bar-content' style='width: 0%;'\u003e \u003c\/div\u003e \u003c\/div\u003e \u003cdiv class='jdgm-histogram__percentage'\u003e0%\u003c\/div\u003e \u003cdiv class='jdgm-histogram__frequency'\u003e(0)\u003c\/div\u003e \u003c\/div\u003e \u003cdiv class='jdgm-histogram__row jdgm-histogram__clear-filter' data-rating=null tabindex='0'\u003e\u003c\/div\u003e \u003c\/div\u003e \u003cdiv class='jdgm-rev-widg__sort-wrapper'\u003e\u003c\/div\u003e \u003c\/div\u003e \u003cdiv class='jdgm-rev-widg__body'\u003e \u003cdiv class='jdgm-rev-widg__reviews'\u003e\u003c\/div\u003e \u003cdiv class='jdgm-paginate' data-per-page='5' data-url='https:\/\/api.judge.me\/reviews\/reviews_for_widget' style=\"display: none;\"\u003e\u003c\/div\u003e \u003c\/div\u003e \u003cdiv class='jdgm-rev-widg__paginate-spinner-wrapper'\u003e \u003cdiv class='jdgm-spinner'\u003e\u003c\/div\u003e \u003c\/div\u003e \u003c\/div\u003e"},"collections":[{"id":294880051371,"handle":"crystals","title":"Crystals","updated_at":"2026-01-07T23:43:11-05:00","body_html":"\u003cp data-start=\"159\" data-end=\"687\"\u003e✨ \u003cstrong data-start=\"161\" data-end=\"216\"\u003eDiscover the Magic of Crystals with Crystal Destiny\u003c\/strong\u003e ✨\u003cbr data-start=\"218\" data-end=\"221\"\u003eCrystals have been treasured for centuries—not only for their natural beauty but also for their powerful healing energies. Beyond their visual allure, they bring balance, harmony, and positive energy into any space. Whether used for home décor, meditation, or simply to elevate the energy of your surroundings, crystals create a sanctuary of peace, relaxation, and well-being. Each piece is a unique gift from the Earth—visually stunning and spiritually uplifting.\u003c\/p\u003e\n\u003cp data-start=\"689\" data-end=\"1011\"\u003eAt \u003cstrong data-start=\"692\" data-end=\"711\"\u003eCrystal Destiny\u003c\/strong\u003e, our signature collection showcases a curated selection of exquisite crystals, from radiant Quartz to soothing Amethyst. Every stone is carefully sourced for its elegance and metaphysical resonance, making them perfect for enhancing your home, uplifting your spirit, or gifting to someone special.\u003c\/p\u003e\n\u003cp data-start=\"1013\" data-end=\"1206\"\u003eExperience the timeless sophistication of crystalline wonders. Explore the \u003cstrong data-start=\"1088\" data-end=\"1118\"\u003eCrystal Destiny Collection\u003c\/strong\u003e today and bring the transformative beauty of these treasures into your everyday life.\u003c\/p\u003e","published_at":"2023-06-05T11:24:02-04:00","sort_order":"created-desc","template_suffix":"","disjunctive":false,"rules":[{"column":"tag","relation":"equals","condition":"crystal"},{"column":"type","relation":"not_contains","condition":"925 Sterling Silver"},{"column":"type","relation":"not_contains","condition":"Wire Wraps"}],"published_scope":"global"},{"id":319456084139,"handle":"universal-chakra-crystals","title":"Universal Chakra Crystals","updated_at":"2026-01-06T23:24:24-05:00","body_html":"\u003cp data-start=\"116\" data-end=\"404\"\u003e✨ \u003cstrong data-start=\"118\" data-end=\"158\"\u003eUniversal Chakra Crystals Collection\u003c\/strong\u003e ✨\u003cbr data-start=\"160\" data-end=\"163\"\u003eBalance, align, and energize all your chakras with our \u003cstrong data-start=\"218\" data-end=\"247\"\u003eUniversal Chakra Crystals\u003c\/strong\u003e. Carefully selected to resonate with every energy center in the body, these crystals support holistic well-being, spiritual growth, and energetic harmony.\u003c\/p\u003e\n\u003cp data-start=\"406\" data-end=\"744\"\u003eOur curated selection includes vibrant stones such as Amethyst, Citrine, Clear Quartz, and more—each chosen for their ability to promote clarity, balance, and vitality across the entire chakra system. Perfect for meditation, energy work, or creating a harmonious space, Universal Chakra Crystals help you connect mind, body, and spirit.\u003c\/p\u003e\n\u003cp data-start=\"746\" data-end=\"875\"\u003eEmbrace full-spectrum energy and elevate your spiritual journey with the transformative power of \u003cstrong data-start=\"843\" data-end=\"872\"\u003eUniversal Chakra Crystals\u003c\/strong\u003e.\u003c\/p\u003e","published_at":"2025-07-17T18:19:50-04:00","sort_order":"best-selling","template_suffix":"","disjunctive":false,"rules":[{"column":"variant_metafield_definition","relation":"equals","condition":"All Chakras"}],"published_scope":"global","image":{"created_at":"2025-07-17T19:07:58-04:00","alt":null,"width":1080,"height":1080,"src":"\/\/crystaldestiny.com\/cdn\/shop\/collections\/Universal_7_Chakras_Collection.jpg?v=1762474934"}},{"id":294880116907,"handle":"polished","title":"Polished Crystals","updated_at":"2026-01-07T23:43:11-05:00","body_html":"\u003cp data-start=\"199\" data-end=\"598\"\u003e✨ \u003cstrong data-start=\"201\" data-end=\"248\"\u003eCrystal Destiny Polished Crystal Collection\u003c\/strong\u003e ✨\u003cbr data-start=\"250\" data-end=\"253\"\u003eIndulge in the brilliance of crystals refined to perfection. Our \u003cstrong data-start=\"318\" data-end=\"341\"\u003ePolished Collection\u003c\/strong\u003e showcases gemstones meticulously shaped and smoothed to reveal their natural radiance and timeless beauty. From the shimmering glow of Quartz to the deep allure of Obsidian, each polished piece is a testament to nature’s artistry and human craftsmanship.\u003c\/p\u003e\n\u003cp data-start=\"600\" data-end=\"862\"\u003ePerfect as statement décor, meaningful gifts, or companions on your spiritual journey, polished crystals bring sophistication and elevated energy into any space. Their radiant surfaces reflect not only light but also the transformative power of crystal energy.\u003c\/p\u003e\n\u003cp data-start=\"864\" data-end=\"1022\"\u003eDiscover the elegance of refinement with Crystal Destiny’s Polished Crystal Collection—where every facet shines with intention, beauty, and timeless allure.\u003c\/p\u003e","published_at":"2023-06-05T11:30:44-04:00","sort_order":"created-desc","template_suffix":"","disjunctive":false,"rules":[{"column":"tag","relation":"equals","condition":"polished"}],"published_scope":"global"},{"id":293659312299,"handle":"best-sellers","title":"Best Sellers","updated_at":"2026-01-07T23:43:11-05:00","body_html":"\u003cp data-start=\"155\" data-end=\"510\"\u003eDiscover the pieces our community loves most. Our Best Sellers Collection brings together handpicked crystals and jewelry that embody timeless elegance, spiritual resonance, and everyday sophistication. Each item has earned its place as a customer favorite—celebrated for both its beauty and its meaningful energy.\u003c\/p\u003e\n\u003cp data-start=\"512\" data-end=\"802\"\u003eFrom stunning statement pieces to versatile daily companions, these treasures are curated to elevate your space, uplift your spirit, and reflect refined taste. Indulge in what’s most cherished and let our best sellers guide you toward the perfect blend of style and transformative energy.\u003c\/p\u003e\n\u003cp data-start=\"804\" data-end=\"932\"\u003eExplore the Best Sellers Collection today—where elegance meets intention, and every piece tells a story of beauty and balance.\u003c\/p\u003e","published_at":"2023-03-15T16:04:51-04:00","sort_order":"best-selling","template_suffix":"","disjunctive":false,"rules":[{"column":"variant_price","relation":"greater_than","condition":"0"},{"column":"variant_inventory","relation":"greater_than","condition":"0"},{"column":"type","relation":"not_equals","condition":"Shipping Protection"}],"published_scope":"global"},{"id":321370390699,"handle":"monthly-crystal-sale","title":"Monthly Crystal Sale | Spheres \u0026 Towers","updated_at":"2026-01-06T23:24:37-05:00","body_html":"\u003cp\u003eShop our \u003cstrong\u003eMonthly Crystal Sale\u003c\/strong\u003e, where you can shop a wide selection of healing crystals at discounted prices. Explore \u003cstrong\u003ecrystal spheres and towers,\u003c\/strong\u003e— all carefully curated to support meditation, energy balancing, and spiritual wellness. Whether you're looking to enhance your home decor, boost your daily energy, or find the perfect gift, our \u003cstrong\u003ecrystals for healing and manifestation\u003c\/strong\u003e offer both beauty and metaphysical benefits.\u003c\/p\u003e\n\u003cp\u003eEach month, our sale features \u003cstrong\u003enew discounted collections\u003c\/strong\u003e, from \u003cstrong\u003enatural quartz and amethyst towers\u003c\/strong\u003e to \u003cstrong\u003ewire-wrapped pendants and polished stones\u003c\/strong\u003e, so there's always something fresh to discover. Shop with confidence knowing you're getting high-quality crystals with \u003cstrong\u003efree shipping options\u003c\/strong\u003e and a trusted experience.\u003c\/p\u003e\n\u003cp\u003e\u003cstrong\u003eTake advantage of the Monthly Crystal Sale today\u003c\/strong\u003e and add powerful, natural energy to your life with \u003cstrong\u003eauthentic healing crystals\u003c\/strong\u003e — while our limited-time discounts last.\u003c\/p\u003e\n\u003cp\u003e\u003cstrong\u003e*Discount automatically applied at checkout.\u003c\/strong\u003e\u003c\/p\u003e","published_at":"2025-12-02T01:26:17-05:00","sort_order":"alpha-asc","template_suffix":"","disjunctive":true,"rules":[{"column":"tag","relation":"equals","condition":"spheres"},{"column":"tag","relation":"equals","condition":"Towers"}],"published_scope":"global","image":{"created_at":"2026-01-01T01:32:34-05:00","alt":"","width":960,"height":960,"src":"\/\/crystaldestiny.com\/cdn\/shop\/collections\/3E8C2969-1B86-4ACE-B349-98E9D8768424.jpg?v=1767249154"}},{"id":297596059819,"handle":"all","title":"All Crystals \u0026 Jewelry","updated_at":"2026-01-07T23:43:11-05:00","body_html":"\u003cp data-start=\"149\" data-end=\"494\"\u003e✨ \u003cstrong data-start=\"151\" data-end=\"181\"\u003eWelcome to Crystal Destiny\u003c\/strong\u003e ✨\u003cbr data-start=\"183\" data-end=\"186\"\u003eStep into a world where beauty, energy, and artistry unite. Our collection is a treasure trove of exquisite crystals, from the raw, untamed elegance of natural formations to the polished brilliance of expertly crafted pieces. Each crystal is a masterpiece, carrying its own unique story and timeless charm.\u003c\/p\u003e\n\u003cp data-start=\"496\" data-end=\"831\"\u003eWhether you’re drawn to the calming presence of Amethyst, the vibrant energy of Citrine, or the grounding strength of Jasper, our crystals invite you to connect with nature’s finest wonders. Perfect for enhancing your space, supporting your spiritual journey, or gifting with intention, every piece resonates with beauty and meaning.\u003c\/p\u003e\n\u003cp data-start=\"833\" data-end=\"1000\"\u003eElevate your surroundings, embrace the mystique, and explore the enchanting world of crystals at \u003cstrong data-start=\"930\" data-end=\"949\"\u003eCrystal Destiny\u003c\/strong\u003e—where every crystal is waiting to be discovered.\u003c\/p\u003e","published_at":"2023-11-10T13:55:31-05:00","sort_order":"created-desc","template_suffix":"","disjunctive":false,"rules":[{"column":"type","relation":"not_equals","condition":"asdf"}],"published_scope":"global"},{"id":296256405675,"handle":"crystal-towers","title":"Crystal Towers","updated_at":"2026-01-06T23:24:37-05:00","body_html":"\u003cp data-end=\"568\" data-start=\"152\"\u003e✨ \u003cstrong data-end=\"190\" data-start=\"154\"\u003eCrystal Destiny Tower Collection\u003c\/strong\u003e ✨\u003cbr data-end=\"195\" data-start=\"192\"\u003eEnchant your space with the timeless beauty and powerful energy of crystal towers. Each piece in our \u003cstrong data-end=\"316\" data-start=\"296\"\u003eTower Collection\u003c\/strong\u003e is carefully crafted to showcase nature’s artistry while radiating higher vibrations and spiritual resonance. From the clarity of Quartz to the calming presence of Amethyst, these towers are both decorative masterpieces and tools for transformation.\u003c\/p\u003e\n\u003cp data-end=\"765\" data-start=\"570\"\u003ePerfect for meditation spaces, energy work, or simply elevating your home décor, crystal towers channel focused energy upward—creating balance, harmony, and refined elegance in any environment.\u003c\/p\u003e\n\u003cp data-end=\"917\" data-start=\"767\"\u003eDiscover the Crystal Destiny Tower Collection today and transform your surroundings into a sanctuary of beauty, purpose, and spiritual significance.\u003c\/p\u003e\n\u003ch2\u003eCrystal Towers, Wands, Generators, Points, Pillars \u0026amp; Obelisks — What's the Difference?\u003c\/h2\u003e\n\u003cp id=\"isPasted\"\u003eWhile these terms may vary, they all describe beautifully shaped crystals with a pointed tip designed to channel and direct energy. Each name highlights a unique aspect of their use:\u003c\/p\u003e\n\u003cul\u003e\n\u003cli\u003e\n\u003cstrong\u003eTowers\u003c\/strong\u003e- Known for their steady, grounding presence, crystal towers help focus and amplify energy, making them perfect for meditation and manifestation.\u003c\/li\u003e\n\u003cli\u003e\n\u003cstrong\u003eWands\u003c\/strong\u003e- Traditionally used in energy work and healing, crystal wands are excellent for directing energy flow and clearing blockages.\u003c\/li\u003e\n\u003cli\u003e\n\u003cstrong\u003ePillars\u003c\/strong\u003e- Symbolizing strength and stability, crystal pillars create a balanced and harmonious environment, making them great for home decor and spiritual practices.\u003c\/li\u003e\n\u003cli\u003e\n\u003cstrong\u003eObelisks\u003c\/strong\u003e- Inspired by ancient structures, crystal obelisks are believed to connect earthly and spiritual energies, making them powerful tools for transformation and enlightenment.\u003c\/li\u003e\n\u003c\/ul\u003e\n\u003cp\u003eNo matter what you call them, these crystals serve the same purpose—to enhance energy, intention, and harmony in your space. Choose the one that resonates most with you!\u003c\/p\u003e","published_at":"2023-09-14T12:52:35-04:00","sort_order":"created-desc","template_suffix":"","disjunctive":false,"rules":[{"column":"tag","relation":"equals","condition":"towers"}],"published_scope":"global"},{"id":298983391403,"handle":"january-crystal-sale","title":"January Sale | 25% Off Crystal Towers \u0026 Spheres","updated_at":"2026-01-06T23:24:37-05:00","body_html":"\u003cp\u003eShop our \u003cstrong\u003eJanuary Crystal Sale\u003c\/strong\u003e, where you can shop a wide selection of healing crystals at discounted prices. Explore \u003cstrong\u003eCrystal Towers, \u0026amp; Crystal Spheres\u003c\/strong\u003e — all carefully curated and crafted to support meditation, energy balancing, and spiritual wellness. Whether you're looking to enhance your home decor, boost your daily energy, or find the perfect gift, our \u003cstrong\u003ecrystals for healing and manifestation\u003c\/strong\u003e offer both beauty and metaphysical benefits.\u003c\/p\u003e\n\u003cp\u003eThis January, our sale features \u003cstrong\u003ediscounted crystal towers and spheres\u003c\/strong\u003e, from \u003cstrong\u003enatural quartz \u003c\/strong\u003eand \u003cstrong\u003eamethyst \u003c\/strong\u003eto \u003cstrong\u003ebumblebee jasper \u003c\/strong\u003eand \u003cstrong\u003ecarnelian\u003c\/strong\u003e, so there's always something fresh to discover. Shop with confidence knowing you're getting high-quality crystals with \u003cstrong\u003efree shipping options\u003c\/strong\u003e and a trusted experience.\u003c\/p\u003e\n\u003cp\u003e\u003cstrong\u003eTake advantage of the January Crystal Sale today\u003c\/strong\u003e and add powerful, natural energy to your life with \u003cstrong\u003eauthentic healing crystals\u003c\/strong\u003e — while our limited-time discounts last.\u003c\/p\u003e\n\u003cp\u003e\u003cstrong\u003e*Discount automatically applied at checkout.\u003c\/strong\u003e\u003c\/p\u003e","published_at":"2026-01-01T00:07:17-05:00","sort_order":"alpha-asc","template_suffix":"monthly-collection","disjunctive":true,"rules":[{"column":"tag","relation":"equals","condition":"Spheres"},{"column":"tag","relation":"equals","condition":"Towers"}],"published_scope":"global","image":{"created_at":"2026-01-01T01:29:59-05:00","alt":"","width":960,"height":960,"src":"\/\/crystaldestiny.com\/cdn\/shop\/collections\/1464163B-22B1-4D62-BEC5-CEC9AECB670B.jpg?v=1767248999"}}]}
[{"alt":"Clear Quartz Obelisk Tower-Towers-Crystal Destiny-Clear Quartz-614g - 5.50\"H x 2.50\"W-Crystal Destiny","id":31176344731819,"position":1,"preview_image":{"aspect_ratio":1.0,"height":3037,"width":3037,"src":"\/\/crystaldestiny.com\/cdn\/shop\/files\/Clear-Quartz-Obelisk-Tower-Towers.jpg?v=1757201089"},"aspect_ratio":1.0,"height":3037,"media_type":"image","src":"\/\/crystaldestiny.com\/cdn\/shop\/files\/Clear-Quartz-Obelisk-Tower-Towers.jpg?v=1757201089","width":3037}]
{"item":{"id":8440116019371,"title":"Punta de cuarzo transparente","handle":"clear-quartz-point-cd-10096","description":"\u003cp\u003e Esta punta natural de cuarzo transparente aprovecha las propiedades amplificadoras de uno de los minerales más abundantes de la Tierra. Conocida por su claridad y versatilidad, este cristal actúa como un conductor de energía que puede programarse para diversos fines metafísicos. Cada punta presenta formaciones internas únicas y facetas prismáticas que captan y refractan la luz, lo que la convierte en una adición esencial a cualquier colección de cristales.\u003c\/p\u003e\n\n\u003cp\u003e Este producto es exactamente como se muestra en la imagen, único en su tipo.\u003c\/p\u003e \u003cdiv\u003e\u003cspan style=\"font-size: 0.875rem;\"\u003eTorres de Cristal, Varas, Generadores, Puntas, Pilares y Obeliscos: ¿Cuál es la Diferencia?\u003c\/span\u003e\u003c\/div\u003e\n\u003cdiv\u003e Si bien estos términos pueden variar, todos describen cristales de formas hermosas con una punta puntiaguda diseñada para canalizar y dirigir la energía. Cada nombre destaca un aspecto único de su uso:\u003c\/div\u003e\n\u003cdiv\u003e \u0026lt;ul\u0026gt;\u003c\/div\u003e\n\u003cdiv\u003e \u0026lt;li\u0026gt;\u003c\/div\u003e\n\u003cdiv\u003e \u0026lt;strong\u0026gt;Torres\u0026lt;\/strong\u0026gt;: Conocidas por su presencia constante y estabilizadora, las torres de cristal ayudan a enfocar y amplificar la energía, lo que las hace perfectas para la meditación y la manifestación.\u0026lt;\/li\u0026gt;\u003c\/div\u003e\n\u003cdiv\u003e \u0026lt;li\u0026gt;\u003c\/div\u003e\n\u003cdiv\u003e \u0026lt;strong\u0026gt;Varitas\u0026lt;\/strong\u0026gt;: Tradicionalmente utilizadas en el trabajo energético y la curación, las varitas de cristal son excelentes para dirigir el flujo de energía y eliminar bloqueos.\u0026lt;\/li\u0026gt;\u003c\/div\u003e\n\u003cdiv\u003e \u0026lt;li\u0026gt;\u003c\/div\u003e\n\u003cdiv\u003e \u0026lt;strong\u0026gt;Pilares\u0026lt;\/strong\u0026gt;: Simbolizando fuerza y estabilidad, los pilares de cristal crean un ambiente equilibrado y armonioso, lo que los hace ideales para la decoración del hogar y las prácticas espirituales.\u0026lt;\/li\u0026gt;\u003c\/div\u003e\n\u003cdiv\u003e \u0026lt;li\u0026gt;\u003c\/div\u003e \u003cdiv\u003e\u0026lt;strong\u0026gt;Obeliscos\u0026lt;\/strong\u0026gt;: Inspirados en estructuras antiguas, se cree que los obeliscos de cristal conectan las energías terrenales y espirituales, lo que los convierte en poderosas herramientas para la transformación y la iluminación.\u0026lt;\/li\u0026gt;\u003c\/div\u003e\n\u003cdiv\u003e \u0026lt;\/ul\u0026gt;\u003c\/div\u003e\n\u003cdiv\u003e No importa cómo los llames, estos cristales tienen el mismo propósito: potenciar la energía, la intención y la armonía en tu espacio. ¡Elige el que más te resuene!\u003c\/div\u003e","published_at":"2025-05-29T17:59:12-04:00","created_at":"2025-05-29T17:59:12-04:00","vendor":"Crystal Destiny","type":"Agujas","tags":["crystal","polished","Towers"],"price":1999,"price_min":1999,"price_max":1999,"available":true,"price_varies":false,"compare_at_price":null,"compare_at_price_min":0,"compare_at_price_max":0,"compare_at_price_varies":false,"variants":[{"id":45261384319147,"title":"Cuarzo transparente \/ 146 g - 2,75\" de largo","option1":"Cuarzo transparente","option2":"146 g - 2,75\" de largo","option3":null,"sku":"CD-10096","requires_shipping":true,"taxable":true,"featured_image":null,"available":true,"name":"Punta de cuarzo transparente - Cuarzo transparente \/ 146 g - 2,75\" de largo","public_title":"Cuarzo transparente \/ 146 g - 2,75\" de largo","options":["Cuarzo transparente","146 g - 2,75\" de largo"],"price":1999,"weight":0,"compare_at_price":null,"inventory_management":"shopify","barcode":"","requires_selling_plan":false,"selling_plan_allocations":[]}],"images":["\/\/crystaldestiny.com\/cdn\/shop\/files\/Clear-Quartz-Point-Points.jpg?v=1757201057"],"featured_image":"\/\/crystaldestiny.com\/cdn\/shop\/files\/Clear-Quartz-Point-Points.jpg?v=1757201057","options":["Material","Tamaño"],"media":[{"alt":"Clear Quartz Point-Points-Crystal Destiny-Clear Quartz-146g - 2.75\"L-Crystal Destiny","id":31176332050603,"position":1,"preview_image":{"aspect_ratio":1.0,"height":1213,"width":1213,"src":"\/\/crystaldestiny.com\/cdn\/shop\/files\/Clear-Quartz-Point-Points.jpg?v=1757201057"},"aspect_ratio":1.0,"height":1213,"media_type":"image","src":"\/\/crystaldestiny.com\/cdn\/shop\/files\/Clear-Quartz-Point-Points.jpg?v=1757201057","width":1213}],"requires_selling_plan":false,"selling_plan_groups":[],"content":"\u003cp\u003e Esta punta natural de cuarzo transparente aprovecha las propiedades amplificadoras de uno de los minerales más abundantes de la Tierra. Conocida por su claridad y versatilidad, este cristal actúa como un conductor de energía que puede programarse para diversos fines metafísicos. Cada punta presenta formaciones internas únicas y facetas prismáticas que captan y refractan la luz, lo que la convierte en una adición esencial a cualquier colección de cristales.\u003c\/p\u003e\n\n\u003cp\u003e Este producto es exactamente como se muestra en la imagen, único en su tipo.\u003c\/p\u003e \u003cdiv\u003e\u003cspan style=\"font-size: 0.875rem;\"\u003eTorres de Cristal, Varas, Generadores, Puntas, Pilares y Obeliscos: ¿Cuál es la Diferencia?\u003c\/span\u003e\u003c\/div\u003e\n\u003cdiv\u003e Si bien estos términos pueden variar, todos describen cristales de formas hermosas con una punta puntiaguda diseñada para canalizar y dirigir la energía. Cada nombre destaca un aspecto único de su uso:\u003c\/div\u003e\n\u003cdiv\u003e \u0026lt;ul\u0026gt;\u003c\/div\u003e\n\u003cdiv\u003e \u0026lt;li\u0026gt;\u003c\/div\u003e\n\u003cdiv\u003e \u0026lt;strong\u0026gt;Torres\u0026lt;\/strong\u0026gt;: Conocidas por su presencia constante y estabilizadora, las torres de cristal ayudan a enfocar y amplificar la energía, lo que las hace perfectas para la meditación y la manifestación.\u0026lt;\/li\u0026gt;\u003c\/div\u003e\n\u003cdiv\u003e \u0026lt;li\u0026gt;\u003c\/div\u003e\n\u003cdiv\u003e \u0026lt;strong\u0026gt;Varitas\u0026lt;\/strong\u0026gt;: Tradicionalmente utilizadas en el trabajo energético y la curación, las varitas de cristal son excelentes para dirigir el flujo de energía y eliminar bloqueos.\u0026lt;\/li\u0026gt;\u003c\/div\u003e\n\u003cdiv\u003e \u0026lt;li\u0026gt;\u003c\/div\u003e\n\u003cdiv\u003e \u0026lt;strong\u0026gt;Pilares\u0026lt;\/strong\u0026gt;: Simbolizando fuerza y estabilidad, los pilares de cristal crean un ambiente equilibrado y armonioso, lo que los hace ideales para la decoración del hogar y las prácticas espirituales.\u0026lt;\/li\u0026gt;\u003c\/div\u003e\n\u003cdiv\u003e \u0026lt;li\u0026gt;\u003c\/div\u003e \u003cdiv\u003e\u0026lt;strong\u0026gt;Obeliscos\u0026lt;\/strong\u0026gt;: Inspirados en estructuras antiguas, se cree que los obeliscos de cristal conectan las energías terrenales y espirituales, lo que los convierte en poderosas herramientas para la transformación y la iluminación.\u0026lt;\/li\u0026gt;\u003c\/div\u003e\n\u003cdiv\u003e \u0026lt;\/ul\u0026gt;\u003c\/div\u003e\n\u003cdiv\u003e No importa cómo los llames, estos cristales tienen el mismo propósito: potenciar la energía, la intención y la armonía en tu espacio. ¡Elige el que más te resuene!\u003c\/div\u003e"},"options":[{"name":"Material","position":1,"values":["Cuarzo transparente"]},{"name":"Tamaño","position":2,"values":["146 g - 2,75\" de largo"]}],"custom_metafields":{"shipping_time":"En un plazo de 7 días"},"metafields":{"badge":"\u003cdiv style='display:none' class='jdgm-prev-badge' data-average-rating='0.00' data-number-of-reviews='0' data-number-of-questions='0'\u003e \u003cspan class='jdgm-prev-badge__stars' data-score='0.00' tabindex='0' aria-label='0.00 stars' role='button'\u003e \u003cspan class='jdgm-star jdgm--off'\u003e\u003c\/span\u003e\u003cspan class='jdgm-star jdgm--off'\u003e\u003c\/span\u003e\u003cspan class='jdgm-star jdgm--off'\u003e\u003c\/span\u003e\u003cspan class='jdgm-star jdgm--off'\u003e\u003c\/span\u003e\u003cspan class='jdgm-star jdgm--off'\u003e\u003c\/span\u003e \u003c\/span\u003e \u003cspan class='jdgm-prev-badge__text'\u003e No reviews \u003c\/span\u003e \u003c\/div\u003e","widget":"\u003cdiv class='jdgm-rev-widg' data-updated-at='2025-05-29T21:59:22Z' data-average-rating='0.00' data-number-of-reviews='0' data-number-of-questions='0'\u003e \u003cstyle class='jdgm-temp-hiding-style'\u003e.jdgm-rev-widg{ display: none }\u003c\/style\u003e \u003cdiv class='jdgm-rev-widg__header'\u003e \u003ch2 class='jdgm-rev-widg__title'\u003eCustomer Reviews\u003c\/h2\u003e \u003cdiv class='jdgm-rev-widg__summary'\u003e \u003cdiv class='jdgm-rev-widg__summary-stars' aria-label='Average rating is 0.00 stars' role='img'\u003e \u003cspan class='jdgm-star jdgm--off'\u003e\u003c\/span\u003e\u003cspan class='jdgm-star jdgm--off'\u003e\u003c\/span\u003e\u003cspan class='jdgm-star jdgm--off'\u003e\u003c\/span\u003e\u003cspan class='jdgm-star jdgm--off'\u003e\u003c\/span\u003e\u003cspan class='jdgm-star jdgm--off'\u003e\u003c\/span\u003e \u003c\/div\u003e \u003cdiv class='jdgm-rev-widg__summary-text'\u003eBe the first to write a review\u003c\/div\u003e \u003c\/div\u003e \u003ca style='display: none' href='#' class='jdgm-write-rev-link' role='button'\u003eWrite a review\u003c\/a\u003e \u003cdiv class='jdgm-histogram jdgm-temp-hidden'\u003e \u003cdiv class='jdgm-histogram__row' data-rating='5' data-frequency='0' data-percentage='0'\u003e \u003cdiv class='jdgm-histogram__star' role='button' aria-label=\"0% (0) reviews with 5 star rating\" tabindex='0' \u003e\u003cspan class='jdgm-star jdgm--on'\u003e\u003c\/span\u003e\u003cspan class='jdgm-star jdgm--on'\u003e\u003c\/span\u003e\u003cspan class='jdgm-star jdgm--on'\u003e\u003c\/span\u003e\u003cspan class='jdgm-star jdgm--on'\u003e\u003c\/span\u003e\u003cspan class='jdgm-star jdgm--on'\u003e\u003c\/span\u003e\u003c\/div\u003e \u003cdiv class='jdgm-histogram__bar'\u003e \u003cdiv class='jdgm-histogram__bar-content' style='width: 0%;'\u003e \u003c\/div\u003e \u003c\/div\u003e \u003cdiv class='jdgm-histogram__percentage'\u003e0%\u003c\/div\u003e \u003cdiv class='jdgm-histogram__frequency'\u003e(0)\u003c\/div\u003e \u003c\/div\u003e \u003cdiv class='jdgm-histogram__row' data-rating='4' data-frequency='0' data-percentage='0'\u003e \u003cdiv class='jdgm-histogram__star' role='button' aria-label=\"0% (0) reviews with 4 star rating\" tabindex='0' \u003e\u003cspan class='jdgm-star jdgm--on'\u003e\u003c\/span\u003e\u003cspan class='jdgm-star jdgm--on'\u003e\u003c\/span\u003e\u003cspan class='jdgm-star jdgm--on'\u003e\u003c\/span\u003e\u003cspan class='jdgm-star jdgm--on'\u003e\u003c\/span\u003e\u003cspan class='jdgm-star jdgm--off'\u003e\u003c\/span\u003e\u003c\/div\u003e \u003cdiv class='jdgm-histogram__bar'\u003e \u003cdiv class='jdgm-histogram__bar-content' style='width: 0%;'\u003e \u003c\/div\u003e \u003c\/div\u003e \u003cdiv class='jdgm-histogram__percentage'\u003e0%\u003c\/div\u003e \u003cdiv class='jdgm-histogram__frequency'\u003e(0)\u003c\/div\u003e \u003c\/div\u003e \u003cdiv class='jdgm-histogram__row' data-rating='3' data-frequency='0' data-percentage='0'\u003e \u003cdiv class='jdgm-histogram__star' role='button' aria-label=\"0% (0) reviews with 3 star rating\" tabindex='0' \u003e\u003cspan class='jdgm-star jdgm--on'\u003e\u003c\/span\u003e\u003cspan class='jdgm-star jdgm--on'\u003e\u003c\/span\u003e\u003cspan class='jdgm-star jdgm--on'\u003e\u003c\/span\u003e\u003cspan class='jdgm-star jdgm--off'\u003e\u003c\/span\u003e\u003cspan class='jdgm-star jdgm--off'\u003e\u003c\/span\u003e\u003c\/div\u003e \u003cdiv class='jdgm-histogram__bar'\u003e \u003cdiv class='jdgm-histogram__bar-content' style='width: 0%;'\u003e \u003c\/div\u003e \u003c\/div\u003e \u003cdiv class='jdgm-histogram__percentage'\u003e0%\u003c\/div\u003e \u003cdiv class='jdgm-histogram__frequency'\u003e(0)\u003c\/div\u003e \u003c\/div\u003e \u003cdiv class='jdgm-histogram__row' data-rating='2' data-frequency='0' data-percentage='0'\u003e \u003cdiv class='jdgm-histogram__star' role='button' aria-label=\"0% (0) reviews with 2 star rating\" tabindex='0' \u003e\u003cspan class='jdgm-star jdgm--on'\u003e\u003c\/span\u003e\u003cspan class='jdgm-star jdgm--on'\u003e\u003c\/span\u003e\u003cspan class='jdgm-star jdgm--off'\u003e\u003c\/span\u003e\u003cspan class='jdgm-star jdgm--off'\u003e\u003c\/span\u003e\u003cspan class='jdgm-star jdgm--off'\u003e\u003c\/span\u003e\u003c\/div\u003e \u003cdiv class='jdgm-histogram__bar'\u003e \u003cdiv class='jdgm-histogram__bar-content' style='width: 0%;'\u003e \u003c\/div\u003e \u003c\/div\u003e \u003cdiv class='jdgm-histogram__percentage'\u003e0%\u003c\/div\u003e \u003cdiv class='jdgm-histogram__frequency'\u003e(0)\u003c\/div\u003e \u003c\/div\u003e \u003cdiv class='jdgm-histogram__row' data-rating='1' data-frequency='0' data-percentage='0'\u003e \u003cdiv class='jdgm-histogram__star' role='button' aria-label=\"0% (0) reviews with 1 star rating\" tabindex='0' \u003e\u003cspan class='jdgm-star jdgm--on'\u003e\u003c\/span\u003e\u003cspan class='jdgm-star jdgm--off'\u003e\u003c\/span\u003e\u003cspan class='jdgm-star jdgm--off'\u003e\u003c\/span\u003e\u003cspan class='jdgm-star jdgm--off'\u003e\u003c\/span\u003e\u003cspan class='jdgm-star jdgm--off'\u003e\u003c\/span\u003e\u003c\/div\u003e \u003cdiv class='jdgm-histogram__bar'\u003e \u003cdiv class='jdgm-histogram__bar-content' style='width: 0%;'\u003e \u003c\/div\u003e \u003c\/div\u003e \u003cdiv class='jdgm-histogram__percentage'\u003e0%\u003c\/div\u003e \u003cdiv class='jdgm-histogram__frequency'\u003e(0)\u003c\/div\u003e \u003c\/div\u003e \u003cdiv class='jdgm-histogram__row jdgm-histogram__clear-filter' data-rating=null tabindex='0'\u003e\u003c\/div\u003e \u003c\/div\u003e \u003cdiv class='jdgm-rev-widg__sort-wrapper'\u003e\u003c\/div\u003e \u003c\/div\u003e \u003cdiv class='jdgm-rev-widg__body'\u003e \u003cdiv class='jdgm-rev-widg__reviews'\u003e\u003c\/div\u003e \u003cdiv class='jdgm-paginate' data-per-page='5' data-url='https:\/\/api.judge.me\/reviews\/reviews_for_widget' style=\"display: none;\"\u003e\u003c\/div\u003e \u003c\/div\u003e \u003cdiv class='jdgm-rev-widg__paginate-spinner-wrapper'\u003e \u003cdiv class='jdgm-spinner'\u003e\u003c\/div\u003e \u003c\/div\u003e \u003c\/div\u003e"},"collections":[{"id":294880051371,"handle":"crystals","title":"Crystals","updated_at":"2026-01-07T23:43:11-05:00","body_html":"\u003cp data-start=\"159\" data-end=\"687\"\u003e✨ \u003cstrong data-start=\"161\" data-end=\"216\"\u003eDiscover the Magic of Crystals with Crystal Destiny\u003c\/strong\u003e ✨\u003cbr data-start=\"218\" data-end=\"221\"\u003eCrystals have been treasured for centuries—not only for their natural beauty but also for their powerful healing energies. Beyond their visual allure, they bring balance, harmony, and positive energy into any space. Whether used for home décor, meditation, or simply to elevate the energy of your surroundings, crystals create a sanctuary of peace, relaxation, and well-being. Each piece is a unique gift from the Earth—visually stunning and spiritually uplifting.\u003c\/p\u003e\n\u003cp data-start=\"689\" data-end=\"1011\"\u003eAt \u003cstrong data-start=\"692\" data-end=\"711\"\u003eCrystal Destiny\u003c\/strong\u003e, our signature collection showcases a curated selection of exquisite crystals, from radiant Quartz to soothing Amethyst. Every stone is carefully sourced for its elegance and metaphysical resonance, making them perfect for enhancing your home, uplifting your spirit, or gifting to someone special.\u003c\/p\u003e\n\u003cp data-start=\"1013\" data-end=\"1206\"\u003eExperience the timeless sophistication of crystalline wonders. Explore the \u003cstrong data-start=\"1088\" data-end=\"1118\"\u003eCrystal Destiny Collection\u003c\/strong\u003e today and bring the transformative beauty of these treasures into your everyday life.\u003c\/p\u003e","published_at":"2023-06-05T11:24:02-04:00","sort_order":"created-desc","template_suffix":"","disjunctive":false,"rules":[{"column":"tag","relation":"equals","condition":"crystal"},{"column":"type","relation":"not_contains","condition":"925 Sterling Silver"},{"column":"type","relation":"not_contains","condition":"Wire Wraps"}],"published_scope":"global"},{"id":319456084139,"handle":"universal-chakra-crystals","title":"Universal Chakra Crystals","updated_at":"2026-01-06T23:24:24-05:00","body_html":"\u003cp data-start=\"116\" data-end=\"404\"\u003e✨ \u003cstrong data-start=\"118\" data-end=\"158\"\u003eUniversal Chakra Crystals Collection\u003c\/strong\u003e ✨\u003cbr data-start=\"160\" data-end=\"163\"\u003eBalance, align, and energize all your chakras with our \u003cstrong data-start=\"218\" data-end=\"247\"\u003eUniversal Chakra Crystals\u003c\/strong\u003e. Carefully selected to resonate with every energy center in the body, these crystals support holistic well-being, spiritual growth, and energetic harmony.\u003c\/p\u003e\n\u003cp data-start=\"406\" data-end=\"744\"\u003eOur curated selection includes vibrant stones such as Amethyst, Citrine, Clear Quartz, and more—each chosen for their ability to promote clarity, balance, and vitality across the entire chakra system. Perfect for meditation, energy work, or creating a harmonious space, Universal Chakra Crystals help you connect mind, body, and spirit.\u003c\/p\u003e\n\u003cp data-start=\"746\" data-end=\"875\"\u003eEmbrace full-spectrum energy and elevate your spiritual journey with the transformative power of \u003cstrong data-start=\"843\" data-end=\"872\"\u003eUniversal Chakra Crystals\u003c\/strong\u003e.\u003c\/p\u003e","published_at":"2025-07-17T18:19:50-04:00","sort_order":"best-selling","template_suffix":"","disjunctive":false,"rules":[{"column":"variant_metafield_definition","relation":"equals","condition":"All Chakras"}],"published_scope":"global","image":{"created_at":"2025-07-17T19:07:58-04:00","alt":null,"width":1080,"height":1080,"src":"\/\/crystaldestiny.com\/cdn\/shop\/collections\/Universal_7_Chakras_Collection.jpg?v=1762474934"}},{"id":294880116907,"handle":"polished","title":"Polished Crystals","updated_at":"2026-01-07T23:43:11-05:00","body_html":"\u003cp data-start=\"199\" data-end=\"598\"\u003e✨ \u003cstrong data-start=\"201\" data-end=\"248\"\u003eCrystal Destiny Polished Crystal Collection\u003c\/strong\u003e ✨\u003cbr data-start=\"250\" data-end=\"253\"\u003eIndulge in the brilliance of crystals refined to perfection. Our \u003cstrong data-start=\"318\" data-end=\"341\"\u003ePolished Collection\u003c\/strong\u003e showcases gemstones meticulously shaped and smoothed to reveal their natural radiance and timeless beauty. From the shimmering glow of Quartz to the deep allure of Obsidian, each polished piece is a testament to nature’s artistry and human craftsmanship.\u003c\/p\u003e\n\u003cp data-start=\"600\" data-end=\"862\"\u003ePerfect as statement décor, meaningful gifts, or companions on your spiritual journey, polished crystals bring sophistication and elevated energy into any space. Their radiant surfaces reflect not only light but also the transformative power of crystal energy.\u003c\/p\u003e\n\u003cp data-start=\"864\" data-end=\"1022\"\u003eDiscover the elegance of refinement with Crystal Destiny’s Polished Crystal Collection—where every facet shines with intention, beauty, and timeless allure.\u003c\/p\u003e","published_at":"2023-06-05T11:30:44-04:00","sort_order":"created-desc","template_suffix":"","disjunctive":false,"rules":[{"column":"tag","relation":"equals","condition":"polished"}],"published_scope":"global"},{"id":293659312299,"handle":"best-sellers","title":"Best Sellers","updated_at":"2026-01-07T23:43:11-05:00","body_html":"\u003cp data-start=\"155\" data-end=\"510\"\u003eDiscover the pieces our community loves most. Our Best Sellers Collection brings together handpicked crystals and jewelry that embody timeless elegance, spiritual resonance, and everyday sophistication. Each item has earned its place as a customer favorite—celebrated for both its beauty and its meaningful energy.\u003c\/p\u003e\n\u003cp data-start=\"512\" data-end=\"802\"\u003eFrom stunning statement pieces to versatile daily companions, these treasures are curated to elevate your space, uplift your spirit, and reflect refined taste. Indulge in what’s most cherished and let our best sellers guide you toward the perfect blend of style and transformative energy.\u003c\/p\u003e\n\u003cp data-start=\"804\" data-end=\"932\"\u003eExplore the Best Sellers Collection today—where elegance meets intention, and every piece tells a story of beauty and balance.\u003c\/p\u003e","published_at":"2023-03-15T16:04:51-04:00","sort_order":"best-selling","template_suffix":"","disjunctive":false,"rules":[{"column":"variant_price","relation":"greater_than","condition":"0"},{"column":"variant_inventory","relation":"greater_than","condition":"0"},{"column":"type","relation":"not_equals","condition":"Shipping Protection"}],"published_scope":"global"},{"id":321370390699,"handle":"monthly-crystal-sale","title":"Monthly Crystal Sale | Spheres \u0026 Towers","updated_at":"2026-01-06T23:24:37-05:00","body_html":"\u003cp\u003eShop our \u003cstrong\u003eMonthly Crystal Sale\u003c\/strong\u003e, where you can shop a wide selection of healing crystals at discounted prices. Explore \u003cstrong\u003ecrystal spheres and towers,\u003c\/strong\u003e— all carefully curated to support meditation, energy balancing, and spiritual wellness. Whether you're looking to enhance your home decor, boost your daily energy, or find the perfect gift, our \u003cstrong\u003ecrystals for healing and manifestation\u003c\/strong\u003e offer both beauty and metaphysical benefits.\u003c\/p\u003e\n\u003cp\u003eEach month, our sale features \u003cstrong\u003enew discounted collections\u003c\/strong\u003e, from \u003cstrong\u003enatural quartz and amethyst towers\u003c\/strong\u003e to \u003cstrong\u003ewire-wrapped pendants and polished stones\u003c\/strong\u003e, so there's always something fresh to discover. Shop with confidence knowing you're getting high-quality crystals with \u003cstrong\u003efree shipping options\u003c\/strong\u003e and a trusted experience.\u003c\/p\u003e\n\u003cp\u003e\u003cstrong\u003eTake advantage of the Monthly Crystal Sale today\u003c\/strong\u003e and add powerful, natural energy to your life with \u003cstrong\u003eauthentic healing crystals\u003c\/strong\u003e — while our limited-time discounts last.\u003c\/p\u003e\n\u003cp\u003e\u003cstrong\u003e*Discount automatically applied at checkout.\u003c\/strong\u003e\u003c\/p\u003e","published_at":"2025-12-02T01:26:17-05:00","sort_order":"alpha-asc","template_suffix":"","disjunctive":true,"rules":[{"column":"tag","relation":"equals","condition":"spheres"},{"column":"tag","relation":"equals","condition":"Towers"}],"published_scope":"global","image":{"created_at":"2026-01-01T01:32:34-05:00","alt":"","width":960,"height":960,"src":"\/\/crystaldestiny.com\/cdn\/shop\/collections\/3E8C2969-1B86-4ACE-B349-98E9D8768424.jpg?v=1767249154"}},{"id":297596059819,"handle":"all","title":"All Crystals \u0026 Jewelry","updated_at":"2026-01-07T23:43:11-05:00","body_html":"\u003cp data-start=\"149\" data-end=\"494\"\u003e✨ \u003cstrong data-start=\"151\" data-end=\"181\"\u003eWelcome to Crystal Destiny\u003c\/strong\u003e ✨\u003cbr data-start=\"183\" data-end=\"186\"\u003eStep into a world where beauty, energy, and artistry unite. Our collection is a treasure trove of exquisite crystals, from the raw, untamed elegance of natural formations to the polished brilliance of expertly crafted pieces. Each crystal is a masterpiece, carrying its own unique story and timeless charm.\u003c\/p\u003e\n\u003cp data-start=\"496\" data-end=\"831\"\u003eWhether you’re drawn to the calming presence of Amethyst, the vibrant energy of Citrine, or the grounding strength of Jasper, our crystals invite you to connect with nature’s finest wonders. Perfect for enhancing your space, supporting your spiritual journey, or gifting with intention, every piece resonates with beauty and meaning.\u003c\/p\u003e\n\u003cp data-start=\"833\" data-end=\"1000\"\u003eElevate your surroundings, embrace the mystique, and explore the enchanting world of crystals at \u003cstrong data-start=\"930\" data-end=\"949\"\u003eCrystal Destiny\u003c\/strong\u003e—where every crystal is waiting to be discovered.\u003c\/p\u003e","published_at":"2023-11-10T13:55:31-05:00","sort_order":"created-desc","template_suffix":"","disjunctive":false,"rules":[{"column":"type","relation":"not_equals","condition":"asdf"}],"published_scope":"global"},{"id":296256405675,"handle":"crystal-towers","title":"Crystal Towers","updated_at":"2026-01-06T23:24:37-05:00","body_html":"\u003cp data-end=\"568\" data-start=\"152\"\u003e✨ \u003cstrong data-end=\"190\" data-start=\"154\"\u003eCrystal Destiny Tower Collection\u003c\/strong\u003e ✨\u003cbr data-end=\"195\" data-start=\"192\"\u003eEnchant your space with the timeless beauty and powerful energy of crystal towers. Each piece in our \u003cstrong data-end=\"316\" data-start=\"296\"\u003eTower Collection\u003c\/strong\u003e is carefully crafted to showcase nature’s artistry while radiating higher vibrations and spiritual resonance. From the clarity of Quartz to the calming presence of Amethyst, these towers are both decorative masterpieces and tools for transformation.\u003c\/p\u003e\n\u003cp data-end=\"765\" data-start=\"570\"\u003ePerfect for meditation spaces, energy work, or simply elevating your home décor, crystal towers channel focused energy upward—creating balance, harmony, and refined elegance in any environment.\u003c\/p\u003e\n\u003cp data-end=\"917\" data-start=\"767\"\u003eDiscover the Crystal Destiny Tower Collection today and transform your surroundings into a sanctuary of beauty, purpose, and spiritual significance.\u003c\/p\u003e\n\u003ch2\u003eCrystal Towers, Wands, Generators, Points, Pillars \u0026amp; Obelisks — What's the Difference?\u003c\/h2\u003e\n\u003cp id=\"isPasted\"\u003eWhile these terms may vary, they all describe beautifully shaped crystals with a pointed tip designed to channel and direct energy. Each name highlights a unique aspect of their use:\u003c\/p\u003e\n\u003cul\u003e\n\u003cli\u003e\n\u003cstrong\u003eTowers\u003c\/strong\u003e- Known for their steady, grounding presence, crystal towers help focus and amplify energy, making them perfect for meditation and manifestation.\u003c\/li\u003e\n\u003cli\u003e\n\u003cstrong\u003eWands\u003c\/strong\u003e- Traditionally used in energy work and healing, crystal wands are excellent for directing energy flow and clearing blockages.\u003c\/li\u003e\n\u003cli\u003e\n\u003cstrong\u003ePillars\u003c\/strong\u003e- Symbolizing strength and stability, crystal pillars create a balanced and harmonious environment, making them great for home decor and spiritual practices.\u003c\/li\u003e\n\u003cli\u003e\n\u003cstrong\u003eObelisks\u003c\/strong\u003e- Inspired by ancient structures, crystal obelisks are believed to connect earthly and spiritual energies, making them powerful tools for transformation and enlightenment.\u003c\/li\u003e\n\u003c\/ul\u003e\n\u003cp\u003eNo matter what you call them, these crystals serve the same purpose—to enhance energy, intention, and harmony in your space. Choose the one that resonates most with you!\u003c\/p\u003e","published_at":"2023-09-14T12:52:35-04:00","sort_order":"created-desc","template_suffix":"","disjunctive":false,"rules":[{"column":"tag","relation":"equals","condition":"towers"}],"published_scope":"global"},{"id":298983391403,"handle":"january-crystal-sale","title":"January Sale | 25% Off Crystal Towers \u0026 Spheres","updated_at":"2026-01-06T23:24:37-05:00","body_html":"\u003cp\u003eShop our \u003cstrong\u003eJanuary Crystal Sale\u003c\/strong\u003e, where you can shop a wide selection of healing crystals at discounted prices. Explore \u003cstrong\u003eCrystal Towers, \u0026amp; Crystal Spheres\u003c\/strong\u003e — all carefully curated and crafted to support meditation, energy balancing, and spiritual wellness. Whether you're looking to enhance your home decor, boost your daily energy, or find the perfect gift, our \u003cstrong\u003ecrystals for healing and manifestation\u003c\/strong\u003e offer both beauty and metaphysical benefits.\u003c\/p\u003e\n\u003cp\u003eThis January, our sale features \u003cstrong\u003ediscounted crystal towers and spheres\u003c\/strong\u003e, from \u003cstrong\u003enatural quartz \u003c\/strong\u003eand \u003cstrong\u003eamethyst \u003c\/strong\u003eto \u003cstrong\u003ebumblebee jasper \u003c\/strong\u003eand \u003cstrong\u003ecarnelian\u003c\/strong\u003e, so there's always something fresh to discover. Shop with confidence knowing you're getting high-quality crystals with \u003cstrong\u003efree shipping options\u003c\/strong\u003e and a trusted experience.\u003c\/p\u003e\n\u003cp\u003e\u003cstrong\u003eTake advantage of the January Crystal Sale today\u003c\/strong\u003e and add powerful, natural energy to your life with \u003cstrong\u003eauthentic healing crystals\u003c\/strong\u003e — while our limited-time discounts last.\u003c\/p\u003e\n\u003cp\u003e\u003cstrong\u003e*Discount automatically applied at checkout.\u003c\/strong\u003e\u003c\/p\u003e","published_at":"2026-01-01T00:07:17-05:00","sort_order":"alpha-asc","template_suffix":"monthly-collection","disjunctive":true,"rules":[{"column":"tag","relation":"equals","condition":"Spheres"},{"column":"tag","relation":"equals","condition":"Towers"}],"published_scope":"global","image":{"created_at":"2026-01-01T01:29:59-05:00","alt":"","width":960,"height":960,"src":"\/\/crystaldestiny.com\/cdn\/shop\/collections\/1464163B-22B1-4D62-BEC5-CEC9AECB670B.jpg?v=1767248999"}}]}
[{"alt":"Clear Quartz Point-Points-Crystal Destiny-Clear Quartz-146g - 2.75\"L-Crystal Destiny","id":31176332050603,"position":1,"preview_image":{"aspect_ratio":1.0,"height":1213,"width":1213,"src":"\/\/crystaldestiny.com\/cdn\/shop\/files\/Clear-Quartz-Point-Points.jpg?v=1757201057"},"aspect_ratio":1.0,"height":1213,"media_type":"image","src":"\/\/crystaldestiny.com\/cdn\/shop\/files\/Clear-Quartz-Point-Points.jpg?v=1757201057","width":1213}]
{"item":{"id":8513736212651,"title":"Clear Quartz Point \"XL\"","handle":"clear-quartz-point-xl-cd-10327","description":"\u003cp\u003eClear Quartz Point \"XL\" is a powerful, naturally formed crystal prized for its energy amplification and clarity-enhancing properties. This larger-than-average crystal point acts as a conduit, drawing in and radiating pure energy, which makes it an essential tool for meditation, healing, and spiritual growth. Known as the \"Master Healer,\" Clear Quartz is believed to cleanse and balance the aura by removing negativity and promoting emotional stability.\u003c\/p\u003e\n\u003cp\u003eIts clear, transparent structure symbolizes clarity of thought and purpose, making it ideal for enhancing concentration and unlocking intuitive insight. Metaphysically, this XL Clear Quartz Point accelerates energy flow and harmonizes the chakras, particularly the crown chakra, creating a stronger connection to higher consciousness and universal wisdom. It is frequently used to amplify intentions during manifestation rituals, making personal goals more attainable through focused energy concentration. In healing practices, it supports physical regeneration and overall vitality by amplifying the powers of other crystals and facilitating deep energy healing. Perfect for practitioners and collectors alike, this substantial Clear Quartz Point serves as a radiant energy anchor in any sacred space, enhancing both spiritual and physical wellness.\u003c\/p\u003e\n\u003cp\u003eThis product is an exact pick as pictured, one of a kind.\u003c\/p\u003e\n\u003ch2\u003eCrystal Towers, Wands, Generators, Points, Pillars \u0026amp; Obelisks — What's the Difference?\u003c\/h2\u003e\n\u003cp id=\"isPasted\"\u003eWhile these terms may vary, they all describe beautifully shaped crystals with a pointed tip designed to channel and direct energy. Each name highlights a unique aspect of their use:\u003c\/p\u003e\n\u003cul\u003e\n\u003cli\u003e\n\u003cstrong\u003eTowers\u003c\/strong\u003e- Known for their steady, grounding presence, crystal towers help focus and amplify energy, making them perfect for meditation and manifestation.\u003c\/li\u003e\n\u003cli\u003e\n\u003cstrong\u003eWands\u003c\/strong\u003e- Traditionally used in energy work and healing, crystal wands are excellent for directing energy flow and clearing blockages.\u003c\/li\u003e\n\u003cli\u003e\n\u003cstrong\u003ePillars\u003c\/strong\u003e- Symbolizing strength and stability, crystal pillars create a balanced and harmonious environment, making them great for home decor and spiritual practices.\u003c\/li\u003e\n\u003cli\u003e\n\u003cstrong\u003eObelisks\u003c\/strong\u003e- Inspired by ancient structures, crystal obelisks are believed to connect earthly and spiritual energies, making them powerful tools for transformation and enlightenment.\u003c\/li\u003e\n\u003c\/ul\u003e\n\u003cp\u003eNo matter what you call them, these crystals serve the same purpose—to enhance energy, intention, and harmony in your space. Choose the one that resonates most with you!\u003c\/p\u003e","published_at":"2025-09-08T17:35:47-04:00","created_at":"2025-09-08T17:35:45-04:00","vendor":"Crystal Destiny","type":"Points","tags":["crystal","polished","Towers"],"price":6999,"price_min":6999,"price_max":6999,"available":true,"price_varies":false,"compare_at_price":null,"compare_at_price_min":0,"compare_at_price_max":0,"compare_at_price_varies":false,"variants":[{"id":45594683998379,"title":"Clear Quartz \/ 454g - 5.00\"L x 2.25\" W","option1":"Clear Quartz","option2":"454g - 5.00\"L x 2.25\" W","option3":null,"sku":"CD-10327","requires_shipping":true,"taxable":true,"featured_image":null,"available":true,"name":"Clear Quartz Point \"XL\" - Clear Quartz \/ 454g - 5.00\"L x 2.25\" W","public_title":"Clear Quartz \/ 454g - 5.00\"L x 2.25\" W","options":["Clear Quartz","454g - 5.00\"L x 2.25\" W"],"price":6999,"weight":454,"compare_at_price":null,"inventory_management":"shopify","barcode":"","requires_selling_plan":false,"selling_plan_allocations":[]}],"images":["\/\/crystaldestiny.com\/cdn\/shop\/files\/Clear-Quartz-Point-XL-Points.jpg?v=1757394404","\/\/crystaldestiny.com\/cdn\/shop\/files\/Clear-Quartz-Point-XL-Points-2.jpg?v=1757394406","\/\/crystaldestiny.com\/cdn\/shop\/files\/Clear-Quartz-Point-XL-Points-3.jpg?v=1757394408"],"featured_image":"\/\/crystaldestiny.com\/cdn\/shop\/files\/Clear-Quartz-Point-XL-Points.jpg?v=1757394404","options":["Material","Size"],"media":[{"alt":"Clear Quartz Point \"XL\"-Points-Crystal Destiny-Clear Quartz-454g - 5.00\"L x 2.25\" W-Crystal Destiny","id":31745950220459,"position":1,"preview_image":{"aspect_ratio":1.0,"height":1667,"width":1667,"src":"\/\/crystaldestiny.com\/cdn\/shop\/files\/Clear-Quartz-Point-XL-Points.jpg?v=1757394404"},"aspect_ratio":1.0,"height":1667,"media_type":"image","src":"\/\/crystaldestiny.com\/cdn\/shop\/files\/Clear-Quartz-Point-XL-Points.jpg?v=1757394404","width":1667},{"alt":"Clear Quartz Point \"XL\"-Points-Crystal Destiny-Clear Quartz-454g - 5.00\"L x 2.25\" W-Crystal Destiny","id":31745950154923,"position":2,"preview_image":{"aspect_ratio":1.0,"height":1653,"width":1653,"src":"\/\/crystaldestiny.com\/cdn\/shop\/files\/Clear-Quartz-Point-XL-Points-2.jpg?v=1757394406"},"aspect_ratio":1.0,"height":1653,"media_type":"image","src":"\/\/crystaldestiny.com\/cdn\/shop\/files\/Clear-Quartz-Point-XL-Points-2.jpg?v=1757394406","width":1653},{"alt":"Clear Quartz Point \"XL\"-Points-Crystal Destiny-Clear Quartz-454g - 5.00\"L x 2.25\" W-Crystal Destiny","id":31745950187691,"position":3,"preview_image":{"aspect_ratio":1.0,"height":2048,"width":2048,"src":"\/\/crystaldestiny.com\/cdn\/shop\/files\/Clear-Quartz-Point-XL-Points-3.jpg?v=1757394408"},"aspect_ratio":1.0,"height":2048,"media_type":"image","src":"\/\/crystaldestiny.com\/cdn\/shop\/files\/Clear-Quartz-Point-XL-Points-3.jpg?v=1757394408","width":2048}],"requires_selling_plan":false,"selling_plan_groups":[],"content":"\u003cp\u003eClear Quartz Point \"XL\" is a powerful, naturally formed crystal prized for its energy amplification and clarity-enhancing properties. This larger-than-average crystal point acts as a conduit, drawing in and radiating pure energy, which makes it an essential tool for meditation, healing, and spiritual growth. Known as the \"Master Healer,\" Clear Quartz is believed to cleanse and balance the aura by removing negativity and promoting emotional stability.\u003c\/p\u003e\n\u003cp\u003eIts clear, transparent structure symbolizes clarity of thought and purpose, making it ideal for enhancing concentration and unlocking intuitive insight. Metaphysically, this XL Clear Quartz Point accelerates energy flow and harmonizes the chakras, particularly the crown chakra, creating a stronger connection to higher consciousness and universal wisdom. It is frequently used to amplify intentions during manifestation rituals, making personal goals more attainable through focused energy concentration. In healing practices, it supports physical regeneration and overall vitality by amplifying the powers of other crystals and facilitating deep energy healing. Perfect for practitioners and collectors alike, this substantial Clear Quartz Point serves as a radiant energy anchor in any sacred space, enhancing both spiritual and physical wellness.\u003c\/p\u003e\n\u003cp\u003eThis product is an exact pick as pictured, one of a kind.\u003c\/p\u003e\n\u003ch2\u003eCrystal Towers, Wands, Generators, Points, Pillars \u0026amp; Obelisks — What's the Difference?\u003c\/h2\u003e\n\u003cp id=\"isPasted\"\u003eWhile these terms may vary, they all describe beautifully shaped crystals with a pointed tip designed to channel and direct energy. Each name highlights a unique aspect of their use:\u003c\/p\u003e\n\u003cul\u003e\n\u003cli\u003e\n\u003cstrong\u003eTowers\u003c\/strong\u003e- Known for their steady, grounding presence, crystal towers help focus and amplify energy, making them perfect for meditation and manifestation.\u003c\/li\u003e\n\u003cli\u003e\n\u003cstrong\u003eWands\u003c\/strong\u003e- Traditionally used in energy work and healing, crystal wands are excellent for directing energy flow and clearing blockages.\u003c\/li\u003e\n\u003cli\u003e\n\u003cstrong\u003ePillars\u003c\/strong\u003e- Symbolizing strength and stability, crystal pillars create a balanced and harmonious environment, making them great for home decor and spiritual practices.\u003c\/li\u003e\n\u003cli\u003e\n\u003cstrong\u003eObelisks\u003c\/strong\u003e- Inspired by ancient structures, crystal obelisks are believed to connect earthly and spiritual energies, making them powerful tools for transformation and enlightenment.\u003c\/li\u003e\n\u003c\/ul\u003e\n\u003cp\u003eNo matter what you call them, these crystals serve the same purpose—to enhance energy, intention, and harmony in your space. Choose the one that resonates most with you!\u003c\/p\u003e"},"options":[{"name":"Material","position":1,"values":["Clear Quartz"]},{"name":"Size","position":2,"values":["454g - 5.00\"L x 2.25\" W"]}],"custom_metafields":{"shipping_time":"Within 7 days"},"metafields":{"badge":"\u003cdiv style='display:none' class='jdgm-prev-badge' data-average-rating='0.00' data-number-of-reviews='0' data-number-of-questions='0'\u003e \u003cspan class='jdgm-prev-badge__stars' data-score='0.00' tabindex='0' aria-label='0.00 stars' role='button'\u003e \u003cspan class='jdgm-star jdgm--off'\u003e\u003c\/span\u003e\u003cspan class='jdgm-star jdgm--off'\u003e\u003c\/span\u003e\u003cspan class='jdgm-star jdgm--off'\u003e\u003c\/span\u003e\u003cspan class='jdgm-star jdgm--off'\u003e\u003c\/span\u003e\u003cspan class='jdgm-star jdgm--off'\u003e\u003c\/span\u003e \u003c\/span\u003e \u003cspan class='jdgm-prev-badge__text'\u003e No reviews \u003c\/span\u003e \u003c\/div\u003e","widget":"\u003cdiv class='jdgm-rev-widg' data-updated-at='2025-09-08T21:36:56Z' data-average-rating='0.00' data-number-of-reviews='0' data-number-of-questions='0' data-image-url='https:\/\/cdn.shopify.com\/s\/files\/1\/0613\/0345\/5915\/files\/6I0A4090.jpg?v=1757367290'\u003e \u003cstyle class='jdgm-temp-hiding-style'\u003e.jdgm-rev-widg{ display: none }\u003c\/style\u003e \u003cdiv class='jdgm-rev-widg__header'\u003e \u003ch2 class='jdgm-rev-widg__title'\u003eCustomer Reviews\u003c\/h2\u003e \u003cdiv class='jdgm-rev-widg__summary'\u003e \u003cdiv class='jdgm-rev-widg__summary-stars' aria-label='Average rating is 0.00 stars' role='img'\u003e \u003cspan class='jdgm-star jdgm--off'\u003e\u003c\/span\u003e\u003cspan class='jdgm-star jdgm--off'\u003e\u003c\/span\u003e\u003cspan class='jdgm-star jdgm--off'\u003e\u003c\/span\u003e\u003cspan class='jdgm-star jdgm--off'\u003e\u003c\/span\u003e\u003cspan class='jdgm-star jdgm--off'\u003e\u003c\/span\u003e \u003c\/div\u003e \u003cdiv class='jdgm-rev-widg__summary-text'\u003eBe the first to write a review\u003c\/div\u003e \u003c\/div\u003e \u003ca style='display: none' href='#' class='jdgm-write-rev-link' role='button'\u003eWrite a review\u003c\/a\u003e \u003cdiv class='jdgm-histogram jdgm-temp-hidden'\u003e \u003cdiv class='jdgm-histogram__row' data-rating='5' data-frequency='0' data-percentage='0'\u003e \u003cdiv class='jdgm-histogram__star' role='button' aria-label=\"0% (0) reviews with 5 star rating\" tabindex='0' \u003e\u003cspan class='jdgm-star jdgm--on'\u003e\u003c\/span\u003e\u003cspan class='jdgm-star jdgm--on'\u003e\u003c\/span\u003e\u003cspan class='jdgm-star jdgm--on'\u003e\u003c\/span\u003e\u003cspan class='jdgm-star jdgm--on'\u003e\u003c\/span\u003e\u003cspan class='jdgm-star jdgm--on'\u003e\u003c\/span\u003e\u003c\/div\u003e \u003cdiv class='jdgm-histogram__bar'\u003e \u003cdiv class='jdgm-histogram__bar-content' style='width: 0%;'\u003e \u003c\/div\u003e \u003c\/div\u003e \u003cdiv class='jdgm-histogram__percentage'\u003e0%\u003c\/div\u003e \u003cdiv class='jdgm-histogram__frequency'\u003e(0)\u003c\/div\u003e \u003c\/div\u003e \u003cdiv class='jdgm-histogram__row' data-rating='4' data-frequency='0' data-percentage='0'\u003e \u003cdiv class='jdgm-histogram__star' role='button' aria-label=\"0% (0) reviews with 4 star rating\" tabindex='0' \u003e\u003cspan class='jdgm-star jdgm--on'\u003e\u003c\/span\u003e\u003cspan class='jdgm-star jdgm--on'\u003e\u003c\/span\u003e\u003cspan class='jdgm-star jdgm--on'\u003e\u003c\/span\u003e\u003cspan class='jdgm-star jdgm--on'\u003e\u003c\/span\u003e\u003cspan class='jdgm-star jdgm--off'\u003e\u003c\/span\u003e\u003c\/div\u003e \u003cdiv class='jdgm-histogram__bar'\u003e \u003cdiv class='jdgm-histogram__bar-content' style='width: 0%;'\u003e \u003c\/div\u003e \u003c\/div\u003e \u003cdiv class='jdgm-histogram__percentage'\u003e0%\u003c\/div\u003e \u003cdiv class='jdgm-histogram__frequency'\u003e(0)\u003c\/div\u003e \u003c\/div\u003e \u003cdiv class='jdgm-histogram__row' data-rating='3' data-frequency='0' data-percentage='0'\u003e \u003cdiv class='jdgm-histogram__star' role='button' aria-label=\"0% (0) reviews with 3 star rating\" tabindex='0' \u003e\u003cspan class='jdgm-star jdgm--on'\u003e\u003c\/span\u003e\u003cspan class='jdgm-star jdgm--on'\u003e\u003c\/span\u003e\u003cspan class='jdgm-star jdgm--on'\u003e\u003c\/span\u003e\u003cspan class='jdgm-star jdgm--off'\u003e\u003c\/span\u003e\u003cspan class='jdgm-star jdgm--off'\u003e\u003c\/span\u003e\u003c\/div\u003e \u003cdiv class='jdgm-histogram__bar'\u003e \u003cdiv class='jdgm-histogram__bar-content' style='width: 0%;'\u003e \u003c\/div\u003e \u003c\/div\u003e \u003cdiv class='jdgm-histogram__percentage'\u003e0%\u003c\/div\u003e \u003cdiv class='jdgm-histogram__frequency'\u003e(0)\u003c\/div\u003e \u003c\/div\u003e \u003cdiv class='jdgm-histogram__row' data-rating='2' data-frequency='0' data-percentage='0'\u003e \u003cdiv class='jdgm-histogram__star' role='button' aria-label=\"0% (0) reviews with 2 star rating\" tabindex='0' \u003e\u003cspan class='jdgm-star jdgm--on'\u003e\u003c\/span\u003e\u003cspan class='jdgm-star jdgm--on'\u003e\u003c\/span\u003e\u003cspan class='jdgm-star jdgm--off'\u003e\u003c\/span\u003e\u003cspan class='jdgm-star jdgm--off'\u003e\u003c\/span\u003e\u003cspan class='jdgm-star jdgm--off'\u003e\u003c\/span\u003e\u003c\/div\u003e \u003cdiv class='jdgm-histogram__bar'\u003e \u003cdiv class='jdgm-histogram__bar-content' style='width: 0%;'\u003e \u003c\/div\u003e \u003c\/div\u003e \u003cdiv class='jdgm-histogram__percentage'\u003e0%\u003c\/div\u003e \u003cdiv class='jdgm-histogram__frequency'\u003e(0)\u003c\/div\u003e \u003c\/div\u003e \u003cdiv class='jdgm-histogram__row' data-rating='1' data-frequency='0' data-percentage='0'\u003e \u003cdiv class='jdgm-histogram__star' role='button' aria-label=\"0% (0) reviews with 1 star rating\" tabindex='0' \u003e\u003cspan class='jdgm-star jdgm--on'\u003e\u003c\/span\u003e\u003cspan class='jdgm-star jdgm--off'\u003e\u003c\/span\u003e\u003cspan class='jdgm-star jdgm--off'\u003e\u003c\/span\u003e\u003cspan class='jdgm-star jdgm--off'\u003e\u003c\/span\u003e\u003cspan class='jdgm-star jdgm--off'\u003e\u003c\/span\u003e\u003c\/div\u003e \u003cdiv class='jdgm-histogram__bar'\u003e \u003cdiv class='jdgm-histogram__bar-content' style='width: 0%;'\u003e \u003c\/div\u003e \u003c\/div\u003e \u003cdiv class='jdgm-histogram__percentage'\u003e0%\u003c\/div\u003e \u003cdiv class='jdgm-histogram__frequency'\u003e(0)\u003c\/div\u003e \u003c\/div\u003e \u003cdiv class='jdgm-histogram__row jdgm-histogram__clear-filter' data-rating=null tabindex='0'\u003e\u003c\/div\u003e \u003c\/div\u003e \u003cdiv class='jdgm-rev-widg__sort-wrapper'\u003e\u003c\/div\u003e \u003c\/div\u003e \u003cdiv class='jdgm-rev-widg__body'\u003e \u003cdiv class='jdgm-rev-widg__reviews'\u003e\u003c\/div\u003e \u003cdiv class='jdgm-paginate' data-per-page='4' data-url='https:\/\/api.judge.me\/reviews\/reviews_for_widget' style=\"display: none;\"\u003e\u003c\/div\u003e \u003c\/div\u003e \u003cdiv class='jdgm-rev-widg__paginate-spinner-wrapper'\u003e \u003cdiv class='jdgm-spinner'\u003e\u003c\/div\u003e \u003c\/div\u003e \u003c\/div\u003e"},"collections":[{"id":294880051371,"handle":"crystals","title":"Crystals","updated_at":"2026-01-07T23:43:11-05:00","body_html":"\u003cp data-start=\"159\" data-end=\"687\"\u003e✨ \u003cstrong data-start=\"161\" data-end=\"216\"\u003eDiscover the Magic of Crystals with Crystal Destiny\u003c\/strong\u003e ✨\u003cbr data-start=\"218\" data-end=\"221\"\u003eCrystals have been treasured for centuries—not only for their natural beauty but also for their powerful healing energies. Beyond their visual allure, they bring balance, harmony, and positive energy into any space. Whether used for home décor, meditation, or simply to elevate the energy of your surroundings, crystals create a sanctuary of peace, relaxation, and well-being. Each piece is a unique gift from the Earth—visually stunning and spiritually uplifting.\u003c\/p\u003e\n\u003cp data-start=\"689\" data-end=\"1011\"\u003eAt \u003cstrong data-start=\"692\" data-end=\"711\"\u003eCrystal Destiny\u003c\/strong\u003e, our signature collection showcases a curated selection of exquisite crystals, from radiant Quartz to soothing Amethyst. Every stone is carefully sourced for its elegance and metaphysical resonance, making them perfect for enhancing your home, uplifting your spirit, or gifting to someone special.\u003c\/p\u003e\n\u003cp data-start=\"1013\" data-end=\"1206\"\u003eExperience the timeless sophistication of crystalline wonders. Explore the \u003cstrong data-start=\"1088\" data-end=\"1118\"\u003eCrystal Destiny Collection\u003c\/strong\u003e today and bring the transformative beauty of these treasures into your everyday life.\u003c\/p\u003e","published_at":"2023-06-05T11:24:02-04:00","sort_order":"created-desc","template_suffix":"","disjunctive":false,"rules":[{"column":"tag","relation":"equals","condition":"crystal"},{"column":"type","relation":"not_contains","condition":"925 Sterling Silver"},{"column":"type","relation":"not_contains","condition":"Wire Wraps"}],"published_scope":"global"},{"id":319456084139,"handle":"universal-chakra-crystals","title":"Universal Chakra Crystals","updated_at":"2026-01-06T23:24:24-05:00","body_html":"\u003cp data-start=\"116\" data-end=\"404\"\u003e✨ \u003cstrong data-start=\"118\" data-end=\"158\"\u003eUniversal Chakra Crystals Collection\u003c\/strong\u003e ✨\u003cbr data-start=\"160\" data-end=\"163\"\u003eBalance, align, and energize all your chakras with our \u003cstrong data-start=\"218\" data-end=\"247\"\u003eUniversal Chakra Crystals\u003c\/strong\u003e. Carefully selected to resonate with every energy center in the body, these crystals support holistic well-being, spiritual growth, and energetic harmony.\u003c\/p\u003e\n\u003cp data-start=\"406\" data-end=\"744\"\u003eOur curated selection includes vibrant stones such as Amethyst, Citrine, Clear Quartz, and more—each chosen for their ability to promote clarity, balance, and vitality across the entire chakra system. Perfect for meditation, energy work, or creating a harmonious space, Universal Chakra Crystals help you connect mind, body, and spirit.\u003c\/p\u003e\n\u003cp data-start=\"746\" data-end=\"875\"\u003eEmbrace full-spectrum energy and elevate your spiritual journey with the transformative power of \u003cstrong data-start=\"843\" data-end=\"872\"\u003eUniversal Chakra Crystals\u003c\/strong\u003e.\u003c\/p\u003e","published_at":"2025-07-17T18:19:50-04:00","sort_order":"best-selling","template_suffix":"","disjunctive":false,"rules":[{"column":"variant_metafield_definition","relation":"equals","condition":"All Chakras"}],"published_scope":"global","image":{"created_at":"2025-07-17T19:07:58-04:00","alt":null,"width":1080,"height":1080,"src":"\/\/crystaldestiny.com\/cdn\/shop\/collections\/Universal_7_Chakras_Collection.jpg?v=1762474934"}},{"id":294880116907,"handle":"polished","title":"Polished Crystals","updated_at":"2026-01-07T23:43:11-05:00","body_html":"\u003cp data-start=\"199\" data-end=\"598\"\u003e✨ \u003cstrong data-start=\"201\" data-end=\"248\"\u003eCrystal Destiny Polished Crystal Collection\u003c\/strong\u003e ✨\u003cbr data-start=\"250\" data-end=\"253\"\u003eIndulge in the brilliance of crystals refined to perfection. Our \u003cstrong data-start=\"318\" data-end=\"341\"\u003ePolished Collection\u003c\/strong\u003e showcases gemstones meticulously shaped and smoothed to reveal their natural radiance and timeless beauty. From the shimmering glow of Quartz to the deep allure of Obsidian, each polished piece is a testament to nature’s artistry and human craftsmanship.\u003c\/p\u003e\n\u003cp data-start=\"600\" data-end=\"862\"\u003ePerfect as statement décor, meaningful gifts, or companions on your spiritual journey, polished crystals bring sophistication and elevated energy into any space. Their radiant surfaces reflect not only light but also the transformative power of crystal energy.\u003c\/p\u003e\n\u003cp data-start=\"864\" data-end=\"1022\"\u003eDiscover the elegance of refinement with Crystal Destiny’s Polished Crystal Collection—where every facet shines with intention, beauty, and timeless allure.\u003c\/p\u003e","published_at":"2023-06-05T11:30:44-04:00","sort_order":"created-desc","template_suffix":"","disjunctive":false,"rules":[{"column":"tag","relation":"equals","condition":"polished"}],"published_scope":"global"},{"id":293659312299,"handle":"best-sellers","title":"Best Sellers","updated_at":"2026-01-07T23:43:11-05:00","body_html":"\u003cp data-start=\"155\" data-end=\"510\"\u003eDiscover the pieces our community loves most. Our Best Sellers Collection brings together handpicked crystals and jewelry that embody timeless elegance, spiritual resonance, and everyday sophistication. Each item has earned its place as a customer favorite—celebrated for both its beauty and its meaningful energy.\u003c\/p\u003e\n\u003cp data-start=\"512\" data-end=\"802\"\u003eFrom stunning statement pieces to versatile daily companions, these treasures are curated to elevate your space, uplift your spirit, and reflect refined taste. Indulge in what’s most cherished and let our best sellers guide you toward the perfect blend of style and transformative energy.\u003c\/p\u003e\n\u003cp data-start=\"804\" data-end=\"932\"\u003eExplore the Best Sellers Collection today—where elegance meets intention, and every piece tells a story of beauty and balance.\u003c\/p\u003e","published_at":"2023-03-15T16:04:51-04:00","sort_order":"best-selling","template_suffix":"","disjunctive":false,"rules":[{"column":"variant_price","relation":"greater_than","condition":"0"},{"column":"variant_inventory","relation":"greater_than","condition":"0"},{"column":"type","relation":"not_equals","condition":"Shipping Protection"}],"published_scope":"global"},{"id":321370390699,"handle":"monthly-crystal-sale","title":"Monthly Crystal Sale | Spheres \u0026 Towers","updated_at":"2026-01-06T23:24:37-05:00","body_html":"\u003cp\u003eShop our \u003cstrong\u003eMonthly Crystal Sale\u003c\/strong\u003e, where you can shop a wide selection of healing crystals at discounted prices. Explore \u003cstrong\u003ecrystal spheres and towers,\u003c\/strong\u003e— all carefully curated to support meditation, energy balancing, and spiritual wellness. Whether you're looking to enhance your home decor, boost your daily energy, or find the perfect gift, our \u003cstrong\u003ecrystals for healing and manifestation\u003c\/strong\u003e offer both beauty and metaphysical benefits.\u003c\/p\u003e\n\u003cp\u003eEach month, our sale features \u003cstrong\u003enew discounted collections\u003c\/strong\u003e, from \u003cstrong\u003enatural quartz and amethyst towers\u003c\/strong\u003e to \u003cstrong\u003ewire-wrapped pendants and polished stones\u003c\/strong\u003e, so there's always something fresh to discover. Shop with confidence knowing you're getting high-quality crystals with \u003cstrong\u003efree shipping options\u003c\/strong\u003e and a trusted experience.\u003c\/p\u003e\n\u003cp\u003e\u003cstrong\u003eTake advantage of the Monthly Crystal Sale today\u003c\/strong\u003e and add powerful, natural energy to your life with \u003cstrong\u003eauthentic healing crystals\u003c\/strong\u003e — while our limited-time discounts last.\u003c\/p\u003e\n\u003cp\u003e\u003cstrong\u003e*Discount automatically applied at checkout.\u003c\/strong\u003e\u003c\/p\u003e","published_at":"2025-12-02T01:26:17-05:00","sort_order":"alpha-asc","template_suffix":"","disjunctive":true,"rules":[{"column":"tag","relation":"equals","condition":"spheres"},{"column":"tag","relation":"equals","condition":"Towers"}],"published_scope":"global","image":{"created_at":"2026-01-01T01:32:34-05:00","alt":"","width":960,"height":960,"src":"\/\/crystaldestiny.com\/cdn\/shop\/collections\/3E8C2969-1B86-4ACE-B349-98E9D8768424.jpg?v=1767249154"}},{"id":297596059819,"handle":"all","title":"All Crystals \u0026 Jewelry","updated_at":"2026-01-07T23:43:11-05:00","body_html":"\u003cp data-start=\"149\" data-end=\"494\"\u003e✨ \u003cstrong data-start=\"151\" data-end=\"181\"\u003eWelcome to Crystal Destiny\u003c\/strong\u003e ✨\u003cbr data-start=\"183\" data-end=\"186\"\u003eStep into a world where beauty, energy, and artistry unite. Our collection is a treasure trove of exquisite crystals, from the raw, untamed elegance of natural formations to the polished brilliance of expertly crafted pieces. Each crystal is a masterpiece, carrying its own unique story and timeless charm.\u003c\/p\u003e\n\u003cp data-start=\"496\" data-end=\"831\"\u003eWhether you’re drawn to the calming presence of Amethyst, the vibrant energy of Citrine, or the grounding strength of Jasper, our crystals invite you to connect with nature’s finest wonders. Perfect for enhancing your space, supporting your spiritual journey, or gifting with intention, every piece resonates with beauty and meaning.\u003c\/p\u003e\n\u003cp data-start=\"833\" data-end=\"1000\"\u003eElevate your surroundings, embrace the mystique, and explore the enchanting world of crystals at \u003cstrong data-start=\"930\" data-end=\"949\"\u003eCrystal Destiny\u003c\/strong\u003e—where every crystal is waiting to be discovered.\u003c\/p\u003e","published_at":"2023-11-10T13:55:31-05:00","sort_order":"created-desc","template_suffix":"","disjunctive":false,"rules":[{"column":"type","relation":"not_equals","condition":"asdf"}],"published_scope":"global"},{"id":296256405675,"handle":"crystal-towers","title":"Crystal Towers","updated_at":"2026-01-06T23:24:37-05:00","body_html":"\u003cp data-end=\"568\" data-start=\"152\"\u003e✨ \u003cstrong data-end=\"190\" data-start=\"154\"\u003eCrystal Destiny Tower Collection\u003c\/strong\u003e ✨\u003cbr data-end=\"195\" data-start=\"192\"\u003eEnchant your space with the timeless beauty and powerful energy of crystal towers. Each piece in our \u003cstrong data-end=\"316\" data-start=\"296\"\u003eTower Collection\u003c\/strong\u003e is carefully crafted to showcase nature’s artistry while radiating higher vibrations and spiritual resonance. From the clarity of Quartz to the calming presence of Amethyst, these towers are both decorative masterpieces and tools for transformation.\u003c\/p\u003e\n\u003cp data-end=\"765\" data-start=\"570\"\u003ePerfect for meditation spaces, energy work, or simply elevating your home décor, crystal towers channel focused energy upward—creating balance, harmony, and refined elegance in any environment.\u003c\/p\u003e\n\u003cp data-end=\"917\" data-start=\"767\"\u003eDiscover the Crystal Destiny Tower Collection today and transform your surroundings into a sanctuary of beauty, purpose, and spiritual significance.\u003c\/p\u003e\n\u003ch2\u003eCrystal Towers, Wands, Generators, Points, Pillars \u0026amp; Obelisks — What's the Difference?\u003c\/h2\u003e\n\u003cp id=\"isPasted\"\u003eWhile these terms may vary, they all describe beautifully shaped crystals with a pointed tip designed to channel and direct energy. Each name highlights a unique aspect of their use:\u003c\/p\u003e\n\u003cul\u003e\n\u003cli\u003e\n\u003cstrong\u003eTowers\u003c\/strong\u003e- Known for their steady, grounding presence, crystal towers help focus and amplify energy, making them perfect for meditation and manifestation.\u003c\/li\u003e\n\u003cli\u003e\n\u003cstrong\u003eWands\u003c\/strong\u003e- Traditionally used in energy work and healing, crystal wands are excellent for directing energy flow and clearing blockages.\u003c\/li\u003e\n\u003cli\u003e\n\u003cstrong\u003ePillars\u003c\/strong\u003e- Symbolizing strength and stability, crystal pillars create a balanced and harmonious environment, making them great for home decor and spiritual practices.\u003c\/li\u003e\n\u003cli\u003e\n\u003cstrong\u003eObelisks\u003c\/strong\u003e- Inspired by ancient structures, crystal obelisks are believed to connect earthly and spiritual energies, making them powerful tools for transformation and enlightenment.\u003c\/li\u003e\n\u003c\/ul\u003e\n\u003cp\u003eNo matter what you call them, these crystals serve the same purpose—to enhance energy, intention, and harmony in your space. Choose the one that resonates most with you!\u003c\/p\u003e","published_at":"2023-09-14T12:52:35-04:00","sort_order":"created-desc","template_suffix":"","disjunctive":false,"rules":[{"column":"tag","relation":"equals","condition":"towers"}],"published_scope":"global"},{"id":298983391403,"handle":"january-crystal-sale","title":"January Sale | 25% Off Crystal Towers \u0026 Spheres","updated_at":"2026-01-06T23:24:37-05:00","body_html":"\u003cp\u003eShop our \u003cstrong\u003eJanuary Crystal Sale\u003c\/strong\u003e, where you can shop a wide selection of healing crystals at discounted prices. Explore \u003cstrong\u003eCrystal Towers, \u0026amp; Crystal Spheres\u003c\/strong\u003e — all carefully curated and crafted to support meditation, energy balancing, and spiritual wellness. Whether you're looking to enhance your home decor, boost your daily energy, or find the perfect gift, our \u003cstrong\u003ecrystals for healing and manifestation\u003c\/strong\u003e offer both beauty and metaphysical benefits.\u003c\/p\u003e\n\u003cp\u003eThis January, our sale features \u003cstrong\u003ediscounted crystal towers and spheres\u003c\/strong\u003e, from \u003cstrong\u003enatural quartz \u003c\/strong\u003eand \u003cstrong\u003eamethyst \u003c\/strong\u003eto \u003cstrong\u003ebumblebee jasper \u003c\/strong\u003eand \u003cstrong\u003ecarnelian\u003c\/strong\u003e, so there's always something fresh to discover. Shop with confidence knowing you're getting high-quality crystals with \u003cstrong\u003efree shipping options\u003c\/strong\u003e and a trusted experience.\u003c\/p\u003e\n\u003cp\u003e\u003cstrong\u003eTake advantage of the January Crystal Sale today\u003c\/strong\u003e and add powerful, natural energy to your life with \u003cstrong\u003eauthentic healing crystals\u003c\/strong\u003e — while our limited-time discounts last.\u003c\/p\u003e\n\u003cp\u003e\u003cstrong\u003e*Discount automatically applied at checkout.\u003c\/strong\u003e\u003c\/p\u003e","published_at":"2026-01-01T00:07:17-05:00","sort_order":"alpha-asc","template_suffix":"monthly-collection","disjunctive":true,"rules":[{"column":"tag","relation":"equals","condition":"Spheres"},{"column":"tag","relation":"equals","condition":"Towers"}],"published_scope":"global","image":{"created_at":"2026-01-01T01:29:59-05:00","alt":"","width":960,"height":960,"src":"\/\/crystaldestiny.com\/cdn\/shop\/collections\/1464163B-22B1-4D62-BEC5-CEC9AECB670B.jpg?v=1767248999"}}]}
[{"alt":"Clear Quartz Point \"XL\"-Points-Crystal Destiny-Clear Quartz-454g - 5.00\"L x 2.25\" W-Crystal Destiny","id":31745950220459,"position":1,"preview_image":{"aspect_ratio":1.0,"height":1667,"width":1667,"src":"\/\/crystaldestiny.com\/cdn\/shop\/files\/Clear-Quartz-Point-XL-Points.jpg?v=1757394404"},"aspect_ratio":1.0,"height":1667,"media_type":"image","src":"\/\/crystaldestiny.com\/cdn\/shop\/files\/Clear-Quartz-Point-XL-Points.jpg?v=1757394404","width":1667},{"alt":"Clear Quartz Point \"XL\"-Points-Crystal Destiny-Clear Quartz-454g - 5.00\"L x 2.25\" W-Crystal Destiny","id":31745950154923,"position":2,"preview_image":{"aspect_ratio":1.0,"height":1653,"width":1653,"src":"\/\/crystaldestiny.com\/cdn\/shop\/files\/Clear-Quartz-Point-XL-Points-2.jpg?v=1757394406"},"aspect_ratio":1.0,"height":1653,"media_type":"image","src":"\/\/crystaldestiny.com\/cdn\/shop\/files\/Clear-Quartz-Point-XL-Points-2.jpg?v=1757394406","width":1653},{"alt":"Clear Quartz Point \"XL\"-Points-Crystal Destiny-Clear Quartz-454g - 5.00\"L x 2.25\" W-Crystal Destiny","id":31745950187691,"position":3,"preview_image":{"aspect_ratio":1.0,"height":2048,"width":2048,"src":"\/\/crystaldestiny.com\/cdn\/shop\/files\/Clear-Quartz-Point-XL-Points-3.jpg?v=1757394408"},"aspect_ratio":1.0,"height":2048,"media_type":"image","src":"\/\/crystaldestiny.com\/cdn\/shop\/files\/Clear-Quartz-Point-XL-Points-3.jpg?v=1757394408","width":2048}]
{"item":{"id":8508013674667,"title":"Clear Quartz Tower","handle":"clear-quartz-tower-cd-10284","description":"\u003cp\u003eElevate any space with this Clear Quartz Tower, known for its clarity and amplifying properties. Expertly shaped to enhance energy flow, it serves as a powerful tool for meditation, healing, and crystal grids. Its pristine transparency allows you to connect deeply with your intentions, helping to clear mind clutter and promote focus. Ideal for practitioners seeking both aesthetic appeal and energetic precision.\u003c\/p\u003e\n\u003cp\u003eThis product is an exact pick as pictured, one of a kind.\u003c\/p\u003e\n\u003ch2\u003eCrystal Towers, Wands, Generators, Points, Pillars \u0026amp; Obelisks — What's the Difference?\u003c\/h2\u003e\n\u003cp id=\"isPasted\"\u003eWhile these terms may vary, they all describe beautifully shaped crystals with a pointed tip designed to channel and direct energy. Each name highlights a unique aspect of their use:\u003c\/p\u003e\n\u003cul\u003e\n\u003cli\u003e\n\u003cstrong\u003eTowers\u003c\/strong\u003e- Known for their steady, grounding presence, crystal towers help focus and amplify energy, making them perfect for meditation and manifestation.\u003c\/li\u003e\n\u003cli\u003e\n\u003cstrong\u003eWands\u003c\/strong\u003e- Traditionally used in energy work and healing, crystal wands are excellent for directing energy flow and clearing blockages.\u003c\/li\u003e\n\u003cli\u003e\n\u003cstrong\u003ePillars\u003c\/strong\u003e- Symbolizing strength and stability, crystal pillars create a balanced and harmonious environment, making them great for home decor and spiritual practices.\u003c\/li\u003e\n\u003cli\u003e\n\u003cstrong\u003eObelisks\u003c\/strong\u003e- Inspired by ancient structures, crystal obelisks are believed to connect earthly and spiritual energies, making them powerful tools for transformation and enlightenment.\u003c\/li\u003e\n\u003c\/ul\u003e\n\u003cp\u003eNo matter what you call them, these crystals serve the same purpose—to enhance energy, intention, and harmony in your space. Choose the one that resonates most with you!\u003c\/p\u003e","published_at":"2025-08-31T18:08:23-04:00","created_at":"2025-08-31T18:08:21-04:00","vendor":"Crystal Destiny","type":"Towers","tags":["crystal","polished","Towers"],"price":3999,"price_min":3999,"price_max":3999,"available":true,"price_varies":false,"compare_at_price":null,"compare_at_price_min":0,"compare_at_price_max":0,"compare_at_price_varies":false,"variants":[{"id":45570659025067,"title":"Clear Quartz \/ 352g - 4.50\"H x 2.00\"W","option1":"Clear Quartz","option2":"352g - 4.50\"H x 2.00\"W","option3":null,"sku":"CD-10284","requires_shipping":true,"taxable":true,"featured_image":null,"available":true,"name":"Clear Quartz Tower - Clear Quartz \/ 352g - 4.50\"H x 2.00\"W","public_title":"Clear Quartz \/ 352g - 4.50\"H x 2.00\"W","options":["Clear Quartz","352g - 4.50\"H x 2.00\"W"],"price":3999,"weight":352,"compare_at_price":null,"inventory_management":"shopify","barcode":"","requires_selling_plan":false,"selling_plan_allocations":[]}],"images":["\/\/crystaldestiny.com\/cdn\/shop\/files\/Clear-Quartz-Tower-Towers.jpg?v=1756703495","\/\/crystaldestiny.com\/cdn\/shop\/files\/Clear-Quartz-Tower-Towers-2.jpg?v=1756703496","\/\/crystaldestiny.com\/cdn\/shop\/files\/Clear-Quartz-Tower-Towers-3.jpg?v=1756703498"],"featured_image":"\/\/crystaldestiny.com\/cdn\/shop\/files\/Clear-Quartz-Tower-Towers.jpg?v=1756703495","options":["Material","Size"],"media":[{"alt":"Clear Quartz Tower-Towers-Crystal Destiny-Clear Quartz-352g - 4.50\"H x 2.00\"W-Crystal Destiny","id":31709720707243,"position":1,"preview_image":{"aspect_ratio":1.0,"height":1853,"width":1853,"src":"\/\/crystaldestiny.com\/cdn\/shop\/files\/Clear-Quartz-Tower-Towers.jpg?v=1756703495"},"aspect_ratio":1.0,"height":1853,"media_type":"image","src":"\/\/crystaldestiny.com\/cdn\/shop\/files\/Clear-Quartz-Tower-Towers.jpg?v=1756703495","width":1853},{"alt":"Clear Quartz Tower-Towers-Crystal Destiny-Clear Quartz-352g - 4.50\"H x 2.00\"W-Crystal Destiny","id":31709720641707,"position":2,"preview_image":{"aspect_ratio":1.0,"height":1825,"width":1825,"src":"\/\/crystaldestiny.com\/cdn\/shop\/files\/Clear-Quartz-Tower-Towers-2.jpg?v=1756703496"},"aspect_ratio":1.0,"height":1825,"media_type":"image","src":"\/\/crystaldestiny.com\/cdn\/shop\/files\/Clear-Quartz-Tower-Towers-2.jpg?v=1756703496","width":1825},{"alt":"Clear Quartz Tower-Towers-Crystal Destiny-Clear Quartz-352g - 4.50\"H x 2.00\"W-Crystal Destiny","id":31709720674475,"position":3,"preview_image":{"aspect_ratio":1.0,"height":1853,"width":1853,"src":"\/\/crystaldestiny.com\/cdn\/shop\/files\/Clear-Quartz-Tower-Towers-3.jpg?v=1756703498"},"aspect_ratio":1.0,"height":1853,"media_type":"image","src":"\/\/crystaldestiny.com\/cdn\/shop\/files\/Clear-Quartz-Tower-Towers-3.jpg?v=1756703498","width":1853}],"requires_selling_plan":false,"selling_plan_groups":[],"content":"\u003cp\u003eElevate any space with this Clear Quartz Tower, known for its clarity and amplifying properties. Expertly shaped to enhance energy flow, it serves as a powerful tool for meditation, healing, and crystal grids. Its pristine transparency allows you to connect deeply with your intentions, helping to clear mind clutter and promote focus. Ideal for practitioners seeking both aesthetic appeal and energetic precision.\u003c\/p\u003e\n\u003cp\u003eThis product is an exact pick as pictured, one of a kind.\u003c\/p\u003e\n\u003ch2\u003eCrystal Towers, Wands, Generators, Points, Pillars \u0026amp; Obelisks — What's the Difference?\u003c\/h2\u003e\n\u003cp id=\"isPasted\"\u003eWhile these terms may vary, they all describe beautifully shaped crystals with a pointed tip designed to channel and direct energy. Each name highlights a unique aspect of their use:\u003c\/p\u003e\n\u003cul\u003e\n\u003cli\u003e\n\u003cstrong\u003eTowers\u003c\/strong\u003e- Known for their steady, grounding presence, crystal towers help focus and amplify energy, making them perfect for meditation and manifestation.\u003c\/li\u003e\n\u003cli\u003e\n\u003cstrong\u003eWands\u003c\/strong\u003e- Traditionally used in energy work and healing, crystal wands are excellent for directing energy flow and clearing blockages.\u003c\/li\u003e\n\u003cli\u003e\n\u003cstrong\u003ePillars\u003c\/strong\u003e- Symbolizing strength and stability, crystal pillars create a balanced and harmonious environment, making them great for home decor and spiritual practices.\u003c\/li\u003e\n\u003cli\u003e\n\u003cstrong\u003eObelisks\u003c\/strong\u003e- Inspired by ancient structures, crystal obelisks are believed to connect earthly and spiritual energies, making them powerful tools for transformation and enlightenment.\u003c\/li\u003e\n\u003c\/ul\u003e\n\u003cp\u003eNo matter what you call them, these crystals serve the same purpose—to enhance energy, intention, and harmony in your space. Choose the one that resonates most with you!\u003c\/p\u003e"},"options":[{"name":"Material","position":1,"values":["Clear Quartz"]},{"name":"Size","position":2,"values":["352g - 4.50\"H x 2.00\"W"]}],"custom_metafields":{"shipping_time":"Within 7 days"},"metafields":{"badge":"\u003cdiv style='display:none' class='jdgm-prev-badge' data-average-rating='0.00' data-number-of-reviews='0' data-number-of-questions='0'\u003e \u003cspan class='jdgm-prev-badge__stars' data-score='0.00' tabindex='0' aria-label='0.00 stars' role='button'\u003e \u003cspan class='jdgm-star jdgm--off'\u003e\u003c\/span\u003e\u003cspan class='jdgm-star jdgm--off'\u003e\u003c\/span\u003e\u003cspan class='jdgm-star jdgm--off'\u003e\u003c\/span\u003e\u003cspan class='jdgm-star jdgm--off'\u003e\u003c\/span\u003e\u003cspan class='jdgm-star jdgm--off'\u003e\u003c\/span\u003e \u003c\/span\u003e \u003cspan class='jdgm-prev-badge__text'\u003e No reviews \u003c\/span\u003e \u003c\/div\u003e","widget":"\u003cdiv class='jdgm-rev-widg' data-updated-at='2025-08-31T22:10:32Z' data-average-rating='0.00' data-number-of-reviews='0' data-number-of-questions='0' data-image-url='https:\/\/cdn.shopify.com\/s\/files\/1\/0613\/0345\/5915\/files\/6I0A3849.jpg?v=1756677914'\u003e \u003cstyle class='jdgm-temp-hiding-style'\u003e.jdgm-rev-widg{ display: none }\u003c\/style\u003e \u003cdiv class='jdgm-rev-widg__header'\u003e \u003ch2 class='jdgm-rev-widg__title'\u003eCustomer Reviews\u003c\/h2\u003e \u003cdiv class='jdgm-rev-widg__summary'\u003e \u003cdiv class='jdgm-rev-widg__summary-stars' aria-label='Average rating is 0.00 stars' role='img'\u003e \u003cspan class='jdgm-star jdgm--off'\u003e\u003c\/span\u003e\u003cspan class='jdgm-star jdgm--off'\u003e\u003c\/span\u003e\u003cspan class='jdgm-star jdgm--off'\u003e\u003c\/span\u003e\u003cspan class='jdgm-star jdgm--off'\u003e\u003c\/span\u003e\u003cspan class='jdgm-star jdgm--off'\u003e\u003c\/span\u003e \u003c\/div\u003e \u003cdiv class='jdgm-rev-widg__summary-text'\u003eBe the first to write a review\u003c\/div\u003e \u003c\/div\u003e \u003ca style='display: none' href='#' class='jdgm-write-rev-link' role='button'\u003eWrite a review\u003c\/a\u003e \u003cdiv class='jdgm-histogram jdgm-temp-hidden'\u003e \u003cdiv class='jdgm-histogram__row' data-rating='5' data-frequency='0' data-percentage='0'\u003e \u003cdiv class='jdgm-histogram__star' role='button' aria-label=\"0% (0) reviews with 5 star rating\" tabindex='0' \u003e\u003cspan class='jdgm-star jdgm--on'\u003e\u003c\/span\u003e\u003cspan class='jdgm-star jdgm--on'\u003e\u003c\/span\u003e\u003cspan class='jdgm-star jdgm--on'\u003e\u003c\/span\u003e\u003cspan class='jdgm-star jdgm--on'\u003e\u003c\/span\u003e\u003cspan class='jdgm-star jdgm--on'\u003e\u003c\/span\u003e\u003c\/div\u003e \u003cdiv class='jdgm-histogram__bar'\u003e \u003cdiv class='jdgm-histogram__bar-content' style='width: 0%;'\u003e \u003c\/div\u003e \u003c\/div\u003e \u003cdiv class='jdgm-histogram__percentage'\u003e0%\u003c\/div\u003e \u003cdiv class='jdgm-histogram__frequency'\u003e(0)\u003c\/div\u003e \u003c\/div\u003e \u003cdiv class='jdgm-histogram__row' data-rating='4' data-frequency='0' data-percentage='0'\u003e \u003cdiv class='jdgm-histogram__star' role='button' aria-label=\"0% (0) reviews with 4 star rating\" tabindex='0' \u003e\u003cspan class='jdgm-star jdgm--on'\u003e\u003c\/span\u003e\u003cspan class='jdgm-star jdgm--on'\u003e\u003c\/span\u003e\u003cspan class='jdgm-star jdgm--on'\u003e\u003c\/span\u003e\u003cspan class='jdgm-star jdgm--on'\u003e\u003c\/span\u003e\u003cspan class='jdgm-star jdgm--off'\u003e\u003c\/span\u003e\u003c\/div\u003e \u003cdiv class='jdgm-histogram__bar'\u003e \u003cdiv class='jdgm-histogram__bar-content' style='width: 0%;'\u003e \u003c\/div\u003e \u003c\/div\u003e \u003cdiv class='jdgm-histogram__percentage'\u003e0%\u003c\/div\u003e \u003cdiv class='jdgm-histogram__frequency'\u003e(0)\u003c\/div\u003e \u003c\/div\u003e \u003cdiv class='jdgm-histogram__row' data-rating='3' data-frequency='0' data-percentage='0'\u003e \u003cdiv class='jdgm-histogram__star' role='button' aria-label=\"0% (0) reviews with 3 star rating\" tabindex='0' \u003e\u003cspan class='jdgm-star jdgm--on'\u003e\u003c\/span\u003e\u003cspan class='jdgm-star jdgm--on'\u003e\u003c\/span\u003e\u003cspan class='jdgm-star jdgm--on'\u003e\u003c\/span\u003e\u003cspan class='jdgm-star jdgm--off'\u003e\u003c\/span\u003e\u003cspan class='jdgm-star jdgm--off'\u003e\u003c\/span\u003e\u003c\/div\u003e \u003cdiv class='jdgm-histogram__bar'\u003e \u003cdiv class='jdgm-histogram__bar-content' style='width: 0%;'\u003e \u003c\/div\u003e \u003c\/div\u003e \u003cdiv class='jdgm-histogram__percentage'\u003e0%\u003c\/div\u003e \u003cdiv class='jdgm-histogram__frequency'\u003e(0)\u003c\/div\u003e \u003c\/div\u003e \u003cdiv class='jdgm-histogram__row' data-rating='2' data-frequency='0' data-percentage='0'\u003e \u003cdiv class='jdgm-histogram__star' role='button' aria-label=\"0% (0) reviews with 2 star rating\" tabindex='0' \u003e\u003cspan class='jdgm-star jdgm--on'\u003e\u003c\/span\u003e\u003cspan class='jdgm-star jdgm--on'\u003e\u003c\/span\u003e\u003cspan class='jdgm-star jdgm--off'\u003e\u003c\/span\u003e\u003cspan class='jdgm-star jdgm--off'\u003e\u003c\/span\u003e\u003cspan class='jdgm-star jdgm--off'\u003e\u003c\/span\u003e\u003c\/div\u003e \u003cdiv class='jdgm-histogram__bar'\u003e \u003cdiv class='jdgm-histogram__bar-content' style='width: 0%;'\u003e \u003c\/div\u003e \u003c\/div\u003e \u003cdiv class='jdgm-histogram__percentage'\u003e0%\u003c\/div\u003e \u003cdiv class='jdgm-histogram__frequency'\u003e(0)\u003c\/div\u003e \u003c\/div\u003e \u003cdiv class='jdgm-histogram__row' data-rating='1' data-frequency='0' data-percentage='0'\u003e \u003cdiv class='jdgm-histogram__star' role='button' aria-label=\"0% (0) reviews with 1 star rating\" tabindex='0' \u003e\u003cspan class='jdgm-star jdgm--on'\u003e\u003c\/span\u003e\u003cspan class='jdgm-star jdgm--off'\u003e\u003c\/span\u003e\u003cspan class='jdgm-star jdgm--off'\u003e\u003c\/span\u003e\u003cspan class='jdgm-star jdgm--off'\u003e\u003c\/span\u003e\u003cspan class='jdgm-star jdgm--off'\u003e\u003c\/span\u003e\u003c\/div\u003e \u003cdiv class='jdgm-histogram__bar'\u003e \u003cdiv class='jdgm-histogram__bar-content' style='width: 0%;'\u003e \u003c\/div\u003e \u003c\/div\u003e \u003cdiv class='jdgm-histogram__percentage'\u003e0%\u003c\/div\u003e \u003cdiv class='jdgm-histogram__frequency'\u003e(0)\u003c\/div\u003e \u003c\/div\u003e \u003cdiv class='jdgm-histogram__row jdgm-histogram__clear-filter' data-rating=null tabindex='0'\u003e\u003c\/div\u003e \u003c\/div\u003e \u003cdiv class='jdgm-rev-widg__sort-wrapper'\u003e\u003c\/div\u003e \u003c\/div\u003e \u003cdiv class='jdgm-rev-widg__body'\u003e \u003cdiv class='jdgm-rev-widg__reviews'\u003e\u003c\/div\u003e \u003cdiv class='jdgm-paginate' data-per-page='4' data-url='https:\/\/api.judge.me\/reviews\/reviews_for_widget' style=\"display: none;\"\u003e\u003c\/div\u003e \u003c\/div\u003e \u003cdiv class='jdgm-rev-widg__paginate-spinner-wrapper'\u003e \u003cdiv class='jdgm-spinner'\u003e\u003c\/div\u003e \u003c\/div\u003e \u003c\/div\u003e"},"collections":[{"id":294880051371,"handle":"crystals","title":"Crystals","updated_at":"2026-01-07T23:43:11-05:00","body_html":"\u003cp data-start=\"159\" data-end=\"687\"\u003e✨ \u003cstrong data-start=\"161\" data-end=\"216\"\u003eDiscover the Magic of Crystals with Crystal Destiny\u003c\/strong\u003e ✨\u003cbr data-start=\"218\" data-end=\"221\"\u003eCrystals have been treasured for centuries—not only for their natural beauty but also for their powerful healing energies. Beyond their visual allure, they bring balance, harmony, and positive energy into any space. Whether used for home décor, meditation, or simply to elevate the energy of your surroundings, crystals create a sanctuary of peace, relaxation, and well-being. Each piece is a unique gift from the Earth—visually stunning and spiritually uplifting.\u003c\/p\u003e\n\u003cp data-start=\"689\" data-end=\"1011\"\u003eAt \u003cstrong data-start=\"692\" data-end=\"711\"\u003eCrystal Destiny\u003c\/strong\u003e, our signature collection showcases a curated selection of exquisite crystals, from radiant Quartz to soothing Amethyst. Every stone is carefully sourced for its elegance and metaphysical resonance, making them perfect for enhancing your home, uplifting your spirit, or gifting to someone special.\u003c\/p\u003e\n\u003cp data-start=\"1013\" data-end=\"1206\"\u003eExperience the timeless sophistication of crystalline wonders. Explore the \u003cstrong data-start=\"1088\" data-end=\"1118\"\u003eCrystal Destiny Collection\u003c\/strong\u003e today and bring the transformative beauty of these treasures into your everyday life.\u003c\/p\u003e","published_at":"2023-06-05T11:24:02-04:00","sort_order":"created-desc","template_suffix":"","disjunctive":false,"rules":[{"column":"tag","relation":"equals","condition":"crystal"},{"column":"type","relation":"not_contains","condition":"925 Sterling Silver"},{"column":"type","relation":"not_contains","condition":"Wire Wraps"}],"published_scope":"global"},{"id":319456084139,"handle":"universal-chakra-crystals","title":"Universal Chakra Crystals","updated_at":"2026-01-06T23:24:24-05:00","body_html":"\u003cp data-start=\"116\" data-end=\"404\"\u003e✨ \u003cstrong data-start=\"118\" data-end=\"158\"\u003eUniversal Chakra Crystals Collection\u003c\/strong\u003e ✨\u003cbr data-start=\"160\" data-end=\"163\"\u003eBalance, align, and energize all your chakras with our \u003cstrong data-start=\"218\" data-end=\"247\"\u003eUniversal Chakra Crystals\u003c\/strong\u003e. Carefully selected to resonate with every energy center in the body, these crystals support holistic well-being, spiritual growth, and energetic harmony.\u003c\/p\u003e\n\u003cp data-start=\"406\" data-end=\"744\"\u003eOur curated selection includes vibrant stones such as Amethyst, Citrine, Clear Quartz, and more—each chosen for their ability to promote clarity, balance, and vitality across the entire chakra system. Perfect for meditation, energy work, or creating a harmonious space, Universal Chakra Crystals help you connect mind, body, and spirit.\u003c\/p\u003e\n\u003cp data-start=\"746\" data-end=\"875\"\u003eEmbrace full-spectrum energy and elevate your spiritual journey with the transformative power of \u003cstrong data-start=\"843\" data-end=\"872\"\u003eUniversal Chakra Crystals\u003c\/strong\u003e.\u003c\/p\u003e","published_at":"2025-07-17T18:19:50-04:00","sort_order":"best-selling","template_suffix":"","disjunctive":false,"rules":[{"column":"variant_metafield_definition","relation":"equals","condition":"All Chakras"}],"published_scope":"global","image":{"created_at":"2025-07-17T19:07:58-04:00","alt":null,"width":1080,"height":1080,"src":"\/\/crystaldestiny.com\/cdn\/shop\/collections\/Universal_7_Chakras_Collection.jpg?v=1762474934"}},{"id":294880116907,"handle":"polished","title":"Polished Crystals","updated_at":"2026-01-07T23:43:11-05:00","body_html":"\u003cp data-start=\"199\" data-end=\"598\"\u003e✨ \u003cstrong data-start=\"201\" data-end=\"248\"\u003eCrystal Destiny Polished Crystal Collection\u003c\/strong\u003e ✨\u003cbr data-start=\"250\" data-end=\"253\"\u003eIndulge in the brilliance of crystals refined to perfection. Our \u003cstrong data-start=\"318\" data-end=\"341\"\u003ePolished Collection\u003c\/strong\u003e showcases gemstones meticulously shaped and smoothed to reveal their natural radiance and timeless beauty. From the shimmering glow of Quartz to the deep allure of Obsidian, each polished piece is a testament to nature’s artistry and human craftsmanship.\u003c\/p\u003e\n\u003cp data-start=\"600\" data-end=\"862\"\u003ePerfect as statement décor, meaningful gifts, or companions on your spiritual journey, polished crystals bring sophistication and elevated energy into any space. Their radiant surfaces reflect not only light but also the transformative power of crystal energy.\u003c\/p\u003e\n\u003cp data-start=\"864\" data-end=\"1022\"\u003eDiscover the elegance of refinement with Crystal Destiny’s Polished Crystal Collection—where every facet shines with intention, beauty, and timeless allure.\u003c\/p\u003e","published_at":"2023-06-05T11:30:44-04:00","sort_order":"created-desc","template_suffix":"","disjunctive":false,"rules":[{"column":"tag","relation":"equals","condition":"polished"}],"published_scope":"global"},{"id":293659312299,"handle":"best-sellers","title":"Best Sellers","updated_at":"2026-01-07T23:43:11-05:00","body_html":"\u003cp data-start=\"155\" data-end=\"510\"\u003eDiscover the pieces our community loves most. Our Best Sellers Collection brings together handpicked crystals and jewelry that embody timeless elegance, spiritual resonance, and everyday sophistication. Each item has earned its place as a customer favorite—celebrated for both its beauty and its meaningful energy.\u003c\/p\u003e\n\u003cp data-start=\"512\" data-end=\"802\"\u003eFrom stunning statement pieces to versatile daily companions, these treasures are curated to elevate your space, uplift your spirit, and reflect refined taste. Indulge in what’s most cherished and let our best sellers guide you toward the perfect blend of style and transformative energy.\u003c\/p\u003e\n\u003cp data-start=\"804\" data-end=\"932\"\u003eExplore the Best Sellers Collection today—where elegance meets intention, and every piece tells a story of beauty and balance.\u003c\/p\u003e","published_at":"2023-03-15T16:04:51-04:00","sort_order":"best-selling","template_suffix":"","disjunctive":false,"rules":[{"column":"variant_price","relation":"greater_than","condition":"0"},{"column":"variant_inventory","relation":"greater_than","condition":"0"},{"column":"type","relation":"not_equals","condition":"Shipping Protection"}],"published_scope":"global"},{"id":321370390699,"handle":"monthly-crystal-sale","title":"Monthly Crystal Sale | Spheres \u0026 Towers","updated_at":"2026-01-06T23:24:37-05:00","body_html":"\u003cp\u003eShop our \u003cstrong\u003eMonthly Crystal Sale\u003c\/strong\u003e, where you can shop a wide selection of healing crystals at discounted prices. Explore \u003cstrong\u003ecrystal spheres and towers,\u003c\/strong\u003e— all carefully curated to support meditation, energy balancing, and spiritual wellness. Whether you're looking to enhance your home decor, boost your daily energy, or find the perfect gift, our \u003cstrong\u003ecrystals for healing and manifestation\u003c\/strong\u003e offer both beauty and metaphysical benefits.\u003c\/p\u003e\n\u003cp\u003eEach month, our sale features \u003cstrong\u003enew discounted collections\u003c\/strong\u003e, from \u003cstrong\u003enatural quartz and amethyst towers\u003c\/strong\u003e to \u003cstrong\u003ewire-wrapped pendants and polished stones\u003c\/strong\u003e, so there's always something fresh to discover. Shop with confidence knowing you're getting high-quality crystals with \u003cstrong\u003efree shipping options\u003c\/strong\u003e and a trusted experience.\u003c\/p\u003e\n\u003cp\u003e\u003cstrong\u003eTake advantage of the Monthly Crystal Sale today\u003c\/strong\u003e and add powerful, natural energy to your life with \u003cstrong\u003eauthentic healing crystals\u003c\/strong\u003e — while our limited-time discounts last.\u003c\/p\u003e\n\u003cp\u003e\u003cstrong\u003e*Discount automatically applied at checkout.\u003c\/strong\u003e\u003c\/p\u003e","published_at":"2025-12-02T01:26:17-05:00","sort_order":"alpha-asc","template_suffix":"","disjunctive":true,"rules":[{"column":"tag","relation":"equals","condition":"spheres"},{"column":"tag","relation":"equals","condition":"Towers"}],"published_scope":"global","image":{"created_at":"2026-01-01T01:32:34-05:00","alt":"","width":960,"height":960,"src":"\/\/crystaldestiny.com\/cdn\/shop\/collections\/3E8C2969-1B86-4ACE-B349-98E9D8768424.jpg?v=1767249154"}},{"id":297596059819,"handle":"all","title":"All Crystals \u0026 Jewelry","updated_at":"2026-01-07T23:43:11-05:00","body_html":"\u003cp data-start=\"149\" data-end=\"494\"\u003e✨ \u003cstrong data-start=\"151\" data-end=\"181\"\u003eWelcome to Crystal Destiny\u003c\/strong\u003e ✨\u003cbr data-start=\"183\" data-end=\"186\"\u003eStep into a world where beauty, energy, and artistry unite. Our collection is a treasure trove of exquisite crystals, from the raw, untamed elegance of natural formations to the polished brilliance of expertly crafted pieces. Each crystal is a masterpiece, carrying its own unique story and timeless charm.\u003c\/p\u003e\n\u003cp data-start=\"496\" data-end=\"831\"\u003eWhether you’re drawn to the calming presence of Amethyst, the vibrant energy of Citrine, or the grounding strength of Jasper, our crystals invite you to connect with nature’s finest wonders. Perfect for enhancing your space, supporting your spiritual journey, or gifting with intention, every piece resonates with beauty and meaning.\u003c\/p\u003e\n\u003cp data-start=\"833\" data-end=\"1000\"\u003eElevate your surroundings, embrace the mystique, and explore the enchanting world of crystals at \u003cstrong data-start=\"930\" data-end=\"949\"\u003eCrystal Destiny\u003c\/strong\u003e—where every crystal is waiting to be discovered.\u003c\/p\u003e","published_at":"2023-11-10T13:55:31-05:00","sort_order":"created-desc","template_suffix":"","disjunctive":false,"rules":[{"column":"type","relation":"not_equals","condition":"asdf"}],"published_scope":"global"},{"id":296256405675,"handle":"crystal-towers","title":"Crystal Towers","updated_at":"2026-01-06T23:24:37-05:00","body_html":"\u003cp data-end=\"568\" data-start=\"152\"\u003e✨ \u003cstrong data-end=\"190\" data-start=\"154\"\u003eCrystal Destiny Tower Collection\u003c\/strong\u003e ✨\u003cbr data-end=\"195\" data-start=\"192\"\u003eEnchant your space with the timeless beauty and powerful energy of crystal towers. Each piece in our \u003cstrong data-end=\"316\" data-start=\"296\"\u003eTower Collection\u003c\/strong\u003e is carefully crafted to showcase nature’s artistry while radiating higher vibrations and spiritual resonance. From the clarity of Quartz to the calming presence of Amethyst, these towers are both decorative masterpieces and tools for transformation.\u003c\/p\u003e\n\u003cp data-end=\"765\" data-start=\"570\"\u003ePerfect for meditation spaces, energy work, or simply elevating your home décor, crystal towers channel focused energy upward—creating balance, harmony, and refined elegance in any environment.\u003c\/p\u003e\n\u003cp data-end=\"917\" data-start=\"767\"\u003eDiscover the Crystal Destiny Tower Collection today and transform your surroundings into a sanctuary of beauty, purpose, and spiritual significance.\u003c\/p\u003e\n\u003ch2\u003eCrystal Towers, Wands, Generators, Points, Pillars \u0026amp; Obelisks — What's the Difference?\u003c\/h2\u003e\n\u003cp id=\"isPasted\"\u003eWhile these terms may vary, they all describe beautifully shaped crystals with a pointed tip designed to channel and direct energy. Each name highlights a unique aspect of their use:\u003c\/p\u003e\n\u003cul\u003e\n\u003cli\u003e\n\u003cstrong\u003eTowers\u003c\/strong\u003e- Known for their steady, grounding presence, crystal towers help focus and amplify energy, making them perfect for meditation and manifestation.\u003c\/li\u003e\n\u003cli\u003e\n\u003cstrong\u003eWands\u003c\/strong\u003e- Traditionally used in energy work and healing, crystal wands are excellent for directing energy flow and clearing blockages.\u003c\/li\u003e\n\u003cli\u003e\n\u003cstrong\u003ePillars\u003c\/strong\u003e- Symbolizing strength and stability, crystal pillars create a balanced and harmonious environment, making them great for home decor and spiritual practices.\u003c\/li\u003e\n\u003cli\u003e\n\u003cstrong\u003eObelisks\u003c\/strong\u003e- Inspired by ancient structures, crystal obelisks are believed to connect earthly and spiritual energies, making them powerful tools for transformation and enlightenment.\u003c\/li\u003e\n\u003c\/ul\u003e\n\u003cp\u003eNo matter what you call them, these crystals serve the same purpose—to enhance energy, intention, and harmony in your space. Choose the one that resonates most with you!\u003c\/p\u003e","published_at":"2023-09-14T12:52:35-04:00","sort_order":"created-desc","template_suffix":"","disjunctive":false,"rules":[{"column":"tag","relation":"equals","condition":"towers"}],"published_scope":"global"},{"id":298983391403,"handle":"january-crystal-sale","title":"January Sale | 25% Off Crystal Towers \u0026 Spheres","updated_at":"2026-01-06T23:24:37-05:00","body_html":"\u003cp\u003eShop our \u003cstrong\u003eJanuary Crystal Sale\u003c\/strong\u003e, where you can shop a wide selection of healing crystals at discounted prices. Explore \u003cstrong\u003eCrystal Towers, \u0026amp; Crystal Spheres\u003c\/strong\u003e — all carefully curated and crafted to support meditation, energy balancing, and spiritual wellness. Whether you're looking to enhance your home decor, boost your daily energy, or find the perfect gift, our \u003cstrong\u003ecrystals for healing and manifestation\u003c\/strong\u003e offer both beauty and metaphysical benefits.\u003c\/p\u003e\n\u003cp\u003eThis January, our sale features \u003cstrong\u003ediscounted crystal towers and spheres\u003c\/strong\u003e, from \u003cstrong\u003enatural quartz \u003c\/strong\u003eand \u003cstrong\u003eamethyst \u003c\/strong\u003eto \u003cstrong\u003ebumblebee jasper \u003c\/strong\u003eand \u003cstrong\u003ecarnelian\u003c\/strong\u003e, so there's always something fresh to discover. Shop with confidence knowing you're getting high-quality crystals with \u003cstrong\u003efree shipping options\u003c\/strong\u003e and a trusted experience.\u003c\/p\u003e\n\u003cp\u003e\u003cstrong\u003eTake advantage of the January Crystal Sale today\u003c\/strong\u003e and add powerful, natural energy to your life with \u003cstrong\u003eauthentic healing crystals\u003c\/strong\u003e — while our limited-time discounts last.\u003c\/p\u003e\n\u003cp\u003e\u003cstrong\u003e*Discount automatically applied at checkout.\u003c\/strong\u003e\u003c\/p\u003e","published_at":"2026-01-01T00:07:17-05:00","sort_order":"alpha-asc","template_suffix":"monthly-collection","disjunctive":true,"rules":[{"column":"tag","relation":"equals","condition":"Spheres"},{"column":"tag","relation":"equals","condition":"Towers"}],"published_scope":"global","image":{"created_at":"2026-01-01T01:29:59-05:00","alt":"","width":960,"height":960,"src":"\/\/crystaldestiny.com\/cdn\/shop\/collections\/1464163B-22B1-4D62-BEC5-CEC9AECB670B.jpg?v=1767248999"}}]}
[{"alt":"Clear Quartz Tower-Towers-Crystal Destiny-Clear Quartz-352g - 4.50\"H x 2.00\"W-Crystal Destiny","id":31709720707243,"position":1,"preview_image":{"aspect_ratio":1.0,"height":1853,"width":1853,"src":"\/\/crystaldestiny.com\/cdn\/shop\/files\/Clear-Quartz-Tower-Towers.jpg?v=1756703495"},"aspect_ratio":1.0,"height":1853,"media_type":"image","src":"\/\/crystaldestiny.com\/cdn\/shop\/files\/Clear-Quartz-Tower-Towers.jpg?v=1756703495","width":1853},{"alt":"Clear Quartz Tower-Towers-Crystal Destiny-Clear Quartz-352g - 4.50\"H x 2.00\"W-Crystal Destiny","id":31709720641707,"position":2,"preview_image":{"aspect_ratio":1.0,"height":1825,"width":1825,"src":"\/\/crystaldestiny.com\/cdn\/shop\/files\/Clear-Quartz-Tower-Towers-2.jpg?v=1756703496"},"aspect_ratio":1.0,"height":1825,"media_type":"image","src":"\/\/crystaldestiny.com\/cdn\/shop\/files\/Clear-Quartz-Tower-Towers-2.jpg?v=1756703496","width":1825},{"alt":"Clear Quartz Tower-Towers-Crystal Destiny-Clear Quartz-352g - 4.50\"H x 2.00\"W-Crystal Destiny","id":31709720674475,"position":3,"preview_image":{"aspect_ratio":1.0,"height":1853,"width":1853,"src":"\/\/crystaldestiny.com\/cdn\/shop\/files\/Clear-Quartz-Tower-Towers-3.jpg?v=1756703498"},"aspect_ratio":1.0,"height":1853,"media_type":"image","src":"\/\/crystaldestiny.com\/cdn\/shop\/files\/Clear-Quartz-Tower-Towers-3.jpg?v=1756703498","width":1853}]
{"item":{"id":8514913861803,"title":"Clear Quartz Towers","handle":"clear-quartz-towers-cd-10337","description":"\u003cp\u003eClear Quartz Towers are celebrated for their exceptional clarity and powerful metaphysical attributes, making them a versatile addition for both seasoned crystal collectors and spiritual practitioners. Known as the “Master Healer,” Clear Quartz serves to amplify energy and intention, facilitating clarity of mind and enhancing spiritual growth. Its naturally faceted tower shape channels and directs energy, making it an ideal tool for meditation, energy healing, and chakra balancing. Placed in any environment, these towers radiate a cleansing energy that clears negativity and promotes a harmonious atmosphere.\u003c\/p\u003e\n\u003cp\u003eBeyond its aesthetic appeal, Clear Quartz is valued for its ability to align all chakras, fostering balance and spiritual attunement across the entire body. It can enhance psychic abilities by sharpening intuition and deepening meditation experiences. Whether used to focus intentions during rituals or as a striking centerpiece in a sacred space, Clear Quartz Towers help bridge physical and spiritual realms, encouraging greater self-awareness and positive transformation. Durable and elegant, they are a timeless choice for enhancing meditation practices, crystal grids, or energy work.\u003c\/p\u003e\n\u003cp\u003eThis product is an exact pick as pictured, one of a kind.\u003c\/p\u003e","published_at":"2025-09-09T14:53:48-04:00","created_at":"2025-09-09T14:53:46-04:00","vendor":"Crystal Destiny","type":"Towers","tags":["crystal","polished","Towers"],"price":3499,"price_min":3499,"price_max":3499,"available":true,"price_varies":false,"compare_at_price":null,"compare_at_price_min":0,"compare_at_price_max":0,"compare_at_price_varies":false,"variants":[{"id":45600738410667,"title":"Clear Quartz \/ 84g - 3.75\"H x 1.00\"W","option1":"Clear Quartz","option2":"84g - 3.75\"H x 1.00\"W","option3":null,"sku":"CD-10337","requires_shipping":true,"taxable":true,"featured_image":{"id":40354348794027,"product_id":8514913861803,"position":2,"created_at":"2025-09-09T14:50:35-04:00","updated_at":"2025-12-11T00:07:27-05:00","alt":"Clear Quartz Towers-Towers-Crystal Destiny-Clear Quartz-84g - 3.75\"H x 1.00\"W-Crystal Destiny","width":2048,"height":2048,"src":"\/\/crystaldestiny.com\/cdn\/shop\/files\/Clear-Quartz-Towers-Towers-Clear-Quartz-84g-3_75H-x-1_00W-2.jpg?v=1765429647","variant_ids":[45600738410667]},"available":true,"name":"Clear Quartz Towers - Clear Quartz \/ 84g - 3.75\"H x 1.00\"W","public_title":"Clear Quartz \/ 84g - 3.75\"H x 1.00\"W","options":["Clear Quartz","84g - 3.75\"H x 1.00\"W"],"price":3499,"weight":84,"compare_at_price":null,"inventory_management":"shopify","barcode":"","featured_media":{"alt":"Clear Quartz Towers-Towers-Crystal Destiny-Clear Quartz-84g - 3.75\"H x 1.00\"W-Crystal Destiny","id":31753422241963,"position":2,"preview_image":{"aspect_ratio":1.0,"height":2048,"width":2048,"src":"\/\/crystaldestiny.com\/cdn\/shop\/files\/Clear-Quartz-Towers-Towers-Clear-Quartz-84g-3_75H-x-1_00W-2.jpg?v=1765429647"}},"requires_selling_plan":false,"selling_plan_allocations":[]},{"id":45600742047915,"title":"Clear Quartz \/ 86g - 3.75\"H x 1.00\"W","option1":"Clear Quartz","option2":"86g - 3.75\"H x 1.00\"W","option3":null,"sku":"CD-10338","requires_shipping":true,"taxable":true,"featured_image":{"id":40354348826795,"product_id":8514913861803,"position":3,"created_at":"2025-09-09T14:50:35-04:00","updated_at":"2025-12-11T00:07:29-05:00","alt":"Clear Quartz Towers-Towers-Crystal Destiny-Clear Quartz-86g - 3.75\"H x 1.00\"W-Crystal Destiny","width":2048,"height":2048,"src":"\/\/crystaldestiny.com\/cdn\/shop\/files\/Clear-Quartz-Towers-Towers-Clear-Quartz-86g-3_75H-x-1_00W-3.jpg?v=1765429649","variant_ids":[45600742047915]},"available":true,"name":"Clear Quartz Towers - Clear Quartz \/ 86g - 3.75\"H x 1.00\"W","public_title":"Clear Quartz \/ 86g - 3.75\"H x 1.00\"W","options":["Clear Quartz","86g - 3.75\"H x 1.00\"W"],"price":3499,"weight":86,"compare_at_price":null,"inventory_management":"shopify","barcode":"","featured_media":{"alt":"Clear Quartz Towers-Towers-Crystal Destiny-Clear Quartz-86g - 3.75\"H x 1.00\"W-Crystal Destiny","id":31753422274731,"position":3,"preview_image":{"aspect_ratio":1.0,"height":2048,"width":2048,"src":"\/\/crystaldestiny.com\/cdn\/shop\/files\/Clear-Quartz-Towers-Towers-Clear-Quartz-86g-3_75H-x-1_00W-3.jpg?v=1765429649"}},"requires_selling_plan":false,"selling_plan_allocations":[]},{"id":45600741621931,"title":"Clear Quartz \/ 98g - 4.00\"H x 1.00\"W","option1":"Clear Quartz","option2":"98g - 4.00\"H x 1.00\"W","option3":null,"sku":"CD-10336","requires_shipping":true,"taxable":true,"featured_image":{"id":40354348859563,"product_id":8514913861803,"position":4,"created_at":"2025-09-09T14:50:35-04:00","updated_at":"2025-12-11T00:07:31-05:00","alt":"Clear Quartz Towers-Towers-Crystal Destiny-Clear Quartz-98g - 4.00\"H x 1.00\"W-Crystal Destiny","width":2048,"height":2048,"src":"\/\/crystaldestiny.com\/cdn\/shop\/files\/Clear-Quartz-Towers-Towers-Clear-Quartz-98g-4_00H-x-1_00W-4.jpg?v=1765429651","variant_ids":[45600741621931]},"available":true,"name":"Clear Quartz Towers - Clear Quartz \/ 98g - 4.00\"H x 1.00\"W","public_title":"Clear Quartz \/ 98g - 4.00\"H x 1.00\"W","options":["Clear Quartz","98g - 4.00\"H x 1.00\"W"],"price":3499,"weight":86,"compare_at_price":null,"inventory_management":"shopify","barcode":"","featured_media":{"alt":"Clear Quartz Towers-Towers-Crystal Destiny-Clear Quartz-98g - 4.00\"H x 1.00\"W-Crystal Destiny","id":31753422307499,"position":4,"preview_image":{"aspect_ratio":1.0,"height":2048,"width":2048,"src":"\/\/crystaldestiny.com\/cdn\/shop\/files\/Clear-Quartz-Towers-Towers-Clear-Quartz-98g-4_00H-x-1_00W-4.jpg?v=1765429651"}},"requires_selling_plan":false,"selling_plan_allocations":[]}],"images":["\/\/crystaldestiny.com\/cdn\/shop\/files\/Clear-Quartz-Towers-Towers.jpg?v=1757481096","\/\/crystaldestiny.com\/cdn\/shop\/files\/Clear-Quartz-Towers-Towers-Clear-Quartz-84g-3_75H-x-1_00W-2.jpg?v=1765429647","\/\/crystaldestiny.com\/cdn\/shop\/files\/Clear-Quartz-Towers-Towers-Clear-Quartz-86g-3_75H-x-1_00W-3.jpg?v=1765429649","\/\/crystaldestiny.com\/cdn\/shop\/files\/Clear-Quartz-Towers-Towers-Clear-Quartz-98g-4_00H-x-1_00W-4.jpg?v=1765429651"],"featured_image":"\/\/crystaldestiny.com\/cdn\/shop\/files\/Clear-Quartz-Towers-Towers.jpg?v=1757481096","options":["Material","Size"],"media":[{"alt":"Clear Quartz Towers-Towers-Crystal Destiny-Clear Quartz-84g - 3.75\"H x 1.00\"W-Crystal Destiny","id":31753422209195,"position":1,"preview_image":{"aspect_ratio":1.0,"height":1776,"width":1776,"src":"\/\/crystaldestiny.com\/cdn\/shop\/files\/Clear-Quartz-Towers-Towers.jpg?v=1757481096"},"aspect_ratio":1.0,"height":1776,"media_type":"image","src":"\/\/crystaldestiny.com\/cdn\/shop\/files\/Clear-Quartz-Towers-Towers.jpg?v=1757481096","width":1776},{"alt":"Clear Quartz Towers-Towers-Crystal Destiny-Clear Quartz-84g - 3.75\"H x 1.00\"W-Crystal Destiny","id":31753422241963,"position":2,"preview_image":{"aspect_ratio":1.0,"height":2048,"width":2048,"src":"\/\/crystaldestiny.com\/cdn\/shop\/files\/Clear-Quartz-Towers-Towers-Clear-Quartz-84g-3_75H-x-1_00W-2.jpg?v=1765429647"},"aspect_ratio":1.0,"height":2048,"media_type":"image","src":"\/\/crystaldestiny.com\/cdn\/shop\/files\/Clear-Quartz-Towers-Towers-Clear-Quartz-84g-3_75H-x-1_00W-2.jpg?v=1765429647","width":2048},{"alt":"Clear Quartz Towers-Towers-Crystal Destiny-Clear Quartz-86g - 3.75\"H x 1.00\"W-Crystal Destiny","id":31753422274731,"position":3,"preview_image":{"aspect_ratio":1.0,"height":2048,"width":2048,"src":"\/\/crystaldestiny.com\/cdn\/shop\/files\/Clear-Quartz-Towers-Towers-Clear-Quartz-86g-3_75H-x-1_00W-3.jpg?v=1765429649"},"aspect_ratio":1.0,"height":2048,"media_type":"image","src":"\/\/crystaldestiny.com\/cdn\/shop\/files\/Clear-Quartz-Towers-Towers-Clear-Quartz-86g-3_75H-x-1_00W-3.jpg?v=1765429649","width":2048},{"alt":"Clear Quartz Towers-Towers-Crystal Destiny-Clear Quartz-98g - 4.00\"H x 1.00\"W-Crystal Destiny","id":31753422307499,"position":4,"preview_image":{"aspect_ratio":1.0,"height":2048,"width":2048,"src":"\/\/crystaldestiny.com\/cdn\/shop\/files\/Clear-Quartz-Towers-Towers-Clear-Quartz-98g-4_00H-x-1_00W-4.jpg?v=1765429651"},"aspect_ratio":1.0,"height":2048,"media_type":"image","src":"\/\/crystaldestiny.com\/cdn\/shop\/files\/Clear-Quartz-Towers-Towers-Clear-Quartz-98g-4_00H-x-1_00W-4.jpg?v=1765429651","width":2048}],"requires_selling_plan":false,"selling_plan_groups":[],"content":"\u003cp\u003eClear Quartz Towers are celebrated for their exceptional clarity and powerful metaphysical attributes, making them a versatile addition for both seasoned crystal collectors and spiritual practitioners. Known as the “Master Healer,” Clear Quartz serves to amplify energy and intention, facilitating clarity of mind and enhancing spiritual growth. Its naturally faceted tower shape channels and directs energy, making it an ideal tool for meditation, energy healing, and chakra balancing. Placed in any environment, these towers radiate a cleansing energy that clears negativity and promotes a harmonious atmosphere.\u003c\/p\u003e\n\u003cp\u003eBeyond its aesthetic appeal, Clear Quartz is valued for its ability to align all chakras, fostering balance and spiritual attunement across the entire body. It can enhance psychic abilities by sharpening intuition and deepening meditation experiences. Whether used to focus intentions during rituals or as a striking centerpiece in a sacred space, Clear Quartz Towers help bridge physical and spiritual realms, encouraging greater self-awareness and positive transformation. Durable and elegant, they are a timeless choice for enhancing meditation practices, crystal grids, or energy work.\u003c\/p\u003e\n\u003cp\u003eThis product is an exact pick as pictured, one of a kind.\u003c\/p\u003e"},"options":[{"name":"Material","position":1,"values":["Clear Quartz"]},{"name":"Size","position":2,"values":["84g - 3.75\"H x 1.00\"W","86g - 3.75\"H x 1.00\"W","98g - 4.00\"H x 1.00\"W"]}],"custom_metafields":{"shipping_time":"Within 7 days"},"metafields":{"badge":"\u003cdiv style='display:none' class='jdgm-prev-badge' data-average-rating='0.00' data-number-of-reviews='0' data-number-of-questions='0'\u003e \u003cspan class='jdgm-prev-badge__stars' data-score='0.00' tabindex='0' aria-label='0.00 stars' role='button'\u003e \u003cspan class='jdgm-star jdgm--off'\u003e\u003c\/span\u003e\u003cspan class='jdgm-star jdgm--off'\u003e\u003c\/span\u003e\u003cspan class='jdgm-star jdgm--off'\u003e\u003c\/span\u003e\u003cspan class='jdgm-star jdgm--off'\u003e\u003c\/span\u003e\u003cspan class='jdgm-star jdgm--off'\u003e\u003c\/span\u003e \u003c\/span\u003e \u003cspan class='jdgm-prev-badge__text'\u003e No reviews \u003c\/span\u003e \u003c\/div\u003e","widget":"\u003cdiv class='jdgm-rev-widg' data-updated-at='2025-09-09T18:54:57Z' data-average-rating='0.00' data-number-of-reviews='0' data-number-of-questions='0' data-image-url='https:\/\/cdn.shopify.com\/s\/files\/1\/0613\/0345\/5915\/files\/6I0A4109.jpg?v=1757443837'\u003e \u003cstyle class='jdgm-temp-hiding-style'\u003e.jdgm-rev-widg{ display: none }\u003c\/style\u003e \u003cdiv class='jdgm-rev-widg__header'\u003e \u003ch2 class='jdgm-rev-widg__title'\u003eCustomer Reviews\u003c\/h2\u003e \u003cdiv class='jdgm-rev-widg__summary'\u003e \u003cdiv class='jdgm-rev-widg__summary-stars' aria-label='Average rating is 0.00 stars' role='img'\u003e \u003cspan class='jdgm-star jdgm--off'\u003e\u003c\/span\u003e\u003cspan class='jdgm-star jdgm--off'\u003e\u003c\/span\u003e\u003cspan class='jdgm-star jdgm--off'\u003e\u003c\/span\u003e\u003cspan class='jdgm-star jdgm--off'\u003e\u003c\/span\u003e\u003cspan class='jdgm-star jdgm--off'\u003e\u003c\/span\u003e \u003c\/div\u003e \u003cdiv class='jdgm-rev-widg__summary-text'\u003eBe the first to write a review\u003c\/div\u003e \u003c\/div\u003e \u003ca style='display: none' href='#' class='jdgm-write-rev-link' role='button'\u003eWrite a review\u003c\/a\u003e \u003cdiv class='jdgm-histogram jdgm-temp-hidden'\u003e \u003cdiv class='jdgm-histogram__row' data-rating='5' data-frequency='0' data-percentage='0'\u003e \u003cdiv class='jdgm-histogram__star' role='button' aria-label=\"0% (0) reviews with 5 star rating\" tabindex='0' \u003e\u003cspan class='jdgm-star jdgm--on'\u003e\u003c\/span\u003e\u003cspan class='jdgm-star jdgm--on'\u003e\u003c\/span\u003e\u003cspan class='jdgm-star jdgm--on'\u003e\u003c\/span\u003e\u003cspan class='jdgm-star jdgm--on'\u003e\u003c\/span\u003e\u003cspan class='jdgm-star jdgm--on'\u003e\u003c\/span\u003e\u003c\/div\u003e \u003cdiv class='jdgm-histogram__bar'\u003e \u003cdiv class='jdgm-histogram__bar-content' style='width: 0%;'\u003e \u003c\/div\u003e \u003c\/div\u003e \u003cdiv class='jdgm-histogram__percentage'\u003e0%\u003c\/div\u003e \u003cdiv class='jdgm-histogram__frequency'\u003e(0)\u003c\/div\u003e \u003c\/div\u003e \u003cdiv class='jdgm-histogram__row' data-rating='4' data-frequency='0' data-percentage='0'\u003e \u003cdiv class='jdgm-histogram__star' role='button' aria-label=\"0% (0) reviews with 4 star rating\" tabindex='0' \u003e\u003cspan class='jdgm-star jdgm--on'\u003e\u003c\/span\u003e\u003cspan class='jdgm-star jdgm--on'\u003e\u003c\/span\u003e\u003cspan class='jdgm-star jdgm--on'\u003e\u003c\/span\u003e\u003cspan class='jdgm-star jdgm--on'\u003e\u003c\/span\u003e\u003cspan class='jdgm-star jdgm--off'\u003e\u003c\/span\u003e\u003c\/div\u003e \u003cdiv class='jdgm-histogram__bar'\u003e \u003cdiv class='jdgm-histogram__bar-content' style='width: 0%;'\u003e \u003c\/div\u003e \u003c\/div\u003e \u003cdiv class='jdgm-histogram__percentage'\u003e0%\u003c\/div\u003e \u003cdiv class='jdgm-histogram__frequency'\u003e(0)\u003c\/div\u003e \u003c\/div\u003e \u003cdiv class='jdgm-histogram__row' data-rating='3' data-frequency='0' data-percentage='0'\u003e \u003cdiv class='jdgm-histogram__star' role='button' aria-label=\"0% (0) reviews with 3 star rating\" tabindex='0' \u003e\u003cspan class='jdgm-star jdgm--on'\u003e\u003c\/span\u003e\u003cspan class='jdgm-star jdgm--on'\u003e\u003c\/span\u003e\u003cspan class='jdgm-star jdgm--on'\u003e\u003c\/span\u003e\u003cspan class='jdgm-star jdgm--off'\u003e\u003c\/span\u003e\u003cspan class='jdgm-star jdgm--off'\u003e\u003c\/span\u003e\u003c\/div\u003e \u003cdiv class='jdgm-histogram__bar'\u003e \u003cdiv class='jdgm-histogram__bar-content' style='width: 0%;'\u003e \u003c\/div\u003e \u003c\/div\u003e \u003cdiv class='jdgm-histogram__percentage'\u003e0%\u003c\/div\u003e \u003cdiv class='jdgm-histogram__frequency'\u003e(0)\u003c\/div\u003e \u003c\/div\u003e \u003cdiv class='jdgm-histogram__row' data-rating='2' data-frequency='0' data-percentage='0'\u003e \u003cdiv class='jdgm-histogram__star' role='button' aria-label=\"0% (0) reviews with 2 star rating\" tabindex='0' \u003e\u003cspan class='jdgm-star jdgm--on'\u003e\u003c\/span\u003e\u003cspan class='jdgm-star jdgm--on'\u003e\u003c\/span\u003e\u003cspan class='jdgm-star jdgm--off'\u003e\u003c\/span\u003e\u003cspan class='jdgm-star jdgm--off'\u003e\u003c\/span\u003e\u003cspan class='jdgm-star jdgm--off'\u003e\u003c\/span\u003e\u003c\/div\u003e \u003cdiv class='jdgm-histogram__bar'\u003e \u003cdiv class='jdgm-histogram__bar-content' style='width: 0%;'\u003e \u003c\/div\u003e \u003c\/div\u003e \u003cdiv class='jdgm-histogram__percentage'\u003e0%\u003c\/div\u003e \u003cdiv class='jdgm-histogram__frequency'\u003e(0)\u003c\/div\u003e \u003c\/div\u003e \u003cdiv class='jdgm-histogram__row' data-rating='1' data-frequency='0' data-percentage='0'\u003e \u003cdiv class='jdgm-histogram__star' role='button' aria-label=\"0% (0) reviews with 1 star rating\" tabindex='0' \u003e\u003cspan class='jdgm-star jdgm--on'\u003e\u003c\/span\u003e\u003cspan class='jdgm-star jdgm--off'\u003e\u003c\/span\u003e\u003cspan class='jdgm-star jdgm--off'\u003e\u003c\/span\u003e\u003cspan class='jdgm-star jdgm--off'\u003e\u003c\/span\u003e\u003cspan class='jdgm-star jdgm--off'\u003e\u003c\/span\u003e\u003c\/div\u003e \u003cdiv class='jdgm-histogram__bar'\u003e \u003cdiv class='jdgm-histogram__bar-content' style='width: 0%;'\u003e \u003c\/div\u003e \u003c\/div\u003e \u003cdiv class='jdgm-histogram__percentage'\u003e0%\u003c\/div\u003e \u003cdiv class='jdgm-histogram__frequency'\u003e(0)\u003c\/div\u003e \u003c\/div\u003e \u003cdiv class='jdgm-histogram__row jdgm-histogram__clear-filter' data-rating=null tabindex='0'\u003e\u003c\/div\u003e \u003c\/div\u003e \u003cdiv class='jdgm-rev-widg__sort-wrapper'\u003e\u003c\/div\u003e \u003c\/div\u003e \u003cdiv class='jdgm-rev-widg__body'\u003e \u003cdiv class='jdgm-rev-widg__reviews'\u003e\u003c\/div\u003e \u003cdiv class='jdgm-paginate' data-per-page='4' data-url='https:\/\/api.judge.me\/reviews\/reviews_for_widget' style=\"display: none;\"\u003e\u003c\/div\u003e \u003c\/div\u003e \u003cdiv class='jdgm-rev-widg__paginate-spinner-wrapper'\u003e \u003cdiv class='jdgm-spinner'\u003e\u003c\/div\u003e \u003c\/div\u003e \u003c\/div\u003e"},"collections":[{"id":294880051371,"handle":"crystals","title":"Crystals","updated_at":"2026-01-07T23:43:11-05:00","body_html":"\u003cp data-start=\"159\" data-end=\"687\"\u003e✨ \u003cstrong data-start=\"161\" data-end=\"216\"\u003eDiscover the Magic of Crystals with Crystal Destiny\u003c\/strong\u003e ✨\u003cbr data-start=\"218\" data-end=\"221\"\u003eCrystals have been treasured for centuries—not only for their natural beauty but also for their powerful healing energies. Beyond their visual allure, they bring balance, harmony, and positive energy into any space. Whether used for home décor, meditation, or simply to elevate the energy of your surroundings, crystals create a sanctuary of peace, relaxation, and well-being. Each piece is a unique gift from the Earth—visually stunning and spiritually uplifting.\u003c\/p\u003e\n\u003cp data-start=\"689\" data-end=\"1011\"\u003eAt \u003cstrong data-start=\"692\" data-end=\"711\"\u003eCrystal Destiny\u003c\/strong\u003e, our signature collection showcases a curated selection of exquisite crystals, from radiant Quartz to soothing Amethyst. Every stone is carefully sourced for its elegance and metaphysical resonance, making them perfect for enhancing your home, uplifting your spirit, or gifting to someone special.\u003c\/p\u003e\n\u003cp data-start=\"1013\" data-end=\"1206\"\u003eExperience the timeless sophistication of crystalline wonders. Explore the \u003cstrong data-start=\"1088\" data-end=\"1118\"\u003eCrystal Destiny Collection\u003c\/strong\u003e today and bring the transformative beauty of these treasures into your everyday life.\u003c\/p\u003e","published_at":"2023-06-05T11:24:02-04:00","sort_order":"created-desc","template_suffix":"","disjunctive":false,"rules":[{"column":"tag","relation":"equals","condition":"crystal"},{"column":"type","relation":"not_contains","condition":"925 Sterling Silver"},{"column":"type","relation":"not_contains","condition":"Wire Wraps"}],"published_scope":"global"},{"id":319456084139,"handle":"universal-chakra-crystals","title":"Universal Chakra Crystals","updated_at":"2026-01-06T23:24:24-05:00","body_html":"\u003cp data-start=\"116\" data-end=\"404\"\u003e✨ \u003cstrong data-start=\"118\" data-end=\"158\"\u003eUniversal Chakra Crystals Collection\u003c\/strong\u003e ✨\u003cbr data-start=\"160\" data-end=\"163\"\u003eBalance, align, and energize all your chakras with our \u003cstrong data-start=\"218\" data-end=\"247\"\u003eUniversal Chakra Crystals\u003c\/strong\u003e. Carefully selected to resonate with every energy center in the body, these crystals support holistic well-being, spiritual growth, and energetic harmony.\u003c\/p\u003e\n\u003cp data-start=\"406\" data-end=\"744\"\u003eOur curated selection includes vibrant stones such as Amethyst, Citrine, Clear Quartz, and more—each chosen for their ability to promote clarity, balance, and vitality across the entire chakra system. Perfect for meditation, energy work, or creating a harmonious space, Universal Chakra Crystals help you connect mind, body, and spirit.\u003c\/p\u003e\n\u003cp data-start=\"746\" data-end=\"875\"\u003eEmbrace full-spectrum energy and elevate your spiritual journey with the transformative power of \u003cstrong data-start=\"843\" data-end=\"872\"\u003eUniversal Chakra Crystals\u003c\/strong\u003e.\u003c\/p\u003e","published_at":"2025-07-17T18:19:50-04:00","sort_order":"best-selling","template_suffix":"","disjunctive":false,"rules":[{"column":"variant_metafield_definition","relation":"equals","condition":"All Chakras"}],"published_scope":"global","image":{"created_at":"2025-07-17T19:07:58-04:00","alt":null,"width":1080,"height":1080,"src":"\/\/crystaldestiny.com\/cdn\/shop\/collections\/Universal_7_Chakras_Collection.jpg?v=1762474934"}},{"id":294880116907,"handle":"polished","title":"Polished Crystals","updated_at":"2026-01-07T23:43:11-05:00","body_html":"\u003cp data-start=\"199\" data-end=\"598\"\u003e✨ \u003cstrong data-start=\"201\" data-end=\"248\"\u003eCrystal Destiny Polished Crystal Collection\u003c\/strong\u003e ✨\u003cbr data-start=\"250\" data-end=\"253\"\u003eIndulge in the brilliance of crystals refined to perfection. Our \u003cstrong data-start=\"318\" data-end=\"341\"\u003ePolished Collection\u003c\/strong\u003e showcases gemstones meticulously shaped and smoothed to reveal their natural radiance and timeless beauty. From the shimmering glow of Quartz to the deep allure of Obsidian, each polished piece is a testament to nature’s artistry and human craftsmanship.\u003c\/p\u003e\n\u003cp data-start=\"600\" data-end=\"862\"\u003ePerfect as statement décor, meaningful gifts, or companions on your spiritual journey, polished crystals bring sophistication and elevated energy into any space. Their radiant surfaces reflect not only light but also the transformative power of crystal energy.\u003c\/p\u003e\n\u003cp data-start=\"864\" data-end=\"1022\"\u003eDiscover the elegance of refinement with Crystal Destiny’s Polished Crystal Collection—where every facet shines with intention, beauty, and timeless allure.\u003c\/p\u003e","published_at":"2023-06-05T11:30:44-04:00","sort_order":"created-desc","template_suffix":"","disjunctive":false,"rules":[{"column":"tag","relation":"equals","condition":"polished"}],"published_scope":"global"},{"id":293659312299,"handle":"best-sellers","title":"Best Sellers","updated_at":"2026-01-07T23:43:11-05:00","body_html":"\u003cp data-start=\"155\" data-end=\"510\"\u003eDiscover the pieces our community loves most. Our Best Sellers Collection brings together handpicked crystals and jewelry that embody timeless elegance, spiritual resonance, and everyday sophistication. Each item has earned its place as a customer favorite—celebrated for both its beauty and its meaningful energy.\u003c\/p\u003e\n\u003cp data-start=\"512\" data-end=\"802\"\u003eFrom stunning statement pieces to versatile daily companions, these treasures are curated to elevate your space, uplift your spirit, and reflect refined taste. Indulge in what’s most cherished and let our best sellers guide you toward the perfect blend of style and transformative energy.\u003c\/p\u003e\n\u003cp data-start=\"804\" data-end=\"932\"\u003eExplore the Best Sellers Collection today—where elegance meets intention, and every piece tells a story of beauty and balance.\u003c\/p\u003e","published_at":"2023-03-15T16:04:51-04:00","sort_order":"best-selling","template_suffix":"","disjunctive":false,"rules":[{"column":"variant_price","relation":"greater_than","condition":"0"},{"column":"variant_inventory","relation":"greater_than","condition":"0"},{"column":"type","relation":"not_equals","condition":"Shipping Protection"}],"published_scope":"global"},{"id":321370390699,"handle":"monthly-crystal-sale","title":"Monthly Crystal Sale | Spheres \u0026 Towers","updated_at":"2026-01-06T23:24:37-05:00","body_html":"\u003cp\u003eShop our \u003cstrong\u003eMonthly Crystal Sale\u003c\/strong\u003e, where you can shop a wide selection of healing crystals at discounted prices. Explore \u003cstrong\u003ecrystal spheres and towers,\u003c\/strong\u003e— all carefully curated to support meditation, energy balancing, and spiritual wellness. Whether you're looking to enhance your home decor, boost your daily energy, or find the perfect gift, our \u003cstrong\u003ecrystals for healing and manifestation\u003c\/strong\u003e offer both beauty and metaphysical benefits.\u003c\/p\u003e\n\u003cp\u003eEach month, our sale features \u003cstrong\u003enew discounted collections\u003c\/strong\u003e, from \u003cstrong\u003enatural quartz and amethyst towers\u003c\/strong\u003e to \u003cstrong\u003ewire-wrapped pendants and polished stones\u003c\/strong\u003e, so there's always something fresh to discover. Shop with confidence knowing you're getting high-quality crystals with \u003cstrong\u003efree shipping options\u003c\/strong\u003e and a trusted experience.\u003c\/p\u003e\n\u003cp\u003e\u003cstrong\u003eTake advantage of the Monthly Crystal Sale today\u003c\/strong\u003e and add powerful, natural energy to your life with \u003cstrong\u003eauthentic healing crystals\u003c\/strong\u003e — while our limited-time discounts last.\u003c\/p\u003e\n\u003cp\u003e\u003cstrong\u003e*Discount automatically applied at checkout.\u003c\/strong\u003e\u003c\/p\u003e","published_at":"2025-12-02T01:26:17-05:00","sort_order":"alpha-asc","template_suffix":"","disjunctive":true,"rules":[{"column":"tag","relation":"equals","condition":"spheres"},{"column":"tag","relation":"equals","condition":"Towers"}],"published_scope":"global","image":{"created_at":"2026-01-01T01:32:34-05:00","alt":"","width":960,"height":960,"src":"\/\/crystaldestiny.com\/cdn\/shop\/collections\/3E8C2969-1B86-4ACE-B349-98E9D8768424.jpg?v=1767249154"}},{"id":297596059819,"handle":"all","title":"All Crystals \u0026 Jewelry","updated_at":"2026-01-07T23:43:11-05:00","body_html":"\u003cp data-start=\"149\" data-end=\"494\"\u003e✨ \u003cstrong data-start=\"151\" data-end=\"181\"\u003eWelcome to Crystal Destiny\u003c\/strong\u003e ✨\u003cbr data-start=\"183\" data-end=\"186\"\u003eStep into a world where beauty, energy, and artistry unite. Our collection is a treasure trove of exquisite crystals, from the raw, untamed elegance of natural formations to the polished brilliance of expertly crafted pieces. Each crystal is a masterpiece, carrying its own unique story and timeless charm.\u003c\/p\u003e\n\u003cp data-start=\"496\" data-end=\"831\"\u003eWhether you’re drawn to the calming presence of Amethyst, the vibrant energy of Citrine, or the grounding strength of Jasper, our crystals invite you to connect with nature’s finest wonders. Perfect for enhancing your space, supporting your spiritual journey, or gifting with intention, every piece resonates with beauty and meaning.\u003c\/p\u003e\n\u003cp data-start=\"833\" data-end=\"1000\"\u003eElevate your surroundings, embrace the mystique, and explore the enchanting world of crystals at \u003cstrong data-start=\"930\" data-end=\"949\"\u003eCrystal Destiny\u003c\/strong\u003e—where every crystal is waiting to be discovered.\u003c\/p\u003e","published_at":"2023-11-10T13:55:31-05:00","sort_order":"created-desc","template_suffix":"","disjunctive":false,"rules":[{"column":"type","relation":"not_equals","condition":"asdf"}],"published_scope":"global"},{"id":296256405675,"handle":"crystal-towers","title":"Crystal Towers","updated_at":"2026-01-06T23:24:37-05:00","body_html":"\u003cp data-end=\"568\" data-start=\"152\"\u003e✨ \u003cstrong data-end=\"190\" data-start=\"154\"\u003eCrystal Destiny Tower Collection\u003c\/strong\u003e ✨\u003cbr data-end=\"195\" data-start=\"192\"\u003eEnchant your space with the timeless beauty and powerful energy of crystal towers. Each piece in our \u003cstrong data-end=\"316\" data-start=\"296\"\u003eTower Collection\u003c\/strong\u003e is carefully crafted to showcase nature’s artistry while radiating higher vibrations and spiritual resonance. From the clarity of Quartz to the calming presence of Amethyst, these towers are both decorative masterpieces and tools for transformation.\u003c\/p\u003e\n\u003cp data-end=\"765\" data-start=\"570\"\u003ePerfect for meditation spaces, energy work, or simply elevating your home décor, crystal towers channel focused energy upward—creating balance, harmony, and refined elegance in any environment.\u003c\/p\u003e\n\u003cp data-end=\"917\" data-start=\"767\"\u003eDiscover the Crystal Destiny Tower Collection today and transform your surroundings into a sanctuary of beauty, purpose, and spiritual significance.\u003c\/p\u003e\n\u003ch2\u003eCrystal Towers, Wands, Generators, Points, Pillars \u0026amp; Obelisks — What's the Difference?\u003c\/h2\u003e\n\u003cp id=\"isPasted\"\u003eWhile these terms may vary, they all describe beautifully shaped crystals with a pointed tip designed to channel and direct energy. Each name highlights a unique aspect of their use:\u003c\/p\u003e\n\u003cul\u003e\n\u003cli\u003e\n\u003cstrong\u003eTowers\u003c\/strong\u003e- Known for their steady, grounding presence, crystal towers help focus and amplify energy, making them perfect for meditation and manifestation.\u003c\/li\u003e\n\u003cli\u003e\n\u003cstrong\u003eWands\u003c\/strong\u003e- Traditionally used in energy work and healing, crystal wands are excellent for directing energy flow and clearing blockages.\u003c\/li\u003e\n\u003cli\u003e\n\u003cstrong\u003ePillars\u003c\/strong\u003e- Symbolizing strength and stability, crystal pillars create a balanced and harmonious environment, making them great for home decor and spiritual practices.\u003c\/li\u003e\n\u003cli\u003e\n\u003cstrong\u003eObelisks\u003c\/strong\u003e- Inspired by ancient structures, crystal obelisks are believed to connect earthly and spiritual energies, making them powerful tools for transformation and enlightenment.\u003c\/li\u003e\n\u003c\/ul\u003e\n\u003cp\u003eNo matter what you call them, these crystals serve the same purpose—to enhance energy, intention, and harmony in your space. Choose the one that resonates most with you!\u003c\/p\u003e","published_at":"2023-09-14T12:52:35-04:00","sort_order":"created-desc","template_suffix":"","disjunctive":false,"rules":[{"column":"tag","relation":"equals","condition":"towers"}],"published_scope":"global"},{"id":298983391403,"handle":"january-crystal-sale","title":"January Sale | 25% Off Crystal Towers \u0026 Spheres","updated_at":"2026-01-06T23:24:37-05:00","body_html":"\u003cp\u003eShop our \u003cstrong\u003eJanuary Crystal Sale\u003c\/strong\u003e, where you can shop a wide selection of healing crystals at discounted prices. Explore \u003cstrong\u003eCrystal Towers, \u0026amp; Crystal Spheres\u003c\/strong\u003e — all carefully curated and crafted to support meditation, energy balancing, and spiritual wellness. Whether you're looking to enhance your home decor, boost your daily energy, or find the perfect gift, our \u003cstrong\u003ecrystals for healing and manifestation\u003c\/strong\u003e offer both beauty and metaphysical benefits.\u003c\/p\u003e\n\u003cp\u003eThis January, our sale features \u003cstrong\u003ediscounted crystal towers and spheres\u003c\/strong\u003e, from \u003cstrong\u003enatural quartz \u003c\/strong\u003eand \u003cstrong\u003eamethyst \u003c\/strong\u003eto \u003cstrong\u003ebumblebee jasper \u003c\/strong\u003eand \u003cstrong\u003ecarnelian\u003c\/strong\u003e, so there's always something fresh to discover. Shop with confidence knowing you're getting high-quality crystals with \u003cstrong\u003efree shipping options\u003c\/strong\u003e and a trusted experience.\u003c\/p\u003e\n\u003cp\u003e\u003cstrong\u003eTake advantage of the January Crystal Sale today\u003c\/strong\u003e and add powerful, natural energy to your life with \u003cstrong\u003eauthentic healing crystals\u003c\/strong\u003e — while our limited-time discounts last.\u003c\/p\u003e\n\u003cp\u003e\u003cstrong\u003e*Discount automatically applied at checkout.\u003c\/strong\u003e\u003c\/p\u003e","published_at":"2026-01-01T00:07:17-05:00","sort_order":"alpha-asc","template_suffix":"monthly-collection","disjunctive":true,"rules":[{"column":"tag","relation":"equals","condition":"Spheres"},{"column":"tag","relation":"equals","condition":"Towers"}],"published_scope":"global","image":{"created_at":"2026-01-01T01:29:59-05:00","alt":"","width":960,"height":960,"src":"\/\/crystaldestiny.com\/cdn\/shop\/collections\/1464163B-22B1-4D62-BEC5-CEC9AECB670B.jpg?v=1767248999"}}]}
[{"alt":"Clear Quartz Towers-Towers-Crystal Destiny-Clear Quartz-84g - 3.75\"H x 1.00\"W-Crystal Destiny","id":31753422209195,"position":1,"preview_image":{"aspect_ratio":1.0,"height":1776,"width":1776,"src":"\/\/crystaldestiny.com\/cdn\/shop\/files\/Clear-Quartz-Towers-Towers.jpg?v=1757481096"},"aspect_ratio":1.0,"height":1776,"media_type":"image","src":"\/\/crystaldestiny.com\/cdn\/shop\/files\/Clear-Quartz-Towers-Towers.jpg?v=1757481096","width":1776},{"alt":"Clear Quartz Towers-Towers-Crystal Destiny-Clear Quartz-84g - 3.75\"H x 1.00\"W-Crystal Destiny","id":31753422241963,"position":2,"preview_image":{"aspect_ratio":1.0,"height":2048,"width":2048,"src":"\/\/crystaldestiny.com\/cdn\/shop\/files\/Clear-Quartz-Towers-Towers-Clear-Quartz-84g-3_75H-x-1_00W-2.jpg?v=1765429647"},"aspect_ratio":1.0,"height":2048,"media_type":"image","src":"\/\/crystaldestiny.com\/cdn\/shop\/files\/Clear-Quartz-Towers-Towers-Clear-Quartz-84g-3_75H-x-1_00W-2.jpg?v=1765429647","width":2048},{"alt":"Clear Quartz Towers-Towers-Crystal Destiny-Clear Quartz-86g - 3.75\"H x 1.00\"W-Crystal Destiny","id":31753422274731,"position":3,"preview_image":{"aspect_ratio":1.0,"height":2048,"width":2048,"src":"\/\/crystaldestiny.com\/cdn\/shop\/files\/Clear-Quartz-Towers-Towers-Clear-Quartz-86g-3_75H-x-1_00W-3.jpg?v=1765429649"},"aspect_ratio":1.0,"height":2048,"media_type":"image","src":"\/\/crystaldestiny.com\/cdn\/shop\/files\/Clear-Quartz-Towers-Towers-Clear-Quartz-86g-3_75H-x-1_00W-3.jpg?v=1765429649","width":2048},{"alt":"Clear Quartz Towers-Towers-Crystal Destiny-Clear Quartz-98g - 4.00\"H x 1.00\"W-Crystal Destiny","id":31753422307499,"position":4,"preview_image":{"aspect_ratio":1.0,"height":2048,"width":2048,"src":"\/\/crystaldestiny.com\/cdn\/shop\/files\/Clear-Quartz-Towers-Towers-Clear-Quartz-98g-4_00H-x-1_00W-4.jpg?v=1765429651"},"aspect_ratio":1.0,"height":2048,"media_type":"image","src":"\/\/crystaldestiny.com\/cdn\/shop\/files\/Clear-Quartz-Towers-Towers-Clear-Quartz-98g-4_00H-x-1_00W-4.jpg?v=1765429651","width":2048}]
{"item":{"id":8440115429547,"title":"Punta de cuarzo transparente craquelada","handle":"crackle-clear-quartz-point-cd-10097","description":"\u003cp\u003e El Cuarzo Transparente Crackle presenta distintivas fracturas internas que crean una cautivadora apariencia de \"hielo agrietado\", manteniendo la integridad de la piedra. Estas inclusiones naturales mejoran la dispersión de la luz, creando un efecto óptico único. Valorado por los entusiastas de los cristales por sus propiedades de energía amplificada, esta variedad de cuarzo combina el atractivo estético con los atributos metafísicos del cuarzo transparente tradicional.\u003c\/p\u003e\n\n\u003cp\u003e Este producto es exactamente como se muestra en la imagen, único en su tipo.\u003c\/p\u003e \u003cdiv\u003e\u003cspan style=\"font-size: 0.875rem;\"\u003eTorres de Cristal, Varas, Generadores, Puntas, Pilares y Obeliscos: ¿Cuál es la Diferencia?\u003c\/span\u003e\u003c\/div\u003e\n\u003cdiv\u003e Si bien estos términos pueden variar, todos describen cristales de formas hermosas con una punta puntiaguda diseñada para canalizar y dirigir la energía. Cada nombre destaca un aspecto único de su uso:\u003c\/div\u003e\n\u003cdiv\u003e \u0026lt;ul\u0026gt;\u003c\/div\u003e\n\u003cdiv\u003e \u0026lt;li\u0026gt;\u003c\/div\u003e\n\u003cdiv\u003e \u0026lt;strong\u0026gt;Torres\u0026lt;\/strong\u0026gt;: Conocidas por su presencia constante y estabilizadora, las torres de cristal ayudan a enfocar y amplificar la energía, lo que las hace perfectas para la meditación y la manifestación.\u0026lt;\/li\u0026gt;\u003c\/div\u003e\n\u003cdiv\u003e \u0026lt;li\u0026gt;\u003c\/div\u003e\n\u003cdiv\u003e \u0026lt;strong\u0026gt;Varitas\u0026lt;\/strong\u0026gt;: Tradicionalmente utilizadas en el trabajo energético y la curación, las varitas de cristal son excelentes para dirigir el flujo de energía y eliminar bloqueos.\u0026lt;\/li\u0026gt;\u003c\/div\u003e\n\u003cdiv\u003e \u0026lt;li\u0026gt;\u003c\/div\u003e\n\u003cdiv\u003e \u0026lt;strong\u0026gt;Pilares\u0026lt;\/strong\u0026gt;: Simbolizando fuerza y estabilidad, los pilares de cristal crean un ambiente equilibrado y armonioso, lo que los hace ideales para la decoración del hogar y las prácticas espirituales.\u0026lt;\/li\u0026gt;\u003c\/div\u003e\n\u003cdiv\u003e \u0026lt;li\u0026gt;\u003c\/div\u003e \u003cdiv\u003e\u0026lt;strong\u0026gt;Obeliscos\u0026lt;\/strong\u0026gt;: Inspirados en estructuras antiguas, se cree que los obeliscos de cristal conectan las energías terrenales y espirituales, lo que los convierte en poderosas herramientas para la transformación y la iluminación.\u0026lt;\/li\u0026gt;\u003c\/div\u003e\n\u003cdiv\u003e \u0026lt;\/ul\u0026gt;\u003c\/div\u003e\n\u003cdiv\u003e No importa cómo los llames, estos cristales tienen el mismo propósito: potenciar la energía, la intención y la armonía en tu espacio. ¡Elige el que más te resuene!\u003c\/div\u003e","published_at":"2025-05-29T17:52:55-04:00","created_at":"2025-05-29T17:52:56-04:00","vendor":"Crystal Destiny","type":"Agujas","tags":["crystal","polished","Towers"],"price":4599,"price_min":4599,"price_max":4599,"available":true,"price_varies":false,"compare_at_price":null,"compare_at_price_min":0,"compare_at_price_max":0,"compare_at_price_varies":false,"variants":[{"id":45261380386987,"title":"Cuarzo craquelado \/ 164 g - 2,75\" de alto","option1":"Cuarzo craquelado","option2":"164 g - 2,75\" de alto","option3":null,"sku":"CD-10097","requires_shipping":true,"taxable":true,"featured_image":null,"available":true,"name":"Punta de cuarzo transparente craquelada - Cuarzo craquelado \/ 164 g - 2,75\" de alto","public_title":"Cuarzo craquelado \/ 164 g - 2,75\" de alto","options":["Cuarzo craquelado","164 g - 2,75\" de alto"],"price":4599,"weight":0,"compare_at_price":null,"inventory_management":"shopify","barcode":"","requires_selling_plan":false,"selling_plan_allocations":[]}],"images":["\/\/crystaldestiny.com\/cdn\/shop\/files\/Crackle-Clear-Quartz-Point-Points.jpg?v=1757201010"],"featured_image":"\/\/crystaldestiny.com\/cdn\/shop\/files\/Crackle-Clear-Quartz-Point-Points.jpg?v=1757201010","options":["Material","Tamaño"],"media":[{"alt":"Crackle Clear Quartz Point-Points-Crystal Destiny-Crackle Quartz-164g - 2.75\"H-Crystal Destiny","id":31176313929899,"position":1,"preview_image":{"aspect_ratio":1.0,"height":1565,"width":1565,"src":"\/\/crystaldestiny.com\/cdn\/shop\/files\/Crackle-Clear-Quartz-Point-Points.jpg?v=1757201010"},"aspect_ratio":1.0,"height":1565,"media_type":"image","src":"\/\/crystaldestiny.com\/cdn\/shop\/files\/Crackle-Clear-Quartz-Point-Points.jpg?v=1757201010","width":1565}],"requires_selling_plan":false,"selling_plan_groups":[],"content":"\u003cp\u003e El Cuarzo Transparente Crackle presenta distintivas fracturas internas que crean una cautivadora apariencia de \"hielo agrietado\", manteniendo la integridad de la piedra. Estas inclusiones naturales mejoran la dispersión de la luz, creando un efecto óptico único. Valorado por los entusiastas de los cristales por sus propiedades de energía amplificada, esta variedad de cuarzo combina el atractivo estético con los atributos metafísicos del cuarzo transparente tradicional.\u003c\/p\u003e\n\n\u003cp\u003e Este producto es exactamente como se muestra en la imagen, único en su tipo.\u003c\/p\u003e \u003cdiv\u003e\u003cspan style=\"font-size: 0.875rem;\"\u003eTorres de Cristal, Varas, Generadores, Puntas, Pilares y Obeliscos: ¿Cuál es la Diferencia?\u003c\/span\u003e\u003c\/div\u003e\n\u003cdiv\u003e Si bien estos términos pueden variar, todos describen cristales de formas hermosas con una punta puntiaguda diseñada para canalizar y dirigir la energía. Cada nombre destaca un aspecto único de su uso:\u003c\/div\u003e\n\u003cdiv\u003e \u0026lt;ul\u0026gt;\u003c\/div\u003e\n\u003cdiv\u003e \u0026lt;li\u0026gt;\u003c\/div\u003e\n\u003cdiv\u003e \u0026lt;strong\u0026gt;Torres\u0026lt;\/strong\u0026gt;: Conocidas por su presencia constante y estabilizadora, las torres de cristal ayudan a enfocar y amplificar la energía, lo que las hace perfectas para la meditación y la manifestación.\u0026lt;\/li\u0026gt;\u003c\/div\u003e\n\u003cdiv\u003e \u0026lt;li\u0026gt;\u003c\/div\u003e\n\u003cdiv\u003e \u0026lt;strong\u0026gt;Varitas\u0026lt;\/strong\u0026gt;: Tradicionalmente utilizadas en el trabajo energético y la curación, las varitas de cristal son excelentes para dirigir el flujo de energía y eliminar bloqueos.\u0026lt;\/li\u0026gt;\u003c\/div\u003e\n\u003cdiv\u003e \u0026lt;li\u0026gt;\u003c\/div\u003e\n\u003cdiv\u003e \u0026lt;strong\u0026gt;Pilares\u0026lt;\/strong\u0026gt;: Simbolizando fuerza y estabilidad, los pilares de cristal crean un ambiente equilibrado y armonioso, lo que los hace ideales para la decoración del hogar y las prácticas espirituales.\u0026lt;\/li\u0026gt;\u003c\/div\u003e\n\u003cdiv\u003e \u0026lt;li\u0026gt;\u003c\/div\u003e \u003cdiv\u003e\u0026lt;strong\u0026gt;Obeliscos\u0026lt;\/strong\u0026gt;: Inspirados en estructuras antiguas, se cree que los obeliscos de cristal conectan las energías terrenales y espirituales, lo que los convierte en poderosas herramientas para la transformación y la iluminación.\u0026lt;\/li\u0026gt;\u003c\/div\u003e\n\u003cdiv\u003e \u0026lt;\/ul\u0026gt;\u003c\/div\u003e\n\u003cdiv\u003e No importa cómo los llames, estos cristales tienen el mismo propósito: potenciar la energía, la intención y la armonía en tu espacio. ¡Elige el que más te resuene!\u003c\/div\u003e"},"options":[{"name":"Material","position":1,"values":["Cuarzo craquelado"]},{"name":"Tamaño","position":2,"values":["164 g - 2,75\" de alto"]}],"custom_metafields":{"shipping_time":"En un plazo de 7 días"},"metafields":{"badge":"\u003cdiv style='display:none' class='jdgm-prev-badge' data-average-rating='0.00' data-number-of-reviews='0' data-number-of-questions='0'\u003e \u003cspan class='jdgm-prev-badge__stars' data-score='0.00' tabindex='0' aria-label='0.00 stars' role='button'\u003e \u003cspan class='jdgm-star jdgm--off'\u003e\u003c\/span\u003e\u003cspan class='jdgm-star jdgm--off'\u003e\u003c\/span\u003e\u003cspan class='jdgm-star jdgm--off'\u003e\u003c\/span\u003e\u003cspan class='jdgm-star jdgm--off'\u003e\u003c\/span\u003e\u003cspan class='jdgm-star jdgm--off'\u003e\u003c\/span\u003e \u003c\/span\u003e \u003cspan class='jdgm-prev-badge__text'\u003e No reviews \u003c\/span\u003e \u003c\/div\u003e","widget":"\u003cdiv class='jdgm-rev-widg' data-updated-at='2025-05-29T21:52:58Z' data-average-rating='0.00' data-number-of-reviews='0' data-number-of-questions='0'\u003e \u003cstyle class='jdgm-temp-hiding-style'\u003e.jdgm-rev-widg{ display: none }\u003c\/style\u003e \u003cdiv class='jdgm-rev-widg__header'\u003e \u003ch2 class='jdgm-rev-widg__title'\u003eCustomer Reviews\u003c\/h2\u003e \u003cdiv class='jdgm-rev-widg__summary'\u003e \u003cdiv class='jdgm-rev-widg__summary-stars' aria-label='Average rating is 0.00 stars' role='img'\u003e \u003cspan class='jdgm-star jdgm--off'\u003e\u003c\/span\u003e\u003cspan class='jdgm-star jdgm--off'\u003e\u003c\/span\u003e\u003cspan class='jdgm-star jdgm--off'\u003e\u003c\/span\u003e\u003cspan class='jdgm-star jdgm--off'\u003e\u003c\/span\u003e\u003cspan class='jdgm-star jdgm--off'\u003e\u003c\/span\u003e \u003c\/div\u003e \u003cdiv class='jdgm-rev-widg__summary-text'\u003eBe the first to write a review\u003c\/div\u003e \u003c\/div\u003e \u003ca style='display: none' href='#' class='jdgm-write-rev-link' role='button'\u003eWrite a review\u003c\/a\u003e \u003cdiv class='jdgm-histogram jdgm-temp-hidden'\u003e \u003cdiv class='jdgm-histogram__row' data-rating='5' data-frequency='0' data-percentage='0'\u003e \u003cdiv class='jdgm-histogram__star' role='button' aria-label=\"0% (0) reviews with 5 star rating\" tabindex='0' \u003e\u003cspan class='jdgm-star jdgm--on'\u003e\u003c\/span\u003e\u003cspan class='jdgm-star jdgm--on'\u003e\u003c\/span\u003e\u003cspan class='jdgm-star jdgm--on'\u003e\u003c\/span\u003e\u003cspan class='jdgm-star jdgm--on'\u003e\u003c\/span\u003e\u003cspan class='jdgm-star jdgm--on'\u003e\u003c\/span\u003e\u003c\/div\u003e \u003cdiv class='jdgm-histogram__bar'\u003e \u003cdiv class='jdgm-histogram__bar-content' style='width: 0%;'\u003e \u003c\/div\u003e \u003c\/div\u003e \u003cdiv class='jdgm-histogram__percentage'\u003e0%\u003c\/div\u003e \u003cdiv class='jdgm-histogram__frequency'\u003e(0)\u003c\/div\u003e \u003c\/div\u003e \u003cdiv class='jdgm-histogram__row' data-rating='4' data-frequency='0' data-percentage='0'\u003e \u003cdiv class='jdgm-histogram__star' role='button' aria-label=\"0% (0) reviews with 4 star rating\" tabindex='0' \u003e\u003cspan class='jdgm-star jdgm--on'\u003e\u003c\/span\u003e\u003cspan class='jdgm-star jdgm--on'\u003e\u003c\/span\u003e\u003cspan class='jdgm-star jdgm--on'\u003e\u003c\/span\u003e\u003cspan class='jdgm-star jdgm--on'\u003e\u003c\/span\u003e\u003cspan class='jdgm-star jdgm--off'\u003e\u003c\/span\u003e\u003c\/div\u003e \u003cdiv class='jdgm-histogram__bar'\u003e \u003cdiv class='jdgm-histogram__bar-content' style='width: 0%;'\u003e \u003c\/div\u003e \u003c\/div\u003e \u003cdiv class='jdgm-histogram__percentage'\u003e0%\u003c\/div\u003e \u003cdiv class='jdgm-histogram__frequency'\u003e(0)\u003c\/div\u003e \u003c\/div\u003e \u003cdiv class='jdgm-histogram__row' data-rating='3' data-frequency='0' data-percentage='0'\u003e \u003cdiv class='jdgm-histogram__star' role='button' aria-label=\"0% (0) reviews with 3 star rating\" tabindex='0' \u003e\u003cspan class='jdgm-star jdgm--on'\u003e\u003c\/span\u003e\u003cspan class='jdgm-star jdgm--on'\u003e\u003c\/span\u003e\u003cspan class='jdgm-star jdgm--on'\u003e\u003c\/span\u003e\u003cspan class='jdgm-star jdgm--off'\u003e\u003c\/span\u003e\u003cspan class='jdgm-star jdgm--off'\u003e\u003c\/span\u003e\u003c\/div\u003e \u003cdiv class='jdgm-histogram__bar'\u003e \u003cdiv class='jdgm-histogram__bar-content' style='width: 0%;'\u003e \u003c\/div\u003e \u003c\/div\u003e \u003cdiv class='jdgm-histogram__percentage'\u003e0%\u003c\/div\u003e \u003cdiv class='jdgm-histogram__frequency'\u003e(0)\u003c\/div\u003e \u003c\/div\u003e \u003cdiv class='jdgm-histogram__row' data-rating='2' data-frequency='0' data-percentage='0'\u003e \u003cdiv class='jdgm-histogram__star' role='button' aria-label=\"0% (0) reviews with 2 star rating\" tabindex='0' \u003e\u003cspan class='jdgm-star jdgm--on'\u003e\u003c\/span\u003e\u003cspan class='jdgm-star jdgm--on'\u003e\u003c\/span\u003e\u003cspan class='jdgm-star jdgm--off'\u003e\u003c\/span\u003e\u003cspan class='jdgm-star jdgm--off'\u003e\u003c\/span\u003e\u003cspan class='jdgm-star jdgm--off'\u003e\u003c\/span\u003e\u003c\/div\u003e \u003cdiv class='jdgm-histogram__bar'\u003e \u003cdiv class='jdgm-histogram__bar-content' style='width: 0%;'\u003e \u003c\/div\u003e \u003c\/div\u003e \u003cdiv class='jdgm-histogram__percentage'\u003e0%\u003c\/div\u003e \u003cdiv class='jdgm-histogram__frequency'\u003e(0)\u003c\/div\u003e \u003c\/div\u003e \u003cdiv class='jdgm-histogram__row' data-rating='1' data-frequency='0' data-percentage='0'\u003e \u003cdiv class='jdgm-histogram__star' role='button' aria-label=\"0% (0) reviews with 1 star rating\" tabindex='0' \u003e\u003cspan class='jdgm-star jdgm--on'\u003e\u003c\/span\u003e\u003cspan class='jdgm-star jdgm--off'\u003e\u003c\/span\u003e\u003cspan class='jdgm-star jdgm--off'\u003e\u003c\/span\u003e\u003cspan class='jdgm-star jdgm--off'\u003e\u003c\/span\u003e\u003cspan class='jdgm-star jdgm--off'\u003e\u003c\/span\u003e\u003c\/div\u003e \u003cdiv class='jdgm-histogram__bar'\u003e \u003cdiv class='jdgm-histogram__bar-content' style='width: 0%;'\u003e \u003c\/div\u003e \u003c\/div\u003e \u003cdiv class='jdgm-histogram__percentage'\u003e0%\u003c\/div\u003e \u003cdiv class='jdgm-histogram__frequency'\u003e(0)\u003c\/div\u003e \u003c\/div\u003e \u003cdiv class='jdgm-histogram__row jdgm-histogram__clear-filter' data-rating=null tabindex='0'\u003e\u003c\/div\u003e \u003c\/div\u003e \u003cdiv class='jdgm-rev-widg__sort-wrapper'\u003e\u003c\/div\u003e \u003c\/div\u003e \u003cdiv class='jdgm-rev-widg__body'\u003e \u003cdiv class='jdgm-rev-widg__reviews'\u003e\u003c\/div\u003e \u003cdiv class='jdgm-paginate' data-per-page='5' data-url='https:\/\/api.judge.me\/reviews\/reviews_for_widget' style=\"display: none;\"\u003e\u003c\/div\u003e \u003c\/div\u003e \u003cdiv class='jdgm-rev-widg__paginate-spinner-wrapper'\u003e \u003cdiv class='jdgm-spinner'\u003e\u003c\/div\u003e \u003c\/div\u003e \u003c\/div\u003e"},"collections":[{"id":294880051371,"handle":"crystals","title":"Crystals","updated_at":"2026-01-07T23:43:11-05:00","body_html":"\u003cp data-start=\"159\" data-end=\"687\"\u003e✨ \u003cstrong data-start=\"161\" data-end=\"216\"\u003eDiscover the Magic of Crystals with Crystal Destiny\u003c\/strong\u003e ✨\u003cbr data-start=\"218\" data-end=\"221\"\u003eCrystals have been treasured for centuries—not only for their natural beauty but also for their powerful healing energies. Beyond their visual allure, they bring balance, harmony, and positive energy into any space. Whether used for home décor, meditation, or simply to elevate the energy of your surroundings, crystals create a sanctuary of peace, relaxation, and well-being. Each piece is a unique gift from the Earth—visually stunning and spiritually uplifting.\u003c\/p\u003e\n\u003cp data-start=\"689\" data-end=\"1011\"\u003eAt \u003cstrong data-start=\"692\" data-end=\"711\"\u003eCrystal Destiny\u003c\/strong\u003e, our signature collection showcases a curated selection of exquisite crystals, from radiant Quartz to soothing Amethyst. Every stone is carefully sourced for its elegance and metaphysical resonance, making them perfect for enhancing your home, uplifting your spirit, or gifting to someone special.\u003c\/p\u003e\n\u003cp data-start=\"1013\" data-end=\"1206\"\u003eExperience the timeless sophistication of crystalline wonders. Explore the \u003cstrong data-start=\"1088\" data-end=\"1118\"\u003eCrystal Destiny Collection\u003c\/strong\u003e today and bring the transformative beauty of these treasures into your everyday life.\u003c\/p\u003e","published_at":"2023-06-05T11:24:02-04:00","sort_order":"created-desc","template_suffix":"","disjunctive":false,"rules":[{"column":"tag","relation":"equals","condition":"crystal"},{"column":"type","relation":"not_contains","condition":"925 Sterling Silver"},{"column":"type","relation":"not_contains","condition":"Wire Wraps"}],"published_scope":"global"},{"id":319456084139,"handle":"universal-chakra-crystals","title":"Universal Chakra Crystals","updated_at":"2026-01-06T23:24:24-05:00","body_html":"\u003cp data-start=\"116\" data-end=\"404\"\u003e✨ \u003cstrong data-start=\"118\" data-end=\"158\"\u003eUniversal Chakra Crystals Collection\u003c\/strong\u003e ✨\u003cbr data-start=\"160\" data-end=\"163\"\u003eBalance, align, and energize all your chakras with our \u003cstrong data-start=\"218\" data-end=\"247\"\u003eUniversal Chakra Crystals\u003c\/strong\u003e. Carefully selected to resonate with every energy center in the body, these crystals support holistic well-being, spiritual growth, and energetic harmony.\u003c\/p\u003e\n\u003cp data-start=\"406\" data-end=\"744\"\u003eOur curated selection includes vibrant stones such as Amethyst, Citrine, Clear Quartz, and more—each chosen for their ability to promote clarity, balance, and vitality across the entire chakra system. Perfect for meditation, energy work, or creating a harmonious space, Universal Chakra Crystals help you connect mind, body, and spirit.\u003c\/p\u003e\n\u003cp data-start=\"746\" data-end=\"875\"\u003eEmbrace full-spectrum energy and elevate your spiritual journey with the transformative power of \u003cstrong data-start=\"843\" data-end=\"872\"\u003eUniversal Chakra Crystals\u003c\/strong\u003e.\u003c\/p\u003e","published_at":"2025-07-17T18:19:50-04:00","sort_order":"best-selling","template_suffix":"","disjunctive":false,"rules":[{"column":"variant_metafield_definition","relation":"equals","condition":"All Chakras"}],"published_scope":"global","image":{"created_at":"2025-07-17T19:07:58-04:00","alt":null,"width":1080,"height":1080,"src":"\/\/crystaldestiny.com\/cdn\/shop\/collections\/Universal_7_Chakras_Collection.jpg?v=1762474934"}},{"id":294880116907,"handle":"polished","title":"Polished Crystals","updated_at":"2026-01-07T23:43:11-05:00","body_html":"\u003cp data-start=\"199\" data-end=\"598\"\u003e✨ \u003cstrong data-start=\"201\" data-end=\"248\"\u003eCrystal Destiny Polished Crystal Collection\u003c\/strong\u003e ✨\u003cbr data-start=\"250\" data-end=\"253\"\u003eIndulge in the brilliance of crystals refined to perfection. Our \u003cstrong data-start=\"318\" data-end=\"341\"\u003ePolished Collection\u003c\/strong\u003e showcases gemstones meticulously shaped and smoothed to reveal their natural radiance and timeless beauty. From the shimmering glow of Quartz to the deep allure of Obsidian, each polished piece is a testament to nature’s artistry and human craftsmanship.\u003c\/p\u003e\n\u003cp data-start=\"600\" data-end=\"862\"\u003ePerfect as statement décor, meaningful gifts, or companions on your spiritual journey, polished crystals bring sophistication and elevated energy into any space. Their radiant surfaces reflect not only light but also the transformative power of crystal energy.\u003c\/p\u003e\n\u003cp data-start=\"864\" data-end=\"1022\"\u003eDiscover the elegance of refinement with Crystal Destiny’s Polished Crystal Collection—where every facet shines with intention, beauty, and timeless allure.\u003c\/p\u003e","published_at":"2023-06-05T11:30:44-04:00","sort_order":"created-desc","template_suffix":"","disjunctive":false,"rules":[{"column":"tag","relation":"equals","condition":"polished"}],"published_scope":"global"},{"id":293659312299,"handle":"best-sellers","title":"Best Sellers","updated_at":"2026-01-07T23:43:11-05:00","body_html":"\u003cp data-start=\"155\" data-end=\"510\"\u003eDiscover the pieces our community loves most. Our Best Sellers Collection brings together handpicked crystals and jewelry that embody timeless elegance, spiritual resonance, and everyday sophistication. Each item has earned its place as a customer favorite—celebrated for both its beauty and its meaningful energy.\u003c\/p\u003e\n\u003cp data-start=\"512\" data-end=\"802\"\u003eFrom stunning statement pieces to versatile daily companions, these treasures are curated to elevate your space, uplift your spirit, and reflect refined taste. Indulge in what’s most cherished and let our best sellers guide you toward the perfect blend of style and transformative energy.\u003c\/p\u003e\n\u003cp data-start=\"804\" data-end=\"932\"\u003eExplore the Best Sellers Collection today—where elegance meets intention, and every piece tells a story of beauty and balance.\u003c\/p\u003e","published_at":"2023-03-15T16:04:51-04:00","sort_order":"best-selling","template_suffix":"","disjunctive":false,"rules":[{"column":"variant_price","relation":"greater_than","condition":"0"},{"column":"variant_inventory","relation":"greater_than","condition":"0"},{"column":"type","relation":"not_equals","condition":"Shipping Protection"}],"published_scope":"global"},{"id":321370390699,"handle":"monthly-crystal-sale","title":"Monthly Crystal Sale | Spheres \u0026 Towers","updated_at":"2026-01-06T23:24:37-05:00","body_html":"\u003cp\u003eShop our \u003cstrong\u003eMonthly Crystal Sale\u003c\/strong\u003e, where you can shop a wide selection of healing crystals at discounted prices. Explore \u003cstrong\u003ecrystal spheres and towers,\u003c\/strong\u003e— all carefully curated to support meditation, energy balancing, and spiritual wellness. Whether you're looking to enhance your home decor, boost your daily energy, or find the perfect gift, our \u003cstrong\u003ecrystals for healing and manifestation\u003c\/strong\u003e offer both beauty and metaphysical benefits.\u003c\/p\u003e\n\u003cp\u003eEach month, our sale features \u003cstrong\u003enew discounted collections\u003c\/strong\u003e, from \u003cstrong\u003enatural quartz and amethyst towers\u003c\/strong\u003e to \u003cstrong\u003ewire-wrapped pendants and polished stones\u003c\/strong\u003e, so there's always something fresh to discover. Shop with confidence knowing you're getting high-quality crystals with \u003cstrong\u003efree shipping options\u003c\/strong\u003e and a trusted experience.\u003c\/p\u003e\n\u003cp\u003e\u003cstrong\u003eTake advantage of the Monthly Crystal Sale today\u003c\/strong\u003e and add powerful, natural energy to your life with \u003cstrong\u003eauthentic healing crystals\u003c\/strong\u003e — while our limited-time discounts last.\u003c\/p\u003e\n\u003cp\u003e\u003cstrong\u003e*Discount automatically applied at checkout.\u003c\/strong\u003e\u003c\/p\u003e","published_at":"2025-12-02T01:26:17-05:00","sort_order":"alpha-asc","template_suffix":"","disjunctive":true,"rules":[{"column":"tag","relation":"equals","condition":"spheres"},{"column":"tag","relation":"equals","condition":"Towers"}],"published_scope":"global","image":{"created_at":"2026-01-01T01:32:34-05:00","alt":"","width":960,"height":960,"src":"\/\/crystaldestiny.com\/cdn\/shop\/collections\/3E8C2969-1B86-4ACE-B349-98E9D8768424.jpg?v=1767249154"}},{"id":297596059819,"handle":"all","title":"All Crystals \u0026 Jewelry","updated_at":"2026-01-07T23:43:11-05:00","body_html":"\u003cp data-start=\"149\" data-end=\"494\"\u003e✨ \u003cstrong data-start=\"151\" data-end=\"181\"\u003eWelcome to Crystal Destiny\u003c\/strong\u003e ✨\u003cbr data-start=\"183\" data-end=\"186\"\u003eStep into a world where beauty, energy, and artistry unite. Our collection is a treasure trove of exquisite crystals, from the raw, untamed elegance of natural formations to the polished brilliance of expertly crafted pieces. Each crystal is a masterpiece, carrying its own unique story and timeless charm.\u003c\/p\u003e\n\u003cp data-start=\"496\" data-end=\"831\"\u003eWhether you’re drawn to the calming presence of Amethyst, the vibrant energy of Citrine, or the grounding strength of Jasper, our crystals invite you to connect with nature’s finest wonders. Perfect for enhancing your space, supporting your spiritual journey, or gifting with intention, every piece resonates with beauty and meaning.\u003c\/p\u003e\n\u003cp data-start=\"833\" data-end=\"1000\"\u003eElevate your surroundings, embrace the mystique, and explore the enchanting world of crystals at \u003cstrong data-start=\"930\" data-end=\"949\"\u003eCrystal Destiny\u003c\/strong\u003e—where every crystal is waiting to be discovered.\u003c\/p\u003e","published_at":"2023-11-10T13:55:31-05:00","sort_order":"created-desc","template_suffix":"","disjunctive":false,"rules":[{"column":"type","relation":"not_equals","condition":"asdf"}],"published_scope":"global"},{"id":296256405675,"handle":"crystal-towers","title":"Crystal Towers","updated_at":"2026-01-06T23:24:37-05:00","body_html":"\u003cp data-end=\"568\" data-start=\"152\"\u003e✨ \u003cstrong data-end=\"190\" data-start=\"154\"\u003eCrystal Destiny Tower Collection\u003c\/strong\u003e ✨\u003cbr data-end=\"195\" data-start=\"192\"\u003eEnchant your space with the timeless beauty and powerful energy of crystal towers. Each piece in our \u003cstrong data-end=\"316\" data-start=\"296\"\u003eTower Collection\u003c\/strong\u003e is carefully crafted to showcase nature’s artistry while radiating higher vibrations and spiritual resonance. From the clarity of Quartz to the calming presence of Amethyst, these towers are both decorative masterpieces and tools for transformation.\u003c\/p\u003e\n\u003cp data-end=\"765\" data-start=\"570\"\u003ePerfect for meditation spaces, energy work, or simply elevating your home décor, crystal towers channel focused energy upward—creating balance, harmony, and refined elegance in any environment.\u003c\/p\u003e\n\u003cp data-end=\"917\" data-start=\"767\"\u003eDiscover the Crystal Destiny Tower Collection today and transform your surroundings into a sanctuary of beauty, purpose, and spiritual significance.\u003c\/p\u003e\n\u003ch2\u003eCrystal Towers, Wands, Generators, Points, Pillars \u0026amp; Obelisks — What's the Difference?\u003c\/h2\u003e\n\u003cp id=\"isPasted\"\u003eWhile these terms may vary, they all describe beautifully shaped crystals with a pointed tip designed to channel and direct energy. Each name highlights a unique aspect of their use:\u003c\/p\u003e\n\u003cul\u003e\n\u003cli\u003e\n\u003cstrong\u003eTowers\u003c\/strong\u003e- Known for their steady, grounding presence, crystal towers help focus and amplify energy, making them perfect for meditation and manifestation.\u003c\/li\u003e\n\u003cli\u003e\n\u003cstrong\u003eWands\u003c\/strong\u003e- Traditionally used in energy work and healing, crystal wands are excellent for directing energy flow and clearing blockages.\u003c\/li\u003e\n\u003cli\u003e\n\u003cstrong\u003ePillars\u003c\/strong\u003e- Symbolizing strength and stability, crystal pillars create a balanced and harmonious environment, making them great for home decor and spiritual practices.\u003c\/li\u003e\n\u003cli\u003e\n\u003cstrong\u003eObelisks\u003c\/strong\u003e- Inspired by ancient structures, crystal obelisks are believed to connect earthly and spiritual energies, making them powerful tools for transformation and enlightenment.\u003c\/li\u003e\n\u003c\/ul\u003e\n\u003cp\u003eNo matter what you call them, these crystals serve the same purpose—to enhance energy, intention, and harmony in your space. Choose the one that resonates most with you!\u003c\/p\u003e","published_at":"2023-09-14T12:52:35-04:00","sort_order":"created-desc","template_suffix":"","disjunctive":false,"rules":[{"column":"tag","relation":"equals","condition":"towers"}],"published_scope":"global"},{"id":298983391403,"handle":"january-crystal-sale","title":"January Sale | 25% Off Crystal Towers \u0026 Spheres","updated_at":"2026-01-06T23:24:37-05:00","body_html":"\u003cp\u003eShop our \u003cstrong\u003eJanuary Crystal Sale\u003c\/strong\u003e, where you can shop a wide selection of healing crystals at discounted prices. Explore \u003cstrong\u003eCrystal Towers, \u0026amp; Crystal Spheres\u003c\/strong\u003e — all carefully curated and crafted to support meditation, energy balancing, and spiritual wellness. Whether you're looking to enhance your home decor, boost your daily energy, or find the perfect gift, our \u003cstrong\u003ecrystals for healing and manifestation\u003c\/strong\u003e offer both beauty and metaphysical benefits.\u003c\/p\u003e\n\u003cp\u003eThis January, our sale features \u003cstrong\u003ediscounted crystal towers and spheres\u003c\/strong\u003e, from \u003cstrong\u003enatural quartz \u003c\/strong\u003eand \u003cstrong\u003eamethyst \u003c\/strong\u003eto \u003cstrong\u003ebumblebee jasper \u003c\/strong\u003eand \u003cstrong\u003ecarnelian\u003c\/strong\u003e, so there's always something fresh to discover. Shop with confidence knowing you're getting high-quality crystals with \u003cstrong\u003efree shipping options\u003c\/strong\u003e and a trusted experience.\u003c\/p\u003e\n\u003cp\u003e\u003cstrong\u003eTake advantage of the January Crystal Sale today\u003c\/strong\u003e and add powerful, natural energy to your life with \u003cstrong\u003eauthentic healing crystals\u003c\/strong\u003e — while our limited-time discounts last.\u003c\/p\u003e\n\u003cp\u003e\u003cstrong\u003e*Discount automatically applied at checkout.\u003c\/strong\u003e\u003c\/p\u003e","published_at":"2026-01-01T00:07:17-05:00","sort_order":"alpha-asc","template_suffix":"monthly-collection","disjunctive":true,"rules":[{"column":"tag","relation":"equals","condition":"Spheres"},{"column":"tag","relation":"equals","condition":"Towers"}],"published_scope":"global","image":{"created_at":"2026-01-01T01:29:59-05:00","alt":"","width":960,"height":960,"src":"\/\/crystaldestiny.com\/cdn\/shop\/collections\/1464163B-22B1-4D62-BEC5-CEC9AECB670B.jpg?v=1767248999"}}]}
[{"alt":"Crackle Clear Quartz Point-Points-Crystal Destiny-Crackle Quartz-164g - 2.75\"H-Crystal Destiny","id":31176313929899,"position":1,"preview_image":{"aspect_ratio":1.0,"height":1565,"width":1565,"src":"\/\/crystaldestiny.com\/cdn\/shop\/files\/Crackle-Clear-Quartz-Point-Points.jpg?v=1757201010"},"aspect_ratio":1.0,"height":1565,"media_type":"image","src":"\/\/crystaldestiny.com\/cdn\/shop\/files\/Crackle-Clear-Quartz-Point-Points.jpg?v=1757201010","width":1565}]
{"item":{"id":8435957727403,"title":"Cuarzo transparente craquelado con arcoíris","handle":"crackle-clear-quartz-with-rainbows-cd-10039","description":"\u003cp\u003e Este ejemplar premium de Cuarzo Transparente Crackle presenta distintivas fracturas internas que crean una fascinante apariencia craquelada. Cuando la luz interactúa con estas inclusiones naturales, produce impresionantes reflejos arcoíris dentro del cristal. Valorado tanto por coleccionistas como por practicantes de la metafísica por sus propiedades de amplificación y su capacidad para purificar los campos energéticos. Cada pieza exhibe patrones únicos y efectos prismáticos.\u003c\/p\u003e\n\n\u003cp\u003e Este producto es exactamente como se muestra en la imagen, único en su tipo.\u003c\/p\u003e\n\u003cdiv\u003e \u003cspan style=\"font-size: 0.875rem;\"\u003eTorres de Cristal, Varas, Generadores, Puntas, Pilares y Obeliscos: ¿Cuál es la Diferencia?\u003c\/span\u003e\n\u003c\/div\u003e\n\u003cdiv\u003e Si bien estos términos pueden variar, todos describen cristales de formas hermosas con una punta puntiaguda diseñada para canalizar y dirigir la energía. Cada nombre destaca un aspecto único de su uso:\u003c\/div\u003e\n\u003cdiv\u003e \u0026lt;ul\u0026gt;\u003c\/div\u003e\n\u003cdiv\u003e \u0026lt;li\u0026gt;\u003c\/div\u003e \u003cdiv\u003e\u0026lt;strong\u0026gt;Torres\u0026lt;\/strong\u0026gt;: Conocidas por su presencia constante y estabilizadora, las torres de cristal ayudan a enfocar y amplificar la energía, lo que las hace perfectas para la meditación y la manifestación.\u0026lt;\/li\u0026gt;\u003c\/div\u003e\n\u003cdiv\u003e \u0026lt;li\u0026gt;\u003c\/div\u003e\n\u003cdiv\u003e \u0026lt;strong\u0026gt;Varitas\u0026lt;\/strong\u0026gt;: Tradicionalmente utilizadas en el trabajo energético y la curación, las varitas de cristal son excelentes para dirigir el flujo de energía y eliminar bloqueos.\u0026lt;\/li\u0026gt;\u003c\/div\u003e\n\u003cdiv\u003e \u0026lt;li\u0026gt;\u003c\/div\u003e\n\u003cdiv\u003e \u0026lt;strong\u0026gt;Pilares\u0026lt;\/strong\u0026gt;: Simbolizando fuerza y estabilidad, los pilares de cristal crean un ambiente equilibrado y armonioso, lo que los hace ideales para la decoración del hogar y las prácticas espirituales.\u0026lt;\/li\u0026gt;\u003c\/div\u003e\n\u003cdiv\u003e \u0026lt;li\u0026gt;\u003c\/div\u003e\n\u003cdiv\u003e \u0026lt;strong\u0026gt;Obeliscos\u0026lt;\/strong\u0026gt;: Inspirados en estructuras antiguas, se cree que los obeliscos de cristal conectan las energías terrenales y espirituales, lo que los convierte en poderosas herramientas para la transformación y la iluminación.\u0026lt;\/li\u0026gt;\u003c\/div\u003e\n\u003cdiv\u003e \u0026lt;\/ul\u0026gt;\u003c\/div\u003e\n\u003cdiv\u003e No importa cómo los llames, estos cristales tienen el mismo propósito: potenciar la energía, la intención y la armonía en tu espacio. ¡Elige el que más te resuene!\u003c\/div\u003e","published_at":"2025-05-22T18:50:38-04:00","created_at":"2025-05-22T18:50:38-04:00","vendor":"Crystal Destiny","type":"Torres","tags":["crystal","polished","Towers"],"price":4999,"price_min":4999,"price_max":4999,"available":true,"price_varies":false,"compare_at_price":null,"compare_at_price_min":0,"compare_at_price_max":0,"compare_at_price_varies":false,"variants":[{"id":45240529748139,"title":"Cuarzo craquelado \/ 4,75\" de alto","option1":"Cuarzo craquelado","option2":"4,75\" de alto","option3":null,"sku":"CD-10039","requires_shipping":true,"taxable":true,"featured_image":null,"available":true,"name":"Cuarzo transparente craquelado con arcoíris - Cuarzo craquelado \/ 4,75\" de alto","public_title":"Cuarzo craquelado \/ 4,75\" de alto","options":["Cuarzo craquelado","4,75\" de alto"],"price":4999,"weight":306,"compare_at_price":null,"inventory_management":"shopify","barcode":"","requires_selling_plan":false,"selling_plan_allocations":[]}],"images":["\/\/crystaldestiny.com\/cdn\/shop\/files\/Crackle-Clear-Quartz-with-Rainbows-Towers.png?v=1757135311"],"featured_image":"\/\/crystaldestiny.com\/cdn\/shop\/files\/Crackle-Clear-Quartz-with-Rainbows-Towers.png?v=1757135311","options":["Material","Tamaño"],"media":[{"alt":"Crackle Clear Quartz with Rainbows-Towers-Crystal Destiny-Crackle Quartz-4.75\" H-Crystal Destiny","id":31733890875563,"position":1,"preview_image":{"aspect_ratio":1.111,"height":1759,"width":1954,"src":"\/\/crystaldestiny.com\/cdn\/shop\/files\/Crackle-Clear-Quartz-with-Rainbows-Towers.png?v=1757135311"},"aspect_ratio":1.111,"height":1759,"media_type":"image","src":"\/\/crystaldestiny.com\/cdn\/shop\/files\/Crackle-Clear-Quartz-with-Rainbows-Towers.png?v=1757135311","width":1954}],"requires_selling_plan":false,"selling_plan_groups":[],"content":"\u003cp\u003e Este ejemplar premium de Cuarzo Transparente Crackle presenta distintivas fracturas internas que crean una fascinante apariencia craquelada. Cuando la luz interactúa con estas inclusiones naturales, produce impresionantes reflejos arcoíris dentro del cristal. Valorado tanto por coleccionistas como por practicantes de la metafísica por sus propiedades de amplificación y su capacidad para purificar los campos energéticos. Cada pieza exhibe patrones únicos y efectos prismáticos.\u003c\/p\u003e\n\n\u003cp\u003e Este producto es exactamente como se muestra en la imagen, único en su tipo.\u003c\/p\u003e\n\u003cdiv\u003e \u003cspan style=\"font-size: 0.875rem;\"\u003eTorres de Cristal, Varas, Generadores, Puntas, Pilares y Obeliscos: ¿Cuál es la Diferencia?\u003c\/span\u003e\n\u003c\/div\u003e\n\u003cdiv\u003e Si bien estos términos pueden variar, todos describen cristales de formas hermosas con una punta puntiaguda diseñada para canalizar y dirigir la energía. Cada nombre destaca un aspecto único de su uso:\u003c\/div\u003e\n\u003cdiv\u003e \u0026lt;ul\u0026gt;\u003c\/div\u003e\n\u003cdiv\u003e \u0026lt;li\u0026gt;\u003c\/div\u003e \u003cdiv\u003e\u0026lt;strong\u0026gt;Torres\u0026lt;\/strong\u0026gt;: Conocidas por su presencia constante y estabilizadora, las torres de cristal ayudan a enfocar y amplificar la energía, lo que las hace perfectas para la meditación y la manifestación.\u0026lt;\/li\u0026gt;\u003c\/div\u003e\n\u003cdiv\u003e \u0026lt;li\u0026gt;\u003c\/div\u003e\n\u003cdiv\u003e \u0026lt;strong\u0026gt;Varitas\u0026lt;\/strong\u0026gt;: Tradicionalmente utilizadas en el trabajo energético y la curación, las varitas de cristal son excelentes para dirigir el flujo de energía y eliminar bloqueos.\u0026lt;\/li\u0026gt;\u003c\/div\u003e\n\u003cdiv\u003e \u0026lt;li\u0026gt;\u003c\/div\u003e\n\u003cdiv\u003e \u0026lt;strong\u0026gt;Pilares\u0026lt;\/strong\u0026gt;: Simbolizando fuerza y estabilidad, los pilares de cristal crean un ambiente equilibrado y armonioso, lo que los hace ideales para la decoración del hogar y las prácticas espirituales.\u0026lt;\/li\u0026gt;\u003c\/div\u003e\n\u003cdiv\u003e \u0026lt;li\u0026gt;\u003c\/div\u003e\n\u003cdiv\u003e \u0026lt;strong\u0026gt;Obeliscos\u0026lt;\/strong\u0026gt;: Inspirados en estructuras antiguas, se cree que los obeliscos de cristal conectan las energías terrenales y espirituales, lo que los convierte en poderosas herramientas para la transformación y la iluminación.\u0026lt;\/li\u0026gt;\u003c\/div\u003e\n\u003cdiv\u003e \u0026lt;\/ul\u0026gt;\u003c\/div\u003e\n\u003cdiv\u003e No importa cómo los llames, estos cristales tienen el mismo propósito: potenciar la energía, la intención y la armonía en tu espacio. ¡Elige el que más te resuene!\u003c\/div\u003e"},"options":[{"name":"Material","position":1,"values":["Cuarzo craquelado"]},{"name":"Tamaño","position":2,"values":["4,75\" de alto"]}],"custom_metafields":{"shipping_time":"En un plazo de 7 días"},"metafields":{"badge":"\u003cdiv style='display:none' class='jdgm-prev-badge' data-average-rating='0.00' data-number-of-reviews='0' data-number-of-questions='0'\u003e \u003cspan class='jdgm-prev-badge__stars' data-score='0.00' tabindex='0' aria-label='0.00 stars' role='button'\u003e \u003cspan class='jdgm-star jdgm--off'\u003e\u003c\/span\u003e\u003cspan class='jdgm-star jdgm--off'\u003e\u003c\/span\u003e\u003cspan class='jdgm-star jdgm--off'\u003e\u003c\/span\u003e\u003cspan class='jdgm-star jdgm--off'\u003e\u003c\/span\u003e\u003cspan class='jdgm-star jdgm--off'\u003e\u003c\/span\u003e \u003c\/span\u003e \u003cspan class='jdgm-prev-badge__text'\u003e No reviews \u003c\/span\u003e \u003c\/div\u003e","widget":"\u003cdiv class='jdgm-rev-widg' data-updated-at='2025-05-22T22:50:40Z' data-average-rating='0.00' data-number-of-reviews='0' data-number-of-questions='0'\u003e \u003cstyle class='jdgm-temp-hiding-style'\u003e.jdgm-rev-widg{ display: none }\u003c\/style\u003e \u003cdiv class='jdgm-rev-widg__header'\u003e \u003ch2 class='jdgm-rev-widg__title'\u003eCustomer Reviews\u003c\/h2\u003e \u003cdiv class='jdgm-rev-widg__summary'\u003e \u003cdiv class='jdgm-rev-widg__summary-stars' aria-label='Average rating is 0.00 stars' role='img'\u003e \u003cspan class='jdgm-star jdgm--off'\u003e\u003c\/span\u003e\u003cspan class='jdgm-star jdgm--off'\u003e\u003c\/span\u003e\u003cspan class='jdgm-star jdgm--off'\u003e\u003c\/span\u003e\u003cspan class='jdgm-star jdgm--off'\u003e\u003c\/span\u003e\u003cspan class='jdgm-star jdgm--off'\u003e\u003c\/span\u003e \u003c\/div\u003e \u003cdiv class='jdgm-rev-widg__summary-text'\u003eBe the first to write a review\u003c\/div\u003e \u003c\/div\u003e \u003ca style='display: none' href='#' class='jdgm-write-rev-link' role='button'\u003eWrite a review\u003c\/a\u003e \u003cdiv class='jdgm-histogram jdgm-temp-hidden'\u003e \u003cdiv class='jdgm-histogram__row' data-rating='5' data-frequency='0' data-percentage='0'\u003e \u003cdiv class='jdgm-histogram__star' role='button' aria-label=\"0% (0) reviews with 5 star rating\" tabindex='0' \u003e\u003cspan class='jdgm-star jdgm--on'\u003e\u003c\/span\u003e\u003cspan class='jdgm-star jdgm--on'\u003e\u003c\/span\u003e\u003cspan class='jdgm-star jdgm--on'\u003e\u003c\/span\u003e\u003cspan class='jdgm-star jdgm--on'\u003e\u003c\/span\u003e\u003cspan class='jdgm-star jdgm--on'\u003e\u003c\/span\u003e\u003c\/div\u003e \u003cdiv class='jdgm-histogram__bar'\u003e \u003cdiv class='jdgm-histogram__bar-content' style='width: 0%;'\u003e \u003c\/div\u003e \u003c\/div\u003e \u003cdiv class='jdgm-histogram__percentage'\u003e0%\u003c\/div\u003e \u003cdiv class='jdgm-histogram__frequency'\u003e(0)\u003c\/div\u003e \u003c\/div\u003e \u003cdiv class='jdgm-histogram__row' data-rating='4' data-frequency='0' data-percentage='0'\u003e \u003cdiv class='jdgm-histogram__star' role='button' aria-label=\"0% (0) reviews with 4 star rating\" tabindex='0' \u003e\u003cspan class='jdgm-star jdgm--on'\u003e\u003c\/span\u003e\u003cspan class='jdgm-star jdgm--on'\u003e\u003c\/span\u003e\u003cspan class='jdgm-star jdgm--on'\u003e\u003c\/span\u003e\u003cspan class='jdgm-star jdgm--on'\u003e\u003c\/span\u003e\u003cspan class='jdgm-star jdgm--off'\u003e\u003c\/span\u003e\u003c\/div\u003e \u003cdiv class='jdgm-histogram__bar'\u003e \u003cdiv class='jdgm-histogram__bar-content' style='width: 0%;'\u003e \u003c\/div\u003e \u003c\/div\u003e \u003cdiv class='jdgm-histogram__percentage'\u003e0%\u003c\/div\u003e \u003cdiv class='jdgm-histogram__frequency'\u003e(0)\u003c\/div\u003e \u003c\/div\u003e \u003cdiv class='jdgm-histogram__row' data-rating='3' data-frequency='0' data-percentage='0'\u003e \u003cdiv class='jdgm-histogram__star' role='button' aria-label=\"0% (0) reviews with 3 star rating\" tabindex='0' \u003e\u003cspan class='jdgm-star jdgm--on'\u003e\u003c\/span\u003e\u003cspan class='jdgm-star jdgm--on'\u003e\u003c\/span\u003e\u003cspan class='jdgm-star jdgm--on'\u003e\u003c\/span\u003e\u003cspan class='jdgm-star jdgm--off'\u003e\u003c\/span\u003e\u003cspan class='jdgm-star jdgm--off'\u003e\u003c\/span\u003e\u003c\/div\u003e \u003cdiv class='jdgm-histogram__bar'\u003e \u003cdiv class='jdgm-histogram__bar-content' style='width: 0%;'\u003e \u003c\/div\u003e \u003c\/div\u003e \u003cdiv class='jdgm-histogram__percentage'\u003e0%\u003c\/div\u003e \u003cdiv class='jdgm-histogram__frequency'\u003e(0)\u003c\/div\u003e \u003c\/div\u003e \u003cdiv class='jdgm-histogram__row' data-rating='2' data-frequency='0' data-percentage='0'\u003e \u003cdiv class='jdgm-histogram__star' role='button' aria-label=\"0% (0) reviews with 2 star rating\" tabindex='0' \u003e\u003cspan class='jdgm-star jdgm--on'\u003e\u003c\/span\u003e\u003cspan class='jdgm-star jdgm--on'\u003e\u003c\/span\u003e\u003cspan class='jdgm-star jdgm--off'\u003e\u003c\/span\u003e\u003cspan class='jdgm-star jdgm--off'\u003e\u003c\/span\u003e\u003cspan class='jdgm-star jdgm--off'\u003e\u003c\/span\u003e\u003c\/div\u003e \u003cdiv class='jdgm-histogram__bar'\u003e \u003cdiv class='jdgm-histogram__bar-content' style='width: 0%;'\u003e \u003c\/div\u003e \u003c\/div\u003e \u003cdiv class='jdgm-histogram__percentage'\u003e0%\u003c\/div\u003e \u003cdiv class='jdgm-histogram__frequency'\u003e(0)\u003c\/div\u003e \u003c\/div\u003e \u003cdiv class='jdgm-histogram__row' data-rating='1' data-frequency='0' data-percentage='0'\u003e \u003cdiv class='jdgm-histogram__star' role='button' aria-label=\"0% (0) reviews with 1 star rating\" tabindex='0' \u003e\u003cspan class='jdgm-star jdgm--on'\u003e\u003c\/span\u003e\u003cspan class='jdgm-star jdgm--off'\u003e\u003c\/span\u003e\u003cspan class='jdgm-star jdgm--off'\u003e\u003c\/span\u003e\u003cspan class='jdgm-star jdgm--off'\u003e\u003c\/span\u003e\u003cspan class='jdgm-star jdgm--off'\u003e\u003c\/span\u003e\u003c\/div\u003e \u003cdiv class='jdgm-histogram__bar'\u003e \u003cdiv class='jdgm-histogram__bar-content' style='width: 0%;'\u003e \u003c\/div\u003e \u003c\/div\u003e \u003cdiv class='jdgm-histogram__percentage'\u003e0%\u003c\/div\u003e \u003cdiv class='jdgm-histogram__frequency'\u003e(0)\u003c\/div\u003e \u003c\/div\u003e \u003cdiv class='jdgm-histogram__row jdgm-histogram__clear-filter' data-rating=null tabindex='0'\u003e\u003c\/div\u003e \u003c\/div\u003e \u003cdiv class='jdgm-rev-widg__sort-wrapper'\u003e\u003c\/div\u003e \u003c\/div\u003e \u003cdiv class='jdgm-rev-widg__body'\u003e \u003cdiv class='jdgm-rev-widg__reviews'\u003e\u003c\/div\u003e \u003cdiv class='jdgm-paginate' data-per-page='5' data-url='https:\/\/api.judge.me\/reviews\/reviews_for_widget' style=\"display: none;\"\u003e\u003c\/div\u003e \u003c\/div\u003e \u003cdiv class='jdgm-rev-widg__paginate-spinner-wrapper'\u003e \u003cdiv class='jdgm-spinner'\u003e\u003c\/div\u003e \u003c\/div\u003e \u003c\/div\u003e"},"collections":[{"id":294880051371,"handle":"crystals","title":"Crystals","updated_at":"2026-01-07T23:43:11-05:00","body_html":"\u003cp data-start=\"159\" data-end=\"687\"\u003e✨ \u003cstrong data-start=\"161\" data-end=\"216\"\u003eDiscover the Magic of Crystals with Crystal Destiny\u003c\/strong\u003e ✨\u003cbr data-start=\"218\" data-end=\"221\"\u003eCrystals have been treasured for centuries—not only for their natural beauty but also for their powerful healing energies. Beyond their visual allure, they bring balance, harmony, and positive energy into any space. Whether used for home décor, meditation, or simply to elevate the energy of your surroundings, crystals create a sanctuary of peace, relaxation, and well-being. Each piece is a unique gift from the Earth—visually stunning and spiritually uplifting.\u003c\/p\u003e\n\u003cp data-start=\"689\" data-end=\"1011\"\u003eAt \u003cstrong data-start=\"692\" data-end=\"711\"\u003eCrystal Destiny\u003c\/strong\u003e, our signature collection showcases a curated selection of exquisite crystals, from radiant Quartz to soothing Amethyst. Every stone is carefully sourced for its elegance and metaphysical resonance, making them perfect for enhancing your home, uplifting your spirit, or gifting to someone special.\u003c\/p\u003e\n\u003cp data-start=\"1013\" data-end=\"1206\"\u003eExperience the timeless sophistication of crystalline wonders. Explore the \u003cstrong data-start=\"1088\" data-end=\"1118\"\u003eCrystal Destiny Collection\u003c\/strong\u003e today and bring the transformative beauty of these treasures into your everyday life.\u003c\/p\u003e","published_at":"2023-06-05T11:24:02-04:00","sort_order":"created-desc","template_suffix":"","disjunctive":false,"rules":[{"column":"tag","relation":"equals","condition":"crystal"},{"column":"type","relation":"not_contains","condition":"925 Sterling Silver"},{"column":"type","relation":"not_contains","condition":"Wire Wraps"}],"published_scope":"global"},{"id":319456084139,"handle":"universal-chakra-crystals","title":"Universal Chakra Crystals","updated_at":"2026-01-06T23:24:24-05:00","body_html":"\u003cp data-start=\"116\" data-end=\"404\"\u003e✨ \u003cstrong data-start=\"118\" data-end=\"158\"\u003eUniversal Chakra Crystals Collection\u003c\/strong\u003e ✨\u003cbr data-start=\"160\" data-end=\"163\"\u003eBalance, align, and energize all your chakras with our \u003cstrong data-start=\"218\" data-end=\"247\"\u003eUniversal Chakra Crystals\u003c\/strong\u003e. Carefully selected to resonate with every energy center in the body, these crystals support holistic well-being, spiritual growth, and energetic harmony.\u003c\/p\u003e\n\u003cp data-start=\"406\" data-end=\"744\"\u003eOur curated selection includes vibrant stones such as Amethyst, Citrine, Clear Quartz, and more—each chosen for their ability to promote clarity, balance, and vitality across the entire chakra system. Perfect for meditation, energy work, or creating a harmonious space, Universal Chakra Crystals help you connect mind, body, and spirit.\u003c\/p\u003e\n\u003cp data-start=\"746\" data-end=\"875\"\u003eEmbrace full-spectrum energy and elevate your spiritual journey with the transformative power of \u003cstrong data-start=\"843\" data-end=\"872\"\u003eUniversal Chakra Crystals\u003c\/strong\u003e.\u003c\/p\u003e","published_at":"2025-07-17T18:19:50-04:00","sort_order":"best-selling","template_suffix":"","disjunctive":false,"rules":[{"column":"variant_metafield_definition","relation":"equals","condition":"All Chakras"}],"published_scope":"global","image":{"created_at":"2025-07-17T19:07:58-04:00","alt":null,"width":1080,"height":1080,"src":"\/\/crystaldestiny.com\/cdn\/shop\/collections\/Universal_7_Chakras_Collection.jpg?v=1762474934"}},{"id":294880116907,"handle":"polished","title":"Polished Crystals","updated_at":"2026-01-07T23:43:11-05:00","body_html":"\u003cp data-start=\"199\" data-end=\"598\"\u003e✨ \u003cstrong data-start=\"201\" data-end=\"248\"\u003eCrystal Destiny Polished Crystal Collection\u003c\/strong\u003e ✨\u003cbr data-start=\"250\" data-end=\"253\"\u003eIndulge in the brilliance of crystals refined to perfection. Our \u003cstrong data-start=\"318\" data-end=\"341\"\u003ePolished Collection\u003c\/strong\u003e showcases gemstones meticulously shaped and smoothed to reveal their natural radiance and timeless beauty. From the shimmering glow of Quartz to the deep allure of Obsidian, each polished piece is a testament to nature’s artistry and human craftsmanship.\u003c\/p\u003e\n\u003cp data-start=\"600\" data-end=\"862\"\u003ePerfect as statement décor, meaningful gifts, or companions on your spiritual journey, polished crystals bring sophistication and elevated energy into any space. Their radiant surfaces reflect not only light but also the transformative power of crystal energy.\u003c\/p\u003e\n\u003cp data-start=\"864\" data-end=\"1022\"\u003eDiscover the elegance of refinement with Crystal Destiny’s Polished Crystal Collection—where every facet shines with intention, beauty, and timeless allure.\u003c\/p\u003e","published_at":"2023-06-05T11:30:44-04:00","sort_order":"created-desc","template_suffix":"","disjunctive":false,"rules":[{"column":"tag","relation":"equals","condition":"polished"}],"published_scope":"global"},{"id":293659312299,"handle":"best-sellers","title":"Best Sellers","updated_at":"2026-01-07T23:43:11-05:00","body_html":"\u003cp data-start=\"155\" data-end=\"510\"\u003eDiscover the pieces our community loves most. Our Best Sellers Collection brings together handpicked crystals and jewelry that embody timeless elegance, spiritual resonance, and everyday sophistication. Each item has earned its place as a customer favorite—celebrated for both its beauty and its meaningful energy.\u003c\/p\u003e\n\u003cp data-start=\"512\" data-end=\"802\"\u003eFrom stunning statement pieces to versatile daily companions, these treasures are curated to elevate your space, uplift your spirit, and reflect refined taste. Indulge in what’s most cherished and let our best sellers guide you toward the perfect blend of style and transformative energy.\u003c\/p\u003e\n\u003cp data-start=\"804\" data-end=\"932\"\u003eExplore the Best Sellers Collection today—where elegance meets intention, and every piece tells a story of beauty and balance.\u003c\/p\u003e","published_at":"2023-03-15T16:04:51-04:00","sort_order":"best-selling","template_suffix":"","disjunctive":false,"rules":[{"column":"variant_price","relation":"greater_than","condition":"0"},{"column":"variant_inventory","relation":"greater_than","condition":"0"},{"column":"type","relation":"not_equals","condition":"Shipping Protection"}],"published_scope":"global"},{"id":321370390699,"handle":"monthly-crystal-sale","title":"Monthly Crystal Sale | Spheres \u0026 Towers","updated_at":"2026-01-06T23:24:37-05:00","body_html":"\u003cp\u003eShop our \u003cstrong\u003eMonthly Crystal Sale\u003c\/strong\u003e, where you can shop a wide selection of healing crystals at discounted prices. Explore \u003cstrong\u003ecrystal spheres and towers,\u003c\/strong\u003e— all carefully curated to support meditation, energy balancing, and spiritual wellness. Whether you're looking to enhance your home decor, boost your daily energy, or find the perfect gift, our \u003cstrong\u003ecrystals for healing and manifestation\u003c\/strong\u003e offer both beauty and metaphysical benefits.\u003c\/p\u003e\n\u003cp\u003eEach month, our sale features \u003cstrong\u003enew discounted collections\u003c\/strong\u003e, from \u003cstrong\u003enatural quartz and amethyst towers\u003c\/strong\u003e to \u003cstrong\u003ewire-wrapped pendants and polished stones\u003c\/strong\u003e, so there's always something fresh to discover. Shop with confidence knowing you're getting high-quality crystals with \u003cstrong\u003efree shipping options\u003c\/strong\u003e and a trusted experience.\u003c\/p\u003e\n\u003cp\u003e\u003cstrong\u003eTake advantage of the Monthly Crystal Sale today\u003c\/strong\u003e and add powerful, natural energy to your life with \u003cstrong\u003eauthentic healing crystals\u003c\/strong\u003e — while our limited-time discounts last.\u003c\/p\u003e\n\u003cp\u003e\u003cstrong\u003e*Discount automatically applied at checkout.\u003c\/strong\u003e\u003c\/p\u003e","published_at":"2025-12-02T01:26:17-05:00","sort_order":"alpha-asc","template_suffix":"","disjunctive":true,"rules":[{"column":"tag","relation":"equals","condition":"spheres"},{"column":"tag","relation":"equals","condition":"Towers"}],"published_scope":"global","image":{"created_at":"2026-01-01T01:32:34-05:00","alt":"","width":960,"height":960,"src":"\/\/crystaldestiny.com\/cdn\/shop\/collections\/3E8C2969-1B86-4ACE-B349-98E9D8768424.jpg?v=1767249154"}},{"id":297596059819,"handle":"all","title":"All Crystals \u0026 Jewelry","updated_at":"2026-01-07T23:43:11-05:00","body_html":"\u003cp data-start=\"149\" data-end=\"494\"\u003e✨ \u003cstrong data-start=\"151\" data-end=\"181\"\u003eWelcome to Crystal Destiny\u003c\/strong\u003e ✨\u003cbr data-start=\"183\" data-end=\"186\"\u003eStep into a world where beauty, energy, and artistry unite. Our collection is a treasure trove of exquisite crystals, from the raw, untamed elegance of natural formations to the polished brilliance of expertly crafted pieces. Each crystal is a masterpiece, carrying its own unique story and timeless charm.\u003c\/p\u003e\n\u003cp data-start=\"496\" data-end=\"831\"\u003eWhether you’re drawn to the calming presence of Amethyst, the vibrant energy of Citrine, or the grounding strength of Jasper, our crystals invite you to connect with nature’s finest wonders. Perfect for enhancing your space, supporting your spiritual journey, or gifting with intention, every piece resonates with beauty and meaning.\u003c\/p\u003e\n\u003cp data-start=\"833\" data-end=\"1000\"\u003eElevate your surroundings, embrace the mystique, and explore the enchanting world of crystals at \u003cstrong data-start=\"930\" data-end=\"949\"\u003eCrystal Destiny\u003c\/strong\u003e—where every crystal is waiting to be discovered.\u003c\/p\u003e","published_at":"2023-11-10T13:55:31-05:00","sort_order":"created-desc","template_suffix":"","disjunctive":false,"rules":[{"column":"type","relation":"not_equals","condition":"asdf"}],"published_scope":"global"},{"id":296256405675,"handle":"crystal-towers","title":"Crystal Towers","updated_at":"2026-01-06T23:24:37-05:00","body_html":"\u003cp data-end=\"568\" data-start=\"152\"\u003e✨ \u003cstrong data-end=\"190\" data-start=\"154\"\u003eCrystal Destiny Tower Collection\u003c\/strong\u003e ✨\u003cbr data-end=\"195\" data-start=\"192\"\u003eEnchant your space with the timeless beauty and powerful energy of crystal towers. Each piece in our \u003cstrong data-end=\"316\" data-start=\"296\"\u003eTower Collection\u003c\/strong\u003e is carefully crafted to showcase nature’s artistry while radiating higher vibrations and spiritual resonance. From the clarity of Quartz to the calming presence of Amethyst, these towers are both decorative masterpieces and tools for transformation.\u003c\/p\u003e\n\u003cp data-end=\"765\" data-start=\"570\"\u003ePerfect for meditation spaces, energy work, or simply elevating your home décor, crystal towers channel focused energy upward—creating balance, harmony, and refined elegance in any environment.\u003c\/p\u003e\n\u003cp data-end=\"917\" data-start=\"767\"\u003eDiscover the Crystal Destiny Tower Collection today and transform your surroundings into a sanctuary of beauty, purpose, and spiritual significance.\u003c\/p\u003e\n\u003ch2\u003eCrystal Towers, Wands, Generators, Points, Pillars \u0026amp; Obelisks — What's the Difference?\u003c\/h2\u003e\n\u003cp id=\"isPasted\"\u003eWhile these terms may vary, they all describe beautifully shaped crystals with a pointed tip designed to channel and direct energy. Each name highlights a unique aspect of their use:\u003c\/p\u003e\n\u003cul\u003e\n\u003cli\u003e\n\u003cstrong\u003eTowers\u003c\/strong\u003e- Known for their steady, grounding presence, crystal towers help focus and amplify energy, making them perfect for meditation and manifestation.\u003c\/li\u003e\n\u003cli\u003e\n\u003cstrong\u003eWands\u003c\/strong\u003e- Traditionally used in energy work and healing, crystal wands are excellent for directing energy flow and clearing blockages.\u003c\/li\u003e\n\u003cli\u003e\n\u003cstrong\u003ePillars\u003c\/strong\u003e- Symbolizing strength and stability, crystal pillars create a balanced and harmonious environment, making them great for home decor and spiritual practices.\u003c\/li\u003e\n\u003cli\u003e\n\u003cstrong\u003eObelisks\u003c\/strong\u003e- Inspired by ancient structures, crystal obelisks are believed to connect earthly and spiritual energies, making them powerful tools for transformation and enlightenment.\u003c\/li\u003e\n\u003c\/ul\u003e\n\u003cp\u003eNo matter what you call them, these crystals serve the same purpose—to enhance energy, intention, and harmony in your space. Choose the one that resonates most with you!\u003c\/p\u003e","published_at":"2023-09-14T12:52:35-04:00","sort_order":"created-desc","template_suffix":"","disjunctive":false,"rules":[{"column":"tag","relation":"equals","condition":"towers"}],"published_scope":"global"},{"id":298983391403,"handle":"january-crystal-sale","title":"January Sale | 25% Off Crystal Towers \u0026 Spheres","updated_at":"2026-01-06T23:24:37-05:00","body_html":"\u003cp\u003eShop our \u003cstrong\u003eJanuary Crystal Sale\u003c\/strong\u003e, where you can shop a wide selection of healing crystals at discounted prices. Explore \u003cstrong\u003eCrystal Towers, \u0026amp; Crystal Spheres\u003c\/strong\u003e — all carefully curated and crafted to support meditation, energy balancing, and spiritual wellness. Whether you're looking to enhance your home decor, boost your daily energy, or find the perfect gift, our \u003cstrong\u003ecrystals for healing and manifestation\u003c\/strong\u003e offer both beauty and metaphysical benefits.\u003c\/p\u003e\n\u003cp\u003eThis January, our sale features \u003cstrong\u003ediscounted crystal towers and spheres\u003c\/strong\u003e, from \u003cstrong\u003enatural quartz \u003c\/strong\u003eand \u003cstrong\u003eamethyst \u003c\/strong\u003eto \u003cstrong\u003ebumblebee jasper \u003c\/strong\u003eand \u003cstrong\u003ecarnelian\u003c\/strong\u003e, so there's always something fresh to discover. Shop with confidence knowing you're getting high-quality crystals with \u003cstrong\u003efree shipping options\u003c\/strong\u003e and a trusted experience.\u003c\/p\u003e\n\u003cp\u003e\u003cstrong\u003eTake advantage of the January Crystal Sale today\u003c\/strong\u003e and add powerful, natural energy to your life with \u003cstrong\u003eauthentic healing crystals\u003c\/strong\u003e — while our limited-time discounts last.\u003c\/p\u003e\n\u003cp\u003e\u003cstrong\u003e*Discount automatically applied at checkout.\u003c\/strong\u003e\u003c\/p\u003e","published_at":"2026-01-01T00:07:17-05:00","sort_order":"alpha-asc","template_suffix":"monthly-collection","disjunctive":true,"rules":[{"column":"tag","relation":"equals","condition":"Spheres"},{"column":"tag","relation":"equals","condition":"Towers"}],"published_scope":"global","image":{"created_at":"2026-01-01T01:29:59-05:00","alt":"","width":960,"height":960,"src":"\/\/crystaldestiny.com\/cdn\/shop\/collections\/1464163B-22B1-4D62-BEC5-CEC9AECB670B.jpg?v=1767248999"}}]}
[{"alt":"Crackle Clear Quartz with Rainbows-Towers-Crystal Destiny-Crackle Quartz-4.75\" H-Crystal Destiny","id":31733890875563,"position":1,"preview_image":{"aspect_ratio":1.111,"height":1759,"width":1954,"src":"\/\/crystaldestiny.com\/cdn\/shop\/files\/Crackle-Clear-Quartz-with-Rainbows-Towers.png?v=1757135311"},"aspect_ratio":1.111,"height":1759,"media_type":"image","src":"\/\/crystaldestiny.com\/cdn\/shop\/files\/Crackle-Clear-Quartz-with-Rainbows-Towers.png?v=1757135311","width":1954}]
{"item":{"id":8511393366187,"title":"Crackle Quartz Point","handle":"crackle-quartz-point-cd-10298","description":"\u003cp\u003eCrackle Quartz Point features a unique fractured surface that enhances its natural sparkle, making it an exceptional tool for energy amplification and clarity. Its intricate internal patterns work to cleanse and balance energy fields, supporting meditation and spiritual healing practices. Ideal for those seeking to deepen their connection to subtle energies, this quartz point serves as a precise focus for directing intention and enhancing metaphysical work.\u003c\/p\u003e\n\u003cp\u003eThis product is an exact pick as pictured, one of a kind.\u003c\/p\u003e\u003ch2\u003eCrystal Towers, Wands, Generators, Points, Pillars \u0026amp; Obelisks — What's the Difference?\u003c\/h2\u003e\n\u003cp id=\"isPasted\"\u003eWhile these terms may vary, they all describe beautifully shaped crystals with a pointed tip designed to channel and direct energy. Each name highlights a unique aspect of their use:\u003c\/p\u003e\n\u003cul\u003e\n\u003cli\u003e\n\u003cstrong\u003eTowers\u003c\/strong\u003e- Known for their steady, grounding presence, crystal towers help focus and amplify energy, making them perfect for meditation and manifestation.\u003c\/li\u003e\n\u003cli\u003e\n\u003cstrong\u003eWands\u003c\/strong\u003e- Traditionally used in energy work and healing, crystal wands are excellent for directing energy flow and clearing blockages.\u003c\/li\u003e\n\u003cli\u003e\n\u003cstrong\u003ePillars\u003c\/strong\u003e- Symbolizing strength and stability, crystal pillars create a balanced and harmonious environment, making them great for home decor and spiritual practices.\u003c\/li\u003e\n\u003cli\u003e\n\u003cstrong\u003eObelisks\u003c\/strong\u003e- Inspired by ancient structures, crystal obelisks are believed to connect earthly and spiritual energies, making them powerful tools for transformation and enlightenment.\u003c\/li\u003e\n\u003c\/ul\u003e\n\u003cp\u003eNo matter what you call them, these crystals serve the same purpose—to enhance energy, intention, and harmony in your space. Choose the one that resonates most with you!\u003c\/p\u003e","published_at":"2025-09-04T16:40:39-04:00","created_at":"2025-09-04T16:40:36-04:00","vendor":"Crystal Destiny","type":"Points","tags":["crystal","polished","Towers"],"price":7799,"price_min":7799,"price_max":7799,"available":true,"price_varies":false,"compare_at_price":null,"compare_at_price_min":0,"compare_at_price_max":0,"compare_at_price_varies":false,"variants":[{"id":45581417349291,"title":"Crackle Quartz \/ 234g - 2.75\"H x 2.00\"W","option1":"Crackle Quartz","option2":"234g - 2.75\"H x 2.00\"W","option3":null,"sku":"CD-10298","requires_shipping":true,"taxable":true,"featured_image":null,"available":true,"name":"Crackle Quartz Point - Crackle Quartz \/ 234g - 2.75\"H x 2.00\"W","public_title":"Crackle Quartz \/ 234g - 2.75\"H x 2.00\"W","options":["Crackle Quartz","234g - 2.75\"H x 2.00\"W"],"price":7799,"weight":234,"compare_at_price":null,"inventory_management":"shopify","barcode":"","requires_selling_plan":false,"selling_plan_allocations":[]}],"images":["\/\/crystaldestiny.com\/cdn\/shop\/files\/Crackle-Quartz-Point-Points.jpg?v=1757088879","\/\/crystaldestiny.com\/cdn\/shop\/files\/Crackle-Quartz-Point-Points-2.jpg?v=1757048694","\/\/crystaldestiny.com\/cdn\/shop\/files\/Crackle-Quartz-Point-Points-3.jpg?v=1757048696","\/\/crystaldestiny.com\/cdn\/shop\/files\/Crackle-Quartz-Point-Points-4.jpg?v=1757048697"],"featured_image":"\/\/crystaldestiny.com\/cdn\/shop\/files\/Crackle-Quartz-Point-Points.jpg?v=1757088879","options":["Material","Size"],"media":[{"alt":"Crackle Quartz Point-Points-Crystal Destiny-Crackle Quartz-234g - 2.75\"H x 2.00\"W-Crystal Destiny","id":31728538419371,"position":1,"preview_image":{"aspect_ratio":1.0,"height":1395,"width":1395,"src":"\/\/crystaldestiny.com\/cdn\/shop\/files\/Crackle-Quartz-Point-Points.jpg?v=1757088879"},"aspect_ratio":1.0,"height":1395,"media_type":"image","src":"\/\/crystaldestiny.com\/cdn\/shop\/files\/Crackle-Quartz-Point-Points.jpg?v=1757088879","width":1395},{"alt":"Crackle Quartz Point-Points-Crystal Destiny-Crackle Quartz-234g - 2.75\"H x 2.00\"W-Crystal Destiny","id":31728538452139,"position":2,"preview_image":{"aspect_ratio":1.0,"height":1502,"width":1502,"src":"\/\/crystaldestiny.com\/cdn\/shop\/files\/Crackle-Quartz-Point-Points-2.jpg?v=1757048694"},"aspect_ratio":1.0,"height":1502,"media_type":"image","src":"\/\/crystaldestiny.com\/cdn\/shop\/files\/Crackle-Quartz-Point-Points-2.jpg?v=1757048694","width":1502},{"alt":"Crackle Quartz Point-Points-Crystal Destiny-Crackle Quartz-234g - 2.75\"H x 2.00\"W-Crystal Destiny","id":31728538484907,"position":3,"preview_image":{"aspect_ratio":1.0,"height":1484,"width":1484,"src":"\/\/crystaldestiny.com\/cdn\/shop\/files\/Crackle-Quartz-Point-Points-3.jpg?v=1757048696"},"aspect_ratio":1.0,"height":1484,"media_type":"image","src":"\/\/crystaldestiny.com\/cdn\/shop\/files\/Crackle-Quartz-Point-Points-3.jpg?v=1757048696","width":1484},{"alt":"Crackle Quartz Point-Points-Crystal Destiny-Crackle Quartz-234g - 2.75\"H x 2.00\"W-Crystal Destiny","id":31728538517675,"position":4,"preview_image":{"aspect_ratio":1.0,"height":1471,"width":1471,"src":"\/\/crystaldestiny.com\/cdn\/shop\/files\/Crackle-Quartz-Point-Points-4.jpg?v=1757048697"},"aspect_ratio":1.0,"height":1471,"media_type":"image","src":"\/\/crystaldestiny.com\/cdn\/shop\/files\/Crackle-Quartz-Point-Points-4.jpg?v=1757048697","width":1471}],"requires_selling_plan":false,"selling_plan_groups":[],"content":"\u003cp\u003eCrackle Quartz Point features a unique fractured surface that enhances its natural sparkle, making it an exceptional tool for energy amplification and clarity. Its intricate internal patterns work to cleanse and balance energy fields, supporting meditation and spiritual healing practices. Ideal for those seeking to deepen their connection to subtle energies, this quartz point serves as a precise focus for directing intention and enhancing metaphysical work.\u003c\/p\u003e\n\u003cp\u003eThis product is an exact pick as pictured, one of a kind.\u003c\/p\u003e\u003ch2\u003eCrystal Towers, Wands, Generators, Points, Pillars \u0026amp; Obelisks — What's the Difference?\u003c\/h2\u003e\n\u003cp id=\"isPasted\"\u003eWhile these terms may vary, they all describe beautifully shaped crystals with a pointed tip designed to channel and direct energy. Each name highlights a unique aspect of their use:\u003c\/p\u003e\n\u003cul\u003e\n\u003cli\u003e\n\u003cstrong\u003eTowers\u003c\/strong\u003e- Known for their steady, grounding presence, crystal towers help focus and amplify energy, making them perfect for meditation and manifestation.\u003c\/li\u003e\n\u003cli\u003e\n\u003cstrong\u003eWands\u003c\/strong\u003e- Traditionally used in energy work and healing, crystal wands are excellent for directing energy flow and clearing blockages.\u003c\/li\u003e\n\u003cli\u003e\n\u003cstrong\u003ePillars\u003c\/strong\u003e- Symbolizing strength and stability, crystal pillars create a balanced and harmonious environment, making them great for home decor and spiritual practices.\u003c\/li\u003e\n\u003cli\u003e\n\u003cstrong\u003eObelisks\u003c\/strong\u003e- Inspired by ancient structures, crystal obelisks are believed to connect earthly and spiritual energies, making them powerful tools for transformation and enlightenment.\u003c\/li\u003e\n\u003c\/ul\u003e\n\u003cp\u003eNo matter what you call them, these crystals serve the same purpose—to enhance energy, intention, and harmony in your space. Choose the one that resonates most with you!\u003c\/p\u003e"},"options":[{"name":"Material","position":1,"values":["Crackle Quartz"]},{"name":"Size","position":2,"values":["234g - 2.75\"H x 2.00\"W"]}],"custom_metafields":{"shipping_time":"Within 7 days"},"metafields":{"badge":"\u003cdiv style='display:none' class='jdgm-prev-badge' data-average-rating='0.00' data-number-of-reviews='0' data-number-of-questions='0'\u003e \u003cspan class='jdgm-prev-badge__stars' data-score='0.00' tabindex='0' aria-label='0.00 stars' role='button'\u003e \u003cspan class='jdgm-star jdgm--off'\u003e\u003c\/span\u003e\u003cspan class='jdgm-star jdgm--off'\u003e\u003c\/span\u003e\u003cspan class='jdgm-star jdgm--off'\u003e\u003c\/span\u003e\u003cspan class='jdgm-star jdgm--off'\u003e\u003c\/span\u003e\u003cspan class='jdgm-star jdgm--off'\u003e\u003c\/span\u003e \u003c\/span\u003e \u003cspan class='jdgm-prev-badge__text'\u003e No reviews \u003c\/span\u003e \u003c\/div\u003e","widget":"\u003cdiv class='jdgm-rev-widg' data-updated-at='2025-09-04T20:41:44Z' data-average-rating='0.00' data-number-of-reviews='0' data-number-of-questions='0' data-image-url='https:\/\/cdn.shopify.com\/s\/files\/1\/0613\/0345\/5915\/files\/6I0A3997.jpg?v=1757018461'\u003e \u003cstyle class='jdgm-temp-hiding-style'\u003e.jdgm-rev-widg{ display: none }\u003c\/style\u003e \u003cdiv class='jdgm-rev-widg__header'\u003e \u003ch2 class='jdgm-rev-widg__title'\u003eCustomer Reviews\u003c\/h2\u003e \u003cdiv class='jdgm-rev-widg__summary'\u003e \u003cdiv class='jdgm-rev-widg__summary-stars' aria-label='Average rating is 0.00 stars' role='img'\u003e \u003cspan class='jdgm-star jdgm--off'\u003e\u003c\/span\u003e\u003cspan class='jdgm-star jdgm--off'\u003e\u003c\/span\u003e\u003cspan class='jdgm-star jdgm--off'\u003e\u003c\/span\u003e\u003cspan class='jdgm-star jdgm--off'\u003e\u003c\/span\u003e\u003cspan class='jdgm-star jdgm--off'\u003e\u003c\/span\u003e \u003c\/div\u003e \u003cdiv class='jdgm-rev-widg__summary-text'\u003eBe the first to write a review\u003c\/div\u003e \u003c\/div\u003e \u003ca style='display: none' href='#' class='jdgm-write-rev-link' role='button'\u003eWrite a review\u003c\/a\u003e \u003cdiv class='jdgm-histogram jdgm-temp-hidden'\u003e \u003cdiv class='jdgm-histogram__row' data-rating='5' data-frequency='0' data-percentage='0'\u003e \u003cdiv class='jdgm-histogram__star' role='button' aria-label=\"0% (0) reviews with 5 star rating\" tabindex='0' \u003e\u003cspan class='jdgm-star jdgm--on'\u003e\u003c\/span\u003e\u003cspan class='jdgm-star jdgm--on'\u003e\u003c\/span\u003e\u003cspan class='jdgm-star jdgm--on'\u003e\u003c\/span\u003e\u003cspan class='jdgm-star jdgm--on'\u003e\u003c\/span\u003e\u003cspan class='jdgm-star jdgm--on'\u003e\u003c\/span\u003e\u003c\/div\u003e \u003cdiv class='jdgm-histogram__bar'\u003e \u003cdiv class='jdgm-histogram__bar-content' style='width: 0%;'\u003e \u003c\/div\u003e \u003c\/div\u003e \u003cdiv class='jdgm-histogram__percentage'\u003e0%\u003c\/div\u003e \u003cdiv class='jdgm-histogram__frequency'\u003e(0)\u003c\/div\u003e \u003c\/div\u003e \u003cdiv class='jdgm-histogram__row' data-rating='4' data-frequency='0' data-percentage='0'\u003e \u003cdiv class='jdgm-histogram__star' role='button' aria-label=\"0% (0) reviews with 4 star rating\" tabindex='0' \u003e\u003cspan class='jdgm-star jdgm--on'\u003e\u003c\/span\u003e\u003cspan class='jdgm-star jdgm--on'\u003e\u003c\/span\u003e\u003cspan class='jdgm-star jdgm--on'\u003e\u003c\/span\u003e\u003cspan class='jdgm-star jdgm--on'\u003e\u003c\/span\u003e\u003cspan class='jdgm-star jdgm--off'\u003e\u003c\/span\u003e\u003c\/div\u003e \u003cdiv class='jdgm-histogram__bar'\u003e \u003cdiv class='jdgm-histogram__bar-content' style='width: 0%;'\u003e \u003c\/div\u003e \u003c\/div\u003e \u003cdiv class='jdgm-histogram__percentage'\u003e0%\u003c\/div\u003e \u003cdiv class='jdgm-histogram__frequency'\u003e(0)\u003c\/div\u003e \u003c\/div\u003e \u003cdiv class='jdgm-histogram__row' data-rating='3' data-frequency='0' data-percentage='0'\u003e \u003cdiv class='jdgm-histogram__star' role='button' aria-label=\"0% (0) reviews with 3 star rating\" tabindex='0' \u003e\u003cspan class='jdgm-star jdgm--on'\u003e\u003c\/span\u003e\u003cspan class='jdgm-star jdgm--on'\u003e\u003c\/span\u003e\u003cspan class='jdgm-star jdgm--on'\u003e\u003c\/span\u003e\u003cspan class='jdgm-star jdgm--off'\u003e\u003c\/span\u003e\u003cspan class='jdgm-star jdgm--off'\u003e\u003c\/span\u003e\u003c\/div\u003e \u003cdiv class='jdgm-histogram__bar'\u003e \u003cdiv class='jdgm-histogram__bar-content' style='width: 0%;'\u003e \u003c\/div\u003e \u003c\/div\u003e \u003cdiv class='jdgm-histogram__percentage'\u003e0%\u003c\/div\u003e \u003cdiv class='jdgm-histogram__frequency'\u003e(0)\u003c\/div\u003e \u003c\/div\u003e \u003cdiv class='jdgm-histogram__row' data-rating='2' data-frequency='0' data-percentage='0'\u003e \u003cdiv class='jdgm-histogram__star' role='button' aria-label=\"0% (0) reviews with 2 star rating\" tabindex='0' \u003e\u003cspan class='jdgm-star jdgm--on'\u003e\u003c\/span\u003e\u003cspan class='jdgm-star jdgm--on'\u003e\u003c\/span\u003e\u003cspan class='jdgm-star jdgm--off'\u003e\u003c\/span\u003e\u003cspan class='jdgm-star jdgm--off'\u003e\u003c\/span\u003e\u003cspan class='jdgm-star jdgm--off'\u003e\u003c\/span\u003e\u003c\/div\u003e \u003cdiv class='jdgm-histogram__bar'\u003e \u003cdiv class='jdgm-histogram__bar-content' style='width: 0%;'\u003e \u003c\/div\u003e \u003c\/div\u003e \u003cdiv class='jdgm-histogram__percentage'\u003e0%\u003c\/div\u003e \u003cdiv class='jdgm-histogram__frequency'\u003e(0)\u003c\/div\u003e \u003c\/div\u003e \u003cdiv class='jdgm-histogram__row' data-rating='1' data-frequency='0' data-percentage='0'\u003e \u003cdiv class='jdgm-histogram__star' role='button' aria-label=\"0% (0) reviews with 1 star rating\" tabindex='0' \u003e\u003cspan class='jdgm-star jdgm--on'\u003e\u003c\/span\u003e\u003cspan class='jdgm-star jdgm--off'\u003e\u003c\/span\u003e\u003cspan class='jdgm-star jdgm--off'\u003e\u003c\/span\u003e\u003cspan class='jdgm-star jdgm--off'\u003e\u003c\/span\u003e\u003cspan class='jdgm-star jdgm--off'\u003e\u003c\/span\u003e\u003c\/div\u003e \u003cdiv class='jdgm-histogram__bar'\u003e \u003cdiv class='jdgm-histogram__bar-content' style='width: 0%;'\u003e \u003c\/div\u003e \u003c\/div\u003e \u003cdiv class='jdgm-histogram__percentage'\u003e0%\u003c\/div\u003e \u003cdiv class='jdgm-histogram__frequency'\u003e(0)\u003c\/div\u003e \u003c\/div\u003e \u003cdiv class='jdgm-histogram__row jdgm-histogram__clear-filter' data-rating=null tabindex='0'\u003e\u003c\/div\u003e \u003c\/div\u003e \u003cdiv class='jdgm-rev-widg__sort-wrapper'\u003e\u003c\/div\u003e \u003c\/div\u003e \u003cdiv class='jdgm-rev-widg__body'\u003e \u003cdiv class='jdgm-rev-widg__reviews'\u003e\u003c\/div\u003e \u003cdiv class='jdgm-paginate' data-per-page='4' data-url='https:\/\/api.judge.me\/reviews\/reviews_for_widget' style=\"display: none;\"\u003e\u003c\/div\u003e \u003c\/div\u003e \u003cdiv class='jdgm-rev-widg__paginate-spinner-wrapper'\u003e \u003cdiv class='jdgm-spinner'\u003e\u003c\/div\u003e \u003c\/div\u003e \u003c\/div\u003e"},"collections":[{"id":294880051371,"handle":"crystals","title":"Crystals","updated_at":"2026-01-07T23:43:11-05:00","body_html":"\u003cp data-start=\"159\" data-end=\"687\"\u003e✨ \u003cstrong data-start=\"161\" data-end=\"216\"\u003eDiscover the Magic of Crystals with Crystal Destiny\u003c\/strong\u003e ✨\u003cbr data-start=\"218\" data-end=\"221\"\u003eCrystals have been treasured for centuries—not only for their natural beauty but also for their powerful healing energies. Beyond their visual allure, they bring balance, harmony, and positive energy into any space. Whether used for home décor, meditation, or simply to elevate the energy of your surroundings, crystals create a sanctuary of peace, relaxation, and well-being. Each piece is a unique gift from the Earth—visually stunning and spiritually uplifting.\u003c\/p\u003e\n\u003cp data-start=\"689\" data-end=\"1011\"\u003eAt \u003cstrong data-start=\"692\" data-end=\"711\"\u003eCrystal Destiny\u003c\/strong\u003e, our signature collection showcases a curated selection of exquisite crystals, from radiant Quartz to soothing Amethyst. Every stone is carefully sourced for its elegance and metaphysical resonance, making them perfect for enhancing your home, uplifting your spirit, or gifting to someone special.\u003c\/p\u003e\n\u003cp data-start=\"1013\" data-end=\"1206\"\u003eExperience the timeless sophistication of crystalline wonders. Explore the \u003cstrong data-start=\"1088\" data-end=\"1118\"\u003eCrystal Destiny Collection\u003c\/strong\u003e today and bring the transformative beauty of these treasures into your everyday life.\u003c\/p\u003e","published_at":"2023-06-05T11:24:02-04:00","sort_order":"created-desc","template_suffix":"","disjunctive":false,"rules":[{"column":"tag","relation":"equals","condition":"crystal"},{"column":"type","relation":"not_contains","condition":"925 Sterling Silver"},{"column":"type","relation":"not_contains","condition":"Wire Wraps"}],"published_scope":"global"},{"id":319456084139,"handle":"universal-chakra-crystals","title":"Universal Chakra Crystals","updated_at":"2026-01-06T23:24:24-05:00","body_html":"\u003cp data-start=\"116\" data-end=\"404\"\u003e✨ \u003cstrong data-start=\"118\" data-end=\"158\"\u003eUniversal Chakra Crystals Collection\u003c\/strong\u003e ✨\u003cbr data-start=\"160\" data-end=\"163\"\u003eBalance, align, and energize all your chakras with our \u003cstrong data-start=\"218\" data-end=\"247\"\u003eUniversal Chakra Crystals\u003c\/strong\u003e. Carefully selected to resonate with every energy center in the body, these crystals support holistic well-being, spiritual growth, and energetic harmony.\u003c\/p\u003e\n\u003cp data-start=\"406\" data-end=\"744\"\u003eOur curated selection includes vibrant stones such as Amethyst, Citrine, Clear Quartz, and more—each chosen for their ability to promote clarity, balance, and vitality across the entire chakra system. Perfect for meditation, energy work, or creating a harmonious space, Universal Chakra Crystals help you connect mind, body, and spirit.\u003c\/p\u003e\n\u003cp data-start=\"746\" data-end=\"875\"\u003eEmbrace full-spectrum energy and elevate your spiritual journey with the transformative power of \u003cstrong data-start=\"843\" data-end=\"872\"\u003eUniversal Chakra Crystals\u003c\/strong\u003e.\u003c\/p\u003e","published_at":"2025-07-17T18:19:50-04:00","sort_order":"best-selling","template_suffix":"","disjunctive":false,"rules":[{"column":"variant_metafield_definition","relation":"equals","condition":"All Chakras"}],"published_scope":"global","image":{"created_at":"2025-07-17T19:07:58-04:00","alt":null,"width":1080,"height":1080,"src":"\/\/crystaldestiny.com\/cdn\/shop\/collections\/Universal_7_Chakras_Collection.jpg?v=1762474934"}},{"id":294880116907,"handle":"polished","title":"Polished Crystals","updated_at":"2026-01-07T23:43:11-05:00","body_html":"\u003cp data-start=\"199\" data-end=\"598\"\u003e✨ \u003cstrong data-start=\"201\" data-end=\"248\"\u003eCrystal Destiny Polished Crystal Collection\u003c\/strong\u003e ✨\u003cbr data-start=\"250\" data-end=\"253\"\u003eIndulge in the brilliance of crystals refined to perfection. Our \u003cstrong data-start=\"318\" data-end=\"341\"\u003ePolished Collection\u003c\/strong\u003e showcases gemstones meticulously shaped and smoothed to reveal their natural radiance and timeless beauty. From the shimmering glow of Quartz to the deep allure of Obsidian, each polished piece is a testament to nature’s artistry and human craftsmanship.\u003c\/p\u003e\n\u003cp data-start=\"600\" data-end=\"862\"\u003ePerfect as statement décor, meaningful gifts, or companions on your spiritual journey, polished crystals bring sophistication and elevated energy into any space. Their radiant surfaces reflect not only light but also the transformative power of crystal energy.\u003c\/p\u003e\n\u003cp data-start=\"864\" data-end=\"1022\"\u003eDiscover the elegance of refinement with Crystal Destiny’s Polished Crystal Collection—where every facet shines with intention, beauty, and timeless allure.\u003c\/p\u003e","published_at":"2023-06-05T11:30:44-04:00","sort_order":"created-desc","template_suffix":"","disjunctive":false,"rules":[{"column":"tag","relation":"equals","condition":"polished"}],"published_scope":"global"},{"id":293659312299,"handle":"best-sellers","title":"Best Sellers","updated_at":"2026-01-07T23:43:11-05:00","body_html":"\u003cp data-start=\"155\" data-end=\"510\"\u003eDiscover the pieces our community loves most. Our Best Sellers Collection brings together handpicked crystals and jewelry that embody timeless elegance, spiritual resonance, and everyday sophistication. Each item has earned its place as a customer favorite—celebrated for both its beauty and its meaningful energy.\u003c\/p\u003e\n\u003cp data-start=\"512\" data-end=\"802\"\u003eFrom stunning statement pieces to versatile daily companions, these treasures are curated to elevate your space, uplift your spirit, and reflect refined taste. Indulge in what’s most cherished and let our best sellers guide you toward the perfect blend of style and transformative energy.\u003c\/p\u003e\n\u003cp data-start=\"804\" data-end=\"932\"\u003eExplore the Best Sellers Collection today—where elegance meets intention, and every piece tells a story of beauty and balance.\u003c\/p\u003e","published_at":"2023-03-15T16:04:51-04:00","sort_order":"best-selling","template_suffix":"","disjunctive":false,"rules":[{"column":"variant_price","relation":"greater_than","condition":"0"},{"column":"variant_inventory","relation":"greater_than","condition":"0"},{"column":"type","relation":"not_equals","condition":"Shipping Protection"}],"published_scope":"global"},{"id":321370390699,"handle":"monthly-crystal-sale","title":"Monthly Crystal Sale | Spheres \u0026 Towers","updated_at":"2026-01-06T23:24:37-05:00","body_html":"\u003cp\u003eShop our \u003cstrong\u003eMonthly Crystal Sale\u003c\/strong\u003e, where you can shop a wide selection of healing crystals at discounted prices. Explore \u003cstrong\u003ecrystal spheres and towers,\u003c\/strong\u003e— all carefully curated to support meditation, energy balancing, and spiritual wellness. Whether you're looking to enhance your home decor, boost your daily energy, or find the perfect gift, our \u003cstrong\u003ecrystals for healing and manifestation\u003c\/strong\u003e offer both beauty and metaphysical benefits.\u003c\/p\u003e\n\u003cp\u003eEach month, our sale features \u003cstrong\u003enew discounted collections\u003c\/strong\u003e, from \u003cstrong\u003enatural quartz and amethyst towers\u003c\/strong\u003e to \u003cstrong\u003ewire-wrapped pendants and polished stones\u003c\/strong\u003e, so there's always something fresh to discover. Shop with confidence knowing you're getting high-quality crystals with \u003cstrong\u003efree shipping options\u003c\/strong\u003e and a trusted experience.\u003c\/p\u003e\n\u003cp\u003e\u003cstrong\u003eTake advantage of the Monthly Crystal Sale today\u003c\/strong\u003e and add powerful, natural energy to your life with \u003cstrong\u003eauthentic healing crystals\u003c\/strong\u003e — while our limited-time discounts last.\u003c\/p\u003e\n\u003cp\u003e\u003cstrong\u003e*Discount automatically applied at checkout.\u003c\/strong\u003e\u003c\/p\u003e","published_at":"2025-12-02T01:26:17-05:00","sort_order":"alpha-asc","template_suffix":"","disjunctive":true,"rules":[{"column":"tag","relation":"equals","condition":"spheres"},{"column":"tag","relation":"equals","condition":"Towers"}],"published_scope":"global","image":{"created_at":"2026-01-01T01:32:34-05:00","alt":"","width":960,"height":960,"src":"\/\/crystaldestiny.com\/cdn\/shop\/collections\/3E8C2969-1B86-4ACE-B349-98E9D8768424.jpg?v=1767249154"}},{"id":297596059819,"handle":"all","title":"All Crystals \u0026 Jewelry","updated_at":"2026-01-07T23:43:11-05:00","body_html":"\u003cp data-start=\"149\" data-end=\"494\"\u003e✨ \u003cstrong data-start=\"151\" data-end=\"181\"\u003eWelcome to Crystal Destiny\u003c\/strong\u003e ✨\u003cbr data-start=\"183\" data-end=\"186\"\u003eStep into a world where beauty, energy, and artistry unite. Our collection is a treasure trove of exquisite crystals, from the raw, untamed elegance of natural formations to the polished brilliance of expertly crafted pieces. Each crystal is a masterpiece, carrying its own unique story and timeless charm.\u003c\/p\u003e\n\u003cp data-start=\"496\" data-end=\"831\"\u003eWhether you’re drawn to the calming presence of Amethyst, the vibrant energy of Citrine, or the grounding strength of Jasper, our crystals invite you to connect with nature’s finest wonders. Perfect for enhancing your space, supporting your spiritual journey, or gifting with intention, every piece resonates with beauty and meaning.\u003c\/p\u003e\n\u003cp data-start=\"833\" data-end=\"1000\"\u003eElevate your surroundings, embrace the mystique, and explore the enchanting world of crystals at \u003cstrong data-start=\"930\" data-end=\"949\"\u003eCrystal Destiny\u003c\/strong\u003e—where every crystal is waiting to be discovered.\u003c\/p\u003e","published_at":"2023-11-10T13:55:31-05:00","sort_order":"created-desc","template_suffix":"","disjunctive":false,"rules":[{"column":"type","relation":"not_equals","condition":"asdf"}],"published_scope":"global"},{"id":296256405675,"handle":"crystal-towers","title":"Crystal Towers","updated_at":"2026-01-06T23:24:37-05:00","body_html":"\u003cp data-end=\"568\" data-start=\"152\"\u003e✨ \u003cstrong data-end=\"190\" data-start=\"154\"\u003eCrystal Destiny Tower Collection\u003c\/strong\u003e ✨\u003cbr data-end=\"195\" data-start=\"192\"\u003eEnchant your space with the timeless beauty and powerful energy of crystal towers. Each piece in our \u003cstrong data-end=\"316\" data-start=\"296\"\u003eTower Collection\u003c\/strong\u003e is carefully crafted to showcase nature’s artistry while radiating higher vibrations and spiritual resonance. From the clarity of Quartz to the calming presence of Amethyst, these towers are both decorative masterpieces and tools for transformation.\u003c\/p\u003e\n\u003cp data-end=\"765\" data-start=\"570\"\u003ePerfect for meditation spaces, energy work, or simply elevating your home décor, crystal towers channel focused energy upward—creating balance, harmony, and refined elegance in any environment.\u003c\/p\u003e\n\u003cp data-end=\"917\" data-start=\"767\"\u003eDiscover the Crystal Destiny Tower Collection today and transform your surroundings into a sanctuary of beauty, purpose, and spiritual significance.\u003c\/p\u003e\n\u003ch2\u003eCrystal Towers, Wands, Generators, Points, Pillars \u0026amp; Obelisks — What's the Difference?\u003c\/h2\u003e\n\u003cp id=\"isPasted\"\u003eWhile these terms may vary, they all describe beautifully shaped crystals with a pointed tip designed to channel and direct energy. Each name highlights a unique aspect of their use:\u003c\/p\u003e\n\u003cul\u003e\n\u003cli\u003e\n\u003cstrong\u003eTowers\u003c\/strong\u003e- Known for their steady, grounding presence, crystal towers help focus and amplify energy, making them perfect for meditation and manifestation.\u003c\/li\u003e\n\u003cli\u003e\n\u003cstrong\u003eWands\u003c\/strong\u003e- Traditionally used in energy work and healing, crystal wands are excellent for directing energy flow and clearing blockages.\u003c\/li\u003e\n\u003cli\u003e\n\u003cstrong\u003ePillars\u003c\/strong\u003e- Symbolizing strength and stability, crystal pillars create a balanced and harmonious environment, making them great for home decor and spiritual practices.\u003c\/li\u003e\n\u003cli\u003e\n\u003cstrong\u003eObelisks\u003c\/strong\u003e- Inspired by ancient structures, crystal obelisks are believed to connect earthly and spiritual energies, making them powerful tools for transformation and enlightenment.\u003c\/li\u003e\n\u003c\/ul\u003e\n\u003cp\u003eNo matter what you call them, these crystals serve the same purpose—to enhance energy, intention, and harmony in your space. Choose the one that resonates most with you!\u003c\/p\u003e","published_at":"2023-09-14T12:52:35-04:00","sort_order":"created-desc","template_suffix":"","disjunctive":false,"rules":[{"column":"tag","relation":"equals","condition":"towers"}],"published_scope":"global"},{"id":298983391403,"handle":"january-crystal-sale","title":"January Sale | 25% Off Crystal Towers \u0026 Spheres","updated_at":"2026-01-06T23:24:37-05:00","body_html":"\u003cp\u003eShop our \u003cstrong\u003eJanuary Crystal Sale\u003c\/strong\u003e, where you can shop a wide selection of healing crystals at discounted prices. Explore \u003cstrong\u003eCrystal Towers, \u0026amp; Crystal Spheres\u003c\/strong\u003e — all carefully curated and crafted to support meditation, energy balancing, and spiritual wellness. Whether you're looking to enhance your home decor, boost your daily energy, or find the perfect gift, our \u003cstrong\u003ecrystals for healing and manifestation\u003c\/strong\u003e offer both beauty and metaphysical benefits.\u003c\/p\u003e\n\u003cp\u003eThis January, our sale features \u003cstrong\u003ediscounted crystal towers and spheres\u003c\/strong\u003e, from \u003cstrong\u003enatural quartz \u003c\/strong\u003eand \u003cstrong\u003eamethyst \u003c\/strong\u003eto \u003cstrong\u003ebumblebee jasper \u003c\/strong\u003eand \u003cstrong\u003ecarnelian\u003c\/strong\u003e, so there's always something fresh to discover. Shop with confidence knowing you're getting high-quality crystals with \u003cstrong\u003efree shipping options\u003c\/strong\u003e and a trusted experience.\u003c\/p\u003e\n\u003cp\u003e\u003cstrong\u003eTake advantage of the January Crystal Sale today\u003c\/strong\u003e and add powerful, natural energy to your life with \u003cstrong\u003eauthentic healing crystals\u003c\/strong\u003e — while our limited-time discounts last.\u003c\/p\u003e\n\u003cp\u003e\u003cstrong\u003e*Discount automatically applied at checkout.\u003c\/strong\u003e\u003c\/p\u003e","published_at":"2026-01-01T00:07:17-05:00","sort_order":"alpha-asc","template_suffix":"monthly-collection","disjunctive":true,"rules":[{"column":"tag","relation":"equals","condition":"Spheres"},{"column":"tag","relation":"equals","condition":"Towers"}],"published_scope":"global","image":{"created_at":"2026-01-01T01:29:59-05:00","alt":"","width":960,"height":960,"src":"\/\/crystaldestiny.com\/cdn\/shop\/collections\/1464163B-22B1-4D62-BEC5-CEC9AECB670B.jpg?v=1767248999"}}]}
[{"alt":"Crackle Quartz Point-Points-Crystal Destiny-Crackle Quartz-234g - 2.75\"H x 2.00\"W-Crystal Destiny","id":31728538419371,"position":1,"preview_image":{"aspect_ratio":1.0,"height":1395,"width":1395,"src":"\/\/crystaldestiny.com\/cdn\/shop\/files\/Crackle-Quartz-Point-Points.jpg?v=1757088879"},"aspect_ratio":1.0,"height":1395,"media_type":"image","src":"\/\/crystaldestiny.com\/cdn\/shop\/files\/Crackle-Quartz-Point-Points.jpg?v=1757088879","width":1395},{"alt":"Crackle Quartz Point-Points-Crystal Destiny-Crackle Quartz-234g - 2.75\"H x 2.00\"W-Crystal Destiny","id":31728538452139,"position":2,"preview_image":{"aspect_ratio":1.0,"height":1502,"width":1502,"src":"\/\/crystaldestiny.com\/cdn\/shop\/files\/Crackle-Quartz-Point-Points-2.jpg?v=1757048694"},"aspect_ratio":1.0,"height":1502,"media_type":"image","src":"\/\/crystaldestiny.com\/cdn\/shop\/files\/Crackle-Quartz-Point-Points-2.jpg?v=1757048694","width":1502},{"alt":"Crackle Quartz Point-Points-Crystal Destiny-Crackle Quartz-234g - 2.75\"H x 2.00\"W-Crystal Destiny","id":31728538484907,"position":3,"preview_image":{"aspect_ratio":1.0,"height":1484,"width":1484,"src":"\/\/crystaldestiny.com\/cdn\/shop\/files\/Crackle-Quartz-Point-Points-3.jpg?v=1757048696"},"aspect_ratio":1.0,"height":1484,"media_type":"image","src":"\/\/crystaldestiny.com\/cdn\/shop\/files\/Crackle-Quartz-Point-Points-3.jpg?v=1757048696","width":1484},{"alt":"Crackle Quartz Point-Points-Crystal Destiny-Crackle Quartz-234g - 2.75\"H x 2.00\"W-Crystal Destiny","id":31728538517675,"position":4,"preview_image":{"aspect_ratio":1.0,"height":1471,"width":1471,"src":"\/\/crystaldestiny.com\/cdn\/shop\/files\/Crackle-Quartz-Point-Points-4.jpg?v=1757048697"},"aspect_ratio":1.0,"height":1471,"media_type":"image","src":"\/\/crystaldestiny.com\/cdn\/shop\/files\/Crackle-Quartz-Point-Points-4.jpg?v=1757048697","width":1471}]
{"item":{"id":8529075896491,"title":"Crystal Sphere Display Stands Assorted Styles","handle":"crystal-sphere-display-stands-assorted-styles-1005006043315902-a-2x2-5cm-wood","description":"\u003cp data-start=\"213\" data-end=\"534\"\u003eThese \u003cstrong data-start=\"246\" data-end=\"288\"\u003eAssorted Crystal Sphere Display Stands\u003c\/strong\u003e feature a variety of styles designed to elegantly showcase your crystal spheres, gemstones, or miniature stones. Each stand is crafted to provide both stability and aesthetic appeal, making your crystal collection the focal point of any space.\u003c\/p\u003e\n\u003cp data-start=\"536\" data-end=\"770\"\u003ePerfect for collectors, meditation areas, or home décor, these stands highlight the natural beauty of your stones while keeping them secure. The assortment offers multiple design options to suit your personal style or display needs.\u003c\/p\u003e\n\u003cp data-start=\"772\" data-end=\"905\"\u003eIdeal for gifting or enhancing your crystal collection, these stands blend functionality, artistry, and timeless decorative appeal.\u003c\/p\u003e","published_at":"2025-09-21T18:00:25-04:00","created_at":"2025-09-21T14:45:26-04:00","vendor":"Ali","type":"Stands","tags":["adjusted-shipping","crystal","spheres","Stands"],"price":399,"price_min":399,"price_max":1999,"available":true,"price_varies":true,"compare_at_price":0,"compare_at_price_min":0,"compare_at_price_max":0,"compare_at_price_varies":false,"variants":[{"id":45647174336683,"title":"A-2x2.5cm-wood","option1":"A-2x2.5cm-wood","option2":null,"option3":null,"sku":"1005006043315902-A-2x2.5cm-wood","requires_shipping":true,"taxable":true,"featured_image":{"id":40448948306091,"product_id":8529075896491,"position":46,"created_at":"2025-09-21T14:45:29-04:00","updated_at":"2025-12-10T00:10:32-05:00","alt":"Crystal Sphere Display Stands Assorted Styles-Stands-Ali-A-2x2.5cm-wood-Crystal Destiny","width":1000,"height":1000,"src":"\/\/crystaldestiny.com\/cdn\/shop\/files\/Crystal-Sphere-Display-Stands-Assorted-Styles-Stands-A-2x2_5cm-wood-46.webp?v=1765343432","variant_ids":[45647174336683]},"available":true,"name":"Crystal Sphere Display Stands Assorted Styles - A-2x2.5cm-wood","public_title":"A-2x2.5cm-wood","options":["A-2x2.5cm-wood"],"price":1099,"weight":40,"compare_at_price":0,"inventory_management":"shopify","barcode":null,"featured_media":{"alt":"Crystal Sphere Display Stands Assorted Styles-Stands-Ali-A-2x2.5cm-wood-Crystal Destiny","id":31835998716075,"position":46,"preview_image":{"aspect_ratio":1.0,"height":1000,"width":1000,"src":"\/\/crystaldestiny.com\/cdn\/shop\/files\/Crystal-Sphere-Display-Stands-Assorted-Styles-Stands-A-2x2_5cm-wood-46.webp?v=1765343432"}},"requires_selling_plan":false,"selling_plan_allocations":[]},{"id":45647174172843,"title":"A-2.5x2.5cm-wood","option1":"A-2.5x2.5cm-wood","option2":null,"option3":null,"sku":"1005006043315902-A-2.5x2.5cm-wood","requires_shipping":true,"taxable":true,"featured_image":{"id":40448948535467,"product_id":8529075896491,"position":53,"created_at":"2025-09-21T14:45:29-04:00","updated_at":"2025-12-10T00:10:42-05:00","alt":"Crystal Sphere Display Stands Assorted Styles-Stands-Ali-A-2.5x2.5cm-wood-Crystal Destiny","width":1000,"height":1000,"src":"\/\/crystaldestiny.com\/cdn\/shop\/files\/Crystal-Sphere-Display-Stands-Assorted-Styles-Stands-A-2_5x2_5cm-wood-53.webp?v=1765343442","variant_ids":[45647174172843]},"available":true,"name":"Crystal Sphere Display Stands Assorted Styles - A-2.5x2.5cm-wood","public_title":"A-2.5x2.5cm-wood","options":["A-2.5x2.5cm-wood"],"price":1099,"weight":40,"compare_at_price":0,"inventory_management":"shopify","barcode":null,"featured_media":{"alt":"Crystal Sphere Display Stands Assorted Styles-Stands-Ali-A-2.5x2.5cm-wood-Crystal Destiny","id":31835998945451,"position":53,"preview_image":{"aspect_ratio":1.0,"height":1000,"width":1000,"src":"\/\/crystaldestiny.com\/cdn\/shop\/files\/Crystal-Sphere-Display-Stands-Assorted-Styles-Stands-A-2_5x2_5cm-wood-53.webp?v=1765343442"}},"requires_selling_plan":false,"selling_plan_allocations":[]},{"id":45647174205611,"title":"A-3x2.5cm-wood","option1":"A-3x2.5cm-wood","option2":null,"option3":null,"sku":"1005006043315902-A-3x2.5cm-wood","requires_shipping":true,"taxable":true,"featured_image":{"id":40448948633771,"product_id":8529075896491,"position":56,"created_at":"2025-09-21T14:45:29-04:00","updated_at":"2025-12-10T00:10:46-05:00","alt":"Crystal Sphere Display Stands Assorted Styles-Stands-Ali-A-3x2.5cm-wood-Crystal Destiny","width":1000,"height":1000,"src":"\/\/crystaldestiny.com\/cdn\/shop\/files\/Crystal-Sphere-Display-Stands-Assorted-Styles-Stands-A-3x2_5cm-wood-56.webp?v=1765343446","variant_ids":[45647174205611]},"available":true,"name":"Crystal Sphere Display Stands Assorted Styles - A-3x2.5cm-wood","public_title":"A-3x2.5cm-wood","options":["A-3x2.5cm-wood"],"price":1099,"weight":40,"compare_at_price":0,"inventory_management":"shopify","barcode":null,"featured_media":{"alt":"Crystal Sphere Display Stands Assorted Styles-Stands-Ali-A-3x2.5cm-wood-Crystal Destiny","id":31835999043755,"position":56,"preview_image":{"aspect_ratio":1.0,"height":1000,"width":1000,"src":"\/\/crystaldestiny.com\/cdn\/shop\/files\/Crystal-Sphere-Display-Stands-Assorted-Styles-Stands-A-3x2_5cm-wood-56.webp?v=1765343446"}},"requires_selling_plan":false,"selling_plan_allocations":[]},{"id":45647174238379,"title":"A-3.5x2.5cm-wood","option1":"A-3.5x2.5cm-wood","option2":null,"option3":null,"sku":"1005006043315902-A-3.5x2.5cm-wood","requires_shipping":true,"taxable":true,"featured_image":{"id":40448948830379,"product_id":8529075896491,"position":62,"created_at":"2025-09-21T14:45:29-04:00","updated_at":"2025-12-10T00:10:55-05:00","alt":"Crystal Sphere Display Stands Assorted Styles-Stands-Ali-A-3.5x2.5cm-wood-Crystal Destiny","width":1000,"height":1000,"src":"\/\/crystaldestiny.com\/cdn\/shop\/files\/Crystal-Sphere-Display-Stands-Assorted-Styles-Stands-A-3_5x2_5cm-wood-62.webp?v=1765343455","variant_ids":[45647174238379]},"available":true,"name":"Crystal Sphere Display Stands Assorted Styles - A-3.5x2.5cm-wood","public_title":"A-3.5x2.5cm-wood","options":["A-3.5x2.5cm-wood"],"price":1099,"weight":40,"compare_at_price":0,"inventory_management":"shopify","barcode":null,"featured_media":{"alt":"Crystal Sphere Display Stands Assorted Styles-Stands-Ali-A-3.5x2.5cm-wood-Crystal Destiny","id":31835999240363,"position":62,"preview_image":{"aspect_ratio":1.0,"height":1000,"width":1000,"src":"\/\/crystaldestiny.com\/cdn\/shop\/files\/Crystal-Sphere-Display-Stands-Assorted-Styles-Stands-A-3_5x2_5cm-wood-62.webp?v=1765343455"}},"requires_selling_plan":false,"selling_plan_allocations":[]},{"id":45647174271147,"title":"A-4x2.5cm-wood","option1":"A-4x2.5cm-wood","option2":null,"option3":null,"sku":"1005006043315902-A-4x2.5cm-wood","requires_shipping":true,"taxable":true,"featured_image":{"id":40448947093675,"product_id":8529075896491,"position":9,"created_at":"2025-09-21T14:45:28-04:00","updated_at":"2025-12-10T00:09:44-05:00","alt":"Crystal Sphere Display Stands Assorted Styles-Stands-Ali-A-4x2.5cm-wood-Crystal Destiny","width":1000,"height":1000,"src":"\/\/crystaldestiny.com\/cdn\/shop\/files\/Crystal-Sphere-Display-Stands-Assorted-Styles-Stands-A-4x2_5cm-wood-9.webp?v=1765343384","variant_ids":[45647174271147]},"available":true,"name":"Crystal Sphere Display Stands Assorted Styles - A-4x2.5cm-wood","public_title":"A-4x2.5cm-wood","options":["A-4x2.5cm-wood"],"price":1099,"weight":40,"compare_at_price":0,"inventory_management":"shopify","barcode":null,"featured_media":{"alt":"Crystal Sphere Display Stands Assorted Styles-Stands-Ali-A-4x2.5cm-wood-Crystal Destiny","id":31835997503659,"position":9,"preview_image":{"aspect_ratio":1.0,"height":1000,"width":1000,"src":"\/\/crystaldestiny.com\/cdn\/shop\/files\/Crystal-Sphere-Display-Stands-Assorted-Styles-Stands-A-4x2_5cm-wood-9.webp?v=1765343384"}},"requires_selling_plan":false,"selling_plan_allocations":[]},{"id":45647173910699,"title":"A-4.5x2.5cm-wood","option1":"A-4.5x2.5cm-wood","option2":null,"option3":null,"sku":"1005006043315902-A-4.5x2.5cm-wood","requires_shipping":true,"taxable":true,"featured_image":{"id":40448948895915,"product_id":8529075896491,"position":64,"created_at":"2025-09-21T14:45:29-04:00","updated_at":"2025-12-10T00:10:58-05:00","alt":"Crystal Sphere Display Stands Assorted Styles-Stands-Ali-A-4.5x2.5cm-wood-Crystal Destiny","width":1000,"height":1000,"src":"\/\/crystaldestiny.com\/cdn\/shop\/files\/Crystal-Sphere-Display-Stands-Assorted-Styles-Stands-A-4_5x2_5cm-wood-64.webp?v=1765343458","variant_ids":[45647173910699]},"available":true,"name":"Crystal Sphere Display Stands Assorted Styles - A-4.5x2.5cm-wood","public_title":"A-4.5x2.5cm-wood","options":["A-4.5x2.5cm-wood"],"price":1399,"weight":40,"compare_at_price":0,"inventory_management":"shopify","barcode":null,"featured_media":{"alt":"Crystal Sphere Display Stands Assorted Styles-Stands-Ali-A-4.5x2.5cm-wood-Crystal Destiny","id":31835999338667,"position":64,"preview_image":{"aspect_ratio":1.0,"height":1000,"width":1000,"src":"\/\/crystaldestiny.com\/cdn\/shop\/files\/Crystal-Sphere-Display-Stands-Assorted-Styles-Stands-A-4_5x2_5cm-wood-64.webp?v=1765343458"}},"requires_selling_plan":false,"selling_plan_allocations":[]},{"id":45647174303915,"title":"A-5x2.5cm-wood","option1":"A-5x2.5cm-wood","option2":null,"option3":null,"sku":"1005006043315902-A-5x2.5cm-wood","requires_shipping":true,"taxable":true,"featured_image":{"id":40448947323051,"product_id":8529075896491,"position":16,"created_at":"2025-09-21T14:45:28-04:00","updated_at":"2025-12-10T00:09:54-05:00","alt":"Crystal Sphere Display Stands Assorted Styles-Stands-Ali-A-5x2.5cm-wood-Crystal Destiny","width":1000,"height":1000,"src":"\/\/crystaldestiny.com\/cdn\/shop\/files\/Crystal-Sphere-Display-Stands-Assorted-Styles-Stands-A-5x2_5cm-wood-16.webp?v=1765343394","variant_ids":[45647174303915]},"available":true,"name":"Crystal Sphere Display Stands Assorted Styles - A-5x2.5cm-wood","public_title":"A-5x2.5cm-wood","options":["A-5x2.5cm-wood"],"price":1099,"weight":40,"compare_at_price":0,"inventory_management":"shopify","barcode":null,"featured_media":{"alt":"Crystal Sphere Display Stands Assorted Styles-Stands-Ali-A-5x2.5cm-wood-Crystal Destiny","id":31835997733035,"position":16,"preview_image":{"aspect_ratio":1.0,"height":1000,"width":1000,"src":"\/\/crystaldestiny.com\/cdn\/shop\/files\/Crystal-Sphere-Display-Stands-Assorted-Styles-Stands-A-5x2_5cm-wood-16.webp?v=1765343394"}},"requires_selling_plan":false,"selling_plan_allocations":[]},{"id":45647173943467,"title":"B-2.5x1cm-wood","option1":"B-2.5x1cm-wood","option2":null,"option3":null,"sku":"1005006043315902-B-2.5x1cm-wood","requires_shipping":true,"taxable":true,"featured_image":{"id":40448948338859,"product_id":8529075896491,"position":47,"created_at":"2025-09-21T14:45:29-04:00","updated_at":"2025-12-10T00:10:34-05:00","alt":"Crystal Sphere Display Stands Assorted Styles-Stands-Ali-B-2.5x1cm-wood-Crystal Destiny","width":1000,"height":1000,"src":"\/\/crystaldestiny.com\/cdn\/shop\/files\/Crystal-Sphere-Display-Stands-Assorted-Styles-Stands-B-2_5x1cm-wood-47.webp?v=1765343434","variant_ids":[45647173943467]},"available":true,"name":"Crystal Sphere Display Stands Assorted Styles - B-2.5x1cm-wood","public_title":"B-2.5x1cm-wood","options":["B-2.5x1cm-wood"],"price":999,"weight":40,"compare_at_price":0,"inventory_management":"shopify","barcode":null,"featured_media":{"alt":"Crystal Sphere Display Stands Assorted Styles-Stands-Ali-B-2.5x1cm-wood-Crystal Destiny","id":31835998748843,"position":47,"preview_image":{"aspect_ratio":1.0,"height":1000,"width":1000,"src":"\/\/crystaldestiny.com\/cdn\/shop\/files\/Crystal-Sphere-Display-Stands-Assorted-Styles-Stands-B-2_5x1cm-wood-47.webp?v=1765343434"}},"requires_selling_plan":false,"selling_plan_allocations":[]},{"id":45647173976235,"title":"B-3x1.5cm-wood","option1":"B-3x1.5cm-wood","option2":null,"option3":null,"sku":"1005006043315902-B-3x1.5cm-wood","requires_shipping":true,"taxable":true,"featured_image":{"id":40448947060907,"product_id":8529075896491,"position":8,"created_at":"2025-09-21T14:45:28-04:00","updated_at":"2025-12-10T00:09:42-05:00","alt":"Crystal Sphere Display Stands Assorted Styles-Stands-Ali-B-3x1.5cm-wood-Crystal Destiny","width":1000,"height":1000,"src":"\/\/crystaldestiny.com\/cdn\/shop\/files\/Crystal-Sphere-Display-Stands-Assorted-Styles-Stands-B-3x1_5cm-wood-8.webp?v=1765343382","variant_ids":[45647173976235]},"available":true,"name":"Crystal Sphere Display Stands Assorted Styles - B-3x1.5cm-wood","public_title":"B-3x1.5cm-wood","options":["B-3x1.5cm-wood"],"price":999,"weight":40,"compare_at_price":0,"inventory_management":"shopify","barcode":null,"featured_media":{"alt":"Crystal Sphere Display Stands Assorted Styles-Stands-Ali-B-3x1.5cm-wood-Crystal Destiny","id":31835997470891,"position":8,"preview_image":{"aspect_ratio":1.0,"height":1000,"width":1000,"src":"\/\/crystaldestiny.com\/cdn\/shop\/files\/Crystal-Sphere-Display-Stands-Assorted-Styles-Stands-B-3x1_5cm-wood-8.webp?v=1765343382"}},"requires_selling_plan":false,"selling_plan_allocations":[]},{"id":45647174009003,"title":"B-3.5x1.5cm-wood","option1":"B-3.5x1.5cm-wood","option2":null,"option3":null,"sku":"1005006043315902-B-3.5x1.5cm-wood","requires_shipping":true,"taxable":true,"featured_image":{"id":40448948797611,"product_id":8529075896491,"position":61,"created_at":"2025-09-21T14:45:29-04:00","updated_at":"2025-12-10T00:10:53-05:00","alt":"Crystal Sphere Display Stands Assorted Styles-Stands-Ali-B-3.5x1.5cm-wood-Crystal Destiny","width":1000,"height":1000,"src":"\/\/crystaldestiny.com\/cdn\/shop\/files\/Crystal-Sphere-Display-Stands-Assorted-Styles-Stands-B-3_5x1_5cm-wood-61.webp?v=1765343453","variant_ids":[45647174009003]},"available":true,"name":"Crystal Sphere Display Stands Assorted Styles - B-3.5x1.5cm-wood","public_title":"B-3.5x1.5cm-wood","options":["B-3.5x1.5cm-wood"],"price":999,"weight":40,"compare_at_price":0,"inventory_management":"shopify","barcode":null,"featured_media":{"alt":"Crystal Sphere Display Stands Assorted Styles-Stands-Ali-B-3.5x1.5cm-wood-Crystal Destiny","id":31835999207595,"position":61,"preview_image":{"aspect_ratio":1.0,"height":1000,"width":1000,"src":"\/\/crystaldestiny.com\/cdn\/shop\/files\/Crystal-Sphere-Display-Stands-Assorted-Styles-Stands-B-3_5x1_5cm-wood-61.webp?v=1765343453"}},"requires_selling_plan":false,"selling_plan_allocations":[]},{"id":45647174041771,"title":"B-3.8x2.2cm-wood","option1":"B-3.8x2.2cm-wood","option2":null,"option3":null,"sku":"1005006043315902-B-3.8x2.2cm-wood","requires_shipping":true,"taxable":true,"featured_image":{"id":40448948076715,"product_id":8529075896491,"position":39,"created_at":"2025-09-21T14:45:29-04:00","updated_at":"2025-12-10T00:10:22-05:00","alt":"Crystal Sphere Display Stands Assorted Styles-Stands-Ali-B-3.8x2.2cm-wood-Crystal Destiny","width":1000,"height":1000,"src":"\/\/crystaldestiny.com\/cdn\/shop\/files\/Crystal-Sphere-Display-Stands-Assorted-Styles-Stands-B-3_8x2_2cm-wood-39.webp?v=1765343422","variant_ids":[45647174041771]},"available":true,"name":"Crystal Sphere Display Stands Assorted Styles - B-3.8x2.2cm-wood","public_title":"B-3.8x2.2cm-wood","options":["B-3.8x2.2cm-wood"],"price":999,"weight":40,"compare_at_price":0,"inventory_management":"shopify","barcode":null,"featured_media":{"alt":"Crystal Sphere Display Stands Assorted Styles-Stands-Ali-B-3.8x2.2cm-wood-Crystal Destiny","id":31835998486699,"position":39,"preview_image":{"aspect_ratio":1.0,"height":1000,"width":1000,"src":"\/\/crystaldestiny.com\/cdn\/shop\/files\/Crystal-Sphere-Display-Stands-Assorted-Styles-Stands-B-3_8x2_2cm-wood-39.webp?v=1765343422"}},"requires_selling_plan":false,"selling_plan_allocations":[]},{"id":45647174074539,"title":"B-4x2.5cm-wood","option1":"B-4x2.5cm-wood","option2":null,"option3":null,"sku":"1005006043315902-B-4x2.5cm-wood","requires_shipping":true,"taxable":true,"featured_image":{"id":40448947486891,"product_id":8529075896491,"position":21,"created_at":"2025-09-21T14:45:28-04:00","updated_at":"2025-12-10T00:10:00-05:00","alt":"Crystal Sphere Display Stands Assorted Styles-Stands-Ali-B-4x2.5cm-wood-Crystal Destiny","width":1000,"height":1000,"src":"\/\/crystaldestiny.com\/cdn\/shop\/files\/Crystal-Sphere-Display-Stands-Assorted-Styles-Stands-B-4x2_5cm-wood-21.webp?v=1765343400","variant_ids":[45647174074539]},"available":true,"name":"Crystal Sphere Display Stands Assorted Styles - B-4x2.5cm-wood","public_title":"B-4x2.5cm-wood","options":["B-4x2.5cm-wood"],"price":999,"weight":40,"compare_at_price":0,"inventory_management":"shopify","barcode":null,"featured_media":{"alt":"Crystal Sphere Display Stands Assorted Styles-Stands-Ali-B-4x2.5cm-wood-Crystal Destiny","id":31835997896875,"position":21,"preview_image":{"aspect_ratio":1.0,"height":1000,"width":1000,"src":"\/\/crystaldestiny.com\/cdn\/shop\/files\/Crystal-Sphere-Display-Stands-Assorted-Styles-Stands-B-4x2_5cm-wood-21.webp?v=1765343400"}},"requires_selling_plan":false,"selling_plan_allocations":[]},{"id":45647174107307,"title":"B-5x2.5cm-wood","option1":"B-5x2.5cm-wood","option2":null,"option3":null,"sku":"1005006043315902-B-5x2.5cm-wood","requires_shipping":true,"taxable":true,"featured_image":{"id":40448947552427,"product_id":8529075896491,"position":23,"created_at":"2025-09-21T14:45:28-04:00","updated_at":"2025-12-10T00:10:03-05:00","alt":"Crystal Sphere Display Stands Assorted Styles-Stands-Ali-B-5x2.5cm-wood-Crystal Destiny","width":1000,"height":1000,"src":"\/\/crystaldestiny.com\/cdn\/shop\/files\/Crystal-Sphere-Display-Stands-Assorted-Styles-Stands-B-5x2_5cm-wood-23.webp?v=1765343403","variant_ids":[45647174107307]},"available":true,"name":"Crystal Sphere Display Stands Assorted Styles - B-5x2.5cm-wood","public_title":"B-5x2.5cm-wood","options":["B-5x2.5cm-wood"],"price":1399,"weight":40,"compare_at_price":0,"inventory_management":"shopify","barcode":null,"featured_media":{"alt":"Crystal Sphere Display Stands Assorted Styles-Stands-Ali-B-5x2.5cm-wood-Crystal Destiny","id":31835997962411,"position":23,"preview_image":{"aspect_ratio":1.0,"height":1000,"width":1000,"src":"\/\/crystaldestiny.com\/cdn\/shop\/files\/Crystal-Sphere-Display-Stands-Assorted-Styles-Stands-B-5x2_5cm-wood-23.webp?v=1765343403"}},"requires_selling_plan":false,"selling_plan_allocations":[]},{"id":45647174140075,"title":"B-7x3.6cm-wood","option1":"B-7x3.6cm-wood","option2":null,"option3":null,"sku":"1005006043315902-B-7x3.6cm-wood","requires_shipping":true,"taxable":true,"featured_image":{"id":40448947880107,"product_id":8529075896491,"position":33,"created_at":"2025-09-21T14:45:28-04:00","updated_at":"2025-12-10T00:10:16-05:00","alt":"Crystal Sphere Display Stands Assorted Styles-Stands-Ali-B-7x3.6cm-wood-Crystal Destiny","width":1000,"height":1000,"src":"\/\/crystaldestiny.com\/cdn\/shop\/files\/Crystal-Sphere-Display-Stands-Assorted-Styles-Stands-B-7x3_6cm-wood-33.webp?v=1765343416","variant_ids":[45647174140075]},"available":true,"name":"Crystal Sphere Display Stands Assorted Styles - B-7x3.6cm-wood","public_title":"B-7x3.6cm-wood","options":["B-7x3.6cm-wood"],"price":1699,"weight":40,"compare_at_price":0,"inventory_management":"shopify","barcode":null,"featured_media":{"alt":"Crystal Sphere Display Stands Assorted Styles-Stands-Ali-B-7x3.6cm-wood-Crystal Destiny","id":31835998290091,"position":33,"preview_image":{"aspect_ratio":1.0,"height":1000,"width":1000,"src":"\/\/crystaldestiny.com\/cdn\/shop\/files\/Crystal-Sphere-Display-Stands-Assorted-Styles-Stands-B-7x3_6cm-wood-33.webp?v=1765343416"}},"requires_selling_plan":false,"selling_plan_allocations":[]},{"id":45647174631595,"title":"B-8.2x3.5cm-wood","option1":"B-8.2x3.5cm-wood","option2":null,"option3":null,"sku":"1005006043315902-B-8.2x3.5cm-wood","requires_shipping":true,"taxable":true,"featured_image":{"id":40448948240555,"product_id":8529075896491,"position":44,"created_at":"2025-09-21T14:45:29-04:00","updated_at":"2025-12-10T00:10:29-05:00","alt":"Crystal Sphere Display Stands Assorted Styles-Stands-Ali-B-8.2x3.5cm-wood-Crystal Destiny","width":1000,"height":1000,"src":"\/\/crystaldestiny.com\/cdn\/shop\/files\/Crystal-Sphere-Display-Stands-Assorted-Styles-Stands-B-8_2x3_5cm-wood-44.webp?v=1765343429","variant_ids":[45647174631595]},"available":true,"name":"Crystal Sphere Display Stands Assorted Styles - B-8.2x3.5cm-wood","public_title":"B-8.2x3.5cm-wood","options":["B-8.2x3.5cm-wood"],"price":1999,"weight":40,"compare_at_price":0,"inventory_management":"shopify","barcode":null,"featured_media":{"alt":"Crystal Sphere Display Stands Assorted Styles-Stands-Ali-B-8.2x3.5cm-wood-Crystal Destiny","id":31835998650539,"position":44,"preview_image":{"aspect_ratio":1.0,"height":1000,"width":1000,"src":"\/\/crystaldestiny.com\/cdn\/shop\/files\/Crystal-Sphere-Display-Stands-Assorted-Styles-Stands-B-8_2x3_5cm-wood-44.webp?v=1765343429"}},"requires_selling_plan":false,"selling_plan_allocations":[]},{"id":45647174369451,"title":"D-25mm-Resin","option1":"D-25mm-Resin","option2":null,"option3":null,"sku":"1005006043315902-D-25mm-Resin","requires_shipping":true,"taxable":true,"featured_image":{"id":40448948568235,"product_id":8529075896491,"position":54,"created_at":"2025-09-21T14:45:29-04:00","updated_at":"2025-12-10T00:10:44-05:00","alt":"Crystal Sphere Display Stands Assorted Styles-Stands-Ali-D-25mm-Resin-Crystal Destiny","width":1000,"height":1000,"src":"\/\/crystaldestiny.com\/cdn\/shop\/files\/Crystal-Sphere-Display-Stands-Assorted-Styles-Stands-D-25mm-Resin-54.webp?v=1765343444","variant_ids":[45647174369451]},"available":true,"name":"Crystal Sphere Display Stands Assorted Styles - D-25mm-Resin","public_title":"D-25mm-Resin","options":["D-25mm-Resin"],"price":999,"weight":40,"compare_at_price":0,"inventory_management":"shopify","barcode":null,"featured_media":{"alt":"Crystal Sphere Display Stands Assorted Styles-Stands-Ali-D-25mm-Resin-Crystal Destiny","id":31835998978219,"position":54,"preview_image":{"aspect_ratio":1.0,"height":1000,"width":1000,"src":"\/\/crystaldestiny.com\/cdn\/shop\/files\/Crystal-Sphere-Display-Stands-Assorted-Styles-Stands-D-25mm-Resin-54.webp?v=1765343444"}},"requires_selling_plan":false,"selling_plan_allocations":[]},{"id":45647174402219,"title":"D-30mm-Resin","option1":"D-30mm-Resin","option2":null,"option3":null,"sku":"1005006043315902-D-30mm-Resin","requires_shipping":true,"taxable":true,"featured_image":{"id":40448948863147,"product_id":8529075896491,"position":63,"created_at":"2025-09-21T14:45:29-04:00","updated_at":"2025-12-10T00:10:56-05:00","alt":"Crystal Sphere Display Stands Assorted Styles-Stands-Ali-D-30mm-Resin-Crystal Destiny","width":1000,"height":1000,"src":"\/\/crystaldestiny.com\/cdn\/shop\/files\/Crystal-Sphere-Display-Stands-Assorted-Styles-Stands-D-30mm-Resin-63.webp?v=1765343456","variant_ids":[45647174402219]},"available":true,"name":"Crystal Sphere Display Stands Assorted Styles - D-30mm-Resin","public_title":"D-30mm-Resin","options":["D-30mm-Resin"],"price":999,"weight":40,"compare_at_price":0,"inventory_management":"shopify","barcode":null,"featured_media":{"alt":"Crystal Sphere Display Stands Assorted Styles-Stands-Ali-D-30mm-Resin-Crystal Destiny","id":31835999273131,"position":63,"preview_image":{"aspect_ratio":1.0,"height":1000,"width":1000,"src":"\/\/crystaldestiny.com\/cdn\/shop\/files\/Crystal-Sphere-Display-Stands-Assorted-Styles-Stands-D-30mm-Resin-63.webp?v=1765343456"}},"requires_selling_plan":false,"selling_plan_allocations":[]},{"id":45647174434987,"title":"D-40mm-Resin","option1":"D-40mm-Resin","option2":null,"option3":null,"sku":"1005006043315902-D-40mm-Resin","requires_shipping":true,"taxable":true,"featured_image":{"id":40448948109483,"product_id":8529075896491,"position":40,"created_at":"2025-09-21T14:45:29-04:00","updated_at":"2025-12-10T00:10:24-05:00","alt":"Crystal Sphere Display Stands Assorted Styles-Stands-Ali-D-40mm-Resin-Crystal Destiny","width":1000,"height":1000,"src":"\/\/crystaldestiny.com\/cdn\/shop\/files\/Crystal-Sphere-Display-Stands-Assorted-Styles-Stands-D-40mm-Resin-40.webp?v=1765343424","variant_ids":[45647174434987]},"available":true,"name":"Crystal Sphere Display Stands Assorted Styles - D-40mm-Resin","public_title":"D-40mm-Resin","options":["D-40mm-Resin"],"price":999,"weight":40,"compare_at_price":0,"inventory_management":"shopify","barcode":null,"featured_media":{"alt":"Crystal Sphere Display Stands Assorted Styles-Stands-Ali-D-40mm-Resin-Crystal Destiny","id":31835998519467,"position":40,"preview_image":{"aspect_ratio":1.0,"height":1000,"width":1000,"src":"\/\/crystaldestiny.com\/cdn\/shop\/files\/Crystal-Sphere-Display-Stands-Assorted-Styles-Stands-D-40mm-Resin-40.webp?v=1765343424"}},"requires_selling_plan":false,"selling_plan_allocations":[]},{"id":45647174467755,"title":"D-50mm-Resin","option1":"D-50mm-Resin","option2":null,"option3":null,"sku":"1005006043315902-D-50mm-Resin","requires_shipping":true,"taxable":true,"featured_image":{"id":40448948371627,"product_id":8529075896491,"position":48,"created_at":"2025-09-21T14:45:29-04:00","updated_at":"2025-12-10T00:10:35-05:00","alt":"Crystal Sphere Display Stands Assorted Styles-Stands-Ali-D-50mm-Resin-Crystal Destiny","width":1000,"height":1000,"src":"\/\/crystaldestiny.com\/cdn\/shop\/files\/Crystal-Sphere-Display-Stands-Assorted-Styles-Stands-D-50mm-Resin-48.webp?v=1765343435","variant_ids":[45647174467755]},"available":true,"name":"Crystal Sphere Display Stands Assorted Styles - D-50mm-Resin","public_title":"D-50mm-Resin","options":["D-50mm-Resin"],"price":999,"weight":40,"compare_at_price":0,"inventory_management":"shopify","barcode":null,"featured_media":{"alt":"Crystal Sphere Display Stands Assorted Styles-Stands-Ali-D-50mm-Resin-Crystal Destiny","id":31835998781611,"position":48,"preview_image":{"aspect_ratio":1.0,"height":1000,"width":1000,"src":"\/\/crystaldestiny.com\/cdn\/shop\/files\/Crystal-Sphere-Display-Stands-Assorted-Styles-Stands-D-50mm-Resin-48.webp?v=1765343435"}},"requires_selling_plan":false,"selling_plan_allocations":[]},{"id":45647174500523,"title":"D-70mm-Resin","option1":"D-70mm-Resin","option2":null,"option3":null,"sku":"1005006043315902-D-70mm-Resin","requires_shipping":true,"taxable":true,"featured_image":{"id":40448948142251,"product_id":8529075896491,"position":41,"created_at":"2025-09-21T14:45:29-04:00","updated_at":"2025-12-10T00:10:25-05:00","alt":"Crystal Sphere Display Stands Assorted Styles-Stands-Ali-D-70mm-Resin-Crystal Destiny","width":1000,"height":1000,"src":"\/\/crystaldestiny.com\/cdn\/shop\/files\/Crystal-Sphere-Display-Stands-Assorted-Styles-Stands-D-70mm-Resin-41.webp?v=1765343425","variant_ids":[45647174500523]},"available":true,"name":"Crystal Sphere Display Stands Assorted Styles - D-70mm-Resin","public_title":"D-70mm-Resin","options":["D-70mm-Resin"],"price":999,"weight":40,"compare_at_price":0,"inventory_management":"shopify","barcode":null,"featured_media":{"alt":"Crystal Sphere Display Stands Assorted Styles-Stands-Ali-D-70mm-Resin-Crystal Destiny","id":31835998552235,"position":41,"preview_image":{"aspect_ratio":1.0,"height":1000,"width":1000,"src":"\/\/crystaldestiny.com\/cdn\/shop\/files\/Crystal-Sphere-Display-Stands-Assorted-Styles-Stands-D-70mm-Resin-41.webp?v=1765343425"}},"requires_selling_plan":false,"selling_plan_allocations":[]},{"id":45647174533291,"title":"D-100mm-Resin","option1":"D-100mm-Resin","option2":null,"option3":null,"sku":"1005006043315902-D-100mm-Resin","requires_shipping":true,"taxable":true,"featured_image":{"id":40448948207787,"product_id":8529075896491,"position":43,"created_at":"2025-09-21T14:45:29-04:00","updated_at":"2025-12-10T00:10:28-05:00","alt":"Crystal Sphere Display Stands Assorted Styles-Stands-Ali-D-100mm-Resin-Crystal Destiny","width":1000,"height":1000,"src":"\/\/crystaldestiny.com\/cdn\/shop\/files\/Crystal-Sphere-Display-Stands-Assorted-Styles-Stands-D-100mm-Resin-43.webp?v=1765343428","variant_ids":[45647174533291]},"available":true,"name":"Crystal Sphere Display Stands Assorted Styles - D-100mm-Resin","public_title":"D-100mm-Resin","options":["D-100mm-Resin"],"price":1399,"weight":40,"compare_at_price":0,"inventory_management":"shopify","barcode":null,"featured_media":{"alt":"Crystal Sphere Display Stands Assorted Styles-Stands-Ali-D-100mm-Resin-Crystal Destiny","id":31835998617771,"position":43,"preview_image":{"aspect_ratio":1.0,"height":1000,"width":1000,"src":"\/\/crystaldestiny.com\/cdn\/shop\/files\/Crystal-Sphere-Display-Stands-Assorted-Styles-Stands-D-100mm-Resin-43.webp?v=1765343428"}},"requires_selling_plan":false,"selling_plan_allocations":[]},{"id":45647174566059,"title":"E-3.4x2cm-Resin","option1":"E-3.4x2cm-Resin","option2":null,"option3":null,"sku":"1005006043315902-E-3.4x2cm-Resin","requires_shipping":true,"taxable":true,"featured_image":{"id":40448947749035,"product_id":8529075896491,"position":29,"created_at":"2025-09-21T14:45:28-04:00","updated_at":"2025-12-10T00:10:11-05:00","alt":"Crystal Sphere Display Stands Assorted Styles-Stands-Ali-E-3.4x2cm-Resin-Crystal Destiny","width":1000,"height":1000,"src":"\/\/crystaldestiny.com\/cdn\/shop\/files\/Crystal-Sphere-Display-Stands-Assorted-Styles-Stands-E-3_4x2cm-Resin-29.webp?v=1765343411","variant_ids":[45647174566059]},"available":true,"name":"Crystal Sphere Display Stands Assorted Styles - E-3.4x2cm-Resin","public_title":"E-3.4x2cm-Resin","options":["E-3.4x2cm-Resin"],"price":1299,"weight":40,"compare_at_price":0,"inventory_management":"shopify","barcode":null,"featured_media":{"alt":"Crystal Sphere Display Stands Assorted Styles-Stands-Ali-E-3.4x2cm-Resin-Crystal Destiny","id":31835998159019,"position":29,"preview_image":{"aspect_ratio":1.0,"height":1000,"width":1000,"src":"\/\/crystaldestiny.com\/cdn\/shop\/files\/Crystal-Sphere-Display-Stands-Assorted-Styles-Stands-E-3_4x2cm-Resin-29.webp?v=1765343411"}},"requires_selling_plan":false,"selling_plan_allocations":[]},{"id":45647174598827,"title":"E-4.2x2.5cm-Resin","option1":"E-4.2x2.5cm-Resin","option2":null,"option3":null,"sku":"1005006043315902-E-4.2x2.5cm-Resin","requires_shipping":true,"taxable":true,"featured_image":{"id":40448948175019,"product_id":8529075896491,"position":42,"created_at":"2025-09-21T14:45:29-04:00","updated_at":"2025-12-10T00:10:27-05:00","alt":"Crystal Sphere Display Stands Assorted Styles-Stands-Ali-E-4.2x2.5cm-Resin-Crystal Destiny","width":1000,"height":1000,"src":"\/\/crystaldestiny.com\/cdn\/shop\/files\/Crystal-Sphere-Display-Stands-Assorted-Styles-Stands-E-4_2x2_5cm-Resin-42.webp?v=1765343427","variant_ids":[45647174598827]},"available":true,"name":"Crystal Sphere Display Stands Assorted Styles - E-4.2x2.5cm-Resin","public_title":"E-4.2x2.5cm-Resin","options":["E-4.2x2.5cm-Resin"],"price":1399,"weight":40,"compare_at_price":0,"inventory_management":"shopify","barcode":null,"featured_media":{"alt":"Crystal Sphere Display Stands Assorted Styles-Stands-Ali-E-4.2x2.5cm-Resin-Crystal Destiny","id":31835998585003,"position":42,"preview_image":{"aspect_ratio":1.0,"height":1000,"width":1000,"src":"\/\/crystaldestiny.com\/cdn\/shop\/files\/Crystal-Sphere-Display-Stands-Assorted-Styles-Stands-E-4_2x2_5cm-Resin-42.webp?v=1765343427"}},"requires_selling_plan":false,"selling_plan_allocations":[]},{"id":45647175155883,"title":"E-5x3cm-Resin","option1":"E-5x3cm-Resin","option2":null,"option3":null,"sku":"1005006043315902-E-5x3cm-Resin","requires_shipping":true,"taxable":true,"featured_image":{"id":40448948273323,"product_id":8529075896491,"position":45,"created_at":"2025-09-21T14:45:29-04:00","updated_at":"2025-12-10T00:10:31-05:00","alt":"Crystal Sphere Display Stands Assorted Styles-Stands-Ali-E-5x3cm-Resin-Crystal Destiny","width":1000,"height":1000,"src":"\/\/crystaldestiny.com\/cdn\/shop\/files\/Crystal-Sphere-Display-Stands-Assorted-Styles-Stands-E-5x3cm-Resin-45.webp?v=1765343431","variant_ids":[45647175155883]},"available":true,"name":"Crystal Sphere Display Stands Assorted Styles - E-5x3cm-Resin","public_title":"E-5x3cm-Resin","options":["E-5x3cm-Resin"],"price":1599,"weight":40,"compare_at_price":0,"inventory_management":"shopify","barcode":null,"featured_media":{"alt":"Crystal Sphere Display Stands Assorted Styles-Stands-Ali-E-5x3cm-Resin-Crystal Destiny","id":31835998683307,"position":45,"preview_image":{"aspect_ratio":1.0,"height":1000,"width":1000,"src":"\/\/crystaldestiny.com\/cdn\/shop\/files\/Crystal-Sphere-Display-Stands-Assorted-Styles-Stands-E-5x3cm-Resin-45.webp?v=1765343431"}},"requires_selling_plan":false,"selling_plan_allocations":[]},{"id":45647174664363,"title":"C-2x2.5cm-wood","option1":"C-2x2.5cm-wood","option2":null,"option3":null,"sku":"1005006043315902-C-2x2.5cm-wood","requires_shipping":true,"taxable":true,"featured_image":{"id":40448947912875,"product_id":8529075896491,"position":34,"created_at":"2025-09-21T14:45:28-04:00","updated_at":"2025-12-10T00:10:18-05:00","alt":"Crystal Sphere Display Stands Assorted Styles-Stands-Ali-C-2x2.5cm-wood-Crystal Destiny","width":1000,"height":1000,"src":"\/\/crystaldestiny.com\/cdn\/shop\/files\/Crystal-Sphere-Display-Stands-Assorted-Styles-Stands-C-2x2_5cm-wood-34.webp?v=1765343418","variant_ids":[45647174664363]},"available":true,"name":"Crystal Sphere Display Stands Assorted Styles - C-2x2.5cm-wood","public_title":"C-2x2.5cm-wood","options":["C-2x2.5cm-wood"],"price":999,"weight":40,"compare_at_price":0,"inventory_management":"shopify","barcode":null,"featured_media":{"alt":"Crystal Sphere Display Stands Assorted Styles-Stands-Ali-C-2x2.5cm-wood-Crystal Destiny","id":31835998322859,"position":34,"preview_image":{"aspect_ratio":1.0,"height":1000,"width":1000,"src":"\/\/crystaldestiny.com\/cdn\/shop\/files\/Crystal-Sphere-Display-Stands-Assorted-Styles-Stands-C-2x2_5cm-wood-34.webp?v=1765343418"}},"requires_selling_plan":false,"selling_plan_allocations":[]},{"id":45647174697131,"title":"C-2.5x2.5cm-wood","option1":"C-2.5x2.5cm-wood","option2":null,"option3":null,"sku":"1005006043315902-C-2.5x2.5cm-wood","requires_shipping":true,"taxable":true,"featured_image":{"id":40448947028139,"product_id":8529075896491,"position":7,"created_at":"2025-09-21T14:45:28-04:00","updated_at":"2025-12-10T00:09:41-05:00","alt":"Crystal Sphere Display Stands Assorted Styles-Stands-Ali-C-2.5x2.5cm-wood-Crystal Destiny","width":1000,"height":1000,"src":"\/\/crystaldestiny.com\/cdn\/shop\/files\/Crystal-Sphere-Display-Stands-Assorted-Styles-Stands-C-2_5x2_5cm-wood-7.webp?v=1765343381","variant_ids":[45647174697131]},"available":true,"name":"Crystal Sphere Display Stands Assorted Styles - C-2.5x2.5cm-wood","public_title":"C-2.5x2.5cm-wood","options":["C-2.5x2.5cm-wood"],"price":899,"weight":40,"compare_at_price":0,"inventory_management":"shopify","barcode":null,"featured_media":{"alt":"Crystal Sphere Display Stands Assorted Styles-Stands-Ali-C-2.5x2.5cm-wood-Crystal Destiny","id":31835997438123,"position":7,"preview_image":{"aspect_ratio":1.0,"height":1000,"width":1000,"src":"\/\/crystaldestiny.com\/cdn\/shop\/files\/Crystal-Sphere-Display-Stands-Assorted-Styles-Stands-C-2_5x2_5cm-wood-7.webp?v=1765343381"}},"requires_selling_plan":false,"selling_plan_allocations":[]},{"id":45647174729899,"title":"C-3x2.5cm-wood","option1":"C-3x2.5cm-wood","option2":null,"option3":null,"sku":"1005006043315902-C-3x2.5cm-wood","requires_shipping":true,"taxable":true,"featured_image":{"id":40448948502699,"product_id":8529075896491,"position":52,"created_at":"2025-09-21T14:45:29-04:00","updated_at":"2025-12-10T00:10:41-05:00","alt":"Crystal Sphere Display Stands Assorted Styles-Stands-Ali-C-3x2.5cm-wood-Crystal Destiny","width":1000,"height":1000,"src":"\/\/crystaldestiny.com\/cdn\/shop\/files\/Crystal-Sphere-Display-Stands-Assorted-Styles-Stands-C-3x2_5cm-wood-52.webp?v=1765343441","variant_ids":[45647174729899]},"available":true,"name":"Crystal Sphere Display Stands Assorted Styles - C-3x2.5cm-wood","public_title":"C-3x2.5cm-wood","options":["C-3x2.5cm-wood"],"price":699,"weight":40,"compare_at_price":0,"inventory_management":"shopify","barcode":null,"featured_media":{"alt":"Crystal Sphere Display Stands Assorted Styles-Stands-Ali-C-3x2.5cm-wood-Crystal Destiny","id":31835998912683,"position":52,"preview_image":{"aspect_ratio":1.0,"height":1000,"width":1000,"src":"\/\/crystaldestiny.com\/cdn\/shop\/files\/Crystal-Sphere-Display-Stands-Assorted-Styles-Stands-C-3x2_5cm-wood-52.webp?v=1765343441"}},"requires_selling_plan":false,"selling_plan_allocations":[]},{"id":45647174762667,"title":"C-3.5x2.5cm-wood","option1":"C-3.5x2.5cm-wood","option2":null,"option3":null,"sku":"1005006043315902-C-3.5x2.5cm-wood","requires_shipping":true,"taxable":true,"featured_image":{"id":40448947126443,"product_id":8529075896491,"position":10,"created_at":"2025-09-21T14:45:28-04:00","updated_at":"2025-12-10T00:09:45-05:00","alt":"Crystal Sphere Display Stands Assorted Styles-Stands-Ali-C-3.5x2.5cm-wood-Crystal Destiny","width":1000,"height":1000,"src":"\/\/crystaldestiny.com\/cdn\/shop\/files\/Crystal-Sphere-Display-Stands-Assorted-Styles-Stands-C-3_5x2_5cm-wood-10.webp?v=1765343385","variant_ids":[45647174762667]},"available":true,"name":"Crystal Sphere Display Stands Assorted Styles - C-3.5x2.5cm-wood","public_title":"C-3.5x2.5cm-wood","options":["C-3.5x2.5cm-wood"],"price":899,"weight":40,"compare_at_price":0,"inventory_management":"shopify","barcode":null,"featured_media":{"alt":"Crystal Sphere Display Stands Assorted Styles-Stands-Ali-C-3.5x2.5cm-wood-Crystal Destiny","id":31835997536427,"position":10,"preview_image":{"aspect_ratio":1.0,"height":1000,"width":1000,"src":"\/\/crystaldestiny.com\/cdn\/shop\/files\/Crystal-Sphere-Display-Stands-Assorted-Styles-Stands-C-3_5x2_5cm-wood-10.webp?v=1765343385"}},"requires_selling_plan":false,"selling_plan_allocations":[]},{"id":45647174795435,"title":"C-4x2.5cm-wood","option1":"C-4x2.5cm-wood","option2":null,"option3":null,"sku":"1005006043315902-C-4x2.5cm-wood","requires_shipping":true,"taxable":true,"featured_image":{"id":40448948928683,"product_id":8529075896491,"position":65,"created_at":"2025-09-21T14:45:29-04:00","updated_at":"2025-12-10T00:10:59-05:00","alt":"Crystal Sphere Display Stands Assorted Styles-Stands-Ali-C-4x2.5cm-wood-Crystal Destiny","width":1000,"height":1000,"src":"\/\/crystaldestiny.com\/cdn\/shop\/files\/Crystal-Sphere-Display-Stands-Assorted-Styles-Stands-C-4x2_5cm-wood-65.webp?v=1765343459","variant_ids":[45647174795435]},"available":true,"name":"Crystal Sphere Display Stands Assorted Styles - C-4x2.5cm-wood","public_title":"C-4x2.5cm-wood","options":["C-4x2.5cm-wood"],"price":899,"weight":40,"compare_at_price":0,"inventory_management":"shopify","barcode":null,"featured_media":{"alt":"Crystal Sphere Display Stands Assorted Styles-Stands-Ali-C-4x2.5cm-wood-Crystal Destiny","id":31835999371435,"position":65,"preview_image":{"aspect_ratio":1.0,"height":1000,"width":1000,"src":"\/\/crystaldestiny.com\/cdn\/shop\/files\/Crystal-Sphere-Display-Stands-Assorted-Styles-Stands-C-4x2_5cm-wood-65.webp?v=1765343459"}},"requires_selling_plan":false,"selling_plan_allocations":[]},{"id":45647174828203,"title":"C-4.5x2.5cm-wood","option1":"C-4.5x2.5cm-wood","option2":null,"option3":null,"sku":"1005006043315902-C-4.5x2.5cm-wood","requires_shipping":true,"taxable":true,"featured_image":{"id":40448947781803,"product_id":8529075896491,"position":30,"created_at":"2025-09-21T14:45:28-04:00","updated_at":"2025-12-10T00:10:12-05:00","alt":"Crystal Sphere Display Stands Assorted Styles-Stands-Ali-C-4.5x2.5cm-wood-Crystal Destiny","width":1000,"height":1000,"src":"\/\/crystaldestiny.com\/cdn\/shop\/files\/Crystal-Sphere-Display-Stands-Assorted-Styles-Stands-C-4_5x2_5cm-wood-30.webp?v=1765343412","variant_ids":[45647174828203]},"available":true,"name":"Crystal Sphere Display Stands Assorted Styles - C-4.5x2.5cm-wood","public_title":"C-4.5x2.5cm-wood","options":["C-4.5x2.5cm-wood"],"price":999,"weight":40,"compare_at_price":0,"inventory_management":"shopify","barcode":null,"featured_media":{"alt":"Crystal Sphere Display Stands Assorted Styles-Stands-Ali-C-4.5x2.5cm-wood-Crystal Destiny","id":31835998191787,"position":30,"preview_image":{"aspect_ratio":1.0,"height":1000,"width":1000,"src":"\/\/crystaldestiny.com\/cdn\/shop\/files\/Crystal-Sphere-Display-Stands-Assorted-Styles-Stands-C-4_5x2_5cm-wood-30.webp?v=1765343412"}},"requires_selling_plan":false,"selling_plan_allocations":[]},{"id":45647174860971,"title":"C-5x2.5cm-wood","option1":"C-5x2.5cm-wood","option2":null,"option3":null,"sku":"1005006043315902-C-5x2.5cm-wood","requires_shipping":true,"taxable":true,"featured_image":{"id":40448947159211,"product_id":8529075896491,"position":11,"created_at":"2025-09-21T14:45:28-04:00","updated_at":"2025-12-10T00:09:47-05:00","alt":"Crystal Sphere Display Stands Assorted Styles-Stands-Ali-C-5x2.5cm-wood-Crystal Destiny","width":1000,"height":1000,"src":"\/\/crystaldestiny.com\/cdn\/shop\/files\/Crystal-Sphere-Display-Stands-Assorted-Styles-Stands-C-5x2_5cm-wood-11.webp?v=1765343387","variant_ids":[45647174860971]},"available":true,"name":"Crystal Sphere Display Stands Assorted Styles - C-5x2.5cm-wood","public_title":"C-5x2.5cm-wood","options":["C-5x2.5cm-wood"],"price":1199,"weight":40,"compare_at_price":0,"inventory_management":"shopify","barcode":null,"featured_media":{"alt":"Crystal Sphere Display Stands Assorted Styles-Stands-Ali-C-5x2.5cm-wood-Crystal Destiny","id":31835997569195,"position":11,"preview_image":{"aspect_ratio":1.0,"height":1000,"width":1000,"src":"\/\/crystaldestiny.com\/cdn\/shop\/files\/Crystal-Sphere-Display-Stands-Assorted-Styles-Stands-C-5x2_5cm-wood-11.webp?v=1765343387"}},"requires_selling_plan":false,"selling_plan_allocations":[]},{"id":45647174893739,"title":"G-40mm-Crystal","option1":"G-40mm-Crystal","option2":null,"option3":null,"sku":"1005006043315902-G-40mm-Crystal","requires_shipping":true,"taxable":true,"featured_image":{"id":40448947814571,"product_id":8529075896491,"position":31,"created_at":"2025-09-21T14:45:28-04:00","updated_at":"2025-12-10T00:10:14-05:00","alt":"Crystal Sphere Display Stands Assorted Styles-Stands-Ali-G-40mm-Crystal-Crystal Destiny","width":1000,"height":1000,"src":"\/\/crystaldestiny.com\/cdn\/shop\/files\/Crystal-Sphere-Display-Stands-Assorted-Styles-Stands-G-40mm-Crystal-31.webp?v=1765343414","variant_ids":[45647174893739]},"available":true,"name":"Crystal Sphere Display Stands Assorted Styles - G-40mm-Crystal","public_title":"G-40mm-Crystal","options":["G-40mm-Crystal"],"price":1199,"weight":40,"compare_at_price":0,"inventory_management":"shopify","barcode":null,"featured_media":{"alt":"Crystal Sphere Display Stands Assorted Styles-Stands-Ali-G-40mm-Crystal-Crystal Destiny","id":31835998224555,"position":31,"preview_image":{"aspect_ratio":1.0,"height":1000,"width":1000,"src":"\/\/crystaldestiny.com\/cdn\/shop\/files\/Crystal-Sphere-Display-Stands-Assorted-Styles-Stands-G-40mm-Crystal-31.webp?v=1765343414"}},"requires_selling_plan":false,"selling_plan_allocations":[]},{"id":45647174926507,"title":"H-White Light-A-Wood","option1":"H-White Light-A-Wood","option2":null,"option3":null,"sku":"1005006043315902-H-White Light-A-Wood","requires_shipping":true,"taxable":true,"featured_image":{"id":40448947585195,"product_id":8529075896491,"position":24,"created_at":"2025-09-21T14:45:28-04:00","updated_at":"2025-12-10T00:10:04-05:00","alt":"Crystal Sphere Display Stands Assorted Styles-Stands-Ali-H-White Light-A-Wood-Crystal Destiny","width":1000,"height":1000,"src":"\/\/crystaldestiny.com\/cdn\/shop\/files\/Crystal-Sphere-Display-Stands-Assorted-Styles-Stands-H-White-Light-A-Wood-24.webp?v=1765343404","variant_ids":[45647174926507]},"available":true,"name":"Crystal Sphere Display Stands Assorted Styles - H-White Light-A-Wood","public_title":"H-White Light-A-Wood","options":["H-White Light-A-Wood"],"price":1799,"weight":40,"compare_at_price":0,"inventory_management":"shopify","barcode":null,"featured_media":{"alt":"Crystal Sphere Display Stands Assorted Styles-Stands-Ali-H-White Light-A-Wood-Crystal Destiny","id":31835997995179,"position":24,"preview_image":{"aspect_ratio":1.0,"height":1000,"width":1000,"src":"\/\/crystaldestiny.com\/cdn\/shop\/files\/Crystal-Sphere-Display-Stands-Assorted-Styles-Stands-H-White-Light-A-Wood-24.webp?v=1765343404"}},"requires_selling_plan":false,"selling_plan_allocations":[]},{"id":45647174959275,"title":"H-Warm Light-A-Wood","option1":"H-Warm Light-A-Wood","option2":null,"option3":null,"sku":"1005006043315902-H-Warm Light-A-Wood","requires_shipping":true,"taxable":true,"featured_image":{"id":40448947191979,"product_id":8529075896491,"position":12,"created_at":"2025-09-21T14:45:28-04:00","updated_at":"2025-12-10T00:09:48-05:00","alt":"Crystal Sphere Display Stands Assorted Styles-Stands-Ali-H-Warm Light-A-Wood-Crystal Destiny","width":1000,"height":1000,"src":"\/\/crystaldestiny.com\/cdn\/shop\/files\/Crystal-Sphere-Display-Stands-Assorted-Styles-Stands-H-Warm-Light-A-Wood-12.webp?v=1765343388","variant_ids":[45647174959275]},"available":true,"name":"Crystal Sphere Display Stands Assorted Styles - H-Warm Light-A-Wood","public_title":"H-Warm Light-A-Wood","options":["H-Warm Light-A-Wood"],"price":1799,"weight":40,"compare_at_price":0,"inventory_management":"shopify","barcode":null,"featured_media":{"alt":"Crystal Sphere Display Stands Assorted Styles-Stands-Ali-H-Warm Light-A-Wood-Crystal Destiny","id":31835997601963,"position":12,"preview_image":{"aspect_ratio":1.0,"height":1000,"width":1000,"src":"\/\/crystaldestiny.com\/cdn\/shop\/files\/Crystal-Sphere-Display-Stands-Assorted-Styles-Stands-H-Warm-Light-A-Wood-12.webp?v=1765343388"}},"requires_selling_plan":false,"selling_plan_allocations":[]},{"id":45647174992043,"title":"H-Multicolor-A-Wood","option1":"H-Multicolor-A-Wood","option2":null,"option3":null,"sku":"1005006043315902-H-Multicolor-A-Wood","requires_shipping":true,"taxable":true,"featured_image":{"id":40448948666539,"product_id":8529075896491,"position":57,"created_at":"2025-09-21T14:45:29-04:00","updated_at":"2025-12-10T00:10:48-05:00","alt":"Crystal Sphere Display Stands Assorted Styles-Stands-Ali-H-Multicolor-A-Wood-Crystal Destiny","width":1000,"height":1000,"src":"\/\/crystaldestiny.com\/cdn\/shop\/files\/Crystal-Sphere-Display-Stands-Assorted-Styles-Stands-H-Multicolor-A-Wood-57.webp?v=1765343448","variant_ids":[45647174992043]},"available":true,"name":"Crystal Sphere Display Stands Assorted Styles - H-Multicolor-A-Wood","public_title":"H-Multicolor-A-Wood","options":["H-Multicolor-A-Wood"],"price":1899,"weight":40,"compare_at_price":0,"inventory_management":"shopify","barcode":null,"featured_media":{"alt":"Crystal Sphere Display Stands Assorted Styles-Stands-Ali-H-Multicolor-A-Wood-Crystal Destiny","id":31835999076523,"position":57,"preview_image":{"aspect_ratio":1.0,"height":1000,"width":1000,"src":"\/\/crystaldestiny.com\/cdn\/shop\/files\/Crystal-Sphere-Display-Stands-Assorted-Styles-Stands-H-Multicolor-A-Wood-57.webp?v=1765343448"}},"requires_selling_plan":false,"selling_plan_allocations":[]},{"id":45647175024811,"title":"H-White Light-B-Wood","option1":"H-White Light-B-Wood","option2":null,"option3":null,"sku":"1005006043315902-H-White Light-B-Wood","requires_shipping":true,"taxable":true,"featured_image":{"id":40448947355819,"product_id":8529075896491,"position":17,"created_at":"2025-09-21T14:45:28-04:00","updated_at":"2025-12-10T00:09:55-05:00","alt":"Crystal Sphere Display Stands Assorted Styles-Stands-Ali-H-White Light-B-Wood-Crystal Destiny","width":1000,"height":1000,"src":"\/\/crystaldestiny.com\/cdn\/shop\/files\/Crystal-Sphere-Display-Stands-Assorted-Styles-Stands-H-White-Light-B-Wood-17.webp?v=1765343395","variant_ids":[45647175024811]},"available":true,"name":"Crystal Sphere Display Stands Assorted Styles - H-White Light-B-Wood","public_title":"H-White Light-B-Wood","options":["H-White Light-B-Wood"],"price":1799,"weight":40,"compare_at_price":0,"inventory_management":"shopify","barcode":null,"featured_media":{"alt":"Crystal Sphere Display Stands Assorted Styles-Stands-Ali-H-White Light-B-Wood-Crystal Destiny","id":31835997765803,"position":17,"preview_image":{"aspect_ratio":1.0,"height":1000,"width":1000,"src":"\/\/crystaldestiny.com\/cdn\/shop\/files\/Crystal-Sphere-Display-Stands-Assorted-Styles-Stands-H-White-Light-B-Wood-17.webp?v=1765343395"}},"requires_selling_plan":false,"selling_plan_allocations":[]},{"id":45647175057579,"title":"H-Warm Light-B-Wood","option1":"H-Warm Light-B-Wood","option2":null,"option3":null,"sku":"1005006043315902-H-Warm Light-B-Wood","requires_shipping":true,"taxable":true,"featured_image":{"id":40448947617963,"product_id":8529075896491,"position":25,"created_at":"2025-09-21T14:45:28-04:00","updated_at":"2025-12-10T00:10:06-05:00","alt":"Crystal Sphere Display Stands Assorted Styles-Stands-Ali-H-Warm Light-B-Wood-Crystal Destiny","width":1000,"height":1000,"src":"\/\/crystaldestiny.com\/cdn\/shop\/files\/Crystal-Sphere-Display-Stands-Assorted-Styles-Stands-H-Warm-Light-B-Wood-25.webp?v=1765343406","variant_ids":[45647175057579]},"available":true,"name":"Crystal Sphere Display Stands Assorted Styles - H-Warm Light-B-Wood","public_title":"H-Warm Light-B-Wood","options":["H-Warm Light-B-Wood"],"price":1899,"weight":40,"compare_at_price":0,"inventory_management":"shopify","barcode":null,"featured_media":{"alt":"Crystal Sphere Display Stands Assorted Styles-Stands-Ali-H-Warm Light-B-Wood-Crystal Destiny","id":31835998027947,"position":25,"preview_image":{"aspect_ratio":1.0,"height":1000,"width":1000,"src":"\/\/crystaldestiny.com\/cdn\/shop\/files\/Crystal-Sphere-Display-Stands-Assorted-Styles-Stands-H-Warm-Light-B-Wood-25.webp?v=1765343406"}},"requires_selling_plan":false,"selling_plan_allocations":[]},{"id":45647175090347,"title":"H-Multicolor-B-Wood","option1":"H-Multicolor-B-Wood","option2":null,"option3":null,"sku":"1005006043315902-H-Multicolor-B-Wood","requires_shipping":true,"taxable":true,"featured_image":{"id":40448948699307,"product_id":8529075896491,"position":58,"created_at":"2025-09-21T14:45:29-04:00","updated_at":"2025-12-10T00:10:49-05:00","alt":"Crystal Sphere Display Stands Assorted Styles-Stands-Ali-H-Multicolor-B-Wood-Crystal Destiny","width":1000,"height":1000,"src":"\/\/crystaldestiny.com\/cdn\/shop\/files\/Crystal-Sphere-Display-Stands-Assorted-Styles-Stands-H-Multicolor-B-Wood-58.webp?v=1765343449","variant_ids":[45647175090347]},"available":true,"name":"Crystal Sphere Display Stands Assorted Styles - H-Multicolor-B-Wood","public_title":"H-Multicolor-B-Wood","options":["H-Multicolor-B-Wood"],"price":1699,"weight":40,"compare_at_price":0,"inventory_management":"shopify","barcode":null,"featured_media":{"alt":"Crystal Sphere Display Stands Assorted Styles-Stands-Ali-H-Multicolor-B-Wood-Crystal Destiny","id":31835999109291,"position":58,"preview_image":{"aspect_ratio":1.0,"height":1000,"width":1000,"src":"\/\/crystaldestiny.com\/cdn\/shop\/files\/Crystal-Sphere-Display-Stands-Assorted-Styles-Stands-H-Multicolor-B-Wood-58.webp?v=1765343449"}},"requires_selling_plan":false,"selling_plan_allocations":[]},{"id":45647175188651,"title":"F-25mm-Wood","option1":"F-25mm-Wood","option2":null,"option3":null,"sku":"1005006043315902-F-25mm-Wood","requires_shipping":true,"taxable":true,"featured_image":{"id":40448947650731,"product_id":8529075896491,"position":26,"created_at":"2025-09-21T14:45:28-04:00","updated_at":"2025-12-10T00:10:08-05:00","alt":"Crystal Sphere Display Stands Assorted Styles-Stands-Ali-F-25mm-Wood-Crystal Destiny","width":1000,"height":1000,"src":"\/\/crystaldestiny.com\/cdn\/shop\/files\/Crystal-Sphere-Display-Stands-Assorted-Styles-Stands-F-25mm-Wood-26.webp?v=1765343408","variant_ids":[45647175188651]},"available":true,"name":"Crystal Sphere Display Stands Assorted Styles - F-25mm-Wood","public_title":"F-25mm-Wood","options":["F-25mm-Wood"],"price":399,"weight":40,"compare_at_price":0,"inventory_management":"shopify","barcode":null,"featured_media":{"alt":"Crystal Sphere Display Stands Assorted Styles-Stands-Ali-F-25mm-Wood-Crystal Destiny","id":31835998060715,"position":26,"preview_image":{"aspect_ratio":1.0,"height":1000,"width":1000,"src":"\/\/crystaldestiny.com\/cdn\/shop\/files\/Crystal-Sphere-Display-Stands-Assorted-Styles-Stands-F-25mm-Wood-26.webp?v=1765343408"}},"requires_selling_plan":false,"selling_plan_allocations":[]},{"id":45647175221419,"title":"F-35mm-Wood","option1":"F-35mm-Wood","option2":null,"option3":null,"sku":"1005006043315902-F-35mm-Wood","requires_shipping":true,"taxable":true,"featured_image":{"id":40448947978411,"product_id":8529075896491,"position":36,"created_at":"2025-09-21T14:45:28-04:00","updated_at":"2025-12-10T00:10:19-05:00","alt":"Crystal Sphere Display Stands Assorted Styles-Stands-Ali-F-35mm-Wood-Crystal Destiny","width":1000,"height":1000,"src":"\/\/crystaldestiny.com\/cdn\/shop\/files\/Crystal-Sphere-Display-Stands-Assorted-Styles-Stands-F-35mm-Wood-36.webp?v=1765343419","variant_ids":[45647175221419]},"available":true,"name":"Crystal Sphere Display Stands Assorted Styles - F-35mm-Wood","public_title":"F-35mm-Wood","options":["F-35mm-Wood"],"price":499,"weight":40,"compare_at_price":0,"inventory_management":"shopify","barcode":null,"featured_media":{"alt":"Crystal Sphere Display Stands Assorted Styles-Stands-Ali-F-35mm-Wood-Crystal Destiny","id":31835998388395,"position":36,"preview_image":{"aspect_ratio":1.0,"height":1000,"width":1000,"src":"\/\/crystaldestiny.com\/cdn\/shop\/files\/Crystal-Sphere-Display-Stands-Assorted-Styles-Stands-F-35mm-Wood-36.webp?v=1765343419"}},"requires_selling_plan":false,"selling_plan_allocations":[]},{"id":45647175254187,"title":"F-50mm-Wood","option1":"F-50mm-Wood","option2":null,"option3":null,"sku":"1005006043315902-F-50mm-Wood","requires_shipping":true,"taxable":true,"featured_image":{"id":40448947683499,"product_id":8529075896491,"position":27,"created_at":"2025-09-21T14:45:28-04:00","updated_at":"2025-12-10T00:10:09-05:00","alt":"Crystal Sphere Display Stands Assorted Styles-Stands-Ali-F-50mm-Wood-Crystal Destiny","width":1000,"height":1000,"src":"\/\/crystaldestiny.com\/cdn\/shop\/files\/Crystal-Sphere-Display-Stands-Assorted-Styles-Stands-F-50mm-Wood-27.webp?v=1765343409","variant_ids":[45647175254187]},"available":true,"name":"Crystal Sphere Display Stands Assorted Styles - F-50mm-Wood","public_title":"F-50mm-Wood","options":["F-50mm-Wood"],"price":499,"weight":40,"compare_at_price":0,"inventory_management":"shopify","barcode":null,"featured_media":{"alt":"Crystal Sphere Display Stands Assorted Styles-Stands-Ali-F-50mm-Wood-Crystal Destiny","id":31835998093483,"position":27,"preview_image":{"aspect_ratio":1.0,"height":1000,"width":1000,"src":"\/\/crystaldestiny.com\/cdn\/shop\/files\/Crystal-Sphere-Display-Stands-Assorted-Styles-Stands-F-50mm-Wood-27.webp?v=1765343409"}},"requires_selling_plan":false,"selling_plan_allocations":[]},{"id":45647175286955,"title":"F-80mm-Wood","option1":"F-80mm-Wood","option2":null,"option3":null,"sku":"1005006043315902-F-80mm-Wood","requires_shipping":true,"taxable":true,"featured_image":{"id":40448948961451,"product_id":8529075896491,"position":66,"created_at":"2025-09-21T14:45:29-04:00","updated_at":"2025-12-10T00:11:00-05:00","alt":"Crystal Sphere Display Stands Assorted Styles-Stands-Ali-F-80mm-Wood-Crystal Destiny","width":1000,"height":1000,"src":"\/\/crystaldestiny.com\/cdn\/shop\/files\/Crystal-Sphere-Display-Stands-Assorted-Styles-Stands-F-80mm-Wood-66.webp?v=1765343460","variant_ids":[45647175286955]},"available":true,"name":"Crystal Sphere Display Stands Assorted Styles - F-80mm-Wood","public_title":"F-80mm-Wood","options":["F-80mm-Wood"],"price":599,"weight":40,"compare_at_price":0,"inventory_management":"shopify","barcode":null,"featured_media":{"alt":"Crystal Sphere Display Stands Assorted Styles-Stands-Ali-F-80mm-Wood-Crystal Destiny","id":31835999436971,"position":66,"preview_image":{"aspect_ratio":1.0,"height":1000,"width":1000,"src":"\/\/crystaldestiny.com\/cdn\/shop\/files\/Crystal-Sphere-Display-Stands-Assorted-Styles-Stands-F-80mm-Wood-66.webp?v=1765343460"}},"requires_selling_plan":false,"selling_plan_allocations":[]},{"id":45647175319723,"title":"G-25mm-Crystal","option1":"G-25mm-Crystal","option2":null,"option3":null,"sku":"1005006043315902-G-25mm-Crystal","requires_shipping":true,"taxable":true,"featured_image":{"id":40448947224747,"product_id":8529075896491,"position":13,"created_at":"2025-09-21T14:45:28-04:00","updated_at":"2025-12-10T00:09:50-05:00","alt":"Crystal Sphere Display Stands Assorted Styles-Stands-Ali-G-25mm-Crystal-Crystal Destiny","width":1000,"height":1000,"src":"\/\/crystaldestiny.com\/cdn\/shop\/files\/Crystal-Sphere-Display-Stands-Assorted-Styles-Stands-G-25mm-Crystal-13.webp?v=1765343390","variant_ids":[45647175319723]},"available":true,"name":"Crystal Sphere Display Stands Assorted Styles - G-25mm-Crystal","public_title":"G-25mm-Crystal","options":["G-25mm-Crystal"],"price":599,"weight":40,"compare_at_price":0,"inventory_management":"shopify","barcode":null,"featured_media":{"alt":"Crystal Sphere Display Stands Assorted Styles-Stands-Ali-G-25mm-Crystal-Crystal Destiny","id":31835997634731,"position":13,"preview_image":{"aspect_ratio":1.0,"height":1000,"width":1000,"src":"\/\/crystaldestiny.com\/cdn\/shop\/files\/Crystal-Sphere-Display-Stands-Assorted-Styles-Stands-G-25mm-Crystal-13.webp?v=1765343390"}},"requires_selling_plan":false,"selling_plan_allocations":[]},{"id":45647175352491,"title":"G-30mm-Crystal","option1":"G-30mm-Crystal","option2":null,"option3":null,"sku":"1005006043315902-G-30mm-Crystal","requires_shipping":true,"taxable":true,"featured_image":{"id":40448947257515,"product_id":8529075896491,"position":14,"created_at":"2025-09-21T14:45:28-04:00","updated_at":"2025-12-10T00:09:51-05:00","alt":"Crystal Sphere Display Stands Assorted Styles-Stands-Ali-G-30mm-Crystal-Crystal Destiny","width":1000,"height":1000,"src":"\/\/crystaldestiny.com\/cdn\/shop\/files\/Crystal-Sphere-Display-Stands-Assorted-Styles-Stands-G-30mm-Crystal-14.webp?v=1765343391","variant_ids":[45647175352491]},"available":true,"name":"Crystal Sphere Display Stands Assorted Styles - G-30mm-Crystal","public_title":"G-30mm-Crystal","options":["G-30mm-Crystal"],"price":799,"weight":40,"compare_at_price":0,"inventory_management":"shopify","barcode":null,"featured_media":{"alt":"Crystal Sphere Display Stands Assorted Styles-Stands-Ali-G-30mm-Crystal-Crystal Destiny","id":31835997667499,"position":14,"preview_image":{"aspect_ratio":1.0,"height":1000,"width":1000,"src":"\/\/crystaldestiny.com\/cdn\/shop\/files\/Crystal-Sphere-Display-Stands-Assorted-Styles-Stands-G-30mm-Crystal-14.webp?v=1765343391"}},"requires_selling_plan":false,"selling_plan_allocations":[]},{"id":45647175385259,"title":"G-35mm-Crystal","option1":"G-35mm-Crystal","option2":null,"option3":null,"sku":"1005006043315902-G-35mm-Crystal","requires_shipping":true,"taxable":true,"featured_image":{"id":40448948011179,"product_id":8529075896491,"position":37,"created_at":"2025-09-21T14:45:29-04:00","updated_at":"2025-12-10T00:10:21-05:00","alt":"Crystal Sphere Display Stands Assorted Styles-Stands-Ali-G-35mm-Crystal-Crystal Destiny","width":1000,"height":1000,"src":"\/\/crystaldestiny.com\/cdn\/shop\/files\/Crystal-Sphere-Display-Stands-Assorted-Styles-Stands-G-35mm-Crystal-37.webp?v=1765343421","variant_ids":[45647175385259]},"available":true,"name":"Crystal Sphere Display Stands Assorted Styles - G-35mm-Crystal","public_title":"G-35mm-Crystal","options":["G-35mm-Crystal"],"price":999,"weight":40,"compare_at_price":0,"inventory_management":"shopify","barcode":null,"featured_media":{"alt":"Crystal Sphere Display Stands Assorted Styles-Stands-Ali-G-35mm-Crystal-Crystal Destiny","id":31835998421163,"position":37,"preview_image":{"aspect_ratio":1.0,"height":1000,"width":1000,"src":"\/\/crystaldestiny.com\/cdn\/shop\/files\/Crystal-Sphere-Display-Stands-Assorted-Styles-Stands-G-35mm-Crystal-37.webp?v=1765343421"}},"requires_selling_plan":false,"selling_plan_allocations":[]},{"id":45647175418027,"title":"J-3.8x1.5cm-G-Alloy","option1":"J-3.8x1.5cm-G-Alloy","option2":null,"option3":null,"sku":"1005006043315902-J-3.8x1.5cm-G-Alloy","requires_shipping":true,"taxable":true,"featured_image":{"id":40448947519659,"product_id":8529075896491,"position":22,"created_at":"2025-09-21T14:45:28-04:00","updated_at":"2025-12-10T00:10:02-05:00","alt":"Crystal Sphere Display Stands Assorted Styles-Stands-Ali-J-3.8x1.5cm-G-Alloy-Crystal Destiny","width":1000,"height":1000,"src":"\/\/crystaldestiny.com\/cdn\/shop\/files\/Crystal-Sphere-Display-Stands-Assorted-Styles-Stands-J-3_8x1_5cm-G-Alloy-22.webp?v=1765343402","variant_ids":[45647175418027]},"available":true,"name":"Crystal Sphere Display Stands Assorted Styles - J-3.8x1.5cm-G-Alloy","public_title":"J-3.8x1.5cm-G-Alloy","options":["J-3.8x1.5cm-G-Alloy"],"price":699,"weight":40,"compare_at_price":0,"inventory_management":"shopify","barcode":null,"featured_media":{"alt":"Crystal Sphere Display Stands Assorted Styles-Stands-Ali-J-3.8x1.5cm-G-Alloy-Crystal Destiny","id":31835997929643,"position":22,"preview_image":{"aspect_ratio":1.0,"height":1000,"width":1000,"src":"\/\/crystaldestiny.com\/cdn\/shop\/files\/Crystal-Sphere-Display-Stands-Assorted-Styles-Stands-J-3_8x1_5cm-G-Alloy-22.webp?v=1765343402"}},"requires_selling_plan":false,"selling_plan_allocations":[]},{"id":45647175516331,"title":"J-3.8X1.5cm-S-Alloy","option1":"J-3.8X1.5cm-S-Alloy","option2":null,"option3":null,"sku":"1005006043315902-J-3.8X1.5cm-S-Alloy","requires_shipping":true,"taxable":true,"featured_image":{"id":40448947388587,"product_id":8529075896491,"position":18,"created_at":"2025-09-21T14:45:28-04:00","updated_at":"2025-12-10T00:09:57-05:00","alt":"Crystal Sphere Display Stands Assorted Styles-Stands-Ali-J-3.8X1.5cm-S-Alloy-Crystal Destiny","width":1000,"height":1000,"src":"\/\/crystaldestiny.com\/cdn\/shop\/files\/Crystal-Sphere-Display-Stands-Assorted-Styles-Stands-J-3_8X1_5cm-S-Alloy-18.webp?v=1765343397","variant_ids":[45647175516331]},"available":true,"name":"Crystal Sphere Display Stands Assorted Styles - J-3.8X1.5cm-S-Alloy","public_title":"J-3.8X1.5cm-S-Alloy","options":["J-3.8X1.5cm-S-Alloy"],"price":699,"weight":40,"compare_at_price":0,"inventory_management":"shopify","barcode":null,"featured_media":{"alt":"Crystal Sphere Display Stands Assorted Styles-Stands-Ali-J-3.8X1.5cm-S-Alloy-Crystal Destiny","id":31835997798571,"position":18,"preview_image":{"aspect_ratio":1.0,"height":1000,"width":1000,"src":"\/\/crystaldestiny.com\/cdn\/shop\/files\/Crystal-Sphere-Display-Stands-Assorted-Styles-Stands-J-3_8X1_5cm-S-Alloy-18.webp?v=1765343397"}},"requires_selling_plan":false,"selling_plan_allocations":[]},{"id":45647175450795,"title":"J-5.3x2.8cm-G-Alloy","option1":"J-5.3x2.8cm-G-Alloy","option2":null,"option3":null,"sku":"1005006043315902-J-5.3x2.8cm-G-Alloy","requires_shipping":true,"taxable":true,"featured_image":{"id":40448948732075,"product_id":8529075896491,"position":59,"created_at":"2025-09-21T14:45:29-04:00","updated_at":"2025-12-10T00:10:50-05:00","alt":"Crystal Sphere Display Stands Assorted Styles-Stands-Ali-J-5.3x2.8cm-G-Alloy-Crystal Destiny","width":1000,"height":1000,"src":"\/\/crystaldestiny.com\/cdn\/shop\/files\/Crystal-Sphere-Display-Stands-Assorted-Styles-Stands-J-5_3x2_8cm-G-Alloy-59.webp?v=1765343450","variant_ids":[45647175450795]},"available":true,"name":"Crystal Sphere Display Stands Assorted Styles - J-5.3x2.8cm-G-Alloy","public_title":"J-5.3x2.8cm-G-Alloy","options":["J-5.3x2.8cm-G-Alloy"],"price":1299,"weight":40,"compare_at_price":0,"inventory_management":"shopify","barcode":null,"featured_media":{"alt":"Crystal Sphere Display Stands Assorted Styles-Stands-Ali-J-5.3x2.8cm-G-Alloy-Crystal Destiny","id":31835999142059,"position":59,"preview_image":{"aspect_ratio":1.0,"height":1000,"width":1000,"src":"\/\/crystaldestiny.com\/cdn\/shop\/files\/Crystal-Sphere-Display-Stands-Assorted-Styles-Stands-J-5_3x2_8cm-G-Alloy-59.webp?v=1765343450"}},"requires_selling_plan":false,"selling_plan_allocations":[]},{"id":45647175549099,"title":"J-5.3x2.8cm-S-Alloy","option1":"J-5.3x2.8cm-S-Alloy","option2":null,"option3":null,"sku":"1005006043315902-J-5.3x2.8cm-S-Alloy","requires_shipping":true,"taxable":true,"featured_image":{"id":40448948437163,"product_id":8529075896491,"position":50,"created_at":"2025-09-21T14:45:29-04:00","updated_at":"2025-12-10T00:10:38-05:00","alt":"Crystal Sphere Display Stands Assorted Styles-Stands-Ali-J-5.3x2.8cm-S-Alloy-Crystal Destiny","width":1000,"height":1000,"src":"\/\/crystaldestiny.com\/cdn\/shop\/files\/Crystal-Sphere-Display-Stands-Assorted-Styles-Stands-J-5_3x2_8cm-S-Alloy-50.webp?v=1765343438","variant_ids":[45647175549099]},"available":true,"name":"Crystal Sphere Display Stands Assorted Styles - J-5.3x2.8cm-S-Alloy","public_title":"J-5.3x2.8cm-S-Alloy","options":["J-5.3x2.8cm-S-Alloy"],"price":1299,"weight":40,"compare_at_price":0,"inventory_management":"shopify","barcode":null,"featured_media":{"alt":"Crystal Sphere Display Stands Assorted Styles-Stands-Ali-J-5.3x2.8cm-S-Alloy-Crystal Destiny","id":31835998847147,"position":50,"preview_image":{"aspect_ratio":1.0,"height":1000,"width":1000,"src":"\/\/crystaldestiny.com\/cdn\/shop\/files\/Crystal-Sphere-Display-Stands-Assorted-Styles-Stands-J-5_3x2_8cm-S-Alloy-50.webp?v=1765343438"}},"requires_selling_plan":false,"selling_plan_allocations":[]},{"id":45647175483563,"title":"J-6x2cm-G-Alloy","option1":"J-6x2cm-G-Alloy","option2":null,"option3":null,"sku":"1005006043315902-J-6x2cm-G-Alloy","requires_shipping":true,"taxable":true,"featured_image":{"id":40448948404395,"product_id":8529075896491,"position":49,"created_at":"2025-09-21T14:45:29-04:00","updated_at":"2025-12-10T00:10:36-05:00","alt":"Crystal Sphere Display Stands Assorted Styles-Stands-Ali-J-6x2cm-G-Alloy-Crystal Destiny","width":1000,"height":1000,"src":"\/\/crystaldestiny.com\/cdn\/shop\/files\/Crystal-Sphere-Display-Stands-Assorted-Styles-Stands-J-6x2cm-G-Alloy-49.webp?v=1765343436","variant_ids":[45647175483563]},"available":true,"name":"Crystal Sphere Display Stands Assorted Styles - J-6x2cm-G-Alloy","public_title":"J-6x2cm-G-Alloy","options":["J-6x2cm-G-Alloy"],"price":999,"weight":40,"compare_at_price":0,"inventory_management":"shopify","barcode":null,"featured_media":{"alt":"Crystal Sphere Display Stands Assorted Styles-Stands-Ali-J-6x2cm-G-Alloy-Crystal Destiny","id":31835998814379,"position":49,"preview_image":{"aspect_ratio":1.0,"height":1000,"width":1000,"src":"\/\/crystaldestiny.com\/cdn\/shop\/files\/Crystal-Sphere-Display-Stands-Assorted-Styles-Stands-J-6x2cm-G-Alloy-49.webp?v=1765343436"}},"requires_selling_plan":false,"selling_plan_allocations":[]},{"id":45647175581867,"title":"J-6x2cm-S-Alloy","option1":"J-6x2cm-S-Alloy","option2":null,"option3":null,"sku":"1005006043315902-J-6x2cm-S-Alloy","requires_shipping":true,"taxable":true,"featured_image":{"id":40448948764843,"product_id":8529075896491,"position":60,"created_at":"2025-09-21T14:45:29-04:00","updated_at":"2025-12-10T00:10:52-05:00","alt":"Crystal Sphere Display Stands Assorted Styles-Stands-Ali-J-6x2cm-S-Alloy-Crystal Destiny","width":1000,"height":1000,"src":"\/\/crystaldestiny.com\/cdn\/shop\/files\/Crystal-Sphere-Display-Stands-Assorted-Styles-Stands-J-6x2cm-S-Alloy-60.webp?v=1765343452","variant_ids":[45647175581867]},"available":true,"name":"Crystal Sphere Display Stands Assorted Styles - J-6x2cm-S-Alloy","public_title":"J-6x2cm-S-Alloy","options":["J-6x2cm-S-Alloy"],"price":999,"weight":40,"compare_at_price":0,"inventory_management":"shopify","barcode":null,"featured_media":{"alt":"Crystal Sphere Display Stands Assorted Styles-Stands-Ali-J-6x2cm-S-Alloy-Crystal Destiny","id":31835999174827,"position":60,"preview_image":{"aspect_ratio":1.0,"height":1000,"width":1000,"src":"\/\/crystaldestiny.com\/cdn\/shop\/files\/Crystal-Sphere-Display-Stands-Assorted-Styles-Stands-J-6x2cm-S-Alloy-60.webp?v=1765343452"}},"requires_selling_plan":false,"selling_plan_allocations":[]},{"id":45647175712939,"title":"I-Warm Light-A-Wood","option1":"I-Warm Light-A-Wood","option2":null,"option3":null,"sku":"1005006043315902-I-Warm Light-A-Wood","requires_shipping":true,"taxable":true,"featured_image":{"id":40448947290283,"product_id":8529075896491,"position":15,"created_at":"2025-09-21T14:45:28-04:00","updated_at":"2025-12-10T00:09:53-05:00","alt":"Crystal Sphere Display Stands Assorted Styles-Stands-Ali-I-Warm Light-A-Wood-Crystal Destiny","width":1000,"height":1000,"src":"\/\/crystaldestiny.com\/cdn\/shop\/files\/Crystal-Sphere-Display-Stands-Assorted-Styles-Stands-I-Warm-Light-A-Wood-15.webp?v=1765343393","variant_ids":[45647175712939]},"available":true,"name":"Crystal Sphere Display Stands Assorted Styles - I-Warm Light-A-Wood","public_title":"I-Warm Light-A-Wood","options":["I-Warm Light-A-Wood"],"price":1799,"weight":40,"compare_at_price":0,"inventory_management":"shopify","barcode":null,"featured_media":{"alt":"Crystal Sphere Display Stands Assorted Styles-Stands-Ali-I-Warm Light-A-Wood-Crystal Destiny","id":31835997700267,"position":15,"preview_image":{"aspect_ratio":1.0,"height":1000,"width":1000,"src":"\/\/crystaldestiny.com\/cdn\/shop\/files\/Crystal-Sphere-Display-Stands-Assorted-Styles-Stands-I-Warm-Light-A-Wood-15.webp?v=1765343393"}},"requires_selling_plan":false,"selling_plan_allocations":[]},{"id":45647175745707,"title":"I-White Light-A-Wood","option1":"I-White Light-A-Wood","option2":null,"option3":null,"sku":"1005006043315902-I-White Light-A-Wood","requires_shipping":true,"taxable":true,"featured_image":{"id":40448947847339,"product_id":8529075896491,"position":32,"created_at":"2025-09-21T14:45:28-04:00","updated_at":"2025-12-10T00:10:15-05:00","alt":"Crystal Sphere Display Stands Assorted Styles-Stands-Ali-I-White Light-A-Wood-Crystal Destiny","width":1000,"height":1000,"src":"\/\/crystaldestiny.com\/cdn\/shop\/files\/Crystal-Sphere-Display-Stands-Assorted-Styles-Stands-I-White-Light-A-Wood-32.webp?v=1765343415","variant_ids":[45647175745707]},"available":true,"name":"Crystal Sphere Display Stands Assorted Styles - I-White Light-A-Wood","public_title":"I-White Light-A-Wood","options":["I-White Light-A-Wood"],"price":1799,"weight":40,"compare_at_price":0,"inventory_management":"shopify","barcode":null,"featured_media":{"alt":"Crystal Sphere Display Stands Assorted Styles-Stands-Ali-I-White Light-A-Wood-Crystal Destiny","id":31835998257323,"position":32,"preview_image":{"aspect_ratio":1.0,"height":1000,"width":1000,"src":"\/\/crystaldestiny.com\/cdn\/shop\/files\/Crystal-Sphere-Display-Stands-Assorted-Styles-Stands-I-White-Light-A-Wood-32.webp?v=1765343415"}},"requires_selling_plan":false,"selling_plan_allocations":[]},{"id":45647175811243,"title":"I-Warm Light-B-Wood","option1":"I-Warm Light-B-Wood","option2":null,"option3":null,"sku":"1005006043315902-I-Warm Light-B-Wood","requires_shipping":true,"taxable":true,"featured_image":{"id":40448948469931,"product_id":8529075896491,"position":51,"created_at":"2025-09-21T14:45:29-04:00","updated_at":"2025-12-10T00:10:39-05:00","alt":"Crystal Sphere Display Stands Assorted Styles-Stands-Ali-I-Warm Light-B-Wood-Crystal Destiny","width":1000,"height":1000,"src":"\/\/crystaldestiny.com\/cdn\/shop\/files\/Crystal-Sphere-Display-Stands-Assorted-Styles-Stands-I-Warm-Light-B-Wood-51.webp?v=1765343439","variant_ids":[45647175811243]},"available":true,"name":"Crystal Sphere Display Stands Assorted Styles - I-Warm Light-B-Wood","public_title":"I-Warm Light-B-Wood","options":["I-Warm Light-B-Wood"],"price":1899,"weight":40,"compare_at_price":0,"inventory_management":"shopify","barcode":null,"featured_media":{"alt":"Crystal Sphere Display Stands Assorted Styles-Stands-Ali-I-Warm Light-B-Wood-Crystal Destiny","id":31835998879915,"position":51,"preview_image":{"aspect_ratio":1.0,"height":1000,"width":1000,"src":"\/\/crystaldestiny.com\/cdn\/shop\/files\/Crystal-Sphere-Display-Stands-Assorted-Styles-Stands-I-Warm-Light-B-Wood-51.webp?v=1765343439"}},"requires_selling_plan":false,"selling_plan_allocations":[]},{"id":45647175844011,"title":"I-White Light-B-Wood","option1":"I-White Light-B-Wood","option2":null,"option3":null,"sku":"1005006043315902-I-White Light-B-Wood","requires_shipping":true,"taxable":true,"featured_image":{"id":40448947454123,"product_id":8529075896491,"position":20,"created_at":"2025-09-21T14:45:28-04:00","updated_at":"2025-12-10T00:09:58-05:00","alt":"Crystal Sphere Display Stands Assorted Styles-Stands-Ali-I-White Light-B-Wood-Crystal Destiny","width":1000,"height":1000,"src":"\/\/crystaldestiny.com\/cdn\/shop\/files\/Crystal-Sphere-Display-Stands-Assorted-Styles-Stands-I-White-Light-B-Wood-20.webp?v=1765343398","variant_ids":[45647175844011]},"available":true,"name":"Crystal Sphere Display Stands Assorted Styles - I-White Light-B-Wood","public_title":"I-White Light-B-Wood","options":["I-White Light-B-Wood"],"price":1799,"weight":40,"compare_at_price":0,"inventory_management":"shopify","barcode":null,"featured_media":{"alt":"Crystal Sphere Display Stands Assorted Styles-Stands-Ali-I-White Light-B-Wood-Crystal Destiny","id":31835997864107,"position":20,"preview_image":{"aspect_ratio":1.0,"height":1000,"width":1000,"src":"\/\/crystaldestiny.com\/cdn\/shop\/files\/Crystal-Sphere-Display-Stands-Assorted-Styles-Stands-I-White-Light-B-Wood-20.webp?v=1765343398"}},"requires_selling_plan":false,"selling_plan_allocations":[]},{"id":45647175778475,"title":"I-Multicolor-A-Wood","option1":"I-Multicolor-A-Wood","option2":null,"option3":null,"sku":"1005006043315902-I-Multicolor-A-Wood","requires_shipping":true,"taxable":true,"featured_image":{"id":40448948601003,"product_id":8529075896491,"position":55,"created_at":"2025-09-21T14:45:29-04:00","updated_at":"2025-12-10T00:10:45-05:00","alt":"Crystal Sphere Display Stands Assorted Styles-Stands-Ali-I-Multicolor-A-Wood-Crystal Destiny","width":1000,"height":1000,"src":"\/\/crystaldestiny.com\/cdn\/shop\/files\/Crystal-Sphere-Display-Stands-Assorted-Styles-Stands-I-Multicolor-A-Wood-55.webp?v=1765343445","variant_ids":[45647175778475]},"available":true,"name":"Crystal Sphere Display Stands Assorted Styles - I-Multicolor-A-Wood","public_title":"I-Multicolor-A-Wood","options":["I-Multicolor-A-Wood"],"price":1899,"weight":40,"compare_at_price":0,"inventory_management":"shopify","barcode":null,"featured_media":{"alt":"Crystal Sphere Display Stands Assorted Styles-Stands-Ali-I-Multicolor-A-Wood-Crystal Destiny","id":31835999010987,"position":55,"preview_image":{"aspect_ratio":1.0,"height":1000,"width":1000,"src":"\/\/crystaldestiny.com\/cdn\/shop\/files\/Crystal-Sphere-Display-Stands-Assorted-Styles-Stands-I-Multicolor-A-Wood-55.webp?v=1765343445"}},"requires_selling_plan":false,"selling_plan_allocations":[]}],"images":["\/\/crystaldestiny.com\/cdn\/shop\/files\/Crystal-Sphere-Display-Stands-Assorted-Styles-Stands.webp?v=1758558153","\/\/crystaldestiny.com\/cdn\/shop\/files\/Crystal-Sphere-Display-Stands-Assorted-Styles-Stands-2.webp?v=1758558155","\/\/crystaldestiny.com\/cdn\/shop\/files\/Crystal-Sphere-Display-Stands-Assorted-Styles-Stands-3.webp?v=1758558157","\/\/crystaldestiny.com\/cdn\/shop\/files\/Crystal-Sphere-Display-Stands-Assorted-Styles-Stands-4.webp?v=1758558158","\/\/crystaldestiny.com\/cdn\/shop\/files\/Crystal-Sphere-Display-Stands-Assorted-Styles-Stands-5.webp?v=1758558160","\/\/crystaldestiny.com\/cdn\/shop\/files\/Crystal-Sphere-Display-Stands-Assorted-Styles-Stands-6.webp?v=1758558162","\/\/crystaldestiny.com\/cdn\/shop\/files\/Crystal-Sphere-Display-Stands-Assorted-Styles-Stands-C-2_5x2_5cm-wood-7.webp?v=1765343381","\/\/crystaldestiny.com\/cdn\/shop\/files\/Crystal-Sphere-Display-Stands-Assorted-Styles-Stands-B-3x1_5cm-wood-8.webp?v=1765343382","\/\/crystaldestiny.com\/cdn\/shop\/files\/Crystal-Sphere-Display-Stands-Assorted-Styles-Stands-A-4x2_5cm-wood-9.webp?v=1765343384","\/\/crystaldestiny.com\/cdn\/shop\/files\/Crystal-Sphere-Display-Stands-Assorted-Styles-Stands-C-3_5x2_5cm-wood-10.webp?v=1765343385","\/\/crystaldestiny.com\/cdn\/shop\/files\/Crystal-Sphere-Display-Stands-Assorted-Styles-Stands-C-5x2_5cm-wood-11.webp?v=1765343387","\/\/crystaldestiny.com\/cdn\/shop\/files\/Crystal-Sphere-Display-Stands-Assorted-Styles-Stands-H-Warm-Light-A-Wood-12.webp?v=1765343388","\/\/crystaldestiny.com\/cdn\/shop\/files\/Crystal-Sphere-Display-Stands-Assorted-Styles-Stands-G-25mm-Crystal-13.webp?v=1765343390","\/\/crystaldestiny.com\/cdn\/shop\/files\/Crystal-Sphere-Display-Stands-Assorted-Styles-Stands-G-30mm-Crystal-14.webp?v=1765343391","\/\/crystaldestiny.com\/cdn\/shop\/files\/Crystal-Sphere-Display-Stands-Assorted-Styles-Stands-I-Warm-Light-A-Wood-15.webp?v=1765343393","\/\/crystaldestiny.com\/cdn\/shop\/files\/Crystal-Sphere-Display-Stands-Assorted-Styles-Stands-A-5x2_5cm-wood-16.webp?v=1765343394","\/\/crystaldestiny.com\/cdn\/shop\/files\/Crystal-Sphere-Display-Stands-Assorted-Styles-Stands-H-White-Light-B-Wood-17.webp?v=1765343395","\/\/crystaldestiny.com\/cdn\/shop\/files\/Crystal-Sphere-Display-Stands-Assorted-Styles-Stands-J-3_8X1_5cm-S-Alloy-18.webp?v=1765343397","\/\/crystaldestiny.com\/cdn\/shop\/files\/Crystal-Sphere-Display-Stands-Assorted-Styles-Stands-19.webp?v=1761887163","\/\/crystaldestiny.com\/cdn\/shop\/files\/Crystal-Sphere-Display-Stands-Assorted-Styles-Stands-I-White-Light-B-Wood-20.webp?v=1765343398","\/\/crystaldestiny.com\/cdn\/shop\/files\/Crystal-Sphere-Display-Stands-Assorted-Styles-Stands-B-4x2_5cm-wood-21.webp?v=1765343400","\/\/crystaldestiny.com\/cdn\/shop\/files\/Crystal-Sphere-Display-Stands-Assorted-Styles-Stands-J-3_8x1_5cm-G-Alloy-22.webp?v=1765343402","\/\/crystaldestiny.com\/cdn\/shop\/files\/Crystal-Sphere-Display-Stands-Assorted-Styles-Stands-B-5x2_5cm-wood-23.webp?v=1765343403","\/\/crystaldestiny.com\/cdn\/shop\/files\/Crystal-Sphere-Display-Stands-Assorted-Styles-Stands-H-White-Light-A-Wood-24.webp?v=1765343404","\/\/crystaldestiny.com\/cdn\/shop\/files\/Crystal-Sphere-Display-Stands-Assorted-Styles-Stands-H-Warm-Light-B-Wood-25.webp?v=1765343406","\/\/crystaldestiny.com\/cdn\/shop\/files\/Crystal-Sphere-Display-Stands-Assorted-Styles-Stands-F-25mm-Wood-26.webp?v=1765343408","\/\/crystaldestiny.com\/cdn\/shop\/files\/Crystal-Sphere-Display-Stands-Assorted-Styles-Stands-F-50mm-Wood-27.webp?v=1765343409","\/\/crystaldestiny.com\/cdn\/shop\/files\/Crystal-Sphere-Display-Stands-Assorted-Styles-Stands-28.webp?v=1761887166","\/\/crystaldestiny.com\/cdn\/shop\/files\/Crystal-Sphere-Display-Stands-Assorted-Styles-Stands-E-3_4x2cm-Resin-29.webp?v=1765343411","\/\/crystaldestiny.com\/cdn\/shop\/files\/Crystal-Sphere-Display-Stands-Assorted-Styles-Stands-C-4_5x2_5cm-wood-30.webp?v=1765343412","\/\/crystaldestiny.com\/cdn\/shop\/files\/Crystal-Sphere-Display-Stands-Assorted-Styles-Stands-G-40mm-Crystal-31.webp?v=1765343414","\/\/crystaldestiny.com\/cdn\/shop\/files\/Crystal-Sphere-Display-Stands-Assorted-Styles-Stands-I-White-Light-A-Wood-32.webp?v=1765343415","\/\/crystaldestiny.com\/cdn\/shop\/files\/Crystal-Sphere-Display-Stands-Assorted-Styles-Stands-B-7x3_6cm-wood-33.webp?v=1765343416","\/\/crystaldestiny.com\/cdn\/shop\/files\/Crystal-Sphere-Display-Stands-Assorted-Styles-Stands-C-2x2_5cm-wood-34.webp?v=1765343418","\/\/crystaldestiny.com\/cdn\/shop\/files\/Crystal-Sphere-Display-Stands-Assorted-Styles-Stands-35.webp?v=1761887170","\/\/crystaldestiny.com\/cdn\/shop\/files\/Crystal-Sphere-Display-Stands-Assorted-Styles-Stands-F-35mm-Wood-36.webp?v=1765343419","\/\/crystaldestiny.com\/cdn\/shop\/files\/Crystal-Sphere-Display-Stands-Assorted-Styles-Stands-G-35mm-Crystal-37.webp?v=1765343421","\/\/crystaldestiny.com\/cdn\/shop\/files\/Crystal-Sphere-Display-Stands-Assorted-Styles-Stands-38.webp?v=1761887171","\/\/crystaldestiny.com\/cdn\/shop\/files\/Crystal-Sphere-Display-Stands-Assorted-Styles-Stands-B-3_8x2_2cm-wood-39.webp?v=1765343422","\/\/crystaldestiny.com\/cdn\/shop\/files\/Crystal-Sphere-Display-Stands-Assorted-Styles-Stands-D-40mm-Resin-40.webp?v=1765343424","\/\/crystaldestiny.com\/cdn\/shop\/files\/Crystal-Sphere-Display-Stands-Assorted-Styles-Stands-D-70mm-Resin-41.webp?v=1765343425","\/\/crystaldestiny.com\/cdn\/shop\/files\/Crystal-Sphere-Display-Stands-Assorted-Styles-Stands-E-4_2x2_5cm-Resin-42.webp?v=1765343427","\/\/crystaldestiny.com\/cdn\/shop\/files\/Crystal-Sphere-Display-Stands-Assorted-Styles-Stands-D-100mm-Resin-43.webp?v=1765343428","\/\/crystaldestiny.com\/cdn\/shop\/files\/Crystal-Sphere-Display-Stands-Assorted-Styles-Stands-B-8_2x3_5cm-wood-44.webp?v=1765343429","\/\/crystaldestiny.com\/cdn\/shop\/files\/Crystal-Sphere-Display-Stands-Assorted-Styles-Stands-E-5x3cm-Resin-45.webp?v=1765343431","\/\/crystaldestiny.com\/cdn\/shop\/files\/Crystal-Sphere-Display-Stands-Assorted-Styles-Stands-A-2x2_5cm-wood-46.webp?v=1765343432","\/\/crystaldestiny.com\/cdn\/shop\/files\/Crystal-Sphere-Display-Stands-Assorted-Styles-Stands-B-2_5x1cm-wood-47.webp?v=1765343434","\/\/crystaldestiny.com\/cdn\/shop\/files\/Crystal-Sphere-Display-Stands-Assorted-Styles-Stands-D-50mm-Resin-48.webp?v=1765343435","\/\/crystaldestiny.com\/cdn\/shop\/files\/Crystal-Sphere-Display-Stands-Assorted-Styles-Stands-J-6x2cm-G-Alloy-49.webp?v=1765343436","\/\/crystaldestiny.com\/cdn\/shop\/files\/Crystal-Sphere-Display-Stands-Assorted-Styles-Stands-J-5_3x2_8cm-S-Alloy-50.webp?v=1765343438","\/\/crystaldestiny.com\/cdn\/shop\/files\/Crystal-Sphere-Display-Stands-Assorted-Styles-Stands-I-Warm-Light-B-Wood-51.webp?v=1765343439","\/\/crystaldestiny.com\/cdn\/shop\/files\/Crystal-Sphere-Display-Stands-Assorted-Styles-Stands-C-3x2_5cm-wood-52.webp?v=1765343441","\/\/crystaldestiny.com\/cdn\/shop\/files\/Crystal-Sphere-Display-Stands-Assorted-Styles-Stands-A-2_5x2_5cm-wood-53.webp?v=1765343442","\/\/crystaldestiny.com\/cdn\/shop\/files\/Crystal-Sphere-Display-Stands-Assorted-Styles-Stands-D-25mm-Resin-54.webp?v=1765343444","\/\/crystaldestiny.com\/cdn\/shop\/files\/Crystal-Sphere-Display-Stands-Assorted-Styles-Stands-I-Multicolor-A-Wood-55.webp?v=1765343445","\/\/crystaldestiny.com\/cdn\/shop\/files\/Crystal-Sphere-Display-Stands-Assorted-Styles-Stands-A-3x2_5cm-wood-56.webp?v=1765343446","\/\/crystaldestiny.com\/cdn\/shop\/files\/Crystal-Sphere-Display-Stands-Assorted-Styles-Stands-H-Multicolor-A-Wood-57.webp?v=1765343448","\/\/crystaldestiny.com\/cdn\/shop\/files\/Crystal-Sphere-Display-Stands-Assorted-Styles-Stands-H-Multicolor-B-Wood-58.webp?v=1765343449","\/\/crystaldestiny.com\/cdn\/shop\/files\/Crystal-Sphere-Display-Stands-Assorted-Styles-Stands-J-5_3x2_8cm-G-Alloy-59.webp?v=1765343450","\/\/crystaldestiny.com\/cdn\/shop\/files\/Crystal-Sphere-Display-Stands-Assorted-Styles-Stands-J-6x2cm-S-Alloy-60.webp?v=1765343452","\/\/crystaldestiny.com\/cdn\/shop\/files\/Crystal-Sphere-Display-Stands-Assorted-Styles-Stands-B-3_5x1_5cm-wood-61.webp?v=1765343453","\/\/crystaldestiny.com\/cdn\/shop\/files\/Crystal-Sphere-Display-Stands-Assorted-Styles-Stands-A-3_5x2_5cm-wood-62.webp?v=1765343455","\/\/crystaldestiny.com\/cdn\/shop\/files\/Crystal-Sphere-Display-Stands-Assorted-Styles-Stands-D-30mm-Resin-63.webp?v=1765343456","\/\/crystaldestiny.com\/cdn\/shop\/files\/Crystal-Sphere-Display-Stands-Assorted-Styles-Stands-A-4_5x2_5cm-wood-64.webp?v=1765343458","\/\/crystaldestiny.com\/cdn\/shop\/files\/Crystal-Sphere-Display-Stands-Assorted-Styles-Stands-C-4x2_5cm-wood-65.webp?v=1765343459","\/\/crystaldestiny.com\/cdn\/shop\/files\/Crystal-Sphere-Display-Stands-Assorted-Styles-Stands-F-80mm-Wood-66.webp?v=1765343460"],"featured_image":"\/\/crystaldestiny.com\/cdn\/shop\/files\/Crystal-Sphere-Display-Stands-Assorted-Styles-Stands.webp?v=1758558153","options":["Color"],"media":[{"alt":"Crystal Sphere Display Stands Assorted Styles-Stands-Ali-A-2x2.5cm-wood-Crystal Destiny","id":31835997241515,"position":1,"preview_image":{"aspect_ratio":1.0,"height":1000,"width":1000,"src":"\/\/crystaldestiny.com\/cdn\/shop\/files\/Crystal-Sphere-Display-Stands-Assorted-Styles-Stands.webp?v=1758558153"},"aspect_ratio":1.0,"height":1000,"media_type":"image","src":"\/\/crystaldestiny.com\/cdn\/shop\/files\/Crystal-Sphere-Display-Stands-Assorted-Styles-Stands.webp?v=1758558153","width":1000},{"alt":"Crystal Sphere Display Stands Assorted Styles-Stands-Ali-A-2x2.5cm-wood-Crystal Destiny","id":31835997274283,"position":2,"preview_image":{"aspect_ratio":1.0,"height":1000,"width":1000,"src":"\/\/crystaldestiny.com\/cdn\/shop\/files\/Crystal-Sphere-Display-Stands-Assorted-Styles-Stands-2.webp?v=1758558155"},"aspect_ratio":1.0,"height":1000,"media_type":"image","src":"\/\/crystaldestiny.com\/cdn\/shop\/files\/Crystal-Sphere-Display-Stands-Assorted-Styles-Stands-2.webp?v=1758558155","width":1000},{"alt":"Crystal Sphere Display Stands Assorted Styles-Stands-Ali-A-2x2.5cm-wood-Crystal Destiny","id":31835997307051,"position":3,"preview_image":{"aspect_ratio":1.0,"height":1000,"width":1000,"src":"\/\/crystaldestiny.com\/cdn\/shop\/files\/Crystal-Sphere-Display-Stands-Assorted-Styles-Stands-3.webp?v=1758558157"},"aspect_ratio":1.0,"height":1000,"media_type":"image","src":"\/\/crystaldestiny.com\/cdn\/shop\/files\/Crystal-Sphere-Display-Stands-Assorted-Styles-Stands-3.webp?v=1758558157","width":1000},{"alt":"Crystal Sphere Display Stands Assorted Styles-Stands-Ali-A-2x2.5cm-wood-Crystal Destiny","id":31835997339819,"position":4,"preview_image":{"aspect_ratio":1.0,"height":1000,"width":1000,"src":"\/\/crystaldestiny.com\/cdn\/shop\/files\/Crystal-Sphere-Display-Stands-Assorted-Styles-Stands-4.webp?v=1758558158"},"aspect_ratio":1.0,"height":1000,"media_type":"image","src":"\/\/crystaldestiny.com\/cdn\/shop\/files\/Crystal-Sphere-Display-Stands-Assorted-Styles-Stands-4.webp?v=1758558158","width":1000},{"alt":"Crystal Sphere Display Stands Assorted Styles-Stands-Ali-A-2x2.5cm-wood-Crystal Destiny","id":31835997372587,"position":5,"preview_image":{"aspect_ratio":1.0,"height":1000,"width":1000,"src":"\/\/crystaldestiny.com\/cdn\/shop\/files\/Crystal-Sphere-Display-Stands-Assorted-Styles-Stands-5.webp?v=1758558160"},"aspect_ratio":1.0,"height":1000,"media_type":"image","src":"\/\/crystaldestiny.com\/cdn\/shop\/files\/Crystal-Sphere-Display-Stands-Assorted-Styles-Stands-5.webp?v=1758558160","width":1000},{"alt":"Crystal Sphere Display Stands Assorted Styles-Stands-Ali-A-2x2.5cm-wood-Crystal Destiny","id":31835997405355,"position":6,"preview_image":{"aspect_ratio":1.0,"height":1000,"width":1000,"src":"\/\/crystaldestiny.com\/cdn\/shop\/files\/Crystal-Sphere-Display-Stands-Assorted-Styles-Stands-6.webp?v=1758558162"},"aspect_ratio":1.0,"height":1000,"media_type":"image","src":"\/\/crystaldestiny.com\/cdn\/shop\/files\/Crystal-Sphere-Display-Stands-Assorted-Styles-Stands-6.webp?v=1758558162","width":1000},{"alt":"Crystal Sphere Display Stands Assorted Styles-Stands-Ali-C-2.5x2.5cm-wood-Crystal Destiny","id":31835997438123,"position":7,"preview_image":{"aspect_ratio":1.0,"height":1000,"width":1000,"src":"\/\/crystaldestiny.com\/cdn\/shop\/files\/Crystal-Sphere-Display-Stands-Assorted-Styles-Stands-C-2_5x2_5cm-wood-7.webp?v=1765343381"},"aspect_ratio":1.0,"height":1000,"media_type":"image","src":"\/\/crystaldestiny.com\/cdn\/shop\/files\/Crystal-Sphere-Display-Stands-Assorted-Styles-Stands-C-2_5x2_5cm-wood-7.webp?v=1765343381","width":1000},{"alt":"Crystal Sphere Display Stands Assorted Styles-Stands-Ali-B-3x1.5cm-wood-Crystal Destiny","id":31835997470891,"position":8,"preview_image":{"aspect_ratio":1.0,"height":1000,"width":1000,"src":"\/\/crystaldestiny.com\/cdn\/shop\/files\/Crystal-Sphere-Display-Stands-Assorted-Styles-Stands-B-3x1_5cm-wood-8.webp?v=1765343382"},"aspect_ratio":1.0,"height":1000,"media_type":"image","src":"\/\/crystaldestiny.com\/cdn\/shop\/files\/Crystal-Sphere-Display-Stands-Assorted-Styles-Stands-B-3x1_5cm-wood-8.webp?v=1765343382","width":1000},{"alt":"Crystal Sphere Display Stands Assorted Styles-Stands-Ali-A-4x2.5cm-wood-Crystal Destiny","id":31835997503659,"position":9,"preview_image":{"aspect_ratio":1.0,"height":1000,"width":1000,"src":"\/\/crystaldestiny.com\/cdn\/shop\/files\/Crystal-Sphere-Display-Stands-Assorted-Styles-Stands-A-4x2_5cm-wood-9.webp?v=1765343384"},"aspect_ratio":1.0,"height":1000,"media_type":"image","src":"\/\/crystaldestiny.com\/cdn\/shop\/files\/Crystal-Sphere-Display-Stands-Assorted-Styles-Stands-A-4x2_5cm-wood-9.webp?v=1765343384","width":1000},{"alt":"Crystal Sphere Display Stands Assorted Styles-Stands-Ali-C-3.5x2.5cm-wood-Crystal Destiny","id":31835997536427,"position":10,"preview_image":{"aspect_ratio":1.0,"height":1000,"width":1000,"src":"\/\/crystaldestiny.com\/cdn\/shop\/files\/Crystal-Sphere-Display-Stands-Assorted-Styles-Stands-C-3_5x2_5cm-wood-10.webp?v=1765343385"},"aspect_ratio":1.0,"height":1000,"media_type":"image","src":"\/\/crystaldestiny.com\/cdn\/shop\/files\/Crystal-Sphere-Display-Stands-Assorted-Styles-Stands-C-3_5x2_5cm-wood-10.webp?v=1765343385","width":1000},{"alt":"Crystal Sphere Display Stands Assorted Styles-Stands-Ali-C-5x2.5cm-wood-Crystal Destiny","id":31835997569195,"position":11,"preview_image":{"aspect_ratio":1.0,"height":1000,"width":1000,"src":"\/\/crystaldestiny.com\/cdn\/shop\/files\/Crystal-Sphere-Display-Stands-Assorted-Styles-Stands-C-5x2_5cm-wood-11.webp?v=1765343387"},"aspect_ratio":1.0,"height":1000,"media_type":"image","src":"\/\/crystaldestiny.com\/cdn\/shop\/files\/Crystal-Sphere-Display-Stands-Assorted-Styles-Stands-C-5x2_5cm-wood-11.webp?v=1765343387","width":1000},{"alt":"Crystal Sphere Display Stands Assorted Styles-Stands-Ali-H-Warm Light-A-Wood-Crystal Destiny","id":31835997601963,"position":12,"preview_image":{"aspect_ratio":1.0,"height":1000,"width":1000,"src":"\/\/crystaldestiny.com\/cdn\/shop\/files\/Crystal-Sphere-Display-Stands-Assorted-Styles-Stands-H-Warm-Light-A-Wood-12.webp?v=1765343388"},"aspect_ratio":1.0,"height":1000,"media_type":"image","src":"\/\/crystaldestiny.com\/cdn\/shop\/files\/Crystal-Sphere-Display-Stands-Assorted-Styles-Stands-H-Warm-Light-A-Wood-12.webp?v=1765343388","width":1000},{"alt":"Crystal Sphere Display Stands Assorted Styles-Stands-Ali-G-25mm-Crystal-Crystal Destiny","id":31835997634731,"position":13,"preview_image":{"aspect_ratio":1.0,"height":1000,"width":1000,"src":"\/\/crystaldestiny.com\/cdn\/shop\/files\/Crystal-Sphere-Display-Stands-Assorted-Styles-Stands-G-25mm-Crystal-13.webp?v=1765343390"},"aspect_ratio":1.0,"height":1000,"media_type":"image","src":"\/\/crystaldestiny.com\/cdn\/shop\/files\/Crystal-Sphere-Display-Stands-Assorted-Styles-Stands-G-25mm-Crystal-13.webp?v=1765343390","width":1000},{"alt":"Crystal Sphere Display Stands Assorted Styles-Stands-Ali-G-30mm-Crystal-Crystal Destiny","id":31835997667499,"position":14,"preview_image":{"aspect_ratio":1.0,"height":1000,"width":1000,"src":"\/\/crystaldestiny.com\/cdn\/shop\/files\/Crystal-Sphere-Display-Stands-Assorted-Styles-Stands-G-30mm-Crystal-14.webp?v=1765343391"},"aspect_ratio":1.0,"height":1000,"media_type":"image","src":"\/\/crystaldestiny.com\/cdn\/shop\/files\/Crystal-Sphere-Display-Stands-Assorted-Styles-Stands-G-30mm-Crystal-14.webp?v=1765343391","width":1000},{"alt":"Crystal Sphere Display Stands Assorted Styles-Stands-Ali-I-Warm Light-A-Wood-Crystal Destiny","id":31835997700267,"position":15,"preview_image":{"aspect_ratio":1.0,"height":1000,"width":1000,"src":"\/\/crystaldestiny.com\/cdn\/shop\/files\/Crystal-Sphere-Display-Stands-Assorted-Styles-Stands-I-Warm-Light-A-Wood-15.webp?v=1765343393"},"aspect_ratio":1.0,"height":1000,"media_type":"image","src":"\/\/crystaldestiny.com\/cdn\/shop\/files\/Crystal-Sphere-Display-Stands-Assorted-Styles-Stands-I-Warm-Light-A-Wood-15.webp?v=1765343393","width":1000},{"alt":"Crystal Sphere Display Stands Assorted Styles-Stands-Ali-A-5x2.5cm-wood-Crystal Destiny","id":31835997733035,"position":16,"preview_image":{"aspect_ratio":1.0,"height":1000,"width":1000,"src":"\/\/crystaldestiny.com\/cdn\/shop\/files\/Crystal-Sphere-Display-Stands-Assorted-Styles-Stands-A-5x2_5cm-wood-16.webp?v=1765343394"},"aspect_ratio":1.0,"height":1000,"media_type":"image","src":"\/\/crystaldestiny.com\/cdn\/shop\/files\/Crystal-Sphere-Display-Stands-Assorted-Styles-Stands-A-5x2_5cm-wood-16.webp?v=1765343394","width":1000},{"alt":"Crystal Sphere Display Stands Assorted Styles-Stands-Ali-H-White Light-B-Wood-Crystal Destiny","id":31835997765803,"position":17,"preview_image":{"aspect_ratio":1.0,"height":1000,"width":1000,"src":"\/\/crystaldestiny.com\/cdn\/shop\/files\/Crystal-Sphere-Display-Stands-Assorted-Styles-Stands-H-White-Light-B-Wood-17.webp?v=1765343395"},"aspect_ratio":1.0,"height":1000,"media_type":"image","src":"\/\/crystaldestiny.com\/cdn\/shop\/files\/Crystal-Sphere-Display-Stands-Assorted-Styles-Stands-H-White-Light-B-Wood-17.webp?v=1765343395","width":1000},{"alt":"Crystal Sphere Display Stands Assorted Styles-Stands-Ali-J-3.8X1.5cm-S-Alloy-Crystal Destiny","id":31835997798571,"position":18,"preview_image":{"aspect_ratio":1.0,"height":1000,"width":1000,"src":"\/\/crystaldestiny.com\/cdn\/shop\/files\/Crystal-Sphere-Display-Stands-Assorted-Styles-Stands-J-3_8X1_5cm-S-Alloy-18.webp?v=1765343397"},"aspect_ratio":1.0,"height":1000,"media_type":"image","src":"\/\/crystaldestiny.com\/cdn\/shop\/files\/Crystal-Sphere-Display-Stands-Assorted-Styles-Stands-J-3_8X1_5cm-S-Alloy-18.webp?v=1765343397","width":1000},{"alt":"Crystal Sphere Display Stands Assorted Styles-Stands-Ali-A-2x2.5cm-wood-Crystal Destiny","id":31835997831339,"position":19,"preview_image":{"aspect_ratio":1.0,"height":1000,"width":1000,"src":"\/\/crystaldestiny.com\/cdn\/shop\/files\/Crystal-Sphere-Display-Stands-Assorted-Styles-Stands-19.webp?v=1761887163"},"aspect_ratio":1.0,"height":1000,"media_type":"image","src":"\/\/crystaldestiny.com\/cdn\/shop\/files\/Crystal-Sphere-Display-Stands-Assorted-Styles-Stands-19.webp?v=1761887163","width":1000},{"alt":"Crystal Sphere Display Stands Assorted Styles-Stands-Ali-I-White Light-B-Wood-Crystal Destiny","id":31835997864107,"position":20,"preview_image":{"aspect_ratio":1.0,"height":1000,"width":1000,"src":"\/\/crystaldestiny.com\/cdn\/shop\/files\/Crystal-Sphere-Display-Stands-Assorted-Styles-Stands-I-White-Light-B-Wood-20.webp?v=1765343398"},"aspect_ratio":1.0,"height":1000,"media_type":"image","src":"\/\/crystaldestiny.com\/cdn\/shop\/files\/Crystal-Sphere-Display-Stands-Assorted-Styles-Stands-I-White-Light-B-Wood-20.webp?v=1765343398","width":1000},{"alt":"Crystal Sphere Display Stands Assorted Styles-Stands-Ali-B-4x2.5cm-wood-Crystal Destiny","id":31835997896875,"position":21,"preview_image":{"aspect_ratio":1.0,"height":1000,"width":1000,"src":"\/\/crystaldestiny.com\/cdn\/shop\/files\/Crystal-Sphere-Display-Stands-Assorted-Styles-Stands-B-4x2_5cm-wood-21.webp?v=1765343400"},"aspect_ratio":1.0,"height":1000,"media_type":"image","src":"\/\/crystaldestiny.com\/cdn\/shop\/files\/Crystal-Sphere-Display-Stands-Assorted-Styles-Stands-B-4x2_5cm-wood-21.webp?v=1765343400","width":1000},{"alt":"Crystal Sphere Display Stands Assorted Styles-Stands-Ali-J-3.8x1.5cm-G-Alloy-Crystal Destiny","id":31835997929643,"position":22,"preview_image":{"aspect_ratio":1.0,"height":1000,"width":1000,"src":"\/\/crystaldestiny.com\/cdn\/shop\/files\/Crystal-Sphere-Display-Stands-Assorted-Styles-Stands-J-3_8x1_5cm-G-Alloy-22.webp?v=1765343402"},"aspect_ratio":1.0,"height":1000,"media_type":"image","src":"\/\/crystaldestiny.com\/cdn\/shop\/files\/Crystal-Sphere-Display-Stands-Assorted-Styles-Stands-J-3_8x1_5cm-G-Alloy-22.webp?v=1765343402","width":1000},{"alt":"Crystal Sphere Display Stands Assorted Styles-Stands-Ali-B-5x2.5cm-wood-Crystal Destiny","id":31835997962411,"position":23,"preview_image":{"aspect_ratio":1.0,"height":1000,"width":1000,"src":"\/\/crystaldestiny.com\/cdn\/shop\/files\/Crystal-Sphere-Display-Stands-Assorted-Styles-Stands-B-5x2_5cm-wood-23.webp?v=1765343403"},"aspect_ratio":1.0,"height":1000,"media_type":"image","src":"\/\/crystaldestiny.com\/cdn\/shop\/files\/Crystal-Sphere-Display-Stands-Assorted-Styles-Stands-B-5x2_5cm-wood-23.webp?v=1765343403","width":1000},{"alt":"Crystal Sphere Display Stands Assorted Styles-Stands-Ali-H-White Light-A-Wood-Crystal Destiny","id":31835997995179,"position":24,"preview_image":{"aspect_ratio":1.0,"height":1000,"width":1000,"src":"\/\/crystaldestiny.com\/cdn\/shop\/files\/Crystal-Sphere-Display-Stands-Assorted-Styles-Stands-H-White-Light-A-Wood-24.webp?v=1765343404"},"aspect_ratio":1.0,"height":1000,"media_type":"image","src":"\/\/crystaldestiny.com\/cdn\/shop\/files\/Crystal-Sphere-Display-Stands-Assorted-Styles-Stands-H-White-Light-A-Wood-24.webp?v=1765343404","width":1000},{"alt":"Crystal Sphere Display Stands Assorted Styles-Stands-Ali-H-Warm Light-B-Wood-Crystal Destiny","id":31835998027947,"position":25,"preview_image":{"aspect_ratio":1.0,"height":1000,"width":1000,"src":"\/\/crystaldestiny.com\/cdn\/shop\/files\/Crystal-Sphere-Display-Stands-Assorted-Styles-Stands-H-Warm-Light-B-Wood-25.webp?v=1765343406"},"aspect_ratio":1.0,"height":1000,"media_type":"image","src":"\/\/crystaldestiny.com\/cdn\/shop\/files\/Crystal-Sphere-Display-Stands-Assorted-Styles-Stands-H-Warm-Light-B-Wood-25.webp?v=1765343406","width":1000},{"alt":"Crystal Sphere Display Stands Assorted Styles-Stands-Ali-F-25mm-Wood-Crystal Destiny","id":31835998060715,"position":26,"preview_image":{"aspect_ratio":1.0,"height":1000,"width":1000,"src":"\/\/crystaldestiny.com\/cdn\/shop\/files\/Crystal-Sphere-Display-Stands-Assorted-Styles-Stands-F-25mm-Wood-26.webp?v=1765343408"},"aspect_ratio":1.0,"height":1000,"media_type":"image","src":"\/\/crystaldestiny.com\/cdn\/shop\/files\/Crystal-Sphere-Display-Stands-Assorted-Styles-Stands-F-25mm-Wood-26.webp?v=1765343408","width":1000},{"alt":"Crystal Sphere Display Stands Assorted Styles-Stands-Ali-F-50mm-Wood-Crystal Destiny","id":31835998093483,"position":27,"preview_image":{"aspect_ratio":1.0,"height":1000,"width":1000,"src":"\/\/crystaldestiny.com\/cdn\/shop\/files\/Crystal-Sphere-Display-Stands-Assorted-Styles-Stands-F-50mm-Wood-27.webp?v=1765343409"},"aspect_ratio":1.0,"height":1000,"media_type":"image","src":"\/\/crystaldestiny.com\/cdn\/shop\/files\/Crystal-Sphere-Display-Stands-Assorted-Styles-Stands-F-50mm-Wood-27.webp?v=1765343409","width":1000},{"alt":"Crystal Sphere Display Stands Assorted Styles-Stands-Ali-A-2x2.5cm-wood-Crystal Destiny","id":31835998126251,"position":28,"preview_image":{"aspect_ratio":1.0,"height":1000,"width":1000,"src":"\/\/crystaldestiny.com\/cdn\/shop\/files\/Crystal-Sphere-Display-Stands-Assorted-Styles-Stands-28.webp?v=1761887166"},"aspect_ratio":1.0,"height":1000,"media_type":"image","src":"\/\/crystaldestiny.com\/cdn\/shop\/files\/Crystal-Sphere-Display-Stands-Assorted-Styles-Stands-28.webp?v=1761887166","width":1000},{"alt":"Crystal Sphere Display Stands Assorted Styles-Stands-Ali-E-3.4x2cm-Resin-Crystal Destiny","id":31835998159019,"position":29,"preview_image":{"aspect_ratio":1.0,"height":1000,"width":1000,"src":"\/\/crystaldestiny.com\/cdn\/shop\/files\/Crystal-Sphere-Display-Stands-Assorted-Styles-Stands-E-3_4x2cm-Resin-29.webp?v=1765343411"},"aspect_ratio":1.0,"height":1000,"media_type":"image","src":"\/\/crystaldestiny.com\/cdn\/shop\/files\/Crystal-Sphere-Display-Stands-Assorted-Styles-Stands-E-3_4x2cm-Resin-29.webp?v=1765343411","width":1000},{"alt":"Crystal Sphere Display Stands Assorted Styles-Stands-Ali-C-4.5x2.5cm-wood-Crystal Destiny","id":31835998191787,"position":30,"preview_image":{"aspect_ratio":1.0,"height":1000,"width":1000,"src":"\/\/crystaldestiny.com\/cdn\/shop\/files\/Crystal-Sphere-Display-Stands-Assorted-Styles-Stands-C-4_5x2_5cm-wood-30.webp?v=1765343412"},"aspect_ratio":1.0,"height":1000,"media_type":"image","src":"\/\/crystaldestiny.com\/cdn\/shop\/files\/Crystal-Sphere-Display-Stands-Assorted-Styles-Stands-C-4_5x2_5cm-wood-30.webp?v=1765343412","width":1000},{"alt":"Crystal Sphere Display Stands Assorted Styles-Stands-Ali-G-40mm-Crystal-Crystal Destiny","id":31835998224555,"position":31,"preview_image":{"aspect_ratio":1.0,"height":1000,"width":1000,"src":"\/\/crystaldestiny.com\/cdn\/shop\/files\/Crystal-Sphere-Display-Stands-Assorted-Styles-Stands-G-40mm-Crystal-31.webp?v=1765343414"},"aspect_ratio":1.0,"height":1000,"media_type":"image","src":"\/\/crystaldestiny.com\/cdn\/shop\/files\/Crystal-Sphere-Display-Stands-Assorted-Styles-Stands-G-40mm-Crystal-31.webp?v=1765343414","width":1000},{"alt":"Crystal Sphere Display Stands Assorted Styles-Stands-Ali-I-White Light-A-Wood-Crystal Destiny","id":31835998257323,"position":32,"preview_image":{"aspect_ratio":1.0,"height":1000,"width":1000,"src":"\/\/crystaldestiny.com\/cdn\/shop\/files\/Crystal-Sphere-Display-Stands-Assorted-Styles-Stands-I-White-Light-A-Wood-32.webp?v=1765343415"},"aspect_ratio":1.0,"height":1000,"media_type":"image","src":"\/\/crystaldestiny.com\/cdn\/shop\/files\/Crystal-Sphere-Display-Stands-Assorted-Styles-Stands-I-White-Light-A-Wood-32.webp?v=1765343415","width":1000},{"alt":"Crystal Sphere Display Stands Assorted Styles-Stands-Ali-B-7x3.6cm-wood-Crystal Destiny","id":31835998290091,"position":33,"preview_image":{"aspect_ratio":1.0,"height":1000,"width":1000,"src":"\/\/crystaldestiny.com\/cdn\/shop\/files\/Crystal-Sphere-Display-Stands-Assorted-Styles-Stands-B-7x3_6cm-wood-33.webp?v=1765343416"},"aspect_ratio":1.0,"height":1000,"media_type":"image","src":"\/\/crystaldestiny.com\/cdn\/shop\/files\/Crystal-Sphere-Display-Stands-Assorted-Styles-Stands-B-7x3_6cm-wood-33.webp?v=1765343416","width":1000},{"alt":"Crystal Sphere Display Stands Assorted Styles-Stands-Ali-C-2x2.5cm-wood-Crystal Destiny","id":31835998322859,"position":34,"preview_image":{"aspect_ratio":1.0,"height":1000,"width":1000,"src":"\/\/crystaldestiny.com\/cdn\/shop\/files\/Crystal-Sphere-Display-Stands-Assorted-Styles-Stands-C-2x2_5cm-wood-34.webp?v=1765343418"},"aspect_ratio":1.0,"height":1000,"media_type":"image","src":"\/\/crystaldestiny.com\/cdn\/shop\/files\/Crystal-Sphere-Display-Stands-Assorted-Styles-Stands-C-2x2_5cm-wood-34.webp?v=1765343418","width":1000},{"alt":"Crystal Sphere Display Stands Assorted Styles-Stands-Ali-A-2x2.5cm-wood-Crystal Destiny","id":31835998355627,"position":35,"preview_image":{"aspect_ratio":1.0,"height":1000,"width":1000,"src":"\/\/crystaldestiny.com\/cdn\/shop\/files\/Crystal-Sphere-Display-Stands-Assorted-Styles-Stands-35.webp?v=1761887170"},"aspect_ratio":1.0,"height":1000,"media_type":"image","src":"\/\/crystaldestiny.com\/cdn\/shop\/files\/Crystal-Sphere-Display-Stands-Assorted-Styles-Stands-35.webp?v=1761887170","width":1000},{"alt":"Crystal Sphere Display Stands Assorted Styles-Stands-Ali-F-35mm-Wood-Crystal Destiny","id":31835998388395,"position":36,"preview_image":{"aspect_ratio":1.0,"height":1000,"width":1000,"src":"\/\/crystaldestiny.com\/cdn\/shop\/files\/Crystal-Sphere-Display-Stands-Assorted-Styles-Stands-F-35mm-Wood-36.webp?v=1765343419"},"aspect_ratio":1.0,"height":1000,"media_type":"image","src":"\/\/crystaldestiny.com\/cdn\/shop\/files\/Crystal-Sphere-Display-Stands-Assorted-Styles-Stands-F-35mm-Wood-36.webp?v=1765343419","width":1000},{"alt":"Crystal Sphere Display Stands Assorted Styles-Stands-Ali-G-35mm-Crystal-Crystal Destiny","id":31835998421163,"position":37,"preview_image":{"aspect_ratio":1.0,"height":1000,"width":1000,"src":"\/\/crystaldestiny.com\/cdn\/shop\/files\/Crystal-Sphere-Display-Stands-Assorted-Styles-Stands-G-35mm-Crystal-37.webp?v=1765343421"},"aspect_ratio":1.0,"height":1000,"media_type":"image","src":"\/\/crystaldestiny.com\/cdn\/shop\/files\/Crystal-Sphere-Display-Stands-Assorted-Styles-Stands-G-35mm-Crystal-37.webp?v=1765343421","width":1000},{"alt":"Crystal Sphere Display Stands Assorted Styles-Stands-Ali-A-2x2.5cm-wood-Crystal Destiny","id":31835998453931,"position":38,"preview_image":{"aspect_ratio":1.0,"height":1000,"width":1000,"src":"\/\/crystaldestiny.com\/cdn\/shop\/files\/Crystal-Sphere-Display-Stands-Assorted-Styles-Stands-38.webp?v=1761887171"},"aspect_ratio":1.0,"height":1000,"media_type":"image","src":"\/\/crystaldestiny.com\/cdn\/shop\/files\/Crystal-Sphere-Display-Stands-Assorted-Styles-Stands-38.webp?v=1761887171","width":1000},{"alt":"Crystal Sphere Display Stands Assorted Styles-Stands-Ali-B-3.8x2.2cm-wood-Crystal Destiny","id":31835998486699,"position":39,"preview_image":{"aspect_ratio":1.0,"height":1000,"width":1000,"src":"\/\/crystaldestiny.com\/cdn\/shop\/files\/Crystal-Sphere-Display-Stands-Assorted-Styles-Stands-B-3_8x2_2cm-wood-39.webp?v=1765343422"},"aspect_ratio":1.0,"height":1000,"media_type":"image","src":"\/\/crystaldestiny.com\/cdn\/shop\/files\/Crystal-Sphere-Display-Stands-Assorted-Styles-Stands-B-3_8x2_2cm-wood-39.webp?v=1765343422","width":1000},{"alt":"Crystal Sphere Display Stands Assorted Styles-Stands-Ali-D-40mm-Resin-Crystal Destiny","id":31835998519467,"position":40,"preview_image":{"aspect_ratio":1.0,"height":1000,"width":1000,"src":"\/\/crystaldestiny.com\/cdn\/shop\/files\/Crystal-Sphere-Display-Stands-Assorted-Styles-Stands-D-40mm-Resin-40.webp?v=1765343424"},"aspect_ratio":1.0,"height":1000,"media_type":"image","src":"\/\/crystaldestiny.com\/cdn\/shop\/files\/Crystal-Sphere-Display-Stands-Assorted-Styles-Stands-D-40mm-Resin-40.webp?v=1765343424","width":1000},{"alt":"Crystal Sphere Display Stands Assorted Styles-Stands-Ali-D-70mm-Resin-Crystal Destiny","id":31835998552235,"position":41,"preview_image":{"aspect_ratio":1.0,"height":1000,"width":1000,"src":"\/\/crystaldestiny.com\/cdn\/shop\/files\/Crystal-Sphere-Display-Stands-Assorted-Styles-Stands-D-70mm-Resin-41.webp?v=1765343425"},"aspect_ratio":1.0,"height":1000,"media_type":"image","src":"\/\/crystaldestiny.com\/cdn\/shop\/files\/Crystal-Sphere-Display-Stands-Assorted-Styles-Stands-D-70mm-Resin-41.webp?v=1765343425","width":1000},{"alt":"Crystal Sphere Display Stands Assorted Styles-Stands-Ali-E-4.2x2.5cm-Resin-Crystal Destiny","id":31835998585003,"position":42,"preview_image":{"aspect_ratio":1.0,"height":1000,"width":1000,"src":"\/\/crystaldestiny.com\/cdn\/shop\/files\/Crystal-Sphere-Display-Stands-Assorted-Styles-Stands-E-4_2x2_5cm-Resin-42.webp?v=1765343427"},"aspect_ratio":1.0,"height":1000,"media_type":"image","src":"\/\/crystaldestiny.com\/cdn\/shop\/files\/Crystal-Sphere-Display-Stands-Assorted-Styles-Stands-E-4_2x2_5cm-Resin-42.webp?v=1765343427","width":1000},{"alt":"Crystal Sphere Display Stands Assorted Styles-Stands-Ali-D-100mm-Resin-Crystal Destiny","id":31835998617771,"position":43,"preview_image":{"aspect_ratio":1.0,"height":1000,"width":1000,"src":"\/\/crystaldestiny.com\/cdn\/shop\/files\/Crystal-Sphere-Display-Stands-Assorted-Styles-Stands-D-100mm-Resin-43.webp?v=1765343428"},"aspect_ratio":1.0,"height":1000,"media_type":"image","src":"\/\/crystaldestiny.com\/cdn\/shop\/files\/Crystal-Sphere-Display-Stands-Assorted-Styles-Stands-D-100mm-Resin-43.webp?v=1765343428","width":1000},{"alt":"Crystal Sphere Display Stands Assorted Styles-Stands-Ali-B-8.2x3.5cm-wood-Crystal Destiny","id":31835998650539,"position":44,"preview_image":{"aspect_ratio":1.0,"height":1000,"width":1000,"src":"\/\/crystaldestiny.com\/cdn\/shop\/files\/Crystal-Sphere-Display-Stands-Assorted-Styles-Stands-B-8_2x3_5cm-wood-44.webp?v=1765343429"},"aspect_ratio":1.0,"height":1000,"media_type":"image","src":"\/\/crystaldestiny.com\/cdn\/shop\/files\/Crystal-Sphere-Display-Stands-Assorted-Styles-Stands-B-8_2x3_5cm-wood-44.webp?v=1765343429","width":1000},{"alt":"Crystal Sphere Display Stands Assorted Styles-Stands-Ali-E-5x3cm-Resin-Crystal Destiny","id":31835998683307,"position":45,"preview_image":{"aspect_ratio":1.0,"height":1000,"width":1000,"src":"\/\/crystaldestiny.com\/cdn\/shop\/files\/Crystal-Sphere-Display-Stands-Assorted-Styles-Stands-E-5x3cm-Resin-45.webp?v=1765343431"},"aspect_ratio":1.0,"height":1000,"media_type":"image","src":"\/\/crystaldestiny.com\/cdn\/shop\/files\/Crystal-Sphere-Display-Stands-Assorted-Styles-Stands-E-5x3cm-Resin-45.webp?v=1765343431","width":1000},{"alt":"Crystal Sphere Display Stands Assorted Styles-Stands-Ali-A-2x2.5cm-wood-Crystal Destiny","id":31835998716075,"position":46,"preview_image":{"aspect_ratio":1.0,"height":1000,"width":1000,"src":"\/\/crystaldestiny.com\/cdn\/shop\/files\/Crystal-Sphere-Display-Stands-Assorted-Styles-Stands-A-2x2_5cm-wood-46.webp?v=1765343432"},"aspect_ratio":1.0,"height":1000,"media_type":"image","src":"\/\/crystaldestiny.com\/cdn\/shop\/files\/Crystal-Sphere-Display-Stands-Assorted-Styles-Stands-A-2x2_5cm-wood-46.webp?v=1765343432","width":1000},{"alt":"Crystal Sphere Display Stands Assorted Styles-Stands-Ali-B-2.5x1cm-wood-Crystal Destiny","id":31835998748843,"position":47,"preview_image":{"aspect_ratio":1.0,"height":1000,"width":1000,"src":"\/\/crystaldestiny.com\/cdn\/shop\/files\/Crystal-Sphere-Display-Stands-Assorted-Styles-Stands-B-2_5x1cm-wood-47.webp?v=1765343434"},"aspect_ratio":1.0,"height":1000,"media_type":"image","src":"\/\/crystaldestiny.com\/cdn\/shop\/files\/Crystal-Sphere-Display-Stands-Assorted-Styles-Stands-B-2_5x1cm-wood-47.webp?v=1765343434","width":1000},{"alt":"Crystal Sphere Display Stands Assorted Styles-Stands-Ali-D-50mm-Resin-Crystal Destiny","id":31835998781611,"position":48,"preview_image":{"aspect_ratio":1.0,"height":1000,"width":1000,"src":"\/\/crystaldestiny.com\/cdn\/shop\/files\/Crystal-Sphere-Display-Stands-Assorted-Styles-Stands-D-50mm-Resin-48.webp?v=1765343435"},"aspect_ratio":1.0,"height":1000,"media_type":"image","src":"\/\/crystaldestiny.com\/cdn\/shop\/files\/Crystal-Sphere-Display-Stands-Assorted-Styles-Stands-D-50mm-Resin-48.webp?v=1765343435","width":1000},{"alt":"Crystal Sphere Display Stands Assorted Styles-Stands-Ali-J-6x2cm-G-Alloy-Crystal Destiny","id":31835998814379,"position":49,"preview_image":{"aspect_ratio":1.0,"height":1000,"width":1000,"src":"\/\/crystaldestiny.com\/cdn\/shop\/files\/Crystal-Sphere-Display-Stands-Assorted-Styles-Stands-J-6x2cm-G-Alloy-49.webp?v=1765343436"},"aspect_ratio":1.0,"height":1000,"media_type":"image","src":"\/\/crystaldestiny.com\/cdn\/shop\/files\/Crystal-Sphere-Display-Stands-Assorted-Styles-Stands-J-6x2cm-G-Alloy-49.webp?v=1765343436","width":1000},{"alt":"Crystal Sphere Display Stands Assorted Styles-Stands-Ali-J-5.3x2.8cm-S-Alloy-Crystal Destiny","id":31835998847147,"position":50,"preview_image":{"aspect_ratio":1.0,"height":1000,"width":1000,"src":"\/\/crystaldestiny.com\/cdn\/shop\/files\/Crystal-Sphere-Display-Stands-Assorted-Styles-Stands-J-5_3x2_8cm-S-Alloy-50.webp?v=1765343438"},"aspect_ratio":1.0,"height":1000,"media_type":"image","src":"\/\/crystaldestiny.com\/cdn\/shop\/files\/Crystal-Sphere-Display-Stands-Assorted-Styles-Stands-J-5_3x2_8cm-S-Alloy-50.webp?v=1765343438","width":1000},{"alt":"Crystal Sphere Display Stands Assorted Styles-Stands-Ali-I-Warm Light-B-Wood-Crystal Destiny","id":31835998879915,"position":51,"preview_image":{"aspect_ratio":1.0,"height":1000,"width":1000,"src":"\/\/crystaldestiny.com\/cdn\/shop\/files\/Crystal-Sphere-Display-Stands-Assorted-Styles-Stands-I-Warm-Light-B-Wood-51.webp?v=1765343439"},"aspect_ratio":1.0,"height":1000,"media_type":"image","src":"\/\/crystaldestiny.com\/cdn\/shop\/files\/Crystal-Sphere-Display-Stands-Assorted-Styles-Stands-I-Warm-Light-B-Wood-51.webp?v=1765343439","width":1000},{"alt":"Crystal Sphere Display Stands Assorted Styles-Stands-Ali-C-3x2.5cm-wood-Crystal Destiny","id":31835998912683,"position":52,"preview_image":{"aspect_ratio":1.0,"height":1000,"width":1000,"src":"\/\/crystaldestiny.com\/cdn\/shop\/files\/Crystal-Sphere-Display-Stands-Assorted-Styles-Stands-C-3x2_5cm-wood-52.webp?v=1765343441"},"aspect_ratio":1.0,"height":1000,"media_type":"image","src":"\/\/crystaldestiny.com\/cdn\/shop\/files\/Crystal-Sphere-Display-Stands-Assorted-Styles-Stands-C-3x2_5cm-wood-52.webp?v=1765343441","width":1000},{"alt":"Crystal Sphere Display Stands Assorted Styles-Stands-Ali-A-2.5x2.5cm-wood-Crystal Destiny","id":31835998945451,"position":53,"preview_image":{"aspect_ratio":1.0,"height":1000,"width":1000,"src":"\/\/crystaldestiny.com\/cdn\/shop\/files\/Crystal-Sphere-Display-Stands-Assorted-Styles-Stands-A-2_5x2_5cm-wood-53.webp?v=1765343442"},"aspect_ratio":1.0,"height":1000,"media_type":"image","src":"\/\/crystaldestiny.com\/cdn\/shop\/files\/Crystal-Sphere-Display-Stands-Assorted-Styles-Stands-A-2_5x2_5cm-wood-53.webp?v=1765343442","width":1000},{"alt":"Crystal Sphere Display Stands Assorted Styles-Stands-Ali-D-25mm-Resin-Crystal Destiny","id":31835998978219,"position":54,"preview_image":{"aspect_ratio":1.0,"height":1000,"width":1000,"src":"\/\/crystaldestiny.com\/cdn\/shop\/files\/Crystal-Sphere-Display-Stands-Assorted-Styles-Stands-D-25mm-Resin-54.webp?v=1765343444"},"aspect_ratio":1.0,"height":1000,"media_type":"image","src":"\/\/crystaldestiny.com\/cdn\/shop\/files\/Crystal-Sphere-Display-Stands-Assorted-Styles-Stands-D-25mm-Resin-54.webp?v=1765343444","width":1000},{"alt":"Crystal Sphere Display Stands Assorted Styles-Stands-Ali-I-Multicolor-A-Wood-Crystal Destiny","id":31835999010987,"position":55,"preview_image":{"aspect_ratio":1.0,"height":1000,"width":1000,"src":"\/\/crystaldestiny.com\/cdn\/shop\/files\/Crystal-Sphere-Display-Stands-Assorted-Styles-Stands-I-Multicolor-A-Wood-55.webp?v=1765343445"},"aspect_ratio":1.0,"height":1000,"media_type":"image","src":"\/\/crystaldestiny.com\/cdn\/shop\/files\/Crystal-Sphere-Display-Stands-Assorted-Styles-Stands-I-Multicolor-A-Wood-55.webp?v=1765343445","width":1000},{"alt":"Crystal Sphere Display Stands Assorted Styles-Stands-Ali-A-3x2.5cm-wood-Crystal Destiny","id":31835999043755,"position":56,"preview_image":{"aspect_ratio":1.0,"height":1000,"width":1000,"src":"\/\/crystaldestiny.com\/cdn\/shop\/files\/Crystal-Sphere-Display-Stands-Assorted-Styles-Stands-A-3x2_5cm-wood-56.webp?v=1765343446"},"aspect_ratio":1.0,"height":1000,"media_type":"image","src":"\/\/crystaldestiny.com\/cdn\/shop\/files\/Crystal-Sphere-Display-Stands-Assorted-Styles-Stands-A-3x2_5cm-wood-56.webp?v=1765343446","width":1000},{"alt":"Crystal Sphere Display Stands Assorted Styles-Stands-Ali-H-Multicolor-A-Wood-Crystal Destiny","id":31835999076523,"position":57,"preview_image":{"aspect_ratio":1.0,"height":1000,"width":1000,"src":"\/\/crystaldestiny.com\/cdn\/shop\/files\/Crystal-Sphere-Display-Stands-Assorted-Styles-Stands-H-Multicolor-A-Wood-57.webp?v=1765343448"},"aspect_ratio":1.0,"height":1000,"media_type":"image","src":"\/\/crystaldestiny.com\/cdn\/shop\/files\/Crystal-Sphere-Display-Stands-Assorted-Styles-Stands-H-Multicolor-A-Wood-57.webp?v=1765343448","width":1000},{"alt":"Crystal Sphere Display Stands Assorted Styles-Stands-Ali-H-Multicolor-B-Wood-Crystal Destiny","id":31835999109291,"position":58,"preview_image":{"aspect_ratio":1.0,"height":1000,"width":1000,"src":"\/\/crystaldestiny.com\/cdn\/shop\/files\/Crystal-Sphere-Display-Stands-Assorted-Styles-Stands-H-Multicolor-B-Wood-58.webp?v=1765343449"},"aspect_ratio":1.0,"height":1000,"media_type":"image","src":"\/\/crystaldestiny.com\/cdn\/shop\/files\/Crystal-Sphere-Display-Stands-Assorted-Styles-Stands-H-Multicolor-B-Wood-58.webp?v=1765343449","width":1000},{"alt":"Crystal Sphere Display Stands Assorted Styles-Stands-Ali-J-5.3x2.8cm-G-Alloy-Crystal Destiny","id":31835999142059,"position":59,"preview_image":{"aspect_ratio":1.0,"height":1000,"width":1000,"src":"\/\/crystaldestiny.com\/cdn\/shop\/files\/Crystal-Sphere-Display-Stands-Assorted-Styles-Stands-J-5_3x2_8cm-G-Alloy-59.webp?v=1765343450"},"aspect_ratio":1.0,"height":1000,"media_type":"image","src":"\/\/crystaldestiny.com\/cdn\/shop\/files\/Crystal-Sphere-Display-Stands-Assorted-Styles-Stands-J-5_3x2_8cm-G-Alloy-59.webp?v=1765343450","width":1000},{"alt":"Crystal Sphere Display Stands Assorted Styles-Stands-Ali-J-6x2cm-S-Alloy-Crystal Destiny","id":31835999174827,"position":60,"preview_image":{"aspect_ratio":1.0,"height":1000,"width":1000,"src":"\/\/crystaldestiny.com\/cdn\/shop\/files\/Crystal-Sphere-Display-Stands-Assorted-Styles-Stands-J-6x2cm-S-Alloy-60.webp?v=1765343452"},"aspect_ratio":1.0,"height":1000,"media_type":"image","src":"\/\/crystaldestiny.com\/cdn\/shop\/files\/Crystal-Sphere-Display-Stands-Assorted-Styles-Stands-J-6x2cm-S-Alloy-60.webp?v=1765343452","width":1000},{"alt":"Crystal Sphere Display Stands Assorted Styles-Stands-Ali-B-3.5x1.5cm-wood-Crystal Destiny","id":31835999207595,"position":61,"preview_image":{"aspect_ratio":1.0,"height":1000,"width":1000,"src":"\/\/crystaldestiny.com\/cdn\/shop\/files\/Crystal-Sphere-Display-Stands-Assorted-Styles-Stands-B-3_5x1_5cm-wood-61.webp?v=1765343453"},"aspect_ratio":1.0,"height":1000,"media_type":"image","src":"\/\/crystaldestiny.com\/cdn\/shop\/files\/Crystal-Sphere-Display-Stands-Assorted-Styles-Stands-B-3_5x1_5cm-wood-61.webp?v=1765343453","width":1000},{"alt":"Crystal Sphere Display Stands Assorted Styles-Stands-Ali-A-3.5x2.5cm-wood-Crystal Destiny","id":31835999240363,"position":62,"preview_image":{"aspect_ratio":1.0,"height":1000,"width":1000,"src":"\/\/crystaldestiny.com\/cdn\/shop\/files\/Crystal-Sphere-Display-Stands-Assorted-Styles-Stands-A-3_5x2_5cm-wood-62.webp?v=1765343455"},"aspect_ratio":1.0,"height":1000,"media_type":"image","src":"\/\/crystaldestiny.com\/cdn\/shop\/files\/Crystal-Sphere-Display-Stands-Assorted-Styles-Stands-A-3_5x2_5cm-wood-62.webp?v=1765343455","width":1000},{"alt":"Crystal Sphere Display Stands Assorted Styles-Stands-Ali-D-30mm-Resin-Crystal Destiny","id":31835999273131,"position":63,"preview_image":{"aspect_ratio":1.0,"height":1000,"width":1000,"src":"\/\/crystaldestiny.com\/cdn\/shop\/files\/Crystal-Sphere-Display-Stands-Assorted-Styles-Stands-D-30mm-Resin-63.webp?v=1765343456"},"aspect_ratio":1.0,"height":1000,"media_type":"image","src":"\/\/crystaldestiny.com\/cdn\/shop\/files\/Crystal-Sphere-Display-Stands-Assorted-Styles-Stands-D-30mm-Resin-63.webp?v=1765343456","width":1000},{"alt":"Crystal Sphere Display Stands Assorted Styles-Stands-Ali-A-4.5x2.5cm-wood-Crystal Destiny","id":31835999338667,"position":64,"preview_image":{"aspect_ratio":1.0,"height":1000,"width":1000,"src":"\/\/crystaldestiny.com\/cdn\/shop\/files\/Crystal-Sphere-Display-Stands-Assorted-Styles-Stands-A-4_5x2_5cm-wood-64.webp?v=1765343458"},"aspect_ratio":1.0,"height":1000,"media_type":"image","src":"\/\/crystaldestiny.com\/cdn\/shop\/files\/Crystal-Sphere-Display-Stands-Assorted-Styles-Stands-A-4_5x2_5cm-wood-64.webp?v=1765343458","width":1000},{"alt":"Crystal Sphere Display Stands Assorted Styles-Stands-Ali-C-4x2.5cm-wood-Crystal Destiny","id":31835999371435,"position":65,"preview_image":{"aspect_ratio":1.0,"height":1000,"width":1000,"src":"\/\/crystaldestiny.com\/cdn\/shop\/files\/Crystal-Sphere-Display-Stands-Assorted-Styles-Stands-C-4x2_5cm-wood-65.webp?v=1765343459"},"aspect_ratio":1.0,"height":1000,"media_type":"image","src":"\/\/crystaldestiny.com\/cdn\/shop\/files\/Crystal-Sphere-Display-Stands-Assorted-Styles-Stands-C-4x2_5cm-wood-65.webp?v=1765343459","width":1000},{"alt":"Crystal Sphere Display Stands Assorted Styles-Stands-Ali-F-80mm-Wood-Crystal Destiny","id":31835999436971,"position":66,"preview_image":{"aspect_ratio":1.0,"height":1000,"width":1000,"src":"\/\/crystaldestiny.com\/cdn\/shop\/files\/Crystal-Sphere-Display-Stands-Assorted-Styles-Stands-F-80mm-Wood-66.webp?v=1765343460"},"aspect_ratio":1.0,"height":1000,"media_type":"image","src":"\/\/crystaldestiny.com\/cdn\/shop\/files\/Crystal-Sphere-Display-Stands-Assorted-Styles-Stands-F-80mm-Wood-66.webp?v=1765343460","width":1000}],"requires_selling_plan":false,"selling_plan_groups":[],"content":"\u003cp data-start=\"213\" data-end=\"534\"\u003eThese \u003cstrong data-start=\"246\" data-end=\"288\"\u003eAssorted Crystal Sphere Display Stands\u003c\/strong\u003e feature a variety of styles designed to elegantly showcase your crystal spheres, gemstones, or miniature stones. Each stand is crafted to provide both stability and aesthetic appeal, making your crystal collection the focal point of any space.\u003c\/p\u003e\n\u003cp data-start=\"536\" data-end=\"770\"\u003ePerfect for collectors, meditation areas, or home décor, these stands highlight the natural beauty of your stones while keeping them secure. The assortment offers multiple design options to suit your personal style or display needs.\u003c\/p\u003e\n\u003cp data-start=\"772\" data-end=\"905\"\u003eIdeal for gifting or enhancing your crystal collection, these stands blend functionality, artistry, and timeless decorative appeal.\u003c\/p\u003e"},"options":[{"name":"Color","position":1,"values":["A-2x2.5cm-wood","A-2.5x2.5cm-wood","A-3x2.5cm-wood","A-3.5x2.5cm-wood","A-4x2.5cm-wood","A-4.5x2.5cm-wood","A-5x2.5cm-wood","B-2.5x1cm-wood","B-3x1.5cm-wood","B-3.5x1.5cm-wood","B-3.8x2.2cm-wood","B-4x2.5cm-wood","B-5x2.5cm-wood","B-7x3.6cm-wood","B-8.2x3.5cm-wood","D-25mm-Resin","D-30mm-Resin","D-40mm-Resin","D-50mm-Resin","D-70mm-Resin","D-100mm-Resin","E-3.4x2cm-Resin","E-4.2x2.5cm-Resin","E-5x3cm-Resin","C-2x2.5cm-wood","C-2.5x2.5cm-wood","C-3x2.5cm-wood","C-3.5x2.5cm-wood","C-4x2.5cm-wood","C-4.5x2.5cm-wood","C-5x2.5cm-wood","G-40mm-Crystal","H-White Light-A-Wood","H-Warm Light-A-Wood","H-Multicolor-A-Wood","H-White Light-B-Wood","H-Warm Light-B-Wood","H-Multicolor-B-Wood","F-25mm-Wood","F-35mm-Wood","F-50mm-Wood","F-80mm-Wood","G-25mm-Crystal","G-30mm-Crystal","G-35mm-Crystal","J-3.8x1.5cm-G-Alloy","J-3.8X1.5cm-S-Alloy","J-5.3x2.8cm-G-Alloy","J-5.3x2.8cm-S-Alloy","J-6x2cm-G-Alloy","J-6x2cm-S-Alloy","I-Warm Light-A-Wood","I-White Light-A-Wood","I-Warm Light-B-Wood","I-White Light-B-Wood","I-Multicolor-A-Wood"]}],"custom_metafields":{"shipping_time":"12-16 days"},"metafields":{"badge":"\u003cdiv style='display:none' class='jdgm-prev-badge' data-average-rating='0.00' data-number-of-reviews='0' data-number-of-questions='0'\u003e \u003cspan class='jdgm-prev-badge__stars' data-score='0.00' tabindex='0' aria-label='0.00 stars' role='button'\u003e \u003cspan class='jdgm-star jdgm--off'\u003e\u003c\/span\u003e\u003cspan class='jdgm-star jdgm--off'\u003e\u003c\/span\u003e\u003cspan class='jdgm-star jdgm--off'\u003e\u003c\/span\u003e\u003cspan class='jdgm-star jdgm--off'\u003e\u003c\/span\u003e\u003cspan class='jdgm-star jdgm--off'\u003e\u003c\/span\u003e \u003c\/span\u003e \u003cspan class='jdgm-prev-badge__text'\u003e No reviews \u003c\/span\u003e \u003c\/div\u003e","widget":"\u003cdiv class='jdgm-rev-widg' data-updated-at='2025-09-21T22:00:26Z' data-average-rating='0.00' data-number-of-reviews='0' data-number-of-questions='0' data-image-url='https:\/\/cdn.shopify.com\/s\/files\/1\/0613\/0345\/5915\/files\/S389945a2ec2b40aba8a7b903d81b0306l.webp?v=1758480335'\u003e \u003cstyle class='jdgm-temp-hiding-style'\u003e.jdgm-rev-widg{ display: none }\u003c\/style\u003e \u003cdiv class='jdgm-rev-widg__header'\u003e \u003ch2 class='jdgm-rev-widg__title'\u003eCustomer Reviews\u003c\/h2\u003e \u003cdiv class='jdgm-rev-widg__summary'\u003e \u003cdiv class='jdgm-rev-widg__summary-stars' aria-label='Average rating is 0.00 stars' role='img'\u003e \u003cspan class='jdgm-star jdgm--off'\u003e\u003c\/span\u003e\u003cspan class='jdgm-star jdgm--off'\u003e\u003c\/span\u003e\u003cspan class='jdgm-star jdgm--off'\u003e\u003c\/span\u003e\u003cspan class='jdgm-star jdgm--off'\u003e\u003c\/span\u003e\u003cspan class='jdgm-star jdgm--off'\u003e\u003c\/span\u003e \u003c\/div\u003e \u003cdiv class='jdgm-rev-widg__summary-text'\u003eBe the first to write a review\u003c\/div\u003e \u003c\/div\u003e \u003ca style='display: none' href='#' class='jdgm-write-rev-link' role='button'\u003eWrite a review\u003c\/a\u003e \u003cdiv class='jdgm-histogram jdgm-temp-hidden'\u003e \u003cdiv class='jdgm-histogram__row' data-rating='5' data-frequency='0' data-percentage='0'\u003e \u003cdiv class='jdgm-histogram__star' role='button' aria-label=\"0% (0) reviews with 5 star rating\" tabindex='0' \u003e\u003cspan class='jdgm-star jdgm--on'\u003e\u003c\/span\u003e\u003cspan class='jdgm-star jdgm--on'\u003e\u003c\/span\u003e\u003cspan class='jdgm-star jdgm--on'\u003e\u003c\/span\u003e\u003cspan class='jdgm-star jdgm--on'\u003e\u003c\/span\u003e\u003cspan class='jdgm-star jdgm--on'\u003e\u003c\/span\u003e\u003c\/div\u003e \u003cdiv class='jdgm-histogram__bar'\u003e \u003cdiv class='jdgm-histogram__bar-content' style='width: 0%;'\u003e \u003c\/div\u003e \u003c\/div\u003e \u003cdiv class='jdgm-histogram__percentage'\u003e0%\u003c\/div\u003e \u003cdiv class='jdgm-histogram__frequency'\u003e(0)\u003c\/div\u003e \u003c\/div\u003e \u003cdiv class='jdgm-histogram__row' data-rating='4' data-frequency='0' data-percentage='0'\u003e \u003cdiv class='jdgm-histogram__star' role='button' aria-label=\"0% (0) reviews with 4 star rating\" tabindex='0' \u003e\u003cspan class='jdgm-star jdgm--on'\u003e\u003c\/span\u003e\u003cspan class='jdgm-star jdgm--on'\u003e\u003c\/span\u003e\u003cspan class='jdgm-star jdgm--on'\u003e\u003c\/span\u003e\u003cspan class='jdgm-star jdgm--on'\u003e\u003c\/span\u003e\u003cspan class='jdgm-star jdgm--off'\u003e\u003c\/span\u003e\u003c\/div\u003e \u003cdiv class='jdgm-histogram__bar'\u003e \u003cdiv class='jdgm-histogram__bar-content' style='width: 0%;'\u003e \u003c\/div\u003e \u003c\/div\u003e \u003cdiv class='jdgm-histogram__percentage'\u003e0%\u003c\/div\u003e \u003cdiv class='jdgm-histogram__frequency'\u003e(0)\u003c\/div\u003e \u003c\/div\u003e \u003cdiv class='jdgm-histogram__row' data-rating='3' data-frequency='0' data-percentage='0'\u003e \u003cdiv class='jdgm-histogram__star' role='button' aria-label=\"0% (0) reviews with 3 star rating\" tabindex='0' \u003e\u003cspan class='jdgm-star jdgm--on'\u003e\u003c\/span\u003e\u003cspan class='jdgm-star jdgm--on'\u003e\u003c\/span\u003e\u003cspan class='jdgm-star jdgm--on'\u003e\u003c\/span\u003e\u003cspan class='jdgm-star jdgm--off'\u003e\u003c\/span\u003e\u003cspan class='jdgm-star jdgm--off'\u003e\u003c\/span\u003e\u003c\/div\u003e \u003cdiv class='jdgm-histogram__bar'\u003e \u003cdiv class='jdgm-histogram__bar-content' style='width: 0%;'\u003e \u003c\/div\u003e \u003c\/div\u003e \u003cdiv class='jdgm-histogram__percentage'\u003e0%\u003c\/div\u003e \u003cdiv class='jdgm-histogram__frequency'\u003e(0)\u003c\/div\u003e \u003c\/div\u003e \u003cdiv class='jdgm-histogram__row' data-rating='2' data-frequency='0' data-percentage='0'\u003e \u003cdiv class='jdgm-histogram__star' role='button' aria-label=\"0% (0) reviews with 2 star rating\" tabindex='0' \u003e\u003cspan class='jdgm-star jdgm--on'\u003e\u003c\/span\u003e\u003cspan class='jdgm-star jdgm--on'\u003e\u003c\/span\u003e\u003cspan class='jdgm-star jdgm--off'\u003e\u003c\/span\u003e\u003cspan class='jdgm-star jdgm--off'\u003e\u003c\/span\u003e\u003cspan class='jdgm-star jdgm--off'\u003e\u003c\/span\u003e\u003c\/div\u003e \u003cdiv class='jdgm-histogram__bar'\u003e \u003cdiv class='jdgm-histogram__bar-content' style='width: 0%;'\u003e \u003c\/div\u003e \u003c\/div\u003e \u003cdiv class='jdgm-histogram__percentage'\u003e0%\u003c\/div\u003e \u003cdiv class='jdgm-histogram__frequency'\u003e(0)\u003c\/div\u003e \u003c\/div\u003e \u003cdiv class='jdgm-histogram__row' data-rating='1' data-frequency='0' data-percentage='0'\u003e \u003cdiv class='jdgm-histogram__star' role='button' aria-label=\"0% (0) reviews with 1 star rating\" tabindex='0' \u003e\u003cspan class='jdgm-star jdgm--on'\u003e\u003c\/span\u003e\u003cspan class='jdgm-star jdgm--off'\u003e\u003c\/span\u003e\u003cspan class='jdgm-star jdgm--off'\u003e\u003c\/span\u003e\u003cspan class='jdgm-star jdgm--off'\u003e\u003c\/span\u003e\u003cspan class='jdgm-star jdgm--off'\u003e\u003c\/span\u003e\u003c\/div\u003e \u003cdiv class='jdgm-histogram__bar'\u003e \u003cdiv class='jdgm-histogram__bar-content' style='width: 0%;'\u003e \u003c\/div\u003e \u003c\/div\u003e \u003cdiv class='jdgm-histogram__percentage'\u003e0%\u003c\/div\u003e \u003cdiv class='jdgm-histogram__frequency'\u003e(0)\u003c\/div\u003e \u003c\/div\u003e \u003cdiv class='jdgm-histogram__row jdgm-histogram__clear-filter' data-rating=null tabindex='0'\u003e\u003c\/div\u003e \u003c\/div\u003e \u003cdiv class='jdgm-rev-widg__sort-wrapper'\u003e\u003c\/div\u003e \u003c\/div\u003e \u003cdiv class='jdgm-rev-widg__body'\u003e \u003cdiv class='jdgm-rev-widg__reviews'\u003e\u003c\/div\u003e \u003cdiv class='jdgm-paginate' data-per-page='4' data-url='https:\/\/api.judge.me\/reviews\/reviews_for_widget' style=\"display: none;\"\u003e\u003c\/div\u003e \u003c\/div\u003e \u003cdiv class='jdgm-rev-widg__paginate-spinner-wrapper'\u003e \u003cdiv class='jdgm-spinner'\u003e\u003c\/div\u003e \u003c\/div\u003e \u003c\/div\u003e"},"collections":[{"id":294880051371,"handle":"crystals","title":"Crystals","updated_at":"2026-01-07T23:43:11-05:00","body_html":"\u003cp data-start=\"159\" data-end=\"687\"\u003e✨ \u003cstrong data-start=\"161\" data-end=\"216\"\u003eDiscover the Magic of Crystals with Crystal Destiny\u003c\/strong\u003e ✨\u003cbr data-start=\"218\" data-end=\"221\"\u003eCrystals have been treasured for centuries—not only for their natural beauty but also for their powerful healing energies. Beyond their visual allure, they bring balance, harmony, and positive energy into any space. Whether used for home décor, meditation, or simply to elevate the energy of your surroundings, crystals create a sanctuary of peace, relaxation, and well-being. Each piece is a unique gift from the Earth—visually stunning and spiritually uplifting.\u003c\/p\u003e\n\u003cp data-start=\"689\" data-end=\"1011\"\u003eAt \u003cstrong data-start=\"692\" data-end=\"711\"\u003eCrystal Destiny\u003c\/strong\u003e, our signature collection showcases a curated selection of exquisite crystals, from radiant Quartz to soothing Amethyst. Every stone is carefully sourced for its elegance and metaphysical resonance, making them perfect for enhancing your home, uplifting your spirit, or gifting to someone special.\u003c\/p\u003e\n\u003cp data-start=\"1013\" data-end=\"1206\"\u003eExperience the timeless sophistication of crystalline wonders. Explore the \u003cstrong data-start=\"1088\" data-end=\"1118\"\u003eCrystal Destiny Collection\u003c\/strong\u003e today and bring the transformative beauty of these treasures into your everyday life.\u003c\/p\u003e","published_at":"2023-06-05T11:24:02-04:00","sort_order":"created-desc","template_suffix":"","disjunctive":false,"rules":[{"column":"tag","relation":"equals","condition":"crystal"},{"column":"type","relation":"not_contains","condition":"925 Sterling Silver"},{"column":"type","relation":"not_contains","condition":"Wire Wraps"}],"published_scope":"global"},{"id":322471624875,"handle":"crystal-favorites","title":"Crystal Enthusiast's Favorites","updated_at":"2026-01-07T23:42:38-05:00","body_html":"\u003cp\u003eDiscover the crystals our community loves most. This collection features our best-selling stones and accessories, carefully curated to highlight pieces that are always in demand and ready to ship. Whether you’re adding to your collection or searching for a gift, these fan-favorite crystals are timeless staples for energy, beauty, and balance.\u003c\/p\u003e","published_at":"2025-10-01T21:07:06-04:00","sort_order":"price-asc","template_suffix":"","disjunctive":false,"rules":[{"column":"variant_inventory","relation":"greater_than","condition":"1"}],"published_scope":"global"},{"id":321695744171,"handle":"direct-from-supplier","title":"Direct from Supplier","updated_at":"2026-01-07T23:43:11-05:00","body_html":"","published_at":"2025-09-12T16:38:23-04:00","sort_order":"best-selling","template_suffix":"","disjunctive":true,"rules":[{"column":"tag","relation":"equals","condition":"adjusted-shipping"}],"published_scope":"global"},{"id":295698202795,"handle":"spheres","title":"Crystal Spheres","updated_at":"2026-01-06T23:24:35-05:00","body_html":"\u003cp data-start=\"106\" data-end=\"370\"\u003e✨ \u003cstrong data-start=\"108\" data-end=\"138\"\u003eCrystal Spheres Collection\u003c\/strong\u003e ✨\u003cbr data-start=\"140\" data-end=\"143\"\u003eBring harmony, balance, and elegance into your space with our \u003cstrong data-start=\"205\" data-end=\"235\"\u003eCrystal Spheres Collection\u003c\/strong\u003e. Each sphere is meticulously crafted to showcase the natural beauty and energy of crystals, from radiant Quartz to calming Amethyst.\u003c\/p\u003e\n\u003cp data-start=\"372\" data-end=\"658\"\u003ePerfect for meditation, energy work, or as striking décor, crystal spheres radiate energy in all directions, promoting clarity, focus, and a sense of calm. Their smooth, polished surfaces highlight the stones’ natural patterns and colors, making each sphere a captivating centerpiece.\u003c\/p\u003e\n\u003cp data-start=\"660\" data-end=\"809\"\u003eElevate your space and embrace the transformative power of crystals with the \u003cstrong data-start=\"737\" data-end=\"767\"\u003eCrystal Spheres Collection\u003c\/strong\u003e—where beauty, energy, and harmony meet.\u003c\/p\u003e","published_at":"2023-07-28T14:20:46-04:00","sort_order":"created-desc","template_suffix":"","disjunctive":true,"rules":[{"column":"tag","relation":"equals","condition":"spheres"},{"column":"tag","relation":"equals","condition":"eggs"}],"published_scope":"global"},{"id":293659312299,"handle":"best-sellers","title":"Best Sellers","updated_at":"2026-01-07T23:43:11-05:00","body_html":"\u003cp data-start=\"155\" data-end=\"510\"\u003eDiscover the pieces our community loves most. Our Best Sellers Collection brings together handpicked crystals and jewelry that embody timeless elegance, spiritual resonance, and everyday sophistication. Each item has earned its place as a customer favorite—celebrated for both its beauty and its meaningful energy.\u003c\/p\u003e\n\u003cp data-start=\"512\" data-end=\"802\"\u003eFrom stunning statement pieces to versatile daily companions, these treasures are curated to elevate your space, uplift your spirit, and reflect refined taste. Indulge in what’s most cherished and let our best sellers guide you toward the perfect blend of style and transformative energy.\u003c\/p\u003e\n\u003cp data-start=\"804\" data-end=\"932\"\u003eExplore the Best Sellers Collection today—where elegance meets intention, and every piece tells a story of beauty and balance.\u003c\/p\u003e","published_at":"2023-03-15T16:04:51-04:00","sort_order":"best-selling","template_suffix":"","disjunctive":false,"rules":[{"column":"variant_price","relation":"greater_than","condition":"0"},{"column":"variant_inventory","relation":"greater_than","condition":"0"},{"column":"type","relation":"not_equals","condition":"Shipping Protection"}],"published_scope":"global"},{"id":321370390699,"handle":"monthly-crystal-sale","title":"Monthly Crystal Sale | Spheres \u0026 Towers","updated_at":"2026-01-06T23:24:37-05:00","body_html":"\u003cp\u003eShop our \u003cstrong\u003eMonthly Crystal Sale\u003c\/strong\u003e, where you can shop a wide selection of healing crystals at discounted prices. Explore \u003cstrong\u003ecrystal spheres and towers,\u003c\/strong\u003e— all carefully curated to support meditation, energy balancing, and spiritual wellness. Whether you're looking to enhance your home decor, boost your daily energy, or find the perfect gift, our \u003cstrong\u003ecrystals for healing and manifestation\u003c\/strong\u003e offer both beauty and metaphysical benefits.\u003c\/p\u003e\n\u003cp\u003eEach month, our sale features \u003cstrong\u003enew discounted collections\u003c\/strong\u003e, from \u003cstrong\u003enatural quartz and amethyst towers\u003c\/strong\u003e to \u003cstrong\u003ewire-wrapped pendants and polished stones\u003c\/strong\u003e, so there's always something fresh to discover. Shop with confidence knowing you're getting high-quality crystals with \u003cstrong\u003efree shipping options\u003c\/strong\u003e and a trusted experience.\u003c\/p\u003e\n\u003cp\u003e\u003cstrong\u003eTake advantage of the Monthly Crystal Sale today\u003c\/strong\u003e and add powerful, natural energy to your life with \u003cstrong\u003eauthentic healing crystals\u003c\/strong\u003e — while our limited-time discounts last.\u003c\/p\u003e\n\u003cp\u003e\u003cstrong\u003e*Discount automatically applied at checkout.\u003c\/strong\u003e\u003c\/p\u003e","published_at":"2025-12-02T01:26:17-05:00","sort_order":"alpha-asc","template_suffix":"","disjunctive":true,"rules":[{"column":"tag","relation":"equals","condition":"spheres"},{"column":"tag","relation":"equals","condition":"Towers"}],"published_scope":"global","image":{"created_at":"2026-01-01T01:32:34-05:00","alt":"","width":960,"height":960,"src":"\/\/crystaldestiny.com\/cdn\/shop\/collections\/3E8C2969-1B86-4ACE-B349-98E9D8768424.jpg?v=1767249154"}},{"id":310483058859,"handle":"crystal-stands-display-holders","title":"Crystal Stands \u0026 Display Holders for Minerals","updated_at":"2026-01-05T07:14:22-05:00","body_html":"\u003cp\u003eCrystals deserve more than just a shelf — they deserve a place where beauty and energy can truly shine. Our \u003cstrong\u003eCrystal Stands \u0026amp; Display Holders\u003c\/strong\u003e collection is designed to help you display your favorite stones, minerals, and specimens with both style and intention.\u003c\/p\u003e\n\u003cp\u003eWhether you're showcasing a single standout tower, arranging spheres on your altar, or displaying delicate mineral specimens, a crystal stand not only enhances the look of your collection but also helps amplify its presence in your space.\u003c\/p\u003e\n\u003ch2\u003eWhy Use a Crystal Stand?\u003c\/h2\u003e\n\u003cp\u003eA crystal stand allows you to elevate the energy of your crystals, making them the focal point of your space. Many stones and minerals are also prone to scratches, and some shapes are prone to rolling or falling over, but a stand allows you to protect these delicate minerals and preserve their lifelong beauty. Using a mineral display holder also allows you to add a polished and intentional aesthetic to your altar, desk, or display shelf. \u003c\/p\u003e\n\u003ch2\u003eTypes of Crystal Stands\/Displays\u003c\/h2\u003e\n\u003cul\u003e\n\u003cli\u003eMetal Stands: Minimalist designs for spheres, towers, or clusters.\u003c\/li\u003e\n\u003cli\u003eWooden Bases: Natural, grounding options to complement earthy energy.\u003c\/li\u003e\n\u003cli\u003eSpecimen Holders: Perfect for minerals, valuable collectibles, and unique finds.\u003c\/li\u003e\n\u003c\/ul\u003e\n\u003cp\u003eWhether you're a seasoned collector or just starting your crystal journey, the right stand can transform your space — helping you honor the beauty, purpose, and energy of each stone.\u003c\/p\u003e","published_at":"2024-11-27T13:51:40-05:00","sort_order":"created-desc","template_suffix":"","disjunctive":true,"rules":[{"column":"tag","relation":"equals","condition":"Stands"}],"published_scope":"global"},{"id":297596059819,"handle":"all","title":"All Crystals \u0026 Jewelry","updated_at":"2026-01-07T23:43:11-05:00","body_html":"\u003cp data-start=\"149\" data-end=\"494\"\u003e✨ \u003cstrong data-start=\"151\" data-end=\"181\"\u003eWelcome to Crystal Destiny\u003c\/strong\u003e ✨\u003cbr data-start=\"183\" data-end=\"186\"\u003eStep into a world where beauty, energy, and artistry unite. Our collection is a treasure trove of exquisite crystals, from the raw, untamed elegance of natural formations to the polished brilliance of expertly crafted pieces. Each crystal is a masterpiece, carrying its own unique story and timeless charm.\u003c\/p\u003e\n\u003cp data-start=\"496\" data-end=\"831\"\u003eWhether you’re drawn to the calming presence of Amethyst, the vibrant energy of Citrine, or the grounding strength of Jasper, our crystals invite you to connect with nature’s finest wonders. Perfect for enhancing your space, supporting your spiritual journey, or gifting with intention, every piece resonates with beauty and meaning.\u003c\/p\u003e\n\u003cp data-start=\"833\" data-end=\"1000\"\u003eElevate your surroundings, embrace the mystique, and explore the enchanting world of crystals at \u003cstrong data-start=\"930\" data-end=\"949\"\u003eCrystal Destiny\u003c\/strong\u003e—where every crystal is waiting to be discovered.\u003c\/p\u003e","published_at":"2023-11-10T13:55:31-05:00","sort_order":"created-desc","template_suffix":"","disjunctive":false,"rules":[{"column":"type","relation":"not_equals","condition":"asdf"}],"published_scope":"global"},{"id":298983391403,"handle":"january-crystal-sale","title":"January Sale | 25% Off Crystal Towers \u0026 Spheres","updated_at":"2026-01-06T23:24:37-05:00","body_html":"\u003cp\u003eShop our \u003cstrong\u003eJanuary Crystal Sale\u003c\/strong\u003e, where you can shop a wide selection of healing crystals at discounted prices. Explore \u003cstrong\u003eCrystal Towers, \u0026amp; Crystal Spheres\u003c\/strong\u003e — all carefully curated and crafted to support meditation, energy balancing, and spiritual wellness. Whether you're looking to enhance your home decor, boost your daily energy, or find the perfect gift, our \u003cstrong\u003ecrystals for healing and manifestation\u003c\/strong\u003e offer both beauty and metaphysical benefits.\u003c\/p\u003e\n\u003cp\u003eThis January, our sale features \u003cstrong\u003ediscounted crystal towers and spheres\u003c\/strong\u003e, from \u003cstrong\u003enatural quartz \u003c\/strong\u003eand \u003cstrong\u003eamethyst \u003c\/strong\u003eto \u003cstrong\u003ebumblebee jasper \u003c\/strong\u003eand \u003cstrong\u003ecarnelian\u003c\/strong\u003e, so there's always something fresh to discover. Shop with confidence knowing you're getting high-quality crystals with \u003cstrong\u003efree shipping options\u003c\/strong\u003e and a trusted experience.\u003c\/p\u003e\n\u003cp\u003e\u003cstrong\u003eTake advantage of the January Crystal Sale today\u003c\/strong\u003e and add powerful, natural energy to your life with \u003cstrong\u003eauthentic healing crystals\u003c\/strong\u003e — while our limited-time discounts last.\u003c\/p\u003e\n\u003cp\u003e\u003cstrong\u003e*Discount automatically applied at checkout.\u003c\/strong\u003e\u003c\/p\u003e","published_at":"2026-01-01T00:07:17-05:00","sort_order":"alpha-asc","template_suffix":"monthly-collection","disjunctive":true,"rules":[{"column":"tag","relation":"equals","condition":"Spheres"},{"column":"tag","relation":"equals","condition":"Towers"}],"published_scope":"global","image":{"created_at":"2026-01-01T01:29:59-05:00","alt":"","width":960,"height":960,"src":"\/\/crystaldestiny.com\/cdn\/shop\/collections\/1464163B-22B1-4D62-BEC5-CEC9AECB670B.jpg?v=1767248999"}}]}
[{"alt":"Crystal Sphere Display Stands Assorted Styles-Stands-Ali-A-2x2.5cm-wood-Crystal Destiny","id":31835997241515,"position":1,"preview_image":{"aspect_ratio":1.0,"height":1000,"width":1000,"src":"\/\/crystaldestiny.com\/cdn\/shop\/files\/Crystal-Sphere-Display-Stands-Assorted-Styles-Stands.webp?v=1758558153"},"aspect_ratio":1.0,"height":1000,"media_type":"image","src":"\/\/crystaldestiny.com\/cdn\/shop\/files\/Crystal-Sphere-Display-Stands-Assorted-Styles-Stands.webp?v=1758558153","width":1000},{"alt":"Crystal Sphere Display Stands Assorted Styles-Stands-Ali-A-2x2.5cm-wood-Crystal Destiny","id":31835997274283,"position":2,"preview_image":{"aspect_ratio":1.0,"height":1000,"width":1000,"src":"\/\/crystaldestiny.com\/cdn\/shop\/files\/Crystal-Sphere-Display-Stands-Assorted-Styles-Stands-2.webp?v=1758558155"},"aspect_ratio":1.0,"height":1000,"media_type":"image","src":"\/\/crystaldestiny.com\/cdn\/shop\/files\/Crystal-Sphere-Display-Stands-Assorted-Styles-Stands-2.webp?v=1758558155","width":1000},{"alt":"Crystal Sphere Display Stands Assorted Styles-Stands-Ali-A-2x2.5cm-wood-Crystal Destiny","id":31835997307051,"position":3,"preview_image":{"aspect_ratio":1.0,"height":1000,"width":1000,"src":"\/\/crystaldestiny.com\/cdn\/shop\/files\/Crystal-Sphere-Display-Stands-Assorted-Styles-Stands-3.webp?v=1758558157"},"aspect_ratio":1.0,"height":1000,"media_type":"image","src":"\/\/crystaldestiny.com\/cdn\/shop\/files\/Crystal-Sphere-Display-Stands-Assorted-Styles-Stands-3.webp?v=1758558157","width":1000},{"alt":"Crystal Sphere Display Stands Assorted Styles-Stands-Ali-A-2x2.5cm-wood-Crystal Destiny","id":31835997339819,"position":4,"preview_image":{"aspect_ratio":1.0,"height":1000,"width":1000,"src":"\/\/crystaldestiny.com\/cdn\/shop\/files\/Crystal-Sphere-Display-Stands-Assorted-Styles-Stands-4.webp?v=1758558158"},"aspect_ratio":1.0,"height":1000,"media_type":"image","src":"\/\/crystaldestiny.com\/cdn\/shop\/files\/Crystal-Sphere-Display-Stands-Assorted-Styles-Stands-4.webp?v=1758558158","width":1000},{"alt":"Crystal Sphere Display Stands Assorted Styles-Stands-Ali-A-2x2.5cm-wood-Crystal Destiny","id":31835997372587,"position":5,"preview_image":{"aspect_ratio":1.0,"height":1000,"width":1000,"src":"\/\/crystaldestiny.com\/cdn\/shop\/files\/Crystal-Sphere-Display-Stands-Assorted-Styles-Stands-5.webp?v=1758558160"},"aspect_ratio":1.0,"height":1000,"media_type":"image","src":"\/\/crystaldestiny.com\/cdn\/shop\/files\/Crystal-Sphere-Display-Stands-Assorted-Styles-Stands-5.webp?v=1758558160","width":1000},{"alt":"Crystal Sphere Display Stands Assorted Styles-Stands-Ali-A-2x2.5cm-wood-Crystal Destiny","id":31835997405355,"position":6,"preview_image":{"aspect_ratio":1.0,"height":1000,"width":1000,"src":"\/\/crystaldestiny.com\/cdn\/shop\/files\/Crystal-Sphere-Display-Stands-Assorted-Styles-Stands-6.webp?v=1758558162"},"aspect_ratio":1.0,"height":1000,"media_type":"image","src":"\/\/crystaldestiny.com\/cdn\/shop\/files\/Crystal-Sphere-Display-Stands-Assorted-Styles-Stands-6.webp?v=1758558162","width":1000},{"alt":"Crystal Sphere Display Stands Assorted Styles-Stands-Ali-C-2.5x2.5cm-wood-Crystal Destiny","id":31835997438123,"position":7,"preview_image":{"aspect_ratio":1.0,"height":1000,"width":1000,"src":"\/\/crystaldestiny.com\/cdn\/shop\/files\/Crystal-Sphere-Display-Stands-Assorted-Styles-Stands-C-2_5x2_5cm-wood-7.webp?v=1765343381"},"aspect_ratio":1.0,"height":1000,"media_type":"image","src":"\/\/crystaldestiny.com\/cdn\/shop\/files\/Crystal-Sphere-Display-Stands-Assorted-Styles-Stands-C-2_5x2_5cm-wood-7.webp?v=1765343381","width":1000},{"alt":"Crystal Sphere Display Stands Assorted Styles-Stands-Ali-B-3x1.5cm-wood-Crystal Destiny","id":31835997470891,"position":8,"preview_image":{"aspect_ratio":1.0,"height":1000,"width":1000,"src":"\/\/crystaldestiny.com\/cdn\/shop\/files\/Crystal-Sphere-Display-Stands-Assorted-Styles-Stands-B-3x1_5cm-wood-8.webp?v=1765343382"},"aspect_ratio":1.0,"height":1000,"media_type":"image","src":"\/\/crystaldestiny.com\/cdn\/shop\/files\/Crystal-Sphere-Display-Stands-Assorted-Styles-Stands-B-3x1_5cm-wood-8.webp?v=1765343382","width":1000},{"alt":"Crystal Sphere Display Stands Assorted Styles-Stands-Ali-A-4x2.5cm-wood-Crystal Destiny","id":31835997503659,"position":9,"preview_image":{"aspect_ratio":1.0,"height":1000,"width":1000,"src":"\/\/crystaldestiny.com\/cdn\/shop\/files\/Crystal-Sphere-Display-Stands-Assorted-Styles-Stands-A-4x2_5cm-wood-9.webp?v=1765343384"},"aspect_ratio":1.0,"height":1000,"media_type":"image","src":"\/\/crystaldestiny.com\/cdn\/shop\/files\/Crystal-Sphere-Display-Stands-Assorted-Styles-Stands-A-4x2_5cm-wood-9.webp?v=1765343384","width":1000},{"alt":"Crystal Sphere Display Stands Assorted Styles-Stands-Ali-C-3.5x2.5cm-wood-Crystal Destiny","id":31835997536427,"position":10,"preview_image":{"aspect_ratio":1.0,"height":1000,"width":1000,"src":"\/\/crystaldestiny.com\/cdn\/shop\/files\/Crystal-Sphere-Display-Stands-Assorted-Styles-Stands-C-3_5x2_5cm-wood-10.webp?v=1765343385"},"aspect_ratio":1.0,"height":1000,"media_type":"image","src":"\/\/crystaldestiny.com\/cdn\/shop\/files\/Crystal-Sphere-Display-Stands-Assorted-Styles-Stands-C-3_5x2_5cm-wood-10.webp?v=1765343385","width":1000},{"alt":"Crystal Sphere Display Stands Assorted Styles-Stands-Ali-C-5x2.5cm-wood-Crystal Destiny","id":31835997569195,"position":11,"preview_image":{"aspect_ratio":1.0,"height":1000,"width":1000,"src":"\/\/crystaldestiny.com\/cdn\/shop\/files\/Crystal-Sphere-Display-Stands-Assorted-Styles-Stands-C-5x2_5cm-wood-11.webp?v=1765343387"},"aspect_ratio":1.0,"height":1000,"media_type":"image","src":"\/\/crystaldestiny.com\/cdn\/shop\/files\/Crystal-Sphere-Display-Stands-Assorted-Styles-Stands-C-5x2_5cm-wood-11.webp?v=1765343387","width":1000},{"alt":"Crystal Sphere Display Stands Assorted Styles-Stands-Ali-H-Warm Light-A-Wood-Crystal Destiny","id":31835997601963,"position":12,"preview_image":{"aspect_ratio":1.0,"height":1000,"width":1000,"src":"\/\/crystaldestiny.com\/cdn\/shop\/files\/Crystal-Sphere-Display-Stands-Assorted-Styles-Stands-H-Warm-Light-A-Wood-12.webp?v=1765343388"},"aspect_ratio":1.0,"height":1000,"media_type":"image","src":"\/\/crystaldestiny.com\/cdn\/shop\/files\/Crystal-Sphere-Display-Stands-Assorted-Styles-Stands-H-Warm-Light-A-Wood-12.webp?v=1765343388","width":1000},{"alt":"Crystal Sphere Display Stands Assorted Styles-Stands-Ali-G-25mm-Crystal-Crystal Destiny","id":31835997634731,"position":13,"preview_image":{"aspect_ratio":1.0,"height":1000,"width":1000,"src":"\/\/crystaldestiny.com\/cdn\/shop\/files\/Crystal-Sphere-Display-Stands-Assorted-Styles-Stands-G-25mm-Crystal-13.webp?v=1765343390"},"aspect_ratio":1.0,"height":1000,"media_type":"image","src":"\/\/crystaldestiny.com\/cdn\/shop\/files\/Crystal-Sphere-Display-Stands-Assorted-Styles-Stands-G-25mm-Crystal-13.webp?v=1765343390","width":1000},{"alt":"Crystal Sphere Display Stands Assorted Styles-Stands-Ali-G-30mm-Crystal-Crystal Destiny","id":31835997667499,"position":14,"preview_image":{"aspect_ratio":1.0,"height":1000,"width":1000,"src":"\/\/crystaldestiny.com\/cdn\/shop\/files\/Crystal-Sphere-Display-Stands-Assorted-Styles-Stands-G-30mm-Crystal-14.webp?v=1765343391"},"aspect_ratio":1.0,"height":1000,"media_type":"image","src":"\/\/crystaldestiny.com\/cdn\/shop\/files\/Crystal-Sphere-Display-Stands-Assorted-Styles-Stands-G-30mm-Crystal-14.webp?v=1765343391","width":1000},{"alt":"Crystal Sphere Display Stands Assorted Styles-Stands-Ali-I-Warm Light-A-Wood-Crystal Destiny","id":31835997700267,"position":15,"preview_image":{"aspect_ratio":1.0,"height":1000,"width":1000,"src":"\/\/crystaldestiny.com\/cdn\/shop\/files\/Crystal-Sphere-Display-Stands-Assorted-Styles-Stands-I-Warm-Light-A-Wood-15.webp?v=1765343393"},"aspect_ratio":1.0,"height":1000,"media_type":"image","src":"\/\/crystaldestiny.com\/cdn\/shop\/files\/Crystal-Sphere-Display-Stands-Assorted-Styles-Stands-I-Warm-Light-A-Wood-15.webp?v=1765343393","width":1000},{"alt":"Crystal Sphere Display Stands Assorted Styles-Stands-Ali-A-5x2.5cm-wood-Crystal Destiny","id":31835997733035,"position":16,"preview_image":{"aspect_ratio":1.0,"height":1000,"width":1000,"src":"\/\/crystaldestiny.com\/cdn\/shop\/files\/Crystal-Sphere-Display-Stands-Assorted-Styles-Stands-A-5x2_5cm-wood-16.webp?v=1765343394"},"aspect_ratio":1.0,"height":1000,"media_type":"image","src":"\/\/crystaldestiny.com\/cdn\/shop\/files\/Crystal-Sphere-Display-Stands-Assorted-Styles-Stands-A-5x2_5cm-wood-16.webp?v=1765343394","width":1000},{"alt":"Crystal Sphere Display Stands Assorted Styles-Stands-Ali-H-White Light-B-Wood-Crystal Destiny","id":31835997765803,"position":17,"preview_image":{"aspect_ratio":1.0,"height":1000,"width":1000,"src":"\/\/crystaldestiny.com\/cdn\/shop\/files\/Crystal-Sphere-Display-Stands-Assorted-Styles-Stands-H-White-Light-B-Wood-17.webp?v=1765343395"},"aspect_ratio":1.0,"height":1000,"media_type":"image","src":"\/\/crystaldestiny.com\/cdn\/shop\/files\/Crystal-Sphere-Display-Stands-Assorted-Styles-Stands-H-White-Light-B-Wood-17.webp?v=1765343395","width":1000},{"alt":"Crystal Sphere Display Stands Assorted Styles-Stands-Ali-J-3.8X1.5cm-S-Alloy-Crystal Destiny","id":31835997798571,"position":18,"preview_image":{"aspect_ratio":1.0,"height":1000,"width":1000,"src":"\/\/crystaldestiny.com\/cdn\/shop\/files\/Crystal-Sphere-Display-Stands-Assorted-Styles-Stands-J-3_8X1_5cm-S-Alloy-18.webp?v=1765343397"},"aspect_ratio":1.0,"height":1000,"media_type":"image","src":"\/\/crystaldestiny.com\/cdn\/shop\/files\/Crystal-Sphere-Display-Stands-Assorted-Styles-Stands-J-3_8X1_5cm-S-Alloy-18.webp?v=1765343397","width":1000},{"alt":"Crystal Sphere Display Stands Assorted Styles-Stands-Ali-A-2x2.5cm-wood-Crystal Destiny","id":31835997831339,"position":19,"preview_image":{"aspect_ratio":1.0,"height":1000,"width":1000,"src":"\/\/crystaldestiny.com\/cdn\/shop\/files\/Crystal-Sphere-Display-Stands-Assorted-Styles-Stands-19.webp?v=1761887163"},"aspect_ratio":1.0,"height":1000,"media_type":"image","src":"\/\/crystaldestiny.com\/cdn\/shop\/files\/Crystal-Sphere-Display-Stands-Assorted-Styles-Stands-19.webp?v=1761887163","width":1000},{"alt":"Crystal Sphere Display Stands Assorted Styles-Stands-Ali-I-White Light-B-Wood-Crystal Destiny","id":31835997864107,"position":20,"preview_image":{"aspect_ratio":1.0,"height":1000,"width":1000,"src":"\/\/crystaldestiny.com\/cdn\/shop\/files\/Crystal-Sphere-Display-Stands-Assorted-Styles-Stands-I-White-Light-B-Wood-20.webp?v=1765343398"},"aspect_ratio":1.0,"height":1000,"media_type":"image","src":"\/\/crystaldestiny.com\/cdn\/shop\/files\/Crystal-Sphere-Display-Stands-Assorted-Styles-Stands-I-White-Light-B-Wood-20.webp?v=1765343398","width":1000},{"alt":"Crystal Sphere Display Stands Assorted Styles-Stands-Ali-B-4x2.5cm-wood-Crystal Destiny","id":31835997896875,"position":21,"preview_image":{"aspect_ratio":1.0,"height":1000,"width":1000,"src":"\/\/crystaldestiny.com\/cdn\/shop\/files\/Crystal-Sphere-Display-Stands-Assorted-Styles-Stands-B-4x2_5cm-wood-21.webp?v=1765343400"},"aspect_ratio":1.0,"height":1000,"media_type":"image","src":"\/\/crystaldestiny.com\/cdn\/shop\/files\/Crystal-Sphere-Display-Stands-Assorted-Styles-Stands-B-4x2_5cm-wood-21.webp?v=1765343400","width":1000},{"alt":"Crystal Sphere Display Stands Assorted Styles-Stands-Ali-J-3.8x1.5cm-G-Alloy-Crystal Destiny","id":31835997929643,"position":22,"preview_image":{"aspect_ratio":1.0,"height":1000,"width":1000,"src":"\/\/crystaldestiny.com\/cdn\/shop\/files\/Crystal-Sphere-Display-Stands-Assorted-Styles-Stands-J-3_8x1_5cm-G-Alloy-22.webp?v=1765343402"},"aspect_ratio":1.0,"height":1000,"media_type":"image","src":"\/\/crystaldestiny.com\/cdn\/shop\/files\/Crystal-Sphere-Display-Stands-Assorted-Styles-Stands-J-3_8x1_5cm-G-Alloy-22.webp?v=1765343402","width":1000},{"alt":"Crystal Sphere Display Stands Assorted Styles-Stands-Ali-B-5x2.5cm-wood-Crystal Destiny","id":31835997962411,"position":23,"preview_image":{"aspect_ratio":1.0,"height":1000,"width":1000,"src":"\/\/crystaldestiny.com\/cdn\/shop\/files\/Crystal-Sphere-Display-Stands-Assorted-Styles-Stands-B-5x2_5cm-wood-23.webp?v=1765343403"},"aspect_ratio":1.0,"height":1000,"media_type":"image","src":"\/\/crystaldestiny.com\/cdn\/shop\/files\/Crystal-Sphere-Display-Stands-Assorted-Styles-Stands-B-5x2_5cm-wood-23.webp?v=1765343403","width":1000},{"alt":"Crystal Sphere Display Stands Assorted Styles-Stands-Ali-H-White Light-A-Wood-Crystal Destiny","id":31835997995179,"position":24,"preview_image":{"aspect_ratio":1.0,"height":1000,"width":1000,"src":"\/\/crystaldestiny.com\/cdn\/shop\/files\/Crystal-Sphere-Display-Stands-Assorted-Styles-Stands-H-White-Light-A-Wood-24.webp?v=1765343404"},"aspect_ratio":1.0,"height":1000,"media_type":"image","src":"\/\/crystaldestiny.com\/cdn\/shop\/files\/Crystal-Sphere-Display-Stands-Assorted-Styles-Stands-H-White-Light-A-Wood-24.webp?v=1765343404","width":1000},{"alt":"Crystal Sphere Display Stands Assorted Styles-Stands-Ali-H-Warm Light-B-Wood-Crystal Destiny","id":31835998027947,"position":25,"preview_image":{"aspect_ratio":1.0,"height":1000,"width":1000,"src":"\/\/crystaldestiny.com\/cdn\/shop\/files\/Crystal-Sphere-Display-Stands-Assorted-Styles-Stands-H-Warm-Light-B-Wood-25.webp?v=1765343406"},"aspect_ratio":1.0,"height":1000,"media_type":"image","src":"\/\/crystaldestiny.com\/cdn\/shop\/files\/Crystal-Sphere-Display-Stands-Assorted-Styles-Stands-H-Warm-Light-B-Wood-25.webp?v=1765343406","width":1000},{"alt":"Crystal Sphere Display Stands Assorted Styles-Stands-Ali-F-25mm-Wood-Crystal Destiny","id":31835998060715,"position":26,"preview_image":{"aspect_ratio":1.0,"height":1000,"width":1000,"src":"\/\/crystaldestiny.com\/cdn\/shop\/files\/Crystal-Sphere-Display-Stands-Assorted-Styles-Stands-F-25mm-Wood-26.webp?v=1765343408"},"aspect_ratio":1.0,"height":1000,"media_type":"image","src":"\/\/crystaldestiny.com\/cdn\/shop\/files\/Crystal-Sphere-Display-Stands-Assorted-Styles-Stands-F-25mm-Wood-26.webp?v=1765343408","width":1000},{"alt":"Crystal Sphere Display Stands Assorted Styles-Stands-Ali-F-50mm-Wood-Crystal Destiny","id":31835998093483,"position":27,"preview_image":{"aspect_ratio":1.0,"height":1000,"width":1000,"src":"\/\/crystaldestiny.com\/cdn\/shop\/files\/Crystal-Sphere-Display-Stands-Assorted-Styles-Stands-F-50mm-Wood-27.webp?v=1765343409"},"aspect_ratio":1.0,"height":1000,"media_type":"image","src":"\/\/crystaldestiny.com\/cdn\/shop\/files\/Crystal-Sphere-Display-Stands-Assorted-Styles-Stands-F-50mm-Wood-27.webp?v=1765343409","width":1000},{"alt":"Crystal Sphere Display Stands Assorted Styles-Stands-Ali-A-2x2.5cm-wood-Crystal Destiny","id":31835998126251,"position":28,"preview_image":{"aspect_ratio":1.0,"height":1000,"width":1000,"src":"\/\/crystaldestiny.com\/cdn\/shop\/files\/Crystal-Sphere-Display-Stands-Assorted-Styles-Stands-28.webp?v=1761887166"},"aspect_ratio":1.0,"height":1000,"media_type":"image","src":"\/\/crystaldestiny.com\/cdn\/shop\/files\/Crystal-Sphere-Display-Stands-Assorted-Styles-Stands-28.webp?v=1761887166","width":1000},{"alt":"Crystal Sphere Display Stands Assorted Styles-Stands-Ali-E-3.4x2cm-Resin-Crystal Destiny","id":31835998159019,"position":29,"preview_image":{"aspect_ratio":1.0,"height":1000,"width":1000,"src":"\/\/crystaldestiny.com\/cdn\/shop\/files\/Crystal-Sphere-Display-Stands-Assorted-Styles-Stands-E-3_4x2cm-Resin-29.webp?v=1765343411"},"aspect_ratio":1.0,"height":1000,"media_type":"image","src":"\/\/crystaldestiny.com\/cdn\/shop\/files\/Crystal-Sphere-Display-Stands-Assorted-Styles-Stands-E-3_4x2cm-Resin-29.webp?v=1765343411","width":1000},{"alt":"Crystal Sphere Display Stands Assorted Styles-Stands-Ali-C-4.5x2.5cm-wood-Crystal Destiny","id":31835998191787,"position":30,"preview_image":{"aspect_ratio":1.0,"height":1000,"width":1000,"src":"\/\/crystaldestiny.com\/cdn\/shop\/files\/Crystal-Sphere-Display-Stands-Assorted-Styles-Stands-C-4_5x2_5cm-wood-30.webp?v=1765343412"},"aspect_ratio":1.0,"height":1000,"media_type":"image","src":"\/\/crystaldestiny.com\/cdn\/shop\/files\/Crystal-Sphere-Display-Stands-Assorted-Styles-Stands-C-4_5x2_5cm-wood-30.webp?v=1765343412","width":1000},{"alt":"Crystal Sphere Display Stands Assorted Styles-Stands-Ali-G-40mm-Crystal-Crystal Destiny","id":31835998224555,"position":31,"preview_image":{"aspect_ratio":1.0,"height":1000,"width":1000,"src":"\/\/crystaldestiny.com\/cdn\/shop\/files\/Crystal-Sphere-Display-Stands-Assorted-Styles-Stands-G-40mm-Crystal-31.webp?v=1765343414"},"aspect_ratio":1.0,"height":1000,"media_type":"image","src":"\/\/crystaldestiny.com\/cdn\/shop\/files\/Crystal-Sphere-Display-Stands-Assorted-Styles-Stands-G-40mm-Crystal-31.webp?v=1765343414","width":1000},{"alt":"Crystal Sphere Display Stands Assorted Styles-Stands-Ali-I-White Light-A-Wood-Crystal Destiny","id":31835998257323,"position":32,"preview_image":{"aspect_ratio":1.0,"height":1000,"width":1000,"src":"\/\/crystaldestiny.com\/cdn\/shop\/files\/Crystal-Sphere-Display-Stands-Assorted-Styles-Stands-I-White-Light-A-Wood-32.webp?v=1765343415"},"aspect_ratio":1.0,"height":1000,"media_type":"image","src":"\/\/crystaldestiny.com\/cdn\/shop\/files\/Crystal-Sphere-Display-Stands-Assorted-Styles-Stands-I-White-Light-A-Wood-32.webp?v=1765343415","width":1000},{"alt":"Crystal Sphere Display Stands Assorted Styles-Stands-Ali-B-7x3.6cm-wood-Crystal Destiny","id":31835998290091,"position":33,"preview_image":{"aspect_ratio":1.0,"height":1000,"width":1000,"src":"\/\/crystaldestiny.com\/cdn\/shop\/files\/Crystal-Sphere-Display-Stands-Assorted-Styles-Stands-B-7x3_6cm-wood-33.webp?v=1765343416"},"aspect_ratio":1.0,"height":1000,"media_type":"image","src":"\/\/crystaldestiny.com\/cdn\/shop\/files\/Crystal-Sphere-Display-Stands-Assorted-Styles-Stands-B-7x3_6cm-wood-33.webp?v=1765343416","width":1000},{"alt":"Crystal Sphere Display Stands Assorted Styles-Stands-Ali-C-2x2.5cm-wood-Crystal Destiny","id":31835998322859,"position":34,"preview_image":{"aspect_ratio":1.0,"height":1000,"width":1000,"src":"\/\/crystaldestiny.com\/cdn\/shop\/files\/Crystal-Sphere-Display-Stands-Assorted-Styles-Stands-C-2x2_5cm-wood-34.webp?v=1765343418"},"aspect_ratio":1.0,"height":1000,"media_type":"image","src":"\/\/crystaldestiny.com\/cdn\/shop\/files\/Crystal-Sphere-Display-Stands-Assorted-Styles-Stands-C-2x2_5cm-wood-34.webp?v=1765343418","width":1000},{"alt":"Crystal Sphere Display Stands Assorted Styles-Stands-Ali-A-2x2.5cm-wood-Crystal Destiny","id":31835998355627,"position":35,"preview_image":{"aspect_ratio":1.0,"height":1000,"width":1000,"src":"\/\/crystaldestiny.com\/cdn\/shop\/files\/Crystal-Sphere-Display-Stands-Assorted-Styles-Stands-35.webp?v=1761887170"},"aspect_ratio":1.0,"height":1000,"media_type":"image","src":"\/\/crystaldestiny.com\/cdn\/shop\/files\/Crystal-Sphere-Display-Stands-Assorted-Styles-Stands-35.webp?v=1761887170","width":1000},{"alt":"Crystal Sphere Display Stands Assorted Styles-Stands-Ali-F-35mm-Wood-Crystal Destiny","id":31835998388395,"position":36,"preview_image":{"aspect_ratio":1.0,"height":1000,"width":1000,"src":"\/\/crystaldestiny.com\/cdn\/shop\/files\/Crystal-Sphere-Display-Stands-Assorted-Styles-Stands-F-35mm-Wood-36.webp?v=1765343419"},"aspect_ratio":1.0,"height":1000,"media_type":"image","src":"\/\/crystaldestiny.com\/cdn\/shop\/files\/Crystal-Sphere-Display-Stands-Assorted-Styles-Stands-F-35mm-Wood-36.webp?v=1765343419","width":1000},{"alt":"Crystal Sphere Display Stands Assorted Styles-Stands-Ali-G-35mm-Crystal-Crystal Destiny","id":31835998421163,"position":37,"preview_image":{"aspect_ratio":1.0,"height":1000,"width":1000,"src":"\/\/crystaldestiny.com\/cdn\/shop\/files\/Crystal-Sphere-Display-Stands-Assorted-Styles-Stands-G-35mm-Crystal-37.webp?v=1765343421"},"aspect_ratio":1.0,"height":1000,"media_type":"image","src":"\/\/crystaldestiny.com\/cdn\/shop\/files\/Crystal-Sphere-Display-Stands-Assorted-Styles-Stands-G-35mm-Crystal-37.webp?v=1765343421","width":1000},{"alt":"Crystal Sphere Display Stands Assorted Styles-Stands-Ali-A-2x2.5cm-wood-Crystal Destiny","id":31835998453931,"position":38,"preview_image":{"aspect_ratio":1.0,"height":1000,"width":1000,"src":"\/\/crystaldestiny.com\/cdn\/shop\/files\/Crystal-Sphere-Display-Stands-Assorted-Styles-Stands-38.webp?v=1761887171"},"aspect_ratio":1.0,"height":1000,"media_type":"image","src":"\/\/crystaldestiny.com\/cdn\/shop\/files\/Crystal-Sphere-Display-Stands-Assorted-Styles-Stands-38.webp?v=1761887171","width":1000},{"alt":"Crystal Sphere Display Stands Assorted Styles-Stands-Ali-B-3.8x2.2cm-wood-Crystal Destiny","id":31835998486699,"position":39,"preview_image":{"aspect_ratio":1.0,"height":1000,"width":1000,"src":"\/\/crystaldestiny.com\/cdn\/shop\/files\/Crystal-Sphere-Display-Stands-Assorted-Styles-Stands-B-3_8x2_2cm-wood-39.webp?v=1765343422"},"aspect_ratio":1.0,"height":1000,"media_type":"image","src":"\/\/crystaldestiny.com\/cdn\/shop\/files\/Crystal-Sphere-Display-Stands-Assorted-Styles-Stands-B-3_8x2_2cm-wood-39.webp?v=1765343422","width":1000},{"alt":"Crystal Sphere Display Stands Assorted Styles-Stands-Ali-D-40mm-Resin-Crystal Destiny","id":31835998519467,"position":40,"preview_image":{"aspect_ratio":1.0,"height":1000,"width":1000,"src":"\/\/crystaldestiny.com\/cdn\/shop\/files\/Crystal-Sphere-Display-Stands-Assorted-Styles-Stands-D-40mm-Resin-40.webp?v=1765343424"},"aspect_ratio":1.0,"height":1000,"media_type":"image","src":"\/\/crystaldestiny.com\/cdn\/shop\/files\/Crystal-Sphere-Display-Stands-Assorted-Styles-Stands-D-40mm-Resin-40.webp?v=1765343424","width":1000},{"alt":"Crystal Sphere Display Stands Assorted Styles-Stands-Ali-D-70mm-Resin-Crystal Destiny","id":31835998552235,"position":41,"preview_image":{"aspect_ratio":1.0,"height":1000,"width":1000,"src":"\/\/crystaldestiny.com\/cdn\/shop\/files\/Crystal-Sphere-Display-Stands-Assorted-Styles-Stands-D-70mm-Resin-41.webp?v=1765343425"},"aspect_ratio":1.0,"height":1000,"media_type":"image","src":"\/\/crystaldestiny.com\/cdn\/shop\/files\/Crystal-Sphere-Display-Stands-Assorted-Styles-Stands-D-70mm-Resin-41.webp?v=1765343425","width":1000},{"alt":"Crystal Sphere Display Stands Assorted Styles-Stands-Ali-E-4.2x2.5cm-Resin-Crystal Destiny","id":31835998585003,"position":42,"preview_image":{"aspect_ratio":1.0,"height":1000,"width":1000,"src":"\/\/crystaldestiny.com\/cdn\/shop\/files\/Crystal-Sphere-Display-Stands-Assorted-Styles-Stands-E-4_2x2_5cm-Resin-42.webp?v=1765343427"},"aspect_ratio":1.0,"height":1000,"media_type":"image","src":"\/\/crystaldestiny.com\/cdn\/shop\/files\/Crystal-Sphere-Display-Stands-Assorted-Styles-Stands-E-4_2x2_5cm-Resin-42.webp?v=1765343427","width":1000},{"alt":"Crystal Sphere Display Stands Assorted Styles-Stands-Ali-D-100mm-Resin-Crystal Destiny","id":31835998617771,"position":43,"preview_image":{"aspect_ratio":1.0,"height":1000,"width":1000,"src":"\/\/crystaldestiny.com\/cdn\/shop\/files\/Crystal-Sphere-Display-Stands-Assorted-Styles-Stands-D-100mm-Resin-43.webp?v=1765343428"},"aspect_ratio":1.0,"height":1000,"media_type":"image","src":"\/\/crystaldestiny.com\/cdn\/shop\/files\/Crystal-Sphere-Display-Stands-Assorted-Styles-Stands-D-100mm-Resin-43.webp?v=1765343428","width":1000},{"alt":"Crystal Sphere Display Stands Assorted Styles-Stands-Ali-B-8.2x3.5cm-wood-Crystal Destiny","id":31835998650539,"position":44,"preview_image":{"aspect_ratio":1.0,"height":1000,"width":1000,"src":"\/\/crystaldestiny.com\/cdn\/shop\/files\/Crystal-Sphere-Display-Stands-Assorted-Styles-Stands-B-8_2x3_5cm-wood-44.webp?v=1765343429"},"aspect_ratio":1.0,"height":1000,"media_type":"image","src":"\/\/crystaldestiny.com\/cdn\/shop\/files\/Crystal-Sphere-Display-Stands-Assorted-Styles-Stands-B-8_2x3_5cm-wood-44.webp?v=1765343429","width":1000},{"alt":"Crystal Sphere Display Stands Assorted Styles-Stands-Ali-E-5x3cm-Resin-Crystal Destiny","id":31835998683307,"position":45,"preview_image":{"aspect_ratio":1.0,"height":1000,"width":1000,"src":"\/\/crystaldestiny.com\/cdn\/shop\/files\/Crystal-Sphere-Display-Stands-Assorted-Styles-Stands-E-5x3cm-Resin-45.webp?v=1765343431"},"aspect_ratio":1.0,"height":1000,"media_type":"image","src":"\/\/crystaldestiny.com\/cdn\/shop\/files\/Crystal-Sphere-Display-Stands-Assorted-Styles-Stands-E-5x3cm-Resin-45.webp?v=1765343431","width":1000},{"alt":"Crystal Sphere Display Stands Assorted Styles-Stands-Ali-A-2x2.5cm-wood-Crystal Destiny","id":31835998716075,"position":46,"preview_image":{"aspect_ratio":1.0,"height":1000,"width":1000,"src":"\/\/crystaldestiny.com\/cdn\/shop\/files\/Crystal-Sphere-Display-Stands-Assorted-Styles-Stands-A-2x2_5cm-wood-46.webp?v=1765343432"},"aspect_ratio":1.0,"height":1000,"media_type":"image","src":"\/\/crystaldestiny.com\/cdn\/shop\/files\/Crystal-Sphere-Display-Stands-Assorted-Styles-Stands-A-2x2_5cm-wood-46.webp?v=1765343432","width":1000},{"alt":"Crystal Sphere Display Stands Assorted Styles-Stands-Ali-B-2.5x1cm-wood-Crystal Destiny","id":31835998748843,"position":47,"preview_image":{"aspect_ratio":1.0,"height":1000,"width":1000,"src":"\/\/crystaldestiny.com\/cdn\/shop\/files\/Crystal-Sphere-Display-Stands-Assorted-Styles-Stands-B-2_5x1cm-wood-47.webp?v=1765343434"},"aspect_ratio":1.0,"height":1000,"media_type":"image","src":"\/\/crystaldestiny.com\/cdn\/shop\/files\/Crystal-Sphere-Display-Stands-Assorted-Styles-Stands-B-2_5x1cm-wood-47.webp?v=1765343434","width":1000},{"alt":"Crystal Sphere Display Stands Assorted Styles-Stands-Ali-D-50mm-Resin-Crystal Destiny","id":31835998781611,"position":48,"preview_image":{"aspect_ratio":1.0,"height":1000,"width":1000,"src":"\/\/crystaldestiny.com\/cdn\/shop\/files\/Crystal-Sphere-Display-Stands-Assorted-Styles-Stands-D-50mm-Resin-48.webp?v=1765343435"},"aspect_ratio":1.0,"height":1000,"media_type":"image","src":"\/\/crystaldestiny.com\/cdn\/shop\/files\/Crystal-Sphere-Display-Stands-Assorted-Styles-Stands-D-50mm-Resin-48.webp?v=1765343435","width":1000},{"alt":"Crystal Sphere Display Stands Assorted Styles-Stands-Ali-J-6x2cm-G-Alloy-Crystal Destiny","id":31835998814379,"position":49,"preview_image":{"aspect_ratio":1.0,"height":1000,"width":1000,"src":"\/\/crystaldestiny.com\/cdn\/shop\/files\/Crystal-Sphere-Display-Stands-Assorted-Styles-Stands-J-6x2cm-G-Alloy-49.webp?v=1765343436"},"aspect_ratio":1.0,"height":1000,"media_type":"image","src":"\/\/crystaldestiny.com\/cdn\/shop\/files\/Crystal-Sphere-Display-Stands-Assorted-Styles-Stands-J-6x2cm-G-Alloy-49.webp?v=1765343436","width":1000},{"alt":"Crystal Sphere Display Stands Assorted Styles-Stands-Ali-J-5.3x2.8cm-S-Alloy-Crystal Destiny","id":31835998847147,"position":50,"preview_image":{"aspect_ratio":1.0,"height":1000,"width":1000,"src":"\/\/crystaldestiny.com\/cdn\/shop\/files\/Crystal-Sphere-Display-Stands-Assorted-Styles-Stands-J-5_3x2_8cm-S-Alloy-50.webp?v=1765343438"},"aspect_ratio":1.0,"height":1000,"media_type":"image","src":"\/\/crystaldestiny.com\/cdn\/shop\/files\/Crystal-Sphere-Display-Stands-Assorted-Styles-Stands-J-5_3x2_8cm-S-Alloy-50.webp?v=1765343438","width":1000},{"alt":"Crystal Sphere Display Stands Assorted Styles-Stands-Ali-I-Warm Light-B-Wood-Crystal Destiny","id":31835998879915,"position":51,"preview_image":{"aspect_ratio":1.0,"height":1000,"width":1000,"src":"\/\/crystaldestiny.com\/cdn\/shop\/files\/Crystal-Sphere-Display-Stands-Assorted-Styles-Stands-I-Warm-Light-B-Wood-51.webp?v=1765343439"},"aspect_ratio":1.0,"height":1000,"media_type":"image","src":"\/\/crystaldestiny.com\/cdn\/shop\/files\/Crystal-Sphere-Display-Stands-Assorted-Styles-Stands-I-Warm-Light-B-Wood-51.webp?v=1765343439","width":1000},{"alt":"Crystal Sphere Display Stands Assorted Styles-Stands-Ali-C-3x2.5cm-wood-Crystal Destiny","id":31835998912683,"position":52,"preview_image":{"aspect_ratio":1.0,"height":1000,"width":1000,"src":"\/\/crystaldestiny.com\/cdn\/shop\/files\/Crystal-Sphere-Display-Stands-Assorted-Styles-Stands-C-3x2_5cm-wood-52.webp?v=1765343441"},"aspect_ratio":1.0,"height":1000,"media_type":"image","src":"\/\/crystaldestiny.com\/cdn\/shop\/files\/Crystal-Sphere-Display-Stands-Assorted-Styles-Stands-C-3x2_5cm-wood-52.webp?v=1765343441","width":1000},{"alt":"Crystal Sphere Display Stands Assorted Styles-Stands-Ali-A-2.5x2.5cm-wood-Crystal Destiny","id":31835998945451,"position":53,"preview_image":{"aspect_ratio":1.0,"height":1000,"width":1000,"src":"\/\/crystaldestiny.com\/cdn\/shop\/files\/Crystal-Sphere-Display-Stands-Assorted-Styles-Stands-A-2_5x2_5cm-wood-53.webp?v=1765343442"},"aspect_ratio":1.0,"height":1000,"media_type":"image","src":"\/\/crystaldestiny.com\/cdn\/shop\/files\/Crystal-Sphere-Display-Stands-Assorted-Styles-Stands-A-2_5x2_5cm-wood-53.webp?v=1765343442","width":1000},{"alt":"Crystal Sphere Display Stands Assorted Styles-Stands-Ali-D-25mm-Resin-Crystal Destiny","id":31835998978219,"position":54,"preview_image":{"aspect_ratio":1.0,"height":1000,"width":1000,"src":"\/\/crystaldestiny.com\/cdn\/shop\/files\/Crystal-Sphere-Display-Stands-Assorted-Styles-Stands-D-25mm-Resin-54.webp?v=1765343444"},"aspect_ratio":1.0,"height":1000,"media_type":"image","src":"\/\/crystaldestiny.com\/cdn\/shop\/files\/Crystal-Sphere-Display-Stands-Assorted-Styles-Stands-D-25mm-Resin-54.webp?v=1765343444","width":1000},{"alt":"Crystal Sphere Display Stands Assorted Styles-Stands-Ali-I-Multicolor-A-Wood-Crystal Destiny","id":31835999010987,"position":55,"preview_image":{"aspect_ratio":1.0,"height":1000,"width":1000,"src":"\/\/crystaldestiny.com\/cdn\/shop\/files\/Crystal-Sphere-Display-Stands-Assorted-Styles-Stands-I-Multicolor-A-Wood-55.webp?v=1765343445"},"aspect_ratio":1.0,"height":1000,"media_type":"image","src":"\/\/crystaldestiny.com\/cdn\/shop\/files\/Crystal-Sphere-Display-Stands-Assorted-Styles-Stands-I-Multicolor-A-Wood-55.webp?v=1765343445","width":1000},{"alt":"Crystal Sphere Display Stands Assorted Styles-Stands-Ali-A-3x2.5cm-wood-Crystal Destiny","id":31835999043755,"position":56,"preview_image":{"aspect_ratio":1.0,"height":1000,"width":1000,"src":"\/\/crystaldestiny.com\/cdn\/shop\/files\/Crystal-Sphere-Display-Stands-Assorted-Styles-Stands-A-3x2_5cm-wood-56.webp?v=1765343446"},"aspect_ratio":1.0,"height":1000,"media_type":"image","src":"\/\/crystaldestiny.com\/cdn\/shop\/files\/Crystal-Sphere-Display-Stands-Assorted-Styles-Stands-A-3x2_5cm-wood-56.webp?v=1765343446","width":1000},{"alt":"Crystal Sphere Display Stands Assorted Styles-Stands-Ali-H-Multicolor-A-Wood-Crystal Destiny","id":31835999076523,"position":57,"preview_image":{"aspect_ratio":1.0,"height":1000,"width":1000,"src":"\/\/crystaldestiny.com\/cdn\/shop\/files\/Crystal-Sphere-Display-Stands-Assorted-Styles-Stands-H-Multicolor-A-Wood-57.webp?v=1765343448"},"aspect_ratio":1.0,"height":1000,"media_type":"image","src":"\/\/crystaldestiny.com\/cdn\/shop\/files\/Crystal-Sphere-Display-Stands-Assorted-Styles-Stands-H-Multicolor-A-Wood-57.webp?v=1765343448","width":1000},{"alt":"Crystal Sphere Display Stands Assorted Styles-Stands-Ali-H-Multicolor-B-Wood-Crystal Destiny","id":31835999109291,"position":58,"preview_image":{"aspect_ratio":1.0,"height":1000,"width":1000,"src":"\/\/crystaldestiny.com\/cdn\/shop\/files\/Crystal-Sphere-Display-Stands-Assorted-Styles-Stands-H-Multicolor-B-Wood-58.webp?v=1765343449"},"aspect_ratio":1.0,"height":1000,"media_type":"image","src":"\/\/crystaldestiny.com\/cdn\/shop\/files\/Crystal-Sphere-Display-Stands-Assorted-Styles-Stands-H-Multicolor-B-Wood-58.webp?v=1765343449","width":1000},{"alt":"Crystal Sphere Display Stands Assorted Styles-Stands-Ali-J-5.3x2.8cm-G-Alloy-Crystal Destiny","id":31835999142059,"position":59,"preview_image":{"aspect_ratio":1.0,"height":1000,"width":1000,"src":"\/\/crystaldestiny.com\/cdn\/shop\/files\/Crystal-Sphere-Display-Stands-Assorted-Styles-Stands-J-5_3x2_8cm-G-Alloy-59.webp?v=1765343450"},"aspect_ratio":1.0,"height":1000,"media_type":"image","src":"\/\/crystaldestiny.com\/cdn\/shop\/files\/Crystal-Sphere-Display-Stands-Assorted-Styles-Stands-J-5_3x2_8cm-G-Alloy-59.webp?v=1765343450","width":1000},{"alt":"Crystal Sphere Display Stands Assorted Styles-Stands-Ali-J-6x2cm-S-Alloy-Crystal Destiny","id":31835999174827,"position":60,"preview_image":{"aspect_ratio":1.0,"height":1000,"width":1000,"src":"\/\/crystaldestiny.com\/cdn\/shop\/files\/Crystal-Sphere-Display-Stands-Assorted-Styles-Stands-J-6x2cm-S-Alloy-60.webp?v=1765343452"},"aspect_ratio":1.0,"height":1000,"media_type":"image","src":"\/\/crystaldestiny.com\/cdn\/shop\/files\/Crystal-Sphere-Display-Stands-Assorted-Styles-Stands-J-6x2cm-S-Alloy-60.webp?v=1765343452","width":1000},{"alt":"Crystal Sphere Display Stands Assorted Styles-Stands-Ali-B-3.5x1.5cm-wood-Crystal Destiny","id":31835999207595,"position":61,"preview_image":{"aspect_ratio":1.0,"height":1000,"width":1000,"src":"\/\/crystaldestiny.com\/cdn\/shop\/files\/Crystal-Sphere-Display-Stands-Assorted-Styles-Stands-B-3_5x1_5cm-wood-61.webp?v=1765343453"},"aspect_ratio":1.0,"height":1000,"media_type":"image","src":"\/\/crystaldestiny.com\/cdn\/shop\/files\/Crystal-Sphere-Display-Stands-Assorted-Styles-Stands-B-3_5x1_5cm-wood-61.webp?v=1765343453","width":1000},{"alt":"Crystal Sphere Display Stands Assorted Styles-Stands-Ali-A-3.5x2.5cm-wood-Crystal Destiny","id":31835999240363,"position":62,"preview_image":{"aspect_ratio":1.0,"height":1000,"width":1000,"src":"\/\/crystaldestiny.com\/cdn\/shop\/files\/Crystal-Sphere-Display-Stands-Assorted-Styles-Stands-A-3_5x2_5cm-wood-62.webp?v=1765343455"},"aspect_ratio":1.0,"height":1000,"media_type":"image","src":"\/\/crystaldestiny.com\/cdn\/shop\/files\/Crystal-Sphere-Display-Stands-Assorted-Styles-Stands-A-3_5x2_5cm-wood-62.webp?v=1765343455","width":1000},{"alt":"Crystal Sphere Display Stands Assorted Styles-Stands-Ali-D-30mm-Resin-Crystal Destiny","id":31835999273131,"position":63,"preview_image":{"aspect_ratio":1.0,"height":1000,"width":1000,"src":"\/\/crystaldestiny.com\/cdn\/shop\/files\/Crystal-Sphere-Display-Stands-Assorted-Styles-Stands-D-30mm-Resin-63.webp?v=1765343456"},"aspect_ratio":1.0,"height":1000,"media_type":"image","src":"\/\/crystaldestiny.com\/cdn\/shop\/files\/Crystal-Sphere-Display-Stands-Assorted-Styles-Stands-D-30mm-Resin-63.webp?v=1765343456","width":1000},{"alt":"Crystal Sphere Display Stands Assorted Styles-Stands-Ali-A-4.5x2.5cm-wood-Crystal Destiny","id":31835999338667,"position":64,"preview_image":{"aspect_ratio":1.0,"height":1000,"width":1000,"src":"\/\/crystaldestiny.com\/cdn\/shop\/files\/Crystal-Sphere-Display-Stands-Assorted-Styles-Stands-A-4_5x2_5cm-wood-64.webp?v=1765343458"},"aspect_ratio":1.0,"height":1000,"media_type":"image","src":"\/\/crystaldestiny.com\/cdn\/shop\/files\/Crystal-Sphere-Display-Stands-Assorted-Styles-Stands-A-4_5x2_5cm-wood-64.webp?v=1765343458","width":1000},{"alt":"Crystal Sphere Display Stands Assorted Styles-Stands-Ali-C-4x2.5cm-wood-Crystal Destiny","id":31835999371435,"position":65,"preview_image":{"aspect_ratio":1.0,"height":1000,"width":1000,"src":"\/\/crystaldestiny.com\/cdn\/shop\/files\/Crystal-Sphere-Display-Stands-Assorted-Styles-Stands-C-4x2_5cm-wood-65.webp?v=1765343459"},"aspect_ratio":1.0,"height":1000,"media_type":"image","src":"\/\/crystaldestiny.com\/cdn\/shop\/files\/Crystal-Sphere-Display-Stands-Assorted-Styles-Stands-C-4x2_5cm-wood-65.webp?v=1765343459","width":1000},{"alt":"Crystal Sphere Display Stands Assorted Styles-Stands-Ali-F-80mm-Wood-Crystal Destiny","id":31835999436971,"position":66,"preview_image":{"aspect_ratio":1.0,"height":1000,"width":1000,"src":"\/\/crystaldestiny.com\/cdn\/shop\/files\/Crystal-Sphere-Display-Stands-Assorted-Styles-Stands-F-80mm-Wood-66.webp?v=1765343460"},"aspect_ratio":1.0,"height":1000,"media_type":"image","src":"\/\/crystaldestiny.com\/cdn\/shop\/files\/Crystal-Sphere-Display-Stands-Assorted-Styles-Stands-F-80mm-Wood-66.webp?v=1765343460","width":1000}]
{"item":{"id":8603309375659,"title":"Dream Amethyst Geode Crystal Sphere","handle":"dream-amethyst-geode-crystal-sphere-1005010035065208-weight-283g","description":"\u003cp data-start=\"185\" data-end=\"506\"\u003eThis Dream Amethyst Geode Crystal Sphere brings together the beauty of polished amethyst with the natural wonder of geode formations. Each sphere showcases deep violet tones, sparkling inner clusters, and smooth polished edges, creating a captivating blend of elegance and raw natural energy.\u003c\/p\u003e\n\u003cp data-start=\"508\" data-end=\"849\"\u003eAmethyst is cherished for its calming vibration, spiritual clarity, and protective qualities. In sphere form, its energy radiates evenly, making it ideal for meditation spaces, witchcraft altars, prayer setups, and home décor. Collectors value these unique spheres for their soothing presence and the touch of magic they bring to any room.\u003c\/p\u003e\n\u003cp data-start=\"508\" data-end=\"849\"\u003eThis product is an exact pick as pictured, one of a kind.\u003c\/p\u003e","published_at":"2025-12-09T18:31:31-05:00","created_at":"2025-12-09T14:38:21-05:00","vendor":"Ali","type":"Spheres","tags":["adjusted-shipping","crystal","new-arrivals","polished","spheres"],"price":5499,"price_min":5499,"price_max":10799,"available":true,"price_varies":true,"compare_at_price":0,"compare_at_price_min":0,"compare_at_price_max":0,"compare_at_price_varies":false,"variants":[{"id":45941100413099,"title":"Dream Amethyst \/ Weight 283g","option1":"Dream Amethyst","option2":"Weight 283g","option3":null,"sku":"1005010035065208-Weight 283g","requires_shipping":true,"taxable":true,"featured_image":{"id":40921467879595,"product_id":8603309375659,"position":8,"created_at":"2025-12-09T14:38:23-05:00","updated_at":"2025-12-10T11:17:11-05:00","alt":"Dream Amethyst Geode Crystal Sphere-Spheres-Ali-Dream Amethyst-Weight 283g-Crystal Destiny","width":1000,"height":1000,"src":"\/\/crystaldestiny.com\/cdn\/shop\/files\/Dream-Amethyst-Geode-Crystal-Sphere-Spheres-Dream-Amethyst-Weight-283g-8.webp?v=1765383431","variant_ids":[45941100413099]},"available":true,"name":"Dream Amethyst Geode Crystal Sphere - Dream Amethyst \/ Weight 283g","public_title":"Dream Amethyst \/ Weight 283g","options":["Dream Amethyst","Weight 283g"],"price":8399,"weight":400,"compare_at_price":0,"inventory_management":"shopify","barcode":null,"featured_media":{"alt":"Dream Amethyst Geode Crystal Sphere-Spheres-Ali-Dream Amethyst-Weight 283g-Crystal Destiny","id":32289036009643,"position":8,"preview_image":{"aspect_ratio":1.0,"height":1000,"width":1000,"src":"\/\/crystaldestiny.com\/cdn\/shop\/files\/Dream-Amethyst-Geode-Crystal-Sphere-Spheres-Dream-Amethyst-Weight-283g-8.webp?v=1765383431"}},"requires_selling_plan":false,"selling_plan_allocations":[]},{"id":45941100445867,"title":"Dream Amethyst \/ Weight 310g","option1":"Dream Amethyst","option2":"Weight 310g","option3":null,"sku":"1005010035065208-Weight 310g","requires_shipping":true,"taxable":true,"featured_image":{"id":40921467912363,"product_id":8603309375659,"position":9,"created_at":"2025-12-09T14:38:23-05:00","updated_at":"2025-12-10T11:17:13-05:00","alt":"Dream Amethyst Geode Crystal Sphere-Spheres-Ali-Dream Amethyst-Weight 310g-Crystal Destiny","width":1000,"height":1000,"src":"\/\/crystaldestiny.com\/cdn\/shop\/files\/Dream-Amethyst-Geode-Crystal-Sphere-Spheres-Dream-Amethyst-Weight-310g-9.webp?v=1765383433","variant_ids":[45941100445867]},"available":true,"name":"Dream Amethyst Geode Crystal Sphere - Dream Amethyst \/ Weight 310g","public_title":"Dream Amethyst \/ Weight 310g","options":["Dream Amethyst","Weight 310g"],"price":8999,"weight":400,"compare_at_price":0,"inventory_management":"shopify","barcode":null,"featured_media":{"alt":"Dream Amethyst Geode Crystal Sphere-Spheres-Ali-Dream Amethyst-Weight 310g-Crystal Destiny","id":32289036042411,"position":9,"preview_image":{"aspect_ratio":1.0,"height":1000,"width":1000,"src":"\/\/crystaldestiny.com\/cdn\/shop\/files\/Dream-Amethyst-Geode-Crystal-Sphere-Spheres-Dream-Amethyst-Weight-310g-9.webp?v=1765383433"}},"requires_selling_plan":false,"selling_plan_allocations":[]},{"id":45941100478635,"title":"Dream Amethyst \/ Weight 395g","option1":"Dream Amethyst","option2":"Weight 395g","option3":null,"sku":"1005010035065208-Weight 395g","requires_shipping":true,"taxable":true,"featured_image":{"id":40921467650219,"product_id":8603309375659,"position":1,"created_at":"2025-12-09T14:38:23-05:00","updated_at":"2025-12-10T11:17:01-05:00","alt":"Dream Amethyst Geode Crystal Sphere-Spheres-Ali-Dream Amethyst-Weight 395g-Crystal Destiny","width":1000,"height":1000,"src":"\/\/crystaldestiny.com\/cdn\/shop\/files\/Dream-Amethyst-Geode-Crystal-Sphere-Spheres-Dream-Amethyst-Weight-395g.webp?v=1765383421","variant_ids":[45941100478635]},"available":false,"name":"Dream Amethyst Geode Crystal Sphere - Dream Amethyst \/ Weight 395g","public_title":"Dream Amethyst \/ Weight 395g","options":["Dream Amethyst","Weight 395g"],"price":10799,"weight":400,"compare_at_price":0,"inventory_management":"shopify","barcode":null,"featured_media":{"alt":"Dream Amethyst Geode Crystal Sphere-Spheres-Ali-Dream Amethyst-Weight 395g-Crystal Destiny","id":32289035780267,"position":1,"preview_image":{"aspect_ratio":1.0,"height":1000,"width":1000,"src":"\/\/crystaldestiny.com\/cdn\/shop\/files\/Dream-Amethyst-Geode-Crystal-Sphere-Spheres-Dream-Amethyst-Weight-395g.webp?v=1765383421"}},"requires_selling_plan":false,"selling_plan_allocations":[]},{"id":45941100511403,"title":"Dream Amethyst \/ Weight 207g","option1":"Dream Amethyst","option2":"Weight 207g","option3":null,"sku":"1005010035065208-Weight 207g","requires_shipping":true,"taxable":true,"featured_image":{"id":40921468567723,"product_id":8603309375659,"position":29,"created_at":"2025-12-09T14:38:23-05:00","updated_at":"2025-12-10T11:17:43-05:00","alt":"Dream Amethyst Geode Crystal Sphere-Spheres-Ali-Dream Amethyst-Weight 207g-Crystal Destiny","width":1000,"height":1000,"src":"\/\/crystaldestiny.com\/cdn\/shop\/files\/Dream-Amethyst-Geode-Crystal-Sphere-Spheres-Dream-Amethyst-Weight-207g-29.webp?v=1765383463","variant_ids":[45941100511403]},"available":false,"name":"Dream Amethyst Geode Crystal Sphere - Dream Amethyst \/ Weight 207g","public_title":"Dream Amethyst \/ Weight 207g","options":["Dream Amethyst","Weight 207g"],"price":6899,"weight":400,"compare_at_price":0,"inventory_management":"shopify","barcode":null,"featured_media":{"alt":"Dream Amethyst Geode Crystal Sphere-Spheres-Ali-Dream Amethyst-Weight 207g-Crystal Destiny","id":32289036697771,"position":29,"preview_image":{"aspect_ratio":1.0,"height":1000,"width":1000,"src":"\/\/crystaldestiny.com\/cdn\/shop\/files\/Dream-Amethyst-Geode-Crystal-Sphere-Spheres-Dream-Amethyst-Weight-207g-29.webp?v=1765383463"}},"requires_selling_plan":false,"selling_plan_allocations":[]},{"id":45941100544171,"title":"Dream Amethyst \/ Weight 283g 1","option1":"Dream Amethyst","option2":"Weight 283g 1","option3":null,"sku":"1005010035065208-Weight 283g 1","requires_shipping":true,"taxable":true,"featured_image":{"id":40921468666027,"product_id":8603309375659,"position":32,"created_at":"2025-12-09T14:38:23-05:00","updated_at":"2025-12-10T11:17:48-05:00","alt":"Dream Amethyst Geode Crystal Sphere-Spheres-Ali-Dream Amethyst-Weight 283g 1-Crystal Destiny","width":1000,"height":1000,"src":"\/\/crystaldestiny.com\/cdn\/shop\/files\/Dream-Amethyst-Geode-Crystal-Sphere-Spheres-Dream-Amethyst-Weight-283g-1-32.webp?v=1765383468","variant_ids":[45941100544171]},"available":true,"name":"Dream Amethyst Geode Crystal Sphere - Dream Amethyst \/ Weight 283g 1","public_title":"Dream Amethyst \/ Weight 283g 1","options":["Dream Amethyst","Weight 283g 1"],"price":8399,"weight":400,"compare_at_price":0,"inventory_management":"shopify","barcode":null,"featured_media":{"alt":"Dream Amethyst Geode Crystal Sphere-Spheres-Ali-Dream Amethyst-Weight 283g 1-Crystal Destiny","id":32289036796075,"position":32,"preview_image":{"aspect_ratio":1.0,"height":1000,"width":1000,"src":"\/\/crystaldestiny.com\/cdn\/shop\/files\/Dream-Amethyst-Geode-Crystal-Sphere-Spheres-Dream-Amethyst-Weight-283g-1-32.webp?v=1765383468"}},"requires_selling_plan":false,"selling_plan_allocations":[]},{"id":45941100576939,"title":"Dream Amethyst \/ Weight 246g","option1":"Dream Amethyst","option2":"Weight 246g","option3":null,"sku":"1005010035065208-Weight 246g","requires_shipping":true,"taxable":true,"featured_image":{"id":40921467682987,"product_id":8603309375659,"position":2,"created_at":"2025-12-09T14:38:23-05:00","updated_at":"2025-12-10T11:17:02-05:00","alt":"Dream Amethyst Geode Crystal Sphere-Spheres-Ali-Dream Amethyst-Weight 246g-Crystal Destiny","width":1000,"height":1000,"src":"\/\/crystaldestiny.com\/cdn\/shop\/files\/Dream-Amethyst-Geode-Crystal-Sphere-Spheres-Dream-Amethyst-Weight-246g-2.webp?v=1765383422","variant_ids":[45941100576939]},"available":false,"name":"Dream Amethyst Geode Crystal Sphere - Dream Amethyst \/ Weight 246g","public_title":"Dream Amethyst \/ Weight 246g","options":["Dream Amethyst","Weight 246g"],"price":8099,"weight":400,"compare_at_price":0,"inventory_management":"shopify","barcode":null,"featured_media":{"alt":"Dream Amethyst Geode Crystal Sphere-Spheres-Ali-Dream Amethyst-Weight 246g-Crystal Destiny","id":32289035813035,"position":2,"preview_image":{"aspect_ratio":1.0,"height":1000,"width":1000,"src":"\/\/crystaldestiny.com\/cdn\/shop\/files\/Dream-Amethyst-Geode-Crystal-Sphere-Spheres-Dream-Amethyst-Weight-246g-2.webp?v=1765383422"}},"requires_selling_plan":false,"selling_plan_allocations":[]},{"id":45941100609707,"title":"Dream Amethyst \/ Weight 138g","option1":"Dream Amethyst","option2":"Weight 138g","option3":null,"sku":"1005010035065208-Weight 138g","requires_shipping":true,"taxable":true,"featured_image":{"id":40921468141739,"product_id":8603309375659,"position":16,"created_at":"2025-12-09T14:38:23-05:00","updated_at":"2025-12-10T11:17:24-05:00","alt":"Dream Amethyst Geode Crystal Sphere-Spheres-Ali-Dream Amethyst-Weight 138g-Crystal Destiny","width":1000,"height":1000,"src":"\/\/crystaldestiny.com\/cdn\/shop\/files\/Dream-Amethyst-Geode-Crystal-Sphere-Spheres-Dream-Amethyst-Weight-138g-16.webp?v=1765383444","variant_ids":[45941100609707]},"available":false,"name":"Dream Amethyst Geode Crystal Sphere - Dream Amethyst \/ Weight 138g","public_title":"Dream Amethyst \/ Weight 138g","options":["Dream Amethyst","Weight 138g"],"price":5499,"weight":400,"compare_at_price":0,"inventory_management":"shopify","barcode":null,"featured_media":{"alt":"Dream Amethyst Geode Crystal Sphere-Spheres-Ali-Dream Amethyst-Weight 138g-Crystal Destiny","id":32289036271787,"position":16,"preview_image":{"aspect_ratio":1.0,"height":1000,"width":1000,"src":"\/\/crystaldestiny.com\/cdn\/shop\/files\/Dream-Amethyst-Geode-Crystal-Sphere-Spheres-Dream-Amethyst-Weight-138g-16.webp?v=1765383444"}},"requires_selling_plan":false,"selling_plan_allocations":[]},{"id":45941100642475,"title":"Dream Amethyst \/ Weight 279g","option1":"Dream Amethyst","option2":"Weight 279g","option3":null,"sku":"1005010035065208-Weight 279g","requires_shipping":true,"taxable":true,"featured_image":{"id":40921467715755,"product_id":8603309375659,"position":3,"created_at":"2025-12-09T14:38:23-05:00","updated_at":"2025-12-10T11:17:04-05:00","alt":"Dream Amethyst Geode Crystal Sphere-Spheres-Ali-Dream Amethyst-Weight 279g-Crystal Destiny","width":1000,"height":1000,"src":"\/\/crystaldestiny.com\/cdn\/shop\/files\/Dream-Amethyst-Geode-Crystal-Sphere-Spheres-Dream-Amethyst-Weight-279g-3.webp?v=1765383424","variant_ids":[45941100642475]},"available":true,"name":"Dream Amethyst Geode Crystal Sphere - Dream Amethyst \/ Weight 279g","public_title":"Dream Amethyst \/ Weight 279g","options":["Dream Amethyst","Weight 279g"],"price":8399,"weight":400,"compare_at_price":0,"inventory_management":"shopify","barcode":null,"featured_media":{"alt":"Dream Amethyst Geode Crystal Sphere-Spheres-Ali-Dream Amethyst-Weight 279g-Crystal Destiny","id":32289035845803,"position":3,"preview_image":{"aspect_ratio":1.0,"height":1000,"width":1000,"src":"\/\/crystaldestiny.com\/cdn\/shop\/files\/Dream-Amethyst-Geode-Crystal-Sphere-Spheres-Dream-Amethyst-Weight-279g-3.webp?v=1765383424"}},"requires_selling_plan":false,"selling_plan_allocations":[]},{"id":45941100675243,"title":"Dream Amethyst \/ Weight 223g","option1":"Dream Amethyst","option2":"Weight 223g","option3":null,"sku":"1005010035065208-Weight 223g","requires_shipping":true,"taxable":true,"featured_image":{"id":40921468174507,"product_id":8603309375659,"position":17,"created_at":"2025-12-09T14:38:23-05:00","updated_at":"2025-12-10T11:17:26-05:00","alt":"Dream Amethyst Geode Crystal Sphere-Spheres-Ali-Dream Amethyst-Weight 223g-Crystal Destiny","width":1000,"height":1000,"src":"\/\/crystaldestiny.com\/cdn\/shop\/files\/Dream-Amethyst-Geode-Crystal-Sphere-Spheres-Dream-Amethyst-Weight-223g-17.webp?v=1765383446","variant_ids":[45941100675243]},"available":true,"name":"Dream Amethyst Geode Crystal Sphere - Dream Amethyst \/ Weight 223g","public_title":"Dream Amethyst \/ Weight 223g","options":["Dream Amethyst","Weight 223g"],"price":7599,"weight":400,"compare_at_price":0,"inventory_management":"shopify","barcode":null,"featured_media":{"alt":"Dream Amethyst Geode Crystal Sphere-Spheres-Ali-Dream Amethyst-Weight 223g-Crystal Destiny","id":32289036304555,"position":17,"preview_image":{"aspect_ratio":1.0,"height":1000,"width":1000,"src":"\/\/crystaldestiny.com\/cdn\/shop\/files\/Dream-Amethyst-Geode-Crystal-Sphere-Spheres-Dream-Amethyst-Weight-223g-17.webp?v=1765383446"}},"requires_selling_plan":false,"selling_plan_allocations":[]},{"id":45941100708011,"title":"Dream Amethyst \/ Weight 252g","option1":"Dream Amethyst","option2":"Weight 252g","option3":null,"sku":"1005010035065208-Weight 252g","requires_shipping":true,"taxable":true,"featured_image":{"id":40921468207275,"product_id":8603309375659,"position":18,"created_at":"2025-12-09T14:38:23-05:00","updated_at":"2025-12-10T11:17:27-05:00","alt":"Dream Amethyst Geode Crystal Sphere-Spheres-Ali-Dream Amethyst-Weight 252g-Crystal Destiny","width":1000,"height":1000,"src":"\/\/crystaldestiny.com\/cdn\/shop\/files\/Dream-Amethyst-Geode-Crystal-Sphere-Spheres-Dream-Amethyst-Weight-252g-18.webp?v=1765383447","variant_ids":[45941100708011]},"available":true,"name":"Dream Amethyst Geode Crystal Sphere - Dream Amethyst \/ Weight 252g","public_title":"Dream Amethyst \/ Weight 252g","options":["Dream Amethyst","Weight 252g"],"price":8199,"weight":400,"compare_at_price":0,"inventory_management":"shopify","barcode":null,"featured_media":{"alt":"Dream Amethyst Geode Crystal Sphere-Spheres-Ali-Dream Amethyst-Weight 252g-Crystal Destiny","id":32289036337323,"position":18,"preview_image":{"aspect_ratio":1.0,"height":1000,"width":1000,"src":"\/\/crystaldestiny.com\/cdn\/shop\/files\/Dream-Amethyst-Geode-Crystal-Sphere-Spheres-Dream-Amethyst-Weight-252g-18.webp?v=1765383447"}},"requires_selling_plan":false,"selling_plan_allocations":[]},{"id":45941100740779,"title":"Dream Amethyst \/ Weight 353g","option1":"Dream Amethyst","option2":"Weight 353g","option3":null,"sku":"1005010035065208-Weight 353g","requires_shipping":true,"taxable":true,"featured_image":{"id":40921468371115,"product_id":8603309375659,"position":23,"created_at":"2025-12-09T14:38:23-05:00","updated_at":"2025-12-10T11:17:34-05:00","alt":"Dream Amethyst Geode Crystal Sphere-Spheres-Ali-Dream Amethyst-Weight 353g-Crystal Destiny","width":1000,"height":1000,"src":"\/\/crystaldestiny.com\/cdn\/shop\/files\/Dream-Amethyst-Geode-Crystal-Sphere-Spheres-Dream-Amethyst-Weight-353g-23.webp?v=1765383454","variant_ids":[45941100740779]},"available":false,"name":"Dream Amethyst Geode Crystal Sphere - Dream Amethyst \/ Weight 353g","public_title":"Dream Amethyst \/ Weight 353g","options":["Dream Amethyst","Weight 353g"],"price":10199,"weight":400,"compare_at_price":0,"inventory_management":"shopify","barcode":null,"featured_media":{"alt":"Dream Amethyst Geode Crystal Sphere-Spheres-Ali-Dream Amethyst-Weight 353g-Crystal Destiny","id":32289036501163,"position":23,"preview_image":{"aspect_ratio":1.0,"height":1000,"width":1000,"src":"\/\/crystaldestiny.com\/cdn\/shop\/files\/Dream-Amethyst-Geode-Crystal-Sphere-Spheres-Dream-Amethyst-Weight-353g-23.webp?v=1765383454"}},"requires_selling_plan":false,"selling_plan_allocations":[]},{"id":45941100773547,"title":"Dream Amethyst \/ Weight 363g","option1":"Dream Amethyst","option2":"Weight 363g","option3":null,"sku":"1005010035065208-Weight 363g","requires_shipping":true,"taxable":true,"featured_image":{"id":40921468698795,"product_id":8603309375659,"position":33,"created_at":"2025-12-09T14:38:23-05:00","updated_at":"2025-12-10T11:17:49-05:00","alt":"Dream Amethyst Geode Crystal Sphere-Spheres-Ali-Dream Amethyst-Weight 363g-Crystal Destiny","width":1000,"height":1000,"src":"\/\/crystaldestiny.com\/cdn\/shop\/files\/Dream-Amethyst-Geode-Crystal-Sphere-Spheres-Dream-Amethyst-Weight-363g-33.webp?v=1765383469","variant_ids":[45941100773547]},"available":false,"name":"Dream Amethyst Geode Crystal Sphere - Dream Amethyst \/ Weight 363g","public_title":"Dream Amethyst \/ Weight 363g","options":["Dream Amethyst","Weight 363g"],"price":10399,"weight":400,"compare_at_price":0,"inventory_management":"shopify","barcode":null,"featured_media":{"alt":"Dream Amethyst Geode Crystal Sphere-Spheres-Ali-Dream Amethyst-Weight 363g-Crystal Destiny","id":32289036828843,"position":33,"preview_image":{"aspect_ratio":1.0,"height":1000,"width":1000,"src":"\/\/crystaldestiny.com\/cdn\/shop\/files\/Dream-Amethyst-Geode-Crystal-Sphere-Spheres-Dream-Amethyst-Weight-363g-33.webp?v=1765383469"}},"requires_selling_plan":false,"selling_plan_allocations":[]},{"id":45941100806315,"title":"Dream Amethyst \/ Weight 292g","option1":"Dream Amethyst","option2":"Weight 292g","option3":null,"sku":"1005010035065208-Weight 292g","requires_shipping":true,"taxable":true,"featured_image":{"id":40921468403883,"product_id":8603309375659,"position":24,"created_at":"2025-12-09T14:38:23-05:00","updated_at":"2025-12-10T11:17:36-05:00","alt":"Dream Amethyst Geode Crystal Sphere-Spheres-Ali-Dream Amethyst-Weight 292g-Crystal Destiny","width":1000,"height":1000,"src":"\/\/crystaldestiny.com\/cdn\/shop\/files\/Dream-Amethyst-Geode-Crystal-Sphere-Spheres-Dream-Amethyst-Weight-292g-24.webp?v=1765383456","variant_ids":[45941100806315]},"available":true,"name":"Dream Amethyst Geode Crystal Sphere - Dream Amethyst \/ Weight 292g","public_title":"Dream Amethyst \/ Weight 292g","options":["Dream Amethyst","Weight 292g"],"price":8599,"weight":400,"compare_at_price":0,"inventory_management":"shopify","barcode":null,"featured_media":{"alt":"Dream Amethyst Geode Crystal Sphere-Spheres-Ali-Dream Amethyst-Weight 292g-Crystal Destiny","id":32289036533931,"position":24,"preview_image":{"aspect_ratio":1.0,"height":1000,"width":1000,"src":"\/\/crystaldestiny.com\/cdn\/shop\/files\/Dream-Amethyst-Geode-Crystal-Sphere-Spheres-Dream-Amethyst-Weight-292g-24.webp?v=1765383456"}},"requires_selling_plan":false,"selling_plan_allocations":[]},{"id":45941100839083,"title":"Dream Amethyst \/ Weight 316g","option1":"Dream Amethyst","option2":"Weight 316g","option3":null,"sku":"1005010035065208-Weight 316g","requires_shipping":true,"taxable":true,"featured_image":{"id":40921467748523,"product_id":8603309375659,"position":4,"created_at":"2025-12-09T14:38:23-05:00","updated_at":"2025-12-10T11:17:05-05:00","alt":"Dream Amethyst Geode Crystal Sphere-Spheres-Ali-Dream Amethyst-Weight 316g-Crystal Destiny","width":1000,"height":1000,"src":"\/\/crystaldestiny.com\/cdn\/shop\/files\/Dream-Amethyst-Geode-Crystal-Sphere-Spheres-Dream-Amethyst-Weight-316g-4.webp?v=1765383425","variant_ids":[45941100839083]},"available":true,"name":"Dream Amethyst Geode Crystal Sphere - Dream Amethyst \/ Weight 316g","public_title":"Dream Amethyst \/ Weight 316g","options":["Dream Amethyst","Weight 316g"],"price":9099,"weight":400,"compare_at_price":0,"inventory_management":"shopify","barcode":null,"featured_media":{"alt":"Dream Amethyst Geode Crystal Sphere-Spheres-Ali-Dream Amethyst-Weight 316g-Crystal Destiny","id":32289035878571,"position":4,"preview_image":{"aspect_ratio":1.0,"height":1000,"width":1000,"src":"\/\/crystaldestiny.com\/cdn\/shop\/files\/Dream-Amethyst-Geode-Crystal-Sphere-Spheres-Dream-Amethyst-Weight-316g-4.webp?v=1765383425"}},"requires_selling_plan":false,"selling_plan_allocations":[]},{"id":45941100871851,"title":"Dream Amethyst \/ Weight 261g","option1":"Dream Amethyst","option2":"Weight 261g","option3":null,"sku":"1005010035065208-Weight 261g","requires_shipping":true,"taxable":true,"featured_image":{"id":40921468436651,"product_id":8603309375659,"position":25,"created_at":"2025-12-09T14:38:23-05:00","updated_at":"2025-12-10T11:17:37-05:00","alt":"Dream Amethyst Geode Crystal Sphere-Spheres-Ali-Dream Amethyst-Weight 261g-Crystal Destiny","width":1000,"height":1000,"src":"\/\/crystaldestiny.com\/cdn\/shop\/files\/Dream-Amethyst-Geode-Crystal-Sphere-Spheres-Dream-Amethyst-Weight-261g-25.webp?v=1765383457","variant_ids":[45941100871851]},"available":true,"name":"Dream Amethyst Geode Crystal Sphere - Dream Amethyst \/ Weight 261g","public_title":"Dream Amethyst \/ Weight 261g","options":["Dream Amethyst","Weight 261g"],"price":8499,"weight":400,"compare_at_price":0,"inventory_management":"shopify","barcode":null,"featured_media":{"alt":"Dream Amethyst Geode Crystal Sphere-Spheres-Ali-Dream Amethyst-Weight 261g-Crystal Destiny","id":32289036566699,"position":25,"preview_image":{"aspect_ratio":1.0,"height":1000,"width":1000,"src":"\/\/crystaldestiny.com\/cdn\/shop\/files\/Dream-Amethyst-Geode-Crystal-Sphere-Spheres-Dream-Amethyst-Weight-261g-25.webp?v=1765383457"}},"requires_selling_plan":false,"selling_plan_allocations":[]},{"id":45941100904619,"title":"Dream Amethyst \/ Weight 337g","option1":"Dream Amethyst","option2":"Weight 337g","option3":null,"sku":"1005010035065208-Weight 337g","requires_shipping":true,"taxable":true,"featured_image":{"id":40921467814059,"product_id":8603309375659,"position":6,"created_at":"2025-12-09T14:38:23-05:00","updated_at":"2025-12-10T11:17:08-05:00","alt":"Dream Amethyst Geode Crystal Sphere-Spheres-Ali-Dream Amethyst-Weight 337g-Crystal Destiny","width":1000,"height":1000,"src":"\/\/crystaldestiny.com\/cdn\/shop\/files\/Dream-Amethyst-Geode-Crystal-Sphere-Spheres-Dream-Amethyst-Weight-337g-6.webp?v=1765383428","variant_ids":[45941100904619]},"available":true,"name":"Dream Amethyst Geode Crystal Sphere - Dream Amethyst \/ Weight 337g","public_title":"Dream Amethyst \/ Weight 337g","options":["Dream Amethyst","Weight 337g"],"price":9599,"weight":400,"compare_at_price":0,"inventory_management":"shopify","barcode":null,"featured_media":{"alt":"Dream Amethyst Geode Crystal Sphere-Spheres-Ali-Dream Amethyst-Weight 337g-Crystal Destiny","id":32289035944107,"position":6,"preview_image":{"aspect_ratio":1.0,"height":1000,"width":1000,"src":"\/\/crystaldestiny.com\/cdn\/shop\/files\/Dream-Amethyst-Geode-Crystal-Sphere-Spheres-Dream-Amethyst-Weight-337g-6.webp?v=1765383428"}},"requires_selling_plan":false,"selling_plan_allocations":[]},{"id":45941100937387,"title":"Dream Amethyst \/ Weight 216g","option1":"Dream Amethyst","option2":"Weight 216g","option3":null,"sku":"1005010035065208-Weight 216g","requires_shipping":true,"taxable":true,"featured_image":{"id":40921467945131,"product_id":8603309375659,"position":10,"created_at":"2025-12-09T14:38:23-05:00","updated_at":"2025-12-10T11:17:14-05:00","alt":"Dream Amethyst Geode Crystal Sphere-Spheres-Ali-Dream Amethyst-Weight 216g-Crystal Destiny","width":1000,"height":1000,"src":"\/\/crystaldestiny.com\/cdn\/shop\/files\/Dream-Amethyst-Geode-Crystal-Sphere-Spheres-Dream-Amethyst-Weight-216g-10.webp?v=1765383434","variant_ids":[45941100937387]},"available":true,"name":"Dream Amethyst Geode Crystal Sphere - Dream Amethyst \/ Weight 216g","public_title":"Dream Amethyst \/ Weight 216g","options":["Dream Amethyst","Weight 216g"],"price":7499,"weight":400,"compare_at_price":0,"inventory_management":"shopify","barcode":null,"featured_media":{"alt":"Dream Amethyst Geode Crystal Sphere-Spheres-Ali-Dream Amethyst-Weight 216g-Crystal Destiny","id":32289036075179,"position":10,"preview_image":{"aspect_ratio":1.0,"height":1000,"width":1000,"src":"\/\/crystaldestiny.com\/cdn\/shop\/files\/Dream-Amethyst-Geode-Crystal-Sphere-Spheres-Dream-Amethyst-Weight-216g-10.webp?v=1765383434"}},"requires_selling_plan":false,"selling_plan_allocations":[]},{"id":45941100970155,"title":"Dream Amethyst \/ Weight 196g","option1":"Dream Amethyst","option2":"Weight 196g","option3":null,"sku":"1005010035065208-Weight 196g","requires_shipping":true,"taxable":true,"featured_image":{"id":40921467977899,"product_id":8603309375659,"position":11,"created_at":"2025-12-09T14:38:23-05:00","updated_at":"2025-12-10T11:17:16-05:00","alt":"Dream Amethyst Geode Crystal Sphere-Spheres-Ali-Dream Amethyst-Weight 196g-Crystal Destiny","width":1000,"height":1000,"src":"\/\/crystaldestiny.com\/cdn\/shop\/files\/Dream-Amethyst-Geode-Crystal-Sphere-Spheres-Dream-Amethyst-Weight-196g-11.webp?v=1765383436","variant_ids":[45941100970155]},"available":true,"name":"Dream Amethyst Geode Crystal Sphere - Dream Amethyst \/ Weight 196g","public_title":"Dream Amethyst \/ Weight 196g","options":["Dream Amethyst","Weight 196g"],"price":6999,"weight":400,"compare_at_price":0,"inventory_management":"shopify","barcode":null,"featured_media":{"alt":"Dream Amethyst Geode Crystal Sphere-Spheres-Ali-Dream Amethyst-Weight 196g-Crystal Destiny","id":32289036107947,"position":11,"preview_image":{"aspect_ratio":1.0,"height":1000,"width":1000,"src":"\/\/crystaldestiny.com\/cdn\/shop\/files\/Dream-Amethyst-Geode-Crystal-Sphere-Spheres-Dream-Amethyst-Weight-196g-11.webp?v=1765383436"}},"requires_selling_plan":false,"selling_plan_allocations":[]},{"id":45941101002923,"title":"Dream Amethyst \/ Weight 260g","option1":"Dream Amethyst","option2":"Weight 260g","option3":null,"sku":"1005010035065208-Weight 260g","requires_shipping":true,"taxable":true,"featured_image":{"id":40921468469419,"product_id":8603309375659,"position":26,"created_at":"2025-12-09T14:38:23-05:00","updated_at":"2025-12-10T11:17:38-05:00","alt":"Dream Amethyst Geode Crystal Sphere-Spheres-Ali-Dream Amethyst-Weight 260g-Crystal Destiny","width":1000,"height":1000,"src":"\/\/crystaldestiny.com\/cdn\/shop\/files\/Dream-Amethyst-Geode-Crystal-Sphere-Spheres-Dream-Amethyst-Weight-260g-26.webp?v=1765383458","variant_ids":[45941101002923]},"available":true,"name":"Dream Amethyst Geode Crystal Sphere - Dream Amethyst \/ Weight 260g","public_title":"Dream Amethyst \/ Weight 260g","options":["Dream Amethyst","Weight 260g"],"price":8399,"weight":400,"compare_at_price":0,"inventory_management":"shopify","barcode":null,"featured_media":{"alt":"Dream Amethyst Geode Crystal Sphere-Spheres-Ali-Dream Amethyst-Weight 260g-Crystal Destiny","id":32289036599467,"position":26,"preview_image":{"aspect_ratio":1.0,"height":1000,"width":1000,"src":"\/\/crystaldestiny.com\/cdn\/shop\/files\/Dream-Amethyst-Geode-Crystal-Sphere-Spheres-Dream-Amethyst-Weight-260g-26.webp?v=1765383458"}},"requires_selling_plan":false,"selling_plan_allocations":[]},{"id":45941101035691,"title":"Dream Amethyst \/ Weight 188g","option1":"Dream Amethyst","option2":"Weight 188g","option3":null,"sku":"1005010035065208-Weight 188g","requires_shipping":true,"taxable":true,"featured_image":{"id":40921468731563,"product_id":8603309375659,"position":34,"created_at":"2025-12-09T14:38:23-05:00","updated_at":"2025-12-10T11:17:51-05:00","alt":"Dream Amethyst Geode Crystal Sphere-Spheres-Ali-Dream Amethyst-Weight 188g-Crystal Destiny","width":1000,"height":1000,"src":"\/\/crystaldestiny.com\/cdn\/shop\/files\/Dream-Amethyst-Geode-Crystal-Sphere-Spheres-Dream-Amethyst-Weight-188g-34.webp?v=1765383471","variant_ids":[45941101035691]},"available":true,"name":"Dream Amethyst Geode Crystal Sphere - Dream Amethyst \/ Weight 188g","public_title":"Dream Amethyst \/ Weight 188g","options":["Dream Amethyst","Weight 188g"],"price":6899,"weight":400,"compare_at_price":0,"inventory_management":"shopify","barcode":null,"featured_media":{"alt":"Dream Amethyst Geode Crystal Sphere-Spheres-Ali-Dream Amethyst-Weight 188g-Crystal Destiny","id":32289036861611,"position":34,"preview_image":{"aspect_ratio":1.0,"height":1000,"width":1000,"src":"\/\/crystaldestiny.com\/cdn\/shop\/files\/Dream-Amethyst-Geode-Crystal-Sphere-Spheres-Dream-Amethyst-Weight-188g-34.webp?v=1765383471"}},"requires_selling_plan":false,"selling_plan_allocations":[]},{"id":45941101068459,"title":"Dream Amethyst \/ Weight 292g 1","option1":"Dream Amethyst","option2":"Weight 292g 1","option3":null,"sku":"1005010035065208-Weight 292g 1","requires_shipping":true,"taxable":true,"featured_image":{"id":40921467781291,"product_id":8603309375659,"position":5,"created_at":"2025-12-09T14:38:23-05:00","updated_at":"2025-12-10T11:17:07-05:00","alt":"Dream Amethyst Geode Crystal Sphere-Spheres-Ali-Dream Amethyst-Weight 292g 1-Crystal Destiny","width":1000,"height":1000,"src":"\/\/crystaldestiny.com\/cdn\/shop\/files\/Dream-Amethyst-Geode-Crystal-Sphere-Spheres-Dream-Amethyst-Weight-292g-1-5.webp?v=1765383427","variant_ids":[45941101068459]},"available":true,"name":"Dream Amethyst Geode Crystal Sphere - Dream Amethyst \/ Weight 292g 1","public_title":"Dream Amethyst \/ Weight 292g 1","options":["Dream Amethyst","Weight 292g 1"],"price":8599,"weight":400,"compare_at_price":0,"inventory_management":"shopify","barcode":null,"featured_media":{"alt":"Dream Amethyst Geode Crystal Sphere-Spheres-Ali-Dream Amethyst-Weight 292g 1-Crystal Destiny","id":32289035911339,"position":5,"preview_image":{"aspect_ratio":1.0,"height":1000,"width":1000,"src":"\/\/crystaldestiny.com\/cdn\/shop\/files\/Dream-Amethyst-Geode-Crystal-Sphere-Spheres-Dream-Amethyst-Weight-292g-1-5.webp?v=1765383427"}},"requires_selling_plan":false,"selling_plan_allocations":[]},{"id":45941101101227,"title":"Dream Amethyst \/ Weight 213g","option1":"Dream Amethyst","option2":"Weight 213g","option3":null,"sku":"1005010035065208-Weight 213g","requires_shipping":true,"taxable":true,"featured_image":{"id":40921468010667,"product_id":8603309375659,"position":12,"created_at":"2025-12-09T14:38:23-05:00","updated_at":"2025-12-10T11:17:17-05:00","alt":"Dream Amethyst Geode Crystal Sphere-Spheres-Ali-Dream Amethyst-Weight 213g-Crystal Destiny","width":1000,"height":1000,"src":"\/\/crystaldestiny.com\/cdn\/shop\/files\/Dream-Amethyst-Geode-Crystal-Sphere-Spheres-Dream-Amethyst-Weight-213g-12.webp?v=1765383437","variant_ids":[45941101101227]},"available":false,"name":"Dream Amethyst Geode Crystal Sphere - Dream Amethyst \/ Weight 213g","public_title":"Dream Amethyst \/ Weight 213g","options":["Dream Amethyst","Weight 213g"],"price":7399,"weight":400,"compare_at_price":0,"inventory_management":"shopify","barcode":null,"featured_media":{"alt":"Dream Amethyst Geode Crystal Sphere-Spheres-Ali-Dream Amethyst-Weight 213g-Crystal Destiny","id":32289036140715,"position":12,"preview_image":{"aspect_ratio":1.0,"height":1000,"width":1000,"src":"\/\/crystaldestiny.com\/cdn\/shop\/files\/Dream-Amethyst-Geode-Crystal-Sphere-Spheres-Dream-Amethyst-Weight-213g-12.webp?v=1765383437"}},"requires_selling_plan":false,"selling_plan_allocations":[]},{"id":45941101133995,"title":"Dream Amethyst \/ Weight 289g","option1":"Dream Amethyst","option2":"Weight 289g","option3":null,"sku":"1005010035065208-Weight 289g","requires_shipping":true,"taxable":true,"featured_image":{"id":40921468305579,"product_id":8603309375659,"position":21,"created_at":"2025-12-09T14:38:23-05:00","updated_at":"2025-12-10T11:17:31-05:00","alt":"Dream Amethyst Geode Crystal Sphere-Spheres-Ali-Dream Amethyst-Weight 289g-Crystal Destiny","width":1000,"height":1000,"src":"\/\/crystaldestiny.com\/cdn\/shop\/files\/Dream-Amethyst-Geode-Crystal-Sphere-Spheres-Dream-Amethyst-Weight-289g-21.webp?v=1765383451","variant_ids":[45941101133995]},"available":true,"name":"Dream Amethyst Geode Crystal Sphere - Dream Amethyst \/ Weight 289g","public_title":"Dream Amethyst \/ Weight 289g","options":["Dream Amethyst","Weight 289g"],"price":8599,"weight":400,"compare_at_price":0,"inventory_management":"shopify","barcode":null,"featured_media":{"alt":"Dream Amethyst Geode Crystal Sphere-Spheres-Ali-Dream Amethyst-Weight 289g-Crystal Destiny","id":32289036435627,"position":21,"preview_image":{"aspect_ratio":1.0,"height":1000,"width":1000,"src":"\/\/crystaldestiny.com\/cdn\/shop\/files\/Dream-Amethyst-Geode-Crystal-Sphere-Spheres-Dream-Amethyst-Weight-289g-21.webp?v=1765383451"}},"requires_selling_plan":false,"selling_plan_allocations":[]},{"id":45941101166763,"title":"Dream Amethyst \/ Weight 277g","option1":"Dream Amethyst","option2":"Weight 277g","option3":null,"sku":"1005010035065208-Weight 277g","requires_shipping":true,"taxable":true,"featured_image":{"id":40921467846827,"product_id":8603309375659,"position":7,"created_at":"2025-12-09T14:38:23-05:00","updated_at":"2025-12-10T11:17:10-05:00","alt":"Dream Amethyst Geode Crystal Sphere-Spheres-Ali-Dream Amethyst-Weight 277g-Crystal Destiny","width":1000,"height":1000,"src":"\/\/crystaldestiny.com\/cdn\/shop\/files\/Dream-Amethyst-Geode-Crystal-Sphere-Spheres-Dream-Amethyst-Weight-277g-7.webp?v=1765383430","variant_ids":[45941101166763]},"available":true,"name":"Dream Amethyst Geode Crystal Sphere - Dream Amethyst \/ Weight 277g","public_title":"Dream Amethyst \/ Weight 277g","options":["Dream Amethyst","Weight 277g"],"price":8299,"weight":400,"compare_at_price":0,"inventory_management":"shopify","barcode":null,"featured_media":{"alt":"Dream Amethyst Geode Crystal Sphere-Spheres-Ali-Dream Amethyst-Weight 277g-Crystal Destiny","id":32289035976875,"position":7,"preview_image":{"aspect_ratio":1.0,"height":1000,"width":1000,"src":"\/\/crystaldestiny.com\/cdn\/shop\/files\/Dream-Amethyst-Geode-Crystal-Sphere-Spheres-Dream-Amethyst-Weight-277g-7.webp?v=1765383430"}},"requires_selling_plan":false,"selling_plan_allocations":[]},{"id":45941101199531,"title":"Dream Amethyst \/ Weight 164g","option1":"Dream Amethyst","option2":"Weight 164g","option3":null,"sku":"1005010035065208-Weight 164g","requires_shipping":true,"taxable":true,"featured_image":{"id":40921468600491,"product_id":8603309375659,"position":30,"created_at":"2025-12-09T14:38:23-05:00","updated_at":"2025-12-10T11:17:45-05:00","alt":"Dream Amethyst Geode Crystal Sphere-Spheres-Ali-Dream Amethyst-Weight 164g-Crystal Destiny","width":1000,"height":1000,"src":"\/\/crystaldestiny.com\/cdn\/shop\/files\/Dream-Amethyst-Geode-Crystal-Sphere-Spheres-Dream-Amethyst-Weight-164g-30.webp?v=1765383465","variant_ids":[45941101199531]},"available":true,"name":"Dream Amethyst Geode Crystal Sphere - Dream Amethyst \/ Weight 164g","public_title":"Dream Amethyst \/ Weight 164g","options":["Dream Amethyst","Weight 164g"],"price":6199,"weight":400,"compare_at_price":0,"inventory_management":"shopify","barcode":null,"featured_media":{"alt":"Dream Amethyst Geode Crystal Sphere-Spheres-Ali-Dream Amethyst-Weight 164g-Crystal Destiny","id":32289036730539,"position":30,"preview_image":{"aspect_ratio":1.0,"height":1000,"width":1000,"src":"\/\/crystaldestiny.com\/cdn\/shop\/files\/Dream-Amethyst-Geode-Crystal-Sphere-Spheres-Dream-Amethyst-Weight-164g-30.webp?v=1765383465"}},"requires_selling_plan":false,"selling_plan_allocations":[]},{"id":45941101232299,"title":"Dream Amethyst \/ Weight 258g","option1":"Dream Amethyst","option2":"Weight 258g","option3":null,"sku":"1005010035065208-Weight 258g","requires_shipping":true,"taxable":true,"featured_image":{"id":40921468240043,"product_id":8603309375659,"position":19,"created_at":"2025-12-09T14:38:23-05:00","updated_at":"2025-12-10T11:17:28-05:00","alt":"Dream Amethyst Geode Crystal Sphere-Spheres-Ali-Dream Amethyst-Weight 258g-Crystal Destiny","width":1000,"height":1000,"src":"\/\/crystaldestiny.com\/cdn\/shop\/files\/Dream-Amethyst-Geode-Crystal-Sphere-Spheres-Dream-Amethyst-Weight-258g-19.webp?v=1765383448","variant_ids":[45941101232299]},"available":true,"name":"Dream Amethyst Geode Crystal Sphere - Dream Amethyst \/ Weight 258g","public_title":"Dream Amethyst \/ Weight 258g","options":["Dream Amethyst","Weight 258g"],"price":8599,"weight":400,"compare_at_price":0,"inventory_management":"shopify","barcode":null,"featured_media":{"alt":"Dream Amethyst Geode Crystal Sphere-Spheres-Ali-Dream Amethyst-Weight 258g-Crystal Destiny","id":32289036370091,"position":19,"preview_image":{"aspect_ratio":1.0,"height":1000,"width":1000,"src":"\/\/crystaldestiny.com\/cdn\/shop\/files\/Dream-Amethyst-Geode-Crystal-Sphere-Spheres-Dream-Amethyst-Weight-258g-19.webp?v=1765383448"}},"requires_selling_plan":false,"selling_plan_allocations":[]},{"id":45941101265067,"title":"Dream Amethyst \/ Weight 220g","option1":"Dream Amethyst","option2":"Weight 220g","option3":null,"sku":"1005010035065208-Weight 220g","requires_shipping":true,"taxable":true,"featured_image":{"id":40921468338347,"product_id":8603309375659,"position":22,"created_at":"2025-12-09T14:38:23-05:00","updated_at":"2025-12-10T11:17:33-05:00","alt":"Dream Amethyst Geode Crystal Sphere-Spheres-Ali-Dream Amethyst-Weight 220g-Crystal Destiny","width":1000,"height":1000,"src":"\/\/crystaldestiny.com\/cdn\/shop\/files\/Dream-Amethyst-Geode-Crystal-Sphere-Spheres-Dream-Amethyst-Weight-220g-22.webp?v=1765383453","variant_ids":[45941101265067]},"available":true,"name":"Dream Amethyst Geode Crystal Sphere - Dream Amethyst \/ Weight 220g","public_title":"Dream Amethyst \/ Weight 220g","options":["Dream Amethyst","Weight 220g"],"price":7499,"weight":400,"compare_at_price":0,"inventory_management":"shopify","barcode":null,"featured_media":{"alt":"Dream Amethyst Geode Crystal Sphere-Spheres-Ali-Dream Amethyst-Weight 220g-Crystal Destiny","id":32289036468395,"position":22,"preview_image":{"aspect_ratio":1.0,"height":1000,"width":1000,"src":"\/\/crystaldestiny.com\/cdn\/shop\/files\/Dream-Amethyst-Geode-Crystal-Sphere-Spheres-Dream-Amethyst-Weight-220g-22.webp?v=1765383453"}},"requires_selling_plan":false,"selling_plan_allocations":[]},{"id":45941101297835,"title":"Dream Amethyst \/ Weight 232g","option1":"Dream Amethyst","option2":"Weight 232g","option3":null,"sku":"1005010035065208-Weight 232g","requires_shipping":true,"taxable":true,"featured_image":{"id":40921468043435,"product_id":8603309375659,"position":13,"created_at":"2025-12-09T14:38:23-05:00","updated_at":"2025-12-10T11:17:19-05:00","alt":"Dream Amethyst Geode Crystal Sphere-Spheres-Ali-Dream Amethyst-Weight 232g-Crystal Destiny","width":1000,"height":1000,"src":"\/\/crystaldestiny.com\/cdn\/shop\/files\/Dream-Amethyst-Geode-Crystal-Sphere-Spheres-Dream-Amethyst-Weight-232g-13.webp?v=1765383439","variant_ids":[45941101297835]},"available":true,"name":"Dream Amethyst Geode Crystal Sphere - Dream Amethyst \/ Weight 232g","public_title":"Dream Amethyst \/ Weight 232g","options":["Dream Amethyst","Weight 232g"],"price":7799,"weight":400,"compare_at_price":0,"inventory_management":"shopify","barcode":null,"featured_media":{"alt":"Dream Amethyst Geode Crystal Sphere-Spheres-Ali-Dream Amethyst-Weight 232g-Crystal Destiny","id":32289036173483,"position":13,"preview_image":{"aspect_ratio":1.0,"height":1000,"width":1000,"src":"\/\/crystaldestiny.com\/cdn\/shop\/files\/Dream-Amethyst-Geode-Crystal-Sphere-Spheres-Dream-Amethyst-Weight-232g-13.webp?v=1765383439"}},"requires_selling_plan":false,"selling_plan_allocations":[]},{"id":45941101330603,"title":"Dream Amethyst \/ Weight 250g","option1":"Dream Amethyst","option2":"Weight 250g","option3":null,"sku":"1005010035065208-Weight 250g","requires_shipping":true,"taxable":true,"featured_image":{"id":40921468272811,"product_id":8603309375659,"position":20,"created_at":"2025-12-09T14:38:23-05:00","updated_at":"2025-12-10T11:17:30-05:00","alt":"Dream Amethyst Geode Crystal Sphere-Spheres-Ali-Dream Amethyst-Weight 250g-Crystal Destiny","width":1000,"height":1000,"src":"\/\/crystaldestiny.com\/cdn\/shop\/files\/Dream-Amethyst-Geode-Crystal-Sphere-Spheres-Dream-Amethyst-Weight-250g-20.webp?v=1765383450","variant_ids":[45941101330603]},"available":true,"name":"Dream Amethyst Geode Crystal Sphere - Dream Amethyst \/ Weight 250g","public_title":"Dream Amethyst \/ Weight 250g","options":["Dream Amethyst","Weight 250g"],"price":8199,"weight":400,"compare_at_price":0,"inventory_management":"shopify","barcode":null,"featured_media":{"alt":"Dream Amethyst Geode Crystal Sphere-Spheres-Ali-Dream Amethyst-Weight 250g-Crystal Destiny","id":32289036402859,"position":20,"preview_image":{"aspect_ratio":1.0,"height":1000,"width":1000,"src":"\/\/crystaldestiny.com\/cdn\/shop\/files\/Dream-Amethyst-Geode-Crystal-Sphere-Spheres-Dream-Amethyst-Weight-250g-20.webp?v=1765383450"}},"requires_selling_plan":false,"selling_plan_allocations":[]},{"id":45941101363371,"title":"Dream Amethyst \/ Weight 271g","option1":"Dream Amethyst","option2":"Weight 271g","option3":null,"sku":"1005010035065208-Weight 271g","requires_shipping":true,"taxable":true,"featured_image":{"id":40921468764331,"product_id":8603309375659,"position":35,"created_at":"2025-12-09T14:38:23-05:00","updated_at":"2025-12-10T11:17:52-05:00","alt":"Dream Amethyst Geode Crystal Sphere-Spheres-Ali-Dream Amethyst-Weight 271g-Crystal Destiny","width":1000,"height":1000,"src":"\/\/crystaldestiny.com\/cdn\/shop\/files\/Dream-Amethyst-Geode-Crystal-Sphere-Spheres-Dream-Amethyst-Weight-271g-35.webp?v=1765383472","variant_ids":[45941101363371]},"available":false,"name":"Dream Amethyst Geode Crystal Sphere - Dream Amethyst \/ Weight 271g","public_title":"Dream Amethyst \/ Weight 271g","options":["Dream Amethyst","Weight 271g"],"price":8599,"weight":400,"compare_at_price":0,"inventory_management":"shopify","barcode":null,"featured_media":{"alt":"Dream Amethyst Geode Crystal Sphere-Spheres-Ali-Dream Amethyst-Weight 271g-Crystal Destiny","id":32289036894379,"position":35,"preview_image":{"aspect_ratio":1.0,"height":1000,"width":1000,"src":"\/\/crystaldestiny.com\/cdn\/shop\/files\/Dream-Amethyst-Geode-Crystal-Sphere-Spheres-Dream-Amethyst-Weight-271g-35.webp?v=1765383472"}},"requires_selling_plan":false,"selling_plan_allocations":[]},{"id":45941101396139,"title":"Dream Amethyst \/ Weight 271g 1","option1":"Dream Amethyst","option2":"Weight 271g 1","option3":null,"sku":"1005010035065208-Weight 271g 1","requires_shipping":true,"taxable":true,"featured_image":{"id":40921468633259,"product_id":8603309375659,"position":31,"created_at":"2025-12-09T14:38:23-05:00","updated_at":"2025-12-10T11:17:46-05:00","alt":"Dream Amethyst Geode Crystal Sphere-Spheres-Ali-Dream Amethyst-Weight 271g 1-Crystal Destiny","width":1000,"height":1000,"src":"\/\/crystaldestiny.com\/cdn\/shop\/files\/Dream-Amethyst-Geode-Crystal-Sphere-Spheres-Dream-Amethyst-Weight-271g-1-31.webp?v=1765383466","variant_ids":[45941101396139]},"available":false,"name":"Dream Amethyst Geode Crystal Sphere - Dream Amethyst \/ Weight 271g 1","public_title":"Dream Amethyst \/ Weight 271g 1","options":["Dream Amethyst","Weight 271g 1"],"price":8599,"weight":400,"compare_at_price":0,"inventory_management":"shopify","barcode":null,"featured_media":{"alt":"Dream Amethyst Geode Crystal Sphere-Spheres-Ali-Dream Amethyst-Weight 271g 1-Crystal Destiny","id":32289036763307,"position":31,"preview_image":{"aspect_ratio":1.0,"height":1000,"width":1000,"src":"\/\/crystaldestiny.com\/cdn\/shop\/files\/Dream-Amethyst-Geode-Crystal-Sphere-Spheres-Dream-Amethyst-Weight-271g-1-31.webp?v=1765383466"}},"requires_selling_plan":false,"selling_plan_allocations":[]},{"id":45941101428907,"title":"Dream Amethyst \/ Weight 161g","option1":"Dream Amethyst","option2":"Weight 161g","option3":null,"sku":"1005010035065208-Weight 161g","requires_shipping":true,"taxable":true,"featured_image":{"id":40921468502187,"product_id":8603309375659,"position":27,"created_at":"2025-12-09T14:38:23-05:00","updated_at":"2025-12-10T11:17:40-05:00","alt":"Dream Amethyst Geode Crystal Sphere-Spheres-Ali-Dream Amethyst-Weight 161g-Crystal Destiny","width":1000,"height":1000,"src":"\/\/crystaldestiny.com\/cdn\/shop\/files\/Dream-Amethyst-Geode-Crystal-Sphere-Spheres-Dream-Amethyst-Weight-161g-27.webp?v=1765383460","variant_ids":[45941101428907]},"available":true,"name":"Dream Amethyst Geode Crystal Sphere - Dream Amethyst \/ Weight 161g","public_title":"Dream Amethyst \/ Weight 161g","options":["Dream Amethyst","Weight 161g"],"price":6299,"weight":400,"compare_at_price":0,"inventory_management":"shopify","barcode":null,"featured_media":{"alt":"Dream Amethyst Geode Crystal Sphere-Spheres-Ali-Dream Amethyst-Weight 161g-Crystal Destiny","id":32289036632235,"position":27,"preview_image":{"aspect_ratio":1.0,"height":1000,"width":1000,"src":"\/\/crystaldestiny.com\/cdn\/shop\/files\/Dream-Amethyst-Geode-Crystal-Sphere-Spheres-Dream-Amethyst-Weight-161g-27.webp?v=1765383460"}},"requires_selling_plan":false,"selling_plan_allocations":[]},{"id":45941101461675,"title":"Dream Amethyst \/ Weight 311g","option1":"Dream Amethyst","option2":"Weight 311g","option3":null,"sku":"1005010035065208-Weight 311g","requires_shipping":true,"taxable":true,"featured_image":{"id":40921468076203,"product_id":8603309375659,"position":14,"created_at":"2025-12-09T14:38:23-05:00","updated_at":"2025-12-10T11:17:20-05:00","alt":"Dream Amethyst Geode Crystal Sphere-Spheres-Ali-Dream Amethyst-Weight 311g-Crystal Destiny","width":1000,"height":1000,"src":"\/\/crystaldestiny.com\/cdn\/shop\/files\/Dream-Amethyst-Geode-Crystal-Sphere-Spheres-Dream-Amethyst-Weight-311g-14.webp?v=1765383440","variant_ids":[45941101461675]},"available":true,"name":"Dream Amethyst Geode Crystal Sphere - Dream Amethyst \/ Weight 311g","public_title":"Dream Amethyst \/ Weight 311g","options":["Dream Amethyst","Weight 311g"],"price":8999,"weight":400,"compare_at_price":0,"inventory_management":"shopify","barcode":null,"featured_media":{"alt":"Dream Amethyst Geode Crystal Sphere-Spheres-Ali-Dream Amethyst-Weight 311g-Crystal Destiny","id":32289036206251,"position":14,"preview_image":{"aspect_ratio":1.0,"height":1000,"width":1000,"src":"\/\/crystaldestiny.com\/cdn\/shop\/files\/Dream-Amethyst-Geode-Crystal-Sphere-Spheres-Dream-Amethyst-Weight-311g-14.webp?v=1765383440"}},"requires_selling_plan":false,"selling_plan_allocations":[]},{"id":45941101494443,"title":"Dream Amethyst \/ Weight 296g","option1":"Dream Amethyst","option2":"Weight 296g","option3":null,"sku":"1005010035065208-Weight 296g","requires_shipping":true,"taxable":true,"featured_image":{"id":40921468534955,"product_id":8603309375659,"position":28,"created_at":"2025-12-09T14:38:23-05:00","updated_at":"2025-12-10T11:17:41-05:00","alt":"Dream Amethyst Geode Crystal Sphere-Spheres-Ali-Dream Amethyst-Weight 296g-Crystal Destiny","width":1000,"height":1000,"src":"\/\/crystaldestiny.com\/cdn\/shop\/files\/Dream-Amethyst-Geode-Crystal-Sphere-Spheres-Dream-Amethyst-Weight-296g-28.webp?v=1765383461","variant_ids":[45941101494443]},"available":true,"name":"Dream Amethyst Geode Crystal Sphere - Dream Amethyst \/ Weight 296g","public_title":"Dream Amethyst \/ Weight 296g","options":["Dream Amethyst","Weight 296g"],"price":8699,"weight":400,"compare_at_price":0,"inventory_management":"shopify","barcode":null,"featured_media":{"alt":"Dream Amethyst Geode Crystal Sphere-Spheres-Ali-Dream Amethyst-Weight 296g-Crystal Destiny","id":32289036665003,"position":28,"preview_image":{"aspect_ratio":1.0,"height":1000,"width":1000,"src":"\/\/crystaldestiny.com\/cdn\/shop\/files\/Dream-Amethyst-Geode-Crystal-Sphere-Spheres-Dream-Amethyst-Weight-296g-28.webp?v=1765383461"}},"requires_selling_plan":false,"selling_plan_allocations":[]},{"id":45941101527211,"title":"Dream Amethyst \/ Weight 201g","option1":"Dream Amethyst","option2":"Weight 201g","option3":null,"sku":"1005010035065208-Weight 201g","requires_shipping":true,"taxable":true,"featured_image":{"id":40921468108971,"product_id":8603309375659,"position":15,"created_at":"2025-12-09T14:38:23-05:00","updated_at":"2025-12-10T11:17:22-05:00","alt":"Dream Amethyst Geode Crystal Sphere-Spheres-Ali-Dream Amethyst-Weight 201g-Crystal Destiny","width":1000,"height":1000,"src":"\/\/crystaldestiny.com\/cdn\/shop\/files\/Dream-Amethyst-Geode-Crystal-Sphere-Spheres-Dream-Amethyst-Weight-201g-15.webp?v=1765383442","variant_ids":[45941101527211]},"available":true,"name":"Dream Amethyst Geode Crystal Sphere - Dream Amethyst \/ Weight 201g","public_title":"Dream Amethyst \/ Weight 201g","options":["Dream Amethyst","Weight 201g"],"price":7099,"weight":400,"compare_at_price":0,"inventory_management":"shopify","barcode":null,"featured_media":{"alt":"Dream Amethyst Geode Crystal Sphere-Spheres-Ali-Dream Amethyst-Weight 201g-Crystal Destiny","id":32289036239019,"position":15,"preview_image":{"aspect_ratio":1.0,"height":1000,"width":1000,"src":"\/\/crystaldestiny.com\/cdn\/shop\/files\/Dream-Amethyst-Geode-Crystal-Sphere-Spheres-Dream-Amethyst-Weight-201g-15.webp?v=1765383442"}},"requires_selling_plan":false,"selling_plan_allocations":[]},{"id":45941101559979,"title":"Dream Amethyst \/ Weight 141g","option1":"Dream Amethyst","option2":"Weight 141g","option3":null,"sku":"1005010035065208-Weight 141g","requires_shipping":true,"taxable":true,"featured_image":{"id":40921468797099,"product_id":8603309375659,"position":36,"created_at":"2025-12-09T14:38:23-05:00","updated_at":"2025-12-10T11:17:54-05:00","alt":"Dream Amethyst Geode Crystal Sphere-Spheres-Ali-Dream Amethyst-Weight 141g-Crystal Destiny","width":1000,"height":1000,"src":"\/\/crystaldestiny.com\/cdn\/shop\/files\/Dream-Amethyst-Geode-Crystal-Sphere-Spheres-Dream-Amethyst-Weight-141g-36.webp?v=1765383474","variant_ids":[45941101559979]},"available":false,"name":"Dream Amethyst Geode Crystal Sphere - Dream Amethyst \/ Weight 141g","public_title":"Dream Amethyst \/ Weight 141g","options":["Dream Amethyst","Weight 141g"],"price":5899,"weight":400,"compare_at_price":0,"inventory_management":"shopify","barcode":null,"featured_media":{"alt":"Dream Amethyst Geode Crystal Sphere-Spheres-Ali-Dream Amethyst-Weight 141g-Crystal Destiny","id":32289036927147,"position":36,"preview_image":{"aspect_ratio":1.0,"height":1000,"width":1000,"src":"\/\/crystaldestiny.com\/cdn\/shop\/files\/Dream-Amethyst-Geode-Crystal-Sphere-Spheres-Dream-Amethyst-Weight-141g-36.webp?v=1765383474"}},"requires_selling_plan":false,"selling_plan_allocations":[]}],"images":["\/\/crystaldestiny.com\/cdn\/shop\/files\/Dream-Amethyst-Geode-Crystal-Sphere-Spheres-Dream-Amethyst-Weight-395g.webp?v=1765383421","\/\/crystaldestiny.com\/cdn\/shop\/files\/Dream-Amethyst-Geode-Crystal-Sphere-Spheres-Dream-Amethyst-Weight-246g-2.webp?v=1765383422","\/\/crystaldestiny.com\/cdn\/shop\/files\/Dream-Amethyst-Geode-Crystal-Sphere-Spheres-Dream-Amethyst-Weight-279g-3.webp?v=1765383424","\/\/crystaldestiny.com\/cdn\/shop\/files\/Dream-Amethyst-Geode-Crystal-Sphere-Spheres-Dream-Amethyst-Weight-316g-4.webp?v=1765383425","\/\/crystaldestiny.com\/cdn\/shop\/files\/Dream-Amethyst-Geode-Crystal-Sphere-Spheres-Dream-Amethyst-Weight-292g-1-5.webp?v=1765383427","\/\/crystaldestiny.com\/cdn\/shop\/files\/Dream-Amethyst-Geode-Crystal-Sphere-Spheres-Dream-Amethyst-Weight-337g-6.webp?v=1765383428","\/\/crystaldestiny.com\/cdn\/shop\/files\/Dream-Amethyst-Geode-Crystal-Sphere-Spheres-Dream-Amethyst-Weight-277g-7.webp?v=1765383430","\/\/crystaldestiny.com\/cdn\/shop\/files\/Dream-Amethyst-Geode-Crystal-Sphere-Spheres-Dream-Amethyst-Weight-283g-8.webp?v=1765383431","\/\/crystaldestiny.com\/cdn\/shop\/files\/Dream-Amethyst-Geode-Crystal-Sphere-Spheres-Dream-Amethyst-Weight-310g-9.webp?v=1765383433","\/\/crystaldestiny.com\/cdn\/shop\/files\/Dream-Amethyst-Geode-Crystal-Sphere-Spheres-Dream-Amethyst-Weight-216g-10.webp?v=1765383434","\/\/crystaldestiny.com\/cdn\/shop\/files\/Dream-Amethyst-Geode-Crystal-Sphere-Spheres-Dream-Amethyst-Weight-196g-11.webp?v=1765383436","\/\/crystaldestiny.com\/cdn\/shop\/files\/Dream-Amethyst-Geode-Crystal-Sphere-Spheres-Dream-Amethyst-Weight-213g-12.webp?v=1765383437","\/\/crystaldestiny.com\/cdn\/shop\/files\/Dream-Amethyst-Geode-Crystal-Sphere-Spheres-Dream-Amethyst-Weight-232g-13.webp?v=1765383439","\/\/crystaldestiny.com\/cdn\/shop\/files\/Dream-Amethyst-Geode-Crystal-Sphere-Spheres-Dream-Amethyst-Weight-311g-14.webp?v=1765383440","\/\/crystaldestiny.com\/cdn\/shop\/files\/Dream-Amethyst-Geode-Crystal-Sphere-Spheres-Dream-Amethyst-Weight-201g-15.webp?v=1765383442","\/\/crystaldestiny.com\/cdn\/shop\/files\/Dream-Amethyst-Geode-Crystal-Sphere-Spheres-Dream-Amethyst-Weight-138g-16.webp?v=1765383444","\/\/crystaldestiny.com\/cdn\/shop\/files\/Dream-Amethyst-Geode-Crystal-Sphere-Spheres-Dream-Amethyst-Weight-223g-17.webp?v=1765383446","\/\/crystaldestiny.com\/cdn\/shop\/files\/Dream-Amethyst-Geode-Crystal-Sphere-Spheres-Dream-Amethyst-Weight-252g-18.webp?v=1765383447","\/\/crystaldestiny.com\/cdn\/shop\/files\/Dream-Amethyst-Geode-Crystal-Sphere-Spheres-Dream-Amethyst-Weight-258g-19.webp?v=1765383448","\/\/crystaldestiny.com\/cdn\/shop\/files\/Dream-Amethyst-Geode-Crystal-Sphere-Spheres-Dream-Amethyst-Weight-250g-20.webp?v=1765383450","\/\/crystaldestiny.com\/cdn\/shop\/files\/Dream-Amethyst-Geode-Crystal-Sphere-Spheres-Dream-Amethyst-Weight-289g-21.webp?v=1765383451","\/\/crystaldestiny.com\/cdn\/shop\/files\/Dream-Amethyst-Geode-Crystal-Sphere-Spheres-Dream-Amethyst-Weight-220g-22.webp?v=1765383453","\/\/crystaldestiny.com\/cdn\/shop\/files\/Dream-Amethyst-Geode-Crystal-Sphere-Spheres-Dream-Amethyst-Weight-353g-23.webp?v=1765383454","\/\/crystaldestiny.com\/cdn\/shop\/files\/Dream-Amethyst-Geode-Crystal-Sphere-Spheres-Dream-Amethyst-Weight-292g-24.webp?v=1765383456","\/\/crystaldestiny.com\/cdn\/shop\/files\/Dream-Amethyst-Geode-Crystal-Sphere-Spheres-Dream-Amethyst-Weight-261g-25.webp?v=1765383457","\/\/crystaldestiny.com\/cdn\/shop\/files\/Dream-Amethyst-Geode-Crystal-Sphere-Spheres-Dream-Amethyst-Weight-260g-26.webp?v=1765383458","\/\/crystaldestiny.com\/cdn\/shop\/files\/Dream-Amethyst-Geode-Crystal-Sphere-Spheres-Dream-Amethyst-Weight-161g-27.webp?v=1765383460","\/\/crystaldestiny.com\/cdn\/shop\/files\/Dream-Amethyst-Geode-Crystal-Sphere-Spheres-Dream-Amethyst-Weight-296g-28.webp?v=1765383461","\/\/crystaldestiny.com\/cdn\/shop\/files\/Dream-Amethyst-Geode-Crystal-Sphere-Spheres-Dream-Amethyst-Weight-207g-29.webp?v=1765383463","\/\/crystaldestiny.com\/cdn\/shop\/files\/Dream-Amethyst-Geode-Crystal-Sphere-Spheres-Dream-Amethyst-Weight-164g-30.webp?v=1765383465","\/\/crystaldestiny.com\/cdn\/shop\/files\/Dream-Amethyst-Geode-Crystal-Sphere-Spheres-Dream-Amethyst-Weight-271g-1-31.webp?v=1765383466","\/\/crystaldestiny.com\/cdn\/shop\/files\/Dream-Amethyst-Geode-Crystal-Sphere-Spheres-Dream-Amethyst-Weight-283g-1-32.webp?v=1765383468","\/\/crystaldestiny.com\/cdn\/shop\/files\/Dream-Amethyst-Geode-Crystal-Sphere-Spheres-Dream-Amethyst-Weight-363g-33.webp?v=1765383469","\/\/crystaldestiny.com\/cdn\/shop\/files\/Dream-Amethyst-Geode-Crystal-Sphere-Spheres-Dream-Amethyst-Weight-188g-34.webp?v=1765383471","\/\/crystaldestiny.com\/cdn\/shop\/files\/Dream-Amethyst-Geode-Crystal-Sphere-Spheres-Dream-Amethyst-Weight-271g-35.webp?v=1765383472","\/\/crystaldestiny.com\/cdn\/shop\/files\/Dream-Amethyst-Geode-Crystal-Sphere-Spheres-Dream-Amethyst-Weight-141g-36.webp?v=1765383474"],"featured_image":"\/\/crystaldestiny.com\/cdn\/shop\/files\/Dream-Amethyst-Geode-Crystal-Sphere-Spheres-Dream-Amethyst-Weight-395g.webp?v=1765383421","options":["Material","Size"],"media":[{"alt":"Dream Amethyst Geode Crystal Sphere-Spheres-Ali-Dream Amethyst-Weight 395g-Crystal Destiny","id":32289035780267,"position":1,"preview_image":{"aspect_ratio":1.0,"height":1000,"width":1000,"src":"\/\/crystaldestiny.com\/cdn\/shop\/files\/Dream-Amethyst-Geode-Crystal-Sphere-Spheres-Dream-Amethyst-Weight-395g.webp?v=1765383421"},"aspect_ratio":1.0,"height":1000,"media_type":"image","src":"\/\/crystaldestiny.com\/cdn\/shop\/files\/Dream-Amethyst-Geode-Crystal-Sphere-Spheres-Dream-Amethyst-Weight-395g.webp?v=1765383421","width":1000},{"alt":"Dream Amethyst Geode Crystal Sphere-Spheres-Ali-Dream Amethyst-Weight 246g-Crystal Destiny","id":32289035813035,"position":2,"preview_image":{"aspect_ratio":1.0,"height":1000,"width":1000,"src":"\/\/crystaldestiny.com\/cdn\/shop\/files\/Dream-Amethyst-Geode-Crystal-Sphere-Spheres-Dream-Amethyst-Weight-246g-2.webp?v=1765383422"},"aspect_ratio":1.0,"height":1000,"media_type":"image","src":"\/\/crystaldestiny.com\/cdn\/shop\/files\/Dream-Amethyst-Geode-Crystal-Sphere-Spheres-Dream-Amethyst-Weight-246g-2.webp?v=1765383422","width":1000},{"alt":"Dream Amethyst Geode Crystal Sphere-Spheres-Ali-Dream Amethyst-Weight 279g-Crystal Destiny","id":32289035845803,"position":3,"preview_image":{"aspect_ratio":1.0,"height":1000,"width":1000,"src":"\/\/crystaldestiny.com\/cdn\/shop\/files\/Dream-Amethyst-Geode-Crystal-Sphere-Spheres-Dream-Amethyst-Weight-279g-3.webp?v=1765383424"},"aspect_ratio":1.0,"height":1000,"media_type":"image","src":"\/\/crystaldestiny.com\/cdn\/shop\/files\/Dream-Amethyst-Geode-Crystal-Sphere-Spheres-Dream-Amethyst-Weight-279g-3.webp?v=1765383424","width":1000},{"alt":"Dream Amethyst Geode Crystal Sphere-Spheres-Ali-Dream Amethyst-Weight 316g-Crystal Destiny","id":32289035878571,"position":4,"preview_image":{"aspect_ratio":1.0,"height":1000,"width":1000,"src":"\/\/crystaldestiny.com\/cdn\/shop\/files\/Dream-Amethyst-Geode-Crystal-Sphere-Spheres-Dream-Amethyst-Weight-316g-4.webp?v=1765383425"},"aspect_ratio":1.0,"height":1000,"media_type":"image","src":"\/\/crystaldestiny.com\/cdn\/shop\/files\/Dream-Amethyst-Geode-Crystal-Sphere-Spheres-Dream-Amethyst-Weight-316g-4.webp?v=1765383425","width":1000},{"alt":"Dream Amethyst Geode Crystal Sphere-Spheres-Ali-Dream Amethyst-Weight 292g 1-Crystal Destiny","id":32289035911339,"position":5,"preview_image":{"aspect_ratio":1.0,"height":1000,"width":1000,"src":"\/\/crystaldestiny.com\/cdn\/shop\/files\/Dream-Amethyst-Geode-Crystal-Sphere-Spheres-Dream-Amethyst-Weight-292g-1-5.webp?v=1765383427"},"aspect_ratio":1.0,"height":1000,"media_type":"image","src":"\/\/crystaldestiny.com\/cdn\/shop\/files\/Dream-Amethyst-Geode-Crystal-Sphere-Spheres-Dream-Amethyst-Weight-292g-1-5.webp?v=1765383427","width":1000},{"alt":"Dream Amethyst Geode Crystal Sphere-Spheres-Ali-Dream Amethyst-Weight 337g-Crystal Destiny","id":32289035944107,"position":6,"preview_image":{"aspect_ratio":1.0,"height":1000,"width":1000,"src":"\/\/crystaldestiny.com\/cdn\/shop\/files\/Dream-Amethyst-Geode-Crystal-Sphere-Spheres-Dream-Amethyst-Weight-337g-6.webp?v=1765383428"},"aspect_ratio":1.0,"height":1000,"media_type":"image","src":"\/\/crystaldestiny.com\/cdn\/shop\/files\/Dream-Amethyst-Geode-Crystal-Sphere-Spheres-Dream-Amethyst-Weight-337g-6.webp?v=1765383428","width":1000},{"alt":"Dream Amethyst Geode Crystal Sphere-Spheres-Ali-Dream Amethyst-Weight 277g-Crystal Destiny","id":32289035976875,"position":7,"preview_image":{"aspect_ratio":1.0,"height":1000,"width":1000,"src":"\/\/crystaldestiny.com\/cdn\/shop\/files\/Dream-Amethyst-Geode-Crystal-Sphere-Spheres-Dream-Amethyst-Weight-277g-7.webp?v=1765383430"},"aspect_ratio":1.0,"height":1000,"media_type":"image","src":"\/\/crystaldestiny.com\/cdn\/shop\/files\/Dream-Amethyst-Geode-Crystal-Sphere-Spheres-Dream-Amethyst-Weight-277g-7.webp?v=1765383430","width":1000},{"alt":"Dream Amethyst Geode Crystal Sphere-Spheres-Ali-Dream Amethyst-Weight 283g-Crystal Destiny","id":32289036009643,"position":8,"preview_image":{"aspect_ratio":1.0,"height":1000,"width":1000,"src":"\/\/crystaldestiny.com\/cdn\/shop\/files\/Dream-Amethyst-Geode-Crystal-Sphere-Spheres-Dream-Amethyst-Weight-283g-8.webp?v=1765383431"},"aspect_ratio":1.0,"height":1000,"media_type":"image","src":"\/\/crystaldestiny.com\/cdn\/shop\/files\/Dream-Amethyst-Geode-Crystal-Sphere-Spheres-Dream-Amethyst-Weight-283g-8.webp?v=1765383431","width":1000},{"alt":"Dream Amethyst Geode Crystal Sphere-Spheres-Ali-Dream Amethyst-Weight 310g-Crystal Destiny","id":32289036042411,"position":9,"preview_image":{"aspect_ratio":1.0,"height":1000,"width":1000,"src":"\/\/crystaldestiny.com\/cdn\/shop\/files\/Dream-Amethyst-Geode-Crystal-Sphere-Spheres-Dream-Amethyst-Weight-310g-9.webp?v=1765383433"},"aspect_ratio":1.0,"height":1000,"media_type":"image","src":"\/\/crystaldestiny.com\/cdn\/shop\/files\/Dream-Amethyst-Geode-Crystal-Sphere-Spheres-Dream-Amethyst-Weight-310g-9.webp?v=1765383433","width":1000},{"alt":"Dream Amethyst Geode Crystal Sphere-Spheres-Ali-Dream Amethyst-Weight 216g-Crystal Destiny","id":32289036075179,"position":10,"preview_image":{"aspect_ratio":1.0,"height":1000,"width":1000,"src":"\/\/crystaldestiny.com\/cdn\/shop\/files\/Dream-Amethyst-Geode-Crystal-Sphere-Spheres-Dream-Amethyst-Weight-216g-10.webp?v=1765383434"},"aspect_ratio":1.0,"height":1000,"media_type":"image","src":"\/\/crystaldestiny.com\/cdn\/shop\/files\/Dream-Amethyst-Geode-Crystal-Sphere-Spheres-Dream-Amethyst-Weight-216g-10.webp?v=1765383434","width":1000},{"alt":"Dream Amethyst Geode Crystal Sphere-Spheres-Ali-Dream Amethyst-Weight 196g-Crystal Destiny","id":32289036107947,"position":11,"preview_image":{"aspect_ratio":1.0,"height":1000,"width":1000,"src":"\/\/crystaldestiny.com\/cdn\/shop\/files\/Dream-Amethyst-Geode-Crystal-Sphere-Spheres-Dream-Amethyst-Weight-196g-11.webp?v=1765383436"},"aspect_ratio":1.0,"height":1000,"media_type":"image","src":"\/\/crystaldestiny.com\/cdn\/shop\/files\/Dream-Amethyst-Geode-Crystal-Sphere-Spheres-Dream-Amethyst-Weight-196g-11.webp?v=1765383436","width":1000},{"alt":"Dream Amethyst Geode Crystal Sphere-Spheres-Ali-Dream Amethyst-Weight 213g-Crystal Destiny","id":32289036140715,"position":12,"preview_image":{"aspect_ratio":1.0,"height":1000,"width":1000,"src":"\/\/crystaldestiny.com\/cdn\/shop\/files\/Dream-Amethyst-Geode-Crystal-Sphere-Spheres-Dream-Amethyst-Weight-213g-12.webp?v=1765383437"},"aspect_ratio":1.0,"height":1000,"media_type":"image","src":"\/\/crystaldestiny.com\/cdn\/shop\/files\/Dream-Amethyst-Geode-Crystal-Sphere-Spheres-Dream-Amethyst-Weight-213g-12.webp?v=1765383437","width":1000},{"alt":"Dream Amethyst Geode Crystal Sphere-Spheres-Ali-Dream Amethyst-Weight 232g-Crystal Destiny","id":32289036173483,"position":13,"preview_image":{"aspect_ratio":1.0,"height":1000,"width":1000,"src":"\/\/crystaldestiny.com\/cdn\/shop\/files\/Dream-Amethyst-Geode-Crystal-Sphere-Spheres-Dream-Amethyst-Weight-232g-13.webp?v=1765383439"},"aspect_ratio":1.0,"height":1000,"media_type":"image","src":"\/\/crystaldestiny.com\/cdn\/shop\/files\/Dream-Amethyst-Geode-Crystal-Sphere-Spheres-Dream-Amethyst-Weight-232g-13.webp?v=1765383439","width":1000},{"alt":"Dream Amethyst Geode Crystal Sphere-Spheres-Ali-Dream Amethyst-Weight 311g-Crystal Destiny","id":32289036206251,"position":14,"preview_image":{"aspect_ratio":1.0,"height":1000,"width":1000,"src":"\/\/crystaldestiny.com\/cdn\/shop\/files\/Dream-Amethyst-Geode-Crystal-Sphere-Spheres-Dream-Amethyst-Weight-311g-14.webp?v=1765383440"},"aspect_ratio":1.0,"height":1000,"media_type":"image","src":"\/\/crystaldestiny.com\/cdn\/shop\/files\/Dream-Amethyst-Geode-Crystal-Sphere-Spheres-Dream-Amethyst-Weight-311g-14.webp?v=1765383440","width":1000},{"alt":"Dream Amethyst Geode Crystal Sphere-Spheres-Ali-Dream Amethyst-Weight 201g-Crystal Destiny","id":32289036239019,"position":15,"preview_image":{"aspect_ratio":1.0,"height":1000,"width":1000,"src":"\/\/crystaldestiny.com\/cdn\/shop\/files\/Dream-Amethyst-Geode-Crystal-Sphere-Spheres-Dream-Amethyst-Weight-201g-15.webp?v=1765383442"},"aspect_ratio":1.0,"height":1000,"media_type":"image","src":"\/\/crystaldestiny.com\/cdn\/shop\/files\/Dream-Amethyst-Geode-Crystal-Sphere-Spheres-Dream-Amethyst-Weight-201g-15.webp?v=1765383442","width":1000},{"alt":"Dream Amethyst Geode Crystal Sphere-Spheres-Ali-Dream Amethyst-Weight 138g-Crystal Destiny","id":32289036271787,"position":16,"preview_image":{"aspect_ratio":1.0,"height":1000,"width":1000,"src":"\/\/crystaldestiny.com\/cdn\/shop\/files\/Dream-Amethyst-Geode-Crystal-Sphere-Spheres-Dream-Amethyst-Weight-138g-16.webp?v=1765383444"},"aspect_ratio":1.0,"height":1000,"media_type":"image","src":"\/\/crystaldestiny.com\/cdn\/shop\/files\/Dream-Amethyst-Geode-Crystal-Sphere-Spheres-Dream-Amethyst-Weight-138g-16.webp?v=1765383444","width":1000},{"alt":"Dream Amethyst Geode Crystal Sphere-Spheres-Ali-Dream Amethyst-Weight 223g-Crystal Destiny","id":32289036304555,"position":17,"preview_image":{"aspect_ratio":1.0,"height":1000,"width":1000,"src":"\/\/crystaldestiny.com\/cdn\/shop\/files\/Dream-Amethyst-Geode-Crystal-Sphere-Spheres-Dream-Amethyst-Weight-223g-17.webp?v=1765383446"},"aspect_ratio":1.0,"height":1000,"media_type":"image","src":"\/\/crystaldestiny.com\/cdn\/shop\/files\/Dream-Amethyst-Geode-Crystal-Sphere-Spheres-Dream-Amethyst-Weight-223g-17.webp?v=1765383446","width":1000},{"alt":"Dream Amethyst Geode Crystal Sphere-Spheres-Ali-Dream Amethyst-Weight 252g-Crystal Destiny","id":32289036337323,"position":18,"preview_image":{"aspect_ratio":1.0,"height":1000,"width":1000,"src":"\/\/crystaldestiny.com\/cdn\/shop\/files\/Dream-Amethyst-Geode-Crystal-Sphere-Spheres-Dream-Amethyst-Weight-252g-18.webp?v=1765383447"},"aspect_ratio":1.0,"height":1000,"media_type":"image","src":"\/\/crystaldestiny.com\/cdn\/shop\/files\/Dream-Amethyst-Geode-Crystal-Sphere-Spheres-Dream-Amethyst-Weight-252g-18.webp?v=1765383447","width":1000},{"alt":"Dream Amethyst Geode Crystal Sphere-Spheres-Ali-Dream Amethyst-Weight 258g-Crystal Destiny","id":32289036370091,"position":19,"preview_image":{"aspect_ratio":1.0,"height":1000,"width":1000,"src":"\/\/crystaldestiny.com\/cdn\/shop\/files\/Dream-Amethyst-Geode-Crystal-Sphere-Spheres-Dream-Amethyst-Weight-258g-19.webp?v=1765383448"},"aspect_ratio":1.0,"height":1000,"media_type":"image","src":"\/\/crystaldestiny.com\/cdn\/shop\/files\/Dream-Amethyst-Geode-Crystal-Sphere-Spheres-Dream-Amethyst-Weight-258g-19.webp?v=1765383448","width":1000},{"alt":"Dream Amethyst Geode Crystal Sphere-Spheres-Ali-Dream Amethyst-Weight 250g-Crystal Destiny","id":32289036402859,"position":20,"preview_image":{"aspect_ratio":1.0,"height":1000,"width":1000,"src":"\/\/crystaldestiny.com\/cdn\/shop\/files\/Dream-Amethyst-Geode-Crystal-Sphere-Spheres-Dream-Amethyst-Weight-250g-20.webp?v=1765383450"},"aspect_ratio":1.0,"height":1000,"media_type":"image","src":"\/\/crystaldestiny.com\/cdn\/shop\/files\/Dream-Amethyst-Geode-Crystal-Sphere-Spheres-Dream-Amethyst-Weight-250g-20.webp?v=1765383450","width":1000},{"alt":"Dream Amethyst Geode Crystal Sphere-Spheres-Ali-Dream Amethyst-Weight 289g-Crystal Destiny","id":32289036435627,"position":21,"preview_image":{"aspect_ratio":1.0,"height":1000,"width":1000,"src":"\/\/crystaldestiny.com\/cdn\/shop\/files\/Dream-Amethyst-Geode-Crystal-Sphere-Spheres-Dream-Amethyst-Weight-289g-21.webp?v=1765383451"},"aspect_ratio":1.0,"height":1000,"media_type":"image","src":"\/\/crystaldestiny.com\/cdn\/shop\/files\/Dream-Amethyst-Geode-Crystal-Sphere-Spheres-Dream-Amethyst-Weight-289g-21.webp?v=1765383451","width":1000},{"alt":"Dream Amethyst Geode Crystal Sphere-Spheres-Ali-Dream Amethyst-Weight 220g-Crystal Destiny","id":32289036468395,"position":22,"preview_image":{"aspect_ratio":1.0,"height":1000,"width":1000,"src":"\/\/crystaldestiny.com\/cdn\/shop\/files\/Dream-Amethyst-Geode-Crystal-Sphere-Spheres-Dream-Amethyst-Weight-220g-22.webp?v=1765383453"},"aspect_ratio":1.0,"height":1000,"media_type":"image","src":"\/\/crystaldestiny.com\/cdn\/shop\/files\/Dream-Amethyst-Geode-Crystal-Sphere-Spheres-Dream-Amethyst-Weight-220g-22.webp?v=1765383453","width":1000},{"alt":"Dream Amethyst Geode Crystal Sphere-Spheres-Ali-Dream Amethyst-Weight 353g-Crystal Destiny","id":32289036501163,"position":23,"preview_image":{"aspect_ratio":1.0,"height":1000,"width":1000,"src":"\/\/crystaldestiny.com\/cdn\/shop\/files\/Dream-Amethyst-Geode-Crystal-Sphere-Spheres-Dream-Amethyst-Weight-353g-23.webp?v=1765383454"},"aspect_ratio":1.0,"height":1000,"media_type":"image","src":"\/\/crystaldestiny.com\/cdn\/shop\/files\/Dream-Amethyst-Geode-Crystal-Sphere-Spheres-Dream-Amethyst-Weight-353g-23.webp?v=1765383454","width":1000},{"alt":"Dream Amethyst Geode Crystal Sphere-Spheres-Ali-Dream Amethyst-Weight 292g-Crystal Destiny","id":32289036533931,"position":24,"preview_image":{"aspect_ratio":1.0,"height":1000,"width":1000,"src":"\/\/crystaldestiny.com\/cdn\/shop\/files\/Dream-Amethyst-Geode-Crystal-Sphere-Spheres-Dream-Amethyst-Weight-292g-24.webp?v=1765383456"},"aspect_ratio":1.0,"height":1000,"media_type":"image","src":"\/\/crystaldestiny.com\/cdn\/shop\/files\/Dream-Amethyst-Geode-Crystal-Sphere-Spheres-Dream-Amethyst-Weight-292g-24.webp?v=1765383456","width":1000},{"alt":"Dream Amethyst Geode Crystal Sphere-Spheres-Ali-Dream Amethyst-Weight 261g-Crystal Destiny","id":32289036566699,"position":25,"preview_image":{"aspect_ratio":1.0,"height":1000,"width":1000,"src":"\/\/crystaldestiny.com\/cdn\/shop\/files\/Dream-Amethyst-Geode-Crystal-Sphere-Spheres-Dream-Amethyst-Weight-261g-25.webp?v=1765383457"},"aspect_ratio":1.0,"height":1000,"media_type":"image","src":"\/\/crystaldestiny.com\/cdn\/shop\/files\/Dream-Amethyst-Geode-Crystal-Sphere-Spheres-Dream-Amethyst-Weight-261g-25.webp?v=1765383457","width":1000},{"alt":"Dream Amethyst Geode Crystal Sphere-Spheres-Ali-Dream Amethyst-Weight 260g-Crystal Destiny","id":32289036599467,"position":26,"preview_image":{"aspect_ratio":1.0,"height":1000,"width":1000,"src":"\/\/crystaldestiny.com\/cdn\/shop\/files\/Dream-Amethyst-Geode-Crystal-Sphere-Spheres-Dream-Amethyst-Weight-260g-26.webp?v=1765383458"},"aspect_ratio":1.0,"height":1000,"media_type":"image","src":"\/\/crystaldestiny.com\/cdn\/shop\/files\/Dream-Amethyst-Geode-Crystal-Sphere-Spheres-Dream-Amethyst-Weight-260g-26.webp?v=1765383458","width":1000},{"alt":"Dream Amethyst Geode Crystal Sphere-Spheres-Ali-Dream Amethyst-Weight 161g-Crystal Destiny","id":32289036632235,"position":27,"preview_image":{"aspect_ratio":1.0,"height":1000,"width":1000,"src":"\/\/crystaldestiny.com\/cdn\/shop\/files\/Dream-Amethyst-Geode-Crystal-Sphere-Spheres-Dream-Amethyst-Weight-161g-27.webp?v=1765383460"},"aspect_ratio":1.0,"height":1000,"media_type":"image","src":"\/\/crystaldestiny.com\/cdn\/shop\/files\/Dream-Amethyst-Geode-Crystal-Sphere-Spheres-Dream-Amethyst-Weight-161g-27.webp?v=1765383460","width":1000},{"alt":"Dream Amethyst Geode Crystal Sphere-Spheres-Ali-Dream Amethyst-Weight 296g-Crystal Destiny","id":32289036665003,"position":28,"preview_image":{"aspect_ratio":1.0,"height":1000,"width":1000,"src":"\/\/crystaldestiny.com\/cdn\/shop\/files\/Dream-Amethyst-Geode-Crystal-Sphere-Spheres-Dream-Amethyst-Weight-296g-28.webp?v=1765383461"},"aspect_ratio":1.0,"height":1000,"media_type":"image","src":"\/\/crystaldestiny.com\/cdn\/shop\/files\/Dream-Amethyst-Geode-Crystal-Sphere-Spheres-Dream-Amethyst-Weight-296g-28.webp?v=1765383461","width":1000},{"alt":"Dream Amethyst Geode Crystal Sphere-Spheres-Ali-Dream Amethyst-Weight 207g-Crystal Destiny","id":32289036697771,"position":29,"preview_image":{"aspect_ratio":1.0,"height":1000,"width":1000,"src":"\/\/crystaldestiny.com\/cdn\/shop\/files\/Dream-Amethyst-Geode-Crystal-Sphere-Spheres-Dream-Amethyst-Weight-207g-29.webp?v=1765383463"},"aspect_ratio":1.0,"height":1000,"media_type":"image","src":"\/\/crystaldestiny.com\/cdn\/shop\/files\/Dream-Amethyst-Geode-Crystal-Sphere-Spheres-Dream-Amethyst-Weight-207g-29.webp?v=1765383463","width":1000},{"alt":"Dream Amethyst Geode Crystal Sphere-Spheres-Ali-Dream Amethyst-Weight 164g-Crystal Destiny","id":32289036730539,"position":30,"preview_image":{"aspect_ratio":1.0,"height":1000,"width":1000,"src":"\/\/crystaldestiny.com\/cdn\/shop\/files\/Dream-Amethyst-Geode-Crystal-Sphere-Spheres-Dream-Amethyst-Weight-164g-30.webp?v=1765383465"},"aspect_ratio":1.0,"height":1000,"media_type":"image","src":"\/\/crystaldestiny.com\/cdn\/shop\/files\/Dream-Amethyst-Geode-Crystal-Sphere-Spheres-Dream-Amethyst-Weight-164g-30.webp?v=1765383465","width":1000},{"alt":"Dream Amethyst Geode Crystal Sphere-Spheres-Ali-Dream Amethyst-Weight 271g 1-Crystal Destiny","id":32289036763307,"position":31,"preview_image":{"aspect_ratio":1.0,"height":1000,"width":1000,"src":"\/\/crystaldestiny.com\/cdn\/shop\/files\/Dream-Amethyst-Geode-Crystal-Sphere-Spheres-Dream-Amethyst-Weight-271g-1-31.webp?v=1765383466"},"aspect_ratio":1.0,"height":1000,"media_type":"image","src":"\/\/crystaldestiny.com\/cdn\/shop\/files\/Dream-Amethyst-Geode-Crystal-Sphere-Spheres-Dream-Amethyst-Weight-271g-1-31.webp?v=1765383466","width":1000},{"alt":"Dream Amethyst Geode Crystal Sphere-Spheres-Ali-Dream Amethyst-Weight 283g 1-Crystal Destiny","id":32289036796075,"position":32,"preview_image":{"aspect_ratio":1.0,"height":1000,"width":1000,"src":"\/\/crystaldestiny.com\/cdn\/shop\/files\/Dream-Amethyst-Geode-Crystal-Sphere-Spheres-Dream-Amethyst-Weight-283g-1-32.webp?v=1765383468"},"aspect_ratio":1.0,"height":1000,"media_type":"image","src":"\/\/crystaldestiny.com\/cdn\/shop\/files\/Dream-Amethyst-Geode-Crystal-Sphere-Spheres-Dream-Amethyst-Weight-283g-1-32.webp?v=1765383468","width":1000},{"alt":"Dream Amethyst Geode Crystal Sphere-Spheres-Ali-Dream Amethyst-Weight 363g-Crystal Destiny","id":32289036828843,"position":33,"preview_image":{"aspect_ratio":1.0,"height":1000,"width":1000,"src":"\/\/crystaldestiny.com\/cdn\/shop\/files\/Dream-Amethyst-Geode-Crystal-Sphere-Spheres-Dream-Amethyst-Weight-363g-33.webp?v=1765383469"},"aspect_ratio":1.0,"height":1000,"media_type":"image","src":"\/\/crystaldestiny.com\/cdn\/shop\/files\/Dream-Amethyst-Geode-Crystal-Sphere-Spheres-Dream-Amethyst-Weight-363g-33.webp?v=1765383469","width":1000},{"alt":"Dream Amethyst Geode Crystal Sphere-Spheres-Ali-Dream Amethyst-Weight 188g-Crystal Destiny","id":32289036861611,"position":34,"preview_image":{"aspect_ratio":1.0,"height":1000,"width":1000,"src":"\/\/crystaldestiny.com\/cdn\/shop\/files\/Dream-Amethyst-Geode-Crystal-Sphere-Spheres-Dream-Amethyst-Weight-188g-34.webp?v=1765383471"},"aspect_ratio":1.0,"height":1000,"media_type":"image","src":"\/\/crystaldestiny.com\/cdn\/shop\/files\/Dream-Amethyst-Geode-Crystal-Sphere-Spheres-Dream-Amethyst-Weight-188g-34.webp?v=1765383471","width":1000},{"alt":"Dream Amethyst Geode Crystal Sphere-Spheres-Ali-Dream Amethyst-Weight 271g-Crystal Destiny","id":32289036894379,"position":35,"preview_image":{"aspect_ratio":1.0,"height":1000,"width":1000,"src":"\/\/crystaldestiny.com\/cdn\/shop\/files\/Dream-Amethyst-Geode-Crystal-Sphere-Spheres-Dream-Amethyst-Weight-271g-35.webp?v=1765383472"},"aspect_ratio":1.0,"height":1000,"media_type":"image","src":"\/\/crystaldestiny.com\/cdn\/shop\/files\/Dream-Amethyst-Geode-Crystal-Sphere-Spheres-Dream-Amethyst-Weight-271g-35.webp?v=1765383472","width":1000},{"alt":"Dream Amethyst Geode Crystal Sphere-Spheres-Ali-Dream Amethyst-Weight 141g-Crystal Destiny","id":32289036927147,"position":36,"preview_image":{"aspect_ratio":1.0,"height":1000,"width":1000,"src":"\/\/crystaldestiny.com\/cdn\/shop\/files\/Dream-Amethyst-Geode-Crystal-Sphere-Spheres-Dream-Amethyst-Weight-141g-36.webp?v=1765383474"},"aspect_ratio":1.0,"height":1000,"media_type":"image","src":"\/\/crystaldestiny.com\/cdn\/shop\/files\/Dream-Amethyst-Geode-Crystal-Sphere-Spheres-Dream-Amethyst-Weight-141g-36.webp?v=1765383474","width":1000}],"requires_selling_plan":false,"selling_plan_groups":[],"content":"\u003cp data-start=\"185\" data-end=\"506\"\u003eThis Dream Amethyst Geode Crystal Sphere brings together the beauty of polished amethyst with the natural wonder of geode formations. Each sphere showcases deep violet tones, sparkling inner clusters, and smooth polished edges, creating a captivating blend of elegance and raw natural energy.\u003c\/p\u003e\n\u003cp data-start=\"508\" data-end=\"849\"\u003eAmethyst is cherished for its calming vibration, spiritual clarity, and protective qualities. In sphere form, its energy radiates evenly, making it ideal for meditation spaces, witchcraft altars, prayer setups, and home décor. Collectors value these unique spheres for their soothing presence and the touch of magic they bring to any room.\u003c\/p\u003e\n\u003cp data-start=\"508\" data-end=\"849\"\u003eThis product is an exact pick as pictured, one of a kind.\u003c\/p\u003e"},"options":[{"name":"Material","position":1,"values":["Dream Amethyst"]},{"name":"Size","position":2,"values":["Weight 283g","Weight 310g","Weight 395g","Weight 207g","Weight 283g 1","Weight 246g","Weight 138g","Weight 279g","Weight 223g","Weight 252g","Weight 353g","Weight 363g","Weight 292g","Weight 316g","Weight 261g","Weight 337g","Weight 216g","Weight 196g","Weight 260g","Weight 188g","Weight 292g 1","Weight 213g","Weight 289g","Weight 277g","Weight 164g","Weight 258g","Weight 220g","Weight 232g","Weight 250g","Weight 271g","Weight 271g 1","Weight 161g","Weight 311g","Weight 296g","Weight 201g","Weight 141g"]}],"custom_metafields":{"shipping_time":"12-16 days"},"metafields":{"badge":"\u003cdiv style='display:none' class='jdgm-prev-badge' data-average-rating='0.00' data-number-of-reviews='0' data-number-of-questions='0'\u003e \u003cspan class='jdgm-prev-badge__stars' data-score='0.00' tabindex='0' aria-label='0.00 stars' role='button'\u003e \u003cspan class='jdgm-star jdgm--off'\u003e\u003c\/span\u003e\u003cspan class='jdgm-star jdgm--off'\u003e\u003c\/span\u003e\u003cspan class='jdgm-star jdgm--off'\u003e\u003c\/span\u003e\u003cspan class='jdgm-star jdgm--off'\u003e\u003c\/span\u003e\u003cspan class='jdgm-star jdgm--off'\u003e\u003c\/span\u003e \u003c\/span\u003e \u003cspan class='jdgm-prev-badge__text'\u003e No reviews \u003c\/span\u003e \u003c\/div\u003e","widget":"\u003cdiv class='jdgm-rev-widg' data-updated-at='2025-12-09T23:31:51Z' data-average-rating='0.00' data-number-of-reviews='0' data-number-of-questions='0' data-image-url='https:\/\/cdn.shopify.com\/s\/files\/1\/0613\/0345\/5915\/files\/Se3d43b88d7d54ff59897d2a95edb1e5e9.webp?v=1765309106'\u003e \u003cstyle class='jdgm-temp-hiding-style'\u003e.jdgm-rev-widg{ display: none }\u003c\/style\u003e \u003cdiv class='jdgm-rev-widg__header'\u003e \u003ch2 class='jdgm-rev-widg__title'\u003eCustomer Reviews\u003c\/h2\u003e \u003cdiv class='jdgm-rev-widg__summary'\u003e \u003cdiv class='jdgm-rev-widg__summary-stars' aria-label='Average rating is 0.00 stars' role='img'\u003e \u003cspan class='jdgm-star jdgm--off'\u003e\u003c\/span\u003e\u003cspan class='jdgm-star jdgm--off'\u003e\u003c\/span\u003e\u003cspan class='jdgm-star jdgm--off'\u003e\u003c\/span\u003e\u003cspan class='jdgm-star jdgm--off'\u003e\u003c\/span\u003e\u003cspan class='jdgm-star jdgm--off'\u003e\u003c\/span\u003e \u003c\/div\u003e \u003cdiv class='jdgm-rev-widg__summary-text'\u003eBe the first to write a review\u003c\/div\u003e \u003c\/div\u003e \u003ca style='display: none' href='#' class='jdgm-write-rev-link' role='button'\u003eWrite a review\u003c\/a\u003e \u003cdiv class='jdgm-histogram jdgm-temp-hidden'\u003e \u003cdiv class='jdgm-histogram__row' data-rating='5' data-frequency='0' data-percentage='0'\u003e \u003cdiv class='jdgm-histogram__star' role='button' aria-label=\"0% (0) reviews with 5 star rating\" tabindex='0' \u003e\u003cspan class='jdgm-star jdgm--on'\u003e\u003c\/span\u003e\u003cspan class='jdgm-star jdgm--on'\u003e\u003c\/span\u003e\u003cspan class='jdgm-star jdgm--on'\u003e\u003c\/span\u003e\u003cspan class='jdgm-star jdgm--on'\u003e\u003c\/span\u003e\u003cspan class='jdgm-star jdgm--on'\u003e\u003c\/span\u003e\u003c\/div\u003e \u003cdiv class='jdgm-histogram__bar'\u003e \u003cdiv class='jdgm-histogram__bar-content' style='width: 0%;'\u003e \u003c\/div\u003e \u003c\/div\u003e \u003cdiv class='jdgm-histogram__percentage'\u003e0%\u003c\/div\u003e \u003cdiv class='jdgm-histogram__frequency'\u003e(0)\u003c\/div\u003e \u003c\/div\u003e \u003cdiv class='jdgm-histogram__row' data-rating='4' data-frequency='0' data-percentage='0'\u003e \u003cdiv class='jdgm-histogram__star' role='button' aria-label=\"0% (0) reviews with 4 star rating\" tabindex='0' \u003e\u003cspan class='jdgm-star jdgm--on'\u003e\u003c\/span\u003e\u003cspan class='jdgm-star jdgm--on'\u003e\u003c\/span\u003e\u003cspan class='jdgm-star jdgm--on'\u003e\u003c\/span\u003e\u003cspan class='jdgm-star jdgm--on'\u003e\u003c\/span\u003e\u003cspan class='jdgm-star jdgm--off'\u003e\u003c\/span\u003e\u003c\/div\u003e \u003cdiv class='jdgm-histogram__bar'\u003e \u003cdiv class='jdgm-histogram__bar-content' style='width: 0%;'\u003e \u003c\/div\u003e \u003c\/div\u003e \u003cdiv class='jdgm-histogram__percentage'\u003e0%\u003c\/div\u003e \u003cdiv class='jdgm-histogram__frequency'\u003e(0)\u003c\/div\u003e \u003c\/div\u003e \u003cdiv class='jdgm-histogram__row' data-rating='3' data-frequency='0' data-percentage='0'\u003e \u003cdiv class='jdgm-histogram__star' role='button' aria-label=\"0% (0) reviews with 3 star rating\" tabindex='0' \u003e\u003cspan class='jdgm-star jdgm--on'\u003e\u003c\/span\u003e\u003cspan class='jdgm-star jdgm--on'\u003e\u003c\/span\u003e\u003cspan class='jdgm-star jdgm--on'\u003e\u003c\/span\u003e\u003cspan class='jdgm-star jdgm--off'\u003e\u003c\/span\u003e\u003cspan class='jdgm-star jdgm--off'\u003e\u003c\/span\u003e\u003c\/div\u003e \u003cdiv class='jdgm-histogram__bar'\u003e \u003cdiv class='jdgm-histogram__bar-content' style='width: 0%;'\u003e \u003c\/div\u003e \u003c\/div\u003e \u003cdiv class='jdgm-histogram__percentage'\u003e0%\u003c\/div\u003e \u003cdiv class='jdgm-histogram__frequency'\u003e(0)\u003c\/div\u003e \u003c\/div\u003e \u003cdiv class='jdgm-histogram__row' data-rating='2' data-frequency='0' data-percentage='0'\u003e \u003cdiv class='jdgm-histogram__star' role='button' aria-label=\"0% (0) reviews with 2 star rating\" tabindex='0' \u003e\u003cspan class='jdgm-star jdgm--on'\u003e\u003c\/span\u003e\u003cspan class='jdgm-star jdgm--on'\u003e\u003c\/span\u003e\u003cspan class='jdgm-star jdgm--off'\u003e\u003c\/span\u003e\u003cspan class='jdgm-star jdgm--off'\u003e\u003c\/span\u003e\u003cspan class='jdgm-star jdgm--off'\u003e\u003c\/span\u003e\u003c\/div\u003e \u003cdiv class='jdgm-histogram__bar'\u003e \u003cdiv class='jdgm-histogram__bar-content' style='width: 0%;'\u003e \u003c\/div\u003e \u003c\/div\u003e \u003cdiv class='jdgm-histogram__percentage'\u003e0%\u003c\/div\u003e \u003cdiv class='jdgm-histogram__frequency'\u003e(0)\u003c\/div\u003e \u003c\/div\u003e \u003cdiv class='jdgm-histogram__row' data-rating='1' data-frequency='0' data-percentage='0'\u003e \u003cdiv class='jdgm-histogram__star' role='button' aria-label=\"0% (0) reviews with 1 star rating\" tabindex='0' \u003e\u003cspan class='jdgm-star jdgm--on'\u003e\u003c\/span\u003e\u003cspan class='jdgm-star jdgm--off'\u003e\u003c\/span\u003e\u003cspan class='jdgm-star jdgm--off'\u003e\u003c\/span\u003e\u003cspan class='jdgm-star jdgm--off'\u003e\u003c\/span\u003e\u003cspan class='jdgm-star jdgm--off'\u003e\u003c\/span\u003e\u003c\/div\u003e \u003cdiv class='jdgm-histogram__bar'\u003e \u003cdiv class='jdgm-histogram__bar-content' style='width: 0%;'\u003e \u003c\/div\u003e \u003c\/div\u003e \u003cdiv class='jdgm-histogram__percentage'\u003e0%\u003c\/div\u003e \u003cdiv class='jdgm-histogram__frequency'\u003e(0)\u003c\/div\u003e \u003c\/div\u003e \u003cdiv class='jdgm-histogram__row jdgm-histogram__clear-filter' data-rating=null tabindex='0'\u003e\u003c\/div\u003e \u003c\/div\u003e \u003cdiv class='jdgm-rev-widg__sort-wrapper'\u003e\u003c\/div\u003e \u003c\/div\u003e \u003cdiv class='jdgm-rev-widg__body'\u003e \u003cdiv class='jdgm-rev-widg__reviews'\u003e\u003c\/div\u003e \u003cdiv class='jdgm-paginate' data-per-page='4' data-url='https:\/\/api.judge.me\/reviews\/reviews_for_widget' style=\"display: none;\"\u003e\u003c\/div\u003e \u003c\/div\u003e \u003cdiv class='jdgm-rev-widg__paginate-spinner-wrapper'\u003e \u003cdiv class='jdgm-spinner'\u003e\u003c\/div\u003e \u003c\/div\u003e \u003c\/div\u003e"},"collections":[{"id":294880051371,"handle":"crystals","title":"Crystals","updated_at":"2026-01-07T23:43:11-05:00","body_html":"\u003cp data-start=\"159\" data-end=\"687\"\u003e✨ \u003cstrong data-start=\"161\" data-end=\"216\"\u003eDiscover the Magic of Crystals with Crystal Destiny\u003c\/strong\u003e ✨\u003cbr data-start=\"218\" data-end=\"221\"\u003eCrystals have been treasured for centuries—not only for their natural beauty but also for their powerful healing energies. Beyond their visual allure, they bring balance, harmony, and positive energy into any space. Whether used for home décor, meditation, or simply to elevate the energy of your surroundings, crystals create a sanctuary of peace, relaxation, and well-being. Each piece is a unique gift from the Earth—visually stunning and spiritually uplifting.\u003c\/p\u003e\n\u003cp data-start=\"689\" data-end=\"1011\"\u003eAt \u003cstrong data-start=\"692\" data-end=\"711\"\u003eCrystal Destiny\u003c\/strong\u003e, our signature collection showcases a curated selection of exquisite crystals, from radiant Quartz to soothing Amethyst. Every stone is carefully sourced for its elegance and metaphysical resonance, making them perfect for enhancing your home, uplifting your spirit, or gifting to someone special.\u003c\/p\u003e\n\u003cp data-start=\"1013\" data-end=\"1206\"\u003eExperience the timeless sophistication of crystalline wonders. Explore the \u003cstrong data-start=\"1088\" data-end=\"1118\"\u003eCrystal Destiny Collection\u003c\/strong\u003e today and bring the transformative beauty of these treasures into your everyday life.\u003c\/p\u003e","published_at":"2023-06-05T11:24:02-04:00","sort_order":"created-desc","template_suffix":"","disjunctive":false,"rules":[{"column":"tag","relation":"equals","condition":"crystal"},{"column":"type","relation":"not_contains","condition":"925 Sterling Silver"},{"column":"type","relation":"not_contains","condition":"Wire Wraps"}],"published_scope":"global"},{"id":294880116907,"handle":"polished","title":"Polished Crystals","updated_at":"2026-01-07T23:43:11-05:00","body_html":"\u003cp data-start=\"199\" data-end=\"598\"\u003e✨ \u003cstrong data-start=\"201\" data-end=\"248\"\u003eCrystal Destiny Polished Crystal Collection\u003c\/strong\u003e ✨\u003cbr data-start=\"250\" data-end=\"253\"\u003eIndulge in the brilliance of crystals refined to perfection. Our \u003cstrong data-start=\"318\" data-end=\"341\"\u003ePolished Collection\u003c\/strong\u003e showcases gemstones meticulously shaped and smoothed to reveal their natural radiance and timeless beauty. From the shimmering glow of Quartz to the deep allure of Obsidian, each polished piece is a testament to nature’s artistry and human craftsmanship.\u003c\/p\u003e\n\u003cp data-start=\"600\" data-end=\"862\"\u003ePerfect as statement décor, meaningful gifts, or companions on your spiritual journey, polished crystals bring sophistication and elevated energy into any space. Their radiant surfaces reflect not only light but also the transformative power of crystal energy.\u003c\/p\u003e\n\u003cp data-start=\"864\" data-end=\"1022\"\u003eDiscover the elegance of refinement with Crystal Destiny’s Polished Crystal Collection—where every facet shines with intention, beauty, and timeless allure.\u003c\/p\u003e","published_at":"2023-06-05T11:30:44-04:00","sort_order":"created-desc","template_suffix":"","disjunctive":false,"rules":[{"column":"tag","relation":"equals","condition":"polished"}],"published_scope":"global"},{"id":321695744171,"handle":"direct-from-supplier","title":"Direct from Supplier","updated_at":"2026-01-07T23:43:11-05:00","body_html":"","published_at":"2025-09-12T16:38:23-04:00","sort_order":"best-selling","template_suffix":"","disjunctive":true,"rules":[{"column":"tag","relation":"equals","condition":"adjusted-shipping"}],"published_scope":"global"},{"id":295698202795,"handle":"spheres","title":"Crystal Spheres","updated_at":"2026-01-06T23:24:35-05:00","body_html":"\u003cp data-start=\"106\" data-end=\"370\"\u003e✨ \u003cstrong data-start=\"108\" data-end=\"138\"\u003eCrystal Spheres Collection\u003c\/strong\u003e ✨\u003cbr data-start=\"140\" data-end=\"143\"\u003eBring harmony, balance, and elegance into your space with our \u003cstrong data-start=\"205\" data-end=\"235\"\u003eCrystal Spheres Collection\u003c\/strong\u003e. Each sphere is meticulously crafted to showcase the natural beauty and energy of crystals, from radiant Quartz to calming Amethyst.\u003c\/p\u003e\n\u003cp data-start=\"372\" data-end=\"658\"\u003ePerfect for meditation, energy work, or as striking décor, crystal spheres radiate energy in all directions, promoting clarity, focus, and a sense of calm. Their smooth, polished surfaces highlight the stones’ natural patterns and colors, making each sphere a captivating centerpiece.\u003c\/p\u003e\n\u003cp data-start=\"660\" data-end=\"809\"\u003eElevate your space and embrace the transformative power of crystals with the \u003cstrong data-start=\"737\" data-end=\"767\"\u003eCrystal Spheres Collection\u003c\/strong\u003e—where beauty, energy, and harmony meet.\u003c\/p\u003e","published_at":"2023-07-28T14:20:46-04:00","sort_order":"created-desc","template_suffix":"","disjunctive":true,"rules":[{"column":"tag","relation":"equals","condition":"spheres"},{"column":"tag","relation":"equals","condition":"eggs"}],"published_scope":"global"},{"id":293659312299,"handle":"best-sellers","title":"Best Sellers","updated_at":"2026-01-07T23:43:11-05:00","body_html":"\u003cp data-start=\"155\" data-end=\"510\"\u003eDiscover the pieces our community loves most. Our Best Sellers Collection brings together handpicked crystals and jewelry that embody timeless elegance, spiritual resonance, and everyday sophistication. Each item has earned its place as a customer favorite—celebrated for both its beauty and its meaningful energy.\u003c\/p\u003e\n\u003cp data-start=\"512\" data-end=\"802\"\u003eFrom stunning statement pieces to versatile daily companions, these treasures are curated to elevate your space, uplift your spirit, and reflect refined taste. Indulge in what’s most cherished and let our best sellers guide you toward the perfect blend of style and transformative energy.\u003c\/p\u003e\n\u003cp data-start=\"804\" data-end=\"932\"\u003eExplore the Best Sellers Collection today—where elegance meets intention, and every piece tells a story of beauty and balance.\u003c\/p\u003e","published_at":"2023-03-15T16:04:51-04:00","sort_order":"best-selling","template_suffix":"","disjunctive":false,"rules":[{"column":"variant_price","relation":"greater_than","condition":"0"},{"column":"variant_inventory","relation":"greater_than","condition":"0"},{"column":"type","relation":"not_equals","condition":"Shipping Protection"}],"published_scope":"global"},{"id":321370390699,"handle":"monthly-crystal-sale","title":"Monthly Crystal Sale | Spheres \u0026 Towers","updated_at":"2026-01-06T23:24:37-05:00","body_html":"\u003cp\u003eShop our \u003cstrong\u003eMonthly Crystal Sale\u003c\/strong\u003e, where you can shop a wide selection of healing crystals at discounted prices. Explore \u003cstrong\u003ecrystal spheres and towers,\u003c\/strong\u003e— all carefully curated to support meditation, energy balancing, and spiritual wellness. Whether you're looking to enhance your home decor, boost your daily energy, or find the perfect gift, our \u003cstrong\u003ecrystals for healing and manifestation\u003c\/strong\u003e offer both beauty and metaphysical benefits.\u003c\/p\u003e\n\u003cp\u003eEach month, our sale features \u003cstrong\u003enew discounted collections\u003c\/strong\u003e, from \u003cstrong\u003enatural quartz and amethyst towers\u003c\/strong\u003e to \u003cstrong\u003ewire-wrapped pendants and polished stones\u003c\/strong\u003e, so there's always something fresh to discover. Shop with confidence knowing you're getting high-quality crystals with \u003cstrong\u003efree shipping options\u003c\/strong\u003e and a trusted experience.\u003c\/p\u003e\n\u003cp\u003e\u003cstrong\u003eTake advantage of the Monthly Crystal Sale today\u003c\/strong\u003e and add powerful, natural energy to your life with \u003cstrong\u003eauthentic healing crystals\u003c\/strong\u003e — while our limited-time discounts last.\u003c\/p\u003e\n\u003cp\u003e\u003cstrong\u003e*Discount automatically applied at checkout.\u003c\/strong\u003e\u003c\/p\u003e","published_at":"2025-12-02T01:26:17-05:00","sort_order":"alpha-asc","template_suffix":"","disjunctive":true,"rules":[{"column":"tag","relation":"equals","condition":"spheres"},{"column":"tag","relation":"equals","condition":"Towers"}],"published_scope":"global","image":{"created_at":"2026-01-01T01:32:34-05:00","alt":"","width":960,"height":960,"src":"\/\/crystaldestiny.com\/cdn\/shop\/collections\/3E8C2969-1B86-4ACE-B349-98E9D8768424.jpg?v=1767249154"}},{"id":297906241707,"handle":"new-arrivals","title":"New Arrivals","updated_at":"2026-01-07T23:43:11-05:00","body_html":"\u003cp data-start=\"172\" data-end=\"573\"\u003e✨ \u003cstrong data-start=\"174\" data-end=\"217\"\u003eDiscover Crystal Destiny’s New Arrivals\u003c\/strong\u003e ✨\u003cbr data-start=\"219\" data-end=\"222\"\u003eStep into a world of fresh sophistication with our latest crystal treasures. Each new piece—whether Quartz, Amethyst, or beyond—embodies nature’s artistry, radiating both timeless beauty and powerful energy. Thoughtfully curated and constantly refreshed, our New Arrivals Collection offers the perfect harmony of elegance and metaphysical resonance.\u003c\/p\u003e\n\u003cp data-start=\"575\" data-end=\"793\"\u003eElevate your space, uplift your spirit, and embrace the transformative power of nature’s wonders. Explore the newest expressions of crystal artistry today, and let your journey with crystals evolve with every update.\u003c\/p\u003e","published_at":"2023-11-20T15:35:42-05:00","sort_order":"created-desc","template_suffix":"","disjunctive":true,"rules":[{"column":"tag","relation":"equals","condition":"new-arrivals"}],"published_scope":"global"},{"id":297596059819,"handle":"all","title":"All Crystals \u0026 Jewelry","updated_at":"2026-01-07T23:43:11-05:00","body_html":"\u003cp data-start=\"149\" data-end=\"494\"\u003e✨ \u003cstrong data-start=\"151\" data-end=\"181\"\u003eWelcome to Crystal Destiny\u003c\/strong\u003e ✨\u003cbr data-start=\"183\" data-end=\"186\"\u003eStep into a world where beauty, energy, and artistry unite. Our collection is a treasure trove of exquisite crystals, from the raw, untamed elegance of natural formations to the polished brilliance of expertly crafted pieces. Each crystal is a masterpiece, carrying its own unique story and timeless charm.\u003c\/p\u003e\n\u003cp data-start=\"496\" data-end=\"831\"\u003eWhether you’re drawn to the calming presence of Amethyst, the vibrant energy of Citrine, or the grounding strength of Jasper, our crystals invite you to connect with nature’s finest wonders. Perfect for enhancing your space, supporting your spiritual journey, or gifting with intention, every piece resonates with beauty and meaning.\u003c\/p\u003e\n\u003cp data-start=\"833\" data-end=\"1000\"\u003eElevate your surroundings, embrace the mystique, and explore the enchanting world of crystals at \u003cstrong data-start=\"930\" data-end=\"949\"\u003eCrystal Destiny\u003c\/strong\u003e—where every crystal is waiting to be discovered.\u003c\/p\u003e","published_at":"2023-11-10T13:55:31-05:00","sort_order":"created-desc","template_suffix":"","disjunctive":false,"rules":[{"column":"type","relation":"not_equals","condition":"asdf"}],"published_scope":"global"},{"id":298983391403,"handle":"january-crystal-sale","title":"January Sale | 25% Off Crystal Towers \u0026 Spheres","updated_at":"2026-01-06T23:24:37-05:00","body_html":"\u003cp\u003eShop our \u003cstrong\u003eJanuary Crystal Sale\u003c\/strong\u003e, where you can shop a wide selection of healing crystals at discounted prices. Explore \u003cstrong\u003eCrystal Towers, \u0026amp; Crystal Spheres\u003c\/strong\u003e — all carefully curated and crafted to support meditation, energy balancing, and spiritual wellness. Whether you're looking to enhance your home decor, boost your daily energy, or find the perfect gift, our \u003cstrong\u003ecrystals for healing and manifestation\u003c\/strong\u003e offer both beauty and metaphysical benefits.\u003c\/p\u003e\n\u003cp\u003eThis January, our sale features \u003cstrong\u003ediscounted crystal towers and spheres\u003c\/strong\u003e, from \u003cstrong\u003enatural quartz \u003c\/strong\u003eand \u003cstrong\u003eamethyst \u003c\/strong\u003eto \u003cstrong\u003ebumblebee jasper \u003c\/strong\u003eand \u003cstrong\u003ecarnelian\u003c\/strong\u003e, so there's always something fresh to discover. Shop with confidence knowing you're getting high-quality crystals with \u003cstrong\u003efree shipping options\u003c\/strong\u003e and a trusted experience.\u003c\/p\u003e\n\u003cp\u003e\u003cstrong\u003eTake advantage of the January Crystal Sale today\u003c\/strong\u003e and add powerful, natural energy to your life with \u003cstrong\u003eauthentic healing crystals\u003c\/strong\u003e — while our limited-time discounts last.\u003c\/p\u003e\n\u003cp\u003e\u003cstrong\u003e*Discount automatically applied at checkout.\u003c\/strong\u003e\u003c\/p\u003e","published_at":"2026-01-01T00:07:17-05:00","sort_order":"alpha-asc","template_suffix":"monthly-collection","disjunctive":true,"rules":[{"column":"tag","relation":"equals","condition":"Spheres"},{"column":"tag","relation":"equals","condition":"Towers"}],"published_scope":"global","image":{"created_at":"2026-01-01T01:29:59-05:00","alt":"","width":960,"height":960,"src":"\/\/crystaldestiny.com\/cdn\/shop\/collections\/1464163B-22B1-4D62-BEC5-CEC9AECB670B.jpg?v=1767248999"}}]}
[{"alt":"Dream Amethyst Geode Crystal Sphere-Spheres-Ali-Dream Amethyst-Weight 395g-Crystal Destiny","id":32289035780267,"position":1,"preview_image":{"aspect_ratio":1.0,"height":1000,"width":1000,"src":"\/\/crystaldestiny.com\/cdn\/shop\/files\/Dream-Amethyst-Geode-Crystal-Sphere-Spheres-Dream-Amethyst-Weight-395g.webp?v=1765383421"},"aspect_ratio":1.0,"height":1000,"media_type":"image","src":"\/\/crystaldestiny.com\/cdn\/shop\/files\/Dream-Amethyst-Geode-Crystal-Sphere-Spheres-Dream-Amethyst-Weight-395g.webp?v=1765383421","width":1000},{"alt":"Dream Amethyst Geode Crystal Sphere-Spheres-Ali-Dream Amethyst-Weight 246g-Crystal Destiny","id":32289035813035,"position":2,"preview_image":{"aspect_ratio":1.0,"height":1000,"width":1000,"src":"\/\/crystaldestiny.com\/cdn\/shop\/files\/Dream-Amethyst-Geode-Crystal-Sphere-Spheres-Dream-Amethyst-Weight-246g-2.webp?v=1765383422"},"aspect_ratio":1.0,"height":1000,"media_type":"image","src":"\/\/crystaldestiny.com\/cdn\/shop\/files\/Dream-Amethyst-Geode-Crystal-Sphere-Spheres-Dream-Amethyst-Weight-246g-2.webp?v=1765383422","width":1000},{"alt":"Dream Amethyst Geode Crystal Sphere-Spheres-Ali-Dream Amethyst-Weight 279g-Crystal Destiny","id":32289035845803,"position":3,"preview_image":{"aspect_ratio":1.0,"height":1000,"width":1000,"src":"\/\/crystaldestiny.com\/cdn\/shop\/files\/Dream-Amethyst-Geode-Crystal-Sphere-Spheres-Dream-Amethyst-Weight-279g-3.webp?v=1765383424"},"aspect_ratio":1.0,"height":1000,"media_type":"image","src":"\/\/crystaldestiny.com\/cdn\/shop\/files\/Dream-Amethyst-Geode-Crystal-Sphere-Spheres-Dream-Amethyst-Weight-279g-3.webp?v=1765383424","width":1000},{"alt":"Dream Amethyst Geode Crystal Sphere-Spheres-Ali-Dream Amethyst-Weight 316g-Crystal Destiny","id":32289035878571,"position":4,"preview_image":{"aspect_ratio":1.0,"height":1000,"width":1000,"src":"\/\/crystaldestiny.com\/cdn\/shop\/files\/Dream-Amethyst-Geode-Crystal-Sphere-Spheres-Dream-Amethyst-Weight-316g-4.webp?v=1765383425"},"aspect_ratio":1.0,"height":1000,"media_type":"image","src":"\/\/crystaldestiny.com\/cdn\/shop\/files\/Dream-Amethyst-Geode-Crystal-Sphere-Spheres-Dream-Amethyst-Weight-316g-4.webp?v=1765383425","width":1000},{"alt":"Dream Amethyst Geode Crystal Sphere-Spheres-Ali-Dream Amethyst-Weight 292g 1-Crystal Destiny","id":32289035911339,"position":5,"preview_image":{"aspect_ratio":1.0,"height":1000,"width":1000,"src":"\/\/crystaldestiny.com\/cdn\/shop\/files\/Dream-Amethyst-Geode-Crystal-Sphere-Spheres-Dream-Amethyst-Weight-292g-1-5.webp?v=1765383427"},"aspect_ratio":1.0,"height":1000,"media_type":"image","src":"\/\/crystaldestiny.com\/cdn\/shop\/files\/Dream-Amethyst-Geode-Crystal-Sphere-Spheres-Dream-Amethyst-Weight-292g-1-5.webp?v=1765383427","width":1000},{"alt":"Dream Amethyst Geode Crystal Sphere-Spheres-Ali-Dream Amethyst-Weight 337g-Crystal Destiny","id":32289035944107,"position":6,"preview_image":{"aspect_ratio":1.0,"height":1000,"width":1000,"src":"\/\/crystaldestiny.com\/cdn\/shop\/files\/Dream-Amethyst-Geode-Crystal-Sphere-Spheres-Dream-Amethyst-Weight-337g-6.webp?v=1765383428"},"aspect_ratio":1.0,"height":1000,"media_type":"image","src":"\/\/crystaldestiny.com\/cdn\/shop\/files\/Dream-Amethyst-Geode-Crystal-Sphere-Spheres-Dream-Amethyst-Weight-337g-6.webp?v=1765383428","width":1000},{"alt":"Dream Amethyst Geode Crystal Sphere-Spheres-Ali-Dream Amethyst-Weight 277g-Crystal Destiny","id":32289035976875,"position":7,"preview_image":{"aspect_ratio":1.0,"height":1000,"width":1000,"src":"\/\/crystaldestiny.com\/cdn\/shop\/files\/Dream-Amethyst-Geode-Crystal-Sphere-Spheres-Dream-Amethyst-Weight-277g-7.webp?v=1765383430"},"aspect_ratio":1.0,"height":1000,"media_type":"image","src":"\/\/crystaldestiny.com\/cdn\/shop\/files\/Dream-Amethyst-Geode-Crystal-Sphere-Spheres-Dream-Amethyst-Weight-277g-7.webp?v=1765383430","width":1000},{"alt":"Dream Amethyst Geode Crystal Sphere-Spheres-Ali-Dream Amethyst-Weight 283g-Crystal Destiny","id":32289036009643,"position":8,"preview_image":{"aspect_ratio":1.0,"height":1000,"width":1000,"src":"\/\/crystaldestiny.com\/cdn\/shop\/files\/Dream-Amethyst-Geode-Crystal-Sphere-Spheres-Dream-Amethyst-Weight-283g-8.webp?v=1765383431"},"aspect_ratio":1.0,"height":1000,"media_type":"image","src":"\/\/crystaldestiny.com\/cdn\/shop\/files\/Dream-Amethyst-Geode-Crystal-Sphere-Spheres-Dream-Amethyst-Weight-283g-8.webp?v=1765383431","width":1000},{"alt":"Dream Amethyst Geode Crystal Sphere-Spheres-Ali-Dream Amethyst-Weight 310g-Crystal Destiny","id":32289036042411,"position":9,"preview_image":{"aspect_ratio":1.0,"height":1000,"width":1000,"src":"\/\/crystaldestiny.com\/cdn\/shop\/files\/Dream-Amethyst-Geode-Crystal-Sphere-Spheres-Dream-Amethyst-Weight-310g-9.webp?v=1765383433"},"aspect_ratio":1.0,"height":1000,"media_type":"image","src":"\/\/crystaldestiny.com\/cdn\/shop\/files\/Dream-Amethyst-Geode-Crystal-Sphere-Spheres-Dream-Amethyst-Weight-310g-9.webp?v=1765383433","width":1000},{"alt":"Dream Amethyst Geode Crystal Sphere-Spheres-Ali-Dream Amethyst-Weight 216g-Crystal Destiny","id":32289036075179,"position":10,"preview_image":{"aspect_ratio":1.0,"height":1000,"width":1000,"src":"\/\/crystaldestiny.com\/cdn\/shop\/files\/Dream-Amethyst-Geode-Crystal-Sphere-Spheres-Dream-Amethyst-Weight-216g-10.webp?v=1765383434"},"aspect_ratio":1.0,"height":1000,"media_type":"image","src":"\/\/crystaldestiny.com\/cdn\/shop\/files\/Dream-Amethyst-Geode-Crystal-Sphere-Spheres-Dream-Amethyst-Weight-216g-10.webp?v=1765383434","width":1000},{"alt":"Dream Amethyst Geode Crystal Sphere-Spheres-Ali-Dream Amethyst-Weight 196g-Crystal Destiny","id":32289036107947,"position":11,"preview_image":{"aspect_ratio":1.0,"height":1000,"width":1000,"src":"\/\/crystaldestiny.com\/cdn\/shop\/files\/Dream-Amethyst-Geode-Crystal-Sphere-Spheres-Dream-Amethyst-Weight-196g-11.webp?v=1765383436"},"aspect_ratio":1.0,"height":1000,"media_type":"image","src":"\/\/crystaldestiny.com\/cdn\/shop\/files\/Dream-Amethyst-Geode-Crystal-Sphere-Spheres-Dream-Amethyst-Weight-196g-11.webp?v=1765383436","width":1000},{"alt":"Dream Amethyst Geode Crystal Sphere-Spheres-Ali-Dream Amethyst-Weight 213g-Crystal Destiny","id":32289036140715,"position":12,"preview_image":{"aspect_ratio":1.0,"height":1000,"width":1000,"src":"\/\/crystaldestiny.com\/cdn\/shop\/files\/Dream-Amethyst-Geode-Crystal-Sphere-Spheres-Dream-Amethyst-Weight-213g-12.webp?v=1765383437"},"aspect_ratio":1.0,"height":1000,"media_type":"image","src":"\/\/crystaldestiny.com\/cdn\/shop\/files\/Dream-Amethyst-Geode-Crystal-Sphere-Spheres-Dream-Amethyst-Weight-213g-12.webp?v=1765383437","width":1000},{"alt":"Dream Amethyst Geode Crystal Sphere-Spheres-Ali-Dream Amethyst-Weight 232g-Crystal Destiny","id":32289036173483,"position":13,"preview_image":{"aspect_ratio":1.0,"height":1000,"width":1000,"src":"\/\/crystaldestiny.com\/cdn\/shop\/files\/Dream-Amethyst-Geode-Crystal-Sphere-Spheres-Dream-Amethyst-Weight-232g-13.webp?v=1765383439"},"aspect_ratio":1.0,"height":1000,"media_type":"image","src":"\/\/crystaldestiny.com\/cdn\/shop\/files\/Dream-Amethyst-Geode-Crystal-Sphere-Spheres-Dream-Amethyst-Weight-232g-13.webp?v=1765383439","width":1000},{"alt":"Dream Amethyst Geode Crystal Sphere-Spheres-Ali-Dream Amethyst-Weight 311g-Crystal Destiny","id":32289036206251,"position":14,"preview_image":{"aspect_ratio":1.0,"height":1000,"width":1000,"src":"\/\/crystaldestiny.com\/cdn\/shop\/files\/Dream-Amethyst-Geode-Crystal-Sphere-Spheres-Dream-Amethyst-Weight-311g-14.webp?v=1765383440"},"aspect_ratio":1.0,"height":1000,"media_type":"image","src":"\/\/crystaldestiny.com\/cdn\/shop\/files\/Dream-Amethyst-Geode-Crystal-Sphere-Spheres-Dream-Amethyst-Weight-311g-14.webp?v=1765383440","width":1000},{"alt":"Dream Amethyst Geode Crystal Sphere-Spheres-Ali-Dream Amethyst-Weight 201g-Crystal Destiny","id":32289036239019,"position":15,"preview_image":{"aspect_ratio":1.0,"height":1000,"width":1000,"src":"\/\/crystaldestiny.com\/cdn\/shop\/files\/Dream-Amethyst-Geode-Crystal-Sphere-Spheres-Dream-Amethyst-Weight-201g-15.webp?v=1765383442"},"aspect_ratio":1.0,"height":1000,"media_type":"image","src":"\/\/crystaldestiny.com\/cdn\/shop\/files\/Dream-Amethyst-Geode-Crystal-Sphere-Spheres-Dream-Amethyst-Weight-201g-15.webp?v=1765383442","width":1000},{"alt":"Dream Amethyst Geode Crystal Sphere-Spheres-Ali-Dream Amethyst-Weight 138g-Crystal Destiny","id":32289036271787,"position":16,"preview_image":{"aspect_ratio":1.0,"height":1000,"width":1000,"src":"\/\/crystaldestiny.com\/cdn\/shop\/files\/Dream-Amethyst-Geode-Crystal-Sphere-Spheres-Dream-Amethyst-Weight-138g-16.webp?v=1765383444"},"aspect_ratio":1.0,"height":1000,"media_type":"image","src":"\/\/crystaldestiny.com\/cdn\/shop\/files\/Dream-Amethyst-Geode-Crystal-Sphere-Spheres-Dream-Amethyst-Weight-138g-16.webp?v=1765383444","width":1000},{"alt":"Dream Amethyst Geode Crystal Sphere-Spheres-Ali-Dream Amethyst-Weight 223g-Crystal Destiny","id":32289036304555,"position":17,"preview_image":{"aspect_ratio":1.0,"height":1000,"width":1000,"src":"\/\/crystaldestiny.com\/cdn\/shop\/files\/Dream-Amethyst-Geode-Crystal-Sphere-Spheres-Dream-Amethyst-Weight-223g-17.webp?v=1765383446"},"aspect_ratio":1.0,"height":1000,"media_type":"image","src":"\/\/crystaldestiny.com\/cdn\/shop\/files\/Dream-Amethyst-Geode-Crystal-Sphere-Spheres-Dream-Amethyst-Weight-223g-17.webp?v=1765383446","width":1000},{"alt":"Dream Amethyst Geode Crystal Sphere-Spheres-Ali-Dream Amethyst-Weight 252g-Crystal Destiny","id":32289036337323,"position":18,"preview_image":{"aspect_ratio":1.0,"height":1000,"width":1000,"src":"\/\/crystaldestiny.com\/cdn\/shop\/files\/Dream-Amethyst-Geode-Crystal-Sphere-Spheres-Dream-Amethyst-Weight-252g-18.webp?v=1765383447"},"aspect_ratio":1.0,"height":1000,"media_type":"image","src":"\/\/crystaldestiny.com\/cdn\/shop\/files\/Dream-Amethyst-Geode-Crystal-Sphere-Spheres-Dream-Amethyst-Weight-252g-18.webp?v=1765383447","width":1000},{"alt":"Dream Amethyst Geode Crystal Sphere-Spheres-Ali-Dream Amethyst-Weight 258g-Crystal Destiny","id":32289036370091,"position":19,"preview_image":{"aspect_ratio":1.0,"height":1000,"width":1000,"src":"\/\/crystaldestiny.com\/cdn\/shop\/files\/Dream-Amethyst-Geode-Crystal-Sphere-Spheres-Dream-Amethyst-Weight-258g-19.webp?v=1765383448"},"aspect_ratio":1.0,"height":1000,"media_type":"image","src":"\/\/crystaldestiny.com\/cdn\/shop\/files\/Dream-Amethyst-Geode-Crystal-Sphere-Spheres-Dream-Amethyst-Weight-258g-19.webp?v=1765383448","width":1000},{"alt":"Dream Amethyst Geode Crystal Sphere-Spheres-Ali-Dream Amethyst-Weight 250g-Crystal Destiny","id":32289036402859,"position":20,"preview_image":{"aspect_ratio":1.0,"height":1000,"width":1000,"src":"\/\/crystaldestiny.com\/cdn\/shop\/files\/Dream-Amethyst-Geode-Crystal-Sphere-Spheres-Dream-Amethyst-Weight-250g-20.webp?v=1765383450"},"aspect_ratio":1.0,"height":1000,"media_type":"image","src":"\/\/crystaldestiny.com\/cdn\/shop\/files\/Dream-Amethyst-Geode-Crystal-Sphere-Spheres-Dream-Amethyst-Weight-250g-20.webp?v=1765383450","width":1000},{"alt":"Dream Amethyst Geode Crystal Sphere-Spheres-Ali-Dream Amethyst-Weight 289g-Crystal Destiny","id":32289036435627,"position":21,"preview_image":{"aspect_ratio":1.0,"height":1000,"width":1000,"src":"\/\/crystaldestiny.com\/cdn\/shop\/files\/Dream-Amethyst-Geode-Crystal-Sphere-Spheres-Dream-Amethyst-Weight-289g-21.webp?v=1765383451"},"aspect_ratio":1.0,"height":1000,"media_type":"image","src":"\/\/crystaldestiny.com\/cdn\/shop\/files\/Dream-Amethyst-Geode-Crystal-Sphere-Spheres-Dream-Amethyst-Weight-289g-21.webp?v=1765383451","width":1000},{"alt":"Dream Amethyst Geode Crystal Sphere-Spheres-Ali-Dream Amethyst-Weight 220g-Crystal Destiny","id":32289036468395,"position":22,"preview_image":{"aspect_ratio":1.0,"height":1000,"width":1000,"src":"\/\/crystaldestiny.com\/cdn\/shop\/files\/Dream-Amethyst-Geode-Crystal-Sphere-Spheres-Dream-Amethyst-Weight-220g-22.webp?v=1765383453"},"aspect_ratio":1.0,"height":1000,"media_type":"image","src":"\/\/crystaldestiny.com\/cdn\/shop\/files\/Dream-Amethyst-Geode-Crystal-Sphere-Spheres-Dream-Amethyst-Weight-220g-22.webp?v=1765383453","width":1000},{"alt":"Dream Amethyst Geode Crystal Sphere-Spheres-Ali-Dream Amethyst-Weight 353g-Crystal Destiny","id":32289036501163,"position":23,"preview_image":{"aspect_ratio":1.0,"height":1000,"width":1000,"src":"\/\/crystaldestiny.com\/cdn\/shop\/files\/Dream-Amethyst-Geode-Crystal-Sphere-Spheres-Dream-Amethyst-Weight-353g-23.webp?v=1765383454"},"aspect_ratio":1.0,"height":1000,"media_type":"image","src":"\/\/crystaldestiny.com\/cdn\/shop\/files\/Dream-Amethyst-Geode-Crystal-Sphere-Spheres-Dream-Amethyst-Weight-353g-23.webp?v=1765383454","width":1000},{"alt":"Dream Amethyst Geode Crystal Sphere-Spheres-Ali-Dream Amethyst-Weight 292g-Crystal Destiny","id":32289036533931,"position":24,"preview_image":{"aspect_ratio":1.0,"height":1000,"width":1000,"src":"\/\/crystaldestiny.com\/cdn\/shop\/files\/Dream-Amethyst-Geode-Crystal-Sphere-Spheres-Dream-Amethyst-Weight-292g-24.webp?v=1765383456"},"aspect_ratio":1.0,"height":1000,"media_type":"image","src":"\/\/crystaldestiny.com\/cdn\/shop\/files\/Dream-Amethyst-Geode-Crystal-Sphere-Spheres-Dream-Amethyst-Weight-292g-24.webp?v=1765383456","width":1000},{"alt":"Dream Amethyst Geode Crystal Sphere-Spheres-Ali-Dream Amethyst-Weight 261g-Crystal Destiny","id":32289036566699,"position":25,"preview_image":{"aspect_ratio":1.0,"height":1000,"width":1000,"src":"\/\/crystaldestiny.com\/cdn\/shop\/files\/Dream-Amethyst-Geode-Crystal-Sphere-Spheres-Dream-Amethyst-Weight-261g-25.webp?v=1765383457"},"aspect_ratio":1.0,"height":1000,"media_type":"image","src":"\/\/crystaldestiny.com\/cdn\/shop\/files\/Dream-Amethyst-Geode-Crystal-Sphere-Spheres-Dream-Amethyst-Weight-261g-25.webp?v=1765383457","width":1000},{"alt":"Dream Amethyst Geode Crystal Sphere-Spheres-Ali-Dream Amethyst-Weight 260g-Crystal Destiny","id":32289036599467,"position":26,"preview_image":{"aspect_ratio":1.0,"height":1000,"width":1000,"src":"\/\/crystaldestiny.com\/cdn\/shop\/files\/Dream-Amethyst-Geode-Crystal-Sphere-Spheres-Dream-Amethyst-Weight-260g-26.webp?v=1765383458"},"aspect_ratio":1.0,"height":1000,"media_type":"image","src":"\/\/crystaldestiny.com\/cdn\/shop\/files\/Dream-Amethyst-Geode-Crystal-Sphere-Spheres-Dream-Amethyst-Weight-260g-26.webp?v=1765383458","width":1000},{"alt":"Dream Amethyst Geode Crystal Sphere-Spheres-Ali-Dream Amethyst-Weight 161g-Crystal Destiny","id":32289036632235,"position":27,"preview_image":{"aspect_ratio":1.0,"height":1000,"width":1000,"src":"\/\/crystaldestiny.com\/cdn\/shop\/files\/Dream-Amethyst-Geode-Crystal-Sphere-Spheres-Dream-Amethyst-Weight-161g-27.webp?v=1765383460"},"aspect_ratio":1.0,"height":1000,"media_type":"image","src":"\/\/crystaldestiny.com\/cdn\/shop\/files\/Dream-Amethyst-Geode-Crystal-Sphere-Spheres-Dream-Amethyst-Weight-161g-27.webp?v=1765383460","width":1000},{"alt":"Dream Amethyst Geode Crystal Sphere-Spheres-Ali-Dream Amethyst-Weight 296g-Crystal Destiny","id":32289036665003,"position":28,"preview_image":{"aspect_ratio":1.0,"height":1000,"width":1000,"src":"\/\/crystaldestiny.com\/cdn\/shop\/files\/Dream-Amethyst-Geode-Crystal-Sphere-Spheres-Dream-Amethyst-Weight-296g-28.webp?v=1765383461"},"aspect_ratio":1.0,"height":1000,"media_type":"image","src":"\/\/crystaldestiny.com\/cdn\/shop\/files\/Dream-Amethyst-Geode-Crystal-Sphere-Spheres-Dream-Amethyst-Weight-296g-28.webp?v=1765383461","width":1000},{"alt":"Dream Amethyst Geode Crystal Sphere-Spheres-Ali-Dream Amethyst-Weight 207g-Crystal Destiny","id":32289036697771,"position":29,"preview_image":{"aspect_ratio":1.0,"height":1000,"width":1000,"src":"\/\/crystaldestiny.com\/cdn\/shop\/files\/Dream-Amethyst-Geode-Crystal-Sphere-Spheres-Dream-Amethyst-Weight-207g-29.webp?v=1765383463"},"aspect_ratio":1.0,"height":1000,"media_type":"image","src":"\/\/crystaldestiny.com\/cdn\/shop\/files\/Dream-Amethyst-Geode-Crystal-Sphere-Spheres-Dream-Amethyst-Weight-207g-29.webp?v=1765383463","width":1000},{"alt":"Dream Amethyst Geode Crystal Sphere-Spheres-Ali-Dream Amethyst-Weight 164g-Crystal Destiny","id":32289036730539,"position":30,"preview_image":{"aspect_ratio":1.0,"height":1000,"width":1000,"src":"\/\/crystaldestiny.com\/cdn\/shop\/files\/Dream-Amethyst-Geode-Crystal-Sphere-Spheres-Dream-Amethyst-Weight-164g-30.webp?v=1765383465"},"aspect_ratio":1.0,"height":1000,"media_type":"image","src":"\/\/crystaldestiny.com\/cdn\/shop\/files\/Dream-Amethyst-Geode-Crystal-Sphere-Spheres-Dream-Amethyst-Weight-164g-30.webp?v=1765383465","width":1000},{"alt":"Dream Amethyst Geode Crystal Sphere-Spheres-Ali-Dream Amethyst-Weight 271g 1-Crystal Destiny","id":32289036763307,"position":31,"preview_image":{"aspect_ratio":1.0,"height":1000,"width":1000,"src":"\/\/crystaldestiny.com\/cdn\/shop\/files\/Dream-Amethyst-Geode-Crystal-Sphere-Spheres-Dream-Amethyst-Weight-271g-1-31.webp?v=1765383466"},"aspect_ratio":1.0,"height":1000,"media_type":"image","src":"\/\/crystaldestiny.com\/cdn\/shop\/files\/Dream-Amethyst-Geode-Crystal-Sphere-Spheres-Dream-Amethyst-Weight-271g-1-31.webp?v=1765383466","width":1000},{"alt":"Dream Amethyst Geode Crystal Sphere-Spheres-Ali-Dream Amethyst-Weight 283g 1-Crystal Destiny","id":32289036796075,"position":32,"preview_image":{"aspect_ratio":1.0,"height":1000,"width":1000,"src":"\/\/crystaldestiny.com\/cdn\/shop\/files\/Dream-Amethyst-Geode-Crystal-Sphere-Spheres-Dream-Amethyst-Weight-283g-1-32.webp?v=1765383468"},"aspect_ratio":1.0,"height":1000,"media_type":"image","src":"\/\/crystaldestiny.com\/cdn\/shop\/files\/Dream-Amethyst-Geode-Crystal-Sphere-Spheres-Dream-Amethyst-Weight-283g-1-32.webp?v=1765383468","width":1000},{"alt":"Dream Amethyst Geode Crystal Sphere-Spheres-Ali-Dream Amethyst-Weight 363g-Crystal Destiny","id":32289036828843,"position":33,"preview_image":{"aspect_ratio":1.0,"height":1000,"width":1000,"src":"\/\/crystaldestiny.com\/cdn\/shop\/files\/Dream-Amethyst-Geode-Crystal-Sphere-Spheres-Dream-Amethyst-Weight-363g-33.webp?v=1765383469"},"aspect_ratio":1.0,"height":1000,"media_type":"image","src":"\/\/crystaldestiny.com\/cdn\/shop\/files\/Dream-Amethyst-Geode-Crystal-Sphere-Spheres-Dream-Amethyst-Weight-363g-33.webp?v=1765383469","width":1000},{"alt":"Dream Amethyst Geode Crystal Sphere-Spheres-Ali-Dream Amethyst-Weight 188g-Crystal Destiny","id":32289036861611,"position":34,"preview_image":{"aspect_ratio":1.0,"height":1000,"width":1000,"src":"\/\/crystaldestiny.com\/cdn\/shop\/files\/Dream-Amethyst-Geode-Crystal-Sphere-Spheres-Dream-Amethyst-Weight-188g-34.webp?v=1765383471"},"aspect_ratio":1.0,"height":1000,"media_type":"image","src":"\/\/crystaldestiny.com\/cdn\/shop\/files\/Dream-Amethyst-Geode-Crystal-Sphere-Spheres-Dream-Amethyst-Weight-188g-34.webp?v=1765383471","width":1000},{"alt":"Dream Amethyst Geode Crystal Sphere-Spheres-Ali-Dream Amethyst-Weight 271g-Crystal Destiny","id":32289036894379,"position":35,"preview_image":{"aspect_ratio":1.0,"height":1000,"width":1000,"src":"\/\/crystaldestiny.com\/cdn\/shop\/files\/Dream-Amethyst-Geode-Crystal-Sphere-Spheres-Dream-Amethyst-Weight-271g-35.webp?v=1765383472"},"aspect_ratio":1.0,"height":1000,"media_type":"image","src":"\/\/crystaldestiny.com\/cdn\/shop\/files\/Dream-Amethyst-Geode-Crystal-Sphere-Spheres-Dream-Amethyst-Weight-271g-35.webp?v=1765383472","width":1000},{"alt":"Dream Amethyst Geode Crystal Sphere-Spheres-Ali-Dream Amethyst-Weight 141g-Crystal Destiny","id":32289036927147,"position":36,"preview_image":{"aspect_ratio":1.0,"height":1000,"width":1000,"src":"\/\/crystaldestiny.com\/cdn\/shop\/files\/Dream-Amethyst-Geode-Crystal-Sphere-Spheres-Dream-Amethyst-Weight-141g-36.webp?v=1765383474"},"aspect_ratio":1.0,"height":1000,"media_type":"image","src":"\/\/crystaldestiny.com\/cdn\/shop\/files\/Dream-Amethyst-Geode-Crystal-Sphere-Spheres-Dream-Amethyst-Weight-141g-36.webp?v=1765383474","width":1000}]
{"item":{"id":8496719397035,"title":"Dream Amethyst Sphere 49mm","handle":"dream-amethyst-sphere-49mm-cd-10224","description":"\u003cp\u003eThe Dream Amethyst Sphere is a finely crafted crystal sphere known for its calming energy and spiritual clarity. Expertly polished to reveal the deep violet hues of genuine amethyst, this sphere serves as a powerful tool for meditation, enhancing intuition and promoting restful sleep. Its smooth, spherical shape allows energy to radiate evenly, creating a balanced environment ideal for focus and emotional healing. Perfect for collectors and practitioners seeking to deepen their connection with amethyst’s natural properties.\u003c\/p\u003e\n\u003cp\u003eThis product is an exact pick as pictured, one of a kind.\u003c\/p\u003e","published_at":"2025-08-14T19:45:06-04:00","created_at":"2025-08-14T19:45:03-04:00","vendor":"Crystal Destiny","type":"Spheres","tags":["crystal","polished","spheres"],"price":3999,"price_min":3999,"price_max":3999,"available":true,"price_varies":false,"compare_at_price":null,"compare_at_price_min":0,"compare_at_price_max":0,"compare_at_price_varies":false,"variants":[{"id":45520676356267,"title":"Amethyst \/ ~ 49mm diameter","option1":"Amethyst","option2":"~ 49mm diameter","option3":null,"sku":"CD-10224","requires_shipping":true,"taxable":true,"featured_image":null,"available":true,"name":"Dream Amethyst Sphere 49mm - Amethyst \/ ~ 49mm diameter","public_title":"Amethyst \/ ~ 49mm diameter","options":["Amethyst","~ 49mm diameter"],"price":3999,"weight":142,"compare_at_price":null,"inventory_management":"shopify","barcode":"","requires_selling_plan":false,"selling_plan_allocations":[]}],"images":["\/\/crystaldestiny.com\/cdn\/shop\/files\/Dream-Amethyst-Sphere-49mm-Spheres.jpg?v=1757135594","\/\/crystaldestiny.com\/cdn\/shop\/files\/Dream-Amethyst-Sphere-49mm-Spheres-2.jpg?v=1757135595","\/\/crystaldestiny.com\/cdn\/shop\/files\/Dream-Amethyst-Sphere-49mm-Spheres-3.jpg?v=1757135597","\/\/crystaldestiny.com\/cdn\/shop\/files\/Dream-Amethyst-Sphere-49mm-Spheres-4.jpg?v=1757135599","\/\/crystaldestiny.com\/cdn\/shop\/files\/Dream-Amethyst-Sphere-49mm-Spheres-5.jpg?v=1757135600","\/\/crystaldestiny.com\/cdn\/shop\/files\/Dream-Amethyst-Sphere-49mm-Spheres-6.jpg?v=1757135602"],"featured_image":"\/\/crystaldestiny.com\/cdn\/shop\/files\/Dream-Amethyst-Sphere-49mm-Spheres.jpg?v=1757135594","options":["Material","Size"],"media":[{"alt":"Dream Amethyst Sphere 49mm-Spheres-Crystal Destiny-Amethyst-~ 49mm diameter-Crystal Destiny","id":31623295828139,"position":1,"preview_image":{"aspect_ratio":1.0,"height":1135,"width":1135,"src":"\/\/crystaldestiny.com\/cdn\/shop\/files\/Dream-Amethyst-Sphere-49mm-Spheres.jpg?v=1757135594"},"aspect_ratio":1.0,"height":1135,"media_type":"image","src":"\/\/crystaldestiny.com\/cdn\/shop\/files\/Dream-Amethyst-Sphere-49mm-Spheres.jpg?v=1757135594","width":1135},{"alt":"Dream Amethyst Sphere 49mm-Spheres-Crystal Destiny-Amethyst-~ 49mm diameter-Crystal Destiny","id":31623295860907,"position":2,"preview_image":{"aspect_ratio":1.0,"height":1254,"width":1254,"src":"\/\/crystaldestiny.com\/cdn\/shop\/files\/Dream-Amethyst-Sphere-49mm-Spheres-2.jpg?v=1757135595"},"aspect_ratio":1.0,"height":1254,"media_type":"image","src":"\/\/crystaldestiny.com\/cdn\/shop\/files\/Dream-Amethyst-Sphere-49mm-Spheres-2.jpg?v=1757135595","width":1254},{"alt":"Dream Amethyst Sphere 49mm-Spheres-Crystal Destiny-Amethyst-~ 49mm diameter-Crystal Destiny","id":31623295893675,"position":3,"preview_image":{"aspect_ratio":1.0,"height":1240,"width":1240,"src":"\/\/crystaldestiny.com\/cdn\/shop\/files\/Dream-Amethyst-Sphere-49mm-Spheres-3.jpg?v=1757135597"},"aspect_ratio":1.0,"height":1240,"media_type":"image","src":"\/\/crystaldestiny.com\/cdn\/shop\/files\/Dream-Amethyst-Sphere-49mm-Spheres-3.jpg?v=1757135597","width":1240},{"alt":"Dream Amethyst Sphere 49mm-Spheres-Crystal Destiny-Amethyst-~ 49mm diameter-Crystal Destiny","id":31623295926443,"position":4,"preview_image":{"aspect_ratio":1.0,"height":1302,"width":1302,"src":"\/\/crystaldestiny.com\/cdn\/shop\/files\/Dream-Amethyst-Sphere-49mm-Spheres-4.jpg?v=1757135599"},"aspect_ratio":1.0,"height":1302,"media_type":"image","src":"\/\/crystaldestiny.com\/cdn\/shop\/files\/Dream-Amethyst-Sphere-49mm-Spheres-4.jpg?v=1757135599","width":1302},{"alt":"Dream Amethyst Sphere 49mm-Spheres-Crystal Destiny-Amethyst-~ 49mm diameter-Crystal Destiny","id":31623295959211,"position":5,"preview_image":{"aspect_ratio":1.0,"height":1224,"width":1224,"src":"\/\/crystaldestiny.com\/cdn\/shop\/files\/Dream-Amethyst-Sphere-49mm-Spheres-5.jpg?v=1757135600"},"aspect_ratio":1.0,"height":1224,"media_type":"image","src":"\/\/crystaldestiny.com\/cdn\/shop\/files\/Dream-Amethyst-Sphere-49mm-Spheres-5.jpg?v=1757135600","width":1224},{"alt":"Dream Amethyst Sphere 49mm-Spheres-Crystal Destiny-Amethyst-~ 49mm diameter-Crystal Destiny","id":31623295991979,"position":6,"preview_image":{"aspect_ratio":1.0,"height":1240,"width":1240,"src":"\/\/crystaldestiny.com\/cdn\/shop\/files\/Dream-Amethyst-Sphere-49mm-Spheres-6.jpg?v=1757135602"},"aspect_ratio":1.0,"height":1240,"media_type":"image","src":"\/\/crystaldestiny.com\/cdn\/shop\/files\/Dream-Amethyst-Sphere-49mm-Spheres-6.jpg?v=1757135602","width":1240}],"requires_selling_plan":false,"selling_plan_groups":[],"content":"\u003cp\u003eThe Dream Amethyst Sphere is a finely crafted crystal sphere known for its calming energy and spiritual clarity. Expertly polished to reveal the deep violet hues of genuine amethyst, this sphere serves as a powerful tool for meditation, enhancing intuition and promoting restful sleep. Its smooth, spherical shape allows energy to radiate evenly, creating a balanced environment ideal for focus and emotional healing. Perfect for collectors and practitioners seeking to deepen their connection with amethyst’s natural properties.\u003c\/p\u003e\n\u003cp\u003eThis product is an exact pick as pictured, one of a kind.\u003c\/p\u003e"},"options":[{"name":"Material","position":1,"values":["Amethyst"]},{"name":"Size","position":2,"values":["~ 49mm diameter"]}],"custom_metafields":{"shipping_time":"Within 7 days"},"metafields":{"badge":"\u003cdiv style='display:none' class='jdgm-prev-badge' data-average-rating='0.00' data-number-of-reviews='0' data-number-of-questions='0'\u003e \u003cspan class='jdgm-prev-badge__stars' data-score='0.00' tabindex='0' aria-label='0.00 stars' role='button'\u003e \u003cspan class='jdgm-star jdgm--off'\u003e\u003c\/span\u003e\u003cspan class='jdgm-star jdgm--off'\u003e\u003c\/span\u003e\u003cspan class='jdgm-star jdgm--off'\u003e\u003c\/span\u003e\u003cspan class='jdgm-star jdgm--off'\u003e\u003c\/span\u003e\u003cspan class='jdgm-star jdgm--off'\u003e\u003c\/span\u003e \u003c\/span\u003e \u003cspan class='jdgm-prev-badge__text'\u003e No reviews \u003c\/span\u003e \u003c\/div\u003e","widget":"\u003cdiv class='jdgm-rev-widg' data-updated-at='2025-08-14T23:46:31Z' data-average-rating='0.00' data-number-of-reviews='0' data-number-of-questions='0' data-image-url='https:\/\/cdn.shopify.com\/s\/files\/1\/0613\/0345\/5915\/files\/6I0A3657.jpg?v=1755214614'\u003e \u003cstyle class='jdgm-temp-hiding-style'\u003e.jdgm-rev-widg{ display: none }\u003c\/style\u003e \u003cdiv class='jdgm-rev-widg__header'\u003e \u003ch2 class='jdgm-rev-widg__title'\u003eCustomer Reviews\u003c\/h2\u003e \u003cdiv class='jdgm-rev-widg__summary'\u003e \u003cdiv class='jdgm-rev-widg__summary-stars' aria-label='Average rating is 0.00 stars' role='img'\u003e \u003cspan class='jdgm-star jdgm--off'\u003e\u003c\/span\u003e\u003cspan class='jdgm-star jdgm--off'\u003e\u003c\/span\u003e\u003cspan class='jdgm-star jdgm--off'\u003e\u003c\/span\u003e\u003cspan class='jdgm-star jdgm--off'\u003e\u003c\/span\u003e\u003cspan class='jdgm-star jdgm--off'\u003e\u003c\/span\u003e \u003c\/div\u003e \u003cdiv class='jdgm-rev-widg__summary-text'\u003eBe the first to write a review\u003c\/div\u003e \u003c\/div\u003e \u003ca style='display: none' href='#' class='jdgm-write-rev-link' role='button'\u003eWrite a review\u003c\/a\u003e \u003cdiv class='jdgm-histogram jdgm-temp-hidden'\u003e \u003cdiv class='jdgm-histogram__row' data-rating='5' data-frequency='0' data-percentage='0'\u003e \u003cdiv class='jdgm-histogram__star' role='button' aria-label=\"0% (0) reviews with 5 star rating\" tabindex='0' \u003e\u003cspan class='jdgm-star jdgm--on'\u003e\u003c\/span\u003e\u003cspan class='jdgm-star jdgm--on'\u003e\u003c\/span\u003e\u003cspan class='jdgm-star jdgm--on'\u003e\u003c\/span\u003e\u003cspan class='jdgm-star jdgm--on'\u003e\u003c\/span\u003e\u003cspan class='jdgm-star jdgm--on'\u003e\u003c\/span\u003e\u003c\/div\u003e \u003cdiv class='jdgm-histogram__bar'\u003e \u003cdiv class='jdgm-histogram__bar-content' style='width: 0%;'\u003e \u003c\/div\u003e \u003c\/div\u003e \u003cdiv class='jdgm-histogram__percentage'\u003e0%\u003c\/div\u003e \u003cdiv class='jdgm-histogram__frequency'\u003e(0)\u003c\/div\u003e \u003c\/div\u003e \u003cdiv class='jdgm-histogram__row' data-rating='4' data-frequency='0' data-percentage='0'\u003e \u003cdiv class='jdgm-histogram__star' role='button' aria-label=\"0% (0) reviews with 4 star rating\" tabindex='0' \u003e\u003cspan class='jdgm-star jdgm--on'\u003e\u003c\/span\u003e\u003cspan class='jdgm-star jdgm--on'\u003e\u003c\/span\u003e\u003cspan class='jdgm-star jdgm--on'\u003e\u003c\/span\u003e\u003cspan class='jdgm-star jdgm--on'\u003e\u003c\/span\u003e\u003cspan class='jdgm-star jdgm--off'\u003e\u003c\/span\u003e\u003c\/div\u003e \u003cdiv class='jdgm-histogram__bar'\u003e \u003cdiv class='jdgm-histogram__bar-content' style='width: 0%;'\u003e \u003c\/div\u003e \u003c\/div\u003e \u003cdiv class='jdgm-histogram__percentage'\u003e0%\u003c\/div\u003e \u003cdiv class='jdgm-histogram__frequency'\u003e(0)\u003c\/div\u003e \u003c\/div\u003e \u003cdiv class='jdgm-histogram__row' data-rating='3' data-frequency='0' data-percentage='0'\u003e \u003cdiv class='jdgm-histogram__star' role='button' aria-label=\"0% (0) reviews with 3 star rating\" tabindex='0' \u003e\u003cspan class='jdgm-star jdgm--on'\u003e\u003c\/span\u003e\u003cspan class='jdgm-star jdgm--on'\u003e\u003c\/span\u003e\u003cspan class='jdgm-star jdgm--on'\u003e\u003c\/span\u003e\u003cspan class='jdgm-star jdgm--off'\u003e\u003c\/span\u003e\u003cspan class='jdgm-star jdgm--off'\u003e\u003c\/span\u003e\u003c\/div\u003e \u003cdiv class='jdgm-histogram__bar'\u003e \u003cdiv class='jdgm-histogram__bar-content' style='width: 0%;'\u003e \u003c\/div\u003e \u003c\/div\u003e \u003cdiv class='jdgm-histogram__percentage'\u003e0%\u003c\/div\u003e \u003cdiv class='jdgm-histogram__frequency'\u003e(0)\u003c\/div\u003e \u003c\/div\u003e \u003cdiv class='jdgm-histogram__row' data-rating='2' data-frequency='0' data-percentage='0'\u003e \u003cdiv class='jdgm-histogram__star' role='button' aria-label=\"0% (0) reviews with 2 star rating\" tabindex='0' \u003e\u003cspan class='jdgm-star jdgm--on'\u003e\u003c\/span\u003e\u003cspan class='jdgm-star jdgm--on'\u003e\u003c\/span\u003e\u003cspan class='jdgm-star jdgm--off'\u003e\u003c\/span\u003e\u003cspan class='jdgm-star jdgm--off'\u003e\u003c\/span\u003e\u003cspan class='jdgm-star jdgm--off'\u003e\u003c\/span\u003e\u003c\/div\u003e \u003cdiv class='jdgm-histogram__bar'\u003e \u003cdiv class='jdgm-histogram__bar-content' style='width: 0%;'\u003e \u003c\/div\u003e \u003c\/div\u003e \u003cdiv class='jdgm-histogram__percentage'\u003e0%\u003c\/div\u003e \u003cdiv class='jdgm-histogram__frequency'\u003e(0)\u003c\/div\u003e \u003c\/div\u003e \u003cdiv class='jdgm-histogram__row' data-rating='1' data-frequency='0' data-percentage='0'\u003e \u003cdiv class='jdgm-histogram__star' role='button' aria-label=\"0% (0) reviews with 1 star rating\" tabindex='0' \u003e\u003cspan class='jdgm-star jdgm--on'\u003e\u003c\/span\u003e\u003cspan class='jdgm-star jdgm--off'\u003e\u003c\/span\u003e\u003cspan class='jdgm-star jdgm--off'\u003e\u003c\/span\u003e\u003cspan class='jdgm-star jdgm--off'\u003e\u003c\/span\u003e\u003cspan class='jdgm-star jdgm--off'\u003e\u003c\/span\u003e\u003c\/div\u003e \u003cdiv class='jdgm-histogram__bar'\u003e \u003cdiv class='jdgm-histogram__bar-content' style='width: 0%;'\u003e \u003c\/div\u003e \u003c\/div\u003e \u003cdiv class='jdgm-histogram__percentage'\u003e0%\u003c\/div\u003e \u003cdiv class='jdgm-histogram__frequency'\u003e(0)\u003c\/div\u003e \u003c\/div\u003e \u003cdiv class='jdgm-histogram__row jdgm-histogram__clear-filter' data-rating=null tabindex='0'\u003e\u003c\/div\u003e \u003c\/div\u003e \u003cdiv class='jdgm-rev-widg__sort-wrapper'\u003e\u003c\/div\u003e \u003c\/div\u003e \u003cdiv class='jdgm-rev-widg__body'\u003e \u003cdiv class='jdgm-rev-widg__reviews'\u003e\u003c\/div\u003e \u003cdiv class='jdgm-paginate' data-per-page='4' data-url='https:\/\/api.judge.me\/reviews\/reviews_for_widget' style=\"display: none;\"\u003e\u003c\/div\u003e \u003c\/div\u003e \u003cdiv class='jdgm-rev-widg__paginate-spinner-wrapper'\u003e \u003cdiv class='jdgm-spinner'\u003e\u003c\/div\u003e \u003c\/div\u003e \u003c\/div\u003e"},"collections":[{"id":294880051371,"handle":"crystals","title":"Crystals","updated_at":"2026-01-07T23:43:11-05:00","body_html":"\u003cp data-start=\"159\" data-end=\"687\"\u003e✨ \u003cstrong data-start=\"161\" data-end=\"216\"\u003eDiscover the Magic of Crystals with Crystal Destiny\u003c\/strong\u003e ✨\u003cbr data-start=\"218\" data-end=\"221\"\u003eCrystals have been treasured for centuries—not only for their natural beauty but also for their powerful healing energies. Beyond their visual allure, they bring balance, harmony, and positive energy into any space. Whether used for home décor, meditation, or simply to elevate the energy of your surroundings, crystals create a sanctuary of peace, relaxation, and well-being. Each piece is a unique gift from the Earth—visually stunning and spiritually uplifting.\u003c\/p\u003e\n\u003cp data-start=\"689\" data-end=\"1011\"\u003eAt \u003cstrong data-start=\"692\" data-end=\"711\"\u003eCrystal Destiny\u003c\/strong\u003e, our signature collection showcases a curated selection of exquisite crystals, from radiant Quartz to soothing Amethyst. Every stone is carefully sourced for its elegance and metaphysical resonance, making them perfect for enhancing your home, uplifting your spirit, or gifting to someone special.\u003c\/p\u003e\n\u003cp data-start=\"1013\" data-end=\"1206\"\u003eExperience the timeless sophistication of crystalline wonders. Explore the \u003cstrong data-start=\"1088\" data-end=\"1118\"\u003eCrystal Destiny Collection\u003c\/strong\u003e today and bring the transformative beauty of these treasures into your everyday life.\u003c\/p\u003e","published_at":"2023-06-05T11:24:02-04:00","sort_order":"created-desc","template_suffix":"","disjunctive":false,"rules":[{"column":"tag","relation":"equals","condition":"crystal"},{"column":"type","relation":"not_contains","condition":"925 Sterling Silver"},{"column":"type","relation":"not_contains","condition":"Wire Wraps"}],"published_scope":"global"},{"id":319455756459,"handle":"crown-chakra-crystals","title":"Crown Chakra Crystals","updated_at":"2026-01-07T23:42:38-05:00","body_html":"\u003cp data-start=\"144\" data-end=\"515\"\u003e✨ \u003cstrong data-start=\"146\" data-end=\"171\"\u003eCrown Chakra Crystals\u003c\/strong\u003e ✨\u003cbr data-start=\"173\" data-end=\"176\"\u003eConnect with higher consciousness and spiritual insight with our \u003cstrong data-start=\"241\" data-end=\"266\"\u003eCrown Chakra Crystals\u003c\/strong\u003e. Located at the top of the head, the Crown Chakra governs wisdom, enlightenment, and your connection to the divine. These crystals help open and balance this energy center, fostering clarity, spiritual growth, and a sense of universal connection.\u003c\/p\u003e\n\u003cp data-start=\"517\" data-end=\"851\"\u003eOur selection includes powerful stones such as Amethyst, Clear Quartz, Selenite, and Lepidolite—each chosen for their ability to enhance meditation, energy work, and mindful practices. Whether placed in your sacred space, carried with you, or worn as jewelry, Crown Chakra Crystals promote harmony, insight, and spiritual alignment.\u003c\/p\u003e\n\u003cp data-start=\"853\" data-end=\"1007\"\u003eElevate your consciousness, deepen your meditative practice, and embrace the transformative energy of the Crown Chakra with these illuminating crystals.\u003c\/p\u003e","published_at":"2025-07-17T18:16:11-04:00","sort_order":"best-selling","template_suffix":"","disjunctive":false,"rules":[{"column":"variant_metafield_definition","relation":"equals","condition":"Crown"}],"published_scope":"global","image":{"created_at":"2025-07-17T19:09:11-04:00","alt":null,"width":1080,"height":1080,"src":"\/\/crystaldestiny.com\/cdn\/shop\/collections\/Crown_Chakra_Collection.jpg?v=1762474922"}},{"id":294880116907,"handle":"polished","title":"Polished Crystals","updated_at":"2026-01-07T23:43:11-05:00","body_html":"\u003cp data-start=\"199\" data-end=\"598\"\u003e✨ \u003cstrong data-start=\"201\" data-end=\"248\"\u003eCrystal Destiny Polished Crystal Collection\u003c\/strong\u003e ✨\u003cbr data-start=\"250\" data-end=\"253\"\u003eIndulge in the brilliance of crystals refined to perfection. Our \u003cstrong data-start=\"318\" data-end=\"341\"\u003ePolished Collection\u003c\/strong\u003e showcases gemstones meticulously shaped and smoothed to reveal their natural radiance and timeless beauty. From the shimmering glow of Quartz to the deep allure of Obsidian, each polished piece is a testament to nature’s artistry and human craftsmanship.\u003c\/p\u003e\n\u003cp data-start=\"600\" data-end=\"862\"\u003ePerfect as statement décor, meaningful gifts, or companions on your spiritual journey, polished crystals bring sophistication and elevated energy into any space. Their radiant surfaces reflect not only light but also the transformative power of crystal energy.\u003c\/p\u003e\n\u003cp data-start=\"864\" data-end=\"1022\"\u003eDiscover the elegance of refinement with Crystal Destiny’s Polished Crystal Collection—where every facet shines with intention, beauty, and timeless allure.\u003c\/p\u003e","published_at":"2023-06-05T11:30:44-04:00","sort_order":"created-desc","template_suffix":"","disjunctive":false,"rules":[{"column":"tag","relation":"equals","condition":"polished"}],"published_scope":"global"},{"id":295698202795,"handle":"spheres","title":"Crystal Spheres","updated_at":"2026-01-06T23:24:35-05:00","body_html":"\u003cp data-start=\"106\" data-end=\"370\"\u003e✨ \u003cstrong data-start=\"108\" data-end=\"138\"\u003eCrystal Spheres Collection\u003c\/strong\u003e ✨\u003cbr data-start=\"140\" data-end=\"143\"\u003eBring harmony, balance, and elegance into your space with our \u003cstrong data-start=\"205\" data-end=\"235\"\u003eCrystal Spheres Collection\u003c\/strong\u003e. Each sphere is meticulously crafted to showcase the natural beauty and energy of crystals, from radiant Quartz to calming Amethyst.\u003c\/p\u003e\n\u003cp data-start=\"372\" data-end=\"658\"\u003ePerfect for meditation, energy work, or as striking décor, crystal spheres radiate energy in all directions, promoting clarity, focus, and a sense of calm. Their smooth, polished surfaces highlight the stones’ natural patterns and colors, making each sphere a captivating centerpiece.\u003c\/p\u003e\n\u003cp data-start=\"660\" data-end=\"809\"\u003eElevate your space and embrace the transformative power of crystals with the \u003cstrong data-start=\"737\" data-end=\"767\"\u003eCrystal Spheres Collection\u003c\/strong\u003e—where beauty, energy, and harmony meet.\u003c\/p\u003e","published_at":"2023-07-28T14:20:46-04:00","sort_order":"created-desc","template_suffix":"","disjunctive":true,"rules":[{"column":"tag","relation":"equals","condition":"spheres"},{"column":"tag","relation":"equals","condition":"eggs"}],"published_scope":"global"},{"id":293659312299,"handle":"best-sellers","title":"Best Sellers","updated_at":"2026-01-07T23:43:11-05:00","body_html":"\u003cp data-start=\"155\" data-end=\"510\"\u003eDiscover the pieces our community loves most. Our Best Sellers Collection brings together handpicked crystals and jewelry that embody timeless elegance, spiritual resonance, and everyday sophistication. Each item has earned its place as a customer favorite—celebrated for both its beauty and its meaningful energy.\u003c\/p\u003e\n\u003cp data-start=\"512\" data-end=\"802\"\u003eFrom stunning statement pieces to versatile daily companions, these treasures are curated to elevate your space, uplift your spirit, and reflect refined taste. Indulge in what’s most cherished and let our best sellers guide you toward the perfect blend of style and transformative energy.\u003c\/p\u003e\n\u003cp data-start=\"804\" data-end=\"932\"\u003eExplore the Best Sellers Collection today—where elegance meets intention, and every piece tells a story of beauty and balance.\u003c\/p\u003e","published_at":"2023-03-15T16:04:51-04:00","sort_order":"best-selling","template_suffix":"","disjunctive":false,"rules":[{"column":"variant_price","relation":"greater_than","condition":"0"},{"column":"variant_inventory","relation":"greater_than","condition":"0"},{"column":"type","relation":"not_equals","condition":"Shipping Protection"}],"published_scope":"global"},{"id":321370390699,"handle":"monthly-crystal-sale","title":"Monthly Crystal Sale | Spheres \u0026 Towers","updated_at":"2026-01-06T23:24:37-05:00","body_html":"\u003cp\u003eShop our \u003cstrong\u003eMonthly Crystal Sale\u003c\/strong\u003e, where you can shop a wide selection of healing crystals at discounted prices. Explore \u003cstrong\u003ecrystal spheres and towers,\u003c\/strong\u003e— all carefully curated to support meditation, energy balancing, and spiritual wellness. Whether you're looking to enhance your home decor, boost your daily energy, or find the perfect gift, our \u003cstrong\u003ecrystals for healing and manifestation\u003c\/strong\u003e offer both beauty and metaphysical benefits.\u003c\/p\u003e\n\u003cp\u003eEach month, our sale features \u003cstrong\u003enew discounted collections\u003c\/strong\u003e, from \u003cstrong\u003enatural quartz and amethyst towers\u003c\/strong\u003e to \u003cstrong\u003ewire-wrapped pendants and polished stones\u003c\/strong\u003e, so there's always something fresh to discover. Shop with confidence knowing you're getting high-quality crystals with \u003cstrong\u003efree shipping options\u003c\/strong\u003e and a trusted experience.\u003c\/p\u003e\n\u003cp\u003e\u003cstrong\u003eTake advantage of the Monthly Crystal Sale today\u003c\/strong\u003e and add powerful, natural energy to your life with \u003cstrong\u003eauthentic healing crystals\u003c\/strong\u003e — while our limited-time discounts last.\u003c\/p\u003e\n\u003cp\u003e\u003cstrong\u003e*Discount automatically applied at checkout.\u003c\/strong\u003e\u003c\/p\u003e","published_at":"2025-12-02T01:26:17-05:00","sort_order":"alpha-asc","template_suffix":"","disjunctive":true,"rules":[{"column":"tag","relation":"equals","condition":"spheres"},{"column":"tag","relation":"equals","condition":"Towers"}],"published_scope":"global","image":{"created_at":"2026-01-01T01:32:34-05:00","alt":"","width":960,"height":960,"src":"\/\/crystaldestiny.com\/cdn\/shop\/collections\/3E8C2969-1B86-4ACE-B349-98E9D8768424.jpg?v=1767249154"}},{"id":297596059819,"handle":"all","title":"All Crystals \u0026 Jewelry","updated_at":"2026-01-07T23:43:11-05:00","body_html":"\u003cp data-start=\"149\" data-end=\"494\"\u003e✨ \u003cstrong data-start=\"151\" data-end=\"181\"\u003eWelcome to Crystal Destiny\u003c\/strong\u003e ✨\u003cbr data-start=\"183\" data-end=\"186\"\u003eStep into a world where beauty, energy, and artistry unite. Our collection is a treasure trove of exquisite crystals, from the raw, untamed elegance of natural formations to the polished brilliance of expertly crafted pieces. Each crystal is a masterpiece, carrying its own unique story and timeless charm.\u003c\/p\u003e\n\u003cp data-start=\"496\" data-end=\"831\"\u003eWhether you’re drawn to the calming presence of Amethyst, the vibrant energy of Citrine, or the grounding strength of Jasper, our crystals invite you to connect with nature’s finest wonders. Perfect for enhancing your space, supporting your spiritual journey, or gifting with intention, every piece resonates with beauty and meaning.\u003c\/p\u003e\n\u003cp data-start=\"833\" data-end=\"1000\"\u003eElevate your surroundings, embrace the mystique, and explore the enchanting world of crystals at \u003cstrong data-start=\"930\" data-end=\"949\"\u003eCrystal Destiny\u003c\/strong\u003e—where every crystal is waiting to be discovered.\u003c\/p\u003e","published_at":"2023-11-10T13:55:31-05:00","sort_order":"created-desc","template_suffix":"","disjunctive":false,"rules":[{"column":"type","relation":"not_equals","condition":"asdf"}],"published_scope":"global"},{"id":298983391403,"handle":"january-crystal-sale","title":"January Sale | 25% Off Crystal Towers \u0026 Spheres","updated_at":"2026-01-06T23:24:37-05:00","body_html":"\u003cp\u003eShop our \u003cstrong\u003eJanuary Crystal Sale\u003c\/strong\u003e, where you can shop a wide selection of healing crystals at discounted prices. Explore \u003cstrong\u003eCrystal Towers, \u0026amp; Crystal Spheres\u003c\/strong\u003e — all carefully curated and crafted to support meditation, energy balancing, and spiritual wellness. Whether you're looking to enhance your home decor, boost your daily energy, or find the perfect gift, our \u003cstrong\u003ecrystals for healing and manifestation\u003c\/strong\u003e offer both beauty and metaphysical benefits.\u003c\/p\u003e\n\u003cp\u003eThis January, our sale features \u003cstrong\u003ediscounted crystal towers and spheres\u003c\/strong\u003e, from \u003cstrong\u003enatural quartz \u003c\/strong\u003eand \u003cstrong\u003eamethyst \u003c\/strong\u003eto \u003cstrong\u003ebumblebee jasper \u003c\/strong\u003eand \u003cstrong\u003ecarnelian\u003c\/strong\u003e, so there's always something fresh to discover. Shop with confidence knowing you're getting high-quality crystals with \u003cstrong\u003efree shipping options\u003c\/strong\u003e and a trusted experience.\u003c\/p\u003e\n\u003cp\u003e\u003cstrong\u003eTake advantage of the January Crystal Sale today\u003c\/strong\u003e and add powerful, natural energy to your life with \u003cstrong\u003eauthentic healing crystals\u003c\/strong\u003e — while our limited-time discounts last.\u003c\/p\u003e\n\u003cp\u003e\u003cstrong\u003e*Discount automatically applied at checkout.\u003c\/strong\u003e\u003c\/p\u003e","published_at":"2026-01-01T00:07:17-05:00","sort_order":"alpha-asc","template_suffix":"monthly-collection","disjunctive":true,"rules":[{"column":"tag","relation":"equals","condition":"Spheres"},{"column":"tag","relation":"equals","condition":"Towers"}],"published_scope":"global","image":{"created_at":"2026-01-01T01:29:59-05:00","alt":"","width":960,"height":960,"src":"\/\/crystaldestiny.com\/cdn\/shop\/collections\/1464163B-22B1-4D62-BEC5-CEC9AECB670B.jpg?v=1767248999"}}]}
[{"alt":"Dream Amethyst Sphere 49mm-Spheres-Crystal Destiny-Amethyst-~ 49mm diameter-Crystal Destiny","id":31623295828139,"position":1,"preview_image":{"aspect_ratio":1.0,"height":1135,"width":1135,"src":"\/\/crystaldestiny.com\/cdn\/shop\/files\/Dream-Amethyst-Sphere-49mm-Spheres.jpg?v=1757135594"},"aspect_ratio":1.0,"height":1135,"media_type":"image","src":"\/\/crystaldestiny.com\/cdn\/shop\/files\/Dream-Amethyst-Sphere-49mm-Spheres.jpg?v=1757135594","width":1135},{"alt":"Dream Amethyst Sphere 49mm-Spheres-Crystal Destiny-Amethyst-~ 49mm diameter-Crystal Destiny","id":31623295860907,"position":2,"preview_image":{"aspect_ratio":1.0,"height":1254,"width":1254,"src":"\/\/crystaldestiny.com\/cdn\/shop\/files\/Dream-Amethyst-Sphere-49mm-Spheres-2.jpg?v=1757135595"},"aspect_ratio":1.0,"height":1254,"media_type":"image","src":"\/\/crystaldestiny.com\/cdn\/shop\/files\/Dream-Amethyst-Sphere-49mm-Spheres-2.jpg?v=1757135595","width":1254},{"alt":"Dream Amethyst Sphere 49mm-Spheres-Crystal Destiny-Amethyst-~ 49mm diameter-Crystal Destiny","id":31623295893675,"position":3,"preview_image":{"aspect_ratio":1.0,"height":1240,"width":1240,"src":"\/\/crystaldestiny.com\/cdn\/shop\/files\/Dream-Amethyst-Sphere-49mm-Spheres-3.jpg?v=1757135597"},"aspect_ratio":1.0,"height":1240,"media_type":"image","src":"\/\/crystaldestiny.com\/cdn\/shop\/files\/Dream-Amethyst-Sphere-49mm-Spheres-3.jpg?v=1757135597","width":1240},{"alt":"Dream Amethyst Sphere 49mm-Spheres-Crystal Destiny-Amethyst-~ 49mm diameter-Crystal Destiny","id":31623295926443,"position":4,"preview_image":{"aspect_ratio":1.0,"height":1302,"width":1302,"src":"\/\/crystaldestiny.com\/cdn\/shop\/files\/Dream-Amethyst-Sphere-49mm-Spheres-4.jpg?v=1757135599"},"aspect_ratio":1.0,"height":1302,"media_type":"image","src":"\/\/crystaldestiny.com\/cdn\/shop\/files\/Dream-Amethyst-Sphere-49mm-Spheres-4.jpg?v=1757135599","width":1302},{"alt":"Dream Amethyst Sphere 49mm-Spheres-Crystal Destiny-Amethyst-~ 49mm diameter-Crystal Destiny","id":31623295959211,"position":5,"preview_image":{"aspect_ratio":1.0,"height":1224,"width":1224,"src":"\/\/crystaldestiny.com\/cdn\/shop\/files\/Dream-Amethyst-Sphere-49mm-Spheres-5.jpg?v=1757135600"},"aspect_ratio":1.0,"height":1224,"media_type":"image","src":"\/\/crystaldestiny.com\/cdn\/shop\/files\/Dream-Amethyst-Sphere-49mm-Spheres-5.jpg?v=1757135600","width":1224},{"alt":"Dream Amethyst Sphere 49mm-Spheres-Crystal Destiny-Amethyst-~ 49mm diameter-Crystal Destiny","id":31623295991979,"position":6,"preview_image":{"aspect_ratio":1.0,"height":1240,"width":1240,"src":"\/\/crystaldestiny.com\/cdn\/shop\/files\/Dream-Amethyst-Sphere-49mm-Spheres-6.jpg?v=1757135602"},"aspect_ratio":1.0,"height":1240,"media_type":"image","src":"\/\/crystaldestiny.com\/cdn\/shop\/files\/Dream-Amethyst-Sphere-49mm-Spheres-6.jpg?v=1757135602","width":1240}]
{"item":{"id":8523525849259,"title":"Dream Amethyst Spheres 51-57mm","handle":"dream-amethyst-spheres-51-57mm-cd-10352","description":"\u003cp\u003eDream Amethyst Spheres are exquisite crystal spheres renowned for their deep violet hues and soothing energy. Amethyst, a powerful variety of quartz, has been revered for centuries for its spiritual properties, making these spheres ideal tools for meditation, healing, and enhancing intuition. The smooth, polished surface of each sphere serves to radiate calming energy evenly, promoting clarity of mind and emotional balance. Metaphysically, Amethyst is associated with the crown and third eye chakras, helping to elevate one’s spiritual awareness and facilitate a connection to higher consciousness.\u003c\/p\u003e\n\u003cp\u003eIt is also believed to protect against negative energies, alleviate stress, and encourage restful sleep by creating a tranquil atmosphere. Placing a Dream Amethyst Sphere in your living or workspace can foster a serene environment conducive to mindfulness and creativity. These spheres are not only elegant decor pieces but also potent instruments for anyone seeking to deepen their spiritual practice or enhance overall well-being.\u003c\/p\u003e\n\u003cp\u003eThis product is an exact pick as pictured, one of a kind.\u003c\/p\u003e","published_at":"2025-09-16T16:45:38-04:00","created_at":"2025-09-16T16:45:36-04:00","vendor":"Crystal Destiny","type":"Spheres","tags":["crystal","polished","spheres"],"price":4499,"price_min":4499,"price_max":4599,"available":true,"price_varies":true,"compare_at_price":null,"compare_at_price_min":0,"compare_at_price_max":0,"compare_at_price_varies":false,"variants":[{"id":45628438806699,"title":"Dream Amethyst \/ 260g - 57mm Diameter","option1":"Dream Amethyst","option2":"260g - 57mm Diameter","option3":null,"sku":"CD-10352","requires_shipping":true,"taxable":true,"featured_image":{"id":40415350620331,"product_id":8523525849259,"position":1,"created_at":"2025-09-16T16:40:19-04:00","updated_at":"2025-12-11T00:09:02-05:00","alt":"Dream Amethyst Spheres 51-57mm-Spheres-Crystal Destiny-Dream Amethyst-260g - 57mm Diameter-Crystal Destiny","width":1802,"height":1802,"src":"\/\/crystaldestiny.com\/cdn\/shop\/files\/Dream-Amethyst-Spheres-51-57mm-Spheres-Dream-Amethyst-260g-57mm-Diameter.jpg?v=1765429742","variant_ids":[45628438806699]},"available":true,"name":"Dream Amethyst Spheres 51-57mm - Dream Amethyst \/ 260g - 57mm Diameter","public_title":"Dream Amethyst \/ 260g - 57mm Diameter","options":["Dream Amethyst","260g - 57mm Diameter"],"price":4599,"weight":260,"compare_at_price":null,"inventory_management":"shopify","barcode":"","featured_media":{"alt":"Dream Amethyst Spheres 51-57mm-Spheres-Crystal Destiny-Dream Amethyst-260g - 57mm Diameter-Crystal Destiny","id":31808206045355,"position":1,"preview_image":{"aspect_ratio":1.0,"height":1802,"width":1802,"src":"\/\/crystaldestiny.com\/cdn\/shop\/files\/Dream-Amethyst-Spheres-51-57mm-Spheres-Dream-Amethyst-260g-57mm-Diameter.jpg?v=1765429742"}},"requires_selling_plan":false,"selling_plan_allocations":[]},{"id":45628440674475,"title":"Dream Amethyst \/ 232g - 55mm Diameter","option1":"Dream Amethyst","option2":"232g - 55mm Diameter","option3":null,"sku":"CD-10353","requires_shipping":true,"taxable":true,"featured_image":{"id":40415350849707,"product_id":8523525849259,"position":8,"created_at":"2025-09-16T16:40:19-04:00","updated_at":"2025-12-11T00:09:08-05:00","alt":"Dream Amethyst Spheres 51-57mm-Spheres-Crystal Destiny-Dream Amethyst-232g - 55mm Diameter-Crystal Destiny","width":2048,"height":2048,"src":"\/\/crystaldestiny.com\/cdn\/shop\/files\/Dream-Amethyst-Spheres-51-57mm-Spheres-Dream-Amethyst-232g-55mm-Diameter-8.jpg?v=1765429748","variant_ids":[45628440674475]},"available":true,"name":"Dream Amethyst Spheres 51-57mm - Dream Amethyst \/ 232g - 55mm Diameter","public_title":"Dream Amethyst \/ 232g - 55mm Diameter","options":["Dream Amethyst","232g - 55mm Diameter"],"price":4599,"weight":260,"compare_at_price":null,"inventory_management":"shopify","barcode":"","featured_media":{"alt":"Dream Amethyst Spheres 51-57mm-Spheres-Crystal Destiny-Dream Amethyst-232g - 55mm Diameter-Crystal Destiny","id":31808206274731,"position":8,"preview_image":{"aspect_ratio":1.0,"height":2048,"width":2048,"src":"\/\/crystaldestiny.com\/cdn\/shop\/files\/Dream-Amethyst-Spheres-51-57mm-Spheres-Dream-Amethyst-232g-55mm-Diameter-8.jpg?v=1765429748"}},"requires_selling_plan":false,"selling_plan_allocations":[]},{"id":45628446408875,"title":"Dream Amethyst \/ 230g - 55mm Diameter","option1":"Dream Amethyst","option2":"230g - 55mm Diameter","option3":null,"sku":"CD-10354","requires_shipping":true,"taxable":true,"featured_image":{"id":40415350751403,"product_id":8523525849259,"position":5,"created_at":"2025-09-16T16:40:19-04:00","updated_at":"2025-12-11T00:09:05-05:00","alt":"Dream Amethyst Spheres 51-57mm-Spheres-Crystal Destiny-Dream Amethyst-230g - 55mm Diameter-Crystal Destiny","width":1724,"height":1724,"src":"\/\/crystaldestiny.com\/cdn\/shop\/files\/Dream-Amethyst-Spheres-51-57mm-Spheres-Dream-Amethyst-230g-55mm-Diameter-5.jpg?v=1765429745","variant_ids":[45628446408875]},"available":true,"name":"Dream Amethyst Spheres 51-57mm - Dream Amethyst \/ 230g - 55mm Diameter","public_title":"Dream Amethyst \/ 230g - 55mm Diameter","options":["Dream Amethyst","230g - 55mm Diameter"],"price":4599,"weight":260,"compare_at_price":null,"inventory_management":"shopify","barcode":"","featured_media":{"alt":"Dream Amethyst Spheres 51-57mm-Spheres-Crystal Destiny-Dream Amethyst-230g - 55mm Diameter-Crystal Destiny","id":31808206176427,"position":5,"preview_image":{"aspect_ratio":1.0,"height":1724,"width":1724,"src":"\/\/crystaldestiny.com\/cdn\/shop\/files\/Dream-Amethyst-Spheres-51-57mm-Spheres-Dream-Amethyst-230g-55mm-Diameter-5.jpg?v=1765429745"}},"requires_selling_plan":false,"selling_plan_allocations":[]},{"id":45628451193003,"title":"Dream Amethyst \/ 198g - 53mm Diameter","option1":"Dream Amethyst","option2":"198g - 53mm Diameter","option3":null,"sku":"CD-10355","requires_shipping":true,"taxable":true,"featured_image":{"id":40415351013547,"product_id":8523525849259,"position":13,"created_at":"2025-09-16T16:40:19-04:00","updated_at":"2025-12-11T00:09:11-05:00","alt":"Dream Amethyst Spheres 51-57mm-Spheres-Crystal Destiny-Dream Amethyst-198g - 53mm Diameter-Crystal Destiny","width":1585,"height":1585,"src":"\/\/crystaldestiny.com\/cdn\/shop\/files\/Dream-Amethyst-Spheres-51-57mm-Spheres-Dream-Amethyst-198g-53mm-Diameter-13.jpg?v=1765429751","variant_ids":[45628451193003]},"available":false,"name":"Dream Amethyst Spheres 51-57mm - Dream Amethyst \/ 198g - 53mm Diameter","public_title":"Dream Amethyst \/ 198g - 53mm Diameter","options":["Dream Amethyst","198g - 53mm Diameter"],"price":4499,"weight":260,"compare_at_price":null,"inventory_management":"shopify","barcode":"","featured_media":{"alt":"Dream Amethyst Spheres 51-57mm-Spheres-Crystal Destiny-Dream Amethyst-198g - 53mm Diameter-Crystal Destiny","id":31808206438571,"position":13,"preview_image":{"aspect_ratio":1.0,"height":1585,"width":1585,"src":"\/\/crystaldestiny.com\/cdn\/shop\/files\/Dream-Amethyst-Spheres-51-57mm-Spheres-Dream-Amethyst-198g-53mm-Diameter-13.jpg?v=1765429751"}},"requires_selling_plan":false,"selling_plan_allocations":[]},{"id":45628453453995,"title":"Dream Amethyst \/ 188g - 51mm Diameter","option1":"Dream Amethyst","option2":"188g - 51mm Diameter","option3":null,"sku":"CD-10356","requires_shipping":true,"taxable":true,"featured_image":{"id":40415350718635,"product_id":8523525849259,"position":4,"created_at":"2025-09-16T16:40:19-04:00","updated_at":"2025-12-11T00:09:04-05:00","alt":"Dream Amethyst Spheres 51-57mm-Spheres-Crystal Destiny-Dream Amethyst-188g - 51mm Diameter-Crystal Destiny","width":1751,"height":1751,"src":"\/\/crystaldestiny.com\/cdn\/shop\/files\/Dream-Amethyst-Spheres-51-57mm-Spheres-Dream-Amethyst-188g-51mm-Diameter-4.jpg?v=1765429744","variant_ids":[45628453453995]},"available":true,"name":"Dream Amethyst Spheres 51-57mm - Dream Amethyst \/ 188g - 51mm Diameter","public_title":"Dream Amethyst \/ 188g - 51mm Diameter","options":["Dream Amethyst","188g - 51mm Diameter"],"price":4499,"weight":260,"compare_at_price":null,"inventory_management":"shopify","barcode":"","featured_media":{"alt":"Dream Amethyst Spheres 51-57mm-Spheres-Crystal Destiny-Dream Amethyst-188g - 51mm Diameter-Crystal Destiny","id":31808206143659,"position":4,"preview_image":{"aspect_ratio":1.0,"height":1751,"width":1751,"src":"\/\/crystaldestiny.com\/cdn\/shop\/files\/Dream-Amethyst-Spheres-51-57mm-Spheres-Dream-Amethyst-188g-51mm-Diameter-4.jpg?v=1765429744"}},"requires_selling_plan":false,"selling_plan_allocations":[]}],"images":["\/\/crystaldestiny.com\/cdn\/shop\/files\/Dream-Amethyst-Spheres-51-57mm-Spheres-Dream-Amethyst-260g-57mm-Diameter.jpg?v=1765429742","\/\/crystaldestiny.com\/cdn\/shop\/files\/Dream-Amethyst-Spheres-51-57mm-Spheres-2.jpg?v=1758085501","\/\/crystaldestiny.com\/cdn\/shop\/files\/Dream-Amethyst-Spheres-51-57mm-Spheres-3.jpg?v=1758085503","\/\/crystaldestiny.com\/cdn\/shop\/files\/Dream-Amethyst-Spheres-51-57mm-Spheres-Dream-Amethyst-188g-51mm-Diameter-4.jpg?v=1765429744","\/\/crystaldestiny.com\/cdn\/shop\/files\/Dream-Amethyst-Spheres-51-57mm-Spheres-Dream-Amethyst-230g-55mm-Diameter-5.jpg?v=1765429745","\/\/crystaldestiny.com\/cdn\/shop\/files\/Dream-Amethyst-Spheres-51-57mm-Spheres-6.jpg?v=1758085508","\/\/crystaldestiny.com\/cdn\/shop\/files\/Dream-Amethyst-Spheres-51-57mm-Spheres-7.jpg?v=1758085510","\/\/crystaldestiny.com\/cdn\/shop\/files\/Dream-Amethyst-Spheres-51-57mm-Spheres-Dream-Amethyst-232g-55mm-Diameter-8.jpg?v=1765429748","\/\/crystaldestiny.com\/cdn\/shop\/files\/Dream-Amethyst-Spheres-51-57mm-Spheres-9.jpg?v=1758085513","\/\/crystaldestiny.com\/cdn\/shop\/files\/Dream-Amethyst-Spheres-51-57mm-Spheres-10.jpg?v=1758085515","\/\/crystaldestiny.com\/cdn\/shop\/files\/Dream-Amethyst-Spheres-51-57mm-Spheres-11.jpg?v=1758085516","\/\/crystaldestiny.com\/cdn\/shop\/files\/Dream-Amethyst-Spheres-51-57mm-Spheres-12.jpg?v=1758085518","\/\/crystaldestiny.com\/cdn\/shop\/files\/Dream-Amethyst-Spheres-51-57mm-Spheres-Dream-Amethyst-198g-53mm-Diameter-13.jpg?v=1765429751","\/\/crystaldestiny.com\/cdn\/shop\/files\/Dream-Amethyst-Spheres-51-57mm-Spheres-14.jpg?v=1758085521","\/\/crystaldestiny.com\/cdn\/shop\/files\/Dream-Amethyst-Spheres-51-57mm-Spheres-15.jpg?v=1758085523"],"featured_image":"\/\/crystaldestiny.com\/cdn\/shop\/files\/Dream-Amethyst-Spheres-51-57mm-Spheres-Dream-Amethyst-260g-57mm-Diameter.jpg?v=1765429742","options":["Material","Size"],"media":[{"alt":"Dream Amethyst Spheres 51-57mm-Spheres-Crystal Destiny-Dream Amethyst-260g - 57mm Diameter-Crystal Destiny","id":31808206045355,"position":1,"preview_image":{"aspect_ratio":1.0,"height":1802,"width":1802,"src":"\/\/crystaldestiny.com\/cdn\/shop\/files\/Dream-Amethyst-Spheres-51-57mm-Spheres-Dream-Amethyst-260g-57mm-Diameter.jpg?v=1765429742"},"aspect_ratio":1.0,"height":1802,"media_type":"image","src":"\/\/crystaldestiny.com\/cdn\/shop\/files\/Dream-Amethyst-Spheres-51-57mm-Spheres-Dream-Amethyst-260g-57mm-Diameter.jpg?v=1765429742","width":1802},{"alt":"Dream Amethyst Spheres 51-57mm-Spheres-Crystal Destiny-Dream Amethyst-260g - 57mm Diameter-Crystal Destiny","id":31808206078123,"position":2,"preview_image":{"aspect_ratio":1.0,"height":2048,"width":2048,"src":"\/\/crystaldestiny.com\/cdn\/shop\/files\/Dream-Amethyst-Spheres-51-57mm-Spheres-2.jpg?v=1758085501"},"aspect_ratio":1.0,"height":2048,"media_type":"image","src":"\/\/crystaldestiny.com\/cdn\/shop\/files\/Dream-Amethyst-Spheres-51-57mm-Spheres-2.jpg?v=1758085501","width":2048},{"alt":"Dream Amethyst Spheres 51-57mm-Spheres-Crystal Destiny-Dream Amethyst-260g - 57mm Diameter-Crystal Destiny","id":31808206110891,"position":3,"preview_image":{"aspect_ratio":1.0,"height":2048,"width":2048,"src":"\/\/crystaldestiny.com\/cdn\/shop\/files\/Dream-Amethyst-Spheres-51-57mm-Spheres-3.jpg?v=1758085503"},"aspect_ratio":1.0,"height":2048,"media_type":"image","src":"\/\/crystaldestiny.com\/cdn\/shop\/files\/Dream-Amethyst-Spheres-51-57mm-Spheres-3.jpg?v=1758085503","width":2048},{"alt":"Dream Amethyst Spheres 51-57mm-Spheres-Crystal Destiny-Dream Amethyst-188g - 51mm Diameter-Crystal Destiny","id":31808206143659,"position":4,"preview_image":{"aspect_ratio":1.0,"height":1751,"width":1751,"src":"\/\/crystaldestiny.com\/cdn\/shop\/files\/Dream-Amethyst-Spheres-51-57mm-Spheres-Dream-Amethyst-188g-51mm-Diameter-4.jpg?v=1765429744"},"aspect_ratio":1.0,"height":1751,"media_type":"image","src":"\/\/crystaldestiny.com\/cdn\/shop\/files\/Dream-Amethyst-Spheres-51-57mm-Spheres-Dream-Amethyst-188g-51mm-Diameter-4.jpg?v=1765429744","width":1751},{"alt":"Dream Amethyst Spheres 51-57mm-Spheres-Crystal Destiny-Dream Amethyst-230g - 55mm Diameter-Crystal Destiny","id":31808206176427,"position":5,"preview_image":{"aspect_ratio":1.0,"height":1724,"width":1724,"src":"\/\/crystaldestiny.com\/cdn\/shop\/files\/Dream-Amethyst-Spheres-51-57mm-Spheres-Dream-Amethyst-230g-55mm-Diameter-5.jpg?v=1765429745"},"aspect_ratio":1.0,"height":1724,"media_type":"image","src":"\/\/crystaldestiny.com\/cdn\/shop\/files\/Dream-Amethyst-Spheres-51-57mm-Spheres-Dream-Amethyst-230g-55mm-Diameter-5.jpg?v=1765429745","width":1724},{"alt":"Dream Amethyst Spheres 51-57mm-Spheres-Crystal Destiny-Dream Amethyst-260g - 57mm Diameter-Crystal Destiny","id":31808206209195,"position":6,"preview_image":{"aspect_ratio":1.0,"height":2048,"width":2048,"src":"\/\/crystaldestiny.com\/cdn\/shop\/files\/Dream-Amethyst-Spheres-51-57mm-Spheres-6.jpg?v=1758085508"},"aspect_ratio":1.0,"height":2048,"media_type":"image","src":"\/\/crystaldestiny.com\/cdn\/shop\/files\/Dream-Amethyst-Spheres-51-57mm-Spheres-6.jpg?v=1758085508","width":2048},{"alt":"Dream Amethyst Spheres 51-57mm-Spheres-Crystal Destiny-Dream Amethyst-260g - 57mm Diameter-Crystal Destiny","id":31808206241963,"position":7,"preview_image":{"aspect_ratio":1.0,"height":2048,"width":2048,"src":"\/\/crystaldestiny.com\/cdn\/shop\/files\/Dream-Amethyst-Spheres-51-57mm-Spheres-7.jpg?v=1758085510"},"aspect_ratio":1.0,"height":2048,"media_type":"image","src":"\/\/crystaldestiny.com\/cdn\/shop\/files\/Dream-Amethyst-Spheres-51-57mm-Spheres-7.jpg?v=1758085510","width":2048},{"alt":"Dream Amethyst Spheres 51-57mm-Spheres-Crystal Destiny-Dream Amethyst-232g - 55mm Diameter-Crystal Destiny","id":31808206274731,"position":8,"preview_image":{"aspect_ratio":1.0,"height":2048,"width":2048,"src":"\/\/crystaldestiny.com\/cdn\/shop\/files\/Dream-Amethyst-Spheres-51-57mm-Spheres-Dream-Amethyst-232g-55mm-Diameter-8.jpg?v=1765429748"},"aspect_ratio":1.0,"height":2048,"media_type":"image","src":"\/\/crystaldestiny.com\/cdn\/shop\/files\/Dream-Amethyst-Spheres-51-57mm-Spheres-Dream-Amethyst-232g-55mm-Diameter-8.jpg?v=1765429748","width":2048},{"alt":"Dream Amethyst Spheres 51-57mm-Spheres-Crystal Destiny-Dream Amethyst-260g - 57mm Diameter-Crystal Destiny","id":31808206307499,"position":9,"preview_image":{"aspect_ratio":1.0,"height":2048,"width":2048,"src":"\/\/crystaldestiny.com\/cdn\/shop\/files\/Dream-Amethyst-Spheres-51-57mm-Spheres-9.jpg?v=1758085513"},"aspect_ratio":1.0,"height":2048,"media_type":"image","src":"\/\/crystaldestiny.com\/cdn\/shop\/files\/Dream-Amethyst-Spheres-51-57mm-Spheres-9.jpg?v=1758085513","width":2048},{"alt":"Dream Amethyst Spheres 51-57mm-Spheres-Crystal Destiny-Dream Amethyst-260g - 57mm Diameter-Crystal Destiny","id":31808206340267,"position":10,"preview_image":{"aspect_ratio":1.0,"height":1684,"width":1684,"src":"\/\/crystaldestiny.com\/cdn\/shop\/files\/Dream-Amethyst-Spheres-51-57mm-Spheres-10.jpg?v=1758085515"},"aspect_ratio":1.0,"height":1684,"media_type":"image","src":"\/\/crystaldestiny.com\/cdn\/shop\/files\/Dream-Amethyst-Spheres-51-57mm-Spheres-10.jpg?v=1758085515","width":1684},{"alt":"Dream Amethyst Spheres 51-57mm-Spheres-Crystal Destiny-Dream Amethyst-260g - 57mm Diameter-Crystal Destiny","id":31808206373035,"position":11,"preview_image":{"aspect_ratio":1.0,"height":1667,"width":1667,"src":"\/\/crystaldestiny.com\/cdn\/shop\/files\/Dream-Amethyst-Spheres-51-57mm-Spheres-11.jpg?v=1758085516"},"aspect_ratio":1.0,"height":1667,"media_type":"image","src":"\/\/crystaldestiny.com\/cdn\/shop\/files\/Dream-Amethyst-Spheres-51-57mm-Spheres-11.jpg?v=1758085516","width":1667},{"alt":"Dream Amethyst Spheres 51-57mm-Spheres-Crystal Destiny-Dream Amethyst-260g - 57mm Diameter-Crystal Destiny","id":31808206405803,"position":12,"preview_image":{"aspect_ratio":1.0,"height":2048,"width":2048,"src":"\/\/crystaldestiny.com\/cdn\/shop\/files\/Dream-Amethyst-Spheres-51-57mm-Spheres-12.jpg?v=1758085518"},"aspect_ratio":1.0,"height":2048,"media_type":"image","src":"\/\/crystaldestiny.com\/cdn\/shop\/files\/Dream-Amethyst-Spheres-51-57mm-Spheres-12.jpg?v=1758085518","width":2048},{"alt":"Dream Amethyst Spheres 51-57mm-Spheres-Crystal Destiny-Dream Amethyst-198g - 53mm Diameter-Crystal Destiny","id":31808206438571,"position":13,"preview_image":{"aspect_ratio":1.0,"height":1585,"width":1585,"src":"\/\/crystaldestiny.com\/cdn\/shop\/files\/Dream-Amethyst-Spheres-51-57mm-Spheres-Dream-Amethyst-198g-53mm-Diameter-13.jpg?v=1765429751"},"aspect_ratio":1.0,"height":1585,"media_type":"image","src":"\/\/crystaldestiny.com\/cdn\/shop\/files\/Dream-Amethyst-Spheres-51-57mm-Spheres-Dream-Amethyst-198g-53mm-Diameter-13.jpg?v=1765429751","width":1585},{"alt":"Dream Amethyst Spheres 51-57mm-Spheres-Crystal Destiny-Dream Amethyst-260g - 57mm Diameter-Crystal Destiny","id":31808206471339,"position":14,"preview_image":{"aspect_ratio":1.0,"height":2048,"width":2048,"src":"\/\/crystaldestiny.com\/cdn\/shop\/files\/Dream-Amethyst-Spheres-51-57mm-Spheres-14.jpg?v=1758085521"},"aspect_ratio":1.0,"height":2048,"media_type":"image","src":"\/\/crystaldestiny.com\/cdn\/shop\/files\/Dream-Amethyst-Spheres-51-57mm-Spheres-14.jpg?v=1758085521","width":2048},{"alt":"Dream Amethyst Spheres 51-57mm-Spheres-Crystal Destiny-Dream Amethyst-260g - 57mm Diameter-Crystal Destiny","id":31808206504107,"position":15,"preview_image":{"aspect_ratio":1.0,"height":2048,"width":2048,"src":"\/\/crystaldestiny.com\/cdn\/shop\/files\/Dream-Amethyst-Spheres-51-57mm-Spheres-15.jpg?v=1758085523"},"aspect_ratio":1.0,"height":2048,"media_type":"image","src":"\/\/crystaldestiny.com\/cdn\/shop\/files\/Dream-Amethyst-Spheres-51-57mm-Spheres-15.jpg?v=1758085523","width":2048}],"requires_selling_plan":false,"selling_plan_groups":[],"content":"\u003cp\u003eDream Amethyst Spheres are exquisite crystal spheres renowned for their deep violet hues and soothing energy. Amethyst, a powerful variety of quartz, has been revered for centuries for its spiritual properties, making these spheres ideal tools for meditation, healing, and enhancing intuition. The smooth, polished surface of each sphere serves to radiate calming energy evenly, promoting clarity of mind and emotional balance. Metaphysically, Amethyst is associated with the crown and third eye chakras, helping to elevate one’s spiritual awareness and facilitate a connection to higher consciousness.\u003c\/p\u003e\n\u003cp\u003eIt is also believed to protect against negative energies, alleviate stress, and encourage restful sleep by creating a tranquil atmosphere. Placing a Dream Amethyst Sphere in your living or workspace can foster a serene environment conducive to mindfulness and creativity. These spheres are not only elegant decor pieces but also potent instruments for anyone seeking to deepen their spiritual practice or enhance overall well-being.\u003c\/p\u003e\n\u003cp\u003eThis product is an exact pick as pictured, one of a kind.\u003c\/p\u003e"},"options":[{"name":"Material","position":1,"values":["Dream Amethyst"]},{"name":"Size","position":2,"values":["260g - 57mm Diameter","232g - 55mm Diameter","230g - 55mm Diameter","198g - 53mm Diameter","188g - 51mm Diameter"]}],"custom_metafields":{"shipping_time":"Within 7 days"},"metafields":{"badge":"\u003cdiv style='display:none' class='jdgm-prev-badge' data-average-rating='0.00' data-number-of-reviews='0' data-number-of-questions='0'\u003e \u003cspan class='jdgm-prev-badge__stars' data-score='0.00' tabindex='0' aria-label='0.00 stars' role='button'\u003e \u003cspan class='jdgm-star jdgm--off'\u003e\u003c\/span\u003e\u003cspan class='jdgm-star jdgm--off'\u003e\u003c\/span\u003e\u003cspan class='jdgm-star jdgm--off'\u003e\u003c\/span\u003e\u003cspan class='jdgm-star jdgm--off'\u003e\u003c\/span\u003e\u003cspan class='jdgm-star jdgm--off'\u003e\u003c\/span\u003e \u003c\/span\u003e \u003cspan class='jdgm-prev-badge__text'\u003e No reviews \u003c\/span\u003e \u003c\/div\u003e","widget":"\u003cdiv class='jdgm-rev-widg' data-updated-at='2025-09-16T20:46:46Z' data-average-rating='0.00' data-number-of-reviews='0' data-number-of-questions='0' data-image-url='https:\/\/cdn.shopify.com\/s\/files\/1\/0613\/0345\/5915\/files\/6I0A4157.jpg?v=1758055394'\u003e \u003cstyle class='jdgm-temp-hiding-style'\u003e.jdgm-rev-widg{ display: none }\u003c\/style\u003e \u003cdiv class='jdgm-rev-widg__header'\u003e \u003ch2 class='jdgm-rev-widg__title'\u003eCustomer Reviews\u003c\/h2\u003e \u003cdiv class='jdgm-rev-widg__summary'\u003e \u003cdiv class='jdgm-rev-widg__summary-stars' aria-label='Average rating is 0.00 stars' role='img'\u003e \u003cspan class='jdgm-star jdgm--off'\u003e\u003c\/span\u003e\u003cspan class='jdgm-star jdgm--off'\u003e\u003c\/span\u003e\u003cspan class='jdgm-star jdgm--off'\u003e\u003c\/span\u003e\u003cspan class='jdgm-star jdgm--off'\u003e\u003c\/span\u003e\u003cspan class='jdgm-star jdgm--off'\u003e\u003c\/span\u003e \u003c\/div\u003e \u003cdiv class='jdgm-rev-widg__summary-text'\u003eBe the first to write a review\u003c\/div\u003e \u003c\/div\u003e \u003ca style='display: none' href='#' class='jdgm-write-rev-link' role='button'\u003eWrite a review\u003c\/a\u003e \u003cdiv class='jdgm-histogram jdgm-temp-hidden'\u003e \u003cdiv class='jdgm-histogram__row' data-rating='5' data-frequency='0' data-percentage='0'\u003e \u003cdiv class='jdgm-histogram__star' role='button' aria-label=\"0% (0) reviews with 5 star rating\" tabindex='0' \u003e\u003cspan class='jdgm-star jdgm--on'\u003e\u003c\/span\u003e\u003cspan class='jdgm-star jdgm--on'\u003e\u003c\/span\u003e\u003cspan class='jdgm-star jdgm--on'\u003e\u003c\/span\u003e\u003cspan class='jdgm-star jdgm--on'\u003e\u003c\/span\u003e\u003cspan class='jdgm-star jdgm--on'\u003e\u003c\/span\u003e\u003c\/div\u003e \u003cdiv class='jdgm-histogram__bar'\u003e \u003cdiv class='jdgm-histogram__bar-content' style='width: 0%;'\u003e \u003c\/div\u003e \u003c\/div\u003e \u003cdiv class='jdgm-histogram__percentage'\u003e0%\u003c\/div\u003e \u003cdiv class='jdgm-histogram__frequency'\u003e(0)\u003c\/div\u003e \u003c\/div\u003e \u003cdiv class='jdgm-histogram__row' data-rating='4' data-frequency='0' data-percentage='0'\u003e \u003cdiv class='jdgm-histogram__star' role='button' aria-label=\"0% (0) reviews with 4 star rating\" tabindex='0' \u003e\u003cspan class='jdgm-star jdgm--on'\u003e\u003c\/span\u003e\u003cspan class='jdgm-star jdgm--on'\u003e\u003c\/span\u003e\u003cspan class='jdgm-star jdgm--on'\u003e\u003c\/span\u003e\u003cspan class='jdgm-star jdgm--on'\u003e\u003c\/span\u003e\u003cspan class='jdgm-star jdgm--off'\u003e\u003c\/span\u003e\u003c\/div\u003e \u003cdiv class='jdgm-histogram__bar'\u003e \u003cdiv class='jdgm-histogram__bar-content' style='width: 0%;'\u003e \u003c\/div\u003e \u003c\/div\u003e \u003cdiv class='jdgm-histogram__percentage'\u003e0%\u003c\/div\u003e \u003cdiv class='jdgm-histogram__frequency'\u003e(0)\u003c\/div\u003e \u003c\/div\u003e \u003cdiv class='jdgm-histogram__row' data-rating='3' data-frequency='0' data-percentage='0'\u003e \u003cdiv class='jdgm-histogram__star' role='button' aria-label=\"0% (0) reviews with 3 star rating\" tabindex='0' \u003e\u003cspan class='jdgm-star jdgm--on'\u003e\u003c\/span\u003e\u003cspan class='jdgm-star jdgm--on'\u003e\u003c\/span\u003e\u003cspan class='jdgm-star jdgm--on'\u003e\u003c\/span\u003e\u003cspan class='jdgm-star jdgm--off'\u003e\u003c\/span\u003e\u003cspan class='jdgm-star jdgm--off'\u003e\u003c\/span\u003e\u003c\/div\u003e \u003cdiv class='jdgm-histogram__bar'\u003e \u003cdiv class='jdgm-histogram__bar-content' style='width: 0%;'\u003e \u003c\/div\u003e \u003c\/div\u003e \u003cdiv class='jdgm-histogram__percentage'\u003e0%\u003c\/div\u003e \u003cdiv class='jdgm-histogram__frequency'\u003e(0)\u003c\/div\u003e \u003c\/div\u003e \u003cdiv class='jdgm-histogram__row' data-rating='2' data-frequency='0' data-percentage='0'\u003e \u003cdiv class='jdgm-histogram__star' role='button' aria-label=\"0% (0) reviews with 2 star rating\" tabindex='0' \u003e\u003cspan class='jdgm-star jdgm--on'\u003e\u003c\/span\u003e\u003cspan class='jdgm-star jdgm--on'\u003e\u003c\/span\u003e\u003cspan class='jdgm-star jdgm--off'\u003e\u003c\/span\u003e\u003cspan class='jdgm-star jdgm--off'\u003e\u003c\/span\u003e\u003cspan class='jdgm-star jdgm--off'\u003e\u003c\/span\u003e\u003c\/div\u003e \u003cdiv class='jdgm-histogram__bar'\u003e \u003cdiv class='jdgm-histogram__bar-content' style='width: 0%;'\u003e \u003c\/div\u003e \u003c\/div\u003e \u003cdiv class='jdgm-histogram__percentage'\u003e0%\u003c\/div\u003e \u003cdiv class='jdgm-histogram__frequency'\u003e(0)\u003c\/div\u003e \u003c\/div\u003e \u003cdiv class='jdgm-histogram__row' data-rating='1' data-frequency='0' data-percentage='0'\u003e \u003cdiv class='jdgm-histogram__star' role='button' aria-label=\"0% (0) reviews with 1 star rating\" tabindex='0' \u003e\u003cspan class='jdgm-star jdgm--on'\u003e\u003c\/span\u003e\u003cspan class='jdgm-star jdgm--off'\u003e\u003c\/span\u003e\u003cspan class='jdgm-star jdgm--off'\u003e\u003c\/span\u003e\u003cspan class='jdgm-star jdgm--off'\u003e\u003c\/span\u003e\u003cspan class='jdgm-star jdgm--off'\u003e\u003c\/span\u003e\u003c\/div\u003e \u003cdiv class='jdgm-histogram__bar'\u003e \u003cdiv class='jdgm-histogram__bar-content' style='width: 0%;'\u003e \u003c\/div\u003e \u003c\/div\u003e \u003cdiv class='jdgm-histogram__percentage'\u003e0%\u003c\/div\u003e \u003cdiv class='jdgm-histogram__frequency'\u003e(0)\u003c\/div\u003e \u003c\/div\u003e \u003cdiv class='jdgm-histogram__row jdgm-histogram__clear-filter' data-rating=null tabindex='0'\u003e\u003c\/div\u003e \u003c\/div\u003e \u003cdiv class='jdgm-rev-widg__sort-wrapper'\u003e\u003c\/div\u003e \u003c\/div\u003e \u003cdiv class='jdgm-rev-widg__body'\u003e \u003cdiv class='jdgm-rev-widg__reviews'\u003e\u003c\/div\u003e \u003cdiv class='jdgm-paginate' data-per-page='4' data-url='https:\/\/api.judge.me\/reviews\/reviews_for_widget' style=\"display: none;\"\u003e\u003c\/div\u003e \u003c\/div\u003e \u003cdiv class='jdgm-rev-widg__paginate-spinner-wrapper'\u003e \u003cdiv class='jdgm-spinner'\u003e\u003c\/div\u003e \u003c\/div\u003e \u003c\/div\u003e"},"collections":[{"id":294880051371,"handle":"crystals","title":"Crystals","updated_at":"2026-01-07T23:43:11-05:00","body_html":"\u003cp data-start=\"159\" data-end=\"687\"\u003e✨ \u003cstrong data-start=\"161\" data-end=\"216\"\u003eDiscover the Magic of Crystals with Crystal Destiny\u003c\/strong\u003e ✨\u003cbr data-start=\"218\" data-end=\"221\"\u003eCrystals have been treasured for centuries—not only for their natural beauty but also for their powerful healing energies. Beyond their visual allure, they bring balance, harmony, and positive energy into any space. Whether used for home décor, meditation, or simply to elevate the energy of your surroundings, crystals create a sanctuary of peace, relaxation, and well-being. Each piece is a unique gift from the Earth—visually stunning and spiritually uplifting.\u003c\/p\u003e\n\u003cp data-start=\"689\" data-end=\"1011\"\u003eAt \u003cstrong data-start=\"692\" data-end=\"711\"\u003eCrystal Destiny\u003c\/strong\u003e, our signature collection showcases a curated selection of exquisite crystals, from radiant Quartz to soothing Amethyst. Every stone is carefully sourced for its elegance and metaphysical resonance, making them perfect for enhancing your home, uplifting your spirit, or gifting to someone special.\u003c\/p\u003e\n\u003cp data-start=\"1013\" data-end=\"1206\"\u003eExperience the timeless sophistication of crystalline wonders. Explore the \u003cstrong data-start=\"1088\" data-end=\"1118\"\u003eCrystal Destiny Collection\u003c\/strong\u003e today and bring the transformative beauty of these treasures into your everyday life.\u003c\/p\u003e","published_at":"2023-06-05T11:24:02-04:00","sort_order":"created-desc","template_suffix":"","disjunctive":false,"rules":[{"column":"tag","relation":"equals","condition":"crystal"},{"column":"type","relation":"not_contains","condition":"925 Sterling Silver"},{"column":"type","relation":"not_contains","condition":"Wire Wraps"}],"published_scope":"global"},{"id":319455756459,"handle":"crown-chakra-crystals","title":"Crown Chakra Crystals","updated_at":"2026-01-07T23:42:38-05:00","body_html":"\u003cp data-start=\"144\" data-end=\"515\"\u003e✨ \u003cstrong data-start=\"146\" data-end=\"171\"\u003eCrown Chakra Crystals\u003c\/strong\u003e ✨\u003cbr data-start=\"173\" data-end=\"176\"\u003eConnect with higher consciousness and spiritual insight with our \u003cstrong data-start=\"241\" data-end=\"266\"\u003eCrown Chakra Crystals\u003c\/strong\u003e. Located at the top of the head, the Crown Chakra governs wisdom, enlightenment, and your connection to the divine. These crystals help open and balance this energy center, fostering clarity, spiritual growth, and a sense of universal connection.\u003c\/p\u003e\n\u003cp data-start=\"517\" data-end=\"851\"\u003eOur selection includes powerful stones such as Amethyst, Clear Quartz, Selenite, and Lepidolite—each chosen for their ability to enhance meditation, energy work, and mindful practices. Whether placed in your sacred space, carried with you, or worn as jewelry, Crown Chakra Crystals promote harmony, insight, and spiritual alignment.\u003c\/p\u003e\n\u003cp data-start=\"853\" data-end=\"1007\"\u003eElevate your consciousness, deepen your meditative practice, and embrace the transformative energy of the Crown Chakra with these illuminating crystals.\u003c\/p\u003e","published_at":"2025-07-17T18:16:11-04:00","sort_order":"best-selling","template_suffix":"","disjunctive":false,"rules":[{"column":"variant_metafield_definition","relation":"equals","condition":"Crown"}],"published_scope":"global","image":{"created_at":"2025-07-17T19:09:11-04:00","alt":null,"width":1080,"height":1080,"src":"\/\/crystaldestiny.com\/cdn\/shop\/collections\/Crown_Chakra_Collection.jpg?v=1762474922"}},{"id":294880116907,"handle":"polished","title":"Polished Crystals","updated_at":"2026-01-07T23:43:11-05:00","body_html":"\u003cp data-start=\"199\" data-end=\"598\"\u003e✨ \u003cstrong data-start=\"201\" data-end=\"248\"\u003eCrystal Destiny Polished Crystal Collection\u003c\/strong\u003e ✨\u003cbr data-start=\"250\" data-end=\"253\"\u003eIndulge in the brilliance of crystals refined to perfection. Our \u003cstrong data-start=\"318\" data-end=\"341\"\u003ePolished Collection\u003c\/strong\u003e showcases gemstones meticulously shaped and smoothed to reveal their natural radiance and timeless beauty. From the shimmering glow of Quartz to the deep allure of Obsidian, each polished piece is a testament to nature’s artistry and human craftsmanship.\u003c\/p\u003e\n\u003cp data-start=\"600\" data-end=\"862\"\u003ePerfect as statement décor, meaningful gifts, or companions on your spiritual journey, polished crystals bring sophistication and elevated energy into any space. Their radiant surfaces reflect not only light but also the transformative power of crystal energy.\u003c\/p\u003e\n\u003cp data-start=\"864\" data-end=\"1022\"\u003eDiscover the elegance of refinement with Crystal Destiny’s Polished Crystal Collection—where every facet shines with intention, beauty, and timeless allure.\u003c\/p\u003e","published_at":"2023-06-05T11:30:44-04:00","sort_order":"created-desc","template_suffix":"","disjunctive":false,"rules":[{"column":"tag","relation":"equals","condition":"polished"}],"published_scope":"global"},{"id":295698202795,"handle":"spheres","title":"Crystal Spheres","updated_at":"2026-01-06T23:24:35-05:00","body_html":"\u003cp data-start=\"106\" data-end=\"370\"\u003e✨ \u003cstrong data-start=\"108\" data-end=\"138\"\u003eCrystal Spheres Collection\u003c\/strong\u003e ✨\u003cbr data-start=\"140\" data-end=\"143\"\u003eBring harmony, balance, and elegance into your space with our \u003cstrong data-start=\"205\" data-end=\"235\"\u003eCrystal Spheres Collection\u003c\/strong\u003e. Each sphere is meticulously crafted to showcase the natural beauty and energy of crystals, from radiant Quartz to calming Amethyst.\u003c\/p\u003e\n\u003cp data-start=\"372\" data-end=\"658\"\u003ePerfect for meditation, energy work, or as striking décor, crystal spheres radiate energy in all directions, promoting clarity, focus, and a sense of calm. Their smooth, polished surfaces highlight the stones’ natural patterns and colors, making each sphere a captivating centerpiece.\u003c\/p\u003e\n\u003cp data-start=\"660\" data-end=\"809\"\u003eElevate your space and embrace the transformative power of crystals with the \u003cstrong data-start=\"737\" data-end=\"767\"\u003eCrystal Spheres Collection\u003c\/strong\u003e—where beauty, energy, and harmony meet.\u003c\/p\u003e","published_at":"2023-07-28T14:20:46-04:00","sort_order":"created-desc","template_suffix":"","disjunctive":true,"rules":[{"column":"tag","relation":"equals","condition":"spheres"},{"column":"tag","relation":"equals","condition":"eggs"}],"published_scope":"global"},{"id":293659312299,"handle":"best-sellers","title":"Best Sellers","updated_at":"2026-01-07T23:43:11-05:00","body_html":"\u003cp data-start=\"155\" data-end=\"510\"\u003eDiscover the pieces our community loves most. Our Best Sellers Collection brings together handpicked crystals and jewelry that embody timeless elegance, spiritual resonance, and everyday sophistication. Each item has earned its place as a customer favorite—celebrated for both its beauty and its meaningful energy.\u003c\/p\u003e\n\u003cp data-start=\"512\" data-end=\"802\"\u003eFrom stunning statement pieces to versatile daily companions, these treasures are curated to elevate your space, uplift your spirit, and reflect refined taste. Indulge in what’s most cherished and let our best sellers guide you toward the perfect blend of style and transformative energy.\u003c\/p\u003e\n\u003cp data-start=\"804\" data-end=\"932\"\u003eExplore the Best Sellers Collection today—where elegance meets intention, and every piece tells a story of beauty and balance.\u003c\/p\u003e","published_at":"2023-03-15T16:04:51-04:00","sort_order":"best-selling","template_suffix":"","disjunctive":false,"rules":[{"column":"variant_price","relation":"greater_than","condition":"0"},{"column":"variant_inventory","relation":"greater_than","condition":"0"},{"column":"type","relation":"not_equals","condition":"Shipping Protection"}],"published_scope":"global"},{"id":321370390699,"handle":"monthly-crystal-sale","title":"Monthly Crystal Sale | Spheres \u0026 Towers","updated_at":"2026-01-06T23:24:37-05:00","body_html":"\u003cp\u003eShop our \u003cstrong\u003eMonthly Crystal Sale\u003c\/strong\u003e, where you can shop a wide selection of healing crystals at discounted prices. Explore \u003cstrong\u003ecrystal spheres and towers,\u003c\/strong\u003e— all carefully curated to support meditation, energy balancing, and spiritual wellness. Whether you're looking to enhance your home decor, boost your daily energy, or find the perfect gift, our \u003cstrong\u003ecrystals for healing and manifestation\u003c\/strong\u003e offer both beauty and metaphysical benefits.\u003c\/p\u003e\n\u003cp\u003eEach month, our sale features \u003cstrong\u003enew discounted collections\u003c\/strong\u003e, from \u003cstrong\u003enatural quartz and amethyst towers\u003c\/strong\u003e to \u003cstrong\u003ewire-wrapped pendants and polished stones\u003c\/strong\u003e, so there's always something fresh to discover. Shop with confidence knowing you're getting high-quality crystals with \u003cstrong\u003efree shipping options\u003c\/strong\u003e and a trusted experience.\u003c\/p\u003e\n\u003cp\u003e\u003cstrong\u003eTake advantage of the Monthly Crystal Sale today\u003c\/strong\u003e and add powerful, natural energy to your life with \u003cstrong\u003eauthentic healing crystals\u003c\/strong\u003e — while our limited-time discounts last.\u003c\/p\u003e\n\u003cp\u003e\u003cstrong\u003e*Discount automatically applied at checkout.\u003c\/strong\u003e\u003c\/p\u003e","published_at":"2025-12-02T01:26:17-05:00","sort_order":"alpha-asc","template_suffix":"","disjunctive":true,"rules":[{"column":"tag","relation":"equals","condition":"spheres"},{"column":"tag","relation":"equals","condition":"Towers"}],"published_scope":"global","image":{"created_at":"2026-01-01T01:32:34-05:00","alt":"","width":960,"height":960,"src":"\/\/crystaldestiny.com\/cdn\/shop\/collections\/3E8C2969-1B86-4ACE-B349-98E9D8768424.jpg?v=1767249154"}},{"id":297596059819,"handle":"all","title":"All Crystals \u0026 Jewelry","updated_at":"2026-01-07T23:43:11-05:00","body_html":"\u003cp data-start=\"149\" data-end=\"494\"\u003e✨ \u003cstrong data-start=\"151\" data-end=\"181\"\u003eWelcome to Crystal Destiny\u003c\/strong\u003e ✨\u003cbr data-start=\"183\" data-end=\"186\"\u003eStep into a world where beauty, energy, and artistry unite. Our collection is a treasure trove of exquisite crystals, from the raw, untamed elegance of natural formations to the polished brilliance of expertly crafted pieces. Each crystal is a masterpiece, carrying its own unique story and timeless charm.\u003c\/p\u003e\n\u003cp data-start=\"496\" data-end=\"831\"\u003eWhether you’re drawn to the calming presence of Amethyst, the vibrant energy of Citrine, or the grounding strength of Jasper, our crystals invite you to connect with nature’s finest wonders. Perfect for enhancing your space, supporting your spiritual journey, or gifting with intention, every piece resonates with beauty and meaning.\u003c\/p\u003e\n\u003cp data-start=\"833\" data-end=\"1000\"\u003eElevate your surroundings, embrace the mystique, and explore the enchanting world of crystals at \u003cstrong data-start=\"930\" data-end=\"949\"\u003eCrystal Destiny\u003c\/strong\u003e—where every crystal is waiting to be discovered.\u003c\/p\u003e","published_at":"2023-11-10T13:55:31-05:00","sort_order":"created-desc","template_suffix":"","disjunctive":false,"rules":[{"column":"type","relation":"not_equals","condition":"asdf"}],"published_scope":"global"},{"id":298983391403,"handle":"january-crystal-sale","title":"January Sale | 25% Off Crystal Towers \u0026 Spheres","updated_at":"2026-01-06T23:24:37-05:00","body_html":"\u003cp\u003eShop our \u003cstrong\u003eJanuary Crystal Sale\u003c\/strong\u003e, where you can shop a wide selection of healing crystals at discounted prices. Explore \u003cstrong\u003eCrystal Towers, \u0026amp; Crystal Spheres\u003c\/strong\u003e — all carefully curated and crafted to support meditation, energy balancing, and spiritual wellness. Whether you're looking to enhance your home decor, boost your daily energy, or find the perfect gift, our \u003cstrong\u003ecrystals for healing and manifestation\u003c\/strong\u003e offer both beauty and metaphysical benefits.\u003c\/p\u003e\n\u003cp\u003eThis January, our sale features \u003cstrong\u003ediscounted crystal towers and spheres\u003c\/strong\u003e, from \u003cstrong\u003enatural quartz \u003c\/strong\u003eand \u003cstrong\u003eamethyst \u003c\/strong\u003eto \u003cstrong\u003ebumblebee jasper \u003c\/strong\u003eand \u003cstrong\u003ecarnelian\u003c\/strong\u003e, so there's always something fresh to discover. Shop with confidence knowing you're getting high-quality crystals with \u003cstrong\u003efree shipping options\u003c\/strong\u003e and a trusted experience.\u003c\/p\u003e\n\u003cp\u003e\u003cstrong\u003eTake advantage of the January Crystal Sale today\u003c\/strong\u003e and add powerful, natural energy to your life with \u003cstrong\u003eauthentic healing crystals\u003c\/strong\u003e — while our limited-time discounts last.\u003c\/p\u003e\n\u003cp\u003e\u003cstrong\u003e*Discount automatically applied at checkout.\u003c\/strong\u003e\u003c\/p\u003e","published_at":"2026-01-01T00:07:17-05:00","sort_order":"alpha-asc","template_suffix":"monthly-collection","disjunctive":true,"rules":[{"column":"tag","relation":"equals","condition":"Spheres"},{"column":"tag","relation":"equals","condition":"Towers"}],"published_scope":"global","image":{"created_at":"2026-01-01T01:29:59-05:00","alt":"","width":960,"height":960,"src":"\/\/crystaldestiny.com\/cdn\/shop\/collections\/1464163B-22B1-4D62-BEC5-CEC9AECB670B.jpg?v=1767248999"}}]}
[{"alt":"Dream Amethyst Spheres 51-57mm-Spheres-Crystal Destiny-Dream Amethyst-260g - 57mm Diameter-Crystal Destiny","id":31808206045355,"position":1,"preview_image":{"aspect_ratio":1.0,"height":1802,"width":1802,"src":"\/\/crystaldestiny.com\/cdn\/shop\/files\/Dream-Amethyst-Spheres-51-57mm-Spheres-Dream-Amethyst-260g-57mm-Diameter.jpg?v=1765429742"},"aspect_ratio":1.0,"height":1802,"media_type":"image","src":"\/\/crystaldestiny.com\/cdn\/shop\/files\/Dream-Amethyst-Spheres-51-57mm-Spheres-Dream-Amethyst-260g-57mm-Diameter.jpg?v=1765429742","width":1802},{"alt":"Dream Amethyst Spheres 51-57mm-Spheres-Crystal Destiny-Dream Amethyst-260g - 57mm Diameter-Crystal Destiny","id":31808206078123,"position":2,"preview_image":{"aspect_ratio":1.0,"height":2048,"width":2048,"src":"\/\/crystaldestiny.com\/cdn\/shop\/files\/Dream-Amethyst-Spheres-51-57mm-Spheres-2.jpg?v=1758085501"},"aspect_ratio":1.0,"height":2048,"media_type":"image","src":"\/\/crystaldestiny.com\/cdn\/shop\/files\/Dream-Amethyst-Spheres-51-57mm-Spheres-2.jpg?v=1758085501","width":2048},{"alt":"Dream Amethyst Spheres 51-57mm-Spheres-Crystal Destiny-Dream Amethyst-260g - 57mm Diameter-Crystal Destiny","id":31808206110891,"position":3,"preview_image":{"aspect_ratio":1.0,"height":2048,"width":2048,"src":"\/\/crystaldestiny.com\/cdn\/shop\/files\/Dream-Amethyst-Spheres-51-57mm-Spheres-3.jpg?v=1758085503"},"aspect_ratio":1.0,"height":2048,"media_type":"image","src":"\/\/crystaldestiny.com\/cdn\/shop\/files\/Dream-Amethyst-Spheres-51-57mm-Spheres-3.jpg?v=1758085503","width":2048},{"alt":"Dream Amethyst Spheres 51-57mm-Spheres-Crystal Destiny-Dream Amethyst-188g - 51mm Diameter-Crystal Destiny","id":31808206143659,"position":4,"preview_image":{"aspect_ratio":1.0,"height":1751,"width":1751,"src":"\/\/crystaldestiny.com\/cdn\/shop\/files\/Dream-Amethyst-Spheres-51-57mm-Spheres-Dream-Amethyst-188g-51mm-Diameter-4.jpg?v=1765429744"},"aspect_ratio":1.0,"height":1751,"media_type":"image","src":"\/\/crystaldestiny.com\/cdn\/shop\/files\/Dream-Amethyst-Spheres-51-57mm-Spheres-Dream-Amethyst-188g-51mm-Diameter-4.jpg?v=1765429744","width":1751},{"alt":"Dream Amethyst Spheres 51-57mm-Spheres-Crystal Destiny-Dream Amethyst-230g - 55mm Diameter-Crystal Destiny","id":31808206176427,"position":5,"preview_image":{"aspect_ratio":1.0,"height":1724,"width":1724,"src":"\/\/crystaldestiny.com\/cdn\/shop\/files\/Dream-Amethyst-Spheres-51-57mm-Spheres-Dream-Amethyst-230g-55mm-Diameter-5.jpg?v=1765429745"},"aspect_ratio":1.0,"height":1724,"media_type":"image","src":"\/\/crystaldestiny.com\/cdn\/shop\/files\/Dream-Amethyst-Spheres-51-57mm-Spheres-Dream-Amethyst-230g-55mm-Diameter-5.jpg?v=1765429745","width":1724},{"alt":"Dream Amethyst Spheres 51-57mm-Spheres-Crystal Destiny-Dream Amethyst-260g - 57mm Diameter-Crystal Destiny","id":31808206209195,"position":6,"preview_image":{"aspect_ratio":1.0,"height":2048,"width":2048,"src":"\/\/crystaldestiny.com\/cdn\/shop\/files\/Dream-Amethyst-Spheres-51-57mm-Spheres-6.jpg?v=1758085508"},"aspect_ratio":1.0,"height":2048,"media_type":"image","src":"\/\/crystaldestiny.com\/cdn\/shop\/files\/Dream-Amethyst-Spheres-51-57mm-Spheres-6.jpg?v=1758085508","width":2048},{"alt":"Dream Amethyst Spheres 51-57mm-Spheres-Crystal Destiny-Dream Amethyst-260g - 57mm Diameter-Crystal Destiny","id":31808206241963,"position":7,"preview_image":{"aspect_ratio":1.0,"height":2048,"width":2048,"src":"\/\/crystaldestiny.com\/cdn\/shop\/files\/Dream-Amethyst-Spheres-51-57mm-Spheres-7.jpg?v=1758085510"},"aspect_ratio":1.0,"height":2048,"media_type":"image","src":"\/\/crystaldestiny.com\/cdn\/shop\/files\/Dream-Amethyst-Spheres-51-57mm-Spheres-7.jpg?v=1758085510","width":2048},{"alt":"Dream Amethyst Spheres 51-57mm-Spheres-Crystal Destiny-Dream Amethyst-232g - 55mm Diameter-Crystal Destiny","id":31808206274731,"position":8,"preview_image":{"aspect_ratio":1.0,"height":2048,"width":2048,"src":"\/\/crystaldestiny.com\/cdn\/shop\/files\/Dream-Amethyst-Spheres-51-57mm-Spheres-Dream-Amethyst-232g-55mm-Diameter-8.jpg?v=1765429748"},"aspect_ratio":1.0,"height":2048,"media_type":"image","src":"\/\/crystaldestiny.com\/cdn\/shop\/files\/Dream-Amethyst-Spheres-51-57mm-Spheres-Dream-Amethyst-232g-55mm-Diameter-8.jpg?v=1765429748","width":2048},{"alt":"Dream Amethyst Spheres 51-57mm-Spheres-Crystal Destiny-Dream Amethyst-260g - 57mm Diameter-Crystal Destiny","id":31808206307499,"position":9,"preview_image":{"aspect_ratio":1.0,"height":2048,"width":2048,"src":"\/\/crystaldestiny.com\/cdn\/shop\/files\/Dream-Amethyst-Spheres-51-57mm-Spheres-9.jpg?v=1758085513"},"aspect_ratio":1.0,"height":2048,"media_type":"image","src":"\/\/crystaldestiny.com\/cdn\/shop\/files\/Dream-Amethyst-Spheres-51-57mm-Spheres-9.jpg?v=1758085513","width":2048},{"alt":"Dream Amethyst Spheres 51-57mm-Spheres-Crystal Destiny-Dream Amethyst-260g - 57mm Diameter-Crystal Destiny","id":31808206340267,"position":10,"preview_image":{"aspect_ratio":1.0,"height":1684,"width":1684,"src":"\/\/crystaldestiny.com\/cdn\/shop\/files\/Dream-Amethyst-Spheres-51-57mm-Spheres-10.jpg?v=1758085515"},"aspect_ratio":1.0,"height":1684,"media_type":"image","src":"\/\/crystaldestiny.com\/cdn\/shop\/files\/Dream-Amethyst-Spheres-51-57mm-Spheres-10.jpg?v=1758085515","width":1684},{"alt":"Dream Amethyst Spheres 51-57mm-Spheres-Crystal Destiny-Dream Amethyst-260g - 57mm Diameter-Crystal Destiny","id":31808206373035,"position":11,"preview_image":{"aspect_ratio":1.0,"height":1667,"width":1667,"src":"\/\/crystaldestiny.com\/cdn\/shop\/files\/Dream-Amethyst-Spheres-51-57mm-Spheres-11.jpg?v=1758085516"},"aspect_ratio":1.0,"height":1667,"media_type":"image","src":"\/\/crystaldestiny.com\/cdn\/shop\/files\/Dream-Amethyst-Spheres-51-57mm-Spheres-11.jpg?v=1758085516","width":1667},{"alt":"Dream Amethyst Spheres 51-57mm-Spheres-Crystal Destiny-Dream Amethyst-260g - 57mm Diameter-Crystal Destiny","id":31808206405803,"position":12,"preview_image":{"aspect_ratio":1.0,"height":2048,"width":2048,"src":"\/\/crystaldestiny.com\/cdn\/shop\/files\/Dream-Amethyst-Spheres-51-57mm-Spheres-12.jpg?v=1758085518"},"aspect_ratio":1.0,"height":2048,"media_type":"image","src":"\/\/crystaldestiny.com\/cdn\/shop\/files\/Dream-Amethyst-Spheres-51-57mm-Spheres-12.jpg?v=1758085518","width":2048},{"alt":"Dream Amethyst Spheres 51-57mm-Spheres-Crystal Destiny-Dream Amethyst-198g - 53mm Diameter-Crystal Destiny","id":31808206438571,"position":13,"preview_image":{"aspect_ratio":1.0,"height":1585,"width":1585,"src":"\/\/crystaldestiny.com\/cdn\/shop\/files\/Dream-Amethyst-Spheres-51-57mm-Spheres-Dream-Amethyst-198g-53mm-Diameter-13.jpg?v=1765429751"},"aspect_ratio":1.0,"height":1585,"media_type":"image","src":"\/\/crystaldestiny.com\/cdn\/shop\/files\/Dream-Amethyst-Spheres-51-57mm-Spheres-Dream-Amethyst-198g-53mm-Diameter-13.jpg?v=1765429751","width":1585},{"alt":"Dream Amethyst Spheres 51-57mm-Spheres-Crystal Destiny-Dream Amethyst-260g - 57mm Diameter-Crystal Destiny","id":31808206471339,"position":14,"preview_image":{"aspect_ratio":1.0,"height":2048,"width":2048,"src":"\/\/crystaldestiny.com\/cdn\/shop\/files\/Dream-Amethyst-Spheres-51-57mm-Spheres-14.jpg?v=1758085521"},"aspect_ratio":1.0,"height":2048,"media_type":"image","src":"\/\/crystaldestiny.com\/cdn\/shop\/files\/Dream-Amethyst-Spheres-51-57mm-Spheres-14.jpg?v=1758085521","width":2048},{"alt":"Dream Amethyst Spheres 51-57mm-Spheres-Crystal Destiny-Dream Amethyst-260g - 57mm Diameter-Crystal Destiny","id":31808206504107,"position":15,"preview_image":{"aspect_ratio":1.0,"height":2048,"width":2048,"src":"\/\/crystaldestiny.com\/cdn\/shop\/files\/Dream-Amethyst-Spheres-51-57mm-Spheres-15.jpg?v=1758085523"},"aspect_ratio":1.0,"height":2048,"media_type":"image","src":"\/\/crystaldestiny.com\/cdn\/shop\/files\/Dream-Amethyst-Spheres-51-57mm-Spheres-15.jpg?v=1758085523","width":2048}]
{"item":{"id":8529075732651,"title":"Driftwood Crystal Sphere Display Stand (2pcs)","handle":"driftwood-crystal-sphere-display-stand-2pcs-1005008632212148-no15-10-12cm-detail-see-video-cn","description":"\u003cp data-start=\"227\" data-end=\"541\"\u003eThis \u003cstrong data-start=\"259\" data-end=\"301\"\u003eDriftwood Crystal Sphere Display Stand\u003c\/strong\u003e comes as a set of 2 handcrafted holders, designed to elegantly showcase single crystal balls, eggs, or spheres. The natural driftwood base adds a rustic and organic touch, highlighting the beauty of your stones while keeping them secure.\u003c\/p\u003e\n\u003cp data-start=\"543\" data-end=\"759\"\u003ePerfect for collectors, home décor, meditation spaces, or gifting, these stands provide stability and elevate your crystal display. Their minimalist yet natural design complements any crystal or mineral collection.\u003c\/p\u003e\n\u003cp data-start=\"761\" data-end=\"890\"\u003eEnhance your display with these artisan-crafted driftwood stands, combining functionality, natural charm, and aesthetic appeal.\u003c\/p\u003e\n\u003cp\u003e\u003cspan\u003eSuitable\u003c\/span\u003e: \u003cspan style=\"color: #333;\"\u003efor 3-6cm sphere\u003c\/span\u003e\u003cspan\u003e\u003c\/span\u003e\u003c\/p\u003e","published_at":"2025-09-21T18:36:21-04:00","created_at":"2025-09-21T14:45:23-04:00","vendor":"Ali","type":"Stands","tags":["adjusted-shipping","crystal","spheres","Stands"],"price":5799,"price_min":5799,"price_max":6099,"available":true,"price_varies":true,"compare_at_price":0,"compare_at_price_min":0,"compare_at_price_max":0,"compare_at_price_varies":false,"variants":[{"id":45647168766123,"title":"NO15 10-12cm \/ For Spheres 30-60mm","option1":"NO15 10-12cm","option2":"For Spheres 30-60mm","option3":null,"sku":"1005008632212148-NO15 10-12cm-detail see video-CN","requires_shipping":true,"taxable":true,"featured_image":{"id":40448946077867,"product_id":8529075732651,"position":8,"created_at":"2025-09-21T14:45:25-04:00","updated_at":"2025-12-11T00:11:05-05:00","alt":"Driftwood Crystal Sphere Display Stand (2pcs)-Stands-Ali-NO15 10-12cm-For Spheres 30-60mm-Crystal Destiny","width":800,"height":800,"src":"\/\/crystaldestiny.com\/cdn\/shop\/files\/Driftwood-Crystal-Sphere-Display-Stand-2pcs-Stands-NO15-10-12cm-For-Spheres-30-60mm-8.webp?v=1765429865","variant_ids":[45647168766123]},"available":false,"name":"Driftwood Crystal Sphere Display Stand (2pcs) - NO15 10-12cm \/ For Spheres 30-60mm","public_title":"NO15 10-12cm \/ For Spheres 30-60mm","options":["NO15 10-12cm","For Spheres 30-60mm"],"price":5799,"weight":465,"compare_at_price":0,"inventory_management":"shopify","barcode":null,"featured_media":{"alt":"Driftwood Crystal Sphere Display Stand (2pcs)-Stands-Ali-NO15 10-12cm-For Spheres 30-60mm-Crystal Destiny","id":31835993931947,"position":8,"preview_image":{"aspect_ratio":1.0,"height":800,"width":800,"src":"\/\/crystaldestiny.com\/cdn\/shop\/files\/Driftwood-Crystal-Sphere-Display-Stand-2pcs-Stands-NO15-10-12cm-For-Spheres-30-60mm-8.webp?v=1765429865"}},"requires_selling_plan":false,"selling_plan_allocations":[]},{"id":45647168798891,"title":"NO14 10-13cm \/ For Spheres 30-60mm","option1":"NO14 10-13cm","option2":"For Spheres 30-60mm","option3":null,"sku":"1005008632212148-NO14 10-13cm-detail see video-CN","requires_shipping":true,"taxable":true,"featured_image":{"id":40448946110635,"product_id":8529075732651,"position":9,"created_at":"2025-09-21T14:45:25-04:00","updated_at":"2025-12-11T00:11:06-05:00","alt":"Driftwood Crystal Sphere Display Stand (2pcs)-Stands-Ali-NO14 10-13cm-For Spheres 30-60mm-Crystal Destiny","width":800,"height":800,"src":"\/\/crystaldestiny.com\/cdn\/shop\/files\/Driftwood-Crystal-Sphere-Display-Stand-2pcs-Stands-NO14-10-13cm-For-Spheres-30-60mm-9.webp?v=1765429866","variant_ids":[45647168798891]},"available":false,"name":"Driftwood Crystal Sphere Display Stand (2pcs) - NO14 10-13cm \/ For Spheres 30-60mm","public_title":"NO14 10-13cm \/ For Spheres 30-60mm","options":["NO14 10-13cm","For Spheres 30-60mm"],"price":5799,"weight":465,"compare_at_price":0,"inventory_management":"shopify","barcode":null,"featured_media":{"alt":"Driftwood Crystal Sphere Display Stand (2pcs)-Stands-Ali-NO14 10-13cm-For Spheres 30-60mm-Crystal Destiny","id":31835993997483,"position":9,"preview_image":{"aspect_ratio":1.0,"height":800,"width":800,"src":"\/\/crystaldestiny.com\/cdn\/shop\/files\/Driftwood-Crystal-Sphere-Display-Stand-2pcs-Stands-NO14-10-13cm-For-Spheres-30-60mm-9.webp?v=1765429866"}},"requires_selling_plan":false,"selling_plan_allocations":[]},{"id":45647168831659,"title":"NO13 12-13cm \/ For Spheres 30-60mm","option1":"NO13 12-13cm","option2":"For Spheres 30-60mm","option3":null,"sku":"1005008632212148-NO13 12-13cm-detail see video-CN","requires_shipping":true,"taxable":true,"featured_image":{"id":40448945881259,"product_id":8529075732651,"position":3,"created_at":"2025-09-21T14:45:25-04:00","updated_at":"2025-12-11T00:10:58-05:00","alt":"Driftwood Crystal Sphere Display Stand (2pcs)-Stands-Ali-NO13 12-13cm-For Spheres 30-60mm-Crystal Destiny","width":800,"height":800,"src":"\/\/crystaldestiny.com\/cdn\/shop\/files\/Driftwood-Crystal-Sphere-Display-Stand-2pcs-Stands-NO13-12-13cm-For-Spheres-30-60mm-3.webp?v=1765429858","variant_ids":[45647168831659]},"available":false,"name":"Driftwood Crystal Sphere Display Stand (2pcs) - NO13 12-13cm \/ For Spheres 30-60mm","public_title":"NO13 12-13cm \/ For Spheres 30-60mm","options":["NO13 12-13cm","For Spheres 30-60mm"],"price":5799,"weight":465,"compare_at_price":0,"inventory_management":"shopify","barcode":null,"featured_media":{"alt":"Driftwood Crystal Sphere Display Stand (2pcs)-Stands-Ali-NO13 12-13cm-For Spheres 30-60mm-Crystal Destiny","id":31835993571499,"position":3,"preview_image":{"aspect_ratio":1.0,"height":800,"width":800,"src":"\/\/crystaldestiny.com\/cdn\/shop\/files\/Driftwood-Crystal-Sphere-Display-Stand-2pcs-Stands-NO13-12-13cm-For-Spheres-30-60mm-3.webp?v=1765429858"}},"requires_selling_plan":false,"selling_plan_allocations":[]},{"id":45647168864427,"title":"NO12 12cm \/ For Spheres 30-60mm","option1":"NO12 12cm","option2":"For Spheres 30-60mm","option3":null,"sku":"1005008632212148-NO12 12cm-detail see video-CN","requires_shipping":true,"taxable":true,"featured_image":{"id":40448945914027,"product_id":8529075732651,"position":4,"created_at":"2025-09-21T14:45:25-04:00","updated_at":"2025-12-11T00:10:59-05:00","alt":"Driftwood Crystal Sphere Display Stand (2pcs)-Stands-Ali-NO12 12cm-For Spheres 30-60mm-Crystal Destiny","width":800,"height":800,"src":"\/\/crystaldestiny.com\/cdn\/shop\/files\/Driftwood-Crystal-Sphere-Display-Stand-2pcs-Stands-NO12-12cm-For-Spheres-30-60mm-4.webp?v=1765429859","variant_ids":[45647168864427]},"available":false,"name":"Driftwood Crystal Sphere Display Stand (2pcs) - NO12 12cm \/ For Spheres 30-60mm","public_title":"NO12 12cm \/ For Spheres 30-60mm","options":["NO12 12cm","For Spheres 30-60mm"],"price":5799,"weight":465,"compare_at_price":0,"inventory_management":"shopify","barcode":null,"featured_media":{"alt":"Driftwood Crystal Sphere Display Stand (2pcs)-Stands-Ali-NO12 12cm-For Spheres 30-60mm-Crystal Destiny","id":31835993637035,"position":4,"preview_image":{"aspect_ratio":1.0,"height":800,"width":800,"src":"\/\/crystaldestiny.com\/cdn\/shop\/files\/Driftwood-Crystal-Sphere-Display-Stand-2pcs-Stands-NO12-12cm-For-Spheres-30-60mm-4.webp?v=1765429859"}},"requires_selling_plan":false,"selling_plan_allocations":[]},{"id":45647168897195,"title":"NO17 15-17cm \/ For Spheres 30-60mm","option1":"NO17 15-17cm","option2":"For Spheres 30-60mm","option3":null,"sku":"1005008632212148-NO17 15-17cm-detail see video-CN","requires_shipping":true,"taxable":true,"featured_image":{"id":40448945848491,"product_id":8529075732651,"position":1,"created_at":"2025-09-21T14:45:25-04:00","updated_at":"2025-12-11T00:10:55-05:00","alt":"Driftwood Crystal Sphere Display Stand (2pcs)-Stands-Ali-NO17 15-17cm-For Spheres 30-60mm-Crystal Destiny","width":800,"height":800,"src":"\/\/crystaldestiny.com\/cdn\/shop\/files\/Driftwood-Crystal-Sphere-Display-Stand-2pcs-Stands-NO17-15-17cm-For-Spheres-30-60mm.webp?v=1765429855","variant_ids":[45647168897195,45647168929963]},"available":false,"name":"Driftwood Crystal Sphere Display Stand (2pcs) - NO17 15-17cm \/ For Spheres 30-60mm","public_title":"NO17 15-17cm \/ For Spheres 30-60mm","options":["NO17 15-17cm","For Spheres 30-60mm"],"price":6099,"weight":465,"compare_at_price":0,"inventory_management":"shopify","barcode":null,"featured_media":{"alt":"Driftwood Crystal Sphere Display Stand (2pcs)-Stands-Ali-NO17 15-17cm-For Spheres 30-60mm-Crystal Destiny","id":31835993505963,"position":1,"preview_image":{"aspect_ratio":1.0,"height":800,"width":800,"src":"\/\/crystaldestiny.com\/cdn\/shop\/files\/Driftwood-Crystal-Sphere-Display-Stand-2pcs-Stands-NO17-15-17cm-For-Spheres-30-60mm.webp?v=1765429855"}},"requires_selling_plan":false,"selling_plan_allocations":[]},{"id":45647168929963,"title":"NO16 12-13cm \/ For Spheres 30-60mm","option1":"NO16 12-13cm","option2":"For Spheres 30-60mm","option3":null,"sku":"1005008632212148-NO16 12-13cm-detail see video-CN","requires_shipping":true,"taxable":true,"featured_image":{"id":40448945848491,"product_id":8529075732651,"position":1,"created_at":"2025-09-21T14:45:25-04:00","updated_at":"2025-12-11T00:10:55-05:00","alt":"Driftwood Crystal Sphere Display Stand (2pcs)-Stands-Ali-NO17 15-17cm-For Spheres 30-60mm-Crystal Destiny","width":800,"height":800,"src":"\/\/crystaldestiny.com\/cdn\/shop\/files\/Driftwood-Crystal-Sphere-Display-Stand-2pcs-Stands-NO17-15-17cm-For-Spheres-30-60mm.webp?v=1765429855","variant_ids":[45647168897195,45647168929963]},"available":false,"name":"Driftwood Crystal Sphere Display Stand (2pcs) - NO16 12-13cm \/ For Spheres 30-60mm","public_title":"NO16 12-13cm \/ For Spheres 30-60mm","options":["NO16 12-13cm","For Spheres 30-60mm"],"price":5799,"weight":465,"compare_at_price":0,"inventory_management":"shopify","barcode":null,"featured_media":{"alt":"Driftwood Crystal Sphere Display Stand (2pcs)-Stands-Ali-NO17 15-17cm-For Spheres 30-60mm-Crystal Destiny","id":31835993505963,"position":1,"preview_image":{"aspect_ratio":1.0,"height":800,"width":800,"src":"\/\/crystaldestiny.com\/cdn\/shop\/files\/Driftwood-Crystal-Sphere-Display-Stand-2pcs-Stands-NO17-15-17cm-For-Spheres-30-60mm.webp?v=1765429855"}},"requires_selling_plan":false,"selling_plan_allocations":[]},{"id":45647168962731,"title":"NO11 11-12cm \/ For Spheres 30-60mm","option1":"NO11 11-12cm","option2":"For Spheres 30-60mm","option3":null,"sku":"1005008632212148-NO11 11-12cm-detail see video-CN","requires_shipping":true,"taxable":true,"featured_image":{"id":40448945946795,"product_id":8529075732651,"position":5,"created_at":"2025-09-21T14:45:25-04:00","updated_at":"2025-12-11T00:11:01-05:00","alt":"Driftwood Crystal Sphere Display Stand (2pcs)-Stands-Ali-NO11 11-12cm-For Spheres 30-60mm-Crystal Destiny","width":800,"height":800,"src":"\/\/crystaldestiny.com\/cdn\/shop\/files\/Driftwood-Crystal-Sphere-Display-Stand-2pcs-Stands-NO11-11-12cm-For-Spheres-30-60mm-5.webp?v=1765429861","variant_ids":[45647168962731]},"available":true,"name":"Driftwood Crystal Sphere Display Stand (2pcs) - NO11 11-12cm \/ For Spheres 30-60mm","public_title":"NO11 11-12cm \/ For Spheres 30-60mm","options":["NO11 11-12cm","For Spheres 30-60mm"],"price":5799,"weight":465,"compare_at_price":0,"inventory_management":"shopify","barcode":null,"featured_media":{"alt":"Driftwood Crystal Sphere Display Stand (2pcs)-Stands-Ali-NO11 11-12cm-For Spheres 30-60mm-Crystal Destiny","id":31835993702571,"position":5,"preview_image":{"aspect_ratio":1.0,"height":800,"width":800,"src":"\/\/crystaldestiny.com\/cdn\/shop\/files\/Driftwood-Crystal-Sphere-Display-Stand-2pcs-Stands-NO11-11-12cm-For-Spheres-30-60mm-5.webp?v=1765429861"}},"requires_selling_plan":false,"selling_plan_allocations":[]},{"id":45647168995499,"title":"NO10 10-12cm \/ For Spheres 30-60mm","option1":"NO10 10-12cm","option2":"For Spheres 30-60mm","option3":null,"sku":"1005008632212148-NO10 10-12cm-detail see video-CN","requires_shipping":true,"taxable":true,"featured_image":{"id":40448945979563,"product_id":8529075732651,"position":6,"created_at":"2025-09-21T14:45:25-04:00","updated_at":"2025-12-11T00:11:02-05:00","alt":"Driftwood Crystal Sphere Display Stand (2pcs)-Stands-Ali-NO10 10-12cm-For Spheres 30-60mm-Crystal Destiny","width":800,"height":800,"src":"\/\/crystaldestiny.com\/cdn\/shop\/files\/Driftwood-Crystal-Sphere-Display-Stand-2pcs-Stands-NO10-10-12cm-For-Spheres-30-60mm-6.webp?v=1765429862","variant_ids":[45647168995499]},"available":false,"name":"Driftwood Crystal Sphere Display Stand (2pcs) - NO10 10-12cm \/ For Spheres 30-60mm","public_title":"NO10 10-12cm \/ For Spheres 30-60mm","options":["NO10 10-12cm","For Spheres 30-60mm"],"price":5799,"weight":465,"compare_at_price":0,"inventory_management":"shopify","barcode":null,"featured_media":{"alt":"Driftwood Crystal Sphere Display Stand (2pcs)-Stands-Ali-NO10 10-12cm-For Spheres 30-60mm-Crystal Destiny","id":31835993768107,"position":6,"preview_image":{"aspect_ratio":1.0,"height":800,"width":800,"src":"\/\/crystaldestiny.com\/cdn\/shop\/files\/Driftwood-Crystal-Sphere-Display-Stand-2pcs-Stands-NO10-10-12cm-For-Spheres-30-60mm-6.webp?v=1765429862"}},"requires_selling_plan":false,"selling_plan_allocations":[]},{"id":45647169028267,"title":"NO9 11-13cm \/ For Spheres 30-60mm","option1":"NO9 11-13cm","option2":"For Spheres 30-60mm","option3":null,"sku":"1005008632212148-NO9 11-13cm-detail see video-CN","requires_shipping":true,"taxable":true,"featured_image":{"id":40448946012331,"product_id":8529075732651,"position":7,"created_at":"2025-09-21T14:45:25-04:00","updated_at":"2025-12-11T00:11:03-05:00","alt":"Driftwood Crystal Sphere Display Stand (2pcs)-Stands-Ali-NO9 11-13cm-For Spheres 30-60mm-Crystal Destiny","width":800,"height":800,"src":"\/\/crystaldestiny.com\/cdn\/shop\/files\/Driftwood-Crystal-Sphere-Display-Stand-2pcs-Stands-NO9-11-13cm-For-Spheres-30-60mm-7.webp?v=1765429863","variant_ids":[45647169028267]},"available":false,"name":"Driftwood Crystal Sphere Display Stand (2pcs) - NO9 11-13cm \/ For Spheres 30-60mm","public_title":"NO9 11-13cm \/ For Spheres 30-60mm","options":["NO9 11-13cm","For Spheres 30-60mm"],"price":5799,"weight":465,"compare_at_price":0,"inventory_management":"shopify","barcode":null,"featured_media":{"alt":"Driftwood Crystal Sphere Display Stand (2pcs)-Stands-Ali-NO9 11-13cm-For Spheres 30-60mm-Crystal Destiny","id":31835993800875,"position":7,"preview_image":{"aspect_ratio":1.0,"height":800,"width":800,"src":"\/\/crystaldestiny.com\/cdn\/shop\/files\/Driftwood-Crystal-Sphere-Display-Stand-2pcs-Stands-NO9-11-13cm-For-Spheres-30-60mm-7.webp?v=1765429863"}},"requires_selling_plan":false,"selling_plan_allocations":[]},{"id":45647169061035,"title":"NO8 13-14cm \/ For Spheres 30-60mm","option1":"NO8 13-14cm","option2":"For Spheres 30-60mm","option3":null,"sku":"1005008632212148-NO8 13-14cm-detail see video-CN","requires_shipping":true,"taxable":true,"featured_image":{"id":40448946045099,"product_id":8529075732651,"position":2,"created_at":"2025-09-21T14:45:25-04:00","updated_at":"2025-12-11T00:10:56-05:00","alt":"Driftwood Crystal Sphere Display Stand (2pcs)-Stands-Ali-NO8 13-14cm-For Spheres 30-60mm-Crystal Destiny","width":800,"height":800,"src":"\/\/crystaldestiny.com\/cdn\/shop\/files\/Driftwood-Crystal-Sphere-Display-Stand-2pcs-Stands-NO8-13-14cm-For-Spheres-30-60mm-2.webp?v=1765429856","variant_ids":[45647169061035]},"available":false,"name":"Driftwood Crystal Sphere Display Stand (2pcs) - NO8 13-14cm \/ For Spheres 30-60mm","public_title":"NO8 13-14cm \/ For Spheres 30-60mm","options":["NO8 13-14cm","For Spheres 30-60mm"],"price":5799,"weight":465,"compare_at_price":0,"inventory_management":"shopify","barcode":null,"featured_media":{"alt":"Driftwood Crystal Sphere Display Stand (2pcs)-Stands-Ali-NO8 13-14cm-For Spheres 30-60mm-Crystal Destiny","id":31835993866411,"position":2,"preview_image":{"aspect_ratio":1.0,"height":800,"width":800,"src":"\/\/crystaldestiny.com\/cdn\/shop\/files\/Driftwood-Crystal-Sphere-Display-Stand-2pcs-Stands-NO8-13-14cm-For-Spheres-30-60mm-2.webp?v=1765429856"}},"requires_selling_plan":false,"selling_plan_allocations":[]}],"images":["\/\/crystaldestiny.com\/cdn\/shop\/files\/Driftwood-Crystal-Sphere-Display-Stand-2pcs-Stands-NO17-15-17cm-For-Spheres-30-60mm.webp?v=1765429855","\/\/crystaldestiny.com\/cdn\/shop\/files\/Driftwood-Crystal-Sphere-Display-Stand-2pcs-Stands-NO8-13-14cm-For-Spheres-30-60mm-2.webp?v=1765429856","\/\/crystaldestiny.com\/cdn\/shop\/files\/Driftwood-Crystal-Sphere-Display-Stand-2pcs-Stands-NO13-12-13cm-For-Spheres-30-60mm-3.webp?v=1765429858","\/\/crystaldestiny.com\/cdn\/shop\/files\/Driftwood-Crystal-Sphere-Display-Stand-2pcs-Stands-NO12-12cm-For-Spheres-30-60mm-4.webp?v=1765429859","\/\/crystaldestiny.com\/cdn\/shop\/files\/Driftwood-Crystal-Sphere-Display-Stand-2pcs-Stands-NO11-11-12cm-For-Spheres-30-60mm-5.webp?v=1765429861","\/\/crystaldestiny.com\/cdn\/shop\/files\/Driftwood-Crystal-Sphere-Display-Stand-2pcs-Stands-NO10-10-12cm-For-Spheres-30-60mm-6.webp?v=1765429862","\/\/crystaldestiny.com\/cdn\/shop\/files\/Driftwood-Crystal-Sphere-Display-Stand-2pcs-Stands-NO9-11-13cm-For-Spheres-30-60mm-7.webp?v=1765429863","\/\/crystaldestiny.com\/cdn\/shop\/files\/Driftwood-Crystal-Sphere-Display-Stand-2pcs-Stands-NO15-10-12cm-For-Spheres-30-60mm-8.webp?v=1765429865","\/\/crystaldestiny.com\/cdn\/shop\/files\/Driftwood-Crystal-Sphere-Display-Stand-2pcs-Stands-NO14-10-13cm-For-Spheres-30-60mm-9.webp?v=1765429866"],"featured_image":"\/\/crystaldestiny.com\/cdn\/shop\/files\/Driftwood-Crystal-Sphere-Display-Stand-2pcs-Stands-NO17-15-17cm-For-Spheres-30-60mm.webp?v=1765429855","options":["Style","Size"],"media":[{"alt":"Driftwood Crystal Sphere Display Stand (2pcs)-Stands-Ali-NO17 15-17cm-For Spheres 30-60mm-Crystal Destiny","id":31835993505963,"position":1,"preview_image":{"aspect_ratio":1.0,"height":800,"width":800,"src":"\/\/crystaldestiny.com\/cdn\/shop\/files\/Driftwood-Crystal-Sphere-Display-Stand-2pcs-Stands-NO17-15-17cm-For-Spheres-30-60mm.webp?v=1765429855"},"aspect_ratio":1.0,"height":800,"media_type":"image","src":"\/\/crystaldestiny.com\/cdn\/shop\/files\/Driftwood-Crystal-Sphere-Display-Stand-2pcs-Stands-NO17-15-17cm-For-Spheres-30-60mm.webp?v=1765429855","width":800},{"alt":"Driftwood Crystal Sphere Display Stand (2pcs)-Stands-Ali-NO8 13-14cm-For Spheres 30-60mm-Crystal Destiny","id":31835993866411,"position":2,"preview_image":{"aspect_ratio":1.0,"height":800,"width":800,"src":"\/\/crystaldestiny.com\/cdn\/shop\/files\/Driftwood-Crystal-Sphere-Display-Stand-2pcs-Stands-NO8-13-14cm-For-Spheres-30-60mm-2.webp?v=1765429856"},"aspect_ratio":1.0,"height":800,"media_type":"image","src":"\/\/crystaldestiny.com\/cdn\/shop\/files\/Driftwood-Crystal-Sphere-Display-Stand-2pcs-Stands-NO8-13-14cm-For-Spheres-30-60mm-2.webp?v=1765429856","width":800},{"alt":"Driftwood Crystal Sphere Display Stand (2pcs)-Stands-Ali-NO13 12-13cm-For Spheres 30-60mm-Crystal Destiny","id":31835993571499,"position":3,"preview_image":{"aspect_ratio":1.0,"height":800,"width":800,"src":"\/\/crystaldestiny.com\/cdn\/shop\/files\/Driftwood-Crystal-Sphere-Display-Stand-2pcs-Stands-NO13-12-13cm-For-Spheres-30-60mm-3.webp?v=1765429858"},"aspect_ratio":1.0,"height":800,"media_type":"image","src":"\/\/crystaldestiny.com\/cdn\/shop\/files\/Driftwood-Crystal-Sphere-Display-Stand-2pcs-Stands-NO13-12-13cm-For-Spheres-30-60mm-3.webp?v=1765429858","width":800},{"alt":"Driftwood Crystal Sphere Display Stand (2pcs)-Stands-Ali-NO12 12cm-For Spheres 30-60mm-Crystal Destiny","id":31835993637035,"position":4,"preview_image":{"aspect_ratio":1.0,"height":800,"width":800,"src":"\/\/crystaldestiny.com\/cdn\/shop\/files\/Driftwood-Crystal-Sphere-Display-Stand-2pcs-Stands-NO12-12cm-For-Spheres-30-60mm-4.webp?v=1765429859"},"aspect_ratio":1.0,"height":800,"media_type":"image","src":"\/\/crystaldestiny.com\/cdn\/shop\/files\/Driftwood-Crystal-Sphere-Display-Stand-2pcs-Stands-NO12-12cm-For-Spheres-30-60mm-4.webp?v=1765429859","width":800},{"alt":"Driftwood Crystal Sphere Display Stand (2pcs)-Stands-Ali-NO11 11-12cm-For Spheres 30-60mm-Crystal Destiny","id":31835993702571,"position":5,"preview_image":{"aspect_ratio":1.0,"height":800,"width":800,"src":"\/\/crystaldestiny.com\/cdn\/shop\/files\/Driftwood-Crystal-Sphere-Display-Stand-2pcs-Stands-NO11-11-12cm-For-Spheres-30-60mm-5.webp?v=1765429861"},"aspect_ratio":1.0,"height":800,"media_type":"image","src":"\/\/crystaldestiny.com\/cdn\/shop\/files\/Driftwood-Crystal-Sphere-Display-Stand-2pcs-Stands-NO11-11-12cm-For-Spheres-30-60mm-5.webp?v=1765429861","width":800},{"alt":"Driftwood Crystal Sphere Display Stand (2pcs)-Stands-Ali-NO10 10-12cm-For Spheres 30-60mm-Crystal Destiny","id":31835993768107,"position":6,"preview_image":{"aspect_ratio":1.0,"height":800,"width":800,"src":"\/\/crystaldestiny.com\/cdn\/shop\/files\/Driftwood-Crystal-Sphere-Display-Stand-2pcs-Stands-NO10-10-12cm-For-Spheres-30-60mm-6.webp?v=1765429862"},"aspect_ratio":1.0,"height":800,"media_type":"image","src":"\/\/crystaldestiny.com\/cdn\/shop\/files\/Driftwood-Crystal-Sphere-Display-Stand-2pcs-Stands-NO10-10-12cm-For-Spheres-30-60mm-6.webp?v=1765429862","width":800},{"alt":"Driftwood Crystal Sphere Display Stand (2pcs)-Stands-Ali-NO9 11-13cm-For Spheres 30-60mm-Crystal Destiny","id":31835993800875,"position":7,"preview_image":{"aspect_ratio":1.0,"height":800,"width":800,"src":"\/\/crystaldestiny.com\/cdn\/shop\/files\/Driftwood-Crystal-Sphere-Display-Stand-2pcs-Stands-NO9-11-13cm-For-Spheres-30-60mm-7.webp?v=1765429863"},"aspect_ratio":1.0,"height":800,"media_type":"image","src":"\/\/crystaldestiny.com\/cdn\/shop\/files\/Driftwood-Crystal-Sphere-Display-Stand-2pcs-Stands-NO9-11-13cm-For-Spheres-30-60mm-7.webp?v=1765429863","width":800},{"alt":"Driftwood Crystal Sphere Display Stand (2pcs)-Stands-Ali-NO15 10-12cm-For Spheres 30-60mm-Crystal Destiny","id":31835993931947,"position":8,"preview_image":{"aspect_ratio":1.0,"height":800,"width":800,"src":"\/\/crystaldestiny.com\/cdn\/shop\/files\/Driftwood-Crystal-Sphere-Display-Stand-2pcs-Stands-NO15-10-12cm-For-Spheres-30-60mm-8.webp?v=1765429865"},"aspect_ratio":1.0,"height":800,"media_type":"image","src":"\/\/crystaldestiny.com\/cdn\/shop\/files\/Driftwood-Crystal-Sphere-Display-Stand-2pcs-Stands-NO15-10-12cm-For-Spheres-30-60mm-8.webp?v=1765429865","width":800},{"alt":"Driftwood Crystal Sphere Display Stand (2pcs)-Stands-Ali-NO14 10-13cm-For Spheres 30-60mm-Crystal Destiny","id":31835993997483,"position":9,"preview_image":{"aspect_ratio":1.0,"height":800,"width":800,"src":"\/\/crystaldestiny.com\/cdn\/shop\/files\/Driftwood-Crystal-Sphere-Display-Stand-2pcs-Stands-NO14-10-13cm-For-Spheres-30-60mm-9.webp?v=1765429866"},"aspect_ratio":1.0,"height":800,"media_type":"image","src":"\/\/crystaldestiny.com\/cdn\/shop\/files\/Driftwood-Crystal-Sphere-Display-Stand-2pcs-Stands-NO14-10-13cm-For-Spheres-30-60mm-9.webp?v=1765429866","width":800}],"requires_selling_plan":false,"selling_plan_groups":[],"content":"\u003cp data-start=\"227\" data-end=\"541\"\u003eThis \u003cstrong data-start=\"259\" data-end=\"301\"\u003eDriftwood Crystal Sphere Display Stand\u003c\/strong\u003e comes as a set of 2 handcrafted holders, designed to elegantly showcase single crystal balls, eggs, or spheres. The natural driftwood base adds a rustic and organic touch, highlighting the beauty of your stones while keeping them secure.\u003c\/p\u003e\n\u003cp data-start=\"543\" data-end=\"759\"\u003ePerfect for collectors, home décor, meditation spaces, or gifting, these stands provide stability and elevate your crystal display. Their minimalist yet natural design complements any crystal or mineral collection.\u003c\/p\u003e\n\u003cp data-start=\"761\" data-end=\"890\"\u003eEnhance your display with these artisan-crafted driftwood stands, combining functionality, natural charm, and aesthetic appeal.\u003c\/p\u003e\n\u003cp\u003e\u003cspan\u003eSuitable\u003c\/span\u003e: \u003cspan style=\"color: #333;\"\u003efor 3-6cm sphere\u003c\/span\u003e\u003cspan\u003e\u003c\/span\u003e\u003c\/p\u003e"},"options":[{"name":"Style","position":1,"values":["NO15 10-12cm","NO14 10-13cm","NO13 12-13cm","NO12 12cm","NO17 15-17cm","NO16 12-13cm","NO11 11-12cm","NO10 10-12cm","NO9 11-13cm","NO8 13-14cm"]},{"name":"Size","position":2,"values":["For Spheres 30-60mm"]}],"custom_metafields":{"shipping_time":"12-16 days"},"metafields":{"badge":"\u003cdiv style='display:none' class='jdgm-prev-badge' data-average-rating='0.00' data-number-of-reviews='0' data-number-of-questions='0'\u003e \u003cspan class='jdgm-prev-badge__stars' data-score='0.00' tabindex='0' aria-label='0.00 stars' role='button'\u003e \u003cspan class='jdgm-star jdgm--off'\u003e\u003c\/span\u003e\u003cspan class='jdgm-star jdgm--off'\u003e\u003c\/span\u003e\u003cspan class='jdgm-star jdgm--off'\u003e\u003c\/span\u003e\u003cspan class='jdgm-star jdgm--off'\u003e\u003c\/span\u003e\u003cspan class='jdgm-star jdgm--off'\u003e\u003c\/span\u003e \u003c\/span\u003e \u003cspan class='jdgm-prev-badge__text'\u003e No reviews \u003c\/span\u003e \u003c\/div\u003e","widget":"\u003cdiv class='jdgm-rev-widg' data-updated-at='2025-09-21T22:36:23Z' data-average-rating='0.00' data-number-of-reviews='0' data-number-of-questions='0' data-image-url='https:\/\/cdn.shopify.com\/s\/files\/1\/0613\/0345\/5915\/files\/S62f8b0695c0548a188f2cffebb7392ccc.webp?v=1758480328'\u003e \u003cstyle class='jdgm-temp-hiding-style'\u003e.jdgm-rev-widg{ display: none }\u003c\/style\u003e \u003cdiv class='jdgm-rev-widg__header'\u003e \u003ch2 class='jdgm-rev-widg__title'\u003eCustomer Reviews\u003c\/h2\u003e \u003cdiv class='jdgm-rev-widg__summary'\u003e \u003cdiv class='jdgm-rev-widg__summary-stars' aria-label='Average rating is 0.00 stars' role='img'\u003e \u003cspan class='jdgm-star jdgm--off'\u003e\u003c\/span\u003e\u003cspan class='jdgm-star jdgm--off'\u003e\u003c\/span\u003e\u003cspan class='jdgm-star jdgm--off'\u003e\u003c\/span\u003e\u003cspan class='jdgm-star jdgm--off'\u003e\u003c\/span\u003e\u003cspan class='jdgm-star jdgm--off'\u003e\u003c\/span\u003e \u003c\/div\u003e \u003cdiv class='jdgm-rev-widg__summary-text'\u003eBe the first to write a review\u003c\/div\u003e \u003c\/div\u003e \u003ca style='display: none' href='#' class='jdgm-write-rev-link' role='button'\u003eWrite a review\u003c\/a\u003e \u003cdiv class='jdgm-histogram jdgm-temp-hidden'\u003e \u003cdiv class='jdgm-histogram__row' data-rating='5' data-frequency='0' data-percentage='0'\u003e \u003cdiv class='jdgm-histogram__star' role='button' aria-label=\"0% (0) reviews with 5 star rating\" tabindex='0' \u003e\u003cspan class='jdgm-star jdgm--on'\u003e\u003c\/span\u003e\u003cspan class='jdgm-star jdgm--on'\u003e\u003c\/span\u003e\u003cspan class='jdgm-star jdgm--on'\u003e\u003c\/span\u003e\u003cspan class='jdgm-star jdgm--on'\u003e\u003c\/span\u003e\u003cspan class='jdgm-star jdgm--on'\u003e\u003c\/span\u003e\u003c\/div\u003e \u003cdiv class='jdgm-histogram__bar'\u003e \u003cdiv class='jdgm-histogram__bar-content' style='width: 0%;'\u003e \u003c\/div\u003e \u003c\/div\u003e \u003cdiv class='jdgm-histogram__percentage'\u003e0%\u003c\/div\u003e \u003cdiv class='jdgm-histogram__frequency'\u003e(0)\u003c\/div\u003e \u003c\/div\u003e \u003cdiv class='jdgm-histogram__row' data-rating='4' data-frequency='0' data-percentage='0'\u003e \u003cdiv class='jdgm-histogram__star' role='button' aria-label=\"0% (0) reviews with 4 star rating\" tabindex='0' \u003e\u003cspan class='jdgm-star jdgm--on'\u003e\u003c\/span\u003e\u003cspan class='jdgm-star jdgm--on'\u003e\u003c\/span\u003e\u003cspan class='jdgm-star jdgm--on'\u003e\u003c\/span\u003e\u003cspan class='jdgm-star jdgm--on'\u003e\u003c\/span\u003e\u003cspan class='jdgm-star jdgm--off'\u003e\u003c\/span\u003e\u003c\/div\u003e \u003cdiv class='jdgm-histogram__bar'\u003e \u003cdiv class='jdgm-histogram__bar-content' style='width: 0%;'\u003e \u003c\/div\u003e \u003c\/div\u003e \u003cdiv class='jdgm-histogram__percentage'\u003e0%\u003c\/div\u003e \u003cdiv class='jdgm-histogram__frequency'\u003e(0)\u003c\/div\u003e \u003c\/div\u003e \u003cdiv class='jdgm-histogram__row' data-rating='3' data-frequency='0' data-percentage='0'\u003e \u003cdiv class='jdgm-histogram__star' role='button' aria-label=\"0% (0) reviews with 3 star rating\" tabindex='0' \u003e\u003cspan class='jdgm-star jdgm--on'\u003e\u003c\/span\u003e\u003cspan class='jdgm-star jdgm--on'\u003e\u003c\/span\u003e\u003cspan class='jdgm-star jdgm--on'\u003e\u003c\/span\u003e\u003cspan class='jdgm-star jdgm--off'\u003e\u003c\/span\u003e\u003cspan class='jdgm-star jdgm--off'\u003e\u003c\/span\u003e\u003c\/div\u003e \u003cdiv class='jdgm-histogram__bar'\u003e \u003cdiv class='jdgm-histogram__bar-content' style='width: 0%;'\u003e \u003c\/div\u003e \u003c\/div\u003e \u003cdiv class='jdgm-histogram__percentage'\u003e0%\u003c\/div\u003e \u003cdiv class='jdgm-histogram__frequency'\u003e(0)\u003c\/div\u003e \u003c\/div\u003e \u003cdiv class='jdgm-histogram__row' data-rating='2' data-frequency='0' data-percentage='0'\u003e \u003cdiv class='jdgm-histogram__star' role='button' aria-label=\"0% (0) reviews with 2 star rating\" tabindex='0' \u003e\u003cspan class='jdgm-star jdgm--on'\u003e\u003c\/span\u003e\u003cspan class='jdgm-star jdgm--on'\u003e\u003c\/span\u003e\u003cspan class='jdgm-star jdgm--off'\u003e\u003c\/span\u003e\u003cspan class='jdgm-star jdgm--off'\u003e\u003c\/span\u003e\u003cspan class='jdgm-star jdgm--off'\u003e\u003c\/span\u003e\u003c\/div\u003e \u003cdiv class='jdgm-histogram__bar'\u003e \u003cdiv class='jdgm-histogram__bar-content' style='width: 0%;'\u003e \u003c\/div\u003e \u003c\/div\u003e \u003cdiv class='jdgm-histogram__percentage'\u003e0%\u003c\/div\u003e \u003cdiv class='jdgm-histogram__frequency'\u003e(0)\u003c\/div\u003e \u003c\/div\u003e \u003cdiv class='jdgm-histogram__row' data-rating='1' data-frequency='0' data-percentage='0'\u003e \u003cdiv class='jdgm-histogram__star' role='button' aria-label=\"0% (0) reviews with 1 star rating\" tabindex='0' \u003e\u003cspan class='jdgm-star jdgm--on'\u003e\u003c\/span\u003e\u003cspan class='jdgm-star jdgm--off'\u003e\u003c\/span\u003e\u003cspan class='jdgm-star jdgm--off'\u003e\u003c\/span\u003e\u003cspan class='jdgm-star jdgm--off'\u003e\u003c\/span\u003e\u003cspan class='jdgm-star jdgm--off'\u003e\u003c\/span\u003e\u003c\/div\u003e \u003cdiv class='jdgm-histogram__bar'\u003e \u003cdiv class='jdgm-histogram__bar-content' style='width: 0%;'\u003e \u003c\/div\u003e \u003c\/div\u003e \u003cdiv class='jdgm-histogram__percentage'\u003e0%\u003c\/div\u003e \u003cdiv class='jdgm-histogram__frequency'\u003e(0)\u003c\/div\u003e \u003c\/div\u003e \u003cdiv class='jdgm-histogram__row jdgm-histogram__clear-filter' data-rating=null tabindex='0'\u003e\u003c\/div\u003e \u003c\/div\u003e \u003cdiv class='jdgm-rev-widg__sort-wrapper'\u003e\u003c\/div\u003e \u003c\/div\u003e \u003cdiv class='jdgm-rev-widg__body'\u003e \u003cdiv class='jdgm-rev-widg__reviews'\u003e\u003c\/div\u003e \u003cdiv class='jdgm-paginate' data-per-page='4' data-url='https:\/\/api.judge.me\/reviews\/reviews_for_widget' style=\"display: none;\"\u003e\u003c\/div\u003e \u003c\/div\u003e \u003cdiv class='jdgm-rev-widg__paginate-spinner-wrapper'\u003e \u003cdiv class='jdgm-spinner'\u003e\u003c\/div\u003e \u003c\/div\u003e \u003c\/div\u003e"},"collections":[{"id":294880051371,"handle":"crystals","title":"Crystals","updated_at":"2026-01-07T23:43:11-05:00","body_html":"\u003cp data-start=\"159\" data-end=\"687\"\u003e✨ \u003cstrong data-start=\"161\" data-end=\"216\"\u003eDiscover the Magic of Crystals with Crystal Destiny\u003c\/strong\u003e ✨\u003cbr data-start=\"218\" data-end=\"221\"\u003eCrystals have been treasured for centuries—not only for their natural beauty but also for their powerful healing energies. Beyond their visual allure, they bring balance, harmony, and positive energy into any space. Whether used for home décor, meditation, or simply to elevate the energy of your surroundings, crystals create a sanctuary of peace, relaxation, and well-being. Each piece is a unique gift from the Earth—visually stunning and spiritually uplifting.\u003c\/p\u003e\n\u003cp data-start=\"689\" data-end=\"1011\"\u003eAt \u003cstrong data-start=\"692\" data-end=\"711\"\u003eCrystal Destiny\u003c\/strong\u003e, our signature collection showcases a curated selection of exquisite crystals, from radiant Quartz to soothing Amethyst. Every stone is carefully sourced for its elegance and metaphysical resonance, making them perfect for enhancing your home, uplifting your spirit, or gifting to someone special.\u003c\/p\u003e\n\u003cp data-start=\"1013\" data-end=\"1206\"\u003eExperience the timeless sophistication of crystalline wonders. Explore the \u003cstrong data-start=\"1088\" data-end=\"1118\"\u003eCrystal Destiny Collection\u003c\/strong\u003e today and bring the transformative beauty of these treasures into your everyday life.\u003c\/p\u003e","published_at":"2023-06-05T11:24:02-04:00","sort_order":"created-desc","template_suffix":"","disjunctive":false,"rules":[{"column":"tag","relation":"equals","condition":"crystal"},{"column":"type","relation":"not_contains","condition":"925 Sterling Silver"},{"column":"type","relation":"not_contains","condition":"Wire Wraps"}],"published_scope":"global"},{"id":321695744171,"handle":"direct-from-supplier","title":"Direct from Supplier","updated_at":"2026-01-07T23:43:11-05:00","body_html":"","published_at":"2025-09-12T16:38:23-04:00","sort_order":"best-selling","template_suffix":"","disjunctive":true,"rules":[{"column":"tag","relation":"equals","condition":"adjusted-shipping"}],"published_scope":"global"},{"id":295698202795,"handle":"spheres","title":"Crystal Spheres","updated_at":"2026-01-06T23:24:35-05:00","body_html":"\u003cp data-start=\"106\" data-end=\"370\"\u003e✨ \u003cstrong data-start=\"108\" data-end=\"138\"\u003eCrystal Spheres Collection\u003c\/strong\u003e ✨\u003cbr data-start=\"140\" data-end=\"143\"\u003eBring harmony, balance, and elegance into your space with our \u003cstrong data-start=\"205\" data-end=\"235\"\u003eCrystal Spheres Collection\u003c\/strong\u003e. Each sphere is meticulously crafted to showcase the natural beauty and energy of crystals, from radiant Quartz to calming Amethyst.\u003c\/p\u003e\n\u003cp data-start=\"372\" data-end=\"658\"\u003ePerfect for meditation, energy work, or as striking décor, crystal spheres radiate energy in all directions, promoting clarity, focus, and a sense of calm. Their smooth, polished surfaces highlight the stones’ natural patterns and colors, making each sphere a captivating centerpiece.\u003c\/p\u003e\n\u003cp data-start=\"660\" data-end=\"809\"\u003eElevate your space and embrace the transformative power of crystals with the \u003cstrong data-start=\"737\" data-end=\"767\"\u003eCrystal Spheres Collection\u003c\/strong\u003e—where beauty, energy, and harmony meet.\u003c\/p\u003e","published_at":"2023-07-28T14:20:46-04:00","sort_order":"created-desc","template_suffix":"","disjunctive":true,"rules":[{"column":"tag","relation":"equals","condition":"spheres"},{"column":"tag","relation":"equals","condition":"eggs"}],"published_scope":"global"},{"id":293659312299,"handle":"best-sellers","title":"Best Sellers","updated_at":"2026-01-07T23:43:11-05:00","body_html":"\u003cp data-start=\"155\" data-end=\"510\"\u003eDiscover the pieces our community loves most. Our Best Sellers Collection brings together handpicked crystals and jewelry that embody timeless elegance, spiritual resonance, and everyday sophistication. Each item has earned its place as a customer favorite—celebrated for both its beauty and its meaningful energy.\u003c\/p\u003e\n\u003cp data-start=\"512\" data-end=\"802\"\u003eFrom stunning statement pieces to versatile daily companions, these treasures are curated to elevate your space, uplift your spirit, and reflect refined taste. Indulge in what’s most cherished and let our best sellers guide you toward the perfect blend of style and transformative energy.\u003c\/p\u003e\n\u003cp data-start=\"804\" data-end=\"932\"\u003eExplore the Best Sellers Collection today—where elegance meets intention, and every piece tells a story of beauty and balance.\u003c\/p\u003e","published_at":"2023-03-15T16:04:51-04:00","sort_order":"best-selling","template_suffix":"","disjunctive":false,"rules":[{"column":"variant_price","relation":"greater_than","condition":"0"},{"column":"variant_inventory","relation":"greater_than","condition":"0"},{"column":"type","relation":"not_equals","condition":"Shipping Protection"}],"published_scope":"global"},{"id":321370390699,"handle":"monthly-crystal-sale","title":"Monthly Crystal Sale | Spheres \u0026 Towers","updated_at":"2026-01-06T23:24:37-05:00","body_html":"\u003cp\u003eShop our \u003cstrong\u003eMonthly Crystal Sale\u003c\/strong\u003e, where you can shop a wide selection of healing crystals at discounted prices. Explore \u003cstrong\u003ecrystal spheres and towers,\u003c\/strong\u003e— all carefully curated to support meditation, energy balancing, and spiritual wellness. Whether you're looking to enhance your home decor, boost your daily energy, or find the perfect gift, our \u003cstrong\u003ecrystals for healing and manifestation\u003c\/strong\u003e offer both beauty and metaphysical benefits.\u003c\/p\u003e\n\u003cp\u003eEach month, our sale features \u003cstrong\u003enew discounted collections\u003c\/strong\u003e, from \u003cstrong\u003enatural quartz and amethyst towers\u003c\/strong\u003e to \u003cstrong\u003ewire-wrapped pendants and polished stones\u003c\/strong\u003e, so there's always something fresh to discover. Shop with confidence knowing you're getting high-quality crystals with \u003cstrong\u003efree shipping options\u003c\/strong\u003e and a trusted experience.\u003c\/p\u003e\n\u003cp\u003e\u003cstrong\u003eTake advantage of the Monthly Crystal Sale today\u003c\/strong\u003e and add powerful, natural energy to your life with \u003cstrong\u003eauthentic healing crystals\u003c\/strong\u003e — while our limited-time discounts last.\u003c\/p\u003e\n\u003cp\u003e\u003cstrong\u003e*Discount automatically applied at checkout.\u003c\/strong\u003e\u003c\/p\u003e","published_at":"2025-12-02T01:26:17-05:00","sort_order":"alpha-asc","template_suffix":"","disjunctive":true,"rules":[{"column":"tag","relation":"equals","condition":"spheres"},{"column":"tag","relation":"equals","condition":"Towers"}],"published_scope":"global","image":{"created_at":"2026-01-01T01:32:34-05:00","alt":"","width":960,"height":960,"src":"\/\/crystaldestiny.com\/cdn\/shop\/collections\/3E8C2969-1B86-4ACE-B349-98E9D8768424.jpg?v=1767249154"}},{"id":310483058859,"handle":"crystal-stands-display-holders","title":"Crystal Stands \u0026 Display Holders for Minerals","updated_at":"2026-01-05T07:14:22-05:00","body_html":"\u003cp\u003eCrystals deserve more than just a shelf — they deserve a place where beauty and energy can truly shine. Our \u003cstrong\u003eCrystal Stands \u0026amp; Display Holders\u003c\/strong\u003e collection is designed to help you display your favorite stones, minerals, and specimens with both style and intention.\u003c\/p\u003e\n\u003cp\u003eWhether you're showcasing a single standout tower, arranging spheres on your altar, or displaying delicate mineral specimens, a crystal stand not only enhances the look of your collection but also helps amplify its presence in your space.\u003c\/p\u003e\n\u003ch2\u003eWhy Use a Crystal Stand?\u003c\/h2\u003e\n\u003cp\u003eA crystal stand allows you to elevate the energy of your crystals, making them the focal point of your space. Many stones and minerals are also prone to scratches, and some shapes are prone to rolling or falling over, but a stand allows you to protect these delicate minerals and preserve their lifelong beauty. Using a mineral display holder also allows you to add a polished and intentional aesthetic to your altar, desk, or display shelf. \u003c\/p\u003e\n\u003ch2\u003eTypes of Crystal Stands\/Displays\u003c\/h2\u003e\n\u003cul\u003e\n\u003cli\u003eMetal Stands: Minimalist designs for spheres, towers, or clusters.\u003c\/li\u003e\n\u003cli\u003eWooden Bases: Natural, grounding options to complement earthy energy.\u003c\/li\u003e\n\u003cli\u003eSpecimen Holders: Perfect for minerals, valuable collectibles, and unique finds.\u003c\/li\u003e\n\u003c\/ul\u003e\n\u003cp\u003eWhether you're a seasoned collector or just starting your crystal journey, the right stand can transform your space — helping you honor the beauty, purpose, and energy of each stone.\u003c\/p\u003e","published_at":"2024-11-27T13:51:40-05:00","sort_order":"created-desc","template_suffix":"","disjunctive":true,"rules":[{"column":"tag","relation":"equals","condition":"Stands"}],"published_scope":"global"},{"id":297596059819,"handle":"all","title":"All Crystals \u0026 Jewelry","updated_at":"2026-01-07T23:43:11-05:00","body_html":"\u003cp data-start=\"149\" data-end=\"494\"\u003e✨ \u003cstrong data-start=\"151\" data-end=\"181\"\u003eWelcome to Crystal Destiny\u003c\/strong\u003e ✨\u003cbr data-start=\"183\" data-end=\"186\"\u003eStep into a world where beauty, energy, and artistry unite. Our collection is a treasure trove of exquisite crystals, from the raw, untamed elegance of natural formations to the polished brilliance of expertly crafted pieces. Each crystal is a masterpiece, carrying its own unique story and timeless charm.\u003c\/p\u003e\n\u003cp data-start=\"496\" data-end=\"831\"\u003eWhether you’re drawn to the calming presence of Amethyst, the vibrant energy of Citrine, or the grounding strength of Jasper, our crystals invite you to connect with nature’s finest wonders. Perfect for enhancing your space, supporting your spiritual journey, or gifting with intention, every piece resonates with beauty and meaning.\u003c\/p\u003e\n\u003cp data-start=\"833\" data-end=\"1000\"\u003eElevate your surroundings, embrace the mystique, and explore the enchanting world of crystals at \u003cstrong data-start=\"930\" data-end=\"949\"\u003eCrystal Destiny\u003c\/strong\u003e—where every crystal is waiting to be discovered.\u003c\/p\u003e","published_at":"2023-11-10T13:55:31-05:00","sort_order":"created-desc","template_suffix":"","disjunctive":false,"rules":[{"column":"type","relation":"not_equals","condition":"asdf"}],"published_scope":"global"},{"id":298983391403,"handle":"january-crystal-sale","title":"January Sale | 25% Off Crystal Towers \u0026 Spheres","updated_at":"2026-01-06T23:24:37-05:00","body_html":"\u003cp\u003eShop our \u003cstrong\u003eJanuary Crystal Sale\u003c\/strong\u003e, where you can shop a wide selection of healing crystals at discounted prices. Explore \u003cstrong\u003eCrystal Towers, \u0026amp; Crystal Spheres\u003c\/strong\u003e — all carefully curated and crafted to support meditation, energy balancing, and spiritual wellness. Whether you're looking to enhance your home decor, boost your daily energy, or find the perfect gift, our \u003cstrong\u003ecrystals for healing and manifestation\u003c\/strong\u003e offer both beauty and metaphysical benefits.\u003c\/p\u003e\n\u003cp\u003eThis January, our sale features \u003cstrong\u003ediscounted crystal towers and spheres\u003c\/strong\u003e, from \u003cstrong\u003enatural quartz \u003c\/strong\u003eand \u003cstrong\u003eamethyst \u003c\/strong\u003eto \u003cstrong\u003ebumblebee jasper \u003c\/strong\u003eand \u003cstrong\u003ecarnelian\u003c\/strong\u003e, so there's always something fresh to discover. Shop with confidence knowing you're getting high-quality crystals with \u003cstrong\u003efree shipping options\u003c\/strong\u003e and a trusted experience.\u003c\/p\u003e\n\u003cp\u003e\u003cstrong\u003eTake advantage of the January Crystal Sale today\u003c\/strong\u003e and add powerful, natural energy to your life with \u003cstrong\u003eauthentic healing crystals\u003c\/strong\u003e — while our limited-time discounts last.\u003c\/p\u003e\n\u003cp\u003e\u003cstrong\u003e*Discount automatically applied at checkout.\u003c\/strong\u003e\u003c\/p\u003e","published_at":"2026-01-01T00:07:17-05:00","sort_order":"alpha-asc","template_suffix":"monthly-collection","disjunctive":true,"rules":[{"column":"tag","relation":"equals","condition":"Spheres"},{"column":"tag","relation":"equals","condition":"Towers"}],"published_scope":"global","image":{"created_at":"2026-01-01T01:29:59-05:00","alt":"","width":960,"height":960,"src":"\/\/crystaldestiny.com\/cdn\/shop\/collections\/1464163B-22B1-4D62-BEC5-CEC9AECB670B.jpg?v=1767248999"}}]}
[{"alt":"Driftwood Crystal Sphere Display Stand (2pcs)-Stands-Ali-NO17 15-17cm-For Spheres 30-60mm-Crystal Destiny","id":31835993505963,"position":1,"preview_image":{"aspect_ratio":1.0,"height":800,"width":800,"src":"\/\/crystaldestiny.com\/cdn\/shop\/files\/Driftwood-Crystal-Sphere-Display-Stand-2pcs-Stands-NO17-15-17cm-For-Spheres-30-60mm.webp?v=1765429855"},"aspect_ratio":1.0,"height":800,"media_type":"image","src":"\/\/crystaldestiny.com\/cdn\/shop\/files\/Driftwood-Crystal-Sphere-Display-Stand-2pcs-Stands-NO17-15-17cm-For-Spheres-30-60mm.webp?v=1765429855","width":800},{"alt":"Driftwood Crystal Sphere Display Stand (2pcs)-Stands-Ali-NO8 13-14cm-For Spheres 30-60mm-Crystal Destiny","id":31835993866411,"position":2,"preview_image":{"aspect_ratio":1.0,"height":800,"width":800,"src":"\/\/crystaldestiny.com\/cdn\/shop\/files\/Driftwood-Crystal-Sphere-Display-Stand-2pcs-Stands-NO8-13-14cm-For-Spheres-30-60mm-2.webp?v=1765429856"},"aspect_ratio":1.0,"height":800,"media_type":"image","src":"\/\/crystaldestiny.com\/cdn\/shop\/files\/Driftwood-Crystal-Sphere-Display-Stand-2pcs-Stands-NO8-13-14cm-For-Spheres-30-60mm-2.webp?v=1765429856","width":800},{"alt":"Driftwood Crystal Sphere Display Stand (2pcs)-Stands-Ali-NO13 12-13cm-For Spheres 30-60mm-Crystal Destiny","id":31835993571499,"position":3,"preview_image":{"aspect_ratio":1.0,"height":800,"width":800,"src":"\/\/crystaldestiny.com\/cdn\/shop\/files\/Driftwood-Crystal-Sphere-Display-Stand-2pcs-Stands-NO13-12-13cm-For-Spheres-30-60mm-3.webp?v=1765429858"},"aspect_ratio":1.0,"height":800,"media_type":"image","src":"\/\/crystaldestiny.com\/cdn\/shop\/files\/Driftwood-Crystal-Sphere-Display-Stand-2pcs-Stands-NO13-12-13cm-For-Spheres-30-60mm-3.webp?v=1765429858","width":800},{"alt":"Driftwood Crystal Sphere Display Stand (2pcs)-Stands-Ali-NO12 12cm-For Spheres 30-60mm-Crystal Destiny","id":31835993637035,"position":4,"preview_image":{"aspect_ratio":1.0,"height":800,"width":800,"src":"\/\/crystaldestiny.com\/cdn\/shop\/files\/Driftwood-Crystal-Sphere-Display-Stand-2pcs-Stands-NO12-12cm-For-Spheres-30-60mm-4.webp?v=1765429859"},"aspect_ratio":1.0,"height":800,"media_type":"image","src":"\/\/crystaldestiny.com\/cdn\/shop\/files\/Driftwood-Crystal-Sphere-Display-Stand-2pcs-Stands-NO12-12cm-For-Spheres-30-60mm-4.webp?v=1765429859","width":800},{"alt":"Driftwood Crystal Sphere Display Stand (2pcs)-Stands-Ali-NO11 11-12cm-For Spheres 30-60mm-Crystal Destiny","id":31835993702571,"position":5,"preview_image":{"aspect_ratio":1.0,"height":800,"width":800,"src":"\/\/crystaldestiny.com\/cdn\/shop\/files\/Driftwood-Crystal-Sphere-Display-Stand-2pcs-Stands-NO11-11-12cm-For-Spheres-30-60mm-5.webp?v=1765429861"},"aspect_ratio":1.0,"height":800,"media_type":"image","src":"\/\/crystaldestiny.com\/cdn\/shop\/files\/Driftwood-Crystal-Sphere-Display-Stand-2pcs-Stands-NO11-11-12cm-For-Spheres-30-60mm-5.webp?v=1765429861","width":800},{"alt":"Driftwood Crystal Sphere Display Stand (2pcs)-Stands-Ali-NO10 10-12cm-For Spheres 30-60mm-Crystal Destiny","id":31835993768107,"position":6,"preview_image":{"aspect_ratio":1.0,"height":800,"width":800,"src":"\/\/crystaldestiny.com\/cdn\/shop\/files\/Driftwood-Crystal-Sphere-Display-Stand-2pcs-Stands-NO10-10-12cm-For-Spheres-30-60mm-6.webp?v=1765429862"},"aspect_ratio":1.0,"height":800,"media_type":"image","src":"\/\/crystaldestiny.com\/cdn\/shop\/files\/Driftwood-Crystal-Sphere-Display-Stand-2pcs-Stands-NO10-10-12cm-For-Spheres-30-60mm-6.webp?v=1765429862","width":800},{"alt":"Driftwood Crystal Sphere Display Stand (2pcs)-Stands-Ali-NO9 11-13cm-For Spheres 30-60mm-Crystal Destiny","id":31835993800875,"position":7,"preview_image":{"aspect_ratio":1.0,"height":800,"width":800,"src":"\/\/crystaldestiny.com\/cdn\/shop\/files\/Driftwood-Crystal-Sphere-Display-Stand-2pcs-Stands-NO9-11-13cm-For-Spheres-30-60mm-7.webp?v=1765429863"},"aspect_ratio":1.0,"height":800,"media_type":"image","src":"\/\/crystaldestiny.com\/cdn\/shop\/files\/Driftwood-Crystal-Sphere-Display-Stand-2pcs-Stands-NO9-11-13cm-For-Spheres-30-60mm-7.webp?v=1765429863","width":800},{"alt":"Driftwood Crystal Sphere Display Stand (2pcs)-Stands-Ali-NO15 10-12cm-For Spheres 30-60mm-Crystal Destiny","id":31835993931947,"position":8,"preview_image":{"aspect_ratio":1.0,"height":800,"width":800,"src":"\/\/crystaldestiny.com\/cdn\/shop\/files\/Driftwood-Crystal-Sphere-Display-Stand-2pcs-Stands-NO15-10-12cm-For-Spheres-30-60mm-8.webp?v=1765429865"},"aspect_ratio":1.0,"height":800,"media_type":"image","src":"\/\/crystaldestiny.com\/cdn\/shop\/files\/Driftwood-Crystal-Sphere-Display-Stand-2pcs-Stands-NO15-10-12cm-For-Spheres-30-60mm-8.webp?v=1765429865","width":800},{"alt":"Driftwood Crystal Sphere Display Stand (2pcs)-Stands-Ali-NO14 10-13cm-For Spheres 30-60mm-Crystal Destiny","id":31835993997483,"position":9,"preview_image":{"aspect_ratio":1.0,"height":800,"width":800,"src":"\/\/crystaldestiny.com\/cdn\/shop\/files\/Driftwood-Crystal-Sphere-Display-Stand-2pcs-Stands-NO14-10-13cm-For-Spheres-30-60mm-9.webp?v=1765429866"},"aspect_ratio":1.0,"height":800,"media_type":"image","src":"\/\/crystaldestiny.com\/cdn\/shop\/files\/Driftwood-Crystal-Sphere-Display-Stand-2pcs-Stands-NO14-10-13cm-For-Spheres-30-60mm-9.webp?v=1765429866","width":800}]
{"item":{"id":8440060575915,"title":"Esfera de cuarzo ferruginoso \"Sanador Dorado\"","handle":"ferruginous-golden-healer-quartz-spheres-75-77mm-cd-10113","description":"\u003cp\u003e Esta esfera de cuarzo ferruginoso \"Golden Healer\" exhibe distintivas inclusiones de óxido de hierro que le confieren su característico tono dorado. De gran importancia mineralógica, este ejemplar combina las propiedades de amplificación del cuarzo con los atributos energéticos de los compuestos de hierro. Los coleccionistas valoran estas esferas por su perfecta forma geométrica y sus variaciones naturales de color. Cada pieza es única y presenta patrones individuales de inclusiones ferruginosas dentro de la matriz cristalina.\u003c\/p\u003e\n\n \u003cp\u003eEste producto es exactamente como se muestra en la imagen, único en su tipo.\u003c\/p\u003e","published_at":"2025-05-29T15:23:35-04:00","created_at":"2025-05-29T15:23:35-04:00","vendor":"Crystal Destiny","type":"Esferas","tags":["crystal","polished","spheres"],"price":15599,"price_min":15599,"price_max":15999,"available":true,"price_varies":true,"compare_at_price":null,"compare_at_price_min":0,"compare_at_price_max":0,"compare_at_price_varies":false,"variants":[{"id":45261239550123,"title":"Cuarzo sanador dorado \/ 604 g - 3,00\"","option1":"Cuarzo sanador dorado","option2":"604 g - 3,00\"","option3":null,"sku":"CD-10113","requires_shipping":true,"taxable":true,"featured_image":{"id":39567320678571,"product_id":8440060575915,"position":1,"created_at":"2025-05-29T15:13:40-04:00","updated_at":"2025-12-11T00:04:16-05:00","alt":"Ferruginous \"Golden Healer\" Quartz Spheres 75-77mm-Spheres-Crystal Destiny-Golden Healer Quartz-604g - 3.00\"-Crystal Destiny","width":1776,"height":1776,"src":"\/\/crystaldestiny.com\/cdn\/shop\/files\/Ferruginous-Golden-Healer-Quartz-Spheres-75-77mm-Spheres-Golden-Healer-Quartz-604g-3_00.jpg?v=1765429456","variant_ids":[45261239550123]},"available":true,"name":"Esfera de cuarzo ferruginoso \"Sanador Dorado\" - Cuarzo sanador dorado \/ 604 g - 3,00\"","public_title":"Cuarzo sanador dorado \/ 604 g - 3,00\"","options":["Cuarzo sanador dorado","604 g - 3,00\""],"price":15599,"weight":0,"compare_at_price":null,"inventory_management":"shopify","barcode":"","featured_media":{"alt":"Ferruginous \"Golden Healer\" Quartz Spheres 75-77mm-Spheres-Crystal Destiny-Golden Healer Quartz-604g - 3.00\"-Crystal Destiny","id":31176005779627,"position":1,"preview_image":{"aspect_ratio":1.0,"height":1776,"width":1776,"src":"\/\/crystaldestiny.com\/cdn\/shop\/files\/Ferruginous-Golden-Healer-Quartz-Spheres-75-77mm-Spheres-Golden-Healer-Quartz-604g-3_00.jpg?v=1765429456"}},"requires_selling_plan":false,"selling_plan_allocations":[]},{"id":45261239582891,"title":"Cuarzo sanador dorado \/ 682 g - 3,10\"","option1":"Cuarzo sanador dorado","option2":"682 g - 3,10\"","option3":null,"sku":"CD-10112","requires_shipping":true,"taxable":true,"featured_image":{"id":39567320907947,"product_id":8440060575915,"position":2,"created_at":"2025-05-29T15:13:52-04:00","updated_at":"2025-12-11T00:04:18-05:00","alt":"Ferruginous \"Golden Healer\" Quartz Spheres 75-77mm-Spheres-Crystal Destiny-Golden Healer Quartz-682g - 3.10\"-Crystal Destiny","width":2006,"height":2006,"src":"\/\/crystaldestiny.com\/cdn\/shop\/files\/Ferruginous-Golden-Healer-Quartz-Spheres-75-77mm-Spheres-Golden-Healer-Quartz-682g-3_10-2.jpg?v=1765429458","variant_ids":[45261239582891]},"available":true,"name":"Esfera de cuarzo ferruginoso \"Sanador Dorado\" - Cuarzo sanador dorado \/ 682 g - 3,10\"","public_title":"Cuarzo sanador dorado \/ 682 g - 3,10\"","options":["Cuarzo sanador dorado","682 g - 3,10\""],"price":15999,"weight":0,"compare_at_price":null,"inventory_management":"shopify","barcode":"","featured_media":{"alt":"Ferruginous \"Golden Healer\" Quartz Spheres 75-77mm-Spheres-Crystal Destiny-Golden Healer Quartz-682g - 3.10\"-Crystal Destiny","id":31176005845163,"position":2,"preview_image":{"aspect_ratio":1.0,"height":2006,"width":2006,"src":"\/\/crystaldestiny.com\/cdn\/shop\/files\/Ferruginous-Golden-Healer-Quartz-Spheres-75-77mm-Spheres-Golden-Healer-Quartz-682g-3_10-2.jpg?v=1765429458"}},"requires_selling_plan":false,"selling_plan_allocations":[]}],"images":["\/\/crystaldestiny.com\/cdn\/shop\/files\/Ferruginous-Golden-Healer-Quartz-Spheres-75-77mm-Spheres-Golden-Healer-Quartz-604g-3_00.jpg?v=1765429456","\/\/crystaldestiny.com\/cdn\/shop\/files\/Ferruginous-Golden-Healer-Quartz-Spheres-75-77mm-Spheres-Golden-Healer-Quartz-682g-3_10-2.jpg?v=1765429458"],"featured_image":"\/\/crystaldestiny.com\/cdn\/shop\/files\/Ferruginous-Golden-Healer-Quartz-Spheres-75-77mm-Spheres-Golden-Healer-Quartz-604g-3_00.jpg?v=1765429456","options":["Material","Tamaño"],"media":[{"alt":"Ferruginous \"Golden Healer\" Quartz Spheres 75-77mm-Spheres-Crystal Destiny-Golden Healer Quartz-604g - 3.00\"-Crystal Destiny","id":31176005779627,"position":1,"preview_image":{"aspect_ratio":1.0,"height":1776,"width":1776,"src":"\/\/crystaldestiny.com\/cdn\/shop\/files\/Ferruginous-Golden-Healer-Quartz-Spheres-75-77mm-Spheres-Golden-Healer-Quartz-604g-3_00.jpg?v=1765429456"},"aspect_ratio":1.0,"height":1776,"media_type":"image","src":"\/\/crystaldestiny.com\/cdn\/shop\/files\/Ferruginous-Golden-Healer-Quartz-Spheres-75-77mm-Spheres-Golden-Healer-Quartz-604g-3_00.jpg?v=1765429456","width":1776},{"alt":"Ferruginous \"Golden Healer\" Quartz Spheres 75-77mm-Spheres-Crystal Destiny-Golden Healer Quartz-682g - 3.10\"-Crystal Destiny","id":31176005845163,"position":2,"preview_image":{"aspect_ratio":1.0,"height":2006,"width":2006,"src":"\/\/crystaldestiny.com\/cdn\/shop\/files\/Ferruginous-Golden-Healer-Quartz-Spheres-75-77mm-Spheres-Golden-Healer-Quartz-682g-3_10-2.jpg?v=1765429458"},"aspect_ratio":1.0,"height":2006,"media_type":"image","src":"\/\/crystaldestiny.com\/cdn\/shop\/files\/Ferruginous-Golden-Healer-Quartz-Spheres-75-77mm-Spheres-Golden-Healer-Quartz-682g-3_10-2.jpg?v=1765429458","width":2006}],"requires_selling_plan":false,"selling_plan_groups":[],"content":"\u003cp\u003e Esta esfera de cuarzo ferruginoso \"Golden Healer\" exhibe distintivas inclusiones de óxido de hierro que le confieren su característico tono dorado. De gran importancia mineralógica, este ejemplar combina las propiedades de amplificación del cuarzo con los atributos energéticos de los compuestos de hierro. Los coleccionistas valoran estas esferas por su perfecta forma geométrica y sus variaciones naturales de color. Cada pieza es única y presenta patrones individuales de inclusiones ferruginosas dentro de la matriz cristalina.\u003c\/p\u003e\n\n \u003cp\u003eEste producto es exactamente como se muestra en la imagen, único en su tipo.\u003c\/p\u003e"},"options":[{"name":"Material","position":1,"values":["Cuarzo sanador dorado"]},{"name":"Tamaño","position":2,"values":["604 g - 3,00\"","682 g - 3,10\""]}],"custom_metafields":{"shipping_time":"En un plazo de 7 días"},"metafields":{"badge":"\u003cdiv style='display:none' class='jdgm-prev-badge' data-average-rating='0.00' data-number-of-reviews='0' data-number-of-questions='0'\u003e \u003cspan class='jdgm-prev-badge__stars' data-score='0.00' tabindex='0' aria-label='0.00 stars' role='button'\u003e \u003cspan class='jdgm-star jdgm--off'\u003e\u003c\/span\u003e\u003cspan class='jdgm-star jdgm--off'\u003e\u003c\/span\u003e\u003cspan class='jdgm-star jdgm--off'\u003e\u003c\/span\u003e\u003cspan class='jdgm-star jdgm--off'\u003e\u003c\/span\u003e\u003cspan class='jdgm-star jdgm--off'\u003e\u003c\/span\u003e \u003c\/span\u003e \u003cspan class='jdgm-prev-badge__text'\u003e No reviews \u003c\/span\u003e \u003c\/div\u003e","widget":"\u003cdiv class='jdgm-rev-widg' data-updated-at='2025-05-29T19:23:38Z' data-average-rating='0.00' data-number-of-reviews='0' data-number-of-questions='0'\u003e \u003cstyle class='jdgm-temp-hiding-style'\u003e.jdgm-rev-widg{ display: none }\u003c\/style\u003e \u003cdiv class='jdgm-rev-widg__header'\u003e \u003ch2 class='jdgm-rev-widg__title'\u003eCustomer Reviews\u003c\/h2\u003e \u003cdiv class='jdgm-rev-widg__summary'\u003e \u003cdiv class='jdgm-rev-widg__summary-stars' aria-label='Average rating is 0.00 stars' role='img'\u003e \u003cspan class='jdgm-star jdgm--off'\u003e\u003c\/span\u003e\u003cspan class='jdgm-star jdgm--off'\u003e\u003c\/span\u003e\u003cspan class='jdgm-star jdgm--off'\u003e\u003c\/span\u003e\u003cspan class='jdgm-star jdgm--off'\u003e\u003c\/span\u003e\u003cspan class='jdgm-star jdgm--off'\u003e\u003c\/span\u003e \u003c\/div\u003e \u003cdiv class='jdgm-rev-widg__summary-text'\u003eBe the first to write a review\u003c\/div\u003e \u003c\/div\u003e \u003ca style='display: none' href='#' class='jdgm-write-rev-link' role='button'\u003eWrite a review\u003c\/a\u003e \u003cdiv class='jdgm-histogram jdgm-temp-hidden'\u003e \u003cdiv class='jdgm-histogram__row' data-rating='5' data-frequency='0' data-percentage='0'\u003e \u003cdiv class='jdgm-histogram__star' role='button' aria-label=\"0% (0) reviews with 5 star rating\" tabindex='0' \u003e\u003cspan class='jdgm-star jdgm--on'\u003e\u003c\/span\u003e\u003cspan class='jdgm-star jdgm--on'\u003e\u003c\/span\u003e\u003cspan class='jdgm-star jdgm--on'\u003e\u003c\/span\u003e\u003cspan class='jdgm-star jdgm--on'\u003e\u003c\/span\u003e\u003cspan class='jdgm-star jdgm--on'\u003e\u003c\/span\u003e\u003c\/div\u003e \u003cdiv class='jdgm-histogram__bar'\u003e \u003cdiv class='jdgm-histogram__bar-content' style='width: 0%;'\u003e \u003c\/div\u003e \u003c\/div\u003e \u003cdiv class='jdgm-histogram__percentage'\u003e0%\u003c\/div\u003e \u003cdiv class='jdgm-histogram__frequency'\u003e(0)\u003c\/div\u003e \u003c\/div\u003e \u003cdiv class='jdgm-histogram__row' data-rating='4' data-frequency='0' data-percentage='0'\u003e \u003cdiv class='jdgm-histogram__star' role='button' aria-label=\"0% (0) reviews with 4 star rating\" tabindex='0' \u003e\u003cspan class='jdgm-star jdgm--on'\u003e\u003c\/span\u003e\u003cspan class='jdgm-star jdgm--on'\u003e\u003c\/span\u003e\u003cspan class='jdgm-star jdgm--on'\u003e\u003c\/span\u003e\u003cspan class='jdgm-star jdgm--on'\u003e\u003c\/span\u003e\u003cspan class='jdgm-star jdgm--off'\u003e\u003c\/span\u003e\u003c\/div\u003e \u003cdiv class='jdgm-histogram__bar'\u003e \u003cdiv class='jdgm-histogram__bar-content' style='width: 0%;'\u003e \u003c\/div\u003e \u003c\/div\u003e \u003cdiv class='jdgm-histogram__percentage'\u003e0%\u003c\/div\u003e \u003cdiv class='jdgm-histogram__frequency'\u003e(0)\u003c\/div\u003e \u003c\/div\u003e \u003cdiv class='jdgm-histogram__row' data-rating='3' data-frequency='0' data-percentage='0'\u003e \u003cdiv class='jdgm-histogram__star' role='button' aria-label=\"0% (0) reviews with 3 star rating\" tabindex='0' \u003e\u003cspan class='jdgm-star jdgm--on'\u003e\u003c\/span\u003e\u003cspan class='jdgm-star jdgm--on'\u003e\u003c\/span\u003e\u003cspan class='jdgm-star jdgm--on'\u003e\u003c\/span\u003e\u003cspan class='jdgm-star jdgm--off'\u003e\u003c\/span\u003e\u003cspan class='jdgm-star jdgm--off'\u003e\u003c\/span\u003e\u003c\/div\u003e \u003cdiv class='jdgm-histogram__bar'\u003e \u003cdiv class='jdgm-histogram__bar-content' style='width: 0%;'\u003e \u003c\/div\u003e \u003c\/div\u003e \u003cdiv class='jdgm-histogram__percentage'\u003e0%\u003c\/div\u003e \u003cdiv class='jdgm-histogram__frequency'\u003e(0)\u003c\/div\u003e \u003c\/div\u003e \u003cdiv class='jdgm-histogram__row' data-rating='2' data-frequency='0' data-percentage='0'\u003e \u003cdiv class='jdgm-histogram__star' role='button' aria-label=\"0% (0) reviews with 2 star rating\" tabindex='0' \u003e\u003cspan class='jdgm-star jdgm--on'\u003e\u003c\/span\u003e\u003cspan class='jdgm-star jdgm--on'\u003e\u003c\/span\u003e\u003cspan class='jdgm-star jdgm--off'\u003e\u003c\/span\u003e\u003cspan class='jdgm-star jdgm--off'\u003e\u003c\/span\u003e\u003cspan class='jdgm-star jdgm--off'\u003e\u003c\/span\u003e\u003c\/div\u003e \u003cdiv class='jdgm-histogram__bar'\u003e \u003cdiv class='jdgm-histogram__bar-content' style='width: 0%;'\u003e \u003c\/div\u003e \u003c\/div\u003e \u003cdiv class='jdgm-histogram__percentage'\u003e0%\u003c\/div\u003e \u003cdiv class='jdgm-histogram__frequency'\u003e(0)\u003c\/div\u003e \u003c\/div\u003e \u003cdiv class='jdgm-histogram__row' data-rating='1' data-frequency='0' data-percentage='0'\u003e \u003cdiv class='jdgm-histogram__star' role='button' aria-label=\"0% (0) reviews with 1 star rating\" tabindex='0' \u003e\u003cspan class='jdgm-star jdgm--on'\u003e\u003c\/span\u003e\u003cspan class='jdgm-star jdgm--off'\u003e\u003c\/span\u003e\u003cspan class='jdgm-star jdgm--off'\u003e\u003c\/span\u003e\u003cspan class='jdgm-star jdgm--off'\u003e\u003c\/span\u003e\u003cspan class='jdgm-star jdgm--off'\u003e\u003c\/span\u003e\u003c\/div\u003e \u003cdiv class='jdgm-histogram__bar'\u003e \u003cdiv class='jdgm-histogram__bar-content' style='width: 0%;'\u003e \u003c\/div\u003e \u003c\/div\u003e \u003cdiv class='jdgm-histogram__percentage'\u003e0%\u003c\/div\u003e \u003cdiv class='jdgm-histogram__frequency'\u003e(0)\u003c\/div\u003e \u003c\/div\u003e \u003cdiv class='jdgm-histogram__row jdgm-histogram__clear-filter' data-rating=null tabindex='0'\u003e\u003c\/div\u003e \u003c\/div\u003e \u003cdiv class='jdgm-rev-widg__sort-wrapper'\u003e\u003c\/div\u003e \u003c\/div\u003e \u003cdiv class='jdgm-rev-widg__body'\u003e \u003cdiv class='jdgm-rev-widg__reviews'\u003e\u003c\/div\u003e \u003cdiv class='jdgm-paginate' data-per-page='5' data-url='https:\/\/api.judge.me\/reviews\/reviews_for_widget' style=\"display: none;\"\u003e\u003c\/div\u003e \u003c\/div\u003e \u003cdiv class='jdgm-rev-widg__paginate-spinner-wrapper'\u003e \u003cdiv class='jdgm-spinner'\u003e\u003c\/div\u003e \u003c\/div\u003e \u003c\/div\u003e"},"collections":[{"id":294880051371,"handle":"crystals","title":"Crystals","updated_at":"2026-01-07T23:43:11-05:00","body_html":"\u003cp data-start=\"159\" data-end=\"687\"\u003e✨ \u003cstrong data-start=\"161\" data-end=\"216\"\u003eDiscover the Magic of Crystals with Crystal Destiny\u003c\/strong\u003e ✨\u003cbr data-start=\"218\" data-end=\"221\"\u003eCrystals have been treasured for centuries—not only for their natural beauty but also for their powerful healing energies. Beyond their visual allure, they bring balance, harmony, and positive energy into any space. Whether used for home décor, meditation, or simply to elevate the energy of your surroundings, crystals create a sanctuary of peace, relaxation, and well-being. Each piece is a unique gift from the Earth—visually stunning and spiritually uplifting.\u003c\/p\u003e\n\u003cp data-start=\"689\" data-end=\"1011\"\u003eAt \u003cstrong data-start=\"692\" data-end=\"711\"\u003eCrystal Destiny\u003c\/strong\u003e, our signature collection showcases a curated selection of exquisite crystals, from radiant Quartz to soothing Amethyst. Every stone is carefully sourced for its elegance and metaphysical resonance, making them perfect for enhancing your home, uplifting your spirit, or gifting to someone special.\u003c\/p\u003e\n\u003cp data-start=\"1013\" data-end=\"1206\"\u003eExperience the timeless sophistication of crystalline wonders. Explore the \u003cstrong data-start=\"1088\" data-end=\"1118\"\u003eCrystal Destiny Collection\u003c\/strong\u003e today and bring the transformative beauty of these treasures into your everyday life.\u003c\/p\u003e","published_at":"2023-06-05T11:24:02-04:00","sort_order":"created-desc","template_suffix":"","disjunctive":false,"rules":[{"column":"tag","relation":"equals","condition":"crystal"},{"column":"type","relation":"not_contains","condition":"925 Sterling Silver"},{"column":"type","relation":"not_contains","condition":"Wire Wraps"}],"published_scope":"global"},{"id":319455953067,"handle":"solar-plexus-chakra-crystals","title":"Solar Plexus Chakra Crystals","updated_at":"2026-01-06T11:12:19-05:00","body_html":"\u003cp data-start=\"142\" data-end=\"577\"\u003e✨ \u003cstrong data-start=\"144\" data-end=\"176\"\u003eSolar Plexus Chakra Crystals\u003c\/strong\u003e ✨\u003cbr data-start=\"178\" data-end=\"181\"\u003eHarness the power of your personal will and confidence with our \u003cstrong data-start=\"245\" data-end=\"277\"\u003eSolar Plexus Chakra Crystals\u003c\/strong\u003e. Focused on the third chakra, located at the center of your torso, these stones help balance self-esteem, personal power, and motivation. Perfect for meditation, energy work, or as wearable reminders of inner strength, each crystal resonates with vibrant energy designed to ignite your inner fire.\u003c\/p\u003e\n\u003cp data-start=\"579\" data-end=\"960\"\u003eOur curated selection includes radiant yellow and golden stones such as Citrine, Yellow Jasper, and Tiger’s Eye—each chosen for their ability to stimulate vitality, courage, and focus. Whether you place them in your sacred space, carry them with you, or incorporate them into jewelry, Solar Plexus Chakra Crystals invite clarity, confidence, and empowerment into your daily life.\u003c\/p\u003e\n\u003cp data-start=\"962\" data-end=\"1109\"\u003eElevate your energy, amplify your inner strength, and embrace the transformative power of your Solar Plexus with these powerful, luminous stones.\u003c\/p\u003e","published_at":"2025-07-17T18:18:13-04:00","sort_order":"best-selling","template_suffix":"","disjunctive":false,"rules":[{"column":"variant_metafield_definition","relation":"equals","condition":"Solar Plexus"}],"published_scope":"global","image":{"created_at":"2025-07-17T19:08:38-04:00","alt":null,"width":1080,"height":1080,"src":"\/\/crystaldestiny.com\/cdn\/shop\/collections\/Solar_Plexus_Chakra_Collection.jpg?v=1762474929"}},{"id":294880116907,"handle":"polished","title":"Polished Crystals","updated_at":"2026-01-07T23:43:11-05:00","body_html":"\u003cp data-start=\"199\" data-end=\"598\"\u003e✨ \u003cstrong data-start=\"201\" data-end=\"248\"\u003eCrystal Destiny Polished Crystal Collection\u003c\/strong\u003e ✨\u003cbr data-start=\"250\" data-end=\"253\"\u003eIndulge in the brilliance of crystals refined to perfection. Our \u003cstrong data-start=\"318\" data-end=\"341\"\u003ePolished Collection\u003c\/strong\u003e showcases gemstones meticulously shaped and smoothed to reveal their natural radiance and timeless beauty. From the shimmering glow of Quartz to the deep allure of Obsidian, each polished piece is a testament to nature’s artistry and human craftsmanship.\u003c\/p\u003e\n\u003cp data-start=\"600\" data-end=\"862\"\u003ePerfect as statement décor, meaningful gifts, or companions on your spiritual journey, polished crystals bring sophistication and elevated energy into any space. Their radiant surfaces reflect not only light but also the transformative power of crystal energy.\u003c\/p\u003e\n\u003cp data-start=\"864\" data-end=\"1022\"\u003eDiscover the elegance of refinement with Crystal Destiny’s Polished Crystal Collection—where every facet shines with intention, beauty, and timeless allure.\u003c\/p\u003e","published_at":"2023-06-05T11:30:44-04:00","sort_order":"created-desc","template_suffix":"","disjunctive":false,"rules":[{"column":"tag","relation":"equals","condition":"polished"}],"published_scope":"global"},{"id":295698202795,"handle":"spheres","title":"Crystal Spheres","updated_at":"2026-01-06T23:24:35-05:00","body_html":"\u003cp data-start=\"106\" data-end=\"370\"\u003e✨ \u003cstrong data-start=\"108\" data-end=\"138\"\u003eCrystal Spheres Collection\u003c\/strong\u003e ✨\u003cbr data-start=\"140\" data-end=\"143\"\u003eBring harmony, balance, and elegance into your space with our \u003cstrong data-start=\"205\" data-end=\"235\"\u003eCrystal Spheres Collection\u003c\/strong\u003e. Each sphere is meticulously crafted to showcase the natural beauty and energy of crystals, from radiant Quartz to calming Amethyst.\u003c\/p\u003e\n\u003cp data-start=\"372\" data-end=\"658\"\u003ePerfect for meditation, energy work, or as striking décor, crystal spheres radiate energy in all directions, promoting clarity, focus, and a sense of calm. Their smooth, polished surfaces highlight the stones’ natural patterns and colors, making each sphere a captivating centerpiece.\u003c\/p\u003e\n\u003cp data-start=\"660\" data-end=\"809\"\u003eElevate your space and embrace the transformative power of crystals with the \u003cstrong data-start=\"737\" data-end=\"767\"\u003eCrystal Spheres Collection\u003c\/strong\u003e—where beauty, energy, and harmony meet.\u003c\/p\u003e","published_at":"2023-07-28T14:20:46-04:00","sort_order":"created-desc","template_suffix":"","disjunctive":true,"rules":[{"column":"tag","relation":"equals","condition":"spheres"},{"column":"tag","relation":"equals","condition":"eggs"}],"published_scope":"global"},{"id":293659312299,"handle":"best-sellers","title":"Best Sellers","updated_at":"2026-01-07T23:43:11-05:00","body_html":"\u003cp data-start=\"155\" data-end=\"510\"\u003eDiscover the pieces our community loves most. Our Best Sellers Collection brings together handpicked crystals and jewelry that embody timeless elegance, spiritual resonance, and everyday sophistication. Each item has earned its place as a customer favorite—celebrated for both its beauty and its meaningful energy.\u003c\/p\u003e\n\u003cp data-start=\"512\" data-end=\"802\"\u003eFrom stunning statement pieces to versatile daily companions, these treasures are curated to elevate your space, uplift your spirit, and reflect refined taste. Indulge in what’s most cherished and let our best sellers guide you toward the perfect blend of style and transformative energy.\u003c\/p\u003e\n\u003cp data-start=\"804\" data-end=\"932\"\u003eExplore the Best Sellers Collection today—where elegance meets intention, and every piece tells a story of beauty and balance.\u003c\/p\u003e","published_at":"2023-03-15T16:04:51-04:00","sort_order":"best-selling","template_suffix":"","disjunctive":false,"rules":[{"column":"variant_price","relation":"greater_than","condition":"0"},{"column":"variant_inventory","relation":"greater_than","condition":"0"},{"column":"type","relation":"not_equals","condition":"Shipping Protection"}],"published_scope":"global"},{"id":321370390699,"handle":"monthly-crystal-sale","title":"Monthly Crystal Sale | Spheres \u0026 Towers","updated_at":"2026-01-06T23:24:37-05:00","body_html":"\u003cp\u003eShop our \u003cstrong\u003eMonthly Crystal Sale\u003c\/strong\u003e, where you can shop a wide selection of healing crystals at discounted prices. Explore \u003cstrong\u003ecrystal spheres and towers,\u003c\/strong\u003e— all carefully curated to support meditation, energy balancing, and spiritual wellness. Whether you're looking to enhance your home decor, boost your daily energy, or find the perfect gift, our \u003cstrong\u003ecrystals for healing and manifestation\u003c\/strong\u003e offer both beauty and metaphysical benefits.\u003c\/p\u003e\n\u003cp\u003eEach month, our sale features \u003cstrong\u003enew discounted collections\u003c\/strong\u003e, from \u003cstrong\u003enatural quartz and amethyst towers\u003c\/strong\u003e to \u003cstrong\u003ewire-wrapped pendants and polished stones\u003c\/strong\u003e, so there's always something fresh to discover. Shop with confidence knowing you're getting high-quality crystals with \u003cstrong\u003efree shipping options\u003c\/strong\u003e and a trusted experience.\u003c\/p\u003e\n\u003cp\u003e\u003cstrong\u003eTake advantage of the Monthly Crystal Sale today\u003c\/strong\u003e and add powerful, natural energy to your life with \u003cstrong\u003eauthentic healing crystals\u003c\/strong\u003e — while our limited-time discounts last.\u003c\/p\u003e\n\u003cp\u003e\u003cstrong\u003e*Discount automatically applied at checkout.\u003c\/strong\u003e\u003c\/p\u003e","published_at":"2025-12-02T01:26:17-05:00","sort_order":"alpha-asc","template_suffix":"","disjunctive":true,"rules":[{"column":"tag","relation":"equals","condition":"spheres"},{"column":"tag","relation":"equals","condition":"Towers"}],"published_scope":"global","image":{"created_at":"2026-01-01T01:32:34-05:00","alt":"","width":960,"height":960,"src":"\/\/crystaldestiny.com\/cdn\/shop\/collections\/3E8C2969-1B86-4ACE-B349-98E9D8768424.jpg?v=1767249154"}},{"id":297596059819,"handle":"all","title":"All Crystals \u0026 Jewelry","updated_at":"2026-01-07T23:43:11-05:00","body_html":"\u003cp data-start=\"149\" data-end=\"494\"\u003e✨ \u003cstrong data-start=\"151\" data-end=\"181\"\u003eWelcome to Crystal Destiny\u003c\/strong\u003e ✨\u003cbr data-start=\"183\" data-end=\"186\"\u003eStep into a world where beauty, energy, and artistry unite. Our collection is a treasure trove of exquisite crystals, from the raw, untamed elegance of natural formations to the polished brilliance of expertly crafted pieces. Each crystal is a masterpiece, carrying its own unique story and timeless charm.\u003c\/p\u003e\n\u003cp data-start=\"496\" data-end=\"831\"\u003eWhether you’re drawn to the calming presence of Amethyst, the vibrant energy of Citrine, or the grounding strength of Jasper, our crystals invite you to connect with nature’s finest wonders. Perfect for enhancing your space, supporting your spiritual journey, or gifting with intention, every piece resonates with beauty and meaning.\u003c\/p\u003e\n\u003cp data-start=\"833\" data-end=\"1000\"\u003eElevate your surroundings, embrace the mystique, and explore the enchanting world of crystals at \u003cstrong data-start=\"930\" data-end=\"949\"\u003eCrystal Destiny\u003c\/strong\u003e—where every crystal is waiting to be discovered.\u003c\/p\u003e","published_at":"2023-11-10T13:55:31-05:00","sort_order":"created-desc","template_suffix":"","disjunctive":false,"rules":[{"column":"type","relation":"not_equals","condition":"asdf"}],"published_scope":"global"},{"id":298983391403,"handle":"january-crystal-sale","title":"January Sale | 25% Off Crystal Towers \u0026 Spheres","updated_at":"2026-01-06T23:24:37-05:00","body_html":"\u003cp\u003eShop our \u003cstrong\u003eJanuary Crystal Sale\u003c\/strong\u003e, where you can shop a wide selection of healing crystals at discounted prices. Explore \u003cstrong\u003eCrystal Towers, \u0026amp; Crystal Spheres\u003c\/strong\u003e — all carefully curated and crafted to support meditation, energy balancing, and spiritual wellness. Whether you're looking to enhance your home decor, boost your daily energy, or find the perfect gift, our \u003cstrong\u003ecrystals for healing and manifestation\u003c\/strong\u003e offer both beauty and metaphysical benefits.\u003c\/p\u003e\n\u003cp\u003eThis January, our sale features \u003cstrong\u003ediscounted crystal towers and spheres\u003c\/strong\u003e, from \u003cstrong\u003enatural quartz \u003c\/strong\u003eand \u003cstrong\u003eamethyst \u003c\/strong\u003eto \u003cstrong\u003ebumblebee jasper \u003c\/strong\u003eand \u003cstrong\u003ecarnelian\u003c\/strong\u003e, so there's always something fresh to discover. Shop with confidence knowing you're getting high-quality crystals with \u003cstrong\u003efree shipping options\u003c\/strong\u003e and a trusted experience.\u003c\/p\u003e\n\u003cp\u003e\u003cstrong\u003eTake advantage of the January Crystal Sale today\u003c\/strong\u003e and add powerful, natural energy to your life with \u003cstrong\u003eauthentic healing crystals\u003c\/strong\u003e — while our limited-time discounts last.\u003c\/p\u003e\n\u003cp\u003e\u003cstrong\u003e*Discount automatically applied at checkout.\u003c\/strong\u003e\u003c\/p\u003e","published_at":"2026-01-01T00:07:17-05:00","sort_order":"alpha-asc","template_suffix":"monthly-collection","disjunctive":true,"rules":[{"column":"tag","relation":"equals","condition":"Spheres"},{"column":"tag","relation":"equals","condition":"Towers"}],"published_scope":"global","image":{"created_at":"2026-01-01T01:29:59-05:00","alt":"","width":960,"height":960,"src":"\/\/crystaldestiny.com\/cdn\/shop\/collections\/1464163B-22B1-4D62-BEC5-CEC9AECB670B.jpg?v=1767248999"}}]}
[{"alt":"Ferruginous \"Golden Healer\" Quartz Spheres 75-77mm-Spheres-Crystal Destiny-Golden Healer Quartz-604g - 3.00\"-Crystal Destiny","id":31176005779627,"position":1,"preview_image":{"aspect_ratio":1.0,"height":1776,"width":1776,"src":"\/\/crystaldestiny.com\/cdn\/shop\/files\/Ferruginous-Golden-Healer-Quartz-Spheres-75-77mm-Spheres-Golden-Healer-Quartz-604g-3_00.jpg?v=1765429456"},"aspect_ratio":1.0,"height":1776,"media_type":"image","src":"\/\/crystaldestiny.com\/cdn\/shop\/files\/Ferruginous-Golden-Healer-Quartz-Spheres-75-77mm-Spheres-Golden-Healer-Quartz-604g-3_00.jpg?v=1765429456","width":1776},{"alt":"Ferruginous \"Golden Healer\" Quartz Spheres 75-77mm-Spheres-Crystal Destiny-Golden Healer Quartz-682g - 3.10\"-Crystal Destiny","id":31176005845163,"position":2,"preview_image":{"aspect_ratio":1.0,"height":2006,"width":2006,"src":"\/\/crystaldestiny.com\/cdn\/shop\/files\/Ferruginous-Golden-Healer-Quartz-Spheres-75-77mm-Spheres-Golden-Healer-Quartz-682g-3_10-2.jpg?v=1765429458"},"aspect_ratio":1.0,"height":2006,"media_type":"image","src":"\/\/crystaldestiny.com\/cdn\/shop\/files\/Ferruginous-Golden-Healer-Quartz-Spheres-75-77mm-Spheres-Golden-Healer-Quartz-682g-3_10-2.jpg?v=1765429458","width":2006}]
{"item":{"id":8603309277355,"title":"Firework Jasper Crystal Spheres","handle":"firework-jasper-crystal-spheres-1005007175464802-fireworks-200-300g","description":"\u003cp data-start=\"167\" data-end=\"579\"\u003eThese Firework Jasper Crystal Spheres showcase vibrant, naturally patterned bursts that resemble cosmic fireworks frozen in stone. Each polished sphere is one of a kind, chosen at random, with swirling reds, creams, and earthy tones that create a stunning display from every angle. Their smooth finish and bold patterns make them perfect for home décor, meditation spaces, or gifting.\u003c\/p\u003e\n\u003cp data-start=\"581\" data-end=\"842\"\u003eFirework Jasper is known for grounding energy, emotional balance, and creative inspiration. Its stabilizing vibration supports focus and confidence, making these spheres ideal for spiritual practice or simply bringing a warm, energizing presence to your room.\u003c\/p\u003e\n\u003cp data-start=\"581\" data-end=\"842\"\u003eThis product is pulled at random by size.\u003c\/p\u003e","published_at":"2025-12-11T18:35:19-05:00","created_at":"2025-12-09T14:38:20-05:00","vendor":"Ali","type":"Spheres","tags":["adjusted-shipping","crystal","new-arrivals","polished","spheres"],"price":3499,"price_min":3499,"price_max":4499,"available":true,"price_varies":true,"compare_at_price":0,"compare_at_price_min":0,"compare_at_price_max":0,"compare_at_price_varies":false,"variants":[{"id":45941097824427,"title":"Fireworks Jasper \/ 200-300g","option1":"Fireworks Jasper","option2":"200-300g","option3":null,"sku":"1005007175464802-Fireworks-200-300g","requires_shipping":true,"taxable":true,"featured_image":{"id":40921465192619,"product_id":8603309277355,"position":5,"created_at":"2025-12-09T14:38:21-05:00","updated_at":"2025-12-12T00:07:25-05:00","alt":"Firework Jasper Crystal Spheres-Spheres-Ali-Fireworks Jasper-200-300g-Crystal Destiny","width":2860,"height":2860,"src":"\/\/crystaldestiny.com\/cdn\/shop\/files\/Firework-Jasper-Crystal-Spheres-Spheres-Fireworks-Jasper-200-300g-5.webp?v=1765516045","variant_ids":[45941097824427,45941097857195]},"available":true,"name":"Firework Jasper Crystal Spheres - Fireworks Jasper \/ 200-300g","public_title":"Fireworks Jasper \/ 200-300g","options":["Fireworks Jasper","200-300g"],"price":3499,"weight":284,"compare_at_price":0,"inventory_management":"shopify","barcode":null,"featured_media":{"alt":"Firework Jasper Crystal Spheres-Spheres-Ali-Fireworks Jasper-200-300g-Crystal Destiny","id":32289033289899,"position":5,"preview_image":{"aspect_ratio":1.0,"height":2860,"width":2860,"src":"\/\/crystaldestiny.com\/cdn\/shop\/files\/Firework-Jasper-Crystal-Spheres-Spheres-Fireworks-Jasper-200-300g-5.webp?v=1765516045"}},"requires_selling_plan":false,"selling_plan_allocations":[]},{"id":45941097857195,"title":"Fireworks Jasper \/ 300-400g","option1":"Fireworks Jasper","option2":"300-400g","option3":null,"sku":"1005007175464802-Fireworks-300-400g","requires_shipping":true,"taxable":true,"featured_image":{"id":40921465192619,"product_id":8603309277355,"position":5,"created_at":"2025-12-09T14:38:21-05:00","updated_at":"2025-12-12T00:07:25-05:00","alt":"Firework Jasper Crystal Spheres-Spheres-Ali-Fireworks Jasper-200-300g-Crystal Destiny","width":2860,"height":2860,"src":"\/\/crystaldestiny.com\/cdn\/shop\/files\/Firework-Jasper-Crystal-Spheres-Spheres-Fireworks-Jasper-200-300g-5.webp?v=1765516045","variant_ids":[45941097824427,45941097857195]},"available":true,"name":"Firework Jasper Crystal Spheres - Fireworks Jasper \/ 300-400g","public_title":"Fireworks Jasper \/ 300-400g","options":["Fireworks Jasper","300-400g"],"price":4499,"weight":284,"compare_at_price":0,"inventory_management":"shopify","barcode":null,"featured_media":{"alt":"Firework Jasper Crystal Spheres-Spheres-Ali-Fireworks Jasper-200-300g-Crystal Destiny","id":32289033289899,"position":5,"preview_image":{"aspect_ratio":1.0,"height":2860,"width":2860,"src":"\/\/crystaldestiny.com\/cdn\/shop\/files\/Firework-Jasper-Crystal-Spheres-Spheres-Fireworks-Jasper-200-300g-5.webp?v=1765516045"}},"requires_selling_plan":false,"selling_plan_allocations":[]}],"images":["\/\/crystaldestiny.com\/cdn\/shop\/files\/Firework-Jasper-Crystal-Spheres-Spheres.webp?v=1765516038","\/\/crystaldestiny.com\/cdn\/shop\/files\/Firework-Jasper-Crystal-Spheres-Spheres-2.webp?v=1765516040","\/\/crystaldestiny.com\/cdn\/shop\/files\/Firework-Jasper-Crystal-Spheres-Spheres-3.webp?v=1765516042","\/\/crystaldestiny.com\/cdn\/shop\/files\/Firework-Jasper-Crystal-Spheres-Spheres-4.webp?v=1765516044","\/\/crystaldestiny.com\/cdn\/shop\/files\/Firework-Jasper-Crystal-Spheres-Spheres-Fireworks-Jasper-200-300g-5.webp?v=1765516045"],"featured_image":"\/\/crystaldestiny.com\/cdn\/shop\/files\/Firework-Jasper-Crystal-Spheres-Spheres.webp?v=1765516038","options":["Material","Size"],"media":[{"alt":"Firework Jasper Crystal Spheres-Spheres-Ali-Fireworks Jasper-200-300g-Crystal Destiny","id":32289033158827,"position":1,"preview_image":{"aspect_ratio":1.0,"height":3024,"width":3024,"src":"\/\/crystaldestiny.com\/cdn\/shop\/files\/Firework-Jasper-Crystal-Spheres-Spheres.webp?v=1765516038"},"aspect_ratio":1.0,"height":3024,"media_type":"image","src":"\/\/crystaldestiny.com\/cdn\/shop\/files\/Firework-Jasper-Crystal-Spheres-Spheres.webp?v=1765516038","width":3024},{"alt":"Firework Jasper Crystal Spheres-Spheres-Ali-Fireworks Jasper-200-300g-Crystal Destiny","id":32289033191595,"position":2,"preview_image":{"aspect_ratio":1.0,"height":3024,"width":3024,"src":"\/\/crystaldestiny.com\/cdn\/shop\/files\/Firework-Jasper-Crystal-Spheres-Spheres-2.webp?v=1765516040"},"aspect_ratio":1.0,"height":3024,"media_type":"image","src":"\/\/crystaldestiny.com\/cdn\/shop\/files\/Firework-Jasper-Crystal-Spheres-Spheres-2.webp?v=1765516040","width":3024},{"alt":"Firework Jasper Crystal Spheres-Spheres-Ali-Fireworks Jasper-200-300g-Crystal Destiny","id":32289033224363,"position":3,"preview_image":{"aspect_ratio":1.0,"height":2791,"width":2791,"src":"\/\/crystaldestiny.com\/cdn\/shop\/files\/Firework-Jasper-Crystal-Spheres-Spheres-3.webp?v=1765516042"},"aspect_ratio":1.0,"height":2791,"media_type":"image","src":"\/\/crystaldestiny.com\/cdn\/shop\/files\/Firework-Jasper-Crystal-Spheres-Spheres-3.webp?v=1765516042","width":2791},{"alt":"Firework Jasper Crystal Spheres-Spheres-Ali-Fireworks Jasper-200-300g-Crystal Destiny","id":32289033257131,"position":4,"preview_image":{"aspect_ratio":1.0,"height":3024,"width":3024,"src":"\/\/crystaldestiny.com\/cdn\/shop\/files\/Firework-Jasper-Crystal-Spheres-Spheres-4.webp?v=1765516044"},"aspect_ratio":1.0,"height":3024,"media_type":"image","src":"\/\/crystaldestiny.com\/cdn\/shop\/files\/Firework-Jasper-Crystal-Spheres-Spheres-4.webp?v=1765516044","width":3024},{"alt":"Firework Jasper Crystal Spheres-Spheres-Ali-Fireworks Jasper-200-300g-Crystal Destiny","id":32289033289899,"position":5,"preview_image":{"aspect_ratio":1.0,"height":2860,"width":2860,"src":"\/\/crystaldestiny.com\/cdn\/shop\/files\/Firework-Jasper-Crystal-Spheres-Spheres-Fireworks-Jasper-200-300g-5.webp?v=1765516045"},"aspect_ratio":1.0,"height":2860,"media_type":"image","src":"\/\/crystaldestiny.com\/cdn\/shop\/files\/Firework-Jasper-Crystal-Spheres-Spheres-Fireworks-Jasper-200-300g-5.webp?v=1765516045","width":2860}],"requires_selling_plan":false,"selling_plan_groups":[],"content":"\u003cp data-start=\"167\" data-end=\"579\"\u003eThese Firework Jasper Crystal Spheres showcase vibrant, naturally patterned bursts that resemble cosmic fireworks frozen in stone. Each polished sphere is one of a kind, chosen at random, with swirling reds, creams, and earthy tones that create a stunning display from every angle. Their smooth finish and bold patterns make them perfect for home décor, meditation spaces, or gifting.\u003c\/p\u003e\n\u003cp data-start=\"581\" data-end=\"842\"\u003eFirework Jasper is known for grounding energy, emotional balance, and creative inspiration. Its stabilizing vibration supports focus and confidence, making these spheres ideal for spiritual practice or simply bringing a warm, energizing presence to your room.\u003c\/p\u003e\n\u003cp data-start=\"581\" data-end=\"842\"\u003eThis product is pulled at random by size.\u003c\/p\u003e"},"options":[{"name":"Material","position":1,"values":["Fireworks Jasper"]},{"name":"Size","position":2,"values":["200-300g","300-400g"]}],"custom_metafields":{"shipping_time":"12-16 days"},"metafields":{"badge":"\u003cdiv style='display:none' class='jdgm-prev-badge' data-average-rating='0.00' data-number-of-reviews='0' data-number-of-questions='0'\u003e \u003cspan class='jdgm-prev-badge__stars' data-score='0.00' tabindex='0' aria-label='0.00 stars' role='button'\u003e \u003cspan class='jdgm-star jdgm--off'\u003e\u003c\/span\u003e\u003cspan class='jdgm-star jdgm--off'\u003e\u003c\/span\u003e\u003cspan class='jdgm-star jdgm--off'\u003e\u003c\/span\u003e\u003cspan class='jdgm-star jdgm--off'\u003e\u003c\/span\u003e\u003cspan class='jdgm-star jdgm--off'\u003e\u003c\/span\u003e \u003c\/span\u003e \u003cspan class='jdgm-prev-badge__text'\u003e No reviews \u003c\/span\u003e \u003c\/div\u003e","widget":"\u003cdiv class='jdgm-rev-widg' data-updated-at='2025-12-11T23:35:20Z' data-average-rating='0.00' data-number-of-reviews='0' data-number-of-questions='0' data-image-url='https:\/\/cdn.shopify.com\/s\/files\/1\/0613\/0345\/5915\/files\/1PC-Random-High-Quality-Fireworks-Sphere-Natural-Crystal-SphereNatural-Crystal-DecorationBirthday-GiftWomen-Gift.webp?v=1765383280'\u003e \u003cstyle class='jdgm-temp-hiding-style'\u003e.jdgm-rev-widg{ display: none }\u003c\/style\u003e \u003cdiv class='jdgm-rev-widg__header'\u003e \u003ch2 class='jdgm-rev-widg__title'\u003eCustomer Reviews\u003c\/h2\u003e \u003cdiv class='jdgm-rev-widg__summary'\u003e \u003cdiv class='jdgm-rev-widg__summary-stars' aria-label='Average rating is 0.00 stars' role='img'\u003e \u003cspan class='jdgm-star jdgm--off'\u003e\u003c\/span\u003e\u003cspan class='jdgm-star jdgm--off'\u003e\u003c\/span\u003e\u003cspan class='jdgm-star jdgm--off'\u003e\u003c\/span\u003e\u003cspan class='jdgm-star jdgm--off'\u003e\u003c\/span\u003e\u003cspan class='jdgm-star jdgm--off'\u003e\u003c\/span\u003e \u003c\/div\u003e \u003cdiv class='jdgm-rev-widg__summary-text'\u003eBe the first to write a review\u003c\/div\u003e \u003c\/div\u003e \u003ca style='display: none' href='#' class='jdgm-write-rev-link' role='button'\u003eWrite a review\u003c\/a\u003e \u003cdiv class='jdgm-histogram jdgm-temp-hidden'\u003e \u003cdiv class='jdgm-histogram__row' data-rating='5' data-frequency='0' data-percentage='0'\u003e \u003cdiv class='jdgm-histogram__star' role='button' aria-label=\"0% (0) reviews with 5 star rating\" tabindex='0' \u003e\u003cspan class='jdgm-star jdgm--on'\u003e\u003c\/span\u003e\u003cspan class='jdgm-star jdgm--on'\u003e\u003c\/span\u003e\u003cspan class='jdgm-star jdgm--on'\u003e\u003c\/span\u003e\u003cspan class='jdgm-star jdgm--on'\u003e\u003c\/span\u003e\u003cspan class='jdgm-star jdgm--on'\u003e\u003c\/span\u003e\u003c\/div\u003e \u003cdiv class='jdgm-histogram__bar'\u003e \u003cdiv class='jdgm-histogram__bar-content' style='width: 0%;'\u003e \u003c\/div\u003e \u003c\/div\u003e \u003cdiv class='jdgm-histogram__percentage'\u003e0%\u003c\/div\u003e \u003cdiv class='jdgm-histogram__frequency'\u003e(0)\u003c\/div\u003e \u003c\/div\u003e \u003cdiv class='jdgm-histogram__row' data-rating='4' data-frequency='0' data-percentage='0'\u003e \u003cdiv class='jdgm-histogram__star' role='button' aria-label=\"0% (0) reviews with 4 star rating\" tabindex='0' \u003e\u003cspan class='jdgm-star jdgm--on'\u003e\u003c\/span\u003e\u003cspan class='jdgm-star jdgm--on'\u003e\u003c\/span\u003e\u003cspan class='jdgm-star jdgm--on'\u003e\u003c\/span\u003e\u003cspan class='jdgm-star jdgm--on'\u003e\u003c\/span\u003e\u003cspan class='jdgm-star jdgm--off'\u003e\u003c\/span\u003e\u003c\/div\u003e \u003cdiv class='jdgm-histogram__bar'\u003e \u003cdiv class='jdgm-histogram__bar-content' style='width: 0%;'\u003e \u003c\/div\u003e \u003c\/div\u003e \u003cdiv class='jdgm-histogram__percentage'\u003e0%\u003c\/div\u003e \u003cdiv class='jdgm-histogram__frequency'\u003e(0)\u003c\/div\u003e \u003c\/div\u003e \u003cdiv class='jdgm-histogram__row' data-rating='3' data-frequency='0' data-percentage='0'\u003e \u003cdiv class='jdgm-histogram__star' role='button' aria-label=\"0% (0) reviews with 3 star rating\" tabindex='0' \u003e\u003cspan class='jdgm-star jdgm--on'\u003e\u003c\/span\u003e\u003cspan class='jdgm-star jdgm--on'\u003e\u003c\/span\u003e\u003cspan class='jdgm-star jdgm--on'\u003e\u003c\/span\u003e\u003cspan class='jdgm-star jdgm--off'\u003e\u003c\/span\u003e\u003cspan class='jdgm-star jdgm--off'\u003e\u003c\/span\u003e\u003c\/div\u003e \u003cdiv class='jdgm-histogram__bar'\u003e \u003cdiv class='jdgm-histogram__bar-content' style='width: 0%;'\u003e \u003c\/div\u003e \u003c\/div\u003e \u003cdiv class='jdgm-histogram__percentage'\u003e0%\u003c\/div\u003e \u003cdiv class='jdgm-histogram__frequency'\u003e(0)\u003c\/div\u003e \u003c\/div\u003e \u003cdiv class='jdgm-histogram__row' data-rating='2' data-frequency='0' data-percentage='0'\u003e \u003cdiv class='jdgm-histogram__star' role='button' aria-label=\"0% (0) reviews with 2 star rating\" tabindex='0' \u003e\u003cspan class='jdgm-star jdgm--on'\u003e\u003c\/span\u003e\u003cspan class='jdgm-star jdgm--on'\u003e\u003c\/span\u003e\u003cspan class='jdgm-star jdgm--off'\u003e\u003c\/span\u003e\u003cspan class='jdgm-star jdgm--off'\u003e\u003c\/span\u003e\u003cspan class='jdgm-star jdgm--off'\u003e\u003c\/span\u003e\u003c\/div\u003e \u003cdiv class='jdgm-histogram__bar'\u003e \u003cdiv class='jdgm-histogram__bar-content' style='width: 0%;'\u003e \u003c\/div\u003e \u003c\/div\u003e \u003cdiv class='jdgm-histogram__percentage'\u003e0%\u003c\/div\u003e \u003cdiv class='jdgm-histogram__frequency'\u003e(0)\u003c\/div\u003e \u003c\/div\u003e \u003cdiv class='jdgm-histogram__row' data-rating='1' data-frequency='0' data-percentage='0'\u003e \u003cdiv class='jdgm-histogram__star' role='button' aria-label=\"0% (0) reviews with 1 star rating\" tabindex='0' \u003e\u003cspan class='jdgm-star jdgm--on'\u003e\u003c\/span\u003e\u003cspan class='jdgm-star jdgm--off'\u003e\u003c\/span\u003e\u003cspan class='jdgm-star jdgm--off'\u003e\u003c\/span\u003e\u003cspan class='jdgm-star jdgm--off'\u003e\u003c\/span\u003e\u003cspan class='jdgm-star jdgm--off'\u003e\u003c\/span\u003e\u003c\/div\u003e \u003cdiv class='jdgm-histogram__bar'\u003e \u003cdiv class='jdgm-histogram__bar-content' style='width: 0%;'\u003e \u003c\/div\u003e \u003c\/div\u003e \u003cdiv class='jdgm-histogram__percentage'\u003e0%\u003c\/div\u003e \u003cdiv class='jdgm-histogram__frequency'\u003e(0)\u003c\/div\u003e \u003c\/div\u003e \u003cdiv class='jdgm-histogram__row jdgm-histogram__clear-filter' data-rating=null tabindex='0'\u003e\u003c\/div\u003e \u003c\/div\u003e \u003cdiv class='jdgm-rev-widg__sort-wrapper'\u003e\u003c\/div\u003e \u003c\/div\u003e \u003cdiv class='jdgm-rev-widg__body'\u003e \u003cdiv class='jdgm-rev-widg__reviews'\u003e\u003c\/div\u003e \u003cdiv class='jdgm-paginate' data-per-page='4' data-url='https:\/\/api.judge.me\/reviews\/reviews_for_widget' style=\"display: none;\"\u003e\u003c\/div\u003e \u003c\/div\u003e \u003cdiv class='jdgm-rev-widg__paginate-spinner-wrapper'\u003e \u003cdiv class='jdgm-spinner'\u003e\u003c\/div\u003e \u003c\/div\u003e \u003c\/div\u003e"},"collections":[{"id":294880051371,"handle":"crystals","title":"Crystals","updated_at":"2026-01-07T23:43:11-05:00","body_html":"\u003cp data-start=\"159\" data-end=\"687\"\u003e✨ \u003cstrong data-start=\"161\" data-end=\"216\"\u003eDiscover the Magic of Crystals with Crystal Destiny\u003c\/strong\u003e ✨\u003cbr data-start=\"218\" data-end=\"221\"\u003eCrystals have been treasured for centuries—not only for their natural beauty but also for their powerful healing energies. Beyond their visual allure, they bring balance, harmony, and positive energy into any space. Whether used for home décor, meditation, or simply to elevate the energy of your surroundings, crystals create a sanctuary of peace, relaxation, and well-being. Each piece is a unique gift from the Earth—visually stunning and spiritually uplifting.\u003c\/p\u003e\n\u003cp data-start=\"689\" data-end=\"1011\"\u003eAt \u003cstrong data-start=\"692\" data-end=\"711\"\u003eCrystal Destiny\u003c\/strong\u003e, our signature collection showcases a curated selection of exquisite crystals, from radiant Quartz to soothing Amethyst. Every stone is carefully sourced for its elegance and metaphysical resonance, making them perfect for enhancing your home, uplifting your spirit, or gifting to someone special.\u003c\/p\u003e\n\u003cp data-start=\"1013\" data-end=\"1206\"\u003eExperience the timeless sophistication of crystalline wonders. Explore the \u003cstrong data-start=\"1088\" data-end=\"1118\"\u003eCrystal Destiny Collection\u003c\/strong\u003e today and bring the transformative beauty of these treasures into your everyday life.\u003c\/p\u003e","published_at":"2023-06-05T11:24:02-04:00","sort_order":"created-desc","template_suffix":"","disjunctive":false,"rules":[{"column":"tag","relation":"equals","condition":"crystal"},{"column":"type","relation":"not_contains","condition":"925 Sterling Silver"},{"column":"type","relation":"not_contains","condition":"Wire Wraps"}],"published_scope":"global"},{"id":319456051371,"handle":"root-chakra-crystals","title":"Root Chakra Crystals","updated_at":"2026-01-07T23:43:11-05:00","body_html":"\u003cp data-start=\"132\" data-end=\"502\"\u003e✨ \u003cstrong data-start=\"134\" data-end=\"158\"\u003eRoot Chakra Crystals\u003c\/strong\u003e ✨\u003cbr data-start=\"160\" data-end=\"163\"\u003eGround your energy and cultivate stability with our \u003cstrong data-start=\"215\" data-end=\"239\"\u003eRoot Chakra Crystals\u003c\/strong\u003e. Centered at the base of the spine, the Root Chakra governs your sense of security, balance, and connection to the Earth. These crystals help release fear, build resilience, and foster a strong foundation for your physical, emotional, and spiritual well-being.\u003c\/p\u003e\n\u003cp data-start=\"504\" data-end=\"881\"\u003eOur selection features powerful grounding stones such as Red Jasper, Black Tourmaline, Hematite, and Smoky Quartz—each chosen for their ability to stabilize energy and promote a sense of safety and strength. Perfect for meditation, energy work, or keeping in your living space, Root Chakra Crystals encourage you to feel anchored, supported, and empowered in your daily life.\u003c\/p\u003e\n\u003cp data-start=\"883\" data-end=\"1037\"\u003eReconnect with the Earth, strengthen your foundation, and embrace the transformative energy of the Root Chakra through these essential grounding stones.\u003c\/p\u003e","published_at":"2025-07-17T18:19:27-04:00","sort_order":"best-selling","template_suffix":"","disjunctive":false,"rules":[{"column":"variant_metafield_definition","relation":"equals","condition":"Root"}],"published_scope":"global","image":{"created_at":"2025-07-17T19:08:08-04:00","alt":null,"width":1080,"height":1080,"src":"\/\/crystaldestiny.com\/cdn\/shop\/collections\/Root_Chakra_Collection.jpg?v=1762474932"}},{"id":319456018603,"handle":"sacral-chakra-crystals","title":"Sacral Chakra Crystals","updated_at":"2026-01-06T11:12:19-05:00","body_html":"\u003cp data-start=\"144\" data-end=\"489\"\u003e✨ \u003cstrong data-start=\"146\" data-end=\"172\"\u003eSacral Chakra Crystals\u003c\/strong\u003e ✨\u003cbr data-start=\"174\" data-end=\"177\"\u003eIgnite creativity, passion, and emotional balance with our \u003cstrong data-start=\"236\" data-end=\"262\"\u003eSacral Chakra Crystals\u003c\/strong\u003e. Located just below the navel, the Sacral Chakra governs pleasure, intimacy, and self-expression. These crystals help release emotional blockages, enhance creativity, and promote confidence in expressing your authentic self.\u003c\/p\u003e\n\u003cp data-start=\"491\" data-end=\"833\"\u003eOur curated selection includes stones such as Carnelian, Orange Calcite, and Sunstone—chosen for their vibrant energy and ability to awaken joy, vitality, and emotional harmony. Perfect for meditation, energy work, or as wearable reminders, Sacral Chakra Crystals encourage a healthy flow of energy and inspire passion in all areas of life.\u003c\/p\u003e\n\u003cp data-start=\"835\" data-end=\"970\"\u003eEmbrace creativity, cultivate emotional balance, and awaken your inner fire with the transformative energy of Sacral Chakra Crystals.\u003c\/p\u003e","published_at":"2025-07-17T18:19:00-04:00","sort_order":"best-selling","template_suffix":"","disjunctive":false,"rules":[{"column":"variant_metafield_definition","relation":"equals","condition":"Sacral"}],"published_scope":"global","image":{"created_at":"2025-07-17T19:08:18-04:00","alt":null,"width":1080,"height":1080,"src":"\/\/crystaldestiny.com\/cdn\/shop\/collections\/Sacral_Chakra_Collection.jpg?v=1762474931"}},{"id":294880116907,"handle":"polished","title":"Polished Crystals","updated_at":"2026-01-07T23:43:11-05:00","body_html":"\u003cp data-start=\"199\" data-end=\"598\"\u003e✨ \u003cstrong data-start=\"201\" data-end=\"248\"\u003eCrystal Destiny Polished Crystal Collection\u003c\/strong\u003e ✨\u003cbr data-start=\"250\" data-end=\"253\"\u003eIndulge in the brilliance of crystals refined to perfection. Our \u003cstrong data-start=\"318\" data-end=\"341\"\u003ePolished Collection\u003c\/strong\u003e showcases gemstones meticulously shaped and smoothed to reveal their natural radiance and timeless beauty. From the shimmering glow of Quartz to the deep allure of Obsidian, each polished piece is a testament to nature’s artistry and human craftsmanship.\u003c\/p\u003e\n\u003cp data-start=\"600\" data-end=\"862\"\u003ePerfect as statement décor, meaningful gifts, or companions on your spiritual journey, polished crystals bring sophistication and elevated energy into any space. Their radiant surfaces reflect not only light but also the transformative power of crystal energy.\u003c\/p\u003e\n\u003cp data-start=\"864\" data-end=\"1022\"\u003eDiscover the elegance of refinement with Crystal Destiny’s Polished Crystal Collection—where every facet shines with intention, beauty, and timeless allure.\u003c\/p\u003e","published_at":"2023-06-05T11:30:44-04:00","sort_order":"created-desc","template_suffix":"","disjunctive":false,"rules":[{"column":"tag","relation":"equals","condition":"polished"}],"published_scope":"global"},{"id":322471624875,"handle":"crystal-favorites","title":"Crystal Enthusiast's Favorites","updated_at":"2026-01-07T23:42:38-05:00","body_html":"\u003cp\u003eDiscover the crystals our community loves most. This collection features our best-selling stones and accessories, carefully curated to highlight pieces that are always in demand and ready to ship. Whether you’re adding to your collection or searching for a gift, these fan-favorite crystals are timeless staples for energy, beauty, and balance.\u003c\/p\u003e","published_at":"2025-10-01T21:07:06-04:00","sort_order":"price-asc","template_suffix":"","disjunctive":false,"rules":[{"column":"variant_inventory","relation":"greater_than","condition":"1"}],"published_scope":"global"},{"id":321695744171,"handle":"direct-from-supplier","title":"Direct from Supplier","updated_at":"2026-01-07T23:43:11-05:00","body_html":"","published_at":"2025-09-12T16:38:23-04:00","sort_order":"best-selling","template_suffix":"","disjunctive":true,"rules":[{"column":"tag","relation":"equals","condition":"adjusted-shipping"}],"published_scope":"global"},{"id":295698202795,"handle":"spheres","title":"Crystal Spheres","updated_at":"2026-01-06T23:24:35-05:00","body_html":"\u003cp data-start=\"106\" data-end=\"370\"\u003e✨ \u003cstrong data-start=\"108\" data-end=\"138\"\u003eCrystal Spheres Collection\u003c\/strong\u003e ✨\u003cbr data-start=\"140\" data-end=\"143\"\u003eBring harmony, balance, and elegance into your space with our \u003cstrong data-start=\"205\" data-end=\"235\"\u003eCrystal Spheres Collection\u003c\/strong\u003e. Each sphere is meticulously crafted to showcase the natural beauty and energy of crystals, from radiant Quartz to calming Amethyst.\u003c\/p\u003e\n\u003cp data-start=\"372\" data-end=\"658\"\u003ePerfect for meditation, energy work, or as striking décor, crystal spheres radiate energy in all directions, promoting clarity, focus, and a sense of calm. Their smooth, polished surfaces highlight the stones’ natural patterns and colors, making each sphere a captivating centerpiece.\u003c\/p\u003e\n\u003cp data-start=\"660\" data-end=\"809\"\u003eElevate your space and embrace the transformative power of crystals with the \u003cstrong data-start=\"737\" data-end=\"767\"\u003eCrystal Spheres Collection\u003c\/strong\u003e—where beauty, energy, and harmony meet.\u003c\/p\u003e","published_at":"2023-07-28T14:20:46-04:00","sort_order":"created-desc","template_suffix":"","disjunctive":true,"rules":[{"column":"tag","relation":"equals","condition":"spheres"},{"column":"tag","relation":"equals","condition":"eggs"}],"published_scope":"global"},{"id":293659312299,"handle":"best-sellers","title":"Best Sellers","updated_at":"2026-01-07T23:43:11-05:00","body_html":"\u003cp data-start=\"155\" data-end=\"510\"\u003eDiscover the pieces our community loves most. Our Best Sellers Collection brings together handpicked crystals and jewelry that embody timeless elegance, spiritual resonance, and everyday sophistication. Each item has earned its place as a customer favorite—celebrated for both its beauty and its meaningful energy.\u003c\/p\u003e\n\u003cp data-start=\"512\" data-end=\"802\"\u003eFrom stunning statement pieces to versatile daily companions, these treasures are curated to elevate your space, uplift your spirit, and reflect refined taste. Indulge in what’s most cherished and let our best sellers guide you toward the perfect blend of style and transformative energy.\u003c\/p\u003e\n\u003cp data-start=\"804\" data-end=\"932\"\u003eExplore the Best Sellers Collection today—where elegance meets intention, and every piece tells a story of beauty and balance.\u003c\/p\u003e","published_at":"2023-03-15T16:04:51-04:00","sort_order":"best-selling","template_suffix":"","disjunctive":false,"rules":[{"column":"variant_price","relation":"greater_than","condition":"0"},{"column":"variant_inventory","relation":"greater_than","condition":"0"},{"column":"type","relation":"not_equals","condition":"Shipping Protection"}],"published_scope":"global"},{"id":321370390699,"handle":"monthly-crystal-sale","title":"Monthly Crystal Sale | Spheres \u0026 Towers","updated_at":"2026-01-06T23:24:37-05:00","body_html":"\u003cp\u003eShop our \u003cstrong\u003eMonthly Crystal Sale\u003c\/strong\u003e, where you can shop a wide selection of healing crystals at discounted prices. Explore \u003cstrong\u003ecrystal spheres and towers,\u003c\/strong\u003e— all carefully curated to support meditation, energy balancing, and spiritual wellness. Whether you're looking to enhance your home decor, boost your daily energy, or find the perfect gift, our \u003cstrong\u003ecrystals for healing and manifestation\u003c\/strong\u003e offer both beauty and metaphysical benefits.\u003c\/p\u003e\n\u003cp\u003eEach month, our sale features \u003cstrong\u003enew discounted collections\u003c\/strong\u003e, from \u003cstrong\u003enatural quartz and amethyst towers\u003c\/strong\u003e to \u003cstrong\u003ewire-wrapped pendants and polished stones\u003c\/strong\u003e, so there's always something fresh to discover. Shop with confidence knowing you're getting high-quality crystals with \u003cstrong\u003efree shipping options\u003c\/strong\u003e and a trusted experience.\u003c\/p\u003e\n\u003cp\u003e\u003cstrong\u003eTake advantage of the Monthly Crystal Sale today\u003c\/strong\u003e and add powerful, natural energy to your life with \u003cstrong\u003eauthentic healing crystals\u003c\/strong\u003e — while our limited-time discounts last.\u003c\/p\u003e\n\u003cp\u003e\u003cstrong\u003e*Discount automatically applied at checkout.\u003c\/strong\u003e\u003c\/p\u003e","published_at":"2025-12-02T01:26:17-05:00","sort_order":"alpha-asc","template_suffix":"","disjunctive":true,"rules":[{"column":"tag","relation":"equals","condition":"spheres"},{"column":"tag","relation":"equals","condition":"Towers"}],"published_scope":"global","image":{"created_at":"2026-01-01T01:32:34-05:00","alt":"","width":960,"height":960,"src":"\/\/crystaldestiny.com\/cdn\/shop\/collections\/3E8C2969-1B86-4ACE-B349-98E9D8768424.jpg?v=1767249154"}},{"id":297906241707,"handle":"new-arrivals","title":"New Arrivals","updated_at":"2026-01-07T23:43:11-05:00","body_html":"\u003cp data-start=\"172\" data-end=\"573\"\u003e✨ \u003cstrong data-start=\"174\" data-end=\"217\"\u003eDiscover Crystal Destiny’s New Arrivals\u003c\/strong\u003e ✨\u003cbr data-start=\"219\" data-end=\"222\"\u003eStep into a world of fresh sophistication with our latest crystal treasures. Each new piece—whether Quartz, Amethyst, or beyond—embodies nature’s artistry, radiating both timeless beauty and powerful energy. Thoughtfully curated and constantly refreshed, our New Arrivals Collection offers the perfect harmony of elegance and metaphysical resonance.\u003c\/p\u003e\n\u003cp data-start=\"575\" data-end=\"793\"\u003eElevate your space, uplift your spirit, and embrace the transformative power of nature’s wonders. Explore the newest expressions of crystal artistry today, and let your journey with crystals evolve with every update.\u003c\/p\u003e","published_at":"2023-11-20T15:35:42-05:00","sort_order":"created-desc","template_suffix":"","disjunctive":true,"rules":[{"column":"tag","relation":"equals","condition":"new-arrivals"}],"published_scope":"global"},{"id":297596059819,"handle":"all","title":"All Crystals \u0026 Jewelry","updated_at":"2026-01-07T23:43:11-05:00","body_html":"\u003cp data-start=\"149\" data-end=\"494\"\u003e✨ \u003cstrong data-start=\"151\" data-end=\"181\"\u003eWelcome to Crystal Destiny\u003c\/strong\u003e ✨\u003cbr data-start=\"183\" data-end=\"186\"\u003eStep into a world where beauty, energy, and artistry unite. Our collection is a treasure trove of exquisite crystals, from the raw, untamed elegance of natural formations to the polished brilliance of expertly crafted pieces. Each crystal is a masterpiece, carrying its own unique story and timeless charm.\u003c\/p\u003e\n\u003cp data-start=\"496\" data-end=\"831\"\u003eWhether you’re drawn to the calming presence of Amethyst, the vibrant energy of Citrine, or the grounding strength of Jasper, our crystals invite you to connect with nature’s finest wonders. Perfect for enhancing your space, supporting your spiritual journey, or gifting with intention, every piece resonates with beauty and meaning.\u003c\/p\u003e\n\u003cp data-start=\"833\" data-end=\"1000\"\u003eElevate your surroundings, embrace the mystique, and explore the enchanting world of crystals at \u003cstrong data-start=\"930\" data-end=\"949\"\u003eCrystal Destiny\u003c\/strong\u003e—where every crystal is waiting to be discovered.\u003c\/p\u003e","published_at":"2023-11-10T13:55:31-05:00","sort_order":"created-desc","template_suffix":"","disjunctive":false,"rules":[{"column":"type","relation":"not_equals","condition":"asdf"}],"published_scope":"global"},{"id":298983391403,"handle":"january-crystal-sale","title":"January Sale | 25% Off Crystal Towers \u0026 Spheres","updated_at":"2026-01-06T23:24:37-05:00","body_html":"\u003cp\u003eShop our \u003cstrong\u003eJanuary Crystal Sale\u003c\/strong\u003e, where you can shop a wide selection of healing crystals at discounted prices. Explore \u003cstrong\u003eCrystal Towers, \u0026amp; Crystal Spheres\u003c\/strong\u003e — all carefully curated and crafted to support meditation, energy balancing, and spiritual wellness. Whether you're looking to enhance your home decor, boost your daily energy, or find the perfect gift, our \u003cstrong\u003ecrystals for healing and manifestation\u003c\/strong\u003e offer both beauty and metaphysical benefits.\u003c\/p\u003e\n\u003cp\u003eThis January, our sale features \u003cstrong\u003ediscounted crystal towers and spheres\u003c\/strong\u003e, from \u003cstrong\u003enatural quartz \u003c\/strong\u003eand \u003cstrong\u003eamethyst \u003c\/strong\u003eto \u003cstrong\u003ebumblebee jasper \u003c\/strong\u003eand \u003cstrong\u003ecarnelian\u003c\/strong\u003e, so there's always something fresh to discover. Shop with confidence knowing you're getting high-quality crystals with \u003cstrong\u003efree shipping options\u003c\/strong\u003e and a trusted experience.\u003c\/p\u003e\n\u003cp\u003e\u003cstrong\u003eTake advantage of the January Crystal Sale today\u003c\/strong\u003e and add powerful, natural energy to your life with \u003cstrong\u003eauthentic healing crystals\u003c\/strong\u003e — while our limited-time discounts last.\u003c\/p\u003e\n\u003cp\u003e\u003cstrong\u003e*Discount automatically applied at checkout.\u003c\/strong\u003e\u003c\/p\u003e","published_at":"2026-01-01T00:07:17-05:00","sort_order":"alpha-asc","template_suffix":"monthly-collection","disjunctive":true,"rules":[{"column":"tag","relation":"equals","condition":"Spheres"},{"column":"tag","relation":"equals","condition":"Towers"}],"published_scope":"global","image":{"created_at":"2026-01-01T01:29:59-05:00","alt":"","width":960,"height":960,"src":"\/\/crystaldestiny.com\/cdn\/shop\/collections\/1464163B-22B1-4D62-BEC5-CEC9AECB670B.jpg?v=1767248999"}}]}
[{"alt":"Firework Jasper Crystal Spheres-Spheres-Ali-Fireworks Jasper-200-300g-Crystal Destiny","id":32289033158827,"position":1,"preview_image":{"aspect_ratio":1.0,"height":3024,"width":3024,"src":"\/\/crystaldestiny.com\/cdn\/shop\/files\/Firework-Jasper-Crystal-Spheres-Spheres.webp?v=1765516038"},"aspect_ratio":1.0,"height":3024,"media_type":"image","src":"\/\/crystaldestiny.com\/cdn\/shop\/files\/Firework-Jasper-Crystal-Spheres-Spheres.webp?v=1765516038","width":3024},{"alt":"Firework Jasper Crystal Spheres-Spheres-Ali-Fireworks Jasper-200-300g-Crystal Destiny","id":32289033191595,"position":2,"preview_image":{"aspect_ratio":1.0,"height":3024,"width":3024,"src":"\/\/crystaldestiny.com\/cdn\/shop\/files\/Firework-Jasper-Crystal-Spheres-Spheres-2.webp?v=1765516040"},"aspect_ratio":1.0,"height":3024,"media_type":"image","src":"\/\/crystaldestiny.com\/cdn\/shop\/files\/Firework-Jasper-Crystal-Spheres-Spheres-2.webp?v=1765516040","width":3024},{"alt":"Firework Jasper Crystal Spheres-Spheres-Ali-Fireworks Jasper-200-300g-Crystal Destiny","id":32289033224363,"position":3,"preview_image":{"aspect_ratio":1.0,"height":2791,"width":2791,"src":"\/\/crystaldestiny.com\/cdn\/shop\/files\/Firework-Jasper-Crystal-Spheres-Spheres-3.webp?v=1765516042"},"aspect_ratio":1.0,"height":2791,"media_type":"image","src":"\/\/crystaldestiny.com\/cdn\/shop\/files\/Firework-Jasper-Crystal-Spheres-Spheres-3.webp?v=1765516042","width":2791},{"alt":"Firework Jasper Crystal Spheres-Spheres-Ali-Fireworks Jasper-200-300g-Crystal Destiny","id":32289033257131,"position":4,"preview_image":{"aspect_ratio":1.0,"height":3024,"width":3024,"src":"\/\/crystaldestiny.com\/cdn\/shop\/files\/Firework-Jasper-Crystal-Spheres-Spheres-4.webp?v=1765516044"},"aspect_ratio":1.0,"height":3024,"media_type":"image","src":"\/\/crystaldestiny.com\/cdn\/shop\/files\/Firework-Jasper-Crystal-Spheres-Spheres-4.webp?v=1765516044","width":3024},{"alt":"Firework Jasper Crystal Spheres-Spheres-Ali-Fireworks Jasper-200-300g-Crystal Destiny","id":32289033289899,"position":5,"preview_image":{"aspect_ratio":1.0,"height":2860,"width":2860,"src":"\/\/crystaldestiny.com\/cdn\/shop\/files\/Firework-Jasper-Crystal-Spheres-Spheres-Fireworks-Jasper-200-300g-5.webp?v=1765516045"},"aspect_ratio":1.0,"height":2860,"media_type":"image","src":"\/\/crystaldestiny.com\/cdn\/shop\/files\/Firework-Jasper-Crystal-Spheres-Spheres-Fireworks-Jasper-200-300g-5.webp?v=1765516045","width":2860}]
{"item":{"id":8551994196139,"title":"Fluorite Crystal Tower Obelisk","handle":"fluorite-crystal-tower-obelisk-1005009861421562-1pc-50-100g","description":"\u003cp data-end=\"499\" data-start=\"204\"\u003eThese fluorite crystal towers feature natural, polished points that showcase the stone’s vibrant banding and rich color variations. Each tower is carefully shaped to highlight its unique patterns, making it a striking addition to any crystal collection or home décor.\u003c\/p\u003e\n\u003cp data-end=\"712\" data-start=\"501\"\u003eFluorite is known for enhancing focus, mental clarity, and balance. These towers are ideal for meditation, energy work, or as an eye-catching centerpiece that promotes harmony and positive energy in any space.\u003c\/p\u003e\n\u003cp data-end=\"887\" data-start=\"714\"\u003eCollectors and spiritual enthusiasts will appreciate the combination of natural beauty and energetic properties, making these towers both a decorative and meaningful tool.\u003c\/p\u003e\n\u003cp data-end=\"887\" data-start=\"714\"\u003eThis product is pulled at random by size.\u003c\/p\u003e\u003ch2\u003eCrystal Towers, Wands, Generators, Points, Pillars \u0026amp; Obelisks — What's the Difference?\u003c\/h2\u003e\n\u003cp id=\"isPasted\"\u003eWhile these terms may vary, they all describe beautifully shaped crystals with a pointed tip designed to channel and direct energy. Each name highlights a unique aspect of their use:\u003c\/p\u003e\n\u003cul\u003e\n\u003cli\u003e\n\u003cstrong\u003eTowers\u003c\/strong\u003e- Known for their steady, grounding presence, crystal towers help focus and amplify energy, making them perfect for meditation and manifestation.\u003c\/li\u003e\n\u003cli\u003e\n\u003cstrong\u003eWands\u003c\/strong\u003e- Traditionally used in energy work and healing, crystal wands are excellent for directing energy flow and clearing blockages.\u003c\/li\u003e\n\u003cli\u003e\n\u003cstrong\u003ePillars\u003c\/strong\u003e- Symbolizing strength and stability, crystal pillars create a balanced and harmonious environment, making them great for home decor and spiritual practices.\u003c\/li\u003e\n\u003cli\u003e\n\u003cstrong\u003eObelisks\u003c\/strong\u003e- Inspired by ancient structures, crystal obelisks are believed to connect earthly and spiritual energies, making them powerful tools for transformation and enlightenment.\u003c\/li\u003e\n\u003c\/ul\u003e\n\u003cp\u003eNo matter what you call them, these crystals serve the same purpose—to enhance energy, intention, and harmony in your space. Choose the one that resonates most with you!\u003c\/p\u003e","published_at":"2025-10-16T16:22:06-04:00","created_at":"2025-10-15T19:39:59-04:00","vendor":"Ali","type":"Towers","tags":["adjusted-shipping","crystal","polished","Towers"],"price":3199,"price_min":3199,"price_max":5999,"available":true,"price_varies":true,"compare_at_price":0,"compare_at_price_min":0,"compare_at_price_max":0,"compare_at_price_varies":false,"variants":[{"id":45735306952875,"title":"Green Fluorite \/ 1pc 50-100g","option1":"Green Fluorite","option2":"1pc 50-100g","option3":null,"sku":"1005009861421562-1pc 50-100g","requires_shipping":true,"taxable":true,"featured_image":{"id":40582404505771,"product_id":8551994196139,"position":7,"created_at":"2025-10-15T19:40:00-04:00","updated_at":"2025-12-11T00:19:18-05:00","alt":"Fluorite Crystal Tower Obelisk-Towers-Ali-Green Fluorite-1pc 50-100g-Crystal Destiny","width":800,"height":800,"src":"\/\/crystaldestiny.com\/cdn\/shop\/files\/Fluorite-Crystal-Tower-Obelisk-Towers-Green-Fluorite-1pc-50-100g-7.webp?v=1765430358","variant_ids":[45735306952875,45735307018411,45735307051179]},"available":true,"name":"Fluorite Crystal Tower Obelisk - Green Fluorite \/ 1pc 50-100g","public_title":"Green Fluorite \/ 1pc 50-100g","options":["Green Fluorite","1pc 50-100g"],"price":3199,"weight":136,"compare_at_price":0,"inventory_management":"shopify","barcode":null,"featured_media":{"alt":"Fluorite Crystal Tower Obelisk-Towers-Ali-Green Fluorite-1pc 50-100g-Crystal Destiny","id":31967224332459,"position":7,"preview_image":{"aspect_ratio":1.0,"height":800,"width":800,"src":"\/\/crystaldestiny.com\/cdn\/shop\/files\/Fluorite-Crystal-Tower-Obelisk-Towers-Green-Fluorite-1pc-50-100g-7.webp?v=1765430358"}},"requires_selling_plan":false,"selling_plan_allocations":[]},{"id":45735307051179,"title":"Green Fluorite \/ 1pc 100-150g","option1":"Green Fluorite","option2":"1pc 100-150g","option3":null,"sku":"1005009861421562-1pc 100-150g","requires_shipping":true,"taxable":true,"featured_image":{"id":40582404505771,"product_id":8551994196139,"position":7,"created_at":"2025-10-15T19:40:00-04:00","updated_at":"2025-12-11T00:19:18-05:00","alt":"Fluorite Crystal Tower Obelisk-Towers-Ali-Green Fluorite-1pc 50-100g-Crystal Destiny","width":800,"height":800,"src":"\/\/crystaldestiny.com\/cdn\/shop\/files\/Fluorite-Crystal-Tower-Obelisk-Towers-Green-Fluorite-1pc-50-100g-7.webp?v=1765430358","variant_ids":[45735306952875,45735307018411,45735307051179]},"available":true,"name":"Fluorite Crystal Tower Obelisk - Green Fluorite \/ 1pc 100-150g","public_title":"Green Fluorite \/ 1pc 100-150g","options":["Green Fluorite","1pc 100-150g"],"price":4699,"weight":136,"compare_at_price":0,"inventory_management":"shopify","barcode":null,"featured_media":{"alt":"Fluorite Crystal Tower Obelisk-Towers-Ali-Green Fluorite-1pc 50-100g-Crystal Destiny","id":31967224332459,"position":7,"preview_image":{"aspect_ratio":1.0,"height":800,"width":800,"src":"\/\/crystaldestiny.com\/cdn\/shop\/files\/Fluorite-Crystal-Tower-Obelisk-Towers-Green-Fluorite-1pc-50-100g-7.webp?v=1765430358"}},"requires_selling_plan":false,"selling_plan_allocations":[]},{"id":45735307018411,"title":"Green Fluorite \/ 1pc 150-200g","option1":"Green Fluorite","option2":"1pc 150-200g","option3":null,"sku":"1005009861421562-1pc 150-200g","requires_shipping":true,"taxable":true,"featured_image":{"id":40582404505771,"product_id":8551994196139,"position":7,"created_at":"2025-10-15T19:40:00-04:00","updated_at":"2025-12-11T00:19:18-05:00","alt":"Fluorite Crystal Tower Obelisk-Towers-Ali-Green Fluorite-1pc 50-100g-Crystal Destiny","width":800,"height":800,"src":"\/\/crystaldestiny.com\/cdn\/shop\/files\/Fluorite-Crystal-Tower-Obelisk-Towers-Green-Fluorite-1pc-50-100g-7.webp?v=1765430358","variant_ids":[45735306952875,45735307018411,45735307051179]},"available":true,"name":"Fluorite Crystal Tower Obelisk - Green Fluorite \/ 1pc 150-200g","public_title":"Green Fluorite \/ 1pc 150-200g","options":["Green Fluorite","1pc 150-200g"],"price":5999,"weight":136,"compare_at_price":0,"inventory_management":"shopify","barcode":null,"featured_media":{"alt":"Fluorite Crystal Tower Obelisk-Towers-Ali-Green Fluorite-1pc 50-100g-Crystal Destiny","id":31967224332459,"position":7,"preview_image":{"aspect_ratio":1.0,"height":800,"width":800,"src":"\/\/crystaldestiny.com\/cdn\/shop\/files\/Fluorite-Crystal-Tower-Obelisk-Towers-Green-Fluorite-1pc-50-100g-7.webp?v=1765430358"}},"requires_selling_plan":false,"selling_plan_allocations":[]}],"images":["\/\/crystaldestiny.com\/cdn\/shop\/files\/Fluorite-Crystal-Tower-Obelisk-Towers.webp?v=1760677906","\/\/crystaldestiny.com\/cdn\/shop\/files\/Fluorite-Crystal-Tower-Obelisk-Towers-2.webp?v=1760677907","\/\/crystaldestiny.com\/cdn\/shop\/files\/Fluorite-Crystal-Tower-Obelisk-Towers-3.webp?v=1760677909","\/\/crystaldestiny.com\/cdn\/shop\/files\/Fluorite-Crystal-Tower-Obelisk-Towers-4.webp?v=1760677911","\/\/crystaldestiny.com\/cdn\/shop\/files\/Fluorite-Crystal-Tower-Obelisk-Towers-5.webp?v=1760677912","\/\/crystaldestiny.com\/cdn\/shop\/files\/Fluorite-Crystal-Tower-Obelisk-Towers-6.webp?v=1760677914","\/\/crystaldestiny.com\/cdn\/shop\/files\/Fluorite-Crystal-Tower-Obelisk-Towers-Green-Fluorite-1pc-50-100g-7.webp?v=1765430358"],"featured_image":"\/\/crystaldestiny.com\/cdn\/shop\/files\/Fluorite-Crystal-Tower-Obelisk-Towers.webp?v=1760677906","options":["Material","Size"],"media":[{"alt":"Fluorite Crystal Tower Obelisk-Towers-Ali-Green Fluorite-1pc 50-100g-Crystal Destiny","id":31967224168619,"position":1,"preview_image":{"aspect_ratio":1.0,"height":800,"width":800,"src":"\/\/crystaldestiny.com\/cdn\/shop\/files\/Fluorite-Crystal-Tower-Obelisk-Towers.webp?v=1760677906"},"aspect_ratio":1.0,"height":800,"media_type":"image","src":"\/\/crystaldestiny.com\/cdn\/shop\/files\/Fluorite-Crystal-Tower-Obelisk-Towers.webp?v=1760677906","width":800},{"alt":"Fluorite Crystal Tower Obelisk-Towers-Ali-Green Fluorite-1pc 50-100g-Crystal Destiny","id":31967224135851,"position":2,"preview_image":{"aspect_ratio":1.0,"height":800,"width":800,"src":"\/\/crystaldestiny.com\/cdn\/shop\/files\/Fluorite-Crystal-Tower-Obelisk-Towers-2.webp?v=1760677907"},"aspect_ratio":1.0,"height":800,"media_type":"image","src":"\/\/crystaldestiny.com\/cdn\/shop\/files\/Fluorite-Crystal-Tower-Obelisk-Towers-2.webp?v=1760677907","width":800},{"alt":"Fluorite Crystal Tower Obelisk-Towers-Ali-Green Fluorite-1pc 50-100g-Crystal Destiny","id":31967224201387,"position":3,"preview_image":{"aspect_ratio":1.0,"height":800,"width":800,"src":"\/\/crystaldestiny.com\/cdn\/shop\/files\/Fluorite-Crystal-Tower-Obelisk-Towers-3.webp?v=1760677909"},"aspect_ratio":1.0,"height":800,"media_type":"image","src":"\/\/crystaldestiny.com\/cdn\/shop\/files\/Fluorite-Crystal-Tower-Obelisk-Towers-3.webp?v=1760677909","width":800},{"alt":"Fluorite Crystal Tower Obelisk-Towers-Ali-Green Fluorite-1pc 50-100g-Crystal Destiny","id":31967224234155,"position":4,"preview_image":{"aspect_ratio":1.0,"height":903,"width":903,"src":"\/\/crystaldestiny.com\/cdn\/shop\/files\/Fluorite-Crystal-Tower-Obelisk-Towers-4.webp?v=1760677911"},"aspect_ratio":1.0,"height":903,"media_type":"image","src":"\/\/crystaldestiny.com\/cdn\/shop\/files\/Fluorite-Crystal-Tower-Obelisk-Towers-4.webp?v=1760677911","width":903},{"alt":"Fluorite Crystal Tower Obelisk-Towers-Ali-Green Fluorite-1pc 50-100g-Crystal Destiny","id":31967224266923,"position":5,"preview_image":{"aspect_ratio":1.0,"height":924,"width":924,"src":"\/\/crystaldestiny.com\/cdn\/shop\/files\/Fluorite-Crystal-Tower-Obelisk-Towers-5.webp?v=1760677912"},"aspect_ratio":1.0,"height":924,"media_type":"image","src":"\/\/crystaldestiny.com\/cdn\/shop\/files\/Fluorite-Crystal-Tower-Obelisk-Towers-5.webp?v=1760677912","width":924},{"alt":"Fluorite Crystal Tower Obelisk-Towers-Ali-Green Fluorite-1pc 50-100g-Crystal Destiny","id":31967224299691,"position":6,"preview_image":{"aspect_ratio":1.0,"height":800,"width":800,"src":"\/\/crystaldestiny.com\/cdn\/shop\/files\/Fluorite-Crystal-Tower-Obelisk-Towers-6.webp?v=1760677914"},"aspect_ratio":1.0,"height":800,"media_type":"image","src":"\/\/crystaldestiny.com\/cdn\/shop\/files\/Fluorite-Crystal-Tower-Obelisk-Towers-6.webp?v=1760677914","width":800},{"alt":"Fluorite Crystal Tower Obelisk-Towers-Ali-Green Fluorite-1pc 50-100g-Crystal Destiny","id":31967224332459,"position":7,"preview_image":{"aspect_ratio":1.0,"height":800,"width":800,"src":"\/\/crystaldestiny.com\/cdn\/shop\/files\/Fluorite-Crystal-Tower-Obelisk-Towers-Green-Fluorite-1pc-50-100g-7.webp?v=1765430358"},"aspect_ratio":1.0,"height":800,"media_type":"image","src":"\/\/crystaldestiny.com\/cdn\/shop\/files\/Fluorite-Crystal-Tower-Obelisk-Towers-Green-Fluorite-1pc-50-100g-7.webp?v=1765430358","width":800}],"requires_selling_plan":false,"selling_plan_groups":[],"content":"\u003cp data-end=\"499\" data-start=\"204\"\u003eThese fluorite crystal towers feature natural, polished points that showcase the stone’s vibrant banding and rich color variations. Each tower is carefully shaped to highlight its unique patterns, making it a striking addition to any crystal collection or home décor.\u003c\/p\u003e\n\u003cp data-end=\"712\" data-start=\"501\"\u003eFluorite is known for enhancing focus, mental clarity, and balance. These towers are ideal for meditation, energy work, or as an eye-catching centerpiece that promotes harmony and positive energy in any space.\u003c\/p\u003e\n\u003cp data-end=\"887\" data-start=\"714\"\u003eCollectors and spiritual enthusiasts will appreciate the combination of natural beauty and energetic properties, making these towers both a decorative and meaningful tool.\u003c\/p\u003e\n\u003cp data-end=\"887\" data-start=\"714\"\u003eThis product is pulled at random by size.\u003c\/p\u003e\u003ch2\u003eCrystal Towers, Wands, Generators, Points, Pillars \u0026amp; Obelisks — What's the Difference?\u003c\/h2\u003e\n\u003cp id=\"isPasted\"\u003eWhile these terms may vary, they all describe beautifully shaped crystals with a pointed tip designed to channel and direct energy. Each name highlights a unique aspect of their use:\u003c\/p\u003e\n\u003cul\u003e\n\u003cli\u003e\n\u003cstrong\u003eTowers\u003c\/strong\u003e- Known for their steady, grounding presence, crystal towers help focus and amplify energy, making them perfect for meditation and manifestation.\u003c\/li\u003e\n\u003cli\u003e\n\u003cstrong\u003eWands\u003c\/strong\u003e- Traditionally used in energy work and healing, crystal wands are excellent for directing energy flow and clearing blockages.\u003c\/li\u003e\n\u003cli\u003e\n\u003cstrong\u003ePillars\u003c\/strong\u003e- Symbolizing strength and stability, crystal pillars create a balanced and harmonious environment, making them great for home decor and spiritual practices.\u003c\/li\u003e\n\u003cli\u003e\n\u003cstrong\u003eObelisks\u003c\/strong\u003e- Inspired by ancient structures, crystal obelisks are believed to connect earthly and spiritual energies, making them powerful tools for transformation and enlightenment.\u003c\/li\u003e\n\u003c\/ul\u003e\n\u003cp\u003eNo matter what you call them, these crystals serve the same purpose—to enhance energy, intention, and harmony in your space. Choose the one that resonates most with you!\u003c\/p\u003e"},"options":[{"name":"Material","position":1,"values":["Green Fluorite"]},{"name":"Size","position":2,"values":["1pc 50-100g","1pc 100-150g","1pc 150-200g"]}],"custom_metafields":{"shipping_time":"12-16 days"},"metafields":{"badge":"\u003cdiv style='display:none' class='jdgm-prev-badge' data-average-rating='0.00' data-number-of-reviews='0' data-number-of-questions='0'\u003e \u003cspan class='jdgm-prev-badge__stars' data-score='0.00' tabindex='0' aria-label='0.00 stars' role='button'\u003e \u003cspan class='jdgm-star jdgm--off'\u003e\u003c\/span\u003e\u003cspan class='jdgm-star jdgm--off'\u003e\u003c\/span\u003e\u003cspan class='jdgm-star jdgm--off'\u003e\u003c\/span\u003e\u003cspan class='jdgm-star jdgm--off'\u003e\u003c\/span\u003e\u003cspan class='jdgm-star jdgm--off'\u003e\u003c\/span\u003e \u003c\/span\u003e \u003cspan class='jdgm-prev-badge__text'\u003e No reviews \u003c\/span\u003e \u003c\/div\u003e","widget":"\u003cdiv class='jdgm-rev-widg' data-updated-at='2025-10-16T20:22:07Z' data-average-rating='0.00' data-number-of-reviews='0' data-number-of-questions='0' data-image-url='https:\/\/cdn.shopify.com\/s\/files\/1\/0613\/0345\/5915\/files\/Green-Fluorite-Crystal-Tower-Towers.webp?v=1760632263'\u003e \u003cstyle class='jdgm-temp-hiding-style'\u003e.jdgm-rev-widg{ display: none }\u003c\/style\u003e \u003cdiv class='jdgm-rev-widg__header'\u003e \u003ch2 class='jdgm-rev-widg__title'\u003eCustomer Reviews\u003c\/h2\u003e \u003cdiv class='jdgm-rev-widg__summary'\u003e \u003cdiv class='jdgm-rev-widg__summary-stars' aria-label='Average rating is 0.00 stars' role='img'\u003e \u003cspan class='jdgm-star jdgm--off'\u003e\u003c\/span\u003e\u003cspan class='jdgm-star jdgm--off'\u003e\u003c\/span\u003e\u003cspan class='jdgm-star jdgm--off'\u003e\u003c\/span\u003e\u003cspan class='jdgm-star jdgm--off'\u003e\u003c\/span\u003e\u003cspan class='jdgm-star jdgm--off'\u003e\u003c\/span\u003e \u003c\/div\u003e \u003cdiv class='jdgm-rev-widg__summary-text'\u003eBe the first to write a review\u003c\/div\u003e \u003c\/div\u003e \u003ca style='display: none' href='#' class='jdgm-write-rev-link' role='button'\u003eWrite a review\u003c\/a\u003e \u003cdiv class='jdgm-histogram jdgm-temp-hidden'\u003e \u003cdiv class='jdgm-histogram__row' data-rating='5' data-frequency='0' data-percentage='0'\u003e \u003cdiv class='jdgm-histogram__star' role='button' aria-label=\"0% (0) reviews with 5 star rating\" tabindex='0' \u003e\u003cspan class='jdgm-star jdgm--on'\u003e\u003c\/span\u003e\u003cspan class='jdgm-star jdgm--on'\u003e\u003c\/span\u003e\u003cspan class='jdgm-star jdgm--on'\u003e\u003c\/span\u003e\u003cspan class='jdgm-star jdgm--on'\u003e\u003c\/span\u003e\u003cspan class='jdgm-star jdgm--on'\u003e\u003c\/span\u003e\u003c\/div\u003e \u003cdiv class='jdgm-histogram__bar'\u003e \u003cdiv class='jdgm-histogram__bar-content' style='width: 0%;'\u003e \u003c\/div\u003e \u003c\/div\u003e \u003cdiv class='jdgm-histogram__percentage'\u003e0%\u003c\/div\u003e \u003cdiv class='jdgm-histogram__frequency'\u003e(0)\u003c\/div\u003e \u003c\/div\u003e \u003cdiv class='jdgm-histogram__row' data-rating='4' data-frequency='0' data-percentage='0'\u003e \u003cdiv class='jdgm-histogram__star' role='button' aria-label=\"0% (0) reviews with 4 star rating\" tabindex='0' \u003e\u003cspan class='jdgm-star jdgm--on'\u003e\u003c\/span\u003e\u003cspan class='jdgm-star jdgm--on'\u003e\u003c\/span\u003e\u003cspan class='jdgm-star jdgm--on'\u003e\u003c\/span\u003e\u003cspan class='jdgm-star jdgm--on'\u003e\u003c\/span\u003e\u003cspan class='jdgm-star jdgm--off'\u003e\u003c\/span\u003e\u003c\/div\u003e \u003cdiv class='jdgm-histogram__bar'\u003e \u003cdiv class='jdgm-histogram__bar-content' style='width: 0%;'\u003e \u003c\/div\u003e \u003c\/div\u003e \u003cdiv class='jdgm-histogram__percentage'\u003e0%\u003c\/div\u003e \u003cdiv class='jdgm-histogram__frequency'\u003e(0)\u003c\/div\u003e \u003c\/div\u003e \u003cdiv class='jdgm-histogram__row' data-rating='3' data-frequency='0' data-percentage='0'\u003e \u003cdiv class='jdgm-histogram__star' role='button' aria-label=\"0% (0) reviews with 3 star rating\" tabindex='0' \u003e\u003cspan class='jdgm-star jdgm--on'\u003e\u003c\/span\u003e\u003cspan class='jdgm-star jdgm--on'\u003e\u003c\/span\u003e\u003cspan class='jdgm-star jdgm--on'\u003e\u003c\/span\u003e\u003cspan class='jdgm-star jdgm--off'\u003e\u003c\/span\u003e\u003cspan class='jdgm-star jdgm--off'\u003e\u003c\/span\u003e\u003c\/div\u003e \u003cdiv class='jdgm-histogram__bar'\u003e \u003cdiv class='jdgm-histogram__bar-content' style='width: 0%;'\u003e \u003c\/div\u003e \u003c\/div\u003e \u003cdiv class='jdgm-histogram__percentage'\u003e0%\u003c\/div\u003e \u003cdiv class='jdgm-histogram__frequency'\u003e(0)\u003c\/div\u003e \u003c\/div\u003e \u003cdiv class='jdgm-histogram__row' data-rating='2' data-frequency='0' data-percentage='0'\u003e \u003cdiv class='jdgm-histogram__star' role='button' aria-label=\"0% (0) reviews with 2 star rating\" tabindex='0' \u003e\u003cspan class='jdgm-star jdgm--on'\u003e\u003c\/span\u003e\u003cspan class='jdgm-star jdgm--on'\u003e\u003c\/span\u003e\u003cspan class='jdgm-star jdgm--off'\u003e\u003c\/span\u003e\u003cspan class='jdgm-star jdgm--off'\u003e\u003c\/span\u003e\u003cspan class='jdgm-star jdgm--off'\u003e\u003c\/span\u003e\u003c\/div\u003e \u003cdiv class='jdgm-histogram__bar'\u003e \u003cdiv class='jdgm-histogram__bar-content' style='width: 0%;'\u003e \u003c\/div\u003e \u003c\/div\u003e \u003cdiv class='jdgm-histogram__percentage'\u003e0%\u003c\/div\u003e \u003cdiv class='jdgm-histogram__frequency'\u003e(0)\u003c\/div\u003e \u003c\/div\u003e \u003cdiv class='jdgm-histogram__row' data-rating='1' data-frequency='0' data-percentage='0'\u003e \u003cdiv class='jdgm-histogram__star' role='button' aria-label=\"0% (0) reviews with 1 star rating\" tabindex='0' \u003e\u003cspan class='jdgm-star jdgm--on'\u003e\u003c\/span\u003e\u003cspan class='jdgm-star jdgm--off'\u003e\u003c\/span\u003e\u003cspan class='jdgm-star jdgm--off'\u003e\u003c\/span\u003e\u003cspan class='jdgm-star jdgm--off'\u003e\u003c\/span\u003e\u003cspan class='jdgm-star jdgm--off'\u003e\u003c\/span\u003e\u003c\/div\u003e \u003cdiv class='jdgm-histogram__bar'\u003e \u003cdiv class='jdgm-histogram__bar-content' style='width: 0%;'\u003e \u003c\/div\u003e \u003c\/div\u003e \u003cdiv class='jdgm-histogram__percentage'\u003e0%\u003c\/div\u003e \u003cdiv class='jdgm-histogram__frequency'\u003e(0)\u003c\/div\u003e \u003c\/div\u003e \u003cdiv class='jdgm-histogram__row jdgm-histogram__clear-filter' data-rating=null tabindex='0'\u003e\u003c\/div\u003e \u003c\/div\u003e \u003cdiv class='jdgm-rev-widg__sort-wrapper'\u003e\u003c\/div\u003e \u003c\/div\u003e \u003cdiv class='jdgm-rev-widg__body'\u003e \u003cdiv class='jdgm-rev-widg__reviews'\u003e\u003c\/div\u003e \u003cdiv class='jdgm-paginate' data-per-page='4' data-url='https:\/\/api.judge.me\/reviews\/reviews_for_widget' style=\"display: none;\"\u003e\u003c\/div\u003e \u003c\/div\u003e \u003cdiv class='jdgm-rev-widg__paginate-spinner-wrapper'\u003e \u003cdiv class='jdgm-spinner'\u003e\u003c\/div\u003e \u003c\/div\u003e \u003c\/div\u003e"},"collections":[{"id":294880051371,"handle":"crystals","title":"Crystals","updated_at":"2026-01-07T23:43:11-05:00","body_html":"\u003cp data-start=\"159\" data-end=\"687\"\u003e✨ \u003cstrong data-start=\"161\" data-end=\"216\"\u003eDiscover the Magic of Crystals with Crystal Destiny\u003c\/strong\u003e ✨\u003cbr data-start=\"218\" data-end=\"221\"\u003eCrystals have been treasured for centuries—not only for their natural beauty but also for their powerful healing energies. Beyond their visual allure, they bring balance, harmony, and positive energy into any space. Whether used for home décor, meditation, or simply to elevate the energy of your surroundings, crystals create a sanctuary of peace, relaxation, and well-being. Each piece is a unique gift from the Earth—visually stunning and spiritually uplifting.\u003c\/p\u003e\n\u003cp data-start=\"689\" data-end=\"1011\"\u003eAt \u003cstrong data-start=\"692\" data-end=\"711\"\u003eCrystal Destiny\u003c\/strong\u003e, our signature collection showcases a curated selection of exquisite crystals, from radiant Quartz to soothing Amethyst. Every stone is carefully sourced for its elegance and metaphysical resonance, making them perfect for enhancing your home, uplifting your spirit, or gifting to someone special.\u003c\/p\u003e\n\u003cp data-start=\"1013\" data-end=\"1206\"\u003eExperience the timeless sophistication of crystalline wonders. Explore the \u003cstrong data-start=\"1088\" data-end=\"1118\"\u003eCrystal Destiny Collection\u003c\/strong\u003e today and bring the transformative beauty of these treasures into your everyday life.\u003c\/p\u003e","published_at":"2023-06-05T11:24:02-04:00","sort_order":"created-desc","template_suffix":"","disjunctive":false,"rules":[{"column":"tag","relation":"equals","condition":"crystal"},{"column":"type","relation":"not_contains","condition":"925 Sterling Silver"},{"column":"type","relation":"not_contains","condition":"Wire Wraps"}],"published_scope":"global"},{"id":319455887531,"handle":"heart-chakra-crystals","title":"Heart Chakra Crystals","updated_at":"2026-01-07T23:43:11-05:00","body_html":"\u003cp data-start=\"107\" data-end=\"457\"\u003e✨ \u003cstrong data-start=\"109\" data-end=\"134\"\u003eHeart Chakra Crystals\u003c\/strong\u003e ✨\u003cbr data-start=\"136\" data-end=\"139\"\u003eOpen your heart to love, compassion, and emotional balance with our \u003cstrong data-start=\"207\" data-end=\"232\"\u003eHeart Chakra Crystals\u003c\/strong\u003e. Located at the center of the chest, the Heart Chakra governs love, forgiveness, and connection to yourself and others. These crystals help release emotional blockages, foster empathy, and promote harmonious relationships.\u003c\/p\u003e\n\u003cp data-start=\"459\" data-end=\"773\"\u003eOur curated selection includes stones such as Rose Quartz, Green Aventurine, and Rhodonite—each chosen for their ability to inspire self-love, emotional healing, and compassion. Perfect for meditation, energy work, or wearing as jewelry, Heart Chakra Crystals support the flow of loving energy and inner harmony.\u003c\/p\u003e\n\u003cp data-start=\"775\" data-end=\"906\"\u003eEmbrace emotional balance, cultivate love, and harness the transformative energy of the Heart Chakra with these radiant crystals.\u003c\/p\u003e","published_at":"2025-07-17T18:17:52-04:00","sort_order":"best-selling","template_suffix":"","disjunctive":false,"rules":[{"column":"variant_metafield_definition","relation":"equals","condition":"Heart"}],"published_scope":"global","image":{"created_at":"2025-07-17T19:08:29-04:00","alt":null,"width":1080,"height":1080,"src":"\/\/crystaldestiny.com\/cdn\/shop\/collections\/Heart_Chakra_Collection.jpg?v=1762474927"}},{"id":319455789227,"handle":"third-eye-chakra-crystals","title":"Third Eye Chakra Crystals","updated_at":"2026-01-07T23:42:38-05:00","body_html":"\u003cp data-start=\"124\" data-end=\"474\"\u003e✨ \u003cstrong data-start=\"126\" data-end=\"155\"\u003eThird Eye Chakra Crystals\u003c\/strong\u003e ✨\u003cbr data-start=\"157\" data-end=\"160\"\u003eAwaken intuition, clarity, and insight with our \u003cstrong data-start=\"208\" data-end=\"237\"\u003eThird Eye Chakra Crystals\u003c\/strong\u003e. Located between the eyebrows, the Third Eye Chakra governs perception, intuition, and inner wisdom. These crystals help balance and activate this energy center, promoting mental clarity, spiritual awareness, and heightened intuition.\u003c\/p\u003e\n\u003cp data-start=\"476\" data-end=\"835\"\u003eOur curated selection features stones such as Amethyst, Lapis Lazuli, and Sodalite—chosen for their ability to enhance meditation, intuitive practices, and energy work. Whether placed in your sacred space, carried with you, or worn as jewelry, Third Eye Chakra Crystals support mental focus, spiritual growth, and a deeper connection to your inner guidance.\u003c\/p\u003e\n\u003cp data-start=\"837\" data-end=\"976\"\u003eElevate your intuition, expand your awareness, and embrace the transformative power of the Third Eye Chakra with these powerful crystals.\u003c\/p\u003e","published_at":"2025-07-17T18:16:49-04:00","sort_order":"best-selling","template_suffix":"","disjunctive":false,"rules":[{"column":"variant_metafield_definition","relation":"equals","condition":"Third Eye"}],"published_scope":"global","image":{"created_at":"2025-07-17T19:09:01-04:00","alt":null,"width":1080,"height":1080,"src":"\/\/crystaldestiny.com\/cdn\/shop\/collections\/Third_Eye_Chakra_Collection.jpg?v=1762474924"}},{"id":294880116907,"handle":"polished","title":"Polished Crystals","updated_at":"2026-01-07T23:43:11-05:00","body_html":"\u003cp data-start=\"199\" data-end=\"598\"\u003e✨ \u003cstrong data-start=\"201\" data-end=\"248\"\u003eCrystal Destiny Polished Crystal Collection\u003c\/strong\u003e ✨\u003cbr data-start=\"250\" data-end=\"253\"\u003eIndulge in the brilliance of crystals refined to perfection. Our \u003cstrong data-start=\"318\" data-end=\"341\"\u003ePolished Collection\u003c\/strong\u003e showcases gemstones meticulously shaped and smoothed to reveal their natural radiance and timeless beauty. From the shimmering glow of Quartz to the deep allure of Obsidian, each polished piece is a testament to nature’s artistry and human craftsmanship.\u003c\/p\u003e\n\u003cp data-start=\"600\" data-end=\"862\"\u003ePerfect as statement décor, meaningful gifts, or companions on your spiritual journey, polished crystals bring sophistication and elevated energy into any space. Their radiant surfaces reflect not only light but also the transformative power of crystal energy.\u003c\/p\u003e\n\u003cp data-start=\"864\" data-end=\"1022\"\u003eDiscover the elegance of refinement with Crystal Destiny’s Polished Crystal Collection—where every facet shines with intention, beauty, and timeless allure.\u003c\/p\u003e","published_at":"2023-06-05T11:30:44-04:00","sort_order":"created-desc","template_suffix":"","disjunctive":false,"rules":[{"column":"tag","relation":"equals","condition":"polished"}],"published_scope":"global"},{"id":322471624875,"handle":"crystal-favorites","title":"Crystal Enthusiast's Favorites","updated_at":"2026-01-07T23:42:38-05:00","body_html":"\u003cp\u003eDiscover the crystals our community loves most. This collection features our best-selling stones and accessories, carefully curated to highlight pieces that are always in demand and ready to ship. Whether you’re adding to your collection or searching for a gift, these fan-favorite crystals are timeless staples for energy, beauty, and balance.\u003c\/p\u003e","published_at":"2025-10-01T21:07:06-04:00","sort_order":"price-asc","template_suffix":"","disjunctive":false,"rules":[{"column":"variant_inventory","relation":"greater_than","condition":"1"}],"published_scope":"global"},{"id":321695744171,"handle":"direct-from-supplier","title":"Direct from Supplier","updated_at":"2026-01-07T23:43:11-05:00","body_html":"","published_at":"2025-09-12T16:38:23-04:00","sort_order":"best-selling","template_suffix":"","disjunctive":true,"rules":[{"column":"tag","relation":"equals","condition":"adjusted-shipping"}],"published_scope":"global"},{"id":293659312299,"handle":"best-sellers","title":"Best Sellers","updated_at":"2026-01-07T23:43:11-05:00","body_html":"\u003cp data-start=\"155\" data-end=\"510\"\u003eDiscover the pieces our community loves most. Our Best Sellers Collection brings together handpicked crystals and jewelry that embody timeless elegance, spiritual resonance, and everyday sophistication. Each item has earned its place as a customer favorite—celebrated for both its beauty and its meaningful energy.\u003c\/p\u003e\n\u003cp data-start=\"512\" data-end=\"802\"\u003eFrom stunning statement pieces to versatile daily companions, these treasures are curated to elevate your space, uplift your spirit, and reflect refined taste. Indulge in what’s most cherished and let our best sellers guide you toward the perfect blend of style and transformative energy.\u003c\/p\u003e\n\u003cp data-start=\"804\" data-end=\"932\"\u003eExplore the Best Sellers Collection today—where elegance meets intention, and every piece tells a story of beauty and balance.\u003c\/p\u003e","published_at":"2023-03-15T16:04:51-04:00","sort_order":"best-selling","template_suffix":"","disjunctive":false,"rules":[{"column":"variant_price","relation":"greater_than","condition":"0"},{"column":"variant_inventory","relation":"greater_than","condition":"0"},{"column":"type","relation":"not_equals","condition":"Shipping Protection"}],"published_scope":"global"},{"id":321370390699,"handle":"monthly-crystal-sale","title":"Monthly Crystal Sale | Spheres \u0026 Towers","updated_at":"2026-01-06T23:24:37-05:00","body_html":"\u003cp\u003eShop our \u003cstrong\u003eMonthly Crystal Sale\u003c\/strong\u003e, where you can shop a wide selection of healing crystals at discounted prices. Explore \u003cstrong\u003ecrystal spheres and towers,\u003c\/strong\u003e— all carefully curated to support meditation, energy balancing, and spiritual wellness. Whether you're looking to enhance your home decor, boost your daily energy, or find the perfect gift, our \u003cstrong\u003ecrystals for healing and manifestation\u003c\/strong\u003e offer both beauty and metaphysical benefits.\u003c\/p\u003e\n\u003cp\u003eEach month, our sale features \u003cstrong\u003enew discounted collections\u003c\/strong\u003e, from \u003cstrong\u003enatural quartz and amethyst towers\u003c\/strong\u003e to \u003cstrong\u003ewire-wrapped pendants and polished stones\u003c\/strong\u003e, so there's always something fresh to discover. Shop with confidence knowing you're getting high-quality crystals with \u003cstrong\u003efree shipping options\u003c\/strong\u003e and a trusted experience.\u003c\/p\u003e\n\u003cp\u003e\u003cstrong\u003eTake advantage of the Monthly Crystal Sale today\u003c\/strong\u003e and add powerful, natural energy to your life with \u003cstrong\u003eauthentic healing crystals\u003c\/strong\u003e — while our limited-time discounts last.\u003c\/p\u003e\n\u003cp\u003e\u003cstrong\u003e*Discount automatically applied at checkout.\u003c\/strong\u003e\u003c\/p\u003e","published_at":"2025-12-02T01:26:17-05:00","sort_order":"alpha-asc","template_suffix":"","disjunctive":true,"rules":[{"column":"tag","relation":"equals","condition":"spheres"},{"column":"tag","relation":"equals","condition":"Towers"}],"published_scope":"global","image":{"created_at":"2026-01-01T01:32:34-05:00","alt":"","width":960,"height":960,"src":"\/\/crystaldestiny.com\/cdn\/shop\/collections\/3E8C2969-1B86-4ACE-B349-98E9D8768424.jpg?v=1767249154"}},{"id":297596059819,"handle":"all","title":"All Crystals \u0026 Jewelry","updated_at":"2026-01-07T23:43:11-05:00","body_html":"\u003cp data-start=\"149\" data-end=\"494\"\u003e✨ \u003cstrong data-start=\"151\" data-end=\"181\"\u003eWelcome to Crystal Destiny\u003c\/strong\u003e ✨\u003cbr data-start=\"183\" data-end=\"186\"\u003eStep into a world where beauty, energy, and artistry unite. Our collection is a treasure trove of exquisite crystals, from the raw, untamed elegance of natural formations to the polished brilliance of expertly crafted pieces. Each crystal is a masterpiece, carrying its own unique story and timeless charm.\u003c\/p\u003e\n\u003cp data-start=\"496\" data-end=\"831\"\u003eWhether you’re drawn to the calming presence of Amethyst, the vibrant energy of Citrine, or the grounding strength of Jasper, our crystals invite you to connect with nature’s finest wonders. Perfect for enhancing your space, supporting your spiritual journey, or gifting with intention, every piece resonates with beauty and meaning.\u003c\/p\u003e\n\u003cp data-start=\"833\" data-end=\"1000\"\u003eElevate your surroundings, embrace the mystique, and explore the enchanting world of crystals at \u003cstrong data-start=\"930\" data-end=\"949\"\u003eCrystal Destiny\u003c\/strong\u003e—where every crystal is waiting to be discovered.\u003c\/p\u003e","published_at":"2023-11-10T13:55:31-05:00","sort_order":"created-desc","template_suffix":"","disjunctive":false,"rules":[{"column":"type","relation":"not_equals","condition":"asdf"}],"published_scope":"global"},{"id":296256405675,"handle":"crystal-towers","title":"Crystal Towers","updated_at":"2026-01-06T23:24:37-05:00","body_html":"\u003cp data-end=\"568\" data-start=\"152\"\u003e✨ \u003cstrong data-end=\"190\" data-start=\"154\"\u003eCrystal Destiny Tower Collection\u003c\/strong\u003e ✨\u003cbr data-end=\"195\" data-start=\"192\"\u003eEnchant your space with the timeless beauty and powerful energy of crystal towers. Each piece in our \u003cstrong data-end=\"316\" data-start=\"296\"\u003eTower Collection\u003c\/strong\u003e is carefully crafted to showcase nature’s artistry while radiating higher vibrations and spiritual resonance. From the clarity of Quartz to the calming presence of Amethyst, these towers are both decorative masterpieces and tools for transformation.\u003c\/p\u003e\n\u003cp data-end=\"765\" data-start=\"570\"\u003ePerfect for meditation spaces, energy work, or simply elevating your home décor, crystal towers channel focused energy upward—creating balance, harmony, and refined elegance in any environment.\u003c\/p\u003e\n\u003cp data-end=\"917\" data-start=\"767\"\u003eDiscover the Crystal Destiny Tower Collection today and transform your surroundings into a sanctuary of beauty, purpose, and spiritual significance.\u003c\/p\u003e\n\u003ch2\u003eCrystal Towers, Wands, Generators, Points, Pillars \u0026amp; Obelisks — What's the Difference?\u003c\/h2\u003e\n\u003cp id=\"isPasted\"\u003eWhile these terms may vary, they all describe beautifully shaped crystals with a pointed tip designed to channel and direct energy. Each name highlights a unique aspect of their use:\u003c\/p\u003e\n\u003cul\u003e\n\u003cli\u003e\n\u003cstrong\u003eTowers\u003c\/strong\u003e- Known for their steady, grounding presence, crystal towers help focus and amplify energy, making them perfect for meditation and manifestation.\u003c\/li\u003e\n\u003cli\u003e\n\u003cstrong\u003eWands\u003c\/strong\u003e- Traditionally used in energy work and healing, crystal wands are excellent for directing energy flow and clearing blockages.\u003c\/li\u003e\n\u003cli\u003e\n\u003cstrong\u003ePillars\u003c\/strong\u003e- Symbolizing strength and stability, crystal pillars create a balanced and harmonious environment, making them great for home decor and spiritual practices.\u003c\/li\u003e\n\u003cli\u003e\n\u003cstrong\u003eObelisks\u003c\/strong\u003e- Inspired by ancient structures, crystal obelisks are believed to connect earthly and spiritual energies, making them powerful tools for transformation and enlightenment.\u003c\/li\u003e\n\u003c\/ul\u003e\n\u003cp\u003eNo matter what you call them, these crystals serve the same purpose—to enhance energy, intention, and harmony in your space. Choose the one that resonates most with you!\u003c\/p\u003e","published_at":"2023-09-14T12:52:35-04:00","sort_order":"created-desc","template_suffix":"","disjunctive":false,"rules":[{"column":"tag","relation":"equals","condition":"towers"}],"published_scope":"global"},{"id":298983391403,"handle":"january-crystal-sale","title":"January Sale | 25% Off Crystal Towers \u0026 Spheres","updated_at":"2026-01-06T23:24:37-05:00","body_html":"\u003cp\u003eShop our \u003cstrong\u003eJanuary Crystal Sale\u003c\/strong\u003e, where you can shop a wide selection of healing crystals at discounted prices. Explore \u003cstrong\u003eCrystal Towers, \u0026amp; Crystal Spheres\u003c\/strong\u003e — all carefully curated and crafted to support meditation, energy balancing, and spiritual wellness. Whether you're looking to enhance your home decor, boost your daily energy, or find the perfect gift, our \u003cstrong\u003ecrystals for healing and manifestation\u003c\/strong\u003e offer both beauty and metaphysical benefits.\u003c\/p\u003e\n\u003cp\u003eThis January, our sale features \u003cstrong\u003ediscounted crystal towers and spheres\u003c\/strong\u003e, from \u003cstrong\u003enatural quartz \u003c\/strong\u003eand \u003cstrong\u003eamethyst \u003c\/strong\u003eto \u003cstrong\u003ebumblebee jasper \u003c\/strong\u003eand \u003cstrong\u003ecarnelian\u003c\/strong\u003e, so there's always something fresh to discover. Shop with confidence knowing you're getting high-quality crystals with \u003cstrong\u003efree shipping options\u003c\/strong\u003e and a trusted experience.\u003c\/p\u003e\n\u003cp\u003e\u003cstrong\u003eTake advantage of the January Crystal Sale today\u003c\/strong\u003e and add powerful, natural energy to your life with \u003cstrong\u003eauthentic healing crystals\u003c\/strong\u003e — while our limited-time discounts last.\u003c\/p\u003e\n\u003cp\u003e\u003cstrong\u003e*Discount automatically applied at checkout.\u003c\/strong\u003e\u003c\/p\u003e","published_at":"2026-01-01T00:07:17-05:00","sort_order":"alpha-asc","template_suffix":"monthly-collection","disjunctive":true,"rules":[{"column":"tag","relation":"equals","condition":"Spheres"},{"column":"tag","relation":"equals","condition":"Towers"}],"published_scope":"global","image":{"created_at":"2026-01-01T01:29:59-05:00","alt":"","width":960,"height":960,"src":"\/\/crystaldestiny.com\/cdn\/shop\/collections\/1464163B-22B1-4D62-BEC5-CEC9AECB670B.jpg?v=1767248999"}}]}
[{"alt":"Fluorite Crystal Tower Obelisk-Towers-Ali-Green Fluorite-1pc 50-100g-Crystal Destiny","id":31967224168619,"position":1,"preview_image":{"aspect_ratio":1.0,"height":800,"width":800,"src":"\/\/crystaldestiny.com\/cdn\/shop\/files\/Fluorite-Crystal-Tower-Obelisk-Towers.webp?v=1760677906"},"aspect_ratio":1.0,"height":800,"media_type":"image","src":"\/\/crystaldestiny.com\/cdn\/shop\/files\/Fluorite-Crystal-Tower-Obelisk-Towers.webp?v=1760677906","width":800},{"alt":"Fluorite Crystal Tower Obelisk-Towers-Ali-Green Fluorite-1pc 50-100g-Crystal Destiny","id":31967224135851,"position":2,"preview_image":{"aspect_ratio":1.0,"height":800,"width":800,"src":"\/\/crystaldestiny.com\/cdn\/shop\/files\/Fluorite-Crystal-Tower-Obelisk-Towers-2.webp?v=1760677907"},"aspect_ratio":1.0,"height":800,"media_type":"image","src":"\/\/crystaldestiny.com\/cdn\/shop\/files\/Fluorite-Crystal-Tower-Obelisk-Towers-2.webp?v=1760677907","width":800},{"alt":"Fluorite Crystal Tower Obelisk-Towers-Ali-Green Fluorite-1pc 50-100g-Crystal Destiny","id":31967224201387,"position":3,"preview_image":{"aspect_ratio":1.0,"height":800,"width":800,"src":"\/\/crystaldestiny.com\/cdn\/shop\/files\/Fluorite-Crystal-Tower-Obelisk-Towers-3.webp?v=1760677909"},"aspect_ratio":1.0,"height":800,"media_type":"image","src":"\/\/crystaldestiny.com\/cdn\/shop\/files\/Fluorite-Crystal-Tower-Obelisk-Towers-3.webp?v=1760677909","width":800},{"alt":"Fluorite Crystal Tower Obelisk-Towers-Ali-Green Fluorite-1pc 50-100g-Crystal Destiny","id":31967224234155,"position":4,"preview_image":{"aspect_ratio":1.0,"height":903,"width":903,"src":"\/\/crystaldestiny.com\/cdn\/shop\/files\/Fluorite-Crystal-Tower-Obelisk-Towers-4.webp?v=1760677911"},"aspect_ratio":1.0,"height":903,"media_type":"image","src":"\/\/crystaldestiny.com\/cdn\/shop\/files\/Fluorite-Crystal-Tower-Obelisk-Towers-4.webp?v=1760677911","width":903},{"alt":"Fluorite Crystal Tower Obelisk-Towers-Ali-Green Fluorite-1pc 50-100g-Crystal Destiny","id":31967224266923,"position":5,"preview_image":{"aspect_ratio":1.0,"height":924,"width":924,"src":"\/\/crystaldestiny.com\/cdn\/shop\/files\/Fluorite-Crystal-Tower-Obelisk-Towers-5.webp?v=1760677912"},"aspect_ratio":1.0,"height":924,"media_type":"image","src":"\/\/crystaldestiny.com\/cdn\/shop\/files\/Fluorite-Crystal-Tower-Obelisk-Towers-5.webp?v=1760677912","width":924},{"alt":"Fluorite Crystal Tower Obelisk-Towers-Ali-Green Fluorite-1pc 50-100g-Crystal Destiny","id":31967224299691,"position":6,"preview_image":{"aspect_ratio":1.0,"height":800,"width":800,"src":"\/\/crystaldestiny.com\/cdn\/shop\/files\/Fluorite-Crystal-Tower-Obelisk-Towers-6.webp?v=1760677914"},"aspect_ratio":1.0,"height":800,"media_type":"image","src":"\/\/crystaldestiny.com\/cdn\/shop\/files\/Fluorite-Crystal-Tower-Obelisk-Towers-6.webp?v=1760677914","width":800},{"alt":"Fluorite Crystal Tower Obelisk-Towers-Ali-Green Fluorite-1pc 50-100g-Crystal Destiny","id":31967224332459,"position":7,"preview_image":{"aspect_ratio":1.0,"height":800,"width":800,"src":"\/\/crystaldestiny.com\/cdn\/shop\/files\/Fluorite-Crystal-Tower-Obelisk-Towers-Green-Fluorite-1pc-50-100g-7.webp?v=1765430358"},"aspect_ratio":1.0,"height":800,"media_type":"image","src":"\/\/crystaldestiny.com\/cdn\/shop\/files\/Fluorite-Crystal-Tower-Obelisk-Towers-Green-Fluorite-1pc-50-100g-7.webp?v=1765430358","width":800}]
{"item":{"id":8434585436331,"title":"Esfera de aventurina dorada","handle":"golden-aventurine-sphere-50mm-cd-10049","description":"\u003cp\u003eEsta esfera de aventurina dorada aprovecha las energías naturales de la piedra, que atraen la prosperidad, en perfecto equilibrio geométrico. Con un distintivo brillo dorado y brillantes inclusiones, esta herramienta de cristal premium sirve tanto como pieza decorativa como instrumento metafísico. Conocida por activar el chakra del plexo solar, la aventurina dorada promueve la confianza, la capacidad de decisión y la manifestación de la abundancia, mientras que su forma esférica asegura una distribución uniforme de la energía, ideal para la meditación, las rejillas de cristal o la exhibición.\u003c\/p\u003e\n\n\u003cp\u003e Este producto es exactamente como se muestra en la imagen, único en su tipo.\u003c\/p\u003e","published_at":"2025-05-20T20:02:12-04:00","created_at":"2025-05-20T20:02:12-04:00","vendor":"Crystal Destiny","type":"Esferas","tags":["crystal","polished","spheres"],"price":3999,"price_min":3999,"price_max":3999,"available":true,"price_varies":false,"compare_at_price":null,"compare_at_price_min":0,"compare_at_price_max":0,"compare_at_price_varies":false,"variants":[{"id":45233114611883,"title":"Venturina \/ 176 g - 50,5 mm","option1":"Venturina","option2":"176 g - 50,5 mm","option3":null,"sku":"CD-10049","requires_shipping":true,"taxable":true,"featured_image":{"id":39490953216171,"product_id":8434585436331,"position":2,"created_at":"2025-05-20T20:04:38-04:00","updated_at":"2025-12-11T00:03:04-05:00","alt":"Golden Aventurine Sphere 50mm-Spheres-Crystal Destiny-Aventurine-176g - 50.5mm-Crystal Destiny","width":1590,"height":1590,"src":"\/\/crystaldestiny.com\/cdn\/shop\/files\/Golden-Aventurine-Sphere-50mm-Spheres-Aventurine-176g-50_5mm-2.jpg?v=1765429384","variant_ids":[45233114611883]},"available":false,"name":"Esfera de aventurina dorada - Venturina \/ 176 g - 50,5 mm","public_title":"Venturina \/ 176 g - 50,5 mm","options":["Venturina","176 g - 50,5 mm"],"price":3999,"weight":0,"compare_at_price":null,"inventory_management":"shopify","barcode":"","featured_media":{"alt":"Golden Aventurine Sphere 50mm-Spheres-Crystal Destiny-Aventurine-176g - 50.5mm-Crystal Destiny","id":31120246866091,"position":2,"preview_image":{"aspect_ratio":1.0,"height":1590,"width":1590,"src":"\/\/crystaldestiny.com\/cdn\/shop\/files\/Golden-Aventurine-Sphere-50mm-Spheres-Aventurine-176g-50_5mm-2.jpg?v=1765429384"}},"requires_selling_plan":false,"selling_plan_allocations":[]},{"id":45233114644651,"title":"Venturina \/ 175 g - 50 mm","option1":"Venturina","option2":"175 g - 50 mm","option3":null,"sku":"CD-10048","requires_shipping":true,"taxable":true,"featured_image":{"id":39490896429227,"product_id":8434585436331,"position":1,"created_at":"2025-05-20T19:55:26-04:00","updated_at":"2025-12-11T00:03:03-05:00","alt":"Golden Aventurine Sphere 50mm-Spheres-Crystal Destiny-Aventurine-175g - 50mm-Crystal Destiny","width":1640,"height":1640,"src":"\/\/crystaldestiny.com\/cdn\/shop\/files\/Golden-Aventurine-Sphere-50mm-Spheres-Aventurine-175g-50mm.jpg?v=1765429383","variant_ids":[45233114644651]},"available":true,"name":"Esfera de aventurina dorada - Venturina \/ 175 g - 50 mm","public_title":"Venturina \/ 175 g - 50 mm","options":["Venturina","175 g - 50 mm"],"price":3999,"weight":0,"compare_at_price":null,"inventory_management":"shopify","barcode":"","featured_media":{"alt":"Golden Aventurine Sphere 50mm-Spheres-Crystal Destiny-Aventurine-175g - 50mm-Crystal Destiny","id":31120198533291,"position":1,"preview_image":{"aspect_ratio":1.0,"height":1640,"width":1640,"src":"\/\/crystaldestiny.com\/cdn\/shop\/files\/Golden-Aventurine-Sphere-50mm-Spheres-Aventurine-175g-50mm.jpg?v=1765429383"}},"requires_selling_plan":false,"selling_plan_allocations":[]}],"images":["\/\/crystaldestiny.com\/cdn\/shop\/files\/Golden-Aventurine-Sphere-50mm-Spheres-Aventurine-175g-50mm.jpg?v=1765429383","\/\/crystaldestiny.com\/cdn\/shop\/files\/Golden-Aventurine-Sphere-50mm-Spheres-Aventurine-176g-50_5mm-2.jpg?v=1765429384"],"featured_image":"\/\/crystaldestiny.com\/cdn\/shop\/files\/Golden-Aventurine-Sphere-50mm-Spheres-Aventurine-175g-50mm.jpg?v=1765429383","options":["Material","Tamaño"],"media":[{"alt":"Golden Aventurine Sphere 50mm-Spheres-Crystal Destiny-Aventurine-175g - 50mm-Crystal Destiny","id":31120198533291,"position":1,"preview_image":{"aspect_ratio":1.0,"height":1640,"width":1640,"src":"\/\/crystaldestiny.com\/cdn\/shop\/files\/Golden-Aventurine-Sphere-50mm-Spheres-Aventurine-175g-50mm.jpg?v=1765429383"},"aspect_ratio":1.0,"height":1640,"media_type":"image","src":"\/\/crystaldestiny.com\/cdn\/shop\/files\/Golden-Aventurine-Sphere-50mm-Spheres-Aventurine-175g-50mm.jpg?v=1765429383","width":1640},{"alt":"Golden Aventurine Sphere 50mm-Spheres-Crystal Destiny-Aventurine-176g - 50.5mm-Crystal Destiny","id":31120246866091,"position":2,"preview_image":{"aspect_ratio":1.0,"height":1590,"width":1590,"src":"\/\/crystaldestiny.com\/cdn\/shop\/files\/Golden-Aventurine-Sphere-50mm-Spheres-Aventurine-176g-50_5mm-2.jpg?v=1765429384"},"aspect_ratio":1.0,"height":1590,"media_type":"image","src":"\/\/crystaldestiny.com\/cdn\/shop\/files\/Golden-Aventurine-Sphere-50mm-Spheres-Aventurine-176g-50_5mm-2.jpg?v=1765429384","width":1590}],"requires_selling_plan":false,"selling_plan_groups":[],"content":"\u003cp\u003eEsta esfera de aventurina dorada aprovecha las energías naturales de la piedra, que atraen la prosperidad, en perfecto equilibrio geométrico. Con un distintivo brillo dorado y brillantes inclusiones, esta herramienta de cristal premium sirve tanto como pieza decorativa como instrumento metafísico. Conocida por activar el chakra del plexo solar, la aventurina dorada promueve la confianza, la capacidad de decisión y la manifestación de la abundancia, mientras que su forma esférica asegura una distribución uniforme de la energía, ideal para la meditación, las rejillas de cristal o la exhibición.\u003c\/p\u003e\n\n\u003cp\u003e Este producto es exactamente como se muestra en la imagen, único en su tipo.\u003c\/p\u003e"},"options":[{"name":"Material","position":1,"values":["Venturina"]},{"name":"Tamaño","position":2,"values":["176 g - 50,5 mm","175 g - 50 mm"]}],"custom_metafields":{"shipping_time":"En un plazo de 7 días"},"metafields":{"badge":"\u003cdiv style='display:none' class='jdgm-prev-badge' data-average-rating='0.00' data-number-of-reviews='0' data-number-of-questions='0'\u003e \u003cspan class='jdgm-prev-badge__stars' data-score='0.00' tabindex='0' aria-label='0.00 stars' role='button'\u003e \u003cspan class='jdgm-star jdgm--off'\u003e\u003c\/span\u003e\u003cspan class='jdgm-star jdgm--off'\u003e\u003c\/span\u003e\u003cspan class='jdgm-star jdgm--off'\u003e\u003c\/span\u003e\u003cspan class='jdgm-star jdgm--off'\u003e\u003c\/span\u003e\u003cspan class='jdgm-star jdgm--off'\u003e\u003c\/span\u003e \u003c\/span\u003e \u003cspan class='jdgm-prev-badge__text'\u003e No reviews \u003c\/span\u003e \u003c\/div\u003e","widget":"\u003cdiv class='jdgm-rev-widg' data-updated-at='2025-05-21T00:02:14Z' data-average-rating='0.00' data-number-of-reviews='0' data-number-of-questions='0'\u003e \u003cstyle class='jdgm-temp-hiding-style'\u003e.jdgm-rev-widg{ display: none }\u003c\/style\u003e \u003cdiv class='jdgm-rev-widg__header'\u003e \u003ch2 class='jdgm-rev-widg__title'\u003eCustomer Reviews\u003c\/h2\u003e \u003cdiv class='jdgm-rev-widg__summary'\u003e \u003cdiv class='jdgm-rev-widg__summary-stars' aria-label='Average rating is 0.00 stars' role='img'\u003e \u003cspan class='jdgm-star jdgm--off'\u003e\u003c\/span\u003e\u003cspan class='jdgm-star jdgm--off'\u003e\u003c\/span\u003e\u003cspan class='jdgm-star jdgm--off'\u003e\u003c\/span\u003e\u003cspan class='jdgm-star jdgm--off'\u003e\u003c\/span\u003e\u003cspan class='jdgm-star jdgm--off'\u003e\u003c\/span\u003e \u003c\/div\u003e \u003cdiv class='jdgm-rev-widg__summary-text'\u003eBe the first to write a review\u003c\/div\u003e \u003c\/div\u003e \u003ca style='display: none' href='#' class='jdgm-write-rev-link' role='button'\u003eWrite a review\u003c\/a\u003e \u003cdiv class='jdgm-histogram jdgm-temp-hidden'\u003e \u003cdiv class='jdgm-histogram__row' data-rating='5' data-frequency='0' data-percentage='0'\u003e \u003cdiv class='jdgm-histogram__star' role='button' aria-label=\"0% (0) reviews with 5 star rating\" tabindex='0' \u003e\u003cspan class='jdgm-star jdgm--on'\u003e\u003c\/span\u003e\u003cspan class='jdgm-star jdgm--on'\u003e\u003c\/span\u003e\u003cspan class='jdgm-star jdgm--on'\u003e\u003c\/span\u003e\u003cspan class='jdgm-star jdgm--on'\u003e\u003c\/span\u003e\u003cspan class='jdgm-star jdgm--on'\u003e\u003c\/span\u003e\u003c\/div\u003e \u003cdiv class='jdgm-histogram__bar'\u003e \u003cdiv class='jdgm-histogram__bar-content' style='width: 0%;'\u003e \u003c\/div\u003e \u003c\/div\u003e \u003cdiv class='jdgm-histogram__percentage'\u003e0%\u003c\/div\u003e \u003cdiv class='jdgm-histogram__frequency'\u003e(0)\u003c\/div\u003e \u003c\/div\u003e \u003cdiv class='jdgm-histogram__row' data-rating='4' data-frequency='0' data-percentage='0'\u003e \u003cdiv class='jdgm-histogram__star' role='button' aria-label=\"0% (0) reviews with 4 star rating\" tabindex='0' \u003e\u003cspan class='jdgm-star jdgm--on'\u003e\u003c\/span\u003e\u003cspan class='jdgm-star jdgm--on'\u003e\u003c\/span\u003e\u003cspan class='jdgm-star jdgm--on'\u003e\u003c\/span\u003e\u003cspan class='jdgm-star jdgm--on'\u003e\u003c\/span\u003e\u003cspan class='jdgm-star jdgm--off'\u003e\u003c\/span\u003e\u003c\/div\u003e \u003cdiv class='jdgm-histogram__bar'\u003e \u003cdiv class='jdgm-histogram__bar-content' style='width: 0%;'\u003e \u003c\/div\u003e \u003c\/div\u003e \u003cdiv class='jdgm-histogram__percentage'\u003e0%\u003c\/div\u003e \u003cdiv class='jdgm-histogram__frequency'\u003e(0)\u003c\/div\u003e \u003c\/div\u003e \u003cdiv class='jdgm-histogram__row' data-rating='3' data-frequency='0' data-percentage='0'\u003e \u003cdiv class='jdgm-histogram__star' role='button' aria-label=\"0% (0) reviews with 3 star rating\" tabindex='0' \u003e\u003cspan class='jdgm-star jdgm--on'\u003e\u003c\/span\u003e\u003cspan class='jdgm-star jdgm--on'\u003e\u003c\/span\u003e\u003cspan class='jdgm-star jdgm--on'\u003e\u003c\/span\u003e\u003cspan class='jdgm-star jdgm--off'\u003e\u003c\/span\u003e\u003cspan class='jdgm-star jdgm--off'\u003e\u003c\/span\u003e\u003c\/div\u003e \u003cdiv class='jdgm-histogram__bar'\u003e \u003cdiv class='jdgm-histogram__bar-content' style='width: 0%;'\u003e \u003c\/div\u003e \u003c\/div\u003e \u003cdiv class='jdgm-histogram__percentage'\u003e0%\u003c\/div\u003e \u003cdiv class='jdgm-histogram__frequency'\u003e(0)\u003c\/div\u003e \u003c\/div\u003e \u003cdiv class='jdgm-histogram__row' data-rating='2' data-frequency='0' data-percentage='0'\u003e \u003cdiv class='jdgm-histogram__star' role='button' aria-label=\"0% (0) reviews with 2 star rating\" tabindex='0' \u003e\u003cspan class='jdgm-star jdgm--on'\u003e\u003c\/span\u003e\u003cspan class='jdgm-star jdgm--on'\u003e\u003c\/span\u003e\u003cspan class='jdgm-star jdgm--off'\u003e\u003c\/span\u003e\u003cspan class='jdgm-star jdgm--off'\u003e\u003c\/span\u003e\u003cspan class='jdgm-star jdgm--off'\u003e\u003c\/span\u003e\u003c\/div\u003e \u003cdiv class='jdgm-histogram__bar'\u003e \u003cdiv class='jdgm-histogram__bar-content' style='width: 0%;'\u003e \u003c\/div\u003e \u003c\/div\u003e \u003cdiv class='jdgm-histogram__percentage'\u003e0%\u003c\/div\u003e \u003cdiv class='jdgm-histogram__frequency'\u003e(0)\u003c\/div\u003e \u003c\/div\u003e \u003cdiv class='jdgm-histogram__row' data-rating='1' data-frequency='0' data-percentage='0'\u003e \u003cdiv class='jdgm-histogram__star' role='button' aria-label=\"0% (0) reviews with 1 star rating\" tabindex='0' \u003e\u003cspan class='jdgm-star jdgm--on'\u003e\u003c\/span\u003e\u003cspan class='jdgm-star jdgm--off'\u003e\u003c\/span\u003e\u003cspan class='jdgm-star jdgm--off'\u003e\u003c\/span\u003e\u003cspan class='jdgm-star jdgm--off'\u003e\u003c\/span\u003e\u003cspan class='jdgm-star jdgm--off'\u003e\u003c\/span\u003e\u003c\/div\u003e \u003cdiv class='jdgm-histogram__bar'\u003e \u003cdiv class='jdgm-histogram__bar-content' style='width: 0%;'\u003e \u003c\/div\u003e \u003c\/div\u003e \u003cdiv class='jdgm-histogram__percentage'\u003e0%\u003c\/div\u003e \u003cdiv class='jdgm-histogram__frequency'\u003e(0)\u003c\/div\u003e \u003c\/div\u003e \u003cdiv class='jdgm-histogram__row jdgm-histogram__clear-filter' data-rating=null tabindex='0'\u003e\u003c\/div\u003e \u003c\/div\u003e \u003cdiv class='jdgm-rev-widg__sort-wrapper'\u003e\u003c\/div\u003e \u003c\/div\u003e \u003cdiv class='jdgm-rev-widg__body'\u003e \u003cdiv class='jdgm-rev-widg__reviews'\u003e\u003c\/div\u003e \u003cdiv class='jdgm-paginate' data-per-page='5' data-url='https:\/\/api.judge.me\/reviews\/reviews_for_widget' style=\"display: none;\"\u003e\u003c\/div\u003e \u003c\/div\u003e \u003cdiv class='jdgm-rev-widg__paginate-spinner-wrapper'\u003e \u003cdiv class='jdgm-spinner'\u003e\u003c\/div\u003e \u003c\/div\u003e \u003c\/div\u003e"},"collections":[{"id":294880051371,"handle":"crystals","title":"Crystals","updated_at":"2026-01-07T23:43:11-05:00","body_html":"\u003cp data-start=\"159\" data-end=\"687\"\u003e✨ \u003cstrong data-start=\"161\" data-end=\"216\"\u003eDiscover the Magic of Crystals with Crystal Destiny\u003c\/strong\u003e ✨\u003cbr data-start=\"218\" data-end=\"221\"\u003eCrystals have been treasured for centuries—not only for their natural beauty but also for their powerful healing energies. Beyond their visual allure, they bring balance, harmony, and positive energy into any space. Whether used for home décor, meditation, or simply to elevate the energy of your surroundings, crystals create a sanctuary of peace, relaxation, and well-being. Each piece is a unique gift from the Earth—visually stunning and spiritually uplifting.\u003c\/p\u003e\n\u003cp data-start=\"689\" data-end=\"1011\"\u003eAt \u003cstrong data-start=\"692\" data-end=\"711\"\u003eCrystal Destiny\u003c\/strong\u003e, our signature collection showcases a curated selection of exquisite crystals, from radiant Quartz to soothing Amethyst. Every stone is carefully sourced for its elegance and metaphysical resonance, making them perfect for enhancing your home, uplifting your spirit, or gifting to someone special.\u003c\/p\u003e\n\u003cp data-start=\"1013\" data-end=\"1206\"\u003eExperience the timeless sophistication of crystalline wonders. Explore the \u003cstrong data-start=\"1088\" data-end=\"1118\"\u003eCrystal Destiny Collection\u003c\/strong\u003e today and bring the transformative beauty of these treasures into your everyday life.\u003c\/p\u003e","published_at":"2023-06-05T11:24:02-04:00","sort_order":"created-desc","template_suffix":"","disjunctive":false,"rules":[{"column":"tag","relation":"equals","condition":"crystal"},{"column":"type","relation":"not_contains","condition":"925 Sterling Silver"},{"column":"type","relation":"not_contains","condition":"Wire Wraps"}],"published_scope":"global"},{"id":319455887531,"handle":"heart-chakra-crystals","title":"Heart Chakra Crystals","updated_at":"2026-01-07T23:43:11-05:00","body_html":"\u003cp data-start=\"107\" data-end=\"457\"\u003e✨ \u003cstrong data-start=\"109\" data-end=\"134\"\u003eHeart Chakra Crystals\u003c\/strong\u003e ✨\u003cbr data-start=\"136\" data-end=\"139\"\u003eOpen your heart to love, compassion, and emotional balance with our \u003cstrong data-start=\"207\" data-end=\"232\"\u003eHeart Chakra Crystals\u003c\/strong\u003e. Located at the center of the chest, the Heart Chakra governs love, forgiveness, and connection to yourself and others. These crystals help release emotional blockages, foster empathy, and promote harmonious relationships.\u003c\/p\u003e\n\u003cp data-start=\"459\" data-end=\"773\"\u003eOur curated selection includes stones such as Rose Quartz, Green Aventurine, and Rhodonite—each chosen for their ability to inspire self-love, emotional healing, and compassion. Perfect for meditation, energy work, or wearing as jewelry, Heart Chakra Crystals support the flow of loving energy and inner harmony.\u003c\/p\u003e\n\u003cp data-start=\"775\" data-end=\"906\"\u003eEmbrace emotional balance, cultivate love, and harness the transformative energy of the Heart Chakra with these radiant crystals.\u003c\/p\u003e","published_at":"2025-07-17T18:17:52-04:00","sort_order":"best-selling","template_suffix":"","disjunctive":false,"rules":[{"column":"variant_metafield_definition","relation":"equals","condition":"Heart"}],"published_scope":"global","image":{"created_at":"2025-07-17T19:08:29-04:00","alt":null,"width":1080,"height":1080,"src":"\/\/crystaldestiny.com\/cdn\/shop\/collections\/Heart_Chakra_Collection.jpg?v=1762474927"}},{"id":294880116907,"handle":"polished","title":"Polished Crystals","updated_at":"2026-01-07T23:43:11-05:00","body_html":"\u003cp data-start=\"199\" data-end=\"598\"\u003e✨ \u003cstrong data-start=\"201\" data-end=\"248\"\u003eCrystal Destiny Polished Crystal Collection\u003c\/strong\u003e ✨\u003cbr data-start=\"250\" data-end=\"253\"\u003eIndulge in the brilliance of crystals refined to perfection. Our \u003cstrong data-start=\"318\" data-end=\"341\"\u003ePolished Collection\u003c\/strong\u003e showcases gemstones meticulously shaped and smoothed to reveal their natural radiance and timeless beauty. From the shimmering glow of Quartz to the deep allure of Obsidian, each polished piece is a testament to nature’s artistry and human craftsmanship.\u003c\/p\u003e\n\u003cp data-start=\"600\" data-end=\"862\"\u003ePerfect as statement décor, meaningful gifts, or companions on your spiritual journey, polished crystals bring sophistication and elevated energy into any space. Their radiant surfaces reflect not only light but also the transformative power of crystal energy.\u003c\/p\u003e\n\u003cp data-start=\"864\" data-end=\"1022\"\u003eDiscover the elegance of refinement with Crystal Destiny’s Polished Crystal Collection—where every facet shines with intention, beauty, and timeless allure.\u003c\/p\u003e","published_at":"2023-06-05T11:30:44-04:00","sort_order":"created-desc","template_suffix":"","disjunctive":false,"rules":[{"column":"tag","relation":"equals","condition":"polished"}],"published_scope":"global"},{"id":295698202795,"handle":"spheres","title":"Crystal Spheres","updated_at":"2026-01-06T23:24:35-05:00","body_html":"\u003cp data-start=\"106\" data-end=\"370\"\u003e✨ \u003cstrong data-start=\"108\" data-end=\"138\"\u003eCrystal Spheres Collection\u003c\/strong\u003e ✨\u003cbr data-start=\"140\" data-end=\"143\"\u003eBring harmony, balance, and elegance into your space with our \u003cstrong data-start=\"205\" data-end=\"235\"\u003eCrystal Spheres Collection\u003c\/strong\u003e. Each sphere is meticulously crafted to showcase the natural beauty and energy of crystals, from radiant Quartz to calming Amethyst.\u003c\/p\u003e\n\u003cp data-start=\"372\" data-end=\"658\"\u003ePerfect for meditation, energy work, or as striking décor, crystal spheres radiate energy in all directions, promoting clarity, focus, and a sense of calm. Their smooth, polished surfaces highlight the stones’ natural patterns and colors, making each sphere a captivating centerpiece.\u003c\/p\u003e\n\u003cp data-start=\"660\" data-end=\"809\"\u003eElevate your space and embrace the transformative power of crystals with the \u003cstrong data-start=\"737\" data-end=\"767\"\u003eCrystal Spheres Collection\u003c\/strong\u003e—where beauty, energy, and harmony meet.\u003c\/p\u003e","published_at":"2023-07-28T14:20:46-04:00","sort_order":"created-desc","template_suffix":"","disjunctive":true,"rules":[{"column":"tag","relation":"equals","condition":"spheres"},{"column":"tag","relation":"equals","condition":"eggs"}],"published_scope":"global"},{"id":293659312299,"handle":"best-sellers","title":"Best Sellers","updated_at":"2026-01-07T23:43:11-05:00","body_html":"\u003cp data-start=\"155\" data-end=\"510\"\u003eDiscover the pieces our community loves most. Our Best Sellers Collection brings together handpicked crystals and jewelry that embody timeless elegance, spiritual resonance, and everyday sophistication. Each item has earned its place as a customer favorite—celebrated for both its beauty and its meaningful energy.\u003c\/p\u003e\n\u003cp data-start=\"512\" data-end=\"802\"\u003eFrom stunning statement pieces to versatile daily companions, these treasures are curated to elevate your space, uplift your spirit, and reflect refined taste. Indulge in what’s most cherished and let our best sellers guide you toward the perfect blend of style and transformative energy.\u003c\/p\u003e\n\u003cp data-start=\"804\" data-end=\"932\"\u003eExplore the Best Sellers Collection today—where elegance meets intention, and every piece tells a story of beauty and balance.\u003c\/p\u003e","published_at":"2023-03-15T16:04:51-04:00","sort_order":"best-selling","template_suffix":"","disjunctive":false,"rules":[{"column":"variant_price","relation":"greater_than","condition":"0"},{"column":"variant_inventory","relation":"greater_than","condition":"0"},{"column":"type","relation":"not_equals","condition":"Shipping Protection"}],"published_scope":"global"},{"id":321370390699,"handle":"monthly-crystal-sale","title":"Monthly Crystal Sale | Spheres \u0026 Towers","updated_at":"2026-01-06T23:24:37-05:00","body_html":"\u003cp\u003eShop our \u003cstrong\u003eMonthly Crystal Sale\u003c\/strong\u003e, where you can shop a wide selection of healing crystals at discounted prices. Explore \u003cstrong\u003ecrystal spheres and towers,\u003c\/strong\u003e— all carefully curated to support meditation, energy balancing, and spiritual wellness. Whether you're looking to enhance your home decor, boost your daily energy, or find the perfect gift, our \u003cstrong\u003ecrystals for healing and manifestation\u003c\/strong\u003e offer both beauty and metaphysical benefits.\u003c\/p\u003e\n\u003cp\u003eEach month, our sale features \u003cstrong\u003enew discounted collections\u003c\/strong\u003e, from \u003cstrong\u003enatural quartz and amethyst towers\u003c\/strong\u003e to \u003cstrong\u003ewire-wrapped pendants and polished stones\u003c\/strong\u003e, so there's always something fresh to discover. Shop with confidence knowing you're getting high-quality crystals with \u003cstrong\u003efree shipping options\u003c\/strong\u003e and a trusted experience.\u003c\/p\u003e\n\u003cp\u003e\u003cstrong\u003eTake advantage of the Monthly Crystal Sale today\u003c\/strong\u003e and add powerful, natural energy to your life with \u003cstrong\u003eauthentic healing crystals\u003c\/strong\u003e — while our limited-time discounts last.\u003c\/p\u003e\n\u003cp\u003e\u003cstrong\u003e*Discount automatically applied at checkout.\u003c\/strong\u003e\u003c\/p\u003e","published_at":"2025-12-02T01:26:17-05:00","sort_order":"alpha-asc","template_suffix":"","disjunctive":true,"rules":[{"column":"tag","relation":"equals","condition":"spheres"},{"column":"tag","relation":"equals","condition":"Towers"}],"published_scope":"global","image":{"created_at":"2026-01-01T01:32:34-05:00","alt":"","width":960,"height":960,"src":"\/\/crystaldestiny.com\/cdn\/shop\/collections\/3E8C2969-1B86-4ACE-B349-98E9D8768424.jpg?v=1767249154"}},{"id":297596059819,"handle":"all","title":"All Crystals \u0026 Jewelry","updated_at":"2026-01-07T23:43:11-05:00","body_html":"\u003cp data-start=\"149\" data-end=\"494\"\u003e✨ \u003cstrong data-start=\"151\" data-end=\"181\"\u003eWelcome to Crystal Destiny\u003c\/strong\u003e ✨\u003cbr data-start=\"183\" data-end=\"186\"\u003eStep into a world where beauty, energy, and artistry unite. Our collection is a treasure trove of exquisite crystals, from the raw, untamed elegance of natural formations to the polished brilliance of expertly crafted pieces. Each crystal is a masterpiece, carrying its own unique story and timeless charm.\u003c\/p\u003e\n\u003cp data-start=\"496\" data-end=\"831\"\u003eWhether you’re drawn to the calming presence of Amethyst, the vibrant energy of Citrine, or the grounding strength of Jasper, our crystals invite you to connect with nature’s finest wonders. Perfect for enhancing your space, supporting your spiritual journey, or gifting with intention, every piece resonates with beauty and meaning.\u003c\/p\u003e\n\u003cp data-start=\"833\" data-end=\"1000\"\u003eElevate your surroundings, embrace the mystique, and explore the enchanting world of crystals at \u003cstrong data-start=\"930\" data-end=\"949\"\u003eCrystal Destiny\u003c\/strong\u003e—where every crystal is waiting to be discovered.\u003c\/p\u003e","published_at":"2023-11-10T13:55:31-05:00","sort_order":"created-desc","template_suffix":"","disjunctive":false,"rules":[{"column":"type","relation":"not_equals","condition":"asdf"}],"published_scope":"global"},{"id":298983391403,"handle":"january-crystal-sale","title":"January Sale | 25% Off Crystal Towers \u0026 Spheres","updated_at":"2026-01-06T23:24:37-05:00","body_html":"\u003cp\u003eShop our \u003cstrong\u003eJanuary Crystal Sale\u003c\/strong\u003e, where you can shop a wide selection of healing crystals at discounted prices. Explore \u003cstrong\u003eCrystal Towers, \u0026amp; Crystal Spheres\u003c\/strong\u003e — all carefully curated and crafted to support meditation, energy balancing, and spiritual wellness. Whether you're looking to enhance your home decor, boost your daily energy, or find the perfect gift, our \u003cstrong\u003ecrystals for healing and manifestation\u003c\/strong\u003e offer both beauty and metaphysical benefits.\u003c\/p\u003e\n\u003cp\u003eThis January, our sale features \u003cstrong\u003ediscounted crystal towers and spheres\u003c\/strong\u003e, from \u003cstrong\u003enatural quartz \u003c\/strong\u003eand \u003cstrong\u003eamethyst \u003c\/strong\u003eto \u003cstrong\u003ebumblebee jasper \u003c\/strong\u003eand \u003cstrong\u003ecarnelian\u003c\/strong\u003e, so there's always something fresh to discover. Shop with confidence knowing you're getting high-quality crystals with \u003cstrong\u003efree shipping options\u003c\/strong\u003e and a trusted experience.\u003c\/p\u003e\n\u003cp\u003e\u003cstrong\u003eTake advantage of the January Crystal Sale today\u003c\/strong\u003e and add powerful, natural energy to your life with \u003cstrong\u003eauthentic healing crystals\u003c\/strong\u003e — while our limited-time discounts last.\u003c\/p\u003e\n\u003cp\u003e\u003cstrong\u003e*Discount automatically applied at checkout.\u003c\/strong\u003e\u003c\/p\u003e","published_at":"2026-01-01T00:07:17-05:00","sort_order":"alpha-asc","template_suffix":"monthly-collection","disjunctive":true,"rules":[{"column":"tag","relation":"equals","condition":"Spheres"},{"column":"tag","relation":"equals","condition":"Towers"}],"published_scope":"global","image":{"created_at":"2026-01-01T01:29:59-05:00","alt":"","width":960,"height":960,"src":"\/\/crystaldestiny.com\/cdn\/shop\/collections\/1464163B-22B1-4D62-BEC5-CEC9AECB670B.jpg?v=1767248999"}}]}
[{"alt":"Golden Aventurine Sphere 50mm-Spheres-Crystal Destiny-Aventurine-175g - 50mm-Crystal Destiny","id":31120198533291,"position":1,"preview_image":{"aspect_ratio":1.0,"height":1640,"width":1640,"src":"\/\/crystaldestiny.com\/cdn\/shop\/files\/Golden-Aventurine-Sphere-50mm-Spheres-Aventurine-175g-50mm.jpg?v=1765429383"},"aspect_ratio":1.0,"height":1640,"media_type":"image","src":"\/\/crystaldestiny.com\/cdn\/shop\/files\/Golden-Aventurine-Sphere-50mm-Spheres-Aventurine-175g-50mm.jpg?v=1765429383","width":1640},{"alt":"Golden Aventurine Sphere 50mm-Spheres-Crystal Destiny-Aventurine-176g - 50.5mm-Crystal Destiny","id":31120246866091,"position":2,"preview_image":{"aspect_ratio":1.0,"height":1590,"width":1590,"src":"\/\/crystaldestiny.com\/cdn\/shop\/files\/Golden-Aventurine-Sphere-50mm-Spheres-Aventurine-176g-50_5mm-2.jpg?v=1765429384"},"aspect_ratio":1.0,"height":1590,"media_type":"image","src":"\/\/crystaldestiny.com\/cdn\/shop\/files\/Golden-Aventurine-Sphere-50mm-Spheres-Aventurine-176g-50_5mm-2.jpg?v=1765429384","width":1590}]
{"item":{"id":8469448425643,"title":"Torre de ágata de uva","handle":"grape-agate-tower-cd-10178","description":"\u003cp\u003eLa Torre de Ágata Uva exhibe un impresionante conjunto de formaciones botrioidales que se asemejan a racimos de uvas, apreciadas por su textura única y sus intensos tonos púrpura. Este mineral natural es apreciado por coleccionistas y aficionados a los cristales por su atractivo estético y sus propiedades metafísicas, a menudo asociadas con la potenciación de la intuición y la serenidad mental. Su forma de torre la convierte en una elegante pieza de exhibición, perfecta tanto para entornos de estudio como de meditación. Creada por la naturaleza, cada torre es única y ofrece una visión excepcional del arte geológico.\u003c\/p\u003e\n\n\u003cp\u003e Este producto es exactamente como se muestra en la imagen, único en su tipo.\u003c\/p\u003e\n\u003cdiv\u003e \u003cspan style=\"font-size: 0.875rem;\"\u003eTorres de Cristal, Varas, Generadores, Puntas, Pilares y Obeliscos: ¿Cuál es la Diferencia?\u003c\/span\u003e\n\u003c\/div\u003e\n\u003cdiv\u003e Si bien estos términos pueden variar, todos describen cristales de formas hermosas con una punta puntiaguda diseñada para canalizar y dirigir la energía. Cada nombre destaca un aspecto único de su uso:\u003c\/div\u003e\n\u003cdiv\u003e \u0026lt;ul\u0026gt;\u003c\/div\u003e\n\u003cdiv\u003e \u0026lt;li\u0026gt;\u003c\/div\u003e \u003cdiv\u003e\u0026lt;strong\u0026gt;Torres\u0026lt;\/strong\u0026gt;: Conocidas por su presencia constante y estabilizadora, las torres de cristal ayudan a enfocar y amplificar la energía, lo que las hace perfectas para la meditación y la manifestación.\u0026lt;\/li\u0026gt;\u003c\/div\u003e\n\u003cdiv\u003e \u0026lt;li\u0026gt;\u003c\/div\u003e\n\u003cdiv\u003e \u0026lt;strong\u0026gt;Varitas\u0026lt;\/strong\u0026gt;: Tradicionalmente utilizadas en el trabajo energético y la curación, las varitas de cristal son excelentes para dirigir el flujo de energía y eliminar bloqueos.\u0026lt;\/li\u0026gt;\u003c\/div\u003e\n\u003cdiv\u003e \u0026lt;li\u0026gt;\u003c\/div\u003e\n\u003cdiv\u003e \u0026lt;strong\u0026gt;Pilares\u0026lt;\/strong\u0026gt;: Simbolizando fuerza y estabilidad, los pilares de cristal crean un ambiente equilibrado y armonioso, lo que los hace ideales para la decoración del hogar y las prácticas espirituales.\u0026lt;\/li\u0026gt;\u003c\/div\u003e\n\u003cdiv\u003e \u0026lt;li\u0026gt;\u003c\/div\u003e\n\u003cdiv\u003e \u0026lt;strong\u0026gt;Obeliscos\u0026lt;\/strong\u0026gt;: Inspirados en estructuras antiguas, se cree que los obeliscos de cristal conectan las energías terrenales y espirituales, lo que los convierte en poderosas herramientas para la transformación y la iluminación.\u0026lt;\/li\u0026gt;\u003c\/div\u003e\n\u003cdiv\u003e \u0026lt;\/ul\u0026gt;\u003c\/div\u003e\n\u003cdiv\u003e No importa cómo los llames, estos cristales tienen el mismo propósito: potenciar la energía, la intención y la armonía en tu espacio. ¡Elige el que más te resuene!\u003c\/div\u003e","published_at":"2025-07-09T20:37:19-04:00","created_at":"2025-07-09T20:37:18-04:00","vendor":"Crystal Destiny","type":"Torres","tags":["crystal","Towers"],"price":2999,"price_min":2999,"price_max":3999,"available":true,"price_varies":true,"compare_at_price":null,"compare_at_price_min":0,"compare_at_price_max":0,"compare_at_price_varies":false,"variants":[{"id":45394330026155,"title":"Ágata de uva \/ 96 g - 3,25\" de alto x 0,90\" de ancho","option1":"Ágata de uva","option2":"96 g - 3,25\" de alto x 0,90\" de ancho","option3":null,"sku":"CD-10178","requires_shipping":true,"taxable":true,"featured_image":{"id":39907662594219,"product_id":8469448425643,"position":3,"created_at":"2025-07-09T20:35:49-04:00","updated_at":"2025-12-11T00:05:07-05:00","alt":"Grape Agate Tower-Towers-Crystal Destiny-Grape Agate-96g - 3.25\"H x .90\"W-Crystal Destiny","width":1930,"height":1930,"src":"\/\/crystaldestiny.com\/cdn\/shop\/files\/Grape-Agate-Tower-Towers-Grape-Agate-96g-3_25H-x-_90W-3.jpg?v=1765429507","variant_ids":[45394330026155]},"available":true,"name":"Torre de ágata de uva - Ágata de uva \/ 96 g - 3,25\" de alto x 0,90\" de ancho","public_title":"Ágata de uva \/ 96 g - 3,25\" de alto x 0,90\" de ancho","options":["Ágata de uva","96 g - 3,25\" de alto x 0,90\" de ancho"],"price":3999,"weight":0,"compare_at_price":null,"inventory_management":"shopify","barcode":"","featured_media":{"alt":"Grape Agate Tower-Towers-Crystal Destiny-Grape Agate-96g - 3.25\"H x .90\"W-Crystal Destiny","id":31417062719659,"position":3,"preview_image":{"aspect_ratio":1.0,"height":1930,"width":1930,"src":"\/\/crystaldestiny.com\/cdn\/shop\/files\/Grape-Agate-Tower-Towers-Grape-Agate-96g-3_25H-x-_90W-3.jpg?v=1765429507"}},"requires_selling_plan":false,"selling_plan_allocations":[]},{"id":45394330058923,"title":"Ágata de uva \/ 60 g - 2,75\" de alto x 0,90\" de ancho","option1":"Ágata de uva","option2":"60 g - 2,75\" de alto x 0,90\" de ancho","option3":null,"sku":"CD-10179","requires_shipping":true,"taxable":true,"featured_image":{"id":39907662528683,"product_id":8469448425643,"position":1,"created_at":"2025-07-09T20:35:49-04:00","updated_at":"2025-12-11T00:05:06-05:00","alt":"Grape Agate Tower-Towers-Crystal Destiny-Grape Agate-60g - 2.75\"H x .90\"W-Crystal Destiny","width":1681,"height":1681,"src":"\/\/crystaldestiny.com\/cdn\/shop\/files\/Grape-Agate-Tower-Towers-Grape-Agate-60g-2_75H-x-_90W.jpg?v=1765429506","variant_ids":[45394330058923]},"available":true,"name":"Torre de ágata de uva - Ágata de uva \/ 60 g - 2,75\" de alto x 0,90\" de ancho","public_title":"Ágata de uva \/ 60 g - 2,75\" de alto x 0,90\" de ancho","options":["Ágata de uva","60 g - 2,75\" de alto x 0,90\" de ancho"],"price":2999,"weight":0,"compare_at_price":null,"inventory_management":"shopify","barcode":"","featured_media":{"alt":"Grape Agate Tower-Towers-Crystal Destiny-Grape Agate-60g - 2.75\"H x .90\"W-Crystal Destiny","id":31417062654123,"position":1,"preview_image":{"aspect_ratio":1.0,"height":1681,"width":1681,"src":"\/\/crystaldestiny.com\/cdn\/shop\/files\/Grape-Agate-Tower-Towers-Grape-Agate-60g-2_75H-x-_90W.jpg?v=1765429506"}},"requires_selling_plan":false,"selling_plan_allocations":[]}],"images":["\/\/crystaldestiny.com\/cdn\/shop\/files\/Grape-Agate-Tower-Towers-Grape-Agate-60g-2_75H-x-_90W.jpg?v=1765429506","\/\/crystaldestiny.com\/cdn\/shop\/files\/Grape-Agate-Tower-Towers-2.jpg?v=1757114584","\/\/crystaldestiny.com\/cdn\/shop\/files\/Grape-Agate-Tower-Towers-Grape-Agate-96g-3_25H-x-_90W-3.jpg?v=1765429507","\/\/crystaldestiny.com\/cdn\/shop\/files\/Grape-Agate-Tower-Towers-4.jpg?v=1757114650"],"featured_image":"\/\/crystaldestiny.com\/cdn\/shop\/files\/Grape-Agate-Tower-Towers-Grape-Agate-60g-2_75H-x-_90W.jpg?v=1765429506","options":["Material","Tamaño"],"media":[{"alt":"Grape Agate Tower-Towers-Crystal Destiny-Grape Agate-60g - 2.75\"H x .90\"W-Crystal Destiny","id":31417062654123,"position":1,"preview_image":{"aspect_ratio":1.0,"height":1681,"width":1681,"src":"\/\/crystaldestiny.com\/cdn\/shop\/files\/Grape-Agate-Tower-Towers-Grape-Agate-60g-2_75H-x-_90W.jpg?v=1765429506"},"aspect_ratio":1.0,"height":1681,"media_type":"image","src":"\/\/crystaldestiny.com\/cdn\/shop\/files\/Grape-Agate-Tower-Towers-Grape-Agate-60g-2_75H-x-_90W.jpg?v=1765429506","width":1681},{"alt":"Grape Agate Tower-Towers-Crystal Destiny-Grape Agate-96g - 3.25\"H x .90\"W-Crystal Destiny","id":31417062686891,"position":2,"preview_image":{"aspect_ratio":1.0,"height":1614,"width":1614,"src":"\/\/crystaldestiny.com\/cdn\/shop\/files\/Grape-Agate-Tower-Towers-2.jpg?v=1757114584"},"aspect_ratio":1.0,"height":1614,"media_type":"image","src":"\/\/crystaldestiny.com\/cdn\/shop\/files\/Grape-Agate-Tower-Towers-2.jpg?v=1757114584","width":1614},{"alt":"Grape Agate Tower-Towers-Crystal Destiny-Grape Agate-96g - 3.25\"H x .90\"W-Crystal Destiny","id":31417062719659,"position":3,"preview_image":{"aspect_ratio":1.0,"height":1930,"width":1930,"src":"\/\/crystaldestiny.com\/cdn\/shop\/files\/Grape-Agate-Tower-Towers-Grape-Agate-96g-3_25H-x-_90W-3.jpg?v=1765429507"},"aspect_ratio":1.0,"height":1930,"media_type":"image","src":"\/\/crystaldestiny.com\/cdn\/shop\/files\/Grape-Agate-Tower-Towers-Grape-Agate-96g-3_25H-x-_90W-3.jpg?v=1765429507","width":1930},{"alt":"Grape Agate Tower-Towers-Crystal Destiny-Grape Agate-96g - 3.25\"H x .90\"W-Crystal Destiny","id":31417062752427,"position":4,"preview_image":{"aspect_ratio":1.0,"height":1869,"width":1869,"src":"\/\/crystaldestiny.com\/cdn\/shop\/files\/Grape-Agate-Tower-Towers-4.jpg?v=1757114650"},"aspect_ratio":1.0,"height":1869,"media_type":"image","src":"\/\/crystaldestiny.com\/cdn\/shop\/files\/Grape-Agate-Tower-Towers-4.jpg?v=1757114650","width":1869}],"requires_selling_plan":false,"selling_plan_groups":[],"content":"\u003cp\u003eLa Torre de Ágata Uva exhibe un impresionante conjunto de formaciones botrioidales que se asemejan a racimos de uvas, apreciadas por su textura única y sus intensos tonos púrpura. Este mineral natural es apreciado por coleccionistas y aficionados a los cristales por su atractivo estético y sus propiedades metafísicas, a menudo asociadas con la potenciación de la intuición y la serenidad mental. Su forma de torre la convierte en una elegante pieza de exhibición, perfecta tanto para entornos de estudio como de meditación. Creada por la naturaleza, cada torre es única y ofrece una visión excepcional del arte geológico.\u003c\/p\u003e\n\n\u003cp\u003e Este producto es exactamente como se muestra en la imagen, único en su tipo.\u003c\/p\u003e\n\u003cdiv\u003e \u003cspan style=\"font-size: 0.875rem;\"\u003eTorres de Cristal, Varas, Generadores, Puntas, Pilares y Obeliscos: ¿Cuál es la Diferencia?\u003c\/span\u003e\n\u003c\/div\u003e\n\u003cdiv\u003e Si bien estos términos pueden variar, todos describen cristales de formas hermosas con una punta puntiaguda diseñada para canalizar y dirigir la energía. Cada nombre destaca un aspecto único de su uso:\u003c\/div\u003e\n\u003cdiv\u003e \u0026lt;ul\u0026gt;\u003c\/div\u003e\n\u003cdiv\u003e \u0026lt;li\u0026gt;\u003c\/div\u003e \u003cdiv\u003e\u0026lt;strong\u0026gt;Torres\u0026lt;\/strong\u0026gt;: Conocidas por su presencia constante y estabilizadora, las torres de cristal ayudan a enfocar y amplificar la energía, lo que las hace perfectas para la meditación y la manifestación.\u0026lt;\/li\u0026gt;\u003c\/div\u003e\n\u003cdiv\u003e \u0026lt;li\u0026gt;\u003c\/div\u003e\n\u003cdiv\u003e \u0026lt;strong\u0026gt;Varitas\u0026lt;\/strong\u0026gt;: Tradicionalmente utilizadas en el trabajo energético y la curación, las varitas de cristal son excelentes para dirigir el flujo de energía y eliminar bloqueos.\u0026lt;\/li\u0026gt;\u003c\/div\u003e\n\u003cdiv\u003e \u0026lt;li\u0026gt;\u003c\/div\u003e\n\u003cdiv\u003e \u0026lt;strong\u0026gt;Pilares\u0026lt;\/strong\u0026gt;: Simbolizando fuerza y estabilidad, los pilares de cristal crean un ambiente equilibrado y armonioso, lo que los hace ideales para la decoración del hogar y las prácticas espirituales.\u0026lt;\/li\u0026gt;\u003c\/div\u003e\n\u003cdiv\u003e \u0026lt;li\u0026gt;\u003c\/div\u003e\n\u003cdiv\u003e \u0026lt;strong\u0026gt;Obeliscos\u0026lt;\/strong\u0026gt;: Inspirados en estructuras antiguas, se cree que los obeliscos de cristal conectan las energías terrenales y espirituales, lo que los convierte en poderosas herramientas para la transformación y la iluminación.\u0026lt;\/li\u0026gt;\u003c\/div\u003e\n\u003cdiv\u003e \u0026lt;\/ul\u0026gt;\u003c\/div\u003e\n\u003cdiv\u003e No importa cómo los llames, estos cristales tienen el mismo propósito: potenciar la energía, la intención y la armonía en tu espacio. ¡Elige el que más te resuene!\u003c\/div\u003e"},"options":[{"name":"Material","position":1,"values":["Ágata de uva"]},{"name":"Tamaño","position":2,"values":["96 g - 3,25\" de alto x 0,90\" de ancho","60 g - 2,75\" de alto x 0,90\" de ancho"]}],"custom_metafields":{"shipping_time":"En un plazo de 7 días"},"metafields":{"badge":"\u003cdiv style='display:none' class='jdgm-prev-badge' data-average-rating='0.00' data-number-of-reviews='0' data-number-of-questions='0'\u003e \u003cspan class='jdgm-prev-badge__stars' data-score='0.00' tabindex='0' aria-label='0.00 stars' role='button'\u003e \u003cspan class='jdgm-star jdgm--off'\u003e\u003c\/span\u003e\u003cspan class='jdgm-star jdgm--off'\u003e\u003c\/span\u003e\u003cspan class='jdgm-star jdgm--off'\u003e\u003c\/span\u003e\u003cspan class='jdgm-star jdgm--off'\u003e\u003c\/span\u003e\u003cspan class='jdgm-star jdgm--off'\u003e\u003c\/span\u003e \u003c\/span\u003e \u003cspan class='jdgm-prev-badge__text'\u003e No reviews \u003c\/span\u003e \u003c\/div\u003e","widget":"\u003cdiv class='jdgm-rev-widg' data-updated-at='2025-07-10T00:37:20Z' data-average-rating='0.00' data-number-of-reviews='0' data-number-of-questions='0' data-image-url='https:\/\/cdn.shopify.com\/s\/files\/1\/0613\/0345\/5915\/files\/6I0A3534.jpg?v=1752107806'\u003e \u003cstyle class='jdgm-temp-hiding-style'\u003e.jdgm-rev-widg{ display: none }\u003c\/style\u003e \u003cdiv class='jdgm-rev-widg__header'\u003e \u003ch2 class='jdgm-rev-widg__title'\u003eCustomer Reviews\u003c\/h2\u003e \u003cdiv class='jdgm-rev-widg__summary'\u003e \u003cdiv class='jdgm-rev-widg__summary-stars' aria-label='Average rating is 0.00 stars' role='img'\u003e \u003cspan class='jdgm-star jdgm--off'\u003e\u003c\/span\u003e\u003cspan class='jdgm-star jdgm--off'\u003e\u003c\/span\u003e\u003cspan class='jdgm-star jdgm--off'\u003e\u003c\/span\u003e\u003cspan class='jdgm-star jdgm--off'\u003e\u003c\/span\u003e\u003cspan class='jdgm-star jdgm--off'\u003e\u003c\/span\u003e \u003c\/div\u003e \u003cdiv class='jdgm-rev-widg__summary-text'\u003eBe the first to write a review\u003c\/div\u003e \u003c\/div\u003e \u003ca style='display: none' href='#' class='jdgm-write-rev-link' role='button'\u003eWrite a review\u003c\/a\u003e \u003cdiv class='jdgm-histogram jdgm-temp-hidden'\u003e \u003cdiv class='jdgm-histogram__row' data-rating='5' data-frequency='0' data-percentage='0'\u003e \u003cdiv class='jdgm-histogram__star' role='button' aria-label=\"0% (0) reviews with 5 star rating\" tabindex='0' \u003e\u003cspan class='jdgm-star jdgm--on'\u003e\u003c\/span\u003e\u003cspan class='jdgm-star jdgm--on'\u003e\u003c\/span\u003e\u003cspan class='jdgm-star jdgm--on'\u003e\u003c\/span\u003e\u003cspan class='jdgm-star jdgm--on'\u003e\u003c\/span\u003e\u003cspan class='jdgm-star jdgm--on'\u003e\u003c\/span\u003e\u003c\/div\u003e \u003cdiv class='jdgm-histogram__bar'\u003e \u003cdiv class='jdgm-histogram__bar-content' style='width: 0%;'\u003e \u003c\/div\u003e \u003c\/div\u003e \u003cdiv class='jdgm-histogram__percentage'\u003e0%\u003c\/div\u003e \u003cdiv class='jdgm-histogram__frequency'\u003e(0)\u003c\/div\u003e \u003c\/div\u003e \u003cdiv class='jdgm-histogram__row' data-rating='4' data-frequency='0' data-percentage='0'\u003e \u003cdiv class='jdgm-histogram__star' role='button' aria-label=\"0% (0) reviews with 4 star rating\" tabindex='0' \u003e\u003cspan class='jdgm-star jdgm--on'\u003e\u003c\/span\u003e\u003cspan class='jdgm-star jdgm--on'\u003e\u003c\/span\u003e\u003cspan class='jdgm-star jdgm--on'\u003e\u003c\/span\u003e\u003cspan class='jdgm-star jdgm--on'\u003e\u003c\/span\u003e\u003cspan class='jdgm-star jdgm--off'\u003e\u003c\/span\u003e\u003c\/div\u003e \u003cdiv class='jdgm-histogram__bar'\u003e \u003cdiv class='jdgm-histogram__bar-content' style='width: 0%;'\u003e \u003c\/div\u003e \u003c\/div\u003e \u003cdiv class='jdgm-histogram__percentage'\u003e0%\u003c\/div\u003e \u003cdiv class='jdgm-histogram__frequency'\u003e(0)\u003c\/div\u003e \u003c\/div\u003e \u003cdiv class='jdgm-histogram__row' data-rating='3' data-frequency='0' data-percentage='0'\u003e \u003cdiv class='jdgm-histogram__star' role='button' aria-label=\"0% (0) reviews with 3 star rating\" tabindex='0' \u003e\u003cspan class='jdgm-star jdgm--on'\u003e\u003c\/span\u003e\u003cspan class='jdgm-star jdgm--on'\u003e\u003c\/span\u003e\u003cspan class='jdgm-star jdgm--on'\u003e\u003c\/span\u003e\u003cspan class='jdgm-star jdgm--off'\u003e\u003c\/span\u003e\u003cspan class='jdgm-star jdgm--off'\u003e\u003c\/span\u003e\u003c\/div\u003e \u003cdiv class='jdgm-histogram__bar'\u003e \u003cdiv class='jdgm-histogram__bar-content' style='width: 0%;'\u003e \u003c\/div\u003e \u003c\/div\u003e \u003cdiv class='jdgm-histogram__percentage'\u003e0%\u003c\/div\u003e \u003cdiv class='jdgm-histogram__frequency'\u003e(0)\u003c\/div\u003e \u003c\/div\u003e \u003cdiv class='jdgm-histogram__row' data-rating='2' data-frequency='0' data-percentage='0'\u003e \u003cdiv class='jdgm-histogram__star' role='button' aria-label=\"0% (0) reviews with 2 star rating\" tabindex='0' \u003e\u003cspan class='jdgm-star jdgm--on'\u003e\u003c\/span\u003e\u003cspan class='jdgm-star jdgm--on'\u003e\u003c\/span\u003e\u003cspan class='jdgm-star jdgm--off'\u003e\u003c\/span\u003e\u003cspan class='jdgm-star jdgm--off'\u003e\u003c\/span\u003e\u003cspan class='jdgm-star jdgm--off'\u003e\u003c\/span\u003e\u003c\/div\u003e \u003cdiv class='jdgm-histogram__bar'\u003e \u003cdiv class='jdgm-histogram__bar-content' style='width: 0%;'\u003e \u003c\/div\u003e \u003c\/div\u003e \u003cdiv class='jdgm-histogram__percentage'\u003e0%\u003c\/div\u003e \u003cdiv class='jdgm-histogram__frequency'\u003e(0)\u003c\/div\u003e \u003c\/div\u003e \u003cdiv class='jdgm-histogram__row' data-rating='1' data-frequency='0' data-percentage='0'\u003e \u003cdiv class='jdgm-histogram__star' role='button' aria-label=\"0% (0) reviews with 1 star rating\" tabindex='0' \u003e\u003cspan class='jdgm-star jdgm--on'\u003e\u003c\/span\u003e\u003cspan class='jdgm-star jdgm--off'\u003e\u003c\/span\u003e\u003cspan class='jdgm-star jdgm--off'\u003e\u003c\/span\u003e\u003cspan class='jdgm-star jdgm--off'\u003e\u003c\/span\u003e\u003cspan class='jdgm-star jdgm--off'\u003e\u003c\/span\u003e\u003c\/div\u003e \u003cdiv class='jdgm-histogram__bar'\u003e \u003cdiv class='jdgm-histogram__bar-content' style='width: 0%;'\u003e \u003c\/div\u003e \u003c\/div\u003e \u003cdiv class='jdgm-histogram__percentage'\u003e0%\u003c\/div\u003e \u003cdiv class='jdgm-histogram__frequency'\u003e(0)\u003c\/div\u003e \u003c\/div\u003e \u003cdiv class='jdgm-histogram__row jdgm-histogram__clear-filter' data-rating=null tabindex='0'\u003e\u003c\/div\u003e \u003c\/div\u003e \u003cdiv class='jdgm-rev-widg__sort-wrapper'\u003e\u003c\/div\u003e \u003c\/div\u003e \u003cdiv class='jdgm-rev-widg__body'\u003e \u003cdiv class='jdgm-rev-widg__reviews'\u003e\u003c\/div\u003e \u003cdiv class='jdgm-paginate' data-per-page='5' data-url='https:\/\/api.judge.me\/reviews\/reviews_for_widget' style=\"display: none;\"\u003e\u003c\/div\u003e \u003c\/div\u003e \u003cdiv class='jdgm-rev-widg__paginate-spinner-wrapper'\u003e \u003cdiv class='jdgm-spinner'\u003e\u003c\/div\u003e \u003c\/div\u003e \u003c\/div\u003e"},"collections":[{"id":294880051371,"handle":"crystals","title":"Crystals","updated_at":"2026-01-07T23:43:11-05:00","body_html":"\u003cp data-start=\"159\" data-end=\"687\"\u003e✨ \u003cstrong data-start=\"161\" data-end=\"216\"\u003eDiscover the Magic of Crystals with Crystal Destiny\u003c\/strong\u003e ✨\u003cbr data-start=\"218\" data-end=\"221\"\u003eCrystals have been treasured for centuries—not only for their natural beauty but also for their powerful healing energies. Beyond their visual allure, they bring balance, harmony, and positive energy into any space. Whether used for home décor, meditation, or simply to elevate the energy of your surroundings, crystals create a sanctuary of peace, relaxation, and well-being. Each piece is a unique gift from the Earth—visually stunning and spiritually uplifting.\u003c\/p\u003e\n\u003cp data-start=\"689\" data-end=\"1011\"\u003eAt \u003cstrong data-start=\"692\" data-end=\"711\"\u003eCrystal Destiny\u003c\/strong\u003e, our signature collection showcases a curated selection of exquisite crystals, from radiant Quartz to soothing Amethyst. Every stone is carefully sourced for its elegance and metaphysical resonance, making them perfect for enhancing your home, uplifting your spirit, or gifting to someone special.\u003c\/p\u003e\n\u003cp data-start=\"1013\" data-end=\"1206\"\u003eExperience the timeless sophistication of crystalline wonders. Explore the \u003cstrong data-start=\"1088\" data-end=\"1118\"\u003eCrystal Destiny Collection\u003c\/strong\u003e today and bring the transformative beauty of these treasures into your everyday life.\u003c\/p\u003e","published_at":"2023-06-05T11:24:02-04:00","sort_order":"created-desc","template_suffix":"","disjunctive":false,"rules":[{"column":"tag","relation":"equals","condition":"crystal"},{"column":"type","relation":"not_contains","condition":"925 Sterling Silver"},{"column":"type","relation":"not_contains","condition":"Wire Wraps"}],"published_scope":"global"},{"id":319455756459,"handle":"crown-chakra-crystals","title":"Crown Chakra Crystals","updated_at":"2026-01-07T23:42:38-05:00","body_html":"\u003cp data-start=\"144\" data-end=\"515\"\u003e✨ \u003cstrong data-start=\"146\" data-end=\"171\"\u003eCrown Chakra Crystals\u003c\/strong\u003e ✨\u003cbr data-start=\"173\" data-end=\"176\"\u003eConnect with higher consciousness and spiritual insight with our \u003cstrong data-start=\"241\" data-end=\"266\"\u003eCrown Chakra Crystals\u003c\/strong\u003e. Located at the top of the head, the Crown Chakra governs wisdom, enlightenment, and your connection to the divine. These crystals help open and balance this energy center, fostering clarity, spiritual growth, and a sense of universal connection.\u003c\/p\u003e\n\u003cp data-start=\"517\" data-end=\"851\"\u003eOur selection includes powerful stones such as Amethyst, Clear Quartz, Selenite, and Lepidolite—each chosen for their ability to enhance meditation, energy work, and mindful practices. Whether placed in your sacred space, carried with you, or worn as jewelry, Crown Chakra Crystals promote harmony, insight, and spiritual alignment.\u003c\/p\u003e\n\u003cp data-start=\"853\" data-end=\"1007\"\u003eElevate your consciousness, deepen your meditative practice, and embrace the transformative energy of the Crown Chakra with these illuminating crystals.\u003c\/p\u003e","published_at":"2025-07-17T18:16:11-04:00","sort_order":"best-selling","template_suffix":"","disjunctive":false,"rules":[{"column":"variant_metafield_definition","relation":"equals","condition":"Crown"}],"published_scope":"global","image":{"created_at":"2025-07-17T19:09:11-04:00","alt":null,"width":1080,"height":1080,"src":"\/\/crystaldestiny.com\/cdn\/shop\/collections\/Crown_Chakra_Collection.jpg?v=1762474922"}},{"id":293659312299,"handle":"best-sellers","title":"Best Sellers","updated_at":"2026-01-07T23:43:11-05:00","body_html":"\u003cp data-start=\"155\" data-end=\"510\"\u003eDiscover the pieces our community loves most. Our Best Sellers Collection brings together handpicked crystals and jewelry that embody timeless elegance, spiritual resonance, and everyday sophistication. Each item has earned its place as a customer favorite—celebrated for both its beauty and its meaningful energy.\u003c\/p\u003e\n\u003cp data-start=\"512\" data-end=\"802\"\u003eFrom stunning statement pieces to versatile daily companions, these treasures are curated to elevate your space, uplift your spirit, and reflect refined taste. Indulge in what’s most cherished and let our best sellers guide you toward the perfect blend of style and transformative energy.\u003c\/p\u003e\n\u003cp data-start=\"804\" data-end=\"932\"\u003eExplore the Best Sellers Collection today—where elegance meets intention, and every piece tells a story of beauty and balance.\u003c\/p\u003e","published_at":"2023-03-15T16:04:51-04:00","sort_order":"best-selling","template_suffix":"","disjunctive":false,"rules":[{"column":"variant_price","relation":"greater_than","condition":"0"},{"column":"variant_inventory","relation":"greater_than","condition":"0"},{"column":"type","relation":"not_equals","condition":"Shipping Protection"}],"published_scope":"global"},{"id":321370390699,"handle":"monthly-crystal-sale","title":"Monthly Crystal Sale | Spheres \u0026 Towers","updated_at":"2026-01-06T23:24:37-05:00","body_html":"\u003cp\u003eShop our \u003cstrong\u003eMonthly Crystal Sale\u003c\/strong\u003e, where you can shop a wide selection of healing crystals at discounted prices. Explore \u003cstrong\u003ecrystal spheres and towers,\u003c\/strong\u003e— all carefully curated to support meditation, energy balancing, and spiritual wellness. Whether you're looking to enhance your home decor, boost your daily energy, or find the perfect gift, our \u003cstrong\u003ecrystals for healing and manifestation\u003c\/strong\u003e offer both beauty and metaphysical benefits.\u003c\/p\u003e\n\u003cp\u003eEach month, our sale features \u003cstrong\u003enew discounted collections\u003c\/strong\u003e, from \u003cstrong\u003enatural quartz and amethyst towers\u003c\/strong\u003e to \u003cstrong\u003ewire-wrapped pendants and polished stones\u003c\/strong\u003e, so there's always something fresh to discover. Shop with confidence knowing you're getting high-quality crystals with \u003cstrong\u003efree shipping options\u003c\/strong\u003e and a trusted experience.\u003c\/p\u003e\n\u003cp\u003e\u003cstrong\u003eTake advantage of the Monthly Crystal Sale today\u003c\/strong\u003e and add powerful, natural energy to your life with \u003cstrong\u003eauthentic healing crystals\u003c\/strong\u003e — while our limited-time discounts last.\u003c\/p\u003e\n\u003cp\u003e\u003cstrong\u003e*Discount automatically applied at checkout.\u003c\/strong\u003e\u003c\/p\u003e","published_at":"2025-12-02T01:26:17-05:00","sort_order":"alpha-asc","template_suffix":"","disjunctive":true,"rules":[{"column":"tag","relation":"equals","condition":"spheres"},{"column":"tag","relation":"equals","condition":"Towers"}],"published_scope":"global","image":{"created_at":"2026-01-01T01:32:34-05:00","alt":"","width":960,"height":960,"src":"\/\/crystaldestiny.com\/cdn\/shop\/collections\/3E8C2969-1B86-4ACE-B349-98E9D8768424.jpg?v=1767249154"}},{"id":297596059819,"handle":"all","title":"All Crystals \u0026 Jewelry","updated_at":"2026-01-07T23:43:11-05:00","body_html":"\u003cp data-start=\"149\" data-end=\"494\"\u003e✨ \u003cstrong data-start=\"151\" data-end=\"181\"\u003eWelcome to Crystal Destiny\u003c\/strong\u003e ✨\u003cbr data-start=\"183\" data-end=\"186\"\u003eStep into a world where beauty, energy, and artistry unite. Our collection is a treasure trove of exquisite crystals, from the raw, untamed elegance of natural formations to the polished brilliance of expertly crafted pieces. Each crystal is a masterpiece, carrying its own unique story and timeless charm.\u003c\/p\u003e\n\u003cp data-start=\"496\" data-end=\"831\"\u003eWhether you’re drawn to the calming presence of Amethyst, the vibrant energy of Citrine, or the grounding strength of Jasper, our crystals invite you to connect with nature’s finest wonders. Perfect for enhancing your space, supporting your spiritual journey, or gifting with intention, every piece resonates with beauty and meaning.\u003c\/p\u003e\n\u003cp data-start=\"833\" data-end=\"1000\"\u003eElevate your surroundings, embrace the mystique, and explore the enchanting world of crystals at \u003cstrong data-start=\"930\" data-end=\"949\"\u003eCrystal Destiny\u003c\/strong\u003e—where every crystal is waiting to be discovered.\u003c\/p\u003e","published_at":"2023-11-10T13:55:31-05:00","sort_order":"created-desc","template_suffix":"","disjunctive":false,"rules":[{"column":"type","relation":"not_equals","condition":"asdf"}],"published_scope":"global"},{"id":296256405675,"handle":"crystal-towers","title":"Crystal Towers","updated_at":"2026-01-06T23:24:37-05:00","body_html":"\u003cp data-end=\"568\" data-start=\"152\"\u003e✨ \u003cstrong data-end=\"190\" data-start=\"154\"\u003eCrystal Destiny Tower Collection\u003c\/strong\u003e ✨\u003cbr data-end=\"195\" data-start=\"192\"\u003eEnchant your space with the timeless beauty and powerful energy of crystal towers. Each piece in our \u003cstrong data-end=\"316\" data-start=\"296\"\u003eTower Collection\u003c\/strong\u003e is carefully crafted to showcase nature’s artistry while radiating higher vibrations and spiritual resonance. From the clarity of Quartz to the calming presence of Amethyst, these towers are both decorative masterpieces and tools for transformation.\u003c\/p\u003e\n\u003cp data-end=\"765\" data-start=\"570\"\u003ePerfect for meditation spaces, energy work, or simply elevating your home décor, crystal towers channel focused energy upward—creating balance, harmony, and refined elegance in any environment.\u003c\/p\u003e\n\u003cp data-end=\"917\" data-start=\"767\"\u003eDiscover the Crystal Destiny Tower Collection today and transform your surroundings into a sanctuary of beauty, purpose, and spiritual significance.\u003c\/p\u003e\n\u003ch2\u003eCrystal Towers, Wands, Generators, Points, Pillars \u0026amp; Obelisks — What's the Difference?\u003c\/h2\u003e\n\u003cp id=\"isPasted\"\u003eWhile these terms may vary, they all describe beautifully shaped crystals with a pointed tip designed to channel and direct energy. Each name highlights a unique aspect of their use:\u003c\/p\u003e\n\u003cul\u003e\n\u003cli\u003e\n\u003cstrong\u003eTowers\u003c\/strong\u003e- Known for their steady, grounding presence, crystal towers help focus and amplify energy, making them perfect for meditation and manifestation.\u003c\/li\u003e\n\u003cli\u003e\n\u003cstrong\u003eWands\u003c\/strong\u003e- Traditionally used in energy work and healing, crystal wands are excellent for directing energy flow and clearing blockages.\u003c\/li\u003e\n\u003cli\u003e\n\u003cstrong\u003ePillars\u003c\/strong\u003e- Symbolizing strength and stability, crystal pillars create a balanced and harmonious environment, making them great for home decor and spiritual practices.\u003c\/li\u003e\n\u003cli\u003e\n\u003cstrong\u003eObelisks\u003c\/strong\u003e- Inspired by ancient structures, crystal obelisks are believed to connect earthly and spiritual energies, making them powerful tools for transformation and enlightenment.\u003c\/li\u003e\n\u003c\/ul\u003e\n\u003cp\u003eNo matter what you call them, these crystals serve the same purpose—to enhance energy, intention, and harmony in your space. Choose the one that resonates most with you!\u003c\/p\u003e","published_at":"2023-09-14T12:52:35-04:00","sort_order":"created-desc","template_suffix":"","disjunctive":false,"rules":[{"column":"tag","relation":"equals","condition":"towers"}],"published_scope":"global"},{"id":298983391403,"handle":"january-crystal-sale","title":"January Sale | 25% Off Crystal Towers \u0026 Spheres","updated_at":"2026-01-06T23:24:37-05:00","body_html":"\u003cp\u003eShop our \u003cstrong\u003eJanuary Crystal Sale\u003c\/strong\u003e, where you can shop a wide selection of healing crystals at discounted prices. Explore \u003cstrong\u003eCrystal Towers, \u0026amp; Crystal Spheres\u003c\/strong\u003e — all carefully curated and crafted to support meditation, energy balancing, and spiritual wellness. Whether you're looking to enhance your home decor, boost your daily energy, or find the perfect gift, our \u003cstrong\u003ecrystals for healing and manifestation\u003c\/strong\u003e offer both beauty and metaphysical benefits.\u003c\/p\u003e\n\u003cp\u003eThis January, our sale features \u003cstrong\u003ediscounted crystal towers and spheres\u003c\/strong\u003e, from \u003cstrong\u003enatural quartz \u003c\/strong\u003eand \u003cstrong\u003eamethyst \u003c\/strong\u003eto \u003cstrong\u003ebumblebee jasper \u003c\/strong\u003eand \u003cstrong\u003ecarnelian\u003c\/strong\u003e, so there's always something fresh to discover. Shop with confidence knowing you're getting high-quality crystals with \u003cstrong\u003efree shipping options\u003c\/strong\u003e and a trusted experience.\u003c\/p\u003e\n\u003cp\u003e\u003cstrong\u003eTake advantage of the January Crystal Sale today\u003c\/strong\u003e and add powerful, natural energy to your life with \u003cstrong\u003eauthentic healing crystals\u003c\/strong\u003e — while our limited-time discounts last.\u003c\/p\u003e\n\u003cp\u003e\u003cstrong\u003e*Discount automatically applied at checkout.\u003c\/strong\u003e\u003c\/p\u003e","published_at":"2026-01-01T00:07:17-05:00","sort_order":"alpha-asc","template_suffix":"monthly-collection","disjunctive":true,"rules":[{"column":"tag","relation":"equals","condition":"Spheres"},{"column":"tag","relation":"equals","condition":"Towers"}],"published_scope":"global","image":{"created_at":"2026-01-01T01:29:59-05:00","alt":"","width":960,"height":960,"src":"\/\/crystaldestiny.com\/cdn\/shop\/collections\/1464163B-22B1-4D62-BEC5-CEC9AECB670B.jpg?v=1767248999"}}]}
[{"alt":"Grape Agate Tower-Towers-Crystal Destiny-Grape Agate-60g - 2.75\"H x .90\"W-Crystal Destiny","id":31417062654123,"position":1,"preview_image":{"aspect_ratio":1.0,"height":1681,"width":1681,"src":"\/\/crystaldestiny.com\/cdn\/shop\/files\/Grape-Agate-Tower-Towers-Grape-Agate-60g-2_75H-x-_90W.jpg?v=1765429506"},"aspect_ratio":1.0,"height":1681,"media_type":"image","src":"\/\/crystaldestiny.com\/cdn\/shop\/files\/Grape-Agate-Tower-Towers-Grape-Agate-60g-2_75H-x-_90W.jpg?v=1765429506","width":1681},{"alt":"Grape Agate Tower-Towers-Crystal Destiny-Grape Agate-96g - 3.25\"H x .90\"W-Crystal Destiny","id":31417062686891,"position":2,"preview_image":{"aspect_ratio":1.0,"height":1614,"width":1614,"src":"\/\/crystaldestiny.com\/cdn\/shop\/files\/Grape-Agate-Tower-Towers-2.jpg?v=1757114584"},"aspect_ratio":1.0,"height":1614,"media_type":"image","src":"\/\/crystaldestiny.com\/cdn\/shop\/files\/Grape-Agate-Tower-Towers-2.jpg?v=1757114584","width":1614},{"alt":"Grape Agate Tower-Towers-Crystal Destiny-Grape Agate-96g - 3.25\"H x .90\"W-Crystal Destiny","id":31417062719659,"position":3,"preview_image":{"aspect_ratio":1.0,"height":1930,"width":1930,"src":"\/\/crystaldestiny.com\/cdn\/shop\/files\/Grape-Agate-Tower-Towers-Grape-Agate-96g-3_25H-x-_90W-3.jpg?v=1765429507"},"aspect_ratio":1.0,"height":1930,"media_type":"image","src":"\/\/crystaldestiny.com\/cdn\/shop\/files\/Grape-Agate-Tower-Towers-Grape-Agate-96g-3_25H-x-_90W-3.jpg?v=1765429507","width":1930},{"alt":"Grape Agate Tower-Towers-Crystal Destiny-Grape Agate-96g - 3.25\"H x .90\"W-Crystal Destiny","id":31417062752427,"position":4,"preview_image":{"aspect_ratio":1.0,"height":1869,"width":1869,"src":"\/\/crystaldestiny.com\/cdn\/shop\/files\/Grape-Agate-Tower-Towers-4.jpg?v=1757114650"},"aspect_ratio":1.0,"height":1869,"media_type":"image","src":"\/\/crystaldestiny.com\/cdn\/shop\/files\/Grape-Agate-Tower-Towers-4.jpg?v=1757114650","width":1869}]
{"item":{"id":8587166875819,"title":"Green Fluorite Crystal Sphere","handle":"green-fluorite-crystal-sphere-1005006604458417-green-fluorite-ball-diameter-3cm","description":"\u003cp data-start=\"162\" data-end=\"593\"\u003eThis polished Green Fluorite Crystal Sphere is a striking blend of natural beauty and tranquil energy. Known for its luminous green hues and mesmerizing internal clarity, Green Fluorite is cherished for its harmonizing presence and ability to bring emotional balance and mental clarity. Each sphere is carefully carved and polished to highlight its natural bands, making it an elegant centerpiece for any home, altar, or workspace.\u003c\/p\u003e\n\u003cp data-start=\"595\" data-end=\"991\"\u003eGreen Fluorite is used by collectors, healers, and energy workers to encourage focus, intuition, and energetic cleansing. Display it as a Feng Shui enhancer for harmony, or gift it as a meaningful birthday present for anyone who loves crystals and unique mineral décor. This large crystal globe also makes a stunning desktop specimen, adding beauty, calm, and natural artistry to any environment.\u003c\/p\u003e\n\u003cp data-start=\"595\" data-end=\"991\"\u003eThis product is pulled at random by size.\u003c\/p\u003e","published_at":"2025-11-20T20:44:17-05:00","created_at":"2025-11-20T20:40:04-05:00","vendor":"Ali","type":"Spheres","tags":["adjusted-shipping","crystal","new-arrivals","polished","spheres"],"price":1699,"price_min":1699,"price_max":10799,"available":true,"price_varies":true,"compare_at_price":0,"compare_at_price_min":0,"compare_at_price_max":0,"compare_at_price_varies":false,"variants":[{"id":45866075619499,"title":"Green Fluorite \/ Diameter 30mm","option1":"Green Fluorite","option2":"Diameter 30mm","option3":null,"sku":"1005006604458417-Green Fluorite ball-Diameter 3cm","requires_shipping":true,"taxable":true,"featured_image":{"id":40816782606507,"product_id":8587166875819,"position":4,"created_at":"2025-11-20T20:40:05-05:00","updated_at":"2025-12-10T00:22:02-05:00","alt":"Green Fluorite Crystal Sphere-Spheres-Ali-Green Fluorite-Diameter 30mm-Crystal Destiny","width":1000,"height":1000,"src":"\/\/crystaldestiny.com\/cdn\/shop\/files\/Green-Fluorite-Crystal-Sphere-Spheres-Green-Fluorite-Diameter-30mm-4.webp?v=1765344122","variant_ids":[45866075521195,45866075553963,45866075586731,45866075619499]},"available":false,"name":"Green Fluorite Crystal Sphere - Green Fluorite \/ Diameter 30mm","public_title":"Green Fluorite \/ Diameter 30mm","options":["Green Fluorite","Diameter 30mm"],"price":1699,"weight":250,"compare_at_price":0,"inventory_management":"shopify","barcode":null,"featured_media":{"alt":"Green Fluorite Crystal Sphere-Spheres-Ali-Green Fluorite-Diameter 30mm-Crystal Destiny","id":32188933243051,"position":4,"preview_image":{"aspect_ratio":1.0,"height":1000,"width":1000,"src":"\/\/crystaldestiny.com\/cdn\/shop\/files\/Green-Fluorite-Crystal-Sphere-Spheres-Green-Fluorite-Diameter-30mm-4.webp?v=1765344122"}},"requires_selling_plan":false,"selling_plan_allocations":[]},{"id":45866075586731,"title":"Green Fluorite \/ Diameter 40-50mm","option1":"Green Fluorite","option2":"Diameter 40-50mm","option3":null,"sku":"1005006604458417-Green Fluorite ball-Diameter 4-5cm","requires_shipping":true,"taxable":true,"featured_image":{"id":40816782606507,"product_id":8587166875819,"position":4,"created_at":"2025-11-20T20:40:05-05:00","updated_at":"2025-12-10T00:22:02-05:00","alt":"Green Fluorite Crystal Sphere-Spheres-Ali-Green Fluorite-Diameter 30mm-Crystal Destiny","width":1000,"height":1000,"src":"\/\/crystaldestiny.com\/cdn\/shop\/files\/Green-Fluorite-Crystal-Sphere-Spheres-Green-Fluorite-Diameter-30mm-4.webp?v=1765344122","variant_ids":[45866075521195,45866075553963,45866075586731,45866075619499]},"available":true,"name":"Green Fluorite Crystal Sphere - Green Fluorite \/ Diameter 40-50mm","public_title":"Green Fluorite \/ Diameter 40-50mm","options":["Green Fluorite","Diameter 40-50mm"],"price":3699,"weight":250,"compare_at_price":0,"inventory_management":"shopify","barcode":null,"featured_media":{"alt":"Green Fluorite Crystal Sphere-Spheres-Ali-Green Fluorite-Diameter 30mm-Crystal Destiny","id":32188933243051,"position":4,"preview_image":{"aspect_ratio":1.0,"height":1000,"width":1000,"src":"\/\/crystaldestiny.com\/cdn\/shop\/files\/Green-Fluorite-Crystal-Sphere-Spheres-Green-Fluorite-Diameter-30mm-4.webp?v=1765344122"}},"requires_selling_plan":false,"selling_plan_allocations":[]},{"id":45866075521195,"title":"Green Fluorite \/ Diameter 50-60mm","option1":"Green Fluorite","option2":"Diameter 50-60mm","option3":null,"sku":"1005006604458417-Green Fluorite ball-Diameter 5-6cm","requires_shipping":true,"taxable":true,"featured_image":{"id":40816782606507,"product_id":8587166875819,"position":4,"created_at":"2025-11-20T20:40:05-05:00","updated_at":"2025-12-10T00:22:02-05:00","alt":"Green Fluorite Crystal Sphere-Spheres-Ali-Green Fluorite-Diameter 30mm-Crystal Destiny","width":1000,"height":1000,"src":"\/\/crystaldestiny.com\/cdn\/shop\/files\/Green-Fluorite-Crystal-Sphere-Spheres-Green-Fluorite-Diameter-30mm-4.webp?v=1765344122","variant_ids":[45866075521195,45866075553963,45866075586731,45866075619499]},"available":true,"name":"Green Fluorite Crystal Sphere - Green Fluorite \/ Diameter 50-60mm","public_title":"Green Fluorite \/ Diameter 50-60mm","options":["Green Fluorite","Diameter 50-60mm"],"price":7699,"weight":250,"compare_at_price":0,"inventory_management":"shopify","barcode":null,"featured_media":{"alt":"Green Fluorite Crystal Sphere-Spheres-Ali-Green Fluorite-Diameter 30mm-Crystal Destiny","id":32188933243051,"position":4,"preview_image":{"aspect_ratio":1.0,"height":1000,"width":1000,"src":"\/\/crystaldestiny.com\/cdn\/shop\/files\/Green-Fluorite-Crystal-Sphere-Spheres-Green-Fluorite-Diameter-30mm-4.webp?v=1765344122"}},"requires_selling_plan":false,"selling_plan_allocations":[]},{"id":45866075553963,"title":"Green Fluorite \/ Diameter 60-70mm","option1":"Green Fluorite","option2":"Diameter 60-70mm","option3":null,"sku":"1005006604458417-Green Fluorite ball-Diameter 6-7cm","requires_shipping":true,"taxable":true,"featured_image":{"id":40816782606507,"product_id":8587166875819,"position":4,"created_at":"2025-11-20T20:40:05-05:00","updated_at":"2025-12-10T00:22:02-05:00","alt":"Green Fluorite Crystal Sphere-Spheres-Ali-Green Fluorite-Diameter 30mm-Crystal Destiny","width":1000,"height":1000,"src":"\/\/crystaldestiny.com\/cdn\/shop\/files\/Green-Fluorite-Crystal-Sphere-Spheres-Green-Fluorite-Diameter-30mm-4.webp?v=1765344122","variant_ids":[45866075521195,45866075553963,45866075586731,45866075619499]},"available":true,"name":"Green Fluorite Crystal Sphere - Green Fluorite \/ Diameter 60-70mm","public_title":"Green Fluorite \/ Diameter 60-70mm","options":["Green Fluorite","Diameter 60-70mm"],"price":10799,"weight":250,"compare_at_price":0,"inventory_management":"shopify","barcode":null,"featured_media":{"alt":"Green Fluorite Crystal Sphere-Spheres-Ali-Green Fluorite-Diameter 30mm-Crystal Destiny","id":32188933243051,"position":4,"preview_image":{"aspect_ratio":1.0,"height":1000,"width":1000,"src":"\/\/crystaldestiny.com\/cdn\/shop\/files\/Green-Fluorite-Crystal-Sphere-Spheres-Green-Fluorite-Diameter-30mm-4.webp?v=1765344122"}},"requires_selling_plan":false,"selling_plan_allocations":[]}],"images":["\/\/crystaldestiny.com\/cdn\/shop\/files\/Green-Fluorite-Crystal-Sphere-Spheres.webp?v=1763741558","\/\/crystaldestiny.com\/cdn\/shop\/files\/Green-Fluorite-Crystal-Sphere-Spheres-2.webp?v=1763741559","\/\/crystaldestiny.com\/cdn\/shop\/files\/Green-Fluorite-Crystal-Sphere-Spheres-3.webp?v=1763741560","\/\/crystaldestiny.com\/cdn\/shop\/files\/Green-Fluorite-Crystal-Sphere-Spheres-Green-Fluorite-Diameter-30mm-4.webp?v=1765344122","\/\/crystaldestiny.com\/cdn\/shop\/files\/Green-Fluorite-Crystal-Sphere-Spheres-5.webp?v=1763741563","\/\/crystaldestiny.com\/cdn\/shop\/files\/Green-Fluorite-Crystal-Sphere-Spheres-6.webp?v=1763741565"],"featured_image":"\/\/crystaldestiny.com\/cdn\/shop\/files\/Green-Fluorite-Crystal-Sphere-Spheres.webp?v=1763741558","options":["Material","Size"],"media":[{"alt":"Green Fluorite Crystal Sphere-Spheres-Ali-Green Fluorite-Diameter 30mm-Crystal Destiny","id":32188933079211,"position":1,"preview_image":{"aspect_ratio":1.0,"height":1000,"width":1000,"src":"\/\/crystaldestiny.com\/cdn\/shop\/files\/Green-Fluorite-Crystal-Sphere-Spheres.webp?v=1763741558"},"aspect_ratio":1.0,"height":1000,"media_type":"image","src":"\/\/crystaldestiny.com\/cdn\/shop\/files\/Green-Fluorite-Crystal-Sphere-Spheres.webp?v=1763741558","width":1000},{"alt":"Green Fluorite Crystal Sphere-Spheres-Ali-Green Fluorite-Diameter 30mm-Crystal Destiny","id":32188933177515,"position":2,"preview_image":{"aspect_ratio":1.0,"height":1000,"width":1000,"src":"\/\/crystaldestiny.com\/cdn\/shop\/files\/Green-Fluorite-Crystal-Sphere-Spheres-2.webp?v=1763741559"},"aspect_ratio":1.0,"height":1000,"media_type":"image","src":"\/\/crystaldestiny.com\/cdn\/shop\/files\/Green-Fluorite-Crystal-Sphere-Spheres-2.webp?v=1763741559","width":1000},{"alt":"Green Fluorite Crystal Sphere-Spheres-Ali-Green Fluorite-Diameter 30mm-Crystal Destiny","id":32188933210283,"position":3,"preview_image":{"aspect_ratio":1.0,"height":1000,"width":1000,"src":"\/\/crystaldestiny.com\/cdn\/shop\/files\/Green-Fluorite-Crystal-Sphere-Spheres-3.webp?v=1763741560"},"aspect_ratio":1.0,"height":1000,"media_type":"image","src":"\/\/crystaldestiny.com\/cdn\/shop\/files\/Green-Fluorite-Crystal-Sphere-Spheres-3.webp?v=1763741560","width":1000},{"alt":"Green Fluorite Crystal Sphere-Spheres-Ali-Green Fluorite-Diameter 30mm-Crystal Destiny","id":32188933243051,"position":4,"preview_image":{"aspect_ratio":1.0,"height":1000,"width":1000,"src":"\/\/crystaldestiny.com\/cdn\/shop\/files\/Green-Fluorite-Crystal-Sphere-Spheres-Green-Fluorite-Diameter-30mm-4.webp?v=1765344122"},"aspect_ratio":1.0,"height":1000,"media_type":"image","src":"\/\/crystaldestiny.com\/cdn\/shop\/files\/Green-Fluorite-Crystal-Sphere-Spheres-Green-Fluorite-Diameter-30mm-4.webp?v=1765344122","width":1000},{"alt":"Green Fluorite Crystal Sphere-Spheres-Ali-Green Fluorite-Diameter 30mm-Crystal Destiny","id":32188933144747,"position":5,"preview_image":{"aspect_ratio":1.0,"height":1000,"width":1000,"src":"\/\/crystaldestiny.com\/cdn\/shop\/files\/Green-Fluorite-Crystal-Sphere-Spheres-5.webp?v=1763741563"},"aspect_ratio":1.0,"height":1000,"media_type":"image","src":"\/\/crystaldestiny.com\/cdn\/shop\/files\/Green-Fluorite-Crystal-Sphere-Spheres-5.webp?v=1763741563","width":1000},{"alt":"Green Fluorite Crystal Sphere-Spheres-Ali-Green Fluorite-Diameter 30mm-Crystal Destiny","id":32188933111979,"position":6,"preview_image":{"aspect_ratio":1.0,"height":1000,"width":1000,"src":"\/\/crystaldestiny.com\/cdn\/shop\/files\/Green-Fluorite-Crystal-Sphere-Spheres-6.webp?v=1763741565"},"aspect_ratio":1.0,"height":1000,"media_type":"image","src":"\/\/crystaldestiny.com\/cdn\/shop\/files\/Green-Fluorite-Crystal-Sphere-Spheres-6.webp?v=1763741565","width":1000}],"requires_selling_plan":false,"selling_plan_groups":[],"content":"\u003cp data-start=\"162\" data-end=\"593\"\u003eThis polished Green Fluorite Crystal Sphere is a striking blend of natural beauty and tranquil energy. Known for its luminous green hues and mesmerizing internal clarity, Green Fluorite is cherished for its harmonizing presence and ability to bring emotional balance and mental clarity. Each sphere is carefully carved and polished to highlight its natural bands, making it an elegant centerpiece for any home, altar, or workspace.\u003c\/p\u003e\n\u003cp data-start=\"595\" data-end=\"991\"\u003eGreen Fluorite is used by collectors, healers, and energy workers to encourage focus, intuition, and energetic cleansing. Display it as a Feng Shui enhancer for harmony, or gift it as a meaningful birthday present for anyone who loves crystals and unique mineral décor. This large crystal globe also makes a stunning desktop specimen, adding beauty, calm, and natural artistry to any environment.\u003c\/p\u003e\n\u003cp data-start=\"595\" data-end=\"991\"\u003eThis product is pulled at random by size.\u003c\/p\u003e"},"options":[{"name":"Material","position":1,"values":["Green Fluorite"]},{"name":"Size","position":2,"values":["Diameter 30mm","Diameter 40-50mm","Diameter 50-60mm","Diameter 60-70mm"]}],"custom_metafields":{"shipping_time":"12-16 days"},"metafields":{"badge":"\u003cdiv style='display:none' class='jdgm-prev-badge' data-average-rating='0.00' data-number-of-reviews='0' data-number-of-questions='0'\u003e \u003cspan class='jdgm-prev-badge__stars' data-score='0.00' tabindex='0' aria-label='0.00 stars' role='button'\u003e \u003cspan class='jdgm-star jdgm--off'\u003e\u003c\/span\u003e\u003cspan class='jdgm-star jdgm--off'\u003e\u003c\/span\u003e\u003cspan class='jdgm-star jdgm--off'\u003e\u003c\/span\u003e\u003cspan class='jdgm-star jdgm--off'\u003e\u003c\/span\u003e\u003cspan class='jdgm-star jdgm--off'\u003e\u003c\/span\u003e \u003c\/span\u003e \u003cspan class='jdgm-prev-badge__text'\u003e No reviews \u003c\/span\u003e \u003c\/div\u003e","widget":"\u003cdiv class='jdgm-rev-widg' data-updated-at='2025-11-21T01:44:19Z' data-average-rating='0.00' data-number-of-reviews='0' data-number-of-questions='0' data-image-url='https:\/\/cdn.shopify.com\/s\/files\/1\/0613\/0345\/5915\/files\/S63fe264490754f09b23efd05136e847bh.webp?v=1763689207'\u003e \u003cstyle class='jdgm-temp-hiding-style'\u003e.jdgm-rev-widg{ display: none }\u003c\/style\u003e \u003cdiv class='jdgm-rev-widg__header'\u003e \u003ch2 class='jdgm-rev-widg__title'\u003eCustomer Reviews\u003c\/h2\u003e \u003cdiv class='jdgm-rev-widg__summary'\u003e \u003cdiv class='jdgm-rev-widg__summary-stars' aria-label='Average rating is 0.00 stars' role='img'\u003e \u003cspan class='jdgm-star jdgm--off'\u003e\u003c\/span\u003e\u003cspan class='jdgm-star jdgm--off'\u003e\u003c\/span\u003e\u003cspan class='jdgm-star jdgm--off'\u003e\u003c\/span\u003e\u003cspan class='jdgm-star jdgm--off'\u003e\u003c\/span\u003e\u003cspan class='jdgm-star jdgm--off'\u003e\u003c\/span\u003e \u003c\/div\u003e \u003cdiv class='jdgm-rev-widg__summary-text'\u003eBe the first to write a review\u003c\/div\u003e \u003c\/div\u003e \u003ca style='display: none' href='#' class='jdgm-write-rev-link' role='button'\u003eWrite a review\u003c\/a\u003e \u003cdiv class='jdgm-histogram jdgm-temp-hidden'\u003e \u003cdiv class='jdgm-histogram__row' data-rating='5' data-frequency='0' data-percentage='0'\u003e \u003cdiv class='jdgm-histogram__star' role='button' aria-label=\"0% (0) reviews with 5 star rating\" tabindex='0' \u003e\u003cspan class='jdgm-star jdgm--on'\u003e\u003c\/span\u003e\u003cspan class='jdgm-star jdgm--on'\u003e\u003c\/span\u003e\u003cspan class='jdgm-star jdgm--on'\u003e\u003c\/span\u003e\u003cspan class='jdgm-star jdgm--on'\u003e\u003c\/span\u003e\u003cspan class='jdgm-star jdgm--on'\u003e\u003c\/span\u003e\u003c\/div\u003e \u003cdiv class='jdgm-histogram__bar'\u003e \u003cdiv class='jdgm-histogram__bar-content' style='width: 0%;'\u003e \u003c\/div\u003e \u003c\/div\u003e \u003cdiv class='jdgm-histogram__percentage'\u003e0%\u003c\/div\u003e \u003cdiv class='jdgm-histogram__frequency'\u003e(0)\u003c\/div\u003e \u003c\/div\u003e \u003cdiv class='jdgm-histogram__row' data-rating='4' data-frequency='0' data-percentage='0'\u003e \u003cdiv class='jdgm-histogram__star' role='button' aria-label=\"0% (0) reviews with 4 star rating\" tabindex='0' \u003e\u003cspan class='jdgm-star jdgm--on'\u003e\u003c\/span\u003e\u003cspan class='jdgm-star jdgm--on'\u003e\u003c\/span\u003e\u003cspan class='jdgm-star jdgm--on'\u003e\u003c\/span\u003e\u003cspan class='jdgm-star jdgm--on'\u003e\u003c\/span\u003e\u003cspan class='jdgm-star jdgm--off'\u003e\u003c\/span\u003e\u003c\/div\u003e \u003cdiv class='jdgm-histogram__bar'\u003e \u003cdiv class='jdgm-histogram__bar-content' style='width: 0%;'\u003e \u003c\/div\u003e \u003c\/div\u003e \u003cdiv class='jdgm-histogram__percentage'\u003e0%\u003c\/div\u003e \u003cdiv class='jdgm-histogram__frequency'\u003e(0)\u003c\/div\u003e \u003c\/div\u003e \u003cdiv class='jdgm-histogram__row' data-rating='3' data-frequency='0' data-percentage='0'\u003e \u003cdiv class='jdgm-histogram__star' role='button' aria-label=\"0% (0) reviews with 3 star rating\" tabindex='0' \u003e\u003cspan class='jdgm-star jdgm--on'\u003e\u003c\/span\u003e\u003cspan class='jdgm-star jdgm--on'\u003e\u003c\/span\u003e\u003cspan class='jdgm-star jdgm--on'\u003e\u003c\/span\u003e\u003cspan class='jdgm-star jdgm--off'\u003e\u003c\/span\u003e\u003cspan class='jdgm-star jdgm--off'\u003e\u003c\/span\u003e\u003c\/div\u003e \u003cdiv class='jdgm-histogram__bar'\u003e \u003cdiv class='jdgm-histogram__bar-content' style='width: 0%;'\u003e \u003c\/div\u003e \u003c\/div\u003e \u003cdiv class='jdgm-histogram__percentage'\u003e0%\u003c\/div\u003e \u003cdiv class='jdgm-histogram__frequency'\u003e(0)\u003c\/div\u003e \u003c\/div\u003e \u003cdiv class='jdgm-histogram__row' data-rating='2' data-frequency='0' data-percentage='0'\u003e \u003cdiv class='jdgm-histogram__star' role='button' aria-label=\"0% (0) reviews with 2 star rating\" tabindex='0' \u003e\u003cspan class='jdgm-star jdgm--on'\u003e\u003c\/span\u003e\u003cspan class='jdgm-star jdgm--on'\u003e\u003c\/span\u003e\u003cspan class='jdgm-star jdgm--off'\u003e\u003c\/span\u003e\u003cspan class='jdgm-star jdgm--off'\u003e\u003c\/span\u003e\u003cspan class='jdgm-star jdgm--off'\u003e\u003c\/span\u003e\u003c\/div\u003e \u003cdiv class='jdgm-histogram__bar'\u003e \u003cdiv class='jdgm-histogram__bar-content' style='width: 0%;'\u003e \u003c\/div\u003e \u003c\/div\u003e \u003cdiv class='jdgm-histogram__percentage'\u003e0%\u003c\/div\u003e \u003cdiv class='jdgm-histogram__frequency'\u003e(0)\u003c\/div\u003e \u003c\/div\u003e \u003cdiv class='jdgm-histogram__row' data-rating='1' data-frequency='0' data-percentage='0'\u003e \u003cdiv class='jdgm-histogram__star' role='button' aria-label=\"0% (0) reviews with 1 star rating\" tabindex='0' \u003e\u003cspan class='jdgm-star jdgm--on'\u003e\u003c\/span\u003e\u003cspan class='jdgm-star jdgm--off'\u003e\u003c\/span\u003e\u003cspan class='jdgm-star jdgm--off'\u003e\u003c\/span\u003e\u003cspan class='jdgm-star jdgm--off'\u003e\u003c\/span\u003e\u003cspan class='jdgm-star jdgm--off'\u003e\u003c\/span\u003e\u003c\/div\u003e \u003cdiv class='jdgm-histogram__bar'\u003e \u003cdiv class='jdgm-histogram__bar-content' style='width: 0%;'\u003e \u003c\/div\u003e \u003c\/div\u003e \u003cdiv class='jdgm-histogram__percentage'\u003e0%\u003c\/div\u003e \u003cdiv class='jdgm-histogram__frequency'\u003e(0)\u003c\/div\u003e \u003c\/div\u003e \u003cdiv class='jdgm-histogram__row jdgm-histogram__clear-filter' data-rating=null tabindex='0'\u003e\u003c\/div\u003e \u003c\/div\u003e \u003cdiv class='jdgm-rev-widg__sort-wrapper'\u003e\u003c\/div\u003e \u003c\/div\u003e \u003cdiv class='jdgm-rev-widg__body'\u003e \u003cdiv class='jdgm-rev-widg__reviews'\u003e\u003c\/div\u003e \u003cdiv class='jdgm-paginate' data-per-page='4' data-url='https:\/\/api.judge.me\/reviews\/reviews_for_widget' style=\"display: none;\"\u003e\u003c\/div\u003e \u003c\/div\u003e \u003cdiv class='jdgm-rev-widg__paginate-spinner-wrapper'\u003e \u003cdiv class='jdgm-spinner'\u003e\u003c\/div\u003e \u003c\/div\u003e \u003c\/div\u003e"},"collections":[{"id":294880051371,"handle":"crystals","title":"Crystals","updated_at":"2026-01-07T23:43:11-05:00","body_html":"\u003cp data-start=\"159\" data-end=\"687\"\u003e✨ \u003cstrong data-start=\"161\" data-end=\"216\"\u003eDiscover the Magic of Crystals with Crystal Destiny\u003c\/strong\u003e ✨\u003cbr data-start=\"218\" data-end=\"221\"\u003eCrystals have been treasured for centuries—not only for their natural beauty but also for their powerful healing energies. Beyond their visual allure, they bring balance, harmony, and positive energy into any space. Whether used for home décor, meditation, or simply to elevate the energy of your surroundings, crystals create a sanctuary of peace, relaxation, and well-being. Each piece is a unique gift from the Earth—visually stunning and spiritually uplifting.\u003c\/p\u003e\n\u003cp data-start=\"689\" data-end=\"1011\"\u003eAt \u003cstrong data-start=\"692\" data-end=\"711\"\u003eCrystal Destiny\u003c\/strong\u003e, our signature collection showcases a curated selection of exquisite crystals, from radiant Quartz to soothing Amethyst. Every stone is carefully sourced for its elegance and metaphysical resonance, making them perfect for enhancing your home, uplifting your spirit, or gifting to someone special.\u003c\/p\u003e\n\u003cp data-start=\"1013\" data-end=\"1206\"\u003eExperience the timeless sophistication of crystalline wonders. Explore the \u003cstrong data-start=\"1088\" data-end=\"1118\"\u003eCrystal Destiny Collection\u003c\/strong\u003e today and bring the transformative beauty of these treasures into your everyday life.\u003c\/p\u003e","published_at":"2023-06-05T11:24:02-04:00","sort_order":"created-desc","template_suffix":"","disjunctive":false,"rules":[{"column":"tag","relation":"equals","condition":"crystal"},{"column":"type","relation":"not_contains","condition":"925 Sterling Silver"},{"column":"type","relation":"not_contains","condition":"Wire Wraps"}],"published_scope":"global"},{"id":319455887531,"handle":"heart-chakra-crystals","title":"Heart Chakra Crystals","updated_at":"2026-01-07T23:43:11-05:00","body_html":"\u003cp data-start=\"107\" data-end=\"457\"\u003e✨ \u003cstrong data-start=\"109\" data-end=\"134\"\u003eHeart Chakra Crystals\u003c\/strong\u003e ✨\u003cbr data-start=\"136\" data-end=\"139\"\u003eOpen your heart to love, compassion, and emotional balance with our \u003cstrong data-start=\"207\" data-end=\"232\"\u003eHeart Chakra Crystals\u003c\/strong\u003e. Located at the center of the chest, the Heart Chakra governs love, forgiveness, and connection to yourself and others. These crystals help release emotional blockages, foster empathy, and promote harmonious relationships.\u003c\/p\u003e\n\u003cp data-start=\"459\" data-end=\"773\"\u003eOur curated selection includes stones such as Rose Quartz, Green Aventurine, and Rhodonite—each chosen for their ability to inspire self-love, emotional healing, and compassion. Perfect for meditation, energy work, or wearing as jewelry, Heart Chakra Crystals support the flow of loving energy and inner harmony.\u003c\/p\u003e\n\u003cp data-start=\"775\" data-end=\"906\"\u003eEmbrace emotional balance, cultivate love, and harness the transformative energy of the Heart Chakra with these radiant crystals.\u003c\/p\u003e","published_at":"2025-07-17T18:17:52-04:00","sort_order":"best-selling","template_suffix":"","disjunctive":false,"rules":[{"column":"variant_metafield_definition","relation":"equals","condition":"Heart"}],"published_scope":"global","image":{"created_at":"2025-07-17T19:08:29-04:00","alt":null,"width":1080,"height":1080,"src":"\/\/crystaldestiny.com\/cdn\/shop\/collections\/Heart_Chakra_Collection.jpg?v=1762474927"}},{"id":294880116907,"handle":"polished","title":"Polished Crystals","updated_at":"2026-01-07T23:43:11-05:00","body_html":"\u003cp data-start=\"199\" data-end=\"598\"\u003e✨ \u003cstrong data-start=\"201\" data-end=\"248\"\u003eCrystal Destiny Polished Crystal Collection\u003c\/strong\u003e ✨\u003cbr data-start=\"250\" data-end=\"253\"\u003eIndulge in the brilliance of crystals refined to perfection. Our \u003cstrong data-start=\"318\" data-end=\"341\"\u003ePolished Collection\u003c\/strong\u003e showcases gemstones meticulously shaped and smoothed to reveal their natural radiance and timeless beauty. From the shimmering glow of Quartz to the deep allure of Obsidian, each polished piece is a testament to nature’s artistry and human craftsmanship.\u003c\/p\u003e\n\u003cp data-start=\"600\" data-end=\"862\"\u003ePerfect as statement décor, meaningful gifts, or companions on your spiritual journey, polished crystals bring sophistication and elevated energy into any space. Their radiant surfaces reflect not only light but also the transformative power of crystal energy.\u003c\/p\u003e\n\u003cp data-start=\"864\" data-end=\"1022\"\u003eDiscover the elegance of refinement with Crystal Destiny’s Polished Crystal Collection—where every facet shines with intention, beauty, and timeless allure.\u003c\/p\u003e","published_at":"2023-06-05T11:30:44-04:00","sort_order":"created-desc","template_suffix":"","disjunctive":false,"rules":[{"column":"tag","relation":"equals","condition":"polished"}],"published_scope":"global"},{"id":322471624875,"handle":"crystal-favorites","title":"Crystal Enthusiast's Favorites","updated_at":"2026-01-07T23:42:38-05:00","body_html":"\u003cp\u003eDiscover the crystals our community loves most. This collection features our best-selling stones and accessories, carefully curated to highlight pieces that are always in demand and ready to ship. Whether you’re adding to your collection or searching for a gift, these fan-favorite crystals are timeless staples for energy, beauty, and balance.\u003c\/p\u003e","published_at":"2025-10-01T21:07:06-04:00","sort_order":"price-asc","template_suffix":"","disjunctive":false,"rules":[{"column":"variant_inventory","relation":"greater_than","condition":"1"}],"published_scope":"global"},{"id":321695744171,"handle":"direct-from-supplier","title":"Direct from Supplier","updated_at":"2026-01-07T23:43:11-05:00","body_html":"","published_at":"2025-09-12T16:38:23-04:00","sort_order":"best-selling","template_suffix":"","disjunctive":true,"rules":[{"column":"tag","relation":"equals","condition":"adjusted-shipping"}],"published_scope":"global"},{"id":295698202795,"handle":"spheres","title":"Crystal Spheres","updated_at":"2026-01-06T23:24:35-05:00","body_html":"\u003cp data-start=\"106\" data-end=\"370\"\u003e✨ \u003cstrong data-start=\"108\" data-end=\"138\"\u003eCrystal Spheres Collection\u003c\/strong\u003e ✨\u003cbr data-start=\"140\" data-end=\"143\"\u003eBring harmony, balance, and elegance into your space with our \u003cstrong data-start=\"205\" data-end=\"235\"\u003eCrystal Spheres Collection\u003c\/strong\u003e. Each sphere is meticulously crafted to showcase the natural beauty and energy of crystals, from radiant Quartz to calming Amethyst.\u003c\/p\u003e\n\u003cp data-start=\"372\" data-end=\"658\"\u003ePerfect for meditation, energy work, or as striking décor, crystal spheres radiate energy in all directions, promoting clarity, focus, and a sense of calm. Their smooth, polished surfaces highlight the stones’ natural patterns and colors, making each sphere a captivating centerpiece.\u003c\/p\u003e\n\u003cp data-start=\"660\" data-end=\"809\"\u003eElevate your space and embrace the transformative power of crystals with the \u003cstrong data-start=\"737\" data-end=\"767\"\u003eCrystal Spheres Collection\u003c\/strong\u003e—where beauty, energy, and harmony meet.\u003c\/p\u003e","published_at":"2023-07-28T14:20:46-04:00","sort_order":"created-desc","template_suffix":"","disjunctive":true,"rules":[{"column":"tag","relation":"equals","condition":"spheres"},{"column":"tag","relation":"equals","condition":"eggs"}],"published_scope":"global"},{"id":293659312299,"handle":"best-sellers","title":"Best Sellers","updated_at":"2026-01-07T23:43:11-05:00","body_html":"\u003cp data-start=\"155\" data-end=\"510\"\u003eDiscover the pieces our community loves most. Our Best Sellers Collection brings together handpicked crystals and jewelry that embody timeless elegance, spiritual resonance, and everyday sophistication. Each item has earned its place as a customer favorite—celebrated for both its beauty and its meaningful energy.\u003c\/p\u003e\n\u003cp data-start=\"512\" data-end=\"802\"\u003eFrom stunning statement pieces to versatile daily companions, these treasures are curated to elevate your space, uplift your spirit, and reflect refined taste. Indulge in what’s most cherished and let our best sellers guide you toward the perfect blend of style and transformative energy.\u003c\/p\u003e\n\u003cp data-start=\"804\" data-end=\"932\"\u003eExplore the Best Sellers Collection today—where elegance meets intention, and every piece tells a story of beauty and balance.\u003c\/p\u003e","published_at":"2023-03-15T16:04:51-04:00","sort_order":"best-selling","template_suffix":"","disjunctive":false,"rules":[{"column":"variant_price","relation":"greater_than","condition":"0"},{"column":"variant_inventory","relation":"greater_than","condition":"0"},{"column":"type","relation":"not_equals","condition":"Shipping Protection"}],"published_scope":"global"},{"id":321370390699,"handle":"monthly-crystal-sale","title":"Monthly Crystal Sale | Spheres \u0026 Towers","updated_at":"2026-01-06T23:24:37-05:00","body_html":"\u003cp\u003eShop our \u003cstrong\u003eMonthly Crystal Sale\u003c\/strong\u003e, where you can shop a wide selection of healing crystals at discounted prices. Explore \u003cstrong\u003ecrystal spheres and towers,\u003c\/strong\u003e— all carefully curated to support meditation, energy balancing, and spiritual wellness. Whether you're looking to enhance your home decor, boost your daily energy, or find the perfect gift, our \u003cstrong\u003ecrystals for healing and manifestation\u003c\/strong\u003e offer both beauty and metaphysical benefits.\u003c\/p\u003e\n\u003cp\u003eEach month, our sale features \u003cstrong\u003enew discounted collections\u003c\/strong\u003e, from \u003cstrong\u003enatural quartz and amethyst towers\u003c\/strong\u003e to \u003cstrong\u003ewire-wrapped pendants and polished stones\u003c\/strong\u003e, so there's always something fresh to discover. Shop with confidence knowing you're getting high-quality crystals with \u003cstrong\u003efree shipping options\u003c\/strong\u003e and a trusted experience.\u003c\/p\u003e\n\u003cp\u003e\u003cstrong\u003eTake advantage of the Monthly Crystal Sale today\u003c\/strong\u003e and add powerful, natural energy to your life with \u003cstrong\u003eauthentic healing crystals\u003c\/strong\u003e — while our limited-time discounts last.\u003c\/p\u003e\n\u003cp\u003e\u003cstrong\u003e*Discount automatically applied at checkout.\u003c\/strong\u003e\u003c\/p\u003e","published_at":"2025-12-02T01:26:17-05:00","sort_order":"alpha-asc","template_suffix":"","disjunctive":true,"rules":[{"column":"tag","relation":"equals","condition":"spheres"},{"column":"tag","relation":"equals","condition":"Towers"}],"published_scope":"global","image":{"created_at":"2026-01-01T01:32:34-05:00","alt":"","width":960,"height":960,"src":"\/\/crystaldestiny.com\/cdn\/shop\/collections\/3E8C2969-1B86-4ACE-B349-98E9D8768424.jpg?v=1767249154"}},{"id":297906241707,"handle":"new-arrivals","title":"New Arrivals","updated_at":"2026-01-07T23:43:11-05:00","body_html":"\u003cp data-start=\"172\" data-end=\"573\"\u003e✨ \u003cstrong data-start=\"174\" data-end=\"217\"\u003eDiscover Crystal Destiny’s New Arrivals\u003c\/strong\u003e ✨\u003cbr data-start=\"219\" data-end=\"222\"\u003eStep into a world of fresh sophistication with our latest crystal treasures. Each new piece—whether Quartz, Amethyst, or beyond—embodies nature’s artistry, radiating both timeless beauty and powerful energy. Thoughtfully curated and constantly refreshed, our New Arrivals Collection offers the perfect harmony of elegance and metaphysical resonance.\u003c\/p\u003e\n\u003cp data-start=\"575\" data-end=\"793\"\u003eElevate your space, uplift your spirit, and embrace the transformative power of nature’s wonders. Explore the newest expressions of crystal artistry today, and let your journey with crystals evolve with every update.\u003c\/p\u003e","published_at":"2023-11-20T15:35:42-05:00","sort_order":"created-desc","template_suffix":"","disjunctive":true,"rules":[{"column":"tag","relation":"equals","condition":"new-arrivals"}],"published_scope":"global"},{"id":297596059819,"handle":"all","title":"All Crystals \u0026 Jewelry","updated_at":"2026-01-07T23:43:11-05:00","body_html":"\u003cp data-start=\"149\" data-end=\"494\"\u003e✨ \u003cstrong data-start=\"151\" data-end=\"181\"\u003eWelcome to Crystal Destiny\u003c\/strong\u003e ✨\u003cbr data-start=\"183\" data-end=\"186\"\u003eStep into a world where beauty, energy, and artistry unite. Our collection is a treasure trove of exquisite crystals, from the raw, untamed elegance of natural formations to the polished brilliance of expertly crafted pieces. Each crystal is a masterpiece, carrying its own unique story and timeless charm.\u003c\/p\u003e\n\u003cp data-start=\"496\" data-end=\"831\"\u003eWhether you’re drawn to the calming presence of Amethyst, the vibrant energy of Citrine, or the grounding strength of Jasper, our crystals invite you to connect with nature’s finest wonders. Perfect for enhancing your space, supporting your spiritual journey, or gifting with intention, every piece resonates with beauty and meaning.\u003c\/p\u003e\n\u003cp data-start=\"833\" data-end=\"1000\"\u003eElevate your surroundings, embrace the mystique, and explore the enchanting world of crystals at \u003cstrong data-start=\"930\" data-end=\"949\"\u003eCrystal Destiny\u003c\/strong\u003e—where every crystal is waiting to be discovered.\u003c\/p\u003e","published_at":"2023-11-10T13:55:31-05:00","sort_order":"created-desc","template_suffix":"","disjunctive":false,"rules":[{"column":"type","relation":"not_equals","condition":"asdf"}],"published_scope":"global"},{"id":298983391403,"handle":"january-crystal-sale","title":"January Sale | 25% Off Crystal Towers \u0026 Spheres","updated_at":"2026-01-06T23:24:37-05:00","body_html":"\u003cp\u003eShop our \u003cstrong\u003eJanuary Crystal Sale\u003c\/strong\u003e, where you can shop a wide selection of healing crystals at discounted prices. Explore \u003cstrong\u003eCrystal Towers, \u0026amp; Crystal Spheres\u003c\/strong\u003e — all carefully curated and crafted to support meditation, energy balancing, and spiritual wellness. Whether you're looking to enhance your home decor, boost your daily energy, or find the perfect gift, our \u003cstrong\u003ecrystals for healing and manifestation\u003c\/strong\u003e offer both beauty and metaphysical benefits.\u003c\/p\u003e\n\u003cp\u003eThis January, our sale features \u003cstrong\u003ediscounted crystal towers and spheres\u003c\/strong\u003e, from \u003cstrong\u003enatural quartz \u003c\/strong\u003eand \u003cstrong\u003eamethyst \u003c\/strong\u003eto \u003cstrong\u003ebumblebee jasper \u003c\/strong\u003eand \u003cstrong\u003ecarnelian\u003c\/strong\u003e, so there's always something fresh to discover. Shop with confidence knowing you're getting high-quality crystals with \u003cstrong\u003efree shipping options\u003c\/strong\u003e and a trusted experience.\u003c\/p\u003e\n\u003cp\u003e\u003cstrong\u003eTake advantage of the January Crystal Sale today\u003c\/strong\u003e and add powerful, natural energy to your life with \u003cstrong\u003eauthentic healing crystals\u003c\/strong\u003e — while our limited-time discounts last.\u003c\/p\u003e\n\u003cp\u003e\u003cstrong\u003e*Discount automatically applied at checkout.\u003c\/strong\u003e\u003c\/p\u003e","published_at":"2026-01-01T00:07:17-05:00","sort_order":"alpha-asc","template_suffix":"monthly-collection","disjunctive":true,"rules":[{"column":"tag","relation":"equals","condition":"Spheres"},{"column":"tag","relation":"equals","condition":"Towers"}],"published_scope":"global","image":{"created_at":"2026-01-01T01:29:59-05:00","alt":"","width":960,"height":960,"src":"\/\/crystaldestiny.com\/cdn\/shop\/collections\/1464163B-22B1-4D62-BEC5-CEC9AECB670B.jpg?v=1767248999"}}]}
[{"alt":"Green Fluorite Crystal Sphere-Spheres-Ali-Green Fluorite-Diameter 30mm-Crystal Destiny","id":32188933079211,"position":1,"preview_image":{"aspect_ratio":1.0,"height":1000,"width":1000,"src":"\/\/crystaldestiny.com\/cdn\/shop\/files\/Green-Fluorite-Crystal-Sphere-Spheres.webp?v=1763741558"},"aspect_ratio":1.0,"height":1000,"media_type":"image","src":"\/\/crystaldestiny.com\/cdn\/shop\/files\/Green-Fluorite-Crystal-Sphere-Spheres.webp?v=1763741558","width":1000},{"alt":"Green Fluorite Crystal Sphere-Spheres-Ali-Green Fluorite-Diameter 30mm-Crystal Destiny","id":32188933177515,"position":2,"preview_image":{"aspect_ratio":1.0,"height":1000,"width":1000,"src":"\/\/crystaldestiny.com\/cdn\/shop\/files\/Green-Fluorite-Crystal-Sphere-Spheres-2.webp?v=1763741559"},"aspect_ratio":1.0,"height":1000,"media_type":"image","src":"\/\/crystaldestiny.com\/cdn\/shop\/files\/Green-Fluorite-Crystal-Sphere-Spheres-2.webp?v=1763741559","width":1000},{"alt":"Green Fluorite Crystal Sphere-Spheres-Ali-Green Fluorite-Diameter 30mm-Crystal Destiny","id":32188933210283,"position":3,"preview_image":{"aspect_ratio":1.0,"height":1000,"width":1000,"src":"\/\/crystaldestiny.com\/cdn\/shop\/files\/Green-Fluorite-Crystal-Sphere-Spheres-3.webp?v=1763741560"},"aspect_ratio":1.0,"height":1000,"media_type":"image","src":"\/\/crystaldestiny.com\/cdn\/shop\/files\/Green-Fluorite-Crystal-Sphere-Spheres-3.webp?v=1763741560","width":1000},{"alt":"Green Fluorite Crystal Sphere-Spheres-Ali-Green Fluorite-Diameter 30mm-Crystal Destiny","id":32188933243051,"position":4,"preview_image":{"aspect_ratio":1.0,"height":1000,"width":1000,"src":"\/\/crystaldestiny.com\/cdn\/shop\/files\/Green-Fluorite-Crystal-Sphere-Spheres-Green-Fluorite-Diameter-30mm-4.webp?v=1765344122"},"aspect_ratio":1.0,"height":1000,"media_type":"image","src":"\/\/crystaldestiny.com\/cdn\/shop\/files\/Green-Fluorite-Crystal-Sphere-Spheres-Green-Fluorite-Diameter-30mm-4.webp?v=1765344122","width":1000},{"alt":"Green Fluorite Crystal Sphere-Spheres-Ali-Green Fluorite-Diameter 30mm-Crystal Destiny","id":32188933144747,"position":5,"preview_image":{"aspect_ratio":1.0,"height":1000,"width":1000,"src":"\/\/crystaldestiny.com\/cdn\/shop\/files\/Green-Fluorite-Crystal-Sphere-Spheres-5.webp?v=1763741563"},"aspect_ratio":1.0,"height":1000,"media_type":"image","src":"\/\/crystaldestiny.com\/cdn\/shop\/files\/Green-Fluorite-Crystal-Sphere-Spheres-5.webp?v=1763741563","width":1000},{"alt":"Green Fluorite Crystal Sphere-Spheres-Ali-Green Fluorite-Diameter 30mm-Crystal Destiny","id":32188933111979,"position":6,"preview_image":{"aspect_ratio":1.0,"height":1000,"width":1000,"src":"\/\/crystaldestiny.com\/cdn\/shop\/files\/Green-Fluorite-Crystal-Sphere-Spheres-6.webp?v=1763741565"},"aspect_ratio":1.0,"height":1000,"media_type":"image","src":"\/\/crystaldestiny.com\/cdn\/shop\/files\/Green-Fluorite-Crystal-Sphere-Spheres-6.webp?v=1763741565","width":1000}]
{"item":{"id":8468691681451,"title":"Torre de fluorita verde","handle":"green-fluorite-tower-cd-10169","description":"\u003cp\u003eLa Torre de Fluorita Verde es un cristal poderoso conocido por su capacidad para mejorar la claridad mental y promover el equilibrio emocional. Sus vibrantes tonos verdes simbolizan el crecimiento y la renovación, lo que la hace ideal para la meditación y las prácticas de sanación energética. Esta forma de torre amplifica la energía natural de la piedra, dirigiéndola hacia arriba para purificar y estabilizar el entorno. Perfecta para expertos que buscan profundizar en su trabajo espiritual o mejorar la concentración, la Torre de Fluorita Verde favorece la toma de decisiones con claridad y fomenta una atmósfera armoniosa.\u003c\/p\u003e\n\n\u003cp\u003e Este producto es exactamente como se muestra en la imagen, único en su tipo.\u003c\/p\u003e\n\u003cdiv\u003e \u003cspan style=\"font-size: 0.875rem;\"\u003eTorres de Cristal, Varas, Generadores, Puntas, Pilares y Obeliscos: ¿Cuál es la Diferencia?\u003c\/span\u003e\n\u003c\/div\u003e\n\u003cdiv\u003e Si bien estos términos pueden variar, todos describen cristales de formas hermosas con una punta puntiaguda diseñada para canalizar y dirigir la energía. Cada nombre destaca un aspecto único de su uso:\u003c\/div\u003e\n\u003cdiv\u003e \u0026lt;ul\u0026gt;\u003c\/div\u003e\n\u003cdiv\u003e \u0026lt;li\u0026gt;\u003c\/div\u003e \u003cdiv\u003e\u0026lt;strong\u0026gt;Torres\u0026lt;\/strong\u0026gt;: Conocidas por su presencia constante y estabilizadora, las torres de cristal ayudan a enfocar y amplificar la energía, lo que las hace perfectas para la meditación y la manifestación.\u0026lt;\/li\u0026gt;\u003c\/div\u003e\n\u003cdiv\u003e \u0026lt;li\u0026gt;\u003c\/div\u003e\n\u003cdiv\u003e \u0026lt;strong\u0026gt;Varitas\u0026lt;\/strong\u0026gt;: Tradicionalmente utilizadas en el trabajo energético y la curación, las varitas de cristal son excelentes para dirigir el flujo de energía y eliminar bloqueos.\u0026lt;\/li\u0026gt;\u003c\/div\u003e\n\u003cdiv\u003e \u0026lt;li\u0026gt;\u003c\/div\u003e\n\u003cdiv\u003e \u0026lt;strong\u0026gt;Pilares\u0026lt;\/strong\u0026gt;: Simbolizando fuerza y estabilidad, los pilares de cristal crean un ambiente equilibrado y armonioso, lo que los hace ideales para la decoración del hogar y las prácticas espirituales.\u0026lt;\/li\u0026gt;\u003c\/div\u003e\n\u003cdiv\u003e \u0026lt;li\u0026gt;\u003c\/div\u003e\n\u003cdiv\u003e \u0026lt;strong\u0026gt;Obeliscos\u0026lt;\/strong\u0026gt;: Inspirados en estructuras antiguas, se cree que los obeliscos de cristal conectan las energías terrenales y espirituales, lo que los convierte en poderosas herramientas para la transformación y la iluminación.\u0026lt;\/li\u0026gt;\u003c\/div\u003e\n\u003cdiv\u003e \u0026lt;\/ul\u0026gt;\u003c\/div\u003e\n\u003cdiv\u003e No importa cómo los llames, estos cristales tienen el mismo propósito: potenciar la energía, la intención y la armonía en tu espacio. ¡Elige el que más te resuene!\u003c\/div\u003e","published_at":"2025-07-08T19:14:16-04:00","created_at":"2025-07-08T19:14:16-04:00","vendor":"Crystal Destiny","type":"Torres","tags":["crystal","polished","Towers"],"price":9499,"price_min":9499,"price_max":9499,"available":true,"price_varies":false,"compare_at_price":null,"compare_at_price_min":0,"compare_at_price_max":0,"compare_at_price_varies":false,"variants":[{"id":45391295283371,"title":"Fluorita verde \/ 836 g - 6,00\" de alto x 2,25\" de ancho","option1":"Fluorita verde","option2":"836 g - 6,00\" de alto x 2,25\" de ancho","option3":null,"sku":"CD-10169","requires_shipping":true,"taxable":true,"featured_image":null,"available":true,"name":"Torre de fluorita verde - Fluorita verde \/ 836 g - 6,00\" de alto x 2,25\" de ancho","public_title":"Fluorita verde \/ 836 g - 6,00\" de alto x 2,25\" de ancho","options":["Fluorita verde","836 g - 6,00\" de alto x 2,25\" de ancho"],"price":9499,"weight":0,"compare_at_price":null,"inventory_management":"shopify","barcode":"","requires_selling_plan":false,"selling_plan_allocations":[]}],"images":["\/\/crystaldestiny.com\/cdn\/shop\/files\/Green-Fluorite-Tower-Towers.jpg?v=1757205721","\/\/crystaldestiny.com\/cdn\/shop\/files\/Green-Fluorite-Tower-Towers-2_744d3cce.jpg?v=1757205751"],"featured_image":"\/\/crystaldestiny.com\/cdn\/shop\/files\/Green-Fluorite-Tower-Towers.jpg?v=1757205721","options":["Material","Tamaño"],"media":[{"alt":"Green Fluorite Tower-Towers-Crystal Destiny-Green Fluorite-836g - 6.00\"h x 2.25\"w-Crystal Destiny","id":31410988187819,"position":1,"preview_image":{"aspect_ratio":1.0,"height":3521,"width":3521,"src":"\/\/crystaldestiny.com\/cdn\/shop\/files\/Green-Fluorite-Tower-Towers.jpg?v=1757205721"},"aspect_ratio":1.0,"height":3521,"media_type":"image","src":"\/\/crystaldestiny.com\/cdn\/shop\/files\/Green-Fluorite-Tower-Towers.jpg?v=1757205721","width":3521},{"alt":"Green Fluorite Tower-Towers-Crystal Destiny-Green Fluorite-836g - 6.00\"h x 2.25\"w-Crystal Destiny","id":31410988220587,"position":2,"preview_image":{"aspect_ratio":1.0,"height":3492,"width":3492,"src":"\/\/crystaldestiny.com\/cdn\/shop\/files\/Green-Fluorite-Tower-Towers-2_744d3cce.jpg?v=1757205751"},"aspect_ratio":1.0,"height":3492,"media_type":"image","src":"\/\/crystaldestiny.com\/cdn\/shop\/files\/Green-Fluorite-Tower-Towers-2_744d3cce.jpg?v=1757205751","width":3492}],"requires_selling_plan":false,"selling_plan_groups":[],"content":"\u003cp\u003eLa Torre de Fluorita Verde es un cristal poderoso conocido por su capacidad para mejorar la claridad mental y promover el equilibrio emocional. Sus vibrantes tonos verdes simbolizan el crecimiento y la renovación, lo que la hace ideal para la meditación y las prácticas de sanación energética. Esta forma de torre amplifica la energía natural de la piedra, dirigiéndola hacia arriba para purificar y estabilizar el entorno. Perfecta para expertos que buscan profundizar en su trabajo espiritual o mejorar la concentración, la Torre de Fluorita Verde favorece la toma de decisiones con claridad y fomenta una atmósfera armoniosa.\u003c\/p\u003e\n\n\u003cp\u003e Este producto es exactamente como se muestra en la imagen, único en su tipo.\u003c\/p\u003e\n\u003cdiv\u003e \u003cspan style=\"font-size: 0.875rem;\"\u003eTorres de Cristal, Varas, Generadores, Puntas, Pilares y Obeliscos: ¿Cuál es la Diferencia?\u003c\/span\u003e\n\u003c\/div\u003e\n\u003cdiv\u003e Si bien estos términos pueden variar, todos describen cristales de formas hermosas con una punta puntiaguda diseñada para canalizar y dirigir la energía. Cada nombre destaca un aspecto único de su uso:\u003c\/div\u003e\n\u003cdiv\u003e \u0026lt;ul\u0026gt;\u003c\/div\u003e\n\u003cdiv\u003e \u0026lt;li\u0026gt;\u003c\/div\u003e \u003cdiv\u003e\u0026lt;strong\u0026gt;Torres\u0026lt;\/strong\u0026gt;: Conocidas por su presencia constante y estabilizadora, las torres de cristal ayudan a enfocar y amplificar la energía, lo que las hace perfectas para la meditación y la manifestación.\u0026lt;\/li\u0026gt;\u003c\/div\u003e\n\u003cdiv\u003e \u0026lt;li\u0026gt;\u003c\/div\u003e\n\u003cdiv\u003e \u0026lt;strong\u0026gt;Varitas\u0026lt;\/strong\u0026gt;: Tradicionalmente utilizadas en el trabajo energético y la curación, las varitas de cristal son excelentes para dirigir el flujo de energía y eliminar bloqueos.\u0026lt;\/li\u0026gt;\u003c\/div\u003e\n\u003cdiv\u003e \u0026lt;li\u0026gt;\u003c\/div\u003e\n\u003cdiv\u003e \u0026lt;strong\u0026gt;Pilares\u0026lt;\/strong\u0026gt;: Simbolizando fuerza y estabilidad, los pilares de cristal crean un ambiente equilibrado y armonioso, lo que los hace ideales para la decoración del hogar y las prácticas espirituales.\u0026lt;\/li\u0026gt;\u003c\/div\u003e\n\u003cdiv\u003e \u0026lt;li\u0026gt;\u003c\/div\u003e\n\u003cdiv\u003e \u0026lt;strong\u0026gt;Obeliscos\u0026lt;\/strong\u0026gt;: Inspirados en estructuras antiguas, se cree que los obeliscos de cristal conectan las energías terrenales y espirituales, lo que los convierte en poderosas herramientas para la transformación y la iluminación.\u0026lt;\/li\u0026gt;\u003c\/div\u003e\n\u003cdiv\u003e \u0026lt;\/ul\u0026gt;\u003c\/div\u003e\n\u003cdiv\u003e No importa cómo los llames, estos cristales tienen el mismo propósito: potenciar la energía, la intención y la armonía en tu espacio. ¡Elige el que más te resuene!\u003c\/div\u003e"},"options":[{"name":"Material","position":1,"values":["Fluorita verde"]},{"name":"Tamaño","position":2,"values":["836 g - 6,00\" de alto x 2,25\" de ancho"]}],"custom_metafields":{"shipping_time":"En un plazo de 7 días"},"metafields":{"badge":"\u003cdiv style='display:none' class='jdgm-prev-badge' data-average-rating='0.00' data-number-of-reviews='0' data-number-of-questions='0'\u003e \u003cspan class='jdgm-prev-badge__stars' data-score='0.00' tabindex='0' aria-label='0.00 stars' role='button'\u003e \u003cspan class='jdgm-star jdgm--off'\u003e\u003c\/span\u003e\u003cspan class='jdgm-star jdgm--off'\u003e\u003c\/span\u003e\u003cspan class='jdgm-star jdgm--off'\u003e\u003c\/span\u003e\u003cspan class='jdgm-star jdgm--off'\u003e\u003c\/span\u003e\u003cspan class='jdgm-star jdgm--off'\u003e\u003c\/span\u003e \u003c\/span\u003e \u003cspan class='jdgm-prev-badge__text'\u003e No reviews \u003c\/span\u003e \u003c\/div\u003e","widget":"\u003cdiv class='jdgm-rev-widg' data-updated-at='2025-07-08T23:14:18Z' data-average-rating='0.00' data-number-of-reviews='0' data-number-of-questions='0' data-image-url='https:\/\/cdn.shopify.com\/s\/files\/1\/0613\/0345\/5915\/files\/6I0A3521.jpg?v=1752016312'\u003e \u003cstyle class='jdgm-temp-hiding-style'\u003e.jdgm-rev-widg{ display: none }\u003c\/style\u003e \u003cdiv class='jdgm-rev-widg__header'\u003e \u003ch2 class='jdgm-rev-widg__title'\u003eCustomer Reviews\u003c\/h2\u003e \u003cdiv class='jdgm-rev-widg__summary'\u003e \u003cdiv class='jdgm-rev-widg__summary-stars' aria-label='Average rating is 0.00 stars' role='img'\u003e \u003cspan class='jdgm-star jdgm--off'\u003e\u003c\/span\u003e\u003cspan class='jdgm-star jdgm--off'\u003e\u003c\/span\u003e\u003cspan class='jdgm-star jdgm--off'\u003e\u003c\/span\u003e\u003cspan class='jdgm-star jdgm--off'\u003e\u003c\/span\u003e\u003cspan class='jdgm-star jdgm--off'\u003e\u003c\/span\u003e \u003c\/div\u003e \u003cdiv class='jdgm-rev-widg__summary-text'\u003eBe the first to write a review\u003c\/div\u003e \u003c\/div\u003e \u003ca style='display: none' href='#' class='jdgm-write-rev-link' role='button'\u003eWrite a review\u003c\/a\u003e \u003cdiv class='jdgm-histogram jdgm-temp-hidden'\u003e \u003cdiv class='jdgm-histogram__row' data-rating='5' data-frequency='0' data-percentage='0'\u003e \u003cdiv class='jdgm-histogram__star' role='button' aria-label=\"0% (0) reviews with 5 star rating\" tabindex='0' \u003e\u003cspan class='jdgm-star jdgm--on'\u003e\u003c\/span\u003e\u003cspan class='jdgm-star jdgm--on'\u003e\u003c\/span\u003e\u003cspan class='jdgm-star jdgm--on'\u003e\u003c\/span\u003e\u003cspan class='jdgm-star jdgm--on'\u003e\u003c\/span\u003e\u003cspan class='jdgm-star jdgm--on'\u003e\u003c\/span\u003e\u003c\/div\u003e \u003cdiv class='jdgm-histogram__bar'\u003e \u003cdiv class='jdgm-histogram__bar-content' style='width: 0%;'\u003e \u003c\/div\u003e \u003c\/div\u003e \u003cdiv class='jdgm-histogram__percentage'\u003e0%\u003c\/div\u003e \u003cdiv class='jdgm-histogram__frequency'\u003e(0)\u003c\/div\u003e \u003c\/div\u003e \u003cdiv class='jdgm-histogram__row' data-rating='4' data-frequency='0' data-percentage='0'\u003e \u003cdiv class='jdgm-histogram__star' role='button' aria-label=\"0% (0) reviews with 4 star rating\" tabindex='0' \u003e\u003cspan class='jdgm-star jdgm--on'\u003e\u003c\/span\u003e\u003cspan class='jdgm-star jdgm--on'\u003e\u003c\/span\u003e\u003cspan class='jdgm-star jdgm--on'\u003e\u003c\/span\u003e\u003cspan class='jdgm-star jdgm--on'\u003e\u003c\/span\u003e\u003cspan class='jdgm-star jdgm--off'\u003e\u003c\/span\u003e\u003c\/div\u003e \u003cdiv class='jdgm-histogram__bar'\u003e \u003cdiv class='jdgm-histogram__bar-content' style='width: 0%;'\u003e \u003c\/div\u003e \u003c\/div\u003e \u003cdiv class='jdgm-histogram__percentage'\u003e0%\u003c\/div\u003e \u003cdiv class='jdgm-histogram__frequency'\u003e(0)\u003c\/div\u003e \u003c\/div\u003e \u003cdiv class='jdgm-histogram__row' data-rating='3' data-frequency='0' data-percentage='0'\u003e \u003cdiv class='jdgm-histogram__star' role='button' aria-label=\"0% (0) reviews with 3 star rating\" tabindex='0' \u003e\u003cspan class='jdgm-star jdgm--on'\u003e\u003c\/span\u003e\u003cspan class='jdgm-star jdgm--on'\u003e\u003c\/span\u003e\u003cspan class='jdgm-star jdgm--on'\u003e\u003c\/span\u003e\u003cspan class='jdgm-star jdgm--off'\u003e\u003c\/span\u003e\u003cspan class='jdgm-star jdgm--off'\u003e\u003c\/span\u003e\u003c\/div\u003e \u003cdiv class='jdgm-histogram__bar'\u003e \u003cdiv class='jdgm-histogram__bar-content' style='width: 0%;'\u003e \u003c\/div\u003e \u003c\/div\u003e \u003cdiv class='jdgm-histogram__percentage'\u003e0%\u003c\/div\u003e \u003cdiv class='jdgm-histogram__frequency'\u003e(0)\u003c\/div\u003e \u003c\/div\u003e \u003cdiv class='jdgm-histogram__row' data-rating='2' data-frequency='0' data-percentage='0'\u003e \u003cdiv class='jdgm-histogram__star' role='button' aria-label=\"0% (0) reviews with 2 star rating\" tabindex='0' \u003e\u003cspan class='jdgm-star jdgm--on'\u003e\u003c\/span\u003e\u003cspan class='jdgm-star jdgm--on'\u003e\u003c\/span\u003e\u003cspan class='jdgm-star jdgm--off'\u003e\u003c\/span\u003e\u003cspan class='jdgm-star jdgm--off'\u003e\u003c\/span\u003e\u003cspan class='jdgm-star jdgm--off'\u003e\u003c\/span\u003e\u003c\/div\u003e \u003cdiv class='jdgm-histogram__bar'\u003e \u003cdiv class='jdgm-histogram__bar-content' style='width: 0%;'\u003e \u003c\/div\u003e \u003c\/div\u003e \u003cdiv class='jdgm-histogram__percentage'\u003e0%\u003c\/div\u003e \u003cdiv class='jdgm-histogram__frequency'\u003e(0)\u003c\/div\u003e \u003c\/div\u003e \u003cdiv class='jdgm-histogram__row' data-rating='1' data-frequency='0' data-percentage='0'\u003e \u003cdiv class='jdgm-histogram__star' role='button' aria-label=\"0% (0) reviews with 1 star rating\" tabindex='0' \u003e\u003cspan class='jdgm-star jdgm--on'\u003e\u003c\/span\u003e\u003cspan class='jdgm-star jdgm--off'\u003e\u003c\/span\u003e\u003cspan class='jdgm-star jdgm--off'\u003e\u003c\/span\u003e\u003cspan class='jdgm-star jdgm--off'\u003e\u003c\/span\u003e\u003cspan class='jdgm-star jdgm--off'\u003e\u003c\/span\u003e\u003c\/div\u003e \u003cdiv class='jdgm-histogram__bar'\u003e \u003cdiv class='jdgm-histogram__bar-content' style='width: 0%;'\u003e \u003c\/div\u003e \u003c\/div\u003e \u003cdiv class='jdgm-histogram__percentage'\u003e0%\u003c\/div\u003e \u003cdiv class='jdgm-histogram__frequency'\u003e(0)\u003c\/div\u003e \u003c\/div\u003e \u003cdiv class='jdgm-histogram__row jdgm-histogram__clear-filter' data-rating=null tabindex='0'\u003e\u003c\/div\u003e \u003c\/div\u003e \u003cdiv class='jdgm-rev-widg__sort-wrapper'\u003e\u003c\/div\u003e \u003c\/div\u003e \u003cdiv class='jdgm-rev-widg__body'\u003e \u003cdiv class='jdgm-rev-widg__reviews'\u003e\u003c\/div\u003e \u003cdiv class='jdgm-paginate' data-per-page='5' data-url='https:\/\/api.judge.me\/reviews\/reviews_for_widget' style=\"display: none;\"\u003e\u003c\/div\u003e \u003c\/div\u003e \u003cdiv class='jdgm-rev-widg__paginate-spinner-wrapper'\u003e \u003cdiv class='jdgm-spinner'\u003e\u003c\/div\u003e \u003c\/div\u003e \u003c\/div\u003e"},"collections":[{"id":294880051371,"handle":"crystals","title":"Crystals","updated_at":"2026-01-07T23:43:11-05:00","body_html":"\u003cp data-start=\"159\" data-end=\"687\"\u003e✨ \u003cstrong data-start=\"161\" data-end=\"216\"\u003eDiscover the Magic of Crystals with Crystal Destiny\u003c\/strong\u003e ✨\u003cbr data-start=\"218\" data-end=\"221\"\u003eCrystals have been treasured for centuries—not only for their natural beauty but also for their powerful healing energies. Beyond their visual allure, they bring balance, harmony, and positive energy into any space. Whether used for home décor, meditation, or simply to elevate the energy of your surroundings, crystals create a sanctuary of peace, relaxation, and well-being. Each piece is a unique gift from the Earth—visually stunning and spiritually uplifting.\u003c\/p\u003e\n\u003cp data-start=\"689\" data-end=\"1011\"\u003eAt \u003cstrong data-start=\"692\" data-end=\"711\"\u003eCrystal Destiny\u003c\/strong\u003e, our signature collection showcases a curated selection of exquisite crystals, from radiant Quartz to soothing Amethyst. Every stone is carefully sourced for its elegance and metaphysical resonance, making them perfect for enhancing your home, uplifting your spirit, or gifting to someone special.\u003c\/p\u003e\n\u003cp data-start=\"1013\" data-end=\"1206\"\u003eExperience the timeless sophistication of crystalline wonders. Explore the \u003cstrong data-start=\"1088\" data-end=\"1118\"\u003eCrystal Destiny Collection\u003c\/strong\u003e today and bring the transformative beauty of these treasures into your everyday life.\u003c\/p\u003e","published_at":"2023-06-05T11:24:02-04:00","sort_order":"created-desc","template_suffix":"","disjunctive":false,"rules":[{"column":"tag","relation":"equals","condition":"crystal"},{"column":"type","relation":"not_contains","condition":"925 Sterling Silver"},{"column":"type","relation":"not_contains","condition":"Wire Wraps"}],"published_scope":"global"},{"id":319455887531,"handle":"heart-chakra-crystals","title":"Heart Chakra Crystals","updated_at":"2026-01-07T23:43:11-05:00","body_html":"\u003cp data-start=\"107\" data-end=\"457\"\u003e✨ \u003cstrong data-start=\"109\" data-end=\"134\"\u003eHeart Chakra Crystals\u003c\/strong\u003e ✨\u003cbr data-start=\"136\" data-end=\"139\"\u003eOpen your heart to love, compassion, and emotional balance with our \u003cstrong data-start=\"207\" data-end=\"232\"\u003eHeart Chakra Crystals\u003c\/strong\u003e. Located at the center of the chest, the Heart Chakra governs love, forgiveness, and connection to yourself and others. These crystals help release emotional blockages, foster empathy, and promote harmonious relationships.\u003c\/p\u003e\n\u003cp data-start=\"459\" data-end=\"773\"\u003eOur curated selection includes stones such as Rose Quartz, Green Aventurine, and Rhodonite—each chosen for their ability to inspire self-love, emotional healing, and compassion. Perfect for meditation, energy work, or wearing as jewelry, Heart Chakra Crystals support the flow of loving energy and inner harmony.\u003c\/p\u003e\n\u003cp data-start=\"775\" data-end=\"906\"\u003eEmbrace emotional balance, cultivate love, and harness the transformative energy of the Heart Chakra with these radiant crystals.\u003c\/p\u003e","published_at":"2025-07-17T18:17:52-04:00","sort_order":"best-selling","template_suffix":"","disjunctive":false,"rules":[{"column":"variant_metafield_definition","relation":"equals","condition":"Heart"}],"published_scope":"global","image":{"created_at":"2025-07-17T19:08:29-04:00","alt":null,"width":1080,"height":1080,"src":"\/\/crystaldestiny.com\/cdn\/shop\/collections\/Heart_Chakra_Collection.jpg?v=1762474927"}},{"id":294880116907,"handle":"polished","title":"Polished Crystals","updated_at":"2026-01-07T23:43:11-05:00","body_html":"\u003cp data-start=\"199\" data-end=\"598\"\u003e✨ \u003cstrong data-start=\"201\" data-end=\"248\"\u003eCrystal Destiny Polished Crystal Collection\u003c\/strong\u003e ✨\u003cbr data-start=\"250\" data-end=\"253\"\u003eIndulge in the brilliance of crystals refined to perfection. Our \u003cstrong data-start=\"318\" data-end=\"341\"\u003ePolished Collection\u003c\/strong\u003e showcases gemstones meticulously shaped and smoothed to reveal their natural radiance and timeless beauty. From the shimmering glow of Quartz to the deep allure of Obsidian, each polished piece is a testament to nature’s artistry and human craftsmanship.\u003c\/p\u003e\n\u003cp data-start=\"600\" data-end=\"862\"\u003ePerfect as statement décor, meaningful gifts, or companions on your spiritual journey, polished crystals bring sophistication and elevated energy into any space. Their radiant surfaces reflect not only light but also the transformative power of crystal energy.\u003c\/p\u003e\n\u003cp data-start=\"864\" data-end=\"1022\"\u003eDiscover the elegance of refinement with Crystal Destiny’s Polished Crystal Collection—where every facet shines with intention, beauty, and timeless allure.\u003c\/p\u003e","published_at":"2023-06-05T11:30:44-04:00","sort_order":"created-desc","template_suffix":"","disjunctive":false,"rules":[{"column":"tag","relation":"equals","condition":"polished"}],"published_scope":"global"},{"id":293659312299,"handle":"best-sellers","title":"Best Sellers","updated_at":"2026-01-07T23:43:11-05:00","body_html":"\u003cp data-start=\"155\" data-end=\"510\"\u003eDiscover the pieces our community loves most. Our Best Sellers Collection brings together handpicked crystals and jewelry that embody timeless elegance, spiritual resonance, and everyday sophistication. Each item has earned its place as a customer favorite—celebrated for both its beauty and its meaningful energy.\u003c\/p\u003e\n\u003cp data-start=\"512\" data-end=\"802\"\u003eFrom stunning statement pieces to versatile daily companions, these treasures are curated to elevate your space, uplift your spirit, and reflect refined taste. Indulge in what’s most cherished and let our best sellers guide you toward the perfect blend of style and transformative energy.\u003c\/p\u003e\n\u003cp data-start=\"804\" data-end=\"932\"\u003eExplore the Best Sellers Collection today—where elegance meets intention, and every piece tells a story of beauty and balance.\u003c\/p\u003e","published_at":"2023-03-15T16:04:51-04:00","sort_order":"best-selling","template_suffix":"","disjunctive":false,"rules":[{"column":"variant_price","relation":"greater_than","condition":"0"},{"column":"variant_inventory","relation":"greater_than","condition":"0"},{"column":"type","relation":"not_equals","condition":"Shipping Protection"}],"published_scope":"global"},{"id":321370390699,"handle":"monthly-crystal-sale","title":"Monthly Crystal Sale | Spheres \u0026 Towers","updated_at":"2026-01-06T23:24:37-05:00","body_html":"\u003cp\u003eShop our \u003cstrong\u003eMonthly Crystal Sale\u003c\/strong\u003e, where you can shop a wide selection of healing crystals at discounted prices. Explore \u003cstrong\u003ecrystal spheres and towers,\u003c\/strong\u003e— all carefully curated to support meditation, energy balancing, and spiritual wellness. Whether you're looking to enhance your home decor, boost your daily energy, or find the perfect gift, our \u003cstrong\u003ecrystals for healing and manifestation\u003c\/strong\u003e offer both beauty and metaphysical benefits.\u003c\/p\u003e\n\u003cp\u003eEach month, our sale features \u003cstrong\u003enew discounted collections\u003c\/strong\u003e, from \u003cstrong\u003enatural quartz and amethyst towers\u003c\/strong\u003e to \u003cstrong\u003ewire-wrapped pendants and polished stones\u003c\/strong\u003e, so there's always something fresh to discover. Shop with confidence knowing you're getting high-quality crystals with \u003cstrong\u003efree shipping options\u003c\/strong\u003e and a trusted experience.\u003c\/p\u003e\n\u003cp\u003e\u003cstrong\u003eTake advantage of the Monthly Crystal Sale today\u003c\/strong\u003e and add powerful, natural energy to your life with \u003cstrong\u003eauthentic healing crystals\u003c\/strong\u003e — while our limited-time discounts last.\u003c\/p\u003e\n\u003cp\u003e\u003cstrong\u003e*Discount automatically applied at checkout.\u003c\/strong\u003e\u003c\/p\u003e","published_at":"2025-12-02T01:26:17-05:00","sort_order":"alpha-asc","template_suffix":"","disjunctive":true,"rules":[{"column":"tag","relation":"equals","condition":"spheres"},{"column":"tag","relation":"equals","condition":"Towers"}],"published_scope":"global","image":{"created_at":"2026-01-01T01:32:34-05:00","alt":"","width":960,"height":960,"src":"\/\/crystaldestiny.com\/cdn\/shop\/collections\/3E8C2969-1B86-4ACE-B349-98E9D8768424.jpg?v=1767249154"}},{"id":297596059819,"handle":"all","title":"All Crystals \u0026 Jewelry","updated_at":"2026-01-07T23:43:11-05:00","body_html":"\u003cp data-start=\"149\" data-end=\"494\"\u003e✨ \u003cstrong data-start=\"151\" data-end=\"181\"\u003eWelcome to Crystal Destiny\u003c\/strong\u003e ✨\u003cbr data-start=\"183\" data-end=\"186\"\u003eStep into a world where beauty, energy, and artistry unite. Our collection is a treasure trove of exquisite crystals, from the raw, untamed elegance of natural formations to the polished brilliance of expertly crafted pieces. Each crystal is a masterpiece, carrying its own unique story and timeless charm.\u003c\/p\u003e\n\u003cp data-start=\"496\" data-end=\"831\"\u003eWhether you’re drawn to the calming presence of Amethyst, the vibrant energy of Citrine, or the grounding strength of Jasper, our crystals invite you to connect with nature’s finest wonders. Perfect for enhancing your space, supporting your spiritual journey, or gifting with intention, every piece resonates with beauty and meaning.\u003c\/p\u003e\n\u003cp data-start=\"833\" data-end=\"1000\"\u003eElevate your surroundings, embrace the mystique, and explore the enchanting world of crystals at \u003cstrong data-start=\"930\" data-end=\"949\"\u003eCrystal Destiny\u003c\/strong\u003e—where every crystal is waiting to be discovered.\u003c\/p\u003e","published_at":"2023-11-10T13:55:31-05:00","sort_order":"created-desc","template_suffix":"","disjunctive":false,"rules":[{"column":"type","relation":"not_equals","condition":"asdf"}],"published_scope":"global"},{"id":296256405675,"handle":"crystal-towers","title":"Crystal Towers","updated_at":"2026-01-06T23:24:37-05:00","body_html":"\u003cp data-end=\"568\" data-start=\"152\"\u003e✨ \u003cstrong data-end=\"190\" data-start=\"154\"\u003eCrystal Destiny Tower Collection\u003c\/strong\u003e ✨\u003cbr data-end=\"195\" data-start=\"192\"\u003eEnchant your space with the timeless beauty and powerful energy of crystal towers. Each piece in our \u003cstrong data-end=\"316\" data-start=\"296\"\u003eTower Collection\u003c\/strong\u003e is carefully crafted to showcase nature’s artistry while radiating higher vibrations and spiritual resonance. From the clarity of Quartz to the calming presence of Amethyst, these towers are both decorative masterpieces and tools for transformation.\u003c\/p\u003e\n\u003cp data-end=\"765\" data-start=\"570\"\u003ePerfect for meditation spaces, energy work, or simply elevating your home décor, crystal towers channel focused energy upward—creating balance, harmony, and refined elegance in any environment.\u003c\/p\u003e\n\u003cp data-end=\"917\" data-start=\"767\"\u003eDiscover the Crystal Destiny Tower Collection today and transform your surroundings into a sanctuary of beauty, purpose, and spiritual significance.\u003c\/p\u003e\n\u003ch2\u003eCrystal Towers, Wands, Generators, Points, Pillars \u0026amp; Obelisks — What's the Difference?\u003c\/h2\u003e\n\u003cp id=\"isPasted\"\u003eWhile these terms may vary, they all describe beautifully shaped crystals with a pointed tip designed to channel and direct energy. Each name highlights a unique aspect of their use:\u003c\/p\u003e\n\u003cul\u003e\n\u003cli\u003e\n\u003cstrong\u003eTowers\u003c\/strong\u003e- Known for their steady, grounding presence, crystal towers help focus and amplify energy, making them perfect for meditation and manifestation.\u003c\/li\u003e\n\u003cli\u003e\n\u003cstrong\u003eWands\u003c\/strong\u003e- Traditionally used in energy work and healing, crystal wands are excellent for directing energy flow and clearing blockages.\u003c\/li\u003e\n\u003cli\u003e\n\u003cstrong\u003ePillars\u003c\/strong\u003e- Symbolizing strength and stability, crystal pillars create a balanced and harmonious environment, making them great for home decor and spiritual practices.\u003c\/li\u003e\n\u003cli\u003e\n\u003cstrong\u003eObelisks\u003c\/strong\u003e- Inspired by ancient structures, crystal obelisks are believed to connect earthly and spiritual energies, making them powerful tools for transformation and enlightenment.\u003c\/li\u003e\n\u003c\/ul\u003e\n\u003cp\u003eNo matter what you call them, these crystals serve the same purpose—to enhance energy, intention, and harmony in your space. Choose the one that resonates most with you!\u003c\/p\u003e","published_at":"2023-09-14T12:52:35-04:00","sort_order":"created-desc","template_suffix":"","disjunctive":false,"rules":[{"column":"tag","relation":"equals","condition":"towers"}],"published_scope":"global"},{"id":298983391403,"handle":"january-crystal-sale","title":"January Sale | 25% Off Crystal Towers \u0026 Spheres","updated_at":"2026-01-06T23:24:37-05:00","body_html":"\u003cp\u003eShop our \u003cstrong\u003eJanuary Crystal Sale\u003c\/strong\u003e, where you can shop a wide selection of healing crystals at discounted prices. Explore \u003cstrong\u003eCrystal Towers, \u0026amp; Crystal Spheres\u003c\/strong\u003e — all carefully curated and crafted to support meditation, energy balancing, and spiritual wellness. Whether you're looking to enhance your home decor, boost your daily energy, or find the perfect gift, our \u003cstrong\u003ecrystals for healing and manifestation\u003c\/strong\u003e offer both beauty and metaphysical benefits.\u003c\/p\u003e\n\u003cp\u003eThis January, our sale features \u003cstrong\u003ediscounted crystal towers and spheres\u003c\/strong\u003e, from \u003cstrong\u003enatural quartz \u003c\/strong\u003eand \u003cstrong\u003eamethyst \u003c\/strong\u003eto \u003cstrong\u003ebumblebee jasper \u003c\/strong\u003eand \u003cstrong\u003ecarnelian\u003c\/strong\u003e, so there's always something fresh to discover. Shop with confidence knowing you're getting high-quality crystals with \u003cstrong\u003efree shipping options\u003c\/strong\u003e and a trusted experience.\u003c\/p\u003e\n\u003cp\u003e\u003cstrong\u003eTake advantage of the January Crystal Sale today\u003c\/strong\u003e and add powerful, natural energy to your life with \u003cstrong\u003eauthentic healing crystals\u003c\/strong\u003e — while our limited-time discounts last.\u003c\/p\u003e\n\u003cp\u003e\u003cstrong\u003e*Discount automatically applied at checkout.\u003c\/strong\u003e\u003c\/p\u003e","published_at":"2026-01-01T00:07:17-05:00","sort_order":"alpha-asc","template_suffix":"monthly-collection","disjunctive":true,"rules":[{"column":"tag","relation":"equals","condition":"Spheres"},{"column":"tag","relation":"equals","condition":"Towers"}],"published_scope":"global","image":{"created_at":"2026-01-01T01:29:59-05:00","alt":"","width":960,"height":960,"src":"\/\/crystaldestiny.com\/cdn\/shop\/collections\/1464163B-22B1-4D62-BEC5-CEC9AECB670B.jpg?v=1767248999"}}]}
[{"alt":"Green Fluorite Tower-Towers-Crystal Destiny-Green Fluorite-836g - 6.00\"h x 2.25\"w-Crystal Destiny","id":31410988187819,"position":1,"preview_image":{"aspect_ratio":1.0,"height":3521,"width":3521,"src":"\/\/crystaldestiny.com\/cdn\/shop\/files\/Green-Fluorite-Tower-Towers.jpg?v=1757205721"},"aspect_ratio":1.0,"height":3521,"media_type":"image","src":"\/\/crystaldestiny.com\/cdn\/shop\/files\/Green-Fluorite-Tower-Towers.jpg?v=1757205721","width":3521},{"alt":"Green Fluorite Tower-Towers-Crystal Destiny-Green Fluorite-836g - 6.00\"h x 2.25\"w-Crystal Destiny","id":31410988220587,"position":2,"preview_image":{"aspect_ratio":1.0,"height":3492,"width":3492,"src":"\/\/crystaldestiny.com\/cdn\/shop\/files\/Green-Fluorite-Tower-Towers-2_744d3cce.jpg?v=1757205751"},"aspect_ratio":1.0,"height":3492,"media_type":"image","src":"\/\/crystaldestiny.com\/cdn\/shop\/files\/Green-Fluorite-Tower-Towers-2_744d3cce.jpg?v=1757205751","width":3492}]
{"item":{"id":8489938354347,"title":"Esfera de ónix verde con soporte","handle":"green-onyx-sphere-w-t-stand-xl-100mm-cd-10193","description":"\u003cp\u003eEl ónix verde, un tipo de calcita, es una gema cautivadora conocida por sus ricos y vibrantes tonos verdes y su textura suave. Valorado por su durabilidad y coloración única, se utiliza a menudo en joyería fina y piezas decorativas. Se cree que esta piedra promueve el equilibrio emocional y facilita la toma de decisiones, lo que la convierte en una opción predilecta entre coleccionistas y entusiastas que buscan belleza y beneficios metafísicos. Su acabado pulido realza los patrones naturales, garantizando que cada pieza sea distintiva y elegante. Ideal para quienes aprecian la combinación de atractivo estético y sutil influencia energética.\u003c\/p\u003e\n\n\u003cp\u003e Este producto es exactamente como se muestra en la imagen, único en su tipo.\u003c\/p\u003e","published_at":"2025-08-06T16:00:08-04:00","created_at":"2025-08-06T16:00:05-04:00","vendor":"Crystal Destiny","type":"Esferas","tags":["crystal","polished","spheres"],"price":9999,"price_min":9999,"price_max":9999,"available":true,"price_varies":false,"compare_at_price":null,"compare_at_price_min":0,"compare_at_price_max":0,"compare_at_price_varies":false,"variants":[{"id":45489255547051,"title":"Ónix verde \/ 3 libras","option1":"Ónix verde","option2":"3 libras","option3":null,"sku":"CD-10193","requires_shipping":true,"taxable":true,"featured_image":null,"available":true,"name":"Esfera de ónix verde con soporte - Ónix verde \/ 3 libras","public_title":"Ónix verde \/ 3 libras","options":["Ónix verde","3 libras"],"price":9999,"weight":1361,"compare_at_price":null,"inventory_management":"shopify","barcode":"","requires_selling_plan":false,"selling_plan_allocations":[]}],"images":["\/\/crystaldestiny.com\/cdn\/shop\/files\/Green-Onyx-Sphere-wt-Stand-XL-100mm-Spheres.jpg?v=1757135515","\/\/crystaldestiny.com\/cdn\/shop\/files\/Green-Onyx-Sphere-wt-Stand-XL-100mm-Spheres-2.jpg?v=1757135517","\/\/crystaldestiny.com\/cdn\/shop\/files\/Green-Onyx-Sphere-wt-Stand-XL-100mm-Spheres-3.jpg?v=1757135519","\/\/crystaldestiny.com\/cdn\/shop\/files\/Green-Onyx-Sphere-wt-Stand-XL-100mm-Spheres-4.jpg?v=1757135520"],"featured_image":"\/\/crystaldestiny.com\/cdn\/shop\/files\/Green-Onyx-Sphere-wt-Stand-XL-100mm-Spheres.jpg?v=1757135515","options":["Material","Tamaño"],"media":[{"alt":"Green Onyx Sphere w\/t Stand XL 100mm-Spheres-Crystal Destiny-Green Onyx-1367g - 100mm-Crystal Destiny","id":31579575648427,"position":1,"preview_image":{"aspect_ratio":1.0,"height":2320,"width":2320,"src":"\/\/crystaldestiny.com\/cdn\/shop\/files\/Green-Onyx-Sphere-wt-Stand-XL-100mm-Spheres.jpg?v=1757135515"},"aspect_ratio":1.0,"height":2320,"media_type":"image","src":"\/\/crystaldestiny.com\/cdn\/shop\/files\/Green-Onyx-Sphere-wt-Stand-XL-100mm-Spheres.jpg?v=1757135515","width":2320},{"alt":"Green Onyx Sphere w\/t Stand XL 100mm-Spheres-Crystal Destiny-Green Onyx-1367g - 100mm-Crystal Destiny","id":31579575713963,"position":2,"preview_image":{"aspect_ratio":1.0,"height":2279,"width":2279,"src":"\/\/crystaldestiny.com\/cdn\/shop\/files\/Green-Onyx-Sphere-wt-Stand-XL-100mm-Spheres-2.jpg?v=1757135517"},"aspect_ratio":1.0,"height":2279,"media_type":"image","src":"\/\/crystaldestiny.com\/cdn\/shop\/files\/Green-Onyx-Sphere-wt-Stand-XL-100mm-Spheres-2.jpg?v=1757135517","width":2279},{"alt":"Green Onyx Sphere w\/t Stand XL 100mm-Spheres-Crystal Destiny-Green Onyx-1367g - 100mm-Crystal Destiny","id":31579575746731,"position":3,"preview_image":{"aspect_ratio":1.0,"height":2324,"width":2324,"src":"\/\/crystaldestiny.com\/cdn\/shop\/files\/Green-Onyx-Sphere-wt-Stand-XL-100mm-Spheres-3.jpg?v=1757135519"},"aspect_ratio":1.0,"height":2324,"media_type":"image","src":"\/\/crystaldestiny.com\/cdn\/shop\/files\/Green-Onyx-Sphere-wt-Stand-XL-100mm-Spheres-3.jpg?v=1757135519","width":2324},{"alt":"Green Onyx Sphere w\/t Stand XL 100mm-Spheres-Crystal Destiny-Green Onyx-1367g - 100mm-Crystal Destiny","id":31579575779499,"position":4,"preview_image":{"aspect_ratio":1.0,"height":2336,"width":2336,"src":"\/\/crystaldestiny.com\/cdn\/shop\/files\/Green-Onyx-Sphere-wt-Stand-XL-100mm-Spheres-4.jpg?v=1757135520"},"aspect_ratio":1.0,"height":2336,"media_type":"image","src":"\/\/crystaldestiny.com\/cdn\/shop\/files\/Green-Onyx-Sphere-wt-Stand-XL-100mm-Spheres-4.jpg?v=1757135520","width":2336}],"requires_selling_plan":false,"selling_plan_groups":[],"content":"\u003cp\u003eEl ónix verde, un tipo de calcita, es una gema cautivadora conocida por sus ricos y vibrantes tonos verdes y su textura suave. Valorado por su durabilidad y coloración única, se utiliza a menudo en joyería fina y piezas decorativas. Se cree que esta piedra promueve el equilibrio emocional y facilita la toma de decisiones, lo que la convierte en una opción predilecta entre coleccionistas y entusiastas que buscan belleza y beneficios metafísicos. Su acabado pulido realza los patrones naturales, garantizando que cada pieza sea distintiva y elegante. Ideal para quienes aprecian la combinación de atractivo estético y sutil influencia energética.\u003c\/p\u003e\n\n\u003cp\u003e Este producto es exactamente como se muestra en la imagen, único en su tipo.\u003c\/p\u003e"},"options":[{"name":"Material","position":1,"values":["Ónix verde"]},{"name":"Tamaño","position":2,"values":["3 libras"]}],"custom_metafields":{"shipping_time":"En un plazo de 7 días"},"metafields":{"badge":"\u003cdiv style='display:none' class='jdgm-prev-badge' data-average-rating='0.00' data-number-of-reviews='0' data-number-of-questions='0'\u003e \u003cspan class='jdgm-prev-badge__stars' data-score='0.00' tabindex='0' aria-label='0.00 stars' role='button'\u003e \u003cspan class='jdgm-star jdgm--off'\u003e\u003c\/span\u003e\u003cspan class='jdgm-star jdgm--off'\u003e\u003c\/span\u003e\u003cspan class='jdgm-star jdgm--off'\u003e\u003c\/span\u003e\u003cspan class='jdgm-star jdgm--off'\u003e\u003c\/span\u003e\u003cspan class='jdgm-star jdgm--off'\u003e\u003c\/span\u003e \u003c\/span\u003e \u003cspan class='jdgm-prev-badge__text'\u003e No reviews \u003c\/span\u003e \u003c\/div\u003e","widget":"\u003cdiv class='jdgm-rev-widg' data-updated-at='2025-08-06T20:00:16Z' data-average-rating='0.00' data-number-of-reviews='0' data-number-of-questions='0' data-image-url='https:\/\/cdn.shopify.com\/s\/files\/1\/0613\/0345\/5915\/files\/6I0A3571.jpg?v=1754510105'\u003e \u003cstyle class='jdgm-temp-hiding-style'\u003e.jdgm-rev-widg{ display: none }\u003c\/style\u003e \u003cdiv class='jdgm-rev-widg__header'\u003e \u003ch2 class='jdgm-rev-widg__title'\u003eCustomer Reviews\u003c\/h2\u003e \u003cdiv class='jdgm-rev-widg__summary'\u003e \u003cdiv class='jdgm-rev-widg__summary-stars' aria-label='Average rating is 0.00 stars' role='img'\u003e \u003cspan class='jdgm-star jdgm--off'\u003e\u003c\/span\u003e\u003cspan class='jdgm-star jdgm--off'\u003e\u003c\/span\u003e\u003cspan class='jdgm-star jdgm--off'\u003e\u003c\/span\u003e\u003cspan class='jdgm-star jdgm--off'\u003e\u003c\/span\u003e\u003cspan class='jdgm-star jdgm--off'\u003e\u003c\/span\u003e \u003c\/div\u003e \u003cdiv class='jdgm-rev-widg__summary-text'\u003eBe the first to write a review\u003c\/div\u003e \u003c\/div\u003e \u003ca style='display: none' href='#' class='jdgm-write-rev-link' role='button'\u003eWrite a review\u003c\/a\u003e \u003cdiv class='jdgm-histogram jdgm-temp-hidden'\u003e \u003cdiv class='jdgm-histogram__row' data-rating='5' data-frequency='0' data-percentage='0'\u003e \u003cdiv class='jdgm-histogram__star' role='button' aria-label=\"0% (0) reviews with 5 star rating\" tabindex='0' \u003e\u003cspan class='jdgm-star jdgm--on'\u003e\u003c\/span\u003e\u003cspan class='jdgm-star jdgm--on'\u003e\u003c\/span\u003e\u003cspan class='jdgm-star jdgm--on'\u003e\u003c\/span\u003e\u003cspan class='jdgm-star jdgm--on'\u003e\u003c\/span\u003e\u003cspan class='jdgm-star jdgm--on'\u003e\u003c\/span\u003e\u003c\/div\u003e \u003cdiv class='jdgm-histogram__bar'\u003e \u003cdiv class='jdgm-histogram__bar-content' style='width: 0%;'\u003e \u003c\/div\u003e \u003c\/div\u003e \u003cdiv class='jdgm-histogram__percentage'\u003e0%\u003c\/div\u003e \u003cdiv class='jdgm-histogram__frequency'\u003e(0)\u003c\/div\u003e \u003c\/div\u003e \u003cdiv class='jdgm-histogram__row' data-rating='4' data-frequency='0' data-percentage='0'\u003e \u003cdiv class='jdgm-histogram__star' role='button' aria-label=\"0% (0) reviews with 4 star rating\" tabindex='0' \u003e\u003cspan class='jdgm-star jdgm--on'\u003e\u003c\/span\u003e\u003cspan class='jdgm-star jdgm--on'\u003e\u003c\/span\u003e\u003cspan class='jdgm-star jdgm--on'\u003e\u003c\/span\u003e\u003cspan class='jdgm-star jdgm--on'\u003e\u003c\/span\u003e\u003cspan class='jdgm-star jdgm--off'\u003e\u003c\/span\u003e\u003c\/div\u003e \u003cdiv class='jdgm-histogram__bar'\u003e \u003cdiv class='jdgm-histogram__bar-content' style='width: 0%;'\u003e \u003c\/div\u003e \u003c\/div\u003e \u003cdiv class='jdgm-histogram__percentage'\u003e0%\u003c\/div\u003e \u003cdiv class='jdgm-histogram__frequency'\u003e(0)\u003c\/div\u003e \u003c\/div\u003e \u003cdiv class='jdgm-histogram__row' data-rating='3' data-frequency='0' data-percentage='0'\u003e \u003cdiv class='jdgm-histogram__star' role='button' aria-label=\"0% (0) reviews with 3 star rating\" tabindex='0' \u003e\u003cspan class='jdgm-star jdgm--on'\u003e\u003c\/span\u003e\u003cspan class='jdgm-star jdgm--on'\u003e\u003c\/span\u003e\u003cspan class='jdgm-star jdgm--on'\u003e\u003c\/span\u003e\u003cspan class='jdgm-star jdgm--off'\u003e\u003c\/span\u003e\u003cspan class='jdgm-star jdgm--off'\u003e\u003c\/span\u003e\u003c\/div\u003e \u003cdiv class='jdgm-histogram__bar'\u003e \u003cdiv class='jdgm-histogram__bar-content' style='width: 0%;'\u003e \u003c\/div\u003e \u003c\/div\u003e \u003cdiv class='jdgm-histogram__percentage'\u003e0%\u003c\/div\u003e \u003cdiv class='jdgm-histogram__frequency'\u003e(0)\u003c\/div\u003e \u003c\/div\u003e \u003cdiv class='jdgm-histogram__row' data-rating='2' data-frequency='0' data-percentage='0'\u003e \u003cdiv class='jdgm-histogram__star' role='button' aria-label=\"0% (0) reviews with 2 star rating\" tabindex='0' \u003e\u003cspan class='jdgm-star jdgm--on'\u003e\u003c\/span\u003e\u003cspan class='jdgm-star jdgm--on'\u003e\u003c\/span\u003e\u003cspan class='jdgm-star jdgm--off'\u003e\u003c\/span\u003e\u003cspan class='jdgm-star jdgm--off'\u003e\u003c\/span\u003e\u003cspan class='jdgm-star jdgm--off'\u003e\u003c\/span\u003e\u003c\/div\u003e \u003cdiv class='jdgm-histogram__bar'\u003e \u003cdiv class='jdgm-histogram__bar-content' style='width: 0%;'\u003e \u003c\/div\u003e \u003c\/div\u003e \u003cdiv class='jdgm-histogram__percentage'\u003e0%\u003c\/div\u003e \u003cdiv class='jdgm-histogram__frequency'\u003e(0)\u003c\/div\u003e \u003c\/div\u003e \u003cdiv class='jdgm-histogram__row' data-rating='1' data-frequency='0' data-percentage='0'\u003e \u003cdiv class='jdgm-histogram__star' role='button' aria-label=\"0% (0) reviews with 1 star rating\" tabindex='0' \u003e\u003cspan class='jdgm-star jdgm--on'\u003e\u003c\/span\u003e\u003cspan class='jdgm-star jdgm--off'\u003e\u003c\/span\u003e\u003cspan class='jdgm-star jdgm--off'\u003e\u003c\/span\u003e\u003cspan class='jdgm-star jdgm--off'\u003e\u003c\/span\u003e\u003cspan class='jdgm-star jdgm--off'\u003e\u003c\/span\u003e\u003c\/div\u003e \u003cdiv class='jdgm-histogram__bar'\u003e \u003cdiv class='jdgm-histogram__bar-content' style='width: 0%;'\u003e \u003c\/div\u003e \u003c\/div\u003e \u003cdiv class='jdgm-histogram__percentage'\u003e0%\u003c\/div\u003e \u003cdiv class='jdgm-histogram__frequency'\u003e(0)\u003c\/div\u003e \u003c\/div\u003e \u003cdiv class='jdgm-histogram__row jdgm-histogram__clear-filter' data-rating=null tabindex='0'\u003e\u003c\/div\u003e \u003c\/div\u003e \u003cdiv class='jdgm-rev-widg__sort-wrapper'\u003e\u003c\/div\u003e \u003c\/div\u003e \u003cdiv class='jdgm-rev-widg__body'\u003e \u003cdiv class='jdgm-rev-widg__reviews'\u003e\u003c\/div\u003e \u003cdiv class='jdgm-paginate' data-per-page='4' data-url='https:\/\/api.judge.me\/reviews\/reviews_for_widget' style=\"display: none;\"\u003e\u003c\/div\u003e \u003c\/div\u003e \u003cdiv class='jdgm-rev-widg__paginate-spinner-wrapper'\u003e \u003cdiv class='jdgm-spinner'\u003e\u003c\/div\u003e \u003c\/div\u003e \u003c\/div\u003e"},"collections":[{"id":294880051371,"handle":"crystals","title":"Crystals","updated_at":"2026-01-07T23:43:11-05:00","body_html":"\u003cp data-start=\"159\" data-end=\"687\"\u003e✨ \u003cstrong data-start=\"161\" data-end=\"216\"\u003eDiscover the Magic of Crystals with Crystal Destiny\u003c\/strong\u003e ✨\u003cbr data-start=\"218\" data-end=\"221\"\u003eCrystals have been treasured for centuries—not only for their natural beauty but also for their powerful healing energies. Beyond their visual allure, they bring balance, harmony, and positive energy into any space. Whether used for home décor, meditation, or simply to elevate the energy of your surroundings, crystals create a sanctuary of peace, relaxation, and well-being. Each piece is a unique gift from the Earth—visually stunning and spiritually uplifting.\u003c\/p\u003e\n\u003cp data-start=\"689\" data-end=\"1011\"\u003eAt \u003cstrong data-start=\"692\" data-end=\"711\"\u003eCrystal Destiny\u003c\/strong\u003e, our signature collection showcases a curated selection of exquisite crystals, from radiant Quartz to soothing Amethyst. Every stone is carefully sourced for its elegance and metaphysical resonance, making them perfect for enhancing your home, uplifting your spirit, or gifting to someone special.\u003c\/p\u003e\n\u003cp data-start=\"1013\" data-end=\"1206\"\u003eExperience the timeless sophistication of crystalline wonders. Explore the \u003cstrong data-start=\"1088\" data-end=\"1118\"\u003eCrystal Destiny Collection\u003c\/strong\u003e today and bring the transformative beauty of these treasures into your everyday life.\u003c\/p\u003e","published_at":"2023-06-05T11:24:02-04:00","sort_order":"created-desc","template_suffix":"","disjunctive":false,"rules":[{"column":"tag","relation":"equals","condition":"crystal"},{"column":"type","relation":"not_contains","condition":"925 Sterling Silver"},{"column":"type","relation":"not_contains","condition":"Wire Wraps"}],"published_scope":"global"},{"id":319455887531,"handle":"heart-chakra-crystals","title":"Heart Chakra Crystals","updated_at":"2026-01-07T23:43:11-05:00","body_html":"\u003cp data-start=\"107\" data-end=\"457\"\u003e✨ \u003cstrong data-start=\"109\" data-end=\"134\"\u003eHeart Chakra Crystals\u003c\/strong\u003e ✨\u003cbr data-start=\"136\" data-end=\"139\"\u003eOpen your heart to love, compassion, and emotional balance with our \u003cstrong data-start=\"207\" data-end=\"232\"\u003eHeart Chakra Crystals\u003c\/strong\u003e. Located at the center of the chest, the Heart Chakra governs love, forgiveness, and connection to yourself and others. These crystals help release emotional blockages, foster empathy, and promote harmonious relationships.\u003c\/p\u003e\n\u003cp data-start=\"459\" data-end=\"773\"\u003eOur curated selection includes stones such as Rose Quartz, Green Aventurine, and Rhodonite—each chosen for their ability to inspire self-love, emotional healing, and compassion. Perfect for meditation, energy work, or wearing as jewelry, Heart Chakra Crystals support the flow of loving energy and inner harmony.\u003c\/p\u003e\n\u003cp data-start=\"775\" data-end=\"906\"\u003eEmbrace emotional balance, cultivate love, and harness the transformative energy of the Heart Chakra with these radiant crystals.\u003c\/p\u003e","published_at":"2025-07-17T18:17:52-04:00","sort_order":"best-selling","template_suffix":"","disjunctive":false,"rules":[{"column":"variant_metafield_definition","relation":"equals","condition":"Heart"}],"published_scope":"global","image":{"created_at":"2025-07-17T19:08:29-04:00","alt":null,"width":1080,"height":1080,"src":"\/\/crystaldestiny.com\/cdn\/shop\/collections\/Heart_Chakra_Collection.jpg?v=1762474927"}},{"id":294880116907,"handle":"polished","title":"Polished Crystals","updated_at":"2026-01-07T23:43:11-05:00","body_html":"\u003cp data-start=\"199\" data-end=\"598\"\u003e✨ \u003cstrong data-start=\"201\" data-end=\"248\"\u003eCrystal Destiny Polished Crystal Collection\u003c\/strong\u003e ✨\u003cbr data-start=\"250\" data-end=\"253\"\u003eIndulge in the brilliance of crystals refined to perfection. Our \u003cstrong data-start=\"318\" data-end=\"341\"\u003ePolished Collection\u003c\/strong\u003e showcases gemstones meticulously shaped and smoothed to reveal their natural radiance and timeless beauty. From the shimmering glow of Quartz to the deep allure of Obsidian, each polished piece is a testament to nature’s artistry and human craftsmanship.\u003c\/p\u003e\n\u003cp data-start=\"600\" data-end=\"862\"\u003ePerfect as statement décor, meaningful gifts, or companions on your spiritual journey, polished crystals bring sophistication and elevated energy into any space. Their radiant surfaces reflect not only light but also the transformative power of crystal energy.\u003c\/p\u003e\n\u003cp data-start=\"864\" data-end=\"1022\"\u003eDiscover the elegance of refinement with Crystal Destiny’s Polished Crystal Collection—where every facet shines with intention, beauty, and timeless allure.\u003c\/p\u003e","published_at":"2023-06-05T11:30:44-04:00","sort_order":"created-desc","template_suffix":"","disjunctive":false,"rules":[{"column":"tag","relation":"equals","condition":"polished"}],"published_scope":"global"},{"id":295698202795,"handle":"spheres","title":"Crystal Spheres","updated_at":"2026-01-06T23:24:35-05:00","body_html":"\u003cp data-start=\"106\" data-end=\"370\"\u003e✨ \u003cstrong data-start=\"108\" data-end=\"138\"\u003eCrystal Spheres Collection\u003c\/strong\u003e ✨\u003cbr data-start=\"140\" data-end=\"143\"\u003eBring harmony, balance, and elegance into your space with our \u003cstrong data-start=\"205\" data-end=\"235\"\u003eCrystal Spheres Collection\u003c\/strong\u003e. Each sphere is meticulously crafted to showcase the natural beauty and energy of crystals, from radiant Quartz to calming Amethyst.\u003c\/p\u003e\n\u003cp data-start=\"372\" data-end=\"658\"\u003ePerfect for meditation, energy work, or as striking décor, crystal spheres radiate energy in all directions, promoting clarity, focus, and a sense of calm. Their smooth, polished surfaces highlight the stones’ natural patterns and colors, making each sphere a captivating centerpiece.\u003c\/p\u003e\n\u003cp data-start=\"660\" data-end=\"809\"\u003eElevate your space and embrace the transformative power of crystals with the \u003cstrong data-start=\"737\" data-end=\"767\"\u003eCrystal Spheres Collection\u003c\/strong\u003e—where beauty, energy, and harmony meet.\u003c\/p\u003e","published_at":"2023-07-28T14:20:46-04:00","sort_order":"created-desc","template_suffix":"","disjunctive":true,"rules":[{"column":"tag","relation":"equals","condition":"spheres"},{"column":"tag","relation":"equals","condition":"eggs"}],"published_scope":"global"},{"id":293659312299,"handle":"best-sellers","title":"Best Sellers","updated_at":"2026-01-07T23:43:11-05:00","body_html":"\u003cp data-start=\"155\" data-end=\"510\"\u003eDiscover the pieces our community loves most. Our Best Sellers Collection brings together handpicked crystals and jewelry that embody timeless elegance, spiritual resonance, and everyday sophistication. Each item has earned its place as a customer favorite—celebrated for both its beauty and its meaningful energy.\u003c\/p\u003e\n\u003cp data-start=\"512\" data-end=\"802\"\u003eFrom stunning statement pieces to versatile daily companions, these treasures are curated to elevate your space, uplift your spirit, and reflect refined taste. Indulge in what’s most cherished and let our best sellers guide you toward the perfect blend of style and transformative energy.\u003c\/p\u003e\n\u003cp data-start=\"804\" data-end=\"932\"\u003eExplore the Best Sellers Collection today—where elegance meets intention, and every piece tells a story of beauty and balance.\u003c\/p\u003e","published_at":"2023-03-15T16:04:51-04:00","sort_order":"best-selling","template_suffix":"","disjunctive":false,"rules":[{"column":"variant_price","relation":"greater_than","condition":"0"},{"column":"variant_inventory","relation":"greater_than","condition":"0"},{"column":"type","relation":"not_equals","condition":"Shipping Protection"}],"published_scope":"global"},{"id":321370390699,"handle":"monthly-crystal-sale","title":"Monthly Crystal Sale | Spheres \u0026 Towers","updated_at":"2026-01-06T23:24:37-05:00","body_html":"\u003cp\u003eShop our \u003cstrong\u003eMonthly Crystal Sale\u003c\/strong\u003e, where you can shop a wide selection of healing crystals at discounted prices. Explore \u003cstrong\u003ecrystal spheres and towers,\u003c\/strong\u003e— all carefully curated to support meditation, energy balancing, and spiritual wellness. Whether you're looking to enhance your home decor, boost your daily energy, or find the perfect gift, our \u003cstrong\u003ecrystals for healing and manifestation\u003c\/strong\u003e offer both beauty and metaphysical benefits.\u003c\/p\u003e\n\u003cp\u003eEach month, our sale features \u003cstrong\u003enew discounted collections\u003c\/strong\u003e, from \u003cstrong\u003enatural quartz and amethyst towers\u003c\/strong\u003e to \u003cstrong\u003ewire-wrapped pendants and polished stones\u003c\/strong\u003e, so there's always something fresh to discover. Shop with confidence knowing you're getting high-quality crystals with \u003cstrong\u003efree shipping options\u003c\/strong\u003e and a trusted experience.\u003c\/p\u003e\n\u003cp\u003e\u003cstrong\u003eTake advantage of the Monthly Crystal Sale today\u003c\/strong\u003e and add powerful, natural energy to your life with \u003cstrong\u003eauthentic healing crystals\u003c\/strong\u003e — while our limited-time discounts last.\u003c\/p\u003e\n\u003cp\u003e\u003cstrong\u003e*Discount automatically applied at checkout.\u003c\/strong\u003e\u003c\/p\u003e","published_at":"2025-12-02T01:26:17-05:00","sort_order":"alpha-asc","template_suffix":"","disjunctive":true,"rules":[{"column":"tag","relation":"equals","condition":"spheres"},{"column":"tag","relation":"equals","condition":"Towers"}],"published_scope":"global","image":{"created_at":"2026-01-01T01:32:34-05:00","alt":"","width":960,"height":960,"src":"\/\/crystaldestiny.com\/cdn\/shop\/collections\/3E8C2969-1B86-4ACE-B349-98E9D8768424.jpg?v=1767249154"}},{"id":297596059819,"handle":"all","title":"All Crystals \u0026 Jewelry","updated_at":"2026-01-07T23:43:11-05:00","body_html":"\u003cp data-start=\"149\" data-end=\"494\"\u003e✨ \u003cstrong data-start=\"151\" data-end=\"181\"\u003eWelcome to Crystal Destiny\u003c\/strong\u003e ✨\u003cbr data-start=\"183\" data-end=\"186\"\u003eStep into a world where beauty, energy, and artistry unite. Our collection is a treasure trove of exquisite crystals, from the raw, untamed elegance of natural formations to the polished brilliance of expertly crafted pieces. Each crystal is a masterpiece, carrying its own unique story and timeless charm.\u003c\/p\u003e\n\u003cp data-start=\"496\" data-end=\"831\"\u003eWhether you’re drawn to the calming presence of Amethyst, the vibrant energy of Citrine, or the grounding strength of Jasper, our crystals invite you to connect with nature’s finest wonders. Perfect for enhancing your space, supporting your spiritual journey, or gifting with intention, every piece resonates with beauty and meaning.\u003c\/p\u003e\n\u003cp data-start=\"833\" data-end=\"1000\"\u003eElevate your surroundings, embrace the mystique, and explore the enchanting world of crystals at \u003cstrong data-start=\"930\" data-end=\"949\"\u003eCrystal Destiny\u003c\/strong\u003e—where every crystal is waiting to be discovered.\u003c\/p\u003e","published_at":"2023-11-10T13:55:31-05:00","sort_order":"created-desc","template_suffix":"","disjunctive":false,"rules":[{"column":"type","relation":"not_equals","condition":"asdf"}],"published_scope":"global"},{"id":298983391403,"handle":"january-crystal-sale","title":"January Sale | 25% Off Crystal Towers \u0026 Spheres","updated_at":"2026-01-06T23:24:37-05:00","body_html":"\u003cp\u003eShop our \u003cstrong\u003eJanuary Crystal Sale\u003c\/strong\u003e, where you can shop a wide selection of healing crystals at discounted prices. Explore \u003cstrong\u003eCrystal Towers, \u0026amp; Crystal Spheres\u003c\/strong\u003e — all carefully curated and crafted to support meditation, energy balancing, and spiritual wellness. Whether you're looking to enhance your home decor, boost your daily energy, or find the perfect gift, our \u003cstrong\u003ecrystals for healing and manifestation\u003c\/strong\u003e offer both beauty and metaphysical benefits.\u003c\/p\u003e\n\u003cp\u003eThis January, our sale features \u003cstrong\u003ediscounted crystal towers and spheres\u003c\/strong\u003e, from \u003cstrong\u003enatural quartz \u003c\/strong\u003eand \u003cstrong\u003eamethyst \u003c\/strong\u003eto \u003cstrong\u003ebumblebee jasper \u003c\/strong\u003eand \u003cstrong\u003ecarnelian\u003c\/strong\u003e, so there's always something fresh to discover. Shop with confidence knowing you're getting high-quality crystals with \u003cstrong\u003efree shipping options\u003c\/strong\u003e and a trusted experience.\u003c\/p\u003e\n\u003cp\u003e\u003cstrong\u003eTake advantage of the January Crystal Sale today\u003c\/strong\u003e and add powerful, natural energy to your life with \u003cstrong\u003eauthentic healing crystals\u003c\/strong\u003e — while our limited-time discounts last.\u003c\/p\u003e\n\u003cp\u003e\u003cstrong\u003e*Discount automatically applied at checkout.\u003c\/strong\u003e\u003c\/p\u003e","published_at":"2026-01-01T00:07:17-05:00","sort_order":"alpha-asc","template_suffix":"monthly-collection","disjunctive":true,"rules":[{"column":"tag","relation":"equals","condition":"Spheres"},{"column":"tag","relation":"equals","condition":"Towers"}],"published_scope":"global","image":{"created_at":"2026-01-01T01:29:59-05:00","alt":"","width":960,"height":960,"src":"\/\/crystaldestiny.com\/cdn\/shop\/collections\/1464163B-22B1-4D62-BEC5-CEC9AECB670B.jpg?v=1767248999"}}]}
[{"alt":"Green Onyx Sphere w\/t Stand XL 100mm-Spheres-Crystal Destiny-Green Onyx-1367g - 100mm-Crystal Destiny","id":31579575648427,"position":1,"preview_image":{"aspect_ratio":1.0,"height":2320,"width":2320,"src":"\/\/crystaldestiny.com\/cdn\/shop\/files\/Green-Onyx-Sphere-wt-Stand-XL-100mm-Spheres.jpg?v=1757135515"},"aspect_ratio":1.0,"height":2320,"media_type":"image","src":"\/\/crystaldestiny.com\/cdn\/shop\/files\/Green-Onyx-Sphere-wt-Stand-XL-100mm-Spheres.jpg?v=1757135515","width":2320},{"alt":"Green Onyx Sphere w\/t Stand XL 100mm-Spheres-Crystal Destiny-Green Onyx-1367g - 100mm-Crystal Destiny","id":31579575713963,"position":2,"preview_image":{"aspect_ratio":1.0,"height":2279,"width":2279,"src":"\/\/crystaldestiny.com\/cdn\/shop\/files\/Green-Onyx-Sphere-wt-Stand-XL-100mm-Spheres-2.jpg?v=1757135517"},"aspect_ratio":1.0,"height":2279,"media_type":"image","src":"\/\/crystaldestiny.com\/cdn\/shop\/files\/Green-Onyx-Sphere-wt-Stand-XL-100mm-Spheres-2.jpg?v=1757135517","width":2279},{"alt":"Green Onyx Sphere w\/t Stand XL 100mm-Spheres-Crystal Destiny-Green Onyx-1367g - 100mm-Crystal Destiny","id":31579575746731,"position":3,"preview_image":{"aspect_ratio":1.0,"height":2324,"width":2324,"src":"\/\/crystaldestiny.com\/cdn\/shop\/files\/Green-Onyx-Sphere-wt-Stand-XL-100mm-Spheres-3.jpg?v=1757135519"},"aspect_ratio":1.0,"height":2324,"media_type":"image","src":"\/\/crystaldestiny.com\/cdn\/shop\/files\/Green-Onyx-Sphere-wt-Stand-XL-100mm-Spheres-3.jpg?v=1757135519","width":2324},{"alt":"Green Onyx Sphere w\/t Stand XL 100mm-Spheres-Crystal Destiny-Green Onyx-1367g - 100mm-Crystal Destiny","id":31579575779499,"position":4,"preview_image":{"aspect_ratio":1.0,"height":2336,"width":2336,"src":"\/\/crystaldestiny.com\/cdn\/shop\/files\/Green-Onyx-Sphere-wt-Stand-XL-100mm-Spheres-4.jpg?v=1757135520"},"aspect_ratio":1.0,"height":2336,"media_type":"image","src":"\/\/crystaldestiny.com\/cdn\/shop\/files\/Green-Onyx-Sphere-wt-Stand-XL-100mm-Spheres-4.jpg?v=1757135520","width":2336}]
{"item":{"id":8436968194219,"title":"Cuarzo hematoide \"fuego\"","handle":"hematoid-fire-quartz-spheres-52-54mm-cd-10074","description":"\u003cp\u003e El Cuarzo Hematoide \"Fuego\" presenta distintivas inclusiones de hematita roja dentro de un cristal de cuarzo transparente, creando una llamativa apariencia de llama. Este raro espécimen mineral combina las propiedades estabilizadoras de la hematita con la energía amplificadora del cuarzo. Los coleccionistas valoran estos especímenes por su singular atractivo estético y su importancia metafísica en las prácticas de cristaloterapia.\u003c\/p\u003e\n\n\u003cp\u003e Este producto es exactamente como se muestra en la imagen, único en su tipo.\u003c\/p\u003e","published_at":"2025-05-24T19:07:00-04:00","created_at":"2025-05-24T19:07:00-04:00","vendor":"Crystal Destiny","type":"Esferas","tags":["crystal","polished","spheres"],"price":4499,"price_min":4499,"price_max":4799,"available":true,"price_varies":true,"compare_at_price":null,"compare_at_price_min":0,"compare_at_price_max":0,"compare_at_price_varies":false,"variants":[{"id":45246365270187,"title":"Cuarzo hematoide \/ 194 gramos","option1":"Cuarzo hematoide","option2":"194 gramos","option3":null,"sku":"CD-10074","requires_shipping":true,"taxable":true,"featured_image":{"id":39534217199787,"product_id":8436968194219,"position":1,"created_at":"2025-05-24T19:03:49-04:00","updated_at":"2025-12-11T00:03:22-05:00","alt":"Hematoid \"Fire\" Quartz Spheres 52-54mm-Spheres-Crystal Destiny-Hematoid Quartz-194g - 52mm Diameter-Crystal Destiny","width":1135,"height":1135,"src":"\/\/crystaldestiny.com\/cdn\/shop\/files\/Hematoid-Fire-Quartz-Spheres-52-54mm-Spheres-Hematoid-Quartz-194g-52mm-Diameter.jpg?v=1765429402","variant_ids":[45246365270187]},"available":true,"name":"Cuarzo hematoide \"fuego\" - Cuarzo hematoide \/ 194 gramos","public_title":"Cuarzo hematoide \/ 194 gramos","options":["Cuarzo hematoide","194 gramos"],"price":4499,"weight":0,"compare_at_price":null,"inventory_management":"shopify","barcode":"","featured_media":{"alt":"Hematoid \"Fire\" Quartz Spheres 52-54mm-Spheres-Crystal Destiny-Hematoid Quartz-194g - 52mm Diameter-Crystal Destiny","id":31151231991979,"position":1,"preview_image":{"aspect_ratio":1.0,"height":1135,"width":1135,"src":"\/\/crystaldestiny.com\/cdn\/shop\/files\/Hematoid-Fire-Quartz-Spheres-52-54mm-Spheres-Hematoid-Quartz-194g-52mm-Diameter.jpg?v=1765429402"}},"requires_selling_plan":false,"selling_plan_allocations":[]},{"id":45246375788715,"title":"Cuarzo hematoide \/ 196 gramos","option1":"Cuarzo hematoide","option2":"196 gramos","option3":null,"sku":"CD-10073","requires_shipping":true,"taxable":true,"featured_image":{"id":39534267433131,"product_id":8436968194219,"position":2,"created_at":"2025-05-24T19:11:54-04:00","updated_at":"2025-12-11T00:03:23-05:00","alt":"Hematoid \"Fire\" Quartz Spheres 52-54mm-Spheres-Crystal Destiny-Hematoid Quartz-196g - 53mm Diameter-Crystal Destiny","width":1169,"height":1169,"src":"\/\/crystaldestiny.com\/cdn\/shop\/files\/Hematoid-Fire-Quartz-Spheres-52-54mm-Spheres-Hematoid-Quartz-196g-53mm-Diameter-2.jpg?v=1765429403","variant_ids":[45246375788715]},"available":true,"name":"Cuarzo hematoide \"fuego\" - Cuarzo hematoide \/ 196 gramos","public_title":"Cuarzo hematoide \/ 196 gramos","options":["Cuarzo hematoide","196 gramos"],"price":4499,"weight":0,"compare_at_price":null,"inventory_management":"shopify","barcode":"","featured_media":{"alt":"Hematoid \"Fire\" Quartz Spheres 52-54mm-Spheres-Crystal Destiny-Hematoid Quartz-196g - 53mm Diameter-Crystal Destiny","id":31151267545259,"position":2,"preview_image":{"aspect_ratio":1.0,"height":1169,"width":1169,"src":"\/\/crystaldestiny.com\/cdn\/shop\/files\/Hematoid-Fire-Quartz-Spheres-52-54mm-Spheres-Hematoid-Quartz-196g-53mm-Diameter-2.jpg?v=1765429403"}},"requires_selling_plan":false,"selling_plan_allocations":[]},{"id":45246375821483,"title":"Cuarzo hematoide \/ 200 gramos","option1":"Cuarzo hematoide","option2":"200 gramos","option3":null,"sku":"CD-10072","requires_shipping":true,"taxable":true,"featured_image":{"id":39534271725739,"product_id":8436968194219,"position":3,"created_at":"2025-05-24T19:12:11-04:00","updated_at":"2025-12-11T00:03:25-05:00","alt":"Hematoid \"Fire\" Quartz Spheres 52-54mm-Spheres-Crystal Destiny-Hematoid Quartz-200g - 54mm Diameter-Crystal Destiny","width":1159,"height":1159,"src":"\/\/crystaldestiny.com\/cdn\/shop\/files\/Hematoid-Fire-Quartz-Spheres-52-54mm-Spheres-Hematoid-Quartz-200g-54mm-Diameter-3.jpg?v=1765429405","variant_ids":[45246375821483]},"available":true,"name":"Cuarzo hematoide \"fuego\" - Cuarzo hematoide \/ 200 gramos","public_title":"Cuarzo hematoide \/ 200 gramos","options":["Cuarzo hematoide","200 gramos"],"price":4799,"weight":0,"compare_at_price":null,"inventory_management":"shopify","barcode":"","featured_media":{"alt":"Hematoid \"Fire\" Quartz Spheres 52-54mm-Spheres-Crystal Destiny-Hematoid Quartz-200g - 54mm Diameter-Crystal Destiny","id":31151269937323,"position":3,"preview_image":{"aspect_ratio":1.0,"height":1159,"width":1159,"src":"\/\/crystaldestiny.com\/cdn\/shop\/files\/Hematoid-Fire-Quartz-Spheres-52-54mm-Spheres-Hematoid-Quartz-200g-54mm-Diameter-3.jpg?v=1765429405"}},"requires_selling_plan":false,"selling_plan_allocations":[]}],"images":["\/\/crystaldestiny.com\/cdn\/shop\/files\/Hematoid-Fire-Quartz-Spheres-52-54mm-Spheres-Hematoid-Quartz-194g-52mm-Diameter.jpg?v=1765429402","\/\/crystaldestiny.com\/cdn\/shop\/files\/Hematoid-Fire-Quartz-Spheres-52-54mm-Spheres-Hematoid-Quartz-196g-53mm-Diameter-2.jpg?v=1765429403","\/\/crystaldestiny.com\/cdn\/shop\/files\/Hematoid-Fire-Quartz-Spheres-52-54mm-Spheres-Hematoid-Quartz-200g-54mm-Diameter-3.jpg?v=1765429405"],"featured_image":"\/\/crystaldestiny.com\/cdn\/shop\/files\/Hematoid-Fire-Quartz-Spheres-52-54mm-Spheres-Hematoid-Quartz-194g-52mm-Diameter.jpg?v=1765429402","options":["Material","Tamaño"],"media":[{"alt":"Hematoid \"Fire\" Quartz Spheres 52-54mm-Spheres-Crystal Destiny-Hematoid Quartz-194g - 52mm Diameter-Crystal Destiny","id":31151231991979,"position":1,"preview_image":{"aspect_ratio":1.0,"height":1135,"width":1135,"src":"\/\/crystaldestiny.com\/cdn\/shop\/files\/Hematoid-Fire-Quartz-Spheres-52-54mm-Spheres-Hematoid-Quartz-194g-52mm-Diameter.jpg?v=1765429402"},"aspect_ratio":1.0,"height":1135,"media_type":"image","src":"\/\/crystaldestiny.com\/cdn\/shop\/files\/Hematoid-Fire-Quartz-Spheres-52-54mm-Spheres-Hematoid-Quartz-194g-52mm-Diameter.jpg?v=1765429402","width":1135},{"alt":"Hematoid \"Fire\" Quartz Spheres 52-54mm-Spheres-Crystal Destiny-Hematoid Quartz-196g - 53mm Diameter-Crystal Destiny","id":31151267545259,"position":2,"preview_image":{"aspect_ratio":1.0,"height":1169,"width":1169,"src":"\/\/crystaldestiny.com\/cdn\/shop\/files\/Hematoid-Fire-Quartz-Spheres-52-54mm-Spheres-Hematoid-Quartz-196g-53mm-Diameter-2.jpg?v=1765429403"},"aspect_ratio":1.0,"height":1169,"media_type":"image","src":"\/\/crystaldestiny.com\/cdn\/shop\/files\/Hematoid-Fire-Quartz-Spheres-52-54mm-Spheres-Hematoid-Quartz-196g-53mm-Diameter-2.jpg?v=1765429403","width":1169},{"alt":"Hematoid \"Fire\" Quartz Spheres 52-54mm-Spheres-Crystal Destiny-Hematoid Quartz-200g - 54mm Diameter-Crystal Destiny","id":31151269937323,"position":3,"preview_image":{"aspect_ratio":1.0,"height":1159,"width":1159,"src":"\/\/crystaldestiny.com\/cdn\/shop\/files\/Hematoid-Fire-Quartz-Spheres-52-54mm-Spheres-Hematoid-Quartz-200g-54mm-Diameter-3.jpg?v=1765429405"},"aspect_ratio":1.0,"height":1159,"media_type":"image","src":"\/\/crystaldestiny.com\/cdn\/shop\/files\/Hematoid-Fire-Quartz-Spheres-52-54mm-Spheres-Hematoid-Quartz-200g-54mm-Diameter-3.jpg?v=1765429405","width":1159}],"requires_selling_plan":false,"selling_plan_groups":[],"content":"\u003cp\u003e El Cuarzo Hematoide \"Fuego\" presenta distintivas inclusiones de hematita roja dentro de un cristal de cuarzo transparente, creando una llamativa apariencia de llama. Este raro espécimen mineral combina las propiedades estabilizadoras de la hematita con la energía amplificadora del cuarzo. Los coleccionistas valoran estos especímenes por su singular atractivo estético y su importancia metafísica en las prácticas de cristaloterapia.\u003c\/p\u003e\n\n\u003cp\u003e Este producto es exactamente como se muestra en la imagen, único en su tipo.\u003c\/p\u003e"},"options":[{"name":"Material","position":1,"values":["Cuarzo hematoide"]},{"name":"Tamaño","position":2,"values":["194 gramos","196 gramos","200 gramos"]}],"custom_metafields":{"shipping_time":"En un plazo de 7 días"},"metafields":{"badge":"\u003cdiv style='display:none' class='jdgm-prev-badge' data-average-rating='0.00' data-number-of-reviews='0' data-number-of-questions='0'\u003e \u003cspan class='jdgm-prev-badge__stars' data-score='0.00' tabindex='0' aria-label='0.00 stars' role='button'\u003e \u003cspan class='jdgm-star jdgm--off'\u003e\u003c\/span\u003e\u003cspan class='jdgm-star jdgm--off'\u003e\u003c\/span\u003e\u003cspan class='jdgm-star jdgm--off'\u003e\u003c\/span\u003e\u003cspan class='jdgm-star jdgm--off'\u003e\u003c\/span\u003e\u003cspan class='jdgm-star jdgm--off'\u003e\u003c\/span\u003e \u003c\/span\u003e \u003cspan class='jdgm-prev-badge__text'\u003e No reviews \u003c\/span\u003e \u003c\/div\u003e","widget":"\u003cdiv class='jdgm-rev-widg' data-updated-at='2025-05-24T23:08:32Z' data-average-rating='0.00' data-number-of-reviews='0' data-number-of-questions='0'\u003e \u003cstyle class='jdgm-temp-hiding-style'\u003e.jdgm-rev-widg{ display: none }\u003c\/style\u003e \u003cdiv class='jdgm-rev-widg__header'\u003e \u003ch2 class='jdgm-rev-widg__title'\u003eCustomer Reviews\u003c\/h2\u003e \u003cdiv class='jdgm-rev-widg__summary'\u003e \u003cdiv class='jdgm-rev-widg__summary-stars' aria-label='Average rating is 0.00 stars' role='img'\u003e \u003cspan class='jdgm-star jdgm--off'\u003e\u003c\/span\u003e\u003cspan class='jdgm-star jdgm--off'\u003e\u003c\/span\u003e\u003cspan class='jdgm-star jdgm--off'\u003e\u003c\/span\u003e\u003cspan class='jdgm-star jdgm--off'\u003e\u003c\/span\u003e\u003cspan class='jdgm-star jdgm--off'\u003e\u003c\/span\u003e \u003c\/div\u003e \u003cdiv class='jdgm-rev-widg__summary-text'\u003eBe the first to write a review\u003c\/div\u003e \u003c\/div\u003e \u003ca style='display: none' href='#' class='jdgm-write-rev-link' role='button'\u003eWrite a review\u003c\/a\u003e \u003cdiv class='jdgm-histogram jdgm-temp-hidden'\u003e \u003cdiv class='jdgm-histogram__row' data-rating='5' data-frequency='0' data-percentage='0'\u003e \u003cdiv class='jdgm-histogram__star' role='button' aria-label=\"0% (0) reviews with 5 star rating\" tabindex='0' \u003e\u003cspan class='jdgm-star jdgm--on'\u003e\u003c\/span\u003e\u003cspan class='jdgm-star jdgm--on'\u003e\u003c\/span\u003e\u003cspan class='jdgm-star jdgm--on'\u003e\u003c\/span\u003e\u003cspan class='jdgm-star jdgm--on'\u003e\u003c\/span\u003e\u003cspan class='jdgm-star jdgm--on'\u003e\u003c\/span\u003e\u003c\/div\u003e \u003cdiv class='jdgm-histogram__bar'\u003e \u003cdiv class='jdgm-histogram__bar-content' style='width: 0%;'\u003e \u003c\/div\u003e \u003c\/div\u003e \u003cdiv class='jdgm-histogram__percentage'\u003e0%\u003c\/div\u003e \u003cdiv class='jdgm-histogram__frequency'\u003e(0)\u003c\/div\u003e \u003c\/div\u003e \u003cdiv class='jdgm-histogram__row' data-rating='4' data-frequency='0' data-percentage='0'\u003e \u003cdiv class='jdgm-histogram__star' role='button' aria-label=\"0% (0) reviews with 4 star rating\" tabindex='0' \u003e\u003cspan class='jdgm-star jdgm--on'\u003e\u003c\/span\u003e\u003cspan class='jdgm-star jdgm--on'\u003e\u003c\/span\u003e\u003cspan class='jdgm-star jdgm--on'\u003e\u003c\/span\u003e\u003cspan class='jdgm-star jdgm--on'\u003e\u003c\/span\u003e\u003cspan class='jdgm-star jdgm--off'\u003e\u003c\/span\u003e\u003c\/div\u003e \u003cdiv class='jdgm-histogram__bar'\u003e \u003cdiv class='jdgm-histogram__bar-content' style='width: 0%;'\u003e \u003c\/div\u003e \u003c\/div\u003e \u003cdiv class='jdgm-histogram__percentage'\u003e0%\u003c\/div\u003e \u003cdiv class='jdgm-histogram__frequency'\u003e(0)\u003c\/div\u003e \u003c\/div\u003e \u003cdiv class='jdgm-histogram__row' data-rating='3' data-frequency='0' data-percentage='0'\u003e \u003cdiv class='jdgm-histogram__star' role='button' aria-label=\"0% (0) reviews with 3 star rating\" tabindex='0' \u003e\u003cspan class='jdgm-star jdgm--on'\u003e\u003c\/span\u003e\u003cspan class='jdgm-star jdgm--on'\u003e\u003c\/span\u003e\u003cspan class='jdgm-star jdgm--on'\u003e\u003c\/span\u003e\u003cspan class='jdgm-star jdgm--off'\u003e\u003c\/span\u003e\u003cspan class='jdgm-star jdgm--off'\u003e\u003c\/span\u003e\u003c\/div\u003e \u003cdiv class='jdgm-histogram__bar'\u003e \u003cdiv class='jdgm-histogram__bar-content' style='width: 0%;'\u003e \u003c\/div\u003e \u003c\/div\u003e \u003cdiv class='jdgm-histogram__percentage'\u003e0%\u003c\/div\u003e \u003cdiv class='jdgm-histogram__frequency'\u003e(0)\u003c\/div\u003e \u003c\/div\u003e \u003cdiv class='jdgm-histogram__row' data-rating='2' data-frequency='0' data-percentage='0'\u003e \u003cdiv class='jdgm-histogram__star' role='button' aria-label=\"0% (0) reviews with 2 star rating\" tabindex='0' \u003e\u003cspan class='jdgm-star jdgm--on'\u003e\u003c\/span\u003e\u003cspan class='jdgm-star jdgm--on'\u003e\u003c\/span\u003e\u003cspan class='jdgm-star jdgm--off'\u003e\u003c\/span\u003e\u003cspan class='jdgm-star jdgm--off'\u003e\u003c\/span\u003e\u003cspan class='jdgm-star jdgm--off'\u003e\u003c\/span\u003e\u003c\/div\u003e \u003cdiv class='jdgm-histogram__bar'\u003e \u003cdiv class='jdgm-histogram__bar-content' style='width: 0%;'\u003e \u003c\/div\u003e \u003c\/div\u003e \u003cdiv class='jdgm-histogram__percentage'\u003e0%\u003c\/div\u003e \u003cdiv class='jdgm-histogram__frequency'\u003e(0)\u003c\/div\u003e \u003c\/div\u003e \u003cdiv class='jdgm-histogram__row' data-rating='1' data-frequency='0' data-percentage='0'\u003e \u003cdiv class='jdgm-histogram__star' role='button' aria-label=\"0% (0) reviews with 1 star rating\" tabindex='0' \u003e\u003cspan class='jdgm-star jdgm--on'\u003e\u003c\/span\u003e\u003cspan class='jdgm-star jdgm--off'\u003e\u003c\/span\u003e\u003cspan class='jdgm-star jdgm--off'\u003e\u003c\/span\u003e\u003cspan class='jdgm-star jdgm--off'\u003e\u003c\/span\u003e\u003cspan class='jdgm-star jdgm--off'\u003e\u003c\/span\u003e\u003c\/div\u003e \u003cdiv class='jdgm-histogram__bar'\u003e \u003cdiv class='jdgm-histogram__bar-content' style='width: 0%;'\u003e \u003c\/div\u003e \u003c\/div\u003e \u003cdiv class='jdgm-histogram__percentage'\u003e0%\u003c\/div\u003e \u003cdiv class='jdgm-histogram__frequency'\u003e(0)\u003c\/div\u003e \u003c\/div\u003e \u003cdiv class='jdgm-histogram__row jdgm-histogram__clear-filter' data-rating=null tabindex='0'\u003e\u003c\/div\u003e \u003c\/div\u003e \u003cdiv class='jdgm-rev-widg__sort-wrapper'\u003e\u003c\/div\u003e \u003c\/div\u003e \u003cdiv class='jdgm-rev-widg__body'\u003e \u003cdiv class='jdgm-rev-widg__reviews'\u003e\u003c\/div\u003e \u003cdiv class='jdgm-paginate' data-per-page='5' data-url='https:\/\/api.judge.me\/reviews\/reviews_for_widget' style=\"display: none;\"\u003e\u003c\/div\u003e \u003c\/div\u003e \u003cdiv class='jdgm-rev-widg__paginate-spinner-wrapper'\u003e \u003cdiv class='jdgm-spinner'\u003e\u003c\/div\u003e \u003c\/div\u003e \u003c\/div\u003e"},"collections":[{"id":294880051371,"handle":"crystals","title":"Crystals","updated_at":"2026-01-07T23:43:11-05:00","body_html":"\u003cp data-start=\"159\" data-end=\"687\"\u003e✨ \u003cstrong data-start=\"161\" data-end=\"216\"\u003eDiscover the Magic of Crystals with Crystal Destiny\u003c\/strong\u003e ✨\u003cbr data-start=\"218\" data-end=\"221\"\u003eCrystals have been treasured for centuries—not only for their natural beauty but also for their powerful healing energies. Beyond their visual allure, they bring balance, harmony, and positive energy into any space. Whether used for home décor, meditation, or simply to elevate the energy of your surroundings, crystals create a sanctuary of peace, relaxation, and well-being. Each piece is a unique gift from the Earth—visually stunning and spiritually uplifting.\u003c\/p\u003e\n\u003cp data-start=\"689\" data-end=\"1011\"\u003eAt \u003cstrong data-start=\"692\" data-end=\"711\"\u003eCrystal Destiny\u003c\/strong\u003e, our signature collection showcases a curated selection of exquisite crystals, from radiant Quartz to soothing Amethyst. Every stone is carefully sourced for its elegance and metaphysical resonance, making them perfect for enhancing your home, uplifting your spirit, or gifting to someone special.\u003c\/p\u003e\n\u003cp data-start=\"1013\" data-end=\"1206\"\u003eExperience the timeless sophistication of crystalline wonders. Explore the \u003cstrong data-start=\"1088\" data-end=\"1118\"\u003eCrystal Destiny Collection\u003c\/strong\u003e today and bring the transformative beauty of these treasures into your everyday life.\u003c\/p\u003e","published_at":"2023-06-05T11:24:02-04:00","sort_order":"created-desc","template_suffix":"","disjunctive":false,"rules":[{"column":"tag","relation":"equals","condition":"crystal"},{"column":"type","relation":"not_contains","condition":"925 Sterling Silver"},{"column":"type","relation":"not_contains","condition":"Wire Wraps"}],"published_scope":"global"},{"id":319455887531,"handle":"heart-chakra-crystals","title":"Heart Chakra Crystals","updated_at":"2026-01-07T23:43:11-05:00","body_html":"\u003cp data-start=\"107\" data-end=\"457\"\u003e✨ \u003cstrong data-start=\"109\" data-end=\"134\"\u003eHeart Chakra Crystals\u003c\/strong\u003e ✨\u003cbr data-start=\"136\" data-end=\"139\"\u003eOpen your heart to love, compassion, and emotional balance with our \u003cstrong data-start=\"207\" data-end=\"232\"\u003eHeart Chakra Crystals\u003c\/strong\u003e. Located at the center of the chest, the Heart Chakra governs love, forgiveness, and connection to yourself and others. These crystals help release emotional blockages, foster empathy, and promote harmonious relationships.\u003c\/p\u003e\n\u003cp data-start=\"459\" data-end=\"773\"\u003eOur curated selection includes stones such as Rose Quartz, Green Aventurine, and Rhodonite—each chosen for their ability to inspire self-love, emotional healing, and compassion. Perfect for meditation, energy work, or wearing as jewelry, Heart Chakra Crystals support the flow of loving energy and inner harmony.\u003c\/p\u003e\n\u003cp data-start=\"775\" data-end=\"906\"\u003eEmbrace emotional balance, cultivate love, and harness the transformative energy of the Heart Chakra with these radiant crystals.\u003c\/p\u003e","published_at":"2025-07-17T18:17:52-04:00","sort_order":"best-selling","template_suffix":"","disjunctive":false,"rules":[{"column":"variant_metafield_definition","relation":"equals","condition":"Heart"}],"published_scope":"global","image":{"created_at":"2025-07-17T19:08:29-04:00","alt":null,"width":1080,"height":1080,"src":"\/\/crystaldestiny.com\/cdn\/shop\/collections\/Heart_Chakra_Collection.jpg?v=1762474927"}},{"id":294880116907,"handle":"polished","title":"Polished Crystals","updated_at":"2026-01-07T23:43:11-05:00","body_html":"\u003cp data-start=\"199\" data-end=\"598\"\u003e✨ \u003cstrong data-start=\"201\" data-end=\"248\"\u003eCrystal Destiny Polished Crystal Collection\u003c\/strong\u003e ✨\u003cbr data-start=\"250\" data-end=\"253\"\u003eIndulge in the brilliance of crystals refined to perfection. Our \u003cstrong data-start=\"318\" data-end=\"341\"\u003ePolished Collection\u003c\/strong\u003e showcases gemstones meticulously shaped and smoothed to reveal their natural radiance and timeless beauty. From the shimmering glow of Quartz to the deep allure of Obsidian, each polished piece is a testament to nature’s artistry and human craftsmanship.\u003c\/p\u003e\n\u003cp data-start=\"600\" data-end=\"862\"\u003ePerfect as statement décor, meaningful gifts, or companions on your spiritual journey, polished crystals bring sophistication and elevated energy into any space. Their radiant surfaces reflect not only light but also the transformative power of crystal energy.\u003c\/p\u003e\n\u003cp data-start=\"864\" data-end=\"1022\"\u003eDiscover the elegance of refinement with Crystal Destiny’s Polished Crystal Collection—where every facet shines with intention, beauty, and timeless allure.\u003c\/p\u003e","published_at":"2023-06-05T11:30:44-04:00","sort_order":"created-desc","template_suffix":"","disjunctive":false,"rules":[{"column":"tag","relation":"equals","condition":"polished"}],"published_scope":"global"},{"id":295698202795,"handle":"spheres","title":"Crystal Spheres","updated_at":"2026-01-06T23:24:35-05:00","body_html":"\u003cp data-start=\"106\" data-end=\"370\"\u003e✨ \u003cstrong data-start=\"108\" data-end=\"138\"\u003eCrystal Spheres Collection\u003c\/strong\u003e ✨\u003cbr data-start=\"140\" data-end=\"143\"\u003eBring harmony, balance, and elegance into your space with our \u003cstrong data-start=\"205\" data-end=\"235\"\u003eCrystal Spheres Collection\u003c\/strong\u003e. Each sphere is meticulously crafted to showcase the natural beauty and energy of crystals, from radiant Quartz to calming Amethyst.\u003c\/p\u003e\n\u003cp data-start=\"372\" data-end=\"658\"\u003ePerfect for meditation, energy work, or as striking décor, crystal spheres radiate energy in all directions, promoting clarity, focus, and a sense of calm. Their smooth, polished surfaces highlight the stones’ natural patterns and colors, making each sphere a captivating centerpiece.\u003c\/p\u003e\n\u003cp data-start=\"660\" data-end=\"809\"\u003eElevate your space and embrace the transformative power of crystals with the \u003cstrong data-start=\"737\" data-end=\"767\"\u003eCrystal Spheres Collection\u003c\/strong\u003e—where beauty, energy, and harmony meet.\u003c\/p\u003e","published_at":"2023-07-28T14:20:46-04:00","sort_order":"created-desc","template_suffix":"","disjunctive":true,"rules":[{"column":"tag","relation":"equals","condition":"spheres"},{"column":"tag","relation":"equals","condition":"eggs"}],"published_scope":"global"},{"id":293659312299,"handle":"best-sellers","title":"Best Sellers","updated_at":"2026-01-07T23:43:11-05:00","body_html":"\u003cp data-start=\"155\" data-end=\"510\"\u003eDiscover the pieces our community loves most. Our Best Sellers Collection brings together handpicked crystals and jewelry that embody timeless elegance, spiritual resonance, and everyday sophistication. Each item has earned its place as a customer favorite—celebrated for both its beauty and its meaningful energy.\u003c\/p\u003e\n\u003cp data-start=\"512\" data-end=\"802\"\u003eFrom stunning statement pieces to versatile daily companions, these treasures are curated to elevate your space, uplift your spirit, and reflect refined taste. Indulge in what’s most cherished and let our best sellers guide you toward the perfect blend of style and transformative energy.\u003c\/p\u003e\n\u003cp data-start=\"804\" data-end=\"932\"\u003eExplore the Best Sellers Collection today—where elegance meets intention, and every piece tells a story of beauty and balance.\u003c\/p\u003e","published_at":"2023-03-15T16:04:51-04:00","sort_order":"best-selling","template_suffix":"","disjunctive":false,"rules":[{"column":"variant_price","relation":"greater_than","condition":"0"},{"column":"variant_inventory","relation":"greater_than","condition":"0"},{"column":"type","relation":"not_equals","condition":"Shipping Protection"}],"published_scope":"global"},{"id":321370390699,"handle":"monthly-crystal-sale","title":"Monthly Crystal Sale | Spheres \u0026 Towers","updated_at":"2026-01-06T23:24:37-05:00","body_html":"\u003cp\u003eShop our \u003cstrong\u003eMonthly Crystal Sale\u003c\/strong\u003e, where you can shop a wide selection of healing crystals at discounted prices. Explore \u003cstrong\u003ecrystal spheres and towers,\u003c\/strong\u003e— all carefully curated to support meditation, energy balancing, and spiritual wellness. Whether you're looking to enhance your home decor, boost your daily energy, or find the perfect gift, our \u003cstrong\u003ecrystals for healing and manifestation\u003c\/strong\u003e offer both beauty and metaphysical benefits.\u003c\/p\u003e\n\u003cp\u003eEach month, our sale features \u003cstrong\u003enew discounted collections\u003c\/strong\u003e, from \u003cstrong\u003enatural quartz and amethyst towers\u003c\/strong\u003e to \u003cstrong\u003ewire-wrapped pendants and polished stones\u003c\/strong\u003e, so there's always something fresh to discover. Shop with confidence knowing you're getting high-quality crystals with \u003cstrong\u003efree shipping options\u003c\/strong\u003e and a trusted experience.\u003c\/p\u003e\n\u003cp\u003e\u003cstrong\u003eTake advantage of the Monthly Crystal Sale today\u003c\/strong\u003e and add powerful, natural energy to your life with \u003cstrong\u003eauthentic healing crystals\u003c\/strong\u003e — while our limited-time discounts last.\u003c\/p\u003e\n\u003cp\u003e\u003cstrong\u003e*Discount automatically applied at checkout.\u003c\/strong\u003e\u003c\/p\u003e","published_at":"2025-12-02T01:26:17-05:00","sort_order":"alpha-asc","template_suffix":"","disjunctive":true,"rules":[{"column":"tag","relation":"equals","condition":"spheres"},{"column":"tag","relation":"equals","condition":"Towers"}],"published_scope":"global","image":{"created_at":"2026-01-01T01:32:34-05:00","alt":"","width":960,"height":960,"src":"\/\/crystaldestiny.com\/cdn\/shop\/collections\/3E8C2969-1B86-4ACE-B349-98E9D8768424.jpg?v=1767249154"}},{"id":297596059819,"handle":"all","title":"All Crystals \u0026 Jewelry","updated_at":"2026-01-07T23:43:11-05:00","body_html":"\u003cp data-start=\"149\" data-end=\"494\"\u003e✨ \u003cstrong data-start=\"151\" data-end=\"181\"\u003eWelcome to Crystal Destiny\u003c\/strong\u003e ✨\u003cbr data-start=\"183\" data-end=\"186\"\u003eStep into a world where beauty, energy, and artistry unite. Our collection is a treasure trove of exquisite crystals, from the raw, untamed elegance of natural formations to the polished brilliance of expertly crafted pieces. Each crystal is a masterpiece, carrying its own unique story and timeless charm.\u003c\/p\u003e\n\u003cp data-start=\"496\" data-end=\"831\"\u003eWhether you’re drawn to the calming presence of Amethyst, the vibrant energy of Citrine, or the grounding strength of Jasper, our crystals invite you to connect with nature’s finest wonders. Perfect for enhancing your space, supporting your spiritual journey, or gifting with intention, every piece resonates with beauty and meaning.\u003c\/p\u003e\n\u003cp data-start=\"833\" data-end=\"1000\"\u003eElevate your surroundings, embrace the mystique, and explore the enchanting world of crystals at \u003cstrong data-start=\"930\" data-end=\"949\"\u003eCrystal Destiny\u003c\/strong\u003e—where every crystal is waiting to be discovered.\u003c\/p\u003e","published_at":"2023-11-10T13:55:31-05:00","sort_order":"created-desc","template_suffix":"","disjunctive":false,"rules":[{"column":"type","relation":"not_equals","condition":"asdf"}],"published_scope":"global"},{"id":298983391403,"handle":"january-crystal-sale","title":"January Sale | 25% Off Crystal Towers \u0026 Spheres","updated_at":"2026-01-06T23:24:37-05:00","body_html":"\u003cp\u003eShop our \u003cstrong\u003eJanuary Crystal Sale\u003c\/strong\u003e, where you can shop a wide selection of healing crystals at discounted prices. Explore \u003cstrong\u003eCrystal Towers, \u0026amp; Crystal Spheres\u003c\/strong\u003e — all carefully curated and crafted to support meditation, energy balancing, and spiritual wellness. Whether you're looking to enhance your home decor, boost your daily energy, or find the perfect gift, our \u003cstrong\u003ecrystals for healing and manifestation\u003c\/strong\u003e offer both beauty and metaphysical benefits.\u003c\/p\u003e\n\u003cp\u003eThis January, our sale features \u003cstrong\u003ediscounted crystal towers and spheres\u003c\/strong\u003e, from \u003cstrong\u003enatural quartz \u003c\/strong\u003eand \u003cstrong\u003eamethyst \u003c\/strong\u003eto \u003cstrong\u003ebumblebee jasper \u003c\/strong\u003eand \u003cstrong\u003ecarnelian\u003c\/strong\u003e, so there's always something fresh to discover. Shop with confidence knowing you're getting high-quality crystals with \u003cstrong\u003efree shipping options\u003c\/strong\u003e and a trusted experience.\u003c\/p\u003e\n\u003cp\u003e\u003cstrong\u003eTake advantage of the January Crystal Sale today\u003c\/strong\u003e and add powerful, natural energy to your life with \u003cstrong\u003eauthentic healing crystals\u003c\/strong\u003e — while our limited-time discounts last.\u003c\/p\u003e\n\u003cp\u003e\u003cstrong\u003e*Discount automatically applied at checkout.\u003c\/strong\u003e\u003c\/p\u003e","published_at":"2026-01-01T00:07:17-05:00","sort_order":"alpha-asc","template_suffix":"monthly-collection","disjunctive":true,"rules":[{"column":"tag","relation":"equals","condition":"Spheres"},{"column":"tag","relation":"equals","condition":"Towers"}],"published_scope":"global","image":{"created_at":"2026-01-01T01:29:59-05:00","alt":"","width":960,"height":960,"src":"\/\/crystaldestiny.com\/cdn\/shop\/collections\/1464163B-22B1-4D62-BEC5-CEC9AECB670B.jpg?v=1767248999"}}]}
[{"alt":"Hematoid \"Fire\" Quartz Spheres 52-54mm-Spheres-Crystal Destiny-Hematoid Quartz-194g - 52mm Diameter-Crystal Destiny","id":31151231991979,"position":1,"preview_image":{"aspect_ratio":1.0,"height":1135,"width":1135,"src":"\/\/crystaldestiny.com\/cdn\/shop\/files\/Hematoid-Fire-Quartz-Spheres-52-54mm-Spheres-Hematoid-Quartz-194g-52mm-Diameter.jpg?v=1765429402"},"aspect_ratio":1.0,"height":1135,"media_type":"image","src":"\/\/crystaldestiny.com\/cdn\/shop\/files\/Hematoid-Fire-Quartz-Spheres-52-54mm-Spheres-Hematoid-Quartz-194g-52mm-Diameter.jpg?v=1765429402","width":1135},{"alt":"Hematoid \"Fire\" Quartz Spheres 52-54mm-Spheres-Crystal Destiny-Hematoid Quartz-196g - 53mm Diameter-Crystal Destiny","id":31151267545259,"position":2,"preview_image":{"aspect_ratio":1.0,"height":1169,"width":1169,"src":"\/\/crystaldestiny.com\/cdn\/shop\/files\/Hematoid-Fire-Quartz-Spheres-52-54mm-Spheres-Hematoid-Quartz-196g-53mm-Diameter-2.jpg?v=1765429403"},"aspect_ratio":1.0,"height":1169,"media_type":"image","src":"\/\/crystaldestiny.com\/cdn\/shop\/files\/Hematoid-Fire-Quartz-Spheres-52-54mm-Spheres-Hematoid-Quartz-196g-53mm-Diameter-2.jpg?v=1765429403","width":1169},{"alt":"Hematoid \"Fire\" Quartz Spheres 52-54mm-Spheres-Crystal Destiny-Hematoid Quartz-200g - 54mm Diameter-Crystal Destiny","id":31151269937323,"position":3,"preview_image":{"aspect_ratio":1.0,"height":1159,"width":1159,"src":"\/\/crystaldestiny.com\/cdn\/shop\/files\/Hematoid-Fire-Quartz-Spheres-52-54mm-Spheres-Hematoid-Quartz-200g-54mm-Diameter-3.jpg?v=1765429405"},"aspect_ratio":1.0,"height":1159,"media_type":"image","src":"\/\/crystaldestiny.com\/cdn\/shop\/files\/Hematoid-Fire-Quartz-Spheres-52-54mm-Spheres-Hematoid-Quartz-200g-54mm-Diameter-3.jpg?v=1765429405","width":1159}]
{"item":{"id":8597779841195,"title":"Hematoid Fire Quartz Crystal Tower","handle":"hematoid-fire-quartz-crystal-tower-1005009505875288-1pcs-random-6-8cm","description":"\u003cp data-start=\"170\" data-end=\"453\"\u003eThis Fire Quartz Crystal Tower features a polished single-point design, radiating fiery energy with its natural red and orange hues. Perfectly shaped as a wand or obelisk, it serves as a striking decorative piece for your home, altar, or meditation space.\u003c\/p\u003e\n\u003cp data-start=\"455\" data-end=\"794\"\u003eFire Quartz is known for its energizing and motivating properties, supporting vitality, focus, and personal empowerment. Display this crystal pillar on your desk, shelf, or spiritual space to enhance energy flow and bring warmth and intention into your environment. It also makes a thoughtful gift for collectors and crystal enthusiasts.\u003c\/p\u003e\n\u003cp data-start=\"455\" data-end=\"794\"\u003eThis product is pulled at random by size.\u003c\/p\u003e\n\u003ch2\u003eCrystal Towers, Wands, Generators, Points, Pillars \u0026amp; Obelisks — What's the Difference?\u003c\/h2\u003e\n\u003cp id=\"isPasted\"\u003eWhile these terms may vary, they all describe beautifully shaped crystals with a pointed tip designed to channel and direct energy. Each name highlights a unique aspect of their use:\u003c\/p\u003e\n\u003cul\u003e\n\u003cli\u003e\n\u003cstrong\u003eTowers\u003c\/strong\u003e- Known for their steady, grounding presence, crystal towers help focus and amplify energy, making them perfect for meditation and manifestation.\u003c\/li\u003e\n\u003cli\u003e\n\u003cstrong\u003eWands\u003c\/strong\u003e- Traditionally used in energy work and healing, crystal wands are excellent for directing energy flow and clearing blockages.\u003c\/li\u003e\n\u003cli\u003e\n\u003cstrong\u003ePillars\u003c\/strong\u003e- Symbolizing strength and stability, crystal pillars create a balanced and harmonious environment, making them great for home decor and spiritual practices.\u003c\/li\u003e\n\u003cli\u003e\n\u003cstrong\u003eObelisks\u003c\/strong\u003e- Inspired by ancient structures, crystal obelisks are believed to connect earthly and spiritual energies, making them powerful tools for transformation and enlightenment.\u003c\/li\u003e\n\u003c\/ul\u003e\n\u003cp\u003eNo matter what you call them, these crystals serve the same purpose—to enhance energy, intention, and harmony in your space. Choose the one that resonates most with you!\u003c\/p\u003e","published_at":"2025-12-02T21:16:20-05:00","created_at":"2025-12-02T21:10:57-05:00","vendor":"Ali","type":"Towers","tags":["adjusted-shipping","crystal","new-arrivals","polished","Towers"],"price":1899,"price_min":1899,"price_max":2999,"available":true,"price_varies":true,"compare_at_price":0,"compare_at_price_min":0,"compare_at_price_max":0,"compare_at_price_varies":false,"variants":[{"id":45917741252779,"title":"Fire Quartz \/ 60-80mm","option1":"Fire Quartz","option2":"60-80mm","option3":null,"sku":"1005009505875288-1pcs random-6-8cm","requires_shipping":true,"taxable":true,"featured_image":{"id":40885016887467,"product_id":8597779841195,"position":5,"created_at":"2025-12-02T21:10:59-05:00","updated_at":"2025-12-11T00:25:03-05:00","alt":"Hematoid Fire Quartz Crystal Tower-Towers-Ali-Fire Quartz-60-80mm-Crystal Destiny","width":800,"height":800,"src":"\/\/crystaldestiny.com\/cdn\/shop\/files\/Hematoid-Fire-Quartz-Crystal-Tower-Towers-Fire-Quartz-60-80mm-5.webp?v=1765430703","variant_ids":[45917741220011,45917741252779]},"available":true,"name":"Hematoid Fire Quartz Crystal Tower - Fire Quartz \/ 60-80mm","public_title":"Fire Quartz \/ 60-80mm","options":["Fire Quartz","60-80mm"],"price":1899,"weight":122,"compare_at_price":0,"inventory_management":"shopify","barcode":null,"featured_media":{"alt":"Hematoid Fire Quartz Crystal Tower-Towers-Ali-Fire Quartz-60-80mm-Crystal Destiny","id":32255576899755,"position":5,"preview_image":{"aspect_ratio":1.0,"height":800,"width":800,"src":"\/\/crystaldestiny.com\/cdn\/shop\/files\/Hematoid-Fire-Quartz-Crystal-Tower-Towers-Fire-Quartz-60-80mm-5.webp?v=1765430703"}},"requires_selling_plan":false,"selling_plan_allocations":[]},{"id":45917741220011,"title":"Fire Quartz \/ 80-100mm","option1":"Fire Quartz","option2":"80-100mm","option3":null,"sku":"1005009505875288-1pcs random-8-10cm","requires_shipping":true,"taxable":true,"featured_image":{"id":40885016887467,"product_id":8597779841195,"position":5,"created_at":"2025-12-02T21:10:59-05:00","updated_at":"2025-12-11T00:25:03-05:00","alt":"Hematoid Fire Quartz Crystal Tower-Towers-Ali-Fire Quartz-60-80mm-Crystal Destiny","width":800,"height":800,"src":"\/\/crystaldestiny.com\/cdn\/shop\/files\/Hematoid-Fire-Quartz-Crystal-Tower-Towers-Fire-Quartz-60-80mm-5.webp?v=1765430703","variant_ids":[45917741220011,45917741252779]},"available":false,"name":"Hematoid Fire Quartz Crystal Tower - Fire Quartz \/ 80-100mm","public_title":"Fire Quartz \/ 80-100mm","options":["Fire Quartz","80-100mm"],"price":2999,"weight":122,"compare_at_price":0,"inventory_management":"shopify","barcode":null,"featured_media":{"alt":"Hematoid Fire Quartz Crystal Tower-Towers-Ali-Fire Quartz-60-80mm-Crystal Destiny","id":32255576899755,"position":5,"preview_image":{"aspect_ratio":1.0,"height":800,"width":800,"src":"\/\/crystaldestiny.com\/cdn\/shop\/files\/Hematoid-Fire-Quartz-Crystal-Tower-Towers-Fire-Quartz-60-80mm-5.webp?v=1765430703"}},"requires_selling_plan":false,"selling_plan_allocations":[]}],"images":["\/\/crystaldestiny.com\/cdn\/shop\/files\/Hematoid-Fire-Quartz-Crystal-Tower-Towers.webp?v=1764778717","\/\/crystaldestiny.com\/cdn\/shop\/files\/Hematoid-Fire-Quartz-Crystal-Tower-Towers-2.webp?v=1764778718","\/\/crystaldestiny.com\/cdn\/shop\/files\/Hematoid-Fire-Quartz-Crystal-Tower-Towers-3.webp?v=1764778720","\/\/crystaldestiny.com\/cdn\/shop\/files\/Hematoid-Fire-Quartz-Crystal-Tower-Towers-4.webp?v=1764778721","\/\/crystaldestiny.com\/cdn\/shop\/files\/Hematoid-Fire-Quartz-Crystal-Tower-Towers-Fire-Quartz-60-80mm-5.webp?v=1765430703","\/\/crystaldestiny.com\/cdn\/shop\/files\/Hematoid-Fire-Quartz-Crystal-Tower-Towers-6.webp?v=1764778724"],"featured_image":"\/\/crystaldestiny.com\/cdn\/shop\/files\/Hematoid-Fire-Quartz-Crystal-Tower-Towers.webp?v=1764778717","options":["Material","Size"],"media":[{"alt":"Hematoid Fire Quartz Crystal Tower-Towers-Ali-Fire Quartz-60-80mm-Crystal Destiny","id":32255576735915,"position":1,"preview_image":{"aspect_ratio":1.0,"height":800,"width":800,"src":"\/\/crystaldestiny.com\/cdn\/shop\/files\/Hematoid-Fire-Quartz-Crystal-Tower-Towers.webp?v=1764778717"},"aspect_ratio":1.0,"height":800,"media_type":"image","src":"\/\/crystaldestiny.com\/cdn\/shop\/files\/Hematoid-Fire-Quartz-Crystal-Tower-Towers.webp?v=1764778717","width":800},{"alt":"Hematoid Fire Quartz Crystal Tower-Towers-Ali-Fire Quartz-60-80mm-Crystal Destiny","id":32255576768683,"position":2,"preview_image":{"aspect_ratio":1.0,"height":800,"width":800,"src":"\/\/crystaldestiny.com\/cdn\/shop\/files\/Hematoid-Fire-Quartz-Crystal-Tower-Towers-2.webp?v=1764778718"},"aspect_ratio":1.0,"height":800,"media_type":"image","src":"\/\/crystaldestiny.com\/cdn\/shop\/files\/Hematoid-Fire-Quartz-Crystal-Tower-Towers-2.webp?v=1764778718","width":800},{"alt":"Hematoid Fire Quartz Crystal Tower-Towers-Ali-Fire Quartz-60-80mm-Crystal Destiny","id":32255576834219,"position":3,"preview_image":{"aspect_ratio":1.0,"height":800,"width":800,"src":"\/\/crystaldestiny.com\/cdn\/shop\/files\/Hematoid-Fire-Quartz-Crystal-Tower-Towers-3.webp?v=1764778720"},"aspect_ratio":1.0,"height":800,"media_type":"image","src":"\/\/crystaldestiny.com\/cdn\/shop\/files\/Hematoid-Fire-Quartz-Crystal-Tower-Towers-3.webp?v=1764778720","width":800},{"alt":"Hematoid Fire Quartz Crystal Tower-Towers-Ali-Fire Quartz-60-80mm-Crystal Destiny","id":32255576866987,"position":4,"preview_image":{"aspect_ratio":1.0,"height":800,"width":800,"src":"\/\/crystaldestiny.com\/cdn\/shop\/files\/Hematoid-Fire-Quartz-Crystal-Tower-Towers-4.webp?v=1764778721"},"aspect_ratio":1.0,"height":800,"media_type":"image","src":"\/\/crystaldestiny.com\/cdn\/shop\/files\/Hematoid-Fire-Quartz-Crystal-Tower-Towers-4.webp?v=1764778721","width":800},{"alt":"Hematoid Fire Quartz Crystal Tower-Towers-Ali-Fire Quartz-60-80mm-Crystal Destiny","id":32255576899755,"position":5,"preview_image":{"aspect_ratio":1.0,"height":800,"width":800,"src":"\/\/crystaldestiny.com\/cdn\/shop\/files\/Hematoid-Fire-Quartz-Crystal-Tower-Towers-Fire-Quartz-60-80mm-5.webp?v=1765430703"},"aspect_ratio":1.0,"height":800,"media_type":"image","src":"\/\/crystaldestiny.com\/cdn\/shop\/files\/Hematoid-Fire-Quartz-Crystal-Tower-Towers-Fire-Quartz-60-80mm-5.webp?v=1765430703","width":800},{"alt":"Hematoid Fire Quartz Crystal Tower-Towers-Ali-Fire Quartz-60-80mm-Crystal Destiny","id":32255576801451,"position":6,"preview_image":{"aspect_ratio":1.0,"height":800,"width":800,"src":"\/\/crystaldestiny.com\/cdn\/shop\/files\/Hematoid-Fire-Quartz-Crystal-Tower-Towers-6.webp?v=1764778724"},"aspect_ratio":1.0,"height":800,"media_type":"image","src":"\/\/crystaldestiny.com\/cdn\/shop\/files\/Hematoid-Fire-Quartz-Crystal-Tower-Towers-6.webp?v=1764778724","width":800}],"requires_selling_plan":false,"selling_plan_groups":[],"content":"\u003cp data-start=\"170\" data-end=\"453\"\u003eThis Fire Quartz Crystal Tower features a polished single-point design, radiating fiery energy with its natural red and orange hues. Perfectly shaped as a wand or obelisk, it serves as a striking decorative piece for your home, altar, or meditation space.\u003c\/p\u003e\n\u003cp data-start=\"455\" data-end=\"794\"\u003eFire Quartz is known for its energizing and motivating properties, supporting vitality, focus, and personal empowerment. Display this crystal pillar on your desk, shelf, or spiritual space to enhance energy flow and bring warmth and intention into your environment. It also makes a thoughtful gift for collectors and crystal enthusiasts.\u003c\/p\u003e\n\u003cp data-start=\"455\" data-end=\"794\"\u003eThis product is pulled at random by size.\u003c\/p\u003e\n\u003ch2\u003eCrystal Towers, Wands, Generators, Points, Pillars \u0026amp; Obelisks — What's the Difference?\u003c\/h2\u003e\n\u003cp id=\"isPasted\"\u003eWhile these terms may vary, they all describe beautifully shaped crystals with a pointed tip designed to channel and direct energy. Each name highlights a unique aspect of their use:\u003c\/p\u003e\n\u003cul\u003e\n\u003cli\u003e\n\u003cstrong\u003eTowers\u003c\/strong\u003e- Known for their steady, grounding presence, crystal towers help focus and amplify energy, making them perfect for meditation and manifestation.\u003c\/li\u003e\n\u003cli\u003e\n\u003cstrong\u003eWands\u003c\/strong\u003e- Traditionally used in energy work and healing, crystal wands are excellent for directing energy flow and clearing blockages.\u003c\/li\u003e\n\u003cli\u003e\n\u003cstrong\u003ePillars\u003c\/strong\u003e- Symbolizing strength and stability, crystal pillars create a balanced and harmonious environment, making them great for home decor and spiritual practices.\u003c\/li\u003e\n\u003cli\u003e\n\u003cstrong\u003eObelisks\u003c\/strong\u003e- Inspired by ancient structures, crystal obelisks are believed to connect earthly and spiritual energies, making them powerful tools for transformation and enlightenment.\u003c\/li\u003e\n\u003c\/ul\u003e\n\u003cp\u003eNo matter what you call them, these crystals serve the same purpose—to enhance energy, intention, and harmony in your space. Choose the one that resonates most with you!\u003c\/p\u003e"},"options":[{"name":"Material","position":1,"values":["Fire Quartz"]},{"name":"Size","position":2,"values":["60-80mm","80-100mm"]}],"custom_metafields":{"shipping_time":"12-16 days"},"metafields":{"badge":"\u003cdiv style='display:none' class='jdgm-prev-badge' data-average-rating='0.00' data-number-of-reviews='0' data-number-of-questions='0'\u003e \u003cspan class='jdgm-prev-badge__stars' data-score='0.00' tabindex='0' aria-label='0.00 stars' role='button'\u003e \u003cspan class='jdgm-star jdgm--off'\u003e\u003c\/span\u003e\u003cspan class='jdgm-star jdgm--off'\u003e\u003c\/span\u003e\u003cspan class='jdgm-star jdgm--off'\u003e\u003c\/span\u003e\u003cspan class='jdgm-star jdgm--off'\u003e\u003c\/span\u003e\u003cspan class='jdgm-star jdgm--off'\u003e\u003c\/span\u003e \u003c\/span\u003e \u003cspan class='jdgm-prev-badge__text'\u003e No reviews \u003c\/span\u003e \u003c\/div\u003e","widget":"\u003cdiv class='jdgm-rev-widg' data-updated-at='2025-12-03T02:17:48Z' data-average-rating='0.00' data-number-of-reviews='0' data-number-of-questions='0' data-image-url='https:\/\/cdn.shopify.com\/s\/files\/1\/0613\/0345\/5915\/files\/Sdfd20f9d9526472d8ece0ccf3903cad6N.webp?v=1764727860'\u003e \u003cstyle class='jdgm-temp-hiding-style'\u003e.jdgm-rev-widg{ display: none }\u003c\/style\u003e \u003cdiv class='jdgm-rev-widg__header'\u003e \u003ch2 class='jdgm-rev-widg__title'\u003eCustomer Reviews\u003c\/h2\u003e \u003cdiv class='jdgm-rev-widg__summary'\u003e \u003cdiv class='jdgm-rev-widg__summary-stars' aria-label='Average rating is 0.00 stars' role='img'\u003e \u003cspan class='jdgm-star jdgm--off'\u003e\u003c\/span\u003e\u003cspan class='jdgm-star jdgm--off'\u003e\u003c\/span\u003e\u003cspan class='jdgm-star jdgm--off'\u003e\u003c\/span\u003e\u003cspan class='jdgm-star jdgm--off'\u003e\u003c\/span\u003e\u003cspan class='jdgm-star jdgm--off'\u003e\u003c\/span\u003e \u003c\/div\u003e \u003cdiv class='jdgm-rev-widg__summary-text'\u003eBe the first to write a review\u003c\/div\u003e \u003c\/div\u003e \u003ca style='display: none' href='#' class='jdgm-write-rev-link' role='button'\u003eWrite a review\u003c\/a\u003e \u003cdiv class='jdgm-histogram jdgm-temp-hidden'\u003e \u003cdiv class='jdgm-histogram__row' data-rating='5' data-frequency='0' data-percentage='0'\u003e \u003cdiv class='jdgm-histogram__star' role='button' aria-label=\"0% (0) reviews with 5 star rating\" tabindex='0' \u003e\u003cspan class='jdgm-star jdgm--on'\u003e\u003c\/span\u003e\u003cspan class='jdgm-star jdgm--on'\u003e\u003c\/span\u003e\u003cspan class='jdgm-star jdgm--on'\u003e\u003c\/span\u003e\u003cspan class='jdgm-star jdgm--on'\u003e\u003c\/span\u003e\u003cspan class='jdgm-star jdgm--on'\u003e\u003c\/span\u003e\u003c\/div\u003e \u003cdiv class='jdgm-histogram__bar'\u003e \u003cdiv class='jdgm-histogram__bar-content' style='width: 0%;'\u003e \u003c\/div\u003e \u003c\/div\u003e \u003cdiv class='jdgm-histogram__percentage'\u003e0%\u003c\/div\u003e \u003cdiv class='jdgm-histogram__frequency'\u003e(0)\u003c\/div\u003e \u003c\/div\u003e \u003cdiv class='jdgm-histogram__row' data-rating='4' data-frequency='0' data-percentage='0'\u003e \u003cdiv class='jdgm-histogram__star' role='button' aria-label=\"0% (0) reviews with 4 star rating\" tabindex='0' \u003e\u003cspan class='jdgm-star jdgm--on'\u003e\u003c\/span\u003e\u003cspan class='jdgm-star jdgm--on'\u003e\u003c\/span\u003e\u003cspan class='jdgm-star jdgm--on'\u003e\u003c\/span\u003e\u003cspan class='jdgm-star jdgm--on'\u003e\u003c\/span\u003e\u003cspan class='jdgm-star jdgm--off'\u003e\u003c\/span\u003e\u003c\/div\u003e \u003cdiv class='jdgm-histogram__bar'\u003e \u003cdiv class='jdgm-histogram__bar-content' style='width: 0%;'\u003e \u003c\/div\u003e \u003c\/div\u003e \u003cdiv class='jdgm-histogram__percentage'\u003e0%\u003c\/div\u003e \u003cdiv class='jdgm-histogram__frequency'\u003e(0)\u003c\/div\u003e \u003c\/div\u003e \u003cdiv class='jdgm-histogram__row' data-rating='3' data-frequency='0' data-percentage='0'\u003e \u003cdiv class='jdgm-histogram__star' role='button' aria-label=\"0% (0) reviews with 3 star rating\" tabindex='0' \u003e\u003cspan class='jdgm-star jdgm--on'\u003e\u003c\/span\u003e\u003cspan class='jdgm-star jdgm--on'\u003e\u003c\/span\u003e\u003cspan class='jdgm-star jdgm--on'\u003e\u003c\/span\u003e\u003cspan class='jdgm-star jdgm--off'\u003e\u003c\/span\u003e\u003cspan class='jdgm-star jdgm--off'\u003e\u003c\/span\u003e\u003c\/div\u003e \u003cdiv class='jdgm-histogram__bar'\u003e \u003cdiv class='jdgm-histogram__bar-content' style='width: 0%;'\u003e \u003c\/div\u003e \u003c\/div\u003e \u003cdiv class='jdgm-histogram__percentage'\u003e0%\u003c\/div\u003e \u003cdiv class='jdgm-histogram__frequency'\u003e(0)\u003c\/div\u003e \u003c\/div\u003e \u003cdiv class='jdgm-histogram__row' data-rating='2' data-frequency='0' data-percentage='0'\u003e \u003cdiv class='jdgm-histogram__star' role='button' aria-label=\"0% (0) reviews with 2 star rating\" tabindex='0' \u003e\u003cspan class='jdgm-star jdgm--on'\u003e\u003c\/span\u003e\u003cspan class='jdgm-star jdgm--on'\u003e\u003c\/span\u003e\u003cspan class='jdgm-star jdgm--off'\u003e\u003c\/span\u003e\u003cspan class='jdgm-star jdgm--off'\u003e\u003c\/span\u003e\u003cspan class='jdgm-star jdgm--off'\u003e\u003c\/span\u003e\u003c\/div\u003e \u003cdiv class='jdgm-histogram__bar'\u003e \u003cdiv class='jdgm-histogram__bar-content' style='width: 0%;'\u003e \u003c\/div\u003e \u003c\/div\u003e \u003cdiv class='jdgm-histogram__percentage'\u003e0%\u003c\/div\u003e \u003cdiv class='jdgm-histogram__frequency'\u003e(0)\u003c\/div\u003e \u003c\/div\u003e \u003cdiv class='jdgm-histogram__row' data-rating='1' data-frequency='0' data-percentage='0'\u003e \u003cdiv class='jdgm-histogram__star' role='button' aria-label=\"0% (0) reviews with 1 star rating\" tabindex='0' \u003e\u003cspan class='jdgm-star jdgm--on'\u003e\u003c\/span\u003e\u003cspan class='jdgm-star jdgm--off'\u003e\u003c\/span\u003e\u003cspan class='jdgm-star jdgm--off'\u003e\u003c\/span\u003e\u003cspan class='jdgm-star jdgm--off'\u003e\u003c\/span\u003e\u003cspan class='jdgm-star jdgm--off'\u003e\u003c\/span\u003e\u003c\/div\u003e \u003cdiv class='jdgm-histogram__bar'\u003e \u003cdiv class='jdgm-histogram__bar-content' style='width: 0%;'\u003e \u003c\/div\u003e \u003c\/div\u003e \u003cdiv class='jdgm-histogram__percentage'\u003e0%\u003c\/div\u003e \u003cdiv class='jdgm-histogram__frequency'\u003e(0)\u003c\/div\u003e \u003c\/div\u003e \u003cdiv class='jdgm-histogram__row jdgm-histogram__clear-filter' data-rating=null tabindex='0'\u003e\u003c\/div\u003e \u003c\/div\u003e \u003cdiv class='jdgm-rev-widg__sort-wrapper'\u003e\u003c\/div\u003e \u003c\/div\u003e \u003cdiv class='jdgm-rev-widg__body'\u003e \u003cdiv class='jdgm-rev-widg__reviews'\u003e\u003c\/div\u003e \u003cdiv class='jdgm-paginate' data-per-page='4' data-url='https:\/\/api.judge.me\/reviews\/reviews_for_widget' style=\"display: none;\"\u003e\u003c\/div\u003e \u003c\/div\u003e \u003cdiv class='jdgm-rev-widg__paginate-spinner-wrapper'\u003e \u003cdiv class='jdgm-spinner'\u003e\u003c\/div\u003e \u003c\/div\u003e \u003c\/div\u003e"},"collections":[{"id":294880051371,"handle":"crystals","title":"Crystals","updated_at":"2026-01-07T23:43:11-05:00","body_html":"\u003cp data-start=\"159\" data-end=\"687\"\u003e✨ \u003cstrong data-start=\"161\" data-end=\"216\"\u003eDiscover the Magic of Crystals with Crystal Destiny\u003c\/strong\u003e ✨\u003cbr data-start=\"218\" data-end=\"221\"\u003eCrystals have been treasured for centuries—not only for their natural beauty but also for their powerful healing energies. Beyond their visual allure, they bring balance, harmony, and positive energy into any space. Whether used for home décor, meditation, or simply to elevate the energy of your surroundings, crystals create a sanctuary of peace, relaxation, and well-being. Each piece is a unique gift from the Earth—visually stunning and spiritually uplifting.\u003c\/p\u003e\n\u003cp data-start=\"689\" data-end=\"1011\"\u003eAt \u003cstrong data-start=\"692\" data-end=\"711\"\u003eCrystal Destiny\u003c\/strong\u003e, our signature collection showcases a curated selection of exquisite crystals, from radiant Quartz to soothing Amethyst. Every stone is carefully sourced for its elegance and metaphysical resonance, making them perfect for enhancing your home, uplifting your spirit, or gifting to someone special.\u003c\/p\u003e\n\u003cp data-start=\"1013\" data-end=\"1206\"\u003eExperience the timeless sophistication of crystalline wonders. Explore the \u003cstrong data-start=\"1088\" data-end=\"1118\"\u003eCrystal Destiny Collection\u003c\/strong\u003e today and bring the transformative beauty of these treasures into your everyday life.\u003c\/p\u003e","published_at":"2023-06-05T11:24:02-04:00","sort_order":"created-desc","template_suffix":"","disjunctive":false,"rules":[{"column":"tag","relation":"equals","condition":"crystal"},{"column":"type","relation":"not_contains","condition":"925 Sterling Silver"},{"column":"type","relation":"not_contains","condition":"Wire Wraps"}],"published_scope":"global"},{"id":319455953067,"handle":"solar-plexus-chakra-crystals","title":"Solar Plexus Chakra Crystals","updated_at":"2026-01-06T11:12:19-05:00","body_html":"\u003cp data-start=\"142\" data-end=\"577\"\u003e✨ \u003cstrong data-start=\"144\" data-end=\"176\"\u003eSolar Plexus Chakra Crystals\u003c\/strong\u003e ✨\u003cbr data-start=\"178\" data-end=\"181\"\u003eHarness the power of your personal will and confidence with our \u003cstrong data-start=\"245\" data-end=\"277\"\u003eSolar Plexus Chakra Crystals\u003c\/strong\u003e. Focused on the third chakra, located at the center of your torso, these stones help balance self-esteem, personal power, and motivation. Perfect for meditation, energy work, or as wearable reminders of inner strength, each crystal resonates with vibrant energy designed to ignite your inner fire.\u003c\/p\u003e\n\u003cp data-start=\"579\" data-end=\"960\"\u003eOur curated selection includes radiant yellow and golden stones such as Citrine, Yellow Jasper, and Tiger’s Eye—each chosen for their ability to stimulate vitality, courage, and focus. Whether you place them in your sacred space, carry them with you, or incorporate them into jewelry, Solar Plexus Chakra Crystals invite clarity, confidence, and empowerment into your daily life.\u003c\/p\u003e\n\u003cp data-start=\"962\" data-end=\"1109\"\u003eElevate your energy, amplify your inner strength, and embrace the transformative power of your Solar Plexus with these powerful, luminous stones.\u003c\/p\u003e","published_at":"2025-07-17T18:18:13-04:00","sort_order":"best-selling","template_suffix":"","disjunctive":false,"rules":[{"column":"variant_metafield_definition","relation":"equals","condition":"Solar Plexus"}],"published_scope":"global","image":{"created_at":"2025-07-17T19:08:38-04:00","alt":null,"width":1080,"height":1080,"src":"\/\/crystaldestiny.com\/cdn\/shop\/collections\/Solar_Plexus_Chakra_Collection.jpg?v=1762474929"}},{"id":319456018603,"handle":"sacral-chakra-crystals","title":"Sacral Chakra Crystals","updated_at":"2026-01-06T11:12:19-05:00","body_html":"\u003cp data-start=\"144\" data-end=\"489\"\u003e✨ \u003cstrong data-start=\"146\" data-end=\"172\"\u003eSacral Chakra Crystals\u003c\/strong\u003e ✨\u003cbr data-start=\"174\" data-end=\"177\"\u003eIgnite creativity, passion, and emotional balance with our \u003cstrong data-start=\"236\" data-end=\"262\"\u003eSacral Chakra Crystals\u003c\/strong\u003e. Located just below the navel, the Sacral Chakra governs pleasure, intimacy, and self-expression. These crystals help release emotional blockages, enhance creativity, and promote confidence in expressing your authentic self.\u003c\/p\u003e\n\u003cp data-start=\"491\" data-end=\"833\"\u003eOur curated selection includes stones such as Carnelian, Orange Calcite, and Sunstone—chosen for their vibrant energy and ability to awaken joy, vitality, and emotional harmony. Perfect for meditation, energy work, or as wearable reminders, Sacral Chakra Crystals encourage a healthy flow of energy and inspire passion in all areas of life.\u003c\/p\u003e\n\u003cp data-start=\"835\" data-end=\"970\"\u003eEmbrace creativity, cultivate emotional balance, and awaken your inner fire with the transformative energy of Sacral Chakra Crystals.\u003c\/p\u003e","published_at":"2025-07-17T18:19:00-04:00","sort_order":"best-selling","template_suffix":"","disjunctive":false,"rules":[{"column":"variant_metafield_definition","relation":"equals","condition":"Sacral"}],"published_scope":"global","image":{"created_at":"2025-07-17T19:08:18-04:00","alt":null,"width":1080,"height":1080,"src":"\/\/crystaldestiny.com\/cdn\/shop\/collections\/Sacral_Chakra_Collection.jpg?v=1762474931"}},{"id":294880116907,"handle":"polished","title":"Polished Crystals","updated_at":"2026-01-07T23:43:11-05:00","body_html":"\u003cp data-start=\"199\" data-end=\"598\"\u003e✨ \u003cstrong data-start=\"201\" data-end=\"248\"\u003eCrystal Destiny Polished Crystal Collection\u003c\/strong\u003e ✨\u003cbr data-start=\"250\" data-end=\"253\"\u003eIndulge in the brilliance of crystals refined to perfection. Our \u003cstrong data-start=\"318\" data-end=\"341\"\u003ePolished Collection\u003c\/strong\u003e showcases gemstones meticulously shaped and smoothed to reveal their natural radiance and timeless beauty. From the shimmering glow of Quartz to the deep allure of Obsidian, each polished piece is a testament to nature’s artistry and human craftsmanship.\u003c\/p\u003e\n\u003cp data-start=\"600\" data-end=\"862\"\u003ePerfect as statement décor, meaningful gifts, or companions on your spiritual journey, polished crystals bring sophistication and elevated energy into any space. Their radiant surfaces reflect not only light but also the transformative power of crystal energy.\u003c\/p\u003e\n\u003cp data-start=\"864\" data-end=\"1022\"\u003eDiscover the elegance of refinement with Crystal Destiny’s Polished Crystal Collection—where every facet shines with intention, beauty, and timeless allure.\u003c\/p\u003e","published_at":"2023-06-05T11:30:44-04:00","sort_order":"created-desc","template_suffix":"","disjunctive":false,"rules":[{"column":"tag","relation":"equals","condition":"polished"}],"published_scope":"global"},{"id":322471624875,"handle":"crystal-favorites","title":"Crystal Enthusiast's Favorites","updated_at":"2026-01-07T23:42:38-05:00","body_html":"\u003cp\u003eDiscover the crystals our community loves most. This collection features our best-selling stones and accessories, carefully curated to highlight pieces that are always in demand and ready to ship. Whether you’re adding to your collection or searching for a gift, these fan-favorite crystals are timeless staples for energy, beauty, and balance.\u003c\/p\u003e","published_at":"2025-10-01T21:07:06-04:00","sort_order":"price-asc","template_suffix":"","disjunctive":false,"rules":[{"column":"variant_inventory","relation":"greater_than","condition":"1"}],"published_scope":"global"},{"id":321695744171,"handle":"direct-from-supplier","title":"Direct from Supplier","updated_at":"2026-01-07T23:43:11-05:00","body_html":"","published_at":"2025-09-12T16:38:23-04:00","sort_order":"best-selling","template_suffix":"","disjunctive":true,"rules":[{"column":"tag","relation":"equals","condition":"adjusted-shipping"}],"published_scope":"global"},{"id":293659312299,"handle":"best-sellers","title":"Best Sellers","updated_at":"2026-01-07T23:43:11-05:00","body_html":"\u003cp data-start=\"155\" data-end=\"510\"\u003eDiscover the pieces our community loves most. Our Best Sellers Collection brings together handpicked crystals and jewelry that embody timeless elegance, spiritual resonance, and everyday sophistication. Each item has earned its place as a customer favorite—celebrated for both its beauty and its meaningful energy.\u003c\/p\u003e\n\u003cp data-start=\"512\" data-end=\"802\"\u003eFrom stunning statement pieces to versatile daily companions, these treasures are curated to elevate your space, uplift your spirit, and reflect refined taste. Indulge in what’s most cherished and let our best sellers guide you toward the perfect blend of style and transformative energy.\u003c\/p\u003e\n\u003cp data-start=\"804\" data-end=\"932\"\u003eExplore the Best Sellers Collection today—where elegance meets intention, and every piece tells a story of beauty and balance.\u003c\/p\u003e","published_at":"2023-03-15T16:04:51-04:00","sort_order":"best-selling","template_suffix":"","disjunctive":false,"rules":[{"column":"variant_price","relation":"greater_than","condition":"0"},{"column":"variant_inventory","relation":"greater_than","condition":"0"},{"column":"type","relation":"not_equals","condition":"Shipping Protection"}],"published_scope":"global"},{"id":321370390699,"handle":"monthly-crystal-sale","title":"Monthly Crystal Sale | Spheres \u0026 Towers","updated_at":"2026-01-06T23:24:37-05:00","body_html":"\u003cp\u003eShop our \u003cstrong\u003eMonthly Crystal Sale\u003c\/strong\u003e, where you can shop a wide selection of healing crystals at discounted prices. Explore \u003cstrong\u003ecrystal spheres and towers,\u003c\/strong\u003e— all carefully curated to support meditation, energy balancing, and spiritual wellness. Whether you're looking to enhance your home decor, boost your daily energy, or find the perfect gift, our \u003cstrong\u003ecrystals for healing and manifestation\u003c\/strong\u003e offer both beauty and metaphysical benefits.\u003c\/p\u003e\n\u003cp\u003eEach month, our sale features \u003cstrong\u003enew discounted collections\u003c\/strong\u003e, from \u003cstrong\u003enatural quartz and amethyst towers\u003c\/strong\u003e to \u003cstrong\u003ewire-wrapped pendants and polished stones\u003c\/strong\u003e, so there's always something fresh to discover. Shop with confidence knowing you're getting high-quality crystals with \u003cstrong\u003efree shipping options\u003c\/strong\u003e and a trusted experience.\u003c\/p\u003e\n\u003cp\u003e\u003cstrong\u003eTake advantage of the Monthly Crystal Sale today\u003c\/strong\u003e and add powerful, natural energy to your life with \u003cstrong\u003eauthentic healing crystals\u003c\/strong\u003e — while our limited-time discounts last.\u003c\/p\u003e\n\u003cp\u003e\u003cstrong\u003e*Discount automatically applied at checkout.\u003c\/strong\u003e\u003c\/p\u003e","published_at":"2025-12-02T01:26:17-05:00","sort_order":"alpha-asc","template_suffix":"","disjunctive":true,"rules":[{"column":"tag","relation":"equals","condition":"spheres"},{"column":"tag","relation":"equals","condition":"Towers"}],"published_scope":"global","image":{"created_at":"2026-01-01T01:32:34-05:00","alt":"","width":960,"height":960,"src":"\/\/crystaldestiny.com\/cdn\/shop\/collections\/3E8C2969-1B86-4ACE-B349-98E9D8768424.jpg?v=1767249154"}},{"id":297906241707,"handle":"new-arrivals","title":"New Arrivals","updated_at":"2026-01-07T23:43:11-05:00","body_html":"\u003cp data-start=\"172\" data-end=\"573\"\u003e✨ \u003cstrong data-start=\"174\" data-end=\"217\"\u003eDiscover Crystal Destiny’s New Arrivals\u003c\/strong\u003e ✨\u003cbr data-start=\"219\" data-end=\"222\"\u003eStep into a world of fresh sophistication with our latest crystal treasures. Each new piece—whether Quartz, Amethyst, or beyond—embodies nature’s artistry, radiating both timeless beauty and powerful energy. Thoughtfully curated and constantly refreshed, our New Arrivals Collection offers the perfect harmony of elegance and metaphysical resonance.\u003c\/p\u003e\n\u003cp data-start=\"575\" data-end=\"793\"\u003eElevate your space, uplift your spirit, and embrace the transformative power of nature’s wonders. Explore the newest expressions of crystal artistry today, and let your journey with crystals evolve with every update.\u003c\/p\u003e","published_at":"2023-11-20T15:35:42-05:00","sort_order":"created-desc","template_suffix":"","disjunctive":true,"rules":[{"column":"tag","relation":"equals","condition":"new-arrivals"}],"published_scope":"global"},{"id":297596059819,"handle":"all","title":"All Crystals \u0026 Jewelry","updated_at":"2026-01-07T23:43:11-05:00","body_html":"\u003cp data-start=\"149\" data-end=\"494\"\u003e✨ \u003cstrong data-start=\"151\" data-end=\"181\"\u003eWelcome to Crystal Destiny\u003c\/strong\u003e ✨\u003cbr data-start=\"183\" data-end=\"186\"\u003eStep into a world where beauty, energy, and artistry unite. Our collection is a treasure trove of exquisite crystals, from the raw, untamed elegance of natural formations to the polished brilliance of expertly crafted pieces. Each crystal is a masterpiece, carrying its own unique story and timeless charm.\u003c\/p\u003e\n\u003cp data-start=\"496\" data-end=\"831\"\u003eWhether you’re drawn to the calming presence of Amethyst, the vibrant energy of Citrine, or the grounding strength of Jasper, our crystals invite you to connect with nature’s finest wonders. Perfect for enhancing your space, supporting your spiritual journey, or gifting with intention, every piece resonates with beauty and meaning.\u003c\/p\u003e\n\u003cp data-start=\"833\" data-end=\"1000\"\u003eElevate your surroundings, embrace the mystique, and explore the enchanting world of crystals at \u003cstrong data-start=\"930\" data-end=\"949\"\u003eCrystal Destiny\u003c\/strong\u003e—where every crystal is waiting to be discovered.\u003c\/p\u003e","published_at":"2023-11-10T13:55:31-05:00","sort_order":"created-desc","template_suffix":"","disjunctive":false,"rules":[{"column":"type","relation":"not_equals","condition":"asdf"}],"published_scope":"global"},{"id":296256405675,"handle":"crystal-towers","title":"Crystal Towers","updated_at":"2026-01-06T23:24:37-05:00","body_html":"\u003cp data-end=\"568\" data-start=\"152\"\u003e✨ \u003cstrong data-end=\"190\" data-start=\"154\"\u003eCrystal Destiny Tower Collection\u003c\/strong\u003e ✨\u003cbr data-end=\"195\" data-start=\"192\"\u003eEnchant your space with the timeless beauty and powerful energy of crystal towers. Each piece in our \u003cstrong data-end=\"316\" data-start=\"296\"\u003eTower Collection\u003c\/strong\u003e is carefully crafted to showcase nature’s artistry while radiating higher vibrations and spiritual resonance. From the clarity of Quartz to the calming presence of Amethyst, these towers are both decorative masterpieces and tools for transformation.\u003c\/p\u003e\n\u003cp data-end=\"765\" data-start=\"570\"\u003ePerfect for meditation spaces, energy work, or simply elevating your home décor, crystal towers channel focused energy upward—creating balance, harmony, and refined elegance in any environment.\u003c\/p\u003e\n\u003cp data-end=\"917\" data-start=\"767\"\u003eDiscover the Crystal Destiny Tower Collection today and transform your surroundings into a sanctuary of beauty, purpose, and spiritual significance.\u003c\/p\u003e\n\u003ch2\u003eCrystal Towers, Wands, Generators, Points, Pillars \u0026amp; Obelisks — What's the Difference?\u003c\/h2\u003e\n\u003cp id=\"isPasted\"\u003eWhile these terms may vary, they all describe beautifully shaped crystals with a pointed tip designed to channel and direct energy. Each name highlights a unique aspect of their use:\u003c\/p\u003e\n\u003cul\u003e\n\u003cli\u003e\n\u003cstrong\u003eTowers\u003c\/strong\u003e- Known for their steady, grounding presence, crystal towers help focus and amplify energy, making them perfect for meditation and manifestation.\u003c\/li\u003e\n\u003cli\u003e\n\u003cstrong\u003eWands\u003c\/strong\u003e- Traditionally used in energy work and healing, crystal wands are excellent for directing energy flow and clearing blockages.\u003c\/li\u003e\n\u003cli\u003e\n\u003cstrong\u003ePillars\u003c\/strong\u003e- Symbolizing strength and stability, crystal pillars create a balanced and harmonious environment, making them great for home decor and spiritual practices.\u003c\/li\u003e\n\u003cli\u003e\n\u003cstrong\u003eObelisks\u003c\/strong\u003e- Inspired by ancient structures, crystal obelisks are believed to connect earthly and spiritual energies, making them powerful tools for transformation and enlightenment.\u003c\/li\u003e\n\u003c\/ul\u003e\n\u003cp\u003eNo matter what you call them, these crystals serve the same purpose—to enhance energy, intention, and harmony in your space. Choose the one that resonates most with you!\u003c\/p\u003e","published_at":"2023-09-14T12:52:35-04:00","sort_order":"created-desc","template_suffix":"","disjunctive":false,"rules":[{"column":"tag","relation":"equals","condition":"towers"}],"published_scope":"global"},{"id":298983391403,"handle":"january-crystal-sale","title":"January Sale | 25% Off Crystal Towers \u0026 Spheres","updated_at":"2026-01-06T23:24:37-05:00","body_html":"\u003cp\u003eShop our \u003cstrong\u003eJanuary Crystal Sale\u003c\/strong\u003e, where you can shop a wide selection of healing crystals at discounted prices. Explore \u003cstrong\u003eCrystal Towers, \u0026amp; Crystal Spheres\u003c\/strong\u003e — all carefully curated and crafted to support meditation, energy balancing, and spiritual wellness. Whether you're looking to enhance your home decor, boost your daily energy, or find the perfect gift, our \u003cstrong\u003ecrystals for healing and manifestation\u003c\/strong\u003e offer both beauty and metaphysical benefits.\u003c\/p\u003e\n\u003cp\u003eThis January, our sale features \u003cstrong\u003ediscounted crystal towers and spheres\u003c\/strong\u003e, from \u003cstrong\u003enatural quartz \u003c\/strong\u003eand \u003cstrong\u003eamethyst \u003c\/strong\u003eto \u003cstrong\u003ebumblebee jasper \u003c\/strong\u003eand \u003cstrong\u003ecarnelian\u003c\/strong\u003e, so there's always something fresh to discover. Shop with confidence knowing you're getting high-quality crystals with \u003cstrong\u003efree shipping options\u003c\/strong\u003e and a trusted experience.\u003c\/p\u003e\n\u003cp\u003e\u003cstrong\u003eTake advantage of the January Crystal Sale today\u003c\/strong\u003e and add powerful, natural energy to your life with \u003cstrong\u003eauthentic healing crystals\u003c\/strong\u003e — while our limited-time discounts last.\u003c\/p\u003e\n\u003cp\u003e\u003cstrong\u003e*Discount automatically applied at checkout.\u003c\/strong\u003e\u003c\/p\u003e","published_at":"2026-01-01T00:07:17-05:00","sort_order":"alpha-asc","template_suffix":"monthly-collection","disjunctive":true,"rules":[{"column":"tag","relation":"equals","condition":"Spheres"},{"column":"tag","relation":"equals","condition":"Towers"}],"published_scope":"global","image":{"created_at":"2026-01-01T01:29:59-05:00","alt":"","width":960,"height":960,"src":"\/\/crystaldestiny.com\/cdn\/shop\/collections\/1464163B-22B1-4D62-BEC5-CEC9AECB670B.jpg?v=1767248999"}}]}
[{"alt":"Hematoid Fire Quartz Crystal Tower-Towers-Ali-Fire Quartz-60-80mm-Crystal Destiny","id":32255576735915,"position":1,"preview_image":{"aspect_ratio":1.0,"height":800,"width":800,"src":"\/\/crystaldestiny.com\/cdn\/shop\/files\/Hematoid-Fire-Quartz-Crystal-Tower-Towers.webp?v=1764778717"},"aspect_ratio":1.0,"height":800,"media_type":"image","src":"\/\/crystaldestiny.com\/cdn\/shop\/files\/Hematoid-Fire-Quartz-Crystal-Tower-Towers.webp?v=1764778717","width":800},{"alt":"Hematoid Fire Quartz Crystal Tower-Towers-Ali-Fire Quartz-60-80mm-Crystal Destiny","id":32255576768683,"position":2,"preview_image":{"aspect_ratio":1.0,"height":800,"width":800,"src":"\/\/crystaldestiny.com\/cdn\/shop\/files\/Hematoid-Fire-Quartz-Crystal-Tower-Towers-2.webp?v=1764778718"},"aspect_ratio":1.0,"height":800,"media_type":"image","src":"\/\/crystaldestiny.com\/cdn\/shop\/files\/Hematoid-Fire-Quartz-Crystal-Tower-Towers-2.webp?v=1764778718","width":800},{"alt":"Hematoid Fire Quartz Crystal Tower-Towers-Ali-Fire Quartz-60-80mm-Crystal Destiny","id":32255576834219,"position":3,"preview_image":{"aspect_ratio":1.0,"height":800,"width":800,"src":"\/\/crystaldestiny.com\/cdn\/shop\/files\/Hematoid-Fire-Quartz-Crystal-Tower-Towers-3.webp?v=1764778720"},"aspect_ratio":1.0,"height":800,"media_type":"image","src":"\/\/crystaldestiny.com\/cdn\/shop\/files\/Hematoid-Fire-Quartz-Crystal-Tower-Towers-3.webp?v=1764778720","width":800},{"alt":"Hematoid Fire Quartz Crystal Tower-Towers-Ali-Fire Quartz-60-80mm-Crystal Destiny","id":32255576866987,"position":4,"preview_image":{"aspect_ratio":1.0,"height":800,"width":800,"src":"\/\/crystaldestiny.com\/cdn\/shop\/files\/Hematoid-Fire-Quartz-Crystal-Tower-Towers-4.webp?v=1764778721"},"aspect_ratio":1.0,"height":800,"media_type":"image","src":"\/\/crystaldestiny.com\/cdn\/shop\/files\/Hematoid-Fire-Quartz-Crystal-Tower-Towers-4.webp?v=1764778721","width":800},{"alt":"Hematoid Fire Quartz Crystal Tower-Towers-Ali-Fire Quartz-60-80mm-Crystal Destiny","id":32255576899755,"position":5,"preview_image":{"aspect_ratio":1.0,"height":800,"width":800,"src":"\/\/crystaldestiny.com\/cdn\/shop\/files\/Hematoid-Fire-Quartz-Crystal-Tower-Towers-Fire-Quartz-60-80mm-5.webp?v=1765430703"},"aspect_ratio":1.0,"height":800,"media_type":"image","src":"\/\/crystaldestiny.com\/cdn\/shop\/files\/Hematoid-Fire-Quartz-Crystal-Tower-Towers-Fire-Quartz-60-80mm-5.webp?v=1765430703","width":800},{"alt":"Hematoid Fire Quartz Crystal Tower-Towers-Ali-Fire Quartz-60-80mm-Crystal Destiny","id":32255576801451,"position":6,"preview_image":{"aspect_ratio":1.0,"height":800,"width":800,"src":"\/\/crystaldestiny.com\/cdn\/shop\/files\/Hematoid-Fire-Quartz-Crystal-Tower-Towers-6.webp?v=1764778724"},"aspect_ratio":1.0,"height":800,"media_type":"image","src":"\/\/crystaldestiny.com\/cdn\/shop\/files\/Hematoid-Fire-Quartz-Crystal-Tower-Towers-6.webp?v=1764778724","width":800}]
{"item":{"id":8603309506731,"title":"Himalayan Selenite Crystal Tower (Lighting Available)","handle":"himalayan-selenite-crystal-tower-lighting-available-1005004899330363-a-height-6cm","description":"\u003cp data-start=\"171\" data-end=\"424\"\u003eThis Himalayan Selenite Crystal Tower showcases natural, translucent layers polished into a sleek skyscraper shape. Its luminous white glow makes it a captivating centerpiece for meditation spaces, home décor, or energy work.\u003c\/p\u003e\n\u003cp data-start=\"426\" data-end=\"740\"\u003eSelenite is prized for its cleansing and harmonizing properties, promoting mental clarity, peace, and energetic balance. This tower is ideal for Reiki healing, crystal grids, or as a decorative piece that elevates any environment. Collectors and spiritual seekers value its natural elegance and calming presence.\u003c\/p\u003e\n\u003cp data-start=\"426\" data-end=\"740\"\u003eThis product is pulled at random by size.\u003c\/p\u003e\n\u003ch2\u003eCrystal Towers, Wands, Generators, Points, Pillars \u0026amp; Obelisks — What's the Difference?\u003c\/h2\u003e\n\u003cp id=\"isPasted\"\u003eWhile these terms may vary, they all describe beautifully shaped crystals with a pointed tip designed to channel and direct energy. Each name highlights a unique aspect of their use:\u003c\/p\u003e\n\u003cul\u003e\n\u003cli\u003e\n\u003cstrong\u003eTowers\u003c\/strong\u003e- Known for their steady, grounding presence, crystal towers help focus and amplify energy, making them perfect for meditation and manifestation.\u003c\/li\u003e\n\u003cli\u003e\n\u003cstrong\u003eWands\u003c\/strong\u003e- Traditionally used in energy work and healing, crystal wands are excellent for directing energy flow and clearing blockages.\u003c\/li\u003e\n\u003cli\u003e\n\u003cstrong\u003ePillars\u003c\/strong\u003e- Symbolizing strength and stability, crystal pillars create a balanced and harmonious environment, making them great for home decor and spiritual practices.\u003c\/li\u003e\n\u003cli\u003e\n\u003cstrong\u003eObelisks\u003c\/strong\u003e- Inspired by ancient structures, crystal obelisks are believed to connect earthly and spiritual energies, making them powerful tools for transformation and enlightenment.\u003c\/li\u003e\n\u003c\/ul\u003e\n\u003cp\u003eNo matter what you call them, these crystals serve the same purpose—to enhance energy, intention, and harmony in your space. Choose the one that resonates most with you!\u003c\/p\u003e","published_at":"2025-12-09T17:11:45-05:00","created_at":"2025-12-09T14:38:23-05:00","vendor":"Ali","type":"Towers","tags":["adjusted-shipping","crystal","home-crystals","new-arrivals","Towers"],"price":1199,"price_min":1199,"price_max":6999,"available":true,"price_varies":true,"compare_at_price":0,"compare_at_price_min":0,"compare_at_price_max":0,"compare_at_price_varies":false,"variants":[{"id":45941104115883,"title":"Selenite Height 60mm","option1":"Selenite Height 60mm","option2":null,"option3":null,"sku":"1005004899330363-A Height 6cm","requires_shipping":true,"taxable":true,"featured_image":{"id":40921471582379,"product_id":8603309506731,"position":8,"created_at":"2025-12-09T14:38:24-05:00","updated_at":"2025-12-23T00:09:06-05:00","alt":"Himalayan Selenite Crystal Tower (Lighting Available)-Towers-Ali-Selenite Height 60mm-Crystal Destiny","width":1000,"height":1000,"src":"\/\/crystaldestiny.com\/cdn\/shop\/files\/Himalayan-Selenite-Crystal-Tower-Lighting-Available-Towers-Selenite-Height-60mm-8.webp?v=1766466546","variant_ids":[45941104083115,45941104115883,45941104181419]},"available":true,"name":"Himalayan Selenite Crystal Tower (Lighting Available) - Selenite Height 60mm","public_title":"Selenite Height 60mm","options":["Selenite Height 60mm"],"price":1599,"weight":230,"compare_at_price":0,"inventory_management":"shopify","barcode":null,"featured_media":{"alt":"Himalayan Selenite Crystal Tower (Lighting Available)-Towers-Ali-Selenite Height 60mm-Crystal Destiny","id":32289039614123,"position":8,"preview_image":{"aspect_ratio":1.0,"height":1000,"width":1000,"src":"\/\/crystaldestiny.com\/cdn\/shop\/files\/Himalayan-Selenite-Crystal-Tower-Lighting-Available-Towers-Selenite-Height-60mm-8.webp?v=1766466546"}},"requires_selling_plan":false,"selling_plan_allocations":[]},{"id":45941104083115,"title":"Selenite Height 100mm","option1":"Selenite Height 100mm","option2":null,"option3":null,"sku":"1005004899330363-B Height 10cm","requires_shipping":true,"taxable":true,"featured_image":{"id":40921471582379,"product_id":8603309506731,"position":8,"created_at":"2025-12-09T14:38:24-05:00","updated_at":"2025-12-23T00:09:06-05:00","alt":"Himalayan Selenite Crystal Tower (Lighting Available)-Towers-Ali-Selenite Height 60mm-Crystal Destiny","width":1000,"height":1000,"src":"\/\/crystaldestiny.com\/cdn\/shop\/files\/Himalayan-Selenite-Crystal-Tower-Lighting-Available-Towers-Selenite-Height-60mm-8.webp?v=1766466546","variant_ids":[45941104083115,45941104115883,45941104181419]},"available":true,"name":"Himalayan Selenite Crystal Tower (Lighting Available) - Selenite Height 100mm","public_title":"Selenite Height 100mm","options":["Selenite Height 100mm"],"price":3099,"weight":230,"compare_at_price":0,"inventory_management":"shopify","barcode":null,"featured_media":{"alt":"Himalayan Selenite Crystal Tower (Lighting Available)-Towers-Ali-Selenite Height 60mm-Crystal Destiny","id":32289039614123,"position":8,"preview_image":{"aspect_ratio":1.0,"height":1000,"width":1000,"src":"\/\/crystaldestiny.com\/cdn\/shop\/files\/Himalayan-Selenite-Crystal-Tower-Lighting-Available-Towers-Selenite-Height-60mm-8.webp?v=1766466546"}},"requires_selling_plan":false,"selling_plan_allocations":[]},{"id":45941104181419,"title":"Selenite Height 150mm","option1":"Selenite Height 150mm","option2":null,"option3":null,"sku":"1005004899330363-C Height 15cm","requires_shipping":true,"taxable":true,"featured_image":{"id":40921471582379,"product_id":8603309506731,"position":8,"created_at":"2025-12-09T14:38:24-05:00","updated_at":"2025-12-23T00:09:06-05:00","alt":"Himalayan Selenite Crystal Tower (Lighting Available)-Towers-Ali-Selenite Height 60mm-Crystal Destiny","width":1000,"height":1000,"src":"\/\/crystaldestiny.com\/cdn\/shop\/files\/Himalayan-Selenite-Crystal-Tower-Lighting-Available-Towers-Selenite-Height-60mm-8.webp?v=1766466546","variant_ids":[45941104083115,45941104115883,45941104181419]},"available":true,"name":"Himalayan Selenite Crystal Tower (Lighting Available) - Selenite Height 150mm","public_title":"Selenite Height 150mm","options":["Selenite Height 150mm"],"price":6999,"weight":230,"compare_at_price":0,"inventory_management":"shopify","barcode":null,"featured_media":{"alt":"Himalayan Selenite Crystal Tower (Lighting Available)-Towers-Ali-Selenite Height 60mm-Crystal Destiny","id":32289039614123,"position":8,"preview_image":{"aspect_ratio":1.0,"height":1000,"width":1000,"src":"\/\/crystaldestiny.com\/cdn\/shop\/files\/Himalayan-Selenite-Crystal-Tower-Lighting-Available-Towers-Selenite-Height-60mm-8.webp?v=1766466546"}},"requires_selling_plan":false,"selling_plan_allocations":[]},{"id":45941104050347,"title":"Warm Light Base","option1":"Warm Light Base","option2":null,"option3":null,"sku":"1005004899330363-warm light","requires_shipping":true,"taxable":true,"featured_image":{"id":40921471549611,"product_id":8603309506731,"position":6,"created_at":"2025-12-09T14:38:24-05:00","updated_at":"2025-12-10T11:19:55-05:00","alt":"Himalayan Selenite Crystal Tower (Lighting Available)-Towers-Ali-Warm Light Base-Crystal Destiny","width":800,"height":800,"src":"\/\/crystaldestiny.com\/cdn\/shop\/files\/Himalayan-Selenite-Crystal-Tower-Lighting-Available-Towers-Warm-Light-Base-6.webp?v=1765383595","variant_ids":[45941104050347]},"available":true,"name":"Himalayan Selenite Crystal Tower (Lighting Available) - Warm Light Base","public_title":"Warm Light Base","options":["Warm Light Base"],"price":1299,"weight":230,"compare_at_price":0,"inventory_management":"shopify","barcode":null,"featured_media":{"alt":"Himalayan Selenite Crystal Tower (Lighting Available)-Towers-Ali-Warm Light Base-Crystal Destiny","id":32289039581355,"position":6,"preview_image":{"aspect_ratio":1.0,"height":800,"width":800,"src":"\/\/crystaldestiny.com\/cdn\/shop\/files\/Himalayan-Selenite-Crystal-Tower-Lighting-Available-Towers-Warm-Light-Base-6.webp?v=1765383595"}},"requires_selling_plan":false,"selling_plan_allocations":[]},{"id":45941104148651,"title":"Colored Light Base","option1":"Colored Light Base","option2":null,"option3":null,"sku":"1005004899330363-colored light","requires_shipping":true,"taxable":true,"featured_image":{"id":40921471647915,"product_id":8603309506731,"position":7,"created_at":"2025-12-09T14:38:24-05:00","updated_at":"2025-12-10T11:19:56-05:00","alt":"Himalayan Selenite Crystal Tower (Lighting Available)-Towers-Ali-Colored Light Base-Crystal Destiny","width":800,"height":800,"src":"\/\/crystaldestiny.com\/cdn\/shop\/files\/Himalayan-Selenite-Crystal-Tower-Lighting-Available-Towers-Colored-Light-Base-7.webp?v=1765383596","variant_ids":[45941104148651]},"available":true,"name":"Himalayan Selenite Crystal Tower (Lighting Available) - Colored Light Base","public_title":"Colored Light Base","options":["Colored Light Base"],"price":1199,"weight":230,"compare_at_price":0,"inventory_management":"shopify","barcode":null,"featured_media":{"alt":"Himalayan Selenite Crystal Tower (Lighting Available)-Towers-Ali-Colored Light Base-Crystal Destiny","id":32289039679659,"position":7,"preview_image":{"aspect_ratio":1.0,"height":800,"width":800,"src":"\/\/crystaldestiny.com\/cdn\/shop\/files\/Himalayan-Selenite-Crystal-Tower-Lighting-Available-Towers-Colored-Light-Base-7.webp?v=1765383596"}},"requires_selling_plan":false,"selling_plan_allocations":[]}],"images":["\/\/crystaldestiny.com\/cdn\/shop\/files\/Himalayan-Selenite-Crystal-Tower-Lighting-Available-Towers.webp?v=1765383587","\/\/crystaldestiny.com\/cdn\/shop\/files\/Himalayan-Selenite-Crystal-Tower-Lighting-Available-Towers-2.webp?v=1765383589","\/\/crystaldestiny.com\/cdn\/shop\/files\/Himalayan-Selenite-Crystal-Tower-Lighting-Available-Towers-3.webp?v=1765383590","\/\/crystaldestiny.com\/cdn\/shop\/files\/Himalayan-Selenite-Crystal-Tower-Lighting-Available-Towers-4.webp?v=1765383592","\/\/crystaldestiny.com\/cdn\/shop\/files\/Himalayan-Selenite-Crystal-Tower-Lighting-Available-Towers-5.webp?v=1765383593","\/\/crystaldestiny.com\/cdn\/shop\/files\/Himalayan-Selenite-Crystal-Tower-Lighting-Available-Towers-Warm-Light-Base-6.webp?v=1765383595","\/\/crystaldestiny.com\/cdn\/shop\/files\/Himalayan-Selenite-Crystal-Tower-Lighting-Available-Towers-Colored-Light-Base-7.webp?v=1765383596","\/\/crystaldestiny.com\/cdn\/shop\/files\/Himalayan-Selenite-Crystal-Tower-Lighting-Available-Towers-Selenite-Height-60mm-8.webp?v=1766466546"],"featured_image":"\/\/crystaldestiny.com\/cdn\/shop\/files\/Himalayan-Selenite-Crystal-Tower-Lighting-Available-Towers.webp?v=1765383587","options":["Material"],"media":[{"alt":"Himalayan Selenite Crystal Tower (Lighting Available)-Towers-Ali-Selenite Height 60mm-Crystal Destiny","id":32289039384747,"position":1,"preview_image":{"aspect_ratio":1.0,"height":800,"width":800,"src":"\/\/crystaldestiny.com\/cdn\/shop\/files\/Himalayan-Selenite-Crystal-Tower-Lighting-Available-Towers.webp?v=1765383587"},"aspect_ratio":1.0,"height":800,"media_type":"image","src":"\/\/crystaldestiny.com\/cdn\/shop\/files\/Himalayan-Selenite-Crystal-Tower-Lighting-Available-Towers.webp?v=1765383587","width":800},{"alt":"Himalayan Selenite Crystal Tower (Lighting Available)-Towers-Ali-Selenite Height 60mm-Crystal Destiny","id":32289039417515,"position":2,"preview_image":{"aspect_ratio":1.0,"height":1000,"width":1000,"src":"\/\/crystaldestiny.com\/cdn\/shop\/files\/Himalayan-Selenite-Crystal-Tower-Lighting-Available-Towers-2.webp?v=1765383589"},"aspect_ratio":1.0,"height":1000,"media_type":"image","src":"\/\/crystaldestiny.com\/cdn\/shop\/files\/Himalayan-Selenite-Crystal-Tower-Lighting-Available-Towers-2.webp?v=1765383589","width":1000},{"alt":"Himalayan Selenite Crystal Tower (Lighting Available)-Towers-Ali-Selenite Height 60mm-Crystal Destiny","id":32289039450283,"position":3,"preview_image":{"aspect_ratio":1.0,"height":1000,"width":1000,"src":"\/\/crystaldestiny.com\/cdn\/shop\/files\/Himalayan-Selenite-Crystal-Tower-Lighting-Available-Towers-3.webp?v=1765383590"},"aspect_ratio":1.0,"height":1000,"media_type":"image","src":"\/\/crystaldestiny.com\/cdn\/shop\/files\/Himalayan-Selenite-Crystal-Tower-Lighting-Available-Towers-3.webp?v=1765383590","width":1000},{"alt":"Himalayan Selenite Crystal Tower (Lighting Available)-Towers-Ali-Selenite Height 60mm-Crystal Destiny","id":32289039515819,"position":4,"preview_image":{"aspect_ratio":1.0,"height":1000,"width":1000,"src":"\/\/crystaldestiny.com\/cdn\/shop\/files\/Himalayan-Selenite-Crystal-Tower-Lighting-Available-Towers-4.webp?v=1765383592"},"aspect_ratio":1.0,"height":1000,"media_type":"image","src":"\/\/crystaldestiny.com\/cdn\/shop\/files\/Himalayan-Selenite-Crystal-Tower-Lighting-Available-Towers-4.webp?v=1765383592","width":1000},{"alt":"Himalayan Selenite Crystal Tower (Lighting Available)-Towers-Ali-Selenite Height 60mm-Crystal Destiny","id":32289039548587,"position":5,"preview_image":{"aspect_ratio":1.0,"height":1000,"width":1000,"src":"\/\/crystaldestiny.com\/cdn\/shop\/files\/Himalayan-Selenite-Crystal-Tower-Lighting-Available-Towers-5.webp?v=1765383593"},"aspect_ratio":1.0,"height":1000,"media_type":"image","src":"\/\/crystaldestiny.com\/cdn\/shop\/files\/Himalayan-Selenite-Crystal-Tower-Lighting-Available-Towers-5.webp?v=1765383593","width":1000},{"alt":"Himalayan Selenite Crystal Tower (Lighting Available)-Towers-Ali-Warm Light Base-Crystal Destiny","id":32289039581355,"position":6,"preview_image":{"aspect_ratio":1.0,"height":800,"width":800,"src":"\/\/crystaldestiny.com\/cdn\/shop\/files\/Himalayan-Selenite-Crystal-Tower-Lighting-Available-Towers-Warm-Light-Base-6.webp?v=1765383595"},"aspect_ratio":1.0,"height":800,"media_type":"image","src":"\/\/crystaldestiny.com\/cdn\/shop\/files\/Himalayan-Selenite-Crystal-Tower-Lighting-Available-Towers-Warm-Light-Base-6.webp?v=1765383595","width":800},{"alt":"Himalayan Selenite Crystal Tower (Lighting Available)-Towers-Ali-Colored Light Base-Crystal Destiny","id":32289039679659,"position":7,"preview_image":{"aspect_ratio":1.0,"height":800,"width":800,"src":"\/\/crystaldestiny.com\/cdn\/shop\/files\/Himalayan-Selenite-Crystal-Tower-Lighting-Available-Towers-Colored-Light-Base-7.webp?v=1765383596"},"aspect_ratio":1.0,"height":800,"media_type":"image","src":"\/\/crystaldestiny.com\/cdn\/shop\/files\/Himalayan-Selenite-Crystal-Tower-Lighting-Available-Towers-Colored-Light-Base-7.webp?v=1765383596","width":800},{"alt":"Himalayan Selenite Crystal Tower (Lighting Available)-Towers-Ali-Selenite Height 60mm-Crystal Destiny","id":32289039614123,"position":8,"preview_image":{"aspect_ratio":1.0,"height":1000,"width":1000,"src":"\/\/crystaldestiny.com\/cdn\/shop\/files\/Himalayan-Selenite-Crystal-Tower-Lighting-Available-Towers-Selenite-Height-60mm-8.webp?v=1766466546"},"aspect_ratio":1.0,"height":1000,"media_type":"image","src":"\/\/crystaldestiny.com\/cdn\/shop\/files\/Himalayan-Selenite-Crystal-Tower-Lighting-Available-Towers-Selenite-Height-60mm-8.webp?v=1766466546","width":1000}],"requires_selling_plan":false,"selling_plan_groups":[],"content":"\u003cp data-start=\"171\" data-end=\"424\"\u003eThis Himalayan Selenite Crystal Tower showcases natural, translucent layers polished into a sleek skyscraper shape. Its luminous white glow makes it a captivating centerpiece for meditation spaces, home décor, or energy work.\u003c\/p\u003e\n\u003cp data-start=\"426\" data-end=\"740\"\u003eSelenite is prized for its cleansing and harmonizing properties, promoting mental clarity, peace, and energetic balance. This tower is ideal for Reiki healing, crystal grids, or as a decorative piece that elevates any environment. Collectors and spiritual seekers value its natural elegance and calming presence.\u003c\/p\u003e\n\u003cp data-start=\"426\" data-end=\"740\"\u003eThis product is pulled at random by size.\u003c\/p\u003e\n\u003ch2\u003eCrystal Towers, Wands, Generators, Points, Pillars \u0026amp; Obelisks — What's the Difference?\u003c\/h2\u003e\n\u003cp id=\"isPasted\"\u003eWhile these terms may vary, they all describe beautifully shaped crystals with a pointed tip designed to channel and direct energy. Each name highlights a unique aspect of their use:\u003c\/p\u003e\n\u003cul\u003e\n\u003cli\u003e\n\u003cstrong\u003eTowers\u003c\/strong\u003e- Known for their steady, grounding presence, crystal towers help focus and amplify energy, making them perfect for meditation and manifestation.\u003c\/li\u003e\n\u003cli\u003e\n\u003cstrong\u003eWands\u003c\/strong\u003e- Traditionally used in energy work and healing, crystal wands are excellent for directing energy flow and clearing blockages.\u003c\/li\u003e\n\u003cli\u003e\n\u003cstrong\u003ePillars\u003c\/strong\u003e- Symbolizing strength and stability, crystal pillars create a balanced and harmonious environment, making them great for home decor and spiritual practices.\u003c\/li\u003e\n\u003cli\u003e\n\u003cstrong\u003eObelisks\u003c\/strong\u003e- Inspired by ancient structures, crystal obelisks are believed to connect earthly and spiritual energies, making them powerful tools for transformation and enlightenment.\u003c\/li\u003e\n\u003c\/ul\u003e\n\u003cp\u003eNo matter what you call them, these crystals serve the same purpose—to enhance energy, intention, and harmony in your space. Choose the one that resonates most with you!\u003c\/p\u003e"},"options":[{"name":"Material","position":1,"values":["Selenite Height 60mm","Selenite Height 100mm","Selenite Height 150mm","Warm Light Base","Colored Light Base"]}],"custom_metafields":{"shipping_time":"12-16 days"},"metafields":{"badge":"\u003cdiv style='display:none' class='jdgm-prev-badge' data-average-rating='5.00' data-number-of-reviews='1' data-number-of-questions='0'\u003e \u003cspan class='jdgm-prev-badge__stars' data-score='5.00' tabindex='0' aria-label='5.00 stars' role='button'\u003e \u003cspan class='jdgm-star jdgm--on'\u003e\u003c\/span\u003e\u003cspan class='jdgm-star jdgm--on'\u003e\u003c\/span\u003e\u003cspan class='jdgm-star jdgm--on'\u003e\u003c\/span\u003e\u003cspan class='jdgm-star jdgm--on'\u003e\u003c\/span\u003e\u003cspan class='jdgm-star jdgm--on'\u003e\u003c\/span\u003e \u003c\/span\u003e \u003cspan class='jdgm-prev-badge__text'\u003e 1 review \u003c\/span\u003e \u003c\/div\u003e","widget":"\u003cdiv class='jdgm-rev-widg' data-updated-at='2026-01-03T00:03:02Z' data-average-rating='5.00' data-number-of-reviews='1' data-number-of-questions='0' data-image-url='https:\/\/cdn.shopify.com\/s\/files\/1\/0613\/0345\/5915\/files\/Himalayan-Selenite-Crystal-Tower-Lighting-Available-Towers.webp?v=1765383587'\u003e \u003cstyle class='jdgm-temp-hiding-style'\u003e.jdgm-rev-widg{ display: none }\u003c\/style\u003e \u003cdiv class='jdgm-rev-widg__header'\u003e \u003ch2 class='jdgm-rev-widg__title'\u003eCustomer Reviews\u003c\/h2\u003e \u003cdiv class='jdgm-rev-widg__summary'\u003e \u003cdiv class='jdgm-rev-widg__summary-stars' aria-label='Average rating is 5.00 stars' role='img'\u003e \u003cspan class='jdgm-star jdgm--on'\u003e\u003c\/span\u003e\u003cspan class='jdgm-star jdgm--on'\u003e\u003c\/span\u003e\u003cspan class='jdgm-star jdgm--on'\u003e\u003c\/span\u003e\u003cspan class='jdgm-star jdgm--on'\u003e\u003c\/span\u003e\u003cspan class='jdgm-star jdgm--on'\u003e\u003c\/span\u003e \u003c\/div\u003e \u003cdiv class='jdgm-rev-widg__summary-text'\u003eBased on 1 review\u003c\/div\u003e \u003c\/div\u003e \u003ca style='display: none' href='#' class='jdgm-write-rev-link' role='button'\u003eWrite a review\u003c\/a\u003e \u003cdiv class='jdgm-histogram jdgm-temp-hidden'\u003e \u003cdiv class='jdgm-histogram__row' data-rating='5' data-frequency='1' data-percentage='100'\u003e \u003cdiv class='jdgm-histogram__star' role='button' aria-label=\"100% (1) reviews with 5 star rating\" tabindex='0' \u003e\u003cspan class='jdgm-star jdgm--on'\u003e\u003c\/span\u003e\u003cspan class='jdgm-star jdgm--on'\u003e\u003c\/span\u003e\u003cspan class='jdgm-star jdgm--on'\u003e\u003c\/span\u003e\u003cspan class='jdgm-star jdgm--on'\u003e\u003c\/span\u003e\u003cspan class='jdgm-star jdgm--on'\u003e\u003c\/span\u003e\u003c\/div\u003e \u003cdiv class='jdgm-histogram__bar'\u003e \u003cdiv class='jdgm-histogram__bar-content' style='width: 100%;'\u003e \u003c\/div\u003e \u003c\/div\u003e \u003cdiv class='jdgm-histogram__percentage'\u003e100%\u003c\/div\u003e \u003cdiv class='jdgm-histogram__frequency'\u003e(1)\u003c\/div\u003e \u003c\/div\u003e \u003cdiv class='jdgm-histogram__row' data-rating='4' data-frequency='0' data-percentage='0'\u003e \u003cdiv class='jdgm-histogram__star' role='button' aria-label=\"0% (0) reviews with 4 star rating\" tabindex='0' \u003e\u003cspan class='jdgm-star jdgm--on'\u003e\u003c\/span\u003e\u003cspan class='jdgm-star jdgm--on'\u003e\u003c\/span\u003e\u003cspan class='jdgm-star jdgm--on'\u003e\u003c\/span\u003e\u003cspan class='jdgm-star jdgm--on'\u003e\u003c\/span\u003e\u003cspan class='jdgm-star jdgm--off'\u003e\u003c\/span\u003e\u003c\/div\u003e \u003cdiv class='jdgm-histogram__bar'\u003e \u003cdiv class='jdgm-histogram__bar-content' style='width: 0%;'\u003e \u003c\/div\u003e \u003c\/div\u003e \u003cdiv class='jdgm-histogram__percentage'\u003e0%\u003c\/div\u003e \u003cdiv class='jdgm-histogram__frequency'\u003e(0)\u003c\/div\u003e \u003c\/div\u003e \u003cdiv class='jdgm-histogram__row' data-rating='3' data-frequency='0' data-percentage='0'\u003e \u003cdiv class='jdgm-histogram__star' role='button' aria-label=\"0% (0) reviews with 3 star rating\" tabindex='0' \u003e\u003cspan class='jdgm-star jdgm--on'\u003e\u003c\/span\u003e\u003cspan class='jdgm-star jdgm--on'\u003e\u003c\/span\u003e\u003cspan class='jdgm-star jdgm--on'\u003e\u003c\/span\u003e\u003cspan class='jdgm-star jdgm--off'\u003e\u003c\/span\u003e\u003cspan class='jdgm-star jdgm--off'\u003e\u003c\/span\u003e\u003c\/div\u003e \u003cdiv class='jdgm-histogram__bar'\u003e \u003cdiv class='jdgm-histogram__bar-content' style='width: 0%;'\u003e \u003c\/div\u003e \u003c\/div\u003e \u003cdiv class='jdgm-histogram__percentage'\u003e0%\u003c\/div\u003e \u003cdiv class='jdgm-histogram__frequency'\u003e(0)\u003c\/div\u003e \u003c\/div\u003e \u003cdiv class='jdgm-histogram__row' data-rating='2' data-frequency='0' data-percentage='0'\u003e \u003cdiv class='jdgm-histogram__star' role='button' aria-label=\"0% (0) reviews with 2 star rating\" tabindex='0' \u003e\u003cspan class='jdgm-star jdgm--on'\u003e\u003c\/span\u003e\u003cspan class='jdgm-star jdgm--on'\u003e\u003c\/span\u003e\u003cspan class='jdgm-star jdgm--off'\u003e\u003c\/span\u003e\u003cspan class='jdgm-star jdgm--off'\u003e\u003c\/span\u003e\u003cspan class='jdgm-star jdgm--off'\u003e\u003c\/span\u003e\u003c\/div\u003e \u003cdiv class='jdgm-histogram__bar'\u003e \u003cdiv class='jdgm-histogram__bar-content' style='width: 0%;'\u003e \u003c\/div\u003e \u003c\/div\u003e \u003cdiv class='jdgm-histogram__percentage'\u003e0%\u003c\/div\u003e \u003cdiv class='jdgm-histogram__frequency'\u003e(0)\u003c\/div\u003e \u003c\/div\u003e \u003cdiv class='jdgm-histogram__row' data-rating='1' data-frequency='0' data-percentage='0'\u003e \u003cdiv class='jdgm-histogram__star' role='button' aria-label=\"0% (0) reviews with 1 star rating\" tabindex='0' \u003e\u003cspan class='jdgm-star jdgm--on'\u003e\u003c\/span\u003e\u003cspan class='jdgm-star jdgm--off'\u003e\u003c\/span\u003e\u003cspan class='jdgm-star jdgm--off'\u003e\u003c\/span\u003e\u003cspan class='jdgm-star jdgm--off'\u003e\u003c\/span\u003e\u003cspan class='jdgm-star jdgm--off'\u003e\u003c\/span\u003e\u003c\/div\u003e \u003cdiv class='jdgm-histogram__bar'\u003e \u003cdiv class='jdgm-histogram__bar-content' style='width: 0%;'\u003e \u003c\/div\u003e \u003c\/div\u003e \u003cdiv class='jdgm-histogram__percentage'\u003e0%\u003c\/div\u003e \u003cdiv class='jdgm-histogram__frequency'\u003e(0)\u003c\/div\u003e \u003c\/div\u003e \u003cdiv class='jdgm-histogram__row jdgm-histogram__clear-filter' data-rating=null tabindex='0'\u003e\u003c\/div\u003e \u003c\/div\u003e \u003cdiv class='jdgm-rev-widg__sort-wrapper'\u003e\u003c\/div\u003e \u003c\/div\u003e \u003cdiv class='jdgm-rev-widg__body'\u003e \u003cdiv class='jdgm-rev-widg__reviews'\u003e\u003cdiv class='jdgm-rev jdgm-divider-top' data-verified-buyer='true' data-review-id='e8e589e9-1a83-52ab-9c39-4a6d3f907743' data-review-language='en' data-product-title='Himalayan Selenite Crystal Tower (Lighting Available)' data-product-url='\/products\/himalayan-selenite-crystal-tower-lighting-available-1005004899330363-a-height-6cm' data-thumb-up-count='0' data-thumb-down-count='0'\u003e \u003cdiv class='jdgm-rev__header'\u003e \u003cdiv class='jdgm-rev__icon' \u003e N \u003c\/div\u003e \u003cspan class='jdgm-rev__rating' data-score='5' tabindex='0' aria-label='5 star review' role='img'\u003e \u003cspan class='jdgm-star jdgm--on'\u003e\u003c\/span\u003e\u003cspan class='jdgm-star jdgm--on'\u003e\u003c\/span\u003e\u003cspan class='jdgm-star jdgm--on'\u003e\u003c\/span\u003e\u003cspan class='jdgm-star jdgm--on'\u003e\u003c\/span\u003e\u003cspan class='jdgm-star jdgm--on'\u003e\u003c\/span\u003e \u003c\/span\u003e \u003cspan class='jdgm-rev__timestamp jdgm-spinner' data-content='2026-01-02 23:16:43 UTC'\u003e\u003c\/span\u003e \u003cdiv class='jdgm-rev__br'\u003e\u003c\/div\u003e \u003cspan class='jdgm-rev__buyer-badge-wrapper'\u003e \u003cspan class='jdgm-rev__buyer-badge'\u003e\u003c\/span\u003e \u003c\/span\u003e \u003cspan class='jdgm-rev__author-wrapper'\u003e \u003cspan class='jdgm-rev__author'\u003eNathan\u003c\/span\u003e \u003cspan class='jdgm-rev__location' \u003e \u003c\/span\u003e \u003cspan class='jdgm-rev__source' data-source=\"shop-app\"\u003e\u003c\/span\u003e \u003c\/span\u003e \u003c\/div\u003e \u003cdiv class='jdgm-rev__content'\u003e \u003cdiv class='jdgm-rev__custom-form'\u003e \u003c\/div\u003e \u003cb class='jdgm-rev__title'\u003e\u003c\/b\u003e \u003cdiv class='jdgm-rev__body'\u003e\u003cp\u003eLove it,but don't get the lite..\u003c\/p\u003e\u003c\/div\u003e \u003cdiv class='jdgm-rev__pics'\u003e \u003c\/div\u003e \u003cdiv class='jdgm-rev__vids'\u003e \u003c\/div\u003e \u003cdiv class='jdgm-rev__transparency-badge-wrapper'\u003e \u003cdiv class='jdgm-rev__transparency-badge' data-badge-type=review_written_in_shop_app\u003e\u003c\/div\u003e \u003c\/div\u003e \u003c\/div\u003e \u003cdiv class='jdgm-rev__actions'\u003e \u003cdiv class='jdgm-rev__social'\u003e\u003c\/div\u003e \u003cdiv class='jdgm-rev__votes'\u003e\u003c\/div\u003e \u003c\/div\u003e \u003cdiv class='jdgm-rev__reply'\u003e \u003cdiv class='jdgm-rev__replier-wrapper'\u003e \u003cb class='jdgm-rev__replier'\u003e\u003c\/b\u003e \u003c\/div\u003e \u003cdiv class='jdgm-rev__reply-content'\u003e\u003cp\u003eHi Nathan, \u003c\/p\u003e\n\n\u003cp\u003eThank you for your order… You didn’t order a light for it, there were options on the product page to add either a white or a multicolor light. If you want to order a light let me know via email and I will give you a free shipping coupon so you won’t have to pay twice for shipping. \u003c\/p\u003e\n\n\u003cp\u003eSadly the SHOP shopping experience Isn’t as robust as shopping directly on the website, it’s missing a lot of the experience and visual assets of my website.\u003c\/p\u003e\u003c\/div\u003e \u003c\/div\u003e \u003c\/div\u003e\u003c\/div\u003e \u003cdiv class='jdgm-paginate' data-per-page='4' data-url='https:\/\/api.judge.me\/reviews\/reviews_for_widget' style=\"display: none;\"\u003e\u003c\/div\u003e \u003c\/div\u003e \u003cdiv class='jdgm-rev-widg__paginate-spinner-wrapper'\u003e \u003cdiv class='jdgm-spinner'\u003e\u003c\/div\u003e \u003c\/div\u003e \u003c\/div\u003e"},"collections":[{"id":294880051371,"handle":"crystals","title":"Crystals","updated_at":"2026-01-07T23:43:11-05:00","body_html":"\u003cp data-start=\"159\" data-end=\"687\"\u003e✨ \u003cstrong data-start=\"161\" data-end=\"216\"\u003eDiscover the Magic of Crystals with Crystal Destiny\u003c\/strong\u003e ✨\u003cbr data-start=\"218\" data-end=\"221\"\u003eCrystals have been treasured for centuries—not only for their natural beauty but also for their powerful healing energies. Beyond their visual allure, they bring balance, harmony, and positive energy into any space. Whether used for home décor, meditation, or simply to elevate the energy of your surroundings, crystals create a sanctuary of peace, relaxation, and well-being. Each piece is a unique gift from the Earth—visually stunning and spiritually uplifting.\u003c\/p\u003e\n\u003cp data-start=\"689\" data-end=\"1011\"\u003eAt \u003cstrong data-start=\"692\" data-end=\"711\"\u003eCrystal Destiny\u003c\/strong\u003e, our signature collection showcases a curated selection of exquisite crystals, from radiant Quartz to soothing Amethyst. Every stone is carefully sourced for its elegance and metaphysical resonance, making them perfect for enhancing your home, uplifting your spirit, or gifting to someone special.\u003c\/p\u003e\n\u003cp data-start=\"1013\" data-end=\"1206\"\u003eExperience the timeless sophistication of crystalline wonders. Explore the \u003cstrong data-start=\"1088\" data-end=\"1118\"\u003eCrystal Destiny Collection\u003c\/strong\u003e today and bring the transformative beauty of these treasures into your everyday life.\u003c\/p\u003e","published_at":"2023-06-05T11:24:02-04:00","sort_order":"created-desc","template_suffix":"","disjunctive":false,"rules":[{"column":"tag","relation":"equals","condition":"crystal"},{"column":"type","relation":"not_contains","condition":"925 Sterling Silver"},{"column":"type","relation":"not_contains","condition":"Wire Wraps"}],"published_scope":"global"},{"id":319455756459,"handle":"crown-chakra-crystals","title":"Crown Chakra Crystals","updated_at":"2026-01-07T23:42:38-05:00","body_html":"\u003cp data-start=\"144\" data-end=\"515\"\u003e✨ \u003cstrong data-start=\"146\" data-end=\"171\"\u003eCrown Chakra Crystals\u003c\/strong\u003e ✨\u003cbr data-start=\"173\" data-end=\"176\"\u003eConnect with higher consciousness and spiritual insight with our \u003cstrong data-start=\"241\" data-end=\"266\"\u003eCrown Chakra Crystals\u003c\/strong\u003e. Located at the top of the head, the Crown Chakra governs wisdom, enlightenment, and your connection to the divine. These crystals help open and balance this energy center, fostering clarity, spiritual growth, and a sense of universal connection.\u003c\/p\u003e\n\u003cp data-start=\"517\" data-end=\"851\"\u003eOur selection includes powerful stones such as Amethyst, Clear Quartz, Selenite, and Lepidolite—each chosen for their ability to enhance meditation, energy work, and mindful practices. Whether placed in your sacred space, carried with you, or worn as jewelry, Crown Chakra Crystals promote harmony, insight, and spiritual alignment.\u003c\/p\u003e\n\u003cp data-start=\"853\" data-end=\"1007\"\u003eElevate your consciousness, deepen your meditative practice, and embrace the transformative energy of the Crown Chakra with these illuminating crystals.\u003c\/p\u003e","published_at":"2025-07-17T18:16:11-04:00","sort_order":"best-selling","template_suffix":"","disjunctive":false,"rules":[{"column":"variant_metafield_definition","relation":"equals","condition":"Crown"}],"published_scope":"global","image":{"created_at":"2025-07-17T19:09:11-04:00","alt":null,"width":1080,"height":1080,"src":"\/\/crystaldestiny.com\/cdn\/shop\/collections\/Crown_Chakra_Collection.jpg?v=1762474922"}},{"id":319455789227,"handle":"third-eye-chakra-crystals","title":"Third Eye Chakra Crystals","updated_at":"2026-01-07T23:42:38-05:00","body_html":"\u003cp data-start=\"124\" data-end=\"474\"\u003e✨ \u003cstrong data-start=\"126\" data-end=\"155\"\u003eThird Eye Chakra Crystals\u003c\/strong\u003e ✨\u003cbr data-start=\"157\" data-end=\"160\"\u003eAwaken intuition, clarity, and insight with our \u003cstrong data-start=\"208\" data-end=\"237\"\u003eThird Eye Chakra Crystals\u003c\/strong\u003e. Located between the eyebrows, the Third Eye Chakra governs perception, intuition, and inner wisdom. These crystals help balance and activate this energy center, promoting mental clarity, spiritual awareness, and heightened intuition.\u003c\/p\u003e\n\u003cp data-start=\"476\" data-end=\"835\"\u003eOur curated selection features stones such as Amethyst, Lapis Lazuli, and Sodalite—chosen for their ability to enhance meditation, intuitive practices, and energy work. Whether placed in your sacred space, carried with you, or worn as jewelry, Third Eye Chakra Crystals support mental focus, spiritual growth, and a deeper connection to your inner guidance.\u003c\/p\u003e\n\u003cp data-start=\"837\" data-end=\"976\"\u003eElevate your intuition, expand your awareness, and embrace the transformative power of the Third Eye Chakra with these powerful crystals.\u003c\/p\u003e","published_at":"2025-07-17T18:16:49-04:00","sort_order":"best-selling","template_suffix":"","disjunctive":false,"rules":[{"column":"variant_metafield_definition","relation":"equals","condition":"Third Eye"}],"published_scope":"global","image":{"created_at":"2025-07-17T19:09:01-04:00","alt":null,"width":1080,"height":1080,"src":"\/\/crystaldestiny.com\/cdn\/shop\/collections\/Third_Eye_Chakra_Collection.jpg?v=1762474924"}},{"id":322471624875,"handle":"crystal-favorites","title":"Crystal Enthusiast's Favorites","updated_at":"2026-01-07T23:42:38-05:00","body_html":"\u003cp\u003eDiscover the crystals our community loves most. This collection features our best-selling stones and accessories, carefully curated to highlight pieces that are always in demand and ready to ship. Whether you’re adding to your collection or searching for a gift, these fan-favorite crystals are timeless staples for energy, beauty, and balance.\u003c\/p\u003e","published_at":"2025-10-01T21:07:06-04:00","sort_order":"price-asc","template_suffix":"","disjunctive":false,"rules":[{"column":"variant_inventory","relation":"greater_than","condition":"1"}],"published_scope":"global"},{"id":321695744171,"handle":"direct-from-supplier","title":"Direct from Supplier","updated_at":"2026-01-07T23:43:11-05:00","body_html":"","published_at":"2025-09-12T16:38:23-04:00","sort_order":"best-selling","template_suffix":"","disjunctive":true,"rules":[{"column":"tag","relation":"equals","condition":"adjusted-shipping"}],"published_scope":"global"},{"id":293659312299,"handle":"best-sellers","title":"Best Sellers","updated_at":"2026-01-07T23:43:11-05:00","body_html":"\u003cp data-start=\"155\" data-end=\"510\"\u003eDiscover the pieces our community loves most. Our Best Sellers Collection brings together handpicked crystals and jewelry that embody timeless elegance, spiritual resonance, and everyday sophistication. Each item has earned its place as a customer favorite—celebrated for both its beauty and its meaningful energy.\u003c\/p\u003e\n\u003cp data-start=\"512\" data-end=\"802\"\u003eFrom stunning statement pieces to versatile daily companions, these treasures are curated to elevate your space, uplift your spirit, and reflect refined taste. Indulge in what’s most cherished and let our best sellers guide you toward the perfect blend of style and transformative energy.\u003c\/p\u003e\n\u003cp data-start=\"804\" data-end=\"932\"\u003eExplore the Best Sellers Collection today—where elegance meets intention, and every piece tells a story of beauty and balance.\u003c\/p\u003e","published_at":"2023-03-15T16:04:51-04:00","sort_order":"best-selling","template_suffix":"","disjunctive":false,"rules":[{"column":"variant_price","relation":"greater_than","condition":"0"},{"column":"variant_inventory","relation":"greater_than","condition":"0"},{"column":"type","relation":"not_equals","condition":"Shipping Protection"}],"published_scope":"global"},{"id":321370390699,"handle":"monthly-crystal-sale","title":"Monthly Crystal Sale | Spheres \u0026 Towers","updated_at":"2026-01-06T23:24:37-05:00","body_html":"\u003cp\u003eShop our \u003cstrong\u003eMonthly Crystal Sale\u003c\/strong\u003e, where you can shop a wide selection of healing crystals at discounted prices. Explore \u003cstrong\u003ecrystal spheres and towers,\u003c\/strong\u003e— all carefully curated to support meditation, energy balancing, and spiritual wellness. Whether you're looking to enhance your home decor, boost your daily energy, or find the perfect gift, our \u003cstrong\u003ecrystals for healing and manifestation\u003c\/strong\u003e offer both beauty and metaphysical benefits.\u003c\/p\u003e\n\u003cp\u003eEach month, our sale features \u003cstrong\u003enew discounted collections\u003c\/strong\u003e, from \u003cstrong\u003enatural quartz and amethyst towers\u003c\/strong\u003e to \u003cstrong\u003ewire-wrapped pendants and polished stones\u003c\/strong\u003e, so there's always something fresh to discover. Shop with confidence knowing you're getting high-quality crystals with \u003cstrong\u003efree shipping options\u003c\/strong\u003e and a trusted experience.\u003c\/p\u003e\n\u003cp\u003e\u003cstrong\u003eTake advantage of the Monthly Crystal Sale today\u003c\/strong\u003e and add powerful, natural energy to your life with \u003cstrong\u003eauthentic healing crystals\u003c\/strong\u003e — while our limited-time discounts last.\u003c\/p\u003e\n\u003cp\u003e\u003cstrong\u003e*Discount automatically applied at checkout.\u003c\/strong\u003e\u003c\/p\u003e","published_at":"2025-12-02T01:26:17-05:00","sort_order":"alpha-asc","template_suffix":"","disjunctive":true,"rules":[{"column":"tag","relation":"equals","condition":"spheres"},{"column":"tag","relation":"equals","condition":"Towers"}],"published_scope":"global","image":{"created_at":"2026-01-01T01:32:34-05:00","alt":"","width":960,"height":960,"src":"\/\/crystaldestiny.com\/cdn\/shop\/collections\/3E8C2969-1B86-4ACE-B349-98E9D8768424.jpg?v=1767249154"}},{"id":297906241707,"handle":"new-arrivals","title":"New Arrivals","updated_at":"2026-01-07T23:43:11-05:00","body_html":"\u003cp data-start=\"172\" data-end=\"573\"\u003e✨ \u003cstrong data-start=\"174\" data-end=\"217\"\u003eDiscover Crystal Destiny’s New Arrivals\u003c\/strong\u003e ✨\u003cbr data-start=\"219\" data-end=\"222\"\u003eStep into a world of fresh sophistication with our latest crystal treasures. Each new piece—whether Quartz, Amethyst, or beyond—embodies nature’s artistry, radiating both timeless beauty and powerful energy. Thoughtfully curated and constantly refreshed, our New Arrivals Collection offers the perfect harmony of elegance and metaphysical resonance.\u003c\/p\u003e\n\u003cp data-start=\"575\" data-end=\"793\"\u003eElevate your space, uplift your spirit, and embrace the transformative power of nature’s wonders. Explore the newest expressions of crystal artistry today, and let your journey with crystals evolve with every update.\u003c\/p\u003e","published_at":"2023-11-20T15:35:42-05:00","sort_order":"created-desc","template_suffix":"","disjunctive":true,"rules":[{"column":"tag","relation":"equals","condition":"new-arrivals"}],"published_scope":"global"},{"id":303374270635,"handle":"other-crystals","title":"Other Crystals","updated_at":"2026-01-06T23:24:24-05:00","body_html":"\u003cp data-start=\"138\" data-end=\"425\"\u003e✨ \u003cstrong data-start=\"140\" data-end=\"169\"\u003eOther Crystals Collection\u003c\/strong\u003e ✨\u003cbr data-start=\"171\" data-end=\"174\"\u003eExplore the diverse beauty and energy of crystals with our \u003cstrong data-start=\"233\" data-end=\"262\"\u003eOther Crystals Collection\u003c\/strong\u003e. This curated assortment features unique stones and rare finds that don’t fit into standard categories, offering something special for every crystal enthusiast.\u003c\/p\u003e\n\u003cp data-start=\"427\" data-end=\"716\"\u003ePerfect for collectors, meditation, energy work, or home décor, these crystals bring balance, inspiration, and metaphysical benefits to your space. From vibrant, eye-catching specimens to subtle, grounding stones, each piece is a testament to nature’s artistry and transformative energy.\u003c\/p\u003e\n\u003cp data-start=\"718\" data-end=\"894\"\u003eDiscover hidden treasures, expand your crystal collection, and embrace the limitless possibilities of \u003cstrong data-start=\"820\" data-end=\"838\"\u003eOther Crystals\u003c\/strong\u003e—each piece offering its own story, energy, and charm.\u003c\/p\u003e","published_at":"2024-04-16T11:40:21-04:00","sort_order":"created-desc","template_suffix":"","disjunctive":true,"rules":[{"column":"tag","relation":"equals","condition":"other"},{"column":"tag","relation":"equals","condition":"home-crystals"},{"column":"tag","relation":"equals","condition":"halloween"},{"column":"tag","relation":"equals","condition":"Holiday"},{"column":"tag","relation":"equals","condition":"ornament"}],"published_scope":"global"},{"id":297596059819,"handle":"all","title":"All Crystals \u0026 Jewelry","updated_at":"2026-01-07T23:43:11-05:00","body_html":"\u003cp data-start=\"149\" data-end=\"494\"\u003e✨ \u003cstrong data-start=\"151\" data-end=\"181\"\u003eWelcome to Crystal Destiny\u003c\/strong\u003e ✨\u003cbr data-start=\"183\" data-end=\"186\"\u003eStep into a world where beauty, energy, and artistry unite. Our collection is a treasure trove of exquisite crystals, from the raw, untamed elegance of natural formations to the polished brilliance of expertly crafted pieces. Each crystal is a masterpiece, carrying its own unique story and timeless charm.\u003c\/p\u003e\n\u003cp data-start=\"496\" data-end=\"831\"\u003eWhether you’re drawn to the calming presence of Amethyst, the vibrant energy of Citrine, or the grounding strength of Jasper, our crystals invite you to connect with nature’s finest wonders. Perfect for enhancing your space, supporting your spiritual journey, or gifting with intention, every piece resonates with beauty and meaning.\u003c\/p\u003e\n\u003cp data-start=\"833\" data-end=\"1000\"\u003eElevate your surroundings, embrace the mystique, and explore the enchanting world of crystals at \u003cstrong data-start=\"930\" data-end=\"949\"\u003eCrystal Destiny\u003c\/strong\u003e—where every crystal is waiting to be discovered.\u003c\/p\u003e","published_at":"2023-11-10T13:55:31-05:00","sort_order":"created-desc","template_suffix":"","disjunctive":false,"rules":[{"column":"type","relation":"not_equals","condition":"asdf"}],"published_scope":"global"},{"id":296256405675,"handle":"crystal-towers","title":"Crystal Towers","updated_at":"2026-01-06T23:24:37-05:00","body_html":"\u003cp data-end=\"568\" data-start=\"152\"\u003e✨ \u003cstrong data-end=\"190\" data-start=\"154\"\u003eCrystal Destiny Tower Collection\u003c\/strong\u003e ✨\u003cbr data-end=\"195\" data-start=\"192\"\u003eEnchant your space with the timeless beauty and powerful energy of crystal towers. Each piece in our \u003cstrong data-end=\"316\" data-start=\"296\"\u003eTower Collection\u003c\/strong\u003e is carefully crafted to showcase nature’s artistry while radiating higher vibrations and spiritual resonance. From the clarity of Quartz to the calming presence of Amethyst, these towers are both decorative masterpieces and tools for transformation.\u003c\/p\u003e\n\u003cp data-end=\"765\" data-start=\"570\"\u003ePerfect for meditation spaces, energy work, or simply elevating your home décor, crystal towers channel focused energy upward—creating balance, harmony, and refined elegance in any environment.\u003c\/p\u003e\n\u003cp data-end=\"917\" data-start=\"767\"\u003eDiscover the Crystal Destiny Tower Collection today and transform your surroundings into a sanctuary of beauty, purpose, and spiritual significance.\u003c\/p\u003e\n\u003ch2\u003eCrystal Towers, Wands, Generators, Points, Pillars \u0026amp; Obelisks — What's the Difference?\u003c\/h2\u003e\n\u003cp id=\"isPasted\"\u003eWhile these terms may vary, they all describe beautifully shaped crystals with a pointed tip designed to channel and direct energy. Each name highlights a unique aspect of their use:\u003c\/p\u003e\n\u003cul\u003e\n\u003cli\u003e\n\u003cstrong\u003eTowers\u003c\/strong\u003e- Known for their steady, grounding presence, crystal towers help focus and amplify energy, making them perfect for meditation and manifestation.\u003c\/li\u003e\n\u003cli\u003e\n\u003cstrong\u003eWands\u003c\/strong\u003e- Traditionally used in energy work and healing, crystal wands are excellent for directing energy flow and clearing blockages.\u003c\/li\u003e\n\u003cli\u003e\n\u003cstrong\u003ePillars\u003c\/strong\u003e- Symbolizing strength and stability, crystal pillars create a balanced and harmonious environment, making them great for home decor and spiritual practices.\u003c\/li\u003e\n\u003cli\u003e\n\u003cstrong\u003eObelisks\u003c\/strong\u003e- Inspired by ancient structures, crystal obelisks are believed to connect earthly and spiritual energies, making them powerful tools for transformation and enlightenment.\u003c\/li\u003e\n\u003c\/ul\u003e\n\u003cp\u003eNo matter what you call them, these crystals serve the same purpose—to enhance energy, intention, and harmony in your space. Choose the one that resonates most with you!\u003c\/p\u003e","published_at":"2023-09-14T12:52:35-04:00","sort_order":"created-desc","template_suffix":"","disjunctive":false,"rules":[{"column":"tag","relation":"equals","condition":"towers"}],"published_scope":"global"},{"id":298983391403,"handle":"january-crystal-sale","title":"January Sale | 25% Off Crystal Towers \u0026 Spheres","updated_at":"2026-01-06T23:24:37-05:00","body_html":"\u003cp\u003eShop our \u003cstrong\u003eJanuary Crystal Sale\u003c\/strong\u003e, where you can shop a wide selection of healing crystals at discounted prices. Explore \u003cstrong\u003eCrystal Towers, \u0026amp; Crystal Spheres\u003c\/strong\u003e — all carefully curated and crafted to support meditation, energy balancing, and spiritual wellness. Whether you're looking to enhance your home decor, boost your daily energy, or find the perfect gift, our \u003cstrong\u003ecrystals for healing and manifestation\u003c\/strong\u003e offer both beauty and metaphysical benefits.\u003c\/p\u003e\n\u003cp\u003eThis January, our sale features \u003cstrong\u003ediscounted crystal towers and spheres\u003c\/strong\u003e, from \u003cstrong\u003enatural quartz \u003c\/strong\u003eand \u003cstrong\u003eamethyst \u003c\/strong\u003eto \u003cstrong\u003ebumblebee jasper \u003c\/strong\u003eand \u003cstrong\u003ecarnelian\u003c\/strong\u003e, so there's always something fresh to discover. Shop with confidence knowing you're getting high-quality crystals with \u003cstrong\u003efree shipping options\u003c\/strong\u003e and a trusted experience.\u003c\/p\u003e\n\u003cp\u003e\u003cstrong\u003eTake advantage of the January Crystal Sale today\u003c\/strong\u003e and add powerful, natural energy to your life with \u003cstrong\u003eauthentic healing crystals\u003c\/strong\u003e — while our limited-time discounts last.\u003c\/p\u003e\n\u003cp\u003e\u003cstrong\u003e*Discount automatically applied at checkout.\u003c\/strong\u003e\u003c\/p\u003e","published_at":"2026-01-01T00:07:17-05:00","sort_order":"alpha-asc","template_suffix":"monthly-collection","disjunctive":true,"rules":[{"column":"tag","relation":"equals","condition":"Spheres"},{"column":"tag","relation":"equals","condition":"Towers"}],"published_scope":"global","image":{"created_at":"2026-01-01T01:29:59-05:00","alt":"","width":960,"height":960,"src":"\/\/crystaldestiny.com\/cdn\/shop\/collections\/1464163B-22B1-4D62-BEC5-CEC9AECB670B.jpg?v=1767248999"}}]}
[{"alt":"Himalayan Selenite Crystal Tower (Lighting Available)-Towers-Ali-Selenite Height 60mm-Crystal Destiny","id":32289039384747,"position":1,"preview_image":{"aspect_ratio":1.0,"height":800,"width":800,"src":"\/\/crystaldestiny.com\/cdn\/shop\/files\/Himalayan-Selenite-Crystal-Tower-Lighting-Available-Towers.webp?v=1765383587"},"aspect_ratio":1.0,"height":800,"media_type":"image","src":"\/\/crystaldestiny.com\/cdn\/shop\/files\/Himalayan-Selenite-Crystal-Tower-Lighting-Available-Towers.webp?v=1765383587","width":800},{"alt":"Himalayan Selenite Crystal Tower (Lighting Available)-Towers-Ali-Selenite Height 60mm-Crystal Destiny","id":32289039417515,"position":2,"preview_image":{"aspect_ratio":1.0,"height":1000,"width":1000,"src":"\/\/crystaldestiny.com\/cdn\/shop\/files\/Himalayan-Selenite-Crystal-Tower-Lighting-Available-Towers-2.webp?v=1765383589"},"aspect_ratio":1.0,"height":1000,"media_type":"image","src":"\/\/crystaldestiny.com\/cdn\/shop\/files\/Himalayan-Selenite-Crystal-Tower-Lighting-Available-Towers-2.webp?v=1765383589","width":1000},{"alt":"Himalayan Selenite Crystal Tower (Lighting Available)-Towers-Ali-Selenite Height 60mm-Crystal Destiny","id":32289039450283,"position":3,"preview_image":{"aspect_ratio":1.0,"height":1000,"width":1000,"src":"\/\/crystaldestiny.com\/cdn\/shop\/files\/Himalayan-Selenite-Crystal-Tower-Lighting-Available-Towers-3.webp?v=1765383590"},"aspect_ratio":1.0,"height":1000,"media_type":"image","src":"\/\/crystaldestiny.com\/cdn\/shop\/files\/Himalayan-Selenite-Crystal-Tower-Lighting-Available-Towers-3.webp?v=1765383590","width":1000},{"alt":"Himalayan Selenite Crystal Tower (Lighting Available)-Towers-Ali-Selenite Height 60mm-Crystal Destiny","id":32289039515819,"position":4,"preview_image":{"aspect_ratio":1.0,"height":1000,"width":1000,"src":"\/\/crystaldestiny.com\/cdn\/shop\/files\/Himalayan-Selenite-Crystal-Tower-Lighting-Available-Towers-4.webp?v=1765383592"},"aspect_ratio":1.0,"height":1000,"media_type":"image","src":"\/\/crystaldestiny.com\/cdn\/shop\/files\/Himalayan-Selenite-Crystal-Tower-Lighting-Available-Towers-4.webp?v=1765383592","width":1000},{"alt":"Himalayan Selenite Crystal Tower (Lighting Available)-Towers-Ali-Selenite Height 60mm-Crystal Destiny","id":32289039548587,"position":5,"preview_image":{"aspect_ratio":1.0,"height":1000,"width":1000,"src":"\/\/crystaldestiny.com\/cdn\/shop\/files\/Himalayan-Selenite-Crystal-Tower-Lighting-Available-Towers-5.webp?v=1765383593"},"aspect_ratio":1.0,"height":1000,"media_type":"image","src":"\/\/crystaldestiny.com\/cdn\/shop\/files\/Himalayan-Selenite-Crystal-Tower-Lighting-Available-Towers-5.webp?v=1765383593","width":1000},{"alt":"Himalayan Selenite Crystal Tower (Lighting Available)-Towers-Ali-Warm Light Base-Crystal Destiny","id":32289039581355,"position":6,"preview_image":{"aspect_ratio":1.0,"height":800,"width":800,"src":"\/\/crystaldestiny.com\/cdn\/shop\/files\/Himalayan-Selenite-Crystal-Tower-Lighting-Available-Towers-Warm-Light-Base-6.webp?v=1765383595"},"aspect_ratio":1.0,"height":800,"media_type":"image","src":"\/\/crystaldestiny.com\/cdn\/shop\/files\/Himalayan-Selenite-Crystal-Tower-Lighting-Available-Towers-Warm-Light-Base-6.webp?v=1765383595","width":800},{"alt":"Himalayan Selenite Crystal Tower (Lighting Available)-Towers-Ali-Colored Light Base-Crystal Destiny","id":32289039679659,"position":7,"preview_image":{"aspect_ratio":1.0,"height":800,"width":800,"src":"\/\/crystaldestiny.com\/cdn\/shop\/files\/Himalayan-Selenite-Crystal-Tower-Lighting-Available-Towers-Colored-Light-Base-7.webp?v=1765383596"},"aspect_ratio":1.0,"height":800,"media_type":"image","src":"\/\/crystaldestiny.com\/cdn\/shop\/files\/Himalayan-Selenite-Crystal-Tower-Lighting-Available-Towers-Colored-Light-Base-7.webp?v=1765383596","width":800},{"alt":"Himalayan Selenite Crystal Tower (Lighting Available)-Towers-Ali-Selenite Height 60mm-Crystal Destiny","id":32289039614123,"position":8,"preview_image":{"aspect_ratio":1.0,"height":1000,"width":1000,"src":"\/\/crystaldestiny.com\/cdn\/shop\/files\/Himalayan-Selenite-Crystal-Tower-Lighting-Available-Towers-Selenite-Height-60mm-8.webp?v=1766466546"},"aspect_ratio":1.0,"height":1000,"media_type":"image","src":"\/\/crystaldestiny.com\/cdn\/shop\/files\/Himalayan-Selenite-Crystal-Tower-Lighting-Available-Towers-Selenite-Height-60mm-8.webp?v=1766466546","width":1000}]
{"item":{"id":8539564474539,"title":"Honey Calcite Sphere 56mm, Warm Empowering Crystal","handle":"honey-calcite-sphere-56mm-warm-empowering-crystal-cd-10384","description":"\u003cp data-start=\"157\" data-end=\"463\"\u003eRadiating golden warmth and uplifting energy, the \u003cstrong data-start=\"234\" data-end=\"258\"\u003eHoney Calcite Sphere\u003c\/strong\u003e is a beautiful crystal that inspires confidence, mental clarity, and personal power. Its soft honey tones and polished surface make it a captivating centerpiece for any crystal collection or home décor.\u003c\/p\u003e\n\u003cp data-start=\"465\" data-end=\"785\"\u003eHoney Calcite is known for activating motivation, enhancing focus, and helping dissolve fear or self-doubt. Its bright, nurturing energy supports spiritual growth and empowerment, making it a favorite for meditation rooms, energy grids, or inspiring workspaces. Collectors love its sunny glow and metaphysical potency.\u003c\/p\u003e\n\u003cp data-start=\"465\" data-end=\"785\"\u003eThis product is an exact pick as pictured, one of a kind.\u003c\/p\u003e","published_at":"2025-09-30T18:20:28-04:00","created_at":"2025-09-30T18:20:26-04:00","vendor":"Crystal Destiny","type":"Spheres","tags":["crystal","polished","spheres"],"price":4999,"price_min":4999,"price_max":4999,"available":true,"price_varies":false,"compare_at_price":null,"compare_at_price_min":0,"compare_at_price_max":0,"compare_at_price_varies":false,"variants":[{"id":45682776342699,"title":"Honey Calcite \/ 260g - 56mm Diameter","option1":"Honey Calcite","option2":"260g - 56mm Diameter","option3":null,"sku":"CD-10384","requires_shipping":true,"taxable":true,"featured_image":{"id":40507804025003,"product_id":8539564474539,"position":1,"created_at":"2025-09-30T18:16:22-04:00","updated_at":"2025-12-11T00:12:24-05:00","alt":"Honey Calcite Sphere 56mm, Warm Empowering Crystal-Spheres-Crystal Destiny-Honey Calcite-260g - 56mm Diameter-Crystal Destiny","width":1701,"height":1701,"src":"\/\/crystaldestiny.com\/cdn\/shop\/files\/Honey-Calcite-Sphere-56mm-Warm-Empowering-Crystal-Spheres-Honey-Calcite-260g-56mm-Diameter.jpg?v=1765429944","variant_ids":[45682776342699]},"available":false,"name":"Honey Calcite Sphere 56mm, Warm Empowering Crystal - Honey Calcite \/ 260g - 56mm Diameter","public_title":"Honey Calcite \/ 260g - 56mm Diameter","options":["Honey Calcite","260g - 56mm Diameter"],"price":4999,"weight":260,"compare_at_price":null,"inventory_management":"shopify","barcode":"","featured_media":{"alt":"Honey Calcite Sphere 56mm, Warm Empowering Crystal-Spheres-Crystal Destiny-Honey Calcite-260g - 56mm Diameter-Crystal Destiny","id":31893950300331,"position":1,"preview_image":{"aspect_ratio":1.0,"height":1701,"width":1701,"src":"\/\/crystaldestiny.com\/cdn\/shop\/files\/Honey-Calcite-Sphere-56mm-Warm-Empowering-Crystal-Spheres-Honey-Calcite-260g-56mm-Diameter.jpg?v=1765429944"}},"requires_selling_plan":false,"selling_plan_allocations":[]},{"id":45682784534699,"title":"Honey Calcite \/ 224g - 54mm Diameter","option1":"Honey Calcite","option2":"224g - 54mm Diameter","option3":null,"sku":"CD-10385","requires_shipping":true,"taxable":true,"featured_image":{"id":40507804156075,"product_id":8539564474539,"position":5,"created_at":"2025-09-30T18:16:22-04:00","updated_at":"2025-12-11T00:12:27-05:00","alt":"Honey Calcite Sphere 56mm, Warm Empowering Crystal-Spheres-Crystal Destiny-Honey Calcite-224g - 54mm Diameter-Crystal Destiny","width":1695,"height":1695,"src":"\/\/crystaldestiny.com\/cdn\/shop\/files\/Honey-Calcite-Sphere-56mm-Warm-Empowering-Crystal-Spheres-Honey-Calcite-224g-54mm-Diameter-5.jpg?v=1765429947","variant_ids":[45682784534699]},"available":true,"name":"Honey Calcite Sphere 56mm, Warm Empowering Crystal - Honey Calcite \/ 224g - 54mm Diameter","public_title":"Honey Calcite \/ 224g - 54mm Diameter","options":["Honey Calcite","224g - 54mm Diameter"],"price":4999,"weight":260,"compare_at_price":null,"inventory_management":"shopify","barcode":"","featured_media":{"alt":"Honey Calcite Sphere 56mm, Warm Empowering Crystal-Spheres-Crystal Destiny-Honey Calcite-224g - 54mm Diameter-Crystal Destiny","id":31893950431403,"position":5,"preview_image":{"aspect_ratio":1.0,"height":1695,"width":1695,"src":"\/\/crystaldestiny.com\/cdn\/shop\/files\/Honey-Calcite-Sphere-56mm-Warm-Empowering-Crystal-Spheres-Honey-Calcite-224g-54mm-Diameter-5.jpg?v=1765429947"}},"requires_selling_plan":false,"selling_plan_allocations":[]}],"images":["\/\/crystaldestiny.com\/cdn\/shop\/files\/Honey-Calcite-Sphere-56mm-Warm-Empowering-Crystal-Spheres-Honey-Calcite-260g-56mm-Diameter.jpg?v=1765429944","\/\/crystaldestiny.com\/cdn\/shop\/files\/Honey-Calcite-Sphere-56mm-Warm-Empowering-Crystal-Spheres-2.jpg?v=1759295651","\/\/crystaldestiny.com\/cdn\/shop\/files\/Honey-Calcite-Sphere-56mm-Warm-Empowering-Crystal-Spheres-3.jpg?v=1759295653","\/\/crystaldestiny.com\/cdn\/shop\/files\/Honey-Calcite-Sphere-56mm-Warm-Empowering-Crystal-Spheres-4.jpg?v=1759295654","\/\/crystaldestiny.com\/cdn\/shop\/files\/Honey-Calcite-Sphere-56mm-Warm-Empowering-Crystal-Spheres-Honey-Calcite-224g-54mm-Diameter-5.jpg?v=1765429947","\/\/crystaldestiny.com\/cdn\/shop\/files\/Honey-Calcite-Sphere-56mm-Warm-Empowering-Crystal-Spheres-6.jpg?v=1759295658","\/\/crystaldestiny.com\/cdn\/shop\/files\/Honey-Calcite-Sphere-56mm-Warm-Empowering-Crystal-Spheres-7.jpg?v=1759295660","\/\/crystaldestiny.com\/cdn\/shop\/files\/Honey-Calcite-Sphere-56mm-Warm-Empowering-Crystal-Spheres-8.jpg?v=1759295662"],"featured_image":"\/\/crystaldestiny.com\/cdn\/shop\/files\/Honey-Calcite-Sphere-56mm-Warm-Empowering-Crystal-Spheres-Honey-Calcite-260g-56mm-Diameter.jpg?v=1765429944","options":["Material","Size"],"media":[{"alt":"Honey Calcite Sphere 56mm, Warm Empowering Crystal-Spheres-Crystal Destiny-Honey Calcite-260g - 56mm Diameter-Crystal Destiny","id":31893950300331,"position":1,"preview_image":{"aspect_ratio":1.0,"height":1701,"width":1701,"src":"\/\/crystaldestiny.com\/cdn\/shop\/files\/Honey-Calcite-Sphere-56mm-Warm-Empowering-Crystal-Spheres-Honey-Calcite-260g-56mm-Diameter.jpg?v=1765429944"},"aspect_ratio":1.0,"height":1701,"media_type":"image","src":"\/\/crystaldestiny.com\/cdn\/shop\/files\/Honey-Calcite-Sphere-56mm-Warm-Empowering-Crystal-Spheres-Honey-Calcite-260g-56mm-Diameter.jpg?v=1765429944","width":1701},{"alt":"Honey Calcite Sphere 56mm, Warm Empowering Crystal-Spheres-Crystal Destiny-Honey Calcite-260g - 56mm Diameter-Crystal Destiny","id":31893950267563,"position":2,"preview_image":{"aspect_ratio":1.0,"height":1735,"width":1735,"src":"\/\/crystaldestiny.com\/cdn\/shop\/files\/Honey-Calcite-Sphere-56mm-Warm-Empowering-Crystal-Spheres-2.jpg?v=1759295651"},"aspect_ratio":1.0,"height":1735,"media_type":"image","src":"\/\/crystaldestiny.com\/cdn\/shop\/files\/Honey-Calcite-Sphere-56mm-Warm-Empowering-Crystal-Spheres-2.jpg?v=1759295651","width":1735},{"alt":"Honey Calcite Sphere 56mm, Warm Empowering Crystal-Spheres-Crystal Destiny-Honey Calcite-260g - 56mm Diameter-Crystal Destiny","id":31893950333099,"position":3,"preview_image":{"aspect_ratio":1.0,"height":2048,"width":2048,"src":"\/\/crystaldestiny.com\/cdn\/shop\/files\/Honey-Calcite-Sphere-56mm-Warm-Empowering-Crystal-Spheres-3.jpg?v=1759295653"},"aspect_ratio":1.0,"height":2048,"media_type":"image","src":"\/\/crystaldestiny.com\/cdn\/shop\/files\/Honey-Calcite-Sphere-56mm-Warm-Empowering-Crystal-Spheres-3.jpg?v=1759295653","width":2048},{"alt":"Honey Calcite Sphere 56mm, Warm Empowering Crystal-Spheres-Crystal Destiny-Honey Calcite-260g - 56mm Diameter-Crystal Destiny","id":31893950234795,"position":4,"preview_image":{"aspect_ratio":1.0,"height":2048,"width":2048,"src":"\/\/crystaldestiny.com\/cdn\/shop\/files\/Honey-Calcite-Sphere-56mm-Warm-Empowering-Crystal-Spheres-4.jpg?v=1759295654"},"aspect_ratio":1.0,"height":2048,"media_type":"image","src":"\/\/crystaldestiny.com\/cdn\/shop\/files\/Honey-Calcite-Sphere-56mm-Warm-Empowering-Crystal-Spheres-4.jpg?v=1759295654","width":2048},{"alt":"Honey Calcite Sphere 56mm, Warm Empowering Crystal-Spheres-Crystal Destiny-Honey Calcite-224g - 54mm Diameter-Crystal Destiny","id":31893950431403,"position":5,"preview_image":{"aspect_ratio":1.0,"height":1695,"width":1695,"src":"\/\/crystaldestiny.com\/cdn\/shop\/files\/Honey-Calcite-Sphere-56mm-Warm-Empowering-Crystal-Spheres-Honey-Calcite-224g-54mm-Diameter-5.jpg?v=1765429947"},"aspect_ratio":1.0,"height":1695,"media_type":"image","src":"\/\/crystaldestiny.com\/cdn\/shop\/files\/Honey-Calcite-Sphere-56mm-Warm-Empowering-Crystal-Spheres-Honey-Calcite-224g-54mm-Diameter-5.jpg?v=1765429947","width":1695},{"alt":"Honey Calcite Sphere 56mm, Warm Empowering Crystal-Spheres-Crystal Destiny-Honey Calcite-260g - 56mm Diameter-Crystal Destiny","id":31893950398635,"position":6,"preview_image":{"aspect_ratio":1.0,"height":2048,"width":2048,"src":"\/\/crystaldestiny.com\/cdn\/shop\/files\/Honey-Calcite-Sphere-56mm-Warm-Empowering-Crystal-Spheres-6.jpg?v=1759295658"},"aspect_ratio":1.0,"height":2048,"media_type":"image","src":"\/\/crystaldestiny.com\/cdn\/shop\/files\/Honey-Calcite-Sphere-56mm-Warm-Empowering-Crystal-Spheres-6.jpg?v=1759295658","width":2048},{"alt":"Honey Calcite Sphere 56mm, Warm Empowering Crystal-Spheres-Crystal Destiny-Honey Calcite-260g - 56mm Diameter-Crystal Destiny","id":31893950464171,"position":7,"preview_image":{"aspect_ratio":1.0,"height":2048,"width":2048,"src":"\/\/crystaldestiny.com\/cdn\/shop\/files\/Honey-Calcite-Sphere-56mm-Warm-Empowering-Crystal-Spheres-7.jpg?v=1759295660"},"aspect_ratio":1.0,"height":2048,"media_type":"image","src":"\/\/crystaldestiny.com\/cdn\/shop\/files\/Honey-Calcite-Sphere-56mm-Warm-Empowering-Crystal-Spheres-7.jpg?v=1759295660","width":2048},{"alt":"Honey Calcite Sphere 56mm, Warm Empowering Crystal-Spheres-Crystal Destiny-Honey Calcite-260g - 56mm Diameter-Crystal Destiny","id":31893950365867,"position":8,"preview_image":{"aspect_ratio":1.0,"height":2048,"width":2048,"src":"\/\/crystaldestiny.com\/cdn\/shop\/files\/Honey-Calcite-Sphere-56mm-Warm-Empowering-Crystal-Spheres-8.jpg?v=1759295662"},"aspect_ratio":1.0,"height":2048,"media_type":"image","src":"\/\/crystaldestiny.com\/cdn\/shop\/files\/Honey-Calcite-Sphere-56mm-Warm-Empowering-Crystal-Spheres-8.jpg?v=1759295662","width":2048}],"requires_selling_plan":false,"selling_plan_groups":[],"content":"\u003cp data-start=\"157\" data-end=\"463\"\u003eRadiating golden warmth and uplifting energy, the \u003cstrong data-start=\"234\" data-end=\"258\"\u003eHoney Calcite Sphere\u003c\/strong\u003e is a beautiful crystal that inspires confidence, mental clarity, and personal power. Its soft honey tones and polished surface make it a captivating centerpiece for any crystal collection or home décor.\u003c\/p\u003e\n\u003cp data-start=\"465\" data-end=\"785\"\u003eHoney Calcite is known for activating motivation, enhancing focus, and helping dissolve fear or self-doubt. Its bright, nurturing energy supports spiritual growth and empowerment, making it a favorite for meditation rooms, energy grids, or inspiring workspaces. Collectors love its sunny glow and metaphysical potency.\u003c\/p\u003e\n\u003cp data-start=\"465\" data-end=\"785\"\u003eThis product is an exact pick as pictured, one of a kind.\u003c\/p\u003e"},"options":[{"name":"Material","position":1,"values":["Honey Calcite"]},{"name":"Size","position":2,"values":["260g - 56mm Diameter","224g - 54mm Diameter"]}],"custom_metafields":{"shipping_time":"Within 7 days"},"metafields":{"badge":"\u003cdiv style='display:none' class='jdgm-prev-badge' data-average-rating='0.00' data-number-of-reviews='0' data-number-of-questions='0'\u003e \u003cspan class='jdgm-prev-badge__stars' data-score='0.00' tabindex='0' aria-label='0.00 stars' role='button'\u003e \u003cspan class='jdgm-star jdgm--off'\u003e\u003c\/span\u003e\u003cspan class='jdgm-star jdgm--off'\u003e\u003c\/span\u003e\u003cspan class='jdgm-star jdgm--off'\u003e\u003c\/span\u003e\u003cspan class='jdgm-star jdgm--off'\u003e\u003c\/span\u003e\u003cspan class='jdgm-star jdgm--off'\u003e\u003c\/span\u003e \u003c\/span\u003e \u003cspan class='jdgm-prev-badge__text'\u003e No reviews \u003c\/span\u003e \u003c\/div\u003e","widget":"\u003cdiv class='jdgm-rev-widg' data-updated-at='2025-09-30T22:21:42Z' data-average-rating='0.00' data-number-of-reviews='0' data-number-of-questions='0' data-image-url='https:\/\/cdn.shopify.com\/s\/files\/1\/0613\/0345\/5915\/files\/6I0A4260.jpg?v=1759270634'\u003e \u003cstyle class='jdgm-temp-hiding-style'\u003e.jdgm-rev-widg{ display: none }\u003c\/style\u003e \u003cdiv class='jdgm-rev-widg__header'\u003e \u003ch2 class='jdgm-rev-widg__title'\u003eCustomer Reviews\u003c\/h2\u003e \u003cdiv class='jdgm-rev-widg__summary'\u003e \u003cdiv class='jdgm-rev-widg__summary-stars' aria-label='Average rating is 0.00 stars' role='img'\u003e \u003cspan class='jdgm-star jdgm--off'\u003e\u003c\/span\u003e\u003cspan class='jdgm-star jdgm--off'\u003e\u003c\/span\u003e\u003cspan class='jdgm-star jdgm--off'\u003e\u003c\/span\u003e\u003cspan class='jdgm-star jdgm--off'\u003e\u003c\/span\u003e\u003cspan class='jdgm-star jdgm--off'\u003e\u003c\/span\u003e \u003c\/div\u003e \u003cdiv class='jdgm-rev-widg__summary-text'\u003eBe the first to write a review\u003c\/div\u003e \u003c\/div\u003e \u003ca style='display: none' href='#' class='jdgm-write-rev-link' role='button'\u003eWrite a review\u003c\/a\u003e \u003cdiv class='jdgm-histogram jdgm-temp-hidden'\u003e \u003cdiv class='jdgm-histogram__row' data-rating='5' data-frequency='0' data-percentage='0'\u003e \u003cdiv class='jdgm-histogram__star' role='button' aria-label=\"0% (0) reviews with 5 star rating\" tabindex='0' \u003e\u003cspan class='jdgm-star jdgm--on'\u003e\u003c\/span\u003e\u003cspan class='jdgm-star jdgm--on'\u003e\u003c\/span\u003e\u003cspan class='jdgm-star jdgm--on'\u003e\u003c\/span\u003e\u003cspan class='jdgm-star jdgm--on'\u003e\u003c\/span\u003e\u003cspan class='jdgm-star jdgm--on'\u003e\u003c\/span\u003e\u003c\/div\u003e \u003cdiv class='jdgm-histogram__bar'\u003e \u003cdiv class='jdgm-histogram__bar-content' style='width: 0%;'\u003e \u003c\/div\u003e \u003c\/div\u003e \u003cdiv class='jdgm-histogram__percentage'\u003e0%\u003c\/div\u003e \u003cdiv class='jdgm-histogram__frequency'\u003e(0)\u003c\/div\u003e \u003c\/div\u003e \u003cdiv class='jdgm-histogram__row' data-rating='4' data-frequency='0' data-percentage='0'\u003e \u003cdiv class='jdgm-histogram__star' role='button' aria-label=\"0% (0) reviews with 4 star rating\" tabindex='0' \u003e\u003cspan class='jdgm-star jdgm--on'\u003e\u003c\/span\u003e\u003cspan class='jdgm-star jdgm--on'\u003e\u003c\/span\u003e\u003cspan class='jdgm-star jdgm--on'\u003e\u003c\/span\u003e\u003cspan class='jdgm-star jdgm--on'\u003e\u003c\/span\u003e\u003cspan class='jdgm-star jdgm--off'\u003e\u003c\/span\u003e\u003c\/div\u003e \u003cdiv class='jdgm-histogram__bar'\u003e \u003cdiv class='jdgm-histogram__bar-content' style='width: 0%;'\u003e \u003c\/div\u003e \u003c\/div\u003e \u003cdiv class='jdgm-histogram__percentage'\u003e0%\u003c\/div\u003e \u003cdiv class='jdgm-histogram__frequency'\u003e(0)\u003c\/div\u003e \u003c\/div\u003e \u003cdiv class='jdgm-histogram__row' data-rating='3' data-frequency='0' data-percentage='0'\u003e \u003cdiv class='jdgm-histogram__star' role='button' aria-label=\"0% (0) reviews with 3 star rating\" tabindex='0' \u003e\u003cspan class='jdgm-star jdgm--on'\u003e\u003c\/span\u003e\u003cspan class='jdgm-star jdgm--on'\u003e\u003c\/span\u003e\u003cspan class='jdgm-star jdgm--on'\u003e\u003c\/span\u003e\u003cspan class='jdgm-star jdgm--off'\u003e\u003c\/span\u003e\u003cspan class='jdgm-star jdgm--off'\u003e\u003c\/span\u003e\u003c\/div\u003e \u003cdiv class='jdgm-histogram__bar'\u003e \u003cdiv class='jdgm-histogram__bar-content' style='width: 0%;'\u003e \u003c\/div\u003e \u003c\/div\u003e \u003cdiv class='jdgm-histogram__percentage'\u003e0%\u003c\/div\u003e \u003cdiv class='jdgm-histogram__frequency'\u003e(0)\u003c\/div\u003e \u003c\/div\u003e \u003cdiv class='jdgm-histogram__row' data-rating='2' data-frequency='0' data-percentage='0'\u003e \u003cdiv class='jdgm-histogram__star' role='button' aria-label=\"0% (0) reviews with 2 star rating\" tabindex='0' \u003e\u003cspan class='jdgm-star jdgm--on'\u003e\u003c\/span\u003e\u003cspan class='jdgm-star jdgm--on'\u003e\u003c\/span\u003e\u003cspan class='jdgm-star jdgm--off'\u003e\u003c\/span\u003e\u003cspan class='jdgm-star jdgm--off'\u003e\u003c\/span\u003e\u003cspan class='jdgm-star jdgm--off'\u003e\u003c\/span\u003e\u003c\/div\u003e \u003cdiv class='jdgm-histogram__bar'\u003e \u003cdiv class='jdgm-histogram__bar-content' style='width: 0%;'\u003e \u003c\/div\u003e \u003c\/div\u003e \u003cdiv class='jdgm-histogram__percentage'\u003e0%\u003c\/div\u003e \u003cdiv class='jdgm-histogram__frequency'\u003e(0)\u003c\/div\u003e \u003c\/div\u003e \u003cdiv class='jdgm-histogram__row' data-rating='1' data-frequency='0' data-percentage='0'\u003e \u003cdiv class='jdgm-histogram__star' role='button' aria-label=\"0% (0) reviews with 1 star rating\" tabindex='0' \u003e\u003cspan class='jdgm-star jdgm--on'\u003e\u003c\/span\u003e\u003cspan class='jdgm-star jdgm--off'\u003e\u003c\/span\u003e\u003cspan class='jdgm-star jdgm--off'\u003e\u003c\/span\u003e\u003cspan class='jdgm-star jdgm--off'\u003e\u003c\/span\u003e\u003cspan class='jdgm-star jdgm--off'\u003e\u003c\/span\u003e\u003c\/div\u003e \u003cdiv class='jdgm-histogram__bar'\u003e \u003cdiv class='jdgm-histogram__bar-content' style='width: 0%;'\u003e \u003c\/div\u003e \u003c\/div\u003e \u003cdiv class='jdgm-histogram__percentage'\u003e0%\u003c\/div\u003e \u003cdiv class='jdgm-histogram__frequency'\u003e(0)\u003c\/div\u003e \u003c\/div\u003e \u003cdiv class='jdgm-histogram__row jdgm-histogram__clear-filter' data-rating=null tabindex='0'\u003e\u003c\/div\u003e \u003c\/div\u003e \u003cdiv class='jdgm-rev-widg__sort-wrapper'\u003e\u003c\/div\u003e \u003c\/div\u003e \u003cdiv class='jdgm-rev-widg__body'\u003e \u003cdiv class='jdgm-rev-widg__reviews'\u003e\u003c\/div\u003e \u003cdiv class='jdgm-paginate' data-per-page='4' data-url='https:\/\/api.judge.me\/reviews\/reviews_for_widget' style=\"display: none;\"\u003e\u003c\/div\u003e \u003c\/div\u003e \u003cdiv class='jdgm-rev-widg__paginate-spinner-wrapper'\u003e \u003cdiv class='jdgm-spinner'\u003e\u003c\/div\u003e \u003c\/div\u003e \u003c\/div\u003e"},"collections":[{"id":294880051371,"handle":"crystals","title":"Crystals","updated_at":"2026-01-07T23:43:11-05:00","body_html":"\u003cp data-start=\"159\" data-end=\"687\"\u003e✨ \u003cstrong data-start=\"161\" data-end=\"216\"\u003eDiscover the Magic of Crystals with Crystal Destiny\u003c\/strong\u003e ✨\u003cbr data-start=\"218\" data-end=\"221\"\u003eCrystals have been treasured for centuries—not only for their natural beauty but also for their powerful healing energies. Beyond their visual allure, they bring balance, harmony, and positive energy into any space. Whether used for home décor, meditation, or simply to elevate the energy of your surroundings, crystals create a sanctuary of peace, relaxation, and well-being. Each piece is a unique gift from the Earth—visually stunning and spiritually uplifting.\u003c\/p\u003e\n\u003cp data-start=\"689\" data-end=\"1011\"\u003eAt \u003cstrong data-start=\"692\" data-end=\"711\"\u003eCrystal Destiny\u003c\/strong\u003e, our signature collection showcases a curated selection of exquisite crystals, from radiant Quartz to soothing Amethyst. Every stone is carefully sourced for its elegance and metaphysical resonance, making them perfect for enhancing your home, uplifting your spirit, or gifting to someone special.\u003c\/p\u003e\n\u003cp data-start=\"1013\" data-end=\"1206\"\u003eExperience the timeless sophistication of crystalline wonders. Explore the \u003cstrong data-start=\"1088\" data-end=\"1118\"\u003eCrystal Destiny Collection\u003c\/strong\u003e today and bring the transformative beauty of these treasures into your everyday life.\u003c\/p\u003e","published_at":"2023-06-05T11:24:02-04:00","sort_order":"created-desc","template_suffix":"","disjunctive":false,"rules":[{"column":"tag","relation":"equals","condition":"crystal"},{"column":"type","relation":"not_contains","condition":"925 Sterling Silver"},{"column":"type","relation":"not_contains","condition":"Wire Wraps"}],"published_scope":"global"},{"id":319455953067,"handle":"solar-plexus-chakra-crystals","title":"Solar Plexus Chakra Crystals","updated_at":"2026-01-06T11:12:19-05:00","body_html":"\u003cp data-start=\"142\" data-end=\"577\"\u003e✨ \u003cstrong data-start=\"144\" data-end=\"176\"\u003eSolar Plexus Chakra Crystals\u003c\/strong\u003e ✨\u003cbr data-start=\"178\" data-end=\"181\"\u003eHarness the power of your personal will and confidence with our \u003cstrong data-start=\"245\" data-end=\"277\"\u003eSolar Plexus Chakra Crystals\u003c\/strong\u003e. Focused on the third chakra, located at the center of your torso, these stones help balance self-esteem, personal power, and motivation. Perfect for meditation, energy work, or as wearable reminders of inner strength, each crystal resonates with vibrant energy designed to ignite your inner fire.\u003c\/p\u003e\n\u003cp data-start=\"579\" data-end=\"960\"\u003eOur curated selection includes radiant yellow and golden stones such as Citrine, Yellow Jasper, and Tiger’s Eye—each chosen for their ability to stimulate vitality, courage, and focus. Whether you place them in your sacred space, carry them with you, or incorporate them into jewelry, Solar Plexus Chakra Crystals invite clarity, confidence, and empowerment into your daily life.\u003c\/p\u003e\n\u003cp data-start=\"962\" data-end=\"1109\"\u003eElevate your energy, amplify your inner strength, and embrace the transformative power of your Solar Plexus with these powerful, luminous stones.\u003c\/p\u003e","published_at":"2025-07-17T18:18:13-04:00","sort_order":"best-selling","template_suffix":"","disjunctive":false,"rules":[{"column":"variant_metafield_definition","relation":"equals","condition":"Solar Plexus"}],"published_scope":"global","image":{"created_at":"2025-07-17T19:08:38-04:00","alt":null,"width":1080,"height":1080,"src":"\/\/crystaldestiny.com\/cdn\/shop\/collections\/Solar_Plexus_Chakra_Collection.jpg?v=1762474929"}},{"id":294880116907,"handle":"polished","title":"Polished Crystals","updated_at":"2026-01-07T23:43:11-05:00","body_html":"\u003cp data-start=\"199\" data-end=\"598\"\u003e✨ \u003cstrong data-start=\"201\" data-end=\"248\"\u003eCrystal Destiny Polished Crystal Collection\u003c\/strong\u003e ✨\u003cbr data-start=\"250\" data-end=\"253\"\u003eIndulge in the brilliance of crystals refined to perfection. Our \u003cstrong data-start=\"318\" data-end=\"341\"\u003ePolished Collection\u003c\/strong\u003e showcases gemstones meticulously shaped and smoothed to reveal their natural radiance and timeless beauty. From the shimmering glow of Quartz to the deep allure of Obsidian, each polished piece is a testament to nature’s artistry and human craftsmanship.\u003c\/p\u003e\n\u003cp data-start=\"600\" data-end=\"862\"\u003ePerfect as statement décor, meaningful gifts, or companions on your spiritual journey, polished crystals bring sophistication and elevated energy into any space. Their radiant surfaces reflect not only light but also the transformative power of crystal energy.\u003c\/p\u003e\n\u003cp data-start=\"864\" data-end=\"1022\"\u003eDiscover the elegance of refinement with Crystal Destiny’s Polished Crystal Collection—where every facet shines with intention, beauty, and timeless allure.\u003c\/p\u003e","published_at":"2023-06-05T11:30:44-04:00","sort_order":"created-desc","template_suffix":"","disjunctive":false,"rules":[{"column":"tag","relation":"equals","condition":"polished"}],"published_scope":"global"},{"id":295698202795,"handle":"spheres","title":"Crystal Spheres","updated_at":"2026-01-06T23:24:35-05:00","body_html":"\u003cp data-start=\"106\" data-end=\"370\"\u003e✨ \u003cstrong data-start=\"108\" data-end=\"138\"\u003eCrystal Spheres Collection\u003c\/strong\u003e ✨\u003cbr data-start=\"140\" data-end=\"143\"\u003eBring harmony, balance, and elegance into your space with our \u003cstrong data-start=\"205\" data-end=\"235\"\u003eCrystal Spheres Collection\u003c\/strong\u003e. Each sphere is meticulously crafted to showcase the natural beauty and energy of crystals, from radiant Quartz to calming Amethyst.\u003c\/p\u003e\n\u003cp data-start=\"372\" data-end=\"658\"\u003ePerfect for meditation, energy work, or as striking décor, crystal spheres radiate energy in all directions, promoting clarity, focus, and a sense of calm. Their smooth, polished surfaces highlight the stones’ natural patterns and colors, making each sphere a captivating centerpiece.\u003c\/p\u003e\n\u003cp data-start=\"660\" data-end=\"809\"\u003eElevate your space and embrace the transformative power of crystals with the \u003cstrong data-start=\"737\" data-end=\"767\"\u003eCrystal Spheres Collection\u003c\/strong\u003e—where beauty, energy, and harmony meet.\u003c\/p\u003e","published_at":"2023-07-28T14:20:46-04:00","sort_order":"created-desc","template_suffix":"","disjunctive":true,"rules":[{"column":"tag","relation":"equals","condition":"spheres"},{"column":"tag","relation":"equals","condition":"eggs"}],"published_scope":"global"},{"id":293659312299,"handle":"best-sellers","title":"Best Sellers","updated_at":"2026-01-07T23:43:11-05:00","body_html":"\u003cp data-start=\"155\" data-end=\"510\"\u003eDiscover the pieces our community loves most. Our Best Sellers Collection brings together handpicked crystals and jewelry that embody timeless elegance, spiritual resonance, and everyday sophistication. Each item has earned its place as a customer favorite—celebrated for both its beauty and its meaningful energy.\u003c\/p\u003e\n\u003cp data-start=\"512\" data-end=\"802\"\u003eFrom stunning statement pieces to versatile daily companions, these treasures are curated to elevate your space, uplift your spirit, and reflect refined taste. Indulge in what’s most cherished and let our best sellers guide you toward the perfect blend of style and transformative energy.\u003c\/p\u003e\n\u003cp data-start=\"804\" data-end=\"932\"\u003eExplore the Best Sellers Collection today—where elegance meets intention, and every piece tells a story of beauty and balance.\u003c\/p\u003e","published_at":"2023-03-15T16:04:51-04:00","sort_order":"best-selling","template_suffix":"","disjunctive":false,"rules":[{"column":"variant_price","relation":"greater_than","condition":"0"},{"column":"variant_inventory","relation":"greater_than","condition":"0"},{"column":"type","relation":"not_equals","condition":"Shipping Protection"}],"published_scope":"global"},{"id":321370390699,"handle":"monthly-crystal-sale","title":"Monthly Crystal Sale | Spheres \u0026 Towers","updated_at":"2026-01-06T23:24:37-05:00","body_html":"\u003cp\u003eShop our \u003cstrong\u003eMonthly Crystal Sale\u003c\/strong\u003e, where you can shop a wide selection of healing crystals at discounted prices. Explore \u003cstrong\u003ecrystal spheres and towers,\u003c\/strong\u003e— all carefully curated to support meditation, energy balancing, and spiritual wellness. Whether you're looking to enhance your home decor, boost your daily energy, or find the perfect gift, our \u003cstrong\u003ecrystals for healing and manifestation\u003c\/strong\u003e offer both beauty and metaphysical benefits.\u003c\/p\u003e\n\u003cp\u003eEach month, our sale features \u003cstrong\u003enew discounted collections\u003c\/strong\u003e, from \u003cstrong\u003enatural quartz and amethyst towers\u003c\/strong\u003e to \u003cstrong\u003ewire-wrapped pendants and polished stones\u003c\/strong\u003e, so there's always something fresh to discover. Shop with confidence knowing you're getting high-quality crystals with \u003cstrong\u003efree shipping options\u003c\/strong\u003e and a trusted experience.\u003c\/p\u003e\n\u003cp\u003e\u003cstrong\u003eTake advantage of the Monthly Crystal Sale today\u003c\/strong\u003e and add powerful, natural energy to your life with \u003cstrong\u003eauthentic healing crystals\u003c\/strong\u003e — while our limited-time discounts last.\u003c\/p\u003e\n\u003cp\u003e\u003cstrong\u003e*Discount automatically applied at checkout.\u003c\/strong\u003e\u003c\/p\u003e","published_at":"2025-12-02T01:26:17-05:00","sort_order":"alpha-asc","template_suffix":"","disjunctive":true,"rules":[{"column":"tag","relation":"equals","condition":"spheres"},{"column":"tag","relation":"equals","condition":"Towers"}],"published_scope":"global","image":{"created_at":"2026-01-01T01:32:34-05:00","alt":"","width":960,"height":960,"src":"\/\/crystaldestiny.com\/cdn\/shop\/collections\/3E8C2969-1B86-4ACE-B349-98E9D8768424.jpg?v=1767249154"}},{"id":297596059819,"handle":"all","title":"All Crystals \u0026 Jewelry","updated_at":"2026-01-07T23:43:11-05:00","body_html":"\u003cp data-start=\"149\" data-end=\"494\"\u003e✨ \u003cstrong data-start=\"151\" data-end=\"181\"\u003eWelcome to Crystal Destiny\u003c\/strong\u003e ✨\u003cbr data-start=\"183\" data-end=\"186\"\u003eStep into a world where beauty, energy, and artistry unite. Our collection is a treasure trove of exquisite crystals, from the raw, untamed elegance of natural formations to the polished brilliance of expertly crafted pieces. Each crystal is a masterpiece, carrying its own unique story and timeless charm.\u003c\/p\u003e\n\u003cp data-start=\"496\" data-end=\"831\"\u003eWhether you’re drawn to the calming presence of Amethyst, the vibrant energy of Citrine, or the grounding strength of Jasper, our crystals invite you to connect with nature’s finest wonders. Perfect for enhancing your space, supporting your spiritual journey, or gifting with intention, every piece resonates with beauty and meaning.\u003c\/p\u003e\n\u003cp data-start=\"833\" data-end=\"1000\"\u003eElevate your surroundings, embrace the mystique, and explore the enchanting world of crystals at \u003cstrong data-start=\"930\" data-end=\"949\"\u003eCrystal Destiny\u003c\/strong\u003e—where every crystal is waiting to be discovered.\u003c\/p\u003e","published_at":"2023-11-10T13:55:31-05:00","sort_order":"created-desc","template_suffix":"","disjunctive":false,"rules":[{"column":"type","relation":"not_equals","condition":"asdf"}],"published_scope":"global"},{"id":298983391403,"handle":"january-crystal-sale","title":"January Sale | 25% Off Crystal Towers \u0026 Spheres","updated_at":"2026-01-06T23:24:37-05:00","body_html":"\u003cp\u003eShop our \u003cstrong\u003eJanuary Crystal Sale\u003c\/strong\u003e, where you can shop a wide selection of healing crystals at discounted prices. Explore \u003cstrong\u003eCrystal Towers, \u0026amp; Crystal Spheres\u003c\/strong\u003e — all carefully curated and crafted to support meditation, energy balancing, and spiritual wellness. Whether you're looking to enhance your home decor, boost your daily energy, or find the perfect gift, our \u003cstrong\u003ecrystals for healing and manifestation\u003c\/strong\u003e offer both beauty and metaphysical benefits.\u003c\/p\u003e\n\u003cp\u003eThis January, our sale features \u003cstrong\u003ediscounted crystal towers and spheres\u003c\/strong\u003e, from \u003cstrong\u003enatural quartz \u003c\/strong\u003eand \u003cstrong\u003eamethyst \u003c\/strong\u003eto \u003cstrong\u003ebumblebee jasper \u003c\/strong\u003eand \u003cstrong\u003ecarnelian\u003c\/strong\u003e, so there's always something fresh to discover. Shop with confidence knowing you're getting high-quality crystals with \u003cstrong\u003efree shipping options\u003c\/strong\u003e and a trusted experience.\u003c\/p\u003e\n\u003cp\u003e\u003cstrong\u003eTake advantage of the January Crystal Sale today\u003c\/strong\u003e and add powerful, natural energy to your life with \u003cstrong\u003eauthentic healing crystals\u003c\/strong\u003e — while our limited-time discounts last.\u003c\/p\u003e\n\u003cp\u003e\u003cstrong\u003e*Discount automatically applied at checkout.\u003c\/strong\u003e\u003c\/p\u003e","published_at":"2026-01-01T00:07:17-05:00","sort_order":"alpha-asc","template_suffix":"monthly-collection","disjunctive":true,"rules":[{"column":"tag","relation":"equals","condition":"Spheres"},{"column":"tag","relation":"equals","condition":"Towers"}],"published_scope":"global","image":{"created_at":"2026-01-01T01:29:59-05:00","alt":"","width":960,"height":960,"src":"\/\/crystaldestiny.com\/cdn\/shop\/collections\/1464163B-22B1-4D62-BEC5-CEC9AECB670B.jpg?v=1767248999"}}]}
[{"alt":"Honey Calcite Sphere 56mm, Warm Empowering Crystal-Spheres-Crystal Destiny-Honey Calcite-260g - 56mm Diameter-Crystal Destiny","id":31893950300331,"position":1,"preview_image":{"aspect_ratio":1.0,"height":1701,"width":1701,"src":"\/\/crystaldestiny.com\/cdn\/shop\/files\/Honey-Calcite-Sphere-56mm-Warm-Empowering-Crystal-Spheres-Honey-Calcite-260g-56mm-Diameter.jpg?v=1765429944"},"aspect_ratio":1.0,"height":1701,"media_type":"image","src":"\/\/crystaldestiny.com\/cdn\/shop\/files\/Honey-Calcite-Sphere-56mm-Warm-Empowering-Crystal-Spheres-Honey-Calcite-260g-56mm-Diameter.jpg?v=1765429944","width":1701},{"alt":"Honey Calcite Sphere 56mm, Warm Empowering Crystal-Spheres-Crystal Destiny-Honey Calcite-260g - 56mm Diameter-Crystal Destiny","id":31893950267563,"position":2,"preview_image":{"aspect_ratio":1.0,"height":1735,"width":1735,"src":"\/\/crystaldestiny.com\/cdn\/shop\/files\/Honey-Calcite-Sphere-56mm-Warm-Empowering-Crystal-Spheres-2.jpg?v=1759295651"},"aspect_ratio":1.0,"height":1735,"media_type":"image","src":"\/\/crystaldestiny.com\/cdn\/shop\/files\/Honey-Calcite-Sphere-56mm-Warm-Empowering-Crystal-Spheres-2.jpg?v=1759295651","width":1735},{"alt":"Honey Calcite Sphere 56mm, Warm Empowering Crystal-Spheres-Crystal Destiny-Honey Calcite-260g - 56mm Diameter-Crystal Destiny","id":31893950333099,"position":3,"preview_image":{"aspect_ratio":1.0,"height":2048,"width":2048,"src":"\/\/crystaldestiny.com\/cdn\/shop\/files\/Honey-Calcite-Sphere-56mm-Warm-Empowering-Crystal-Spheres-3.jpg?v=1759295653"},"aspect_ratio":1.0,"height":2048,"media_type":"image","src":"\/\/crystaldestiny.com\/cdn\/shop\/files\/Honey-Calcite-Sphere-56mm-Warm-Empowering-Crystal-Spheres-3.jpg?v=1759295653","width":2048},{"alt":"Honey Calcite Sphere 56mm, Warm Empowering Crystal-Spheres-Crystal Destiny-Honey Calcite-260g - 56mm Diameter-Crystal Destiny","id":31893950234795,"position":4,"preview_image":{"aspect_ratio":1.0,"height":2048,"width":2048,"src":"\/\/crystaldestiny.com\/cdn\/shop\/files\/Honey-Calcite-Sphere-56mm-Warm-Empowering-Crystal-Spheres-4.jpg?v=1759295654"},"aspect_ratio":1.0,"height":2048,"media_type":"image","src":"\/\/crystaldestiny.com\/cdn\/shop\/files\/Honey-Calcite-Sphere-56mm-Warm-Empowering-Crystal-Spheres-4.jpg?v=1759295654","width":2048},{"alt":"Honey Calcite Sphere 56mm, Warm Empowering Crystal-Spheres-Crystal Destiny-Honey Calcite-224g - 54mm Diameter-Crystal Destiny","id":31893950431403,"position":5,"preview_image":{"aspect_ratio":1.0,"height":1695,"width":1695,"src":"\/\/crystaldestiny.com\/cdn\/shop\/files\/Honey-Calcite-Sphere-56mm-Warm-Empowering-Crystal-Spheres-Honey-Calcite-224g-54mm-Diameter-5.jpg?v=1765429947"},"aspect_ratio":1.0,"height":1695,"media_type":"image","src":"\/\/crystaldestiny.com\/cdn\/shop\/files\/Honey-Calcite-Sphere-56mm-Warm-Empowering-Crystal-Spheres-Honey-Calcite-224g-54mm-Diameter-5.jpg?v=1765429947","width":1695},{"alt":"Honey Calcite Sphere 56mm, Warm Empowering Crystal-Spheres-Crystal Destiny-Honey Calcite-260g - 56mm Diameter-Crystal Destiny","id":31893950398635,"position":6,"preview_image":{"aspect_ratio":1.0,"height":2048,"width":2048,"src":"\/\/crystaldestiny.com\/cdn\/shop\/files\/Honey-Calcite-Sphere-56mm-Warm-Empowering-Crystal-Spheres-6.jpg?v=1759295658"},"aspect_ratio":1.0,"height":2048,"media_type":"image","src":"\/\/crystaldestiny.com\/cdn\/shop\/files\/Honey-Calcite-Sphere-56mm-Warm-Empowering-Crystal-Spheres-6.jpg?v=1759295658","width":2048},{"alt":"Honey Calcite Sphere 56mm, Warm Empowering Crystal-Spheres-Crystal Destiny-Honey Calcite-260g - 56mm Diameter-Crystal Destiny","id":31893950464171,"position":7,"preview_image":{"aspect_ratio":1.0,"height":2048,"width":2048,"src":"\/\/crystaldestiny.com\/cdn\/shop\/files\/Honey-Calcite-Sphere-56mm-Warm-Empowering-Crystal-Spheres-7.jpg?v=1759295660"},"aspect_ratio":1.0,"height":2048,"media_type":"image","src":"\/\/crystaldestiny.com\/cdn\/shop\/files\/Honey-Calcite-Sphere-56mm-Warm-Empowering-Crystal-Spheres-7.jpg?v=1759295660","width":2048},{"alt":"Honey Calcite Sphere 56mm, Warm Empowering Crystal-Spheres-Crystal Destiny-Honey Calcite-260g - 56mm Diameter-Crystal Destiny","id":31893950365867,"position":8,"preview_image":{"aspect_ratio":1.0,"height":2048,"width":2048,"src":"\/\/crystaldestiny.com\/cdn\/shop\/files\/Honey-Calcite-Sphere-56mm-Warm-Empowering-Crystal-Spheres-8.jpg?v=1759295662"},"aspect_ratio":1.0,"height":2048,"media_type":"image","src":"\/\/crystaldestiny.com\/cdn\/shop\/files\/Honey-Calcite-Sphere-56mm-Warm-Empowering-Crystal-Spheres-8.jpg?v=1759295662","width":2048}]
{"item":{"id":8488654078123,"title":"Enorme esfera de fluorita verde \"Canon Ball\" con soporte","handle":"huge-green-fluorite-canon-ball-sphere-w-t-stand-153mm-cd-10197","description":"\u003cp\u003eEsta enorme esfera de fluorita verde es un impresionante ejemplo de la belleza natural del cristal, pulida con maestría hasta formar un orbe liso y perfecto. Sus ricos tonos verdes y sutiles bandas resaltan las características únicas de la fluorita, convirtiéndola en una pieza destacada para cualquier colección. Conocida por su capacidad para mejorar la claridad mental y la concentración, la fluorita verde es utilizada a menudo por expertos para favorecer la toma de decisiones y el equilibrio emocional. Su forma esférica permite que la energía irradie uniformemente, creando una atmósfera armoniosa dondequiera que se coloque. Ideal para exhibir, meditar o practicar la cristaloterapia, esta gran esfera de fluorita combina atractivo estético con beneficios prácticos para quienes buscan profundizar su conexión con las energías naturales.\u003c\/p\u003e\n\n\u003cp\u003e Este producto es exactamente como se muestra en la imagen, único en su tipo.\u003c\/p\u003e","published_at":"2025-08-05T18:13:11-04:00","created_at":"2025-08-05T18:13:09-04:00","vendor":"Crystal Destiny","type":"Esferas","tags":["crystal","polished","spheres"],"price":69999,"price_min":69999,"price_max":69999,"available":true,"price_varies":false,"compare_at_price":0,"compare_at_price_min":0,"compare_at_price_max":0,"compare_at_price_varies":false,"variants":[{"id":45485178585259,"title":"Fluorita verde \/ 13,7 libras - 6,25\" de diámetro","option1":"Fluorita verde","option2":"13,7 libras - 6,25\" de diámetro","option3":null,"sku":"CD-10197","requires_shipping":true,"taxable":true,"featured_image":null,"available":true,"name":"Enorme esfera de fluorita verde \"Canon Ball\" con soporte - Fluorita verde \/ 13,7 libras - 6,25\" de diámetro","public_title":"Fluorita verde \/ 13,7 libras - 6,25\" de diámetro","options":["Fluorita verde","13,7 libras - 6,25\" de diámetro"],"price":69999,"weight":6214,"compare_at_price":0,"inventory_management":"shopify","barcode":"","requires_selling_plan":false,"selling_plan_allocations":[]}],"images":["\/\/crystaldestiny.com\/cdn\/shop\/files\/Huge-Green-Fluorite-Canon-Ball-Sphere-wt-Stand-153mm-Spheres.jpg?v=1757135492","\/\/crystaldestiny.com\/cdn\/shop\/files\/Huge-Green-Fluorite-Canon-Ball-Sphere-wt-Stand-153mm-Spheres-2.jpg?v=1757135495","\/\/crystaldestiny.com\/cdn\/shop\/files\/Huge-Green-Fluorite-Canon-Ball-Sphere-wt-Stand-153mm-Spheres-3.jpg?v=1757135497"],"featured_image":"\/\/crystaldestiny.com\/cdn\/shop\/files\/Huge-Green-Fluorite-Canon-Ball-Sphere-wt-Stand-153mm-Spheres.jpg?v=1757135492","options":["Material","Tamaño"],"media":[{"alt":"Huge Green Fluorite \"Canon Ball\" Sphere w\/t Stand 153mm-Spheres-Crystal Destiny-Green Fluorite-6214g - 153mm Diameter-Crystal Destiny","id":31570232508587,"position":1,"preview_image":{"aspect_ratio":1.0,"height":3776,"width":3776,"src":"\/\/crystaldestiny.com\/cdn\/shop\/files\/Huge-Green-Fluorite-Canon-Ball-Sphere-wt-Stand-153mm-Spheres.jpg?v=1757135492"},"aspect_ratio":1.0,"height":3776,"media_type":"image","src":"\/\/crystaldestiny.com\/cdn\/shop\/files\/Huge-Green-Fluorite-Canon-Ball-Sphere-wt-Stand-153mm-Spheres.jpg?v=1757135492","width":3776},{"alt":"Huge Green Fluorite \"Canon Ball\" Sphere w\/t Stand 153mm-Spheres-Crystal Destiny-Green Fluorite-6214g - 153mm Diameter-Crystal Destiny","id":31570232541355,"position":2,"preview_image":{"aspect_ratio":1.0,"height":3776,"width":3776,"src":"\/\/crystaldestiny.com\/cdn\/shop\/files\/Huge-Green-Fluorite-Canon-Ball-Sphere-wt-Stand-153mm-Spheres-2.jpg?v=1757135495"},"aspect_ratio":1.0,"height":3776,"media_type":"image","src":"\/\/crystaldestiny.com\/cdn\/shop\/files\/Huge-Green-Fluorite-Canon-Ball-Sphere-wt-Stand-153mm-Spheres-2.jpg?v=1757135495","width":3776},{"alt":"Huge Green Fluorite \"Canon Ball\" Sphere w\/t Stand 153mm-Spheres-Crystal Destiny-Green Fluorite-6214g - 153mm Diameter-Crystal Destiny","id":31570232574123,"position":3,"preview_image":{"aspect_ratio":1.0,"height":3776,"width":3776,"src":"\/\/crystaldestiny.com\/cdn\/shop\/files\/Huge-Green-Fluorite-Canon-Ball-Sphere-wt-Stand-153mm-Spheres-3.jpg?v=1757135497"},"aspect_ratio":1.0,"height":3776,"media_type":"image","src":"\/\/crystaldestiny.com\/cdn\/shop\/files\/Huge-Green-Fluorite-Canon-Ball-Sphere-wt-Stand-153mm-Spheres-3.jpg?v=1757135497","width":3776}],"requires_selling_plan":false,"selling_plan_groups":[],"content":"\u003cp\u003eEsta enorme esfera de fluorita verde es un impresionante ejemplo de la belleza natural del cristal, pulida con maestría hasta formar un orbe liso y perfecto. Sus ricos tonos verdes y sutiles bandas resaltan las características únicas de la fluorita, convirtiéndola en una pieza destacada para cualquier colección. Conocida por su capacidad para mejorar la claridad mental y la concentración, la fluorita verde es utilizada a menudo por expertos para favorecer la toma de decisiones y el equilibrio emocional. Su forma esférica permite que la energía irradie uniformemente, creando una atmósfera armoniosa dondequiera que se coloque. Ideal para exhibir, meditar o practicar la cristaloterapia, esta gran esfera de fluorita combina atractivo estético con beneficios prácticos para quienes buscan profundizar su conexión con las energías naturales.\u003c\/p\u003e\n\n\u003cp\u003e Este producto es exactamente como se muestra en la imagen, único en su tipo.\u003c\/p\u003e"},"options":[{"name":"Material","position":1,"values":["Fluorita verde"]},{"name":"Tamaño","position":2,"values":["13,7 libras - 6,25\" de diámetro"]}],"custom_metafields":{"shipping_time":"En un plazo de 7 días"},"metafields":{"badge":"\u003cdiv style='display:none' class='jdgm-prev-badge' data-average-rating='0.00' data-number-of-reviews='0' data-number-of-questions='0'\u003e \u003cspan class='jdgm-prev-badge__stars' data-score='0.00' tabindex='0' aria-label='0.00 stars' role='button'\u003e \u003cspan class='jdgm-star jdgm--off'\u003e\u003c\/span\u003e\u003cspan class='jdgm-star jdgm--off'\u003e\u003c\/span\u003e\u003cspan class='jdgm-star jdgm--off'\u003e\u003c\/span\u003e\u003cspan class='jdgm-star jdgm--off'\u003e\u003c\/span\u003e\u003cspan class='jdgm-star jdgm--off'\u003e\u003c\/span\u003e \u003c\/span\u003e \u003cspan class='jdgm-prev-badge__text'\u003e No reviews \u003c\/span\u003e \u003c\/div\u003e","widget":"\u003cdiv class='jdgm-rev-widg' data-updated-at='2025-08-05T22:14:23Z' data-average-rating='0.00' data-number-of-reviews='0' data-number-of-questions='0' data-image-url='https:\/\/cdn.shopify.com\/s\/files\/1\/0613\/0345\/5915\/files\/6I0A3559.jpg?v=1754431050'\u003e \u003cstyle class='jdgm-temp-hiding-style'\u003e.jdgm-rev-widg{ display: none }\u003c\/style\u003e \u003cdiv class='jdgm-rev-widg__header'\u003e \u003ch2 class='jdgm-rev-widg__title'\u003eCustomer Reviews\u003c\/h2\u003e \u003cdiv class='jdgm-rev-widg__summary'\u003e \u003cdiv class='jdgm-rev-widg__summary-stars' aria-label='Average rating is 0.00 stars' role='img'\u003e \u003cspan class='jdgm-star jdgm--off'\u003e\u003c\/span\u003e\u003cspan class='jdgm-star jdgm--off'\u003e\u003c\/span\u003e\u003cspan class='jdgm-star jdgm--off'\u003e\u003c\/span\u003e\u003cspan class='jdgm-star jdgm--off'\u003e\u003c\/span\u003e\u003cspan class='jdgm-star jdgm--off'\u003e\u003c\/span\u003e \u003c\/div\u003e \u003cdiv class='jdgm-rev-widg__summary-text'\u003eBe the first to write a review\u003c\/div\u003e \u003c\/div\u003e \u003ca style='display: none' href='#' class='jdgm-write-rev-link' role='button'\u003eWrite a review\u003c\/a\u003e \u003cdiv class='jdgm-histogram jdgm-temp-hidden'\u003e \u003cdiv class='jdgm-histogram__row' data-rating='5' data-frequency='0' data-percentage='0'\u003e \u003cdiv class='jdgm-histogram__star' role='button' aria-label=\"0% (0) reviews with 5 star rating\" tabindex='0' \u003e\u003cspan class='jdgm-star jdgm--on'\u003e\u003c\/span\u003e\u003cspan class='jdgm-star jdgm--on'\u003e\u003c\/span\u003e\u003cspan class='jdgm-star jdgm--on'\u003e\u003c\/span\u003e\u003cspan class='jdgm-star jdgm--on'\u003e\u003c\/span\u003e\u003cspan class='jdgm-star jdgm--on'\u003e\u003c\/span\u003e\u003c\/div\u003e \u003cdiv class='jdgm-histogram__bar'\u003e \u003cdiv class='jdgm-histogram__bar-content' style='width: 0%;'\u003e \u003c\/div\u003e \u003c\/div\u003e \u003cdiv class='jdgm-histogram__percentage'\u003e0%\u003c\/div\u003e \u003cdiv class='jdgm-histogram__frequency'\u003e(0)\u003c\/div\u003e \u003c\/div\u003e \u003cdiv class='jdgm-histogram__row' data-rating='4' data-frequency='0' data-percentage='0'\u003e \u003cdiv class='jdgm-histogram__star' role='button' aria-label=\"0% (0) reviews with 4 star rating\" tabindex='0' \u003e\u003cspan class='jdgm-star jdgm--on'\u003e\u003c\/span\u003e\u003cspan class='jdgm-star jdgm--on'\u003e\u003c\/span\u003e\u003cspan class='jdgm-star jdgm--on'\u003e\u003c\/span\u003e\u003cspan class='jdgm-star jdgm--on'\u003e\u003c\/span\u003e\u003cspan class='jdgm-star jdgm--off'\u003e\u003c\/span\u003e\u003c\/div\u003e \u003cdiv class='jdgm-histogram__bar'\u003e \u003cdiv class='jdgm-histogram__bar-content' style='width: 0%;'\u003e \u003c\/div\u003e \u003c\/div\u003e \u003cdiv class='jdgm-histogram__percentage'\u003e0%\u003c\/div\u003e \u003cdiv class='jdgm-histogram__frequency'\u003e(0)\u003c\/div\u003e \u003c\/div\u003e \u003cdiv class='jdgm-histogram__row' data-rating='3' data-frequency='0' data-percentage='0'\u003e \u003cdiv class='jdgm-histogram__star' role='button' aria-label=\"0% (0) reviews with 3 star rating\" tabindex='0' \u003e\u003cspan class='jdgm-star jdgm--on'\u003e\u003c\/span\u003e\u003cspan class='jdgm-star jdgm--on'\u003e\u003c\/span\u003e\u003cspan class='jdgm-star jdgm--on'\u003e\u003c\/span\u003e\u003cspan class='jdgm-star jdgm--off'\u003e\u003c\/span\u003e\u003cspan class='jdgm-star jdgm--off'\u003e\u003c\/span\u003e\u003c\/div\u003e \u003cdiv class='jdgm-histogram__bar'\u003e \u003cdiv class='jdgm-histogram__bar-content' style='width: 0%;'\u003e \u003c\/div\u003e \u003c\/div\u003e \u003cdiv class='jdgm-histogram__percentage'\u003e0%\u003c\/div\u003e \u003cdiv class='jdgm-histogram__frequency'\u003e(0)\u003c\/div\u003e \u003c\/div\u003e \u003cdiv class='jdgm-histogram__row' data-rating='2' data-frequency='0' data-percentage='0'\u003e \u003cdiv class='jdgm-histogram__star' role='button' aria-label=\"0% (0) reviews with 2 star rating\" tabindex='0' \u003e\u003cspan class='jdgm-star jdgm--on'\u003e\u003c\/span\u003e\u003cspan class='jdgm-star jdgm--on'\u003e\u003c\/span\u003e\u003cspan class='jdgm-star jdgm--off'\u003e\u003c\/span\u003e\u003cspan class='jdgm-star jdgm--off'\u003e\u003c\/span\u003e\u003cspan class='jdgm-star jdgm--off'\u003e\u003c\/span\u003e\u003c\/div\u003e \u003cdiv class='jdgm-histogram__bar'\u003e \u003cdiv class='jdgm-histogram__bar-content' style='width: 0%;'\u003e \u003c\/div\u003e \u003c\/div\u003e \u003cdiv class='jdgm-histogram__percentage'\u003e0%\u003c\/div\u003e \u003cdiv class='jdgm-histogram__frequency'\u003e(0)\u003c\/div\u003e \u003c\/div\u003e \u003cdiv class='jdgm-histogram__row' data-rating='1' data-frequency='0' data-percentage='0'\u003e \u003cdiv class='jdgm-histogram__star' role='button' aria-label=\"0% (0) reviews with 1 star rating\" tabindex='0' \u003e\u003cspan class='jdgm-star jdgm--on'\u003e\u003c\/span\u003e\u003cspan class='jdgm-star jdgm--off'\u003e\u003c\/span\u003e\u003cspan class='jdgm-star jdgm--off'\u003e\u003c\/span\u003e\u003cspan class='jdgm-star jdgm--off'\u003e\u003c\/span\u003e\u003cspan class='jdgm-star jdgm--off'\u003e\u003c\/span\u003e\u003c\/div\u003e \u003cdiv class='jdgm-histogram__bar'\u003e \u003cdiv class='jdgm-histogram__bar-content' style='width: 0%;'\u003e \u003c\/div\u003e \u003c\/div\u003e \u003cdiv class='jdgm-histogram__percentage'\u003e0%\u003c\/div\u003e \u003cdiv class='jdgm-histogram__frequency'\u003e(0)\u003c\/div\u003e \u003c\/div\u003e \u003cdiv class='jdgm-histogram__row jdgm-histogram__clear-filter' data-rating=null tabindex='0'\u003e\u003c\/div\u003e \u003c\/div\u003e \u003cdiv class='jdgm-rev-widg__sort-wrapper'\u003e\u003c\/div\u003e \u003c\/div\u003e \u003cdiv class='jdgm-rev-widg__body'\u003e \u003cdiv class='jdgm-rev-widg__reviews'\u003e\u003c\/div\u003e \u003cdiv class='jdgm-paginate' data-per-page='4' data-url='https:\/\/api.judge.me\/reviews\/reviews_for_widget' style=\"display: none;\"\u003e\u003c\/div\u003e \u003c\/div\u003e \u003cdiv class='jdgm-rev-widg__paginate-spinner-wrapper'\u003e \u003cdiv class='jdgm-spinner'\u003e\u003c\/div\u003e \u003c\/div\u003e \u003c\/div\u003e"},"collections":[{"id":305307320491,"handle":"collectors-corner","title":"VIP Collector's Vault","updated_at":"2026-01-06T23:24:37-05:00","body_html":"\u003cp data-start=\"131\" data-end=\"457\"\u003e✨ \u003cstrong data-start=\"133\" data-end=\"173\"\u003eWelcome to the VIP Collector’s Vault\u003c\/strong\u003e ✨\u003cbr data-start=\"175\" data-end=\"178\"\u003eStep into a world of unparalleled elegance with our \u003cstrong data-start=\"230\" data-end=\"255\"\u003eVIP Collector’s Vault\u003c\/strong\u003e, where only the most exquisite high-end crystals reside. Each piece in this exclusive collection is valued at over $500 and carefully selected for its exceptional quality, rarity, and natural beauty.\u003c\/p\u003e\n\u003cp data-start=\"459\" data-end=\"652\"\u003ePerfect for seasoned collectors, those seeking a luxurious addition to their collection, or anyone looking for a truly unique gift, these crystals represent the pinnacle of nature’s artistry.\u003c\/p\u003e\n\u003cp data-start=\"654\" data-end=\"818\"\u003eExplore the VIP Collector’s Vault today and discover treasures that embody sophistication, craftsmanship, and the timeless allure of the Earth’s finest offerings.\u003c\/p\u003e","published_at":"2024-06-21T11:19:44-04:00","sort_order":"created-desc","template_suffix":"collectors-corner","disjunctive":false,"rules":[{"column":"variant_price","relation":"greater_than","condition":"499.99"},{"column":"variant_inventory","relation":"greater_than","condition":"0"}],"published_scope":"global"},{"id":294880051371,"handle":"crystals","title":"Crystals","updated_at":"2026-01-07T23:43:11-05:00","body_html":"\u003cp data-start=\"159\" data-end=\"687\"\u003e✨ \u003cstrong data-start=\"161\" data-end=\"216\"\u003eDiscover the Magic of Crystals with Crystal Destiny\u003c\/strong\u003e ✨\u003cbr data-start=\"218\" data-end=\"221\"\u003eCrystals have been treasured for centuries—not only for their natural beauty but also for their powerful healing energies. Beyond their visual allure, they bring balance, harmony, and positive energy into any space. Whether used for home décor, meditation, or simply to elevate the energy of your surroundings, crystals create a sanctuary of peace, relaxation, and well-being. Each piece is a unique gift from the Earth—visually stunning and spiritually uplifting.\u003c\/p\u003e\n\u003cp data-start=\"689\" data-end=\"1011\"\u003eAt \u003cstrong data-start=\"692\" data-end=\"711\"\u003eCrystal Destiny\u003c\/strong\u003e, our signature collection showcases a curated selection of exquisite crystals, from radiant Quartz to soothing Amethyst. Every stone is carefully sourced for its elegance and metaphysical resonance, making them perfect for enhancing your home, uplifting your spirit, or gifting to someone special.\u003c\/p\u003e\n\u003cp data-start=\"1013\" data-end=\"1206\"\u003eExperience the timeless sophistication of crystalline wonders. Explore the \u003cstrong data-start=\"1088\" data-end=\"1118\"\u003eCrystal Destiny Collection\u003c\/strong\u003e today and bring the transformative beauty of these treasures into your everyday life.\u003c\/p\u003e","published_at":"2023-06-05T11:24:02-04:00","sort_order":"created-desc","template_suffix":"","disjunctive":false,"rules":[{"column":"tag","relation":"equals","condition":"crystal"},{"column":"type","relation":"not_contains","condition":"925 Sterling Silver"},{"column":"type","relation":"not_contains","condition":"Wire Wraps"}],"published_scope":"global"},{"id":319455887531,"handle":"heart-chakra-crystals","title":"Heart Chakra Crystals","updated_at":"2026-01-07T23:43:11-05:00","body_html":"\u003cp data-start=\"107\" data-end=\"457\"\u003e✨ \u003cstrong data-start=\"109\" data-end=\"134\"\u003eHeart Chakra Crystals\u003c\/strong\u003e ✨\u003cbr data-start=\"136\" data-end=\"139\"\u003eOpen your heart to love, compassion, and emotional balance with our \u003cstrong data-start=\"207\" data-end=\"232\"\u003eHeart Chakra Crystals\u003c\/strong\u003e. Located at the center of the chest, the Heart Chakra governs love, forgiveness, and connection to yourself and others. These crystals help release emotional blockages, foster empathy, and promote harmonious relationships.\u003c\/p\u003e\n\u003cp data-start=\"459\" data-end=\"773\"\u003eOur curated selection includes stones such as Rose Quartz, Green Aventurine, and Rhodonite—each chosen for their ability to inspire self-love, emotional healing, and compassion. Perfect for meditation, energy work, or wearing as jewelry, Heart Chakra Crystals support the flow of loving energy and inner harmony.\u003c\/p\u003e\n\u003cp data-start=\"775\" data-end=\"906\"\u003eEmbrace emotional balance, cultivate love, and harness the transformative energy of the Heart Chakra with these radiant crystals.\u003c\/p\u003e","published_at":"2025-07-17T18:17:52-04:00","sort_order":"best-selling","template_suffix":"","disjunctive":false,"rules":[{"column":"variant_metafield_definition","relation":"equals","condition":"Heart"}],"published_scope":"global","image":{"created_at":"2025-07-17T19:08:29-04:00","alt":null,"width":1080,"height":1080,"src":"\/\/crystaldestiny.com\/cdn\/shop\/collections\/Heart_Chakra_Collection.jpg?v=1762474927"}},{"id":294880116907,"handle":"polished","title":"Polished Crystals","updated_at":"2026-01-07T23:43:11-05:00","body_html":"\u003cp data-start=\"199\" data-end=\"598\"\u003e✨ \u003cstrong data-start=\"201\" data-end=\"248\"\u003eCrystal Destiny Polished Crystal Collection\u003c\/strong\u003e ✨\u003cbr data-start=\"250\" data-end=\"253\"\u003eIndulge in the brilliance of crystals refined to perfection. Our \u003cstrong data-start=\"318\" data-end=\"341\"\u003ePolished Collection\u003c\/strong\u003e showcases gemstones meticulously shaped and smoothed to reveal their natural radiance and timeless beauty. From the shimmering glow of Quartz to the deep allure of Obsidian, each polished piece is a testament to nature’s artistry and human craftsmanship.\u003c\/p\u003e\n\u003cp data-start=\"600\" data-end=\"862\"\u003ePerfect as statement décor, meaningful gifts, or companions on your spiritual journey, polished crystals bring sophistication and elevated energy into any space. Their radiant surfaces reflect not only light but also the transformative power of crystal energy.\u003c\/p\u003e\n\u003cp data-start=\"864\" data-end=\"1022\"\u003eDiscover the elegance of refinement with Crystal Destiny’s Polished Crystal Collection—where every facet shines with intention, beauty, and timeless allure.\u003c\/p\u003e","published_at":"2023-06-05T11:30:44-04:00","sort_order":"created-desc","template_suffix":"","disjunctive":false,"rules":[{"column":"tag","relation":"equals","condition":"polished"}],"published_scope":"global"},{"id":295698202795,"handle":"spheres","title":"Crystal Spheres","updated_at":"2026-01-06T23:24:35-05:00","body_html":"\u003cp data-start=\"106\" data-end=\"370\"\u003e✨ \u003cstrong data-start=\"108\" data-end=\"138\"\u003eCrystal Spheres Collection\u003c\/strong\u003e ✨\u003cbr data-start=\"140\" data-end=\"143\"\u003eBring harmony, balance, and elegance into your space with our \u003cstrong data-start=\"205\" data-end=\"235\"\u003eCrystal Spheres Collection\u003c\/strong\u003e. Each sphere is meticulously crafted to showcase the natural beauty and energy of crystals, from radiant Quartz to calming Amethyst.\u003c\/p\u003e\n\u003cp data-start=\"372\" data-end=\"658\"\u003ePerfect for meditation, energy work, or as striking décor, crystal spheres radiate energy in all directions, promoting clarity, focus, and a sense of calm. Their smooth, polished surfaces highlight the stones’ natural patterns and colors, making each sphere a captivating centerpiece.\u003c\/p\u003e\n\u003cp data-start=\"660\" data-end=\"809\"\u003eElevate your space and embrace the transformative power of crystals with the \u003cstrong data-start=\"737\" data-end=\"767\"\u003eCrystal Spheres Collection\u003c\/strong\u003e—where beauty, energy, and harmony meet.\u003c\/p\u003e","published_at":"2023-07-28T14:20:46-04:00","sort_order":"created-desc","template_suffix":"","disjunctive":true,"rules":[{"column":"tag","relation":"equals","condition":"spheres"},{"column":"tag","relation":"equals","condition":"eggs"}],"published_scope":"global"},{"id":293659312299,"handle":"best-sellers","title":"Best Sellers","updated_at":"2026-01-07T23:43:11-05:00","body_html":"\u003cp data-start=\"155\" data-end=\"510\"\u003eDiscover the pieces our community loves most. Our Best Sellers Collection brings together handpicked crystals and jewelry that embody timeless elegance, spiritual resonance, and everyday sophistication. Each item has earned its place as a customer favorite—celebrated for both its beauty and its meaningful energy.\u003c\/p\u003e\n\u003cp data-start=\"512\" data-end=\"802\"\u003eFrom stunning statement pieces to versatile daily companions, these treasures are curated to elevate your space, uplift your spirit, and reflect refined taste. Indulge in what’s most cherished and let our best sellers guide you toward the perfect blend of style and transformative energy.\u003c\/p\u003e\n\u003cp data-start=\"804\" data-end=\"932\"\u003eExplore the Best Sellers Collection today—where elegance meets intention, and every piece tells a story of beauty and balance.\u003c\/p\u003e","published_at":"2023-03-15T16:04:51-04:00","sort_order":"best-selling","template_suffix":"","disjunctive":false,"rules":[{"column":"variant_price","relation":"greater_than","condition":"0"},{"column":"variant_inventory","relation":"greater_than","condition":"0"},{"column":"type","relation":"not_equals","condition":"Shipping Protection"}],"published_scope":"global"},{"id":321370390699,"handle":"monthly-crystal-sale","title":"Monthly Crystal Sale | Spheres \u0026 Towers","updated_at":"2026-01-06T23:24:37-05:00","body_html":"\u003cp\u003eShop our \u003cstrong\u003eMonthly Crystal Sale\u003c\/strong\u003e, where you can shop a wide selection of healing crystals at discounted prices. Explore \u003cstrong\u003ecrystal spheres and towers,\u003c\/strong\u003e— all carefully curated to support meditation, energy balancing, and spiritual wellness. Whether you're looking to enhance your home decor, boost your daily energy, or find the perfect gift, our \u003cstrong\u003ecrystals for healing and manifestation\u003c\/strong\u003e offer both beauty and metaphysical benefits.\u003c\/p\u003e\n\u003cp\u003eEach month, our sale features \u003cstrong\u003enew discounted collections\u003c\/strong\u003e, from \u003cstrong\u003enatural quartz and amethyst towers\u003c\/strong\u003e to \u003cstrong\u003ewire-wrapped pendants and polished stones\u003c\/strong\u003e, so there's always something fresh to discover. Shop with confidence knowing you're getting high-quality crystals with \u003cstrong\u003efree shipping options\u003c\/strong\u003e and a trusted experience.\u003c\/p\u003e\n\u003cp\u003e\u003cstrong\u003eTake advantage of the Monthly Crystal Sale today\u003c\/strong\u003e and add powerful, natural energy to your life with \u003cstrong\u003eauthentic healing crystals\u003c\/strong\u003e — while our limited-time discounts last.\u003c\/p\u003e\n\u003cp\u003e\u003cstrong\u003e*Discount automatically applied at checkout.\u003c\/strong\u003e\u003c\/p\u003e","published_at":"2025-12-02T01:26:17-05:00","sort_order":"alpha-asc","template_suffix":"","disjunctive":true,"rules":[{"column":"tag","relation":"equals","condition":"spheres"},{"column":"tag","relation":"equals","condition":"Towers"}],"published_scope":"global","image":{"created_at":"2026-01-01T01:32:34-05:00","alt":"","width":960,"height":960,"src":"\/\/crystaldestiny.com\/cdn\/shop\/collections\/3E8C2969-1B86-4ACE-B349-98E9D8768424.jpg?v=1767249154"}},{"id":297596059819,"handle":"all","title":"All Crystals \u0026 Jewelry","updated_at":"2026-01-07T23:43:11-05:00","body_html":"\u003cp data-start=\"149\" data-end=\"494\"\u003e✨ \u003cstrong data-start=\"151\" data-end=\"181\"\u003eWelcome to Crystal Destiny\u003c\/strong\u003e ✨\u003cbr data-start=\"183\" data-end=\"186\"\u003eStep into a world where beauty, energy, and artistry unite. Our collection is a treasure trove of exquisite crystals, from the raw, untamed elegance of natural formations to the polished brilliance of expertly crafted pieces. Each crystal is a masterpiece, carrying its own unique story and timeless charm.\u003c\/p\u003e\n\u003cp data-start=\"496\" data-end=\"831\"\u003eWhether you’re drawn to the calming presence of Amethyst, the vibrant energy of Citrine, or the grounding strength of Jasper, our crystals invite you to connect with nature’s finest wonders. Perfect for enhancing your space, supporting your spiritual journey, or gifting with intention, every piece resonates with beauty and meaning.\u003c\/p\u003e\n\u003cp data-start=\"833\" data-end=\"1000\"\u003eElevate your surroundings, embrace the mystique, and explore the enchanting world of crystals at \u003cstrong data-start=\"930\" data-end=\"949\"\u003eCrystal Destiny\u003c\/strong\u003e—where every crystal is waiting to be discovered.\u003c\/p\u003e","published_at":"2023-11-10T13:55:31-05:00","sort_order":"created-desc","template_suffix":"","disjunctive":false,"rules":[{"column":"type","relation":"not_equals","condition":"asdf"}],"published_scope":"global"},{"id":298983391403,"handle":"january-crystal-sale","title":"January Sale | 25% Off Crystal Towers \u0026 Spheres","updated_at":"2026-01-06T23:24:37-05:00","body_html":"\u003cp\u003eShop our \u003cstrong\u003eJanuary Crystal Sale\u003c\/strong\u003e, where you can shop a wide selection of healing crystals at discounted prices. Explore \u003cstrong\u003eCrystal Towers, \u0026amp; Crystal Spheres\u003c\/strong\u003e — all carefully curated and crafted to support meditation, energy balancing, and spiritual wellness. Whether you're looking to enhance your home decor, boost your daily energy, or find the perfect gift, our \u003cstrong\u003ecrystals for healing and manifestation\u003c\/strong\u003e offer both beauty and metaphysical benefits.\u003c\/p\u003e\n\u003cp\u003eThis January, our sale features \u003cstrong\u003ediscounted crystal towers and spheres\u003c\/strong\u003e, from \u003cstrong\u003enatural quartz \u003c\/strong\u003eand \u003cstrong\u003eamethyst \u003c\/strong\u003eto \u003cstrong\u003ebumblebee jasper \u003c\/strong\u003eand \u003cstrong\u003ecarnelian\u003c\/strong\u003e, so there's always something fresh to discover. Shop with confidence knowing you're getting high-quality crystals with \u003cstrong\u003efree shipping options\u003c\/strong\u003e and a trusted experience.\u003c\/p\u003e\n\u003cp\u003e\u003cstrong\u003eTake advantage of the January Crystal Sale today\u003c\/strong\u003e and add powerful, natural energy to your life with \u003cstrong\u003eauthentic healing crystals\u003c\/strong\u003e — while our limited-time discounts last.\u003c\/p\u003e\n\u003cp\u003e\u003cstrong\u003e*Discount automatically applied at checkout.\u003c\/strong\u003e\u003c\/p\u003e","published_at":"2026-01-01T00:07:17-05:00","sort_order":"alpha-asc","template_suffix":"monthly-collection","disjunctive":true,"rules":[{"column":"tag","relation":"equals","condition":"Spheres"},{"column":"tag","relation":"equals","condition":"Towers"}],"published_scope":"global","image":{"created_at":"2026-01-01T01:29:59-05:00","alt":"","width":960,"height":960,"src":"\/\/crystaldestiny.com\/cdn\/shop\/collections\/1464163B-22B1-4D62-BEC5-CEC9AECB670B.jpg?v=1767248999"}}]}
[{"alt":"Huge Green Fluorite \"Canon Ball\" Sphere w\/t Stand 153mm-Spheres-Crystal Destiny-Green Fluorite-6214g - 153mm Diameter-Crystal Destiny","id":31570232508587,"position":1,"preview_image":{"aspect_ratio":1.0,"height":3776,"width":3776,"src":"\/\/crystaldestiny.com\/cdn\/shop\/files\/Huge-Green-Fluorite-Canon-Ball-Sphere-wt-Stand-153mm-Spheres.jpg?v=1757135492"},"aspect_ratio":1.0,"height":3776,"media_type":"image","src":"\/\/crystaldestiny.com\/cdn\/shop\/files\/Huge-Green-Fluorite-Canon-Ball-Sphere-wt-Stand-153mm-Spheres.jpg?v=1757135492","width":3776},{"alt":"Huge Green Fluorite \"Canon Ball\" Sphere w\/t Stand 153mm-Spheres-Crystal Destiny-Green Fluorite-6214g - 153mm Diameter-Crystal Destiny","id":31570232541355,"position":2,"preview_image":{"aspect_ratio":1.0,"height":3776,"width":3776,"src":"\/\/crystaldestiny.com\/cdn\/shop\/files\/Huge-Green-Fluorite-Canon-Ball-Sphere-wt-Stand-153mm-Spheres-2.jpg?v=1757135495"},"aspect_ratio":1.0,"height":3776,"media_type":"image","src":"\/\/crystaldestiny.com\/cdn\/shop\/files\/Huge-Green-Fluorite-Canon-Ball-Sphere-wt-Stand-153mm-Spheres-2.jpg?v=1757135495","width":3776},{"alt":"Huge Green Fluorite \"Canon Ball\" Sphere w\/t Stand 153mm-Spheres-Crystal Destiny-Green Fluorite-6214g - 153mm Diameter-Crystal Destiny","id":31570232574123,"position":3,"preview_image":{"aspect_ratio":1.0,"height":3776,"width":3776,"src":"\/\/crystaldestiny.com\/cdn\/shop\/files\/Huge-Green-Fluorite-Canon-Ball-Sphere-wt-Stand-153mm-Spheres-3.jpg?v=1757135497"},"aspect_ratio":1.0,"height":3776,"media_type":"image","src":"\/\/crystaldestiny.com\/cdn\/shop\/files\/Huge-Green-Fluorite-Canon-Ball-Sphere-wt-Stand-153mm-Spheres-3.jpg?v=1757135497","width":3776}]
{"item":{"id":8497196466347,"title":"Indigo Gabbro Sphere 40mm","handle":"indigo-gabbro-sphere-40mm-cd-10229","description":"\u003cp\u003eThe Indigo Gabbro Sphere is a captivating natural stone, prized for its deep blue and gray hues. Renowned for its grounding energy, this sphere promotes balance and clarity, making it an essential tool for focused meditation and spiritual work. Its smooth, polished surface allows easy handling, enhancing connection to its unique vibrational properties. Ideal for collectors and practitioners seeking a blend of aesthetic beauty and metaphysical benefit.\u003c\/p\u003e\n\u003cp\u003eThis product is an exact pick as pictured, one of a kind.\u003c\/p\u003e\n\u003cp\u003e \u003c\/p\u003e","published_at":"2025-08-15T16:57:54-04:00","created_at":"2025-08-15T16:57:35-04:00","vendor":"Crystal Destiny","type":"Spheres","tags":["crystal","polished","spheres"],"price":2499,"price_min":2499,"price_max":2499,"available":true,"price_varies":false,"compare_at_price":null,"compare_at_price_min":0,"compare_at_price_max":0,"compare_at_price_varies":false,"variants":[{"id":45522834194603,"title":"Indigo Gabbro \/ 110g - 40mm","option1":"Indigo Gabbro","option2":"110g - 40mm","option3":null,"sku":"CD-10229","requires_shipping":true,"taxable":true,"featured_image":null,"available":true,"name":"Indigo Gabbro Sphere 40mm - Indigo Gabbro \/ 110g - 40mm","public_title":"Indigo Gabbro \/ 110g - 40mm","options":["Indigo Gabbro","110g - 40mm"],"price":2499,"weight":0,"compare_at_price":null,"inventory_management":"shopify","barcode":"","requires_selling_plan":false,"selling_plan_allocations":[]}],"images":["\/\/crystaldestiny.com\/cdn\/shop\/files\/Indigo-Gabbro-Sphere-40mm-Spheres.jpg?v=1757135612","\/\/crystaldestiny.com\/cdn\/shop\/files\/Indigo-Gabbro-Sphere-40mm-Spheres-2.jpg?v=1757135613","\/\/crystaldestiny.com\/cdn\/shop\/files\/Indigo-Gabbro-Sphere-40mm-Spheres-3.jpg?v=1757135615"],"featured_image":"\/\/crystaldestiny.com\/cdn\/shop\/files\/Indigo-Gabbro-Sphere-40mm-Spheres.jpg?v=1757135612","options":["Material","Size"],"media":[{"alt":"Indigo Gabbro Sphere 40mm-Spheres-Crystal Destiny-Indigo Gabbro-110g - 40mm-Crystal Destiny","id":31627535745195,"position":1,"preview_image":{"aspect_ratio":1.0,"height":1051,"width":1051,"src":"\/\/crystaldestiny.com\/cdn\/shop\/files\/Indigo-Gabbro-Sphere-40mm-Spheres.jpg?v=1757135612"},"aspect_ratio":1.0,"height":1051,"media_type":"image","src":"\/\/crystaldestiny.com\/cdn\/shop\/files\/Indigo-Gabbro-Sphere-40mm-Spheres.jpg?v=1757135612","width":1051},{"alt":"Indigo Gabbro Sphere 40mm-Spheres-Crystal Destiny-Indigo Gabbro-110g - 40mm-Crystal Destiny","id":31627535810731,"position":2,"preview_image":{"aspect_ratio":1.0,"height":1083,"width":1083,"src":"\/\/crystaldestiny.com\/cdn\/shop\/files\/Indigo-Gabbro-Sphere-40mm-Spheres-2.jpg?v=1757135613"},"aspect_ratio":1.0,"height":1083,"media_type":"image","src":"\/\/crystaldestiny.com\/cdn\/shop\/files\/Indigo-Gabbro-Sphere-40mm-Spheres-2.jpg?v=1757135613","width":1083},{"alt":"Indigo Gabbro Sphere 40mm-Spheres-Crystal Destiny-Indigo Gabbro-110g - 40mm-Crystal Destiny","id":31627535843499,"position":3,"preview_image":{"aspect_ratio":1.0,"height":1069,"width":1069,"src":"\/\/crystaldestiny.com\/cdn\/shop\/files\/Indigo-Gabbro-Sphere-40mm-Spheres-3.jpg?v=1757135615"},"aspect_ratio":1.0,"height":1069,"media_type":"image","src":"\/\/crystaldestiny.com\/cdn\/shop\/files\/Indigo-Gabbro-Sphere-40mm-Spheres-3.jpg?v=1757135615","width":1069}],"requires_selling_plan":false,"selling_plan_groups":[],"content":"\u003cp\u003eThe Indigo Gabbro Sphere is a captivating natural stone, prized for its deep blue and gray hues. Renowned for its grounding energy, this sphere promotes balance and clarity, making it an essential tool for focused meditation and spiritual work. Its smooth, polished surface allows easy handling, enhancing connection to its unique vibrational properties. Ideal for collectors and practitioners seeking a blend of aesthetic beauty and metaphysical benefit.\u003c\/p\u003e\n\u003cp\u003eThis product is an exact pick as pictured, one of a kind.\u003c\/p\u003e\n\u003cp\u003e \u003c\/p\u003e"},"options":[{"name":"Material","position":1,"values":["Indigo Gabbro"]},{"name":"Size","position":2,"values":["110g - 40mm"]}],"custom_metafields":{"shipping_time":"Within 7 days"},"metafields":{"badge":"\u003cdiv style='display:none' class='jdgm-prev-badge' data-average-rating='0.00' data-number-of-reviews='0' data-number-of-questions='0'\u003e \u003cspan class='jdgm-prev-badge__stars' data-score='0.00' tabindex='0' aria-label='0.00 stars' role='button'\u003e \u003cspan class='jdgm-star jdgm--off'\u003e\u003c\/span\u003e\u003cspan class='jdgm-star jdgm--off'\u003e\u003c\/span\u003e\u003cspan class='jdgm-star jdgm--off'\u003e\u003c\/span\u003e\u003cspan class='jdgm-star jdgm--off'\u003e\u003c\/span\u003e\u003cspan class='jdgm-star jdgm--off'\u003e\u003c\/span\u003e \u003c\/span\u003e \u003cspan class='jdgm-prev-badge__text'\u003e No reviews \u003c\/span\u003e \u003c\/div\u003e","widget":"\u003cdiv class='jdgm-rev-widg' data-updated-at='2025-08-15T20:59:06Z' data-average-rating='0.00' data-number-of-reviews='0' data-number-of-questions='0' data-image-url='https:\/\/cdn.shopify.com\/s\/files\/1\/0613\/0345\/5915\/files\/6I0A3672.jpg?v=1755291262'\u003e \u003cstyle class='jdgm-temp-hiding-style'\u003e.jdgm-rev-widg{ display: none }\u003c\/style\u003e \u003cdiv class='jdgm-rev-widg__header'\u003e \u003ch2 class='jdgm-rev-widg__title'\u003eCustomer Reviews\u003c\/h2\u003e \u003cdiv class='jdgm-rev-widg__summary'\u003e \u003cdiv class='jdgm-rev-widg__summary-stars' aria-label='Average rating is 0.00 stars' role='img'\u003e \u003cspan class='jdgm-star jdgm--off'\u003e\u003c\/span\u003e\u003cspan class='jdgm-star jdgm--off'\u003e\u003c\/span\u003e\u003cspan class='jdgm-star jdgm--off'\u003e\u003c\/span\u003e\u003cspan class='jdgm-star jdgm--off'\u003e\u003c\/span\u003e\u003cspan class='jdgm-star jdgm--off'\u003e\u003c\/span\u003e \u003c\/div\u003e \u003cdiv class='jdgm-rev-widg__summary-text'\u003eBe the first to write a review\u003c\/div\u003e \u003c\/div\u003e \u003ca style='display: none' href='#' class='jdgm-write-rev-link' role='button'\u003eWrite a review\u003c\/a\u003e \u003cdiv class='jdgm-histogram jdgm-temp-hidden'\u003e \u003cdiv class='jdgm-histogram__row' data-rating='5' data-frequency='0' data-percentage='0'\u003e \u003cdiv class='jdgm-histogram__star' role='button' aria-label=\"0% (0) reviews with 5 star rating\" tabindex='0' \u003e\u003cspan class='jdgm-star jdgm--on'\u003e\u003c\/span\u003e\u003cspan class='jdgm-star jdgm--on'\u003e\u003c\/span\u003e\u003cspan class='jdgm-star jdgm--on'\u003e\u003c\/span\u003e\u003cspan class='jdgm-star jdgm--on'\u003e\u003c\/span\u003e\u003cspan class='jdgm-star jdgm--on'\u003e\u003c\/span\u003e\u003c\/div\u003e \u003cdiv class='jdgm-histogram__bar'\u003e \u003cdiv class='jdgm-histogram__bar-content' style='width: 0%;'\u003e \u003c\/div\u003e \u003c\/div\u003e \u003cdiv class='jdgm-histogram__percentage'\u003e0%\u003c\/div\u003e \u003cdiv class='jdgm-histogram__frequency'\u003e(0)\u003c\/div\u003e \u003c\/div\u003e \u003cdiv class='jdgm-histogram__row' data-rating='4' data-frequency='0' data-percentage='0'\u003e \u003cdiv class='jdgm-histogram__star' role='button' aria-label=\"0% (0) reviews with 4 star rating\" tabindex='0' \u003e\u003cspan class='jdgm-star jdgm--on'\u003e\u003c\/span\u003e\u003cspan class='jdgm-star jdgm--on'\u003e\u003c\/span\u003e\u003cspan class='jdgm-star jdgm--on'\u003e\u003c\/span\u003e\u003cspan class='jdgm-star jdgm--on'\u003e\u003c\/span\u003e\u003cspan class='jdgm-star jdgm--off'\u003e\u003c\/span\u003e\u003c\/div\u003e \u003cdiv class='jdgm-histogram__bar'\u003e \u003cdiv class='jdgm-histogram__bar-content' style='width: 0%;'\u003e \u003c\/div\u003e \u003c\/div\u003e \u003cdiv class='jdgm-histogram__percentage'\u003e0%\u003c\/div\u003e \u003cdiv class='jdgm-histogram__frequency'\u003e(0)\u003c\/div\u003e \u003c\/div\u003e \u003cdiv class='jdgm-histogram__row' data-rating='3' data-frequency='0' data-percentage='0'\u003e \u003cdiv class='jdgm-histogram__star' role='button' aria-label=\"0% (0) reviews with 3 star rating\" tabindex='0' \u003e\u003cspan class='jdgm-star jdgm--on'\u003e\u003c\/span\u003e\u003cspan class='jdgm-star jdgm--on'\u003e\u003c\/span\u003e\u003cspan class='jdgm-star jdgm--on'\u003e\u003c\/span\u003e\u003cspan class='jdgm-star jdgm--off'\u003e\u003c\/span\u003e\u003cspan class='jdgm-star jdgm--off'\u003e\u003c\/span\u003e\u003c\/div\u003e \u003cdiv class='jdgm-histogram__bar'\u003e \u003cdiv class='jdgm-histogram__bar-content' style='width: 0%;'\u003e \u003c\/div\u003e \u003c\/div\u003e \u003cdiv class='jdgm-histogram__percentage'\u003e0%\u003c\/div\u003e \u003cdiv class='jdgm-histogram__frequency'\u003e(0)\u003c\/div\u003e \u003c\/div\u003e \u003cdiv class='jdgm-histogram__row' data-rating='2' data-frequency='0' data-percentage='0'\u003e \u003cdiv class='jdgm-histogram__star' role='button' aria-label=\"0% (0) reviews with 2 star rating\" tabindex='0' \u003e\u003cspan class='jdgm-star jdgm--on'\u003e\u003c\/span\u003e\u003cspan class='jdgm-star jdgm--on'\u003e\u003c\/span\u003e\u003cspan class='jdgm-star jdgm--off'\u003e\u003c\/span\u003e\u003cspan class='jdgm-star jdgm--off'\u003e\u003c\/span\u003e\u003cspan class='jdgm-star jdgm--off'\u003e\u003c\/span\u003e\u003c\/div\u003e \u003cdiv class='jdgm-histogram__bar'\u003e \u003cdiv class='jdgm-histogram__bar-content' style='width: 0%;'\u003e \u003c\/div\u003e \u003c\/div\u003e \u003cdiv class='jdgm-histogram__percentage'\u003e0%\u003c\/div\u003e \u003cdiv class='jdgm-histogram__frequency'\u003e(0)\u003c\/div\u003e \u003c\/div\u003e \u003cdiv class='jdgm-histogram__row' data-rating='1' data-frequency='0' data-percentage='0'\u003e \u003cdiv class='jdgm-histogram__star' role='button' aria-label=\"0% (0) reviews with 1 star rating\" tabindex='0' \u003e\u003cspan class='jdgm-star jdgm--on'\u003e\u003c\/span\u003e\u003cspan class='jdgm-star jdgm--off'\u003e\u003c\/span\u003e\u003cspan class='jdgm-star jdgm--off'\u003e\u003c\/span\u003e\u003cspan class='jdgm-star jdgm--off'\u003e\u003c\/span\u003e\u003cspan class='jdgm-star jdgm--off'\u003e\u003c\/span\u003e\u003c\/div\u003e \u003cdiv class='jdgm-histogram__bar'\u003e \u003cdiv class='jdgm-histogram__bar-content' style='width: 0%;'\u003e \u003c\/div\u003e \u003c\/div\u003e \u003cdiv class='jdgm-histogram__percentage'\u003e0%\u003c\/div\u003e \u003cdiv class='jdgm-histogram__frequency'\u003e(0)\u003c\/div\u003e \u003c\/div\u003e \u003cdiv class='jdgm-histogram__row jdgm-histogram__clear-filter' data-rating=null tabindex='0'\u003e\u003c\/div\u003e \u003c\/div\u003e \u003cdiv class='jdgm-rev-widg__sort-wrapper'\u003e\u003c\/div\u003e \u003c\/div\u003e \u003cdiv class='jdgm-rev-widg__body'\u003e \u003cdiv class='jdgm-rev-widg__reviews'\u003e\u003c\/div\u003e \u003cdiv class='jdgm-paginate' data-per-page='4' data-url='https:\/\/api.judge.me\/reviews\/reviews_for_widget' style=\"display: none;\"\u003e\u003c\/div\u003e \u003c\/div\u003e \u003cdiv class='jdgm-rev-widg__paginate-spinner-wrapper'\u003e \u003cdiv class='jdgm-spinner'\u003e\u003c\/div\u003e \u003c\/div\u003e \u003c\/div\u003e"},"collections":[{"id":294880051371,"handle":"crystals","title":"Crystals","updated_at":"2026-01-07T23:43:11-05:00","body_html":"\u003cp data-start=\"159\" data-end=\"687\"\u003e✨ \u003cstrong data-start=\"161\" data-end=\"216\"\u003eDiscover the Magic of Crystals with Crystal Destiny\u003c\/strong\u003e ✨\u003cbr data-start=\"218\" data-end=\"221\"\u003eCrystals have been treasured for centuries—not only for their natural beauty but also for their powerful healing energies. Beyond their visual allure, they bring balance, harmony, and positive energy into any space. Whether used for home décor, meditation, or simply to elevate the energy of your surroundings, crystals create a sanctuary of peace, relaxation, and well-being. Each piece is a unique gift from the Earth—visually stunning and spiritually uplifting.\u003c\/p\u003e\n\u003cp data-start=\"689\" data-end=\"1011\"\u003eAt \u003cstrong data-start=\"692\" data-end=\"711\"\u003eCrystal Destiny\u003c\/strong\u003e, our signature collection showcases a curated selection of exquisite crystals, from radiant Quartz to soothing Amethyst. Every stone is carefully sourced for its elegance and metaphysical resonance, making them perfect for enhancing your home, uplifting your spirit, or gifting to someone special.\u003c\/p\u003e\n\u003cp data-start=\"1013\" data-end=\"1206\"\u003eExperience the timeless sophistication of crystalline wonders. Explore the \u003cstrong data-start=\"1088\" data-end=\"1118\"\u003eCrystal Destiny Collection\u003c\/strong\u003e today and bring the transformative beauty of these treasures into your everyday life.\u003c\/p\u003e","published_at":"2023-06-05T11:24:02-04:00","sort_order":"created-desc","template_suffix":"","disjunctive":false,"rules":[{"column":"tag","relation":"equals","condition":"crystal"},{"column":"type","relation":"not_contains","condition":"925 Sterling Silver"},{"column":"type","relation":"not_contains","condition":"Wire Wraps"}],"published_scope":"global"},{"id":319455756459,"handle":"crown-chakra-crystals","title":"Crown Chakra Crystals","updated_at":"2026-01-07T23:42:38-05:00","body_html":"\u003cp data-start=\"144\" data-end=\"515\"\u003e✨ \u003cstrong data-start=\"146\" data-end=\"171\"\u003eCrown Chakra Crystals\u003c\/strong\u003e ✨\u003cbr data-start=\"173\" data-end=\"176\"\u003eConnect with higher consciousness and spiritual insight with our \u003cstrong data-start=\"241\" data-end=\"266\"\u003eCrown Chakra Crystals\u003c\/strong\u003e. Located at the top of the head, the Crown Chakra governs wisdom, enlightenment, and your connection to the divine. These crystals help open and balance this energy center, fostering clarity, spiritual growth, and a sense of universal connection.\u003c\/p\u003e\n\u003cp data-start=\"517\" data-end=\"851\"\u003eOur selection includes powerful stones such as Amethyst, Clear Quartz, Selenite, and Lepidolite—each chosen for their ability to enhance meditation, energy work, and mindful practices. Whether placed in your sacred space, carried with you, or worn as jewelry, Crown Chakra Crystals promote harmony, insight, and spiritual alignment.\u003c\/p\u003e\n\u003cp data-start=\"853\" data-end=\"1007\"\u003eElevate your consciousness, deepen your meditative practice, and embrace the transformative energy of the Crown Chakra with these illuminating crystals.\u003c\/p\u003e","published_at":"2025-07-17T18:16:11-04:00","sort_order":"best-selling","template_suffix":"","disjunctive":false,"rules":[{"column":"variant_metafield_definition","relation":"equals","condition":"Crown"}],"published_scope":"global","image":{"created_at":"2025-07-17T19:09:11-04:00","alt":null,"width":1080,"height":1080,"src":"\/\/crystaldestiny.com\/cdn\/shop\/collections\/Crown_Chakra_Collection.jpg?v=1762474922"}},{"id":319456051371,"handle":"root-chakra-crystals","title":"Root Chakra Crystals","updated_at":"2026-01-07T23:43:11-05:00","body_html":"\u003cp data-start=\"132\" data-end=\"502\"\u003e✨ \u003cstrong data-start=\"134\" data-end=\"158\"\u003eRoot Chakra Crystals\u003c\/strong\u003e ✨\u003cbr data-start=\"160\" data-end=\"163\"\u003eGround your energy and cultivate stability with our \u003cstrong data-start=\"215\" data-end=\"239\"\u003eRoot Chakra Crystals\u003c\/strong\u003e. Centered at the base of the spine, the Root Chakra governs your sense of security, balance, and connection to the Earth. These crystals help release fear, build resilience, and foster a strong foundation for your physical, emotional, and spiritual well-being.\u003c\/p\u003e\n\u003cp data-start=\"504\" data-end=\"881\"\u003eOur selection features powerful grounding stones such as Red Jasper, Black Tourmaline, Hematite, and Smoky Quartz—each chosen for their ability to stabilize energy and promote a sense of safety and strength. Perfect for meditation, energy work, or keeping in your living space, Root Chakra Crystals encourage you to feel anchored, supported, and empowered in your daily life.\u003c\/p\u003e\n\u003cp data-start=\"883\" data-end=\"1037\"\u003eReconnect with the Earth, strengthen your foundation, and embrace the transformative energy of the Root Chakra through these essential grounding stones.\u003c\/p\u003e","published_at":"2025-07-17T18:19:27-04:00","sort_order":"best-selling","template_suffix":"","disjunctive":false,"rules":[{"column":"variant_metafield_definition","relation":"equals","condition":"Root"}],"published_scope":"global","image":{"created_at":"2025-07-17T19:08:08-04:00","alt":null,"width":1080,"height":1080,"src":"\/\/crystaldestiny.com\/cdn\/shop\/collections\/Root_Chakra_Collection.jpg?v=1762474932"}},{"id":294880116907,"handle":"polished","title":"Polished Crystals","updated_at":"2026-01-07T23:43:11-05:00","body_html":"\u003cp data-start=\"199\" data-end=\"598\"\u003e✨ \u003cstrong data-start=\"201\" data-end=\"248\"\u003eCrystal Destiny Polished Crystal Collection\u003c\/strong\u003e ✨\u003cbr data-start=\"250\" data-end=\"253\"\u003eIndulge in the brilliance of crystals refined to perfection. Our \u003cstrong data-start=\"318\" data-end=\"341\"\u003ePolished Collection\u003c\/strong\u003e showcases gemstones meticulously shaped and smoothed to reveal their natural radiance and timeless beauty. From the shimmering glow of Quartz to the deep allure of Obsidian, each polished piece is a testament to nature’s artistry and human craftsmanship.\u003c\/p\u003e\n\u003cp data-start=\"600\" data-end=\"862\"\u003ePerfect as statement décor, meaningful gifts, or companions on your spiritual journey, polished crystals bring sophistication and elevated energy into any space. Their radiant surfaces reflect not only light but also the transformative power of crystal energy.\u003c\/p\u003e\n\u003cp data-start=\"864\" data-end=\"1022\"\u003eDiscover the elegance of refinement with Crystal Destiny’s Polished Crystal Collection—where every facet shines with intention, beauty, and timeless allure.\u003c\/p\u003e","published_at":"2023-06-05T11:30:44-04:00","sort_order":"created-desc","template_suffix":"","disjunctive":false,"rules":[{"column":"tag","relation":"equals","condition":"polished"}],"published_scope":"global"},{"id":295698202795,"handle":"spheres","title":"Crystal Spheres","updated_at":"2026-01-06T23:24:35-05:00","body_html":"\u003cp data-start=\"106\" data-end=\"370\"\u003e✨ \u003cstrong data-start=\"108\" data-end=\"138\"\u003eCrystal Spheres Collection\u003c\/strong\u003e ✨\u003cbr data-start=\"140\" data-end=\"143\"\u003eBring harmony, balance, and elegance into your space with our \u003cstrong data-start=\"205\" data-end=\"235\"\u003eCrystal Spheres Collection\u003c\/strong\u003e. Each sphere is meticulously crafted to showcase the natural beauty and energy of crystals, from radiant Quartz to calming Amethyst.\u003c\/p\u003e\n\u003cp data-start=\"372\" data-end=\"658\"\u003ePerfect for meditation, energy work, or as striking décor, crystal spheres radiate energy in all directions, promoting clarity, focus, and a sense of calm. Their smooth, polished surfaces highlight the stones’ natural patterns and colors, making each sphere a captivating centerpiece.\u003c\/p\u003e\n\u003cp data-start=\"660\" data-end=\"809\"\u003eElevate your space and embrace the transformative power of crystals with the \u003cstrong data-start=\"737\" data-end=\"767\"\u003eCrystal Spheres Collection\u003c\/strong\u003e—where beauty, energy, and harmony meet.\u003c\/p\u003e","published_at":"2023-07-28T14:20:46-04:00","sort_order":"created-desc","template_suffix":"","disjunctive":true,"rules":[{"column":"tag","relation":"equals","condition":"spheres"},{"column":"tag","relation":"equals","condition":"eggs"}],"published_scope":"global"},{"id":293659312299,"handle":"best-sellers","title":"Best Sellers","updated_at":"2026-01-07T23:43:11-05:00","body_html":"\u003cp data-start=\"155\" data-end=\"510\"\u003eDiscover the pieces our community loves most. Our Best Sellers Collection brings together handpicked crystals and jewelry that embody timeless elegance, spiritual resonance, and everyday sophistication. Each item has earned its place as a customer favorite—celebrated for both its beauty and its meaningful energy.\u003c\/p\u003e\n\u003cp data-start=\"512\" data-end=\"802\"\u003eFrom stunning statement pieces to versatile daily companions, these treasures are curated to elevate your space, uplift your spirit, and reflect refined taste. Indulge in what’s most cherished and let our best sellers guide you toward the perfect blend of style and transformative energy.\u003c\/p\u003e\n\u003cp data-start=\"804\" data-end=\"932\"\u003eExplore the Best Sellers Collection today—where elegance meets intention, and every piece tells a story of beauty and balance.\u003c\/p\u003e","published_at":"2023-03-15T16:04:51-04:00","sort_order":"best-selling","template_suffix":"","disjunctive":false,"rules":[{"column":"variant_price","relation":"greater_than","condition":"0"},{"column":"variant_inventory","relation":"greater_than","condition":"0"},{"column":"type","relation":"not_equals","condition":"Shipping Protection"}],"published_scope":"global"},{"id":321370390699,"handle":"monthly-crystal-sale","title":"Monthly Crystal Sale | Spheres \u0026 Towers","updated_at":"2026-01-06T23:24:37-05:00","body_html":"\u003cp\u003eShop our \u003cstrong\u003eMonthly Crystal Sale\u003c\/strong\u003e, where you can shop a wide selection of healing crystals at discounted prices. Explore \u003cstrong\u003ecrystal spheres and towers,\u003c\/strong\u003e— all carefully curated to support meditation, energy balancing, and spiritual wellness. Whether you're looking to enhance your home decor, boost your daily energy, or find the perfect gift, our \u003cstrong\u003ecrystals for healing and manifestation\u003c\/strong\u003e offer both beauty and metaphysical benefits.\u003c\/p\u003e\n\u003cp\u003eEach month, our sale features \u003cstrong\u003enew discounted collections\u003c\/strong\u003e, from \u003cstrong\u003enatural quartz and amethyst towers\u003c\/strong\u003e to \u003cstrong\u003ewire-wrapped pendants and polished stones\u003c\/strong\u003e, so there's always something fresh to discover. Shop with confidence knowing you're getting high-quality crystals with \u003cstrong\u003efree shipping options\u003c\/strong\u003e and a trusted experience.\u003c\/p\u003e\n\u003cp\u003e\u003cstrong\u003eTake advantage of the Monthly Crystal Sale today\u003c\/strong\u003e and add powerful, natural energy to your life with \u003cstrong\u003eauthentic healing crystals\u003c\/strong\u003e — while our limited-time discounts last.\u003c\/p\u003e\n\u003cp\u003e\u003cstrong\u003e*Discount automatically applied at checkout.\u003c\/strong\u003e\u003c\/p\u003e","published_at":"2025-12-02T01:26:17-05:00","sort_order":"alpha-asc","template_suffix":"","disjunctive":true,"rules":[{"column":"tag","relation":"equals","condition":"spheres"},{"column":"tag","relation":"equals","condition":"Towers"}],"published_scope":"global","image":{"created_at":"2026-01-01T01:32:34-05:00","alt":"","width":960,"height":960,"src":"\/\/crystaldestiny.com\/cdn\/shop\/collections\/3E8C2969-1B86-4ACE-B349-98E9D8768424.jpg?v=1767249154"}},{"id":297596059819,"handle":"all","title":"All Crystals \u0026 Jewelry","updated_at":"2026-01-07T23:43:11-05:00","body_html":"\u003cp data-start=\"149\" data-end=\"494\"\u003e✨ \u003cstrong data-start=\"151\" data-end=\"181\"\u003eWelcome to Crystal Destiny\u003c\/strong\u003e ✨\u003cbr data-start=\"183\" data-end=\"186\"\u003eStep into a world where beauty, energy, and artistry unite. Our collection is a treasure trove of exquisite crystals, from the raw, untamed elegance of natural formations to the polished brilliance of expertly crafted pieces. Each crystal is a masterpiece, carrying its own unique story and timeless charm.\u003c\/p\u003e\n\u003cp data-start=\"496\" data-end=\"831\"\u003eWhether you’re drawn to the calming presence of Amethyst, the vibrant energy of Citrine, or the grounding strength of Jasper, our crystals invite you to connect with nature’s finest wonders. Perfect for enhancing your space, supporting your spiritual journey, or gifting with intention, every piece resonates with beauty and meaning.\u003c\/p\u003e\n\u003cp data-start=\"833\" data-end=\"1000\"\u003eElevate your surroundings, embrace the mystique, and explore the enchanting world of crystals at \u003cstrong data-start=\"930\" data-end=\"949\"\u003eCrystal Destiny\u003c\/strong\u003e—where every crystal is waiting to be discovered.\u003c\/p\u003e","published_at":"2023-11-10T13:55:31-05:00","sort_order":"created-desc","template_suffix":"","disjunctive":false,"rules":[{"column":"type","relation":"not_equals","condition":"asdf"}],"published_scope":"global"},{"id":298983391403,"handle":"january-crystal-sale","title":"January Sale | 25% Off Crystal Towers \u0026 Spheres","updated_at":"2026-01-06T23:24:37-05:00","body_html":"\u003cp\u003eShop our \u003cstrong\u003eJanuary Crystal Sale\u003c\/strong\u003e, where you can shop a wide selection of healing crystals at discounted prices. Explore \u003cstrong\u003eCrystal Towers, \u0026amp; Crystal Spheres\u003c\/strong\u003e — all carefully curated and crafted to support meditation, energy balancing, and spiritual wellness. Whether you're looking to enhance your home decor, boost your daily energy, or find the perfect gift, our \u003cstrong\u003ecrystals for healing and manifestation\u003c\/strong\u003e offer both beauty and metaphysical benefits.\u003c\/p\u003e\n\u003cp\u003eThis January, our sale features \u003cstrong\u003ediscounted crystal towers and spheres\u003c\/strong\u003e, from \u003cstrong\u003enatural quartz \u003c\/strong\u003eand \u003cstrong\u003eamethyst \u003c\/strong\u003eto \u003cstrong\u003ebumblebee jasper \u003c\/strong\u003eand \u003cstrong\u003ecarnelian\u003c\/strong\u003e, so there's always something fresh to discover. Shop with confidence knowing you're getting high-quality crystals with \u003cstrong\u003efree shipping options\u003c\/strong\u003e and a trusted experience.\u003c\/p\u003e\n\u003cp\u003e\u003cstrong\u003eTake advantage of the January Crystal Sale today\u003c\/strong\u003e and add powerful, natural energy to your life with \u003cstrong\u003eauthentic healing crystals\u003c\/strong\u003e — while our limited-time discounts last.\u003c\/p\u003e\n\u003cp\u003e\u003cstrong\u003e*Discount automatically applied at checkout.\u003c\/strong\u003e\u003c\/p\u003e","published_at":"2026-01-01T00:07:17-05:00","sort_order":"alpha-asc","template_suffix":"monthly-collection","disjunctive":true,"rules":[{"column":"tag","relation":"equals","condition":"Spheres"},{"column":"tag","relation":"equals","condition":"Towers"}],"published_scope":"global","image":{"created_at":"2026-01-01T01:29:59-05:00","alt":"","width":960,"height":960,"src":"\/\/crystaldestiny.com\/cdn\/shop\/collections\/1464163B-22B1-4D62-BEC5-CEC9AECB670B.jpg?v=1767248999"}}]}
[{"alt":"Indigo Gabbro Sphere 40mm-Spheres-Crystal Destiny-Indigo Gabbro-110g - 40mm-Crystal Destiny","id":31627535745195,"position":1,"preview_image":{"aspect_ratio":1.0,"height":1051,"width":1051,"src":"\/\/crystaldestiny.com\/cdn\/shop\/files\/Indigo-Gabbro-Sphere-40mm-Spheres.jpg?v=1757135612"},"aspect_ratio":1.0,"height":1051,"media_type":"image","src":"\/\/crystaldestiny.com\/cdn\/shop\/files\/Indigo-Gabbro-Sphere-40mm-Spheres.jpg?v=1757135612","width":1051},{"alt":"Indigo Gabbro Sphere 40mm-Spheres-Crystal Destiny-Indigo Gabbro-110g - 40mm-Crystal Destiny","id":31627535810731,"position":2,"preview_image":{"aspect_ratio":1.0,"height":1083,"width":1083,"src":"\/\/crystaldestiny.com\/cdn\/shop\/files\/Indigo-Gabbro-Sphere-40mm-Spheres-2.jpg?v=1757135613"},"aspect_ratio":1.0,"height":1083,"media_type":"image","src":"\/\/crystaldestiny.com\/cdn\/shop\/files\/Indigo-Gabbro-Sphere-40mm-Spheres-2.jpg?v=1757135613","width":1083},{"alt":"Indigo Gabbro Sphere 40mm-Spheres-Crystal Destiny-Indigo Gabbro-110g - 40mm-Crystal Destiny","id":31627535843499,"position":3,"preview_image":{"aspect_ratio":1.0,"height":1069,"width":1069,"src":"\/\/crystaldestiny.com\/cdn\/shop\/files\/Indigo-Gabbro-Sphere-40mm-Spheres-3.jpg?v=1757135615"},"aspect_ratio":1.0,"height":1069,"media_type":"image","src":"\/\/crystaldestiny.com\/cdn\/shop\/files\/Indigo-Gabbro-Sphere-40mm-Spheres-3.jpg?v=1757135615","width":1069}]
Expertly Curated Crystals
Just For You
Safe and Secure Checkout
Secure Payment
Free Shipping Over $100.00
On Every Order
Guaranteed Delivery
Includes Tracking
Join program to get rewards
Redeem your points for discounts
Join now
Log in
Use this discount code on your next order!
Copied!
Reward expires on
Log in to redeem your points for rewards.
Log in